First Days of School
|
|
|
- Cody Porter
- 5 years ago
- Views:
Transcription
1 Supplies Mirrors Mouthpiece patches Pencils grips (for thumb rests) Link HERE First Days of School Logistics Chairs set up for teacher movement One stand per child (stand tags) Case storage under the chair or behind them on the chair but they don t touch it with their back if it s on the chair Philosophy of Beginning Band No Bad Habits Top 5 things for a student to learn in beginning band (according to Randy Storie) 1. Kids have a good attitude about band 2. A great sound 3. A great sound 4. A great sound 5. Everything else Go as slow as possible first semester, as fast as possible second semester. Demonstrating for students (non-clarinetists) Play FOR the students when you feel comfortable, lay along with the students when you don t. Stay at least one day ahead. If needed, demonstrate on your own instrument some as well. Every day you play with them will help you improve and give you insight into what students are struggling with. Before playing (especially if waiting for students to receive instruments): Check for correct and complete supplies Names on books & number reed guard (silver sharpies - number slots 1,2,3,4) Teach parts of instrument (use yours for demo) Teach parts of the reed Reed care/rotation Note name games (Link HERE), Posture Chant, Lines & Spaces Chant (Link HERE) Music alphabet forwards and backwards Foot tap & counting Individual performances on chants, counting, musical alphabet etc


 1. Center the base of the reed as well 2. Ligature screws are on the right 3.")
2 Putting on the Reed Opening the case Place cases on the floor. Be sure latches open up. Putting together mouthpiece and barrel Have them use cork grease, Remind them not to drop the mouthpiece Be prepared to help students with brand new corks Putting on the ligature Be sure the bigger opening on the ligature goes on the bottom. Be sure the screws are on the right. Point out the guide lines on the mouthpiece Putting on the reed Have them slide the reed down from the top, Flat side of the reed to the flat part of the mouthpiece, Tip of the reed, tip of the mouthpiece, Be sure the ligature is between the guides, Don t over tighten ligature (until it stops, then another ¼ turn) 4 things to check for reed placement: 1. Line of black/line of reed (magic!) 1. Center the base of the reed as well 2. Ligature screws are on the right 3. Ligature is within the guides on the mouthpiece Reminders for the first day of putting on the reed: Be sure you have at least 5 minutes left at the end of class to pack up. It won t be perfect the first day. Keep talking them through it for 2 weeks, getting quicker and more picky every day. Article with more pictures and details HERE.
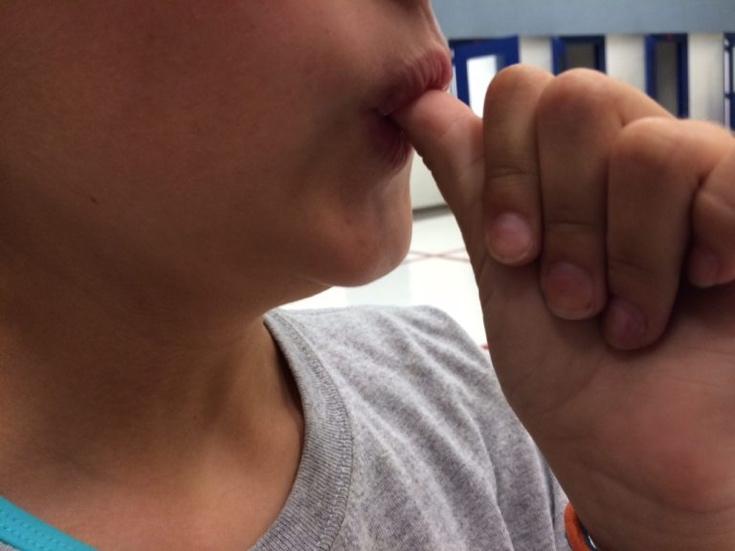
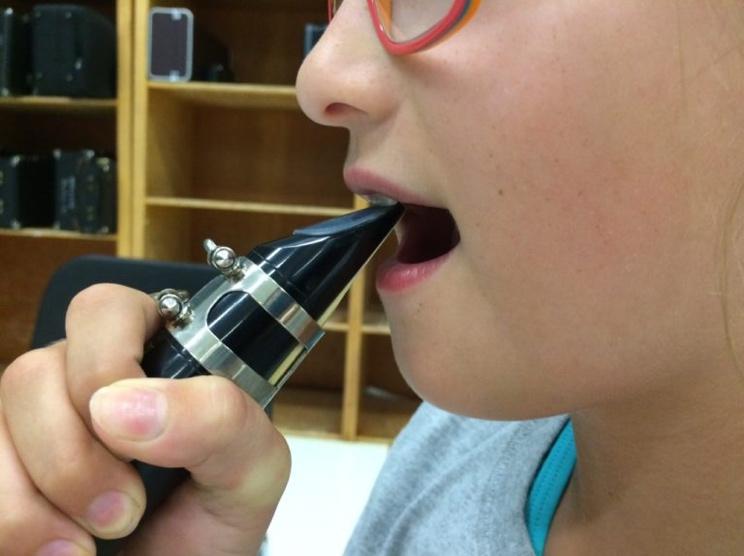
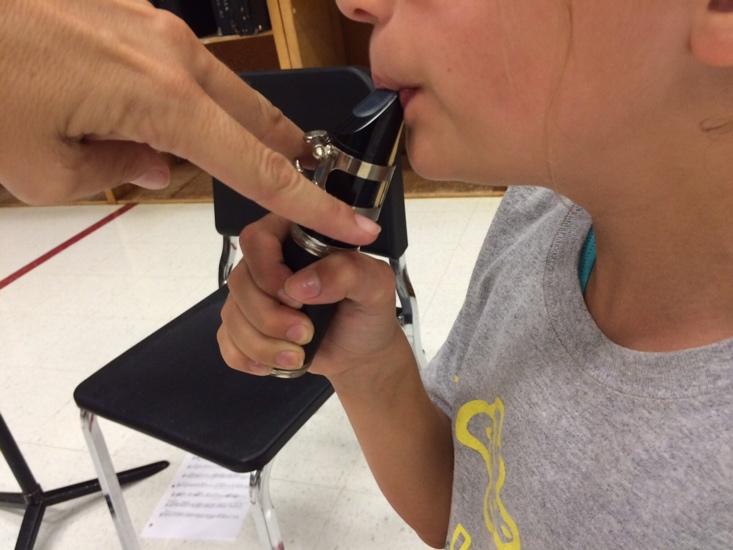
3 The First Sound How I Teach Embouchure - Milkshake Face (Link HERE) Start teaching milkshake on day 1 or 2 without instruments. Use thumb for demo. 1. Look in mirror 2. Drink a milkshake (Open, Click, Milkshake add Blow when they have instrument) 3. Look for muscles 4. Milkshake face time at home Ready for the first sound Students hold mirror in left hand at eye level, Mouthpiece & barrel in right hand, Embouchure picture on screen (no stands) Words to say between tries Look in your mirror. Look in your mirror - Look for muscles. Be sure you re clicking on your top teeth. Grip the sides of the mouthpiece the corners of your mouth. Sit up tall. Take a big relaxed breath Think about your milkshake face. Look in your mirror - watch your chin. Individual help You hold it for them & anchor/adjust angle If no sound - Blow more, blow more, blow more If still no sound - Don t bite (finger between teeth) If squeaks - It s ok! Try less mouthpiece If any real sound - even flat - good for today Walk around and check for anchor, angle - things you can see Hear individuals for 1) no sound or 2) only squeaks Addressing Squeaks Squeaks will happen. All year as you learn new things. My rule it s fine to squeak on things that are new. It s not ok to squeak on things we ve been doing a long time. But the first few weeks, squeaks are welcome. Growth Mindset! Day 1 just get a sound! Day 2 start working on getting up to pitch Air Use as much air as their embouchure can handle (2 fists analogy) Cold/fast air - blow on hand Blow across reed (spot on wall) Keep mirrors at or above eye level Internal Symptoms Tongue too low - Say eee (or hee) Not anchored enough (wedge up at angle of instrument) Corners/lips not gripping mouthpiece firmly
4 External Symptoms Bunched chin (muscles, too much bottom lip) Amount of mouthpiece Angle of head (balance a book) Angle of instrument Alternate Embouchure Smile (EEE) for chin muscles, then EEWWW for corners forward Start with less air and increase (especially for puffed cheeks) Reminders Walk around constantly correcting these things: -Posture/Angle of head (mirror/stand) -Angle of instrument (you adjust) -Anchoring (two finger wiggle check) -Looking in mirror (pull it higher) -Chin (muscles) It s ok for pitch to be a little high, just not a little low. Playing Activities/ Individual Assessment with Mouthpiece & barrel Play 4, Rest 4 adding the metronome is a new challenge Down the row a) Straight down the row b) Solo/Soli Open G 1. Cases on floor, add upper joint ONLY 1. Right hand on barrel, left holds mirror (not in hand position) 2. Bring the instrument to the student 3. Review all embouchure, air, position concepts Taking Instruments Home - parents Include these points in your -Moving slowly for good habits -Students MUST have a mirror at home -Mouthpiece/barrel and upper joint only (to avoid damage) -Students should be using lots of air (need a private area to practice) -Listen to your child perform for you a few times a week -They have chants, counting, note-names (on-line) to practice as well -Songs will be coming soon (patience & consistent practice for now) Encourage them to contact you if they ever want to verify what their child is practicing. Mouthpiece Only Start after everyone is up to pitch on mouthpiece/barrel 1. It tells you more than Mouthpiece/Barrel 2. Be sure they keep the angle the same 3. Pitch should be between a C/C# 4. If they are low, use the same tips above to correct them 5. Make a big deal about being up to pitch. Celebrate!

5
 Fingers 1, 2 & 3 The PAD of the fingers cover the holes, not the tip.")
6 Hand Position Starting Hand Position No playing - just fingers, Left hand (upper joint) only, Hold at barrel with right hand The Thumb Thumb hovers over the thumb hole. ALWAYS gently touches register key. Teach the 3 positions (hole only, hole + key, key only) Fingers 1, 2 & 3 The PAD of the fingers cover the holes, not the tip. The first knuckle (by fingernail) should not bend up. They hover over the holes - as close as possible. The Pinky Touches the C# Key Should always touch the key Finger Drills 1. Practice GFEDC with note names and positions. 2. Use simple fingering system - Open, Thumb, 1,2,3 2. No playing, only fingers Introducing G-F Metronome on Name & finger open - thumb in half notes 2. Name & finger G-F in half notes 3. You play (slurred) while they finger, 4 beats rest, then they play Walk behind them to check thumb position!! Introducing E Add E on the 2nd day if they are doing well enough. 1. Name & finger open-thumb-thumb1 in half notes 2. Name & finger G-F-E in half notes 3. You play (slurred) while they finger, 4 beats rest, then they play Introducing D & C This might be the 3rd or 4th day The C will be terribly out of tune. Make your peace with it. It s worth it in the long run. Name & finger open-thumb in half notes Name & finger G-F-E-D-C in half notes, then play Expect squeaks - it s new! Some kids find it easier to do quarter notes with a half note at end because of running out of breath. I switch to that as quickly as possible. Earning the Lower Joint (don t let them earn it yet) GFEDC - quarter notes, half note at end. EVERYTHING is great - air, embouchure, posture, hand position (I+)
7 Note Name 1 C-B Tamarie Sayger 1 & c 2 & 3 & 4 & 5 & 6 & 7 & Copyright 2016 by Tamarie Sayger and CrossingTheBreak.com This exercise may be freely copied for educational use in public and private schools. More resources for teaching clarinet can be found at CrossingTheBreak.com. This copyright disclaimer must be present on ALL copies made.
 Keep the stands completely down for as much of class as possible.")
8 Music Reading When/How to start Reading Music Students 90% of class correct 90% of time Books start with tonguing too soon for clarinets Use a supplemental page similar to Getting Started Spend 80% of your time on class routine/20% on reading music Music Stands Must be ridiculously high (must have excellent discipline) Keep the stands completely down for as much of class as possible. Raise ONLY when they start reading music Playing Supplemental Page This is much easier than the rote exercises Have them name/finger & position/finger each line first They should move fingers at the beginning of the rest to prep Why Stay on the Upper Joint 1. Beginning band priority #1 is tone. 2. You only need half the clarinet to learn to play with a good sound, embouchure, breath support and left hand position. 3. You only need half of the clarinet to learn lots of early songs. 4. Less awkwardness of holding the instrument 5. No bad right hand position, bad thumb or hooking pinkies under 6. More secure anchoring 7. They can focus on left hand position and embouchure and when they move to the whole instrument it s less change and more secure. 8. They can earn their instrument - it s a pride thing. Earning the Bottom Joint: Play GFEDC (Waterfall) Play GFEDC in in 4 quarter notes/1 half note Slur (they should not be tonguing anything yet) Try to have before or after school time available To Earn It They Must Play With: 1. Perfect posture 2. Head up 3. Right hand on barrel - anchoring really well 4. Perfect hand position (fingers very close and pinky touching key) 5. Foot tap 6. Metronome (60-70) 7. TONS of air. Lots and lots of air. As much as they can without blowing out their embouchure or squeaking. Make It a Big Deal! Keep track, Recognize accomplishment Tell them not to put it on until you teach the whole class how to do it

9 Tonguing Face Your Fears If you have a weakness in your teaching, keep working on it, ask for help Make yourself face your fears so you can get better Opening the Can of Worms - Tonguing Can mess up all your work if you re not careful They can start bunching chins, quit anchoring, drop their tongue, lose their pitch, start chewing Start on mouthpiece and barrel Then move to mouthpiece one week later. Then have them tongue open G a few days after that. Day 1 1. Compare to talking (articulate) 2. Top tip of the tongue to the tip of the reed 3. One taste bud (Say this a lot) 4. Say Look at your mirror - nothing moves a lot 5. Give them a sound signal to tongue 6. Keep the signal OUT of rhythm so they can t stop the air Day 2-5 Day 2 - Speed of tongue - snake tongue Day 3 - Lightness of tongue - tinkerbell Day 4 - Take tongue off reed, don t put it on (release, not attack) - hot stove Day 5 - Hear them down the row - address pitch, think eee Other things to say Look like a photo not a video (look at mirror) Look like a statue (look at mirror) Chin doesn t move (look at mirror) Top tip of the tongue to the tip of the reed Fast air, think eee, head up - other normal reminders
")


10 The Crucial Key A key Prepare with The Trick Do all of this page WELL before they reach an A in the book! Mark a dot on the left index finger with a pen or marker It should be on the side of the 1st knuckle (not side of the nail) Introduction to Rolling Teach it by rote first Play E (Thumb1) half note, roll to A half note, back to E half note Do just this for 2-3 days - just have them concentrate on the motion Watch that they keep the tip of their index hovering over the 1st hole When they play A you should not be able to see the 1st hole Words to Use Rotate from the 1st knuckle Press the A key with your knuckle not the side of the first finger It must be one motion There is not up and then down. The finger just moves down Do not hop The thumb still stays in contact with (or very near) the register key Be sure you are still anchoring to your top teeth Pinkies on the dots, fingers hover over the holes Rolling to A Daily Exercise 1. E half note - A half note- E half note 2. D half note - A half note- D half note 3. C half note - A half note- C half note
 2. Have everyone add the bottom joint to work Bb & A 3.")
 Practice right hand finger")
 4.")
11 Adding the Bottom Joint Continue Earning the Bottom Joint 1. Consider having only those that have earned it put on the bottom joint at the when playing upper joint. (The Ds & Cs will sound awful. It s ok.) 2. Have everyone add the bottom joint to work Bb & A 3. Try to get everyone on bottom joint within a week of starting Bb &A Adding the Bottom Joint Bridge key - Hold down 2nd ring - Stare at it. Remind them to watch the bridge key everyday for a month Right Hand Position Hang right hand down by side Fat PAD of the finger covers hole Right pinky on home key (C key) Practice right hand finger drills without playing first Right Thumb Pad of the thumb touches the wood Fingernail is half under thumb rest - no knuckle Walk behind them a lot After 2-3 days give them a thumb-saver (pencil grip) After a week give them a band-aid for a day. Things to Watch for 1. Thumb -1/2 nail and 1/2 skin/pad on wood 2. Pinkies on home keys 3. PAD of fingers hovering over the holes (very close) 4. Index finger not touching side keys 5. Embouchure - anchoring - must push up with thumb now 6. Instrument angle - keep head up Adding Bottom Joint Have all students add the bottom joint for about 5-10 minutes daily Be sure they have the 2nd ring down and watch bridge key Have them move right hand up to barrel often to be sure they are still anchoring Use the 2 finger wiggle check often Head up - blow cold fast air straight across the reed

12 Adding Bb & A Teach it by rote for now Check right hand position - thumb - walk around behind Don t let them hook right index finger under side keys - pinkies touch Adding G Have them look at the holes - compare hole 1 to hole 6 PAD of the finger Feel the bottom of the hole Push your 6th finger down toward your pinkie Be sure pinkies are on the keys They are going to squeak. A lot. Don t get frustrated or they will too. Right Hand Finger Drills C, Bb, A in half notes C, Bb, A in quarter notes, then hold G for 4 beats C,Bb,C,B in quarters. Bb,A,Bb,A in quarters. A,G,A,G in quarters. All slurred at this time Left Hand Finger Drills G,F,E,D,C,D,E,F,G - in eighths - hold last note G,F,G,E,G,D,G,C,G - in quarters, then eighths Start tonguing waterfall and other easier rote drills. Do some ear training - tell them 1st note and they figure out pattern Earning the Bell Play C, Bb, A, G, F, E Teach by rote now and add note names on upcoming warm-up 6th finger is critical - seal completely, push to the bottom of the hole Keep heads and air stream up/level Evaluation for this time of year Link HERE.
13 Starting in the Book Starting in the book Make it a goal - have them earn it When you get in the book it replaces Getting Started/More Lines to Play Things to Say 1. You guys already know this. 2. Does this line have any notes you don t know? 3. Does this line have any rhythms you don t know? 4. Should we be able to play this really well the first time? Build Trust 1. Wow, how do you guys already know all this? You must have an awesome band director! 2. Show them you know where they are going and what they need to get there. 3. Teach things before you get to it in the book so they can have great success sight reading and so they trust you. Physical vs. Cognitive Rote teach the physical - embouchure, finger drills, tonguing, foot tap Fully explain the cognitive - note names, counting rhythms Try to approach from both ways before putting together Ways to Use the Book 1. Cognitive understanding 2. Sight-reading 3. Review lines 4. 2 measure assessments 5. Show them their progress 6. Student choice reward days (students pick lines)
14 Parent Demonstration Invitations Confirm with administration that having parents during school hours is ok. Clarify what type of procedure parents need to follow when checking in. Send out information well ahead of time - parents have to get off work If possible send home a real paper invitation Post on social media/send s/talk it up with students Invite your administration and other faculty and staff Preparing About 2 weeks before demo start focusing the students on preparing Set goals of what you will perform for parents Use the upcoming demonstration for motivation Make plans for having light refreshments if possible (not necessary) Parent Announcements Thank them for coming, especially during the work day Middle school kids don t often invite parents, so enjoy today! Give them permission to embarrass their kids. Take pictures, video etc. Demonstration (what to talk about) Put on reed (reed rotation, 4 good reeds at all times) Mouthpiece only (x-ray to see inside mouth, explain tonguing) Upper joint (same steps at home, waterfall, finger drills, ear training) Prepared book lines (50% of practice at home, play for parents weekly) Lower joint (delayed gratification, work to earn it, squeaks are ok) Other things to mention Taking instrument home daily, if they have questions about how their child is practicing they can you, private lessons, how parents can be involved in the program, upcoming dates (including summer band camp) - Leave time to pack up the instrument and let kids get pics with parents - Be positive and professional the whole time - parents are watching you!
15 The First Warmup The warm-up (daily exercises) should be played EVERY day. They are the most important things to touch on consistently. Exercise 1 - Tonguing Mouthpiece first, Then open G Monitor posture, focus, embouchure, pitch Exercise 2 - Waterfall with Tonguing Big air, good hand position (both hands) Oral reminders during rests Exercise 3 - A Exercise More information in Episode 18 Compare student fingers to pictures in the show notes links from 18 Exercise 4 - Right Hand Descending Scale Conduct each note All in one breath - slowly enough to cover carefully Exercise 5 & 6 - Beginner Register Studies - Make it look easy when you introduce it - Possibly demonstrate with 1st chair or yourself - Have student hold low A, you add register - Troubleshooting - Left thumb position - should always touch register key - Be sure they don t lift the thumb off the hole - tell them to keep the air going fast - Anchoring, tongue position, flat chin - More in episodes 5 & 6 about getting up to pitch Exercise 7 & 8 - Chromatic Scales See the outline about the Chromatic scale.
16 1 Beginner Warm-up Fall & c w w T Sayger 6 2 Left hand Slur & Tongue Ó Ó Ó 3 Rolling/knuckle & Left thumb Ó Pinkies down Ó Ó 4 Right hand & b u Watch the teacher... Head up Pad of finger on middle of hole Œ Ó b u b u Ó b u 5 Going up & Only rest 2 beats b Flat Chin Anchor 6 7 Going down & & Ó Chromatic Only rest 2 beats Ó # Ó # Pad of finger Ó Head up! Ó Ó # Ó Ó 8 & Chromatic 1 octave # # # # # Ó The teaching of this warm-up is explained on the CrossingThe Break podcast Episode 28 Copyright 2016 by Tamarie Sayger and CrossingTheBreak.com This exercise may be freely copied for educational use in public and private schools. More resources for teaching clarinet can be found at CrossingTheBreak.com. This copyright disclaimer must be present on ALL copies made.
17 The Chromatic Scale To introduce to the chromatic scale, I use the Beginner Fall Warm-up - lines 7 & 8. I have a long time love for the Chromatic Scale. Take aways from my Love of the Chromatic Scale story 1. Hearing students individually daily increases the odds that they will practice daily. Change up the routine. 2. Challenges/Extra credits can affect different students in different ways. 3. Try to let every student be first chair (legitimately) - at least for a day. 4. Kids who are in the middle/bottom of the section in beginning band may become some of your best band kids once you inspire them. Introducing the chromatic Make it a big, FUN deal! Have them write the milestone on their calendars. The way we reach long term goals in band is one step at a time. How to start It s not what note you start on as much as teaching methodically & slowly Teach 1 new note (and 1-2 old notes) per day, starting as early as possible Teach in half notes with half rests in between so you can name/fingering Take out half rests when they are ready, then speed up later Teach them to look ahead and get fingers ready early They must READ every note - no memory in beginning band (yet) Fingerings - C# - only 1 - let pinky - D# - either banana or bottom sk (I prefer banana for chromatic) - F# - MUST teach thumb & bottom 2 side keys (DO NOT TEACH TOP) - Low G# - only 1 - top top right - Low A# - explain the enharmonics (briefly or in detail) - Low B - MUST teach thumb 1,2,3,4, banana. (DO NOT TEACH MIDDLE)
18 Name Instrument The Keyboard C#/Db D#/Eb F#/Gb G#/Ab A#/Bb C#/Db D#/Eb F#/Gb G#/Ab A#/Bb Natural half step Natural Cb half step B# Natural half step Fb E# Fb E# C D E F G A B C D E F G A B Interval: the distance between two notes Enharmonic: 2 names for the same note Half step: the smallest possible interval Flat: lowers a note a half step Sharp: raises a note a half step Natural: cancels a flat or sharp Natural half step: B-C & E-F Chromatic scale: a scale progressing by half steps Whole Step: two half steps Tetrachord: a four note pattern consisting of whole step, whole step, half step Major scale: two tetrachords joined by a whole step --- W W H W W W H
19 Starting Scales What are tetrachords? (as related to major scales) Four note chunks of scales - whole step/whole step/half step Ex. Concert Ab scale/clarinet Bb scale - Bb, C, D, Eb & F, G, A, Bb are the two tetrachords that make up the Bb scale when played together. Why tetrachords? Four note sections are easy to learn When you learn one tetrachord You ve learned half the scale Kids get used to the whole, whole, half steps & hear wrong notes You can easily isolate the trickier half of the scale (or newer half) Drawbacks of tetrachords They take lots of time (consider this when planning pacing/start time) They don t cover the middle interval (between 4th & 5th degrees) Band directors must be committed to tetrachords for it to work Favorite parts of scales (1st octave) Concert Eb - super easy (too easy to really know if they get it) Concert G - middle B natural (and the top F#) Concert Ab - have to understand key (Bb/Eb) Concert Bb - crossing the break, like the warmup line on spring warmup Concert C - teach coolio C# and trading pinkies Concert G - easy but have to understand key Concert Db - crossing the break, understanding key, Eb top top Key Signature You must really teach key signature for students to get the point of scales. - Purpose of scales - play in different keys and learn those finger patterns. - Scales are all the same except for the starting note and key signature Key Chant I teach this by rote before introducing key signatures/scales I also do a unit on Keyboard around this same time It all comes together and starts to make sense when they start reading scales Then you can relate it to songs in different keys (Kookaburra)
20 32 Crossing the Break What to Say (and not to say) NEVER say crossing the break to middle school students Say - Going from A to B or going from Bb to C Say - Going from no fingers to all fingers or lots of open holes to lots of closed holes Four Objectives to Master: 1. Great hand position 2. Start on low E consistently 3. Completely comfortable with register key with minimal thumb motion 4. Have perfect left index finger position and motion down perfectly Starting on Low E Play descending scale (C, Bb, A, G, F, E) then breathe, E, breathe, E Play E 10 times without squeaking (possibly before the winter break) Play B 10 times without squeaking (possibly right after winter break) Play drop out (see link on CrossingTheBreak.com) Introduce Playing from A to B Write on board: whole note G, whole rest, whole note A, rest, whole note B Ask students Where have you seen that note before? (on warmup #6) Play the whole notes/rests from the board A couple days later add C, A couple days after that take out the rests Encourage them to do this in one breath (adjust metronome if needed) Right Hand Down Super glue your right hand down for the whole GABC line Be sure that the right hand is truly covering the holes Visualization for a Little Bit Later Air has to go from the A key to the bell in seconds (laser fast air)
21 & c w w w w w w w w & b. & & 37 & Right Hand Down Going Lower 2 Note Registers 3 Note Registers Tonguing # 2 beats Ó Clarinet Warm-up Level 2 2 beats b b Ó. # # Going Higher Ó Tamarie Sayger TT TT TT Add TopTop/ Speaker key banana 2 beats 2 beats 2 beats Ó & Ó & Ó Ó 53 & 56 & Tongue/Finger 4 Note Drill Right Hand Down Finger Wiggles Low (Practice slurred and tongued) Finger Wiggles High b (Practice slurred and tongued) Copyright 2016 by Tamarie Sayger and CrossingTheBreak.com People who purchased this product may make copies for students. Please do not copy for other directors or programs. Each director may purchase his/her own liscence to copy at CrossingThreBreak.com or TeachersPayTeachers. Ó Ó
22 Kookaburra Key Exercises-Clarinet
23 Let's Go Band!! BandDirectorsTalkShop.com & c # Œ Œ Œ # Œ Œ Œ # Œ Œ Œ # Œ 2 sk 8 & # Œ Œ out L Œ # Œ Œ Œ # Œ Œ Œ # Œ n 15 & Œ Œ banana # Œ Œ Œ # Œ Œ Œ # Œ Œ b 22 banana & b Œ Œ n# Œ Œ Œ n Œ Œ Œ n Œ Œ n 29 & # Œ Œ # Œ 5 4 TT Œ Œ Œ # Œ Œ Œ # Œ
24 CrossingTheBreak.com Direct Links 00 Introductory Episode Episodes Beginning clarinet (Developing Good Habits from Day 1) 01 Before School Starts 02 Before Opening the Case 03 Putting on the Reed 04 The First Sound 05 Up to Pitch (part 1) 06 Up to Pitch (part 2) 07 Keep it Fun & Open G 08 Hand Position & Mouthpiece Only 09 Playing GFEDC 10 First Note Reading & Note Name Games 11 Earning the Bottom Joint 12 Tonguing (Day 1) 13 Tonguing (Days 2-5) 14 Adding the Bottom Joint 15 Playing Bb, A, G 16 Pause and Evaluate 17 Starting in the Book 18 A Key & Earning the Bell 19 Parent Demonstration 20 Q&A First Months of Beginning Band Episodes Intermediate Clarinets 21 Tone (& Tuning) 22 Tonguing 23 Increasing Range 24 Scales (Chromatic & Fingering patterns) 25 Warm-ups & Alternate Fingerings 26 Practice Tools/Preparing for Auditions Episodes Beginning Clarinet (Mastering the Middle of the Year) 27 Accountability in Beginning Band 28 First Written Warm-up 29 The Chromatic Scale (intro & 1st octave) 30 Analyzing a New Line 31 Starting Scales 32 Crossing the Break 33 Making Your Class Contagious 34 What Would You Do in My Situation Episodes Miscellaneous 35 Student Evaluation and 2016 Overview 36 Ideas for the New Year 37 Switching the Right Kids to Bass Clarinet 38 Challenging Your Bass Clarinetists 39 Method Books 40 Band Director's Workshop Episodes Finishing Strong in Beginning Clarinet Class 41 Beginning Spring Warm-up 42 Multi-Octave Scales and Chromatic 43 Differentiation in Beginning Band 44 Teaching Band Through Games! 45 Rhythm Tips for Maturing Beginners 46 Finishing This Year and Planning for Next Year Articles Available: Putting on a Clarinet Reed (with 30 beginners) Why My Beginning Clarinets Only Need 1/2 Their Instrument the First 6 Weeks of School Clarinet Deodorant (#1 Clarinet Exercise) Bass Clarinet - Switching the Right Kids Right Hand Down (or not) on Clarinet

25 How I Teach Clarinet Embouchure Originally published on BandDirectorsTalkShop.com Students MUST have a mirror to watch so they can see what I m talking about on their own face. I teach clarinet embouchure with a story. This is what I say to the kids: Ok, so how many of you have ever had a milkshake in your life? Raise your hand. So almost everyone if you haven t you can use your imagination. Imagine you are at a restaurant that has really great milkshakes. And you re dying for a milkshake and you order one and their machine is a little out of whack so it makes it extra thick. So imagine this yummy milkshake. It s really thick and you re so thirsty. But here s the catch. They re out of spoons and regular straws and the only thing they have there for you to drink it is a coffee straw. So imagine you have this really thick, yummy milkshake and you re drinking it through a coffee straw. Show me what that would look like. Then the students try it and most of the time they make a perfect clarinet embouchure chin, corners, lips everything on the outside. When they make the milkshake face I tell them to freeze and hold that face for 5 seconds. Then I have them do it again and look in the mirror. Once they are looking in the mirror I say Now we re going to do it again but after you take your big sip of your milkshake I want you to freeze your face muscles in place don t let your face move but breathe in and out. Watch me demonstrate. That way they can hold the milkshake face without the tension of holding their breath. They should focus on how they need to be relaxed everywhere except their lips/chin. The milkshake analogy can make their body tense up if you re not careful, so be sure they are only firm on their embouchure and everything else is relaxed. At this point I have not said a word about flat chin, corners, bottom lip anything. They ll start doing all kinds of weird stuff if you tell them flat chin. They don t understand that yet. Just have them make the milkshake face. If they are doing it wrong. Say, Look at my milkshake face. Now look in your mirror and make your face look like mine. Once they all seem to be freezing pretty well (maybe on the second or third day) I start to point out what they are doing in more clarinet embouchure terms. I tell them that embouchure is the way we set our face to play our instrument. When they are frozen in milkshake face, they are making the clarinet embouchure.
 as those muscles pull down. That s how I know they are using their muscles correctly.")
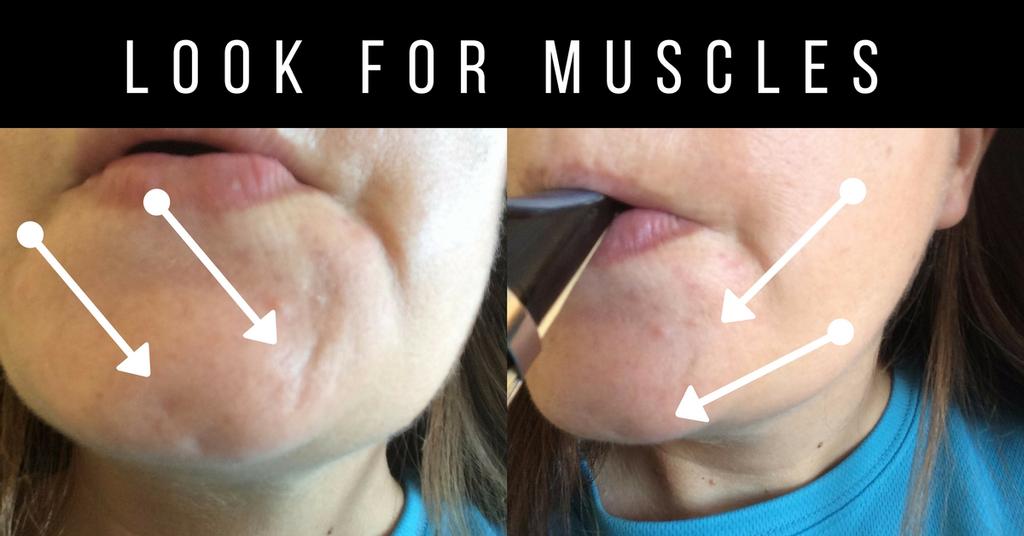
26 Here s what I should see for clarinet embouchure: The muscles of the chin For most students, when their chin is really flat will have tiny little muscles on the front, bottom edge of their chin (and often on the side edges of the chin too) as those muscles pull down. That s how I know they are using their muscles correctly. A few kids don t have those muscles, and if their chin is super flat, and against their bottom teeth, it s probably ok. But most can find the muscles. Corners The corners should be forward, not pulled back. This is one of the reasons I like the milkshake analogy. I tell them if they pull their corners back they are going to bite the straw closed and not get any milkshake. Keep the corners forward. You can say grip the straw. I don t talk about the bottom lip or the top teeth at this point because nothing is in their mouth. This simplifies the whole thing and lets me focus on just chin and corners at first. Fun Idea Use an ipad that is hooked up to a projector to show students their embouchures live. Just set the ipad to video (don t actually record) and it will live stream the picture to the front screen/white board. Students can see their own faces and their classmates faces and look for the muscles in the chin and see if the corners are forward. They can practice their milkshake face at home. It can be in the car, as they are doing homework, fixing their hair, going to bed, texting, watching Netflix, anything. If they can be in front of a mirror, even better. They should just make their milkshake face and hold it a little longer each time. To find out what the next step of beginning clarinet class is (moving to actually playing their first sounds) listen to this episode of the Crossing The Break Podcast. If your clarinets are already playing and you need help getting them up to pitch on mouthpiece & barrel, listen to this episode of the Crossing The Break podcast.

27 Why My Beginning Clarinets Only Need 1/2 their Instruments for the First Few Weeks of School Originally published on CrossingTheBreak.com Many of us would agree that when teaching new concepts, it can often be helpful to isolate the idea we want the students to think about the most. The new part. Teaching a beginning clarinet player the first few weeks includes a TON of new things. Posture, air, embouchure, hand position, rhythm, foot tap, reading music, etc. (Notice I don t mention tonguing. I hold off on teaching tonguing as long as possible.) Again, I feel many of us would agree that tone is the most important concept not just in the first few weeks, but the entire first year. Tone. Tone. Tone. Everything else is secondary. It is common to start beginning clarinetists on mouthpiece and barrel. I do this as well. I strongly, strongly encourage you to continue to have students play on mouthpiece and barrel (to check pitch) at the beginning of class for many weeks. Then most directors go from the mouthpiece and barrel to the entire instrument. This requires that all at the same time students must try to master both left and right-hand position, finger motion and, fairly quickly, note reading/music reading. They must also deal with a whole new level of resistance when blowing through the instrument and a strong support from the right thumb at the same time. That s asking kids who are still developing the muscle memory for embouchure to add many different things all at once. So, about 15 years ago, I started wondering why we have clarinet players add the entire instrument so early. Students only use the top joint for their first 5 notes. (I don t have my students add right hand down as standard fingerings on open G. Post explaining why is here.) They can often play many pages in the beginning band book with just upper joint. Clarinet has a perfect, built-in way to simplify the process of moving from mouthpiece/barrel to the full instrument in a much more gradual, natural way. It can avoid all kinds of bad habits. As you know if you listen to the Crossing The Break podcast, one of my big beginner band mantras is No bad habits! Only have your students only add the upper joint. For quite a while. Here are some reasons why: 1. It is much less awkward. Most beginners, especially small ones, find holding the entire instrument very awkward and uncomfortable. 2. There is less resistance when blowing through upper joint only. It is still considerably more than mouthpiece/barrel, but less than the entire instrument. So their embouchure muscles are gradually strengthened by adding small amounts of resistance.
28 3. This allows them to use their left hand to hold a mirror and look at their embouchure as they play open G. 4. When they add the left-hand position, they can concentrate much more on keeping their fingers perfect. Here s what I tell them with regards to finger position: Thumb barely touching the register key and very close to the thumb hole. Fingers 1,2,3 are hovering as close as possible PAD of the finger over the hole (not tip.) Left Pinky key is touching the upper joint pinky. (some directors call it the C# key) 5. Their right hand is on the barrel and can help them to anchor on their top teeth firmly. When they move to the right thumb pushing up from the thumb rest they will have a better concept of what it should feel like if they have experienced it for a long time on upper joint. 6. They will have less squeaks and greater success on the first songs they play. For all the reasons listed above, everything will feel less frustrating. 7. You are eliminating the option for untold bad right-hand positions. By the time they add the bottom joint, the left hand and embouchure should feel so natural, that they can then focus much more attention on the right hand. Plus they will be actually using the right hand to play Bb, A etc. so it will have to be in the right place. Here are a few more additional benefits that aren t a big deal, but are a nice bonus. The first few weeks of school are chaotic in any beginning class, but especially in clarinet class. Anything you can do to limit chaos is a plus. It doesn t take students as long to get their instruments out and ready Easier to monitor assembly as a group Less corks to grease daily Less chance of students breaking something due to assembly or awkwardness Less time taking instruments apart All of this translates to more order and more teaching time. For heterogeneous classes the open G should be ok with just upper joint and the F as well. As you get to E, somewhat D and absolutely C, you will have to either add the bottom joint or have the clarinets play alone. The C is basically a C# and the D is very sharp. See what you can come up with, (and let me know if you have a great solution!) but even if it s just one week that they can play on upper joint, that s certainly better than nothing. ***Also for heterogeneous classes, the students can put the bottom joint on but still hold the barrel with their right hand. That takes care of the D & C but still allows them to not have to add right-hand position and helps them continue to anchor correctly. Remember the saying, The most dangerous phrase in the English language is we ve never done it that way before. Maybe this is one new idea you can try out this year.

29 Right Hand Down (or not) on Clarinet Clarinet teaching has a number of controversial subjects and this is one of them. Hopefully, this post will help you look at both sides and come up with your own decision of how you want to teach this. Most importantly, you ll know WHY you choose to teach it the way you do. (At the end of this article you can get my full Beginner Fall and Beginner Spring Warm-ups free.) What is Right hand down? In general it means that on throat tones (G, G#, A, Bb in the middle of the staff) clarinet players can put down some or all of the fingers in the right hand. Reasons TO put down the right hand? For pitch For resonance (tone) For technique Reasons NOT to put down the right hand? As a crutch (to help hold the instrument) It often causes you to break the Law of Minimal Motion in technical passages Pitch/Resonance Throat tones G#, A & Bb can be bad notes on clarinet. Some instruments are worse than others, but most of the time if a young clarinet player plays those notes with a decent embouchure, they are still gross. They are often sharp (sometimes very sharp!) and the Bb specifically has a thin, pinched tone. What makes it worse is that they are very common notes on clarinet and are often prominent in repertoire for young bands. One more consideration is that the notes A & Bb are often right next to a B or C right above which are much more stable, resonant notes making the discrepancy even more noticeable. Technique Keeping the right hand down in some passages can help greatly with technique, especially in what people call Crossing the Break or going from no fingers to all fingers type fingerings. It can eliminate many unnecessary finger movements and help facilitate smoother transitions from throat tones to notes like B, C, or D.

30 As a Crutch The biggest reason to not teach right hand down is that it can provide a crutch to beginners. I think some teachers do it the first few weeks of school to help stabilize the instrument when students are learning open G. However, this often results in students feeling that every G they ever play must have the right hand down. (Read an alternative here.) This can create huge technical problems later and if you include the right pinky in the fingering, it can create major pinky problems later as well. The right pinky must be free to move to all 4 pinky keys easily, not locked into the home position. It can also be a crutch that keeps student from ever truly crossing the break smoothly. Although most advanced clarinetists tend to add fingers early sometimes when going from a throat tone to a higher note, I think most would also tell you they don t have to add them. If students don t learn how to just put down all the fingers and have the note come out, it can become a technical and musical problem down the line. Law of Minimal Motion When students are taught that the fingering for open G is 4, 5, 6, R Pinky, they have a hard time breaking that habit when they advance enough to realize that s really not true. So a student that has a fast DEFGFED type pattern all in the left hand will put down the right hand on the G, involving 8 finger motions and an entire hand that have no business being involved. That pattern is a simplified example, but this is one of the habits I have had the hardest time getting high school students to fix. The most difficult cases can cause hundreds of extra finger motions in their all-state music because they want to put down their right hand on every throat tone. Read more on the Law of Minimal Motion. Let s look at examples dealing with A When you add the right hand fingers 4,5,6, R pinky the pitch goes down. The tone often improves as well. If you add pinkies (the low F and/or Low E) the pitch should go down a hair more because you re closing holes. However, I don t use either of those fingerings for A. If it s a long note I usually finger it with finger 3, 4 & 6 down. Why? Because when I ve tried many combinations of fingerings and that one works best for me on my instrument. Another very popular option (possibly the most popular) is to add fingers 2,3 & 5,6. Long A example of where I would use resonance fingering


31 Now, if I am playing a fast, technical passage that has an A that never crosses the break to go to B or C or anything involving the right hand, I would not add anything. The small amount of improvement on a fast A is not worth the technical tradeoff of violating the Law of Minimal Motion. Fast technique where I don t add anything (until needed for C) However, if I m playing a fast technical passage that has an A that goes back and forth to B or C and involves the right hand being down a lot, I would leave down as much as finger 3,4,5,6 and both pinkies depending on the passage. Fast Technique where I would leave down all right hand Fast technique where I would leave down 3 fingers or some fingers down. Hopefully, the examples above show you why there can t be a 100% correct answer to whether or not you should teach right hand down. Let me tell you what I do.

 down and don t let it move the entire line. I check it daily and include that heavily in grades or chair test scores.")
 As we find places the book or music where having the right hand down is helpful, I mark it on their music like this: I continue to have them mark RH down spots as long as needed and for most")
32 I do NOT teach right hand down when I first teach the throat tone notes. I teach the true basic fingering only. Around January, I introduce this exercise on the beginner Spring Warm-up: I INSIST that students put down their right hand on this exercise. I remind them every day and check it obsessively. Around March, I introduce this exercise, also on the beginner Spring Warm-up: Again, I INSIST that students put down their right hand. Before we start I tell them to super-glue the right hand (3 fingers and pinky) down and don t let it move the entire line. I check it daily and include that heavily in grades or chair test scores. (for more about this topic, listen to this podcast on crossing the break.) As we find places the book or music where having the right hand down is helpful, I mark it on their music like this: I continue to have them mark RH down spots as long as needed and for most students that seems to be about 2-3 years. I also explain why I m doing it. Is it for technique (law of minimal motion) or for resonance? Letting them know why we are using it allows students, as they mature, to make the call for themselves about when to use right hand and when not to. This is how I help students learn make good technical and musical choices on their own, without relying on me every time.
 in conjunction with one of the largest student band camps in the country.")
33 WTAMU Band Directors Workshop Band Directors Workshop is a band director clinic held every summer at West Texas A&M University in Canyon, TX. It takes place during the middle of July (July 7-19, 2019) in conjunction with one of the largest student band camps in the country. This camp hosts between students in 9 bands learning from the some of the best band directors in the state of Texas. While the students are attending their classes, band directors attend their own classes, known as Band Directors Workshop. A sample schedule includes: 7:30 8:30 Free donuts and coffee in the directors lounge. 8:30 11:00 Rehearsal observation and discussion 11:10 12:15 Instrumental classes 1:30 3:20 Talk Shop sessions (first week only) 3:30 4:20 Directors Band 4:30 Band Director Workshops Continuing Education documentation is provided! Evening & Weekend Activities include: Access to the Virgil Henson Activity Center (basketball, swimming and workout center) Band Concerts (all day Saturday of the 1st week and Friday of the 2nd week) Some evenings have additional band rehearsals/activities you may observe. If you have students attending the camp you can check in with them at any of the numerous student evening events. Canyon is located 12 miles from Palo Duro Canyon State Park, the 2nd largest canyon in the US, and 20 miles from Amarillo, TX. The cost: It s FREE. Really. Completely. Totally. Free. You can attend all the rehearsals, classes, and activities above at NO charge. You (or your school) are responsible for paying for your own meals and housing. However, most directors stay in campus housing which is very reasonably priced. Sign up for the updates here if you d like more information on campus housing prices when available. For meals, most directors just buy food at the local fast food places around campus or prepare meals in their rooms (which are equipped with basic kitchen amenities). (updates link - Free Room Scholarships are offered by WTAMU for ALL directors with 5 or more students from a single school attending camp. BandDirectorsTalkShop.com will be providing a number of HOUSING scholarships for the 2019 Workshops. Click HERE to apply! (
34
Fundamental Music Instruction
 Fundamental Music Instruction Clarinet Welcome to the Fundamental Music Instruction First Songs for Band a beginner s starter kit. The goal of this booklet (and the Supplement Book) is to help the very
When you open your case, this is what you should see: LOWER JOINT UPPER JOINT. Instrument Assembly
 PAGE 7 When you open your case, this is what you should see: LOWER JOINT BARREL Accessories: Reeds, Swab, & Cork Grease BELL Corks MOUTHPIECE with ligature & cap Tone Holes with and without rings Bridge
TEXAS BANDMASTERS ASSOCIATION
 TEXAS BANDMASTERS ASSOCIATION Beginners Instructional Series Clarinet Clinician: Leigh Ann Dixon 55th Annual Convention/Clinic San Antonio, Texas 2002 Forward The Texas Bandmasters Association has a long
Clarinet Assembling the Instrument
 Clarinet Assembling the Instrument 1. Have students take instrument cases to another area of the room and set the cases flat on a table. If no table is available, students should put cases on the floor
Arkansas High School All-Region Study Guide CLARINET
 2018-2019 Arkansas High School All-Region Study Guide CLARINET Klose (Klose- Prescott) Page 126 (42), D minor thirds Page 128 (44), lines 2-4: Broken Chords of the Tonic Page 132 (48), #8: Exercise on
THE BASIC BAND BOOK. a project by Mr. Glynn CLARINET THIS BOOK BELONGS TO
 THE BASIC BAND BOOK a project by Mr. Glynn CLARINET THIS BOOK BELONGS TO Before we begin YOU ARE CREATIVE YOU ARE A MUSICIAN YOU CAN DO THIS - 3 - THE MUSICAL ALPHABET FORWARDS BACKWARDS E F G A B C D
Before I proceed with the specifics of each etude, I would like to give you some general suggestions to help prepare you for your audition.
 TMEA ALL-STATE TRYOUT MUSIC BE SURE TO BRING THE FOLLOWING: 1. Copies of music with numbered measures 2. Copy of written out master class 1. Hello, My name is Dr. David Shea, professor of clarinet at Texas
Richardson Area Bands
 Richardson Area Bands Clarinet Packet NAME: SCHOOL: Petronome A metronome ith animal sounds for the beats. Tonal Energy Tuner A tuner, a metronome, and a pitch matching miracle. Tenuto It s musictheory.net
THE BASIC BAND BOOK. a project by Mr. Glynn SAXOPHONE THIS BOOK BELONGS TO
 THE BASIC BAND BOOK a project by Mr. Glynn SAXOPHONE THIS BOOK BELONGS TO Before we begin YOU ARE CREATIVE YOU ARE A MUSICIAN YOU CAN DO THIS - 3 - THE MUSICAL ALPHABET FORWARDS BACKWARDS E F G A B C
Marion BANDS STUDENT RESOURCE BOOK
 Marion BANDS STUDENT RESOURCE BOOK TABLE OF CONTENTS Staff and Clef Pg. 1 Note Placement on the Staff Pg. 2 Note Relationships Pg. 3 Time Signatures Pg. 3 Ties and Slurs Pg. 4 Dotted Notes Pg. 5 Counting
Before I proceed with the specifics of each etude, I would like to give you some general suggestions to help prepare you for your audition.
 TMEA ALL-STATE TRYOUT MUSIC BE SURE TO BRING THE FOLLOWING: 1. Copies of music with numbered measures 2. Copy of written out master class 1. Hello, My name is Dr. David Shea, professor of clarinet at Texas
Texas Bandmasters Association 2017 Convention/Clinic
 Reeder's Digest: A Comprehensive Guide to Beginning Clarinet CLINICIANS: Christine Cumberledge, Manuel San Luis, Jessica Shin Texas Bandmasters Association 2017 Convention/Clinic JULY 20 22, 2017 HENRY
Trombone Troubleshooting
 Trombone Troubleshooting Dr. Erik Shinn University of Florida FMEA Professional Development Conference January 12, 2017 etshinn@ufl.edu ~ www.erikshinn.com I. Problem: Equipment a. Right Horn for the Right
Before I proceed with the specifics of each etude, I would like to give you some general suggestions to help prepare you for your audition.
 TMEA ALL-STATE TRYOUT MUSIC BE SURE TO BRING THE FOLLOWING: 1. Copies of music with numbered measures 2. Copy of written out master class 1. Hello, My name is Dr. David Shea, professor of clarinet at Texas
Texas Bandmasters Association 2015 Convention/Clinic
 A Practical Approach to Beginner Saxophone From hree Perspectives CLINICIANS: Damian Gonzales, Carter Matschek, Manuel San Luis exas Bandmasters Association 2015 Convention/Clinic JULY 2-26, 2015 HENRY
Section V: Technique Building V - 1
 Section V: Technique Building V - 1 Understanding Transposition All instruments used in modern bands have evolved over hundreds of years. Even the youngest instruments, the saxophone and euphonium, are
Before I proceed with the specifics of each etude, I would like to give you some general suggestions to help prepare you for your audition.
 TMEA ALL-STATE TRYOUT MUSIC BE SURE TO BRING THE FOLLOWING: 1. Copies of music with numbered measures 2. Copy of written out master class 1. Hello, My name is Dr. David Shea, professor of clarinet at Texas
Clarinet Basics, by Edward Palanker
 Clarinet Basics, by Edward Palanker I ve had the good fortune of studying with some of the last century s finest clarinet players and teachers, and I wanted to share with you some of the teaching techniques
Rehearsal Techniques Log
 Anne McTighe Prof. Farris Instrumental II May 29, 2012 Divide each stand; have one player do the sixteenth note subdivision, while the other plays the part. Then switch. Sight-reading rhythms in a new
This question will most likely be the favorite one asked by your prospective switcher to tuba. The answers are fairly simple indeed:
 Why switch to Tuba? This question will most likely be the favorite one asked by your prospective switcher to tuba. The answers are fairly simple indeed: Tubas are the heart of a dark sound. The balance
Heterogeneous Beginning Band
 Texas Bandmasters Association Convention/Clinic July 26-28, 2018 Heterogeneous Beginning Band CLINICIAN: Alyssa Grey HENRY B. GONZALEZ CONVENTION CENTER SAN ANTONIO, TEXAS TBA Conference July 28, 2018
Richardson Area Bands
 Richardson Area Bands Flute Packet NAME: SCHOOL: Petronome A metronome with animal sounds for the beats. Tonal Energy Tuner A tuner, a metronome, and a pitch matching miracle. Tenuto It s musictheory.net
Clarinet Basics, Foundations for Clarinet Players
 Clarinet Basics, Foundations for Clarinet Players By John Cipolla Embouchure Harmonics Hand Position Tonguing/Articulation Scales Etudes Solos Chord Progressions Embouchure The clarinet embouchure can
Help for Your Horn Players: Guiding Your Young Horn Players to Success! Ideal Beginners or How to Avoid a Lot of Headaches Later Body Position
 Help for Your Horn Players: Guiding Your Young Horn Players to Success! The Midwest Clinic: An International Band and Orchestra Conference Rachel Maxwell, clinician Traughber Junior High School, Oswego,
TMEA ALL-STATE AUDITION SELECTIONS
 TMEA ALL-STATE AUDITION SELECTIONS 2014-2015 Hello, my name is Amy Anderson, Oboe Professor at Texas Tech University. I have recorded the 2014-2015 All-State Audition music for oboe including Masterclasses
Clarinet Technique 101: Dr. Robert Spring. It is a Requirement, not an Elective
 Clarinet Technique 101: It is a equirement, not an Elective Dr. obert Spring Herberger Institute of Design and the Arts School of Music Arizona State University ThisClinicissponsoredinpartbyBuffetCramponandCie.andinpart
HOW TO SELECT A NEW CLARINET by Tom Ridenour
 HOW TO SELECT A NEW CLARINET by Tom Ridenour Choosing a new clarinet is not rocket science. But it isn't falling off a log either. Like in all endeavors, the more you know and the less you guess the better
Trombone Warm-Up. Remember - When you practice at home START WITH A GOOD WARM-UP TO WORK ON YOUR TONE!!!
 Trombone Warm-Up Remember - When you practice at home START WITH A GOOD WARM-UP TO WORK ON YOUR TONE!!! In band, nothing is more important than playing with a beautiful sound. 1. Buzz! (2-3 minutes): start
Clarinet Care. Parts of a Clarinet - Ten Clarinet Care Imperatives:
 Clarinet Care The most frequent cause of damage to a clarinet is due to improper assembly and disassembly. This is because the keys are made of soft metal and bend very easily. If the keys are bent even
Student/Parent Handbook
 Sabin Middle School Student/Parent Handbook 2018-2019 Melissa Shank Band Director The Student/Parent Handbook is a guide to help students and parents understand more about the expectations for the band
Euphonium Warm-Up. Remember - When you practice at home START WITH A GOOD WARM-UP TO WORK ON YOUR TONE!!!
 Euphonium Warm-Up Remember - When you practice at home START WITH A GOOD WARM-UP TO WORK ON YOUR TONE!!! In band, nothing is more important than playing with a beautiful sound. 1. Buzz! (2-3 minutes) start
Saxophone Warm-Up. Remember - When you practice at home START WITH A GOOD WARM-UP TO WORK ON YOUR TONE!!!
 Saxophone Warm-Up Remember - When you practice at home START WITH A GOOD WARM-UP TO WORK ON YOUR TONE!!! In band, nothing is more important than playing with a beautiful sound. Low/High/Low Game (Long
If your fingers can cover all the holes on this flute, you can learn to play it!
 The Pocket Flute Part 1: Beginning Techniques for the Pocket Flute If your fingers can cover all the holes on this flute, you can learn to play it! Holding the Flute To make covering the holes easier,
TMEA Clinic Presentation 2002
 TMEA Clinic Presentation 2002 Clarinet A tone ment: Practical tips and Diagnostic Tools to Improve the Tone of Your Clarinet Section Dr. David Shea, Texas Tech University dshea@ttacs.ttu.edu 1. There are
Texas Bandmasters Association 2017 Convention/Clinic
 The Advanced Trombone Player CLINICIAN: Dr. Deb Scott Texas Bandmasters Association 2017 Convention/Clinic JULY 20 22, 2017 HENRY B. GONZALEZ CONVENTION CENTER SAN ANTONIO, TEXAS The Advanced Trombone
Flute Warm-Up. Remember - When you practice at home START WITH A GOOD WARM-UP TO WORK ON YOUR TONE!!!
 Flute Warm-Up Remember - When you practice at home START WITH A GOOD WARM-UP TO WORK ON YOUR TONE!!! In band, nothing is more important than playing with a beautiful sound. Head Joint Target Practice (1-2
Beginning Band Primer Part 1
 Trumpet, Cornet, Baritone Beginning Band Primer Part 1 by Mike Davies Trumpet, Cornet, Baritone: The Basics Putting Instrument Together: Step 1:! Open case right side up. Step 2:! Hold instrument in your
American Band College of Sam Houston State University
 Max McKee Executive Director (541) 840-4888 Scott McKee Managing Director (541) 778-4880 Paul Kassulke Director of Operations (541) 778-3161 Visit us @ www.bandworld.org Another ABC Presentation American
West Des Moines Elementary Band West Des Moines Community Schools Elementary Band
 West Des Moines Elementary Band 2015 West Des Moines Community Schools Elementary Band Contents Elementary Band Program Motivation Fifth Grade Band Practice Makes Permanent Sixth Grade Band Tips for Beginning
BEGINNING BAND FUNDAMENTALS THAT WORK THROUGH HIGH SCHOOL
 BEGINNING BAND FUNDAMENTALS THAT WORK THROUGH HIGH SCHOOL Presented by: Julie Capps Missouri Music Educators Association Convention January 29, 2016 Tan-Tar-A Resort Chuck Appleton Establish routines and
Guiding the Saxophonist in Concert Band
 Guiding the Saxophonist in Concert Band By Dr. Patrick Jones Edinboro University of PA As junior high and high school saxophonists advance, band directors are faced with the prospect of guiding these young
by Staff Sergeant Samuel Woodhead
 1 by Staff Sergeant Samuel Woodhead Range extension is an aspect of trombone playing that many exert considerable effort to improve, but often with little success. This article is intended to provide practical
ATSSB AUDITION MUSIC BASSOON
 2018 TEXAS BANDMASTERS ASSOCIATION CONVENTION ATSSB AUDITION MUSIC BASSOON DR. NATHAN KOCH ASSOCIATE PROFESSOR OF BASSOON SAM HOUSTON STATE UNIVERSITY SUPPLEMENTAL MATERIALS July 27, 2018 11:00am CC 305
Instrument Care. Band. Instruction Pack. Print and hand out! Instruments:
 Band Instrument Care Instruction Pack Print and hand out! Instruments: Flute Oboe Bassoon Clarinet Saxophone Trumpet French Horn Trombone Euphonium Tuba Percussion Easy-to-read Pictures included!! Before
2018 White Sabers Brass Warm-up Packet
 2018 White Sabers Brass Warm-up Packet Welcome to the 2018 version of the White Sabers Drum and Bugle Corps brass section! This packet is intended to help you become more familiar ith hat you can expect
TMEA ALL-STATE OBOE MASTERCLASSES Before we begin with the selections, following are general suggestionsfor preparation:
 TMEA ALL-STATE OBOE MASTERCLASSES 2011-2012 Hello, my name is Amy Anderson, Oboe Professor at Texas Tech University. For the 2011-2012 All- State Tryout Music, we have recorded performances, practice tempos,
Beginning Band Primer Part 1
 Alto Sax Beginning Band Primer Part 1 by Mike Davies Alto Saxophone: The Basics Putting Instrument Together: Step 1:! Open case right side up.! put thin end of reed into your mouth to moisten the reed.!
GPS. (Grade Performance Steps) The Road to Musical Success! Band Performance Tasks YEAR 1. Tenor Saxophone
 The Road to Musical Success! Band Performance Tasks YEAR 1. Tenor Saxophone") Name: GPS (Grade Performance Steps) The Road to Musical Success! Band Performance Tasks YEAR 1 Tenor Saxophone Ontario Music Educators Association www.omea.on.ca GPS Task Student Evaluation Chart Band
Name: GPS (Grade Performance Steps) The Road to Musical Success! Band Performance Tasks YEAR 1 Tenor Saxophone Ontario Music Educators Association www.omea.on.ca GPS Task Student Evaluation Chart Band
American Band College of Sam Houston State University
 Max McKee Executive Director (541) 840-4888 Scott McKee Managing Director (541) 778-4880 Paul Kassulke Director of Operations (541) 778-3161 Visit us @ www.bandworld.org Another ABC Presentation American
Starter Packet for Flute
 Name: Starter Packet for Flute Note Values h q e A hole note gets four counts in A half note gets to counts in A quarter note gets one count in time time time An eighth note gets a half of a count in
The Goal of this Session is to help attendees answer the three questions.
 So, What s the Plan? We Know What We Want to Rehearse, But What Are We supposed to Teach? to A Path for Figuring Out What To Teach Upper Level String Players and When To Teach It Christopher R. Selby The
Richardson Area Bands. Euphonium NAME: SCHOOL:
 Richardson Area Bands Euphonium Packet NAME: SCHOOL: Petronome A metronome with animal sounds for the beats. Tonal Energy Tuner A tuner, a metronome, and a pitch matching miracle. Tenuto It s musictheory.net
10. Before practicing and learning a difficult passage choose proper fingerings that will ensure technical ease and good intonation rather than
 College of Lake County Grayslake, IL The Complete Clarinetist Dr. Caroline Hartig Master Class Technician or Musician: Finding the music within demanding technical passages Noon-1:30 p.m. in P101 Saturday,
PRODUCTIVE PRACTICING
 PRODUCTIVE PRACTICING Suggestions to Help Ensure a Productive Practice Session By Patrick McAvoy Thanks for requesting my new article Productive Practicing: Suggestions to Help Ensure a Productive Practice
PIANO SAFARI FOR THE OLDER STUDENT REPERTOIRE & TECHNIQUE BOOK 1
 PIANO SAFARI FOR THE OLDER STUDENT REPERTOIRE & TECHNIQUE BOOK 1 TEACHER GUIDE by Dr. Julie Knerr TITLE TYPE BOOK PAGE NUMBER TEACHER GUIDE PAGE NUMBER Unit 1 Table of Contents 9 Goals and Objectives 10
Straight harp tab rulers (page 2)
") CONTENTS 1. What kind of harmonica should I use? 2. How do I use the numbers over the words to the songs? 3. So what if I am not familiar with a song? 4. So how do I improve my harmonica skills? 5. Do
CONTENTS 1. What kind of harmonica should I use? 2. How do I use the numbers over the words to the songs? 3. So what if I am not familiar with a song? 4. So how do I improve my harmonica skills? 5. Do
Clarinet Clarity: An Interview with Julie DeRoche
 Clarinet Clarity: An Interview with Julie DeRoche Dr. Mary Ellen Cavitt Part One. This interview will be continued in the June issue of the Bandmasters Review. Julie DeRoche is Chair of the Music Performance
Centennial Middle School. Supplemental Band Book. Bass Clarinet. This book belongs to:
 Centennial Middle School Supplemental Band Book Bass Clarinet This book belongs to: Table of Contents: History 1 Instrument assembly and care 2 Tone production problems and remedies 6 Pitch tendencies
Student Guide for SOLO-TUNED HARMONICA (Part II Chromatic)
") Student Guide for SOLO-TUNED HARMONICA (Part II Chromatic) Presented by The Gateway Harmonica Club, Inc. St. Louis, Missouri To participate in the course Solo-Tuned Harmonica (Part II Chromatic), the student
Student Guide for SOLO-TUNED HARMONICA (Part II Chromatic) Presented by The Gateway Harmonica Club, Inc. St. Louis, Missouri To participate in the course Solo-Tuned Harmonica (Part II Chromatic), the student
Clarinet. History Assembly Cleaning
 Clarinet History Assembly Cleaning History of the Clarinet Johann Christoph Denner (1655 -) invented the clarinet. Invented around 1690, the clarinet is a single-reed woodwind instrument with a cylindrical
Recruiting and Retaining Trombone Players
 Recruiting and Retaining Trombone Players Deal with the myths The trombone is hard The trombone is too big or too heavy The trombone is a boy s instrument The trombone doesn t play melodies Others? Too
BEGiNNER BRASS AChiEvEMENtT ttrophies
 BEGiNNER BRASS AChiEvEMENtT ttrophies STUDENT NAME: YEAR: Demonstrate skills to earn stickers. Can you make it to the Ultra Rare level? COMMON ttrophies (BRONzE) Hold an eight second buzz on the mouthpiece
5 th Grade BAND. Artistic Processes Perform Respond. Fairfield s Band Program Ensemble Sequence
 5 th Grade BAND Band is offered to all 5 th grade students. Instruments offered are: Flute, Oboe, Bb Clarinet, Eb Alto Saxophone, French Horn in F, Bb Trumpet, Trombone, Baritone Horn, and Percussion.
Richardson Area Bands. Trumpet NAME: SCHOOL:
 Richardson Area Bands Trumpet Packet NAME: SCHOOL: Petronome A metronome with animal sounds for the beats. Tonal Energy Tuner A tuner, a metronome, and a pitch matching miracle. Tenuto It s musictheory.net
ATSSB Bb clarinet (revised February 2016) Artistic Studies Book I from the French School David Hite/Southern Music
 Artistic Studies Book I from the French School David Hite/Southern Music") ATSSB Bb clarinet (revised February 2016) Artistic Studies Book I from the French School David Hite/Southern Music Year A Page 26, No. 24 A minor Quarter note = 54 60 Play from the beginning through measure
ATSSB Bb clarinet (revised February 2016) Artistic Studies Book I from the French School David Hite/Southern Music Year A Page 26, No. 24 A minor Quarter note = 54 60 Play from the beginning through measure
THE MUSIC ACADEMY AT CCTS.
 THE MUSIC ACADEMY AT CCTS Audition requirements for Instrumentalists applying for acceptance into The Music Academy at Camden County Technical Schools www.ccts.org YOUR MUSIC ACADEMY AUDITION DATE Gloucester
Focus on Fundamentals For Young Band
 AMEA State In-Service Conference February 6-7, 2015 Session 5 & 12 Focus on Fundamentals For Young Band Director of Bands - Poston Junior High School Mesa Public Schools - Mesa, Arizona Email: jabock@mpsaz.org
Parent s Guide For The Young Musician s Practice Experience
 Marc Whitlock Parent s Guide For The Young Musician s Practice Experience The Environment of Practice This is the first step a parent must take to ensure a successful practice session Parent Practice What
GPS. (Grade Performance Steps) The Road to Musical Success! Band Performance Tasks YEAR 1. Conductor
 The Road to Musical Success! Band Performance Tasks YEAR 1. Conductor") Name: GPS (Grade Performance Steps) The Road to Musical Success! Band Performance Tasks YEAR 1 Conductor Ontario Music Educators Association www.omea.on.ca GPS Task Student Evaluation Chart Band Performance
Name: GPS (Grade Performance Steps) The Road to Musical Success! Band Performance Tasks YEAR 1 Conductor Ontario Music Educators Association www.omea.on.ca GPS Task Student Evaluation Chart Band Performance
REGISTRATION FOR 5TH & 6TH GRADE BAND PACKET RETURN COMPLETED BACK PAGE BY JULY 24 TH!
 REGISTRATION FOR 5TH & 6TH GRADE BAND PACKET RETURN COMPLETED BACK PAGE BY JULY 24 TH! Dear Parents, The Chandler Unified School District has invited your child to participate in free music instruction
A Guide to Using the Asper Pickett Visualizer
 A Guide to Using the Asper Pickett Visualizer This guide will help you get the most benefit from your Asper Pickett Visualizer (APV). Also known as a mouthpiece visualizer, the APV allows a player to see
MARCHING BAND WARMUPS
 MARCHING BAND WARMUPS BARITONE Table of Contents Foreword...3 Breathing Exercises.4 Buzzing Exercises....5 Long Tones...6 Lip Slurs.......7 Articulation and Flexibility.....8 Helpful Tips.......11 2 FOREWORD
American Band College of Sam Houston State University
 Max McKee Executive Director (541) 840-4888 Scott McKee Managing Director (541) 778-4880 Paul Kassulke Director of Operations (541) 778-3161 Visit us @ www.bandworld.org Another ABC Presentation American
Joan Martin 4 th Grade Music
 Joan Martin 4 th Grade Music - 1 - Name Class How to Play The Recorder - 2 - How to place the recorder in your mouth. Place the mouthpiece of the recorder on your bottom lip and in front of your bottom
Challenges in Beginning Trombone Pedagogy
 The University of Akron IdeaExchange@UAkron Honors Research Projects The Dr. Gary B. and Pamela S. Williams Honors College Fall 2016 Challenges in Beginning Trombone Pedagogy Robert Sobnosky University
Page 16 Lesson Plan Exercises Score Pages
 1 Page 16 Lesson Plan Exercises 56 60 Score Pages 167 178 Goal Students will progress in developing comprehensive musicianship through a standards-based curriculum, including singing, performing, improvising,
 What's 2012 Directo Schools NO LOGIN R National Sousa Directors add win names (both curre this new list. Special Student Professors/Teac a student group pdf Students - order To order/renew in below. Subsc
Bassoon Fingering Issues By Michael Burns
 Bassoon Fingering Issues By Michael Burns One of the things that distinguishes the bassoon from the other woodwinds is its illogical, awkward fingering system. What other instrument demands so much of
Clark County School District Las Vegas, Nevada
 Clark County School District Las Vegas, Nevada Middle School/Junior High School Intermediate Band Curriculum Alignment Project (CAPS) Scott Kissel, Burkholder MS Mark Nekoba, Schofield MS Danielle McCracken,
Oskaloosa Community School District. Music. Grade Level Benchmarks
 Oskaloosa Community School District Music Grade Level Benchmarks Drafted 2011-2012 Music Mission Statement The mission of the Oskaloosa Music department is to give all students the opportunity to develop
COURSE: Instrumental Music (Brass & Woodwind) GRADE(S): Level I (Grade 4-5)
 GRADE(S): Level I (Grade 4-5)") COURSE: Instrumental Music (Brass & Woodwind) GRADE(S): Level I (Grade 4-5) UNIT: Preliminary Physical Concepts 9.1 Production, Performance and Exhibition of Music UNIT OBJECTIVES: 1. Students will demonstrate
COURSE: Instrumental Music (Brass & Woodwind) GRADE(S): Level I (Grade 4-5) UNIT: Preliminary Physical Concepts 9.1 Production, Performance and Exhibition of Music UNIT OBJECTIVES: 1. Students will demonstrate
Beginning Band Primer Part 1
 Flute Beginning Band Primer Part 1 1 by Mike Davies Flute: The Basics Putting Instrument Together: Step 1: q Open case right side up. Step 2: q Put head joint into middle joint with a gentle twisting motion.
Tips for Flutists Katherine Borst Jones Professor of Flute, The Ohio State University
 Tips for Flutists Katherine Borst Jones Professor of Flute, The Ohio State University OPENING EXERCISE: Breathe in and out - reach to the sun; swim; embouchure variables; trombone breathing ex.; Darth
Winning Woodwinds! Beginning Band Method Book Supplement for: CLARINET. by Catrina Tangchittsumran-Stumpf
 Winning Woodwinds! Beginning Band Method Book Supplement for: CLARINET by Catrina Tangchittsumran-Stumpf Practical Applications III in partial fulfillment of the degree requirements for a Master s of Music
2. ARTICULATION The pupil must be able to able to articulate evenly and clearly at a variety of slow to medium tempos and demonstrate a good posture
 Brass Foundation Level 1 The pupil must be able to hold a level tone and be able to pitch low C and G on the 2nd line treble clef (Bb and F bass clef). The pupil should be able to play simple melodies
How To Play Clarinet For Beginners
 How To Play Clarinet For Beginners Everything you need to get started on the clarinet with the best habits that will help you to play more easily and succeed quickly! Michelle Anderson Copyright @ 2017
Practical Horn Pedagogy! Dr. Abigail Pack ABC 2017!!
 Practical Horn Pedagogy Dr. Abigail Pack ABC 2017 Session 1: The Fundamentals of Posture and Mouthpiece Placement Session 2: Embouchure and Tone Production Session 3: More Technique and Troubleshooting
Bedford Junior High School Band
 Bedford Junior High School Band Bedford Junior High School 325 Carolyn Drive Bedford, TX 76021 817-788-3101 Band Directors: Valerie Howell Eric Suzanne Dell Clarinet Lesson Handbook Summer 2014 Melissa
Page 4 Lesson Plan Exercises Score Pages 50 63
 Page 4 Lesson Plan Exercises 14 19 Score Pages 50 63 Goal Students will progress in developing comprehensive musicianship through a standards-based curriculum, including singing, performing, reading and
Weiss HS Percussion Audition Guidelines and Materials For the School year
 Weiss HS Percussion Audition Guidelines and Materials For the 2017-2018 School year Parents and Students, I hope this information finds you doing well, and excited about starting a brand new program! In
OSU MARCHING BAND PERCUSSION A GUIDE TO TECHNIQUE
 OSU MARCHING BAND PERCUSSION A GUIDE TO TECHNIQUE 2015 WELCOME TO THE OSU MARCHING BAND PERCUSSION SECTION THE APPROACH The 2014, OSU percussion program, will be focusing on technique as it applies to
BAND HANDBOOK AND INFORMATION
 Chapel Hill 7 th & 8 th Grade Center BAND HANDBOOK AND INFORMATION 2016 2017 NilaFillmann Eric Park v.m. 988-8815 v.m. 988-8805 nila.fillmann@wayne.k12.in.us eric.park@wayne.k12.in.us TABLE OF CONTENTS
Joan Martin 4 th Grade Music
 Joan Martin 4 th Grade Music - 1 - Name Class How to Play The Recorder - 2 - How to place the recorder in your mouth. Place the mouthpiece of the recorder on your bottom lip and in front of your bottom
Recorder Rocks! Level 1
 Recorder Rocks! Level 1 RAINBOW Level 1 Master RED GOLD ORANGE SILVER YELLOW BLACK GREEN BROWN BLUE PURPLE Name: Recorder Etiquette Agreement 1. Your recorder should LIVE in your backpack when not being
Presented by Michael Pote and Chris Grifa Carmel, Indiana. Saturday, February 4th, :45 p.m. - 3:45 p.m. 4:00 p.m. - 5:00 p.m.
 Achieving Your Ensemble Sound: It s Fundamental! Presented by Michael Pote and Chris Grifa Carmel, Indiana Saturday, February 4th, 2016 2:45 p.m. - 3:45 p.m. 4:00 p.m. - 5:00 p.m. Mesa Room Featuring the
Music Theory Courses - Piano Program
 Music Theory Courses - Piano Program I was first introduced to the concept of flipped classroom learning when my son was in 5th grade. His math teacher, instead of assigning typical math worksheets as
C O N C E R T I N O C O L L E C T I O N.
 C O N C E R T I N O C O L L E C T I O N Assembly, Care & Maintenance Guide.suzukibandinstruments.com STOP! Read This First Before You Assemble Your Trumpet Did You Kno This? Your ne Trumpet is manufactured
Long Tones Chromatic Scale-Ascending 5 minutes
 Experiment Make Discoveries Play each note ith a ull, rich tone. Breath as oten as necessary. q =60 m b æ n Long Tones Chromatic Scale-Ascending 5 minutes b n æ b # # # E e E # r ) 6 Ab key æ # # E æ Ee
J. JENNINGS PUBLISHING COMPANY 5012 Kahn Street, Carmichael, CA 95608
 E M E R S O N K A R A O K E K E Y B O A R D This packet contains introductory lessons for Emerson Karaoke Keyboard 1. We assume you are a total beginner. The exercises start out very easy and will progress
FALL 2016 AUDITION INFORMATION
 FALL 2016 AUDITION INFORMATION Thank you for your interest in the St. Cloud State University Wind Ensemble! The Wind Ensemble is the Music Department s upper level band, and is open to music majors and