English. Deutsch. Français. Owner s Manual. Bedienungsanleitung. Mode d emploi
|
|
|
- Jonathan Logan
- 6 years ago
- Views:
Transcription

1
2 Owner s Manual English Bedienungsanleitung Deutsch Mode d emploi Français
3 Congratulations! You are the proud owner of an extraordinary electronic keyboard. The Yamaha PSR-6000 PortaTone combines the most advanced AWM tone generation technology with state-of-the-art digital electronics and features to give you stunning sound quality with maximum musical enjoyment. The Interactive Accompaniment and One Touch Setting features, in particular, are brilliant examples of how advanced technology can significantly expand your musical horizons. A new large-size graphic display and easy-to-use interface also greatly enhance the operability of this advanced instrument. In order to make the most of your PortaTone s features and vast performance potential, we urge you to read the manuals thoroughly while trying out the various features described. Keep the manual in a safe place for later reference. Contents Taking Care of Your PortaTone 2 Floppy Disks & the Disk Drive... 3 Nomenclature 4 Connections & Music Stand 6 The Demonstration 8 The Demo Play Modes... 9 The PSR-6000 Display & Help Function 10 The Display & Multi-function Controls The [MIXER] Button The [LIST HOLD] Button The [CONTRAST] Control The Help Function Playing the PSR Selecting & Playing Voices Keyboard Percussion USER SET Voice Assignment Changing the Split Point Transposition, Tuning, Octave Change, & Key Velocity 17 TRANSPOSE & TUNE OCTAVE CHANGE KEY VELOCITY Using the Accompaniment Section 19 Accompaniment Volume Rhythm-only Accompaniment USER SET Style Assignment Interactive Accompaniment Auto Solo Using Disk Styles on Optional Data Disks Selecting a DISK Style One Touch Setting 29 Expression & Effects 31 Harmony Sustain Reverb Effects Left Hold Pitch Bend Wheel Modulation/Effect Wheel Using the Pads 33 The MULTI Mode The PHRASE Pads (pads 1 4) Recording Phrases Phrase Playback The CHORD Pads (pads 5 8) Recording Chords Chord Playback MULTI Pad Repeat Playback The PERC Mode Assigning Different Instruments To the PERC Pads Playing the Percussion Pads The PERC BREAK Function The TEMPO Mode The TEMPO SYNCHRO Function Panel Registration 41 Registering the Panel Settings Recall the Registered Panel Settings The Freeze Function Playing DOC (Disk Orchestra Collection) & General MIDI Music Software Disks 43 Disk Orchestra Collection Disk Playback Volume Control Muting Specific Parts Octave, Transpose, and Tune Other Controls That Function In the DOC Mode General MIDI Disk Playback Volume Control Muting Specific Tracks Octave Other Controls That Function In the General MIDI Mode The Sequencer 49 Recording Deleting Tracks Playback Sequence Editing CONDITION/VOLUME CONDITION METRONOME HARMONY RECORDING TYPE CONDITION/VOLUME TRACK VOLUME EDIT TRACK COPY/MIX REMOVE EVENT DELETE MEASURE CREATE MEASURE QUANTIZE ERASE NOTE SHIFT SONG CLEAR... 61
4 The Custom Accompaniment Programmer 62 Basic Programming Procedure (Normal section) Creating Intro, Fill-In, & Ending Sections Programming a Preset Intro, Fill-in, or Ending Section Editing a Previously Saved User Intro, Fill-in, or Ending Section Creating a New Intro, Fill-in, or Ending Section From Scratch Custom Accompaniment Editing RECORD NAME/SECTION NAME SECTION RECORD MEASURE/BEAT RECORD TRACK VOLUME RECORD FADER ASSIGN EDIT QUANTIZE EDIT COPY EDIT REMOVE EVENT STORE I/F/E Select Exiting From the Custom Accompaniment Programmer Selecting & Using a Custom Accompaniment Style The PSR-6000 Functions 75 General Function Selection & Editing Procedure The [EXIT] Button F1: Custom Voice Edit 77 Standard Voice Edit Functions (voice groups 1 through 10) NAME/CONTROL NAME CONTROLLER TOUCH SENS PITCH BEND COMMON OCTAVE PAN MODULATION DEPTH SPEED TONE BRILLIANCE RESONANCE ENVELOPE ATTACK DECAY RELEASE SUSTAIN Dual Voice Edit Functions (voice group 11) NAME/VOICE NAME VOICE OCT/PAN/VOL./DETUNE OCTAVE PAN VOLUME DETUNE Drum Voice Edit Functions (Voice group 12) NAME/PAN/PITCH/SOFTNESS NAME PAN PITCH SOFTNESS F2: Reverb/Effect 84 REVERB TYPE & DEPTH REVERB TYPE REVERB DEPTH EFFECT TYPE & DEPTH EFFECT TYPE EFFECT DEPTH F3: Controller 86 FOOT CONTROLLER MODULATION/EFFECT WHEEL SUSTAIN PEDAL & PITCH BEND WHEEL SUSTAIN PEDAL PITCH BEND WHEEL FOOT SWITCH F4: One Touch Setting/IA 89 ONE TOUCH SETTING SYNCHRO CHANGE INTERACTIVE ACCOMPANIMENT F5: Harmony Type 90 F6: Disk 91 The [TO DISK] Button The [FROM DISK] Button The F6: DISK Functions FROM DISK TO DISK RENAME FILE DELETE FILE FORMAT DISK DISK FREE AREA F7: Utility 100 MEMORY BACKUP & REGISTRATION FREEZE MEMORY BACKUP REGISTRATION FREEZE RECALL PRESET DATA F8: MIDI 102 THE NORMAL PLAY MODE THE DOC MODE THE GENERAL MIDI (GM) MODE Initial General MIDI Mode Settings MIDI Channel & Multi Part Settings Normal Play Mode CH. SETTING TRANSMIT RECEIVE SPLIT TRANSMIT RHYTHM RECEIVE SEQ. TRACK CH MULTI PART DOC/GM Mode KEYBOARD CHANNEL LOCAL CONTROL TRANSPOSE MIDI Switch, System Settings, & Data Transmission MIDI SWITCH (Normal Play Mode Only) MIDI SYSTEM (Normal Play Mode Only) CLOCK LOCAL CONTROL TRANSPOSE SPLIT SEND DATA TRANSMIT (Normal Play Mode Only) MIDI Bulk Dump Reception (Memory Data Receive) Receiving MIDI Bulk Dump Request Messages Bulk Dump Error Messages Error Messages 111 Sequencer Errors Custom Accompaniment Programmer Errors Disk Errors MIDI Errors DOC/GM Mode Errors Other Messages Troubleshooting 113 Index 114 Voice List Keyboard Percussion List Style List Normal Play Mode MIDI Percussion Map GM/DOC Mode Percussion Map Fingering Chart MIDI Function Tree MIDI Messages MIDI Implementation Chart Specifications
5 Taking Care of Your PortaTone Your PortaTone will give you years of playing pleasure if you follow the simple rules given below: Location Do not expose the instrument to the following conditions to avoid deformation, discoloration, or more serious damage. Direct sunlight (e.g. near a window). High temperatures (e.g. near a heat source, outside, or in a car during the daytime). Excessive humidity. Excessive dust. Strong vibration. Power Supply Turn the power switch OFF when the instrument is not in use. The power supply cord should be unplugged from the AC outlet if the instrument is not to be used for an extended period of time. Unplug the instrument during electric storms. Avoid plugging the instrument into the same AC outlet as appliances with high power consumption, such as electric heaters or ovens. Also avoid using multi-plug adapters since these can result in reduced sound quality, operation errors, and possibly damage. Turn Power OFF When Making Connections To avoid damage to the instrument and other devices to which it is connected (a sound system, for example), turn the power switches of all related devices OFF prior to connecting or disconnecting audio and MIDI cables. Cleaning Clean the cabinet and panel with a dry soft cloth. A slightly damp cloth may be used to remove stubborn grime and dirt. Never use cleaners such as alcohol or thinner. Avoid placing vinyl objects on top of the instrument (vinyl can stick to and discolor the surface). Electrical Interference This instrument contains digital circuitry and may cause interference if placed too close to radio or television receivers. If this occurs, move the instrument further away from the affected equipment. Data Backup Internal data (e.g. sequencer data) is retained in memory even if the power switch is turned OFF. If the power is not turned ON for periods longer than about a week, however, memory data will be lost. Save all important data to disk before turning off for longer periods. Internal memory data can be corrupted due to incorrect operation. Be sure to save important data to a floppy disk frequently so you have a backup to revert to if something happens to damage the data in memory. Also note that magnetic fields can damage data on the disk, so it is advisable to make a second back-up copy of disks that contain very important data, and keep backup disks in a safe place away from stray magnetic fields (i.e. away from speakers, appliances containing motors, etc.). Handling and Transport Never apply excessive force to the controls, connectors or other parts of the instrument. Always unplug cables by gripping the plug firmly, not by pulling on the cable. Disconnect all cables before moving the instrument. Physical shocks caused by dropping, bumping, or placing heavy objects on the instrument can result in scratches and more serious damage. Service and Modification The PSR-6000 contains no user serviceable parts. Opening it or tampering with it in anyway can lead to irreparable damage and possibly electric shock. Refer all servicing to qualified YAMAHA personnel. 2
6 Taking Care of Your PortaTone Floppy Disks & the Disk Drive Type of Disk Use only 3.5-inch 2DD floppy disks. Disk Insertion & Removal To insert a floppy disk in the disk drive, hold the disk with the label side facing up and the sliding shutter facing the disk drive door, then insert carefully until the disk clicks into place. To remove a floppy disk from the disk drive, make sure the disk drive in use light is not lit and press the disk eject button firmly as far as it will go and then, when the disk is full ejected, remove it by hand. If the eject button is only partially pressed or pressed too quickly the eject mechanism may not function properly, leaving the disk stuck halfway. Do not attempt to remove the disk forcefully if this happens, since excess force can damage the disk and/or the drive mechanism. Try either pressing the eject button carefully again, or push the disk all the way back into the drive and repeat the eject procedure. Never attempt to remove a floppy disk during a record or playback operation!! This can corrupt the data on the disk, and actually damage the disk drive! Be sure to remove the floppy disk from the disk drive before turning off the power. A floppy disk left in the drive for extended periods can easily pick up dust and dirt that can cause data read/write errors. Clean the Read/Write Head Regularly This instrument employs a precision magnetic read/ write head which, after an extended period of use, will pick up a layer of magnetic particles from the disks used that will eventually cause read and write errors. To maintain the disk drive in optimum working order we recommend that you use a commercially-available Drytype Head Cleaning Disk to clean the head about once a month. Ask your Yamaha dealer about the available of head-cleaning disks. Floppy Disk Handling & Storage The actual recording medium inside a floppy disk has a fine coating of magnetic particles in which the data is stored. To protect this coating as well as the disk drive s delicate read-write head, please observe the following: Always keep floppy disks in their plastic case when they are not in use. Never place heavy objects on a disk or bend the disk in any way. Also keep disks away from liquids and dust. Never open the disk s shutter and touch the exposed surface of the disk. Keep floppy disks away from strong magnetic fields such as those produced by television sets, speakers, motors, etc. Never leave floppy disks in areas exposed to strong direct sunlight, excessively high or low temperature, or high humidity. Never use a floppy disk with a deformed shutter or housing. Do not attach anything other than the provided labels to a floppy disk. Also make sure that labels are attached in the proper location. Protecting Your data To prevent accidental erasure of important data you have saved to floppy disk, be sure to slide the disk s write-protect tab to the write protect position (the tab window should be open). When this is done the disk cannot be written to. Write protected Write enabled Make regular backup copies of important data to a separate floppy disk, and keep your backup disks in a separate, safe place. To ensure the safety of your data (and of the disk drive itself) always use floppy disks from a well-known, reliable manufacturer. No-brand disks can cause trouble. YAMAHA is not responsible for damage caused by improper handling or operation. 3


7 Nomenclature FOOT CONTROLLER SUSTAIN FOOT SWITCH THRU OUT IN MIDI CONTRAST STYLE FUNCTION HELP/ LANGUAGE EXIT * & 1 DANCE 7 LATIN PRESET 4 ROCK N 2 ROLL 8 3 ROCK 9 LATIN POP WALTZ USER SET CUSTOM A MASTER VOLUME 4 POP 10 COUNTRY CUSTOM B MAX MIN INTERACTIVE ACCOMPANIMENT 5 BALLAD 11 6 JAZZ 12 AUTO BASS CHORD TRADITIONAL FOR DISK IA ONE TOUCH VERSE VERSE CHORUS CHORUS A B A B $ 0! % ^ # TEMPO + ) MIXER LIST HOLD q FILL IN FILL IN ENDING/ rit. VERSE 1 VERSE 2 CHORUS 1 CHORUS 2 SOLO SYNCHRO START START/ RE-START STOP MULTI REPEAT PERC. BREAK REC / STOP MULTI PLAYING PHRAS TEMPO SYNCHRO MODE SELECT 1 2 INTRO 1 INTRO 2 INTRO 3 Tempo Change Tap Start E PITCH BEND R MODULATION/ EFFECT UP MAX DOWN MIN PHONES 1 POWER Button... [page 8] 2 DEMO Button... [page 8] 3 DISK ORCHESTRA/GENERAL MIDI Button... [page 43] 4 MASTER VOLUME Control... [page 8] 5 CONTRAST Control... [page 11] 6 FUNCTION Button... [page 75] 7 HELP/LANGUAGE Button... [page 11] 8 EXIT Button... [page 9, 11] 9 STYLE Buttons... [page 21, 26, 28, 62, 64] PRESET, USER SET, CUSTOM A, CUSTOM B, Style Group [1] [12] Buttons 0 INTERACTIVE ACCOMPANIMENT Button... [page 27]! AUTO BASS CHORD Button... [page ONE TOUCH SETTING Buttons... [page 29] VERSE A, VERSE B, CHORUS A, CHORUS B # TEMPO [ ], [+] Buttons and Beat Display... [page 22] $ Fill-in, Intro, and Ending Buttons [page 22, 23, 25] FILL INj (INTRO 1), FILL INn (INTRO 2), ENDING/rit. (INTRO 3) % Verse, Chorus, and Solo Buttons... [page 24] VERSE 1, VERSE 2, CHORUS 1, CHORUS 2, SOLO ^ Accompaniment Control Buttons [page 22, 23, 25] SYNCHRO START, START/RE-START, STOP & Liquid Crystal Display (LCD)... [page 8, 10] * LCD Buttons... [page 8, 10] ( LCD Dials... [page 9, 10] ) MIXER Button... [page 10] q LIST HOLD Button... [page 11] w PAD Buttons... [page 33] PAD MODE SELECT Buttons, REC/STOP, 1-8 4

8 Nomenclature L/L+R AUX IN R L/L+R AUX OUT R * e SEQUENCER / CUSTOM ACCOMPANIMENT PROGRAMMER RECORD DELETE EDIT SEQUENCER PLAY/REC PLAY/REC PLAY/REC PLAY/REC PLAY/REC PLAY/REC PLAY/REC PLAY/REC 2 DEMO ACCOMP. CUSTOM ACCOMP. r VOICE PART ORCH. 1 ORCH. 2 CHORD 1 CHORD 2 CHORD 3 CHORD 4 CHORD 5 CHORD 6 BASS RHYTHM ORCHESTRA VOICE PIANO/E. PIANO ORGAN/ ACCORDION 1 GUITAR 7 2 BASS 8 DISK ORCHESTRA/ GENERAL MIDI 3 PRESET STRINGS/CHOIR 3 SYNTH 9 POWER USER SET WOODWIND BRASS WORLD/ 4 PERCUSSIVE 10 DUAL VOICE/ 5 SOUND 11 EFFECT 1 CUSTOM VOICE MALLET 6 DRUMS 12 E PAD ( w CHORD ORCH. 1 ORCHESTRATION ORCH. 2+1 t ORCH. 2 1 FREEZE LEFT HOLD HARMONY SUSTAIN REVERB EFFECT y u i o p BANK A B C D PANEL REGISTRATION W DISK IN USE FROM DISK Q TO DISK MEMORY Tempo l accel. faster a tempo slower rit. > CANCEL DISK T Y e SEQUENCER/CUSTOM ACCOMPANIMENT PROGRAMMER Buttons... [page 49, 62] SEQUENCER, CUSTOM ACCOMP. Sequencer Track/Custom Accompaniment Programmer Track Buttons 1 through 6/CHORD 1 through 6, 7/BASS, ACCOMP./RHYTHM Sequencer/Custom Accompaniment Programmer Control Buttons RECORD, DELETE, EDIT, p (Top), r (Rewind), f (Forward) r ORCHESTRA VOICE Buttons... [page 13, 15, 77] VOICE PART ORCH.1, VOICE PART ORCH.2, PRESET, USER SET, CUSTOM VOICE, Voice Group [1] [12] Buttons t ORCHESTRATION Buttons... [page 12] ORCH. 1, ORCH. 2+1, ORCH. 2v1 y LEFT HOLD Button... [page 32] u HARMONY Button... [page 31] i SUSTAIN Button... [page 31] o REVERB Button... [page 31] p EFFECT Button... [page 31] Q DISK IN USE Buttons... [page 91, 93] FROM DISK, TO DISK W PANEL REGISTRATION Buttons... [page 41] MEMORY, FREEZE, 1-8, BANK E PITCH BEND Wheel... [page 32] R MODULATION/EFFECT Wheel... [page 32] T Disk Drive... [page 3, 28, 43] Y Disk Eject Button... [page 3, 45] 5
9 Connections & Music Stand PHONES 1 1 The PHONES Jack... A standard pair of stereo headphones can be plugged in here for private practice or late-night playing. The internal stereo speaker system is automatically shut off when a pair of headphones is plugged into the PHONES jack. 2 The AUX OUT L/L+R and R Jacks... The rear-panel AUX OUT L/L+R and R jacks deliver the output of the PSR-6000 for connection to a keyboard amplifier, stereo sound system, a mixing console, or tape recorder. If you will be connecting the PSR-6000 to a monaural sound system, use only the L/L+R jack. When a plug is inserted into the L/L+R jack only, the left- and rightchannel signals are combined and delivered via the L/L+R jack so you don t lose any of the PSR-6000 sound. Stereo System CAUTION To prevent damage to the internal circuitry, the AUX OUT jack signal must never be returned to the AUX IN jacks, either directly or through external equipment. R AUX OUT L/L+R 3 AUX IN L/L+R and R Jacks... These jacks are intended primarily for use with external audio sources such as tone generators, drum machines, CD players, and similar equipment. The signal received via the AUX IN L and R jacks is reproduced via the PSR-6000 s internal stereo amplifier and speaker system. If you will be connecting a monaural source to the PSR-6000, use only the L/L+R jack. When a plug is inserted into the L/L+R jack only, the monaural input signal is fed to both the left and right channels of the PSR-6000 stereo sound system. Please note that the PSR-6000 MASTER VOLUME control does not affect the level of the signal delivered to external equipment. Tone Generator R AUX IN L/L+R 6
10 Connections & Music Stand IN MIDI OUT THRU FOOT SWITCH SUSTAIN FOOT CONTROLLER AUX OUT AUX IN R L/L+R R L/L+R FOOT SWITCH Jack... An optional Yamaha FC5 footswitch connected to this jack can be used to control a range of important functions. Refer to the FOOT SWITCH SELECT function described on page 86. FOOT SWITCH 5 SUSTAIN Jack... An optional FC5 footswitch can be connected here for foot sustain control. The footswitch functions like the damper pedal on a piano press for sustain, release for normal sound. SUSTAIN 6 FOOT CONTROLLER Jack... An optional Yamaha FC7 Foot Controller can be connected to this jack to allow foot expression (swell) or effect control. Please note that when the foot controller is used for expression control, no sound will be produced if it is set to the minimum position. FOOT CONTROLLER 7 MIDI IN, THRU and OUT Connectors... The MIDI IN connector receives MIDI data from an external MIDI device (such as a MIDI sequencer) which can be used to control the PSR The MIDI THRU connector re-transmits any data received at the MIDI IN connector, allowing chaining of several MIDI instruments or other devices. The MIDI OUT connector transmits MIDI data generated by the PSR-6000 (e.g. note and velocity data produced by playing the keyboard). More details on MIDI are provided on page 102. IN Music Computer MIDI OUT THRU Tone Generator The Music Stand The PSR-6000 is supplied with a music stand that can be attached to the instrument by inserting it into the slot at the rear of the control panel. 7
11 The Demonstration To give you an idea of the PSR-6000 s sophisticated capabilities, it is programmed with 21 demonstration sequences which can be played in a number of ways. The demonstration sequences have been specially programmed for demonstration purposes it is not possible to reproduce the demonstration sequences 100% using the PSR-6000 sequencer functions. Z Switch ON... Plug the AC power cord into a convenient AC outlet, then press the [POWER] button to turn the PSR-6000 ON. POWER X Set an Initial Volume Level... Set the [MASTER VOLUME] control to a position about half way toward the highest setting. You can re-adjust the [MASTER VOLUME] control for the most comfortable overall volume level after playback begins. MAX MASTER VOLUME MIN C Press the [DEMO] Button... Press the [DEMO] button and the PSR-6000 demo display will appear. DEMO V Start & Stop Playback as Required DISK ORCHESTRA/ GENERAL MIDI Press the START LCD button to start playback of all demo songs. Press the STOP LCD button when you want to stop playback. The default demo play mode is RANDOM. Demo playback can also be started and stopped by using the [START/RE-START] and [STOP] buttons on the PSR-6000 panel. B Exit When Done... Press either the [DEMO] button or the [EXIT] button to exit from the demo mode and return to the normal play-mode display when you ve finished playing the demo songs. EXIT DEMO DISK ORCHESTRA/ GENERAL MIDI 8
12 The Demonstration The Demo Play Modes If you play the demo as described above, you ll hear all 21 demo songs, one after another. Note that the demo songs are arranged into 7 groups of three songs each. By selecting an appropriate play mode, you can also play back all the songs in sequence, in random order, or a single specified song. Z Select a Play Mode... With demo playback stopped, use any of the three LCD dials under PLAY MODE on the display to select one of the available play modes. ALL SONGS RANDOM SINGLE SONG All 21 demo songs are played back in sequence. All 21 demo songs are played back in random order. This is the default mode. Only the selected song is played. X Select a Song... If you ve selected the SINGLE SONG play mode, press the LCD button corresponding to the demo group you want to play (DANCE, ROCK, etc.) and use the same LCD button to select the desired song (a new song within the group is selected each time it is pressed). If you ve selected the ALL SONGS or RANDOM play mode, you can use the LCD buttons to select the first song to be played back. You can also use either of the LCD dials under SONG on the display to select any of the 21 demo songs. C Turn the Repeat Mode ON or OFF... X Use the REP. LCD dial to turn repeat playback ON or OFF as required (when ON, the selected song or sequence of songs will be repeated until the STOP LCD button is pressed) C X V Start & Stop Playback as Required... Press the START LCD button to start playback of the selected demo song(s). Press the STOP LCD button when you want to stop playback. B Exit When Done... Press either the [DEMO] button or the [EXIT] button to exit from the demo mode and return to the normal play-mode display when you ve finished playing the demo songs. EXIT DEMO DISK ORCHESTRA/ GENERAL MIDI 9
13 The PSR-6000 Display & Help Function The Display & Multi-function Controls The PSR-6000 makes general operation and programming easier than ever with a large backlit LCD display panel and multi-function controls. The 8 LCD buttons four on either side of the display panel and 8 LCD dials below the display perform the function indicated by the adjacent section of the display. In the example display shown here, for example, the two LCD dials immediately below TEMPO on the display can be used to adjust the tempo (in this case both dials perform the same function). In the same way, the LCD button immediately to the right of KEY VELOCITY on the display is used to turn key velocity ON or OFF. The [MIXER] Button... The lower section of the normal play mode display, shown above, provides individual volume controls for the PSR-6000 s rhythm, bass, chord 1, chord 2, orchestra 1, and orchestra 2 parts. This is essentially a mixer that you will use the achieve the best overall balance for your musical needs. The mixer controls will disappear when functions which have different displays are selected, but can be instantly recalled without exiting from the current display mode by pressing the [MIXER] button. Pressing the [MIXER] button a second time (or the [EXIT] button) causes the mixer controls to disappear. MIXER LIST HOLD 10
14 The PSR-6000 Display & Help Function The [LIST HOLD] Button... When selecting voices (page 13) or accompaniment styles (page 21), the voice or style list will appear on the display, but will automatically disappear after a few seconds if no selections are made. The voice/style list can be kept on the display for as long as required by pressing the [LIST HOLD] button so that its LED lights. Press [LIST HOLD] a second time (the LED will go out) to disengage the list hold function. If the [LIST HOLD] button is engaged when the voice or style list is not showing, the list will not appear even when a voice or style group button is pressed. MIXER LIST HOLD The [CONTRAST] Control... The PSR-6000 display panel is a liquid-crystal type which can be easier or more difficult to read from different angles. Use the [CONTRAST] control to set the display for optimum legibility at your viewing angle. CONTRAST FUNCTION HELP/ LANGUAGE EXIT The Help Function If you re ever in doubt about a display or button, the PSR-6000 HELP function is available. Simply press the [HELP/LANGUAGE] button to get information about the current display, or press [HELP/LANGUAGE] and then any panel button for information about that button and its function. If more that one help display page is available for the selected topic, use the [ ] and [ ] LCD buttons to change pages. Help is provided in five languages English, German, French, Spanish, and Italian that you can select by using any of the LCD dials. Exit from the HELP function by pressing either the [HELP/LANGUAGE] or [EXIT] button. CONTRAST FUNCTION HELP/ LANGUAGE EXIT The HELP function will be automatically exited if a disk is inserted or ejected. 11
15 Playing the PSR-6000 Before You Begin Before playing your PSR-6000 for the first time, it might be a good idea to re-initialize it to the original factory settings just in case these have been changed at some point before you receive the instrument. To do this, turn the [POWER] switch ON while holding the [EXIT] and [DEMO] buttons. EXIT DEMO POWER When the display shown to the right appears, use the LCD dials to select the language you want the HELP text and messages to be displayed in, then press the OK LCD button. CAUTION When the above initialization procedure is carried out, all sequencer and custom accompaniment data will also be initialized and therefore lost! Selecting & Playing Voices Z Turn Power On and Set Initial Volume Levels... Press the [POWER] button to turn the power ON, and set the [MASTER VOLUME] control about half way toward its highest setting. Also make sure that the RHY, BASS, CHD2, CHD1, ORC2, and ORC1 volume levels on the LCD are set to their maximum 100 levels (use the corresponding LCD dials to set these volume levels if necessary). You can set the [MASTER VOLUME] control for the most comfortable overall volume level after beginning to play. MAX MASTER VOLUME No sound will be produced if all volume levels other than the [MASTER VOLUME] control are set to their minimum values. MIN X Select the Orchestration... The PSR-6000 has three orchestration modes, selected by the corresponding ORCHESTRATION buttons. The corresponding ORCHESTRATION LED will light. ORCH. 1 ORCHESTRATION ORCH. 2+1 ORCH. 2 1 LEFT HOLD HARMONY SUSTAIN REVERB EFFECT 12
16 Playing the PSR-6000 ORCH. 1 ORCH. 2+1 ORCH. 2v1 In this mode a single voice the ORCH. 1 voice can be played across the entire keyboard. This is a dual mode in which two voices ORCH. 1 and ORCH. 2 can be played simultaneously across the entire keyboard. This is a split mode in which the ORCH. 2 voice is played on the left-hand section of the keyboard (to the left of the split point see below), while the ORCH. 1 voice is played on the righthand section of the keyboard. The split point for the PSR-6000 is initially set at F#2. This means that when the ORCH. 2v1 mode is selected, the ORCH. 2 voice will be played by all keys to the left of and including F#2, while the ORCH. 1 voice will be played on all keys to the right of F#2. You can change the split point to any key desired as described on page 16. Since two voices are played simultaneously in the dual and split modes, the total number of notes that can be played on the keyboard at the same time is reduced. When the ORCH.2+1 mode is selected and the same voice is selected for both ORCH. 1 and ORCH. 2, the sound may be slightly different from the normal voice. When the ORCH.2v1 mode is selected, the ORCH. 2 voice will automatically be transposed up one octave. Split Point (F#2) Left-hand Section Right-hand Section The lowest key on the keyboard is C1. C3 C Select a Voice or Voices... Before selecting a preset voice, make sure that the ORCHESTRA VOICE control section [PRE- SET] button LED is lit (if it isn t press the [PRE- SET] button so that it does light). ORCH. 1 VOICE PART ORCH. 2 PRESET ORCHESTRA VOICE PIANO/E. PIANO ORGAN/ ACCORDION STRINGS/CHOIR 1 GUITAR 7 2 BASS 8 3 SYNTH 9 The PSR-6000 has 128 preset voices organized in 12 voice groups (see page 116 for a complete voice list). USER SET WOODWIND 4 WORLD/ PERCUSSIVE 10 DUAL VOICE/ BRASS 5 SOUND 11 EFFECT CUSTOM VOICE MALLET 6 DRUMS 12 Press the [ORCH. 1] or [ORCH. 2] VOICE PART button, depending on which voice you want to select. The corresponding VOICE PART LED will light. ORCH. 1 VOICE PART ORCH. 2 PRESET ORCHESTRA VOICE PIANO/E. PIANO ORGAN/ ACCORDION STRINGS/CHOIR 1 GUITAR 7 2 BASS 8 3 SYNTH 9 Use the voice group buttons to select the group from which you want to select a voice. The corresponding voice display will appear. USER SET WOODWIND 4 WORLD/ PERCUSSIVE 10 DUAL VOICE/ BRASS 5 SOUND 11 EFFECT CUSTOM VOICE MALLET 6 DRUMS 12 The display will automatically revert to the main display after a few seconds if the [LIST HOLD] button is not engaged (page 11). 13
17 Playing the PSR-6000 Use the PAGE LCD dials the select the page containing the voice you want if more than one page is available, then press the LCD button corresponding to the desired voice. You can also use either of the SELECT LCD dials to select any of the voices within the selected group. V Play & Adjust Volume... You can now play the selected voice or voices with the selected orchestration. Use the [MASTER VOLUME] control to adjust the overall volume level, and the ORC1 and ORC2 LCD dials can be used to set the desired balance between the ORCH. 1 and ORCH. 2 voices when either the dual or split orchestration mode is used. Voices in the DUAL VOICE/SOUND EFFECT group are actually combinations of two voices, so the total number of simultaneous notes that can be played when these voices are selected is less than when any of the other voices are selected. Keyboard Percussion When either of the DRUMS voices is selected Drum Kit or Pop Drum Kit, you can play 59 different drums and percussion instruments on the keyboard. The drums and percussion instruments played by the various keys are marked by symbols above the keys. Some of the instruments in the Drum Kit and Pop Drum Kit voices sound different even though they have the same name, while others are essentially the same. The Transpose, Tune, Sustain, Harmony, Left Hold, Modulation, and Octave Change functions do not affect the keyboard percussion sound. The pitch bend wheel can be used to bend the pitch of the keyboard percussion voices to create unique musical effects, but it has little effect on some percussion sounds. See page 118 for a complete listing of the keyboard percussion drum instrument assignments. 14
18 Playing the PSR-6000 USER SET Voice Assignment The PSR-6000 USER SET voice selection mode lets you assign any 12 voices preset or custom (page 13, 77) to the 12 voice select buttons so you can select them directly without having to select a category, page, and then a voice. This is particularly useful for the performer who want direct access to the voices he needs for a song or set. Z Select the USER SET Mode... Press the [USER SET] button so that its indicator lights. The USER SET voice display will appear. The display will automatically revert to the main display after a few seconds if the [LIST HOLD] button is not engaged (page 11). VOICE PART ORCH. 1 ORCH. 2 PRESET USER SET ORCHESTRA VOICE PIANO/E. PIANO ORGAN/ ACCORDION STRINGS/CHOIR WOODWIND 1 GUITAR 7 2 BASS 8 3 SYNTH 9 WORLD/ 4 PERCUSSIVE 10 BRASS 5 DUAL VOICE/ SOUND EFFECT 11 CUSTOM VOICE MALLET 6 DRUMS 12 X Select a Voice Button... Press the voice group button to which you want to assign a voice. VOICE PART ORCH. 1 ORCH. 2 ORCHESTRA VOICE PIANO/E. PIANO ORGAN/ ACCORDION 1 GUITAR 7 2 BASS 8 PRESET STRINGS/CHOIR 3 SYNTH 9 USER SET WOODWIND WORLD/ 4 PERCUSSIVE 10 BRASS DUAL VOICE/ 5 SOUND 11 EFFECT CUSTOM VOICE MALLET 6 DRUMS 12 C Select a Voice... Use the PAGE LCD dials, the SELECT LCD dials, and the LCD buttons as required to select the voice you want to assign to the currently selected voice button. To assign a custom voice, press the [CUSTOM VOICE] button so that its indicator lights (when the CUSTOM VOICE LED is off the preset voices are assigned). That s all there is to it, now the assigned voice will instantly be recalled anytime you press the same voice button while the USER SET mode is engaged. Voice assignments can be changed at any time in the same way. 15
19 Playing the PSR-6000 Changing the Split Point The PSR-6000 split point applies to both the ORCH. 2v1 split play mode, described in this section, and Auto Bass Chord accompaniment described on page 19. The current split point is indicated on the display by the triangular split marker (t) and the split in the graphic keyboard when the ORCH. 2v1 orchestration mode is selected. Here s how you can change the split point to suit your own playing requirements. Z Press the ABC MODE/SPLIT POINT LCD Button... Press the ABC MODE/SPLIT POINT LCD button. The ABC MODE and SPLIT POINT function displays will appear. X Set the Split Point... The split point can be set in two ways: either use the SPLIT POINT LCD dials, or press the desired key on the keyboard while holding the DIRECT SETTING LCD button (or vice-versa). The new split point will be indicated on the graphic keyboard in the LCD. Press a key while holding the DIRECT SETTING LCD button. C Return to the Main Display When Done... Press the VOLUME LCD button to return to the main display when done. 16
20 Transposition, Tuning, Octave Change, & Key Velocity The most important and fundamental adjustment for any musical instrument is tuning. The TRANSPOSE, TUNING, and OCTAVE CHANGE functions described below let you control the pitch of the PSR-6000 in a number of ways. The Key Velocity function has also been included in this section because it affects the way the PSR-6000 responds to notes played on the keyboard. TRANSPOSE & TUNE These functions allow the overall pitch of the PSR-6000 to be transposed up or down in semitone increments, and fine-tuned in 0.5 Hertz increments. Z Press the TRANSPOSE/TUNE LCD Button... Select the transpose and tune functions from the normal play mode display by pressing the TRANS- POSE/TUNE LCD button. X Set the Transposition and/or Tuning As Required... Use the TRANSPOSE LCD dials to set the desired degree of transposition, and the TUNE LCD dials to set the desired degree of tuning. The transpose range is from -6 to +6, allowing a maximum upward or downward transposition of 1/2-octave. A setting of 0 produces the normal pitch. The tuning range is from Hertz to Hertz, adjustable in 0.5-Hertz increments. A3 = Hertz is normal pitch. C Return to the Main Display When Done... Press the VOLUME LCD button to exit from the transpose and tune functions and return to the main display. 17
21 Transposition, Tuning, Octave Change, & Key Velocity OCTAVE CHANGE This function allows the ORCH. 1 and ORCH. 2 voices to be independently transposed up or down by one octave. The OCTAVE LCD button to the right of the ORCH.1. voice name changes the octave of the ORCH.1. voice, while the OCTAVE LCD button to the right of the ORCH.2 voice affects the ORCH.2. voice. Pressing either of these buttons changes the corresponding octave setting to +1, -1, and then 0, in sequence. +1 shifts the voice up one octave -1 shifts the voice down one octave, and 0 sets the voice to its normal octave. Some voices may suddenly shift octaves when played at the extreme ends of the keyboard if they are set to a lower or higher octave than normal. This can also occur when the PITCH BEND wheel is used on extremely low or high notes. If you change the transpose, octave change, or tuning settings while playing one or more notes on the keyboard, the new transpose and octave change settings will take effect from the next notes played while tune settings take effect immediately. KEY VELOCITY The key velocity function turns the PSR-6000 s keyboard velocity response on or off. Normally, key velocity should be turned ON to allow normal dynamic control via the keyboard (i.e. the harder the keys are played, the louder the sound). In some cases, however, you might want to turn key velocity OFF. For example, most organs have no keyboard velocity response, so key velocity can be turned OFF for greater realism when playing organ type voices. Key Velocity can also be turned off to create a constant-volume sound with any voice. Use the KEY VELOCITY LCD button to turn key velocity ON or OFF as required. 18
22 Using the Accompaniment Section The PSR-6000 has 50+1 different accompaniment styles (including preset IA style New Age (No.12 button) )that can be used to provide fully-orchestrated or rhythm-only accompaniment. The PSR s sophisticated Auto Bass Chord accompaniment system can provide automated bass and chord backing that is perfectly matched to the selected accompaniment style. Z Turn ABC ON... Press the [AUTO BASS CHORD] button so that its indicator lights, thereby turning the ABC mode on. INTERACTIVE ACCOMPANIMENT AUTO BASS CHORD VERSE A The maximum number of notes that can be played simultaneously on the PSR-6000 keyboard is reduced when the Auto Bass Chord feature is used. X Select the Desired ABC Mode... Press the ABC MODE/SPLIT POINT LCD button to select the ABC MODE and SPLIT POINT display, then use the ABC MODE LCD dials to select the FINGERED CHORD, SINGLE FIN- GER, or MANUAL BASS mode. If you select the MANUAL BASS mode, the GRP. VOICE # LCD dials can be used to specify the bass voice to be used. Press the VOLUME LCD button to return to the main display when done. The FINGERED CHORD, SINGLE FINGER, and MANUAL BASS modes function as follows: FINGERED CHORD This is the default ABC mode. The Fingered Chord mode lets you finger your own chords on the left-hand section of the keyboard (i.e. all keys to the left of and including the split-point key normally F#2), while the PSR-6000 supplies appropriately orchestrated rhythm, bass, and chord accompaniment in the selected style. The Fingered Chord mode will accept the chord types listed below (notes in parentheses may be omitted). 19
23 Using the Accompaniment Section Chord Name/[Abbreviation] Normal Voicing Major [M] * Minor [m]... 1-b3-5* Major seventh [M7] (5)-7* Major sixth [6] Suspended fourth [sus4] * Minor sixth [m6]... 1-b3-5-6 Minor seventh [m7]... 1-b3-(5)-b7 Minor seventh flatted fifth [m7b5]... 1-b3-b5-b7 Minor major seventh [mm7]... 1-b3-(5)-7* Seventh [7] (5)-b7* Seventh flatted fifth [7b5] b5-b7 Seventh augmented [7aug] #5-b7* Seventh suspended fourth [7sus4] b7* Seventh ninth [7(9)] (5)-b7* Minor ninth [m(9)] b3-5 Minor seventh ninth [m7(9)] b3-(5)-b7* Major ninth [M(9)] Major seventh ninth [M7(9)] (5)-7* Minor major seventh ninth [mm7(9)] b3-(5)-7* Seventh flatted ninth [7(b9)]... 1-b2-3-(5)-b7* Major seventh flatted fifth [M7b5] b5-7* Augmented [aug] #5 Diminished [dim]... 1-b3-b5-(6) Example for C chords C C 6 Cm 7 C7 ( ) ( ) C sus 4 7 Cm 7 (9) ( ) CmM 7 (9) Cm Csus 4 Cm 7 b5 C7 b5 C 7 (9) ( ) CM(9) CM 7 Cm 6 CmM 7 C7aug Cm (9) CM 7 (9) C 7 (b9) CM7 b5 ( ) ( ) ( ) * Chords marked with an asterisk (*) can be played in any inversion (i.e. the root of the chord does not have to be the lowest note played). Caug ( ) Cdim ( ) * If you play any three adjacent keys (including black keys), the chord sound will be cancelled and only the rhythm instruments will continue playing (CHORD CANCEL function). ( ) SINGLE FINGER Single-finger accompaniment makes it simple to produce beautifully orchestrated accompaniment using major, seventh, minor and minor-seventh chords by pressing a minimum number of keys on the lefthand section of the keyboard. The abbreviated chord fingerings described below are used: For a major chord, press the root key only. For a minor chord, simultaneously press the root key and a black key to its left. For a seventh chord, simultaneously press the root key and a white key to its left. For a minor-seventh chord, simultaneously press the root key and both a white and black key to its left. C G F Cm C 7 Cm 7 20
24 Using the Accompaniment Section MANUAL BASS The Manual Bass mode provides an alternative to the normal split keyboard. The bass voice assigned to the left-hand keyboard section is monophonic, while a polyphonic ORCH. 1 voice is played on the upper section of the keyboard. You can select any of the PSR-6000 s normal voices to play on the lower section of the keyboard of course, it s normal to choose a bass voices for the left hand. No automatic bass and chord accompaniment is produced, although the Interactive Accompaniment feature (page 27) does affect the rhythm sound. Voices created using the PSR-6000 Custom Voice feature (page 77) can also be selected for use with the Manual Bass mode. The ABC mode cannot be changed when the sequencer ACCOMP. track contains data. C Select a Style... Before selecting a preset style, make sure that the STYLE control section [PRESET] button indicator is lit (if it isn t press the [PRESET] button so that it does light). The PSR-6000 has 50+1 preset styles (including preset IA style New Age (No.12 button) ) organized in 12 groups (see the Style List on page 119). Use the style group buttons to select the group from which you want to select a style. The corresponding style display will appear. The display will automatically revert to the main display after a few seconds if the [LIST HOLD] button is not engaged (page 11). Press the LCD button corresponding to the desired style. You can also use either of the SELECT LCD dials to select any of the styles within the selected group. Although you can select the ORCH. 1 voice you intend to play on the right-hand section of the keyboard and the ORCH. 2 voice if you use the split mode, the PSR-6000 automatically determines the voices to be used for the accompaniment bass and chords according the accompaniment style you select. Also see USER SET Style Assignment on page 26, and Custom Style on page DANCE 7 ROCK N 2 ROLL 8 3 ROCK 9 4 POP 10 5 BALLAD 11 6 JAZZ 12 LATIN STYLE LATIN POP WALTZ COUNTRY TRADITIONAL FOR DISK IA PRESET USER SET CUSTOM A CUSTOM B 21
25 Using the Accompaniment Section V Set the Tempo... When you select a different style while the accompaniment is not playing, the default tempo for that style is also selected, and the tempo is displayed on the display in quarter-note beats per minute. If the accompaniment is playing, the same tempo is maintained even if you select a different style. You can change the tempo to any value between 40 and 280 beats per minute, however, by using the TEMPO [ ] and [+] buttons, or the TEMPO LCD dials. This can be done either before the accompaniment is started or while it is playing. To use the [ ] and [+] buttons, press either button briefly to decrement or increment the tempo value by one, or hold the button for continuous decrementing or incrementing. NOTE The default tempo for the selected style can be recalled at any time by pressing both the TEMPO [-] and [+] buttons simultaneously. TEMPO + B Start the Accompaniment... There are several ways to start the accompaniment: Straight start: Press the [START/RE-START] button. If you press the [START/RE-START] button, the rhythm will begin playing immediately without bass and chord accompaniment. SOLO SYNCHRO START START/ RE-START STOP NOTE If you press the [START/RE-START] button while the accompaniment is playing, playback will immediately return to the first beat of the current accompaniment pattern, making it possible to create measures with odd time signatures. It is also possible to select one of the several sections available prior to a straight start refer to 7. Select Sections as Required, below. Start with an introduction followed by the VERSE 1 section: press the [INTRO 1] button. FILL IN INTRO 1 FILL IN INTRO 2 ENDING/ rit. INTRO 3 VERSE 1 VERSE 2 CHORUS 1 CHORUS 2 SOLO Start with an introduction followed by the VERSE 2 section: press the [INTRO 2] button. FILL IN INTRO 1 FILL IN INTRO 2 ENDING/ rit. INTRO 3 VERSE 1 VERSE 2 CHORUS 1 CHORUS 2 SOLO 22
26 Using the Accompaniment Section Start with an introduction followed by the CHO- RUS 1 section: press the [INTRO 3] button. FILL IN FILL IN ENDING/ rit. VERSE 1 VERSE 2 CHORUS 1 CHORUS 2 SOLO Synchronized start: Any of the above start types can be synchronized to the first note or chord played on the left-hand section of the keyboard (i.e. keys to the left of and including the split-point key normally F#2) by first pressing the [SYNCHRO START] button. Pressing the [SYNCHRO START] button alone causes a straight start to occur when the first note or chord is played. Press [SYNCHRO START] and then the appropriate INTRO button for a synchronized introduction start. The first dot of the TEMPO display will flash at the current tempo when a synchronized start mode has been selected. INTRO 1 INTRO 2 INTRO 3 SOLO SYNCHRO START START/ RE-START STOP If you press the [SYNCHRO START] button while the accompaniment is playing, the accompaniment will stop and the synchro start mode will be engaged. The four LED dots of the TEMPO display provide a visual indication of the selected tempo as shown to the right. Several LEDs will flash simultaneously on the first beat of oddnumbered measures in all time signatures. A Yamaha FC5 footswitch plugged into the rear panel FOOT SWITCH jack can also be used to start the accompaniment if the appropriate function is assigned to the footswitch using the FOOT SWITCH SELECT function described on page 88. 1st Beat 2nd Beat 3rd Beat 4th Beat 4/4 Time 3/4 Time TEMPO TEMPO N Play On the Left-hand Section Of the Keyboard... As soon as you play any chord that the PSR-6000 can recognize on the left-hand section of the keyboard in the FINGERED CHORD mode (see fingering chart on page 122) or an abbreviated chord in the SINGLE FINGER mode, the PSR-6000 will automatically begin to play the chord along with the selected rhythm and an appropriate bass line. The accompaniment will continue playing even if you release the left-hand keys. If the MANUAL BASS mode is selected only the rhythm accompaniment will play automatically, and selected bass voice can be played on the left-hand section of the keyboard. ABC Section Split Point C3 Melody Section The appropriate chord and bass note will sound if you play in the left-hand section of the keyboard while the ABC function is on but the accompaniment is stopped. Please note that the Left Hold function (page 11) cannot be applied to these chord and bass notes. 23
27 Using the Accompaniment Section M Select Sections as Required... Each accompaniment style has a number of sections: VERSE 1, VERSE 2, CHORUS 1, and CHORUS 2. The VERSE and CHORUS sections further have more complex SOLO sections. There is also an ENDING section which is described in step >. The INTRO section can be used to start the accompaniment as described in the preceding step. The remaining sections VERSE 1, VERSE 2, CHORUS 1, CHORUS 2, and the SOLO sections of these can be selected manually by pressing the corresponding section button. It is also possible to select the section that will follow the INTRO by pressing the appropriate section button while the INTRO is playing or while the intro synchro start mode is engaged. Some INTRO, ENDING, and SOLO sections have their own chord progressions which play in the current accompaniment key the key is shown below the style name in the LCD display. VERSE 1 VERSE 2 CHORUS 1 CHORUS 2 SOLO The SOLO Sections Although the SOLO sections can be selected manually, they can also be activated automatically when INTERAC- TIVE ACCOMPANIMENT is engaged (see page 27). If an accompaniment is playing and nothing is played on the keyboard for several measures, the SOLO mode is automatically engaged to fill out the accompaniment. When SOLO is on, not only are the sections more complex, but they will automatically cycle (VERSE 1 m VERSE 2 m CHORUS 1 m CHORUS 2 m VERSE 1, etc.). If the SOLO mode is on, it will be automatically disengaged after you begin playing on the keyboard. This automatic switching of the solo mode can be turned off via the Auto Solo function described on page 27. VERSE 1 VERSE 2 CHORUS 1 CHORUS 2 SOLO The SOLO section will be automatically disengaged if it is turned on prior to starting the accompaniment with an introduction. < Use Fill-ins... The PSR-6000 provides two types of automatic breaks or fill-ins. 24
28 Using the Accompaniment Section FILL IN j: Press the [FILL IN j] button to produce a short fill and return to the same section. FILL IN FILL IN ENDING/ rit. FILL IN n: Press the [FILL IN n] button to produce a fill and then go to the corresponding chorus or verse: INTRO 1 INTRO 2 INTRO 3 VERSE 1 n CHORUS 1 VERSE 2 n CHORUS 2 FILL IN FILL IN ENDING/ rit. It is possible to change the section that will play after the fill-in by pressing the appropriate section button while the fill-in is playing. If you hold one of the FILL IN buttons, the fill-in will repeat until the button is released. INTRO 1 INTRO 2 INTRO 3 A Yamaha FC5 footswitch plugged into the rear panel FOOT SWITCH jack can also be used to activate fill-ins if the appropriate function is assigned to the footswitch using the FOOT SWITCH SELECT function described on page 88. The transitions between the verse and chorus are different when SOLO is ON. > Stop the Accompaniment... The accompaniment can be stopped at any time by pressing the [STOP] button. Press the [ENDING/rit.] button if you want to go to the ending section and then stop. Press the [ENDING/rit.] button while the ending section is playing to produce a ritardando ending i.e. the tempo gradually slows down during the ending. FILL IN INTRO 1 FILL IN INTRO 2 ENDING/ rit. INTRO 3 SYNCHRO START START/ RE-START STOP Accompaniment Volume... Use the RHY, BASS, CHD1, and CHD2 LCD dials controls to set the best balance between the corresponding accompaniment parts, and the optimum volume of the accompaniment parts in relation to the ORCH. 1 and ORCH. 2 voices. Rhythm-only Accompaniment... The AUTO BASS CHORD mode can be turned off at any time leaving the rhythm accompaniment only by pressing the [AUTO BASS CHORD] button so that its indicator goes out. INTERACTIVE ACCOMPANIMENT AUTO BASS CHORD VERSE A 25
29 Using the Accompaniment Section USER SET Style Assignment The PSR-6000 USER SET style selection mode lets you assign any 12 styles to the 12 style group buttons so you can select them directly without having to select a category, page, and then a style. This is particularly useful for the performer who want direct access to the styles he needs for a song or set. Z Select the USER SET Mode... Press the STYLE control section [USER SET] button so that its indicator lights. The USER SET style display will appear. 1 DANCE 7 ROCK N 2 ROLL 8 LATIN STYLE LATIN POP PRESET USER SET The display will automatically revert to the main display after a few seconds if the [LIST HOLD] button is not engaged (page 11). 3 ROCK 9 4 POP 10 5 BALLAD 11 WALTZ COUNTRY TRADITIONAL CUSTOM A CUSTOM B 6 JAZZ 12 FOR DISK IA X Select a Style Button... Press the style group button to which you want to assign a style. 1 DANCE 7 LATIN STYLE PRESET ROCK N 2 ROLL 8 LATIN POP USER SET 3 ROCK 9 WALTZ CUSTOM A 4 POP 10 COUNTRY CUSTOM B 5 BALLAD 11 TRADITIONAL 6 JAZZ 12 FOR DISK IA C Select a Style... Use the PAGE LCD dials, the SELECT LCD dials, and the LCD buttons as required to select the style you want to assign to the currently selected style button. Now the assigned style will instantly be recalled anytime you press the same style button while the USER SET mode is engaged. Style assignments can be changed at any time in the same way. 26
30 Using the Accompaniment Section Interactive Accompaniment Press the [INTERACTIVE ACCOMPANIMENT] button so that its indicator lights to activate the Interactive Accompaniment mode. In this mode the PSR-6000 uses advanced technology to monitor the way you are playing on the keyboard and automatically varies the rhythm or ABC accompaniment accordingly. If you are playing with the VERSE 1 section, for example, and you begin to build up the musical excitement on the keyboard (i.e. play more notes, faster, and/or harder) the PSR-6000 will automatically switch to the VERSE 2 section to better support what you are playing. On the other hand, if you play more mellow right-hand lines the PSR-6000 will automatically shift down to the VERSE 1 section. The same applies to the CHORUS 1 and CHORUS 2 sections. INTERACTIVE ACCOMPANIMENT AUTO BASS CHORD VERSE A The sensitivity of the Interactive Accompaniment mode can be adjusted via the INTERACTIVE ACCOMPANIMENT Sensitivity function described on page 89. Also note that automatic switching between VERSE 1 and VERSE 2 or CHORUS 1 and CHORUS 2 will not occur if the Interactive Accompaniment MUTE mode is selected see page 89. Auto Solo... When the AUTO SOLO function is turned ON (ON is the default setting see page 89), the SOLO accompaniment sections will automatically be activated if nothing is played on the keyboard for a few measures. Further, the solo sections will automatically be de-activated from the end of the current phrase after keyboard performance is resumed. ABC/IA Accompaniment Flow Diagram INTRO 1 VERSE 1 IA INTRO 2 FILL INj VERSE 2 ENDING (ENDING 1) VERSE 1 VERSE 1 SOLO FILL INj FILL INn VERSE 2 VERSE 2 SOLO INTRO 3 FILL INj CHORUS 1 ENDING (ENDING 2) CHORUS 1 CHORUS 1 SOLO FILL INj CHORUS 2 ENDING (ENDING 3) CHORUS 2 CHORUS 2 SOLO 27
31 Using the Accompaniment Section Using Disk Styles on Optional Data Disks Use the following procedure to assign the desired disk style from an optional Yamaha style disk to the [FOR DISK IA] style button on the PSR-6000 panel. Z Insert the Data Disk... Insert the data disk into the PSR-6000 disk drive (located below the right end of the keyboard) with the disk shutter facing the drive slot and the label side facing upward. X Press [FROM DISK]... Press the [FROM DISK] button. The display shown to the right should appear. C Select a Style File... Use the left st LCD dials to select I/A-SET, then use the right st dials to select the style you want to load. DISK IN USE FROM DISK TO DISK V Press the EXECUTE LCD Button... Press the EXECUTE LCD button. The Are you sure? confirmation prompt will appear. Press the YES LCD button to begin loading the selected file (or NO to cancel). Do not remove disk! will appear on the display while the data is loading. Completed. will appear briefly when the data has been successfully loaded, and the normal play mode will then be automatically engaged. If an error message appears during the disk load procedure, refer to page 111 for details. Disk style data that has been loaded into the PSR can be saved to a different floppy disk. See page 95 for details. C C V V Selecting a DISK Style... Once loaded, the disk style can be selected and used in the same way as the internal styles by pressing the [FOR DISK IA] button. The preset IA style New Age can be recalled by using the F7: RECALL PRESET DATA function described on page BALLAD 11 6 JAZZ 12 TRADITIONAL FOR DISK IA 28
32 One Touch Setting The PSR-6000 s 50+1 internal styles (including preset IA style New Age ) each have 4 different preset panel setups that can be instantly selected via the ONE TOUCH SETTING buttons [VERSE A], [VERSE B], [CHORUS A], and [CHORUS B] to create different musical textures. The ONE TOUCH SETTING setups include settings for all of the following parameters: Orchestration Orchestra 1 Voice Orchestra 2 Voice Orchestra 1 Volume Orchestra 2 Volume Bass Volume Chord 1 Volume Chord 2 Volume Rhythm Volume Orchestra 1 Octave Orchestra 2 Octave Harmony On/Off Harmony Type Left Hold On/Off Sustain On/Off Sustain Part Select Pitch Bend Select Reverb On/Off Reverb Type & Depth Effect On/Off Effect Type & Depth Z Engage the One Touch Setting Feature... The ONE TOUCH SETTING feature can be used either while an accompaniment is playing or prior to starting an accompaniment by simply pressing the appropriate ONE TOUCH SETTING button so that its indicator lights: [VERSE A] for a soft, mellow feel; [VERSE B] for a slightly more active feel; [CHORUS A] for an even more lively sound; [CHORUS B] for maximum presence and animation. If the One Touch Setting SYNCHRO CHANGE parameter (see page 89) is turned ON, selecting a different accompaniment style while ONE TOUCH SETTING is engaged will cause the ONE TOUCH SETTING settings for that style to be selected automatically. TO BASS HORD ONE TOUCH SETTING VERSE VERSE CHORUS CHORUS A B A B X Adjust The Settings If Necessary... Any of the parameters set by the ONE TOUCH SET- TING feature can be adjusted to create the desired sound after a ONE TOUCH SETTING setup has been selected. If the One Touch Setting SYNCHRO CHANGE parameter is turned ON and you change a ONE TOUCH SET- TING setting, the corresponding ONE TOUCH SETTING indicator will flash to indicate that a change has been made. TO BASS HORD ONE TOUCH SETTING VERSE VERSE CHORUS CHORUS A B A B 29
33 One Touch Setting C Memorize the One Touch Settings If You Like... Your One Touch Settings can be memorized by pressing the VERSE [A] or [B] or CHORUS [A] or [B] button while holding the Panel Registration [MEMORY] button. ONE TOUCH SETTING VERSE VERSE CHORUS CHORUS A B A B MEMORY FREEZE 1 The initial One Touch Settings can be recalled by using the RECALL PRESET DATA function described on page 101. One Touch Settings can also be stored in the Panel Registration memory. V Turn One Touch Setting Off... ONE TOUCH SETTING is turned OFF by pressing the currently engaged [ONE TOUCH SETTING] button a second time so that its indicator goes out. If the ONE TOUCH SETTING indicator is flashing because changes have been made to the panel settings (and the SYNCHRO CHANGE parameter is ON), pressing any [ONE TOUCH SETTING] button twice turns ONE TOUCH SETTING off. TO BASS HORD ONE TOUCH SETTING VERSE VERSE CHORUS CHORUS A B A B If you turn the SYNCHRO CHANGE parameter described on page 89 ON, the ONE TOUCH SETTING setup will automatically switch according to changes in the accompaniment section. ONE TOUCH SETTING cannot be used with accompaniment styles created using the Custom Accompaniment feature described on page 62. The currently lit ONE TOUCH SET- TING LED will automatically go out if a Custom Style is selected. ONE TOUCH SETTING setup data can be saved to floppy disk. See page 95 for details. VERSE VERSE CHORUS CHORUS A B A B 30
34 Expression & Effects Harmony... The harmony effect can only be used when the AUTO BASS CHORD accompaniment mode is selected. Press the [HARMONY] button to turn the HARMONY effect on or off. When HARMONY is on (indicator lit), playing single notes or chords on the right-hand section of the keyboard produces automatic harmony matched to the accompaniment chords. The type of harmony produced can be selected via the HAR- MONY TYPE function described on page 90. The harmony is based on the top note of chords. Slight tempo delays may occur when harmony is used in conjunction with the ABC Fingered Chord mode. LEFT HOLD HARMONY SUSTAIN REVERB EFFECT Sustain... Press the [SUSTAIN] button to turn the sustain effect on or off. When on (indicator lit), extra sustain is applied to the selected voice. If a footswitch connected to the rear-panel SUSTAIN jack is pressed in order to apply sustain, however, the panel SUSTAIN function will be automatically turned off. Sustain can be applied to the ORCH. 1 voice only, the ORCH. 2 voice only, or both voices via the SUSTAIN PEDAL ASSIGN function described on page 87. LEFT HOLD HARMONY SUSTAIN REVERB EFFECT Reverb... Press the [REVERB] button to apply the reverb effect specified by the REVERB TYPE and DEPTH functions described on page 84 to the ORCH. 1 and 2 voices as well as the chord and rhythm accompaniment sound. The [REVERB] button alternately turns the reverb effect on (indicator lit) or off (indicator out). Reverb type changes will apply to the note currently being played, while reverb ON/OFF and depth changes will apply to the next note played. LEFT HOLD HARMONY SUSTAIN REVERB EFFECT Effects... Press the [EFFECT] button to apply the effect specified by the EFFECT TYPE and DEPTH functions described on page 85 to the ORCH. 1 and 2 voices as well as the chord accompaniment sound. The [EFFECT] button alternately turns the effect on (indicator lit) or off (indicator out). Effect type changes will apply to the note currently being played, while effect ON/OFF and depth changes will apply to the next note played. LEFT HOLD HARMONY SUSTAIN REVERB EFFECT 31
35 Expression & Effects Left Hold... This function causes the left-hand (ORCH. 2) voice to be held even when the keys are released when using the AUTO BASS CHORD and ORCH. 2v1 orchestration modes. Non-decaying voices such as strings are held continuously, while decay-type voices such as piano decay more slowly (as if the sustain pedal has been pressed). The LEFT HOLD function works only while AUTO BASS CHORD accompaniment is running. Further, LEFT HOLD is temporarily disengaged during ENDING sections and INTRO or SOLO sections that have their own chord progressions. LEFT HOLD will not function during Multi Pad (Chord Pad) playback or Sequencer ACCOMP. track playback even if the LEFT HOLD indicator is lit. LEFT HOLD HARMONY SUSTAIN REVERB EFFECT Pitch Bend Wheel... The PITCH BEND wheel to the left of the keyboard lets you bend the pitch of notes played on the keyboard up or down. Normal pitch is restored when the PITCH BEND wheel is released. The maximum pitch bend range is preset for each voice, but can be set as required for custom voices by using the CUSTOM VOICE EDIT feature described on page 77. PITCH BEND UP MODULATION/ EFFECT MAX Pitch bend can be applied to the ORCH. 1 voice only, the ORCH. 2 voice only, or both voices via the PITCH BEND WHEEL ASSIGN function described on page 87. Also, pitch bend is applied to harmony notes on the basis of the ORCH. 1 settings. The pitch bend wheel may have no effect when applied to notes at the upper and lower extremes of the keyboard if a CUSTOM VOICE is used. Also, sudden pitch changes may occur. Pitch bend cannot be applied to the ORCH. 2 voice when AUTO BASS CHORD is ON and the ORCH. 2v1 orchestration mode is selected. Pitch bend can be applied to notes from C-1 to C7 (i.e. MIDI note numbers 12 through 108). Pitch can not be bent down below the lowest note or up above the highest note in this range. DOWN MIN Modulation/Effect Wheel... The MODULATION/EFFECT wheel to the left of the keyboard lets you apply amplitude/pitch modulation or effects to notes played on the keyboard. Rolling the MODULATION/EFFECT wheel upward (away from you) increases the modulation depth or effect. Use the WHEEL SELECT function described on page 86 to select modulation or effect operation. The type of effect applied when effect operation is selected is determined by the EFFECT TYPE function described on page 85. The modulation effect mode is preset for each voice, but can be set for custom voices by using the CUSTOM VOICE EDIT feature described on page 77. PITCH BEND UP DOWN MODULATION/ EFFECT MAX MIN 32 Modulation is automatically applied to some voices, while to some it cannot be applied even if the modulation wheel is operated.
36 Using the Pads The PSR-6000 features 8 PADs above the keyboard that can be used in a variety of ways: MULTI: PERC: When the MULTI mode is selected, the 4 pads marked PHRASE and the 4 pads marked CHORD can be used to record and play back short sequences of notes and chords, respectively. In the PERC mode the pads can be used to play 8 different drum and percussion instruments selected from the PSR-6000 s drum voices DRUM KIT and POP DRUM KIT. TEMPO: In the TEMPO mode the pads are used to vary tempo in a number of ways, giving the PSR-6000 unprecedented capability for creative tempo variations while playing. MULTI REPEAT PERC. BREAK TEMPO SYNCHRO MODE SELECT MULTI PLAYING PAD REC / STOP PHRASE CHORD 1 Tempo Change 2 Tap Start 3 Tempo l 4 5 accel. faster a tempo slower rit Pad data can be saved to floppy disk. See page 95 for details. The MULTI Mode To engage the MULTI mode, press the [MODE SELECT] button a few times until the MULTI indicator lights. Preset data is initially recorded in pads 1 through 8. MULTI REPEAT PERC. BREAK TEMPO SYNCHRO MODE SELECT The PHRASE Pads (pads 1 4) Each PHRASE pad can record up to approximately 160 notes played using the ORCH. 1 voice (only the ORCH. 1 voice is recorded even if the ORCH. 2+1 orchestration mode is selected). The recorded phrases can then be played back at any time even while playing on the keyboard, with or without accompaniment. The PHRASE pads record the following data: Voice (Orch.1) Note On/Off (Orch.1) Modulation (when Modulation is On for Orchestra 1: see page 32) Orchestra 1 Volume Sustain On/Off (when Sustain is On for Orchestra 1: see page 31) Pitch Bend (when Pitch Bend is On for Orchestra 1: see page 32) Glide On/Off (when Glide is On for Orchestra 1: see page 88) Octave Change (Orch. 1) The data listed above is also recorded if it is received via the PSR-6000 MIDI interface (page 102). 33
37 Using the Pads Recording Phrases... ZSelect a PHRASE Pad For Recording Press the PHRASE pad you intend to record to while holding the [REC/STOP] button. The REC/STOP indicator will flash, indicating that the selected pad is ready to record. XPlay a Phrase Recording begins automatically as soon as you play on the keyboard using the ORCHESTRA 1 voice (i.e. the right-hand section of the keyboard if the split play mode or AUTO BASS CHORD accompaniment is engaged), and the REC/STOP indicator will light continuously as long as recording continues. You can record phrases while AUTO BASS CHORD accompaniment is playing or stopped. In either case the phrase will be recorded in relation to the currently set accompaniment tempo, so it is a good idea to record phrases while monitoring the accompaniment to ensure that they are reproduced at an appropriate tempo when played back with accompaniment. REC / STOP MULTI PLAYING 1 Tempo Change 2 Tap Start PHRASE 3 Tempo l 4 accel. CStop Recording Press the [REC/STOP] button to stop recording when you ve finished playing the phrase. The [REC/STOP] button indicator will go out when recording ends. REC / STOP MULTI PLAYING PHRASE Tempo Change Tap Start Tempo l 4 accel. Recording will stop automatically if the PHRASE pad memory becomes full (approximately 160 notes per pad), or if another pad is pressed. Phrase Playback... As long as the MULTI mode is selected, any recorded phrase can be played back simply by pressing the corresponding PHRASE pad. The phrase will play back whether the accompaniment is playing or not, but will always play at the currently set tempo. The MULTI PLAYING indicator will light while the phrase plays back, and playback will end automatically as soon as the end of the phrase is reached. A phrase can be stopped while it is playing by pressing either the [REC/STOP] button or the corresponding pad button. It is also possible to play back several phrases at the same time. Although the note data played by the phrase pads can not be recorded by the PSR-6000 sequencer (page 49), the phrase pad events (i.e. the fact that a pad has been pressed) can be recorded. Phrase pad data can be saved to and loaded from disk (page 96), but can not be memorized by the Panel Registration feature (page 41). Use the MASTER VOLUME control to adjust the playback volume of the phrase pads. REC / STOP MULTI PLAYING 1 Tempo Change 2 Tap Start PHRASE 3 Tempo l 4 accel. 34
38 Using the Pads The CHORD Pads (pads 5 8) Each CHORD pad can record up to approximately 80 chords played on the left-hand section of the keyboard when the AUTO BASS CHORD feature is engaged. The recorded chords can then be played back at any time. Recording Chords... ZSelect a CHORD Pad For Recording Press the CHORD pad you intend to record to while holding the [REC/STOP] button. The REC/STOP indicator will flash, indicating that the selected pad is ready to record. If the accompaniment is stopped when the CHORD pad is selected for recording, the SYNCHRO START mode will automatically be engaged. If AUTO BASS CHORD is OFF when a CHORD pad is selected for recording, it will automatically be turned ON. Further, if the MANUAL BASS mode is selected, the FINGERED CHORD mode will automatically be selected in its place. REC/STOP 5 6 CHORD faster a tempo slower rit. 7 8 XPlay the Required Chords Recording begins automatically as soon as you play a chord on the left-hand section of the keyboard, and the REC/STOP indicator will light continuously as long as recording continues. CStop Recording Press the [REC/STOP] button or the pad being recorded to stop recording when you ve finished playing the chords. The [REC/STOP] button indicator will go out when recording ends. Recording will stop automatically if the CHORD pad memory becomes full (approximately 80 chords per pad); if another pad is pressed; or if the accompaniment [STOP], [START/RE-START], or [SYNCHRO START] buttons is pressed. REC/STOP 5 6 CHORD faster a tempo slower rit
39 Using the Pads Chord Playback... As long as the MULTI mode is selected and an AUTO BASS CHORD accompaniment is playing, any recorded chord sequence can be played back simply by pressing the corresponding CHORD pad. The phrase will play back at the currently set tempo. The MULTI PLAYING indicator will light while the chord sequence plays back, and playback will end automatically as soon as the end of the sequence is reached. Only one chord sequence can be played at a time. During chord pad playback the ABC indicator will go out and the left-hand section of the keyboard plays in the same way as the right-hand section. To indicate that the end of the chord sequence is approaching, the MULTI PLAYING indicator flashes during the last two measures. A chord sequence that is playing can be stopped by pressing the same chord pad again, or by pressing the [REC/STOP] button. If you press a CHORD pad while the accompaniment is stopped or while the AUTO BASS CHORD function is off, Engage ABC to play the chord pads! will appear on the display. Also, if AUTO BASS CHORD is on but the Manual Bass mode is selected, Select FC or SF mode to play the chord pads! will appear on the display, since chord playback will not function in the Manual Bass mode. Chord pad playback can be recorded by the PSR-6000 sequencer. Chord pad data can be saved to and loaded from disk (page 96, 97), but can not be memorized by the Panel Registration feature (page 41). Playback occurs in measure units. Playback will continue until the end of the measure even if recording was stopped prior to the end of that measure. MULTI PLAYING 1 2 Tempo Change Tap St 5 6 CHORD faster a tempo slower rit. 7 8 MULTI Pad Repeat Playback... If you press the button immediately to the right of the pad [MODE SELECT] button so that the indicator above it lights while the MULTI mode is engaged, the MULTI REPEAT function is engaged and phrase or chord playback will repeat continuously until the [REC/STOP] button is pressed, the same pad is pressed a second time, or the REPEAT mode is turned off by pressing the button to the right of the [MODE SELECT] button again. In the last case the phrase or chord sequence will play through to the end and then stop. MULTI REPEAT PERC. BREAK TEMPO SYNCHRO MODE SELECT 36
40 Using the Pads The PERC Mode To engage the PERC mode, press the [MODE SELECT] button a few times until the PERC indicator lights. The 8 pads are initially programmed with the following drum and percussion instruments which can be played via the pads when the PERC mode is selected: 1. Kick 1 2. Snare 3 3. Tom 1 Low 4. Tom 1 Mid 5. Tom 1 Hi 6. Closed Hi-Hat 1 7. Open Hi-Hat 1 8. Crash Cymbal 2 MULTI REPEAT PERC. BREAK TEMPO SYNCHRO MODE SELECT Assigning Different Instruments To the PERC Pads... ZPress [REC/STOP] Press the [REC/STOP] button so that its indicator lights (make sure the PERC mode is selected first). The PERCUSSION PAD ASSIGN display will appear, listing the percussion instruments currently assigned to the pads. REC / STOP MULTI PLAYING PHRASE Tempo Change Tap Start Temp XSelect a Drum Voice The DRUM KIT voice is automatically selected if you press the [REC/STOP] key while in the PERC mode and a non-drum voice is selected. Use the DRUM KIT/POP DRUM KIT LCD button to select the drum voice which includes the percussion instruments you want to assign. CAssign the Instruments A new drum/percussion instrument is assigned to a pad simply by playing the key corresponding to the desired instrument while holding the drum pad to which it is to be assigned. The reverse also works: press the pad while holding the key. The velocity at which you play the key (how hard you press the key = how loud the note sounds) is also recorded to the specified pad. MULTI PLAYING PHRASE Tempo Change Tap Start Tempo l 4 accel. PAD 5 faster 6 a tempo CHORD Percussion voices created using the CUSTOM VOICE EDIT functions described on page 83 cannot be assigned to the percussion pads. 37
41 Using the Pads VPress [REC/STOP] To End Assignment When you re finished making instrument assignments to the PERC pads, press the [REC/STOP] button so that its indicator goes out. Percussion pad data can be saved to and loaded from disk (page 95, 96), but can not be memorized by the Panel Registration feature (page 41). REC / STOP MULTI PLAYING PHRASE Tempo Change Tap Start Temp Playing the Percussion Pads... The PERC pads can be played at any time whether an accompaniment is playing or not as long as the PERC mode is selected. Depending on the assigned instrument, some pads will play continuously as long as they are held. MULTI PLAYING PHRASE Tempo Change Tap Start Tempo l 4 accel. PAD 5 faster 6 a tempo CHORD The PERC pad sounds are not affected by the PSR-6000 PITCH BEND wheel or EFFECT settings. The PERC BREAK Function... If you press the button immediately to the right of the pad [MODE SELECT] button so that the indicator above it lights while the PERC mode is engaged, the PERC BREAK function is engaged playing on the PERC pads causes the accompaniment rhythm to stop playing so you can create your own fill-in. The accompaniment rhythm begins playing from the beginning of the next measure when you stop playing the percussion pads. The BREAK mode is turned off by pressing the button to the right of the [MODE SELECT] button again. MULTI REPEAT PERC. BREAK TEMPO SYNCHRO MODE SELECT 38
42 Using the Pads The TEMPO Mode To engage the TEMPO mode, press the [MODE SELECT] button a few times until the TEMPO indicator lights. The functions of the pads in the TEMPO mode are indicated by labels below each pad: MULTI REPEAT PERC. BREAK TEMPO SYNCHRO MODE SELECT Tempo Change If you press this pad while holding the [REC/STOP] button, the tempo at that instant is registered in memory. The registered tempo can then be recalled at any time, regardless of the current tempo, simply by pressing the [Tempo Change] pad. REC / STOP MULTI PLAYING PHRASE Tempo Change Tap Start Tempo l 4 accel. If this pad is used during an accelerando or ritardando (described below), the accelerando or ritardando stops immediately and the [Tempo Change] value takes effect. Tap Start While the accompaniment is stopped, or during the SYNCHRO START mode before the accompaniment is started, the [Tap Start] pad can be used to set any desired tempo (within the PSR-6000 s 40 to 280 beats per minute range) by simply tapping on the pad at the required tempo. Tap 4 times for an accompaniment with a 4/4 time signature, 3 times for 3/4, and 5 times for 5/ 4. 1 Tempo Change PHRASE 2 3 Tap Start Tempo l 4 accel. If the accompaniment is started before the required number of taps has been entered, the Tap Start setting will be ignored. The Tap Start setting will also be ignored if several seconds elapse before the required number of taps have been entered, if a different style is selected, or if the accompaniment [STOP] button is pressed. Tempo I (Tempo Primo) If the [Tempo I] pad is tapped while an accompaniment is playing, the tempo setting that was active when the accompaniment was started is immediately restored, regardless of any tempo changes that occurred after the accompaniment was started. 1 Tempo Change PHRASE 2 3 Tap Start Tempo l 4 accel. If this pad is used during an accelerando or ritardando (described below), the accelerando or ritardando stops immediately and the [Tempo I] value takes effect. accel. (Accelerando) Pressing the [accel.] pad immediately starts a 2-measure accelerando (tempo increase) that is executed by increasing the tempo by a small amount on every 8th beat. The accelerando is stopped if the [accel.] pad is pressed again before the 2 measures are completed. 1 Tempo Change PHRASE 2 3 Tap Start Tempo l 4 accel. 39
43 Using the Pads faster Tap the [faster] pad to increase the tempo by a fixed amount, whether the accompaniment is playing or not. 5 6 CHORD faster a tempo slower rit. 7 8 If this pad is used during an accelerando or ritardando, the accelerando or ritardando stops immediately and the [faster] value takes effect. a tempo This pad recalls the tempo prior to the last tempo change e.g. any change incurred by pressing the [Tempo Change], [accel.], [faster], [slower], or [rit.] pad. 5 6 CHORD faster a tempo slower rit. 7 8 If this pad is used during an accelerando or ritardando, the accelerando or ritardando stops immediately and the [a tempo] value takes effect. slower Tap the [slower] pad to decrease the tempo by a fixed amount, whether the accompaniment is playing or not. 5 6 CHORD faster a tempo slower rit. 7 8 If this pad is used during an accelerando or ritardando, the accelerando or ritardando stops immediately and the [slower] value takes effect. rit. (Ritardando) Pressing the [rit.] pad immediately starts a 2-measure ritardando (tempo decrease) that is executed by decreasing the tempo by a small amount on every 8th beat. The ritardando is stopped if the [rit.] pad is pressed again before the 2 measures are completed. 5 6 CHORD faster a tempo slower rit. 7 8 The [PAD 8/rit.] pad has essentially the same effect on the tempo as the [ENDING/ rit.] button (page 25), except that while the [ENDING/rit.] button causes the tempo to return to its initial value after the rhythm stops, the tempo does not return to its initial value if the [PAD 8/rit.] pad is used, even after the rhythm is stopped. If a fill-in pattern is selected during a ritardando, the ritardando continues during the fill-in but then original tempo is then restored as soon as the fill-in ends. The TEMPO SYNCHRO Function... If you press the button immediately to the right of the pad [MODE SELECT] button so that the indicator above it lights while the TEMPO mode is engaged, the TEMPO SYNCHRO function is engaged any tempo change initiated by a TEMPO pad takes place at the beginning of the next measure instead of immediately when the pad is tapped (TEMPO SYNCHRO has no effect on Tap Start operation). The SYNCHRO mode is turned off by pressing the button to the right of the [MODE SELECT] button again. MULTI REPEAT PERC. BREAK TEMPO SYNCHRO MODE SELECT 40
44 Panel Registration The PSR-6000 Panel Registration feature can be used to memorize 32 complete control-panel setups (4 banks, 8 setups each) that you can recall whenever needed. When the PSR-6000 is in its initial factory-preset condition, the panel registration memories contain preset setups. When these are recalled, a descriptive setup name will appear at the top of the display (example: A1 Going West!). FREEZE BANK A B C D PANEL REGISTRATION MEMORY Registering the Panel Settings Z Set Up the Controls as Required... Make the desired control settings. The following settings are memorized by the Panel Registration function: Data Stored By the Panel Registration Memory Panel Registration Freeze Accomp. Voice OFF Freeze ON Freeze ON Orchestra 1 Voice O O X Orchestra 2 Voice O O X Orchestration O O X Harmony On/Off O O X Sustain On/Off O O X Reverb On/Off O O X Panel Effect On/Off O O X Buttons Style O X O ABC On/Off O X O IA On/Off O X O Accompaniment Section O X O Multi Pad Select O O O Pad Synchro/Break/ O O O Repeat On/Off Left Hold On/Off O O O Tempo O X O Orchestra 1 O O X Orchestra 2 O O X Volume Bass O X O Chord 1 O X O Chord 2 O X O Rhythm O X O LCD Orchestra 1 Octave O O X Orchestra 2 Octave O O X Panel Registration Freeze Accomp. Voice OFF Freeze ON Freeze ON Key Velocity On/Off O O X Split Point O O O LCD ABC Mode O X O Manual Bass Voice O X O Transpose O O O Reverb Type O O X F2 Reverb Depth O O X Effect Type O O X Effect Depth O O X Foot Switch Select O O O Foot Switch Percussion O O O Foot Controller Select O O O F3 Sustain Part Select O O X Pitch Bend Wheel Select O O X Modulation/Effect Wheel Type O O X Modulation/Effect Wheel On/Off O O X IA Mode O X O Auto Solo On/Off O X O F4 IA Sensitivity O X O IA Key Part O X O =recalled O One Touch Setting O X =not recalled O (Synchro Change On/Off) F5 Harmony Type O O X 41
45 Panel Registration X Register in Memory... Use the [A], [B], [C], or [D] button to select the corresponding memory bank the corresponding indicator will light. Press and hold the [MEMORY] button, then press one of the PANEL REGISTRA- TION buttons. Any data that was previously in the selected location is erased and replaced by the new settings. MEMORY FREEZE BANK A B C D PANEL REGISTRATION Recall the Registered Panel Settings Simply select the appropriate bank using the [A], [B], [C] or [D] button and press the desired PANEL REGISTRATION button at any time to recall the memorized settings. BANK A B C D No registration name is displayed when a user registration setup is recalled. The preset registration setups can be recalled by using the initialization procedure described on page 101. When the Foot Switch function is set to REGISTRA- TION+ and a different panel registration memory is recalled either via the panel controls or the footswitch, the Foot Switch setting will not change even if a different setting is included in the recalled panel registration memory (i.e. Foot Switch remains set to REG- ISTRATION+). MEMORY FREEZE PANEL REGISTRATION The Freeze Function If you press the [FREEZE] button so that its LED lights, selecting a different panel registration will not change the currently selected accompaniment or voice settings even if the new panel registration includes a different settings. The REGISTRA- TION FREEZE utility function (page 101) determines whether the freeze function affects accompaniment or voice settings. MEMORY FREEZE PANEL REGISTRATION
46 Playing DOC (Disk Orchestra Collection) & General MIDI Music Software Disks The PSR-6000 can play optional Yamaha Disc Orchestra Collection software, and General MIDI mode software recorded by other equipment. When a disk of either type (3.5" 2DD disks only) is inserted into the PSR-6000 disk drive, the PSR-6000 automatically switches the internal tone generator system to allow playback of the software and performance on the keyboard. Disk Orchestra Collection Disk Playback Using DISK ORCHESTRA disks (available from Yamaha), the PSR-6000 will let you enjoy listening to automated performances, or function as your private music tutor, allowing you to practice various parts of a piece while the others are played automatically. Z Insert the DOC Disk... Insert the DISK ORCHESTRA disk into the PSR-6000 disk drive (located below the right end of the keyboard) with the sliding disk shutter facing the drive slot and the label side facing upward. The disk should click into place and the DISK IN USE lamp will light briefly while the PSR-6000 reads and identifies the disk. When the disk is inserted and identified the display shown to the right will appear (if this display doesn t appear, press the [DISK ORCHESTRA/ GENERAL MIDI] button): DEMO DISK ORCHESTRA/ GENERAL MIDI There are actually three ways to select the DOC mode: 1) Insert a DOC disk (the DOC mode is automatically selected). 2) Press the [DISK ORCHESTRA/GENERAL MIDI] button (the normal, DOC, and General MIDI modes are selected in sequence). 3) Receive a MIDI exclusive Switch To DOC Mode message from an external MIDI device. The [DISK ORCHESTRA/GENERAL MIDI button is a handy way to engage the DOC mode from another mode when the disk is already loaded in the drive. Any rhythm or ABC operation in progress will stop automatically. You can use the [EXIT] button or [DISK ORCHESTRA/ GENERAL MIDI] button to exit from the DOC mode. 43
47 Playing DOC (Disk Orchestra Collection) & General MIDI Music Software Disks X Select a Playback Mode & Song Number If Necessary... If the song select display is not showing, press the SONG SELECT LCD button to recall it. Three song playback modes are available: ALL, CHAIN, and SINGLE. Use the st LCD dial next to the TEMPO dial to select the desired playback mode. The DOC and GM chain list data can be saved to or loaded from disk (page 91). Further, this data is retained in memory even when the power is off if the F7: UTILITY MEMORY BACKUP function is turned ON. ALL CHAIN SINGLE All songs shown in the song list will be played in sequence. A specified sequence of songs from the song list will be played in sequence. When CHAIN is selected use the LIST st LCD dials to select a song to add to the chain, then press the INS. LCD button to add that song to the chain. To delete songs from the chain use the CHAIN LIST st LCD dials to select the song you want to delete, then press the DEL. LCD button. Only a single specified song is played. When SINGLE is selected use the LIST st LCD dials to select the song you want to play. C Set the Repeat Function As Required... Use the REPEAT LCD button to turn repeat playback ON or OFF. When repeat is ON, the selected song or sequence of songs will play repeatedly until stopped. When repeat is OFF, the song(s) will play through once, then playback will stop automatically. V Press [START/RE-START] To Begin Playback... Start playback by pressing the [START/RE- START] button. The current measure number will be shown to the right of the current song number on the display during playback, and the activity of the various parts is shown by the circular indicators below the current song number. Playback can be stopped at any time by pressing the [STOP] button. RUS SOLO SYNCHRO START START/ RE-START STOP The TEMPO LCD dial or TEMPO [-] and [+] buttons can be used to adjust the playback tempo before or during playback. Some Disk Orchestra software does not produce a tempo display (e.g. free-tempo phrases, etc.). In this case, three bars appear instead of the usual tempo value on the display. If the inserted disk contains both DOC and GM song files, the DOC mode will automatically be selected. GM song data may not be reproduced correctly in this case. 44
48 Playing DOC (Disk Orchestra Collection) & General MIDI Music Software Disks B Eject the Disk When Done... When you ve finished with the currently loaded disk, simply press the disk drive EJECT button to remove it. This will automatically exit the DISK ORCHESTRA mode. There are actually three ways to exit from the DOC mode: 1) Remove the DOC disk. 2) Press the [DISK ORCHESTRA/GENERAL MIDI] or [EXIT] button (the normal, DOC, and General MIDI modes are selected in sequence). 3) Receive any MIDI exclusive message that selects a different mode from an external MIDI device. NEVER eject a disk or turn the power off while: 1) the DISK ORCHESTRA function is playing. 2) the DISK is formatting or recording. Volume Control... If the volume control/mute display is not showing, press the VOLUME/MUTE LCD button to recall it. The volume-control LCD dials function in the same way as the volume controls in the normal play mode, each controlling the volume of the corresponding part, as listed below. As always, the MASTER VOLUME control adjusts the overall volume level. ORC1 SONG RIGHT LEFT ACC BASS RHY Adjusts the volume of ORCH.1 played on the keyboard. Adjusts the overall volume of the song. Adjusts the volume of the right-hand part. Adjusts the volume of the left-hand part. Adjusts the volume of the disk backing. Adjusts the volume of the disk bass part. Adjusts the volume of the disk rhythm part. Operation of the volume controls may be different with some songs. Further, the reverb or other effect can be turned on or off for all parts by using the REVERB or EFFECT button. During DOC playback reverb (type) ON/OFF data may be read from the disk. When OFF data is received, the depth values for all parts other than the part you are playing are set to 0. This means that unless you change the depth setting, reverb cannot be applied to those parts even if the REVERB indicator is lit. Also, since the effect depth values for all parts other than the part you will be playing are set to 0 before DOC playback is started, you will have to change the depth settings before effects can be applied to those parts, even if the EFFECT indicator is lit. Since only the ORCH.1 voice is used for the part played on the keyboard in the DOC mode, no ORCH.2 volume control is provided. 45
49 Playing DOC (Disk Orchestra Collection) & General MIDI Music Software Disks Muting Specific Parts By turning off (muting) the left- or right-hand melody part, or both, you can practice playing those parts on the PSR-6000 keyboard. The PSR-6000 also makes it possible to mute the rhythm, bass, and accompaniment parts. Sheet music is provided with the Disk Orchestra Collection disks. Press the MUTE LCD button (from the VOL- UME display) and use the RHY, BASS, ACC., LEFT, and/or RIGHT LCD dials to set the corresponding part to PLAY, MUTE, or SOLO. PLAY MUTE SOLO The corresponding part plays normally. The corresponding part is muted and will not play. Only the corresponding part will play all others are muted. Press the VOLUME LCD button when you want to go back to the volume-control display. The left and right-hand parts cannot be played separately on some songs. The appropriate voice for the part you are going to play is automatically selected when you select a song (When ALL is selected, the voice for the first song is automatically selected). Octave, Transpose, and Tune The OCTAVE and TRANSPOSE/TUNE LCD buttons function in exactly the same way as in the normal play mode (page 17, 18). 46 Other Controls That Function In the DOC Mode Keyboard. Voice select buttons (the DOC voice list is different from the normal play mode voice list the voice group [12] button does not function). START and STOP buttons (ABC does not function). REVERB and EFFECT buttons (REVERB is automatically turned ON when the DOC mode is engaged). TEMPO buttons (the recommended tempo can be selected by pressing both the [+] and [-] buttons simultaneously). SUSTAIN button and pedal (Affects notes played on the keyboard. Sustain Part Select fixed at Orchestra 1). PITCH BEND wheel (affects notes played on the keyboard. Pitch Bend Select fixed at Orchestra 1. Range fixed at ±300 cents). MODULATION/EFFECT wheel (modulation applies to Orchestra 1). PAD (fixed at PERCUSSION. Voices fixed as per normal play mode, and cannot be changed in the DOC mode). FOOT SWITCH (applies to notes played on the keyboard. Footswitch Select fixed at GLIDE). FOOT CONTROLLER (Applies to notes played on the keyboard. Foot Controller Select fixed at Orc1Vol). FUNCTION buttons (F2 and F8 only pages 84 and 102). LIST HOLD button. HELP button. MIDI transmission/reception. Since octave offset is applied to some voices played via the keyboard in the DOC mode, the pitch of notes played via the keyboard may not match that of those played via MIDI note numbers.
50 Playing DOC (Disk Orchestra Collection) & General MIDI Music Software Disks General MIDI Disk Playback General MIDI disk playback is essentially the same as Disk Orchestra Collection disk playback, except for the differences listed below. Refer to the Disk Orchestra Collection procedure, above, for operational details. Only GM data recorded on 3.5" 2DD IBM-format disks in standard MIDI file format 0 or 1 can be played on the PSR-6000 (up to track 17 with format 1). Also note that data that does not comply with GM System Level 1 specifications may not be reproduced. No measure number appears on the GM mode display. * IBM is a registered trademark of International Business Machines. Volume Control... If the volume control display is not showing, press the VOLUME LCD button to recall it. The volume-control LCD dials function in the same way as the volume controls in the normal play mode, each controlling the volume of the corresponding track. Use the Tr1-8 or Tr9-16 LCD button to switch between the track 1-through-8 and track 9- through-16 displays, as required. As always, the MASTER VOLUME control adjusts the overall volume level. Press the [MIXER] button to access the SONG, PAD, and ORC1 volume controls listed below. The standard TRANSPOSE and TUNE functions can also be accessed from this screen by pressing the TRANSPOSE/TUNE LCD button. Press the [MIXER] button again, or the [EXIT] button, to return to the main GM mode display. SONG PAD ORC1 Adjusts the overall volume of song playback. Adjusts the volume of the PSR-6000 pads. Adjusts the volume of ORCH.1 played on the keyboard. The reverb or other effect can be turned on or off for all parts by using the REVERB or EFFECT button. MIXER LIST HOLD 47
51 Playing DOC (Disk Orchestra Collection) & General MIDI Music Software Disks Muting Specific Tracks... Individual tracks can be turned on or off (muted) as required. Press the MUTE LCD button (from the VOLUME display) and use the LCD dials to set the corresponding track to PLAY, MUTE, or SOLO. Use the Tr1-8 or Tr9-16 LCD button to switch between the track 1-through-8 and track 9-through- 16 displays, as required. PLAY MUTE The corresponding track plays normally. The corresponding track is muted and will not play. SOLO Only the corresponding track will play all others are muted. Press the VOLUME LCD button when you want to go back to the volume-control display. Octave... The OCTAVE LCD button functions in exactly the same way as in the normal play mode (page 18). Other Controls That Function In the General MIDI Mode... Keyboard. Voice select buttons (the General MIDI voice list is different from the normal play mode voice list the voice group [12] button does not function). START and STOP buttons (ABC does not function). REVERB and EFFECT buttons (REVERB is automatically turned ON when the GM mode is engaged). TEMPO buttons (the recommended tempo can be selected by pressing both the [+] and [-] buttons simultaneously). SUSTAIN button and pedal (Affects notes played on the keyboard. Sustain Part Select fixed at Orchestra 1). PITCH BEND wheel (affects notes played on the keyboard. Pitch Bend Select fixed at Orchestra 1. Range fixed at ±300 cents). MODULATION/EFFECT wheel (modulation applies to Orchestra 1). PAD (fixed at PERCUSSION. Voices fixed as per normal play mode, and cannot be changed in the GM mode). FOOT SWITCH (applies to notes played on the keyboard. Footswitch Select fixed at GLIDE). FOOT CONTROLLER (Applies to notes played on the keyboard. Foot Controller Select fixed at Orc1Vol). FUNCTION buttons (F2 and F8 only pages 84 and 102). LIST HOLD button. HELP button. MIDI transmission/reception. See the GM/DOC Mode Percussion Map on page 121 for details on which rhythm voices are played by which note numbers. 48
52 The Sequencer The PSR-6000 features an 8-track sequencer that allows you to record and play back original musical creations along with auto accompaniment if required. You can record the accompaniment and orchestra parts separately or at the same time. If, for example, you record the accompaniment first and then record your own performance while listening to playback of the accompaniment, you re free to use the entire keyboard for your performance rather than being limited to only the upper keyboard area. You can also play back each part independently or in any combination. For even further versatility, the PSR-6000 sequencer allows different songs to be saved to or reloaded from floppy disk. Recording As you become more familiar with the PSR-6000 sequencer you ll probably develop a recording procedure that best suits your particular musical requirements. Here, to get you started, is the most simple, straightforward way to approach sequencer recording. Z Engage the Sequencer... Press the [SEQUENCER] button to engage the sequencer. SEQUENCER will appear at the top of the display, the MEASURE number will appear to the right of this, and the top left LCD button will function as the sequencer s SONG select button. If the sequencer contains previously recorded data, the green PLAY indicators of tracks containing data will light when the sequencer is engaged. Any of these tracks can be muted prior to engaging the record-ready mode (below) by pressing the corresponding track button so that the green PLAY indicator flashes. The sequencer can also be engaged by pressing one of the track buttons. SEQUENCER SEQUENCER / CUSTOM ACCOMPANIMENT PROGRAMMER RECORD DELETE EDIT PLAY/REC PLAY/REC PLAY/REC PLAY/REC PLAY/REC PLAY/REC PLAY/REC PLAY/REC ACCOMP. CUSTOM ACCOMP. CHORD 1 CHORD 2 CHORD 3 CHORD 4 CHORD 5 CHORD 6 BASS RHYTHM X Select a Song Number... The PSR-6000 sequencer can record up to 6 separate songs. Use the SONG LCD button to select the song number you want to record. The selected song number is shown to the right of SONG on the display. 49
53 The Sequencer C Set Up All Record Parameters... Select the accompaniment style you want to record with, voices, orchestration, harmony, and other parameters before actually beginning recording. A list of the parameters that can be recorded by the PSR-6000 sequencer is given below. You may also need to select a specific record mode and other conditions accessible via the sequencer s METRONOME, HAR- MONY, and RECORDING TYPE functions, described on page 54. Recordable Parameters Tracks 1 7 Note on/off Pitch bend Modulation Sustain on/off Orchestra 1 & 2 volume Voice change (including custom voice on/off) Tempo (if ACCOMP. track contains no data) Glide on/off Percussion pad on/off* Tempo pad tempo value* Multi pad on/off (phrase only)* * The pad mode selected when the sequence is played back will be used. * Press the Pad [REC/STOP] button if you want to stop the phrase pad playback in the middle of the song recording. Accompaniment Track Chord & root (note on/off in Manual Bass mode) Style change (styles with the same time signature only) Rhythm volume Bass volume Chord 1 volume Chord 2 volume Tempo Reverb on/off & depth Reverb type Effect on/off & depth Effect type Effect control Harmony on/off and type Interactive Accompaniment on/off Interactive Accompaniment section Interactive Accompaniment mode & sensitivity Auto Bass Chord mode Percussion Pad on/off Pad function (Multi/Tempo/Perc) Repeat/Synchro/Break on/off Manual bass on/off, voice Intro, fill in & ending Chord pad chord sequence Tempo pad tempo value If the record and playback pad modes are different, pad on/off events will not be reproduced. If parameter changes are memorized using the Panel Registration or One Touch Setting features during recording, only those parameters that can be recorded on the current track will be memorized. The time signature cannot be changed once a song has been recorded. V Select the Record Track(s)... AUTO BASS CHORD accompaniment can only be recorded on the ACCOMP. track. The ORCH.1 and ORCH.2 voices can be recorded on any of the remaining 7 tracks, but only one of these tracks can be recorded at a time if the normal ORCH.1 orchestration is selected. If the ORCH.2+1 or ORCH.2v1 orchestration is selected, two record tracks must be selected the ORCH.1 voice will be recorded on the lower-numbered track while the ORCH.2 voice will be recorded on the higher-numbered track. This means that a maximum of three record tracks can be specified when the ORCH.2+1 or ORCH.2v1 orchestration is selected: ACCOMP. and any two numbered tracks. 50
54 The Sequencer To select the record track(s) and engage the recordready mode, hold the [RECORD] button and press the appropriate track button(s). The red REC indicator for the tracks will flash. Also note that the AUTO BASS CHORD indicator will light automatically when the ACCOMP. track is selected. SEQUENCER / CUSTOM ACCOMPANIMENT PROGRAMMER RECORD DELETE EDIT SEQUENCER PLAY/REC PLAY/REC PLAY/REC PLAY/REC PLAY/REC PLAY/REC PLAY/REC PLAY/REC ACCOMP. CUSTOM ACCOMP. CHORD 1 CHORD 2 CHORD 3 CHORD 4 CHORD 5 CHORD 6 BASS RHYTHM The upper markings on the track buttons apply when the SEQUENCER mode is engaged (1 through 7, and ACCOMP.). The lower markings when the CUSTOM ACCOMPANIMENT PROGRAMMER described on page 62 is operating. If you are adding new material to tracks that have already been recorded, the [r] and [f] buttons can be used at this point to move to any measure number from which you want to begin recording. The [r] and [f] buttons will not function once recording has been started. SEQUENCER / CUSTOM ACCOMPANIMENT PROGRAMMER RECORD DELETE EDIT B Start Recording... Recording will start as soon as the [START/RE- START] button is pressed or, if you also press the [SYNCHRO START] button, as soon as any key on the keyboard is pressed. If the ACCOMP. track is selected and you start recording by pressing the [START/RE-START] button, only the rhythm will play until the first chord (FINGERED or SINGLE FINGER) is played on the left-hand section of the keyboard. If you start recording in the SYNCHRO START mode by playing on the right-hand section of the keyboard, a metronome will sound in place of the rhythm and AUTO BASS CHORD accompaniment until a key is played on the left-hand section of the keyboard. SOLO SYNCHRO START START/ RE-START STOP You can also start recording with an introduction by pressing any of the [INTRO] buttons. The restart function can not be used while the sequencer mode is engaged. Previously recorded fill-ins may not always be erased if that section is re-recorded or deleted. FILL IN FILL IN ENDING/ rit. INTRO 1 INTRO 2 INTRO 3 51
55 The Sequencer N Play... Play the accompaniment and/or orchestra parts. The current measure number is shown in the upper right corner of the display as you record. M Stop Recording... Press the [STOP] button to stop recording immediately, or the [ENDING/rit.] button to finish off the recording with an appropriate ending. The first measure of the sequence is automatically selected when recording is stopped. FILL IN INTRO 1 FILL IN INTRO 2 ENDING/ rit. INTRO 3 SYNCHRO START START/ RE-START STOP < Record a New Track... To record a new track, simply select a new voice and other parameters as required, select a new track as described in step V, then record. All previously recorded tracks will automatically be set to the PLAY mode so you can record the new material while listening to the material you ve already recorded. Repeat this procedure until your sequence is complete. Up to approximately 14,000 notes can be recorded for all six sequencer songs. The exact number of notes that can be recorded, however, will depend on the type of data you record. SEQUENCER SEQUENCER / CUSTOM ACCOMPANIMENT PROGRAMMER RECORD DELETE EDIT PLAY/REC PLAY/REC PLAY/REC PLAY/REC PLAY/REC PLAY/REC PLAY/REC PLAY/REC ACCOMP. CUSTOM ACCOMP. CHORD 1 CHORD 2 CHORD 3 CHORD 4 CHORD 5 CHORD 6 BASS RHYTHM Deleting Tracks If you make a mistake while recording or simply want to delete a track from your sequence, press the track button corresponding to the track you want to delete while holding the [DELETE] button. SEQUENCER / CUSTOM ACCOMPANIMENT PROGRAMMER RECORD DELETE EDIT SEQUENCER PLAY/REC PLAY/REC PLAY/REC PLAY/REC PLAY/REC PLAY/REC PLAY/REC PLAY/REC ACCOMP. CUSTOM ACCOMP. CHORD 1 CHORD 2 CHORD 3 CHORD 4 CHORD 5 CHORD 6 BASS RHYTHM Tracks cannot be deleted while the record-ready mode is engaged, during recording, or during playback. 52
56 The Sequencer Playback Z Start Playback... Since tracks are automatically set to the PLAY mode once they have been recorded, and tracks containing data are automatically set to the PLAY mode when the sequencer is initially engaged by pressing the [SEQUENCER] button, all you have to do to play back a sequence is to press the [START/RE-START] button (the green PLAY LEDs of all tracks set to the PLAY mode will be lit). If you first press the [SYNCHRO START] button, sequencer playback can be started by playing any key on the keyboard. Any of the PLAY tracks can be muted before or during playback by pressing the corresponding track button. The PLAY indicator will flash when a track is muted. Normal playback can be restored by pressing the track buttons of muted tracks a second time (the PLAY indicator will light continuously). SOLO SYNCHRO START START/ RE-START EQUENCER / CUSTOM ACCOMPANIMENT PROGRAMMER RECORD DELETE EDIT STOP PLAY/REC PLAY/REC PLAY/REC PLAY/REC PLAY/REC PLAY/REC PLAY/REC PLAY/REC ACCOMP. CHORD 1 CHORD 2 CHORD 3 CHORD 4 CHORD 5 CHORD 6 BASS RHYTHM Before starting playback you can use the [r] and [f] buttons to move to any measure number from which you want to begin playback. The [p] button goes directly to measure number 1. If the One Touch Setting SYNCHRO CHANGE parameter (page 89) is turned ON during ACCOMP. track playback, the One Touch Setting section will change in accordance with accompaniment section transitions and the result may be different from the recorded data. EQUENCER / CUSTOM ACCOMPANIMENT PROGRAMMER RECORD DELETE EDIT X Play along If You Like... You can play along with the sequence using the entire PSR keyboard, selecting different voices and changing the tempo as required. If any parameter changes are recorded in the sequence, the recorded changes will still take effect even if you manually change the parameters while playing. C Stop Playback... Playback will stop automatically when the end of the sequence is reached. At this point the parameters recorded on the ACCOMP. track will revert to their initial values. You can also stop playback at any time by pressing the [STOP] button. SYNCHRO START START/ RE-START STOP V Press [EXIT] When Done... Press the [EXIT] button to exit the sequencer mode and return to the normal play mode. The sequencer mode can also be exited by pressing the [SEQUENCER] button. EXIT SEQUENCER PLAY/REC PLAY/ 1 2 CUSTOM ACCOMP. CHORD 1 CHOR 53
57 The Sequencer Sequence Editing The PSR-6000 sequencer edit mode offers a range of functions that let you modify the recorded data and the way in which it is recorded in a number of ways. Press the [EDIT] button while the sequencer is engaged to enter the sequencer edit mode. When you re finished editing press the [EDIT] button again or press the [EXIT] button to return to the sequencer. EXIT TOM ACCOMPANIMENT PRO RECORD DELETE EDIT The sequencer edit display has two main pages CONDITION/VOLUME and EDIT which are selected by using the [ ] and [ ] LCD buttons. The various functions within the selected display page are selected by using the s and t LCD buttons. The corresponding parameters are edited via the appropriate LCD dials. The edit functions may not work if a large amount of sequence data has been recorded. CONDITION/VOLUME CONDITION... The CONDITION function actually includes three functions: METRONOME, HARMONY, and RECORDING TYPE. METRONOME Allows the recording metronome sound to be turned on or off. Use the METRONOME LCD dial to turn ON or OFF as required. The metronome only sounds during recording when no rhythm is playing. HARMONY Determines whether harmony will be applied to the keyboard or a track part. Use the HARM LCD dial to select the harmony part KEY or TR1 through TR7. 54
58 The Sequencer When the KEY harmony setting is selected (this is the default setting when the sequencer mode is engaged), harmony will be applied to notes played on the keyboard. If the TR1 harmony setting is selected, harmony will be applied to the track-1 part. If TR2 is selected harmony is applied to track 2, and so on. If Harmony is not turned on during recording, it will automatically be turned off each time playback is stopped if it is turned on before or during playback. Harmony can only be applied to tracks that contain data. RECORDING TYPE Selects the Replace, Overdub, or Punch record mode. Use either of the TYPE LCD dials to select the REPLACE, OVERDUB, or PUNCH record mode: REPLACE If replace recording is selected, any previous data on the track being recorded will be erased and replaced by the new material. This is the default mode which is selected when the sequencer is initially engaged. OVERDUB If overdub recording is selected, previous material on that track will be retained and the new material will be added to it. PUNCH Punch-in recording allows a specified measure or range of measures to be re-recorded (replaced) without affecting previously recorded material before and after the punch-in range. When the Punch mode is selected you must also specify the measure from which playback is to begin prior to the punch-in point at which recording will actually begin (use the PLAY START LCD dial), the punch-in measure from which recording is to begin (use the PUNCH IN LCD dial), and the punch-out measure at which recording is to end (use the PUNCH OUT LCD dial). It s generally convenient to set the PLAY START measure in the PUNCH mode to just a few measures before the punch-in point. This allows you to get the feel of the music and prepare to start playing at the punch-in point. You can even play along with the material prior to the actual punchin point so you ll flow naturally into the punch-in recording range. A footswitch (an optional FC5 footswitch can be used) plugged into the rear-panel FOOT SWITCH jack can also be used to punch-in and punch-out when the footswitch PUNCH IN/OUT function is selected via the FOOT SWITCH function described on page 88. With the sequencer running in the Punch Record mode, press the footswitch at the point you want to begin recording (i.e. to punch in ), and again to stop recording (punch out). Please note that the punch-in record function can only be used on tracks that already contain recorded material. CONDITION/VOLUME TRACK VOLUME... This function lets you independently set the playback volume of each of the sequencer s seven orchestra tracks. Use the LCD dials Tr1 through Tr7 to set the volume of the corresponding tracks to a value between 0 (minimum volume no sound) and 100 (maximum volume). Only tracks that contain data are available for volume control others are indicated by an asterisk (*). Any recorded volume changes will override these settings. 55
59 The Sequencer EDIT TRACK COPY/MIX... Copies the data from one recorded track to another, or mixes the data from two recorded tracks (except the ACCOMP. track). Use the SOURCE1 LCD dial to set the first source track, the SOURCE2 LCD dial to set the second source track, and the DESTINATION LCD dial to set the destination track. If CPY is selected for the SOURCE2 parameter, only the SOURCE1 track is copied to the destination track. Once the source and destination tracks have been selected, press the EXECUTE LCD button to actually execute the copy or mixdown operation. Executing. will appear on the display while the operation is in progress, and Completed. will appear briefly when the operation has finished. Immediately after execution an UNDO LCD button will appear on the left side of the display, and that button can be used to undo the copy or mixdown if it was executed by mistake. The undo function is only available until the next operation is performed. The mix function is most useful when you want to record more than 7 individual parts on the seven orchestra-part tracks. Successfully recorded parts can be combined using this function, thus opening up more tracks for further recording. The data in the source tracks is not erased during a mix operation. If the tracks that are mixed use different voices, the voice of the lower-numbered track will be used. Subsequent recorded voice changes will operate normally. Please note that only tracks containing data can be specified as the source tracks tracks containing no data are indicated by an asterisk (*). Any data in the destination track will be overwritten by data copied from the source 1 and 2 tracks. Copy Source track 1 Data Copy to Destination track Mix Source track 1 Source track 2 Destination track Data Data Data 56
60 The Sequencer REMOVE EVENT... Removes all occurrences of the specified event type (pitch bend, modulation wheel, volume, sustain, or program change operations) from the specified measure or range of measures in the specified track (accompaniment track not available). Use the TRACK LCD dials to set the track number, the EVENT LCD dials to set type of event to be removed, the TOP LCD dial to set the number of the first measure in the range from which the events are to be removed, and the LAST LCD dial to set the number of the last measure in the range from which the events are to be removed. Once the track, event, and measure numbers have been specified, press the EXECUTE LCD button on the right side of the display to actually execute the remove event operation. Executing. will appear on the display while the operation is in progress, and Completed. will appear briefly when the operation has finished. Immediately after execution an UNDO LCD button will appear on the left side of the display, and that button can be used to undo the remove event operation if it was executed by mistake. The undo function is only available until the next operation is performed. This function is handy if, for example, you ve played some wild pitch bends that don t sound right. You can remove only the offending pitch bends without erasing the entire track. Be careful when removing effect on/off events. If, for example, you remove a pitch bend off event in a specified measure, the pitch bend applied in a previous measure will remain in effect until the next pitch bend event is encountered. Similarly, if you remove all program change events from the beginning of a track, the voice that was initially selected when the track was recorded will be used. 57
61 The Sequencer DELETE MEASURE... Deletes the specified measure or range of measures from all tracks (including the accompaniment track). Use the TOP LCD dial to specify the number of the first measure in the range to be deleted, and the LAST LCD dial to specify the number of the last measure in the range to be deleted. Once the top and last measure numbers have been selected, press the EXECUTE LCD button to execute the delete operation. The Are you sure? confirmation prompt will appear on the display: press the YES LCD button to go ahead with the delete operation, or the NO LCD button to cancel. Executing. will appear on the display while the operation is in progress, and Completed. will appear briefly when the operation has finished. It s important to remember that a Delete Measure operation affects all tracks simultaneously, and that measures following the deleted range are moved back to take the place of the deleted measures. This differentiates the Delete Measure function from the Erase function (described later), which replaces data in the specified range with rests. Be careful when deleting measures that contain effect on/off events e.g. pitch bend, modulation, sustain, harmony, etc. If, for example, you delete a measure that contains a pitch bend off event, the pitch bend applied in a previous measure will remain in effect until the next pitch bend event is encountered. The Delete Measure operation has no undo function, so be absolutely sure you want to delete the selected material before actually executing the delete operation. Delete Measures 4 through Measure 4 through 6 deleted Subsequent measures moved back CREATE MEASURE Inserts a specified number of blank measures in all tracks (including the accompaniment track) at the specified measure number. Use the TOP LCD dial to specify the number of the measure at which the blank measures are to be inserted, and the SIZE LCD dial to specify the number of blank measures to be inserted. Once the top measure number and size have been selected, press the EXECUTE LCD button to actually execute the insert operation. The Are you sure? confirmation prompt will appear on the 58
62 The Sequencer display: press the YES LCD button to go ahead with the create measure operation, or the NO LCD button to cancel. Executing. will appear on the display while the operation is in progress, and Completed. will appear briefly when the operation has finished. Create Measure affects all tracks simultaneously. The specified number of blank measures is inserted before the existing data beginning at the specified measure Create measure, size 3, at measure Measure 6 moved up; 3 blank measures inserted Result with new measure numbers number. The create measure operation has no undo function. QUANTIZE Aligns notes in the specified track to the nearest specified beat. Use the TRACK LCD dial to select the track you want to quantize, and the SIZE LCD dial to specify the quantize size. Once the track number and quantize size have been selected, press the EXECUTE LCD button to actually execute the quantize operation. Executing. will appear on the display while the operation is in progress, and Completed. will appear briefly when the operation has finished. Immediately after execution an UNDO LCD button will appear on the left side of the display, and that button can be used to undo the quantize operation if it was executed by mistake. The undo function is only available until the next operation is 3 performed. 3 The Quantize Sizes are: 1/4 = 1/4 note 1/6 = 1/4 note triplet 1/8 = 1/8 note 1/12 = 1/8 note triplet 1/16 = 1/16 note 1/24 = 1/16 note triplet 1/32 = 1/32 note 3 One measure of 8th notes before quantization q e e q e e After quantization q e e q e e Quantization is generally used to tighten up sloppy timing. Use it judiciously, however, because timing that is too perfect can sound cold and mechanical unless, of course, you re specifically aiming for a cold, mechanical feel. Always use a quantize value that is at 59
63 The Sequencer least as short as the shortest notes in the track to be quantized. If you quantize a track containing 16th notes to 1/8 (8th notes), for example, some of the 16th notes will be aligned with 8th note beats, thus ruining the track. ERASE Erases all note and event (pitch bend, volume changes, etc.) data from the specified measure or range of measures in the specified track (accompaniment track not available), leaving blank measures. Use the TRACK LCD dials to set the track number, the TOP LCD dial to set the number of the first measure in the range to be erased, and the LAST LCD dial to set the number of the last measure in the range to be erased. Once the track and measure numbers have been selected, press the EXECUTE LCD button to actually execute the erase operation. Executing. will appear on the display while the operation is in progress, and Completed. will appear briefly when the operation has finished. Immediately after execution an UNDO LCD button will appear on the left side of the display, and that button can be used to undo the erase operation if it was executed by mistake. The undo function is TRACK 1 Erase measures 4 through TRACK Measures 4 6 blank, containing only rests. only available until the next operation is performed. An erase operation leaves the specified measures intact but blank. NOTE SHIFT Shifts the pitch of notes in the specified measures of the specified track (accompaniment track not available) up or down by a maximum of two octaves, in semitone increments. Use the TRACK LCD dials to set the track number, the SHIFT LCD dials to set the amount of note shift (see below), the TOP LCD dial to set the number of the first measure in the range in which the notes are to be shifted, and the LAST LCD dial to set the number of the last measure in the range 60
64 The Sequencer in which the notes are to be shifted. Once the track, shift, and measure numbers have been specified, press EXECUTE LCD button to actually execute the note shift operation. Executing. will appear on the display while the operation is in progress, and Completed. will appear briefly when the operation has finished. Immediately after execution an UNDO LCD button will appear on the left side of the display, and that button can be used to undo the note shift operation if it was executed by mistake. The undo function is only available until the next operation is performed. The range of SHIFT values is from -24 to +24. A setting of 0 produces no note shift. Each increment represents a semitone, so a setting of +4, for example, would shift the pitch of notes in the specified range up by an interval of a third. A setting of -12 would shift the notes down by one octave. The ability to selectively shift the pitch of specified measures and tracks makes it simple to create modulations (key changes) without having to reprogram entire passages, and to create simple harmonies. SONG CLEAR Deletes the entire song i.e. deletes all data from all sequencer tracks. Use the CLEAR SONG LCD dials to select the song to be cleared (1 6), then press the EXECUTE LCD button to execute the song clear operation. The Are you sure? confirmation prompt will appear on the display: press the YES LCD button to go ahead with the clear operation, or the NO LCD button to cancel. Completed. will appear briefly when the operation has finished. Remember that this function deletes all data from the specified song in one operation. If you think you might want to keep the data for later use or editing, be sure to save it to floppy disk (page 91) before executing the song clear operation. Be careful with SONG CLEAR it has no undo function! The amount of sequencer memory used by each song is shown to the right of the song numbers in kilobytes (approximate). The total amount of free sequencer memory remaining is shown in parentheses under SONG CLEAR on the display. 61
65 The Custom Accompaniment Programmer The PSR-6000 CUSTOM ACCOMPANIMENT feature allows you to create and store up to 24 original accompaniment styles including rhythm, bass, and chords in addition to the 50+1 internal preset accompaniment styles (including preset IA style New Age ). You can even create intro, fill-in, and ending patterns that can be saved with your accompaniment styles. More custom accompaniment styles can be created and saved to floppy disk (page 91). Your original accompaniment styles can be selected and played at any time, just like the presets. Basic Programming Procedure (Normal section) Although many of the steps outlined below do not have to be carried out in the order given, the basic programming procedure presented below will serve as useful guide to get you started. Z Select a Suitable Accompaniment Style... Begin by selecting one of the preset accompaniment styles that is close to the type of accompaniment you want to create. For example, select a WALTZ accompaniment style if you want to program a rhythm pattern in 3/4 time. 1 DANCE 7 ROCK N 2 ROLL 8 3 ROCK 9 4 POP 10 LATIN STYLE LATIN POP WALTZ COUNTRY PRESET USER SET CUSTOM A CUSTOM B 5 BALLAD 11 TRADITIONAL 6 JAZZ 12 FOR DISK IA X Engage the Custom Accompaniment Programmer... Press the [CUSTOM ACCOMP.] button. The CUSTOM ACCOMPANIMENT PROGRAMMER display will appear and the selected accompaniment style will begin playing, with accompaniment based on a C major chord. Also, the rhythm track will be set to the record mode (red REC indicator lit) and the Drum Kit voice will be selected. All other tracks containing data will be set to the PLAY mode (green PLAY indicator lit). PLAY tracks can be muted by pressing the corresponding track button (the green PLAY indicator will flash when the track is muted). SEQUENCER SEQUENCER / CUSTOM ACCOMPANIMENT PROGRAMMER RECORD DELETE EDIT PLAY/REC PLAY/REC PLAY/REC PLAY/REC PLAY/REC PLAY/REC PLAY/REC PLAY/REC ACCOMP. CUSTOM ACCOMP. CHORD 1 CHORD 2 CHORD 3 CHORD 4 CHORD 5 CHORD 6 BASS RHYTHM 62
66 The Custom Accompaniment Programmer C Select an Accompaniment Variation... Use the [VERSE 1], [VERSE 2], [CHORUS 1], [CHORUS 2], and [SOLO] buttons to select the accompaniment variation you want to program (variations cannot be selected when a custom style is selected). Intro, fill-in, and ending patterns will be based on the selected variation. If you delete all existing data to program an accompaniment from scratch, and change the time signature (beat), the intro, fillin, and ending patterns cannot be used. You could select a section INTRO, FILL-IN, or ENDING at this point instead of a variation. See CREATING INTRO, FILL-IN, AND ENDING PAT- TERNS on page 66. VERSE 1 VERSE 2 CHORUS 1 CHORUS 2 SOLO V Program the Rhythm Track... Since the RHYTHM track is initially set to the REC mode and the Drum Kit voice is selected automatically, you can start programming the RHYTHM track immediately. You could also select the POP DRUM KIT voice using the normal voice selection procedure, and/or set a comfortable recording tempo before you actually start recording. You can add new notes to the rhythm by playing the keys corresponding to the PSR-6000 drums and percussion instruments. The drums and percussion instruments produced are indicated by the symbols immediately above the keys (see the Keyboard Percussion List on page 118). Please note that pitch bend can not be applied to the rhythm instruments. If you want to create a totally new rhythm track, press the [RHYTHM] track button while holding the [DELETE] button. This cancels all the instruments in the original rhythm track, leaving only a metronome sound (the metronome sound will not be heard while the rhythm is playing). The rhythm pattern can be up to 8 measures long (see RECORD MEASURE/BEAT on page 69), and the pattern will continue to repeat so you can add new instruments during each repeat, if necessary. SEQUENCER / CUSTOM ACCOMPANIMENT PROGRAMMER RECORD DELETE EDIT SEQUENCER PLAY/REC PLAY/REC PLAY/REC PLAY/REC PLAY/REC PLAY/REC PLAY/REC PLAY/REC ACCOMP. CUSTOM ACCOMP. CHORD 1 CHORD 2 CHORD 3 CHORD 4 CHORD 5 CHORD 6 BASS RHYTHM 63
67 The Custom Accompaniment Programmer To Cancel A Single Percussion Instrument Although you can cancel all instruments in the RHYTHM track by pressing the [RHYTHM] track button while holding the [DELETE] button, it is also possible to cancel a single instrument to eradicate a mistake or simply eliminate an unwanted instrument. While holding the CANCEL key (the highest key on the PSR-6000 keyboard), press the percussion key corresponding to the instrument you want to cancel. The selected instrument should now be cleared from the pattern. CANCEL > The appropriate voice must be selected in order to cancel individual instruments if you can t cancel an instrument even after following the above procedure, select another drum voice (DRUM KIT or POP DRUM KIT) and try again. To Add Accents To accent specific beats after recording the rhythm, press the accent key (the second to highest key on the keyboard, with the > symbol) at the timing of beats you want to accent. B Program the Bass and Chord Tracks... After the RHYTHM track has been programmed (or it can be left as it is if no changes are required), you can select a bass or chord track for programming by pressing the [BASS] or a [CHORD] track button while holding the [RECORD] button (tracks containing preset data cannot be selected for recording). You can also select the voice you want to record with using the normal voice selection procedure. The RHYTHM track will automatically switch to the PLAY mode when a new REC track is specified. Please remember that only one track can be programmed at a time. You can press the [SYNCHRO START] button to engage the synchro start ready mode if you want to start recording from the first beat of the first measure. SEQUENCER SEQUENCER / CUSTOM ACCOMPANIMENT PROGRAMMER RECORD DELETE EDIT PLAY/REC PLAY/REC PLAY/REC PLAY/REC PLAY/REC PLAY/REC PLAY/REC PLAY/REC ACCOMP. CUSTOM ACCOMP. CHORD 1 CHORD 2 CHORD 3 CHORD 4 CHORD 5 CHORD 6 BASS RHYTHM Play notes or chords to be added to the existing data, or delete all data on the track (press the track button while holding the [DELETE] button) and start from scratch. The bass and chord tracks must be programmed in the key of C major! SEQUENCER / CUSTOM ACCOMPANIMENT PROGRAMMER RECORD DELETE EDIT SEQUENCER PLAY/REC PLAY/REC PLAY/REC PLAY/REC PLAY/REC PLAY/REC PLAY/REC PLAY/REC ACCOMP. CUSTOM ACCOMP. CHORD 1 CHORD 2 CHORD 3 CHORD 4 CHORD 5 CHORD 6 BASS RHYTHM 64
68 The Custom Accompaniment Programmer Continue selecting new record tracks, and program until your custom accompaniment is complete. Unwanted tracks can be deleted from the accompaniment by holding the [DELETE] button and pressing the appropriate track button. Although the bass and chord tracks must be programmed in C major, they are automatically re-harmonized when the custom accompaniment style is used in the play mode, and can be used in any key, major or minor. When programming an accompaniment from scratch, you can select a new voice that will take effect from the beginning of the accompaniment after deleting all tracks. Other voice changes added while programming will take effect from the point at which they are made. The synchro start, start, and stop functions can be used when recording a custom accompaniment. The re-start function, however, cannot be used. Pitch bend, modulation, and sustain changes are not recorded if the accompaniment is stopped the accompaniment must be running for parameter changes to be recorded. The Custom Accompaniment Programmer memory capacity is limited. When the available memory for the track you are recording is exhausted, the Work area full!! display will appear and further recording on that track will be impossible unless existing data is deleted. Further, if the data size is too big when you perform a save operation, Memory full!! Cannot store data will appear on the display. Only the non-percussion and non-dual preset voices in groups 1 through 10 can be used to record bass and chord parts (custom voices cannot be used). N Set a New Default Tempo... If necessary, set a new default tempo for the custom accompaniment style by using the TEMPO LCD dial or the TEMPO [ ] and [+] buttons. M Give the Finished Accompaniment Style a Name and Assign it to a CUSTOM STYLE Number... Use the NAME function described on page 68 to give your custom accompaniment style an original name, then use the STORE function described on page 72 to assign the accompaniment style to a CUSTOM STYLE number. 65
69 The Custom Accompaniment Programmer Creating Intro, Fill-In, & Ending Sections The custom accompaniment programmer allows you to create four sets of intro, fill-in, and ending sections that can be saved and later used with custom accompaniment styles. Programming a Preset Intro, Fill-in, or Ending Section Z Select an Intro, Fill-in or Ending Section... After selecting a suitable accompaniment style and engaging the Custom Accompaniment Programmer as described in steps Z and X of the Basic Programming Procedure (page 62), use the SEC- TION LCD dials to select the INTRO, FILL IN, or ENDING section for programming. If any edits to the NORMAL section data have been made before you do this, the Edited data not stored! message will appear press the YES LCD button to store the edited data and move on to the new section, NO to ignore the edited data and go on to the new section, or CANCEL to return to the last operation. X Program the Selected Section(s)... Program the selected section as described in steps V and B of the Basic Programming Procedure (page 63, 64). Select a different section and repeat as necessary. The default tempo will be determined by the tempo set for the NORMAL section. Names cannot be individually programmed for the intro, fill-in, or ending sections. C Assign the Programmed Sections to a Custom Accompaniment Style Group... Use the STORE function described on page 72 to assign the programmed section(s) to a custom style group. 66
70 The Custom Accompaniment Programmer V Determine Whether Your Custom Style Will Use the Preset or Original Intro/Fill/Ending... Select the I/F/E SELECT page as described in Custom Accompaniment Editing (next section) and select USER for the custom style numbers with which you want to use your original intro/fill/ ending sections. If the custom intro, fill-in, and ending sections have a different time signature than the normal custom accompaniment section, then USER cannot be selected in the I/F/E SELECT screen. To prevent differences between the time signatures of the custom intro, fill-in, and ending sections, all the sections for the selected styles are saved simultaneously when any one custom section is saved. For example, if you edit an intro section while a preset style is selected and then save the intro section, the fill-in and ending sections for the selected style will also be saved. If you then edit and save the fill-in section, the intro and ending sections will also be saved, meaning the intro section you just saved will be overwritten. To prevent this, first copy the preset style to a custom style number, and then use this as a basis for your new sections. Of course, you must be careful that you don t overwrite a previously saved custom accompaniment style when doing this. Editing a Previously Saved User Intro, Fill-in, or Ending Section To edit intro, fill-in, and ending sections that you have previously created and saved, simply select the custom accompaniment style to which the user sections are assigned and program as described above. Creating a New Intro, Fill-in, or Ending Section From Scratch After selecting an intro, fill-in, or ending section as described above, use the [DELETE] button to delete all data from all tracks. You can then program a totally new pattern from scratch. To create an intro, fill-in, or ending pattern with a different time signature, go to the Custom Accompaniment Programmer RECORD screen MEASURE/BEAT function (page 69) and set the BEAT parameter as required. 67
71 The Custom Accompaniment Programmer Custom Accompaniment Editing The PSR-6000 Custom Accompaniment Programmer offers a range of functions that let you modify the recorded data in a number of ways. The Custom Accompaniment Programmer display has four main pages RECORD, EDIT, STORE, and I/F/E SELECT which are selected by using the [ ] and [ ] LCD buttons. The various functions within the selected display page are selected by using the s and t LCD buttons. The corresponding parameters are edited via the appropriate LCD dials. RECORD NAME/SECTION... This display includes two functions: NAME, which allows a name of up to 8 characters to be assigned to the current custom accompaniment style before it is stored; and SECTION, which allows you to select the normal, intro, fill-in, or ending section for programming (page 68 for intro, fill-in, and ending programming details). NAME Use the < > LCD dial to move the name cursor to the various character positions, then use the A~Z, a~z, or 0~9.. LCD dial to select the required character for each position. The A~Z LCD dial selects capital letters, the a~z LCD dial selects lower-case letters, and the 0~9.. LCD dial selects numbers and special characters. Independent names can not be assigned to INTRO, FILL, and ENDING sections. Preset style names which are originally longer than 8 characters will be truncated to the first 8 characters when used as the basis for custom accompaniment style programming. SECTION Selects the normal, intro, fill-in, or ending section for programming (see page 66 for details). 68
72 The Custom Accompaniment Programmer RECORD MEASURE/BEAT... These functions allow the length (in measures) and time signature of the accompaniment to be defined. Use the MEASURE LCD dials to specify the number of measures the accompaniment is to have (from 1 to 8), and the BEAT LCD dials to specify the number of beats per measure 3/4, 4/4, or 5/4. These parameters can only be changed when you re creating an entirely new pattern from scratch i.e. you have deleted all tracks from the original accompaniment by holding the [DELETE] button and pressing the buttons of all tracks containing data so that no PLAY indicators remain lit. All intro, fill-in and ending patterns must be clear in order to change the BEAT parameter of an intro, fill-in, or ending pattern. FILL patterns can have a maximum length of 1 measure. RECORD TRACK VOLUME... Lets you independently set the volume of each of the Custom Accompaniment Programmer s tracks. Use the LCD dials to set the volume of the corresponding tracks to a value between 0 (minimum volume no sound) and 100 (maximum volume). In addition to the graphic controls above the respective LCD dials, vertical bar-graphs to the right of each track number in the TRACK VOL- UME section of the display provide a graphic representation of the track volume levels. 69
73 The Custom Accompaniment Programmer RECORD FADER ASSIGN... Assigns the CHD1 and CHD2 volume controls in the main play display to Custom Accompaniment Programmer CHORD tracks 1 through 6, determining which control affects which chord tracks when the accompaniment is played back. Use the CHD1 through CHD6 LCD dials to assign the corresponding Custom Accompaniment Programmer track to the main play display CHD1 or CHD2 control. It is a good idea to group the chord tracks according to their musical function. For example, tracks containing basic block chords could be assigned to the CHD1 control while tracks containing more decorative chord work could be assigned to the CHD2 control. EDIT QUANTIZE... Aligns notes in the specified track to the nearest specified beat. Use the TRACK LCD dials to select the track you want to quantize, and the SIZE LCD dials to specify the quantize size. Once the track number and quantize size have been selected, press the EXECUTE LCD button to actually execute the quantize operation. Completed. will appear briefly when the operation has finished. Immediately after execution an UNDO LCD button will appear on the left side of the display, and that button can be used to undo the quantize operation if it was executed by mistake. The undo function is only available until the next operation is performed. The Quantize Sizes are: 1/4 = 1/4 note 3 1/6 = 1/4 note triplet 1/8 = 1/8 note 3 1/12 = 1/8 note triplet 1/16 = 1/16 note 3 1/24 = 1/16 note triplet 1/32 = 1/32 note 70
74 The Custom Accompaniment Programmer Quantization is generally used to tighten up sloppy timing. Use it judiciously, however, because timing that is too perfect can sound cold and mechanical unless, of course, you re specifically aiming for a cold, mechanical feel. Always use a quantize value that is at least as short as the shortest notes in the track to be quantized. If you quantize a track containing 16th notes to 1/8 (8th notes), for example, some of the 16th notes will be aligned with 8th note beats, thus ruining the track. Tracks displayed in small characters (preset) or marked with an asterisk (* no data) cannot be selected for quantization. One measure of 8th notes before quantization q e e q e e After quantization q e e q e e EDIT COPY... Copies a specified measure or range of measures to a different location within the same track. Use the TRACK LCD dials to specify the track number, the TOP LCD dial to specify the number of the first measure of the range to be copied, the LAST LCD dial to specify the number of last measure of the range to be copied, and the DEST. LCD dial to specify the number of the measure to which the data is to be copied. Once the track numbers and measure numbers have been selected, press the EXECUTE LCD button to actually execute the copy operation. Completed. will appear briefly when the operation has finished. Immediately after execution an UNDO LCD button will appear on the left side of the display, and that button can be used to undo the copy operation if it was executed by mistake. The undo function is only available until the next operation is performed. A copy operation overwrites the data from the beginning of the specified destination measure with the data from the source measure(s). Previous data in the overwritten measures is therefore lost. The COPY function cannot be used with tracks containing preset data. Copy measures 1 through 2 to measure 5 in the same track
75 The Custom Accompaniment Programmer EDIT REMOVE EVENT... Removes all occurrences of the specified event type (pitch bend, modulation wheel, volume, or sustain operations) from the specified track. Use the TRACK LCD dials to set the track number and the EVENT LCD dials to set type of event to be removed. Once the track and event type have been specified, press the EXECUTE LCD button on the right side of the display to actually execute the remove event operation. Completed. will appear briefly when the operation has finished. Immediately after execution an UNDO LCD button will appear on the left side of the display, and that button can be used to undo the remove event operation if it was executed by mistake. The undo function is only available until the next operation is performed. This function is handy if, for example, you ve played some wild pitch bends that don t sound right. You can remove only the offending pitch bends without erasing the entire track. Only the VOLUME event type can be selected when the RHYTHM tracks is selected. Be careful when removing effect on/off events. If, for example, you remove a pitch bend off event in a specified measure, the pitch bend applied in a previous measure will remain in effect until the next pitch bend event is encountered. Tracks displayed in small characters (preset) or marked with an asterisk (* no data) cannot be selected for event removal. STORE... This function stores the current custom accompaniment to a specified custom accompaniment style number. Any of the LCD dials can be used to determine to which custom style number the accompaniment will be stored. When saving a normal section, you can select any of the 24 available custom style memory locations: A1 through A12 and B1 through B12. When storing an intro, fill-in, or ending, you can select one of four custom style groups: 1 (A1 A6), 2 (A7 A12), 3 (B1 B6), or 4 (B7 B12). When the custom style number or group has been selected, press STORE LCD button to store the current custom accompaniment to the specified custom accompaniment style number. The Are 72
76 The Custom Accompaniment Programmer you sure? confirmation prompt will appear on the display: press the YES LCD button to go ahead with the store operation, or the NO LCD button to cancel. Completed. will appear when the operation is complete. If during editing you change styles, variations, or sections, the Edited data not stored! Store it in memory? message will appear. Press the YES LCD button to store the data, the NO LCD button to exit, or the CANCEL LCD button to return to the last operation. I/F/E Select... Determines whether the preset, user-programmed, or no intro, fill-in, and ending sections will be used with each custom accompaniment style. Use the STYLE NUMBER LCD dials to select a custom style number, then the I/F/E SELECT LCD dials to assign either the PRESET or USER intro, fill-in, and ending sections to that style number. Select NO ASSIGN if you want no intro, fill-in, or ending section to be used (see below). If you select PRESET, then the un-edited intro, fill-in and ending sections of the original preset style will be used with the selected custom style. If you select NO ASSIGN, then no intro, fill-in, or ending sections will be used. In this case the [INTRO] button functions in the same way as the [START] button, the [ENDING] button functions in the same way as the [STOP] button, and the [FILL IN] button has no effect. 73
77 The Custom Accompaniment Programmer Exiting From the Custom Accompaniment Programmer To exit from the Custom Accompaniment Programmer mode, press either the [CUSTOM ACCOMP.] or [EXIT] button. This will return you to the normal play mode. If you do this after editing any custom accompaniment data and you haven t already used the STORE function to save the edited data to a custom accompaniment number, the following display will appear: Press the YES LCD button if you want to store the accompaniment you will automatically be taken to the STORE function display described on page 72. Press the NO LCD button if you want to exit from the Custom Accompaniment Programmer without storing the data, or the CANCEL LCD button to cancel the store operation and return to the Custom Accompaniment Programmer if you want to make a few more changes or additions to the accompaniment before storing. EXIT SEQUENCER PLAY/REC PLAY/ 1 2 CUSTOM ACCOMP. CHORD 1 CHOR Selecting & Using a Custom Accompaniment Style Once created and stored, your original accompaniment style can be selected and used in the same way as the preset accompaniment styles. Press the [CUSTOM A] or [CUSTOM B] button and then the appropriate STYLE select button (1 12) to select a custom accompaniment style. The selected custom accompaniment style can then be operated just like any of the preset accompaniment styles it can be started and stopped as usual, and can be used in the FINGERED or SINGLE FINGER AUTO BASS CHORD modes. 1 DANCE 7 2 ROCK N ROLL 8 3 ROCK 9 4 POP 10 5 BALLAD 11 6 JAZZ 12 STYLE LATIN LATIN POP WALTZ COUNTRY TRADITIONAL FOR DISK IA PRESET USER SET CUSTOM A CUSTOM B Interactive Accompaniment cannot be used with custom accompaniment styles. The [VERSE 1], [VERSE 2], [CHORUS 1], [CHORUS 2] and [SOLO] buttons cannot be used with custom styles. 74
78 The PSR-6000 Functions The PSR-6000 [FUNCTION] button selects 8 groups of functions that access a number of related parameters. Here s a list of the functions and the manual page numbers on which they are described in detail. [F1] CUSTOM VOICE EDIT...77 [F2] REVERB/EFFECT...84 [F3] CONTROLLER...86 [F4] ONE TOUCH SETTING/IA...89 [F5] HARMONY TYPE...90 [F6] DISK...94 [F7] UTILITY [F8] MIDI General Function Selection & Editing Procedure Press the [FUNCTION] button to engage the function mode. CONTRAST FUNCTION HELP/ LANGUAGE EXIT Each of the function groups is selected by pressing the corresponding LCD button. In some cases all of the parameters included in a function group will be available in a single display page, and the various parameters can be accessed via the and LCD buttons as in the F3: CONTROLLER display, below. 75
79 The PSR-6000 Functions In cases where the number of parameters included in the function group is too large to fit on a single display page, several pages may be available, selectable via the and LCD buttons as in the F8: MIDI display shown to the right. In all cases the selected parameter can be edited via the appropriated labelled or positioned LCD dial(s). The [EXIT] Button... The [EXIT] button can be used at any time to exit from a function and return to the normal play mode. CONTRAST FUNCTION HELP/ LANGUAGE EXIT Some functions cannot be selected in the Sequencer, Custom Accompaniment Programmer, or DOC/GM mode. You can return to the main function display from any other function display by pressing the [FUNCTION] button. 76
80 F1: Custom Voice Edit The Custom Voice Edit mode allows you to edit any of the PSR-6000 voices to create new sounds that ideally match your own music style. 128 custom voices can be programmed, each based on the corresponding preset voice. After selecting the voice you want to edit (see below), engage the Custom Voice Edit mode by pressing the [FUNCTION] button and then the F1 CUS- TOM VOICE EDIT LCD button. Use the various editing functions described below to modify the sound to suit your needs. Then press the [EXIT] button when you re finished editing to return to the normal play mode. Your custom voices can be selected and played by pressing the [CUSTOM VOICE] button and using the VOICE SELECT buttons in the normal way. You can also select a different voice while the Custom Voice Edit mode is engaged via the VOICE SELECT buttons. In this case the normal custom voice selection display will appear while the VOICE SELECT buttons are being used, and for a few seconds afterwards. The display will then revert to the previous Custom Voice Edit display page. Please note that some voices may suddenly shift to a different octave or change in level when played on the highest or lowest keys. There may also be slight tonal changes at one or more points on the keyboard. Some settings may produce noise or no sound. Standard Voice Edit Functions (voice groups 1 through 10) The following functions are available when editing voice groups 1 through 10. Different edit functions are provided for the PSR-6000 dual voices (group 11 DUAL VOICE/SOUND EFFECT) and drum voices (group 12 DRUMS). NAME/CONTROL The NAME/CONTROL page includes the NAME function via which you can give your custom voice an original name, and the TOUCH SENSITIVITY and PITCH BEND parameters which define the operation of the two most fundamental keyboard control features. NAME The NAME function allows an 8-character name to be assigned to the voice. Use the < > LCD dial to move the name cursor to the various character positions, then use the A~Z, a~z, or 0~9.. LCD dial to select the required character for each position. The A~Z LCD dial selects capital letters, the a~z LCD dial selects lower-case letters, and the 0~9.. LCD dial selects 77
81 F1: Custom Voice Edit numbers and special characters. It s a good idea to give your voices names that make them easily identifiable. If you ve created a new voice that is a variation on the standard piano voice, for example, you could call it something like PianVar. Preset voice names longer than 8 characters will be truncated to 8 characters when used in custom voices. (HARD). Use the 1 LCD dial to select as required. 2 PITCH BEND Sets the range of the pitch bend wheel to 0 (OFF), 1 (±1 semitone), 2 (±2 semitones), 3 (±3 semitones), or GLISSAND (maximum 1-octave glissando in semitone steps). Use the 2 LCD dial to CONTROLLER The CONTROLLER section of the display includes two parameters that affect the entire voice. 1 TOUCH SENS. Allows the touch sensitivity of the keyboard to be set to three different levels, or turned off: 1 (OFF), 2 (SOFT), 3 (MEDIUM), or 4 select as required. COMMON The OCTAVE, PAN, MODULATION, and TONE parameters in this display page affect the entire voice. 1 OCTAVE Shifts the pitch of the voice up one octave (+1) or down one octave (-1). A setting of 0 produces the normal pitch for that voice. Use the 1 LCD dial to set as required. Some voices may exhibit sudden pitch changes in the highest and lowest ranges of the keyboard when shifted up or down by an octave. The pitch bend wheel may also cause sudden pitch changes. 2 PAN Sets the apparent position of the voice in the stereo sound field. The graphic display indicates the approximate location of the sound between the left and right speakers. The pan range is from L7 (full left) through 0 (center) to R7 (full right). Use the 2 LCD dial to set as required. 78
82 F1: Custom Voice Edit When Pan is set to the center position, the preset pan setting of the selected voice is used, creating a stereo effect with some voices. plus settings produce deeper or faster modulation, respectively. Modulation is applied automatically to some voices, and in some cases operating the wheel causes modulation to be applied automatically. MODULATION The two parameters provided in this screen are used to adjust the depth and speed of modulation produced by the PSR-6000 MODULATION/EF- FECT wheel. 3 DEPTH Decreases (-) or increases (+) the depth of modulation produced by the PSR-6000 MODULA- TION/EFFECT wheel relative to the original modulation depth of the selected voice. Use the 3 LCD dial to set as required. 4 SPEED Decreases (-) or increases (+) the speed of modulation produced by the MODULATION/EF- FECT wheel relative to the original modulation speed of the selected voice. Use the 4 LCD dial to set as required. TONE The BRILLIANCE and RESONANCE parameters provided here make it possible to vary the tone of the voice over a wide range. 5 BRILLIANCE This parameter alters the cutoff frequency of the filter applied to the voice, thereby making the sound more or less brilliant. Minus settings reduce brilliance for a rounder, more mellow tone, while plus setting increase brilliance for a sharper tone. Use the 5 LCD dial to set as required. 6 RESONANCE Plus settings increase the height of a resonant peak at the filter cutoff frequency, giving the voice greater presence and sometimes a more nasal tone. Minus settings reduce resonance for a flatter sound. Use the 6 LCD dial to set as required. The maximum range of the depth and speed is from - 7 through 0 to +7, although this range is more limited with some voices. An exclamation mark (!) will appear next to the parameter when the maximum or minimum allowable setting for the selected voice has been reached. The default modulation depth and speed values for the selected voice are produced by settings of 0. Minus settings produce gentler or slower modulation, while The maximum range of both parameters is from -50 through 0 to +50, although this range is more limited with some 79
83 F1: Custom Voice Edit voices. An exclamation mark (!) will appear next to the parameter when the maximum or minimum allowable setting for the selected voice has been reached. The default values for the selected voice are produced by settings of 0. ENVELOPE The ATTACK, DECAY, RELEASE, and SUSTAIN parameters provided here let you shape the volume envelope of the voice. 1 ATTACK Sets the speed of attack i.e. how fast the sound reaches maximum level after a key is pressed. 0 sets the normal attack for the selected voice, minus settings produce a slower attack, and plus settings produce a faster attack. Use the 1 LCD dials to set as required. 2 DECAY Sets the speed of decay portion of the envelope i.e. how fast the sound decays from the maximum attack level to its normal level. 0 sets the normal decay for the selected voice, minus settings produce a slower decay, and plus settings produce a faster decay. Use the 2 LCD dials to set as required. 3 RELEASE Sets the speed of release i.e. how fast the sound decays after a key is released when the panel [SUSTAIN] button is off and the sustain pedal is not pressed. 0 sets the normal release for the selected voice, minus settings produce a slower release decay, and plus settings produce a faster release decay. Use the 3 LCD dials to set as required. 4 SUSTAIN Sets the speed of sustain decay i.e. how fast the sound decays after a key is released when the panel [SUSTAIN] button is on or the sustain pedal is pressed. 0 sets the normal sustain for the selected voice, minus settings produce a longer sustain decay, and plus settings produce a faster sustain decay. Use the 4 LCD dials to set as required. The maximum range for all parameters is from -50 through 0 to +50, although this range is more limited with some voices. An exclamation mark (!) will appear next to the parameter when the maximum or minimum allowable setting for the selected voice has been reached. The default values for the selected voice are produced by settings of 0. With voices like STRINGS, in which key velocity (keyboard dynamics) controls the speed of attack, attack speed changes in the same way even if the attack parameter is set to a minus value. Since PIANO 1 and some other voices already have the 80
84 F1: Custom Voice Edit Dual Voice Edit Functions (voice group 11) fastest possible attack, no sound will be produced if the Decay parameter for such voices is set to +50. The Decay parameter will have no effect on some sustain-type voices which have no inherent decay. Changing the envelope parameter setting may have no effect on the sound with some voices. The following functions are available when editing the group 11 voices (DUAL VOICE/SOUND EFFECT). Different edit functions are provided for the PSR-6000 normal voices (groups 1 through 10 page 77) and drum voices (group 12 page 83). NAME/VOICE This display page includes the NAME and VOICE functions, letting you assign an original name to your custom dual voice and specify the voices to be used. NAME The NAME function allows an 8-character name to be assigned to the custom dual voice. Use the < > LCD dial to move the name cursor to the various character positions, then use the A~Z, a~z, or 0~9.. LCD dial to select the required character for each position. The A~Z LCD dial selects capital letters, the a~z LCD dial selects lower-case letters, and the 0~9.. LCD dial selects numbers and special characters. Give your dual voice names that identify both the voices used, if possible. If you ve created a new dual voice that combines piano and organ, for example, you could call it something like PianOrg. Preset voice names longer than 8 characters will be truncated to 8 characters when used in custom voices. VOICE This function allows any two of the PSR-6000 s preset and custom voices (groups 1 through 10) to be assigned to the dual voice. 81
85 F1: Custom Voice Edit Use the GRP. 1 and GRP. 2 LCD dials to select the desired voice groups, and the 1 # and 2 # LCD dials to select the desired voices. The pitch bend range for DUAL VOICE is limited to ±1 whole tone. OCT/PAN/VOL./DETUNE In this display screen all parameters have dual settings, one for each of the voices used in the custom dual voice. OCTAVE Allows the two voices used in the dual voice to be independently shifted up or down one octave. Use the 1 LCD dial to set the octave of the A voice, and the 2 LCD dial to set the octave of the B voice. Some voices may exhibit sudden pitch changes in the highest and lowest ranges of the keyboard when shifted up or down by an octave. The pitch bend wheel may also cause sudden pitch changes. 0 is the normal setting. PAN Independently sets the pan positions of the two voices used in the dual voice. Use the 3 LCD dial to set the pan position of the A voice, and the 4 LCD dial to set the pan position of the B voice. The graphic displays indicates the approximate location of the sound between the left and right speakers. When Pan is set to the center position, the preset pan setting of the selected voice is used, creating a stereo effect with some voices. VOLUME Independently adjusts the volumes of the two voices used in the dual voice. Use the 5 LCD dial to set the volume of the A voice, and the 6 LCD dial to set the volume of the B voice. The volume range is from 0 (no sound) to 100 (maximum volume). Use this function to set the optimum balance between the two voices. When the parameter is set to 0 or 100 an exclamation mark (!) will appear next to the parameter indicating that the limit has been reached. DETUNE Allows the two voices used in the dual voice to be detuned slightly to create a thicker sound. Use the 7 LCD dial to detune the A voice, and the 8 LCD dial to detune the B voice. A setting of 0 produces the normal pitch of the voice, while positive (+) settings raise the pitch and negative (-) settings lower the pitch of the voice. The normal tune value is 0. This can be tuned down to a maximum setting of -50 or up to a maximum setting of +50. Each increment equals approximately 0.78 cents (a cent is one hundredth of a semitone). The maximum amount of detune that can be set in either direction is therefore 39 cents 82
86 F1: Custom Voice Edit Drum Voice Edit Functions (Voice group 12) not quite a quarter tone. This function can be used by leaving one of the voices set at 0 and detuning the other until the desired effect is achieved. Another approach is to tune one voice down and the other up. The pitch bend range is always ±200 cents, regardless of the setting of this function. When the parameter is set to -50 or +50 an exclamation mark (!) will appear next to the parameter indicating that the limit has been reached. The following functions are available when editing the drum voices in group 12. Different edit functions are provided for the PSR-6000 normal voices (groups 1 through 10 page 77) and dual voices (group 11 page 81). NAME/PAN/PITCH/SOFTNESS All parameters available for drum voice editing are provided in a signle display screen. NAME Allows an 8-character name to be assigned to the custom drum voice. Use the < > LCD dial to move the name cursor to the various character positions, then use the A~Z, a~z, or 0~9.. LCD dial to select the required character for each position. The A~Z LCD dial selects capital letters, the a~z LCD dial selects lower-case letters, and the 0~9.. LCD dial selects numbers and special characters. Give your drum voice names that identify their character. If you ve created a new drum voice intended for rock music, for example, you could call it something like RockDrum. PAN Allows the pan position of each instrument in the drum voice to be individually adjusted. Use the 4 LCD dial to select the drum instrument you want to edit (an alternative method is to press the key on the PSR-6000 keyboard corresponding to the desired instrument). Then use the 1 LCD dial to set the pan position. The pan range is from L7 (full left) through C (center) to R7 (full right). The graphic PAN display indicates the approximate location of the sound between the left and right speakers. Use this function to create the required stereo image for your drum voice. View in the drum kit from the audience side, for example, the bass drum is normally in the center, the snare to its right, the tom-toms to the left, and so on. PITCH Allows the pitch of each instrument in the drum voice to be individually tuned. Use the 4 LCD dial to select the drum instrument you want to edit (an alternative method is to press the key on the PSR-6000 keyboard corresponding to the desired instrument). Then use the 2 LCD dial to set the pitch as required. The maximum tuning range is from -50 through 0 to +50, with 0 being the normal pitch for the instrument. Each increment equals approximately 6.25 cents (a cent is one hundredth of a semitone), for a total tuning range of about ±312 cents. When the parameter is set to -50 or +50 an exclamation mark (!) will appear next to the parameter indicating that the limit has been reached. SOFTNESS Allows the tone (softness) of each instrument in the drum voice to be individually adjusted. Use the 4 LCD dial to select the drum instrument you want to edit (an alternative method is to press the key on the PSR-6000 keyboard corresponding to the desired 83
87 F2: Reverb/Effect The PSR-6000 has 23 reverb-based effects and 9 other effects that can be selected via the REVERB/EFFECT function display. The selected reverb and effect types are applied to the sound when the [EF- FECT] and [REVERB] buttons are used (see page 31). REVERB TYPE & DEPTH... REVERB TYPE Selects the reverb effect to be applied when the [REVERB] button is turned on (page 31). If the REVERB TYPE parameters are not showing on the lower section of the display, press the TYPE LCD button. Use the GROUP LCD dials to select a reverb group, and the TYPE LCD dials to select the desired reverb effect. The Reverb Effects No. Group Type 1. Reverb 1 Hall 2. Reverb 1 Room 3. Reverb 1 Plate 4. Reverb 2 Church 5. Reverb 2 Club 6. Reverb 2 Stage 7. Reverb 3 Bathroom 8. Reverb 3 Metal 9. Delay 1 Short 10. Delay 1 Medium 11. Delay 1 Long 12. Delay 2 OneShot No. Group Type 13. TempoSync. Short 14. TempoSync. Long 15. Echo Stereo 16. Echo PingPong 17. Refl.&Gate Panned 18. Refl.&Gate Early 19. Refl.&Gate Gate 20. Delay&Rev Single 21. Delay&Rev Dly. L/R 22. Variation Distort. 23. Variation Tunnel The TempoSync effects produce a delay that is synchronized to the currently selected tempo. Variation : Distort. produces a distortion effect. Try out all of the effects to get a feel for what they can do to your sound. REVERB DEPTH Independently sets the depth of the selected reverb effect for the rhythm, bass, chord 1, chord 2, orchestra 1, and orchestra 2 sound. If the REVERB DEPTH parameters are not showing on the lower section of the display, press the DEPTH LCD button. Use the RHY, BASS, CHD2, CHD1, ORC2, and ORC1 LCD dials to set the depth of the reverb effect as required for the corresponding orchestra parts. Reverb depth can be adjusted in 8 steps (0 7), represented by a vertical bar to the right of each DEPTH parameter in the upper section of the display. The longer the bar, the greater the reverb depth. If the depth setting is changed while a note is being played, the new depth setting will take effect from the next note played. 84
88 F2: Reverb/Effect EFFECT TYPE & DEPTH... EFFECT TYPE Selects the effect to be applied when the [EF- FECT] button is turned on (page 31). If the EFFECT TYPE parameters are not showing on the lower section of the display, press the TYPE LCD button. Use the GROUP LCD dials to select an effect group, and the TYPE LCD dials to select the desired effect. The Effects No. Group Type 1. Tremolo 1 2. Tremolo 2 3. Tremolo 3 4. Chorus 1 5. Chorus 2 6. Flange 1 7. Flange 2 8. Symphonic 1 9. Symphonic 2 Try out all of the effects to get a feel for what they can do to your sound. EFFECT DEPTH Independently sets the depth of the selected effect for the bass, chord 1, chord 2, orchestra 1, and orchestra 2 sound. If the EFFECT DEPTH parameters are not showing on the lower section of the display, press the DEPTH LCD button. Use the BASS, CHD2, CHD1, ORC2, and ORC1 LCD dials to set the depth of the effect as required for the corresponding orchestra parts. Effect depth can be adjusted in 8 steps (0 7), represented by a vertical bar to the right of each parameter. The longer the bar, the greater the effect depth. If the depth setting is changed while a note is being played, the new depth setting will take effect from the next note played. 85
89 F3: Controller The [F3] function group includes four functions that affect how the PSR-6000 responds to control via the keyboard, a foot controller plugged into the rear-panel FOOT CONTROLLER jack, the MODULA- TION/EFFECT wheel, the [SUSTAIN] button and SUSTAIN footswitch, the PITCH BEND wheel, and a footswitch plugged into the rear-panel FOOT SWITCH jack. FOOT CONTROLLER... Determines whether a foot controller plugged into the rear-panel FOOT CONTROLLER jack will control master volume, the volume of an individual orchestra part (rhythm, ABC, etc.), or the depth of the selected effect. Use the TYPE LCD dials to select MASTER VOLUME for master volume control, INDIVIDUAL VOLUME for individual part volume control, or EFFECT for effect depth control. Individual part assignment parameters for the RHY, ABC, ORC2 and ORC1 parts will appear when the INDIVIDUAL type is selected. Use the corresponding LCD dials to turn volume control for the corresponding parts ON or OFF as required. Normally you ll want to be able to apply expression control to the orchestra voices without affecting the accompaniment and rhythm sound, so the INDIVIDUAL type should be selected and the ORC1 and/or ORC2 part turned on while the remaining parts are turned off. The EFFECT setting only applies when the panel [EFFECT] button is turned ON. MODULATION/EFFECT WHEEL... Determines whether the MODULATION/EF- FECT wheel will control modulation or the selected effect (page 32), and whether it will affect the orchestra 1 voice, the orchestra 2 voice, or both orchestra voices. Use the TYPE LCD dials to select either MODU- LATION or EFFECT operation. If MODULATION is selected the ORC2 and ORC1 assignment parameters will appear: use the corresponding LCD dials to turn modulation wheel operation ON or OFF for the ORC2 and ORC1 parts, as required. 86
90 F3: Controller This function can be used to apply modulation or the selected effect to just one of the voices being played in the split mode (ORCH. 2v1) to emphasize that voice and provide greater contrast with the other voice. When EFFECT operation is selected, the wheel will function only when the panel [EFFECT] button is turned on. If AUTO BASS CHORD is on and the ORCH. 2v1 orchestration mode is selected, no modulation is applied to the ORCH. 2 voice. SUSTAIN PEDAL & PITCH BEND WHEEL... SUSTAIN PEDAL Determines whether the PSR-6000 sustain effect is to be applied to the orchestra 1 voice, the orchestra 2 voice, or both orchestra voices. Use the SUSTAIN PEDAL ORC2 LCD dial to turn sustain on or off for the orchestra 2 voice, and the SUSTAIN PEDAL ORC1 LCD dial to turn sustain on or off for the orchestra 1 voice. The sustain effect is applied to the specified orchestra part(s) only when the panel [SUSTAIN] button is turned on or when the sustain pedal is pressed. PITCH BEND WHEEL Determines whether the PITCH BEND wheel will affect the orchestra 1 voice, the orchestra 2 voice, or both orchestra voices. Use the PITCH BEND WHEEL ORC2 LCD dial to turn pitch bend on or off for the orchestra 2 voice, and the PITCH BEND WHEEL ORC1 LCD dial to turn pitch bend on or off for the orchestra 1 voice. If, for example, you re using the split mode (ORCH. 2v1) with a bass voice on the left and a sax voice on the right, you ll want pitch bend to apply only to the right-hand sax voice. In this case simply turn orchestra 1 pitch bend on and orchestra 2 pitch bend off. If AUTO BASS CHORD is on and the ORCH. 2v1 orchestration mode is selected, no pitch bend is applied to the ORCH. 2 voice. 87
91 F3: Controller FOOT SWITCH... Determines the function of a footswitch plugged into the rear-panel FOOT SWITCH jack. Use the TYPE LCD dials to select one of the following footswitch functions: When the Foot Switch function is set to REGISTRA- TION+ and a different panel registration memory is recalled either via the panel controls or the footswitch, the Foot Switch setting will not change even if a different setting is included in the recalled panel registration memory (i.e. Foot Switch remains set to REG- ISTRATION+). START/STOP GLIDE ROTARY SPEAKER HARMONY REGISTRATION + START/RE-START INTRO1/FILL INTRO2/FILL INTRO3/ENDING/rit TAP TEMPO PERCUSSION 1 PERCUSSION 2 PUNCH IN/OUT EFFECT TENSION Same as panel [START] and [STOP] buttons. Lower orchestra 1 sound by a semitone while footswitch pressed. The footswitch varies the speed of the tremolo effect each time it is pressed: slow m medium m fast m slow, and so on. When ROTARY SPEAKER is selected the panel [EFFECT] button automatically lights, the effect type is set to Tremolo1, and the ORCH.1 and ORCH.2 effect depth are set to maximum, while all other depth parameters are set to 0. If a different effect is selected via the F2: REVERB/EFFECT display after the ROTARY SPEAKER setting has been selected, the foot switch can be used to change the depth of the selected effect in three stages. Harmony occurs only while footswitch pressed. Recall next (increment) panel registration. Same as panel [START/RE-START] button. Same as panel [INTRO 1/FILL IN] button. Same as panel [INTRO 2/FILL IN] button. Same as panel [INTRO 3/ENDING/rit.] button. Same as PAD Tap Start function. Footswitch plays a percussion instrument from the DRUM KIT voice. Use the PERCUSSION LCD dials to specify the percussion instrument to be played when the footswitch is pressed. Footswitch plays a percussion instrument from the POP DRUM KIT voice. Use the PER- CUSSION LCD dials to specify the percussion instrument to be played when the footswitch is pressed. Sets punch-in and punch-out points when sequencer record mode set to Punch. Same as panel [EFFECT] button. Modifies dominant 7th chords in the accompaniment to produce a more consistent sound when playing in a minor key. Also automatically re-harmonizes non-scale tones on chords other than the tonic and 7th. 88
92 F4: One Touch Setting/IA ONE TOUCH SETTING SYNCHRO CHANGE... Determines whether One Touch Setting variation switching will occur at the same time as accompaniment style and verse-to-chorus switching. When ON, selecting a different accompaniment style or switching between the VERSE and CHO- RUS variations while ONE TOUCH SETTING is engaged will cause the ONE TOUCH SETTING settings for that style or variation to be selected automatically. Also, if you change a ONE TOUCH SETTING setting the corresponding ONE TOUCH SETTING indicator will flash to indicate that a change has been made. When OFF no change occurs in the ONE TOUCH SETTING settings when a different style or VERSE/CHORUS variation is selected. Use the 1 LCD dials to turn the SYNCHRO CHANGE parameter ON or OFF. Turning this function on can provide greater contrast between the chorus and verse variations when using the Accompaniment feature. When the SYNCHRO CHANGE parameter is OFF, the current ONE TOUCH SETTING indicator will go out if any of the settings it includes is changed. The default setting is OFF. INTERACTIVE ACCOMPANIMENT... The parameters in this section of the display select one of two available Interactive Accompaniment modes, turn the AUTO SOLO function on or off, determine the keyboard part on which Interactive Accompaniment will be based, and set the sensitivity of the Interactive Accompaniment function. MODE AUTO SOLO PART SENSITIVITY Use the 2 LCD dial to select the MUTE or ADVANCED MODE. When the MUTE Interactive Accompaniment mode is selected, accompaniment parts that may interfere with what is played on the keyboard are automatically lowered in volume when the keyboard is being played. When the ADVANCED mode is selected, the above function is combined with automatic muting of interfering parts and automatic switching between VERSE 1 and VERSE 2 or between CHORUS 1 and CHORUS 2 in response to keyboard activity. The default Mode setting is AD- VANCED. Use the 3 LCD dial to turn AUTO SOLO ON or OFF. When the AUTO SOLO function is turned ON, the solo accompaniment variations will automatically be activated if nothing is played on the keyboard for a few measures (the actual number of measures depends on the selected style). Further, the solo variations will automatically be de-activated at the end of the current phrase after keyboard performance is resumed. No automatic solo switching occurs when the AUTO SOLO function is turned OFF. The default AutoSolo setting is ON. Use the 4 LCD dial to select the keyboard part(s) on which Interactive Accompaniment is to be based. When the PART parameter is set to R+L, the Interactive Accompaniment system responds to activity (i.e. anything you play) on the entire keyboard. When set to RIGHT only activity on the right-hand section of the keyboard is detected, and when set to LEFT only activity on the left-hand section of the keyboard is detected. The default PART setting is RIGHT. Use the 5 LCD dial to set the desired Interactive Accompaniment sensitivity. The sensitivity range is from 1 to 8. 8 is the highest sensitivity. In this case sensitivity refers to how much activity the Interactive Accompaniment system must detect in the specified section(s) of the keyboard before a change in the accompaniment occurs. The default Sensitivity setting is 4. 89
93 F5: Harmony Type Selects the type of harmony to be applied when the [HARMONY] button is turned on (page 31). There are four groups of harmony types BA- SIC, POP, JAZZ, and CLASSIC which can be selected either by using the GROUP LCD dials or by pressing the corresponding LCD buttons (the LCD buttons beside the arrows corresponding to the title of each group on the display). Once the group containing the desired harmony type has been selected, use the TYPE LCD dials to select the harmony type (you can actually use the TYPE LCD dials to scroll through all type in all groups, without first selecting a group). The Harmony Types No. Group Type 1. Basic Duet 2. Basic Trio 3. Basic 4 Part 4. Pop Octave 5. Pop Pop Riff 6. Pop Strings 1 7. Pop Strings 2 8. Pop Synth Ensemble 9. Pop Add Vocal 10. Jazz 4 way Close 11. Jazz 4 way Open 12. Jazz Vib. Ensemble 13. Jazz Sax Ensemble 14. Jazz Wind Ensemble 15. Jazz Guitar 16. Classic Strings 90
94 F6: Disk Although the F6: DISK function accesses a range of important disk operations, the most commonly used disk functions save to disk and load from disk can also be directly accessed via the [TO DISK] and [FROM DISK] buttons, as described below. Please note that no other PSR-6000 functions will operate while a disk function is in progress. For any disk operation an appropriate floppy disk must first be properly inserted into the PSR-6000 disk drive. The PSR-6000 uses only 3.5" 2DD type floppy disks. Make sure the disk write protect tab is set to the write enable position if you intend to save any data to the disk, and insert the disk with the sliding disk cover facing the disk drive and the disk label facing upward. Before a new disk can be used to save data, it must be formatted using the FORMAT DISK function described on page 98. The [TO DISK] Button... Press this button when you want to save the current contents of the PSR-6000 memory (see list below) to floppy disk for later re-loading and use. The display shown to the right will appear: RB EFFECT DISK IN USE FROM DISK TO DISK Use any of the LCD dials to select the file to which you want to save the data. The file list at the bottom of the display includes all files which currently exist on the disk and one NEW file (named N-FILE ). Select an existing file if you want to overwrite the file with the new data, or select the NEW file if you want to create a new file. With the exception of the NEW file, the size of each file will appear to the right of the file name in kilobytes (approximate). If you want to give a new file an original filename or change the name of an existing file prior to saving it to disk, press the NAME LCD button to go to the name display. 91
95 F6: Disk File names can be up to 8 characters long. Use the < > LCD dial buttons to move the name cursor to the various character positions, then use the A~Z or 0~9.. LCD dial to select the required character for each position. The A~Z LCD dial selects capital letters and the 0~9.. LCD dial selects numbers and special characters. When the file and, if necessary, the file name has been specified, press the EXECUTE LCD button to actually begin the save operation the Are you sure? confirmation display will appear. If you want to execute the save operation press the YES LCD button (or press NO LCD button to cancel the operation). Do not remove disk! will appear while the data is being saved, and the progress of the save operation will be indicated by a bar graph at the bottom of the display. You can go back to the file list by pressing the LIST LCD button. The data saved to disk is as follows: Instrument setup (condition) data (including DOC/ GM Chain list data). Disk style data. Custom voice data. Custom style data. Panel registration data. One touch setting data. Pad assignment data (Multi, Tempo, and Percussion assignments). Sequencer song data. If you insert a disk that has not been formatted into the drive, the display shown to the right will appear when the [TO DISK] button is pressed: Press the YES LCD button to format the disk (see FORMAT DISK on page 98). If you press the LIST LCD button to switch displays after entering a file name and pressing the EXECUTE LCD button, but before actually saving the name, the new file name will be canceled. See page 111 for a list of error messages that may appear during disk save. The PSR-6000 identifies and handles disk files by number rather than the file name. If you save to a file number that already contains data, the original data will be erased and replaced by the new data. 92
96 F6: Disk The [FROM DISK] Button... Press this button when you want to re-load a previously saved file from floppy disk. The data loaded is the same as that saved by the TO DISK operation described above. When the [FROM DISK] button is pressed one of the displays shown to the right will appear, depending on the type of disk currently in the drive: If normal data is to be loaded, simply use any of the LCD dials to select the file you want to load. The size of each file in the file list will appear to the right of the file name in kilobytes (approximate). If a style disk is loaded the style data disk display will appear. In this case use the left LCD dials to select either I/ A SET or CUSTOM STYLE data, then use the right LCD dials to select the style or style group (A1 A6, A7 A12, B1 B6, or B7 B12). When the file has been specified, press the EX- ECUTE LCD button to actually begin the load operation the Are you sure? confirmation display will appear. RB EFFECT DISK IN USE FROM DISK TO DISK If you want to execute the load operation press the YES LCD button (or press the NO LCD button to cancel the operation). Do not remove disk! will appear while the data is being loaded, and the progress of the load operation will be indicated by a bar graph at the bottom of the display. The [FROM DISK] button allows all data in a file to be loaded at once. To load individual data groups use the FROM DISK function described on page 94. See page 111 for a list of error messages that may appear during a disk load operation. 93
97 F6: Disk The F6: DISK Functions... The F6: DISK function accesses a range of functions that are used for storage and retrieval of floppy disk data. If you select the F6: DISK when no disk is present in the drive, the Disk not found. Please insert disk. message will appear on the display. 1 FROM DISK Loads the specified file from a floppy disk inserted into the PSR-6000 disk drive. If the FILE LIST display shown above is not showing, press the LIST LCD button to select it. Use the any of the LCD dials to select the file to load. The name of the selected file is displayed to the right of the file number, and the size of the file appears to the right of the file name in kilobytes (approximate). If you want to select a specific type of data to load, press the CONTENTS LCD button. The LCD dials can now be used to select only one type of data to be loaded from the selected file (or ALL DATA to load all of the data types). Some selections provide extra choices, listed in the chart below. Press the LIST LCD button when you want to go back to the FILE LIST display. When the file and other parameters have been specified, press the EXECUTE LCD button to actually begin the load operation the Are you sure? confirmation display will appear. If you want to execute the load operation press the YES LCD button (or press the NO LCD button to cancel the operation). Do not remove disk! will appear while the data is being loaded, and the progress of the load operation will be indicated by a bar graph at the bottom of the display. 94
98 F6: Disk The following data types can be selected for loading: ALL DATA SET UP DISK STYLE CUSTOM VOICE CUSTOM STYLE PANEL REGIST ONE TOUCH S. PAD DATA SEQUENCER All of the below. Instrument setup (condition) data (including DOC/GM Chain list data). Disk Style data saved via a TO SAVE operation. Custom voice data. Custom style data. Press the GROUP LCD button to go to the group display. Use the left LCD dials to select the group to be loaded from disk, then the right LCD dials to select the custom accompaniment group to which the data is to be loaded. Press the CONTENTS LCD button to go back to the contents screen or the LIST LCD button to go back to the file list. Panel registration data. One touch setting data. Multi, Tempo, and Percussion pad assignment data. Sequencer song data. Press the INDIVIDUAL LCD button to go to the individual song select display. Use the left LCD dials to select the song to be loaded from disk, then the right LCD dials to select the song number to which the data is to be loaded. Press the CONTENTS LCD button to go back to the contents screen or the LIST LCD button to go back to the file list. See page 28 for instructions on loading data from an optional Style Disk by using the FROM DISK function. 2 TO DISK Saves the data listed below to a floppy disk inserted into the PSR-6000 disk drive. If the FILE LIST display shown above is not showing, press the LIST LCD button to select it. Use any of the LCD dials to select the file to which you want to save the data. The file list at the bottom of the display includes all files which currently exist on the disk and one NEW file (named N-FILE ). Select an existing file if you want to overwrite the file with the new data, or select the NEW file if you want to create a new file. With the exception of the NEW file, the size of each file will appear to the right of the file name in kilobytes (approximate). If you want to give a new file an original filename or change the name of an existing file prior to saving it to disk, press the NAME LCD button to go to the name display. 95
99 F6: Disk File names can be up to 8 characters long. Use the < > LCD dial to move the name cursor to the various character positions, then use the A~Z or 0~9.. LCD dial to select the required character for each position. The A~Z LCD dial selects capital letters and the 0~9.. LCD dial selects numbers and special characters. When the file and, if necessary, the file name has been specified, press the EXECUTE LCD button to actually begin the save operation the Are you sure? confirmation display will appear. If you want to execute the save operation press the YES LCD button (or press the NO LCD button to cancel the operation). Do not remove disk! will appear while the data is being saved, and the progress of the save operation will be indicated by a bar graph at the bottom of the display. You can go back to the file list by pressing the LIST LCD button. The data saved to disk is as follows: Instrument setup (condition) data (including DOC/GM Chain list data). Disk style data. Custom voice data. Custom style data. Panel registration data. One touch setting data. Pad assignment data (Multi, Tempo, and Percussion assignments). Sequencer song data. If you press the LIST LCD button to switch displays after entering a file name and pressing the EXECUTE LCD button, but before actually saving the name, the new file name will be canceled. All data is saved in one operation. Specific data types can not be saved individually. See page 111 for a list of error messages that may appear during disk save. The PSR-6000 identifies and handles disk files by number rather than the file name. If you save to a file number that already contains data, the original data will be erased and replaced by the new data. 96
100 F6: Disk 3 RENAME FILE Allows the name of the specified file to be changed as required. If the FILE LIST display shown above is not showing, press the LIST LCD button to select it. Use the any of the LCD dials to select the file you want to rename. The name of the selected file is displayed to the right of the file number, and the size of the file appears to the right of the file name in kilobytes (approximate). Press the NAME LCD button to go to the name display. File names can be up to 8 characters long. Use the < > LCD dial to move the name cursor to the various character positions, then use the A~Z or 0~9.. LCD dial to select the required character for each position. The A~Z LCD dial selects capital letters and the 0~9.. LCD dial selects numbers and special characters. When the file and file name have been specified, press the EXECUTE LCD button to actually begin the rename operation the Are you sure? confirmation display will appear. If you want to execute the rename operation press the YES LCD button (or press the NO LCD button to cancel the operation). Do not remove disk! will appear while the file is being renamed. You can go back to the file list by pressing the LIST LCD button. If you press the LIST LCD button to switch displays after entering a file name and pressing the EXECUTE LCD button, but before actually saving the name, the new file name will be canceled. This function lets you change the name of a file without having to re-load and then re-save the entire file with a new name. Since the PSR-6000 uses the file number rather than the file name to recognize and manage data files, a file saved with the same number as another file will overwrite that file even if it has a different name. 97
101 F6: Disk 4 DELETE FILE Deletes the specified file from the disk. Use the any of the LCD dials to select the file you want to delete. The name of the selected file is displayed to the right of the file number, and the size of the file appears to the right of the file name in kilobytes (approximate). When the file has been specified, press the EX- ECUTE LCD button to actually begin the delete operation the Are you sure? confirmation display will appear. If you want to execute the delete operation press the YES LCD button (or press the NO LCD button to cancel the operation). Do not remove disk! will appear while the file is being deleted. Files deleted from disk can not be restored (there is no Undo function), so be sure you ve selected the right file before actually executing the delete operation. 5 FORMAT DISK Formats a floppy disk for use with the PSR After inserting a new floppy disk into the disk drive, press the EXECUTE LCD button to actually begin the format operation the Are you sure? confirmation display will appear. 98
102 F6: Disk If you want to execute the format operation press the YES LCD button (or press the NO LCD button to cancel the operation). Do not remove disk! will appear while the disk is being formatted, and the progress of the format operation will be indicated by a bar graph at the bottom of the display. The PSR-6000 uses only 3.5" 2DD type floppy disks. Formatting a disk completely erases all data on the disk, so be sure that the disk you re formatting does not contain important data! 6 DISK FREE AREA Displays the remaining data capacity of the loaded disk in approximate percent and kilobytes. This is a display-only function with no editable parameters. 99
103 F7: Utility The F7: UTILITY function accesses utility functions that let you turn memory backup on or off, select the Panel Registration freeze function mode, and recall the factory preset data. MEMORY BACKUP & REGISTRATION FREEZE MEMORY BACKUP This function turns memory backup on or off. Use the MEMORY BACK UP LCD dials to turn memory backup ON or OFF. Data Backed Up When MEMORY BACKUP is ON Sequencer Song Data Custom Style Data Custom Voice Data Disk Style Data Panel Registration Memory Data Multi Pad Data Tempo Change Data Percussion Pad Data One Touch Setting Data Voice Part Select Orchestration Orchestra 1 Voice Orchestra 2 Voice Orchestra 1 Octave Orchestra 2 Octave Mixer Display Volume (ORCH1, ORCH2, CHD1, CHD2, BASS, RHY) Harmony On/Off Harmony Type Style DOC/GM Chain list data ABC On/Off ABC Mode Manual Bass Voice Transpose Data Tune IA On/Off Accompaniment Variation Multi Pad Select Pad Synchro, Break, Repeat, On/Off Left Hold On/Off Key Velocity On/Off Foot Switch Assign Data Foot Switch Percussion Foot Controller Assign Data Sustain On/Off Sustain Part Select Pitch Bend Select Wheel On/Off Wheel Type Split Point IA Mode Auto Solo On/Off IA Sensitivity IA Part One Touch Setting Mode Reverb On/Off Reverb Type & Depth Effect On/Off Effect Type & Depth Memory Backup On/Off MIDI Transmit Ch MIDI Receive Ch MIDI Split Send Ch MIDI Rhythm Receive Ch MIDI Sequencer Ch MIDI Multi Part Ch MIDI Multi Part Volume MIDI Multi Part Voice MIDI Switch (Control Change, Pitch Bend, Program Change, System Exclusive) MIDI Clock MIDI Local On/Off MIDI Transpose Add Note MIDI Split Send On/Off, Enable * The above data will be retained in memory for about one week even if the power is not turned on. To retain the backed up data for longer periods, turn the power switch ON for a few minutes at least once a week. * The default setting for this parameter is OFF. 100
104 F7: Utility Data Backed Up At All Times (MEMORY BACKUP ON or OFF) Sequencer Song Data Custom Style Data Custom Voice Data Disk Style Data Panel Registration Memory Data Multi Pad Data Tempo Change Data Percussion Pad Data One Touch Setting Data The data backed up (retained in memory even when the power is turned off) by the PSR-6000 are listed above. When memory backup is turned OFF, the initial factory settings are automatically recalled whenever the power is turned on. REGISTRATION FREEZE Determines whether Panel Registration [FREEZE] button (page 42) freezes the accompaniment or voice settings. Use the REGISTRATION FREEZE LCD dials to select ACCOMP. FREEZE or VOICE FREEZE as required. RECALL PRESET DATA... Recalls the specified initial factory settings. Use any of the LCD dials to select the type of factory preset data you want to recall (see list below), then press the EXECUTE LCD button the Are you sure? confirmation display will appear. If you want to execute the recall preset data operation press the YES LCD button (or press the NO LCD button to cancel the operation). Executing. will appear while the data is being initialized, Completed. will appear briefly when the job is finished. Data initialized by the RECALL PRESET DATA function: ALL DATA CUSTOM VOICE PANEL REGIST ONE TOUCH S. PAD DATA SPLIT POINT HARMONY TYPE All of the below. Custom voice data. Panel registration data. One touch setting data. Multi, Tempo, and Percussion pad assignment data. The split point key. The harmony type. CONTROLLER All controller settings (F3 function group). ABC & IA Auto Bass Chord & Interactive Accompaniment data, preset IA style New Age (No.12 button). REVERB Reverb type, depth. EFFECT Effect type, depth. MIDI All MIDI data. 101
105 F8: MIDI MIDI, the Musical Instrument Digital Interface, is a world-standard communication interface that allows MIDI-compatible musical instruments and equipment to share musical information and control one another. This makes it possible to create systems of MIDI instruments and equipment that offer far greater versatility and control than is available with isolated instruments. The PSR-6000 offers a range of MIDI functions that allow it to be used in even sophisticated MIDI systems. The MIDI parameters available on the PSR-6000 are different according to whether the normal play mode or Disk Orchestra/General MIDI mode is selected. Playback of Disk Orchestra Collection and General MIDI music software disks is described on page 43. Always use a high-quality MIDI cable to connect MIDI OUT to MIDI IN terminals. Never use MIDI cables longer than about 15 meters, since cables longer than this can pick up noise which can cause data errors. THE NORMAL PLAY MODE... In the PSR-6000 s normal mode of operation (i.e. when the DOC/GM mode is not selected) key on/off, voice, sustain, volume, pitch bend, and other performance data is transmitted and received without modification directly via the MIDI OUT and MIDI IN connectors. The receive channel is determined by the MIDI channel setting parameter described on page 104. It is also possible to play the rhythm instrument voices via the rhythm channel (page 104). More complex control is available through the Multi Part Setting parameters (page 105), allowing up to 8 different voices to be controlled via different MIDI channels. It is possible, for example, to play a number of melody parts from an external MIDI control device to the accompaniment of the PSR-6000 ABC system. THE DOC MODE... In this mode the PSR-6000 can play Yamaha Disk Orchestra Collection (DOC) software. MIDI data is transmitted and received in accordance with Yamaha DOC specifications. For details refer to the MIDI Function Tree on page 128, the Voice List on page 116, and the GM/DOC Mode Percussion Map on page Ways To Select the DOC Mode Insert a DOC disk (the DOC mode is automatically selected). Press the [DISK ORCHESTRA/GENERAL MIDI] button (the normal, DOC, and General MIDI modes are selected in sequence). Receive a MIDI exclusive Switch To DOC Mode message from an external MIDI device. 102
106 F8: MIDI THE GENERAL MIDI (GM) MODE... In this mode MIDI data is received and transmitted in accordance with the General MIDI System Level 1 standard. General MIDI data can be received via the MIDI IN connector and played by the PSR General MIDI data transmitted via the PSR-6000 MIDI OUT connector can be used to control appropriate tone generators and other MIDI equipment. For details refer to the MIDI Function Tree on page 128, the Voice List on page 116, and the GM/DOC Mode Percussion Map on page Ways To Select the GENERAL MIDI Mode Insert a General MIDI disk (the GM mode is automatically selected). Press the [DISK ORCHESTRA/GENERAL MIDI] button. Receive a MIDI exclusive Switch To GM Mode message from an external MIDI device. ABOUT GENERAL MIDI The existing MIDI protocol allows performance and other data to be transferred between different instruments, even if they are from different manufacturers. This means, for example, that sequence data that was originally created to control a tone generator from manufacturer A can also be used to control a different tone generator from manufacturer B. Since the voice allocation in different devices from different manufacturers is usually different, however, appropriate program change data must be transmitted to select the right voices. The General MIDI protocol was developed to minimize confusion and the need for re-programming when playing software created by one MIDI device on another. This has been achieved by defining a standard voice allocation in which the same or similar voices are accessed by the same program change numbers or MIDI channels. The current standard recognized by the International MIDI Association is known as GM System Level 1. The PSR-6000 voice allocation complies with the GM System Level 1 standard when it is switched to the GM mode. See the Voice List on page 116 for details. Initial General MIDI Mode Settings When the General MIDI mode is selected, the parameters listed below are initialized as shown. General MIDI System Level 1 Mode Initial Settings Program Change# 0 (Grand Piano) Pitch Bend ±0 (Center) Volume 100 Pan Voice Preset Modulation 0 (Off) Expression 127 (Max.) Hold (Sustain) 0 (Off) Pitch Bend Sense 02H/00H (2 semitones) Fine Tune 40H/00H ±0 Coarse Tune 40H/00H ±0 RPN NULL 103
107 F8: MIDI MIDI Channel & Multi Part Settings The contents of this display are different depending on whether the normal play mode or the DOC/GM mode is selected. Normal Play Mode CH. SETTING Sets the basic transmit, basic receive, split transmit, and rhythm receive channels. Use the TRANSMIT LCD dials to select the basic transmit channel (1 16), and the RECEIVE LCD dials to select the basic receive channel (1 16, All). The SPLIT TRANSMIT LCD dials select the split (left-hand) transmit channel (1 16), and the RHYTHM RECEIVE LCD dials select the rhythm receive channel (1 16). TRANSMIT This setting determines the basic channel on which all PSR-6000 data will be transmitted in the normal play mode. RECEIVE The receive channel is the basic channel on which the PSR-6000 will receive all MIDI data. If set to All, data can be received via all 16 MIDI channels. SPLIT TRANSMIT The split transmit channel functions only in the normal play mode. This is the channel on which left-hand performance data (i.e. data produced by playing keys to the left of the split point) will be transmitted. Right-hand performance data is transmitted on the basic transmit channel. RHYTHM RECEIVE This setting specifies an independent MIDI channel via which the PSR-6000 s rhythm (drums and percussion) can be controlled. This means you can, for example, play the selected voice via the basic receive channel while simultaneously playing the rhythm instruments via a different channel The rhythm channel cannot be specified in the DOC/GM mode. Channel 15 is reserved for rhythm in the DOC mode, while channel 10 is reserved for rhythm in the GM mode. 104
108 F8: MIDI (i.e. the RHYTHM RECEIVE channel). SEQ. TRACK CH. Individually sets the transmit channels for the sequencer tracks. Use the LCD dials TR1 through TR7 to set the transmit channels for the corresponding tracks. These settings only apply when the normal play mode is selected. Separate transmit channels can be set for sequencer tracks 1 through 7 (the ACCOMP. track does not transmit) so the PSR-6000 sequencer can be used to drive an external multi-timbre tone generator or multiple tone generators via the specified channels. If basic, split, and or sequencer track transmit channels are set to the same MIDI channel number, DUP will appear below the channel number. If the basic and split transmit channels are set to the same number, the data from both the left- and right-hand sections of the keyboard will be transmitted on the basic transmit channel (the content of the data to be transmitted can be set via the SPLIT SEND function described on page 108). Further, if several sequencer tracks are set to transmit on the same channel, the data from all those tracks will be transmitted on the same channel. As with the transmit channels described above, if the basic, rhythm, and or multi part (described below) receive channels are set to the same MIDI channel number, DUP will appear below the channel number. In this case the received data will apply to all voices accessed by that channel number. If, for example, the basic, rhythm, and multi part receive channel are all set to the same number, any note data received on that channel will play the orchestra 1, rhythm, and multi part voices simultaneously. MULTI PART Allows the receive channel, volume, and voice to be independently specified for 8 separate parts to be controlled from an external MIDI device. In the DOC mode MIDI reception occurs via channels 1 through 10, and channel 15 (rhythm part). In the GM mode, reception occurs on all channels regardless of these settings. With the MULTI PART CH. parameters selected, use the LCD dials PART1 through PART8 to set the MIDI receive channels of the corre- 105
109 F8: MIDI sponding parts. With the MULTI PART VOL. parameters selected, use the LCD dials PART1 through PART8 to set the volume levels of the corresponding parts. With the MULTI PART VOICE parameters selected, use the LCD dials PART1 through PART8 to select the voices to be used by the corresponding parts. Note that parts that are not required can be turned OFF via the Channel parameter in the MULTI PART RECEIVE CHANNEL display. If the channel number of any part is set to the same channel number as another part DUP will appear below both channel numbers, and OFF will appear below the higher-numbered part indicating that the part is turned off. Any of the preset or custom voices can be specified via the voice parameter in the MULTI PART VOICE display. If the basic receive channel is set to All, a multi part receive channel cannot be assigned (OFF and DUP will appear on the display). DOC/GM Mode Sets the keyboard transmit channel, turns local control on or off, and specifies the transpose type for the DOC/GM mode. Use the KEYBOARD CHANNEL LCD dial to set the transmit channel (1 16), the LOCAL CONTROL LCD dials to turn local control on or off 106
110 F8: MIDI (see description below), and the TRANSPOSE LCD dials to set the transpose type as required (see description below). KEYBOARD CHANNEL In addition to accepting MIDI note data on 16 channels (also during disk playback), the PSR-6000 has a separate keyboard note channel. Data on this channel can only be controlled via the PSR-6000 panel controls (when LOCAL CONTROL is ON), and is not affected by MIDI data. This data is transmitted via MIDI OUT, on the KEYBOARD CHANNEL. LOCAL CONTROL The Local parameter determines whether the PSR-6000 is controlled by its own keyboard or MIDI data received from an external MIDI device. When local control is on, the PSR-6000 keyboard controls its internal tone generator, allowing the internal voices to be played directly from the keyboard. Local control can be turned off, however, so that the PSR-6000 keyboard does not play the internal voices, but the appropriate MIDI information is still transmitted via the MIDI OUT connector when notes are played on the keyboard. At the same time, the internal tone generator responds to MIDI information received via the MIDI IN connector. This means that while an external sequencer or MIDI computer, for example, plays the PSR-6000 s internal voices, an external tone generator can be played from the PSR-6000 keyboard. When Local is ON voice and controller parameters that can be played via the keyboard are set to the same channel as the transmit channel. TRANSPOSE When this parameter is set to RECEIVE, the PSR transpose settings are not applied to transmitted MIDI data. When set to TRANSMIT, the PSR-6000 transpose settings apply to transmitted MIDI data in the same they do to notes played on the PSR-6000 itself. As for received MIDI data, when this parameter is set to MIDI Switch, System Settings, & Data Transmission TRANSMIT the note data is not transposed, and when set to RECEIVE the note data is transposed. MIDI SWITCH (Normal Play Mode Only) Allows reception and transmission of control change, program change, pitch bend, and system exclusive data to be independently turned on or off. Use the appropriate LCD dials to turn CON- TROL CHANGE, PROGRAM CHANGE, PITCH BEND, and/or SYSTEM EXCLUSIVE data reception and transmission ON or OFF. These switches can be used to determine how the PSR-6000 responds to MIDI data received from external equipment. If, for example, you don t want the PSR voices to be changed by program change messages received from an external device, turn the program change switch OFF. The same applies to transmission from the PSR-6000 turn off data that you don t want to be transmitted to 107
111 F8: MIDI external equipment. In the DOC/GM mode, all control change data are transmitted and received regardless of the settings on this page. MIDI SYSTEM (Normal Play Mode Only) These functions provide access to a number of important MIDI system switches internal or external clock synchronization, local control on/off, transpose data transmission on/off, and split mode data transmission on/off. Use the appropriate LCD dials to set the CLOCK, LOCAL CONTROL, TRANSPOSE, and SPLIT SEND parameters as required (see descriptions below). CLOCK INT (internal) clock setting is the normal setting when the PSR-6000 is being used alone. If you are using the PSR-6000 with an external sequencer, MIDI computer, or other MIDI device, and you want the PSR-6000 to be synchronized to the external device, set this function to EXT (external). In the latter case, the external device must be connected to the PSR-6000 MIDI IN connector, and must be transmitting an appropriate MIDI clock signal. LOCAL CONTROL Local Control refers to the fact that, normally, the PSR-6000 keyboard controls its internal tone generator, allowing the internal voices to be played directly from the keyboard. This situation is Local Control ON since the internal tone generator is controlled locally by its own keyboard. Local control can be turned off, however, so that the PSR keyboard does not play the internal voices, but the appropriate MIDI information is still transmitted via the MIDI OUT connector when notes are played on the keyboard. At the same time, the internal tone generator responds to MIDI information received via the MIDI IN connector. This means that while an external sequencer or MIDI computer, for example, plays the PSR-6000 s internal voices, an external tone generator can be played from the PSR-6000 keyboard. TRANSPOSE When this parameter is set to RECEIVE, the transmitted MIDI note data will not be affected by the PSR-6000 transpose setting. When set to TRANSMIT the transmitted notes will be transposed in accordance with the PSR transpose setting. The reverse is true for reception: when set to TRANSMIT received note data is not transposed; when set to RECEIVE received note data is transposed. SPLIT SEND The SPLIT SEND parameter can be set so that MIDI note data from the left-hand (L), right-hand (R), or both sections of the keyboard (L&R) are transmitted via the MIDI OUT connector. You could choose to transmit only 108
112 F8: MIDI the right-hand data so that only notes played on the right-hand section of the keyboard are reproduced via an external tone generator, for example. When turned OFF data from the entire keyboard is transmitted on the basic transmit channel. DATA TRANSMIT (Normal Play Mode Only) Transmits the specified PSR-6000 panel or memory data via the MIDI OUT connector. Use any of the LCD dials to select PANEL or MEMORY data (see below), then press the EX- ECUTE LCD button the Are you sure? confirmation display will appear. If you want to transmit the selected data press the YES LCD button (or press the NO LCD button to cancel the operation). The progress of the data transmit operation will be indicated by a bar graph at the bottom of the display. The selected data is transmitted as a MIDI bulk dump that can be automatically received by a second PSR-6000 or other compatible MIDI device. PANEL When PANEL is selected all PSR-6000 panel settings are transmitted. MEMORY When MEMORY is selected the following data types are transmitted: Panel data. 109
113 F8: MIDI Panel registration data. One touch setting data. Multi, tempo, and percussion pad data. Custom voice data. Custom style data. Sequencer data. MIDI Bulk Dump Reception (Memory Data Receive) The PSR-6000 can receive bulk data transmitted by a second PSR-6000 as long as it is not accessing disk data, the Custom Accompaniment Programmer is not engaged, and the DOC/GM mode is not selected. When a bulk dump is received the following display will appear: The bar graph roughly indicates the progress of the bulk dump receive operation. Completed. will appear on the display when the data has been successfully received. Receiving MIDI Bulk Dump Request Messages When the normal play mode is selected and the PSR-6000 receives a MIDI bulk dump request message from an external device, The display appears and a bulk data transmission is performed. Progress of the transmission is shown in bar-graph form on the display. Bulk Dump Error Messages If an error is encountered during bulk reception, a System Exclusive Error error message will appear for a few seconds and the receive operation will be terminated. In most cases the data will be replaced up until the point at which the error occurred. Data being received at the time the error occurred will be initialized. All other data is not affected. Broken cables and other external problems can also cause a System Exclusive Error message. 110
114 Error Messages If you attempt to perform an illegal operation or some other problem occurs, the PSR-6000 will usually warn you with an error message that provides an idea of what caused the problem and how it can be rectified. The following are the error messages you re most likely to see during normal operation. Some of the error displays automatically revert to the previous display after a few seconds, while others require that the CANCEL LCD button be pressed to exit from the error display. If a damaged disk is used the data countdown during FROM DISK or TO DISK operations may stop and the load or save operation may get hung up. In this case, eject the disk from the drive even though the DISK IN USE lamp may be on. Discard the damaged disk. Sequencer Errors... Time signature conflict! Playback not possible. Data error! Playback stopped. Memory full! Recording stopped. Too much data! Operation cancelled. You have attempted to play back a sequence using a different time signature from the one with which it was recorded. A data error has been encountered during playback which makes continued playback impossible. The sequencer memory is full and no more data can be recorded. You may have to clear songs or data to make room. Save data you want to keep to floppy disk, then clear it from the PSR-6000 memory. There is too much data for the specified edit operation. Simplify the sequence and try again. Custom Accompaniment Programmer Errors... Memory full! Cannot store data. Work area full! Recording stopped. Preset track! Cannot record. Edited data not stored! Not enough memory is available to store all the data. Simplify the accompaniment to reduce the amount of data, then try storing the data again. The work area memory used during custom accompaniment recording is full and recording cannot continue. Simplify the accompaniment so that it fits in the available work area. This message will appear if you attempt to set a track which contains preset data to the record mode. You have attempted to exit from the Custom Accompaneiment Programmer or change styles without first saving the edited data. Press the appropriate LCD button to continue. Disk Errors... Disk error! Cannot continue. Disk full! Cannot continue. Bad file name. A data error has occurred during a save, load, delete, or format operation. Press the CANCEL LCD button to clear this error message. The floppy disk does not have enough remaining capacity to carry out the specified operation. Press the CANCEL LCD button to clear this error message. The file name is all spaces and cannot be recognized by the PSR
115 Error Messages Not enough memory. Not a user disk! Cannot continue. Wrong disk type/format! Cannot continue. Wrong disk type/format! Format disk? (All data will be erased!) Disk write protected! Cannot continue. Disk not found. Please insert disk. File not found! Not enough memory to load the specified sequencer file from disk. You have attempted to perform a save, rename, delete, format, or disk free area operation while a pre-programmed (non-user) disk is in the drive. The disk in the drive has not been formatted or the disk is the wrong type or has the wrong format. The current disk is write protected so no format option is provided with this error message (see below). The disk in the drive has not been formatted or the disk is the wrong type or has the wrong format. In this case the current disk can be written to, so a format option is provided with the error message. The disk write protect tab is in the write disable position, so the specified operation cannot be performed. No disk in drive. Insert an appropriate disk and try again. The disk does not contain any files saved by the user. MIDI Errors... System exclusive error. MIDI receive buffer overflow. An error has been encountered while receiving MIDI system exclusive data e.g. during a MIDI bulk dump operation. The MIDI receive buffer cannot handle the amount of data being received. Reduce the complexity of the data being received and try again. DOC/GM Mode Errors... Wrong disk type! (Operation cancelled.) File not found! (Operation cancelled.) Disk load error! Operation cancelled. The loaded disk does not contain DOC or GM song files recognizable by the PSR The specified song file cannot be found on the currently loaded disk. An error was encountered while loading data from the disk. Other Messages... Back up time limit exceeded! All data was initialized. The PSR-6000 retains all data in memory for up to approximately one week if the power is not turned on during this time. This message will appear if a longer period of time has elapsed since the last time the power was turned on. In this case all data will be initialized to the factory-preset values. This message will also appear when all internal data is initialized by turning on the power while holding the [EXIT] and [DEMO] buttons. 112
116 Troubleshooting Symptom Noise is heard when the power is turned on or off. No sound. Possible Cause/Solution This is a normal result of the power surge that occurs when the unit is turned on of off. No solution necessary. The volume controls or foot controller are turned all the way down. Set the volume controls and foot controller to a reasonable listening level. A pair of headphones is plugged into the PHONES jack. Unplug the headphones. MIDI local control is turned OFF. Turn MIDI local control ON. The ABC chord does not change even when a different chord is played. The disk lamp lights dimly. The style list or voice list does not appear even when a STYLE or VOICE group button is pressed. Some function menus cannot be selected. An intro, fill-in, or ending created using the Custom Accompaniment Programmer cannot be used. Are you sure you re playing on the left-hand section of the keyboard? You are using single-finger type fingering in the fingered mode, or viceversa. Use the correct type of chord fingering for the selected ABC mode. The PSR-6000 is constantly checking for the presence of a disk. This is not a problem. The [LIST HOLD] button is engaged (its LED is lit). Press the [LIST HOLD] button so that its indicator goes out, then try selecting a style or voice (page 11). The GM/DOC, Sequencer, or Custom Accomp. mode is engaged. All function menus are available in the normal play mode. PRESET/NO ASSIGN is selected for that intro/fill/ending in the I/F/E display screen. Set to USER and try again (page 73). 113
117 Index A a tempo pad ABC modes accel. pad Accents, adding Accompaniment Accompaniment volume Accompaniment, ways to start Attack, custom voice Auto solo Aux in jacks... 6 Aux out jacks... 6 B Bass and chord tracks Brilliance, custom voice C Channel setting, MIDI Chord pads Chord playback Chord recording Clock, MIDI CONTRAST control Controller functions Controller, custom voice Copy, custom accompaniment Create measure, sequencer Custom accompaniment editing Custom accompaniment programmer Custom accompaniment programmer, exiting Custom accompaniment style, selecting & using Custom style number Custom voice edit D Data backup... 2 Data initialization Data transmit, MIDI Decay, custom voice Delete file, disk function Delete measure, sequencer Demo play modes... 9 Demo playback... 8 Depth, custom voice Detune, custom voice, dual Disk free area function Disk functions Disk styles Display DOC and General MIDI disks, playing DOC mode DOC volume control DOC/GM mode, MIDI Drum voice edit functions Dual voice edit functions E Effect depth Effect type Effects Envelope, custom voice Erase, sequencer Error messages EXIT button F Fader assign, custom accompaniment faster pad Fill-ins Fingered chord accompaniment Floppy disk & drive... 3 Foot controller function Foot controller jack... 7 Foot switch function Footswitch jack... 7 Format disk function Freeze function FROM DISK button From disk function Function selection and editing, general procedure Functions G General MIDI mode GM volume control H Harmony Harmony type Harmony, sequencer Headphones jack... 6 Help function I I/F/E select, custom accompaniment Interactive accompaniment... 27, 89 Intro, fill-in, and ending sections, creating K Key velocity Keyboard channel, MIDI Keyboard percussion L Left hold LIST HOLD button Local control, MIDI , 108 M Manual bass mode Measure/beat, custom accompaniment Memory backup Metronome, sequencer MIDI bulk dump error messages MIDI bulk dump reception MIDI bulk dump request MIDI channel and multi-part settings MIDI functions MIDI jacks... 7 MIDI switch MIDI switch, system settings, & data transmission MIDI system MIXER button Modulation, custom voice Modulation/effect wheel... 32, 86 Multi pad repeat playback Multi part, MIDI
118 Index Music stand... 7 Muting DOC parts Muting GM parts N Name, custom accompaniment Name, custom voice Name, custom voice, drum Name, custom voice, dual Normal play mode Note shift, sequencer O Octave change Octave, custom voice Octave, custom voice, dual One touch setting One touch setting synchro change 89 One touch setting/ia functions Orchestration P Pads, multi mode Pads, perc mode Pads, tempo mode Pan, custom voice Pan, custom voice, drum Pan, custom voice, dual Panel registration Perc break function Perc pad instrument assignment Percussion instrument cancel Phrase pads Phrase recording & playback Pitch bend wheel... 32, 87 Pitch bend, custom voice Pitch, custom voice, drum Power supply... 2 Q Quantize, custom accompaniment. 70 Quantize, sequencer R Recall preset data Record track selection Recording type, sequencer Release, custom voice Remove event, custom accompaniment Remove event, sequencer Rename file, disk function Resonance, custom voice Reverb Reverb and effect function Reverb depth Reverb type Rhythm track Rhythm-only accompaniment rit. pad S Section selection Section, custom accompaniment Sequence editing Sequencer playback Sequencer record parametrers Sequencer recording Sequencer track channel, MIDI Single finger accompaniment slower pad Softness, custom voice, drum Solo sections Song clear, sequencer Song number selection Speed, custom voice Split point, changing Split send, MIDI Store, custom accompaniment Style name Style selection Sustain jack... 7 Sustain pedal function Sustain, custom voice Sustain T Tap start pad Tempo Tempo change pad Tempo I pad Tempo synchro function TO DISK button To disk function Tone, custom voice Touch sensitivity, custom voice Track copy/mix, sequencer Track delete Track volume, custom accompaniment Track volume, sequencer Transpose, MIDI , 108 Transposition Troubleshooting Tuning U User set style assignment User set voice assignment Utility functions V Voice, custom voice, dual Voices, selecting Volume control Volume, custom voice, dual
119
120

121
122
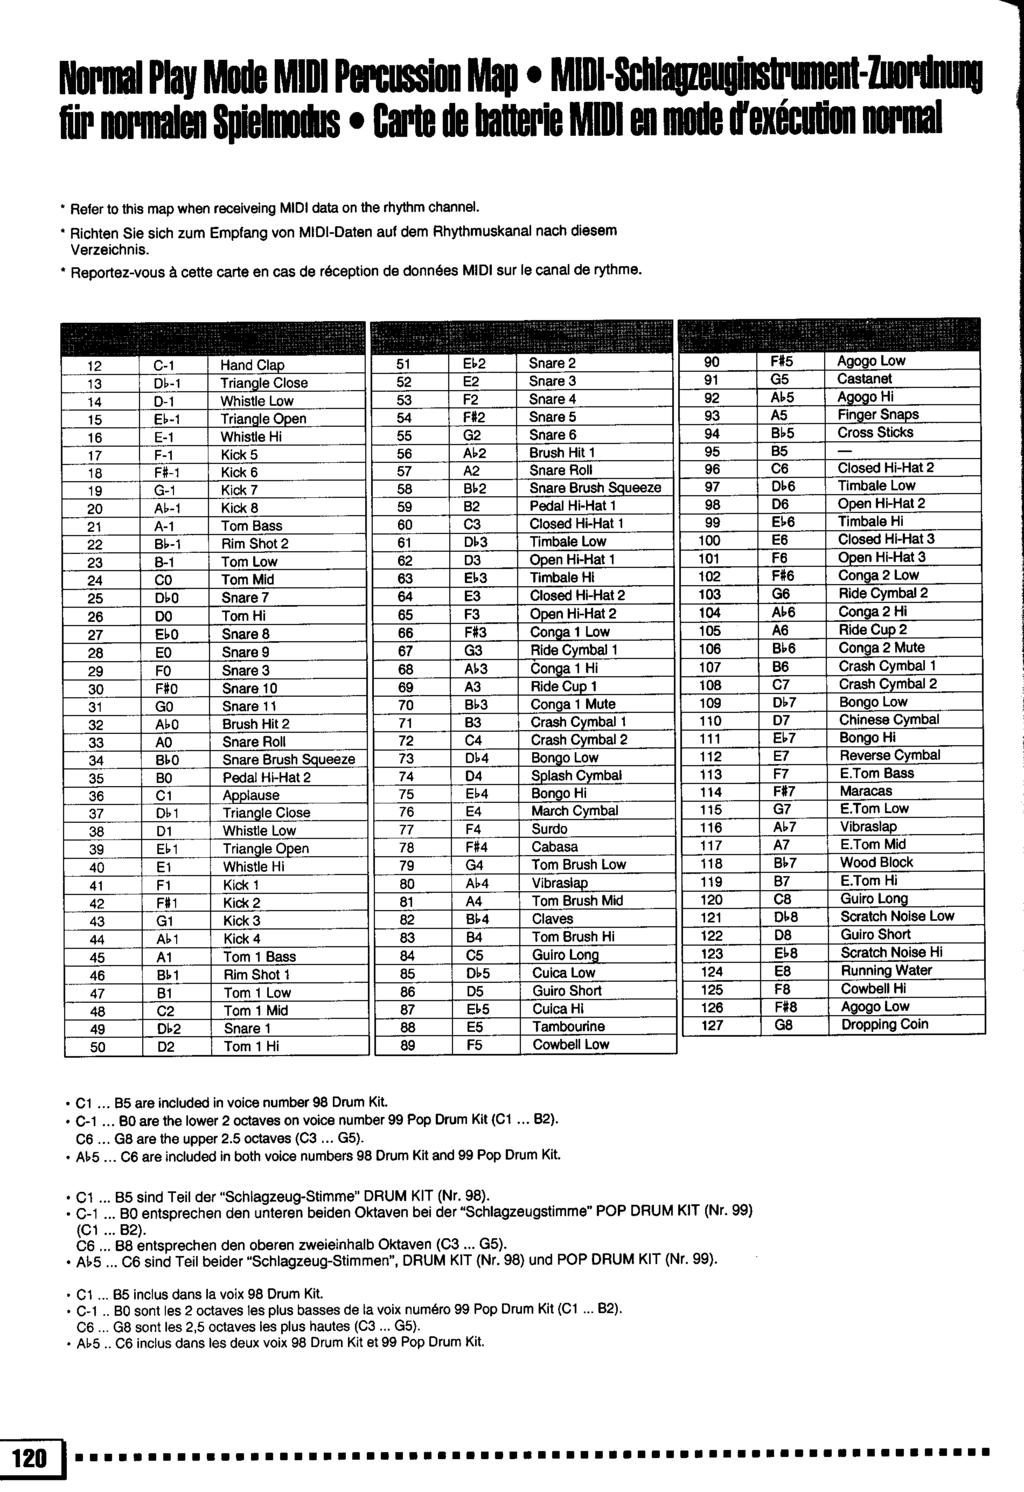
123
124
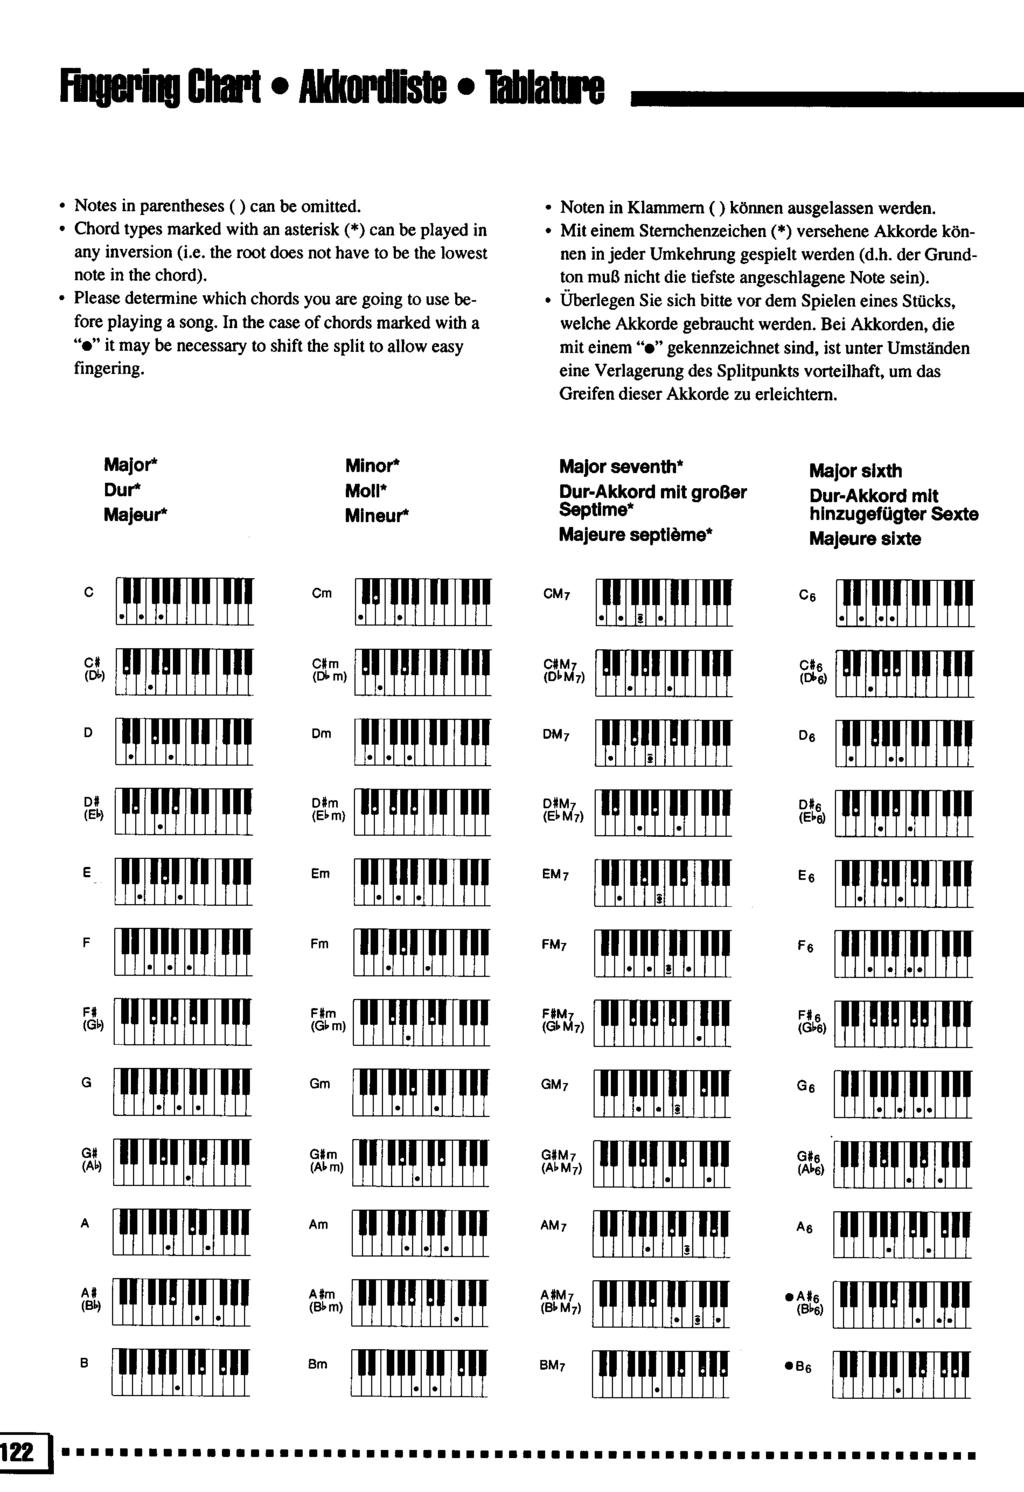
125
126
127
128
129
130
131
132
133
134
135
136
137
138
139
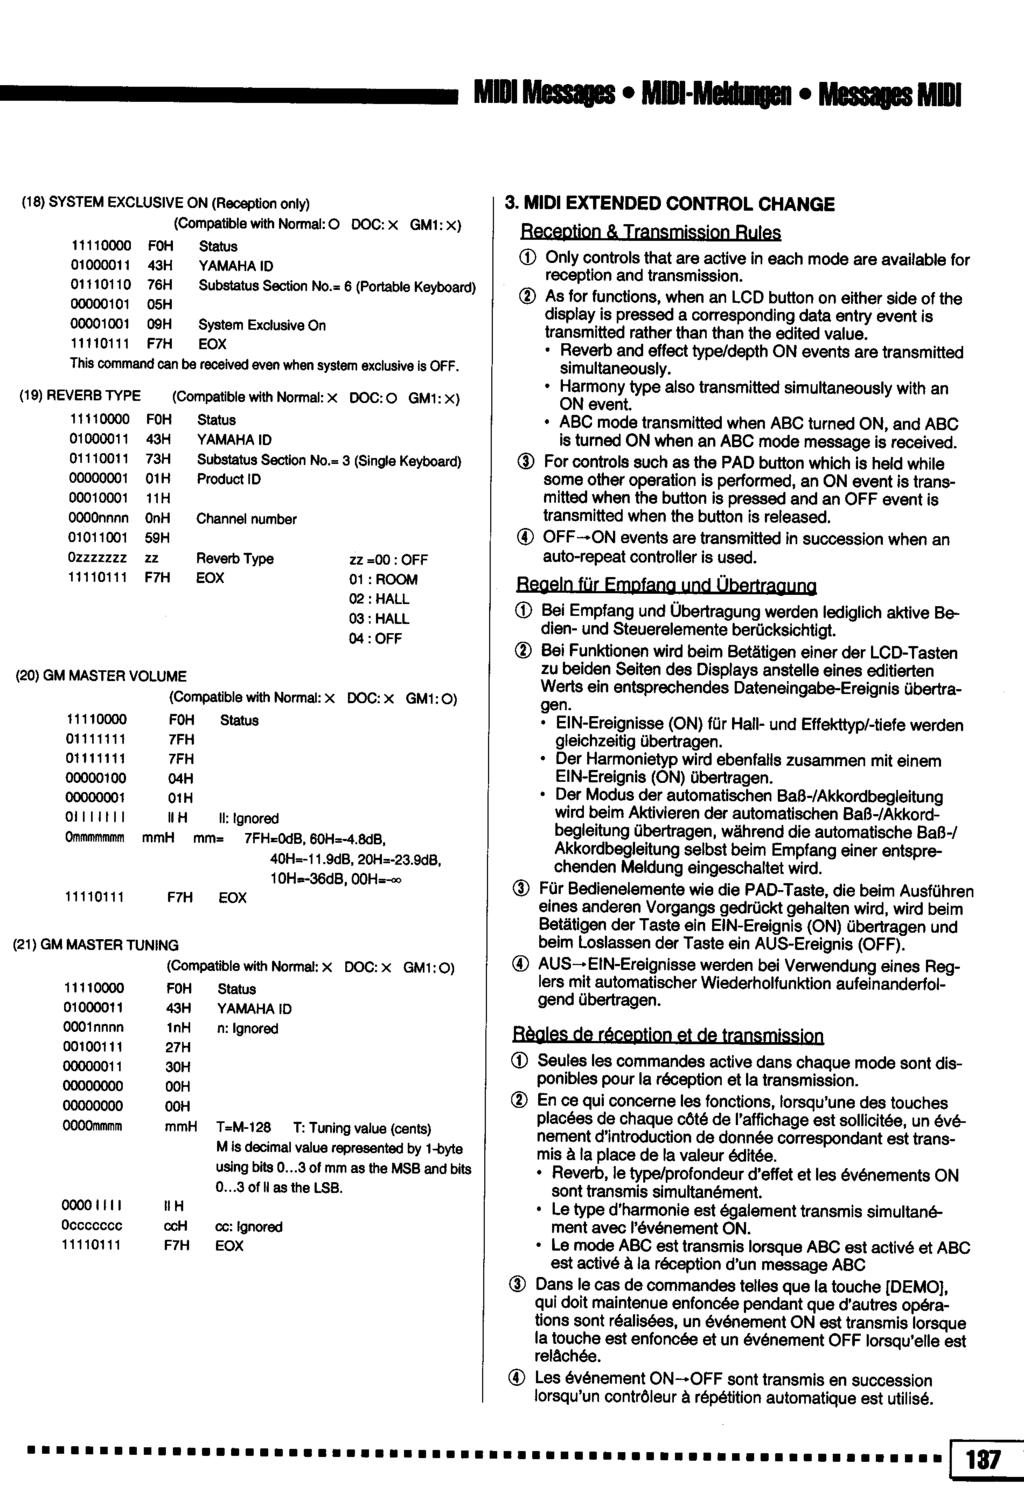
140
141

142
SPECIAL MESSAGE SECTION
 CAUTION RISK OF ELECTRIC SHOCK DO NOT OPEN AVIS: RISQUE DE CHOC ELECTRIQUE NE PAS OUVRIR. AUX OUT R L/L+R WARNING: TO REDUCE THE RISK OF FIRE OR ELECTRIC SHOCK, DO NOT EXPOSE THIS PRODUCT TO RAIN OR MOISTURE.
Important Safety Instructions
 Important Safety Instructions 1) Do not use near water. 2) Clean only with dry cloth. 3) Do not block any ventilation openings. 4) Do not place near any heat sources such as radiators, heat registers,
SPECIAL MESSAGE SECTION
 SPECIAL MESSAGE SECTION This product utilizes batteries or an external power supply (adapter). DO NOT connect this product to any power supply or adapter other than one described in the manual, on the
OWNER S MANUAL SUZUKI
 SUZUKI Pianos SS-100 DIGITAL PIANO OWNER S MANUAL SUZUKI 1 2 WELCOME! We would like to express our appreciation and congratulate you for purchasing this Suzuki digital piano. With proper care this piano
Dual and Split voice modes. One-touch Performance recall. High quality AWM piano and other sounds. Master keyboard features. Organ combination editing
 Congratulations! and thank you for purchasing the Yamaha P-. The P- is a high-performance electronic piano with full-scale, weighted action keyboard, a selection of high quality piano and other useful
Deluxe Home Digital Piano. Owner s Manual
 DP-77 Deluxe Home Digital Piano Owner s Manual Suzuki Musical Instrument Corporation P.O. Box 710459 Santee, California 92072-0459 800-854-1594 www.suzukimusic.com Copyright Suzuki Musical Instrument Corporation
OWNER S MANUAL SUZUKI
 SUZUKI Pianos SP-47 Portable Keyboard OWNER S MANUAL SUZUKI 1 2 WELCOME! We would like to express our appreciation and congratulate you for purchasing this Suzuki portable keyboard. This keyboard has been
QUICK START GUIDE FP-S SPINET DIGITAL PIANO. Designer Series
 QUICK START GUIDE FP-S SPINET DIGITAL PIANO Designer Series QUICK START GUIDE INDEX PLAYING THE DEMO SONGS... 2 PLAYING SONGS FROM THE FLOPPY DISKS... 3 BUY OR DOWNLOAD SONGS TO PLAY... 4 USING THE LCD
Please read the following carefully before use: Do not expose the piano to high temperature, direct sunlight and excessively dusty places.
 Using the Instruction Manual Thank you for purchasing this Digital Piano. The use of high technology and the most advanced sampling technique brings you high quality sound and enjoyment. The combination
SP-500 Main Features. EasyStart CONTENTS
 EasyStart 88 key RH2 (Real Weighted Hammer Action 2) keyboard. Different degrees of resistance from top to bottom. Velocity sensitive with 6 touch curves for custom response. TouchView Graphical user interface.
QUICK START GUIDE. GP-3 Mini-Grand Digital Piano
 QUICK START GUIDE GP-3 Mini-Grand Digital Piano QUICK START GUIDE INDEX PLAYING THE DEMO SONGS... 2 PLAYING SONGS FROM THE FLOPPY DISKS... 3 BUY OR DOWNLOAD SONGS TO PLAY... 4 USING THE LCD AND ITS CONTROLS..
Milano II / Milano IIG
 GALILEO Pianos Milano II / Milano IIG DIGITAL PIANO OWNER!S MANUAL 1 2 IMPORTANT SAFETY INSTRUCTION GENERAL PRECAUTIONS CAUTION RISK OF ELECTRIC SHOCK DO NOT OPEN! CAUTION: TO REDUCE THE RISK OF ELECTRIC
Digital Grand Player Piano. Owner s Manual
 Digital Grand Player Piano Owner s Manual Suzuki Musical Instrument Corporation P.O. Box 710459 Santee, California 92072-0459 800-854-1594 www.suzukimusic.com Copyright Suzuki Musical Instrument Corporation
Contents TAKING CARE OF YOUR DIGITAL PIANO...4 SERVICE AND MODIFICATION... 4 HANDLING AND TRANSPORT... PANEL CONTROLS... 6 CONNECTOR PANEL...
 Contents TAKING CARE OF YOUR DIGITAL PIANO...4 SERVICE AND MODIFICATION... 4 HANDLING AND TRANSPORT... 4 CLEANING... 4 LOCATION... 4 POWER... 5 PANEL CONTROLS... 6 CONNECTOR PANEL... 12 BOTTOM OF PIANO...
LEGATO. digital piano. owner's manual
 LEGATO digital piano owner's manual LEGATO DIGITAL PIANO CAUTION: TO REDUCE THE RISK OF ELECTRIC SHOCK, DO NOT REMOVE COVER OR BACK. NO USER-SERVICEABLE PARTS INSIDE. REFER SERVICING TO QUALIFIED SERVICE
QUICK START GUIDE. G-33 Digital Grand Piano
 QUICK START GUIDE G-33 Digital Grand Piano QUICK START GUIDE INDEX PLAYING THE DEMO SONGS... 2 PLAYING SONGS FROM THE FLOPPY DISKS... 3 BUY OR DOWNLOAD SONGS TO PLAY... 4 USING THE LCD AND ITS CONTROLS..
IMPORTANT Check your power supply
 IMPORTANT Check your power supply Make sure that your local AC mains voltage matches the voltage specified on the name plate on the bottom panel. In some areas a voltage selector may be provided on the
Important Safety Instructions
 Important Safety Instructions 1) Do not use near water. 2) Clean only with dry cloth. 3) Do not block any ventilation openings. 4) Do not place near any heat sources such as radiators, heat registers,
Controller DMX DC-1224
 Manual Controller DMX DC-1224 Table of Contents 1. Safety instructions... 4 1.1. FOR SAFE AND EFFICIENT OPERATION... 4 3. Overview... 6 3.1. Front view... 6 3.2. Rear view... 9 4. Operation guide... 10
Data handling. To ensure long, trouble-free operation, please read this manual carefully. Precautions
 E To ensure long, trouble-free operation, please read this manual carefully. Precautions Location Using the unit in the following locations can result in a malfunction. In direct sunlight Locations of
YAMAHA AUTHORIZED PRODUCT MANUAL DIGITAL RHYTHM PROGRAMMER
 YAMAHA AUTHORIZED PRODUCT MANUAL DIGITAL RHYTHM PROGRAMMER YAMAHA DIGITAL RHYTHM PROGRAMMER OWNER S MANUAL Congratulations on your purchase of the Yamaha RX5 Digital Rhythm Programmer! Your RX5 has been
COPYING A PATTERN...35
 f TABLE OF CONTENTS INTRODUCTION...5 WELCOME TO THE SR18 DRUM MACHINE!...5 GROUND RULES...5 CONNECTION DIAGRAM...8 TOP PANEL PHYSICAL LAYOUT...9 GENERAL CONTROLS...9 NAVIGATION BUTTONS...10 MODE BUTTONS...10
Reference Manual. Manual Development Group 2017 Yamaha Corporation Published 11/2017 PO-B0 v1.10
 Reference Manual This Reference Manual explains advanced features of Genos that are not explained in the Owner s Manual. Please read the Owner s Manual first, before reading this Reference Manual. Manual
Owner s Manual. Bedienungsanleitung. Mode d emploi. Manuale dell'utente. Manual del usuario. Manual do proprietário. Gebruikershandleiding
 Owner s Manual Bedienungsanleitung Mode d emploi Manuale dell'utente Manual del usuario Manual do proprietário Provision of Bluetooth functionality Please be aware that depending on the country in which
Elegant Styles, Refined Tones and Much More: Presenting the Flagship AT-90S Atelier. AT-90S
 Elegant Styles, Refined Tones and Much More: Presenting the Flagship AT-90S Atelier. AT-90S The Pinnacle of High-quality Organ Sound. The organ is a keyboard instrument with a long history, an instrument
INSTRUCTION MANUAL. 61-Key Electronic Teaching Keyboard SKY SKY3160. Ver. 2
 Ver. 2 INSTRUCTION MANUAL 6-Key Electronic Teaching Keyboard SKY2954 + SKY360 TOOLS REQUIRED WRENCH HARDWARE PERSON ASSEMBLY APPROXIMATELY 5 MIN. ASSEMBLY 2 5 x 35mm 5 x 35mm 4 5 x 25mm 3 4 PCS 4 PCS 8
DP-25 digital piano. user manual
 DP-25 digital piano user manual Musikhaus Thomann e.k. Treppendorf 30 96138 Burgebrach Germany Telephone: +49 (0) 9546 9223-0 E-mail: info@thomann.de Internet: www.thomann.de 25.02.2013 Table of contents
SDMK4. Digital Drum pads user s Manual. BEAT PEDAL 2 PEDAL 1 DRUM 1 DRUM 2 CHORD LEARNING RECORD DEMO TAP START METRONOME REVERB
 ON SDMK4 Digital Drum pads user s Manual BEAT SONG KITS PAD ASS. PEDAL PEDAL 2 DRUM DRUM 2 BASS CHORD OFF TAP START 2 3 4 5 6 SONG LEARNING RECORD METRONOME REVERB DEMO POWER MASTER VOLUME SONG VOLUME
Real panel Real panel screws. Real panel
 Classico 750 CAUTION Please take a few minutes to read the following pages of instruction and precaution. 1. Please use AC 110V power cord. 2. Use the AC power cord correctly. 3. Avoid injecting water
To ensure long, trouble-free operation, please read this manual carefully. Precautions
 Thank you purchasing the Korg ELECTRIBE M EM-1. In order to enjoy long and trouble-free use, please read this manual carefully and use the instrument correctly. E 1 To ensure long, trouble-free operation,
STAGE PIANO. Owner s Manual. 01 GrandPno 03 E.Piano 05 E.Piano 3 07 Clavi. 09 PercOrgn 11 ChurOrgn VOLUME
 MIN VOLUME MAX SAVE REC 01 GrandPno 03 E.Piano 05 E.Piano 3 07 Clavi 02 GrandPn 2 04 E.Piano 2 06 Harpsi 08 Vibra 13 RockOrgn 15 Harmnic 17 CleanGtr 19 Strings 14 Acordion 16 NylonGtr 18 FngrBass 20 SynStrs
SL-1. Digital Studio Piano. Owner s Manual
 SL-1 Digital Studio Piano Owner s Manual Welcome We would like to express our appreciation and congratulate you for purchasing this Suzuki digital piano. With proper care this piano will provide you with
24 CHANNEL DIMMER CONSOLE USER MANUAL
 PAGE 1 wdmlighting.com CHANNEL DIMMER CONSOLE USER MANUAL WDM LIGHTING 3 OAK LAWN AVE., STE. 1, DALLAS, TX 7519 Improvement and changes to specifications, design and this manual, may be made at any time
Owner s Manual. Contents. Main Specifications Roland RP501R: Digital Piano. Provision of Bluetooth functionality
 Owner s Manual Contents Operation Guide...2 Performing...2 Playing Back Songs...4 Using Automatic Accompaniment (Rhythm) That Matches Your Chords...5 Recording Performances...6 Playing Songs from a USB
SPECIAL MESSAGE SECTION
 O W N E R ' S M A N U A L EN SPECIAL MESSAGE SECTION This product utilizes batteries or an external power supply (adapter). DO NOT connect this product to any power supply or adapter other than one described
USER'S MANUAL. ADJ R Junostraat EW Kerkrade
 USER'S MANUAL ADJ R Junostraat EW Kerkrade www.adj.com Improvement and changes to specifications, design and this manual, may be made at any time without prior notice. All Rights Reserved Contents Features
Techni-Lux. COMMANDER 24&48 24&48 Ch DMX Controllers USER'S MANUAL. Please read before use V1.1
 Techni-Lux COMMANDER & & Ch DMX Controllers USER'S MANUAL Please read before use V1.1 COMMANDER & & Ch DMX Controllers Improvement and changes to specifications, design and this manual, may be made at
Quick Start. Congratulations on choosing of the Roland Digital Intelligent Piano KF-7! Score Display
 Quick Start Congratulations on choosing of the Roland Digital Intelligent Piano KF-7! Select/Listen to a Song The KF-7 features over 170 songs in its memory. Use this button to select a song. P. 6 Score
CVP-609 / CVP-605. Reference Manual
 CVP-609 / CVP-605 Reference Manual This manual explains about the functions called up by touching each icon shown in the Menu display. Please read the Owner s Manual first for basic operations, before
English. Light Operator 24 USER'S MANUAL. Please read before use
 English Light Operator USER'S MANUAL Please read before use Contents Light Operator Improvement and changes to specifications, design and this manual, may be may at any time without prior notice. All rights
IMPORTANT Check Your Power Supply
 IMPORTANT Check Your Power Supply Make sure that your local AC mains voltage matches the voltage specified on the name plate on the bottom panel. In some areas a voltage selector may be provided on the
Stereo Cassette Deck
 3-858-050-11(1) Stereo Cassette Deck Operating Instructions 199 by Sony Corporation 3-858-050-11 (1) WARNING To prevent fire or shock hazard, do not expose the unit to rain or moisture. To avoid electrical
PLL2210MW LED Monitor
 PLL2210MW LED Monitor USER'S GUIDE www.planar.com Content Operation Instructions...1 Safety Precautions...2 First Setup...3 Front View of the Product...4 Rear View of the Product...5 Quick Installation...6
USER MANUAL. 22" Class Slim HD Widescreen Monitor L215DS
 USER MANUAL 22" Class Slim HD Widescreen Monitor L215DS TABLE OF CONTENTS 1 Getting Started Package Includes Installation 2 Control Panel / Back Panel Control Panel Back Panel 3 On Screen Display 4 Technical
Owner s Manual LED COMMANDER 16/2
 Owner s Manual LED COMMANDER 16/2 Content Introduction...2 Technical Specification...2 Maintenance and care...2 Notes on safety...3 Features...4 Overview...5 Installation...6 Operation...6 Channel Assignment...7
USER MANUAL. 27 Full HD Widescreen LED Monitor L27ADS
 USER MANUAL 27 Full HD Widescreen LED Monitor L27ADS TABLE OF CONTENTS 1 Getting Started 2 Control Panel/ Back Panel 3 On Screen Display 4 Technical Specs 5 Care & Maintenance 6 Troubleshooting 7 Safety
DIGITAL PIANO. Owner s Manual
 DIGITAL PIANO Owner s Manual INFORMATION FOR YOUR SAFETY! THE FCC REGULATION WARNING (for USA) This equipment has been tested and found to comply with the limits for a Class B digital device, pursuant
PXL2760MW LED LCD Monitor
 PXL2760MW LED LCD Monitor USER'S GUIDE www.planar.com Content Operation Instructions...1 Safety Precautions...2 Package Overview...3 First Setup...4 Front View of the Product...5 Rear View of the Product...6
Reference Manual CVP-509 / 505 / 503 / 501
 CVP-509 / 505 / 503 / 501 Reference Manual This Reference Manual explains advanced features of the CVP-509/505/503/501 that are not explained in the Owner's Manual. Please read the Owner's Manual first,
Software version 2.0. Operator's Manual
 3 Software version 2.0 Operator's Manual By Roger Linn Copyright 1987, 1988, 1989 Akai Electric Co., LTD. Document revision date: April 20, 1989 4 READ THIS BEFORE YOU START! Power requirements Power requirements
Mackie Control and Cubase SX/SL
 Mackie Control and Cubase SX/SL - 1 - The information in this document is subject to change without notice and does not represent a commitment on the part of Steinberg Media Technologies AG. The software
PLL1920M LED LCD Monitor
 PLL1920M LED LCD Monitor USER'S GUIDE www.planar.com Content Operation Instructions...1 Safety Precautions...2 First Setup...3 Front View of the Product...4 Rear View of the Product...5 Installation...6
Model. Owner s Manual
 Model Thank you, and congratulations on your choice of a Hammond XLK-3. The XLK-3 is the lower keyboard unit for Hammond XK-3/3C. In order to get the most out of this instrument for many years to come,
28 & 32 & 40 & 55 & 65 & 84-INCH TFT-LCD 4K MONITOR
 28 & 32 & 40 & 55 & 65 & 84-INCH TFT-LCD 4K MONITOR INSTRUCTION MANUAL Please read this manual thoroughly before use, and keep it handy for future reference. TABLE OF CONTENTS 1, General information...
Show Designer 3. Software Revision 1.15
 Show Designer 3 Software Revision 1.15 OVERVIEW... 1 REAR PANEL CONNECTIONS... 1 TOP PANEL... 2 MENU AND SETUP FUNCTIONS... 3 CHOOSE FIXTURES... 3 PATCH FIXTURES... 3 PATCH CONVENTIONAL DIMMERS... 4 COPY
SP Apollon Stage Piano
 SP Apollon Stage Piano Users manual 00024016 Version 01/2012 Welcome Welcome... Thank you and congratulations on your purchase of the High-Performance STAGE PIANO. Your new High-Performance STAGE PIANO
FP-S SUZUKI SPINET DIGITAL PIANO OWNER S MANUAL. Designer Series
 SUZUKI PIANOS FP-S SPINET DIGITAL PIANO Designer Series OWNER S MANUAL SUZUKI 1 2 WELCOME! We would like to express our appreciation and congratulate you for purchasing this Suzuki digital piano. This
P116 SH SILENT PIANOS
 With magnificent cabinetry, spruce soundboard and back posts crafted to European preferences, the P116 delivers superb sound quality while remaining compact in appearance. Silent functionality has been
STAGE 2412 DMX 24 CHANNELS DMX CONSOLE FOR CONVENTIONAL LIGHTING
 English STAGE 1 DMX User Manual Rev. 11 STAGE 1 DMX CHANNELS DMX CONSOLE FOR CONVENTIONAL LIGHTING This symbol on the product or on its packaging indicates that this product shall not be trated as household
P121 SH SILENT PIANOS
 Designed in Europe to European preferences, the P121 boasts exquisite cabinetry, European spruce soundboard and back posts and the rich, expressive voice of a full-sized upright. Silent functionality has
Chapter 40: MIDI Tool
 MIDI Tool 40-1 40: MIDI Tool MIDI Tool What it does This tool lets you edit the actual MIDI data that Finale stores with your music key velocities (how hard each note was struck), Start and Stop Times
SPECIAL MESSAGE SECTION
 Owner s Manual SPECIAL MESSAGE SECTION This product utilizes batteries or an external power supply (adapter). DO NOT connect this product to any power supply or adapter other than one described in the
Edit Menu. To Change a Parameter Place the cursor below the parameter field. Rotate the Data Entry Control to change the parameter value.
 The Edit Menu contains four layers of preset parameters that you can modify and then save as preset information in one of the user preset locations. There are four instrument layers in the Edit menu. See
USAGE AND SAFETY PRECAUTIONS
 Operation Manual USAGE AND SAFETY PRECAUTIONS USAGE AND SAFETY PRECAUTIONS SAFETY PRECAUTIONS In this manual, symbols are used to highlight warnings and cautions for you to read so that accidents can be
VITEK VTM-TLM191 VTM-TLM240
 VTM-TLM191 VTM-TLM240 19 & 24 Professional LED Monitors with HDMI, VGA, and Looping BNC VITEK FEATURES 19 & 24 Wide Screen LED Display Panel HDMI, VGA, and Looping BNC Composite Video Inputs & Stereo Audio
4K LED MONITOR 430LED4K & 550LED4K INSTRUCTION MANUAL. Please read this manual thoroughly before use, and keep it handy for future reference.
 4K LED MONITOR 430LED4K & 550LED4K INSTRUCTION MANUAL Please read this manual thoroughly before use, and keep it handy for future reference. CONTENTS 1. GENERAL INFORMATION...3 2. 3. 1.1. 1.2. 1.3. 2.1.
Colour Control48 Order Code: Control48
 Colour Control48 Order Code: Control48 www.cobrainternational.com User Manual Cobra Colour Control 48 Dear Customer, Thank you for purchasing the Cobra Colour Control 48. With decades of experience in
PLL2710W LED LCD Monitor
 PLL2710W LED LCD Monitor USER'S GUIDE www.planar.com Content Operation Instructions...1 Safety Precautions...2 Package Overview...3 First Setup...4 Front View of the Product...5 Rear View of the Product...6
CONCERT CDP2400USB. User Manual. A50-A
 User Manual CONCERT CDP2400USB Enjoy the Sound of a Concert Grand - Play Straight Away with Included Piano Learning Software and USB Interface Thank you Thank you for choosing the CONCERT digital piano
OWNER S MANUAL SUZUKI
 SUZUKI PIANOS GP-7 BABY GRAND DIGITAL PIANO OWNER S MANUAL SUZUKI 1 2 WELCOME! We would like to express our appreciation and congratulate you for purchasing this Suzuki Baby Grand digital piano. This piano
PL2410W LCD Monitor USER'S GUIDE.
 PL2410W LCD Monitor USER'S GUIDE www.planar.com Content Operation Instructions...1 Safety Precautions...2 First Setup...3 Front View of the Product...4 Rear View of the Product...5 Quick Installation...6
Stereo Cassette Deck
 3-864-650-12(1) Stereo Cassette Deck Operating Instructions TC-TX333 1998 by Sony Corporation WARNING To prevent fire or shock hazard, do not expose the unit to rain or moisture. To avoid electrical shock,
YDP-103. Owner s Manual
 YDP-103 Owner s Manual Before using the instrument, be sure to read PRECAUTIONS on pages 5-7. For information on assembling the instrument, refer to the instructions at the end of this manual. EN 2 YDP-103
Classic Cantabile DP-60
 Classic Cantabile DP-60 Users manual 00022171/00023425/00023428 Version 01/2012 Important Notes Your piano will give you years of playing pleasure if you follow the simple rules given below: Location Do
Winmate Communication INC.
 20.1 Military Grade Display Model: R20L100-RKA2ML User s Manual Winmate Communication INC. May, 2011 1 IMPORTANT SAFETY INSTRUCTIONS Please read these instructions carefully before using the product and
Introduction...2. Features...2 Safety Precautions...2. Installation...4
 PE1900 Contents Introduction...2 Features...2 Safety Precautions...2 Installation...4 Unpacking the Display...4 Locations and Functions of Controls...4 Connections...5 Using Your Display...7 Turning the
USER GUIDE 8-CHANNEL DMX CONTROLLER December 2013 Version 1.0 CHASE / STROBE SPEED FADE SPEED RED GREEN BLUE WHITE AMBER DIMMER INSERT
 8-CHANNEL DMX CONTROLLER RED GREEN BLUE YELLOW 1 2 3 4 5 6 CYAN ORANGE PURPLE WHITE RED GREEN BLUE WHITE AMBER DIMMER RECORD INSERT DELETE TAP CLEAR MANUAL MUSIC 1 2 3 5 6 7 AUTO CHASE / STROBE SPEED 4
28 4K LED monitor. User Manual M284K
 28 4K LED monitor User Manual M284K CONTENTS Safety Information... 2 What s included..... 4 Getting Started....... 8 Troubleshooting.... 14 Specification.... 15 2 of 15 SAFETY INFORMATION Read these instructions
DMX OPERATOR PRO. User Manual
 User Manual (24-004-1262 Rev 2.0) E-mail: support@elationlighting.com Internet: http://www.elationlighting.com Sections: Table of Contents DMX OPERATOR PRO 1 : General Introduction..... 3 2 : Safety Information
USER MANUAL Full HD Widescreen LED Monitor L236VA
 USER MANUAL 23.6 Full HD Widescreen LED Monitor L236VA TABLE OF CONTENTS 1 Getting Started 2 Control Panel/ Back Panel 3 On Screen Display 4 Technical Specs 5 Care & Maintenance 6 Troubleshooting 7 Safety
Digital Piano YDP-88II IMPORTANT
 Digital Piano YDP-88II IMPORTANT Check Your Power Supply Make sure that your local AC mains voltage matches the voltage specified on the name plate on the bottom panel. In some areas a voltage selector
VG-17 SUZUKI SPINET DIGITAL PIANO OWNER S MANUAL. Designer Series
 SUZUKI PIANOS VG-17 SPINET DIGITAL PIANO Designer Series OWNER S MANUAL SUZUKI 1 2 WELCOME! We would like to express our appreciation and congratulate you for purchasing this Suzuki digital piano. This
Dynatone Digital Piano
 Dynatone Digital Piano The all new DYNATONE digital pianos combine the feel of a real grand piano keyboard with realistic piano and instrument voices to make them truly versatile musical instruments. The
Owner s Manual AC & BATTERY POWERED FET
 Owner s Manual AC DC AC & BATTERY POWERED FET Thank you, and congratulations on your choice of the BOSS RC-2 Loop Station. Before using this unit, carefully read the sections entitled: USING THE UNIT SAFELY
Stereo Cassette Deck
 3-864-773-11(1) Stereo Cassette Deck Operating Instructions TC-SD1 1998 by Sony Corporation WARNING WARNING To prevent fire or shock hazard, do not expose the unit to rain or moisture. To avoid electrical
Operation Manual. ZOOM Corporation. Reproduction of this manual, in whole or in part, by any means, is prohibited.
 Operation Manual ZOOM Corporation Reproduction of this manual, in whole or in part, by any means, is prohibited. USAGE AND SAFETY PRECAUTIONS SAFETY PRECAUTIONS In this manual, symbols are used to highlight
DG-200 SUZUKI DIGITAL GRAND PIANO OWNER S MANUAL
 SUZUKI Pianos DG-200 DIGITAL GRAND PIANO OWNER S MANUAL SUZUKI 1 2 WELCOME! We would like to express our appreciation and congratulate you for purchasing this Suzuki Digital Grand Piano. This piano has
CMX-DSP Compact Mixers
 CMX-DSP Compact Mixers CMX4-DSP, CMX8-DSP, CMX12-DSP Introduction Thank you for choosing a Pulse CMX-DSP series mixer. This product has been designed to offer reliable, high quality mixing for stage and/or
SUZUKI PIANOS G-33 DIGITAL GRAND PIANO OWNER' S MANUAL SUZUKI 1
 SUZUKI PIANOS G-33 DIGITAL GRAND PIANO OWNER' S MANUAL SUZUKI 1 2 GENERAL PRECAUTIONS PRODUCT SAFETY MARKINGS: Suzuki electronic products may have either labels similar to the graphics shown below facsimiles
SX-PR54/M DIGITAL ENSEMBLE. Operating Instructions
 DIGITAL ENSEMBLE SX-PR54/M Operating Instructions Before connecting, operating or adjusting this product, please read these instructions completely. Please keep this manual for future reference. This manual
PLAYMATE PROFESSIONAL STEREO 19 MIXER, USB/SD CARD AND BLUETOOTH PLAYER. User Guide and Reference Manual. page 1
 PLAYMATE PROFESSIONAL STEREO 19 MIXER, USB/SD CARD AND BLUETOOTH PLAYER User Guide and Reference Manual page 1 INTRODUCTION Congratulations and thank you for purchasing the NewHank Playmate mixer. This
USING THE UNIT SAFELY
 Owner s Manual 201a Before using this unit, carefully read the sections entitled: USING THE UNIT SAFELY (p. 3) and IMPORTANT NOTES (p. 5). These sections provide important information concerning the proper
DIGITAL PIANO. Owner s Manual
 DIGITAL PIANO Owner s Manual INFORMATION FOR YOUR SAFETY! THE FCC REGULATION WARNING (for USA) This equipment has been tested and found to comply with the limits for a Class B digital device, pursuant
DIGITAL PIANO. Owner s Manual
 DIGITAL PIANO Owner s Manual INFORMATION FOR YOUR SAFETY! THE FCC REGULATION WARNING (for USA) This equipment has been tested and found to comply with the limits for a Class B digital device, pursuant
y POWER USER Understanding Master Mode Phil Clendeninn Senior Product Specialist Technology Products Yamaha Corporation of America
 y POWER USER Understanding Master Mode Phil Clendeninn Senior Product Specialist Technology Products Yamaha Corporation of America This synthesizer is loaded with such a wealth of different features, functions
USER MANUAL Full HD Widescreen LED Monitor L215ADS
 USER MANUAL 21.5 Full HD Widescreen LED Monitor L215ADS TABLE OF CONTENTS 1 Getting Started 2 Control Panel/ Back Panel 3 On Screen Display 4 Technical Specs 5 Care & Maintenance 6 Troubleshooting 7 Safety
FXL8 Pro effects looper. user manual
 FXL8 Pro effects looper user manual Musikhaus Thomann e.k. Treppendorf 30 96138 Burgebrach Germany Telephone: +49 (0) 9546 9223-0 E-mail: info@thomann.de Internet: www.thomann.de 15.09.2014, ID: 337603
USER MANUAL Full HD Widescreen LED Monitor L215IPS
 USER MANUAL 21.5 Full HD Widescreen LED Monitor L215IPS TABLE OF CONTENTS 1 Getting Started 2 Control Panel/ Back Panel 3 On Screen Display 4 Technical Specs 5 Care & Maintenance 6 Troubleshooting 7 Safety
Tetrapad Manual. Tetrapad. Multi-Dimensional Performance Touch Controller. Firmware: 1.0 Manual Revision:
 Tetrapad Multi-Dimensional Performance Touch Controller Firmware: 1.0 Manual Revision: 2017.11.15 Table of Contents Table of Contents Overview Installation Before Your Start Installing Your Module Panel
K150 USER S MANUAL. Kurzweil Music Systems, Inc. Waltham, MA. June 1986 version KMSI P/N:
 K150 USER S MANUAL Kurzweil Music Systems, Inc. Waltham, MA June 1986 version KMSI P/N: 91002501 Copyright (C) 1986 Kurzweil Music Systems, Inc. Preface......................... 6 How To Use This Manual.............