Table of Contents. Table of Contents
|
|
|
- Jasmine Harmon
- 5 years ago
- Views:
Transcription


1
2 Table of Contents Table of Contents 1. SAFETY PRECAUTIONS 2. GENERAL FEATURES 3. HARDWARE DESCRIPTION 4. HOW TO CONNECT YOUR RECEIVER 5. SYSTEM SETUP 6. MENU STRUCTURE 7. MENU OPERATION 7.1. USER SETTING 7.2. CHANNEL ORGANIZATION 7.3. SYSTEM INFORMATION 7.4. INSTALLATION 7.5. MULTIMEDIA 7.6 ENTERTAINMENT 7.7. CHANNEL LIST 7.8. CHANNEL GUIDE 7.9. AUDIO ZOOM FUNCTION MULTI PICTURE SLEEP TIMER FIND CHANNEL ADDITIONAL SETTING HOW TO USE USB 8. HOW TO RECORD & PLAYBACK 8.1. QUICK RECORD 8.2. PLAYBACK 9. TROUBLE SHOOTING 10. TECHNICAL SPECIFICATIONS 11. PROGRAMING THE REMOTE CONTROL 12. WARRANTY CARD * To enhance the product, functions are subject to change without notice.

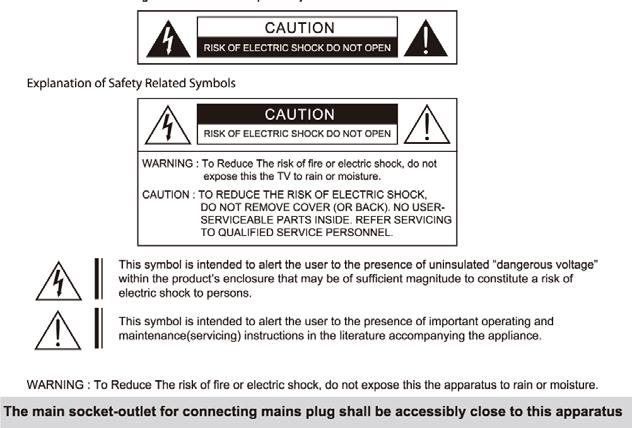
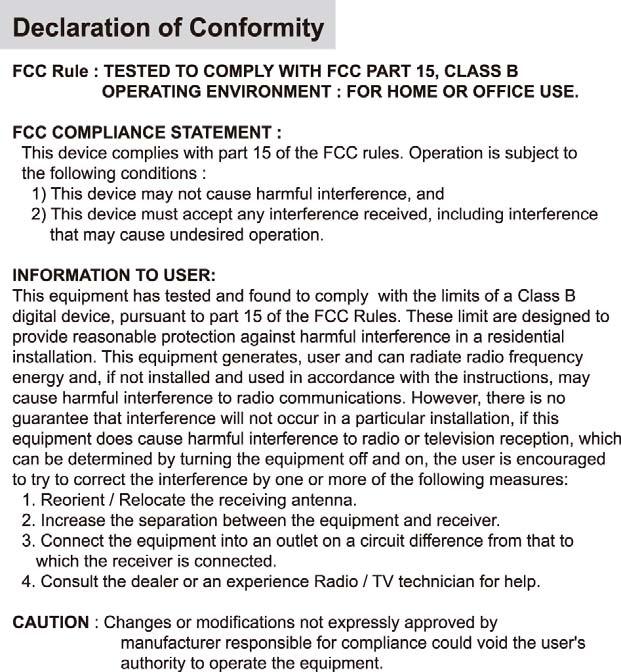
3 IMPORTANT SAFETY INSTRUCTION DECLEARATION OF CONFORMITY 3 4


4 SAFETY PRECAUTIONS 1. SAFETY PRECAUTIONS 1.1. ACCESSORIES This receiver has been manufactured to satisfy the international standards. Please read the following recommended safety precautions carefully. MAINS SUPPLY : AC 95~240V 50/60Hz safety Check the following accessories when you open the box. LOCATION : Place the receiver indoor. Place receiver away from potential hazards such as houseplants, lightning, rain, and direct sunlight. OVERLOADING : Do not overload wall outlets, extension cords or adapters as this can result in fire or electrical shock. LIQUIDS : Keep liquids away from the receiver. CLEANING : Before cleaning the receiver, disconnect it from the wall socket. Use a cloth lightly dampened with water (no solvents) to clean the exterior. User s manual RCU Batteries VENTILATION : Do not block the receiver ventilation holes. Ensure that free airflow is maintained around the receiver. Never set the receiver on soft furnishings or carpets. Do not use or store the receiver where it is exposed to direct sunlight, or near heater. Never stack other electronic equipment on top of the receiver. Place the receiver at least 30mm from the wall. ATTACHMENTS : Do not use any attachment that is not recommended by the manufacturer, as it may cause a hazard or damage the equipment. SERVICING : Do not attempt to service this product yourself. Any attempt to do so will void the warranty. Refer all servicing to a qualified service agent. LIGHTNING : If the receiver is installed in an area subject to intense lightning activity, protection devices for the receivers main connector and modem telephone line are essential. The individual manufacturer's instruction for safeguarding other equipment, such as TV set, HiFi, etc., connected to the receiver, must also be followed during lightning storms. Serial cable DiSEqC S/W RCA cable The device, packing material, and batteries should be disposed of properly. Please obtain appropriate information about regulations in your community, and dispose of all in accordance with regulations at the separate locations provided. 5 6
5 GENERAL FEATURES HARDWARE DESCRIPTION 2. GENERAL FEATURES Fully MPEG2 & DVBS2 Compliant Input frequency 950 ~ 2150 MHz Supports EPG,PIG Supports SCPC & MCPC from C/Kuband 1 LNB Input Tuner with Loop Through IF Signal Tuner Symbol Rate: 1~45MS/s Fast booting & auto scan Quick channel changing Max channels (TV & radio) programmable True color OSD & easy GUI A lot of OSD Language supported Radio channel background Display Favorite Channel List programmable Master PIN Code Function & Parental Lock Function 100Steps Volume control Automatic Detection of Forward Error Correction Window based S/W Download Program Supported By RS232 Serial Port Set to Set Download (Main Program, Channel Data) 7 Keys on the Front Panel (Power On/Off, Channel Up/Down, Volume Up/Down, Menu, Ok) Various LNB Polarity Control * 22KHz Switching Control 3 RCA Output for Video,Audio L/R 3 RCA outputs for Component(Y, Pb,Pr) USB Host Interface S/W Upgade Supported by USB Port 9Days EPG (Electronic Program Guide) Support S/PDIF Output for Digital Audio SVIDEO Output Zoom Function Multi Picture USALS 3. HARDWARE DESCRIPTION 3.1. FRONT PANEL 1) POWER: This key is used to turn the receiver on and off (stand by). 2) CH : These keys are used to change the channels. 3) VOL : These keys are used to increase and decrease the volume level manually. 4) MENU : This key is used to open up the menu. 5) OK : This key is used to enter and confirm any data to the receiver in the menu systems. 6) INFRARED SENSOR : This is to receive the IR commands from the RCU. Do not block the view of the sensor. 7) DISPLAY : This display will show the current channel number(* Channel name). While the receiver is in standby mode, the display will show the current time. (* available for VFD model only ) 8) USB HOST PORT: This is used to connect your USB Device to your receiver. (Either front side USB port or rear side must be selected in the menu.) 7 8

 SERIAL PORT: Connect your receiver to a computer with a serial cable. This port can be used for upgrading software. 4) USB HOST PORT: This is used to connect your USB Device to your receiver.")
 VIDEO, AUDIO R/L, COMPONENT(Y, Pb, Pr): These RCA connectors are used to connect any external video and audio.")
6 REMOTE CONTROL UNIT 3.2. REAR PANEL 3.3. REMOTE CONTROL UNIT 1) LNB IN: This port is to connect the coaxial cable from LNB of your Dish. The IF input is provided through this port and the input frequency range is 950~2150MHz. Also, the voltage switching 13V and 18V is passed through this port. 2) IF OUT: To enable the connection of an analog receiver, the receiver is provided with this port. Connect this port to LNB IN port of the other receiver via RF Cable. 3) SERIAL PORT: Connect your receiver to a computer with a serial cable. This port can be used for upgrading software. 4) USB HOST PORT: This is used to connect your USB Device to your receiver. (Either front side USB port or rear side must be selected in the menu.) 5) HDMI: To connect HDMI input of TV or PC monitor. 6) VIDEO, AUDIO R/L, COMPONENT(Y, Pb, Pr): These RCA connectors are used to connect any external video and audio. 7) S/PDIF DIGITAL OUTPUT: This port is for the connection to the external HiFi system which has an optical S/PDIF input interface (Option). 8) SVIDEO: Connect to your TV with a SVideo cable. 9) POWER INPUT: This is the AC main power cord. The input AC volts range is 95V to 240V, 50Hz/60Hz supply. 10) POWER SWITCH: This is a switch to turn on and off the AC main power. 9 10
7 HOW TO CONNECT YOUR RECEIVER SYSTEM SET UP 4. HOW TO CONNECT YOUR RECEIVER Please DO NOT plug in the main power supply cord until you complete all the connections. 5. SYSTEM SET UP 5.1. Automatic Channel Search You can automatically detect and save all TV and radio channels as follows : System Connection Connect the receiver to all peripheral devices. Power On Turn on the power of the receiver and other devices LOCATION OF THE RECEIVER Your receiver should be placed under proper ventilation. Do not place the unit in enclosed cabinets that will restrict the flow of air, resulting overheating. The location should be safeguarded from direct sunlight, excess moisture, rough handling or household pets. Avoid stacking other electronic components on top of the receiver. The location should be safely accessible by the cable CONNECTING TO THE ANTENNA After installing your Antenna system, connect the coaxial cable from LNB of your antenna to DISH IN" terminal marked at the rear of the receiver. All cable connectors should be finger tightened; do not use any kind of wrench on cable over connectors. The cable should be 75Ω impedance coaxial twisted at the end with an F type connector. Main Menu / Installation / Antenna Setup Automatic Configuration Setting Select Main Menu / Installation / Antenna Setup using CH ( ) & OK keys. Select the satellite which you want to search using VOL (. ) keys. Insert all information of your antenna CONNECTING TO EXTERNAL DEVICES 1) CONNECTING TO THE TV After installing your antenna system, connect the coaxial cable. To connect the receiver with your television, you can follow methods; Through RF cable, RCA cable, COMPONENT cable and SVideo cable. Connect the RF cable to the terminal marked OUT TO TV at the rear panel of the receiver and its other end to the TV RF input socket. 2) CONNECTING EXTERNAL HiFi AUDIO SYSTEM To connect any external Audio HiFi system, the receiver is provided with two RCA connectors at the back of the receiver, marked with L and R respectively to connect the left and right audio. 3) CONNECTING TO THE OTHER SATELLITE RECEIVER Connect the satellite antenna cable to the DISH IN socket on the receiver. With other connector, connect the LOOP OUT socket on the receiver to the DISH IN socket of the other receiver. Main Menu / Installation / Auto Scan Press OK key, and the receiver will automatically search for all TV/Radio channels from a satellite


8 MENU STRUCTURE 6. MENU STRUCTURE Manual Channel Search for Transponder You can search and save all TV and radio channels of a transponder as follows : Main Menu / Installation / Channel Scan Select Menu / Installation / Channel Scan. Select the satellite which you want to search. Antenna Configuration Setting Insert all information of your antenna. Manual Channel Search Select the transponder from the transponder list you want to search. If you cannot find it from the transponder list, insert all transponder information (i.e., Channel no, Frequency, and Bandwidth). Press the OK key, and the receiver will search for all channels of the selected transponder

9 MENU OPERATION 7. MENU OPERATION The main menu is classified into several sub menus which will carry out the various operation individually. MAIN MENU After installing your dish system and receiver with appropriate connectors, plug in the AC main power and turn on the receiver. Press the MENU key of the RCU. You will see the Main Menu on the TV screen as follow. Please note that the Common Interface menu will be displayed for the CI Model. You can move into the desired submenu Using the left/right / up / down keys(.,. ). Press OK key to confirm your selection. If the Main Menu is locked, note that you should enter the PIN code in order to move into the corresponding submenu in case of Edit Channels menu, Edit Favorites menu and Installation menu. The default factory PIN code is Press the menu key or exit key to return to previous menu. 1. USER SETTING This menu helps you to set up System. Select User Setting menu in Main Menu, and will be asked to enter your PIN Code. 1. A. PARENTAL CONTROL This function prevents children or unauthorized persons from watching programs. Also you can change PIN(Personal Identification Number) code. Select Parental Control menu in User Setting menu, and the following screen will be displayed. 1.A.1 Receiver Lock To lock receiver, select Receiver Lock in the Parental Control menu and change it to On mode using the left/right keys (. ). 1.A.2 Menu Lock To lock the Main Menu, select Menu Lock in the Parental Control menu and change it to On mode using the left/right keys (. ). 1.A.3 Maturity Rate You can set the maturity rate of the receiver. If program rate is higher than the receiver, PIN code window will appear. 1.A.4 Change PIN Code You can change your PIN code from factory default value 0000 as follows: Select Change PIN Code in the Parental Control. Press OK key. Then you will be asked for a new PIN code. Once you enter a new PIN code, the receiver will ask you to enter it in again. After you enter a new PIN code twice, the PIN code is changed permanently. If you forget the PIN code, you need to contact the distributor to reset the PIN. 1. B. TIME SETTING You can change the time of your receiver and also switch on/off the timer function in this menu. Select Time Setting item in the User Setting menu and the following screen will be displayed

10 Time Mode Time Adjustment Current time Summer Time On time Off time Event time TV Screen Type Display Mode Menu Transparency Menu Language Audio Language Information timeout USB Port Audio Type : Select the time mode of your receiver. In Auto mode, your receiver will use the information from the satellite as time reference. In manual mode, you can set the time of your receiver manually. : Set the time offset from the UTC (GMT). Useful in auto mode only. : Set the current time manually. Useful in manual mode only. : Enable or disable the Summer Time. Useful in auto mode only. : Set the time when the receiver will be automatically turned on : Set the time when the receiver will be automatically turned off. : You can set the additional timer. 1.C. SYSTEM SETTINGS This menu helps you to Set up mode, language, and screen type Select System Settings menu in User Setting. : You can select your TV type : You can select the display mode. : You can select the transparency of the menu. : You can select the menu language. : You can select the audio language. : You can select the timeout of the Channel Information menu. : You can select USB port of the front or the rear. : You can select the audio priority. Press the menu key or exit key to return to previous menu. 1.D. EPG SETTING This menu helps you to set the maximum time for EPG. 1.E. OPTION This menu helps you to set the additional options. Sort By SID Previous Channel : If this is on, channel list will sort by service ID. : You can select the operating type of last key Main Menu Display Style DVR Stop Key 2. CHANNEL ORGANIZATION This menu helps you to edit the favorite Channel List and Channels. Select Channel Organization menu in Main Menu, and the following Screen will be displayed. 2.A. EDIT CHANNELS You can edit channels on various channel lists channel lock, delete channel, move channel, edit the name of a channel, and sort the channel list. Select Edit Channels menu in Channel Organization, and you will be asked to enter your PIN code. You can find the following Edit Channels screen by entering it. 2. A.1. Channel Lock Select the LOCK icon using the left/right keys (. ). Select the channel that you want to lock or unlock from the channel list using the up/down keys (. ) and the page up/down keys( ). Press the OK key to confirm your selection. Also, you can use the key to select either TV channel list or Radio channel list. Once the channel is locked, every time you try to watch the program, you will be asked to enter PIN code. Press the menu key or exit key to return to previous menu. 2. A.2 Delete Channel Select the DELETE icon using the left/right keys(. ). Select the channel that you want to delete from the channel list using the up/down keys(. ) and the page up/down keys( ). Press the OK key to confirm your selection. Also, you can use the key to select either TV channel list or Radio channel list. Press the menu key or exit key to return to previous menu. 2. A.3 Move Channel : You can select the display style in main menu : If this is off, the stop key will be operated like the pause key in DVR menu Select the MOVE icon using the left/right keys(. ). Select the channel that you want to move from the channel list using the up/down keys(. ) and the page up/down keys( ). Press OK key to confirm your selection. Press F2 key to move start. Move it to the position where you want to place it using the up/down keys(. ) and the page up/down keys( ). Press the OK key to confirm. Also, you can use the key to select either TV channel list or Radio channel list. Press the menu key or exit key to return to previous menu
. Press OK key to confirm. Save the character currently selected using the F1 key.")
11 2. A.4 Edit Channel Name Select the RENAME icon using the left/right keys(. ). Select the channel that you want to edit from the channel list using the up/down keys(. ) and the page up/down keys( ). Press OK key to confirm your selection. Select the character which you want to edit using the browse keys(.,. ). Press OK key to confirm. Save the character currently selected using the F1 key. Also, you can use the key to select either TV channel list or Radio channel list. Press the menu key or exit key to return to previous menu. 2. A.5 Sort Channel List Select the SORT icon using the left/right keys(. ). Press OK key to confirm. Select the sort type which you want to sort using the up/down keys(. ). Press the OK key to confirm. Also, you can use the key to select either TV channel list or Radio channel list. Press the menu key or exit key to return to previous menu. 2.B. EDIT FAVORITES You can edit the favorite channel list, such as add/delete a channel or move its position, which facilitates you to easily find your favorite channel from the favorite channel list. The favorite channel is classified into one of 8 favorite categories depending on its genre. Select Edit Favorites menu in Channel Organization, and you will be asked to enter your PIN code. You can find the following Edit Favorite screen by entering it. 2. B.1 Add Favorite Channel You can choose TV channel list or Radio channel list in an alternative way by pressing the key on the RCU. By pressing FAV key on the RCU, you can choose your favorite channel group out of 8 favorite groups. Select the ADD icon using the left/right keys(. ). Select a channel that you want to add into the favorite channel list using the up/down keys(. ) and the page up/down keys ( ). Press the OK key, and the selected channel will be added to the favorite channel list. Press the menu key or exit key to return to previous menu. 2. B.2. Delete Favorite Channel You can choose TV channel list or Radio channal list in an alternative way by pressing the key on the RCU. By pressing FAV key on the RCU, you can choose your favorite channel group out of 8 favorite groups. Select the DELETE icon using the left/right keys(. ). Select a channel that you want to delete from the favorite channel list using the up/down keys(. ) and the page up/down keys( ). Press the OK key, and the selected channel will disappear from the favorite channel list. Press the menu key or exit key to return to previous menu. 2. B.3. Move Favorite Channel You can choose TV channel list or Radio channel list in an alternative way by pressing the key on the RCU. By pressing FAV key on the RCU, you can choose your favorite channel group out of 8 favorite groups. Select the MOVE icon using the left/right keys(. ). Select a channel that you want to move using the up/down keys(. ) and the page up/down keys( ). Press OK key to confirm your selection. Move it to the position where you want to place it using the up/down keys(. ) or, and the page up/down keys( ). Press the OK key to confirm. Press the menu key or exit key to return to previous menu. 2. B.4. Rename Favorite Group You can choose TV channel list or Radio channel list in an alternative way by pressing the key on the RCU. By pressing FAV key on the RCU, you can choose your favorite channel group out of 8 favorite groups. Select the RENAME icon using the left/right keys(. ). Press the OK key and select the character which you want to edit using the browse keys(.,. ). Press the OK key to confirm. Save the character currently renamed using the F1 key. Press the menu key or exit key to return to previous menu. 2. B.5. Sort Channel List You can choose TV Channel list or Radio channel list in an alternative way by pressing the key on the RCU. By pressing FAV key on the RCU, you can choose your favorite channel group out of 8 favorite groups. Select the SORT icon using the left/right keys(. ). Press OK key to confirm. Select the sort type which you want to sort using the up/down keys(. ). Press the OK key to confirm. Press the menu key or exit key to return to previous menu


12 3. SYSTEM INFORMATION Distributor supports useful information and new software for the receiver. Select the firmware upgrade file and press OK. 3. A. RECEIVER INFORMATION This menu displays the information of S/W version. 3. B. RECEIVER UPGRADE You can upgrade the software of this receiver through serial port or USB port when the new software is released. Please contact the distributor for receiver upgrade. When file transfer is completed, the receiver will be automatically rebooted. 3. B.1. USB Firmware upgrade using USB flash drive. Copy the firmware upgrade file to a USB flash drive. Connect the USB flash drive to USB port in a receiver. Go to System Information then select Receiver Upgrade. Select USB and press OK button. 3. C. FACTORY DEFAULT This is to restore the factory set values in case the user has encountered some problems after changing any new values of channel data and others which may be an error. Select Factory Default menu in User Setting menu and press OK key. If you want to continue, select option Yes.The receiver will be reset to settings automatically. Please note that the Factory Default procedure may take a few minutes


13 4. INSTALLATION 4.A. ANTENNA SETUP Installation menu helps you to setup a variety of parameters necessary for receiving signal, add new service, upgrade the new software and reset the channel data. Select Installation menu in main menu, and you will be asked to enter your PIN code. You can find the following Installation screen by entering it. LNB Power LNB Type LNB Freq. 22KHz DiSEqC 1.0 Motor : Depending on the user s antenna LNB, you can supply either LNB power by setting ON or not by setting OFF. Normally set this to ON. : You can select the LNB type. : You can select the predefined LNB frequency or manually enter a specific frequency in MHz unit by pressing numeric keys. : In case you are using two antennas connected to a 22KHz tone switch box, you can supply either 22KHz by setting ON or off by setting OFF to select antenna. : If you have DiSEqC box, you can choose port by selecting port number. Otherwise, choose none. : If you have a DiSEqC 1.2 motorised system, then you can take advantage of the DiSEqC 1.2 functions available. Choose Installer as Motor and press OK key. After that, adjust antenna direction using browse keys. Your receiver includes the preprogrammed information of transponders contained in various satellites. You can update the transponder list preprogrammed for a satellite by adding a new transponder to it or modifying the information of the existing transponder. (Refer to the Channel Scan described in section 4.B) Select Antenna Setup menu in Installation menu and the following screen will be displayed. Select the desired satellite using the left/right keys(. ). Set LNB Power, LNB Type, LNB Freq, 22KHz, and DiSEqC 1.0 fields to the appropriate value using the left/right keys(. ) at each field. 4. A.1. USALS Please go to Antenna Setup and select USALS from motor. Press the OK key then Popup will appear. Press arrow button to write Longitude Press arrow button to write Latitude, then OK to work

. Press OK key, and select the desired transponder using the up/down keys (. ). Press OK key to start the manual searching for selected transponder.")

14 4. B. CHANNEL SCAN It will be more convenient to use Channel Scan procedure when you want to search channel for a specified transponder offered from the satellite. As in Antenna Setup, Channel Scan also searches all channels broadcasted over a specific transponder using its predefined information. You can add a new transponder if you cannot find it on the predefined transponder list. Select Channel Scan menu in Installation menu, and the following screen will be displayed. Select the Search/Edit TP icon using the left/right keys(. ). Press OK key, and select the desired transponder using the up/down keys (. ). Press OK key to start the manual searching for selected transponder. You can see the progressive status of channel searching. If you cannot find the desired transponder from the transponder list, you can add by inputting appropriate parameter values for a new transponder using the F1 key. When you want to change the parameter of an existent transponder, select the parameter using the F1 key, change its value and press the Exit key. Correctly set various parameters. Freq. S/R PoI. FEC : Input the frequency of the transponder you want to find manually. : Inputs the symbol rate of the transponder you want to find. : Select the polarization of the transponder you want to find. In the case of horizontal,18v and in the case vertical, 13V are output through LNB line. : Select the FEC of the transponder you want to find. You can select the value of 1/2, 2/3, 3/4, 5/6, 7/8 or auto. 4. C. AUTO SCAN 4. D. BLIND SCAN Check the signal strength. Press OK key to start the scan procedure. You can see the progressive status of channel searching. Please note that the scan procedure may take a few minutes. Press the menu key or exit key to return to previous menu. Blind Scan search the channel when you don't know the transponder information. Press the "OK" key to start the blind scan procedure and the following screen will be displayed. Please note that the scan procedure may take a few minutes. Press the "menu" key or "exit" key to return to previous menu


15 5. MULTIMEDIA 5.C. Time shift You can play a MP3 Player, JPEG Viewer and recorded files in this menu. 5.A. USB Storage You can enable or disable the timeshift function, and set the maximum operating time. This menu helps you to Remove, Scan, and Format the USB device To remove USB device from your receiver, select Remove menu before you remove it. Please select Scan menu, if your USB device is not scanned automatically. Format menu helps you to delete all data in USB device. * Note: If you do not practice this remove menu before removing your USB device, the device might not be recognized next time. 5.B. DVR You can play the recorded file in the USB in this menu. Please connect USB device to the host port and press OK key to watch the file what you want. 5.D. JPEG Viewer This screen represents how to record & playback. For the specific information, please refer to the 8. How to Record & Playback. You can confirm the image file in the USB. Please connect the USB device to the host port and select the image files on the list by using the up/down keys ( ) and push OK key to see the images
 and play music by pressing OK key or Play key.")
 key. Press Pause key to pause.")


16 5. E. MP3 Player You can enjoy listening to music in this function. Please connect USB device saved MP3 to the host port, then select the MP3 file on the list by using the up/down keys ( ) and play music by pressing OK key or Play key. You can select / deselect each MP3 file by using the F1 key to listen to songs. And to select / deselect all MP3 files in the folder, use the F2 key. After selecting the list of songs, press F4 key to play. You can play the previous / next songs by using the Left/Right ( ) key. Press Pause key to pause. In addition, you can stop playing by using Exit or Stop key. 6. ENTERTAINMENT Two arcade games are provided : Sokoban Sudoku into that specific channel. You can also select a specific satellite using the SAT key. When you press the key, you can alternatively select TV or radio channel list. When you press the menu key or exit key to return to previous menu. 8. CHANNEL GUIDE Press GUIDE key, and the following screen will be displayed. It will give the titles of the current and next programs on different channels. The information may include: current time / channel name, name of the current and next program, the start and total time of the current program, the start and total time of the next program. Program information will be available only when it is included in the transmission. When you press the key, you can alternatively select TV or radio channel guide. Press the menu key or exit key to return to previous menu. When you press GUIDE key again, Daily Guide will be displayed. You can see all events for selected channel. 7. CHANNEL LIST This menu helps you to easily select the channel that you want to watch. The channel list is separately constructed for each satellite. Press OK key, and the following screen will be displayed. You can get information of channel number, channel name, and whether the program is scrambled or locked. To watch a specific channel, first select it by pressing the up/down keys (, ) and the page up/down keys ( ).Then, press OK key. This enables you to move 9. AUDIO Press AUDIO key. Some programs are broadcasted with one or more alternative language soundtracks. You can select the preferred audio language for soundtrack using the up/down keys (, )

 and push the Save button by using up/down keys ( ) and OK key.")

 : Move the ZOOM box Page Up/Page Down keys ( ) : Increase or decrease the ZOOM box OK key :")

 keys and press OK.")
 keys and OK key in Multipicture Screen.")

17 10. ZOOM FUNCTION 12. SLEEP TIMER This function enables to turn off the receiver after certain time. Select by using the left( ) button after pressing F4 on the live screen. Use left/right keys( ) and push the Save button by using up/down keys ( ) and OK key. On the live TV screen or paused TV screen, you can magnify some region of TV screen. Press Zoom Key key and the ZOOM box will be display. You can use following keys. Up/Down/Left/Right keys (.,. ) : Move the ZOOM box Page Up/Page Down keys ( ) : Increase or decrease the ZOOM box OK key : Watch the ZOOM box to full screen or return to ZOOM box Exit key : Return to the live screen 11. MULTI PICTURE You can use the Multipicture Function using F1 key. You can watch four, six or nine pictures at the same time using this function. And select the number of pictures using (, ) keys and press OK. After that, you can see the MultiPicture Screen. Also, you can select channels using(,, ) keys and OK key in Multipicture Screen. The channel of your selection is only live signal when you selected one channel of the several channels. The channels of which is not selected are just pictures. 13. FIND CHANNEL You can seek the channel with the channel s name. Select by using the Down button after pressing F4 on the live screen. You can move the keyword by using the left/right ( ) Up/Down ( ) key. After selecting each character by using the OK key, you can move to the list of searched channels by using the F1 key. 4 Picture 6 Picture 9 Picture 31 32


18 HOW TO RECORD & PLAYBACK 8. HOW TO RECORD & PLAYBACK 14. ADDITIONAL SETTING This function enables to select the additional option rapidly on the live screen. It can be selected by using the Up key after pressing F4 on the live screen. Control the selection of radio background screen saver QUICK RECORD * Note: If recording time is less than 30 seconds, the event will not be saved. This is to avoid the unexpected start of recording Quick Record Push the key. And the current channel will be recorded. If you want to stop the record, push the key. 15. HOW TO USE USB(External Storage) External HDD / External Memory (connected to USB Host port) 1) You can use external memory with FAT or FAT32 file system * The External Storage which has only FAT system unformatted by Settop box doesn't support recording and capturing functions PLAYBACK To watch the recorded program: 1. Select a recorded program to watch by using up/down keys ( ) and push OK key. (Please refer to the 5.B DVR 2. When the Playback is starting, Playback Box is shown as the left picture. You can control Playback easily and check the Recorded file name, Progress Time, Book Mark, and Repeat status etc. 3. To stop the Playback, push key
19 TROUBLE SHOOTING 9. TROUBLE SHOOTING Fast Forward Fast forward during playback is available. 1) In Playback, push key. 2) In order to increase playback speed, push key several times. 3) For returning to normal speed, push key. * 5 steps of speed are available for Fast forward Fast Rewind Fast rewind is available during playback. 1) In Playback, push key. 2) In order to increase rewind speed, push key several times. 3) For returning to the normal speed, push key. * 6 steps of speed are available for Fast rewind Slow Motion For slow motion playback, 1) In playback, push key. 2) For returning to normal speed, push key Pause To pause the screen, push key. Problem Solution Does not display LED on the front panel or the receiver has no power No pictures on the screen No sound Remote Control does not operate Poor picture quality About the Receiver Connect the power cord to the power outlet properly. Check if the receiver is in standby mode. Check if the video output port is firmly connected to the TV. Check if you have selected the correct channel or video output on your TV. Connect audio cords properly. Check volume level of the TV. Press key. Point remote control directly towards the receiver. Check and replace batteries. Check the signal strength in the ANTENNA SETUP menu. If this is low, try to adjust the alignment of your antenna. Frequent Rebooting after Poweron Turn on after removing the signal cable from LNB: If the rebooting does not occur; check the LNB! (possible cause is LNB shortcircuit) Abnormal operation when two STBs are connected by LOOP OUT Searching Signal On Screen Error Messages Turn off one of the two STBs. Connect the antenna cable properly. Check the signal strength in the ANTENNA SETUP menu
20 TECHNICAL SPECIFICATIONS 10. TECHNICAL SPECIFICATIONS Power Supply Audio/Video Output Input Voltage Type Demodulator : AC 95V~240V 50Hz / 60Hz : SMPS Digital Output Audio Output Video Output Digital Audio SVideo COMPNENT : HDMI : 2 x RCA Cinch : 1 x RCA Cinch : 1 x S/PDIF (Optical) : 1 x SVIDEO : 3 x RCA Cinch Waveform Input Symbol Rate FEC Decoder Tuner & Channel Frequency Range Signal Level LNB Power & Polarization 22 KHz Tone DiSEqC Control : QPSK,8PSK : DVBS : 245 Ms/s DVBS2 : 1030 Ms/s (QPSK), 1031 Ms/s (8PSK) : Convolutional Code Rate 1/2,2/3, 3/4, 5/6,7/8 DVBS2 : Auto, 1/2, 3/5, 2/3, 3/4, 4/5, 5/6, 8/9, 9/10 (QPSK) Auto, 3/5, 2/3, 3/4, 5/6, 8/9, 9/10 (8PSK) : 950 ~ 2150 MHz : 25 ~ 65 dbm : Vertical : V, Horizontal : +18 V Current : Max. 500 ma, overload Protection : Frequency : 22±4 KHz Amplitude 0.7±0.2V : Version 1.0/1.2 Compatible, USALS compatible USB Interface USB Data rate Serial Data Interface Signal Connector Type Memory Flash Memory Graphic(MPEG) & System DRAM EEPROM : USB Host Port (MAX Load 200mA) : 12M bps : RS232, Max bps : 9 Pin DSub (male) : 16MB : 128MB + 64MB : 2K VIDEO DECODER Transport Stream Profiles and levels Compressed data input Input Rate Video Formats Video Output Video Resolution : MPEG2 ISO/IEC : MPEG4 AVCH.264 HP@L4 : Parallel peak input rate: 160 Mbps : Max. 15 Mbit/s : 4:3, 16:9 Letter box (Default) : CVBS (Default),CY,CB.CR,SVIDEO : 1080i, 720p, 480p/576p, 480i/576i 37 38
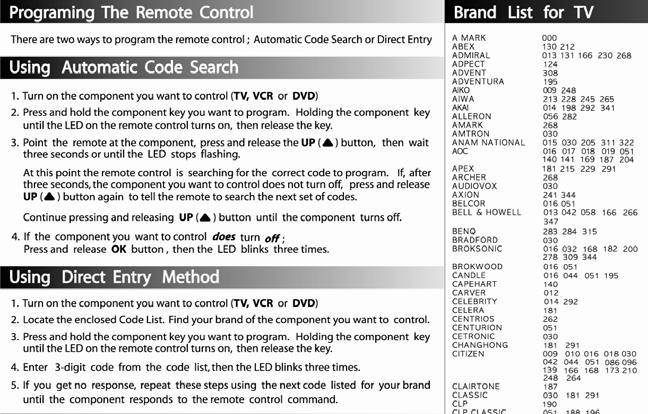
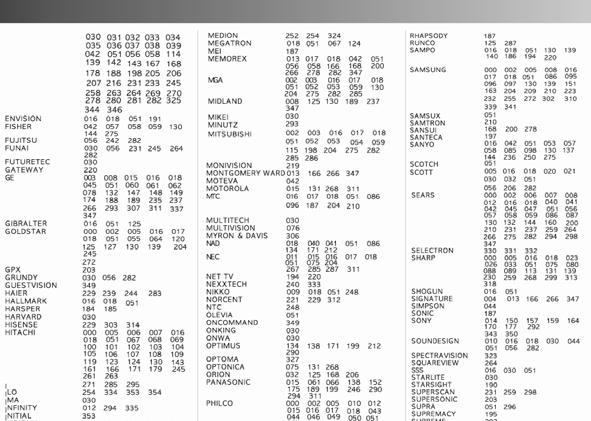
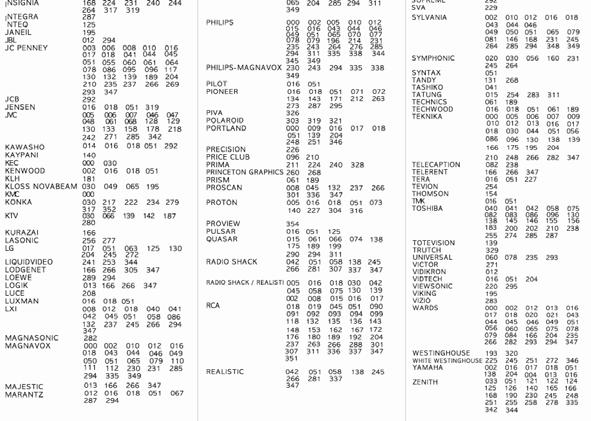
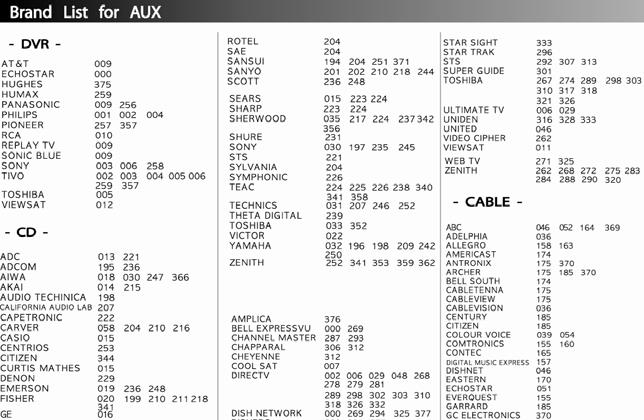
21 PROGRAMING THE REMOTE CONTROL 11. PROGRAMING THE REMOTE CONTROL 39 40

22 41 42

23 WARRANTY CARD 12. WARRANTY CARD 43 44
User s Manual. Digital Satellite Receiver. INSTRUCTION ABOUT WEEE SYMBOL I/B parenthesis to offer information for user. Viaccess CAS Embedded
 INSTRUCTION ABOUT WEEE SYMBOL I/B parenthesis to offer information for user. User s Manual Viaccess CAS Embedded This marking shown on the product or its literature, indicates that it should not be disposed
NMS ETA TM Stereo Advanced Digital TV Set-top Box
 Digital TV HD Set-top Box STB2-T2 NMS ETA TM Stereo Advanced Digital TV Set-top Box User Guide CONTENTS Safety Information... 3 Introduction... 4 Set-top Box Front Panel... 4 Set-top Box Back Panel...
User s Manual Digital Satellite Receiver
 A_ENG_110944 User s Manual Digital Satellite Receiver Please read the entire manual thoroughly and retain it for future reference. ENG - 1 General Safety Warning CAUTION RISK OF ELECTRIC SHOCK DO NOT OPEN
Table of Contents. Table of Contents. Safety Warning General Information. Installing Equipment Channel List Guide Menu Guide Main Page
 TABLE OF CONTENTS Table of Contents Table of Contents Safety Warning General Information Package Contents & Features Front Panel Rear Panel Remote Control Unit (RCU) Programing the Remote Control Installing
SYMBOLS USED ON THE RECEIVER... 3 SAFETY INSTRUCTIONS... 4 I.GENERAL INFORMATION...
 Table of Contents SYMBOLS USED ON THE RECEIVER... 3 SAFETY INSTRUCTIONS... 4 I.GENERAL INFORMATION... 5 1. Preface... 5 2. Main Features... 5 3. General Operation of the Receiver... 6 4. Front Panel...
CONNECTION TO THE SATELLITE DISH LNB
 Safety Instructions Safety Instructions This product has been manufactured to satisfy the international safety standards. Please read all of safety and operating instructions before operating the product
Throughout the whole user manual, pay special attention to the following marks that
 Notice Warnings, Cautions and Notes Throughout the whole user manual, pay special attention to the following marks that indicate hazardous situations. Warning ** Indicates a hazardous situation which could
GDB9 INSTRUCTION MANUAL DIGITAL TERRESTRIAL RECEIVER
 GDB9 INSTRUCTION MANUAL DIGITAL TERRESTRIAL RECEIVER Goodmans Support: www.goodmans.co.uk/support Please read these instructions before use and keep for future reference IMPORTANT SAFETY INSTRUCTIONS Thank
Thank you for purchasing STB10HD Digital High Definition Set Top Box.
 Thank you for purchasing STB10HD Digital High Definition Set Top Box. This manual will help you to install, use and maintain the receiver. Please read this manual carefully before operating your unit and
Contents. Safety instructions Reference 1.1 Genareal Features Delivery... 04
 HD 580 user manual Contents Safety instructions... 03 1. Reference 1.1 Genareal Features... 04 1.2 Delivery... 04 2. Names and key assignment 2.1 Front view... 05 2.2 Rear view... 05 2.3 Remote Control...
S7030PVR User Manual
 S7030PVR User Manual Important Safety Instructions 1) Do not use this apparatus near water. 2) Clean only with dry cloth. 3) Do not block any ventilation openings, install in accordance with the instructions.
STM 26 HD. DVB-S2+T2/C Compact meter User Manual. Ref R13. CAHORS Digital CS Cahors Cedex 9 FRANCE
 STM 26 HD DVB-S2+T2/C Compact meter User Manual Ref 0145225R13 Preface USER MANUAL Please read this manual carefully before using your Digital Sat meter for the first time. This operating manual will help
Remote Control Unit
 Contents Declaration of Conformity --------------------------------------------------------------------------------- 3 General Information -----------------------------------------------------------------------------------------
Quick Start Digital Satellite Receiver
 Quick Start Digital Satellite Receiver Support of SD (MPEG2), DVB-S system Standard resolution video output - SCART Compatible with Diseqc 1.0, 1.1, 1.2, and USALS Electronic Program Guide - EPG Multilingual
GENERAL INFORMATION INSTALLATION MENU INFORMATION. Main Features For your Safety Unpacking General Operation RCU Rear Panel.
 GENERAL INFORMATION 3 Main Features For your Safety Unpacking General Operation RCU Rear Panel 3 4 7 7 8 9 INSTALLATION 10 MENU INFORMATION Main Menu 1. Installation 1.1 Satellite list 1.2 Dish Setting
Front and Rear Panel Remote Control Connecting to a Television...4. Connecting to an Audio System...5
 Table of Contents Front and Rear Panel... 1 Remote Control...... 2 Connecting to a Television...4 Connecting to an Audio System...5 Connecting to a DVD Recorder or VCR... 6 First Time Installation... 7
User manual FT-8100 HD. English
 User manual FT-8100 HD English WARNING!!! On the USB Memory Function for FT-8100 HD model, user can make recording or playing function using by external USB devices such as USB Flash Memory Disk or external
DIGITAL SATELLITE RECEIVER ESR-D101 INSTRUCTION MANUAL
 DIGITAL SATELLITE RECEIVER ESR-D101 INSTRUCTION MANUAL 1 SATETY INSTRUCTION Please read the following instructions carefully Do not overload the following wall outlets, extension cords or integral convenience
Xsarius Satmeter Pro. Manual
 Xsarius Satmeter Pro Manual 1 2 Directory of content Introduction Directory of content 3 Introduction 3 Satmeter Pro 02 Frontpanel & buttons 6 Xsarius provides high quality products that enable you to
User Manual High Definition Digital Set Top Box DVBT9070 Please read this User Manual carefully to ensure proper use of this product and keep this man
 User Manual High Definition Digital Set Top Box DVBT9070 Please read this User Manual carefully to ensure proper use of this product and keep this manual for future reference. Important Safety Instructions
HRS 8590 LAN. User s Manual
 HRS 8590 LAN User s Manual Content Safety Precaution...3 1. Reference... 4 1.1 General Features... 4 1.2 Accessories... 4 2. Product Overview... 5 2.1 Front Panel... 5 2.2 Rear Panel... 6 2.3 Remote Control
User s Guide. Digital Satellite Receiver
 User s Guide Digital Satellite Receiver Before Getting Started Information contained in this manual is subject to change without notice. No part of this publication may be copied, reproduced, or translated
DIGITAL SET TOP BOX STB 7017 INSTRUCTION MANUAL
 DIGITAL SET TOP BOX STB7017 INSTRUCTION MANUAL STB 7017 CHANNEL After Sales Support Now you have purchased a Tevion product you can rest assured in the knowledge that as well as your 3 year parts and labour
Xpresionn Digital Terrestrial Receiver. User Guide
 Xpresionn 2150 Digital Terrestrial Receiver User Guide GENERAL INFORMATION...3 A) SAFETY PRECAUTIONS...3 B) MAIN FEATURES...4 C) CONTENTS OF THE PACKAGING...4 D) REMOTE CONTROL...5 INSTALLATION...6 A)
Quick Start Digital Satellite Receiver HD
 Quick Start Digital Satellite Receiver HD One slot for Smart Card in Conax system One slot for Common Interface Module Support of SD / HD (MPEG2 / MPEG4 H.264), DVB-S, DVB-S2 system High resolution video
FV400 DIGITAL TV RECEIVER WITH MODULATOR INSTRUCTION MANUAL
 FV400 DIGITAL TV RECEIVER WITH MODULATOR INSTRUCTION MANUAL Please read this instruction manual carefully before using your receiver Table of Contents Introduction-----------------------------------------------------------------------------
PART 1 English 1.0 Usage
 SAT OUT SAT IN Thank you for choosing this Strong satellite receiver. This receiver is of our latest development and it is designed to be capable of safely install your receiver and to achieve its optimum
User's Manual 700HDMI PVR
 Digital Satellite Receiver User's Manual 700HDMI PVR INDEX INDEX... 3 Precautions... 5 1. Important Safety Instructions... 5 2. Notice... 5 3. Copyright... 6 4. Disclaimer... 6 Before You Begin... 7 1.
8.2 EPG Subtitle Teletext Additional Information Trouble Shooting Technical Specification...
 HD AX 150 Content 1. Reference... 4 1.1 General Features... 4 2. Product Overview... 5 2.1 Front Panel... 5 2.2 Rear Panel... 5 2.3 Remote Control Unit (RCU)... 6 3. Installation... 7 3.1 Antenna Settings...
MAX T200 HD QUICK INSTALLATION GUIDE
 MAX T200 HD QUICK INSTALLATION GUIDE MAX T200 HD QUICK INSTALLATION GUIDE CONTENT receiver BATTERIES x 2 REMOTE CONTROL Quick installation guide Quick Installation Guide The lightning flash with arrowhead
The following symbols will serve as follows: Indicates any other additional important or helpful information. Indicates warning information.
 Contents 1 2 HD2011IR User Manual Notice This manual can help you to become familiar with the many great features of our high definition digital Satellite receiver, as well as how to use and operate these
User s Guide. HD Satellite Receiver Pansat 9500HDX
 User s Guide HD Satellite Receiver Pansat 9500HDX Panarex Electronics Sun Valley, California, U.S.A. c 2011 by Panarex Electronics 1 CONTENTS 1 - GETTING STARTED... 4 1.1 Introduction... 4 1.2 Caution...
Instructions for use. UFS 810 English IMPORTANT READ CAREFULLY BEFORE USE
 Instructions for use UFS 810 English IMPORTANT READ CAREFULLY BEFORE USE List of Contents 1 About these instructions...4 1.1 Contents...4 1.2 Markings...4 1.2.1 Pre-requirements for certain functions...4
HDTV-Sat-Irdeto-Receiver
 HDTV-Sat-Irdeto-Receiver TABLE OF CONTENTS 1 SAFETY ADVICE... 4 2 QUICK SETUP... 6 3 FEATURES... 8 4 HOW TO CONNECT YOUR RECEIVER... 9 5 HARDWARE:... 11 6 WATCHING TV... 15 7 MENU OPERATION... 23 8 EDITING
healing HHR787 HD Digital Terrestrial Twin Tuner Recorder Operating Manual INTRODUCTION... 3 HHR787 FEATURES... 4 SAFETY INSTRUCTIONS...
 CONTENTS INTRODUCTION... 3 HHR787 FEATURES... 4 SAFETY INSTRUCTIONS... 5 FRONT PANEL AND REAR PANEL...6 and 7 REMOTE CONTROL UNIT KEY FUNCTIONS...8 and 9 REMOTE CONTROL BATTERY CARE... 10 INSTALLATION
Content. Safety Precaution General Features Accessories Front Panel Rear Panel Remote Control Unit...
 Content Safety Precaution...3 1. Reference 1.1 General Features...4 1.2 Accessories...5 2. Basic Function 2.1 Front Panel...6 2.2 Rear Panel...7 2.3 Remote Control Unit...8 3. Installation and Connection
DURING A LIGHTNING STORM,
 Safety Instructions Safety Instructions This product has been manufactured to satisfy the international safety standards. Please read all of safety and operating instructions before operating the product
User Manual. High Definition Digital Set Top Box HDSTB250
 User Manual High Definition Digital Set Top Box HDSTB250 CHANNEL HDSTB250 Please read this User Manual carefully to ensure proper use of this product and keep this manual for future reference. Important
Digital Terrestrial Television Receiver USER S MANUAL
 # 5024 Digital Terrestrial Television Receiver USER S MANUAL CAUTION RISK OF ELECTRIC SHOCK DO NOT OPEN This symbol is intended to alert the user to the presence of insulated dangerous voltage within the
DVB-T2. Digital Terrestrial Receiver WD-822T2 USER S MANUAL
 DVB-T2 Digital Terrestrial Receiver WD-822T2 USER S MANUAL Index Important Safety Instructions... 3 Main Features.... 5 Front and Rear Panel.... 6 Remote Control..... 7 Installing the Batteries..... 8
Safety warning Important Safety Instructions. Wall Mount Specifications. Electronic Program Guide. Lock Menu 18. PVR File System
 LT-32N370Z 32 INPUT Safety warning Important Safety Instructions Wall Mount Specifications Electronic Program Guide Lock Menu 18 PVR File System 11 11 11 14 15 16 17 19 20 21 21 22 23 24 25 INPUT AAA
ATLANTA ASF 2033HD+ DVB-S/S2 METER. User`s Manual
 ATLANTA ASF 2033HD+ DVB-S/S2 METER User`s Manual Buttons and Indicators... 2 How to measure... 3 Main menu... 4 LNB Setting... 4 Edit Satellite... 6 Spectrum Chart... 7 Constellation... 9 Angle Calculation...
HD Digital Satellite Receiver. User s Manual
 HD Digital Satellite Receiver ZDX-670 User s Manual Keep this manual for future reference II General Safety This STB has been manufactured to meet international safety standards. Please read the following
User s Manual. ZvSync - NA. HD Digital Tuner/Decoder QAM
 User s Manual ZvSync - NA HD Digital Tuner/Decoder QAM Notice Warnings Cautions and Notes Throughout the entire user s manual, pay special attention to the following marks that indicate hazardous situations:
English DMB-118HDMK3
 English DMB-118HDMK3 Table of Contents Safety Information...1 System Connection...1 Remote Control...2 First Time Installation...3 Basic Operation...3 Change Channel...3 Volume and Mute...3 Subtitle/Audio
Instructions for use GB
 Instructions for use DIGITAL TERRESTRIAL RECEIVER SAFETY INSTRUCTIONS SAFETY INSTRUCTIONS This STB has been manufactured to satisfy international safety standards. Please read the following recommended
USER S MANUAL. Digital Satellite Receiver
 USER S MANUAL Digital Satellite Receiver E109000257A STRONG & Co. (FAR EAST), LTD. P. O. Box : 85, YOKOHAMA, KANAGAWA-KEN JAPAN 231-91 - FAX : +81 45 662-4957 Website : www.strong-technologies.com E-mail
User Manual Of Digital Set Top Box Manhattan RC-1978
 User Manual Of Digital Set Top Box Manhattan RC-1978 Please read this User Manual carefully to ensure proper use of this product and keep this manual for future reference Table of Contents Important Safety
English SAFETY PRECAUTION DO NOT INSTALL THE RECEIVER: PAG. 2
 U4109 SAFETY PRECAUTION The lightning fl ash with arrowhead symbol, within an equilateral triangle, is intended to alert the user to dangerous voltage and to prevent from a risk of electric shock. Warning:
English CONTENTS 1. GUIDE OUTLINE THE MENU OSD INSTRUCTION TECHNICAL SPECIFICATION...17
 USER S MANUAL English CONTENTS 1. GUIDE...2 1.1 IMPORTANT SAFETY INSTRUCTIONS...2 1.2 UNPACKING...2 1.3 PRODUCT OVERVIEW& ILLUSTRATION...3 1.4 INSTALLATION OF METER...4 2. OUTLINE...5 3. THE MENU OSD INSTRUCTION...6
CONNECTION TO THE SATELLITE DISH LNB
 Safety Instructions Safety Instructions This product has been manufactured to satisfy the international safety standards. Please read all of safety and operating instructions before operating the product
For Freeview HD User s Manual
 extra Terrestrial HD For Freeview HD User s Manual 1 Table of contents 1 INTRODUCTION...4 2 MAIN FUNCTIONS AND FEATURES...4 3 THE REMOTE CONTROL...5 4 FRONT AND REAR PANEL...7 4.1 FRONT PANEL... 7 5 FIRST
Table of Contents. 1. Safety Use. 2. General Description. 3. Connection Diagram. 4. Operations and Management. 4.1 Display Status. 4.
 DTM-HD01 Thank you for buying this encoder modulator. Please read this manual carefully to install, use and maintain the encoder modulator in the best conditions of performance. Keep this manual for future
OPERATION Channel Manager HDD Installation... 22
 1.General Information... 3 2. Main Features... 3 3. FOR YOUR SAFETY... 4 4. ACCESSORIES... 4 OVERVIEW... 6 1. REMOTE CONTROL KEY... 6 2.FRONT PANEL... 8 3.REAR PANEL... 9 CONNECTION DIAGRAMS... 11 1. PVRX2
The product must be installed in accordance with national regulations.
 Important safety instructions to be kept with the product Please read attentively To prevent fire and electric shock, do not expose this receiver to rain or moisture. In order to avoid any possible risk
Contents. 1. Introduction Overview 1.2 Main Features. 2. Safety/Precautions Safety 2.2 Precautions
 HTS 9300 Contents 1. Introduction 2 1.1 Overview 1.2 Main Features 2. Safety/Precautions 3 2.1 Safety 2.2 Precautions 3. Check Point before Use 5 3.1 Accessories 4. Controls/Functions 6 4.1 Front Panel
Be sure to run the vehicle engine while using this unit to avoid battery exhaustion.
 CAUTION: TO REDUCE THE RISK OF ELECTRIC SHOCK DO NOT REMOVE COVER (OR BACK) NO USER-SERVICEABLE PARTS INSIDE REFER SERVICING TO QUALIFIED SERVICE PERSONNE; Please Read all of these instructions regarding
SAFETY PRECAUTION ENGLISH DO NOT INSTALL THE RECEIVER: PAG. 2
 MAX S92+ HDMI SAFETY PRECAUTION The lightning fl ash with arrowhead symbol, within an equilateral triangle, is intended to alert the user to dangerous voltage and to prevent from a risk of electric shock.
DSR 9500A FTA, CI, EM VIA, VIA CI. Instructions for use REV 1.0 DIGITAL SATELLITE RECEIVER MF A
 DSR 9500A FTA, CI, EM VIA, VIA CI Instructions for use REV 1.0 GB MF68-00247A DIGITAL SATELLITE RECEIVER SAFETY INSTRUCTIONS This STB has been manufactured to satisfy international safety standards. Please
S7070rHD-XM USER MANUAL
 S7070rHD-XM USER MANUAL CONTENTS GENERAL INFORMATION 2 Features and Unpacking Remote Control Rear Panel Connections Connecting your S7070rHD Freeview EPG 3 4 5 5 6 FIRST TIME INSTALLATION 7 MENU INFORMATION
5 Getting Started Connecting the DVB-T Receiver First Steps... 9
 Table of Contents 1. Introduction... 2 2. Features... 3 3. Safety Notes... 4 4. Your Receiver and its Functions... 5 4.1 Remote Control Functions... 5 4.2 Front Panel Controls... 7 4.3 Rear Panel Connections...
Quick Start Digital Terrestrial Receiver
 Quick Start Digital Terrestrial Receiver Support of SD / HD (MPEG2 / MPEG4 H.264), DVB-T system PVR Ready - possibility to record on external USB drive Time Shift (video pausing, rewinding) HDMI video
SatKing DVBS-250S2RF. Instruction Manual
 SatKing DVBS-250S2RF Instruction Manual SAFETY Safety Precaution The IRD is complied with international safety standards. Please read these simple guidelines carefully before using this device. Power Supply
The User s Manual. Digital Terrestrial Receiver Personal Video Recorder
 TM The User s Manual Digital Terrestrial Receiver Personal Video Recorder Please read this User's Manual carefully. The menu structure and specification can be changed without notice. TABLE OF CONTENTS
OWNER'S MANUAL MODEL: DTV-2000 STANDBY/ON
 OWNER'S MANUAL MODEL: DTV-2000 STANDBY/ON CH+ CH- TABLE OF CONTENTS SAFETY PRECAUTIONS IMPORTANT SAFETY INSTRUCTIONS and FEATURES ACCESSORIES and LOADING BATTERIES REMOTE CONTROL UNIT FRONT PANEL and REAR
SATELLITE FINDER SK-3200 USER MANUAL
 SATELLITE FINDER SK-3200 USER MANUAL CONTENTS 1. GUIDE...1 1.1 IMPORTANT SAFETY INSTRUCTIONS... 1 1.2 UNPACKING...1 1.3 PRODUCT OVERVIEW & ILLUSTRATION... 2 2. OUTLINE...4 3. THE MENU OSD INSTRUCTION...5
Digital High Definition Satellite Receiver SRT 7100
 Digital High Definition Satellite Receiver SRT 7100 Picture similar User Manual 1 3 Fig. 1 2 1 6 3 9 10 Fig. 2 2 4 5 7 8 Fig. 3 SCART Fig. 4 A B C HDMI Fig. 5 A B C A A Fig. 6 B C Table of Contents 1.0
High Definition Digital Set Top Box With USB Record DFTA45R. The Gold Technical Support Line: (Charges will apply at $2.
 High Definition Digital Set Top Box With USB Record INSTRUCTION MANUAL DFTA45R The Gold Technical Support Line: 1902 215 259 (Charges will apply at $2.95 per minute) Safety Instructions Always read the
EDISION OS mega VIEWS
 + + H.265 HEVC VIEWS 1 2 3 4 5 Front view: 1. Power Button Switch between operation and standby modes 2. Display current menu information and channel name etc. 3. USB Connect to the External HDD or USB
SET TOP BOX MODEL: GDB01SFV1 USER MANUAL
 SET TOP BOX MODEL: USER MANUAL 1 2 3 4 5 6 7 8 Welcome Your Set Top Box 2.1 In The Box 2.2 Front View 2.3 Rear View Quick Setup 3.1 TV Connection 3.2 Recording from the set top box 3.3 Record one channel
DIGITAL SATELLITE METER
 DIGITAL SATELLITE METER THE PROFESSIONAL EQUIPMENT DIGITAL SATELLITE METER THE PROFESSIONAL EQUIPMENT USER S MANUAL Product Description 1.Guide 2. Menu 1.1 Face Panel & Button 1.2 Power On/Off 1.3Power
S7070rHD - XM USER MANUAL
 S7070rHD - XM USER MANUAL CONTENTS GENERAL INFORMATION 2 Features and Unpacking Remote Control Rear Panel Connections Connecting your S7070rHD Freeview EPG 3 4 5 5 6 FIRST TIME INSTALLATION 7 MENU INFORMATION
Satellite locator WS-6933
 R Satellite locator WS-6933 User's Manual English CONTENTS 1. GUIDE...2 1.1 IMPORTANT SAFETY INSTRUCTIONS...2 1.2 UNPACKING...2 1.3 PRODUCT OVERVIEW&ILLUSTRATION...3 2. OUTLINE...4 3. THE MENU OSD INSTRUCTION...5
Table of Contents. Safety Instruction 2. Trademark Information 3 Introduction 4. Package Contents 4. Features 5. Product Overview 6 Front Panel 6
 - 0 - Table of Contents Safety Instruction 2 Trademark Information 3 Introduction 4 Package Contents 4 Features 5 Product Overview 6 Front Panel 6 Rear Panel 7 Remote Control 8 System Installation 11 Setting
User s Manual S9 HD PVR
 User s Manual S9 HD PVR High Definition Digital Satellite Recorder Personal Video Recorder 1 Common Interface 4 CONTENTS 1. REMOTE CONTROLLER...7 2. BASIC OPERATIONS...8 2.1 TURN ON STB..8 2.2 POWER.8
SAFETY PRECAUTION ENGLISH DO NOT INSTALL THE RECEIVER: PAG. 2
 MAX S21 SAFETY PRECAUTION The lightning fl ash with arrowhead symbol, within an equilateral triangle, is intended to alert the user to dangerous voltage and to prevent from a risk of electric shock. Warning:
PCM-1210 DVB COMBO METER User`s Manual
 PCM-1210 DVB COMBO METER User`s Manual 1. Main Features... 1 2. Buttons and Indicators... 2 3. How to measure... 3 4. Home menu... 4 5. Satellite... 4 5.1 Satellite Measure... 4 5.2 LNB Setting... 5 5.3
Set Top Box (STB) TV STAR C101 USER MANUAL
 TV STAR C101 USER MANUAL") DIGITAL CABLE TV RECEIVER Set Top Box (STB) TV STAR C101 USER MANUAL 1 Table of contents Safety. 4 General Introduction.. 6 Front Panel / Rear Panel...8 Remote Control Unit.. 10 S.T.B Connection...13 Digital
DIGITAL CABLE TV RECEIVER Set Top Box (STB) TV STAR C101 USER MANUAL 1 Table of contents Safety. 4 General Introduction.. 6 Front Panel / Rear Panel...8 Remote Control Unit.. 10 S.T.B Connection...13 Digital
IMPORTANT SAFETY INSTRUCTIONS
 IMPORTANT SAFETY INSTRUCTIONS 1. Read, follow and keep these instructions safely. 2. Heed all warnings. 1. Do not use this apparatus near water. 2. Clean only with dry cloth. 3. Do not block any ventilation
English SAFETY PRECAUTION DO NOT INSTALL THE RECEIVER: PAG. 2
 U4127 SAFETY PRECAUTION The lightning fl ash with arrowhead symbol, within an equilateral triangle, is intended to alert the user to dangerous voltage and to prevent from a risk of electric shock. Warning:
QUICK START GUIDE MODEL : PHD-VRX2
 Full HD 1080p Dual Tuner Digital HDTV Recorder, Receiver and Media Center Box QUICK START GUIDE MODEL : PHD-VRX2 Copyright 2013, PrimeDTV Technologies, Inc. Front View Menu: Display On-screen (OSD) Main
SAFETY PRECAUTION ENGLISH PAG. 2. rev 1.2. dangerous voltage and to prevent only. operating and maintenance from a risk of electric shock.
 MAX S93+ SAFETY PRECAUTION The lightning fl ash with arrowhead WARNING: To reduce the risk of The exclamation point within an symbol, within an equilateral triangle, electric shock, don t open the cabinet.
Digital Terrestrial Television Receiver USER S MANUAL
 Digital Terrestrial Television Receiver USER S MANUAL CAUTION RISK OF ELECTRIC SHOCK DO NOT OPEN This symbol is intended to alert the user to the presence of insulated dangerous voltage within the products
HRM 8760 CI+ User s Manual (ENG)
") HRM 8760 CI+ User s Manual (ENG) TABLE OF CONTENTS 1 SAFETY ADVICE... 3 2 QUICK SETUP... 5 3 FEATURES... 7 4 HOW TO CONNECT YOUR RECEIVER... 7 5 HARDWARE... 9 6 WATCHING TV... 13 7 MENU OPERATION... 21
HRM 8760 CI+ User s Manual (ENG) TABLE OF CONTENTS 1 SAFETY ADVICE... 3 2 QUICK SETUP... 5 3 FEATURES... 7 4 HOW TO CONNECT YOUR RECEIVER... 7 5 HARDWARE... 9 6 WATCHING TV... 13 7 MENU OPERATION... 21
Table of contents. 1. Before initial operation of the receiver. 2. Installation. 3. First Time Installation (using Wizard) 4.
 4.") Table of contents 1. Before initial operation of the receiver 2. Installation 3. First Time Installation (using Wizard) 4. Basic operation 5. Electronic Program Guide-EPG 6. Edit the channel list 7. Hard
Table of contents 1. Before initial operation of the receiver 2. Installation 3. First Time Installation (using Wizard) 4. Basic operation 5. Electronic Program Guide-EPG 6. Edit the channel list 7. Hard
1. Safety precautions Environment protection Features Accessories Front panel Rear panel...
 Contents 1. Safety precautions... 1 2. Environment protection... 3 3. Features... 4 4. Accessories... 4 5. Front panel... 4 6. Rear panel... 5 7. Remote controller... 6 8. Basic connection... 7 8.1. Connecting
Ref SATELLITE. User Manual. High Definition TV Satellite Receiver.
 SATELLITE High Definition TV Satellite Receiver Ref. 717501 User Manual www.televes.com Index SATELLITE 1. Safety recommendations............................................................ 4 2. General
DIGITAL TERRESTRIAL RECEIVER NVR-2090DU CHANNEL
 DIGITAL TERRESTRIAL RECEIVER NVR-2090DU CHANNEL 1 Espanol ~ Digital Video Broadcasting 2 3 STANDBY DTV/VCR TEXT MUTE VOL+ INFO PLAY/PAUSE EPG VOL- CH+ STOP SETUP EXIT 23 FAV- ENTER FAV+ 24 25 SOURCE CH-
1. INTRODUCTION SAFETY INSTRUCTIONS HHT895 FEATURES INCLUDE: ACCESSORIES INCLUDED WITH YOUR RECEIVER:...
 1. INTRODUCTION... 2 1.1 SAFETY INSTRUCTIONS... 2 1.2 HHT895 FEATURES INCLUDE:... 3 1.3 ACCESSORIES INCLUDED WITH YOUR RECEIVER:... 4 2. INSTALLATION... 4 2.1 FRONT PANEL... 4 2.2 REMOTE CONTROL UNIT BATTERY
INSTRUCTIONS MANUAL SAVE THESE INSTRUCTIONS IN A SAFE PLACE FOR FUTURE REFERENCE
 High Definition Digital Set Top Box MPF3573HU INSTRUCTIONS MANUAL SAVE THESE INSTRUCTIONS IN A SAFE PLACE FOR FUTURE REFERENCE Important Safety Instructions 1) Read these instructions. 2) Keep these instructions.
English CONTENTS 1. GUIDE OUTLINE THE MENU OSD INSTRUCTION TECHNICAL SPECIFICATION TROUBLE SHOOTING...
 English CONTENTS 1. GUIDE...2 1.1 IMPORTANT SAFETY INSTRUCTIONS...2 1.2 UNPACKING...2 1.3 PRODUCT OVERVIEW& ILLUSTRATION...3 1.4 INSTALLATION OF METER...4 2. OUTLINE...5 3. THE MENU OSD INSTRUCTION...6
Receiver/Digital Decoder DVB-T2 Set Top Box. Installation Manual & User Manual
 Receiver/Digital Decoder DVB-T2 Set Top Box Installation Manual & User Manual SAFETY PRECAUTION CAUTION: The lightening flash with arrowhead symbol, within an equilateral triangle, is intended to alert
1. Before Getting Started Main Features Accessories 2
 çêðð Ð Í» Š ̱ Š Þ± Ë» Ž Ù«¼» For your safety Information contained in this manual is subject to change without notice. No part of this publication may be copied, reproduced, or translated to another
English CONTENTS 1. GUIDE OUTLINE THE MENU OSD INSTRUCTION TECHNICAL SPECIFICATION TROUBLE SHOOTING...
 USER S MANUAL English CONTENTS 1. GUIDE...2 1.1 IMPORTANT SAFETY INSTRUCTIONS...2 1.2 UNPACKING...2 1.3 PRODUCT OVERVIEW& ILLUSTRATION...3 1.4 INSTALLATION OF METER...4 2. OUTLINE...5 3. THE MENU OSD INSTRUCTION...6
IMPORTANT SAFETY INSTRUCTIONS
 IMPORTANT SAFETY INSTRUCTIONS All the safety and operating instructions should be read before operating this product. The safety and operating instructions should be retained for future reference. All
Before you can install your LCD TV on the wall, you must fi rst remove the base using the steps below:
 Quick Start Guide English CONTENTS INSTALLING LCD TV ON THE WALL.. TV CHANNEL INSTALLATION........ PRESENTATION OF THE LCD TV...... ACCESSORIES.................... BATTERY INSTALLATION............ REMOTE
SatKing DVBS-100HD. Instruction Manual
 SatKing DVBS-100HD Instruction Manual SAFETY Safety Precaution The IRD is complied with international safety standards. Please read these simple guidelines carefully before using this device. Power Supply
CAUTION RISK OF ELECTRIC SHOCK NO NOT OPEN
 Evolution Digital HD Set-Top Box Important Safety Instructions 1. Read these instructions. 2. Keep these instructions. 3. Heed all warnings. 4. Follow all instructions. 5. Do not use this apparatus near
English SAFETY PRECAUTION DO NOT INSTALL THE RECEIVER: PAG. 2
 U4125 SAFETY PRECAUTION The lightning fl ash with arrowhead symbol, within an equilateral triangle, is intended to alert the user to dangerous voltage and to prevent from a risk of electric shock. Warning:
HD X1 Technical specification
 2013 HD X1 Technical specification DVB-C HD MPEG-4 Receiver FOR INTERNAL USE ONLY GLOBO MULTIMEDIA Sp. z o.o. Sp. k. Gryfińska 104, 70-772 Szczecin, Poland 2013-09-10 Version 2.03 Albin Kimsa albin.kimsa@globo.com.pl