Breaking Barriers Community Arts. Digital storytelling training Lives + /Stories for Improvement
|
|
|
- Shonda Shepherd
- 5 years ago
- Views:
Transcription

1 Breaking Barriers Community Arts Digital storytelling training 1000 Lives + /Stories for Improvement May 2012
2 2
3 Contents File discipline 5 Preparing audio for use in digital stories...6! Editing Audio in Audacity..7 Preparing images for use in digital stories...13! Windows Live Photo Gallery..16! Paint...18 Putting digital story audio and images together in Windows Movie Maker. 23! 3
4 4
5 File discipline and archiving File discipline is crucial at all times in digital storytelling: apart from the need to respect and keep intact each storyteller s work, some of the software works on a pointer system. That means a project will hit problems if the files are not in the correct place. In addition, it s essential to keep each story together so that it can be archived and cleared off the computer once it is complete. The files are relatively large and leaving them on the computer takes up space and slows the machine down. Create one folder, Name, per storyteller with six subfolders: Name Audio Name Original images Name Prepared images Name Projects Name Script Name Movies Place the original audio and images in the correct folders and NEVER save over them. Edit copies of them but keep the originals intact -- it is surprising how often you need to go back to them. 5
6 Preparing audio for use in digital stories Scripts, spoken stories or interviews? There will be many factors which dictate the NHS s choice in this matter. From the point of view of audio-editing, there are several factors to bear in mind: 1. Recording from scripts: The advantage of recording from scripts is that the content is pre-agreed. Editing the voiceover is simply a matter of tidying it up and takes relatively little time. Tips for recording scripts: To create the best quality voiceover you can: Aim to record several takes of each script.! The first time the storyteller reads their script to the microphone, they are usually! nervous and unfamiliar with the tone of voice they wish to use. The next recording is! usually much better. A third version gives leeway to swap out unwanted external! noises. You can then cut and paste between versions. Alternatively, ask the storyteller to repeat each sentence until they are happy with the! version they have recorded. In this case, you end up with a single long take to edit. In all cases: get the storyteller to go slow.! Many people rush, and it is advisable to encourage them to think of the experience! as telling a story to friends in the pub, or to a child. They need encouragement to! relax so they will use their voice to create natural drama and their audience can! digest their words. Tips for recording stories told live or interviews: Make sure you record a beginning, a middle and an end. Don t speak over the storyteller - signal for a pause if you need to speak.!! Your voice cannot be separated from theirs afterwards. Signal your encouragement with your listening face. Agree the story in advance and only record that story because: It takes a long time to cut a 30 minute interview/narration down to a usable 2-3 minutes. 6
7 The storyteller remains more in charge of what he/she appears to end up saying. Technical tips: Always wear headphones while recording.!! You ll be sure the microphone is working and manage external noises better. Never set the microphone sensitivity too high.!! It s easy to amplify the volume of a soft recording in the edit, but impossible!! to correct the distortion introduced by setting the volume too high. Always record 5 seconds of background silence in the recording room.!!! The background is never fully silent and is different in every room.!! This 5 seconds is useful for optimizing the spacing of words and phrases in!! the voiceover and for pasting over unwanted external sounds.!! NB: A good way of recording this silence is to count the storyteller in!! for 5 with your fingers before they begin. Choose the quietest possible space. If possible, turn off computers, clocks, TVs etc. Editing the voiceover in Audacity Always keep the original recordings intact and only edit copies of them. Make a copy of the original recordings before you even open the editing software. Opening Audacity:! There may be a Welcome window. Turn it off, but remember help exists out there. Go to File<Open and navigate to the file you want to edit.! You may get a Warning window; just click OK. Save the work as an Audacity project in the audio folder. Tour Audacity: 7

8 Audacity contains many features not needed in editing voiceovers that we will not cover. 8
9 The basics Playing the audio:! Click anywhere over the waveform of the voiceover.!! A long black line appear and remains when you move the mouse elsewhere.!! This is the playhead, the point from which the voiceover will play when the!!! play button or the spacebar is pressed. Selecting a section of voiceover: Accurate selection is crucial to all audio-editing procedures. Zoom in to ensure precision. Use the figures above the timeline and the wave shape to make sure you know the location of both the beginning and the end of the section you wish to select. Put the playhead precisely at the start of the section you wish to select.!! Use the arrow keys to nudge it into the exact spot. Move the cursor towards the centre of the timeline until it turns into a hand. Click and drag the hand to the end of the section you wish to select. What you can do with a selection: Delete it using the backspace or delete keys Cut it using CTRL X Copy it using the edit menu or CTRL C Replace it with a previously copied or cut selection using CTRL V. Alter it by the application of an effect from the Effects menu. (Not usually relevant.) 9
10 The editing Creating a high quality voiceover: Editing is simply cutting a piece out, pasting a piece in or both. Watch out for: Words that begin twice, hesitations, repeated phrases Places where there are inadequate gaps between phrases Background noises, coughs, rustling.! Play along the voiceover until you come to an error.!! Does it simply need to be removed?! Select it and delete it. Does it need to be pasted elsewhere?! Select it and go to Edit<Cut or use CTRL X.! Place the playhead precisely at its new location.! Use Edit<Paste or CTRL V. The pasted material is inserted at the playhead.!!!! Do you need to copy a piece from elsewhere to cover a section over?!!! Locate and select the replacement piece.! Go to Edit<Copy or use CTRL C.! Select the section you wish to cover over.! Use Edit<Paste or CTRL V. The copied material is pasted over the selected section. Checking and completing: Play over the changed area, checking it sounds good, listening for any unnatural sounds you may have introduced: clicks, double breaths etc. Work along the whole voiceover until you are satisfied that it is as good as it can be.! NB: Open other takes to cut and paste between them and get the best mix. 10
11 Finishing off -- normalizing: Once the edit is complete, normalize the audio. Normalizing helps ensure that the volume of all the voiceovers is comparable, whatever device they were made on, by whoever.! Go to Edit<Select all.! Then go to Effect<Normalize and click OK.!! The peaks of the waveforms grow, representing the increase in volume.! NB: Occasionally you may have such a quiet voiceover that you need to Normalize! it before editing in order to be able to hear it clearly. Final saving/exporting: Once you ve edited a file in Audacity, you have to export the project to a file format readable elsewhere.! Go to File<Export! Navigate to the correct folder to save the file.! Give it the file name it needs.! Save as type: use the menu to select WAV (Microsoft)!! This is an uncompressed, high quality file. Reducing file size comes later on,!! once we ve made the story -- it s easy to compress files, but once!! compressed, you can never regain full quality. It would be a waste if you kept!! all the file sizes tiny, made the story, someone picked it up and wanted to!! send it to someone at high quality and you couldn t provide that version.! Click Save.! Add metadata if you need to and click OK.! A progress window will appear, and the voiceover will be ready for use in the! video-editing program. 11
12 Editing stories told live and interviews: Editing audio from a script is relatively straightforward, because the decisions as to content have been made previously. However editing audio from an interview or spoken story is much more complex: You have to make the decisions regarding content - you are responsible for creating the public version of someone else s story. There is usually a lot of material to cut out. You will have to shuffle material around!! EG: the end of the story may have been recorded halfway through. The person is likely to have repeated parts of the story.!! You will have to decide which version of events to use. You are unlikely to be able to cut out unwanted background noises. Adding labels to manage a tricky edit: It is impossible to scan through audio-files quickly as you would a written document. To speed up the process of navigating round a long recording, Audacity lets you add labels to the track. Set the cursor where exactly where you want to add the label.!! NB: Always place labels accurately: it makes future editing much easier.!!!! The label will flash yellow when the playhead hovers above it and the!!!! playhead will snap to it.!! The selection hand will also snap to labels, making it very easy to move!!!! whole sections from one part of the track to another. Go to Track<Add Label at Selection (or use CTRL B) Type into the white rectangle so you know what you have labeled. Check Sync Lock (see below) then cut and paste as needed to make the voiceover. 12
13 Sync Lock: BIG NB: Do not cut and paste a labeled track before checking Sync Lock. If Sync Lock is! not checked, the label will remain fixed at the time on the track where it was placed.! That means that if the waveform shifts (eg because something was inserted or! deleted before that time) the label will not shift with it and the labeling will no longer! be of any value. Go to Track and click on Sync Lock Tracks. NB: Nothing appears to happen, but if you return to Tracks, you will see that there is a check mark beside Sync Lock. Once this is checked, the label will stay with the waveform of the audio that you have aligned it with. Once Sync Lock is checked, cut and paste as needed to make the voiceover. Removing a label:! Go to Tracks<Edit Labels!! Select the label you wish to remove! Click Remove. Transcripts: Consider the transcript option when you have an interview or story told live. Although timeconsuming, transcribing is a useful way of managing the equally time-consuming task of cutting a long piece of audio down and also enables consultation about the final voiceover. If you are transcribing the audio, add labels as you listen and type, edit the written document and go back to do the final audio-edit. 13
14 Preparing images for use in digital stories: Which images shall I use? When you have recorded a good story, images can make the tale. We have become used to seeing pictures while we listen through film and TV, and images help to focus the listeners attention. However poor choice of images can reduce the impact of what might be a good audio-story. Many NHS stories will not come with photos that relate to their content, and given the potential need for anonymity, finding effective images may be challenging. Image sources Existing prints, digital photos, drawings etc Where these are not available, consider: Taking close-ups...hands, surfaces, scars...anything to create atmosphere Creating mood by altering the colour of images.!!!! E.g: convert images to black and white for a sombre mood. Making funnies: these can be very memorable Drawing stick men with attitude, either on the computer or on paper. Using internet photos and clip art:!! NB: If you choose to use internet images, check for copyright restrictions and!! check that the image is of high enough quality when used full screen.!!!! NB: BBCA has always avoided using internet images because: Some of them are copyright to other users. We might be sued. Their high compression made their quality too poor for our purposes. It s often more effective to find another solution. They are impersonal and look weak compared to the power of the very personal voiceover. 14
15 Preparing images for digital stories: image size and changing times Technology has advanced. Whereas it used to be essential to resize every image before using it in a video-editing program, this is no longer always necessary. Many photos can be used immediately with no preparation at all. Aspect ratio: When you begin editing the images and sound together, you choose the aspect ratio of the final story. Traditionally, digital stories have stuck to the old 4:3 aspect ratio rather than moving to the 16:9 wide-screen ratio. The 4:3 ratio matches the proportions of most photos better. Cropping photos to a widescreen aspect ratio involves omitting a lot of the photo, cutting off heads and other important features. Image size:!! For this 4:3 aspect ratio, the image size for screens is:! 768 pixels wide x 576 pixels high at a resolution of 150 pixels per inch.! This is small compared to many digital photos because images for use on screen! don t need to be nearly as big as those used to produce good prints.! For wide-screen, 16:9, should you choose to use it, the size is 1024x576 pixels. Checking image size:! Clicking on the image in Windows Explorer to select it.! The bottom of the window shows the image dimensions in pixels. Some guidelines on when to resize: Resize large digital images (over 2 Mb).!! Large images clog up computer memory and may make your video-editing!! software crash. If your program starts going slowly, take it as a warning that!! you re asking too much of the computer and size your images. Crop and resize scans to ensure you ve got a clean edge. 15

16 Scanning All scanning set-ups differ and you will have to explore your own. It is often easier to bring a scan directly into Windows Live Photo Gallery using the Import command under the Home tab. Aim to scan the print to a size of 3Mb.!!! Achieve this by adjusting the dpi setting displayed in the preview window!! until the size registers 3Mb.! Where is your scanner set-up saving the image files it produces?!!! Find out and make sure they go into the folder you choose. Is the scanner making adjustments to the tonality or other parameters of the photo?!!! Take charge and alter the settings so this only happens if you want it to. 16

17 Windows Live Photo Gallery Windows Live Photo Gallery is the Windows 7 version of the Microsoft program Windows Photo Gallery that was included with Vista and XP operating systems. Use whichever you have access to. The tools are the same, they are just in different places. Open an image in Windows Live Photo Gallery by using the Open With command in Windows Explorer. For digital storytelling, we want to use the Edit features of Photo Gallery: resizing, and altering the colours and exposure to create mood. These are found under the tab next to Home. However, since digital stories are shown on many different screen set-ups with varying colour, brightness and contrast parameters, fine adjustment of images for quality is usually pointless, unlike when preparing images for print. The top bar shows numerous automatic features for image improvement. The Fine tune button offers manual versions of the same adjustment options,!! NB: Windows Live Photo Gallery keeps a record of changes made to images and! you can re-open the program and revert an image to the original version using the! button on the top right. 17
18 Resizing and renaming: Go to the Properties button, which is in the organize section, and scroll down to Resize. Select Small: 800, which is not much larger than the 768 px required. Browse to locate the Prepared Images folder.! Windows Live Photo Gallery makes a smaller copy of the image, keeping the! original in its old location.! Saving resized images in a new folder ensures you will use those versions for! making your story rather than the old ones. Click Resize and Save The crop tool: The crop tool is used: to eliminate something from the edge of an image to bring out an object that is lost in a mass of background. Click on the arrow beneath the crop symbol to choose the proportions of the crop.! Use 4 x 3 for a full screen crop, rotating the frame as necessary! Use Custom for a portrait image. Drag the cursor over the image Adjust the position of the resulting frame to include all you wish to retain. Click again on the small arrow and click Apply crop to make the crop actually happen. Click Close file once you have finished editing. Converting an image to black and white: Under the Effects section, there are a range of photo filters, including one for black and white. For more control, and a wider choice of options, use the Adjust Colour and Adjust exposure options under Fine Tune. And don t be afraid to play around, you can always revert the image to the original. Again, click Close file once you have finished editing. 18

19 Paint Versions of Paint have come with every Windows PC for years. For digital storytelling, we ll use it for creating new images and adding text or other objects to photos. Making a new, plain black image: Resize the default white canvas. Go to Resize. Select Pixels rather than Percentage. Uncheck Maintain aspect ratio Type 768 in Horizontal Type 576 in Vertical Click OK. 19

20 Altering colours: Color 1 is the foreground colour, and is applied to text, brushes and the outline of shapes. Color 2 is the background and is applied to backgrounds, the middle of shapes and the fill tool. The Fill Tool! Select this tool to replace an area of colour.! Left click to replace an area of colour with Color 1.!! Right click to replace an area of colour with Color 2.! Select the sort of fill required from the drop-down Fill menu. The Shape Tool: Click to choose the shape of the area you want to alter using the Shapes palette. Select colours 2 & 1 for the middle and the edge, or choose No Fill for a transparent shape. Drag the shape over the canvas to fill it as required. Save the image in the prepared images folder as a.jpg file. NB: Experiment with the curve tools. For these, you initially draw a straight line, then click and drag over it to control how it bends. 20

21 Using text: Select the Text tool from the Tool box. Click where you want the text to appear in the image and type into the text box. Click and drag over the text to select it and click on Color 1 to alter the text color. Adjust font style and size using the standard options on the menu bar. Adjust the text box background by choosing Transparent or Opaque.! NB: For Opaque, choose the background color using the Color 2 button. Click on another part of the canvas to complete and render the text uneditable.! Save your work. 21

22 Moving an object in Paint: Locate the selection button and choose a shape from the drop-down menu. Drag or draw the selection marquee round the area you wish to move.! NB: Adjust the background colour, which will appear as the object moves. Move the selection when the cursor displays crossed arrows. Use the double-headed arrow at the corners to enlarge/shrink it while maintaining its! proportions. Use the double headed arrow on its sides to enlarge/shrink it while distorting its shape. Exercises: 1. Resize a large dslr image in Windows Live Photo Gallery, crop it and convert it to black and white. 2. Use Paint to make a black spacer image. 3. Create a moody stick man in Paint and prepare him/her for use in a digital story. 4. Draw and scan in a moody stick man and prepare him/her for use in a digital story. 22


23 Putting digital story audio and images together in Movie Maker 1. Open movie maker. By default, it will open on the Tasks window. 2. Click the button indicated to reveal the Collections window.


24 The Movie Maker workspace: First of all, save your work in the Projects folder. Importing the images and voiceover: Create a new collections folder for each storyteller by going to File<New Collections folder.! NB: Movie Maker displays the folders of every project it is engaged on.! Delete the folders of completed projects to keep the program tidy. Import the images and voiceover by clicking the Import Media button, navigating to the correct folder, selecting the required items and clicking Import. The images and voiceover will appear above the timeline, beside the black viewer window. Storyboard: Getting the images in the correct order: Click the button to the top left of the timeline and select storyboard.

25 Here you can arrange the images in the order!you want to use them. Drag and drop the black or title image into the first space. Then drag the other images into the remaining spaces in their correct order. Revert to timeline view.

26 Putting the voiceover into the timeline: Drag and drop the voiceover in so the waveform begins about 8 seconds in. This allows both space for a title and a gap before the story begins.!! NB: BBCA always allows a 3s black and silent space before the title of each story.! This ensures that when stories are shown together there is adequate breathing! space between them. When recording the voiceover, we allowed some silent space at the start to help in the edit. Now we need to create a smooth fade from total silence into the storyteller s voice. Click on the left edge of the voiceover until the cursor becomes a red arrow. Drag it to the right to reduce, but not eliminate, the silent space. Repeat at the end of the voiceover. Right click the voiceover to reveal a menu where you can fade the audio in and out. Do both these actions.

27 Previewing the story: Click on the timeline - creates a green playhead. Pressing the spacebar or using the play button under the monitor window. Listen to see if the audio is fading in too late. If the first few words are not at full volume, stretch the voiceover back until they are. Aligning the images with the voiceover: NB: Use the zoom tool to get close in to achieve precise alignment of the images with particular words and phrases. Stretch the first image out so that it ends where the waveform of the voiceover begins. Slide the second image back over the first image to create a fade between them.!! A blue slider indicates the size of the overlap between the two images. Preview it. Work steadily along the timeline from the beginning, stretching and shrinking the images so that each one matches with the sound it accompanies, listening and relistening continually, and adding any fades you need.
28 NB: Shrinking or stretching an image makes all the subsequent images shuffle along as well, altering their alignment with the voiceover. Aim to get the best match you can before moving on to the next image, to avoid image shuffle disrupting editing decisions you have already made. Background information: More advanced tips and tricks Movie Maker works on a pointer system. The images and voiceover are not really in Movie Maker, the program simply knows where they are from the Import action. That means two things: If you alter any file Movie Maker is using, Movie Maker will use the new version. If you move any file Movie Maker is using, Movie Maker won t be able to find it.
29 Precise voiceover/image matching with the Split tool: It can be really fiddly to get an image to match with a precise moment in the voiceover simply by stretching and shrinking. At moments where you feel a very precise match is called for Stretch the image beyond the voiceover moment you want it to end. Click to select it. Use the split tool to cut the image at the playhead. Delete the bit you don t want. Adding a title: Go to Tools<Titles and Credits Zoom in and place the playhead at 3.00s. Select Title on the selected clip. Adjust the wording, animation and font to suit. Click Add Title.

30 Replacing an image without altering any other editing decisions: Hover the mouse over the image you want to replace and note its duration (arrow). Click on the image, press delete and drag the new image into its place. Zoom in and adjust the new image so its duration matches the duration of the old image. Transitions: Movie Maker offers many transitions apart from the Fade we have already used. Explore these options if it seems appropriate to the story.

31 Effects: The most commonly used effect in digital storytelling is a gentle ease in to the image. This is particularly useful when relatively few images are available; it makes a single image being on-screen for quite a while visually acceptable. Our eyes are used to seeing moving images and get restless when the image doesn t change. You can gain extra-powerful effects in Movie Maker by applying the same effect two or more times. Drag effects down from the Effects window and drop them on the image in the timeline. Remove them by right clicking on the image and selecting Effects.
32 Creating a slow fade out: Insert the black image and create fades around it as desired. Publishing/sharing the story: The story is now ready for the voice and images to be tied together as a movie file that can be burned to DVD, shared between computers put online. Originally, we chose not to compress and reduce the quality of the audio-recording. Now we are going to make several different versions of the story for different purposes: A maximum quality version for archive purposes. Large file size. A desktop playable, powerpoint friendly version. Compressed version. A small able version. Highly compressed version, small file size NB: Although you may think you only want an -friendly version of the story, always make and archive a full, maximum quality version of the story. It is quick and easy to do and ensures you will always be ready should somebody want the story at full high quality for prestigious events. It can also be used to make new compressed versions of the story as technology develops. To make the maximum quality version: Go to File<Publish Movie Select to publish the movie for This Computer.


33 Name the story and select the appropriate save location. Choose More settings<dv-avi PAL!! NB: The file size will be several hundred Mb. Click Publish.
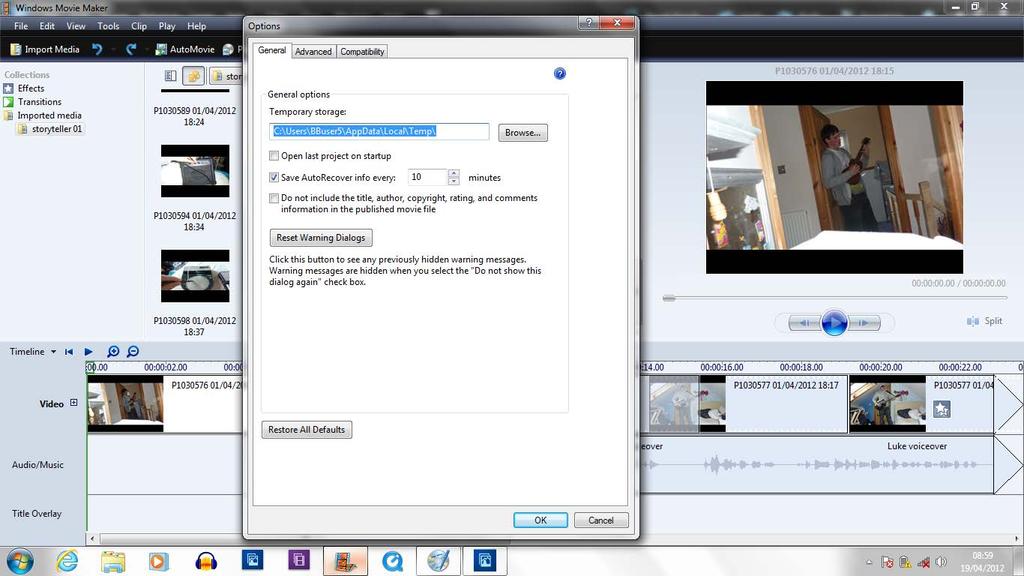
34 To make the computer playable/powerpoint friendly version: Repeat sections Choose Best quality for playback on my computer before clicking Publish.!! NB: The file size will be 10-30Mb. To make the -friendly version: Repeat sections Choose Compress to... and type in the size you are permitted for attachments. 5. Click Publish.!! NB: You can simply select to Publish the movie to , but that asks to use!! your program, which may or may not be available. Burning stories to DVD: Some windows based computers have software that burns playable DVDs. An alternative is to download the free program DVDstyler, but check that your computer has a DVD burner. DVDStyler - Download.com Digital Storytelling and Housekeeping: Image, sound and movie files take up space on the computer. Archive all projects to hard drive and remove the originals from the computer to keep the machine functioning fast. However there are some files that may be stored in back departments of the computer and may slowly clog up the system without you being aware of it. If the computer is used regularly for making digital stories: Go to Tools<Options and click on the General Tab.! Select where Movie Maker stores temporary files.! Alter the settings to save them in the project folder.! Delete them before archiving the project. NB: In the Advanced Tab, you can also alter the project settings from 4:3 to 16:9 should you need to.
35
36 Further comments about software: Audio editing: Versions of Audacity have been available for all Windows operating systems, and hopefully still are. Image Preparation: Windows Live Photogallery is very similar to the Windows Photogallery installed on earlier Windows based computers. Paint has been installed for many years, although the number of features it offers has increased with time; early versions may feel limited. Microsoft Office has a Picture Manager section which will do many of the things Photogallery does. Although not strictly speaking a free program, it is installed on many computers, so is worth looking out for. Commands and menu items such as Fix and Resize, may lead you to the right part of a program. Video-editing: The version of Windows Movie Maker used in this manual is Version 6. It is the smoothest version of the program and works well for making digital stories. It was installed routinely for many years, but from Windows 7 onwards it has been dropped by Microsoft. Despite this, it is still free to download and works well in Windows 7. The latest Microsoft offering, Windows Live Movie Maker, works in a completely differently and is reputed to be difficult to use for making digital stories. We have not explored it fully because the Movie Maker 6 option works so well. A previous version of Movie Maker was Windows Movie Maker 2.6, which is also still downloadable. This version is compatible with older computers running Windows XP. The main differences between 2.6 and version 6 are that 2.6 does not allow separate collection folders for each story, and there are fewer effects available. The Ease in effect may be absent.
37
38 All contents copyright Breaking Barriers Community Arts 2012 Breaking Barriers Community Arts St Illtyd s Resource Centre, Llanhilleth Institute, Abertillery NP13 2JT info@breakingbarriers.org.uk
Linkage 3.6. User s Guide
 Linkage 3.6 User s Guide David Rector Friday, December 01, 2017 Table of Contents Table of Contents... 2 Release Notes (Recently New and Changed Stuff)... 3 Installation... 3 Running the Linkage Program...
Audacity Tips and Tricks for Podcasters
 Audacity Tips and Tricks for Podcasters Common Challenges in Podcast Recording Pops and Clicks Sometimes audio recordings contain pops or clicks caused by a too hard p, t, or k sound, by just a little
Camtasia for Mac. Create Your First Video Guide. Release 1.1. February TechSmith Corporation. All rights reserved.
 Camtasia for Mac Create Your First Video Guide Release 1.1 February 2009 2009 TechSmith Corporation. All rights reserved. Contents Contents Planning your video... 1 Should I record my entire screen or
DIGITAL STORYTELLING: PHOTOSTORY 3 TUTORIAL: CREATE A NEW PROJECT
 Photostory Tutorial: Begin a New Project http://millie.furman.edu/mll/tutorials/photostory3/create.htm Page 1 of 1 DIGITAL STORYTELLING: PHOTOSTORY 3 TUTORIAL: CREATE A NEW PROJECT When you double-click
The BAT WAVE ANALYZER project
 The BAT WAVE ANALYZER project Conditions of Use The Bat Wave Analyzer program is free for personal use and can be redistributed provided it is not changed in any way, and no fee is requested. The Bat Wave
Designing Custom DVD Menus: Part I By Craig Elliott Hanna Manager, The Authoring House at Disc Makers
 Designing Custom DVD Menus: Part I By Craig Elliott Hanna Manager, The Authoring House at Disc Makers DVD authoring software makes it easy to create and design template-based DVD menus. But many of those
A-ATF (1) PictureGear Pocket. Operating Instructions Version 2.0
 PictureGear Pocket. Operating Instructions Version 2.0") A-ATF-200-11(1) PictureGear Pocket Operating Instructions Version 2.0 Introduction PictureGear Pocket What is PictureGear Pocket? What is PictureGear Pocket? PictureGear Pocket is a picture album application
A-ATF-200-11(1) PictureGear Pocket Operating Instructions Version 2.0 Introduction PictureGear Pocket What is PictureGear Pocket? What is PictureGear Pocket? PictureGear Pocket is a picture album application
VIDEOPOINT CAPTURE 2.1
 VIDEOPOINT CAPTURE 2.1 USER GUIDE TABLE OF CONTENTS INTRODUCTION 2 INSTALLATION 2 SYSTEM REQUIREMENTS 3 QUICK START 4 USING VIDEOPOINT CAPTURE 2.1 5 Recording a Movie 5 Editing a Movie 5 Annotating a Movie
EndNote X7: the basics (downloadable desktop version)
") EndNote X7: the basics (downloadable desktop version) EndNote is a package for creating and storing a library of references (citations plus abstracts, notes etc) it is recommended that you do not exceed
EndNote X7: the basics (downloadable desktop version) EndNote is a package for creating and storing a library of references (citations plus abstracts, notes etc) it is recommended that you do not exceed
Lab experience 1: Introduction to LabView
 Lab experience 1: Introduction to LabView LabView is software for the real-time acquisition, processing and visualization of measured data. A LabView program is called a Virtual Instrument (VI) because
Guide to EndNote X8. Windows-version
 Guide to EndNote X8 Windows-version University Library of Stavanger 2018 Contents EndNote... 3 Locating and starting EndNote... 3 Your library... 4 Modes... 5 Style... 5 Display fields... 5 Rating... 5
INTRODUCTION TO ENDNOTE. NTNU University Library, Medicine and Health Library January 2017
 INTRODUCTION TO ENDNOTE X8 NTNU University Library, Medicine and Health Library January 2017 CONTENTS About EndNote... 4 Obtaining and Installing EndNote... 4 Guides... 4 Creating a New Library... 5 Making
SNR Playback Viewer SNR Version 1.9.7
 User Manual SNR Playback Viewer SNR Version 1.9.7 Modular Network Video Recorder Note: To ensure proper operation, please read this manual thoroughly before using the product and retain the information
User Guide Version 1.1.0
 obotic ean C R E A T I V E User Guide Version 1.1.0 Contents Introduction... 3 Getting Started... 4 Loading a Combinator Patch... 5 The Front Panel... 6 On/Off... 6 The Display... 6 Reset... 7 Keys...
Pictures To Exe Version 5.0 A USER GUIDE. By Lin Evans And Jeff Evans (Appendix F By Ray Waddington)
") Pictures To Exe Version 5.0 A USER GUIDE By Lin Evans And Jeff Evans (Appendix F By Ray Waddington) Contents 1. INTRODUCTION... 7 2. SCOPE... 8 3. BASIC OPERATION... 8 3.1 General... 8 3.2 Main Window
Pictures To Exe Version 5.0 A USER GUIDE By Lin Evans And Jeff Evans (Appendix F By Ray Waddington) Contents 1. INTRODUCTION... 7 2. SCOPE... 8 3. BASIC OPERATION... 8 3.1 General... 8 3.2 Main Window
Copyright and Disclaimer
 Copyright and Disclaimer All rights reserved. No part of this publication may be reproduced, stored in a retrieval system, or transmitted in any form or by any means electronic, mechanical, photocopying,
EndNote X8 Workbook. Getting started with EndNote for desktop. More information available at :
 EndNote X8 Workbook Getting started with EndNote for desktop. More information available at : http://www.brad.ac.uk/library/libraryresources/endnote/ The University of Bradford retains copyright for this
After Effects Compositing Basics
 This tutorial is a continuation of the VIllus Capillary tutorial where you went through the basics of creating a Maya scene from A-to-Z. You re now ready to stitch together a final movie from the individual
User s Guide W-E
 Presto! PVR ISDB User s Guide 518100-02-01-W-E-112307-02 Copyright 2007, NewSoft Technology Corp. All Rights Reserved. No portion of this document may be copied or reproduced in any manner without prior
Delivering the Curriculum Through Creativity
 Page 1 Delivering the Curriculum Through Creativity! 2013 Kudlian Software Limited!!! System Requirements Page 2 A Macintosh computer running Mac OS X 10.6, 10.7, 10.8 or later 7 MB of free hard disc space,
ColorPlay 3. Light show authoring software for iplayer3 Version 1.4. User Guide
 ColorPlay 3 Light show authoring software for iplayer3 Version 1.4 User Guide Copyright 2008 Philips Solid-State Lighting Solutions, Inc. All rights reserved. Chromacore, Chromasic, CK, the CK logo, Color
Background. About automation subtracks
 16 Background Cubase provides very comprehensive automation features. Virtually every mixer and effect parameter can be automated. There are two main methods you can use to automate parameter settings:
U S E R G U I D E HD1000
 U S E R G U I D E HD1000 1 W e l c o m e t o R o k u! In This Guide... Bring your HDTV to life with Roku. For the first time, you ll enjoy viewing your favorite digital photos in high-definition on your
Laboratory 5: DSP - Digital Signal Processing
 Laboratory 5: DSP - Digital Signal Processing OBJECTIVES - Familiarize the students with Digital Signal Processing using software tools on the treatment of audio signals. - To study the time domain and
Classroom Setup... 2 PC... 2 Document Camera... 3 DVD... 4 Auxiliary... 5
 Classroom Setup... 2 PC... 2 Document Camera... 3 DVD... 4 Auxiliary... 5 Lecture Capture Setup... 6 Pause and Resume... 6 Considerations... 6 Video Conferencing Setup... 7 Camera Control... 8 Preview
ELSA WINNER Series M a n u a l
 Manual Series 2002 Neue ELSA GmbH, Aachen (Germany) While the information in this manual has been compiled with great care, it may not be deemed an assurance of product characteristics. Neue ELSA GmbH
Glossary Unit 1: Introduction to Video
 1. ASF advanced streaming format open file format for streaming multimedia files containing text, graphics, sound, video and animation for windows platform 10. Pre-production the process of preparing all
INTRODUCTION TO ENDNOTE X4
 INTRODUCTION TO ENDNOTE X4 (based on the training manual offered at University of Queensland Library) Contents PART 1 1. Introduction 1 2. Opening EndNote 2 3. Setting up a New Reference Library 4 4. Using
Bogart SE 3. Addition to the manual
 Bogart SE 3 Addition to the manual Bogart SE 3 Addition to the manual 3 Table of contents General information... 4 Overview of new functions and improvements... 4 Audio.... 4 Recording, HDV... 4 Editing...
The Complete Guide to Music Technology using Cubase Sample Chapter
 The Complete Guide to Music Technology using Cubase Sample Chapter This is a sample of part of a chapter from 'The Complete Guide to Music Technology', ISBN 978-0-244-05314-7, available from lulu.com.
How to create a video of your presentation mind map
 How to create a video of your presentation mind map Creating a narrated video of your mind map and placing it on YouTube or on your corporate website is an excellent way to draw attention to your ideas,
7thSense Design Delta Media Server
 7thSense Design Delta Media Server Channel Alignment Guide: Warping and Blending Original by Andy B Adapted by Helen W (November 2015) 1 Trademark Information Delta, Delta Media Server, Delta Nano, Delta
Introduction to EndNote Desktop
 Introduction to EndNote Desktop These notes have been prepared to assist participants in EndNote classes run by the Federation University Library. Examples have been developed using Windows 8.1 (Enterprise)
ATI Multimedia Center 7.6 Guide to New Features
 New Features in ATI Multimedia Center 7.6 1 ATI Multimedia Center 7.6 Guide to New Features ATI Multimedia Center 7.6 introduces several new features not found in previous versions. There are other pre-existing
ENDNOTE X6 FOR HEALTH
 ENDNOTE X6 FOR HEALTH Contents Aims... 2 Further help... 2 Part A - Adding references to an EndNote library... 3 1. Opening EndNote and creating an EndNote library... 3 2. Importing/exporting references
2 Select the magic wand tool (M) in the toolbox. 3 Click the sky to select that area. Add to the. 4 Click the Quick Mask Mode button(q) in
 in the toolbox. 3 Click the sky to select that area. Add to the. 4 Click the Quick Mask Mode button(q) in") ADOBE PHOTOSHOP 4.0 FUNDAMENTALS A mask works like a rubylith or frisket, covering part of the image and selecting the rest. In Adobe Photoshop, you can create masks using the selection tools or by painting
ADOBE PHOTOSHOP 4.0 FUNDAMENTALS A mask works like a rubylith or frisket, covering part of the image and selecting the rest. In Adobe Photoshop, you can create masks using the selection tools or by painting
Formatting Dissertations or Theses for UMass Amherst with MacWord 2008
 January 2015 Formatting Dissertations or Theses for UMass Amherst with MacWord 2008 Getting started make your life easy (or easier at least) 1. Read the Graduate School s Guidelines and follow their rules.
Introduction 2. The Veescope Live Interface 3. Trouble Shooting Veescope Live 10
 Introduction 2 The Veescope Live Interface 3 Inputs Tab View 3 Record/Display Tab View 4 Patterns Tab View 6 Zebras Sub Tab View 6 Chroma Key Sub View 6 Scopes Tab View 8 Trouble Shooting Veescope Live
System Requirements SA0314 Spectrum analyzer:
 System Requirements SA0314 Spectrum analyzer: System requirements Windows XP, 7, Vista or 8: 1 GHz or faster 32-bit or 64-bit processor 1 GB RAM 10 MB hard disk space \ 1. Getting Started Insert DVD into
APA Research Paper Chapter 2 Supplement
 Microsoft Office Word 00 Appendix D APA Research Paper Chapter Supplement Project Research Paper Based on APA Documentation Style As described in Chapter, two popular documentation styles for research
APA Style Page Formatting Instructions Microsoft Word Windows Version. Adjust all margins to 1 inch on each side, page in Portrait orientation
 APA Style Page Formatting Instructions Microsoft Word Windows Version PART 1 GENERAL FORMATTING AND COVER PAGE Adjust all margins to 1 inch on each side, page in Portrait orientation 1. Click on the Page
MICROSOFT WORD FEATURES FOR ARTS POSTGRADUATES
 MICROSOFT WORD FEATURES FOR ARTS POSTGRADUATES...2 Page Setup...3 Styles...4 Using Inbuilt Styles...4 Modifying a Style...5 Creating a Style...5 Section Breaks...6 Insert a section break...6 Delete a section
Mendeley Basics. Get Mendeley. Get Articles and Documents into Mendeley. Import Citations from a Website
 Mendeley Basics Get Mendeley 1. Go to www.mendeley.com 2. Create an online account and download the software. Use your MIT email address to get extra storage with our institutional account. 3. Open Mendeley
Flash Television Advertisement
 Flash Television Advertisement -Open the 3 images of TV characters and the network logo in Photoshop. Your images must be high resolution images! -Use layer mask to cut out the background from each characters
The only warranties for HP products and services are set forth in the express warranty statements accompanying such products and services.
 The only warranties for HP products and services are set forth in the express warranty statements accompanying such products and services. Nothing herein should be construed as constituting an additional
Should you have any questions that aren t answered here, simply call us at Live Connected.
 Interactive TV User Guide This is your video operations manual. It provides simple, straightforward instructions for your TV service. From how to use your Remote Control to Video On Demand, this guide
Claymation Workshop Kit Materials
 Kit Materials [ 1 ] Full day workshop While participants can make claymations on any topic, providing a specific topic helps focus effort and save time. This full-day agenda is based on animating idioms
WORKING WITH FRAME GRABS
 WORKING WITH FRAME GRABS Incorporating frame grabs is a great way to help your reader understand the analytic points you are making about embodied displays in face-to-face interaction. But producing quality
About Final Cut Pro Includes installation instructions and information on new features
 apple About Final Cut Pro 1.2.5 Includes installation instructions and information on new features This document includes installation instructions and describes features and enhancements of Final Cut
Swinburne University of Technology
 Swinburne University of Technology EndNote X9 for Mac Swinburne Library EndNote resources page: http://www.swinburne.edu.au/library/referencing/references-endnote/endnote/ These notes include excerpts
Processing data with Mestrelab Mnova
 Processing data with Mestrelab Mnova This exercise has three parts: a 1D 1 H spectrum to baseline correct, integrate, peak-pick, and plot; a 2D spectrum to plot with a 1 H spectrum as a projection; and
Reason Overview3. Reason Overview
 Reason Overview3 In this chapter we ll take a quick look around the Reason interface and get an overview of what working in Reason will be like. If Reason is your first music studio, chances are the interface
Introductory Course EndNote X2 for PC users. University of Otago Library.
 Introductory Course EndNote X2 for PC users University of Otago Library www.library.otago.ac.nz/endnote on-campus type endnote in web browser address bar July 2009 1 Course Objectives: Create a new EndNote
Guide to Analysing Full Spectrum/Frequency Division Bat Calls with Audacity (v.2.0.5) by Thomas Foxley
 by Thomas Foxley") Guide to Analysing Full Spectrum/Frequency Division Bat Calls with Audacity (v.2.0.5) by Thomas Foxley Contents Getting Started Setting Up the Sound File Noise Removal Finding All the Bat Calls Call Analysis
Guide to Analysing Full Spectrum/Frequency Division Bat Calls with Audacity (v.2.0.5) by Thomas Foxley Contents Getting Started Setting Up the Sound File Noise Removal Finding All the Bat Calls Call Analysis
TELEVISION. Entertainment Plans. Interactive Guide and DVR (Digital Video Recorder) Manual ARVIG arvig.net
 Manual ARVIG arvig.net") TELEVISION Entertainment Plans Interactive Guide and DVR (Digital Video Recorder) Manual 888.99.ARVIG arvig.net . TABLE OF CONTENTS Interactive Guide Remote Control... 3 Changing the Channel... 4 Picture-In-Picture
TELEVISION Entertainment Plans Interactive Guide and DVR (Digital Video Recorder) Manual 888.99.ARVIG arvig.net . TABLE OF CONTENTS Interactive Guide Remote Control... 3 Changing the Channel... 4 Picture-In-Picture
Dektak Step by Step Instructions:
 Dektak Step by Step Instructions: Before Using the Equipment SIGN IN THE LOG BOOK Part 1: Setup 1. Turn on the switch at the back of the dektak machine. Then start up the computer. 2. Place the sample
USB Mini Spectrum Analyzer User s Guide TSA5G35
 USB Mini Spectrum Analyzer User s Guide TSA5G35 Triarchy Technologies, Corp. Page 1 of 21 USB Mini Spectrum Analyzer User s Guide Copyright Notice Copyright 2011 Triarchy Technologies, Corp. All rights
EndNote Menus Reference Guide. EndNote Training
 EndNote Menus Reference Guide EndNote Training The EndNote Menus Reference Guide Page 1 1 What EndNote Can Do for You EndNote is a reference management solution which allows you to keep all your reference
1) Open EndNote. When asked, choose an existing library or Create a New Library.
 Open EndNote. When asked, choose an existing library or Create a New Library.") What is EndNote? EndNote is a program that lets you collect and organize a database of bibliographic references. You can use EndNote to connect to the UVM library catalog or to other online databases and
What is EndNote? EndNote is a program that lets you collect and organize a database of bibliographic references. You can use EndNote to connect to the UVM library catalog or to other online databases and
ULTRA-Flex CLOUD. ULTRA-Flex Lite CLOUD Design $1495 $695
 Design $1495 $695 Draw DesignCentral Workspace Profiles Customize Workspace NEW! Job Info Job Statistics NEW! Find File Snapping Commands Measure Tool Import Standard File Formats PDF/PostScript/EPS Import
There are three categories of unique transitions to choose from, all of which can be found on the Transitions tab:
 PowerPoint 2013 Applying Transitions Introduction If you've ever seen a PowerPoint presentation that had special effects between each slide, you've seen slide transitions. A transition can be as simple
Tutor Led Manual v1.7. Table of Contents PREFACE I.T. Skills Required Before Attempting this Course... 1 Copyright... 2 GETTING STARTED...
 EndNote X7 Tutor Led Manual v1.7 Table of Contents PREFACE... 1 I.T. Skills Required Before Attempting this Course... 1 Copyright... 2 GETTING STARTED... 1 EndNote Explained... 1 Opening the EndNote Program...
PicturesToExe Deluxe Version 6.0 The User`s Guide
 PicturesToExe Deluxe Version 6.0 The User`s Guide www.wnsoft.com 1 Introduction...3 Main features...4 System Requirements...5 What`s New in PicturesToExe...6 Questions...7 Problems...8 How to...10 Quick
imovie Workflow Digital Story Telling
 imovie Workflow for Digital Storytelling Kit Laybourne mediachops.com page 1 imovie Workflow Digital Story Telling This document tracks, step-by-step, the workflow for building a slide show of the kind
EndNote X6 Workshop Michigan State University Libraries
 EndNote X6 Workshop Michigan State University Libraries http://libguides.lib.msu.edu/endnote/ endnote@mail.lib.msu.edu Contents What is EndNote?... 2 Building an EndNote Library... 2 Starting EndNote...
EndNote X7: the basics (downloadable desktop version)
") EndNote X7: the basics (downloadable desktop version) EndNote is a package for creating and storing a library of references (citations plus abstracts, notes etc) it is recommended that you do not exceed
EndNote X7: the basics (downloadable desktop version) EndNote is a package for creating and storing a library of references (citations plus abstracts, notes etc) it is recommended that you do not exceed
I Can Present Green Screening - Windows
 I Can Present Green Screening - Windows Page 1 Introduction 4 System Requirements 5 Additional Requirements 5 Installing the Software 5 Getting Started 6 The Main Window 6 Creating and Editing Slides 7
Using the Remote Control
 note If a button is pressed longer than 30 seconds, the remote control stops operating to conserve power. When you release the button, normal operation resumes. Using the Remote Control Follow these tips
AVerTV 6. User Manual. English DISCLAIMER COPYRIGHT
 User Manual English DISCLAIMER All the screen shots in this documentation are only example images. The images may vary depending on the product and software version. Information presented in this documentation
WAVES Cobalt Saphira. User Guide
 WAVES Cobalt Saphira TABLE OF CONTENTS Chapter 1 Introduction... 3 1.1 Welcome... 3 1.2 Product Overview... 3 1.3 Components... 5 Chapter 2 Quick Start Guide... 6 Chapter 3 Interface and Controls... 7
Getting started with Mendeley
 UNIVERSITY OF TWENTE. Getting started with Mendeley C.M.Gerritsen ITC faculty library https://www.itc.nl/library August, 2018 1 Table of Contents 1 Mendeley in not even 10 steps... 3 1.1 Go to www.mendeley.com
Essential EndNote X7.
 Essential EndNote X7 IT www.york.ac.uk/it-services/training it-training@york.ac.uk Essential EndNote X7 EndNote X7 is a desktop application, and as such must be installed. All University of York classroom
Digital TV. User guide. Call for assistance
 Digital TV User guide Call 623-4400 for assistance Table of Contents Watch TV with Tbaytel Digital TV 1 Turn On Your TV and Tbaytel Digital TV 1 Turn Off the Screen Saver 1 Turn Off the TV 1 Use the Set
Introduction to EndNote Online
 Introduction to EndNote Online Creating an EndNote Online account Go to EndNote Online. Click on the Access EndNote Online button and, if prompted, enter your Warwick username and password to confirm you
USER GUIDE RELEASE 1.0
 USER GUIDE RELEASE 1.0 TM Copyright 2007 Color Kinetics Incorporated. All rights reserved. Chromacore, Chromasic, CK, the CK logo, Color Kinetics, the Color Kinetics logo, Color Kinetics The Leader in
Neuratron AudioScore. Quick Start Guide
 Neuratron AudioScore Quick Start Guide What AudioScore Can Do AudioScore is able to recognize notes in polyphonic music with up to 16 notes playing at a time (Lite/First version up to 2 notes playing at
EndNote X7 Getting Started. (adapted with permission from Thompson 2006)
") EndNote X7 Getting Started (adapted with permission from Thompson 2006) August 2013 Content 1. Introduction... 3 1.1 Finding Your Way Around EndNote... 3 2. Creating & Adding Records To Your EndNote Library...
EndNote X7 Getting Started (adapted with permission from Thompson 2006) August 2013 Content 1. Introduction... 3 1.1 Finding Your Way Around EndNote... 3 2. Creating & Adding Records To Your EndNote Library...
A few quick notes about the use of Spectran V2
 A few quick notes about the use of Spectran V2 The full fledged help file of Spectran is not ready yet, but many have asked for some sort of help. This document tries to explain in a quick-and-dirty way
Render Panel. Display Render - Render Output
 10.4 Render - Render Output Render Panel...1 Display...1 Output Options...2 Dimensions panel...2 Output Panel...3 Video Output...4 Preparing your work for video...4 Safe Areas and Overscan...4 Enabling
timing Correction Chapter 2 IntroductIon to timing correction
 41 Chapter 2 timing Correction IntroductIon to timing correction Correcting the timing of a piece of music, whether it be the drums, percussion, or merely tightening up doubled vocal parts, is one of the
DVR-431 USB Wireless Receiver User Manual
 DVR-431 USB Wireless Receiver User Manual Thank you for using our wireless USB receiver, please read the following content carefully before using, it will help you make better use of this product. Introduction
SkyEye Viewer Instruction Manual
 SkyEye Viewer Instruction Manual The SkyEye Viewer program provides an easy and convenient method to view images captured with the SkyEye camera system. Images can be viewed one frame at a time or played
Chapter 40: MIDI Tool
 MIDI Tool 40-1 40: MIDI Tool MIDI Tool What it does This tool lets you edit the actual MIDI data that Finale stores with your music key velocities (how hard each note was struck), Start and Stop Times
HyperMedia User Manual
 HyperMedia User Manual Contents V3.5 Chapter 1 : HyperMedia Software Functions... 3 1.1 HyperMedia Introduction... 3 1.2 Main Panel... 3 1.2.2 Information Window... 4 1.2.3 Keypad... 4 1.2.4 Channel Index...
Introduction to EndNote X8
 Introduction to EndNote X8 UCL Library Services, Gower St., London WC1E 6BT 020 7679 7793 E-mail: library@ucl.ac.uk Web www.ucl.ac.uk/library What is EndNote? EndNote is a reference management package
EndNote Essentials. EndNote Overview PC. KUMC Dykes Library
 EndNote Essentials EndNote Overview PC KUMC Dykes Library Table of Contents Uses, downloading and getting assistance... 4 Create an EndNote library... 5 Exporting citations/abstracts from databases and
R H Y T H M G E N E R A T O R. User Guide. Version 1.3.0
 R H Y T H M G E N E R A T O R User Guide Version 1.3.0 Contents Introduction... 3 Getting Started... 4 Loading a Combinator Patch... 4 The Front Panel... 5 The Display... 5 Pattern... 6 Sync... 7 Gates...
Contents 1 INSTALLATION THE 4 MAIN PARTS OF LASER CONTROLLER EDITOR/FRAMELISTS...4
 User Manual User Manual Page: 2 Contents 1 INSTALLATION...4 2 THE 4 MAIN PARTS OF LASER CONTROLLER...4 3 EDITOR/FRAMELISTS...4 3.1 THE TOOLS...4 3.2 BACKGROUND IMAGES...5 3.3 SELECTING OBJECTS...5 3.4
Table of Contents. Chapter 1 Introduction Video Conferencing on your PC... 1 Image and Video Capture... 1
 Table of Contents Chapter 1 Introduction... 1 Video Conferencing on your PC... 1 Image and Video Capture... 1 Chapter 2 Introducing the AVerTV Application... 2 Launching the AVerTV Application... 2 Introducing
MultiQ Digital signage template system for widescreen monitors
 Technical Note MultiQ Digital signage template system for widescreen monitors This document is intended as a guide for users of the MultiQ Digital Signage Template System for widescreen monitors in landscape
First Question: Camera head. Lighting unit. Shooting stage
 Elmo P30 Visualiser First Question: Q. Is everyone familiar with exactly what a visualiser is? A. A visualiser is effectively a camera on an arm, usually with a shooting stage and its own lighting source.
University of St Andrews - Medical and Biological Science Building Handbook LECTURE THEATRE
 LECTURE THEATRE 1. Booking. The School of Medicine gets first call to book the lecture theatre during teaching term time 1. Other schools or students can make bookings for the lecture theatre from mid
Remote Control Operation
 Remote Control Operation When you first switch the TV on, you will be presented with either the preview screen which shows the current program along with a brief summary of future programs or the full
Overview. Project Shutdown Schedule
 Overview This handbook and the accompanying databases were created by the WGBH Media Library and Archives and are offered to the production community to assist you as you move through the different phases
Network Disk Recorder WJ-ND200
 Network Disk Recorder WJ-ND200 Network Disk Recorder Operating Instructions Model No. WJ-ND200 ERROR MIRROR TIMER HDD1 REC LINK /ACT OPERATE HDD2 ALARM SUSPEND ALARM BUZZER STOP Before attempting to connect
Guidelines for use of the Access to HE trademarks
 Guidelines for use of the Access to HE trademarks September 2016 Introduction 1. The Access to Higher Education (HE) trademarks comprise the Access to HE logos and wordmarks. They act as a visual marker
Kindle Add-In for Microsoft Word User Guide
 Kindle Add-In for Microsoft Word User Guide version 0.97 Beta, 9/21/17 Contents 1 Introduction...2 1.1 Overview of Kindle Tab...2 2 Anatomy of a Kindle Book...3 3 Formatting Your Book...4 3.1 Getting Started...4
Exercise #1: Create and Revise a Smart Group
 EndNote X7 Advanced: Hands-On for CDPH Sheldon Margen Public Health Library, UC Berkeley Exercise #1: Create and Revise a Smart Group Objective: Learn how to create and revise Smart Groups to automate
User s Guide Contents
 User s Guide Contents Chapter 1 Introduction Video Conferencing on your PC Image and Video Capture Chapter 2 Setting Up your PC for Video Conferencing Overview How to Setup AVerMedia AVerTV Studio for
Page 1. Stop Motion Animation Kudlian Software Inspire, Create, Animate
 Page 1 Stop Motion Animation Introduction Forward by David Bunting Page 2 When I first started animating aged 9, I used a Super8 cine camera and needed to wait about three weeks for the film to be processed