IMPORTANT! USER MANUAL. LCDV3255HD 32 HD Wide Screen LCD TV WARRANTY INFORMATION INSIDE. PLEASE READ. Product Image to be inserted
|
|
|
- Kerrie Stanley
- 5 years ago
- Views:
Transcription


1 LCDV3255HD 32 HD Wide Screen LCD TV Product Image to be inserted USER MANUAL IMPORTANT! WARRANTY INFORMATION INSIDE. PLEASE READ Trademark of TEAC Corporation JAPAN
2 WARRANTY REGISTRATION Please read this warranty card. Keep your purchase receipt to enable you to proceed quickly in the event of a Warranty Service. Warranty Terms & Conditions 1. TEAC warrants to the original retail purchaser only, that this product is free from defects in material and workmanship under normal domestic use and authorises free service during the warranty period at any TEAC Authorised Service Centre only. TEAC warranty only applies to products purchased, used and serviced in Australia. 2. Subject to the terms herein, this warranty effectively covers the equipment as specified in the Warranty Periods Table below from the date of purchase. TEAC PRODUCT Plasma TV 106 cm and above LCD Televisions 80 cm and above Televisions 59cm and above All Televisions under 59 cm Digital Set Top Boxes & Module VCR DVD & Module DVD Recorder & PVR Module Audio Systems WARRANTY PERIOD 1 Year (In-Home Service/ Pick up Available)* 1 Year (In-Home Service/Pick up Available)* 1 Year (In-Home Service/ Pick up Available)* 1 Year (No In-Home Service) 1 Year (No In-Home Service) 1 Year (No In-Home Service) 1 Year (No In-Home Service) 1 Year (No In-Home Service) 1 Year (No In-Home Service) 3. In Home Service/Pick up* will only be provided as part of this warranty if all the following conditions are met; a) The product as indicated in the Warranty Period Table. b) The product is within the warranty period. c) The product is located within the normal service area of the local TEAC Authorised Service Centre. In any other situation or circumstance, where an In Home Service/Pick up* call is made, a service fee will be charged by the Service Provider including a travel fee if outside normal service area. If TEAC determines that the product is not repairable on site, TEAC can complete the repair by taking the product to a TEAC Authorised Service Centre. Where In-Home service/pick up* is not available, the purchaser is required to send the product to the nearest TEAC Authorised Service Centre for repair. In this event, a copy of this warranty card and a copy of your receipt of purchase must be enclosed to be a valid warranty. Such equipment or part must be sent freight prepaid to your nearest TEAC Authorised Service Centre. After the repair, the product will be available for collection by or return to the purchaser at purchaser s cost. The warranty does not cover freight or insurance. In all cases of transit damage or lost, a claim must be filed against the carrier by the purchaser, even if shipment is arranged by TEAC. TEAC inhome service may also be available at a fee upon request. 4. Accessories, Remote, including power adaptors, AV box, TV tuners, etc, are warranted to be defect free for 1 year. 5. Replacement of spare parts under normal usage; except cabinet, front panel, knob, removable accessories, battery, consumable, AC cord, connecting cord and other accessories, are warranted as specified in Warranty Periods Table, and will be repaired or replaced at the sole judgement of TEAC. 6. The warranties hereby conferred do not extend to, and exclude, any cost associated with the installation, deinstallation or re-installation of a product (be it in-home or otherwise), including costs related to the mounting, demounting or remounting of any screen, (and any other ancillary activities), delivery, handling, freighting, transportation or insurance of the product or any part thereof or replacement of and do not extend to, and exclude, any damage or loss occurring by reason of, during, associated with, or related to such installation, de-installation, re-installation or transit. 7. Normal customer maintenance as described in the owner s manual is not covered by this warranty (such as cleaning VCR heads etc.) 8. Service will be provided only during normal business hours and under safety conditions and circumstances.
3 9. This warranty does not apply to equipment showing abuse, damage or that it may have been tampered with, altered or repaired outside any TEAC Authorised Service Centre. If so, the warranty will be void. *Your nearest Authorised TEAC Service Centre is listed in your Owner s Manual, please refer to TEAC website for up to date list. 10. No one is authorised to assume any liability on behalf of TEAC or impose any obligation on it, in connection with the sale of any equipment other than as stated in this warranty and outlined above. 11. In no event will TEAC be responsible or liable for indirect or consequential damages from interrupted operations or other causes. 12. Warranty is not transferable to any subsequent purchaser if the product is sold during the warranty period. 13. LCD dead pixel policy, please contact TEAC Customer Care Centre on for assistance. * Extended promotional warranty may apply to certain products (for more info please contact: service@teac.com.au) In home service administration fee is applied after 1 st year of warranty.
4 WARRANTY PROCEDURES Please keep this information for your own records. Please refer to the owner s manual to ensure that you have followed the correct installation and operating procedures. 1. Read owner s manual carefully 2. If you require Warranty Service, please contact the TEAC Authorised Service Centre 3. Please have your purchase receipt as your proof of purchase and the following details completed for a valid Warranty. Owner s Name Owner s Address Postcode Model Name/No. Serial No. Dealer s Name Dealer s Address Postcode 4. Please ensure that your product is packed appropriately upon return to the service centre. If you have any other queries regarding service or warranty please contact the TEAC Customer Care Centre below: service@teac.com.au
5 Table Of Contents Important Safety Instructions... 2 Supplied Accessories... 4 View of Unit... 5 Right Side Panel... 5 Left Side Panel... 6 Rear Panel... 7 Front Panel... 8 Special Feature of DVD Module... 9 Disc Information...10 Remote Control...11 Remote Control Drawing...11 Preparation of Remote Control...14 Using of Remote control...14 System Connections...15 Connecting to the Power Supply...15 Connecting to a TV Antenna...15 Connecting to an External AV Signal Source (AV1/S-Video)...16 Connecting to an External AV Signal Source (AV2)...17 Connecting to an External AV Signal Source (YPbPr)...18 Connecting to an External AV Signal Source (HDMI)...19 Connecting to an External Signal Source (AV Output)...20 Connecting a Coaxial Digital Output...21 Connecting to a PC...22 Connecting a USB Device for Upgrading...23 Input Source Selecting...24 TV Function...25 Preparations...25 Installation Guide...25 Channel Setting...26 Picture Setting...28 Sound Setting...31 Time Setting...32 Option Setting...33 EPG Function...35 NICAM Function...36 DVD Playback Operation...37 Preparation...37 DVD Playback...37 CD Playback...39 JPEG Playback...40 AVI Playback...41 USB and SD/MS/MMC Card Function...42 DVD System Setup...43 Troubleshooting...48 Specifications


6 Important Safety Instructions This symbol indicates that dangerous voltage instituting a risk of electric shock is present within this unit. This symbol indicates that there are important operation and maintenance instructions in the literature accompanying the appliance. Caution: Laser radiation when open. Do not stare into beam. Caution: use of any controls, adjustments, or procedures other than those specified herein may result in hazardous radiation exposure. Caution 1. The product contains a low-power device. In order to ensure the safety of the laser device, do not remove any cover and attempt to repair the unit. If any service is needed, please contact the distributor or its authorised service centre. 2. To reduce the risk of electric shock, do not remove the cover (back). No user-serviceable parts inside. Refer servicing to qualified service personnel. Unplug the product from the wall outlet before servicing or when it is unused for a long period of time. 3. The manufacturer will not be held responsible for the damage caused by any substitutions and modification of the product without authorisation from the manufacturer s or authorised service agent. WARNING The apparatus shall not be exposed to dripping or splashing and that no objects filled with liquids, such as vases, shall be placed on the apparatus. The illustrations in this manual serve mainly as a reference and may differ slightly from you device. 2
7 Important Safety Instructions 1. Read these instructions. IMPORTANT FOR LASER PRODUCTS 2. Keep these instructions. 1. CLASS 1 LASER PRODUCT 3. Heed all warnings. 2. DANGER: Visible laser radiation when open and 4. Follow all instructions. interlock failed or defeated. Avoid direct exposure to 5. Do not use near water. beam. 6. Clean only with dry cloth. 3. CAUTION: Do not open the back cover. There are no 7. Do not block any ventilation user serviceable parts inside the unit. Leave all servicing openings. Maintain well to qualified service personnel. ventilated conditions around the product. Do not put product on a bed, sofa or anything that blocks ventilation. Install according to the manufacturer s instructions. 8. Do not install near any heat sources such as radiators, heat registers, stoves or other apparatus (including amplifiers) that produce heat. 9. Read, heed and follow all instructions to ensure correct and safe installation and interconnection of the apparatus; 10. The apparatus shall not be exposed to dripping or splashing and that no objects filled with liquids, such as vases, shall be placed on the apparatus. 11. The mains socket-outlet shall be installed near the apparatus and the mains plug shall remain readily operable. 12. Protect the power cord from being walked on or pinched particularly at plugs, power sockets, and the point where they exit from the apparatus. 13. Only use attachments/accessories specified by the manufacturer. 14. Use only with the stand, tripod, bracket, or table specified by the manufacturer, or sold with the apparatus. 15. Unplug the apparatus during lightning storms or when unused for long periods of time. 16. Refer all servicing to qualified service personnel. Servicing is required when the apparatus has been damaged in any way, such as power-supply cord or plug is damaged, liquid has been spilled or objects have fallen into the apparatus, the apparatus has been exposed to rain or moisture, does not operate normally, or has been dropped. 17. The apparatus shall be connected to a mains socket outlet with a protective earthing connection. Note: Do not touch the color TFT LCD screen directly by hand. Copyright Protection This product incorporates copyright protection technology that is protected by U.S. patents and other intellectual property rights. Use of this copyright protection technology must be authorized by Macrovision, and is intended for home and other limited viewing uses only unless otherwise authorized by Macrovision. Reverse engineering or disassembly is prohibited. 3


8 Supplied Accessories Make sure that the following accessories are provide with the product. ITEM NAME QTY Remote Control 1 Batteries for Remote Control 2 Power Supply Cord 1 AV Cables 1 User Manual 1 Note: Accessories and their numbers are subject to modification without prior notice. 4

9 View of Unit Right Side Panel 1. INPUT button Press to select enter the source selecting menu, press the direction buttons to select desired mode and press the ENTER button to enter the selected mode. In system setup menu, this button also serves as the ENTER button. 2. MENU button Press to enter the system setup menu. 3. CH buttons In TV or DTV mode, press to select channels; In system setup menu, this button also serves as the direction buttons. 4. VOL buttons Press to decrease or increase the volume; In system setup menu, this button also serves as the direction buttons. 5. POWER button Press to enter or exit standby mode. 5

10 View of Unit Left Side Panel 6. EJECT button Press to eject the disc from the unit. 7. STOP button Press to stop disc playback in DVD mode. 8. PLAY/PAUSE button Press to start disc playback and press it again to pause playback in DVD mode. 9. Disc Tray Slot Insert disc into this slot. 10. SD/MS/MMC Card Port Insert SD/MS/MMC card into this slot. 11. USB Port Connect the USB device. 6

11 View of Unit Rear Panel 7
12 View of Unit 1. HDMI 1, HDMI 2 and HDMI 3 Input Jacks Connect the HDMI signal source. 2. UPGRADE PORT Connect the USB device only for upgrading the TV software. 3. VGA IN Jack Connect the VGA signal source in VGA mode. 4. COAXIAL OUTPUT Jack Output the coaxial digital audio signal. 5. Y/Pb/Pr (Component) and L/R audio Input Jacks Connect the Y/Pb/Pr (Component) signal source in Component mode. 6. AV Output Jacks Connect to output the audio/video signals. 7. S-VIDEO Input Jack Connect Composite signal source in S-Video mode. 8. AV2 and L/R Audio Input Jacks Connect Composite signal source in Composite 2 mode. 9. AV1 and L/R Audio Input Jacks Connect AV1 signal source in Composite 1 mode. AV1 and S-Video share L/R audio jacks. 10. VGA AUDIO IN Jack Connect the audio signal in VGA mode. 11. TV antenna Input Jack Connect the external TV antenna signal source. 12. Power In Jack Connect the power supply. Front Panel 1. Color TFT Screen 2. Speakers 3. Power Indicator Lights blue while system is active and red while system is in standby mode. 4. Remote Sensor 8
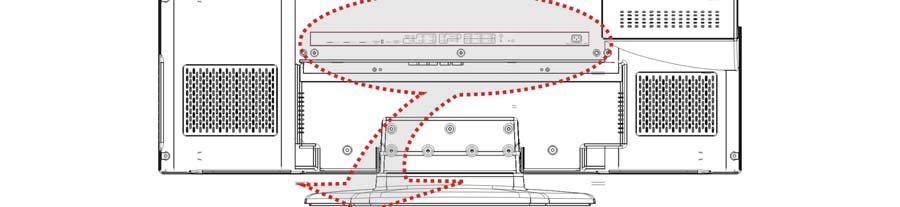
13 Special Feature of DVD Module Your TV comes equipped with a removable DVD module. Please follow the procedures below to remove or install the DVD module. Note: Before removing or installing the DVD module, ensure that the television is unplugged and turned off. DVD module removal: Refer to the illustration below and follow the procedures below to remove the DVD module from the unit: 1. Loosen the screw on the DVD module. 2. Carefully slide the DVD module along the rails and unplug the connecting cord from the LCD TV. 3. Slide the DVD module along the rails to fully remove the DVD module. DVD module installation: 1. Plug the connecting cord into the DVD module. 2. Carefully slide the module into the desired position and lock the function module with one screw. 9
14 Disc Information Discs Supported DISC LOGO CONTENTS SIZE MAXIMUM TIME 133min(SS-SL) DVD Audio + Video (active picture) 12cm 242min(SS-DL) 266min(DS-SL) 484min(DS-DL) CD Audio 12cm 74min JPEG Still high resolution 12cm AVI Audio + Video 12cm The operating method of some DVD discs is specified by the software maker. Please refer to the instruction manual of the disc. The unit will play most recordable (CD-R) or erasable (CD-RW) CDs, but playback of CD-R or CD-RW discs created on a computer requires proper formatting and finalization of the disc for audio playback. Some computers and/or software programs may not be capable of creating compatible discs. About Disc Terms Title Generally, pictures or music compressed on a DVD are divided into several sections, title. Chapter The smaller section unit of pictures or music in a DVD under the title, usually one title is comprised of one or more chapters and each of them is numbered for easy searching. But some discs may not have a recording by chapter facility. Track A segment of picture or music on a CD. Each track is numbered for searching. 10
15 Remote Control Remote Control Drawing 1. POWER button Press to enter or exit standby mode. 2. DTV button Press to enter DTV mode. 3. ATV button Press to select ATV mode. 4. SOUND button Press to select the screen picture mode: choose from Standard, User, Sports, Movie or Music. 5. TV.RADIO button Press to select DTV program playback or Radio program playback in DTV mode. 6. 0~9 Number buttons Press to select numbers such as TV channel. 7. button In TV or DTV mode, press to return to the channel previously viewed. 8. STEREO button Press to select sound track in TV mode. 9. VOL+/- button Press to increase or decrease the volume. 10. MUTE button Press to turn on or off the speaker output. 11. INPUT button Press to select enter the source selecting menu, press the direction buttons or press the INPUT button repeatedly to select desired mode and press the ENTER button to enter the selected mode. 12. Direction buttons ( ) In the setup menu, press the button to select a desired item and press the button to adjust or set. 13. DISPLAY button Press to display the reference information of the current mode. 14. ENTER button Press to confirm your operation in setup menu. 11
16 Remote Control 15. PLAY button Press to play a disc in DVD mode. 16. PAUSE button In DVD mode, press to pause playback and again to resume. 17. / buttons Press to search backward or forward in DVD mode. In Channel Edit menu, press the red button to delete a channel and use the green button to rename a channel (see P25-26 for details). In teletext mode, they are the teletext color buttons. 18. SETUP button In DVD mode press to enter the DVD setup menu. In TV mode, press to display or close the teletext. 19. MENU button (under DVD mode) Press to enter disc menu in DVD mode. In teletext mode, press to disable teletext display for page updates and press again to resume. 20. SUBTITLE button In DTV/DVD mode, press to select alternate subtitle languages during view/playback of a DTV program or multiple language DVD disc. In teletext mode, press to display index page. Note: Subtitle and teletext is only available if the service is provided by broadcaster. 21. AUDIO button In DVD mode, press to select the audio language or audio track. In teletext mode, press once to display the concealed information, such as solution of riddles or puzzles; press again to remove the riddles answers from the display. 22. FAV.LIST button Press to display the favorite channel list. In Channel Edit menu, press this button to set a favorite channel (see P25 for details). 23. CH.LIST button Press to display the channel list. 24. ASPECT button Press to shift the aspect ratio of the screen among 16:9, Zoom1, Zoom2, Auto and 4: EPG button Press to display the CHANNEL GUIDE menu in DTV mode button In DVD mode, press to select numbers greater than PICTURE button Press repeatedly to select the picture mode: Standard, Dynamic, User or Mild. 28. CH / button In TV or DTV mode, press to select analog channel or digital channel. 29. SLEEP button Press the button repeatedly to select the desired time to sleep or select Off to close the function. 30. MENU button Press to enter or exit the setup menu. 31. EXIT button Press to exit all the OSD on the screen. 32. EJECT button Press to eject the disc from the unit. 33. STOP button Press to stop disc playback in DVD mode. 34. / buttons Press to skip to the previous or next chapter/track in DVD mode. In Channel Edit menu, press the yellow button to move a channel and use the blue button to skip a channel (see P26 for details). In teletext mode, they are the teletext color buttons. 12


17 Remote Control Remote Control Drawing 35. REPEAT button Press to repeat a chapter, track, title or all program content in DVD mode. In teletext mode, press to hold the current page and press again to resume. 36. TITLE button During disc normal playback, press to go to display the title menu. In teletext mode, press the button first time to double the size of teletext letters in the upper half of the screen, second to double the size of teletext letters in the lower half of the screen and third to resume normal status. 37. CARD button Press to display the media selecting menu in DVD mode. In teletext mode, press to select four groups of 3-digit numbers that are displayed in different colors at the bottom of the screen. Press the color buttons on the remote control to select, then use the number buttons to input the corresponding number to display the page. Repeat the above procedures for each page to be stored, using a different color button each time. 38. GOTO button Press to select the desired disc starting time, title or chapter in DVD mode. In TV mode, press to display the real clock and press the EXIT button to exit. 13


18 Remote Control Preparation of Remote Control Softly push the back cover to open the battery compartment. Using of Remote control Point the remote control unit from no more than about 7 meters from the remote control sensor and within about 60 degrees of the front of the unit. Insert two batteries (1.5V, size AAA), please make sure the polarity matches the marks inside the compartment. Softly press the back cover to close it. The operating distance may vary depending on the brightness in the room. Under normal use the battery will last for six months. Take out battery when the remote is not in use for a long time. Notes: Do not point bright lights directly at the remote control sensor. Do not place objects between the remote control unit and the remote control sensor. Do not use this remote control unit while simultaneously operating the remote control unit of any other equipment. 14
19 System Connections Do not connect the power cord until all other connections have been made. Ensure that you observe the color code when connecting audio and video cables. Connecting to the Power Supply Connect one end of the power sully cord to the power jack on the rear panel of the unit and the other end to the wall AC outlet, see the figure below. Connecting to a TV Antenna Connect TV signal input source from the aerial to the TV jack on the rear panel of the unit. After connection, turn on the power of the unit. Then press the INPUT button and the direction buttons to select TV or DTV mode, press the ENTER button to confirm and conduct program selection. 15
 to connect the external AV signal source to the S-VIDEO input jack on the rear panel of the unit.")
20 System Connections Connecting to an External AV Signal Source (AV1/S-Video) Use the AV cables to connect the external AV signal source to the AV input jacks on the rear panel of the unit. Use a S-VIDEO cable (not supplied) to connect the external AV signal source to the S-VIDEO input jack on the rear panel of the unit. After connection, turn on the power of the unit and the external AV signal source. Press INPUT then direction buttons to select Composite 1 or S-Video mode, and then press the ENTER button to confirm. The L/R audio input jacks can be used in both Composite 1 and S-Video modes. 16

21 System Connections Connecting to an External AV Signal Source (AV2) Use the AV cables to connect the external AV signal source to the AV input jacks on the rear panel of the unit. After connection, turn on the power of the unit and the external AV signal source. Press INPUT then direction buttons to select Composite 2 mode, and then press the ENTER button to confirm. 17

22 System Connections Connecting to an External AV Signal Source (YPbPr) Use AV cables to connect an external AV signal source to the Y/Pb /Pr (Component) input jacks on the rear panel of the unit. After connection, turn on the power of the unit and the external AV signal source. Press INPUT then direction buttons to select Component mode, and then press the ENTER button to confirm. 18


23 System Connections Connecting to an External AV Signal Source (HDMI) Follow the figure below to connect an HDMI signal source to one of the HDMI jacks on the rear panel of the unit. After connection, turn on the power of the unit and the external AV signal source. Press INPUT then direction buttons to select HDMI 1, HDMI 2 or HDMI 3 mode, and then press the ENTER button to confirm. HDMI provides both audio and video signals and typically provides superior image quality to Component, S-Video or Composite. 19

24 System Connections Connecting to an External Signal Source (AV Output) Use the AV cables to connect the external AV input device to the AV output jacks on the rear panel of the unit. After connection, turn on the power of the unit and the external AV signal source. Press INPUT then direction buttons to select the corresponding mode, and then press the ENTER button to confirm. 20

25 System Connections Connecting a Coaxial Digital Output This unit is designed with a coaxial digital audio jack, can be connected to the digital amplifier, see the figure below: This feature is available only for amplifiers equipped with coaxial digital audio input connectors. 21
26 System Connections Connecting to a PC Follow the steps and figure below to connect a PC to the unit. 1. Connect one end of the VGA cable to the VGA IN jack on the jack panel of the unit and the other end to the PC VGA output. 2. Connect one end of the audio cables to the VGA AUDIO IN jack on the jack panel of the unit and the other end to the PC audio output jack. 3. Set the PC video resolution to match that of the television (Native 1366 x 768@60Hz). After connection, turn on the power of the unit and the external AV signal source. Press INPUT then direction buttons to select VGA mode, and then press the ENTER button to confirm. 22
27 System Connections Connecting a USB Device for Upgrading This unit is designed with a USB upgrade port, can be connected to the USB device for upgrading the software, see the figure below: Make sure that Software file for upgrade is stored in the USB device before connection. 23


28 Input Source Selecting The unit incorporates multiple video modes which can be selected via the INPUT button on the unit or remote control. Press the INPUT button to enter Input Source menu. The screen will display as shown below: NOTE: In this menu, TV stands for ATV mode. Use the direction buttons and ENTER button On the input menu, press the direction button to select the desired video mode. After several seconds, you can enter the selected mode. Or after you selected the desired mode press the ENTER button to enter the selected mode immediately. Use the INPUT button and ENTER button On the input menu, press the INPUT button repeatedly to select the desired video mode. After several seconds, you can enter the selected mode. Or after you selected the desired mode press the ENTER button to enter the selected mode immediately. 24


29 TV Function Preparations 1. After connection, press the POWER button to turn on the unit. 2. Press the INPUT button to select TV mode and you can then conduct the following operations: Note: In other mode, you can refer to the following instructions in TV mode to go on with some settings. Installation Guide When you turn on the TV for the first time or after you reset all the settings to their original status, the Installation Guide page appears automatically. Please follow the instructions to finish the installation guide setup. It helps to quick set the language and get the channels. The Installation Guide menu shown on the right will be displayed on the screen. The Language option is highlighted and the default is English. You can select the desired OSD language you want by pressing the button. Press the button to highlight Auto Tuning option and press the ENTER or button to prompt a information box, as shown on the right: Press the button to select a desired country. Press the button to highlight Start and press the ENTER button to start auto searching the available channels. The menu on the right will be displayed on the screen to show the progress of the search for TV, DTV and Radio programs. During searching, press the MENU button to skip some range of available channels. Press the EXIT button to exit. 25


30 TV Function If you did not use the unit for the first time or if your setup has changed, you can setup the unit from Channel Setup menu. Please follow the instructions below: Channel Setting Press the MENU button once to enter CHANNEL setup menu as shown on the right. Press the ENTER or button to enter the menu. In the CHANNEL setup menu, press the button to select the desired item. Press the MENU button to return to the previous menu. Press the EXIT button to exit. Auto Tuning Press the button to select Auto Tuning and press the ENTER or button, the screen will display as shown on the right: Press the button to select desired country and press the button to highlight Start. To cancel auto tuning, press the ENTER button after highlight Cancel by pressing the button. To start auto tuning, press the ENTER button after highlighting Start. The screen will display as shown: When auto tuning is over, all searched channels will be stored automatically and it will return to the first searched channel. During searching, press the MENU button to skip some range of available channels. Press the EXIT button to exit. Notes: Channel Tuning scans the analog channels, digital channels and Radio programs. Please allow a few minutes for this feature to scan the entire range of available channels to ensure accurate programming of available channels. 26


31 TV Function DTV Manual Tuning Press the button to select DTV Manual Tuning and press the ENTER or button, the screen will display as shown on the right: Press the button to select desired channel number and press the ENTER button to start tuning. ATV Manual Tuning Press the button to select ATV Manual Tuning and press the ENTER or button, the screen will display as shown on the right: Within this menu, press the button to select desired item and press the button to set or activate. Press the red button to save the settings. Channel Edit Press the button to select Channel Edit and press the ENTER or button, the screen will display as shown: Set a favorite channel: Within the menu, press the button to select a channel and press the FAV.LIST button to set it as your favorite channel, press the FAV.LIST button again to cancel. Delete a channel: Press the button to select a channel you want to delete and press the red button to set a symbol on the channel. Press the red button again to delete the selected channel, press the MENU button to return. 27
32 TV Function Rename a channel: (this function is only available for ATV channels) Press the button to select a channel you want to rename and press the green button to set a symbol on the channel. Press the button to highlight the character position of channel name and press the button to select desired character, press the MENU button to confirm and return. Move a channel: (this function is only available for ATV channels) Press the button to select a channel you want to move and press the yellow button to set a symbol on the channel. Press the button to select the desired position and press the MENU button to move the selected channel to the position you select. Skip a channel: Press the button to select a channel you want to skip and press the blue button to set the channel skipped. A symbol is appear on the skipped channel. Press the blue button again to cancel, press the MENU button to return. Note: A skipped channel is skipped when using the CH / button to browse the channels but can be watched by selecting in the channel list or using the number buttons. Picture Setting Press the MENU button once to enter CHANNEL setup menu and press the button to select PICTURE, the screen will display as shown. Press the ENTER or button to enter the menu. In the PICTURE setup menu, press the button to select the desired item. Press the MENU button to return to the previous menu. Press the EXIT button to exit. Picture Mode Press the button to select Picture Mode and press the button to select Standard, Mild, User or Dynamic. Contrast Press the button to select Contrast and press the or ENTER button to enter the contrast adjusting bar. Press the button to adjust the difference between the brightest and darkest regions of the picture. 28
33 TV Function Brightness Press the button to select Brightness and press the or ENTER button to enter the brightness adjusting bar. Press the button to darken or brighten the picture. Color Press the button to select Color and press the or ENTER button to enter the color adjusting bar. Press the button to adjust the level. Sharpness Press the button to select Sharpness and press the or ENTER button to enter the sharpness adjusting bar. Press the button to adjust the level. Tint Press the button to select Tint and press the or ENTER button to enter the adjusting bar. Press the button to adjust the level. Notes: This item is only available under NTSC signal mode. The items Contrast, Brightness, Color, Sharpness and Tint are only available when Picture Mode is set to User. Within the adjusting bar, you can select Contrast, Brightness, Color, Sharpness and Tint by pressing the button. Color Temperature Press the button to select Color Temperature and press the button to select Medium, Warm, User or Cool. Red Press the button to select Red and press the or ENTER button to enter the adjusting bar. Press the button to select adjust the level. Green Press the button to select Green and press the or ENTER button to enter the adjusting bar. Press the button to select adjust the level. 29
34 TV Function Blue Press the button to select Blue and press the or ENTER button to enter the adjusting bar. Press the button to select adjust the level. Notes: The items Red, Green and Blue are only available when Color Temperature is set to User. Within the adjusting bar, you can select Red, Green and Blue by pressing the button. Aspect Ratio Press the button to select Aspect Ratio and press the button to select 16:9, 4:3, Auto, Zoom2 or Zoom1. Noise Reduction Press the button to select Noise Reduction and press the button to select Auto, Off, Low, Standard or High. Screen This item is only available in VGA mode. Press the button to select Screen and press the or ENTER button to enter its sub menu, as shown on the right: Within this menu, press the button to select desired item and press the MENU button to return. Press the EXIT button to exit. Auto Adjust Press the button to select Auto Adjust and press the or ENTER button to start auto adjusting the screen. Horizontal Pos. Press the button to select Horizontal Pos. and press the button to adjust the level. Vertical Pos. Press the button to select Vertical Pos. and press the button to adjust the level. Size Press the button to select Size and press the button to adjust the level. Phase Press the button to select Phase and press the button to adjust the level. 30

35 TV Function Sound Setting Press the MENU button once to enter CHANNEL setup menu and press the button to select SOUND, the screen will display as shown. Press the ENTER or button to enter the menu. In the SOUND setup menu, press the button to select the desired item. Press the MENU button to return to the previous menu. Press the EXIT button to exit. Sound Mode Press the button to select Sound Mode and press the button to select Standard, Music, Movie, Sports or User. Note: The items Treble and Bass are only available when Sound Mode is set to User. Treble Press the button to select Treble and press the button to adjust the level. Bass Press the button to select Bass and press the button to adjust the level. Balance Press the button to select Balance and press the button to adjust the level. Auto Volume Occasionally, different TV stations volume level may be different from each other, this function will mornalise audio level form all channels. Press the button to select Auto Volume and press the button to select On or Off. Surround Sound Press the button to select Surround Sound and press the button to select Surround or Off. Spdif Press the button to select Spdif and press the button to select PCM, RAW or Off. 31


36 TV Function Time Setting Press the MENU button once to enter CHANNEL setup menu and press the button to select TIME, the screen will display as shown. Press the ENTER or button to enter the menu. In the TIME setup menu, press the button to select the desired item. Press the MENU button to return to the previous menu. Press the EXIT button to exit. Clock Press the button to select Clock and press the button or ENTER button to prompt a information box, as shown: Press the button to select Date, Month, Year, Hour or Minute, press the button to set. Press the ENTER button to confirm after selecting Close. NOTE: in DTV mode, the Clock function is not available when there is DTV signal input. Off Time Press the button to select Off Time and press the ENTER or button to prompt a information box, as shown: Press the button to select Repeat, Hour or Minute, press the button to set. Press the ENTER button to confirm after selecting Close. Sleep Timer Press the button to select Sleep Timer and press the button to select the time to turn off the TV. Auto Sleep Press the button to select Auto Sleep and press the button to select On or Off. Time Zone Press the button to select Time Zone and press the button to select desired time zone. 32


37 TV Function Option Setting Press the MENU button once to enter CHANNEL setup menu and press the button to select OPTION, the screen will display as shown. Press the ENTER or button to enter the menu. In the OPTION setup menu, press the button to select the desired item. Press the MENU button to return to the previous menu. Press the EXIT button to exit. Language Press the button to select Language and press the button to select desired language. Audio Languages Press the button to select Audio Languages and press the ENTER or button to prompt a information box, as shown: Press the button to select Primary or Secondary, press the button to select desired language. Press the ENTER button to confirm before selecting Close. Note: This item is only available in DTV mode. Subtitle Language Press the button to select Subtitle Language and press the ENTER or button to prompt a information box, as shown: Press the button to select Primary or Secondary, press the button to select desired language. Press the ENTER button to confirm after selecting Close. Note: This item is only available in DTV mode. Hearing Impaired Press the button to select Hearing Impaired and press the button to select On or Off. Country This item is used to shown the current country. 33


38 TV Function Restore Factory Default Press the button to select Restore Factory Default and press the ENTER or button to prompt a confirmation information box, as shown: Press the button to highlight Yes or No, press the ENTER button to reset the settings to their default status or cancel. Note: this will delete all changes and user setting. Software Update Press the button to select Software Update and press the ENTER or button to prompt a confirmation information box, as shown: Press the button to highlight Yes or No, press the ENTER button to start updating or cancel. NOTES: Before updating, make sure the USB device is connected to the upgrade port on the rear panel of the unit. During updating, please don t power off. After updating, please unplug the power and wait for 10 seconds then plug in the power again to reboot the unit. 34


39 EPG Function In DTV mode, press the EPG button to display the CHANNEL GUIDE menu as shown below: Within this menu, press the button to select a desired channel. Press the DISPLAY button to display the detail information of the selected channel. Press the yellow button to check the date information. Press the green button to display the Schedule List as shown below: Within the SCHEDULE LIST menu, press the button to select desired item and press the red button to delete it. Press the EXIT button to exit. Press the blue button in the CHANNEL GUIDE menu to enter the Reminder menu, as shown on the right: Within this menu, press the button to select desired item and press the button to set. Press the green button to display the Schedule List. Press the ENTER button to save your settings. Press the EXIT button to exit. 35
40 NICAM Function The unit supports NICAM function when in TV mode. Under NICAM TV broadcast: 1. When receiving stereo audio signals, press the STEREO button on the remote control repeatedly to select the sound tracks between NICAM STEREO and Mono and the screen will show the corresponding display as shown below: 2. When receiving bilingual audio signals, press the STEREO button on the remote control repeatedly to shift the sound tracks between NICAM DUAL I, NICAM DUAL II, NICAM DUAL I+II and Mono and the screen will show the corresponding display as shown below: 3. When receiving mono audio signals, press the STEREO button on the remote control repeatedly to shift the sound tracks between NICAM Mono and Mono and the screen will show the corresponding display as shown below: Under A2 TV broadcast: 1. When receiving stereo audio signals, press the STEREO button on the remote control repeatedly to shift the sound tracks between Stereo and Mono and the screen will show the corresponding display as shown below: 2. When receiving bilingual audio signals, press the STEREO button on the remote control repeatedly to shift the sound tracks between DUAL I, DUAL II and DUAL I+II and the screen will show the corresponding display as shown below: 3. When receiving mono audio signals, press the STEREO button on the remote control to display sound track Mono on the screen. 36
41 DVD Playback Operation Preparation 1. Connect the unit to the power supply and press the POWER button to turn on the unit. 2. Repeatedly press the INPUT button on the remote control to select DVD mode and press the ENTER button to enter. 3. Gently insert the disc, with the label side toward the front of the television, into the disc tray slot until about half of the disc is in the tray and then the disc will be drawn into the disc tray and loaded automatically. note: must select DVD mode before insert disc. 4. Press the EJECT button to eject the disc, but the disc can not be drawn into the disc tray by pressing the EJECT button again. You must push the disc until it is drawn into the disc tray automatically. Warning: Use of poor quality discs could result in damage to the television. DVD Playback Region Code DVD players and discs are coded by region. These regional codes must match the played discs. If the codes don t match, the disc cannot be played. This player s default code is 4. Play Press the PLAY button to start playback. Stop During playback, press the STOP button once to stop playback and press the PLAY button to resume normal playback. Press the STOP button twice to stop playback completely. Pause During playback, press the PAUSE button once to pause the playback; press it repeatedly to start step-by-step playback. Press the PLAY button to resume normal playback. 37
42 DVD Playback Operation Previous and Next Press the button to go to the next chapter. Press the button once to return to the beginning of the current chapter or track; press it twice to go to the previous chapter. Fast Playback During playback, press the button to activate fast backward or forward playback. During fast playback, press the PLAY button to resume normal playback. Repeat Press the REPEAT button repeatedly to repeat a chapter, title or all. Some discs do not support the repeat function. Menu Normally there is a selecting menu for DVD discs. You can press the MENU button (under DVD mode) to enter the menu, and use the direction buttons to highlight an item. Then press the ENTER button to confirm. Title & Chapter Normally there are several titles in a DVD disc, and several chapters (sections) in a title. Press the TITLE button to enter the title menu, and you can select any title or chapter quickly by entering the relevant number. Some discs do not support the function by inputting the number button but the direction buttons. Language (Audio) There can be up to 8 audio languages on a DVD disc. When you play a multi-language DVD disc you can use the AUDIO button on the remote control to select a desired language. GOTO During DVD disc playback, press the GOTO button on the remote control once, there will be a menu displayed on the screen. You can set or select items for your preference. Use the direction buttons to select items and press the ENTER button to enter and use the direction buttons to select the desired item. Press the direction button to return. When selecting the Title/Chapter, TT Time/CH Time, use the number buttons to input the desired title/chapter, time. Some DVD discs do not support the search function. 38
43 DVD Playback Operation Subtitle The DVD player can support multiple kinds of subtitles. When you play a multi-subtitle disc you can press the SUBTITLE button on the remote control to select different subtitles. Some discs do not support the shifting subtitle function. CD Playback The player will play all tracks on a CD disc by default. You can use the buttons, or number buttons to select a track. Stop Press the STOP button once to stop playback and press the PLAY button to resume normal playback. Press the STOP button twice to stop playback completely. Pause Press the PAUSE button to pause the playback and then press the PAUSE button again or PLAY button to resume normal playback. Previous and Next Press the button to go the beginning of the current track. Press twice repeatedly to go the previous track. Press the button to play from the beginning of the next track. Fast Playback Press the button on the remote control to activate fast backward or forward playback. Repeat Press the Repeat button repeatedly to repeat a single track, all tracks, or to exit repeat mode. Some discs do not support the repeat function. Audio During playback, press the Audio button to toggle audio output between Mono Left, Mono Right, Mix-Mono or Stereo. GOTO Press the GOTO button to access the time-selected state. You can select Disc Go To, Track Go To or Select Track respectively by pressing this button repeatedly. Use the 0-9 buttons to enter the desired time and then the player will play according to the selected time. Use the 0~9 number buttons and the +10 button to enter the desired track number, then the player will play the selected track. 39
44 DVD Playback Operation JPEG Playback JPEG is a common picture format that requires small amounts of storage per image and has low loss in resolution. Hundreds of pictures can be stored on a disc in this format. In order to view JPEG photo albums, you can ask your film development company to make a PICTURE CD when they develop your film. Normal Playback Load a JPEG disc in. For JPEG disc, there will be a root menu displayed on the screen. Use the ENTER button and the direction button to select a submenu, and then use the direction button to select the contents. Many discs have other contents besides pictures. For Picture CD disc, it will display the pictures automatically. During playback, press the button to select the picture. Many discs have other contents besides pictures. Stop Press the STOP button to preview the pictures behind currently playing picture in the way of small pictures. Press the PLAY button to resume normal playback. Pause Press the PAUSE button to pause playback, press the PAUSE button again or PLAY button to resume playback. Repeat During playback, press the REPEAT button repeatedly, and the repeat modes are Shuffle, Random, Single, Repeat One, Repeat All and Repeat Off. Menu Press the MENU button once to stop playback and return to the root menu. GOTO During playback, press the GOTO button on the remote control once, use the number buttons to input the file number. Picture Rotation During playback, press the button to rotate the currently displayed picture. This function only activates for the current picture; once another picture is displayed, rotation will be cancelled automatically. Some JPEG discs may not support the rotation function. 40
45 DVD Playback Operation AVI Playback AVI is the name of a revolutionary new video code, which is based on the new AVI compression standard for video. 1. Load a AVI disc in the disc tray, the player will enter the reading mode. 2. The screen displays the root menu. Use the buttons to select desired item and press the ENTER button to play. Stop During playback, press the STOP button to stop playback and return to root menu and press the PLAY button to play the file from the beginning. Pause During playback, press the PAUSE button once to pause the playback and press it again or press the PLAY button to resume normal playback. Previous and Next Press the button to go the previous file; press the button to play the next file Fast Playback During playback, press the button to activate fast backward or forward playback. During fast playback, press the PLAY button to resume normal playback. REPEAT During playback, press the REPEAT button repeatedly to select repeat mode. GOTO Press the GOTO button repeatedly to select Select:--- or Go To:-:--:--. Use the 0-9 buttons to enter the desired time or and then the player will play according to the selected time. Use the 0~9 number buttons and the +10 button to enter the desired track number, then the player will play the selected track. 41

46 DVD Playback Operation USB and SD/MS/MMC Card Function In DVD mode, connect USB device to the USB port or insert SD/MS/MMC card into the SD/MS/MMC card slot on the left side of the unit. Make sure that files are stored in the USB and SD/MS/MMC card before connection. 1. When you turn on the unit, the media select menu will appear on the screen, as shown on the right: 2. This menu also appears when pressing the CARD button in DVD mode. 3. Press the button to select DVD and press the ENTER button to start disc playback. 4. Press the button to select Media and press the ENTER button to enter. Press the button to select USB memory playback or the SD/MS/MMC playback and press the ENTER button to start. Please see the below figure: 5. Press the button to select the folder, and press the ENTER button to enter. 6. Press the button to select the desired track. Then press the PLAY button to start playback. 7. Press the STOP button to stop playback. Press the PLAY button to start playing from the beginning of the current track. Press the button to return to the folder menu. Notes: 1. The screen display will vary from disc to disc. 2. Pull out the USB memory or SD/MS/MMC card directly after the files are played. Then the media selecting menu will appear on the screen. 42


47 DVD System Setup This is the place where you can arrange all important settings for the cooperation of the DVD with the TV set and other audio equipment. General Operating Steps 1. Press the INPUT button to change to DVD mode. Press the SETUP button on the remote control, the settings menu will appear. It includes the options General Setup Page, Audio Setup Page, Video Setup Page and Preference Page. Use to select the desired main menu. 2. Select the desired submenu using the direction buttons on the remote and press ENTER to confirm. Select an option value to be set using the direction buttons on the remote and press ENTER to confirm, or press to cancel setting. After ENTER; you return to the main menu using. 3. SETUP takes you back out of the setup menu. General Setup Page Press the SETUP button in DVD mode. The General Setup menu will appear. Select the desired submenu using the direction buttons on the remote and press ENTER to confirm. Select an option value to be set using the direction buttons on the remote and press ENTER to confirm, or press to cancel setting. After ENTER; you return to the main menu using. TV Display Used for setting the screen mode. 4:3/Ps, 4:3/Lb, 16:9 and Wide Squeeze are available. Select 4:3/Ps (Pan Scan) or 4:3/Lb (Letter Box), when a 4:3 TV is connected. Select 16:9 and Wide Squeeze, when using a 16:9 screen on the unit. Angle Mark This is where you can change the camera angel of the scenes being played if the DVD this function is available. On : A camera symbol appears on the screen. If there are alternative view angles, a corresponding message appears. Off : No camera symbol is displayed. 43


48 DVD Setup Menu OSD Lang Please select preferred language for the OSD menus. Captions You can activate the captions display during playback with On or deactivate the display with Off. Screen Saver When activated, under stop mode, the unit will go into screen saver mode if the same image remains on the screen for several minutes. Last Memory Use this option to switch the "Resume after playback interruption" function on or off. Use to select On or Off ; use ENTER to confirm and to end setting. Audio Setup Page Press the SETUP button in DVD mode. Use to select the Audio Setup menu. The Audio Setup menu will appear: Select the desired submenu using the direction buttons on the remote and press ENTER to confirm. Select an option value to be set using the direction buttons on the remote and press ENTER to confirm, or press to cancel setting. After ENTER; you return to the main menu using. 44


49 DVD Setup Menu Dolby Digital Setup: Dual Mono This function is used to set audio output. Stereo: Stereo signal output. L-Mono: Left audio channel signal output. R-Mono: Right audio channel signal output. Mix-Mono: Output of left and right mixed audio signals. Dynamic Use this function for setting the linear, dynamic compression ratio that can be used to implement various signal compression effects. The greater the compression ratio, the smaller the difference between highs and lows. This option is only available for Dolby Digital audio. As shown above, switch into the sub-menu and select the desired value with. Use ENTER to confirm and to end setting. HDCD Setup: Filter As shown above, switch into the sub-menu and select the desired value with. Options are: Off, 1x, 2x. Use ENTER to confirm and to end setting. Video Setup Page Press the SETUP button in DVD mode. Use to select the Video Setup menu. The Video Setup menu will appear: Select the submenu "Quality" using the direction buttons on the remote and press ENTER to confirm. Select further options and an option value to be set using the direction buttons on the remote and press ENTER to confirm, or press to cancel setting. After ENTER; you return to the main menu using. 45

50 DVD Setup Menu Sharpness This menu allows the settings for the sharpness of the picture: High, Medium or Low. Select "Low" for a soft image and "High" to improve a blurry image. Brightness and Contrast Used to set the brightness and contrast of the image to conform to the surrounding light and according to individual preferences. DivX VOD Setup For receiving the DivX Video On Demand registration codes. You can use this code for downloading a DivX video. The downloaded video can only be downloaded onto this device. The code is automatically updated after the DivX video is played. Navigate to the OK option and display the information using ENTER. Press the ENTER button again to exit the option s setting. Preference Page This function is allowed to set when there is no disc in the disc tray or all the operation has been stopped. Press the SETUP button in DVD mode. Use to select the Preference Setup menu. The Preference Setup menu will appear: Select the desired submenu using the direction buttons on the remote and press ENTER to confirm. Select an option value to be set using the direction buttons on the remote and press ENTER to confirm, or press to cancel setting. After ENTER; you return to the main menu using. 46

51 DVD Setup Menu Audio, Subtitle and Disc Menu If a DVD contains several languages, you can choose the language for the playback, subtitles and DVD menu. Default This option is used to reset the unit. The factory settings are adopted. Notes: Resetting is only possible when the disk is removed from the DVD drive. All your settings done so far will be deleted. 47
TFTV7450M 72cm(29")HD LED TV/DVD Combo
HD LED TV/DVD Combo") TFTV7450M 72cm(29")HD LED TV/DVD Combo Table Of Contents Important Safety Instructions...2 View of Unit...4 Front Panel... 4 Right Side Panel... 4 Rear Panel... 5 Remote Control...6 Remote Control Drawing...
TFTV7450M 72cm(29")HD LED TV/DVD Combo Table Of Contents Important Safety Instructions...2 View of Unit...4 Front Panel... 4 Right Side Panel... 4 Rear Panel... 5 Remote Control...6 Remote Control Drawing...
< > ϯϯyyϭ USER MANUAL
 USER MANUAL Contents Contents Safety Precautions Power Supply... 1 Installation... 2 Use and Maintenance... 3 Important Safety Instructions... 4-5 User Guidance Information Names of each part(front View)
Safety warning Important Safety Instructions. Wall Mount Specifications. Electronic Program Guide. Lock Menu 18. PVR File System
 LT-32N370Z 32 INPUT Safety warning Important Safety Instructions Wall Mount Specifications Electronic Program Guide Lock Menu 18 PVR File System 11 11 11 14 15 16 17 19 20 21 21 22 23 24 25 INPUT AAA
User Manual High Definition Digital Set Top Box DVBT9070 Please read this User Manual carefully to ensure proper use of this product and keep this man
 User Manual High Definition Digital Set Top Box DVBT9070 Please read this User Manual carefully to ensure proper use of this product and keep this manual for future reference. Important Safety Instructions
KGN&, > Ϯϰs USER MANUAL
 USER MANUAL KGN Contents Contents Safety Precautions Power Supply... 1 Installation... 2 Use and Maintenance... 3 Important Safety Instructions... 4-5 User Guidance Information Names of each part(front
User Manual. High Definition Digital Set Top Box HDSTB250
 User Manual High Definition Digital Set Top Box HDSTB250 CHANNEL HDSTB250 Please read this User Manual carefully to ensure proper use of this product and keep this manual for future reference. Important
Evolution Digital HD Set-Top Box Important Safety Instructions
 Evolution Digital HD Set-Top Box Important Safety Instructions 1. Read these instructions. 2. Keep these instructions. 3. Heed all warnings. 4. Follow all instructions. 5. Do not use this apparatus near
HD Digital Set-Top Box Quick Start Guide
 HD Digital Set-Top Box Quick Start Guide Eagle Communications HD Digital Set-Top Box Important Safety Instructions WARNING TO REDUCE THE RISK OF FIRE OR ELECTRIC SHOCK, DO NOT EXPOSE THIS PRODUCT TO RAIN
USER MANUAL KGN1080P32VD
 USER MANUAL KGN1080P32VD USB... Power cord Remote control/batteries Power/Standby button Picture mode button Sound mode button Multi-digits channel buttton P.MODE S.MODE FREEZE SLEEP 1 2 3 4 5 6 7 8 9
Full High Definition LCD TV USER MANUAL
 1080p3 LCD TV Full High Definition LCD TV 1080p3 USER MANUAL Important Safety Precautions Important Safety Precautions 1 CAUTION RISK OF ELECTRIC SHOCK DO NOT OPEN This symbol indicates important instructions
CAUTION RISK OF ELECTRIC SHOCK NO NOT OPEN
 Evolution Digital HD Set-Top Box Important Safety Instructions 1. Read these instructions. 2. Keep these instructions. 3. Heed all warnings. 4. Follow all instructions. 5. Do not use this apparatus near
CONTENTS 8 ACCESSORIES 13 9 TROUBLE SHOOTING AND ADVICE SPECIFICATIONS BATTERY USAGE CAUTION 13
 CONTENTS 1 PREFACE 2 2 SAFETY PRECAUTIONS 2 3 FRONT & BACK VIEW, REAR CONNECTION OF LCD 3 4 TV INSTALLATION DRAWINGS 4 4.1 ANTENNA CONNECTION 4 4.2 AV1 INPUT CONNECTION 4 4.3 AV2 INPUT CONNECTION 4 4.4
Introduction. Important Safety Instructions
 Introduction Congratulations on purchasing your Eviant Portable Digital TV. On June 12, 2009 the conversion to digital television broadcasting will be complete all throughout the United States and Puerto
28 4K LED monitor. User Manual M284K
 28 4K LED monitor User Manual M284K CONTENTS Safety Information... 2 What s included..... 4 Getting Started....... 8 Troubleshooting.... 14 Specification.... 15 2 of 15 SAFETY INFORMATION Read these instructions
INSTALLATION MANUAL VIP 1903 / VIP 1903 T VIP 1963 / VIP 1963 T
 INSTALLATION MANUAL VIP 1903 / VIP 1903 T VIP 1963 / VIP 1963 T We Declaration of Conformity Motorola Mobility, Inc. 101 Tournament Drive Horsham Pennsylvania 19044 USA declare under our sole responsibility
User Manual of digital Set Top Box PAT1 02
 User Manual of digital Set Top Box PAT1 02 Please read this User Manual carefully to ensure proper use of this product and keep this manual for future reference. Important Safety Instructions 1) Read these
NMS ETA TM Stereo Advanced Digital TV Set-top Box
 Digital TV HD Set-top Box STB2-T2 NMS ETA TM Stereo Advanced Digital TV Set-top Box User Guide CONTENTS Safety Information... 3 Introduction... 4 Set-top Box Front Panel... 4 Set-top Box Back Panel...
60cm(23.6 ) LED TV WITH DVD & DVB-T
 LED TV WITH DVD & DVB-T") 60cm(23.6 ) LED TV WITH DVD & DVB-T INSTRUCTION MANUAL TFTV6045LEDR Contents Power Supply... 1 Installation... 2 Use and Maintenance... 3 Important Safety Instructions... 4-5 Overview(Front View) / Accessories...
60cm(23.6 ) LED TV WITH DVD & DVB-T INSTRUCTION MANUAL TFTV6045LEDR Contents Power Supply... 1 Installation... 2 Use and Maintenance... 3 Important Safety Instructions... 4-5 Overview(Front View) / Accessories...
DVH-1019 MK2 User Manual PULL
 DVH-1019 MK2 User Manual PULL Safety Rules WARNING Read all instructions. Failure to follow all instructions listed below may result in electric shock, fire and/or serious injury. The term electrical device,as
Attention. Please handle this product with care and inspect it regularly to ensure it is in good working order.
 Attention Please handle this product with care and inspect it regularly to ensure it is in good working order. If the product, power supply cord or plug shows any signs of damage: stop use, unplug and
26 Wide screen LCD TV With DVD Model No.: DVT-2621
 26 Wide screen LCD TV With DVD Model No.: DVT-2621 For information and support, www.lenco.eu Contents Contents Caution Safety Information Unit and Accessories Product Feature Introduction 1. Front View
Installation Manual VIP 1003
 Installation Manual VIP 1003 We Caring for the Environment by Recycling When you see this symbol on a Motorola product, do not dispose of the product with residential or commercial waste. Recycling your
ZVOX AccuVoice TV Speaker MODEL AV150.
 ZVOX AccuVoice TV Speaker MODEL AV150 www.zvoxaudio.com READ THIS FIRST Important Safety Instructions For ZVOX Audio System WARNING TO PREVENT FIRE OR SHOCK HAZARD, DO NOT EXPOSE THIS APPLIANCE TO RAIN
Safety Instructions. General Safety Instructions
 Table of Contents Safety Instructions...2 General Safety Instructions...2 Installation...3 Cleaning...4 General Description...5 Specifications & Accessories...5 Specifications...5 Accessories...5 Input
LED TV MODEL NO.: NE22K5BG. Please read this manual carefully before installing and operating the TV. Keep this manual handy for further reference
 LED TV USER MANUAL MODEL NO.: NE22K5BG IMPORTANT Please read this manual carefully before installing and operating the TV. Keep this manual handy for further reference Table Of Contents Preparations Guide
TFD-2622 USER S MANUAL
 26 Wide Screen LCD TV with DVD player TFD-2622 USER S MANUAL Contents Contents Caution Safety Information Unit and Accessories Product Feature Introduction 1. Front View 2. Rear View 3. Remote Control
<'E&, > WZKϮϰs USER MANUAL
 USER MANUAL Contents Contents Safety Precautions Power Supply... 1 Installation... 2 Use and Maintenance... 3 Important Safety Instructions... 4-5 User Guidance Information Names of each part(front View)
Operating Instructions
 Model No.: MS0801-E02 Operating Instructions Thanks for purchasing our product. Please be sure to read this instruction manual carefully before using our product. Introduction MS0801-E02 supports to switch
 Register your product and get support at www.philips.com/welcome SWS3435S/27 SWS3435H/37 EN User manual Contents 1 Important 4 Safety 4 English 2 Your SWS3435 6 Overview 6 3 Installation 7 Connect the
USER MANUAL KGNPRO19VD
 USER MANUAL KGNPRO19VD X P.MODE S.MODE SLEEP AUDIO 1 2 3 4 5 6 7 8 9 A/DTV USB/SD FAV + 0 SOURCE MENU OK INFO EXIT MUTE VOL CH ASPECT TTX TITLE /AUTO DVD.SETU P EPG SU BTITL E D.MENU ZOOM/REC.LIST GOTO
LT-50N530Z 50" class INPUT
 LT-50N530Z 50" class INPUT Safety warning Important Safety Instructions Wall Mount Specifications Electronic Program Guide Lock Menu 18 PVR File System 11 11 11 14 15 16 17 19 20 21 21 22 23 24 25 Safety
KALED24DVDWA USER MANUAL
 KALED24DVDWA USER MANUAL Contents Contents Safety Precautions Power Supply... 1 Installation... 2 Use and Maintenance... 3 Important Safety Instructions... 4-5 User Guidance Information Names of each part(front
FV400 DIGITAL TV RECEIVER WITH MODULATOR INSTRUCTION MANUAL
 FV400 DIGITAL TV RECEIVER WITH MODULATOR INSTRUCTION MANUAL Please read this instruction manual carefully before using your receiver Table of Contents Introduction-----------------------------------------------------------------------------
ZVOX AccuVoice TV Speaker Model AV203
 ZVOX AccuVoice TV Speaker Model AV203 SETUP & OPERATION www.zvoxaudio.com 2 ZVOX AccuVoice TV Speaker Setup & Operation READ THIS FIRST Important Safety Instructions For ZVOX Audio System WARNING TO PREVENT
ZVOX AccuVoice TV Speaker Model AV203
 ZVOX AccuVoice TV Speaker Model AV203 SETUP & OPERATION www.zvoxaudio.com READ THIS FIRST Important Safety Instructions For ZVOX Audio System WARNING TO PREVENT FIRE OR SHOCK HAZARD, DO NOT EXPOSE THIS
IMPORTANT SAFETY INSTRUCTIONS
 IMPORTANT SAFETY INSTRUCTIONS 1. Read, follow and keep these instructions safely. 2. Heed all warnings. 1. Do not use this apparatus near water. 2. Clean only with dry cloth. 3. Do not block any ventilation
MAX T200 HD QUICK INSTALLATION GUIDE
 MAX T200 HD QUICK INSTALLATION GUIDE MAX T200 HD QUICK INSTALLATION GUIDE CONTENT receiver BATTERIES x 2 REMOTE CONTROL Quick installation guide Quick Installation Guide The lightning flash with arrowhead
1812R Blues King 12. User Manual
 1812R Blues King 12 User Manual All contents c Absara Audio LLC 2018 1. Important Safety Information The triangle surrounding an exclamation mark alerts users to the presence of important warnings or information.
55" Curved Ultra HD LED TV User s Guide for Model TU5587B v For the most up-to-date version of this User s Guide, go to
 55" Curved Ultra HD LED TV User s Guide for Model TU5587B v1922-01 For the most up-to-date version of this User s Guide, go to www.gpx.com Safety Instructions & Warnings CAUTION RISK OF ELECTRIC SHOCK
ATTACHING & REMOVING THE BASE
 TV53DB ATTACHING & REMOVING THE BASE 1. To install or remove the neck, screw in or remove the 4 screws indicated in the picture. 2. To install the base, place the display unit flat on a table. Afterwards
KGNϭϬϴϬWWZKϮϮs USER MANUAL
 USER MANUAL KGN X P.MODE S.MODE SLEEP AUDIO 1 2 3 4 5 6 7 8 9 USB/SD A/DTV FAV + 0 SOURCE MENU OK INFO EXIT MUTE VOL CH ASPECT /C AN CE L TTX /SIZE D.MENU/HOLD U P G /AUTO DVD.SETU P /S B A E TITLE EPG
1080p UPCONVERTING HDMI
 1080p UPCONVERTING HDMI DVD PLAYER DV D3300 DVD3300 INSTRUCTION MANUAL 1-11 WARNINGS To reduce the risk of fire or electric shock, do not expose this appliance to rain or moisture. To reduce the risk of
Model 1606 Super. User Manual
 Model 1606 Super User Manual All contents c Absara Audio LLC 2014 1. Important Safety Information The triangle surrounding an exclamation mark alerts users to the presence of important warnings or information.
PROGRAM RATING TV-PG LTD " LCD/DVD COMBO
 PROGRAM RATING TV-PG LTD1510 15" LCD/DVD COMBO Table of Contents Table of Contents -------------------------------------------------------------------------- 2 Safety Instructions ------------------------------------------------------------------------
HDMI Converter. Operating Instructions(P/N of this Instructions is INSYH0101)
") HDMI Converter Model No. YH0101 Operating Instructions(P/N of this Instructions is INSYH0101) Dear customer Thank you for purchasing this product. For optimum performance and safety, please read these
HDMI Converter Model No. YH0101 Operating Instructions(P/N of this Instructions is INSYH0101) Dear customer Thank you for purchasing this product. For optimum performance and safety, please read these
2.0 Wall Mount TV Soundbar Instruction Manual
 8010275 2.0 Wall Mount TV Soundbar Instruction Manual Read all of the instructions before using this soundbar and keep the manual in a safe place for future reference. Safety Information CA UT IO N RISK
Owner's Manual DIGITAL TO ANALOG BROADCAST CONVERTER WITH REMOTE CONTROL. Model: CVD508 PLEASE READ BEFORE OPERATING THIS EQUIPMENT.
 Size: 148.5(W) x 210(H)mm (A5) DIGITAL TO ANALOG BROADCAST CONVERTER WITH REMOTE CONTROL Owner's Manual PLEASE READ BEFORE OPERATING THIS EQUIPMENT. Model: CVD508 FCC NOTICE: To assure continued compliance,
OWNER'S MANUAL MODEL: DTV-2000 STANDBY/ON
 OWNER'S MANUAL MODEL: DTV-2000 STANDBY/ON CH+ CH- TABLE OF CONTENTS SAFETY PRECAUTIONS IMPORTANT SAFETY INSTRUCTIONS and FEATURES ACCESSORIES and LOADING BATTERIES REMOTE CONTROL UNIT FRONT PANEL and REAR
E246 Series User Guide
 E246 Series User Guide PACKAGE CONTENTS SCEPTRE Display x 1 Display Base x 1 Display Neck x 1 Screws x 6 (ST3 x 10mm) Warranty Card x 1 Power Cord x 1 (Attached) Display Remote Control (AAA Batteries included)
DIGITAL WATERPROOF TV / MIRROR TV USER MANUAL. copyright and intellectual property rights. 10"/15" /17"/19"/22"/26"/32" series
 DIGITAL USER MANUAL MENU VOL- VOL+ CH- CH+ TV/AV POWER IR copyright and intellectual property rights The original manufacturer exclusively own or are licensed to use all copyright and other intellectual
27'' Full HD LED Monitor KALED27MONSC Quick Start Guide
 Safety Warnings 27'' Full HD LED Monitor KALED27MONSC Quick Start Guide TO REDUCE THE RISK OF ELECTRIC SHOCK, DO NOT REMOVE ANY COVERS (OR BACKINGS). NO USER SERVICEABLE PARTS ARE INSIDE. REFER ALL SERVICING
16" WIDE SCREEN HD LED TV WITH DVD PLAYER MODEL NO: NTD-1552
 16" WIDE SCREEN HD LED TV WITH DVD PLAYER MODEL NO: NTD-1552 Instruction Manual PLEASE READ CAREFULLY BEFORE USE Table of Contents SAFETY INFORMATION WARNING IMPORTANT SAFETY PRECAUTIONS 1 FRONT/BACK PANEL
Table of Contents Safety Precautions 1.1 Safety Precautions... Introduction to the Product 2.1 Features Important Information
 best, and Table of Contents Safety Precautions 1.1 Safety Precautions..... 1 Introduction to the Product 2.1 Features..... 3 2.2 Important Information... 4 2.3 The Device and Accessories... 5 Functional
T1000n-VM USER MANUAL
 T1000n-VM USER MANUAL IMPORTANT! Safety Instructions 01. Read these Instructions. 02. Follow all Instructions. 03. Keep these Instructions. 04. Do not use this receiver near water. 05. Clean only with
Before you can install your LCD TV on the wall, you must fi rst remove the base using the steps below:
 Quick Start Guide English CONTENTS INSTALLING LCD TV ON THE WALL.. TV CHANNEL INSTALLATION........ PRESENTATION OF THE LCD TV...... ACCESSORIES.................... BATTERY INSTALLATION............ REMOTE
AX1919/AX1922/AX1924/AX /24V LED DVD/TV
 AX1919/AX1922/AX1924/AX1932 12/24V LED DVD/TV PANEL - Display Size: 19 (48cm) - AX1919 22 (56cm) - AX1922 24 (60cm) - AX1924 32 (81cm) - AX1932 - High Definition LED TV - AX1919/32 - Full High Definition
Acer LCD TV AT2001 User's Guide
 Acer LCD TV AT2001 User's Guide Copyright 2005. Acer Incorporated. All Rights Reserved. Acer AT2001 User' s Guide Original Issue: May 2005 Acer and the Acer logo are registered trademarks of Acer Incorporated.
Full High Definition LCD TV. Kogan 1080p42 USER MANUAL
 Full High Definition LCD TV Kogan 1080p42 USER MANUAL Safety information To ensure reliable and safe operation of this equipment, please read carefully all of the instructions in this user guide, especially
E325 Series User Guide
 E325 Series User Guide PACKAGE CONTENTS SCEPTRE Display x 1 Display Base x 1 Thick Threaded Screws x 3 Thin Threaded Screws x 4 Circular Metal Plate x 1 Black Plastic Ring x 1 Power Cord x 1 (Attached)
UNFOLD THE BASE. Quick Start Guide CONTENTS INSTALLING LCD TV ON THE WALL
 Quick Start Guide English CONTENTS INSTALLING LCD TV ON THE WALL.. UNFOLD THE BASE............... TV CHANNEL INSTALLATION........ PRESENTATION OF THE LCD TV..... ACCESSORIES.................... BATTERY
Register your product and get support at SDV5122/27. EN User manual
 Register your product and get support at www.philips.com/welcome SDV5122/27 User manual Contents 1 Important 4 Safety 4 Notice for USA 5 Notice for Canada 5 Recycling 6 English 2 Your SDV5122 7 Overview
39" 1080p LCD Television PLCD3992A
 PROSCAN 39" 1080p LCD Television PLCD3992A Contents Contents Caution Safety Information Unit and Accessories Product Feature 2 3 4 4 Introduction 5-9 1. Front View 5 2. Rear View 6 3. Instruction for
LED LCD TV OWNER' S MANUAL
 LED LCD TV OWNER' S MANUAL MODEL: LE22M600 LE24M600 Please READ this manual carefully before operating your TV, and retain it for future reference Contents 1 Safety and warnings...2-3 2 Introduction...4
DVB-T2. Digital Terrestrial Receiver WD-822T2 USER S MANUAL
 DVB-T2 Digital Terrestrial Receiver WD-822T2 USER S MANUAL Index Important Safety Instructions... 3 Main Features.... 5 Front and Rear Panel.... 6 Remote Control..... 7 Installing the Batteries..... 8
Congratulations on purchasing your Eviant Portable Digital TV.
 Introduction Congratulations on purchasing your Eviant Portable Digital TV. On June 12, 2009 the conversion to digital television broadcasting will be complete all throughout the United States and Puerto
26 HD READY DIGITAL LCD TV WITH DVD PLAYER
 M26DVDB19 26 HD READY DIGITAL LCD TV WITH DVD PLAYER INSTRUCTION MANUAL Safety Warnings Read all the instructions carefully before using the unit and keep them for future reference. Retain the manual.
Prestigio P370MW User s Manual
 Prestigio P370MW User s Manual Trademarks HDMI, the HDMI logo and High-Definition Multimedia Interface are trademarks or registered trademarks of HDMI Licensing LLC. All other brand and product names are
LED LCD TV OWNER' S MANUAL
 LED LCD TV OWNER' S MANUAL MODEL: LE22T1000F LE24T1000F Please READ this manual carefully before operating your TV, and retain it for future reference Contents 1 Safety and warnings...2-3 2 Introduction...4
32 (80cm) HD LED LCD TV
 HD LED LCD TV") 32 (80cm) HD LED LCD TV / GVADLED32 Instruction Manual 2 Contents Preface 4 Safety Precautions 4 Important Safety Instructions 7 In the Carton 10 Connections and Functions 11 Basic Installation 12 Remote
32 (80cm) HD LED LCD TV / GVADLED32 Instruction Manual 2 Contents Preface 4 Safety Precautions 4 Important Safety Instructions 7 In the Carton 10 Connections and Functions 11 Basic Installation 12 Remote
Owner s Manual. TFT-LCD TV High Brightness & Contrast NICAM/A2 Stereo Sound MODEL: L15SV6-A0, L17LV6-A1,L20AV6-A0 L17L6A-G1,L20L6A
 TFT-LCD COLOUR TV Owner s Manual TFT-LCD TV High Brightness & Contrast NICAM/A2 Stereo Sound Please read this manual carefully before using your television and keep this manual in a good place for future
HDTV Supply Inc. reserves the right to make changes in the hardware, packaging and any accompanying documentation without prior written
 HDMI Matrix (Router Type) Model No. HDTVMX0404313 HDTV Supply, Inc Features Easy to use: install in seconds, no need for setting. Allows up to four HDMI audio/video devices to be independently switched
Safety Information...2 Important Safety Precautions...3
 TFTV3955M Table Of Contents Preparations Guide Safety Information...2 Important Safety Precautions...3 Installed And Connected TV TV Bracket assemble...4 TV Buttons And Terminal Interface... 5 External
HDTV Supply. Mega Scaler. Operating Instructions FEATURES
 Mega Scaler Model No: mega-scaler HDTV Supply Operating Instructions FEATURES 11-inputs-2 outputs multi-function video scaler, could convert AV, S-video, YPBPR, VGA, DVI-I and HDMI signal to two identical
E32 Series User Guide
 PACKAGE CONTENTS E32 Series User Guide SCEPTRE Display x 1 TV Foot x 2 Screws x 4 Power Cord x 1 (attached) Warranty Card x 1 Display Remote Control (AAA Batteries included) x 1 User Guide x 1 (Complete
Q-TV2. User Manual. for Screens
 Q-TV2 User Manual for 30-42 Screens Contents Introduction 02 Safety Guidelines 03 Getting started 03 Potential Uses 04 Carton Contents 05 Q-TV2 Controls 05 Remote Fixings 06 Fixing Rails 07 Fitting Q-TV2
26 HD Ready Digital LCD TV with DVD Player
 26 HD Ready Digital LCD TV with DVD Player Instruction Manual L26DVDB10 L26DVDB10_IB_final110210_running change3.indd 1 10/02/2011 3:36 PM Contents Preparation... 4 Unpacking the TV...4 Installing / Removing
50 (127cm) FHD LED LCD TV. Instruction Manual L50HTV17a 24 Month Manufacturer s Warranty
 FHD LED LCD TV. Instruction Manual L50HTV17a 24 Month Manufacturer s Warranty") 50 (127cm) FHD LED LCD TV Instruction Manual L50HTV17a 24 Month Manufacturer s Warranty Contents Guide to the Television 3 Front / Bottom View and Controls 3 Rear View and Sockets 4 Remote Control 5 Installing
50 (127cm) FHD LED LCD TV Instruction Manual L50HTV17a 24 Month Manufacturer s Warranty Contents Guide to the Television 3 Front / Bottom View and Controls 3 Rear View and Sockets 4 Remote Control 5 Installing
Be sure to run the vehicle engine while using this unit to avoid battery exhaustion.
 CAUTION: TO REDUCE THE RISK OF ELECTRIC SHOCK DO NOT REMOVE COVER (OR BACK) NO USER-SERVICEABLE PARTS INSIDE REFER SERVICING TO QUALIFIED SERVICE PERSONNE; Please Read all of these instructions regarding
Xpresionn Digital Terrestrial Receiver. User Guide
 Xpresionn 2150 Digital Terrestrial Receiver User Guide GENERAL INFORMATION...3 A) SAFETY PRECAUTIONS...3 B) MAIN FEATURES...4 C) CONTENTS OF THE PACKAGING...4 D) REMOTE CONTROL...5 INSTALLATION...6 A)
DIGITAL SET TOP BOX STB 7017 INSTRUCTION MANUAL
 DIGITAL SET TOP BOX STB7017 INSTRUCTION MANUAL STB 7017 CHANNEL After Sales Support Now you have purchased a Tevion product you can rest assured in the knowledge that as well as your 3 year parts and labour
Operating Instructions
 Model No.: TESTER-H01 Operating Instructions Thanks for purchasing our product. Please be sure to read this instruction manual carefully before using our product. Contents HDMI Signal Generator...1 Product
35 INCH CURVED QHD LED MONITOR
 35 INCH CURVED QHD LED MONITOR eiq-35cmuwq60gafs Thank you for choosing electriq Please read this user manual before using this monitor and keep it safe for future reference. Visit our page www.electriq.co.uk
User Guide. 42" LED-LCD, 60Hz 1080p NS-42E760A12
 User Guide 42" LED-LCD, 6Hz 18p NS-42E76A12 Contents CHILD SAFETY...................................................1 Important safety instructions.....................................2 Warnings........................................................
Programming Manual for Broadcastvision Entertainment
 Programming Manual for Broadcastvision Entertainment 18.5 Widescreen LCD Part Number: AXS19HD2G 18.5 Widescreen Controller Part Number: AXSPVSC-BVE AXS19HD2G AXSPVSC-BVE Other parts and accessories included
39 WIDESCREEN LED TV MODEL NO.: SP-LED40 USER MANUAL
 39 WIDESCREEN LED TV MODEL NO.: SP-LED40 USER MANUAL Please read this manual carefully before using, and keep it for future reference. IMPORTANT SAFETY INSTRUCTIONS 1. Read these instructions All the safety
40 FHD LED LCD TELEVISION with BUILT IN DVD. Instruction Manual
 40 FHD LED LCD TELEVISION with BUILT IN DVD MODEL: VN4019LEDDVD Instruction Manual 8 Table of Contents Safety Information...2 Important Safety Precautions... 3 TV Base Assembly... 4 Front Back panel diagrams...
E246 Series User Guide
 E246 Series User Guide IMPORTANT SAFETY INSTRUCTIONS Electricity is used to perform many useful functions, but it can also cause personal injuries and property damage if improperly handled. This product
Safety Instructions. General Safety Instructions
 Table of Contents Safety Instructions...2 General Safety Instructions...2 Installation...3 Cleaning...4 General Description...5 Specifications & Accessories...5 Specifications...5 Accessories...5 Overview...6
S7030PVR User Manual
 S7030PVR User Manual Important Safety Instructions 1) Do not use this apparatus near water. 2) Clean only with dry cloth. 3) Do not block any ventilation openings, install in accordance with the instructions.
TV CHANNEL INSTALLATION
 LCD TV TV CHANNEL ATION Immediately after unpacking and plugging in your new television, run the auto program function to set up the TV for the broadcast or cable channels available in your area. If you
USER MANUAL. 27 Full HD Widescreen LED Monitor L27ADS
 USER MANUAL 27 Full HD Widescreen LED Monitor L27ADS TABLE OF CONTENTS 1 Getting Started 2 Control Panel/ Back Panel 3 On Screen Display 4 Technical Specs 5 Care & Maintenance 6 Troubleshooting 7 Safety
Utility Amplifier GA6A Model
 Utility Amplifier GA6A Model Installation and Use Manual 2004 Bogen Communications, Inc. All rights reserved. Specifications subject to change without notice. 54-5757-03D 1503 NOTICE: Every effort was
LCD VALUE SERIES (32 inches)
") LCD VALUE SERIES (32 inches) http://www.orionimages.com All contents of this document may change without prior notice, and actual product appearance may differ from that depicted herein 1. SAFETY INSTRUCTION
LCD VALUE SERIES (32 inches) http://www.orionimages.com All contents of this document may change without prior notice, and actual product appearance may differ from that depicted herein 1. SAFETY INSTRUCTION
19 HD Ready Digital LCD TV with DVD Player
 19 HD Ready Digital LCD TV with DVD Player Instruction Manual L19DVDP10 L19DVDB20 Logik L19DVDP10_B20_IB_100914_Zell.indd 1 14/09/2010 3:02 PM Logik L19DVDP10_B20_IB_100914_Zell.indd 2 14/09/2010 3:02
Operating Instructions
 Model No.: SPL1T801 Operating Instructions Thanks for purchasing our product. Please be sure to read this instruction manual carefully before using our product. Introduction Wyrestorm s SPL1T801 is a
D108S INSTRUCTION MANUAL
 D108S INSTRUCTION MANUAL Contents Warnings & Precautions... 2 Important Safety Instructions... 3 In the Box & Features... 4 Powering the Unit... 5 Playing and Programming a DVD or CD... 6 Viewing a Photo
Digital Terrestrial Television Receiver USER S MANUAL
 # 5024 Digital Terrestrial Television Receiver USER S MANUAL CAUTION RISK OF ELECTRIC SHOCK DO NOT OPEN This symbol is intended to alert the user to the presence of insulated dangerous voltage within the
Safety Instructions. General Safety Instructions
 Table of Contents Safety Instructions...2 General Safety Instructions...2 Installation...3 Cleaning...4 General Description...5 Specifications & Accessories...5 Specifications...5 Accessories...5 Overview...6
16 WIDESCREEN LED TV MODEL NO.: SP-LED16 USER MANUAL
 16 WIDESCREEN LED TV MODEL NO.: SP-LED16 USER MANUAL Please read this manual carefully before using, and keep it for future reference. IMPORTANT SAFETY INSTRUCTIONS 1. Read these instructions All the safety
Front and Rear Panel Remote Control Connecting to a Television...4. Connecting to an Audio System...5
 Table of Contents Front and Rear Panel... 1 Remote Control...... 2 Connecting to a Television...4 Connecting to an Audio System...5 Connecting to a DVD Recorder or VCR... 6 First Time Installation... 7