DCX-24 ORDERCODE D2020
|
|
|
- Ralf McCarthy
- 5 years ago
- Views:
Transcription

1 DCX-24 ORDERCODE D2020

2 Congratulations! You have bought a great, innovative product from DAP Audio. The DAP Audio DCX-24 brings excitement to any venue. Whether you want simple plug-&-play action or a sophisticated show, this product provides the effect you need. You can rely on DAP Audio, for more excellent audio products. We design and manufacture professional audio equipment for the entertainment industry. New products are being launched regularly. We work hard to keep you, our customer, satisfied. For more information: iwant@dap-audio.info You can get some of the best quality, best priced products on the market from DAP Audio. So next time, turn to DAP Audio for more great audio equipment. Always get the best -- with DAP Audio! Thank you!
3 DAP Audio DAP Audio DCX-24 Product Guide Warning Safety-instructions.. Operating Determinations. Description Features... Overview Front side Overview Back side.... Installation..... Set Up and Operation Xover submenu Safety Options System Menu Interface Menu Parameter Menu Software DCX Main Menu Gain Settings Delay Settings Limiter Settings Out 1 Scene Filter Settings Out 2 Settings Out 3 Settings Out 4 Settings Operation Connection Cables Maintenance Troubleshooting Product Specifications
4 WARNING CAUTION! Keep this system away from rain and moisture! FOR YOUR OWN SAFETY, PLEASE READ THIS USER MANUAL CAREFULLY BEFORE YOUR INITIAL START-UP! SAFETY INSTRUCTIONS Every person involved with the installation, operation and maintenance of this system has to: - be qualified - follow the instructions of this manual CAUTION! Be careful with your operations. With a dangerous voltage you can suffer a dangerous electric shock when touching the wires! Before you initial start-up, please make sure that there is no damage caused by transportation. Should there be any, consult your dealer and do not use the system. To maintain perfect condition and to ensure a safe operation, it is absolutely necessary for the user to follow the safety instructions and warning notes written in this manual. Please consider that damages caused by manual modifications to the system are not subject to warranty. This system contains no user-serviceable parts. Refer servicing to qualified technicians only. IMPORTANT: The manufacturer will not accept liability for any resulting damages caused by the non-observance of this manual or any unauthorized modification to the system. Never let the power-cord come into contact with other cables! Handle the power-cord and all connections with the mains with particular caution! Never remove warning or informative labels from the unit. Never use anything to cover the ground contact. Do not insert objects into air vents. Do not connect this system to a dimmerpack. Do not switch the system on and off in short intervals, as this would reduce the system s life. Do not open this device. Risk: hazardous radiation exposure. Do not run the output of any amplifier channel, back into another channel s input. Do not connect (parallel or series) an amplifier output with any other amplifier output. Only use system indoor, avoid contact with water or other liquids. Avoid flames and do not put close to flammable liquids or gases. Always disconnect power from the mains, when system is not used. Only handle the power-cord by the plug. Never pull out the plug by tugging the power-cord. Make sure you don t use the wrong kind of cables or defective cables. Make sure that the signals into the mixer are balanced, otherwise hum could be created. Make sure you use DI boxes to balance unbalanced signals; All incoming signals should be clear. Make sure that the available voltage is not higher than stated on the rear panel. Make sure that the power-cord is never crimped or damaged. Check the system and the power-cord from time to time. Avoid flames and do not put close to flammable liquids or gases. 2
5 Before connecting or disconnecting the power cord, make certain the ON / OFF switch is in the OFF position. Before switching on or off make certain the sound system s amplifiers are off or turned down: this will avoid signal peaks, which are annoying and sometimes dangerous (particularly for speaker enclosures). Avoid installing your equipment very near radio or TV sets, mobile phones, etc., as these can cause RF (radio frequency) interference. When connecting the other parts of your sound system, watch out for the so-called ground loops. The best way (even if not always feasible) to avoid ground loops is to connect the electric ground of all the equipment to a single central point ( star system). In this case, the central point can be the mixer. To avoid or solve hum and buzzing troubles, try different combinations of lifting grounds on units that are supplied with ground lift switches or make sure all chassis are connected to earth ground, either through the A.C. power cord ground or by the front panel rack mount screws. Before changing your grounds around, always turn your amplifiers down. Keep this user s manual for future consultation. Also remember that the crossover will get a better price on the secondhand market if (as well as being in good condition) it has its original documentation and packaging. Always operate the unit with the AC ground wire connected to the electrical system ground. Do not drive the inputs with a signal level bigger, than required to drive the equipment to full output. In system setup, the amplifier's output power must be 50%-100% more than the loaded loudspeakers rated power. Please turn off the power switch, when changing the power cord or signal cable, or select the input mode switch. Sometimes, when you want to send one signal to more than one amplifier, you should use a signal distributor. Extreme frequency boosts in connection with a high input signal level may lead to overdriving your equipment. Should this occur, it is necessary to reduce the input signal level by using the INPUT control. To emphasize a frequency range, you don t necessarily have to move its respective sliding control upward; try lowering surrounding frequency ranges instead. This way, you avoid causing the next piece of equipment in your sound path to overdrive. You also preserve valuable dynamic reserve ( headroom ) For replacement use fuses of same type and rating only. Prevent distortion! Make sure that all components connected to the DCX-24 have sufficient power ratings. Otherwise distortion will be generated because the components are operated at their limits. Avoid ground loops! Always be sure to connect the power amps and the mixing console to the same electrical circuit to ensure the same phase! If system is dropped or struck, disconnect mains power supply immediately. Have a qualified engineer inspect for safety before operating. If the system has been exposed to drastic temperature fluctuation (e.g. after transportation), do not switch it on immediately. The arising condensation water might damage your system. Leave the system switched off until it has reached room temperature. Repairs, servicing and electric connection must be carried out by a qualified technician. WARRANTY: Till one year after date of purchase. OPERATING DETERMINATIONS If this system is operated in any other way, than the one described in this manual, the product may suffer damages and the warranty becomes void. Any other operation may lead to dangers like short-circuit, burns, electric shock, etc. You endanger your own safety and the safety of others! Improper installation can cause serious damage to people and property! 3

6 Description of the device Features The DCX-24 is a professional crossover: Active frequency filter with slopes up to 48 db/octave split up the audio-signal into different frequency bands 5 basic configurations 5-band parametric EQ per output Up to 7 ms signal delay for the inputs and outputs adjustable Delay displayed in milliseconds, meters, feet and frame/second Output limiter with adjustable limits and automatic attack and release settings as overload protection for your amplifying system Lock-function for protecting the program settings Phase Invert switch per output Rs232 interface for remote control including PC software 2x XLR Input and 4x XLR Output Clip LED Software included for easy set-up with DCX-24 Overview 1) LCD-Display: To display functions and operating status. 2) BACK-Button 3) MENU-Button 4) GAIN-Button 5) NEXT-Button 6) ENTER-Button 7) QUIT-Button 8) Parameter Knob: For adjusting the parameters. Turning the Parameter knob to the right increases the parameter value, turning to the left decreases the value. 9) Input LEDs 10) Output LEDs with MUTE-button 11) Power ON/OFF Fig. 1 4

7 Backside 12) IEC Connector + Fuse 13) RS232-SOCKET 14) 4x XLR Output Socket 15) 2x XLR Input Socket Fig. 2 Installation Remove all packing materials from the DCX-24. Check that all foam and plastic padding is removed. Screw the equipment into a 19" rack. Connect all cables. Always disconnect from electric mains power supply before cleaning or servicing. Damages caused by non-observance are not subject to warranty. Set Up and Operation Before plugging the unit in, always make sure that the power supply matches the product specification voltage. Do not attempt to operate a 120V specification product on 240V power, or vice versa. Install this device on a flat surface, not bending or curved. Do not supply power before all components of the system are set up and connected properly. Main Menu Press the MENU-button (3), to enter the main menu. Select the desired submenu by pressing the BACK (2) or NEXT buttons (5) and confirm your setting with the ENTER-button (6). Xover submenu 1. Load a crossover Select the desired program via the Parameter knob (8) and confirm with the ENTER-button (6). You can only choose from already stored programs. 2. Design a crossover Select the desired setting via the Parameter knob (8) and confirm with the ENTER-button (6). DCX-24: Stereo 2-way, mono 3-way, mono 4-way Stereo-Link Only for stereo programs. The stereo link links two outputs depending on the crossover type. 3. Store a crossover You can save up to 10 programs. Press the ENTER-button (6) for saving. Select the desired program number via the Parameter knob (8). In order to move the cursor (e.g. for entering the next letter or correcting the last letter), press the BACK (2) or NEXT buttons (5). Confirm your entry by pressing the ENTER-button (6). 4. Erase a crossover Select the desired program via the Parameter knob (8) and confirm with the ENTER-button (6). 5
8 Safety options The DCX-24 offers you the possibility to protect your settings from any unauthorized access. 1. Change only: The parameters can be viewed but not be changed. Mute is possible. 2. Changes + View: The parameters cannot be viewed and not be changed. Mute is possible. 3. Changes + Mute: The parameters can be viewed. Changes and mute are not possible. 4. Everything: Everything is locked, nothing can be viewed and mute is not possible. In order to unlock: A) Push the BACK (2) or NEXT buttons (5), shift the cursor, turn round the PARAM to change the character. B) Push the ENTER-button (6), confirm your password and the display shows. Enter Security Code [ ] C) Repeat step A and push the ENTER-button (6). D) System is locked when the password is the same, or the locking operation is invalid. System menu 1. Input option Switch the stereo link between channels A and B, ON or OFF. 2. Wake-up Time With this menu, you can adjust the way the DCX-24 reacts after turning on. 3. Fade-in When turning on, the outputs slowly increase to the preset output volume. Mute Hold: all output remains muted. 4. Delay Time / Distance You can adjust the delay in: milli seconds (ms) meters (m) feet (ft) Interface menu Interface-Setup Baud-Rate: Here, you can adjust the transmission speed of the RS-232 port. Press the ENTER-button (6). You can select 2400, 4800, 9600, 19200, Remote ID: you can only enter this menu after having confirmed the baud-rate with the ENTER-button (6). Here, you can adjust the device s ID between 1 and 32. 6
9 PARAMETER MENU Press the GAIN-button (4) in order to enter the Parameter menu. 1. Input Gain Via the Parameter knob (8), you can adjust the input sensitivity between -40 db and + 6 db in 0.5 db steps. The display shows if the inputs are linked with each other (e.g. Input A&B). For linked inputs, the gain is adjusted for both inputs. Press the NEXT-button (5) in order to jump to the next parameter. 2. Output Gain Via the Parameter knob (8), you can adjust the output volume between -40 db and + 6 db in 0.5 db steps. By pressing the GAIN-button (4), you can change to Output 2 etc. The display shows if the inputs are linked with each other (e.g. OP 1&4). For linked inputs, the parameters are adjusted for both inputs. 3. Polarity-function The polarity of every output can be inverted. If the polarity of a linked output will be inverted, the polarity of the other channel will also be inverted. 4. Delay With the delay, it is possible to compensate differences in the running distances between different speaker-systems or speaker-systems at different installation spots. The delay can be adjusted for both inputs and all outputs between 0 and 7 ms in 0.5 ms steps. How to calculate the delay-time: The delay-time T equals the distance in meters (D) divided by the speed of sound (C). T=D/C How to calculate the speed of sound: C=20.6 * (273 + C) in meter per second. 5. Hi-pass/Lo-pass Hi-pass filter for passing higher frequencies. Lo-pass filter for passing lower frequencies. If several parameters are displayed, you can switch from parameter to parameter by pressing the Parameter knob (8). The active parameter is marked with a hook. Adjust the crossover frequency and the filter type via the Parameter knob. 6. Equalizer There are five parametric equalizers per output. The individual equalizer band can be deactivated by pressing the ENTER-button (6) (Bypass). The symbol in the upper right corner of the display changes to =. If the equalizer is activated, you can adjust the frequency (20 Hz to 20 khz), the Q-factor (0.5 to 10) and the gain (± 12 db, ± 1 db). By pressing the Parameter knob (8), you can jump to the next parameter. Additionally, you can switch the equalizers to shelving characteristic. Set the gain to 0 db. If you select a Q-factor below 0, you can choose between Hi-shelf and Lo-shelf. 7
10 7. Limiter The DCX-24 features a limiter-function with independent limiters (one per output). The limiter serves as an additional clipping protection to avoid speaker damage. The signal level is always limited to the adjusted threshold-level. In most cases, it is sufficient to adjust the threshold-value to the clipping level of the connected amplifier. Nevertheless make sure that the amplifier does not distort. Via the Parameter knob (8), you can adjust the limiter between -20 and + 15 db. If the limiter will be adjusted to e.g. +2,0 db the output signal level Limit corresponds to +2 db and the levels -2, -6, -12 and -20 db correspond -1, -4, -8 and -12 db. Attack You can adjust the Attack-time between 1 and 100 ms. Hold You can adjust the Hold-time between 0 and 100 ms. Decay You can adjust the Decay-time between 10 and 1000 ms. 8. Name Via the Parameter knob (8), you can select the best suitable name from a preset name list. 9. Source Via the Parameter knob (8), you can check the input sources Input A, Input B or Input A+B but not change it. 8


11 Software DCX-24 Insert the CD in your computer and install the CD by clicking on the DCXSetup V13-icon. Within 5 seconds this handy piece of software is installed. Be sure to connect the DCX-24 via a RS232-cable to your computer. You can already make a few different choices in the Start-up screen. Main Menu 9


12 Gain settings Delay Settings 10

13 Limiter Settings Out 1 Settings 11

14 Filter Settings Out 2 Settings 12

15 Out 3 Settings Out 4 Settings 13
16 14

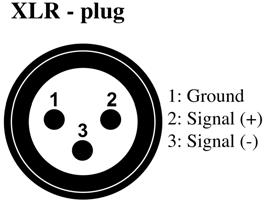
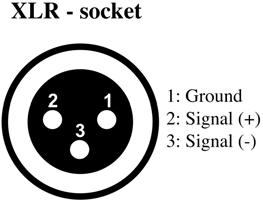
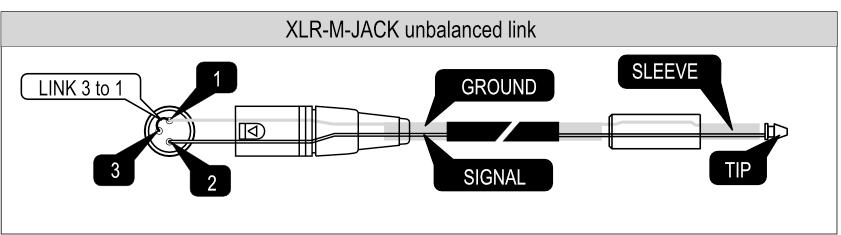
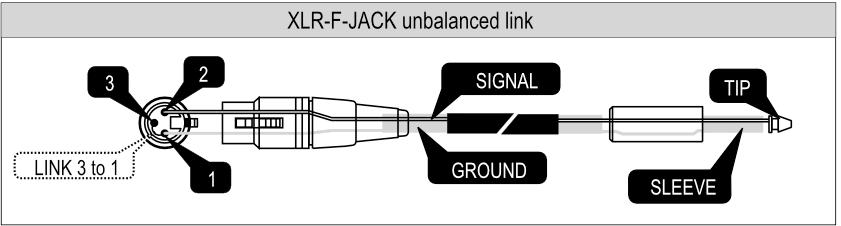
17 Connection Cables In this chapter you ll find the wiring diagrams for the connectors to be used with your crossover. Take care of the connector cables, always holding them by the connectors and avoiding knots and twists when coiling them: This gives the advantage of increasing their life and reliability, which is always to your advantage. Periodically check that your cables are in good condition, that they are correctly wired and that all their contacts are perfectly efficient: a great number of problems (faulty contacts, ground hum, discharges, etc.) are caused entirely by using unsuitable or faulty cables. 15
18 16
19 Maintenance The DCX-24 crossover requires almost no maintenance. However, you should keep the unit clean. Disconnect the mains power supply, and then wipe the cover with a damp cloth. Do not immerse in liquid. Keep connections clean. Disconnect electric power, and then wipe the audio connections with a damp cloth. Make sure connections are thoroughly dry before linking equipment or supplying electric power. Troubleshooting Dap Audio DCX-24 This troubleshooting guide is meant to help solve simple problems. If a problem occurs, carry out the steps below in sequence until a solution is found. Once the unit operates properly, do not carry out following steps. 1. If the device does not operate properly, unplug the device. 2. Check the power from the wall, all cables etc. 3. If all of the above appears to be O.K., plug the unit in again. 4. If you are unable to determine the cause of the problem, do not open the crossover, as this may damage the unit and the warranty will become void. 5. Return the crossover to your Dap Audio dealer. 17
20 Product Specifications Model: DAP Audio DCX-24 Power consumption: 30W Dimensions : 483 x 223 x 44.5 mm (LxWxH) Weight : 3.6 kg Inputs Inputs: 2 active, balanced Input Impedance: 10 KOhm CMRR: > 50 db (30 Hz 20 KHz) Frequency response: 15Hz 20KHz (+/- 0.25dB) 15Hz 40KHz (+/- 3dB) Input Gain Range: -40 db +6 db ±0,5 db Outputs Outputs: 4 active, balanced with automatic correction for unbalanced loading Output Impedance: <50 Ohm (electronically balanced) Output Gain Range: -40 db +6 db ±0,5 db Maximum output level: +20dBu Distortion: 0,005%, 20Hz 20Khz S / N Ratio: > 112dB (22 Hz 22 KHz) Channel separation: 80 db (30 Hz 20 KHz) Crossover frequency: 15 Hz - 20 khz Maximum output electrical level: Vpp = 7,6V Dynamic Range Distortion THD %: <0.005% Delay: 7 ms Parametric Equalizer Filter Gain: ±12 db in 1 db steps Central Frequency: 20 Hz 20 KHz Q Value: 0,5 10 Shelving Equalizing Lo-shelf: 20 Hz 1 KHz Hi-shelf: 1 KHz 20 KHz Shelf Gain: ±12 db in 1 db steps 31 ISO Bands Hi-Pass Filter/ Lo-Pass Filter HPF & LPF Frequency (Hi-Pass): < 10 Hz 16 KHz Frequency (Lo-Pass): < 35 Hz 22 KHz Response Curve: Butterworth 6 db, 12 db, 18 db, 24 db, 48 db Bessel 12 db, 18 db, 24 db, 48 db Linkwitz-Riley 24 db, 48 db Limiter Level Attach Time: ms Holding Time: ms Decay Time: ms Input LED: -30 db, -24 db, -12 db, -6 db, -3 db, Limit, Clip Output LED: -30 db, -24 db, -12 db, -6 db, -3 db, Limit, Clip Design and product specifications are subject to change without prior notice. 18
21 2005 Dap Audio.
Oxygen ORDERCODE D2150
 Oxygen ORDERCODE D2150 Congratulations! You have bought a great, innovative product from DAP Audio. The DAP Audio Oxygen brings excitement to any venue. Whether you want simple plug-&-play action or a
Concert Series ORDERCODE D3470 ORDERCODE D3471 ORDERCODE D3472 D3470 D3471 D3472
 Concert Series ORDERCODE D3470 ORDERCODE D3471 ORDERCODE D3472 D3470 D3471 D3472 Congratulations! You have bought a great, innovative product from DAP Audio. The DAP Audio Concert Series brings excitement
MANUAL ENGLISH Core Club Ordercode: D2314
 MANUAL ENGLISH Core Club Ordercode: Highlite International B.V. Vestastraat 2 6468 EX Kerkrade the Netherlands Table of contents Warning... 2 Unpacking Instructions... 2 Safety Instructions... 2 Operating
K-112 ORDERCODE D3551
 K-112 ORDERCODE D31 Congratulations! You have bought a great, innovative product from DAP Audio. The DAP Audio K-112 brings excitement to any venue. Whether you want simple plug-&-play action or a sophisticated
ENGLISH Antenna Distributor
 MANUAL ENGLISH Antenna Distributor V1 Highlite International B.V. Vestastraat 2 6468 EX Kerkrade the Netherlands Table of contents Warning... 2 Safety Instructions... 2 Operating Determinations... 4 Connection
IM-53 Installation Mixer ORDERCODE D2178
 IM-53 Installation Mixer ORDERCODE D2178 Congratulations! You have bought a great, innovative product from DAP Audio. The DAP Audio IM-53 brings excitement to any venue. Whether you want simple plug-&-play
LED Spere Direct Control 30 ORDERCODE 41125
 LED Spere Direct Control 30 ORDERCODE 41125 Congratulations! You have bought a great, innovative product from Showtec. The Showtec LED Sphere Direct Control 30 brings excitement to any venue. Whether you
LED Pixel Track Pro ORDERCODE 42205
 LED Pixel Track Pro ORDERCODE 42205 Congratulations! You have bought a great, innovative product from Showtec. The Showtec LED Pixel Track Pro brings excitement to any venue. Whether you want simple plug-&-play
CR-6 MIXER USER MANUAL ENGLISH. Order Code: MIXE01
 CR-6 MIXER P R O F E S S I O N A L 1 9 R A C K M I X E R Order Code: MIXE01 w w w. p r o l i g h t. c o. u k USER MANUAL ENGLISH WARNING FOR YOUR OWN SAFETY, PLEASE READ THIS USER MANUAL CAREFULLY BEFORE
VGAD-12 ORDERCODE
 VGAD-12 ORDERCODE 101220 Congratulations! You have bought a great, innovative product from DMT. The DMT Media Spinner brings excitement to any venue. Whether you want simple plug-&-play action or a sophisticated
Sessionmix 12 ORDERCODE D2192
 Sessionmix 12 ORDERCODE D2192 Congratulations! You have bought a great, innovative product from DAP Audio. The DAP Audio Sessionmix 12 brings excitement to any venue. Whether you want simple plug-&-play
ENGLISH Odin S-18A Line Array Sub
 MANUAL ENGLISH Odin S-18A Line Array Sub V1 Highlite International B.V. Vestastraat 2 6468 EX Kerkrade the Netherlands Table of contents Warning... 2 Safety Instructions... 2 Connection with the mains...
DIGITAL SPEAKER MANAGEMENT UK
 DSM2-6mkII DIGITAL SPEAKER MANAGEMENT 170.659UK Features 96kHz sampling frequency, 32-bit A/D and D/A converter, 24-bit DSP processor Input channel: 6-band parametric EQ, Delay, Polarity Output channel:
Spectra Batten (Order code: LEDJ95)
") www.prolight.co.uk Spectra Batten (Order code: LEDJ95) Safety WARNING FOR YOUR OWN SAFETY, PLEASE READ THIS USER MANUAL CAREFULLY BEFORE YOUR INITIAL START-UP! CAUTION! Keep this equipment away from rain,
www.prolight.co.uk Spectra Batten (Order code: LEDJ95) Safety WARNING FOR YOUR OWN SAFETY, PLEASE READ THIS USER MANUAL CAREFULLY BEFORE YOUR INITIAL START-UP! CAUTION! Keep this equipment away from rain,
XO-231 USER S MANUAL. Crossover ENGLISH
 XO-231 Crossover ENGLISH USER S MANUAL IMPORTANT SAFETY INSTRUCTIONS For your own safety you should read this section in full first! Risk of electrical shock! Connect the device only to a properly wired
TRANSCENSION 6-CHANNEL DMX DIMMER PACK (order code: BOTE40) USER MANUAL
 USER MANUAL") www.prolight.co.uk TRANSCENSION 6-CHANNEL PACK (order code: BOTE40) USER MANUAL SAFETY WARNING FOR YOUR OWN SAFETY, PLEASE READ THIS USER MANUAL CAREFULLY BEFORE YOUR INITIAL START-UP! CAUTION! Keep this
www.prolight.co.uk TRANSCENSION 6-CHANNEL PACK (order code: BOTE40) USER MANUAL SAFETY WARNING FOR YOUR OWN SAFETY, PLEASE READ THIS USER MANUAL CAREFULLY BEFORE YOUR INITIAL START-UP! CAUTION! Keep this
LED Pixel Track V3 ORDERCODE 42200
 LED Pixel Track V3 ORDERCODE 42200 Congratulations! You have bought a great, innovative product from Showtec. The Showtec LED Pixel Track brings excitement to any venue. Whether you want simple plug-&-play
DJ SET ORDERCODE D1210
 DJ SET ORDERCODE D1210 Congratulations! You have bought a great, innovative product from DAP Audio. The DAP Audio DJ Set brings excitement to any venue. Whether you want simple plug-&-play action or a
Professional Power Amplifier Specifications...8 SPECIFICATION
 Contents Contents...1 Important note...2 Control elements...3 Rear panel features introduction...4 Rear panel features introduction...5 Audio input and output connections...6 PC Interface...7 Professional
CPH-10 SUBWOOFER OWNERS MANUAL
 CPH-10 SUBWOOFER OWNERS MANUAL www.artcoustic.com Welcome to the world of Artcoustic! Congratulations with your purchase of the Artcoustic CPH-10 Subwoofer. The CPH-10 has an efficient design, producing
Dragonfly Quad. User Manual V1.4. Order code: EQLED101
 Dragonfly Quad User Manual V1.4 Order code: EQLED101 Safety advice WARNING FOR YOUR OWN SAFETY, PLEASE READ THIS USER MANUAL CAREFULLY BEFORE YOUR INITIAL START-UP! Before your initial start-up, please
Showdesigner 1024 ORDERCODE 50720
 Showdesigner 1024 ORDERCODE 50720 Congratulations! You have bought a great, innovative product from Showtec. The Showtec Showdesigner 1024 brings excitement to any venue. Whether you want simple plug-&-play
LED Floodlight 6x 1W, 40 ORDERCODE ORDERCODE ORDERCODE ORDERCODE ORDERCODE ORDERCODE 42760
 LED Floodlight 6x 1W, 40 ORDERCODE 42755 ORDERCODE 42756 ORDERCODE 42757 ORDERCODE 42758 ORDERCODE 42759 ORDERCODE 42760 Congratulations! You have bought a great, innovative product from Showtec. The Showtec
T L Audio. User Manual C1 VALVE COMPRESSOR. Tony Larking Professional Sales Limited, Letchworth, England.
 T L Audio User Manual C1 VALVE COMPRESSOR Tony Larking Professional Sales Limited, Letchworth, England. Tel: 01462 490600. International +44 1462 490600. Fax: 01462 490700. International +44 1462 490700.
ORDER CODE: EQLED65 USER MANUAL
 www.prolight.co.uk ORDER CODE: EQLED65 USER MANUAL Safety WARNING FOR YOUR OWN SAFETY, PLEASE READ THIS USER MANUAL CAREFULLY BEFORE YOUR INITIAL START-UP! CAUTION! Keep this equipment away from rain,
Fusion 120 Zoom. User Manual. Order code: EQLED068
 Fusion 120 Zoom User Manual Order code: EQLED068 Safety advice WARNING FOR YOUR OWN SAFETY, PLEASE READ THIS USER MANUAL CAREFULLY BEFORE YOUR INITIAL START-UP! Before your initial start-up, please make
SATRI AMPLIFIER AMP-51R. Owner s Manual
 SATRI AMPLIFIER AMP-51R Owner s Manual contents SAFETY INSTRUCTIONS 4 INTRODUCTION 6 OVERVIEW (FRONT PANEL) 8 OVERVIEW (REAR PANEL) 9 OVERVIEW (REMOTE CONTROL) 1 1 OPERATION 12 TROUBLESHOOTING 13 SPECIFICATION
Stratos Duo RGB. User Manual. Order code: EQLED371
 Stratos Duo RGB User Manual Order code: EQLED1 Safety advice WARNING FOR YOUR OWN SAFETY, PLEASE READ THIS USER MANUAL CAREFULLY BEFORE YOUR INITIAL START-UP! Before your initial start-up, please make
LED Par 56 Short Eco V2 ORDERCODE 42417
 LED Par 56 Short Eco V2 ORDERCODE 42417 Congratulations! You have bought a great, innovative product from Showtec. The Showtec LED Par 56 brings excitement to any venue. Whether you want simple plug-&-play
Element 78 MPE-200. by Summit Audio. Guide To Operations. for software version 1.23
 Element 78 MPE-200 by Summit Audio Guide To Operations for software version 1.23 TABLE OF CONTENTS IMPORTANT SAFETY AND GROUNDING INSTRUCTIONS COVER 1. UNPACKING AND CONNECTING...3 AUDIO CONNECTIONS...4
Commander 384. w w w. p r o l i g h t. c o. u k U S E R M A N U A L
 Commander 384 w w w. p r o l i g h t. c o. u k U S E R M A N U A L 1, Before you begin 1.1: Safety warnings...2 3 1.2: What is included...4 1.3: Unpacking instructions...4 2, Introduction 2.1: Features...4
Professional RGB LED DMX Controller
 Professional RGB LED DMX Controller LC-8PRO Order No. 38.0010 INSTRUCTION MANUAL ELECTRONICS FOR SPECIALISTS ELECTRONICS FOR SPECIALISTS ELECTRONICS FOR SPECIALISTS ELECTRONICS FOR SPECIALISTS Warning...
Chameleon Labs Model 7720
 Chameleon Labs Model 7720 Stereo Compressor Owner s Manual 704 228 th Avenue NE, # 826 Sammamish, WA 98074 206-264-7602 www.chameleonlabs.com Revision C - December, 2007 UNPACKING AND INSPECTION Carefully
SM-8/2 ORDERCODE 50700
 SM-8/2 ORDERCODE 50700 Congratulations! You have bought a great, innovative product from Showtec. The Showtec SM-8/2 brings excitement to any venue. Whether you want simple plug-&-play action or a sophisticated
OPERATIONS MANUAL FOR EDISON PROFESSIONAL Professional ABS Molded Loudspeaker M4000
 M4000 Introduction: Congratulations on your purchase of an M-4000 powered loudspeaker, engineered and manufactured by BriteLite Enterprises. The M-4000 includes a high-output compression driver, and 15
AG 500SC. Owners Manual. Manual Version 1.7
 AG 500SC Owners Manual Manual Version 1.7 1. Table of Contents I. Getting Started page 3. A. Safety Instructions B. Manual Conventions C. Basic Setup D. Protection Modes II. Features and Functions page
Technical Specifications
 INSTALLATION SHEET AND OPERATORS MANUAL General Description: The is a mixer/preamplifier that includes 6 channels that each include a microphone input at screw terminals and an aux input at an RCA jack.
INSTRUCTIONS FOR USE Pro-Ject Receiver Box S
 INSTRUCTIONS FOR USE Pro-Ject Receiver Box S Dear music lover, thank you for purchasing a PRO-JECT AUDIO receiver. In order to achieve maximum performance and reliability you should study these instructions
MANUAL ENGLISH Showmaster 48 MKII V1 Ordercode: 50831
 MANUAL ENGLISH Showmaster 48 MKII V1 Highlite International B.V. Vestastraat 2 6468 EX Kerkrade the Netherlands Table of contents Warning... 2 Safety Instructions... 2 Operating Determinations... 3 Connection
PROFESSIONAL 2 CHANNEL SOLID-STATE MIC / LINE PREAMPLIFIER USER S MANUAL
 PROFESSIONAL 2 CHANNEL SOLID-STATE MIC / LINE PREAMPLIFIER USER S MANUAL SAFETY INSTRUCTIONS This symbol, wherever it appears, alerts you to important operating and maintenance instructions in the accompanying
X D M PREAMP MIXER
 User Instructions X D M - 3 5 2 PREAMP MIXER Thank you for purchasing this American DJ product. The XDM-352 is ready to be used, there is no assembly required. Please read the following instructions before
ENGLISH Optic Fiber Double
 MANUAL ENGLISH Double V1 Highlite International B.V. Vestastraat 2 6468 EX Kerkrade the Netherlands Table of contents Warning... 2 Safety Instructions... 2 Operating Determinations... 4 Rigging... 4 Connection
USER MANUAL. DE-1 Police-light. CAUTION! Keep this device away from rain and moisture! Unplug mains lead before opening the housing!
 USER MANUAL DE-1 Police-light CAUTION! Keep this device away from rain and moisture! Unplug mains lead before opening the housing! For your own safety, please read this user manual carefully before you
INSTRUCTIONS FOR USE Pro-Ject Tuner Box S
 INSTRUCTIONS FOR USE Pro-Ject Tuner Box S Dear music lover, thank you for purchasing a Pro-Ject Audio Systems FM-tuner. In order to achieve maximum performance and reliability you should study these instructions
ENGLISH Scanmaster 2 MKII
 MANUAL ENGLISH Scanmaster 2 MKII V1 Highlite International B.V. Vestastraat 2 6468 EX Kerkrade the Netherlands Table of contents Warning...2 Safety Instructions...2 Operating Determinations...3 Connection
DISTRIBUTION AMPLIFIER
 MANUAL PART NUMBER: 400-0045-005 DA1907SX 1-IN, 2-OUT VGA/SVGA/XGA/UXGA DISTRIBUTION AMPLIFIER USER S GUIDE TABLE OF CONTENTS Page PRECAUTIONS / SAFETY WARNINGS... 2 GENERAL...2 GUIDELINES FOR RACK-MOUNTING...2
Introduction Front Panel Functions Rear Panel Functions Precautions Placement & Ventilation... 5
 Contents Introduction... 2 Front Panel Functions... 3 Rear Panel Functions... 3 Precautions... 5 Placement & Ventilation... 5 Installation & Operation... 5 Care & Maintenance... 7 Troubleshooting... 8
ARK ARK. 20 series USER MANUAL V ARK 20xx processor Loading DSP Program. Valencia, Spain -
 ARK 20 series USER MANUAL V.11.02 ARK 20xx processor Loading DSP Program ARK Valencia, Spain - www.lynxproaudio.com INDEX 1.- INTRODUCTION. ARK Description...5 Description of the ARK's front panel...6
USERS MANUAL GR ONE 300 GR ONE 700 GR ONE 1400
 USERS MANUAL GR ONE 300 GR ONE 700 GR ONE 1400 PURE SOUND USER MANUAL PURPOSE This user manual is dedicated to the use of the bass amplifiers GR-ONE 700, GR-ONE700x2 and GR-ONE 300. The manual includes
Connevans.info. DeafEquipment.co.uk. This product may be purchased from Connevans Limited secure online store at
 Connevans.info Solutions to improve the quality of life Offering you choice Helping you choose This product may be purchased from Connevans Limited secure online store at www.deafequipment.co.uk DeafEquipment.co.uk
USER MANUAL MX102 & MX1202
 USER MANUAL MX102 & MX1202 WWW.PULSE-AUDIO.CO.UK 1 SAVE THESE SAFETY INSTRUCTIONS Thank you for purchasing our product. To assure the optimum performance, please read this manual carefully and keep it
ENGLISH LED Operator 6
 MANUAL ENGLISH V2 Highlite International B.V. Vestastraat 2 6468 EX Kerkrade the Netherlands Table of contents Warning... 2 Unpacking Instructions... 2 Safety Instructions... 2 Operating Determinations...
DA IN 1-OUT LINE DRIVER WITH EQUALIZATION + AUDIO USER S GUIDE
 MANUAL PART NUMBER: 400-0430-001 1-IN 1-OUT LINE DRIVER WITH UALIZATION + AUDIO USER S GUIDE TABLE OF CONTENTS Page PRECAUTIONS / SAFETY WARNINGS... 2 GENERAL...2 GUIDELINES FOR RACK-MOUNTING...2 INSTALLATION...2
Features/Specifications
 Introduction Thank you for purchasing the DD Audio DSI-1(Digital Signal Integrator). The DSI-1 is a feature rich audio signal processor that will allow you to precisely tune the acoustics of your car audio
PLAYMATE PROFESSIONAL STEREO 19 MIXER, USB/SD CARD AND BLUETOOTH PLAYER. User Guide and Reference Manual. page 1
 PLAYMATE PROFESSIONAL STEREO 19 MIXER, USB/SD CARD AND BLUETOOTH PLAYER User Guide and Reference Manual page 1 INTRODUCTION Congratulations and thank you for purchasing the NewHank Playmate mixer. This
Recording to Tape (Analogue or Digital)...10
...10") c o n t e n t s DUAL MIC-PRE Green Dual Mic Pre (introduction).............................4 Section (i): Setting Up Power Connections...........................................4 Power Supply................................................5
c o n t e n t s DUAL MIC-PRE Green Dual Mic Pre (introduction).............................4 Section (i): Setting Up Power Connections...........................................4 Power Supply................................................5
DSP 18 Sub active subwoofer. user manual
 DSP 18 Sub active subwoofer user manual Musikhaus Thomann Thomann GmbH Hans-Thomann-Straße 1 96138 Burgebrach Germany Telephone: +49 (0) 9546 9223-0 E-mail: info@thomann.de Internet: www.thomann.de 05.11.2018,
DA1909 COMPUTER VIDEO LINE DRIVER WITH EQUALIZATION USER S GUIDE
 MANUAL PART NUMBER: 400-0108-002 PRODUCT REVISION: 1 COMPUTER VIDEO LINE DRIVER WITH EQUALIZATION USER S GUIDE INTRODUCTION Altinex appreciates your purchase of the Line Driver. We are sure you will find
ALO 030 MKII. 30 Watt DMX LED scanner. User manual
 ALO 030 MKII 30 Watt DMX LED scanner User manual Safety instructions WARNING! Always keep this device away from moisture and rain! Hazardous electrical shocks may occur! WARNING! Only connect this device
ENGLISH Dancefloor Sparkle RGB
 MANUAL ENGLISH V1 Highlite International B.V. Vestastraat 2 6468 EX Kerkrade the Netherlands Table of contents Warning... 2 Safety Instructions... 2 Operating Determinations... 4 Connection with the mains...
TDM 24CX-2 24CX-3 24CX-4 ELECTRONIC CROSSOVER OWNER S MANUAL A U D I O
 TDM A U D I O 24CX-2 24CX-3 24CX-4 ELECTRONIC CROSSOVER OWNER S MANUAL TDM AUDIO INC. 7270 BELLAIRE AVE. NORTH HOLLYWOOD, CA 91605 (818) 765-6200 TDMAUDIO.COM IMPORTANT! *** Read Before Using *** CAUTION:
Achat 115 Sub A active subwoofer. user manual
 Achat 115 Sub A active subwoofer user manual Musikhaus Thomann Thomann GmbH Hans-Thomann-Straße 1 96138 Burgebrach Deutschland Telephone: +49 (0) 9546 9223-0 E-mail: info@thomann.de Internet: www.thomann.de
DMX Operator 192-channel lighting controller
 USER MANUAL DMX Operator 192-channel lighting controller CAUTION! Keep this device away from rain and moisture! Unplug mains lead before opening the housing! For your own safety, please read this user
.Power Distribution Center. PD-1. Instruction Manual
 .Power Distribution Center. PD-1 Instruction Manual www.datavideo-tek.com 1 Contents Warnings and Precautions... 3 Warranty... 4 Standard Warranty... 4 Two Year Warranty... 4 Disposal... 4 Packing List...
2.0 Wall Mount TV Soundbar Instruction Manual
 8010275 2.0 Wall Mount TV Soundbar Instruction Manual Read all of the instructions before using this soundbar and keep the manual in a safe place for future reference. Safety Information CA UT IO N RISK
20.12 mixer. user manual
 20.12 mixer user manual Musikhaus Thomann Thomann GmbH Hans-Thomann-Straße 1 96138 Burgebrach Germany Telephone: +49 (0) 9546 9223-0 E-mail: info@thomann.de Internet: www.thomann.de 07.09.2018, ID: 433540
Contents Introduction Safety Cleaning Connections Cartridge gain and loading Technical specification Fig.1 PS.30R/ PS.30RDT rear panel Fig.
 Contents Introduction Safety Cleaning Connections Cartridge gain and loading Technical specification Fig.1 PS.30R/ PS.30RDT rear panel Fig.2 Basic audio connection Fig.3 Removing the lid Fig 4 Gain and
MAW218D7. User s manual. Pol.Ind.Norte-Perpinyà, TERRASSA (Barcelona-SPAIN)
") MAW218D7 User s manual Pol.Ind.Norte-Perpinyà,25 08226 TERRASSA (Barcelona-SPAIN) info@master-audio.com www.master-audio.com Nov 2008 CAUTION RISK OF ELECTRIC SHOCK DON T OPEN WARNING: To reduce the risk
MAW218D7 User s manual Pol.Ind.Norte-Perpinyà,25 08226 TERRASSA (Barcelona-SPAIN) info@master-audio.com www.master-audio.com Nov 2008 CAUTION RISK OF ELECTRIC SHOCK DON T OPEN WARNING: To reduce the risk
508 Phono Preamplifier. Boulder Amplifiers, Inc. 255 S. Taylor Ave. Louisville, CO (303) /1/2018 Rev. 1.
 /1/2018 Rev. 1.") 508 Phono Preamplifier 6/1/2018 Rev. 1.0 P/N: 91053 Boulder Amplifiers, Inc. 255 S. Taylor Ave. Louisville, CO 80027 (303) 449-8220 www.boulderamp.com About About Boulder Amplifiers, Inc. Boulder was founded
508 Phono Preamplifier 6/1/2018 Rev. 1.0 P/N: 91053 Boulder Amplifiers, Inc. 255 S. Taylor Ave. Louisville, CO 80027 (303) 449-8220 www.boulderamp.com About About Boulder Amplifiers, Inc. Boulder was founded
PLL1920M LED LCD Monitor
 PLL1920M LED LCD Monitor USER'S GUIDE www.planar.com Content Operation Instructions...1 Safety Precautions...2 First Setup...3 Front View of the Product...4 Rear View of the Product...5 Installation...6
6-Channel Portable Mixer
 6-Channel Portable Mixer Model: MIX-06 User Manual www.talentaudio.com SAFETY PECAUTIONS SAFETY PECAUTIONS WANING - TO EDUCE THE ISK OF FIE O ELECTIC SHOCK, DO NOT EXPOSE THIS UNIT TO AIN O MOISTUE. Do
Coda Audio. DNC260 Digital Loudspeaker Processor. User Guide version 0.1
 Coda Audio DNC260 Digital Loudspeaker Processor User Guide version 0.1 Quick Reference Guide Display The LCD displays preset and parameter information. The default screen is shown after start up and displays
INSTRUCTIONS FOR USE Pro-Ject Phono Box S2
 INSTRUCTIONS FOR USE Pro-Ject Phono Box S2 Dear music lover, thank you for purchasing a Pro-Ject Audio Systems phono amplifier. In order to achieve maximum performance and reliability you should study
music hall pa2.2 INSTRUCTION MANUAL music hall
 music hall pa2.2 INSTRUCTION MANUAL music hall http://www.musichallaudio.com CONGRATULATIONS ON YOUR PURCHASE You have selected an exceptional phono preamplifier. Each component used in the construction
INSTRUCTIONS FOR USE Pro-Ject Tuner Box S2
 INSTRUCTIONS FOR USE Pro-Ject Tuner Box S2 Dear music lover, thank you for purchasing a Pro-Ject Audio Systems FM-tuner. In order to achieve maximum performance and reliability you should study these instructions
ER-100 Eurorack 8 Channel Stereo, Transformer Balanced Out Summing Mixer User Manual
 ER-100 Eurorack 8 Channel Stereo, Transformer Balanced Out Summing Mixer User Manual Issue 0.1 SAFETY INSTRUCTIONS WARNING Always follow the precautions listed below to avoid any possibility of serious
INSTRUCTIONS FOR USE Pro-Ject Phono Box DS2 USB
 INSTRUCTIONS FOR USE Pro-Ject Phono Box DS2 USB Dear music lover, thank you for purchasing a Pro-Ject Audio phono amplifier. In order to achieve maximum performance and reliability you should study these
Arc-Bar 3 ORDERCODE 41350
 Arc-Bar 3 ORDERCODE 41350 Congratulations! You have bought a great, innovative product from Showtec. The Showtec Arc-Bar 3 brings excitement to any venue. Whether you want simple plug-&-play action or
Compact 60. Solutions. Manual English
 Acoustic Compact 60 Solutions 2 Manual English 1 Acoustic Solutions Compact 602 Operating Manual Contents: 1. Introduction 2. Safety Precautions 3. Controls and Connections 4. Operation Summary 5. Technical
LX20 OPERATORS MANUAL
 LX20 OPERATORS MANUAL CONTENTS SAFETY CONSIDERATIONS page 1 INSTALLATION page 2 INTRODUCTION page 2 FIRST TIME USER page 3 SYSTEM OPERATING LEVELS page 3 FRONT & REAR PANEL LAYOUT page 4 OPERATION page
LINK EXT40-4KECO. 4K 40m HDMI Extender. User Manual. Version: V1.0.1
 LINK EXT40-4KECO 4K 40m HDMI Extender User Manual Version: V1.0.1 Important Safety Instructions 1. Do not expose this apparatus to rain, moisture, dripping or splashing and that no objects filled with
Winmate Communication INC.
 20.1 Military Grade Display Model: R20L100-RKA2ML User s Manual Winmate Communication INC. May, 2011 1 IMPORTANT SAFETY INSTRUCTIONS Please read these instructions carefully before using the product and
TR6102HD HDTV/DVD/COMPONENT VIDEO TO RGBHV TRANSCODER USER S GUIDE
 MANUAL PART NUMBER: 400-0031-003 PRODUCT REVISION: 1 HDTV/DVD/COMPONENT VIDEO TO RGBHV TRANSCODER USER S GUIDE INTRODUCTION Thank you for your purchase of the Transcoder. We are certain that you will find
POWERED MIXER MPM 4130 OWNER S MANUAL 4 CHANNEL POWERED MIXER
 POWERED MIXER OWNER S MANUAL MPM 4130 4 CHANNEL POWERED MIXER MPM 4130 4 CHANNEL POWERED MIXER Congratulations on your choice of a powered mixer you have purchased one of the finest powered mixers on the
HeadAmp 4 Pro. User s Manual. Project Series. Five Channel Headphone Amp with Listen and Talkback
 HeadAmp 4 Pro Five Channel Headphone Amp with Listen and Talkback Project Series User s Manual IMPORTANT SAFETY INSTRUCTIONS READ FIRST This symbol, wherever it appears, alerts you to the presence of
Ashly Audio Inc. 847 Holt Road, Webster, NY Toll Free (800) , Telephone (585) , FAX (585)
 , Telephone (585) , FAX (585)") XR 1001 Electronic Crossover Operating Manual U U U U U U db Hz db Hz Ashly Audio Inc. 847 Holt Road, Webster, NY 14580-9103 Toll Free (800) 828-6308, Telephone (585) 872-0010, FAX (585) 872-0739 www.ashly.com
XR 1001 Electronic Crossover Operating Manual U U U U U U db Hz db Hz Ashly Audio Inc. 847 Holt Road, Webster, NY 14580-9103 Toll Free (800) 828-6308, Telephone (585) 872-0010, FAX (585) 872-0739 www.ashly.com
USER MANUAL GOLDMUND METIS 7 Integrated Amplifier
 USER MANUAL GOLDMUND METIS 7 Integrated Amplifier Congratulations. Thank you for purchasing the Goldmund METIS 7. You have acquired the best multi-usage ever made for professional and domestic uses. Please
PREAMPLIFIER INTRODUCTION INSTRUCTIONS FOR USE. Thank you for purchasing the Musical Fidelity A3 CR remote control preamplifier.
 INTRODUCTION A3 CR PREAMPLIFIER INSTRUCTIONS FOR USE Thank you for purchasing the Musical Fidelity A3 CR remote control preamplifier. Used properly and carefully, it should give you many years of outstanding
LED Design Par 18 RGB ORDERCODE 42570
 LED Design Par 18 RGB ORDERCODE 42570 Congratulations! You have bought a great, innovative product from Showtec. The Showtec LED Design Par brings excitement to any venue. Whether you want simple plug-&-play
Instruction Manual By Digital & Analog
 FEMTO Instruction Manual By Digital & Analog www.calyxaudio.com 1 Thank you for purchasing FEMTO Music is the most important messenger of human emotion as well as a meaning of its expression since human
GIULIA Y. combo amplifier for acoustic instruments
 GIULIA Y combo amplifier for acoustic instruments IMPORTANT SAFETY INSTRUCTIONS THE LIGHTNING FLASH WITH ARROWHEAD SYMBOL, WITHIN AN EQUILATERAL TRIANGLE, IS INTENDED TO ALERT THE USER TO THE PRESENCE
LED Spot 300W. Please read this user manual before your operation
 LED Spot 300W Please read this user manual before your operation 1. Introduction 2. General Guideline 3. Safety Instructions 4. Cleaning and Maintenance 5. Technical Parameters 6. DMX Channels 7. Remark
IMPORTANT SAFETY INSTRUCTIONS
 IMPORTANT SAFETY INSTRUCTIONS When using this electronic device, basic precautions should always be taken, including the following: 1. Read all instructions before using the product. 2. Do not use this
2.4 GHz WIRELESS VIDEO SENDER SYSTEM MODEL: VS6234
 2.4 GHz WIRELESS VIDEO SENDER SYSTEM MODEL: VS6234 Please read this manual thoroughly before operating this system OPERATING INSTRUCTIONS 03/02 1 SAFETY INSTRUCTIONS CAUTION! RISK OF ELECTRIC SHOCK. DO
INSTRUCTIONAL MANUAL FOR LCD ZOOM MICROSCOPE
 INSTRUCTIONAL MANUAL FOR LCD ZOOM MICROSCOPE ? 8 LCD Screen? 10.4 LCD Screen LCD Zoom Microscope Instruction Manual Please read the Instruction Manual carefully before installation and keep it for future
ARS x4 MATRIX SWITCHER Instruction Manual
 ARS-8400 8x4 MATRIX SWITCHER Instruction Manual Thank you for purchasing one of our products. Please read this manual before using this product. When using this product, always follow the instructions
TS2.8 Sub OWNER S MANUAL
 TS2.8 Sub OWNER S MANUAL TS2.8 Sub CONTENTS IMPORTANT SAFETY INSTRUCTIONS 03 WARNINGS 03 FUSE PROTECTION 04 WARNING: STRONG MAGNETIC FIELD 04 EMC / EMI 04 ECODESIGN STANDBY POWER CONSUMPTION 04 WARRANTY
CS x1 RS-232 Computer Controlled Video Switcher. Instruction Manual
 CS-1600 16x1 RS-232 Computer Controlled Video Switcher Instruction Manual Thank you for purchasing one of our products. Please read this manual before using this product. When using this product, always
!! 1 of! 21. Magico Subwoofer Setup and DSP Control Manual. Password: Fact_ory
 Magico Subwoofer Setup and DSP Control Manual Password: Fact_ory Thank you for the purchase of your new Magico S-Sub or Q-Sub. The goal of this setup manual is to first integrate the subwoofer into your
LED Par 56 Short Eco V2 ORDERCODE 42417
 LED Par 56 Short Eco V2 ORDERCODE 42417 Congratulations! You have bought a great, innovative product from Showtec. The Showtec LED Par 56 brings excitement to any venue. Whether you want simple plug-&-play