Disclaimer of Product & Services The information offered in this instruction manual is intended as a guide only. At all times, Datavideo Technologies
|
|
|
- Benedict Sims
- 5 years ago
- Views:
Transcription


1 TC-100
2 Table of Contents FCC COMPLIANCE STATEMENT... III WARNINGS AND PRECAUTIONS... III WARRANTY... V STANDARD WARRANTY... V THREE YEAR WARRANTY... V DISPOSAL... VI INTRODUCTION... 1 FEATURES... 1 HOW TO DOWNLOAD THE CG-200 CG SOFTWARE... 1 MINIMUM COMPUTER REQUIREMENTS:... 1 CONNECTIONS & CONTROLS... 3 FRONT PANEL... 3 REAR PANEL... 4 DIP SWITCH CONTROL... 5 ACCESS THE TC-100 USING THE CONFIGURATION TOOL... 6 CHANGE THE DEVICE S IP ADDRESS... 8 CONFIGURATION TOOL... 9 VIDEO... 9 LOGO OVERLAY CONFIGURING THE LOGO CONFIGURING LUMA KEY SUBTITLES FIRMWARE UPDATE FREQUENTLY-ASKED QUESTIONS DIMENSIONS SPECIFICATIONS SERVICE & SUPPORT i
3 Disclaimer of Product & Services The information offered in this instruction manual is intended as a guide only. At all times, Datavideo Technologies will try to give correct, complete and suitable information. However, Datavideo Technologies cannot exclude that some information in this manual, from time to time, may not be correct or may be incomplete. This manual may contain typing errors, omissions or incorrect information. Datavideo Technologies always recommend that you double check the information in this document for accuracy before making any purchase decision or using the product. Datavideo Technologies is not responsible for any omissions or errors, or for any subsequent loss or damage caused by using the information contained within this manual. Further advice on the content of this manual or on the product can be obtained by contacting your local Datavideo Office or dealer. ii
4 FCC Compliance Statement This device complies with part 15 of the FCC rules. Operation is subject to the following two conditions: (1) This device may not cause harmful interference, and (2) This device must accept any interference received, including interference that may cause undesired operation. Warnings and Precautions 1. Read all of these warnings and save them for later reference. 2. Follow all warnings and instructions marked on this unit. 3. Unplug this unit from the wall outlet before cleaning. Do not use liquid or aerosol cleaners. Use a damp cloth for cleaning. 4. Do not use this unit in or near water. 5. Do not place this unit on an unstable cart, stand, or table. The unit may fall, causing serious damage. 6. Slots and openings on the cabinet top, back, and bottom are provided for ventilation. To ensure safe and reliable operation of this unit, and to protect it from overheating, do not block or cover these openings. Do not place this unit on a bed, sofa, rug, or similar surface, as the ventilation openings on the bottom of the cabinet will be blocked. This unit should never be placed near or over a heat register or radiator. This unit should not be placed in a built-in installation unless proper ventilation is provided. 7. This product should only be operated from the type of power source indicated on the marking label of the AC adapter. If you are not sure of the type of power available, consult your Datavideo dealer or your local power company. 8. Do not allow anything to rest on the power cord. Do not locate this unit where the power cord will be walked on, rolled over, or otherwise stressed. 9. If an extension cord must be used with this unit, make sure that the total of the ampere ratings on the products plugged into the extension cord do not exceed the extension cord rating. 10. Make sure that the total amperes of all the units that are plugged into a single wall outlet do not exceed 15 amperes. 11. Never push objects of any kind into this unit through the cabinet ventilation slots, as they may touch dangerous voltage points or short out parts that could result in risk of fire or electric shock. Never spill liquid of any kind onto or into this unit. iii
5 12. Except as specifically explained elsewhere in this manual, do not attempt to service this product yourself. Opening or removing covers that are marked Do Not Remove may expose you to dangerous voltage points or other risks, and will void your warranty. Refer all service issues to qualified service personnel. 13. Unplug this product from the wall outlet and refer to qualified service personnel under the following conditions: a. When the power cord is damaged or frayed; b. When liquid has spilled into the unit; c. When the product has been exposed to rain or water; d. When the product does not operate normally under normal operating conditions. Adjust only those controls that are covered by the operating instructions in this manual; improper adjustment of other controls may result in damage to the unit and may often require extensive work by a qualified technician to restore the unit to normal operation; e. When the product has been dropped or the cabinet has been damaged; f. When the product exhibits a distinct change in performance, indicating a need for service. iv

6 Warranty Standard Warranty Datavideo equipment are guaranteed against any manufacturing defects for one year from the date of purchase. The original purchase invoice or other documentary evidence should be supplied at the time of any request for repair under warranty. The product warranty period begins on the purchase date. If the purchase date is unknown, the product warranty period begins on the thirtieth day after shipment from a Datavideo office. All non-datavideo manufactured products (product without Datavideo logo) have only one year warranty from the date of purchase. Damage caused by accident, misuse, unauthorized repairs, sand, grit or water is not covered under warranty. Viruses and malware infections on the computer systems are not covered under warranty. Any errors that are caused by unauthorized third-party software installations, which are not required by our computer systems, are not covered under warranty. All mail or transportation costs including insurance are at the expense of the owner. All other claims of any nature are not covered. All accessories including headphones, cables, and batteries are not covered under warranty. Warranty only valid in the country or region of purchase. Your statutory rights are not affected. Three Year Warranty All Datavideo products purchased after July 1st, 2017 are qualified for a free two years extension to the standard warranty, providing the product is registered with Datavideo within 30 days of purchase. Certain parts with limited lifetime expectancy such as LCD panels, DVD drives, Hard Drive, Solid State Drive, SD Card, USB Thumb Drive, Lighting, Camera module, PCIe Card are covered for 1 year. The three-year warranty must be registered on Datavideo's official website or with your local Datavideo office or one of its authorized distributors within 30 days of purchase. v

7 Disposal For EU Customers only - WEEE Marking This symbol on the product or on its packaging indicates that this product must not be disposed of with your other household waste. Instead, it is your responsibility to dispose of your waste equipment by handing it over to a designated collection point for the recycling of waste electrical and electronic equipment. The separate collection and recycling of your waste equipment at the time of disposal will help to conserve natural resources and ensure that it is recycled in a manner that protects human health and the environment. For more information about where you can drop off your waste equipment for recycling, please contact your local city office, your household waste disposal service or the shop where you purchased the product. CE Marking is the symbol as shown on the left of this page. The letters "CE" are the abbreviation of French phrase "Conformité Européene" which literally means "European Conformity". The term initially used was "EC Mark" and it was officially replaced by "CE Marking" in the Directive 93/68/EEC in "CE Marking" is now used in all EU official documents. vi
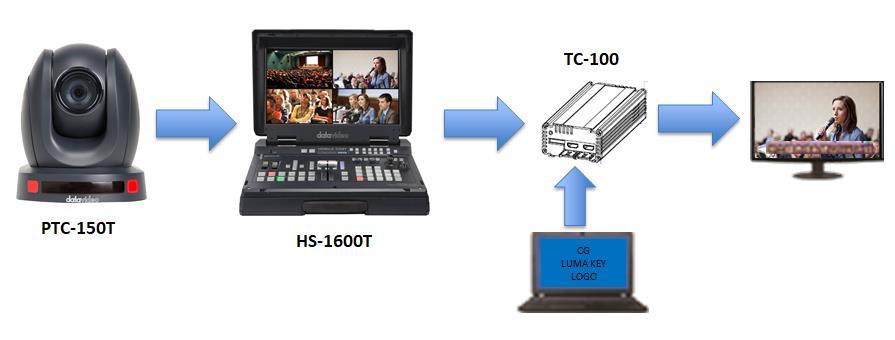
8 Introduction Thank you for purchasing the Datavideo TC-100, Title Creator, overlay box. The TC-100 can be used with Datavideo s Windows based Character Generator software such as CG-200, CG-250, CG-350 and CG-500. The TC-100 is designed to be portable and rugged as well as quick and easy to set up in the field. It allows producers to create professional CG overlays with a Windows laptop instead of transporting a high end desktop PC with PCIe cards fitted. The box receives graphics/title signal from the PC s HDMI output and overlays graphics/title signal on the HDMI live video signal. There are two graphics/title options, either CG titles or luma key. The TC-100 box can also overlay a logo on the output signal. This manual will cover the TC-100 overlay box only, a separate manual is provided with the supplied Character Generator software. Features Live title generator Supports video resolutions up to 1080p 50/60 Title editing on laptop No additional PCI card required Compatible with Windows 7/8 or above Major Five HDMI input and output for laptop CG overlay input. Supports HD video up to 1080p 50/60 Luma key for Title Overlay Logo overlay function Real-time graphics and titles How to download the CG-200 CG Software The CG-200 is a piece of CG software that allows users to create subtitles and logo. To download the latest CG-200 software, please visit Datavideo s official website Minimum computer requirements: See CG software manual. 1
9 2

10 Connections & Controls Front Panel Mode Select The DIP Switch allows the user to configure the following TC-100 settings. HDMI Output Output videos with title or logo overlay. Note: If you found audio or video functions not working properly, restart the device power or disconnect and then reconnect the video source. 3
 Connect to the PC or laptop via an HDMI cable to receive title input from the computer.")

11 Power LED Turned ON when power is connected. Rear Panel Title Content from PC Input (HDMI) Connect to the PC or laptop via an HDMI cable to receive title input from the computer. Subtitles or logo will be placed on the video received at the Video port. HDMI Video Input The HDMI Video Input connects a video source via an HDMI cable. Subtitles or logo received at the Title Content port will be placed on the video. Ethernet Port (RJ-45) 10/100M Ethernet Network Interface for connecting to the PC/laptop to access the TC-100 configuration tool. 4
12 DC In Socket Connect the supplied 12V PSU to this socket. The connection can be secured by screwing the outer fastening ring of the DC In plug to the socket. DIP Switch Control The TC-100 provides an 8 position DIP Switch for users to configure device modes, title overlay and logo overlay. Please see following table for details of the DIP Switch control. DIP Switch Position 1/2 Device Mode (Frame Rate) 0/0 50 Hz 0/1 60 Hz 1/ Hz DIP Switch Position 3/4 Device Mode (Resolution) 0/ x 1080i 0/ x 1080p 1/ x 720p DIP Switch Position 5/6 Title Overlay 0/0 OFF 0/1 Luma key titles overlay 1/0 CG titles overlay DIP Switch Position 7 Logo Overlay 0 Logo OFF 1 Logo ON 5
13 Access the TC-100 using the Configuration Tool 1. To configure the TC-100, first establish direct connection between the PC (laptop) and the TC-100 via an Ethernet cable. 2. Power ON the TC-100 by connecting a 12 V power supply to the DC In socket. 3. Once the TC-100 is powered ON, double click the TC-100 configuration tool icon to enter the IP search page. 4. Manually set the PC s IP address and make sure it has the same IP address range as the TC-100. In the example shown below, we have set the PC s IP address to

14 Note: If you are connected to a local area network and there are multiple TC-100 devices on your network, click Search to find all available devices connected. 5. After you have configured your PC s IP address, click the Connect button to enter the configuration interface as shown below. 7

15 Change the device s IP address 1. On the Connect page of the configuration tool, click the search button to display a list of the connected devices. 2. Click the configure button to change the IP address of the device. 8

16 Configuration Tool In the previous sections, once you are successfully connected to the TC-100 via Ethernet port, you will be taken directly to the Video tab and on the page that opens, you will be able to view your video settings and select color mode for HDMI video input and outputs. Logo and Overlay tabs allow you to set the logo and subtitles to be placed on the input video respectively. Note that you are allowed to enable title and logo overlay simultaneously. See DIP Switch Control section to manually enable these modes. Video Click Video tab to view the video settings as shown below. Click the color mode pull-down menu to set the color mode. The three color mode options for HDMI video input and outputs are listed as follows: 9

17 RGB YUV 4:2:2 YUV 4:4:4 To change the video mode settings, adjust the DIP Switch positions 1-4 according to the corresponding settings shown in the diagram below. Note: you can also find these settings in the Video tab of the TC-100 configuration tool. 10

18 Logo Before you use the logo function, you will have to enable it by setting the DIP Switch position 7 to 1. See DIP Switch Control section. The Logo tab allows you to browse the media library on your computer s hard disk. Right below the browsing window, you will be able to see a list of available logo files. To preview the logo, simply click the file name. Make sure the logo files are of the size of 256 x 128 pixels. Acceptable file types are tga, png, bmp, jpg, gif, lbl and bin (8 bits/channel). If the output resolution is set to 720p, the logo will appear visually bigger to viewers. Selected logos are displayed as thumbnail pictures in the center column. Double click to activate the desired logo. On the right, drag the small grey rectangular box to change the logo position on the output screen. Note: Make sure the logo image that you save in the media library directory is against a transparent background. 11

19 Overlay The TC-100 offers the user two ways to insert subtitles. To insert subtitles using luma key function, set the DIP Switch position 5/6 to 0/1. For instructions on how to use luma keyed subtitles, see the subsequent section for details. To insert CG subtitles, simply set the DIP Switch position 5/6 to 1/0 and create CG subtitles with Datavideo s CG-200 Character Generator Software. To disable the Overlay function, simply set the DIP Switch position 5/6 to 0/0. 12

20 Configuring the Logo Follow the steps below to overlay the logo on your output screen. 1. The Logo tab allows you to browse the media library on your computer s hard disk. Right below the browsing window, you will be able to see a list of available logo files and click the file name to preview the logo. 2. To place logos in the center column, click and drag the selected logo file name to the Logos column. Double click a thumb nail picture in the Logos column to activate the selected logo. 3. Drag the small grey rectangular box to the desired logo position on the output screen. 13

21 Configuring Luma Key Subtitles Follow the steps below to create your own luma key subtitles and display them on the output screen. 1. Create a subtitle against a black or white background using PowerPoint on a laptop. 2. Depending on the color of the background, adjust the luma key threshold accordingly. 3. Set the PowerPoint to full screen to display the subtitle on the output screen. Note: Please shut down the CG software before using the luma key function to overlay the subtitles. 14

22 Firmware Update Datavideo usually releases new firmware containing new features or reported bug fixes from time to time. Customers can either download the TC-100 firmware as they wish or contact their local dealer or reseller for assistance. This section outlines the firmware upgrade process which should take approximately 10 minutes to complete. The existing TC-100 settings should persist through the firmware upgrade process, which should not be interrupted once started as this could result in a non-responsive unit. Successful firmware upgrade on TC-100 requires: TC-100 x 1 12V Power adapter x 1 Windows PC x 1 Ethernet Cable x 1 Procedure 1. Connect the TC-100 to a Windows PC via the Ethernet interface. Note: In the example below, the TC-100 has a default IP address of

23 2. Set the PC s IP address to Run FlashUpdate_x.xx.exe and click Next. 16


24 4. Turn the device off then click Next after selecting Device is connected via Ethernet. 5. POWER ON the TC-100 and as soon as it is discovered by the Computer, select Automatically update the device to latest firmware version then click NEXT. 6. Click Yes button to confirm you wish to perform the firmware update when you see the prompt window Do you really want to perform firmware update?. 7. The update process will now begin, taking around 15 minutes to complete. 8. Once this process is complete, close the application and power cycle the TC
25 Frequently-Asked Questions This section describes problems that you may encounter while using the TC If you have any questions, please refer to related sections and follow all suggested solutions. If problem still exists, please contact your distributor or the service center. No. Problems Solutions 1. Can TC-100 output 1920 x 1080 logo? Currently the maximum logo size supported is 256 x x 128 logo size is the hardware limitation. At this point, it is not possible to increase the logo size due to DDR memory amount and bandwidth. 2. Sometimes audio and video functions fail to work properly after switching the input sources or changing the output format. 3. Luma key function fails to overlay subtitles on the video. If customers need full-screen graphics, I'd advise to use CG-200 software which outputs 1920x1080 picture without any problem. You can also set the output resolution to 720p to make the logo appear visually larger. Output video will restore after the device power is restarted or the video source is disconnected and then reconnected. Please shut down your CG software before using the luma key overlay. 4. I cannot open dynamic logo. Dynamic logo is not supported on the TC


26 Dimensions All measurements in millimeters (mm) 19
27 Specifications Video Input Video Output HDMI x 2 HDMI Signal Format HDMI x 2 (Video and Graphic) p (50/59.94/60) i (50/59.94/60) p (50/59.94/60) Internal Processing 20 bit, YCbCr Video Descriptions Logo Parameters (PC settings) Control F/W Upgrade Power Supply Live video input: HD HDMI signal YUV (4-2-2) YUV (4-4-4) RGB (4-4-4) Live Video Output signal YUV (4-2-2) YUV (4-4-4) RGB (4-4-4) PC HD HDMI Input signal RGB (4-4-4) CG Software signal Size: 256 x 128 pixels Formats (8bits/ch): tga, png, bmp, jpg, gif, lbl, bin X Position = Left to Right Y Position = Lower to Upper Options = Logo selection 1 to 8 DIP Switch PC via Ethernet (RJ45) Ethernet (RJ45) 7-15V DC 20


28 Sep Ver: E1
Contents. Disclaimer of Product and Services
 Instruction Manual Contents FCC COMPLIANCE STATEMENT... 3 WARNINGS AND PRECAUTIONS... 3 WARRANTY... 4 STANDARD WARRANTY... 4 THREE YEAR WARRANTY... 4 DISPOSAL... 4 INTRODUCTION... 5 FEATURES... 5 GO KMU-100
Table of Contents FCC COMPLIANCE STATEMENT... 4 WARNINGS AND PRECAUTIONS... 4 WARRANTY... 5 STANDARD WARRANTY... 5 TWO YEAR WARRANTY... 5 DISPOSAL...
 1 Table of Contents FCC COMPLIANCE STATEMENT... 4 WARNINGS AND PRECAUTIONS... 4 WARRANTY... 5 STANDARD WARRANTY... 5 TWO YEAR WARRANTY... 5 DISPOSAL... 6 1. INTRODUCTION... 7 FEATURES... 7 2. CONNECTIONS
Contents. Disclaimer of Product and Services Warnings and Precautions Standard Warranty Two Year Warranty Introduction...
 Contents Disclaimer of Product and Services... 3 Warnings and Precautions... 5 -Standard Warranty... 5 -Two Year Warranty... 5 Introduction... 6 Features... 6 Setup Diagram... 7 Connections & Control...
POWER INPUT F1 F2 EXIT MENU POWER INPUT F1 F2 EXIT MENU TLM-102 DUAL 10 MONITOR. Instruction Manual.
 POWER INPUT F1 F2 EXIT MENU POWER INPUT F1 F2 EXIT MENU TLM-102 DUAL 10 MONITOR DUAL 10 MONITOR TLM-102 Instruction Manual www.datavideo.com Table of Contents FCC COMPLIANCE STATEMENT... 3 WARNINGS AND
Repeater & Power Adaptor VP-633 HD/SD SDI Repeater VP-634 Quick Start Guide
 Repeater & Power Adaptor VP-633 HD/SD SDI Repeater VP-634 Quick Start Guide www.datavideo.com Warnings and Precautions 1. Read all of these warnings and save them for later reference. 2. Follow all warnings
RACK MOUNT KIT RMK-2 Quick Start Guide
 RACK MOUNT KIT RMK-2 Quick Start Guide www.datavideo-tek.com Apr-22.2013 P/N: G082060691B1 Warnings and Precautions 1. Read all of these warnings and save them for later reference. 2. Follow all warnings
TITLE CREATOR TC-200. Instruction manual.
 TITLE CREATOR TC-200 Instruction manual www.datavideo.com Table of Contents FCC COMPLIANCE STATEMENT... 3 WARNINGS AND PRECAUTIONS... 3 WARRANTY... 5 STANDARD WARRANTY... 5 THREE YEAR WARRANTY... 5 DISPOSAL...
SE-2850 / HS-2850 /MS CHANNEL UPGRADE I/O CARD SE-2850 UPGRADE I/O CARD. Instruction Manual
 SE-2850 / HS-2850 /MS-2850 4 CHANNEL UPGRADE I/O CARD SE-2850 UPGRADE I/O CARD Instruction Manual Table of Contents FCC COMPLIANCE STATEMENT... 3 WARNINGS AND PRECAUTIONS... 3 WARRANTY... 5 STANDARD WARRANTY...
TALLY LIGHT INDICATOR TD-3. Instruction manual.
 TALLY LIGHT INDICATOR TD-3 Instruction manual www.datavideo.com Table of Contents FCC COMPLIANCE STATEMENT... 3 WARNINGS AND PRECAUTIONS... 3 WARRANTY... 4 STANDARD WARRANTY... 4 THREE YEAR WARRANTY...
.Power Distribution Center. PD-1. Instruction Manual
 .Power Distribution Center. PD-1 Instruction Manual www.datavideo-tek.com 1 Contents Warnings and Precautions... 3 Warranty... 4 Standard Warranty... 4 Two Year Warranty... 4 Disposal... 4 Packing List...
Table of Contents FCC COMPLIANCE STATEMENT... 3 WARNINGS AND PRECAUTIONS... 3 WARRANTY... 4 STANDARD WARRANTY... 4 THREE YEAR WARRANTY...
 7 4K LCD Monitor Table of Contents FCC COMPLIANCE STATEMENT... 3 WARNINGS AND PRECAUTIONS... 3 WARRANTY... 4 STANDARD WARRANTY... 4 THREE YEAR WARRANTY... 5 DISPOSAL... 6 1. INTRODUCTION... 7 TLM-700K
REAR PANEL FOR SDI OUTPUT PP-ONE X. Instruction Manual.
 REAR PANEL FOR SDI OUTPUT PP-ONE X Instruction Manual www.datavideo.com Table of Contents FCC COMPLIANCE STATEMENT... 3 WARNINGS AND PRECAUTIONS... 3 WARRANTY... 4 STANDARD WARRANTY... 4 THREE YEAR WARRANTY...
Network Video Decoder NVD-20. Contents
 Contents Warnings and Precautions... 4 Warranty... 5 Standard Warranty... 5 Two Year Warranty... 5 Disclaimer of Product & Services... 6 Disposal... 6 Packing List... 6 Product Overview... 7 Features...
Warnings and Precautions
 Warnings and Precautions 1. Read all of these warnings and save them for later reference. 2. Follow all warnings and instructions marked on this unit. 3. Unplug this unit from the wall outlet before cleaning.
VP-737 Instruction Manual
 COMPOSITE SIGNAL REPEATER VP-737 Instruction Manual Table of Contents FCC COMPLIANCE STATEMENT... 3 WARNINGS AND PRECAUTIONS... 3 WARRANTY... 5 STANDARD WARRANTY... 5 THREE YEAR WARRANTY... 6 DISPOSAL...
REAR PANEL WITH VP-633x3 & SDI BNC I/Ox8 RP-75. Instruction Manual.
 REAR PANEL WITH VP-633x3 & SDI BNC I/Ox8 RP-75 Instruction Manual www.datavideo.com Table of Contents FCC COMPLIANCE STATEMENT... 2 WARNINGS AND PRECAUTIONS... 2 WARRANTY... 3 STANDARD WARRANTY... 3 THREE
FCC COMPLIANCE STATEMENT... 3 WARNINGS AND PRECAUTIONS... 3 WARRANTY...
 Table of Contents FCC COMPLIANCE STATEMENT... 3 WARNINGS AND PRECAUTIONS... 3 WARRANTY... 4 STANDARD WARRANTY... 4 TWO YEAR WARRANTY... 4 DISPOSAL... 4 1. INTRODUCTION... 5 FEATURES... 5 TLM-170L MODEL
AUDIO ISOLATION TRANSFORMER. DAC-80 Instruction Manual.
 AUDIO ISOLATION TRANSFORMER DAC-80 Instruction Manual www.datavideo.com Table of Contents FCC COMPLIANCE STATEMENT... 3 WARNINGS AND PRECAUTIONS... 3 WARRANTY... 5 STANDARD WARRANTY... 5 THREE YEAR WARRANTY...
HD/SD SDI AND INTERCOM REPEATER BOX VP-781 Instruction Manual
 HD/SD SDI AND INTERCOM REPEATER BOX VP-781 Instruction Manual Table of Contents FCC COMPLIANCE STATEMENT... 3 WARNINGS AND PRECAUTIONS... 3 WARRANTY... 5 STANDARD WARRANTY... 5 THREE YEAR WARRANTY... 5
HD/SD- SDI to VGA Converter DAC-60 Quick Start Guide
 HD/SD- SDI to VGA Converter DAC-60 Quick Start Guide www.datavideo-tek.com Table of Contents Warnings and Precautions... 2 What s in the box?... 4 Introduction... 4 Features... 4 Functions... 5 Front Panel...
2 x 7" TFT LCD MONITOR TLM-702HD
 2 x 7" TFT LCD MONITOR TLM-702HD Instruction Manual Rev 150310 www.datavideo-tek.com Table of Contents Warnings and Precautions... 3 Warranty... 4 Standard Warranty... 4 Two Year Warranty... 4 Disposal...
HD/SD-SDI TO VGA CONVERTER. DAC-60 Quick Start Guide.
 HD/SD-SDI TO VGA CONVERTER DAC-60 Quick Start Guide www.datavideo.com Warranty Standard Warranty Datavideo equipment is guaranteed against any manufacturing defects for one year from the date of purchase.
HD/SD-SDI TO VGA CONVERTER. DAC-60 Quick Start Guide.
 HD/SD-SDI TO VGA CONVERTER DAC-60 Quick Start Guide www.datavideo.com Warranty Standard Warranty Datavideo equipment is guaranteed against any manufacturing defects for one year from the date of purchase.
LOOK-BACK/RECORDER REMOTE CONTROLLER. RMC-200 Instruction Manual.
 LOOK-BACK/RECORDER REMOTE CONTROLLER RMC-200 Instruction Manual www.datavideo.com Table of Contents FCC COMPLIANCE STATEMENT... 2 WARNINGS AND PRECAUTIONS... 2 WARRANTY... 4 STANDARD WARRANTY... 4 THREE
30M / 50M / 100M HDMI ACTIVE OPTICAL CABLE CB-60/61/62 Instruction manual
 30M / 50M / 100M HDMI ACTIVE OPTICAL CABLE CB-60/61/62 Instruction manual Table of Contents FCC COMPLIANCE STATEMENT... 3 WARNINGS AND PRECAUTIONS... 3 WARRANTY... 4 STANDARD WARRANTY... 4 THREE YEAR WARRANTY...
TBC & Matrix Switcher TBC-5000 Instruction Manual
 TBC & Matrix Switcher TBC-5000 Instruction Manual www.datavideo-tek.com Rev 150509 1 Contents Warnings and Precautions... 3 Warranty... 4 Disposal... 4 Packing List... 4 TBC-5000 Features... 4 Product
Teleprompter Remote Controls TP-WRC TP-BTWC. Instruction Manual. Rev Date: P/N: TP Controllers
 Teleprompter Remote Controls TP-WRC TP-BTWC Instruction Manual Rev Date: 03-06-2013 P/N: TP Controllers WWW.DATAVIDEO.COM Contents Warnings and Precautions... 3 Warranty... 4 Disposal... 4 Free App download
KMU-100 Instruction manual
 4K MULTICAMERA PROCESSOR KMU-100 Instruction manual Table of Contents FCC COMPLIANCE STATEMENT... 4 WARNINGS AND PRECAUTIONS... 4 WARRANTY... 5 STANDARD WARRANTY... 5 THREE YEAR WARRANTY... 5 DISPOSAL...
DAC-90 Instruction Manual
 SDI AUDIO DE-EMBEDDER DAC-90 Instruction Manual Table of Contents FCC Compliance Statement... 3 Warnings and Precautions... 3 Warranty... 4 Standard Warranty... 4 Three Year Warranty... 5 Disposal... 6
SDI AUDIO EMBEDDER. DAC-91 Instruction Manual.
 SDI AUDIO EMBEDDER DAC-91 Instruction Manual www.datavideo.com Table of Contents FCC COMPLIANCE STATEMENT... 2 WARNINGS AND PRECAUTIONS... 2 WARRANTY... 4 STANDARD WARRANTY... 4 THREE YEAR WARRANTY...
DAC-60 Instruction Manual
 HD/SD-SDI TO VGA CONVERTER DAC-60 Instruction Manual Table of Contents FCC COMPLIANCE STATEMENT... 4 WARNINGS AND PRECAUTIONS... 4 WARRANTY... 5 STANDARD WARRANTY... 5 THREE YEAR WARRANTY... 5 DISPOSAL...
HD/SD-SDI to HDMI Converter DAC-8P Quick Start Guide
 HD/SD-SDI to HDMI Converter DAC-8P Quick Start Guide www.datavideo-tek.com Table of Contents Warnings and Precautions... 2 What s in the box?... 5 Introduction... 5 Features... 6 Functions... 7 Front Panel...
ITC-200B Quick Start Guide
 INTERCOM BASE UNIT ITC-200B Quick Start Guide http:// www.datavideo-tek.com Warnings and Precautions 1. Read all of these warnings and save them for later reference. 2. Follow all warnings and instructions
Keyer Control Key Source Fill Source Still Load Still Save Still Freeze User Load Memory...
 Table of Contents Warnings and Precautions... 4 Warranty... 4 Standard Warranty... 4 Two Year Warranty... 5 Disposal... 5 Packing List... 5 Introduction... 6 Features... 6 System Diagram... 7 Rear Panel...
2X6 3G HD/SD-SDI DISTRIBUTION AMPLIFIER. VP-597 Instruction Manual
 2X6 3G HD/SD-SDI DISTRIBUTION AMPLIFIER VP-597 Instruction Manual 2 Warranty Standard Warranty Datavideo equipment are guaranteed against any manufacturing defects for one year from the date of purchase.
Keyer Control Key Source Fill Source Still Load Still Save Still Freeze User Load Memory...
 1 Table of Contents Warnings and Precautions... 4 Warranty... 4 Standard Warranty... 4 Two Year Warranty... 5 Disposal... 5 Packing List... 5 Introduction... 6 Features... 6 System Diagram... 7 Rear Panel...
BLUETOOTH TELEPROMPTER REMOTE CONTROL WR-500. Instruction manual.
 BLUETOOTH TELEPROMPTER REMOTE CONTROL WR-500 Instruction manual www.datavideo.com Table of Contents FCC COMPLIANCE STATEMENT... 3 WARNINGS AND PRECAUTIONS... 3 WARRANTY... 4 STANDARD WARRANTY... 4 THREE
Contents Warnings and Precautions... 2 Warranty... 2 Disposal... 3 Packing List... 3 Product Overview... 4 Features... 5 Functions...
 Contents Warnings and Precautions... 2 Warranty... 2 Standard Warranty... 2 Two Year Warranty... 2 Disposal... 3 Packing List... 3 1. Product Overview... 4 Algorithm Strength of our solution... 4 Setting
.Prompter Kit for Apple ipad. TP-200
 .Prompter Kit for Apple ipad. TP-200 Instruction Manual www.datavideo-tek.com 1 Contents Warnings and Precautions... 3 GLASS - Handle with care... 3 Warranty... 4 Standard Warranty... 4 Two Year Warranty...
TLM 170 / D / M / MD 17 Widescreen LCD TFT Monitor
 TLM 170 / D / M / MD 17 Widescreen LCD TFT Monitor Instruction Manual Rev 060509 www.datavideo-tek.com Table of contents Warnings and Precautions ------------------------------------------------------------------------------------
STC-100 Standards Converter
 STC-100 Standards Converter User s Guide http:// www.datavideo-tek.com Rev: 240106 Warnings and Precautions 1. Read all of these warnings and save them for later reference. 2. Follow all warnings and instructions
HD/SD Recorder HDR-60 Quick Start Guide
 HD/SD Recorder HDR-60 Quick Start Guide www.datavideo.com May-20.2013 P/N: G082060647B3 1 Table of contents Warnings and Precautions... 3 Warranty... 4 Disposal... 4 Packing List... 5 Introduction... 5
USER MANUAL. 27 Full HD Widescreen LED Monitor L27ADS
 USER MANUAL 27 Full HD Widescreen LED Monitor L27ADS TABLE OF CONTENTS 1 Getting Started 2 Control Panel/ Back Panel 3 On Screen Display 4 Technical Specs 5 Care & Maintenance 6 Troubleshooting 7 Safety
.Prompter Kit for Apple ipad. TP-200 Instruction Manual
 .Prompter Kit for Apple ipad. TP-200 Instruction Manual www.datavideo-tek.com 1 Contents Warnings and Precautions... 3 Warranty... 4 Disposal... 4 Packing List... 5 Product Overview... 6 Features... 6
Datavideo TLM x 2 TFT LCD Monitors
 Datavideo TLM-702 7 x 2 TFT LCD Monitors Instruction Manual http://www.datavideo-tek.com Rev: 131205 Table of contents Warnings and Precautions -----------------------------------------------------------------------------------2
UP / DOWN / CROSS CONVERTER. DAC-70 Instruction Manual.
 UP / DOWN / CROSS CONVERTER DAC-70 Instruction Manual www.datavideo.com Table of Contents FCC COMPLIANCE STATEMENT... 4 WARNINGS AND PRECAUTIONS... 4 WARRANTY... 5 STANDARD WARRANTY... 5 THREE YEAR WARRANTY...
Welcome to the ITC-100 Instruction Manual
 INTERCOM TLK BCK SYSTEM Welcome to the ITC-100 Instruction Manual Thank you for choosing a Datavideo product, please visit the support pages on our website for the latest version of the instruction manual.
UP / DOWN / CROSS CONVERTER. DAC-70 Instruction Manual.
 UP / DOWN / CROSS CONVERTER DAC-70 Instruction Manual www.datavideo.com UP / DOWN / CROSS CONVERTER Welcome to the DAC-70 Instruction Manual Thank you for choosing a Datavideo product, please visit the
USERS GUIDE MCX-HTS. HDMI to 3G SDI Converter. Manual Number:
 USERS GUIDE MCX-HTS HDMI to 3G SDI Converter i Manual Number: 151226 SAFETY INSTRUCTIONS Please review the following safety precautions. If this is the first time using this model, then read this manual
USER MANUAL. 27 Full HD Widescreen LED Monitor L270E
 USER MANUAL 27 Full HD Widescreen LED Monitor L270E TABLE OF CONTENTS 1 Getting Started 2 Control Panel/ Back Panel 3 On Screen Display 4 Technical Specs 5 Care & Maintenance 6 Troubleshooting 7 Safety
HD 4-CHANNEL VIDEO SWITCHER. SE-500MU Instruction manual.
 HD 4-CHANNEL VIDEO SWITCHER SE-500MU Instruction manual www.datavideo.com Table of Contents FCC COMPLIANCE STATEMENT...5 WARNINGS AND PRECAUTIONS...5 WARRANTY...6 STANDARD WARRANTY...6 THREE YEAR WARRANTY...6
Winmate Communication INC.
 20.1 Military Grade Display Model: R20L100-RKA2ML User s Manual Winmate Communication INC. May, 2011 1 IMPORTANT SAFETY INSTRUCTIONS Please read these instructions carefully before using the product and
AITech ProA/V Media Extender 5GHz Digital
 AITech ProA/V Media Extender 5GHz Digital 5 GHz Wireless Digital Media Transmitter and Receiver User Manual Table of Contents 1. Package Contents 2. Panels and Functions AV Sender AV Receiver 3. Setup
USO RESTRITO. DAC-70 Instruction Manual UP / DOWN / CROSS CONVERTER.
 UP / DOWN / CROSS CONVERTER DAC-70 Instruction Manual www.datavideo.com 2 UP / DOWN / CROSS CONVERTER Welcome to the DAC-70 Instruction Manual Thank you for choosing a Datavideo product, please visit the
Prompter Kit for PTZ camera TP-150 Instruction Manual
 Prompter Kit for PTZ camera TP-150 Instruction Manual WWW.DATAVIDEO.COM Contents Warnings and Precautions... 3 Warranty... 4 Disposal... 4 Packing List... 5 Product Overview... 6 Normal tripod assembly...
HD/SD 4-CHANNEL DIGITAL VIDEO SWITCHER SE-500HD Instruction Manual
 HD/SD 4-CHANNEL DIGITAL VIDEO SWITCHER SE-500HD Instruction Manual Table of Contents FCC COMPLIANCE STATEMENT... 4 WARNINGS AND PRECAUTIONS... 4 WARRANTY... 5 STANDARD WARRANTY... 5 THREE YEAR WARRANTY...
Disclaimer of Product and Services - 1 -
 Table of Contents Warnings and Precautions... - 2 - Warranty... - 2 - Standard Warranty... - 2 - Two Year Warranty... - 3 - Disposal... - 3-1. Product Overview... - 4-1.1 Features... - 4-2. Example CCU-100
CU103 User Manual. Contents
 [Note] The Photos of Light Engine and Control Unit in this manual are for reference only. The items may be different in actual package. Contents 1. PRECAUTIONS... 2 2. PACKAGE CONTENT... 4 3. PORT DESCRIPTION...
USER MANUAL Full HD Widescreen LED Monitor L215IPS
 USER MANUAL 21.5 Full HD Widescreen LED Monitor L215IPS TABLE OF CONTENTS 1 Getting Started 2 Control Panel/ Back Panel 3 On Screen Display 4 Technical Specs 5 Care & Maintenance 6 Troubleshooting 7 Safety
OPERATING INSTRUCTIONS TOM-0431IP
 OPERATING INSTRUCTIONS TOM-0431IP Table of Contents FCC Information -------------------------------------------------------------------- 2 Safety and Environmental Precautions ------------------------------------------------
4K UP/DOWN/CROSS CONVERTER DAC-45. Instruction Manual
 4K UP/DOWN/CROSS CONVERTER DAC-45 Instruction Manual Table of Contents FCC COMPLIANCE STATEMENT... 3 WARNINGS AND PRECAUTIONS... 3 WARRANTY... 4 STANDARD WARRANTY...4 THREE YEAR WARRANTY...4 DISPOSAL...
Camera 220C Document Camera User s Guide
 Camera 220C Document Camera User s Guide #401-220C-00 Table of Contents TABLE OF CONTENTS... 0 TABLE OF CONTENTS... 1 COPYRIGHT INFORMATION... 2 CHAPTER 1 PRECAUTIONS... 3 CHAPTER 2 PACKAGE CONTENT...
User Manual TL-2X1-HDV 2x1 HDMI & VGA Switcher All Rights Reserved Version: TL-2X1-HDV_160630
 User Manual TL-2X1-HDV 2x1 HDMI & VGA Switcher All Rights Reserved Version: TL-2X1-HDV_160630 Preface Read this user manual carefully before using this product. Pictures shown in this manual are for reference
USER MANUAL. 27" 2K QHD LED Monitor L27HAS2K
 USER MANUAL 27" 2K QHD LED Monitor L27HAS2K TABLE OF CONTENTS 1 Getting Started 2 Control Panel/ Back Panel 3 On Screen Display 4 Technical Specs 5 Troubleshooting 6 Safety Info & FCC warning 1 GETTING
DC162 Digital Visualizer. User Manual. English - 1
 DC162 Digital Visualizer User Manual English - 1 Table of Contents CHAPTER 1 PRECAUTIONS... 5 CHAPTER 2 PACKAGE CONTENT... 7 CHAPTER 3 PRODUCT OVERVIEW... 8 3.1 PRODUCT INTRODUCTION... 8 3.2 I/O CONNECTION...
USER MANUAL Full HD Widescreen LED Monitor L215ADS
 USER MANUAL 21.5 Full HD Widescreen LED Monitor L215ADS TABLE OF CONTENTS 1 Getting Started 2 Control Panel/ Back Panel 3 On Screen Display 4 Technical Specs 5 Care & Maintenance 6 Troubleshooting 7 Safety
KMU CONTROLLER RMC-185 Instruction manual
 KMU CONTROLLER RMC-185 Instruction manual Table of Contents FCC COMPLIANCE STATEMENT... 4 WARNINGS AND PRECAUTIONS... 4 WARRANTY... 5 STANDARD WARRANTY... 5 THREE YEAR WARRANTY... 5 DISPOSAL... 5 1. INTRODUCTION...
User Manual TL-2X1-HDVC 2x1 HDMI & VGA Switcher with Control All Rights Reserved Version: TL-2X1-HDVC_160630
 User Manual TL-2X1-HDVC 2x1 HDMI & VGA Switcher with Control All Rights Reserved Version: TL-2X1-HDVC_160630 Preface Read this user manual carefully before using this product. Pictures shown in this manual
USER MANUAL. 22" Class Slim HD Widescreen Monitor L215DS
 USER MANUAL 22" Class Slim HD Widescreen Monitor L215DS TABLE OF CONTENTS 1 Getting Started Package Includes Installation 2 Control Panel / Back Panel Control Panel Back Panel 3 On Screen Display 4 Technical
USER MANUAL Full HD Widescreen LED Monitor L236VA
 USER MANUAL 23.6 Full HD Widescreen LED Monitor L236VA TABLE OF CONTENTS 1 Getting Started 2 Control Panel/ Back Panel 3 On Screen Display 4 Technical Specs 5 Care & Maintenance 6 Troubleshooting 7 Safety
VLHDMIEXTFIB_2017V1.0
 User Manual VLHDMIEXTFI ll Rights Reserved Version: VLHDMIEXTFI_2017V1.0 Preface Read this user manual carefully before using the product. Pictures are shown in this manual for reference only, different
User Manual PS-684. HDBaseT Extender Kit 70m. All Rights Reserved. Version: UHBT70P_2016V1.2
 User Manual PS-684 All Rights Reserved Version: UHBT70P_2016V1.2 Preface Read this user manual carefully before using this product. Pictures shown in this manual is for reference only, different model
Congratulations on your mcable purchase! The mcable delivers the best possible picture to your HD or 4K TV by up-converting 480p and 720p content to
 1 USER GUIDE Congratulations on your mcable purchase! The mcable delivers the best possible picture to your HD or 4K TV by up-converting 480p and 720p content to 1080p, up-converting 1080p content to near-native
HDMI to VGA Converter with Audio
 Introduction HDMI to VGA Converter with Audio Quick Installation Guide The HDMI to VGA Converter with Audio allows you to convert digital HDMI to VGA and analog stereo audio. Features and Benefits Converts
HDMI Wireless Extender VE809 User Manual
 HDMI Wireless Extender VE809 User Manual www.aten.com RoHS This product is RoHS compliant. SJ/T 11364-2006 The following contains information that relates to China. ii User Information Online Registration
DisplayPort to VGA Converter
 DisplayPort to VGA Converter Model #: C-DP-VGA 2010 Avenview Inc. All rights reserved. The contents of this document are provided in connection with Avenview Inc. ( Avenview ) products. Avenview makes
USER MANUAL. 28" 4K Ultra HD Monitor L28TN4K
 USER MANUAL 28" 4K Ultra HD Monitor L28TN4K TABLE OF CONTENTS 1 Getting Started 2 Control Panel/ Back Panel 3 On Screen Display 4 Technical Specs 5 Care & Maintenance 6 Troubleshooting 7 Safety Info &
PT-C-HDADE. User Manual. HDMI Audio De-Embedder 4K (60Hz 4:4:4) Model PT-C-HDADE. Designed in Germany
 Model PT-C-HDADE. Designed in Germany") HDMI Audio De-Embedder 4K (60Hz 4:4:4) Model Designed in Germany 2017 PureLink GmbH All rights reserved. VersionV1.0 Preface Read this user manual carefully before using this product. Pictures shown in
HDMI Audio De-Embedder 4K (60Hz 4:4:4) Model Designed in Germany 2017 PureLink GmbH All rights reserved. VersionV1.0 Preface Read this user manual carefully before using this product. Pictures shown in
4K HDMI/DVI to HDMI Converter with Audio De-embedder VC881 User Manual
 4K HDMI/DVI to HDMI Converter with Audio De-embedder VC881 User Manual www.aten.com Preface EMC Information FEDERAL COMMUNICATIONS COMMISSION INTERFERENCE STATEMENT: This equipment has been tested and
HD Digital Set-Top Box Quick Start Guide
 HD Digital Set-Top Box Quick Start Guide Eagle Communications HD Digital Set-Top Box Important Safety Instructions WARNING TO REDUCE THE RISK OF FIRE OR ELECTRIC SHOCK, DO NOT EXPOSE THIS PRODUCT TO RAIN
User Manual CVA3. HDMI Audio Decoder. All Rights Reserved. Version: CVA3_2016V1.0
 User Manual CVA3 All Rights Reserved Version: CVA3_2016V1.0 Preface Read this user manual carefully before using this product. Pictures shown in this manual is for reference only, different model and specifications
 Register your product and get support at www.philips.com/welcome SWS3435S/27 SWS3435H/37 EN User manual Contents 1 Important 4 Safety 4 English 2 Your SWS3435 6 Overview 6 3 Installation 7 Connect the
DV6819 Quick Reference Guide V1.0. Smart TV Box. Quick Reference Guide. Please do read user manual before you operate the TV box.
 DV6819 Quick Reference Guide V1.0 Smart TV Box Quick Reference Guide Please do read user manual before you operate the TV box. ~ 1 ~ DV6819 Quick Reference Guide V1.0 Safety instruction Please keep the
10.4" LCD Monitor with Aluminum Front Bezel YPM1040PHB
 SPECIFICATION FOR APPROVAL M0DEL: 10.4" LCD Monitor with Aluminum Front Bezel YPM1040PHB BASE MODEL Customer's Confirmation Approved by: Reviewed by: Prepared by: Supplier's Confirmation Approved by: Reviewed
User Manual TL-TP70-HDIR 70m Extender with ARC and IR All Rights Reserved Version: TL-TP70-HDIR_180723
 User Manual TL-TP70-HDIR 70m Extender with ARC and IR All Rights Reserved Version: TL-TP70-HDIR_180723 Preface Read this user manual carefully before using this product. Pictures shown in this manual is
User Manual TP70L. HDBaseT Extender. All Rights Reserved. Version: TP70L2016V1.1
 User Manual TP70L HDBaseT Extender All Rights Reserved Version: TP70L2016V1.1 Preface Read this user manual carefully before using this product. Pictures shown in this manual is for reference only, different
COMMODORE 1802 COLOR MONITOR USER'S GUIDE
 COMMODORE 1802 COLOR MONITOR USER'S GUIDE Warning: This product includes critical mechanical and electrical parts which are essential for X radiation safety. For continued safety replace critical components
4 PORT HDMI SWITCH
 4 PORT HDMI SWITCH 1518896 IMPORTANT SAFEGUARDS OF HDMI SWITCH PRODUCTS PLEASE READ CAREFULLY THE FOLLOWING SAFEGUARDS THAT ARE APPLICABLE TO YOUR EQUIPMENT 1. Read instructions - All the safety and operating
HD/SD 8/12-CHANNEL DIGITAL VIDEO SWITCHER SE-2850 ( 8 / 12 CHANNEL ) Instruction Manual
 Instruction Manual") HD/SD 8/12-CHANNEL DIGITAL VIDEO SWITCHER SE-2850 ( 8 / 12 CHANNEL ) Instruction Manual Table of Contents FCC COMPLIANCE STATEMENT... 4 WARNINGS AND PRECAUTIONS... 4 WARRANTY... 5 STANDARD WARRANTY...
HD/SD 8/12-CHANNEL DIGITAL VIDEO SWITCHER SE-2850 ( 8 / 12 CHANNEL ) Instruction Manual Table of Contents FCC COMPLIANCE STATEMENT... 4 WARNINGS AND PRECAUTIONS... 4 WARRANTY... 5 STANDARD WARRANTY...
Golf ball tracker. Instruction manual
 Golf ball tracker Instruction manual General Intended use The Prazza golf ball finder is intended for use on the golf course only and should never be used inside the home or any other enclosed environment.the
PS600 Digital Visualizer. User Manual. English - 0
 PS600 Digital Visualizer User Manual English - 0 Table of Content COPYRIGHT INFORMATION... 3 CHAPTER 1 PRECAUTIONS... 4 SAFETY PRECAUTIONS... 5 FCC WARNING... 5 EN55022 (CE RADIATION) WARNING... 5 CHAPTER
HD/SD 12-CHANNEL PORTABLE VIDEO STUDIO HS-2850 ( 8 / 12 CHANNEL ) Instruction manual
 Instruction manual") HD/SD 12-CHANNEL PORTABLE VIDEO STUDIO HS-2850 ( 8 / 12 CHANNEL ) Instruction manual Table of Contents WARNINGS AND PRECAUTIONS... 4 WARRANTY... 5 STANDARD WARRANTY... 5 THREE YEAR WARRANTY... 5 DISPOSAL...
HD/SD 12-CHANNEL PORTABLE VIDEO STUDIO HS-2850 ( 8 / 12 CHANNEL ) Instruction manual Table of Contents WARNINGS AND PRECAUTIONS... 4 WARRANTY... 5 STANDARD WARRANTY... 5 THREE YEAR WARRANTY... 5 DISPOSAL...
Model#: IN-MDRI3MF. Hardware User Manual. 3MP Indoor Mini Dome with Basic WDR, Fixed lens. (PoE) Ver. 2013/02/04
 Ver. 2013/02/04") Model#: IN-MDRI3MF 3MP Indoor Mini Dome with Basic WDR, Fixed lens Hardware User Manual (PoE) Ver. 2013/02/04 Table of Contents 0. Precautions 3 1. Introduction 4 Package Contents... 4 Features and Benefits...
Model#: IN-MDRI3MF 3MP Indoor Mini Dome with Basic WDR, Fixed lens Hardware User Manual (PoE) Ver. 2013/02/04 Table of Contents 0. Precautions 3 1. Introduction 4 Package Contents... 4 Features and Benefits...
18.5, 21.5, 23.8 & 27 Widescreen LED Security Monitors LED22 USER GUIDE
 LED18 / LED22 / LED24 / LED27 18.5, 21.5, 23.8 & 27 Widescreen LED Security Monitors LED27 LED24 LED22 LED18 USER GUIDE 3625 Cincinnati Avenue, Rocklin, CA 95765 855-388-7422 www.northernvideo.com Rev.
Content. User s Manual 3. Owner s Manual Ver. 1.1 / June Introduction...4. Mytek Package Content Features...
 Owner s Manual User s Manual 3 Content Owner s Manual Ver. 1.1 / June 2018 Mytek 2017 The Brooklyn AMP firmware can be easily updated via Mytek USB Control Panel. As the firmware is updated, Mytek will
3G/HD/SD-SDI to HDMI Converter
 3G/HD/SD-SDI to HDMI Converter Model #: 3G/HD/SD-SDI to HDMI Converter 2010 Avenview Inc. All rights reserved. The contents of this document are provided in connection with Avenview Inc. ( Avenview ) products.
9" B/W MONITOR CEM-09/09A-2 12" B/W MONITOR CEM-12/12A-2 OPERATION MANUAL
 9" B/W MONITOR CEM-09/09A-2 12" B/W MONITOR CEM-12/12A-2 OPERATION MANUAL CONTENTS PRECAUTIONS FOR USE AND INSTALLATION IMPORTANT SAFEGAURDS SAFETY INSTRUCTIONS INSTRUCTION MANUAL CLASS B COMPUTING DEVICES
HD/SD 12-CHANNEL PORTABLE VIDEO STUDIO HS-2850 ( 8 / 12 CHANNEL ) Instruction manual
 Instruction manual") HD/SD 12-CHANNEL PORTABLE VIDEO STUDIO HS-2850 ( 8 / 12 CHANNEL ) Instruction manual Table of Contents WARNINGS AND PRECAUTIONS... 4 WARRANTY... 5 STANDARD WARRANTY... 5 THREE YEAR WARRANTY... 5 DISPOSAL...
HD/SD 12-CHANNEL PORTABLE VIDEO STUDIO HS-2850 ( 8 / 12 CHANNEL ) Instruction manual Table of Contents WARNINGS AND PRECAUTIONS... 4 WARRANTY... 5 STANDARD WARRANTY... 5 THREE YEAR WARRANTY... 5 DISPOSAL...
Model#: IN-DI2MIRF 2MP Indoor Dome with True Day/Night, IR, Basic WDR, Fixed lens
 Model#: IN-DI2MIRF 2MP Indoor Dome with True Day/Night, IR, Basic WDR, Fixed lens Hardware User Manual (PoE) Ver.2013/01/17 Table of Contents 0. Precautions 3 1. Introduction 4 Package Contents...4 Features
 Register your product and get support at www.philips.com/welcome SWW1890 User manual Contents 1 Important 4 Safety 4 English 2 Your Philips Wireless HD Net Connect 5 What is in the box 5 3 Overview 6