Failure to follow the instructions marked with this symbol may cause personal injury or even fatality.
|
|
|
- Ann Rose
- 5 years ago
- Views:
Transcription

1

2 To avoid injuries or damage to property, please read the following precautions carefully and use the product accordingly. Failure to follow the instructions marked with this symbol may cause personal injury or even fatality. Failure to follow the instructions marked with this symbol may cause personal injury or damage to the product or property. Power Related Installation Related Cleaning and Use Related [The images here are for reference only, and are not applicable in all cases (or countries).] Insert the power plug firmly so that it does not come loose. When the connection is not firm, it may cause a fire. Do not use loose power outlets or damaged power cables. There is a danger of electric shock or fire. Under no circumstances touch the power plug with wet hands. There is a danger of electric shock. Do not plug multiple devices into a single wall outlet. There is a danger of fire. Do not bend the power cord excessively or place heavy objects on it. There is a danger of electric shock or fire. Before moving the product, make sure the power is off and remove the power cord from the wall outlet. In addition, make sure all connection cables are disconnected from other devices before moving it. Moving the product without disconnecting the power cord may damage the power cord and cause electric shock or fire. To disconnect the apparatus from the mains, the plug must be pulled out from the mains socket, therefore the mains plug shall be readily operable. There is a danger of electric shock or fire.


3 Always unplug the unit by holding the power plug. Pulling the power cable may damage the inside of it. There is a danger of fire. Unplug the power plug before cleaning the product. There is a danger of electric shock or fire. Power Related Installation Related Cleaning and Use Related TO PREVENT THE SPREAD OF FIRE, KEEP CANDLES OR OTHER OPEN FLAMES AWAY FROM THIS PRODUCT AT ALL TIMES. There is a danger of fire. When installing the product in a cabinet or on a shelf, make sure the front end of the base does not protrude. Dropping the product may damage it or cause injury. Keep the power cord away from heaters. The coating of the power cord may melt and cause electric shock or fire. Do not install the product in locations exposed to oil, smoke, moisture or water (rainwater), or in a vehicle. There is a danger of electric shock or fire. Do not install the product in locations with poor ventilation such as a bookshelf, closet, etc. An increase in the internal temperature may cause a fire. Do not install on an unstable location, or on a stand smaller than the product.


4 If the product falls it may harm children. Install on a flat and stable location as the front part is heavy. In case of thunder/lightning, disconnect the power cord from the wall outlet. There is a danger of electric shock or fire. Make sure the product's vents are not blocked by a table cloth or curtain. An increase in the internal temperature may cause a fire. Place the product on the ground carefully. Doing so may cause damage or injury. Do not drop the product while carrying it. Doing so may cause damage or injury. Keep the product out of children s reach. If the product falls it may cause harm to children. Install on a flat and stable location as the front part is heavy. Power Related Installation Related Cleaning and Use Related Do not insert any metal objects such as a fork, chopsticks, wires, gimlets, or inflammable objects such as paper into the vents, the PC/COMPOSITE port, the Power port or the Battery port. This may cause electric shock or fire. If water or an alien substance enters the product, turn the product off, disconnect the power cord from a wall outlet and contact a Service Center. Do not disassemble, or attempt to fix or modify the product. When the product requires repairs, contact a Service Center. Do not use or keep the product near flammable sprays or other such substances.


5 There is a danger of fire or explosion. Do not place containers with water, vases, drinks, chemicals, small metal parts or heavy objects on the product. If water enters the product, it may cause electric shock, or fire and when heavy objects fall, they may cause injury. Do not let children place objects such as toys or cookies on the product. If a child tries to reach for any of these objects, the product may fall and cause harm. Do not look directly at the light of the lamp nor project the picture onto eyes. This is dangerous especially for children. When you remove batteries from the remote, be careful that they are not swallowed by children. Keep batteries out of the reach of children. If swallowed, see a doctor immediately. If the product emits smoke, unusual noise, or there is a burning smell,disconnect the power plug immediately, and contact a Service Center. There is a danger of electric shock or fire. If the power plug pin or jack is exposed to dust, water or alien substances, clean it thoroughly. There is a danger of electric shock or fire. When cleaning the product, disconnect the power cord and wipe the product using a soft dry cloth. Do not use any chemicals such as wax, benzene, alcohol, thinners, insecticide, air freshener, lubricant or detergent. When not using the product for an extended period of time, disconnect the power plug. Otherwise, this may cause heat emission from the accumulated dirt or degraded insulation, leading to electric shock or fire. Do not install the product in places with heavy dust, chemical substances, high or low temperatures, high humidity, or where it will be operated for a long period continuously etc.
.")
 - Europe only (Applicable in the European Union and other European countries with separate collection systems) This marking")
6 If the product is dropped or the casing is damaged, turn the product off and unplug the power cord. This may cause electric shock or fire. Contact a Service Center. Use only specified standard batteries. Do not use new and used batteries together. Incorrect polarity may cause a battery to break or leak and could lead to fire, injury, or contamination (damage). Make sure to place your remote control on a table or desk. If you step on the remote control, you may fall and hurt yourself or the product may be damaged. Correct Disposal of This Product (Waste Electrical & Electronic Equipment) - Europe only (Applicable in the European Union and other European countries with separate collection systems) This marking on the product, accessories or literature indicates that the product and its electronic accessories (e.g. charger, headset, USB cable) should not be disposed of with other household waste at the end of their working life. To prevent possible harm to the environment or human health from uncontrolled waste disposal, please separate these items from other types of waste and recycle them responsibly to promote the sustainable reuse of material resources. Household users should contact either the retailer where they purchased this product, or their local government office, for details of where and how they can take these items for environmentally safe recycling. Business users should contact their supplier and check the terms and conditions of the purchase contract. This product and its electronic accessories should not be mixed with other commercial wastes for disposal. Correct disposal of batteries in this product - Europe only (Applicable in the European Union and other European countries with separate battery return systems.) This marking on the battery, manual or packaging indicates that the batteries in this product should not be disposed of with other household waste at the end of their working life. Where marked, the chemical symbols Hg, Cd or Pb indicate that the battery contains mercury, cadmium or lead above the reference levels in EC Directive 2006/66. If batteries are not properly disposed of, these substances can cause harm to human health or the environment. To protect natural resources and to promote material reuse, please separate batteries from other types of waste and recycle them through your local, free battery return system.
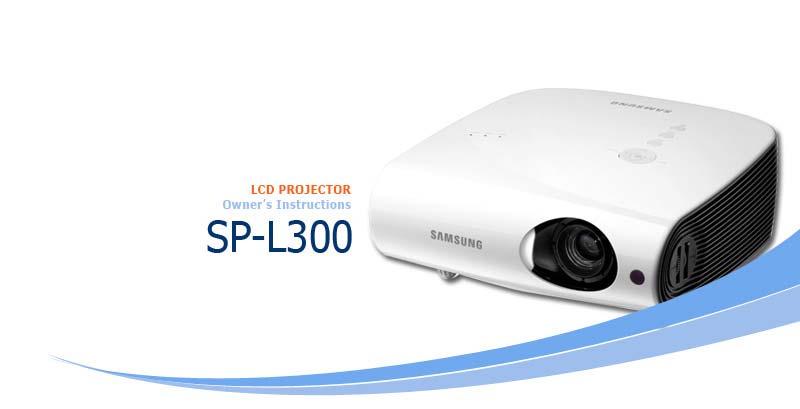
7 Product Features Product Views Remote Control Product Specifications An optical engine adopting new LCD technology x 768 panel has been adapted. - Utilizing a 3P-LCD panel. - Provides a bright screen of 3000 lumen. - Compact size, lightweight, and good portability Minimized fan noise - Minimizes the noise generated by the product s fan by optimizing the internal air flow and the fan installation structure. Various input terminals - Increases the connectivity to peripherals by providing various terminals, such as HDMI (DVI PC signal, supported), 2 D-Sub 15p, S-Video, and Video terminals. Audio Output - There are two stereo speakers on the right and left and a 5-band equalizer is supported. User adjustments - This unit allows adjustment of each input port. - The unit has a reference pattern that can be used for positioning and adjustment. Product Features Product Views Remote Control Product Specifications Front/Upper Side
 Button - STAND BY (Blue LED) Used to turn the projector on")


8 1. Indicators 5. POWER( ) Button - STAND BY (Blue LED) Used to turn the projector on or off. - LAMP (Blue LED) - TEMP (Red LED) 6. Lens Refer to the LED Indications. 7. Remote Control Signal Receiver 2. VOL - / + & Select and Move Button Adjusts the volume. Use this button to move to or select an item 8. Focus Ring Used for Focus Adjustment. within a menu. 9. Zoom Knob 3. MENU Button Used to enlarge or reduce image size. Use this button to enter or exit a menu or to move forward in a menu. 10.Lens cover 4. SOURCE Button Used to select input signals from the external sources. Unpacking Quick Installation Guide Warranty Card/ Registration Card (Not available in all locations) User Manual CD
9 Power Cable Remote Control/ 1 Batteries (CR2025) (Not available in all locations) Cleaning Cloth D-Sub Cable LED Indications :Light is On :Light is Blinking :Light is Off STAND BY LAMP TEMP Information If you press the POWER button on the remote control or projector, the screen appears within 30 seconds. The projector is in normal operating condition. This state appears when the projector is preparing an operation after the POWER button on the projector or the remote control has been pressed. The POWER button is pressed to turn off the projector, and the cooling system is in operation to cool off the inside of the projector. (Operates for about 30 seconds.) Refer to Action 1 below if the cooling fan inside the projector is not in normal operation condition. Refer to Action 2 below if the lamp cover protecting the lamp unit is not closed properly. This indicates that the lens cover does not open completely. Refer to Action 3 below. This indicates that it has changed to Cooling mode, because the internal temperature of the projector has increased beyond the maintenance limit. Refer to Action 4 below. This indicates that the power is turned off automatically because the internal temperature of the projector has increased beyond the maintenance limit. Refer to Action 5 below A problem has occurred with the operation of the lamp. Refer to Action 6. The lifetime of the lamp has expired. Refer to Action 7. The power for the product is not operating normally. Contact a service center. Clearing Indicator Problems Classification State Measures Action 1 Action 2 When the cooling fan system is not in normal operating condition. When the lamp cover protecting the lamp unit is not properly closed or the sensor system is not in normal operating condition. If the symptom remains even after disconnecting and then reconnecting the power cord and turning the projector on again, contact your product provider or our service center. Check if the screws on the side of the projector are correctly locked, and if they are locked normally, contact your product distributor or a service center. The status that the lens Open the lens cover completely. If the lens cover is not open completely while operating the projector,

10 Action 3 Action 4 Action 5 Action 6 Action 7 cover is not open completely. This indicates that it has changed to Cooling mode, because the internal temperature of the projector has increased beyond the maintenance limit. If the internal temperature of the projector increases higher than the limit, it is turned off automatically. The lamp malfunctions after power turns off abnormally or after powering on right after turning off the projector. When the screen becomes darker both the video and audio are turned off automatically. If this status persists for ten minutes, the projector is turned off automatically. If the internal temperature of the projector has increased beyond the maintenance limit, it is changed to Cooling mode before it is turned off automatically. * Cooling mode: The status that the fan speed has increased and the lamp of the projector has been changed to ECO mode by force. Check whether the ventilating hole of the projector is blocked. Check whether the air filter is blocked. Clean it if it is blocked. Check whether the surrounding temperature of the projector is higher than the standard temperature range of the projector. Cool the projector sufficiently and operate it again. Check whether the ventilating hole of the projector is blocked. Check whether the air filter is blocked. Clean it if it is blocked. Check whether the surrounding temperature of the projector is higher than the standard temperature range of the projector. Cool the projector sufficiently and operate it again. If the same problem occurs continually, contact your product distributor or service center. Turn the power off, wait for a sufficient amount of cooling time and then turn the power on to operate. If the same problem occurs continually, contact your product distributor or service center. Check the lamp usage time on the Information Display screen. If you need to replace the lamp, contact your product distributor or service center. This Projector uses a cooling fan system to keep the unit from overheating. Operation of the cooling fan may cause noise, which does not affect the product performance and is part of normal operation. Rear Side 1. PC OUT port 7. [AV IN] VIDEO Input port
![2. AUDIO OUT port 3. HDMI/DVI IN Input port 4. PC 1/DVI AUDIO IN Input port 5. RS-232C port (For service input terminals) 6. [AV IN] R-AUDIO-L Input port 8. [AV IN] S-VIDEO Input port 9.](/docs-images/95/122542850/images/11-0.jpg "PC IN 1,2 Input port 10.[PC IN2] AUDIO Input port 11.Remote Control Signal Receiver 12.POWER Input port Product Features Product Views Remote Control Product Specifications 1. POWER ( ) Button 2.")
11 2. AUDIO OUT port 3. HDMI/DVI IN Input port 4. PC 1/DVI AUDIO IN Input port 5. RS-232C port (For service input terminals) 6. [AV IN] R-AUDIO-L Input port 8. [AV IN] S-VIDEO Input port 9. PC IN 1,2 Input port 10.[PC IN2] AUDIO Input port 11.Remote Control Signal Receiver 12.POWER Input port Product Features Product Views Remote Control Product Specifications 1. POWER ( ) Button 2. AUTO Button 3. MENU ( ) Button 4. Move ( )/( ) Button 5. V.KEYSTONE(+/-) (VERTICAL KEYSTONE)Button 6. INSTALL Button 7. BLANK Button 8. P.SIZE Button 9. QUICK utton 10. MUTE ( ) Button 11. RETURN ( ) Button 12. EXIT ( ) Button 13. VOL Button 14. INFO Button 15. SOURCE Button 16. P.MODE Button 17. STILL Button 1. POWER ( ) Used to turn on the projector. 2. AUTO Adjusts the Picture automatically. (Available in PC Mode Only) 3. MENU ( ) Used to display Menu Screen. 4. Move ( )/ ( ) Used to move to or select each menu item. 5. V.KEYSTONE(VERTICAL KEYSTONE) (+/-) Use this when video scenes are distorted or tilted.
12 6. INSTALL Used to flip or reverse the projected image. 7. BLANK This is used to turn off the video and audio temporarily. It is released when any button other than the POWER button is pressed. 8. P.SIZE Used to adjust the size of picture screen. 9. QUICK This is used when quickly selecting the last used menu. 10. MUTE ( ) This is used to temporarily mute the sound. To hear sound again, press the MUTE button again or press the - VOL + button. 11. RETURN ( ) Returns to the previous menu. 12. EXIT ( ) Used to make Menu Screen disappear. 13. VOL Adjusts the volume. 14. INFO Used to check source signals, picture setup, PC screen adjustment and lamp lifespan. 15. SOURCE This is used to switch between the TV and the external input. 16. P.MODE Used to select Picture Mode. 17. STILL Used to see still images. Product Features Product Views Remote Control Product Specifications Design and specifications of the product may be modified without prior notice for better performance. Specifications Model Panel SP-L " 3P LCD Resolution XGA (1024 x 768) Aspect ratio 4:3 Brightness Max 3,000 ANSI lumen (Eco 2200 lumen) Contrast Max 500:1 Diagonal screen size 40 ~ 300" Projection Range Zoom Adjustment Focus Adjustment Lens 1 m ~ 10 m Manual Manual F=1.65~1.93, f=18.5mm~22.5mm Zoom Ratio 1:1.2 Keystone Vertical (±30 )
13 Lamp Power Consumption 220W (Normal : 200W, Eco : 152W ) Life Time 2,000 Hours (Eco : 2,500 Hours ) Input Terminal Speaker Power Noise Dimensions Weight User Environment D-Sub 15p x 2 HDMI Mini DIN x 1 RCA x 1 Power Consumption Voltage Operating Storage Analog RGB, analog YPbPr Digital RGB, digital YCbCr S-Video Composite video 3W x 2 (Stereo) Max 300 W 100~240V AC, 50/60Hz Eco : 30dB, Normal : 32dB, Bright : 35dB 291(W) x 289(D) x 127(H) 11.5 inches(w) x 11.4 inches(d) x 5 inches(h) 3. Kg / 8. lb Temperature : 41 F ~ 95 F (5 C ~ 35 C), Humidity : 20 % ~ 80 % ((Non-condensing)) Temperature : -14 F ~ 140 F (-10 C ~ 60 C) Humidity : 10 % ~ 90 % (Non-condensing) This Class B equipment is designed for home and office use. The equipment has been registered regarding EMI for residential use. It may be used in all areas. Class A is for office use. Class A is for business while class B emits less electromagnetic waves than class A. The LCD panel used in the LCD projector consists of hundreds of thousands of fine pixels. Like other video display devices, the LCD panel may contain bad pixels which do not operate. When shipping a product, the conditions for identifying bad pixels and the number of bad pixels that a LCD panel is allowed to contain are strictly managed in accordance with the relevant specified standards by the LCD panel manufacturer and our company. Though a screen may have some dead pixels, this does not affect the overall screen quality and the lifetime of the product. Supported Display Modes PC Timing (D-Sub/HDMI) Format Resolution Horizontal Frequency (khz) Vertical Frequency (Hz) Pixel Frequency (MHz) IBM 640 x Hz IBM 640 x Hz IBM 720 x Hz VESA 640 x Hz MAC 640 x Hz VESA 640 x Hz VESA 640 x Hz VESA 640 x Hz VESA 720 x Hz VESA 800 x Hz VESA 800 x Hz VESA 800 x Hz VESA 800 x Hz VESA 800 x Hz MAC 832 x Hz VESA 1024 x Hz VESA 1024 x Hz VESA 1024 x Hz VESA 1024 x Hz VESA 1152 x Hz VESA 1152 x Hz VESA 1152 x Hz VESA 1152 x Hz VESA 1280 x Hz
14 VESA 1280 x Hz VESA 1280 x Hz VESA 1280 x Hz VESA 1280 x Hz VESA 1280 x Hz VESA 1280 x Hz VESA 1280 x Hz VESA 1280 x Hz VESA 1280 x Hz VESA 1280 x Hz VESA 1280 x Hz VESA 1280 x Hz VESA 1280 x Hz VESA 1280 x Hz VESA 1280 x Hz VESA 1400 x Hz VESA 1440 x Hz VESA 1440 x Hz VESA 1600 x Hz For the resolutions presented above, if a signal with a resolution lower or higher than 1024x768 is input, it is converted to 1024x768 by the Scaler chip inside the projector. When the real resolution (1024x768) of the projector and the PC output resolution are the same, the screen quality is optimal. AV Timing (D-Sub) Format Resolution Scan BT.601 SMPTE 267M 480i 59.94Hz Interlaced BT.1358 SMPTE 293M 480p 59.94Hz Progressive BT i 50Hz Interlaced BT p 50Hz Progressive SMPTE 296M 720p 59.94Hz/60Hz Progressive 720p 50Hz Progressive BT.709 SMPTE 274M 1080i 59.94Hz/60Hz Interlaced 1080i 50Hz Interlaced AV Timing (HDMI) Format Resolution Scan Horizontal Frequency (khz) Vertical Frequency (Hz) Pixel Frequency (MHz) EIA-861 Format1 640 x 480 Progressive EIA-861 Format1 640 x 480 Progressive EIA-861 Format2,3 720 x 480 Progressive EIA-861 Format2,3 720 x 480 Progressive EIA-861 Format x 720 Progressive EIA-861 Format x 720 Progressive EIA-861 Format x 1080 Interlaced EIA-861 Format x 1080 Interlaced EIA-861 Format17, x 576 Progressive EIA-861 Format x 720 Progressive EIA-861 Format x 1080 Interlaced AV Timing (VIDEO/S-VIDEO) NTSC, NTSC 4.43, PAL, PAL60, PAL-N, PAL-M, SECAM
15


16 Basic Settings Connecting the Power Connecting an External Device Installing the Projector Install the projector so that the beam from the projector is perpendicular to the screen. Place the projector so that the lens is at the center of the screen. If the screen is not vertically installed, the picture on the screen may not be a rectangle. Do not install the screen in bright surroundings. If the screen is too bright, the picture on the screen will not be displayed clearly. When installing the screen in bright surroundings, use curtains. You can install the projector in the following locations: Front-Floor / Front-Ceiling / Rear-Floor / Rear-Ceiling. (To view the installation position settings) To view the picture when installing the projector behind the screen, Install a semi-transparent screen. Select Menu > Setup > Install > Rear-Floor To view the picture when installing the projector in the front of the screen, Install the projector at the side where you are watching the screen. Select Menu > Setup > Install > Front-Floor Zoom and Focus Adjustment Zoom Knob Focus Ring
, the focus cannot be adjusted correctly.")
17 You can adjust the size of image within zoom range by manipulating the Zoom Knob. Focus the picture on the screen using the Focus Ring. If your product is installed at a location out of the specified projection distance (refer to Screen Size and Projection Distance), the focus cannot be adjusted correctly. Leveling with Adjustable Feet For level placing of the projector, adjust the Adjustable Feet of the projector. The projector can be adjusted to a height of up to 30 mm (about 12 ) from the reference point. Depending on the position of the projector, Keystone distortion of image may appear. If a keystone occurs, adjust it using the V-Keystone function. Screen Size and Projection Distance Install the projector on a flat, even surface and level the projector using the adjustable feet to realize optimal picture quality. If images are not clear, adjust them using the Zoom Knob or Focus Ring, or move the projector forward and backward. Screen size (M:inch) Horizental Vertical Max Min Offset (X:mm) (Y:mm) (Z:mm) (Z:mm) (Y':mm)


18 This projector is designed to show images optimally on a 80 ~ 120 inch sized screen. A. Screen Z: Throw Distance Y': Distance from Lens Center to Image Bottom Setting up the PC Environment - Check the following items before connecting your PC to your projector. 1. Click the right mouse button on the Windows desktop and click on [Properties]. <Display Properties> tab will appear. 2. Click on [Settings] tab and set the <Screen resolution> by referring to <Resolution> described in the display mode table supported by this projector. You do not have to change <Color quality> setup. 3. Press the [Advanced] button. Another property window will appear.
![4. Click on [Monitor] tab and set the <Screen refresh rate> by referring to <Vertical Frequency> described in the Supported Resolution/Size Modes table.](/docs-images/95/122542850/images/19-0.jpg "Set up both the vertical and horizontal frequency instead of <Screen refresh rate>. 5.")
![Click the [OK] button to close the window, and click the [OK] button of the <Display Properties> window to close the window. The computer may restart automatically. 6.](/docs-images/95/122542850/images/19-1.jpg "Shut down the PC and connect to the projector. Process might vary depending on your type of computer or Windows versions. (For example, [Properties] appears instead of [Properties (R)] as shown in 1.")
19 4. Click on [Monitor] tab and set the <Screen refresh rate> by referring to <Vertical Frequency> described in the Supported Resolution/Size Modes table. Set up both the vertical and horizontal frequency instead of <Screen refresh rate>. 5. Click the [OK] button to close the window, and click the [OK] button of the <Display Properties> window to close the window. The computer may restart automatically. 6. Shut down the PC and connect to the projector. Process might vary depending on your type of computer or Windows versions. (For example, [Properties] appears instead of [Properties (R)] as shown in 1.) This unit appliance supports up to 24 bits per pixel in Color quality when it is used as a PC monitor. Projected images may differ from the monitor depending on monitor manufacture or Windows versions. When connecting the projector to a PC, check that PC setup complies to display settings supported by this projector. If not, there may be signal problems. Basic Settings Connecting the Power Connecting an External Device 1. Rear of Projector Plug the power cord into the power terminal on the rear side of the projector. Basic Settings Connecting the Power Connecting an External Device
] terminal at the back of the projector to the D-Sub terminal of your PC using a D-Sub cable. - For the supported input signals, refer to \"PC Timing(D-Sub/HDMI)\".")
![Connect the [PC 1/DVI AUDIO IN] or [AUDIO IN 2] terminal at the back of the projector to the Audio out terminal of your PC using an audio cable (Not supplied).](/docs-images/95/122542850/images/20-1.jpg "Connecting a PC using a HDMI/DVI cable Check that your PC and projector are turned off.")
20 Connecting a PC using a D-Sub cable Check that your PC and projector are turned off. Connect the [PC IN (1 or 2)] terminal at the back of the projector to the D-Sub terminal of your PC using a D-Sub cable. - For the supported input signals, refer to "PC Timing(D-Sub/HDMI)". Connect the [PC 1/DVI AUDIO IN] or [AUDIO IN 2] terminal at the back of the projector to the Audio out terminal of your PC using an audio cable (Not supplied). Connecting a PC using a HDMI/DVI cable Check that your PC and projector are turned off. Connect the [HDMI/DVI IN] terminal of the projector to the DVI terminal of your PC using a HDMI/DVI cable (Not supplied). - When connecting to the HDMI terminal of your PC, use an HDMI cable (Not supplied). - For the supported input signals, refer to "PC Timing(D-Sub/HDMI)". Connect the [PC 1/DVI AUDIO IN] terminal of the projector and the Audio out terminal of your PC using an audio cable (Not supplied). - If it is connected with an HDMI cable, connecting an audio cable (Not supplied) is not needed.

![Connect the [PC OUT] terminal of the projector to the D-Sub terminal of a monitor using a D-Sub cable.](/docs-images/95/122542850/images/21-1.jpg "- When connecting a monitor using the [PC OUT] function, make sure to connect your PC to the [PC IN 1] terminal.")
21 Connecting an External Monitor You can view an image on both your projector and a separate monitor at the same time. Check that your PC and projector are turned off. Connect the [PC IN 1] terminal at the back of the projector to the D-Sub terminal of your PC using a D-Sub cable. Connect the [PC OUT] terminal of the projector to the D-Sub terminal of a monitor using a D-Sub cable. - When connecting a monitor using the [PC OUT] function, make sure to connect your PC to the [PC IN 1] terminal. - The monitor output which is connected to the [PC OUT] termininal will be normal even if you see a blank screen on your projector. - The [PC OUT] function also operates in standby mode. Connecting an HDMI-Compatible Device

22 First, check that the AV device and your projector are turned off. Connect the [HDMI/DVI IN] terminal at the back of the projector to the DVI output terminal of the digital output device using an HDMI/DVI cable. - When connecting to the HDMI output terminal of the digital output device, use an HDMI cable. - For the supported input signals, refer to "AV Timing(HDMI)". Connect the [PC 1/DVI AUDIO IN] terminal of the projector to the Audio out terminal of your digital output device using an audio cable (Not supplied). - If it is connected with a HDMI cable, connecting an audio cable (Not supplied) is not needed. Connecting an AV device using a D-Sub cable First, check that the AV device and your projector are turned off. Connect the [PC IN (1 or 2)] terminal at the back of the projector to the D-Sub terminal of your AV device using a D-Sub cable. - For supported input signals, refer to the "AV Timing (D-Sub)". Connect the [PC 1/DVI AUDIO IN] or [AUDIO IN 2] terminal at the back of the projector to the Audio out terminal of your AV device using an audio cable (Not supplied). Connecting a component output AV device
] terminal at the back of the projector to the Component terminal of your AV device using a D- Sub/Component cable (Not supplied).")
.")
23 First, check that the AV device and your projector are turned off. Connect the [PC IN (1 or 2)] terminal at the back of the projector to the Component terminal of your AV device using a D- Sub/Component cable (Not supplied). - For supported input signals, refer to the "AV Timing(D-Sub)". Connect the [PC 1/DVI AUDIO IN] or [AUDIO IN 2] terminal at the back of the projector and the Audio out terminal of your AV device using an audio cable (Not supplied). Connecting using a Video/S-Video cable First, check that the AV device and your projector are turned off. Connect the [VIDEO] or [S-VIDEO] terminal and the AV device using a Video cable (Not supplied) or S-Video cable (Not supplied). - For supported input signals, refer to the "AV Timing(VIDEO/S-VIDEO)". Connect the [AV IN R-AUDIO-L] terminal at the back of the projector and the Audio out terminal of your AV device using an audio cable (Not supplied).
 suitable for your external speaker. Connect the [AUDIO OUT] terminal of the projector to the external speaker using an audio cable.")
24 Connecting an External Speaker You can hear sound through an external speaker instead of the internal speaker embedded in the projector. Prepare an audio cable (Not supplied) suitable for your external speaker. Connect the [AUDIO OUT] terminal of the projector to the external speaker using an audio cable. - When using an external speaker, the internal speaker does not operate but you can adjust the volume of the external speaker using the Volume button of the projector (or remote control). - The [AUDIO OUT] terminal can output all audio signals.
25 Basic Functions Input Picture Setup Option Turning on the projector Check that the lens cover is opened completely. Turn the power on. Check that the STAND BY LED indicator is turned on. Press the Power button. While the power is turned on (with the Power button on the remote control or at the top of the projector), the blue LAMP LED indicator blinks. When the power is turned on completely, the LAMP LED indicator remains blue. If the projector is turned on when the lamp is not sufficiently cooled, a temporary loud noise may be heard because the fan speed increases to cool the lamp. Turning off the projector Press the Power button. (Remote control or on top of the projector) OK or Cancel is displayed. Select OK using the arrow keys (Remote control or on top of the projector). Press the Enter button or press the Power button again. The STAND BY LED indicator is turned off and the LAMP LED indicator blinks. The fan speed increases to cool the lamp quickly. When the operation is finished, the LAMP LED indicator is turned off and the STAND BY LED indicator is turned on and remains blue. Remove the power cord. Close the lens cover. Selecting an input source Press the SOURCE button (on the remote control or at the top of the projector). AV, S-Video and HDMI modes can only be selected when an external device is connected, and the PC1 and PC2 modes can be selected regardless of connecting an external device. Basic Functions Input Picture Setup Option * Click the Play( )/Stop( ) button in the table below to view the video file.
26 Screen Adjustment Source List Description You can select a device connected to the projector to display. Play/Stop 1) PC 1 4) S-Video 2) PC 2 5) HDMI 3) AV Edit Name You can edit the names of devices connected to the projector. 1) VCR 7) DVD Receiver 2) DVD 8) Game 3) Cable STB 9) Camcorder 4) HD STB 10) DVD Combo 5) Satellite STB 11) PC 6) AV Receiver Basic Functions Input Picture Setup Option * Click the Play( )/Stop( ) button in the table below to view the video file. Screen Adjustment Mode Description Select a screen state which is customized to your projector or change the screen mode as required. Play/Stop 1) Mode - Standard This picture mode is the most general mode for various cases. - Presentation This mode is suitable for presentations. - Text This mode is suitable for text work. - Movie This mode is suitable for viewing a movie. - Game This picture mode is optimized for playing games. The text in a still picture may be displayed unnaturally. - User This mode is a customized mode created using the Mode > Save function. Mode
27 Presentation and Text modes are only enabled if the input signal is a PC Timing(D- Sub/HDMI)signal. 2) Contrast : Used to adjust the contrast between the object and the background. 3) Brightness : Used to adjust brightness of the entire picture. 4) Sharpness : Used to adjust the sharpness of the picture. When the input signal is PC Timing(D-Sub/HDMI), the Sharpness cannot be adjusted. 5) Color : Used to adjust color lighter or darker. When the input signal is PC Timing(D-Sub/HDMI), the Color cannot be adjusted. 6) Tint : Used to obtain more natural color of objects using Green or Red enhancement. When the input signal is PC Timing(D-Sub/HDMI)and PAL and SECAM of the [S-Video] and [AV] modes, the color cannot be adjusted. Contrast Brightness Sharpness Color Tint 7) Color Temperature : You can select the color temperature according to your preferences. - Factory defaults: 5500K, 6500K, 8000K, 9300K - You can select the color temperature for the items below according to your preferences. R-Gain, G-Gain, B-Gain : Adjusts the color temperature of the White level. R-Offset, G-Offset, B-Offset : Adjusts the color temperature of the Black level. 1) Color Temperature 5) R-Offset 2) R-Gain 6) G-Offset 3) G-Gain 7) B-Offset 4) B-Gain Color Temperature R-Gain G-Gain B-Gain R-Offset G-Offset B-Offset 8) Gamma : Changes the brightness characteristic for each color tone of an image. - The larger (+) the value, the greater the contrast of the bright and dark parts; the smaller (-) the value, the darker the dark parts. - Adjustable range: -3 to +3 Gamma 9) Save :You can save the status of a screen you adjusted according to your preferences using the Mode > User OSD. Save 10) Reset : Restores the mode settings to the factory defaults. Reset Size You can select a screen size according to the type of scene. When the input signal is PC Timing(D-Sub/HDMI), Zoom1/Zoom2 is not supported. 1) Normal 2) Zoom1 3) Zoom2 4) 16:9 Position Adjust the screen position if it is not aligned. Digital NR Black Level When a dotted line is displayed or the screen shakes, you can view a better visual quality picture by enabling Noise Reduction. When the input signal is PC Timing(D-Sub/HDMI)), Digital NR does not operate. You can select the signal black level according to the input signal. If it is unsuitable for the input signal, the dark parts may not be shown clearly or may be shown dimly. The Black Level can only be set for [AV],[S-Video], the 480i and 576i signals of AV Timing(D-Sub), and the RGB signal of the [HDMI] mode. - For [AV],[S-Video] and the 480i and 576i signals of AV Timing(D-Sub). 1) 0 IRE : Sets the black level to 0 IRE 2) 7.5 IRE : Sets the black level to 7.5 IRE - For the RGB signal of [HDMI] mode
28 1) Normal: Used in a normal environment. 2) Low: Used when the dark part is shown too bright. Overscan Using this function, you can cut the edge of the picture when unnecessary information, images appear on the edge of the picture. This is not supported in [AV] and [S-Video] modes. This is supported only when the input signal is AV Timing(D-Sub) or AV Timing (HDMI). If Overscan is turned off, unnecessary extra parts at the edges of an image may also be shown though you can view more of the area. In this case, turn Overscan on. Film Mode Using this function, you can set the display mode optimized for playing movies. 1) Off 2) On Film Mode can only be supported for the [AV], [S-Video], 480i, and 576i signals. PC Eliminates or reduces noise that causes unstable screen quality, such as screen shaking. If the noise is not removed using Fine Adjustment, adjust the frequency to the maximum and then perform Fine Adjustment again. It is only enabled for the PC Timing input of the D-Sub terminal. Refer to " PC Timing (D-Sub/HDMI) ". 1) Auto Adjustment : Used to adjust frequency and phase of PC screen automatically. 2) Coarse : Used to adjust frequency when vertical lines appear on PC screen. 3) Fine : Used to fine tune the PC screen. 4) Reset : Using this function, you can reset the PC menu settings to the factory default settings. Auto Adjustment Coarse Fine Reset Zoom Enlarges the PC screen to 2X, 4X, or 8X. This can only be adjusted when the input signal is PC Timing(D-Sub/HDMI). Basic Functions Input Picture Setup Option * Click the Play( )/Stop( ) button in the table below to view the video file. Screen Adjustment Install Description To tailor the picture to the installation location, you can invert the projected images vertically/horizontally. Play/Stop 1) Front-Floor : Normal Image 2) Front-Ceiling : Horizontal/Vertical Reversed Image 3) Rear-Floor : Horizontally Reversed Image
29 4) Rear-Ceiling : Vertically Reversed Image Lamp Mode Used to set the image brightness by adjusting the amount of light generated by the lamp. 1) Eco : This mode is optimized for small screens smaller than 100 inches. This mode decreases the lamp brightness and power consumption in order to extend the lamp lifetime and reduce noise and power consumption. 2) Normal : This mode is optimized for general use. This mode is the recommended mode for a stable lamp brightness that enables a low-noise, comfortable operating environment even under bright ambient illumination. 3) Bright : This mode maximizes the lamp brightness when the ambient illumination is bright. As the brightness of the lamp increases, the lamp lifetime can be reduced and the noise and power consumption may increase. Eco Normal Bright V-Keystone Background If video scences are distorted or tilted, you can compensate for this using the vertical Keystone function. You can set the Background that is displayed when there is no signal from the external device connected to the projector.if a signal is received, the Background you set disappears and a normal screen is displayed. 1) Logo 2) Blue 3) Black Test Pattern Generated by the projector itself. Utilized as standard to optimize the installation of the projector. 1) Crosshatch : You can check whether the picture is distorted or not. 2) Screen Size : You can refer to picture format sizes such as 1.33:1 or 1.78:1. Crosshatch Screen Size Video Type If the screen quality is abnormal since the projector does not identify the input signal type automatically in PC or HDMI mode, you can set the input signal type by force. In [PC] mode, this is only enabled if the input signal is AV Timing(D-Sub).However, for a separate H/V sync., this is only enabled for the 1280 x 720p Hz/60 Hz signals. In [HDMI] mode, this is only enabled for the 640x480p 59.94Hz/60 Hz, 1280x720p 59.94Hz/60 Hz signals from among the AV Timing(HDMI) signals. 1) Auto 2) RGB(PC) 3) RGB(AV) 4) YPbPr(AV) Usage Color, Sharpness,Tint PC menu and zoom RGB(PC) When connecting the RGB output of a PC to the D-Sub terminal Disable Enable When connecting the RGB output of RGB(AV) an AV device (STB, DVD, etc ) to the D-Sub terminal Enable Enable When connecting the YPbPr output of YPbPr(AV) an AV device (STB, DVD, etc ) to the D-Sub terminal Enable Disable PC When connecting a PC to the HDMI terminal Disable Enable AV When connecting an AV device (STB, DVD, etc ) to the HDMI terminal Enable Disable Auto Auto settings - - Reset Using this function, you can reset various settings to the factory default settings. 1) Factory Default : Changes the settings to the factory defaults. Factory Default
 Position You can move Menu Position up/down/left/right.")
30 2) Reset Filter Time : Resets the filter time. Reset Filter Time Basic Functions Input Picture Setup Option * Click the Play( )/Stop( ) button in the table below to view the video file. Screen Adjustment Language Description You can select the Language used for the menu screen. Play/Stop Menu Option 1) Position You can move Menu Position up/down/left/right. 2) Transparency You can set the translucency of menu. - - Medium - - Opaque 3) Display Time You can set the display time of the menu. - 5 sec / 10 sec / 30 sec / 60 sec / 90 sec / 120 sec / Stay On Position Transparency Display Time Sound Adjusts the right and left audio balance and equalizer of the 3W stereo speaker embedded in the projector. 1) Balance 4) 1kHz 2) 100Hz 5) 3kHz 3) 300Hz 6) 10kHz Filter Check Time Sets the check period for the filter. (Unit: hour) 1) Off
31 2) 100 3) 200 4) 400 5) 800 If the filter usage time is larger than the filter check period, the filter check message is displayed for a minute whenever the projector is turned on. Filter check message: "Check the filter, and if necessary, clean or replace it." Auto Power On If the power is supplied to the projector, it is turned on automatically without pressing the Power button. 1) Off 2) On Sleep Timer Information If there is no input signal for the specified time, the projector is turned off automatically. (But, for the specified time, there must be no button input from the remote control or the top of the projector) 1) Off 2) 10 min 3) 20 min 4) 30 min You can check external source signals, picture setup, PC picture adjustment and lamp use time.
32 Before Contacting Service Personnel Installation and Connection Symptoms Troubleshooting No Power. Check the power cable connections. I want to install my projector on the ceiling. External Source can not be selected. The ceiling installation support is sold separately. Contact your local product distributor. Be sure that the connection cable(s) (video) is properly connected to the proper port. If the device is not connected properly, it can not be selected. Menu and Remote Control Symptoms Troubleshooting Remote control does not work. Check whether your remote control is at a right angle and at the correct distance. Remove any obstacles between your remote control and the product. Direct lighting of 3-way light bulbs or other lighting device on the remote sensor of the projector may affect the sensitivity and cause the remote control to malfunction. Check if the remote control battery is empty. Check whether the LED indicator on the top of the projector is turned on. I cannot select a menu. Check if the menu is displayed in gray. A gray-colored menu is unavailable. Screen and External Source Symptoms Troubleshooting Cannot see picture images. Be sure that the power cord of the projector is connected. Be sure that the proper input source is selected. Check that the connectors are properly connected to the ports at the back of the projector. Check the Remote Control batteries. Be sure that the <Color>, <Brightness> settings are not at their lower limit. Poor color. Adjust the <Tint> and <Contrast>. Images are not clear. Adjust the focus. Check that the projection distance is either too far or too near to the screen. Strange noise. If a strange sound continues, contact our service center. The operating LED is lit up. Refer to Corrective Actions According to LED Indications. Lines appear on screen. Because noise may occur when using your PC, adjust the frequency of the screen. No external device screen is displayed. Check the operating status for the external device and check whether the adjustment items, such as the Brightness and the Contrast have been changed correctly in the <Mode> command screen of the Projector menu. Only blue screen appears. Be sure to properly connect the external devices. Check the connection cables again. Screen appears in black and white or odd color./ screen is too dark or bright. As mentioned above, check the adjustment items such as the Brightness, Contrast and Color in the menu. If you want to restore various settings to their factory defaults, run <Factory Default>from the menu.
33


34 Care and Maintenance Contact SAMSUNG WORLDWIDE Authority To clean the exterior and lens of the projector Clean the projector using a soft dry cloth. Do not clean the projector with flammable substances such as benzene, thinners or a wet cloth, as these may cause problems. Do not touch the projector with a nail or any other sharp objects, as this may scratch the surface. To clean the interior of the projector For cleaning the interior of the projector, ask your Service Center or a distributor. Contact your distributor or a Service Center if dust or other substances are inside the projector. Lamp Replacement Cautions on Lamp Replacement The projector lamp is an expendable item. For best operating performance, replace the lamp according to the usage time. You can view the lamp usage time in the Information Display (INFO button). Use the recommended lamp when replacing. Replace the lamp with the one specified below. - Lamp Model Name : 220W UHP E Lamp Manufacture : Philips - For inquiries on lamp purchase, please refer to 'Contact SAMSUNG WORLDWIDE'. Check that the power cord is unplugged before replacing the lamp. Since the lamp is a high temperature and high voltage product, wait at least one hour from the time that the power cord is disconnected before replacing it. The lamp is located on the left side of the projector (when looking from the front). Do not leave the old lamp near inflammables or in reach of children. There is a danger of burn or injury. Remove dirts or foreign materials around or inside the lamp unit using a proper vacuum device. When handling the lamp, avoid touching any part of it except for the handles. If you handle the lamp incorrectly, it may affect the screen quality and shorten its lifetime. Before you turn the projector over to change the lamp, cover the projector with a soft cloth on a flat surface. The projector has been designed so that the projector does not work if the lamp cover is not completely assembled after a lamp replacement. If the projector does not work properly, please check the operating status of the indicator LED.
.")

 Remove the screw shown in the Remove the two (2) screws shown in figure below and than open the the figure below. cover.")
 Remove the screw shown in the Remove the two (2) screws shown in figure below and than open the the figure below. cover.")


35 Contains Mercury, Dispose According to Local, State or Federal Laws Lamp Replacement Procedure Since the lamp is a high temperature and high voltage product, wait at least one hour from the time that the power cord is disconnected before replacing it. The lamp is located on the left side of the projector (when looking from the front). Since the lamp type varies depending on the model code of a purchased product, make sure to check the model code when buying a lamp. When replacing the lamp, check the model code of a purchased product first and refer to the appropriate replacement instructions. The model code can be found on the label that is attached to the bottom or rear of the package box or product. Type 1 (Model Code : SPL300WX/**) Remove the screw shown in the Remove the two (2) screws shown in figure below and than open the the figure below. cover. Hold and pull the lamp handle out of the projector, as shown in the figure below. Type 2 (Model Code : SPL300WVX/**) Remove the screw shown in the Remove the two (2) screws shown in figure below and than open the the figure below. cover. Hold and pull the lamp handle out of the projector, as shown in the figure below. Assembling a new lamp is in the reverse order of the disassembly. Replacing and Cleaning the Filter Precautions when replacing the projector filter The filter is located at the bottom of the projector. Turn off the power of the projector, and then disconnect the power cord after the heat of the projector is cooled sufficiently. Otherwise, its parts may be damaged due to internal heat. When replacing the filter, dust may occur. For inquiries on filter purchase, please refer to 'Contact SAMSUNG WORLDWIDE'. The sequence for replacing or cleaning the filter of the projector. Turn off the power of the projector, Place the product so that its bottom and then disconnect the power cord looks upward, and than push and after the heat of the projector has remove the filter cover in the cooled sufficiently. direction of the arrow. * When placing the product with the bottom upwards, make sure to place a soft cloth on the floor to prevent scratches. Replace or clean the filter.


 http://www.samsung.com/ca MEXICO 01-800-SAMSUNG(726-7864) http://www.")
 http://www.samsung.com/cl COLOMBIA 01-8000112112 http://www.")
36 When cleaning the filter, use a small vacuum cleaner for computers and small electronics products, or wash it under running water. When washing the filter under running water, make sure to dry it completely. The moisture may cause the filter to corrode. If dust cannot be separated from the filter or the filter is torn, it must be replaced. Make sure to select the Reset Filter Time option after replacing or cleaning the filter of the projector Ventilating openings The location of the ventilation openings The ventilation openings are located on the right and left sides and at the bottom of the projector. Care and Maintenance Contact SAMSUNG WORLDWIDE Authority If you have any questions or comments relating to Samsung products, please contact a SAMSUNG customer care center. North America U.S.A SAMSUNG( ) CANADA SAMSUNG( ) MEXICO SAMSUNG( ) Latin America ARGENTINE BRAZIL CHILE 800-SAMSUNG( ) COLOMBIA COSTA RICA ECUADOR
LCD Projector Owner s Instructions
 SP-M200 SP-M220 SP-M250 LCD Projector Owner s Instructions The color and the appearance of the product may differ from the illustrations in this manual. The specifications are subject to change without
Quick Reference Guide
 Multimedia Projector Quick Reference Guide MODEL 103-011100-01 Projection lens is optional. English Use this book as a reference guide when setting up the projector. For detailed information about installation,
SP-A600B DLP Projector Owner s Instructions
 SP-A600B DLP Projector Owner s Instructions The appearance and the color may differ depending on the model. Table Of Contents MAJOR SAFETY PRECAUTIONS Before You Start...........................................
Failure to follow the instructions marked with this symbol may cause personal injury or even fatality.
 To avoid injuries or damage to property, please read the following precautions carefully and use the product accordingly. The images here are for reference only, and are not applicable in all cases (or
The product color and shape may vary depending on the model.
 The product color and shape may vary depending on the model. To avoid injuries or damage to property, please read the following precautions carefully and use the product accordingly. Failure to follow
DCL9AW. User Manual. English
 DCL9AW User Manual English PRECAUTIONS Information for users applicable in European Union countries 1 Information for users applicable in United States of America 1 Installation 1 Power connection 1 Maintenance
Part names (continued) Remote control
 Remote control") Introduction Part names (continued) Remote control (1) STANDBY ( 25) (1) (2) ON ( 25) (3) (3) ID - 1 / 2 / 3 / 4 s ( 18) (4) (4) COMPUTER 1 ( 27) (7) (5) COMPUTER 2 * (8) (6) COMPUTER 3 * (10) (13) (7)
Introduction Part names (continued) Remote control (1) STANDBY ( 25) (1) (2) ON ( 25) (3) (3) ID - 1 / 2 / 3 / 4 s ( 18) (4) (4) COMPUTER 1 ( 27) (7) (5) COMPUTER 2 * (8) (6) COMPUTER 3 * (10) (13) (7)
Warning & Cautions. Warning. Cautions
 Contents 1. Warning & Cautions 2. Components 3. Monitor Buttons 4. Connecting Monitor Cables 5. On Screen Display Menu 6. Display Specifications 7. Monitor Specifications 8. Troubleshooting (When using
PL2410W LCD Monitor USER'S GUIDE.
 PL2410W LCD Monitor USER'S GUIDE www.planar.com Content Operation Instructions...1 Safety Precautions...2 First Setup...3 Front View of the Product...4 Rear View of the Product...5 Quick Installation...6
PLL1920M LED LCD Monitor
 PLL1920M LED LCD Monitor USER'S GUIDE www.planar.com Content Operation Instructions...1 Safety Precautions...2 First Setup...3 Front View of the Product...4 Rear View of the Product...5 Installation...6
PLL2210MW LED Monitor
 PLL2210MW LED Monitor USER'S GUIDE www.planar.com Content Operation Instructions...1 Safety Precautions...2 First Setup...3 Front View of the Product...4 Rear View of the Product...5 Quick Installation...6
PXL2760MW LED LCD Monitor
 PXL2760MW LED LCD Monitor USER'S GUIDE www.planar.com Content Operation Instructions...1 Safety Precautions...2 Package Overview...3 First Setup...4 Front View of the Product...5 Rear View of the Product...6
17 19 PROFESSIONAL LCD COLOUR MONITOR ART
 17 19 PROFESSIONAL LCD COLOUR MONITOR ART. 41657-41659 Via Don Arrigoni, 5 24020 Rovetta S. Lorenzo (Bergamo) http://www.comelit.eu e-mail:export.department@comelit.it WARNING: TO REDUCE THE RISK OF FIRE
USER MANUAL. 27 Full HD Widescreen LED Monitor L27ADS
 USER MANUAL 27 Full HD Widescreen LED Monitor L27ADS TABLE OF CONTENTS 1 Getting Started 2 Control Panel/ Back Panel 3 On Screen Display 4 Technical Specs 5 Care & Maintenance 6 Troubleshooting 7 Safety
Failure to follow the instructions marked with this symbol may cause personal injury or even fatality.
 To avoid injuries or damage to property, please read the following precautions carefully and use the product accordingly. The images here are for reference only, and are not applicable in all cases (or
security-led MONITOR SMT-1931 SMT-2731 User Guide
 security-led MONITOR SMT-1931 SMT-2731 User Guide USER'S MANUAL USER'S MANUAL USER'S MANUAL USER'S MANUAL (availabel for SMT-1931,SMT-2731) 10 10 10 10 3 14 18 9 21 25 USER'S MANUAL Unpacking Remove the
32" LED Television. Initial Assembly B. Main Unit. 1. Fix the Left Base Stand to the main unit using 2 pcs provided screws.
 2 3 4 8047922B 32" LED Television Initial Assembly 8047922 Main accessories: Installation Steps: 1. Fix the Left Base Stand to the main unit using 2 pcs provided screws. 2. Fix the Right Base Stand to
28 4K LED monitor. User Manual M284K
 28 4K LED monitor User Manual M284K CONTENTS Safety Information... 2 What s included..... 4 Getting Started....... 8 Troubleshooting.... 14 Specification.... 15 2 of 15 SAFETY INFORMATION Read these instructions
MP Zero-G 27" WQHD 144Hz TN-LED Monitor with AMD FreeSync
 MP Zero-G 27" WQHD 144Hz TN-LED Monitor with AMD FreeSync P/N 31004 User's Manual SAFETY WARNINGS AND GUIDELINES Please read this entire manual before using this device, paying extra attention to these
Introduction...2. Features...2 Safety Precautions...2. Installation...4
 PE1900 Contents Introduction...2 Features...2 Safety Precautions...2 Installation...4 Unpacking the Display...4 Locations and Functions of Controls...4 Connections...5 Using Your Display...7 Turning the
PLL2710W LED LCD Monitor
 PLL2710W LED LCD Monitor USER'S GUIDE www.planar.com Content Operation Instructions...1 Safety Precautions...2 Package Overview...3 First Setup...4 Front View of the Product...5 Rear View of the Product...6
MP 35" Zero-G 100Hz Curved Monitor with AMD FreeSync 2.0
 MP 35" Zero-G 100Hz Curved Monitor with AMD FreeSync 2.0 P/N 31005 User's Manual SAFETY WARNINGS AND GUIDELINES Please read this entire manual before using this device, paying extra attention to these
Table of Contents Table of Contents... 1 Usage Notice... 2 Introduction... 4 Installation User Controls Appendices...
 Table of Contents Table of Contents... 1 Usage Notice... 2 Precautions... 2 Introduction... 4 Product Features... 4 Package Overview... 5 Product Overview... 6 Main Unit... 6 Control Panel... 7 Connection
Precautions About the Product... 4 Package Overview Product Overview... 6 Start Your Installation... 8
 2 Table of Contents Usage Notice Precautions... 3 Introduction About the Product... 4 Package Overview... 5 Installation Product Overview... 6 Start Your Installation... 8 User Controls User Control Overview...
USER MANUAL. 27 Full HD Widescreen LED Monitor L270E
 USER MANUAL 27 Full HD Widescreen LED Monitor L270E TABLE OF CONTENTS 1 Getting Started 2 Control Panel/ Back Panel 3 On Screen Display 4 Technical Specs 5 Care & Maintenance 6 Troubleshooting 7 Safety
DH551C/DH550C/DL550C Double Sided Display User Manual
 DH551C/DH550C/DL550C Double Sided Display User Manual Disclaimer BenQ Corporation makes no representations or warranties, either expressed or implied, with respect to the contents of this document. BenQ
DISTRIBUTION AMPLIFIER
 MANUAL PART NUMBER: 400-0045-005 DA1907SX 1-IN, 2-OUT VGA/SVGA/XGA/UXGA DISTRIBUTION AMPLIFIER USER S GUIDE TABLE OF CONTENTS Page PRECAUTIONS / SAFETY WARNINGS... 2 GENERAL...2 GUIDELINES FOR RACK-MOUNTING...2
TFT LCD MONITOR USER MANUAL. L80AP and L101AP
 TFT LCD MONITOR USER MANUAL L80AP - 8.0 and L101AP - 10.1 Table Of Contents Table of contents/ Warning.... 2 Precautions...3 About this user manual and products / Items included in the delivery..... 4
DLP PROJECTOR FEATURES USER S GUIDE OUTLINE. 1. High Brightness. 2. High Resolution. 3. Compact Size, Feather Weight for Portability
 DLP PROJECTOR USER S GUIDE Thank you for purchasing the DLP TM Projector. Please read this user s guide to ensure correct use of the device. Save this user s guide for future reference. OUTLINE This DLP
22" Touchscreen LED Monitor USER'S GUIDE
 22" Touchscreen LED Monitor USER'S GUIDE Content Operation Instructions...1 Unpacking Instructions...2 Safety Precautions...2 Front View of the Product...3 Rear View of the Product...4 Quick Installation...5
USER MANUAL. 22" Class Slim HD Widescreen Monitor L215DS
 USER MANUAL 22" Class Slim HD Widescreen Monitor L215DS TABLE OF CONTENTS 1 Getting Started Package Includes Installation 2 Control Panel / Back Panel Control Panel Back Panel 3 On Screen Display 4 Technical
CM-S23349SV. Vari-Focal IR Bullet Camera
 Vari-Focal IR Bullet Camera User s Guide CM-S23349SV SAFETY PRECAUTIONS WARNING 1. Be sure to use only the standard adapter that is specified in the specification sheet. Using any other adapter could cause
USER MANUAL. 28" 4K Ultra HD Monitor L28TN4K
 USER MANUAL 28" 4K Ultra HD Monitor L28TN4K TABLE OF CONTENTS 1 Getting Started 2 Control Panel/ Back Panel 3 On Screen Display 4 Technical Specs 5 Care & Maintenance 6 Troubleshooting 7 Safety Info &
LCD Monitor User Manual
 SyncMaster BX1950/BX1950N/BX2050/BX2050N/BX2250/BX2250N/BX2350/BX2450/ BX2450L/BX2450N LCD Monitor User Manual The color and the appearance may differ depending on the product, and the specifications are
INSTRUCTIONAL MANUAL FOR LCD ZOOM MICROSCOPE
 INSTRUCTIONAL MANUAL FOR LCD ZOOM MICROSCOPE ? 8 LCD Screen? 10.4 LCD Screen LCD Zoom Microscope Instruction Manual Please read the Instruction Manual carefully before installation and keep it for future
C. 48" LED Television FLD C. 6 machine x12 Screws
 2 3 4 8012422C 48" LED Television FLD4800 8012422C 6 6 machine x12 Screws 5 6 7 8 1 18 2 3 4 5 19 20 21 6 7 8 9 10 22 23 24 25 11 12 13 14 15 16 26 27 28 29 30 31 32 33 17 9 I I II 10 11 12 13 14 15 4-digit
LCD VALUE SERIES (32 inches)
") LCD VALUE SERIES (32 inches) http://www.orionimages.com All contents of this document may change without prior notice, and actual product appearance may differ from that depicted herein 1. SAFETY INSTRUCTION
LCD VALUE SERIES (32 inches) http://www.orionimages.com All contents of this document may change without prior notice, and actual product appearance may differ from that depicted herein 1. SAFETY INSTRUCTION
Operating Instructions
 Operating Instructions LCDRV700 Digital LCD Color Monitor Please read this manual thoroughly before operating the unit, and keep it for future reference. V1.0 Contents 1. Precautions 2. Features 1 3 3.
Contents. Contents About this manual Operation During Projection Image Operations During Projection... 3
 Contents Contents... About this manual...... Operation During Projection... 3 Image Operations During Projection... 3 Adjusting Image Brightness... 3 Selecting the Color Mode... 4 Zooming an Image... 4
USER MANUAL Full HD Widescreen LED Monitor L215IPS
 USER MANUAL 21.5 Full HD Widescreen LED Monitor L215IPS TABLE OF CONTENTS 1 Getting Started 2 Control Panel/ Back Panel 3 On Screen Display 4 Technical Specs 5 Care & Maintenance 6 Troubleshooting 7 Safety
Precautions About the Product... 3 Package Overview... 4
 English 1 Table of Contents Usage Notice Precautions... 2 Introduction About the Product... 3 Package Overview... 4 Installation Product Overview... 5 Connecting the Projection Display... 8 Powering On/Off
Table of Contents. English. Usage Notice. Introduction. Installation. User Controls. Appendices. Precautions... 2
 Table of Contents Usage Notice Precautions... 2 Introduction Product Features... 4 Package Overview... 5 Product Overview... 6 Main Unit... 6 Control Panel... 7 Connection Ports... 8 IR Remote Control...
Outdoor IR Audio Camera
 Outdoor IR Audio Camera User s Guide CM-S22326BW-AD SAFETY PRECAUTIONS WARNING 1. Be sure to use only the standard adapter that is specified in the specification sheet. Using any other adapter could cause
USER MANUAL Full HD Widescreen LED Monitor L236VA
 USER MANUAL 23.6 Full HD Widescreen LED Monitor L236VA TABLE OF CONTENTS 1 Getting Started 2 Control Panel/ Back Panel 3 On Screen Display 4 Technical Specs 5 Care & Maintenance 6 Troubleshooting 7 Safety
CM-S38901SV TVL IR Long Range camera
 5 40 TVL IR Long Range camera User s Guide CM-S38901SV SAFETY PRECAUTIONS WARNING 1. Be sure to use only the standard adapter that is specified in the specification sheet. Using any other adapter could
USER MANUAL Full HD Widescreen LED Monitor L215ADS
 USER MANUAL 21.5 Full HD Widescreen LED Monitor L215ADS TABLE OF CONTENTS 1 Getting Started 2 Control Panel/ Back Panel 3 On Screen Display 4 Technical Specs 5 Care & Maintenance 6 Troubleshooting 7 Safety
Thank you for purchasing this projector.
 Projector CP-RX70 User's Manual (detailed) Operating Guide Thank you for purchasing this projector. WARNING Before using this product, please read all manuals for this product. Be sure to read Safety Guide
ACUBRITE 23 SS. Manual. Stainless Steel Chassis 23" LCD Display. Content
 ACUBRITE 23 SS Stainless Steel Chassis 23" LCD Display Manual Introduction... 2 Hardware Installation... 2 The Display Timing... 5 The Display Outline Dimensions... 6 The Display Controls... 7 The Screen
Digital Projector X66 Operator's Guide
 Digital Projector X66 Operator's Guide Thank you for purchasing this projector. WARNING WARNING CAUTION NOTE Trademark acknowledgment 1 Content About this manual.... 1 Content.... 2 Projector features....
For safe and correct use, be sure to read the Safety Information in Read This First before using the machine. Operating Instructions
 For safe and correct use, be sure to read the Safety Information in Read This First before using the machine. Operating Instructions Table of Contents 1 Disclaimer...2 1. Using the Remote control... 3
CP-255ID Multi-Format to DVI Scaler
 CP-255ID Multi-Format to DVI Scaler Operation Manual DISCLAIMERS The information in this manual has been carefully checked and is believed to be accurate. Cypress Technology assumes no responsibility
Owner's Instructions SP-H700/H710/H500
 wner's Instructions SP-H700/H70/H00 Table of Contents Preparation Table of Contents Preparation Features and Design...4 Caution on Lamp Use and Replacement... Projector and Accessories Front/Upper Side
IPS LED Monitor. (LED Monitor*) OWNER S MANUAL
 OWNER S MANUAL") OWNER S MANUAL IPS LED Monitor (LED Monitor*) * LG LED Monitor applies LCD screen with LED backlights. Please read this manual carefully before operating your set and retain it for future reference. 34UC89G
OWNER S MANUAL IPS LED Monitor (LED Monitor*) * LG LED Monitor applies LCD screen with LED backlights. Please read this manual carefully before operating your set and retain it for future reference. 34UC89G
PXL2470MW LED LCD Monitor
 PXL2470MW LED LCD Monitor USER'S GUIDE www.planar.com Content Operation Instructions...1 Unpacking Instructions...2 Safety Precautions...2 Package Overview...3 First Setup...4 Front View of the Product...5
TABLE OF CONTENTS Important Safety Instructions Package Content Setting Up the Display Trouble shooting Specifications Product Dimensions
 TABLE OF CONTENTS Important Safety Instructions...1 1.1 Safety precautions and maintenance....1 1.2 Use.......4 1.3 Installation Notes.......7 Package Content...9 2.1 Unpacking...9 2.2 Accessories......10
SAFETY WARNINGS AND GUIDELINES
 SAFETY WARNINGS AND GUIDELINES Please read this manual thoroughly, paying extra attention to these safety warnings and guidelines: Do not expose this monitor to water or moisture of any kind. Do not handle
INFORMATION TO THE USER
 U.S.FEDERAL COMMUNICATIONS COMMISSION RADIO FREQUENCY INTERFERENCE STATEMENT INFORMATION TO THE USER NOTE: This equipment has been tested and found to comply with the limits for a Class B digital device
CSLUX-300 Multi-Format to HDMI Scaler
 CSLUX-300 Multi-Format to HDMI Scaler Operation Manual DISCLAIMERS The information in this manual has been carefully checked and is believed to be accurate. Cypress Technology assumes no responsibility
SUPERSCALE Multi-Format to HDMI Scaler
 SUPERSCALE Multi-Format to HDMI Scaler Operation Manual DISCLAIMERS The information in this manual has been carefully checked and is believed to be accurate. SPATZ assumes no responsibility for any infringements
PRODUCT NO.: PT-L735 PRODUCT NAME: Ultra Portable LCD Projector
 PRODUCT NO.: PRODUCT NAME: MAJOR FEATURES Bright - High 2600 ANSI lumens brightness Time-saving - One-touch auto setup - Automatic input signal detector - Speed start - Direct power off - Momentary switch
May result in personal injury or property loss. Indicate the behaviors that must be prohibited
 User Manual VXM143U Please read this manual carefully for proper usage before lnstallatlon and use. It is recommended to keep this manual for future check. The pictures in this manual are only for reference.
LA1500R USER S GUIDE.
 LA1500R USER S GUIDE www.planar.com The information contained in this document is subject to change without notice. This document contains proprietary information that is protected by copyright. All rights
Mini Projector User s Guide
 Mini Projector User s Guide Please read this manual before Model P50 Table of Contents 1. Table of Contents---------------------------------1 2. Warnings-----------------------------------------2 3. Accessories---------------------------------------4
Table of Contents. English. Table of Contents... 1 Usage Notice Introduction Installation User Controls Appendices...
 Table of Contents Table of Contents... 1 Usage Notice... 2 Precautions... 2 Introduction... 4 Product Features... 4 Package Overview... 5 Product Overview... 6 Main Unit... 6 Control Panel... 7 Connection
Table of Contents Table of Contents... 1 Usage Notice... 2 Introduction... 4 Installation User Controls Appendices...
 Table of Contents Table of Contents... 1 Usage Notice... 2 Precautions... 2 Introduction... 4 Product Features... 4 Package Overview... 5 Product Overview... 6 Main Unit... 6 Control Panel... 7 Connection
DC162 Digital Visualizer. User Manual. English - 1
 DC162 Digital Visualizer User Manual English - 1 Table of Contents CHAPTER 1 PRECAUTIONS... 5 CHAPTER 2 PACKAGE CONTENT... 7 CHAPTER 3 PRODUCT OVERVIEW... 8 3.1 PRODUCT INTRODUCTION... 8 3.2 I/O CONNECTION...
USER MANUAL. 27" 2K QHD LED Monitor L27HAS2K
 USER MANUAL 27" 2K QHD LED Monitor L27HAS2K TABLE OF CONTENTS 1 Getting Started 2 Control Panel/ Back Panel 3 On Screen Display 4 Technical Specs 5 Troubleshooting 6 Safety Info & FCC warning 1 GETTING
Digital Multimedia Projector
 Digital Multimedia Projector About User s manual Thank you for purchasing the LCD projector. Please read this user s manual thoroughly to ensure correct usage of the projector and its features. After reading,
Digital Multimedia Projector
 Digital Multimedia Projector About User s manual Thank you for purchasing the LCD projector. Please read this user s manual thoroughly to ensure correct usage of the projector and its features. After reading,
USER MANUAL. VP-435 Component / UXGA HDMI Scaler MODEL: P/N: Rev 13
 KRAMER ELECTRONICS LTD. USER MANUAL MODEL: VP-435 Component / UXGA HDMI Scaler P/N: 2900-000262 Rev 13 Contents 1 Introduction 1 2 Getting Started 2 2.1 Achieving the Best Performance 2 2.2 Safety Instructions
10.4" LCD Monitor with Aluminum Front Bezel YPM1040PHB
 SPECIFICATION FOR APPROVAL M0DEL: 10.4" LCD Monitor with Aluminum Front Bezel YPM1040PHB BASE MODEL Customer's Confirmation Approved by: Reviewed by: Prepared by: Supplier's Confirmation Approved by: Reviewed
P-2 Installing the monitor (continued) Carry out as necessary
 Carry out as necessary") P-2 Installing the monitor (continued) Carry out as necessary Using the monitor without the bezel MDT552S satisfies the UL requirements as long as it is used with the bezel attached. When using the monitor
P-2 Installing the monitor (continued) Carry out as necessary Using the monitor without the bezel MDT552S satisfies the UL requirements as long as it is used with the bezel attached. When using the monitor
PLANAR 40" LCD MANUAL.
 PLANAR 40" LCD MANUAL www.planar.com Table of contents Precautions... 2 Before First Use Names and Functions... 3,4 Check Accessories... 3 Outer Dimension... 5,6 Installation... 7-10 LCD Monitor Instructions
900-Lumen Portable LED Projector Part #: User manual
 900-Lumen Portable LED Projector Part #: 21797 User manual 900-Lumen LED Projector Manual Page 2 of 14 900-Lumen LED Projector Manual Page 3 of 14! SAFETY WARNINGS AND CAUTIONS WARNING: To reduce the risk
USER S MANUAL MANUEL DE L UTILISATEUR MANUAL DEL USUARIO WE28UX8310
 USER S MANUAL MANUEL DE L UTILISATEUR MANUAL DEL USUARIO WE28UX8310 Contents BEFORE USING THE PRODUCT SAFETY INFORMATION PREPARATIONS CONNECTIONS INITIAL SETUP OSD MENU SETTINGS SPECIFICATIONS 3 4 5 6
General. zoom ring. focus ring. Size of liquid. Color. foot adjust levers. Projection. Computer In. Mouse/Com. Power
 Projector Specifications status lights control panel speakers zoom ring focus ring General Type of display Size of liquid crystal panels Poly-silicon Thin Film Transistor (TFT), active matrix Diagonal:
19 / 20.1 / 22 WIDE SCREEN TFT-LCD MONITOR
 19 / 20.1 / 22 WIDE SCREEN TFT-LCD MONITOR V193/ V220 Series V202 Series USER MANUAL www.viewera.com Rev. 2.0 Table of Contents EMC Compliance......1 Important Precautions...2 1. Package contents....3
Table of Contents Precautions... 2
 Table of Contents Precautions... 2 Special notes on LCD monitors... 2 Package contents... 3 Installation instructions... 3 Assembling the monitor... 3 Adjusting the viewing angle... 4 Connecting the devices...
Warning Statement. This equipment has been tested and found to comply with the limits for a Class A digital device, pursuant to
 Warning Statement All contents subject to change without prior notice WARNING This equipment has been tested and found to comply with the limits for a Class A digital device, pursuant to Part 15 of the
21.5 HD-SDI / 3G Broadcast Monitor 215LEDN
 21.5 HD-SDI / 3G Broadcast Monitor 215LEDN USER GUIDE(v1.0) Driving Visual Innovation Please read this manual carefully to ensure proper use, including connection and operation. Also, keep this manual
Safety Precautions and Maintenance
 Safety Precautions and Maintenance 1. Unplug the monitor before cleaning it with a slightly damp cloth. 2. Wiping the screen with a dry cloth is recommendable, and only during the power has been switched
User Manual TL-2X1-HDVC 2x1 HDMI & VGA Switcher with Control All Rights Reserved Version: TL-2X1-HDVC_160630
 User Manual TL-2X1-HDVC 2x1 HDMI & VGA Switcher with Control All Rights Reserved Version: TL-2X1-HDVC_160630 Preface Read this user manual carefully before using this product. Pictures shown in this manual
Table of Contents Table of Contents... 1 Usage Notice... 2 Introduction... 4 Installation User Controls Appendices...
 Table of Contents Table of Contents... 1 Usage Notice... 2 Precautions... 2 Introduction... 4 Product Features... 4 Package Overview... 5 Product Overview... 6 Main Unit... 6 Control Panel... 7 Connection
DP-1200X Digital Projector User Manual
 DP-1200X Digital Projector User Manual English 030531 FCC Notice This equipment has been tested and found to comply with the limits for a Class B digital device, pursuant to part 15 of the FCC Rules. These
AUTO - SCANNING WITH DIGITAL CONTROL LCD COLOR MONITOR FS-L1903C. User manual (Rev.01) SMITHS HEIMANN
 SMITHS HEIMANN") AUTO - SCANNING WITH DIGITAL CONTROL LCD COLOR MONITOR FS-L1903C User manual (Rev.01) SMITHS HEIMANN www.smithsdetection.com Table of Contents Safety Instructions... 5 Accessories... 8 Power Connections...
AUTO - SCANNING WITH DIGITAL CONTROL LCD COLOR MONITOR FS-L1903C User manual (Rev.01) SMITHS HEIMANN www.smithsdetection.com Table of Contents Safety Instructions... 5 Accessories... 8 Power Connections...
CONTENTS 8 ACCESSORIES 13 9 TROUBLE SHOOTING AND ADVICE SPECIFICATIONS BATTERY USAGE CAUTION 13
 CONTENTS 1 PREFACE 2 2 SAFETY PRECAUTIONS 2 3 FRONT & BACK VIEW, REAR CONNECTION OF LCD 3 4 TV INSTALLATION DRAWINGS 4 4.1 ANTENNA CONNECTION 4 4.2 AV1 INPUT CONNECTION 4 4.3 AV2 INPUT CONNECTION 4 4.4
Warning...1 Safety Precaution...3
 PL1910W Contents Preface...1 Warning...1 Safety Precaution......3 Installation...4 Introduction...4 Features...4 Unpacking...5 Attaching the Base...6 Removing the Base...7 Preparing The Monitor For Wall-Mounting...8
X6 X7. Reference Guide
 X6 X7 Reference Guide Table of Contents Table of Contents... 1 Usage Notice... 2 Precautions...2 Important Operating Considerations for Safety...4 Introduction... 5 Product Features...5 Package Overview...6
COLOR TFT LCD MONITOR WITH MULTI-TOUCH FUNCTION Manual
 COLOR TFT LCD MONITOR WITH MULTI-TOUCH FUNCTION Manual DEAR CUSTOMERS Thank you for choosing our TFT LCD (liquid crystal display) monitor. This product employs integrate circuits, low power consumption,
User s Guide L192WS. LCD Computer Monitor
 User s Guide L192WS LCD Computer Monitor Make sure to read the Important Precautions before using this product. Keep the User's Guide(CD) in an accessible place for furture reference. Have the model and
1... English. Table of Contents... 1 Usage Notice Introduction Installation User Controls Appendices Precautions...
 Table of Contents Table of Contents... 1 Usage Notice... 2 Precautions... 2 Introduction... 4 Product Features... 4 Package Overview... 5 Product Overview... 6 Main Unit... 6 Panel Control... 7 Connection
User Manual rev: Made in Taiwan
 CV-500S HDMI to Component/CVBS & Audio Scaler Converter User Manual rev: 131218 Made in Taiwan The CV-500S HDMI to Component/CVBS & Audio Scaler Converter has been tested for conformance to safety regulations
28 & 32 & 40 & 55 & 65 & 84-INCH TFT-LCD 4K MONITOR
 28 & 32 & 40 & 55 & 65 & 84-INCH TFT-LCD 4K MONITOR INSTRUCTION MANUAL Please read this manual thoroughly before use, and keep it handy for future reference. TABLE OF CONTENTS 1, General information...
600 Series Video Surveillance Monitors
 600 Series Video Surveillance Monitors 32 LED Monitor 43, 50, 55 & 55 4K LED Monitor Models: PMCL632: PMCL643 PMCL650 PMCL655 PMCL655K Contents for Wall Mount Monitor User Manual (10/16)... 1 Important
Printed in Japan ( ) A(C05)
 A(C05)") Printed in Japan 402029000 (9002201) 01.11-.7A(C05) Checking Accessories When unpacking the projector and accessories from their box, check that the following items are included. If any of the components
Printed in Japan 402029000 (9002201) 01.11-.7A(C05) Checking Accessories When unpacking the projector and accessories from their box, check that the following items are included. If any of the components
Thank you for purchasing this projector.
 S55/X45/X55 Multimedia Projector Operator's Guide Thank you for purchasing this projector. CAUTION Before using, read the "Product Safety Guide" and these manuals to ensure correct usage through understanding.
Thank you for purchasing this projector.
 Projector CP-X253 User's Manual (detailed) Operating Guide Thank you for purchasing this projector. WARNING Before using this product, please read all manuals for this product. Be sure to read Safety Guide
Usage Notice Precautions Follow all warnings, precautions and maintenance as recommended in this user s guide to maximize the life of your unit. Warni
 Table of Contents Table of Contents... 1 Usage Notice... 2 Precautions... 2 Introduction... 4 Product Features... 4 Package Overview... 5 Product Overview... 6 Main Unit... 6 Panel Control... 7 Connection
Do not use damaged electrical cord/ plug, or loose outlet. It can cause an electric shock or a fire.
 PDP-42 Manual Safety precautions Power Supply - Warning AC plug should not be touched with wet hands. It may cause an electrical shock. It can cause an electrical shock. Do not use damaged electrical cord/
Table of Contents... 1 Usage Notice Introduction Installation Connecting the Projector...10 Powering On/Off the Projector...
 Table of Contents Table of Contents... 1 Usage Notice... 2 Precautions...2 Introduction... 4 Product Features...4 Package Overview...5 Product Overview...6 Main Unit...6 Control Panel...7 Connection Ports...8