AudioFetch User Manual 1
|
|
|
- Norman Whitehead
- 5 years ago
- Views:
Transcription


1 AudioFetch User Manual 1 Thank you for your purchase of: By Broadcastvision Entertainment The dynamic AudioFetch system enables Android and Apple smartphones and tablets with the AudioFetch App to receive local audio from TVs etc. AudioFetch should operate in a plug-andplay manner when one audio source per channel is connected to AudioFetch and the Ethernet jack is on a suitable WiFi router. Additional instructions are included below. Please note that AudioFetch can be ordered/expanded in 4 channel increments. Your AudioFetch application is as follows: Proposal Number : AudioFetch Model : Specific Cables Requested : Note: If no specific cables or lengths are requested, a 25 Ethernet cable and 6 RCA to stereo jack cables for each channel will be enclosed. Additional cable lengths and types are available at Please call AudioFetch technical support at x3 if your application differs from the above

2 2 CONTENTS 1. The AudioFetch App Connecting AudioFetch to audio sources and WiFi AudioFetch Swag - TV Signage, Table Tents, Cardio Clings and Window Stickers The free AudioFetch Ad Portal Expanding AudioFetch for Additional Channels - Add a Card OPTIONAL: Accordio - Provides Wireless Inputs using existing or new FM/900 MHz transmitters to save cabling audio sources to AudioFetch Configuration Management The Doghouse Reference Information - Network Traffic and Guest Networks Regulatory Compliance Statements The AudioFetch App Download the latest AudioFetch app for free from the Google Play or Apple itunes store. Familiarize yourself with the drop down menu including the help menu section should it be needed during installation. 2. Connecting AudioFetch to audio sources and WiFi Connect each audio source to a channel input on AudioFetch. There are 3 input options per channel. CHOOSE ONLY ONE INPUT PER CHANNEL. Two popular analog connections are RCA


 cannot connect into the AudioFetch digital coax input.")


3 3 (one red and one white) and a 3.5mm stereo jack (headphone jack). Either one can be connected into the Analog input of AudioFetch which is a 3.5mm stereo jack. Digital connection options are optical and digital coax. Note that RCA and digital coax connections are not the same. A digital coax output (on TV, etc.) cannot connect into the AudioFetch analog input. An RCA analog output (from TV, etc.) cannot connect into the AudioFetch digital coax input. The configuration management pages can be logged into as described below to determine if a good audio signal is connected into the channel. When connecting via digital inputs, always choose the audio source type (in the TV s setup) as PCM since Dolby-encoded signals are not supported. Picture A: Cable Types Remove Protective Cover Picture B: Audio Input Types Optical Input Digital Coax Input Analog Input choose one RCA Plugs 3.5mm Stereo Plug Optical Plug Digital Coax 3. AudioFetch Swag - TV Signage, Table Tents, Cardio Clings and Window Stickers

4 4 Post the provided signage on the TVs. Cardio clings, table tents and door/window stickers are provided to enable patrons to easily obtain and use the AudioFetch app. 4. The free AudioFetch Ad Portal The AudioFetch app displays custom ads and notices which can be managed from the cloud. Log into the ad portal at using the username and password provided below to post your ad/info graphic that can direct users to website, an address, and/or phone number that you specify. Add multiple graphics that rotate through at the time duration you specify. Call x3 to confirm your log-in credentials if needed. Username : Password :

5 5 5. Expanding AudioFetch for Additional Channels - Add a Card Determine which model you currently have and order 1 or more expansion cards: 4 FETCH4 NE - 4 channel Non-Expandable 4 FETCH4-4 channel Expandable 8 FETCH8-8 channel Expandable 12 FETCH12-12 channel Expandable 16 FETCH16-16 channel Expandable ADD a 2nd, 3rd, or more AudioFetch boxes FETCH Channel Expandable


6 6 Then follow these instructions to add additional card(s): 1 2 Remove the AudioFetch Cover then slide out the base AudioFetch card from the side rails. 2 Connect the expansion channel card to the base card as seen here. 3 Place the base card into the side rails Use an X-Acto knife to cut through the protective covering of the expansion card holes then reattach the top cover. 6. OPTIONAL: Accordio - Provides Wireless Inputs using existing or new FM/900 MHz transmitters to save cabling audio sources to AudioFetch. Accordio - Available in 4 or 8 channel increments Fitness centers and sports bars often have existing FM or 900MHz audio transmitters from Broadcastvision, Cardiotheater, Cardiovision, Mye, SportsSelect, etc. The Accordio box can be configured in 4 or 8 channel increments to receive audio wirelessly from transmitters at TVs or cable/satellite boxes.

7 7 When ordering Accordio, specify the desired channel line-up by channel scheme and channel number (i.e.: Broadcastvision Series 2, channels 1-4 or Cardiotheater xtv channels 1-8) corresponding to channels A-D or A-H of each Accordio box. A stereo jack to stereo jack cable is included to cable the received audio to the AudioFetch channel inputs: 7. Configuration Management The Doghouse Configuration settings ( The Doghouse ) for each AudioFetch box are viewed using a web browser on a device (PC, tablet, mobile phone, however not compatible with MAC) which must be connected to the same network as AudioFetch. Most applications do not require access to the Doghouse since the default settings are adequate. When adjustments are required, please review information in this section. The Doghouse Utility App can be used to search for AudioFetch boxes on the network and provide easy one-click access to the Doghouse for each box. The Doghouse Utility App is available for Windows, Android, and ios (not available for MAC), further information and install links can be found here: On a Windows device: Install then run the Windows version Doghouse Utility to locate AudioFetch box(s) on the network. The Windows version Doghouse Utility looks like this:
 or Apple itunes")

: During detection (about 10-20 seconds) After")
8 8 On Android or Apple (ios) devices: Search and install AudioFetch Doghouse in the Google Play (Android OS devices) or Apple itunes (Apple devices with ios operating system) store, direct links to the store locations are provided on the web page referenced above. Here is an example screenshot of the Apple version Doghouse App (Android looks similar): During detection (about seconds) After AudioFetch box(s) detected


9 9 In AudioFetch systems employing more than one AudioFetch box, all of the boxes present should appear in the listing, like this: Each box has its own configuration settings, in other words each box has its own independent Doghouse. When installing a system with multiple boxes, each Doghouse must be accessed in order to configure each of the boxes correctly. More on this later Once the AudioFetch box(s) are displayed, click the Connect button (Windows) or tap in the information area for the box (Android/Apple) to open the Doghouse for the desired box in your default web browser. A login dialog will be displayed (this is the Windows version, Android/Apple will look different but request the same info): Default username is: ADMIN (all upper case) Default password is: admin (all lower case)
.")
10 10 After successful login you will see a welcome page similar to below: Use the links in the NAVIGATION section to access each of the configuration pages. On the NETWORK SETUP page check Use Automatic IP Address to have the AudioFetch box receive its IP address automatically (from the network s DHCP server). Or uncheck this setting and enter values for: Manual IP Address Subnet Mask Gateway The values must be correct for operation with the connected network, contact your IT network administrator for instructions if needed. Note that there is usually no need to enter manual information here when the network s DHCP server has been configured with a reservation IP address for the AudioFetch Box.

11 11 After any changes are made on the NETWORK SETUP page, the Save Settings button at bottom of page must be clicked, otherwise the new settings will be lost when navigating away from this page. When the Save Settings button is clicked, the settings are saved and the AudioFetch box will automatically restart. If DHCP assigns a new/different IP address after the restart, then use the Doghouse Utility again. Where more audio channels are required, multiple AudioFetch boxes can be connected to the same network (up to 32). The MULTI-BOX SETUP page is used to configure AudioFetch to work correctly in multi-box installations.

12 12 Most AudioFetch installations are single-box, in this case ensure that BOX A is selected from the drop-down list - as shown in the image above (this is the factory default setting). In multi-box installations, the AudioFetch App needs to know how to coordinate the order of channels it displays with channels from each of the AudioFetch boxes present. This is accomplished by designating the AudioFetch boxes present as: BOX A BOX B BOX C BOX D... (32 choices, up to BOX AF) The channels from BOX A will be displayed first by the AudioFetch App, channels from BOX B will be displayed next, etc.
13 13 For example, in a 2-box installation where a 16-channel box has been designated BOX A and a 4-channel box has been designated BOX B, the channels will be displayed by the App like this: BOX A BOX B Note that if channel names have been assigned (see info about that later in this document), the names will be displayed by the app instead of default channel numbers shown above, but the ordering will still be determined by the BOX A/B designation. Each AudioFetch box must be separately configured with a BOX A/B/C/D designation. Default from the factory is BOX A, so when installing a multi-box AudioFetch system, one must access the Doghouse for each and every box and set the desired designation, to ensure channels from each of the boxes are mapped to the desired display order (and numbering) on the AudioFetch App. IMPORTANT: Each box must have a different designation!
14 14 If two or more boxes have the same designation, then the system will not operate correctly. Accessing the Doghouse and configuring the BOX designations is mandatory in multi-box installations! Note: When multiple AudioFetch boxes are ordered to work together on the same network, they will be pre-configured for you and this procedure will not be necessary. To configure the boxes in a multi-box installation: 1. Decide how you want the channels from each box to be ordered by the App (which box s channels display first, second, third, etc.). 2. Use the Doghouse Utility to find/display all of the boxes on the network. 3. Access the Doghouse for the first box (You want the App to display this box s channels first), navigate to the MULTI-BOX SETUP page and use the drop-down selector to select BOX A, the new setting is saved automatically. 4. Access the Doghouse for the second box, navigate to the MULTI-BOX SETUP page and use the drop-down selector to select BOX B (new setting automatically saved). a. NOTE: Each box has its own Doghouse, you must access each box s Doghouse separately. 5. If a third box is present: access the Doghouse for the third box, navigate to the MULTI-BOX SETUP page and use the drop-down selector to select BOX C 6. If a fourth box is present: access the Doghouse for the fourth box, navigate to the MULTI-BOX SETUP page and use the drop-down selector to select BOX D 7. Continue this procedure for any additional boxes present. A maximum of 32 boxes are supported in a multi-box system. To assist in setup, the Doghouse MULTI-BOX SETUP page contains a link to detect/display info about other boxes present on the LAN. Click the link, and then a notification page will appear for about 5 seconds while the other boxes are being detected. Then the MULTI-BOX SETUP page will display again with the list of boxes filled out. See the example below which shows the detection results for a 3-box system.


15 15 When the drop-down selector is used to change the box designation, the list of other boxes is cleared. In this case just click the detection link again to re-display all the boxes. After detection, the box setting for each will be displayed as shown above (in the column labeled Setting ). When configuring a multi-box system, use the detect link to double-check that all boxes have different/unique designations. For example, this display of detected boxes indicates a problem because two boxes are set to the same designation: In this case, one of the conflicting boxes should be changed to BOX C.


, and display channels 17-32 for BOX B, like this: BOX A BOX B 1 2 3 4 17 18 19 20 21 22 23 24 25 26 27 28 29 30 31 32")
16 16 Note that other-box detection in the Multi-Box Setup page works only on networks which fully support SSDP discovery protocol. Some network configurations do not, in this case use the Doghouse Utility as an alternative to discover all the boxes on the network and display their box settings. More about multi-box channel numbering in the App: The App by default reserves 16 channels for each box when displaying channel numbers in a multi-box system this is because each box can potentially contain up to 16 channels. This has a special impact when boxes with fewer than 16 channels are used. In the previous example, a 2-box system had one 16-channel box designated as BOX A and one 4-channel box designated as BOX B. What if the designations were reversed? In this case, the App would display channels 1-4 for BOX A (the 4-channel box), and display channels for BOX B, like this: BOX A BOX B While there is nothing wrong with this default channel numbering in the App, it may be preferable to have continuous channel numbers. If so, the CHANNELS SETUP page, described next, can be used to adjust the channel numbers displayed by the App.
17 17 The CHANNELS SETUP shows the installed channels and allows alternate names/numbers to be assigned for each channel. The Enable checkboxes can be used to disable individual channels - the App will no longer display any which are un-checked. The default CHANNELS SETUP page for a 16-channel box looks like this: All installed channels are enabled and all the channel name fields are blank. The App will display its default channel numbers for this box, as described above. NOTE: Boxes with fewer channels installed will show the non-installed channels greyed out. The default channel numbers displayed by the App may be replaced by making entries in the Name fields. Although up to 10 characters may be entered in the Doghouse, the App will display only the first five characters of the channel name entry. The App will continue displaying the default channel number for any channels with empty names in the Doghouse.
: IMPORTANT: The Save Settings button must be clicked after any changes are made, otherwise the new settings will be lost at the next power cycle.")
18 18 So taking the example just above, where a 4-channel box has been defined as BOX A and a 16- channel box has been defined as BOX B, channel names could be re-defined for BOX B like this (BOX B s Doghouse): IMPORTANT: The Save Settings button must be clicked after any changes are made, otherwise the new settings will be lost at the next power cycle. With the redefined channel names shown above, our 2-box example system will now have the App displaying a continuous set of channel numbers: 1-4 for the 4-channel BOX A, and 5-20 for the 16-channel BOX B. Remember, the channel names can be numbers or characters such as: CBS, MSNBC, CH01, etc.
 for the channel selected from the drop-down list, and allows the gain to be adjusted.")
19 19 The AUDIO SETTINGS page is used to access three different sets of configurations: AUDIO GAIN PUBLIC ADDRESS ACE (Audio Control and Enhance) The AUDIO GAIN section displays current audio status (signal level, active input source) for the channel selected from the drop-down list, and allows the gain to be adjusted. Status begins updating only after AudioFetch has connected to the network, therefore when using this page please be sure the AudioFetch box is connected to a working network.
20 20 To set the Audio Gain: 1. Select the desired channel to adjust from the drop-down list 2. Ensure an audio source is connected to the corresponding input on the box. 3. Monitor the Peak Audio Status number, if an active audio source is connected then it will constantly change. a. NOTE: There will be no status indicated if the selected channel is not enabled in Doghouse Channels Setup page b. If the Audio Gain setting is very low (a large negative number) then this might be the problem try changing the Audio Gain setting to a number like 15 (positive fifteen) c. If it remains at 0% then check if enabled in the Channels Setup page, check the audio connections, else something is likely wrong in the cabling or audio source 4. Optimum Peak Audio Status is when the status hits 60% to 85% at its maximum 5. If Peak Audio Status is too low or too high, enter a new value for Audio Gain. Values entered can be numbers like 7 or 9.0 or 12.5 (the tenths digit can only be 0 or 5 ). Acceptable range is to Press the Enter key or click the Save button to set/save the new gain value. a. After saving, you should notice a corresponding change in the Peak Audio Status level immediately b. Keep adjusting the Audio Gain until Peak Audio Status is within optimum range 6. Repeat this procedure for all audio channels The example presented above shows an Audio Gain setting of 12.5 and resulting Peak Audio Status of 83.9% (this will change continuously). The PUBLIC ADDRESS section (please scroll further down on the AUDIO SETTINGS page) allows the audio from one input channel to interrupt/override all other channels automatically when a signal is detected on the designated PA Interrupt channel. This allows announcements from a facility s PA system to be heard by everyone listening to AudioFetch with earphones so that important announcements are not missed. To use the Public Address feature: 1. Connect a line-level microphone signal to one of the channel inputs this will be called the designated PA channel.
21 21 a. The AudioFetch inputs are not directly compatible with microphones, do not plug a microphone directly into a channel input. b. A line-level signal would normally be available as an output on an existing PA amplifier/system in a facility. c. Alternately, a microphone preamp can be used together with a microphone to provide a line-level signal contact AudioFetch support for recommendations. 2. Adjust the audio gain as previously described, for the designated PA channel 3. In the PUBLIC ADDRESS section, select the designated PA channel from the drop-down list the example presented below shows Channel 5 selected 4. Use a mobile device (preferably with earphones), listen to a different channel on the AudioFetch system, one that has an active audio source (TV, music, etc.), then speak into the microphone the microphone s signal should automatically replace the TV/music (then the TV/music will automatically return after the microphone becomes silent) 5. Adjust the Detection Speed, Detection Threshold, and Hold Time, until the automatic interrupt/override occurs as desired when someone speaks into the microphone. a. Experiment with different settings to become familiar with what they do 6. Click the Save Settings button to save the new settings In certain applications the AudioFetch system might be used as a permanent PA system, in this case enable the Force Override Always checkbox (and then click Save Settings button) this causes audio from the designated PA channel to be to always stream to all channels. Here is an example of Public Address configured with channel 5 as the designated PA channel:

22 22 More about the Public Address settings: The Detection Speed setting helps prevent accidental interrupts (random interruptions to the audio in all other channels) if the PA microphone picks up occasional noise, gets bumped, etc. A lower/slower setting means a longer period of sound from the microphone must be detected before an interrupt occurs this helps prevent accidental interrupts but it also means there is a longer delay before the interrupt occurs after a person starts speaking into the PA microphone. If a lower setting is required for your situation, then personnel making announcements should be trained to preface their announcement with a word or two to stimulate the slower detection (example: Announcement, announcemnent, the facility will be closing in 15 minutes. ). The Threshold setting should be set to approximately 33% of the maximum Peak Audio Status seen when speaking into the microphone. It can then be adjusted up or down as desired to affect detection sensitivity (adjust up to reduce detection sensitivity, down to increase sensitivity). The Detection Speed and Threshold adjustments work together to set the overall detection sensitivity, so it s best to play with different combinations to achieve the best detection performance. The Hold Time setting determines how long the microphone signal will continue interrupting (all other channels) after a person stops speaking. Adjust it higher to prevent the system from reverting back to normal audio on all channels when the announcer pauses between words.
23 23 To use the Public Address feature in a multi-box installation, the line-level microphone signal must be split and connected to a channel on each of AudioFetch boxes. Then the Doghouse in each box must be configured to enable the PA Interrupt feature as described above. It is recommended that the same settings for Detection Speed, Threshold, and Hold Time be used on all boxes. The ACE section (please scroll further down on the AUDIO SETTINGS page) provides optional adjustments which can improve audio quality in facilities where network/wifi conditions may not be optimum for AudioFetch. Increasing the ACE setting will increase the amount of audio buffering used by the AudioFetch App this can improve audio quality at the expense of slightly more latency (more delay between on-screen video and the audio heard by users). Usually the latency is not noticeable for ACE settings 1, 1.5, and 2. The latency may be just slightly noticeable for higher settings, but not so much in a fitness club or sports bar environment. Please review the displayed information and instructions, then contact AudioFetch Technical Support if further assistance is needed with the ACE settings.

24 24 The SYSTEM STATUS page shows basic information about the system and connected users (see example on next page). Not all information is refreshed automatically, click the Refresh button at the bottom of the page to update the display of latest status. Click the Reset Statistics button to reset the general statistics in the upper area.

25 Click anywhere in the Connected Users per channel area and a detailed list of currently connected users is displayed with various sorting options provided by the drop-down selector: 25

26 26 AudioFetch provides additional monitoring statistics online, click the link at the bottom of the SYSTEM STATUS page to access the online reporting service. Contact AudioFetch Support if you have lost or forgotten your online login credentials. The TOOLS AND UTILITIES page provides means to change the Doghouse username/password, an alternate QoS adjustment which can improve audio quality on some networks, settings related to how automatic firmware updates are delivered, and other utility functions. To change username/password, enter the current credentials into the first two boxes, then enter the new username/password into the last two boxes and click the Modify Name/Password button.
27 27
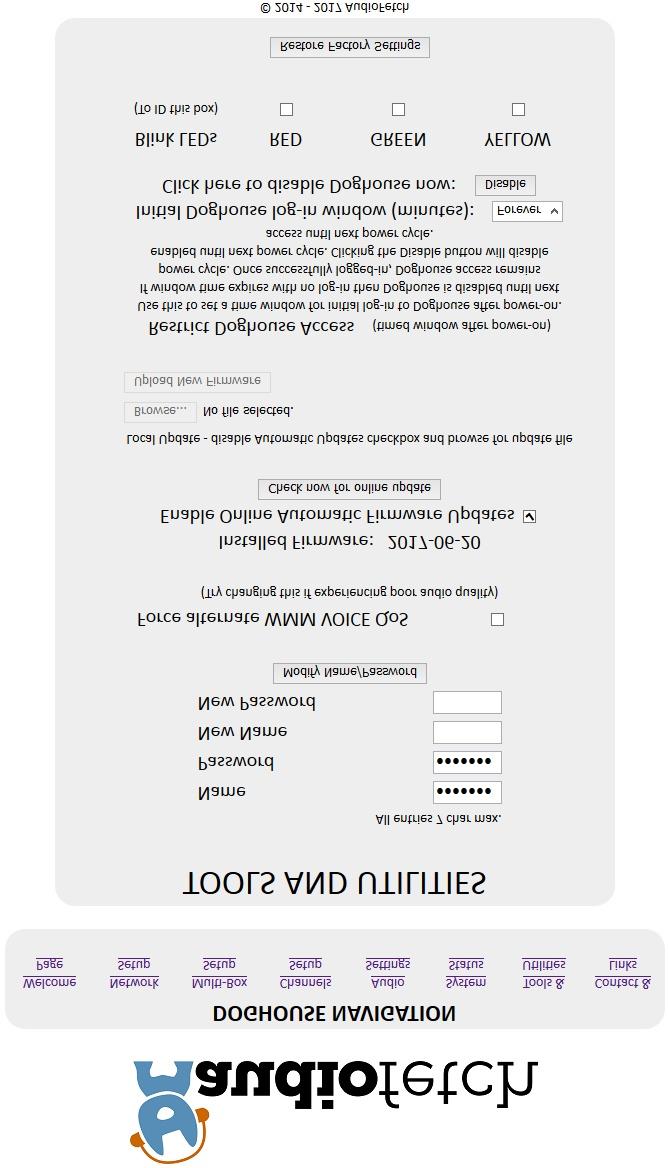
28 28 The Force alternate WMM VOICE QoS checkbox should be used when experiencing audio quality issues especially on busy networks. Experiment with this setting to determine if it can improve audio quality. Expected behavior is that audio will be better with this box unchecked on networks using Cisco equipment, and better with this box checked on networks using non-cisco equipment. But this is not certain and one should experiment to determine which setting produces the best audio quality. There is a checkbox to enable/disable Online Automatic Firmware Updates, which are provided from time to time by AudioFetch (the box must be connected to a network with Internet access). Default setting is enabled, AudioFetch recommends this be left enabled. AudioFetch system firmware updates are rare and generally occur late at night. The AudioFetch box checks for an available update once just after power-on and then once every 5 hours thereafter. If desired, the Check now for online update button may be clicked. A confirmation will pop up, click the OK button to proceed. There is no subsequent display about an update being available or starting, but if an update is available then it will begin automatically and the download progress is indicated by the yellow status LED on the AudioFetch box flashing (during download). After the download completes, AudioFetch will reset itself, execute the update (yellow LED will turn on again during update), then reboot. Completing all of this typically takes about seconds. New firmware may be manually uploaded to AudioFetch if needed (see buttons near the bottom of the page) but this would be an extremely rare occurrence and should be accomplished while receiving guidance from AudioFetch tech support on a case-by-case basis. Restrict Doghouse Access is a security feature to help prevent unauthorized access into the Doghouse by end users of the AudioFetch system. By default, the Doghouse may be accessed at any time so long as the correct username/password credentials are entered. By selecting a specific log-in window of time from the dropdown box, the Doghouse will only be accessible if the initial log-in occurs within the selected number of minutes after power-on. The choices are: 1 minute, 2 minutes, 5 minutes, 10 minutes, and Forever. If an initial log-in does not occur within the selected time window, then the Doghouse becomes and remains completely inaccessible until the next power cycle occurs. For example, if a 1 minute time window is selected, you must log-in to the Doghouse within 1 minute of power-on (it s actually 1 minute from the time the green status LED turns on solid). Once successfully logged-in, the Doghouse will remain accessible indefinitely, until either: the next power cycle, or the Disable button is
29 29 clicked. If access to the Doghouse is needed again, just power cycle the box and log-in again within the 1 minute window. The Blink LEDs section provides checkboxes for each of the three status LEDs on the AudioFetch box. When any of these checkboxes are enabled, the normal status display is temporarily replaced by the enabled LEDs blinking. This is simply a way to force the status LEDs on a particular box to blink which can be useful for identifying specific boxes in a multi-box installation. Be sure to uncheck all of these to return the LEDs to normal display of status. Clicking the Restore Factory Settings button clears most AudioFetch Doghouse settings, restoring to factory default values. The Audio Gain settings for each channel will not be changed. AudioFetch will automatically reboot after clicking this button. After performing a factory restore, Doghouse settings should be reviewed and adjusted as necessary (don t forget that the username/password will be reset back to default ADMIN/admin as well). The CONTACT & LINKS page contains contact information in case support is required, as well as a link to the online portal.
30 30 8. Reference Information - Network Traffic and Guest Networks AudioFetch typically works out of the box on simple networks such as when connected into a single small business wireless router using the main (not guest) WiFi. More complex networks may require configuration adjustments (firewall, etc.). Information in this section is provided to assist IT/Network personnel when such adjustments are necessary. Network traffic used by the AudioFetch System, unless otherwise noted packets are unicast between IP address of the Mobile Device (running AudioFetch App) and IP address of AudioFetch Box: Traffic direction: Mobile Device (AudioFetch app) à AudioFetch box: Protocol source port dest port UDP multicast ( ) p_1 * 1900 (this is primary SSDP discovery) TCP p_2 * 80 TCP p_3 * 6971 UDP broadcast ( ) (used for fallback discovery) DNS QUERY (usual for DNS) (usual) (used for fallback discovery) Traffic direction: AudioFetch box à Mobile Device (AudioFetch app): Protocol source port dest port UDP 1900 p_1 * TCP 80 p_2 * TCP 6971 p_3 * UDP This is the audio stream UDP multicast ( ) (used for fallback discovery) UDP (used for fallback discovery) * p_1 and p_2 indicate port numbers which have been chosen by the mobile device s operating system and typically are different each time the app runs

31 31 Fallback discovery traffic is required only if the network blocks standard SSDP discovery mechanism. If SSDP fails then AudioFetch will automatically fall back to alternate discovery mechanisms. In some cases, with a complex network and tight security restrictions on traffic, a DNS discovery method may be required. If so, please refer to the AudioFetch App Notes: Network Quick Start and Network Details for further information on network configuration requirements. Contact AudioFetch Technical Support if further assistance is needed. Guest Networks: Most wireless routers and access points provide a WiFi Guest Network or Guest Access feature typically a separate WiFi SSID which provides internet access but limits access to other local resources on the network (such as printers, network storage, etc.) which is useful when providing public WiFi access. An example is shown below taken from the user manual for a number of common Linksys wireless routers: E1200 E1500 E2500 E3200 E4200 The user manual makes it clear that communication is prevented between the guest and local networks. The guest network is only for access to the internet. Because the AudioFetch box connects into the local network (via wired Ethernet) there s no way the AudioFetch system can work for user mobile devices connected to the guest network. Mobile devices need to communicate with the AudioFetch box, and this is being prevented by the guest network restrictions in the wireless router.
32 32 The solution is not to use the guest network but instead use the wireless router s (or access point s) main WiFi network which will not restrict communication between mobile devices and the AudioFetch box. Some guest networks have been found to be plug-n-play with AudioFetch but this note of caution is made. In cases where it is not possible to use the main WiFi network for public access, then the wireless router or access point must be configured with exception rules to allow communication between mobile devices on the guest network and the AudioFetch Box. In some cases simple firewall rules may be sufficient, in other cases it may be necessary to place the guest network on a separate VLAN together with the AudioFetch Box, your IT personnel will need to make this determination based on configuration capabilities of your specific network equipment. An alternate approach is to simply employ a separate wireless router for guest/public WiFi access: Use its main WiFi, connect the AudioFetch Box into its wired switch ports, and then connect its WAN port into a port on the existing network for internet access. This configuration will limit public/guest access to the existing local network resources yet will not restrict the needed communication with the AudioFetch Box. 9. Regulatory Compliance Statements This device complies with Part 15 of the FCC Rules. Operation is subject to the following two conditions: (1) this device may not cause harmful interference, and (2) this device must accept any interference received, including interference that may cause undesired operation. This product meets the applicable Industry Canada technical specifications.
AudioFetch User Manual 1
 AudioFetch User Manual 1 Thank you for your purchase of: By Broadcastvision Entertainment The dynamic AudioFetch system enables Android and Apple smartphones and tablets with the AudioFetch App to receive
CCE900-IP-TR. User s Guide
 CCE900-IP-TR CCE900-IP-T & CCE900-IP-R User s Guide i-tech Company LLC TOLL FREE: (888) 483-2418 EMAIL: info@itechlcd.com WEB: www.itechlcd.com 1. Introduction The CCE900-IP-T & CCE900-IP-R is a solution
Installation Guide. Wireless Display Receiver
 Wireless Display Receiver Installation Guide Model# SBWD950A This Installation Guide will walk you through the easy steps to set up your ScreenBeam Pro Wireless Display Receiver - Enterprise Edition. During
EdgeConnect Module Quick Start Guide ITERIS INNOVATION FOR BETTER MOBILITY
 EdgeConnect Module Quick Start Guide ITERIS INNOVATION FOR BETTER MOBILITY 493456301 Rev B April 2009 Table of Contents Installation... 1 Setup... 2 Operation... 4 Live Video... 4 Video Settings... 5 Network
IP LIVE PRODUCTION UNIT NXL-IP55
 IP LIVE PRODUCTION UNIT NXL-IP55 OPERATION MANUAL 1st Edition (Revised 2) [English] Table of Contents Overview...3 Features... 3 Transmittable Signals... 3 Supported Networks... 3 System Configuration
Operating Guide. ViewClix offers a revolutionary experience for seniors and their families and friends.
 ViewClix Mini TM Operating Guide ViewClix offers a revolutionary experience for seniors and their families and friends. To make using ViewClix an easy and fun experience for you and your loved ones, we
User Guide. MonitorMix User Guide 1
 User Guide EN MonitorMix User Guide 1 Introduction Thank you for downloading MonitorMix app for ios or Android. With MonitorMix, you can control MIX/MATRIX/AUX mixes wirelessly for your CL, QL or TF series
Video Server SED-2100R/S. Quick Installation Guide
 Video Server SED-2100R/S Quick Installation Guide Feb.10,2006 1 1 Getting Started 1.1 PACKAGE CONTENTS SED-2100 Warranty Card Software CD Hook up & Screws Terminal Blocks for Power & DI/O Power Adaptor
E-MANUAL. Thank you for purchasing this Samsung product. To receive more complete service, please register your product at.
 E-MANUAL Thank you for purchasing this Samsung product. To receive more complete service, please register your product at www.samsung.com/register Model Serial No. Contents Connecting Antenna and External
Z-IP Stream 004/008. User Guide and Installation Manual. Four or Eight Input QAM Encoder / Modulator
 Z-IP Stream 004/008 User Guide and Installation Manual Four or Eight Input QAM Encoder / Modulator MPEG-2 / H.264 HD ENCODER with QAM /IP/ & ASI Outputs Contents Safety Precautions... 3 Package Contents...
Fibe TV Reference Guide
 1 Fibe TV Reference Guide 2 Table of contents Your Fibe account information 4 Customer support 5 Fibe TV basics 6 Your remote 8 Accessing How-to tutorial videos 9 Search 10 Capabilities of your Fibe HD
TF5 / TF3 / TF1 DIGITAL MIXING CONSOLE. TF StageMix User's Guide
 TF5 / TF3 / TF1 DIGITAL MIXING CONSOLE EN Note The software and this document are the exclusive copyrights of Yamaha Corporation. Copying or modifying the software or reproduction of this document, by
VIDEO GRABBER. DisplayPort. User Manual
 VIDEO GRABBER DisplayPort User Manual Version Date Description Author 1.0 2016.03.02 New document MM 1.1 2016.11.02 Revised to match 1.5 device firmware version MM 1.2 2019.11.28 Drawings changes MM 2
E-MANUAL. Thank you for purchasing this Samsung product. To receive more complete service, please register your product at.
 E-MANUAL Thank you for purchasing this Samsung product. To receive more complete service, please register your product at www.samsung.com/register Model Serial No. Contents Quick Guides Using Smart Hub
Hi! Let s get started.
 Hi! Let s get started. What s in the box Roku 2 player Roku 2 enhanced remote Headphones 2 x AA batteries for remote A/V cable (RCA) Power adapter Get to know your Roku 2 A Front view B E Back view C
CI-218 / CI-303 / CI430
 CI-218 / CI-303 / CI430 Network Camera User Manual English AREC Inc. All Rights Reserved 2017. l www.arec.com All information contained in this document is Proprietary Table of Contents 1. Overview 1.1
QUICK START GUIDE. QT Analog HD Camera & DVR Bundle ENGLISH
 QUICK START GUIDE QT Analog HD Camera & DVR Bundle ENGLISH Table of Contents Welcome What s Included...3 Understanding your DVR...4 Get Connected Registration...5 Connect Your Cameras...5 Connect DVR to
QUICK START GUIDE. IP Camera & NVR Bundle ENGLISH
 QUICK START GUIDE IP Camera & NVR Bundle ENGLISH Table of Contents Welcome What s Included...3 Understanding Your NVR...4 Get Connected Registration...5 Connect Your Cameras...5 Connect Your NVR...6 Powering
Positive Attendance. Overview What is Positive Attendance? Who may use Positive Attendance? How does the Positive Attendance option work?
 Positive Attendance Overview What is Positive Attendance? Who may use Positive Attendance? How does the Positive Attendance option work? Setup Security Codes Absence Types Absence Reasons Attendance Periods/Bell
H.264 HDMI Extender over IP Extender With LED, Remote, POE, RS232 Operating Instruction
 H.264 HDMI Extender over IP Extender With LED, Remote, POE, RS232 Operating Instruction 1 Introduction This HDMI over IP Extender use the advanced H.264 as the compression type, which makes it occupy lower
1. Get support Attention Safety Caution Applications View Cameras on Screen (ex. HD TV or PC monitor) 3. Change Time Zone 5
 3. Change Time Zone 5") 1. Get support 1 2. Attention 1 3. Safety Caution 1 4. Applications 1 5. View Cameras on Screen (ex. HD TV or PC monitor) 3 Change Time Zone 5 6. Installation Guide for ONWOTE Cameras 6 7. View Cameras
1. Get support 1 2. Attention 1 3. Safety Caution 1 4. Applications 1 5. View Cameras on Screen (ex. HD TV or PC monitor) 3 Change Time Zone 5 6. Installation Guide for ONWOTE Cameras 6 7. View Cameras
-TECH DIGITAL. Explore The High DefinitionWorld. Website: Hot Line: [US] USER MANUAL
![-TECH DIGITAL. Explore The High DefinitionWorld. Website: Hot Line: [US] USER MANUAL](/thumbs/80/80689593.jpg "-TECH DIGITAL. Explore The High DefinitionWorld. Website: Hot Line: [US] USER MANUAL") -TECH DIGITAL Explore The High DefinitionWorld Website: www.jtechdigital.com Hot Line: 1-888-610-2818[US] USER MANUAL J-Tech Digital ProAV H.264 Encoder/Decoder Many to Many HDMI Extender RoHS 1 Operating
-TECH DIGITAL Explore The High DefinitionWorld Website: www.jtechdigital.com Hot Line: 1-888-610-2818[US] USER MANUAL J-Tech Digital ProAV H.264 Encoder/Decoder Many to Many HDMI Extender RoHS 1 Operating
QUICK START GUIDE QT ANALOG HD CAMERA & DVR BUNDLE ENGLISH
 QUICK START GUIDE QT ANALOG HD CAMERA & DVR BUNDLE ENGLISH Table of Contents Welcome What s Included...3 Understanding your DVR...4 Get Connected Registration...5 Connect Your Cameras...5 Connect DVR to
Getting started with
 Getting started with Electricity consumption monitoring single phase for homes and some smaller light commercial premises OVERVIEW: The OWL Intuition-e electricity monitoring system comprises of three
Grande2Go FAQs. 1. What is Grande2Go?
 Grande2Go FAQs 1. What is Grande2Go? Grande2Go presents a unique opportunity to watch hundreds of shows anywhere you have Internet access on your laptop/pc, ios/apple and Android devices. Grande2Go, powered
IP LIVE PRODUCTION UNIT NXL-IP55 USO RESTRITO. OPERATION MANUAL 1st Edition (Revised 2) [English]
![IP LIVE PRODUCTION UNIT NXL-IP55 USO RESTRITO. OPERATION MANUAL 1st Edition (Revised 2) [English]](/thumbs/89/99059597.jpg "IP LIVE PRODUCTION UNIT NXL-IP55 USO RESTRITO. OPERATION MANUAL 1st Edition (Revised 2) [English]") IP LIVE PRODUCTIO UIT XL-IP55 USO RESTRITO OPERATIO MAUAL 1st Edition (Revised 2) [English] Table of Contents Overview... 3 Features... 3 Transmittable Signals... 3 Supported etworks... 3 System Configuration
IP LIVE PRODUCTIO UIT XL-IP55 USO RESTRITO OPERATIO MAUAL 1st Edition (Revised 2) [English] Table of Contents Overview... 3 Features... 3 Transmittable Signals... 3 Supported etworks... 3 System Configuration
2G Video Wall Guide Just Add Power HD over IP Page1 2G VIDEO WALL GUIDE. Revised
 2G Video Wall Guide Just Add Power HD over IP Page1 2G VIDEO WALL GUIDE Revised 2016-05-09 2G Video Wall Guide Just Add Power HD over IP Page2 Table of Contents Specifications... 4 Requirements for Setup...
MultiQ Digital signage template system for widescreen monitors
 Technical Note MultiQ Digital signage template system for widescreen monitors This document is intended as a guide for users of the MultiQ Digital Signage Template System for widescreen monitors in landscape
ViewCommander- NVR Version 3. User s Guide
 ViewCommander- NVR Version 3 User s Guide The information in this manual is subject to change without notice. Internet Video & Imaging, Inc. assumes no responsibility or liability for any errors, inaccuracies,
THD601DC Set-top box
 THD601DC Set-top box Contents 1. Safety... 1 2. Appearance... 2 3. Rear Panel Connection... 3 4. Remote... 4 5 First Time Set-Up... 7 6. Network Settings... 8 6.1 Available Networks and Checking Current
Casambi App User Guide
 Casambi App User Guide Version 1.5.4 2.1.2017 Casambi Technologies Oy Table of contents 1 of 28 Table of contents 1 Smart & Connected 2 Using the Casambi App 3 First time use 3 Taking luminaires into use:
Wireless Cloud Camera TV-IP751WC (v1.0r)
") TRENDnet s, model, takes the work out of viewing video over the internet. Previously to view video remotely, users needed to perform many complicated and time consuming steps: such as signing up for a
TRENDnet s, model, takes the work out of viewing video over the internet. Previously to view video remotely, users needed to perform many complicated and time consuming steps: such as signing up for a
Automate Pulse Set-Up Instructions
 Automate Pulse Set-Up Instructions ABOUT THE AUTOMATE SHADES SKILL The Automate Pulse app allows for control of your motorized window treatments through your smartphone/tablet THE APP ALLOWS FOR: Individual
Hi! Let s get started.
 Hi! Let s get started. What s in the box LT Roku LT player Roku standard remote 2 x AAA batteries for remote A/V cable (RCA) Power adapter Get to know your Roku LT A LT Front view B C F Back view D E
Video Extender DS128 DSRXL. Instruction Manual. 8-Port Cat5 VGA Digital Signage Broadcaster with RS232 and Audio
 DS128 DSRXL Instruction Manual Video Extender 8-Port Cat5 VGA Digital Signage Broadcaster with RS232 and Audio Cat5 VGA Digital Signage Receiver with RS232 and Audio FCC Compliance Statement This equipment
Operation and Installation Guide
 Operation and Installation Guide HDS2800 Series Encoder Modulator High Definition (HD) Digital COFDM MPEG2 and H.264 Modulator with IP Multicast. 19 Rack Mount Revision 4.0 Firmware version Released File
EtherneTV-STB Set Top Box
 EtherneTV-STB Set Top Box Set Top Box v3.7.3b Quick Start Guide September 14, 2006 4410-0134-0005 Copyright 2006 VBrick Systems, Inc. All rights reserved. 12 Beaumont Road Wallingford, Connecticut 06492,
Inside the Box. Touchscreen LCD 1 WAN 2 LAN. Reset Button. Power Connector. Stylus
 Inside the Box Touchscreen LCD 1 WAN 2 LAN Reset Button Power Connector Stylus 12V, 1A Power Adapter Ethernet Cable The setup process consists of a few simple steps: 1) Connect Almond to the Internet in
E-MANUAL. Thank you for purchasing this Samsung product. To receive more complete service, please register your product at.
 E-MANUAL Thank you for purchasing this Samsung product. To receive more complete service, please register your product at www.samsung.com/register Model Serial No. Contents Quick Guides Connecting the
Cablecast SX. Setup Guide. c Tightrope Media Systems For Cablecast version Build 206
 Cablecast SX Setup Guide c Tightrope Media Systems For Cablecast version 5.2.11 Build 206 Printed June 5, 2015 1 Cablecast SX Setup 1.1 Prerequisites 1.2 Overview of Setup Thank you for purchasing a Cablecast
VF-STB IP Appliance User Guide
 VF-STB IP Appliance User Guide Copyright 2007 Video Furnace, Inc. All Rights Reserved. Copyright 2002-2007 Video Furnace, Inc. All Rights Reserved This document refers to the current published version
GY-HM200SP USERS GUIDE
 SCORING OVERLAYS GY-HM200SP USERS GUIDE Network Connections, Overlays and Scorebot Live Data Feeds 1 TABLE OF CONTENTS Introduction 3 Step 1: Selecting an Overlay 4 Step 2: Establishing a Connection P2P
BoxIO User Manual Updated Applies to BoxIO Firmware Version 1.51 IP Remote Utility Version 1.0
 BoxIO User Manual Updated 09.25.2017 Applies to BoxIO Firmware Version 1.51 IP Remote Utility Version 1.0 Flanders Scientific, Inc. 6215 Shiloh Crossing Suite G Alpharetta, GA. 30005 Phone: +1.678.835.4934
Matrox PowerStream Plus
 Matrox PowerStream Plus User Guide 20246-301-0100 2016.12.01 Contents 1 About this user guide...5 1.1 Using this guide... 5 1.2 More information... 5 2 Matrox PowerStream Plus software...6 2.1 Before you
Wireless Studio. User s Guide Version 5.1x Before using this software, please read this manual thoroughly and retain it for future reference.
 4-743-161-12 (1) Wireless Studio User s Guide Version 5.1x Before using this software, please read this manual thoroughly and retain it for future reference. DWR-R01D/R02D/R02DN/R03D 2018 Sony Corporation
A: If you are a qualified integrator/dealer (or distributor), the first step is to visit the RTI Become a Dealer webpage for information.
, the first step is to visit the RTI Become a Dealer webpage for information.") RTI Miravue FAQ Q: Why is RTI Miravue the best IP video distribution solution? A: The RTI Miravue VIP-1 Transceiver: Offers both simultaneous transmit and receive in a single, small device Does not require
RTI Miravue FAQ Q: Why is RTI Miravue the best IP video distribution solution? A: The RTI Miravue VIP-1 Transceiver: Offers both simultaneous transmit and receive in a single, small device Does not require
Part 1 Basic Operation
 This product is a designed for video surveillance video encode and record, it include H.264 video Compression, large HDD storage, network, embedded Linux operate system and other advanced electronic technology,
E-MANUAL. Thank you for purchasing this Samsung product. To receive more complete service, please register your product at. Model Serial No.
 E-MANUAL Thank you for purchasing this Samsung product. To receive more complete service, please register your product at www.samsung.com Model Serial No. To directly go to the page that provides instructions
Operation Guide Version 2.0, December 2016
 Operation Guide Version 2.0, December 2016 Document Revision History Revision Date Description v1.0 January 8, 2016 Initial release of COLR Operation Manual, based on firmware version 1.0.1 CONTENTS Contents...
Multiroom Solution Guide HDR-3000T + H3
 Multiroom Solution Guide HDR-3000T + H3 Contents What s in the box?... 3 How multiroom solution works... 4 How to connect H3 and HDR-3000T... 5 How to pair H3 and HDR-3000T... 7 What you can do with multiroom
Quick Start. 24x8 Cable Modem Plus AC1900 Router MG7700
 Quick Start 24x8 Cable Modem Plus AC1900 Router MG7700 Packaged with your MG7700 modem/router Power Cube Coax Wrench Ethernet Cable Velcro Cable Organizer Para una Guía de Inicio Rápido en español, por
Viewing Set-Top Box Data
 Device View, page 1 Alerts, page 3 Device Properties, page 3 Quick Actions, page 3 View Log Entries, page 4 Monitor STB Connectivity, page 5 Device View Note While every possible effort has been made to
Operation and Installation Guide
 Operation and Installation Guide HDS2800 Series Encoder Modulator High Definition (HD) Digital COFDM MPEG2 and H.264 Modulator with IP Multicast. 19 Rack Mount Wall Mount Revision 0.1 Firmware version
USER GUIDE /4-16/9047
 USER GUIDE 171951/4-16/9047 May 2016 CONTENTS Equipment 4 Connected-Home DVR/Standard Set-Top Box Wireless Set-Top Box Wireless Access Point Remote Controls Residential Gateway Getting Started 12 Turn
X-Sign 2.0 User Manual
 X-Sign 2.0 User Manual Copyright Copyright 2018 by BenQ Corporation. All rights reserved. No part of this publication may be reproduced, transmitted, transcribed, stored in a retrieval system or translated
E-MANUAL. Thank you for purchasing this Samsung product. To receive more complete service, please register your product at.
 E-MANUAL Thank you for purchasing this Samsung product. To receive more complete service, please register your product at www.samsung.com/register Model Serial No. Contents Quick Guides Connecting the
E-MANUAL. Thank you for purchasing this Samsung product. To receive more complete service, please register your product at. Model Serial No.
 E-MANUAL Thank you for purchasing this Samsung product. To receive more complete service, please register your product at www.samsung.com Model Serial No. To directly go to the page that provides instructions
E-MANUAL. Thank you for purchasing this Samsung product. To receive more complete service, please register your product at.
 E-MANUAL Thank you for purchasing this Samsung product. To receive more complete service, please register your product at www.samsung.com/register Model Serial No. Contents Connecting Antenna and External
Single cable multiswich programmer PC102W
 Single cable multiswich programmer PC102W 1. Product description The PC102W - single cable multiswich programmer (in the text - programmer) is useful instrument while configuring and troubleshooting SAT
Usermanual. P2K-HL3E1 1080p HDMI Extender over IP P2K-HL3E1-P 1080p HDMI Extender over IP with PoE P2K-HRSL3E1 / P2K-LHRS1E3
 Usermanual P2K-HL3E1 1080p HDMI Extender over IP P2K-HL3E1-P 1080p HDMI Extender over IP with PoE P2K-HRSL3E1/ P2K-LHRS1E3 P2K-HRSL3E1 / P2K-LHRS1E3 P2K-HRSL3E1-P / P2K-LHRS1E3-P Partilink Technology Co.,
Whole House Lighting Controller
 User Guide Whole House Lighting Controller LC7001 radiant RF Lighting Control adorne Wi-Fi Ready Lighting Control Compliance FCC Notice FCC ID These devices comply with part 15 of the FCC Rules. Operation
E-MANUAL. Thank you for purchasing this Samsung product. To receive more complete service, please register your product at.
 E-MANUAL Thank you for purchasing this Samsung product. To receive more complete service, please register your product at www.samsung.com/register Model Serial No. Contents Quick Guides Using Smart Hub
Getting started with
 PART NO. CMA11 3 MADE IN CHINA 1. Measuring CAT II 2. Max. voltage 250V ~ 3. Max. current 71 Amp Getting started with Electricity consumption & Solar PV generation monitoring single phase, for homes fitted
E-MANUAL. Thank you for purchasing this Samsung product. To receive more complete service, please register your product at.
 E-MANUAL Thank you for purchasing this Samsung product. To receive more complete service, please register your product at www.samsung.com/register Model Serial No. Contents Connecting Antenna and External
Operation Guide Version 1.0, December 2015
 Operation Guide Version 1.0, December 2015 Document Revision History Revision Date Description v1.0 January 8, 2016 Initial release of COLR Operation Manual, based on firmware version 1.0.1 CONTENTS Contents...
Getting Started Guide for the V Series
 product pic here Getting Started Guide for the V Series Version 9.0.6 March 2010 Edition 3725-24476-003/A Trademark Information POLYCOM, the Polycom Triangles logo and the names and marks associated with
Matrox PowerStream Plus
 Matrox PowerStream Plus User Guide 20246-301-0200 2017.07.04 Contents 1 About this user guide... 5 1.1 Using this guide... 5 1.2 More information... 5 2 Matrox PowerStream Plus software... 6 2.1 Before
E-MANUAL. Thank you for purchasing this Samsung product. To receive more complete service, please register your product at.
 E-MANUAL Thank you for purchasing this Samsung product. To receive more complete service, please register your product at www.samsung.com/register Model Serial No. Contents Connecting Antenna and External
WiPry 5x User Manual. 2.4 & 5 GHz Wireless Troubleshooting Dual Band Spectrum Analyzer
 WiPry 5x User Manual 2.4 & 5 GHz Wireless Troubleshooting Dual Band Spectrum Analyzer 1 Table of Contents Section 1 Getting Started 1.10 Quickstart Guide 1.20 Compatibility Section 2 How WiPry Works 2.10
GUIDE TO GETTING STARTED
 GUIDE TO GETTING STARTED Experience Extraordinary DIGICELPLAYTT.COM This is your guide to using your new Digicel Play service, giving you the essentials as well as handy tips on all our great features.
IMPORTANT! This instruction guide explains how to install your CCTV system.
 IMPORTANT! This instruction guide explains how to install your CCTV system. Which accessories do you need before getting started? 1. Monitor or TV (recommended not less than 19" for clear viewing) 2. HDMI
Brandlive Production Playbook
 There are a number of important components to consider when planning a live broadcast. Deciding on a theme, selecting presenters, curating content, and assigning skilled moderators make up some of the
E-MANUAL. Thank you for purchasing this Samsung product. To receive more complete service, please register your product at.
 E-MANUAL Thank you for purchasing this Samsung product. To receive more complete service, please register your product at www.samsung.com/register Model Serial No. Contents Quick Guides Connecting the
User Manual K.M.E. Dante Module
 User Manual K.M.E. Dante Module Index 1. General Information regarding the K.M.E. Dante Module... 1 1.1 Stream Processing... 1 1.2 Recommended Setup Method... 1 1.3 Hints about Switches in a Dante network...
Version /1/2017. User Manual. Full HD 180-Degree Outdoor Wi-Fi Cam DCS-2670L
 Version 1.00 6/1/2017 User Manual Full HD 180-Degree Outdoor Wi-Fi Cam DCS-2670L D-Link reserves the right to revise this publication and to make changes in the content hereof without obligation to notify
Hi! Let s get started.
 Hi! Let s get started. What s in the Box Roku player Remote control 2 x AAA batteries for remote A/V cable RCA to 3.5mm Power adapter Get to know your roku A B Front view C D G Back view E F A B C D E
SOFTWARE INSTRUCTIONS REAL-TIME STEERING ARRAY MICROPHONES AM-1B AM-1W
 SOFTWARE INSTRUCTIONS REAL-TIME STEERING ARRAY MICROPHONES AM-1B AM-1W Thank you for purchasing TOA s Real-Time Steering Array Microphone. Please carefully follow the instructions in this manual to ensure
Contents. Quick Guides. Connections. Remote Control and Peripherals. Connecting a Mobile Device. Using Smart Hub
 SMART TV E-Manual Contents Quick Guides Using Smart Hub 1 Connecting to the Internet 1 Setting up Smart Hub 1 Using Smart Hub Using the Samsung Smart Remote 2 Operating the TV with the POINTER button 3
E-MANUAL. Thank you for purchasing this Samsung product. To receive more complete service, please register your product at.
 E-MANUAL Thank you for purchasing this Samsung product. To receive more complete service, please register your product at www.samsung.com/register Model Serial No. Contents Quick Guides Connecting the
Model#: IN-MDRI3MF. Hardware User Manual. 3MP Indoor Mini Dome with Basic WDR, Fixed lens. (PoE) Ver. 2013/02/04
 Ver. 2013/02/04") Model#: IN-MDRI3MF 3MP Indoor Mini Dome with Basic WDR, Fixed lens Hardware User Manual (PoE) Ver. 2013/02/04 Table of Contents 0. Precautions 3 1. Introduction 4 Package Contents... 4 Features and Benefits...
Model#: IN-MDRI3MF 3MP Indoor Mini Dome with Basic WDR, Fixed lens Hardware User Manual (PoE) Ver. 2013/02/04 Table of Contents 0. Precautions 3 1. Introduction 4 Package Contents... 4 Features and Benefits...
First Time Setup Guide
 First Time Setup Guide www.exhibio.com 1.877.EXHIBIO (394.4246) Exhibio ST-200 Components & Accessories Standing Mount TV Tuner with Input Cable (USB 2.0 only) VESA Mount Over-the-Air Antenna Power Adapter
INFORMATION TO USER CAUTION RISK OF ELECTRIC SHOCK, DO NOT OPEN
 INFORMATION TO USER CAUTION RISK OF ELECTRIC SHOCK, DO NOT OPEN! CAUTION: TO REDUCE THE RISK OF ELECTRIC SHOCK, DO NOT REMOVE COVER (OR BACK). NO USER SERVICEABLE PARTS INSIDE. REFER SERVICING TO QUALIFIED
E-MANUAL. Thank you for purchasing this Samsung product. To receive more complete service, please register your product at.
 E-MANUAL Thank you for purchasing this Samsung product. To receive more complete service, please register your product at www.samsung.com/register Model Serial No. Contents e-manual Guide Viewing the e-manual
Tyler SIS Student 360 Mobile
 Tyler SIS Student 360 Mobile Overview Tyler SIS Student 360 Mobile is a mobile phone app version of the Tyler SIS Student 360 Parent Portal available on both ios and Android. It can be downloaded from
E-MANUAL. Thank you for purchasing this Samsung product. To receive more complete service, please register your product at.
 E-MANUAL Thank you for purchasing this Samsung product. To receive more complete service, please register your product at www.samsung.com/register Model Serial No. Contents Quick Guides Connecting the
DETEXI Basic Configuration
 DETEXI Network Video Management System 5.5 EXPAND YOUR CONCEPTS OF SECURITY DETEXI Basic Configuration SETUP A FUNCTIONING DETEXI NVR / CLIENT It is important to know how to properly setup the DETEXI software
Remote Control. degraded, causing unreliable operation. The recommended effective distance for remote operation is about 16 feet (5 meters).
.") Media Streaming Sound Bar RTS736W User Manual Remote Control using the remote control Point the remote control at the REMOTE SENSOR located on the unit (see Front Panel illustration for precise location).
Media Streaming Sound Bar RTS736W User Manual Remote Control using the remote control Point the remote control at the REMOTE SENSOR located on the unit (see Front Panel illustration for precise location).
E-MANUAL. Thank you for purchasing this Samsung product. To receive more complete service, please register your product at.
 E-MANUAL Thank you for purchasing this Samsung product. To receive more complete service, please register your product at www.samsung.com/register Model Serial No. Contents Quick Guide Using Smart Hub
Model#: IN-DI2MIRF 2MP Indoor Dome with True Day/Night, IR, Basic WDR, Fixed lens
 Model#: IN-DI2MIRF 2MP Indoor Dome with True Day/Night, IR, Basic WDR, Fixed lens Hardware User Manual (PoE) Ver.2013/01/17 Table of Contents 0. Precautions 3 1. Introduction 4 Package Contents...4 Features
E-MANUAL. Thank you for purchasing this Samsung product. To receive more complete service, please register your product at.
 E-MANUAL Thank you for purchasing this Samsung product. To receive more complete service, please register your product at www.samsung.com/register Model Serial No. Contents Quick Guides Using Smart Hub
Digital Video Recorder
 Digital Video Recorder Quick Operation Guide UD.6L0202B0067A02 Thank you for purchasing our product. If there is any question or request, please do not hesitate to contact dealer. This manual is applicable
Tuning into a Radio Station
 AM/FM Radio Receiving Function Tuning into a Radio Station Tuning into stations automatically 1. Press TUNER on the main unit several times to select either "AM" or "FM". 2. Press TUNING MODE so that the
The New Contour INTRODUCING
 INTRODUCING The New Contour Welcome to the simplest, fastest and most fun way to search and access all your entertainment on all your devices. Search visually with show title art that is organized by category,
Harmony Ultimate. User Guide
 Harmony Ultimate User Guide Harmony Ultimate User Guide Table of Contents About this Manual... 6 Terms used in this manual... 6 At a Glance... 6 Features... 6 Know your Harmony Ultimate... 6 Features of
Avigilon View Software Release Notes
 Version 4.6.5 System Version 4.6.5 includes the following components: Avigilon VIEW Version 4.6.5 R-Series Version 4.6.5 Rialto Version 4.6.5 ICVR-HD Version 3.7.3 ICVR-SD Version 2.6.3 System Requirements
Cablecast Server. Setup Guide. c Tightrope Media Systems For Cablecast version Build 74
 Cablecast Server Setup Guide c Tightrope Media Systems For Cablecast version 6.1.2 Build 74 Printed July 22, 2016 1 Cablecast Server Setup 1.1 Prerequisites 1.2 Overview of Setup Thank you for purchasing
Simple Media Platform Quick Installation Guide V1.0-N. Simple Media Platform. Quick Installation Guide
 Simple Media Platform Quick Installation Guide 1. Installation Instruction 1.1 Mounting unit to a 19 rack When selecting the installation site, try to comply with the following: Protective Ground - The
IMPORTANT! This instruction guides you how to install surveillance system.
 DIY Do-It-Yourself Quick Start Guide Network DVR with H.264 Compression IMPORTANT! This instruction guides you how to install surveillance system. What accessories you need before getting started 1.One
E-MANUAL. Thank you for purchasing this Samsung product. To receive more complete service, please register your product at.
 E-MANUAL Thank you for purchasing this Samsung product. To receive more complete service, please register your product at www.samsung.com/register Model Serial No. Contents Connecting Antenna and External