Gazer VI700A-SYNC/IN and VI700W- SYNC/IN INSTALLATION MANUAL
|
|
|
- Kathleen Boone
- 5 years ago
- Views:
Transcription

1 Gazer VI700A-SYNC/IN and VI700W- SYNC/IN INSTALLATION MANUAL
2 Contents List of compatible cars... 3 Package contents... 4 Special information... 6 Car interior disassembly and connection guide for Ford Focus... 9 Troubleshooting
3 We congratulate you on purchasing VI700X-SYNC/IN multimedia interface Please, read this manual carefully before using the product. Precautions 1. To install and connect the product without voiding your vehicle warranty, please contact an authorized service station. 2. The car battery must remain disconnected during the entire installation procedure. 3. To install the product, use only original components that come in the package. 4. Do not attempt to repair the product by yourself. In case of malfunctions, please contact the authorized Gazer maintenance center. 5. Avoid hitting and damaging the product mechanically. 6. The manufacturer reserves the right to change product specifications and/or configuration without prior notice. 7. The product exterior design as well as the number and design of components may differ from those specified in the manual. 2

4 List of compatible cars Gazer VI700A-SYNC/IN and VI700W-SYNC/IN is compatible with standard Ford Sync 2 devices with a 8 touchscreen display. 3


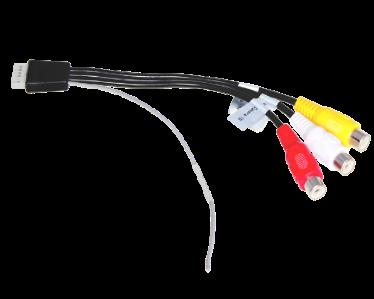
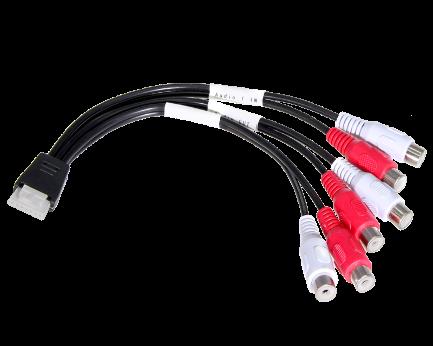


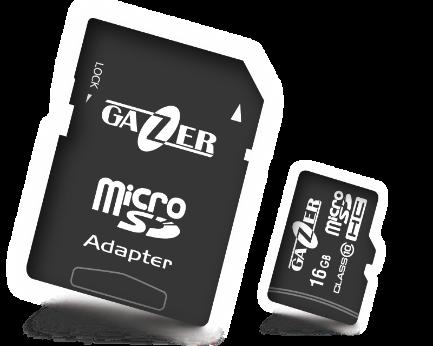

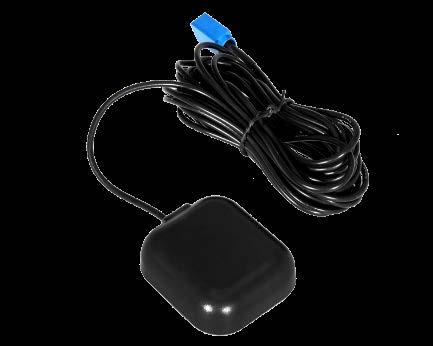


5 Package contents Central unit Power and CAN bus connection cables Video and touchscreen signal pickup board Video-in cable Audio-in/out cable Remote mode switching button CAN bus signal processing unit 16 Gb Gazer micro SDHC memory card* GPS antenna* Microphone* 4


6 Remote cable with a USB port* Touch panel connection cable* Navigation module power cable* Power cable Remote speaker* Video signal connection cable Set of flat connection cables Navigation module* Warranty card User manual *For Gazer VI700A-XXX and Gazer VI700W-XXX models 5

7 Special information Video interface connection The video interface is connected via Bord-insertion (connection to the flat video signal cable of the stock multimedia system display) without the need to modify original cables and ports. After the video interface is connected, the navigation system is controlled using the original touchscreen of the stock multimedia system. It can also be controlled using a USB mouse or a keyboard. Switching between modes To enable the video interface display mode and switch between its operating modes, you can do the following: Press the remote button (comes in the package); Press the original Voice button on the steering wheel. Configuring DIP switches on the video interface body Switch No. ON (down position) OFF (up position) 1. RGB input On Off 2. AV1 input On Off 3. AV2 input On Off 4. RGB input display resolution 5. Camera selection 800X480 If the vehicle has a rear view camera connected to the video interface Toggle down once for IR 480X240 If the vehicle has a factory-installed rear view camera 6. Programming or calibration mode programming Normal use 7. Not usable - Always up 8. Not usable - Always up Display configuration buttons on the video interface body There are Menu, +, and buttons on the video interface lower panel that one can use to configure how the image from the video interface will be displayed. To access the image settings menu, press and hold Menu" button, which will bring up the settings window. Use "Menu" button to switch between menu items and "+", and " " buttons to change settings. 6

8 Contrast: image contrast adjustment; Brightness: image brightness adjustment; Saturation: image saturation adjustment; Position-H: horizontal image adjustment; Position-V: vertical image adjustment; IR-AV1/AV2: IR control settings menu for devices connected to AV1/AV2. When "None" value is set, control buttons will not pop up when you tap the touch panel; Guide-L: parking guide line position adjustment; Ui-CNTRL: switching PDC and IPAS functions on and off; Guide-CNTRL: switching parking guide lines on and off; H-SIZE: horizontal image size adjustment; V-SIZE: vertical image size adjustment. Note. Depending on the car model, the type and the number of settings may vary. Touch panel calibration One needs to calibrate the touch panel to ensure its correct operation. Calibration menu pops up automatically when you switch on the video interface for the first time. To calibrate the touch panel, tap the icons appearing on the screen as accurately as possible. Once the calibration procedure is complete, press Android logo (for VI700A-SYNC/IN model) or OK button (for Gazer VI700W-SYNC/IN model). Caution! If the SD card slot is empty or DIP switch No. 6 is set to "On", the touch panel calibration procedure will have to be repeated on every startup 7

9 Audio connection There are several ways to arrange audio playback from the video interface: Connection via Bluetooth in audio transmission mode (only for VI700A-SYNC/IN). To do this, connect the stock multimedia system to the video interface via Bluetooth. Then select Only audio in the video interface Bluetooth settings. This is required for correct operation of Hands-Free function when a mobile phone is connected to the stock stereo system. In this case, when the engine is running and all equipment is fully operational, two devices (the phone and the video interface) will be simultaneously connected to the stock stereo system. The phone will operate in Hands-Free mode, while the video interface will playback all navigation system voice prompts as well as audio tracks. 8

 to dismantle the plastic, carefully unlatch the panel along with the air")

10 Car interior disassembly and connection guide for Ford Focus Turn the ignition and all electrical devices off; Put the start key outside the car to avoid unintentional turning on of the ignition; Use the wedge tool (Fig. 1) to dismantle the plastic, carefully unlatch the panel along with the air vent deflectors as shown in Fig. 2; Then switch off power and the CAN bus; Fig. 1 Fig. 2 Release the multimedia system control unit by unscrewing 2 screws as shown in Fig. 3; 9
11 Fig. 3 Detach the multimedia system control unit from the shaft after switching off power and the CAN bus; Unscrew 4 fastening screws as shown in Fig. 4; Detach the multimedia system display after switching off power and the CAN bus; Fig. 4 To install the interface, the multimedia system display needs to be partially disassembled: Unscrew 4 screws fastening the rear cover as shown in Fig. 5; 10
 Connect the video signal cable from the video interface; 2) Connect the flat cable of")

12 Fig. 5 Install the video pickup board by fastening it with standard screws as shown with arrows in Fig. 6; Fig. 6 Connect regular and flat cables: 1) Connect the video signal cable from the video interface; 2) Connect the flat cable of the display matrix; 3) Connect the pickup board to the display board; 4) Connect the flat cable of the touch panel to the pickup board, then use the set of flat cables from the package to connect the touch panel signal output from the pickup board with the 11
13 display board input (this step is only applicable for the installation of the VI700A/W- SYNC/IN video interface); 5) Connect the cable between the touch panel and the Android/Windows box; Assemble the display in inverse order. Connect the video signal cable from the video pickup board to the video interface; Use the adapter from the video interface package to connect power and the CAN bus. 12
14 No image/ black screen (manufacturer image). Troubleshooting Malfunction Cause Possible solution Not all plugs have been connected to the stock head Connect the remaining unit or monitor after installation. plugs. No power supplied to CAN unit (not all CAN-unit LEDs light up). No image/ black screen / white image (inserted image) or manufacturer image is displayed incorrectly. Incorrect image size or positioning. Inserted image is doubled or 4 pictures are displayed on the monitor. Inserted image is distorted, flickering or displayed in black and white. Poor quality of inserted image CAN unit is connected to CAN bus in a wrong place. No power supplied to the video interface (not all video interface LEDs light up). No image from the video source. No video source connected to the selected video interface input. LVDS is connected in a wrong place. Incorrect video interface monitor settings. Video source output is in AUTO or MULTI mode, which causes incorrect detection of the car s interfaces. If the error occurs only after the video source is turned on, Some interfaces can process NTSC input only. Image settings have not been properly adjusted. Check CAN unit power supply. Check CAN bus and CAN unit connectivity. Consult the manual for correct CAN bus connection. Check whether CAN unit is connected properly. The output voltage on the red wire connected directly to the video interface must be + 12V ACC Use a different monitor to check if everything is OK with the video source. Check the settings of DIP switches 2 and 3; see which inputs are enabled and switch to those inputs. Double check how LVDS cables are connected; consult the manual if needed. If it does not work when connected to the head unit (CD), connect it to the monitor. Try different combinations of video interface DIP switches 7 and 8. Unplug the power connector after every change of settings to save them. Use 3 additional buttons in the bottom part of the video interface. Set the output video source to PAL or NTSC. Best of all is to use one video standard for all video sources. Use one video standard for all video sources. Consult the manual for any NTSC-related restrictions. If only NTSC standard is supported, set the video source to NTSC output. Use 3 buttons available on the video interface to 13
15 Incorrect image size setting. Incorrect image positioning. Camera feed displayed in black. Camera feed is distorted. Unable to adjust camera input video settings. Parking sensor operation display. Chinese symbols when the backup camera is active. Unable to switch between video sources with OEM button. The interface fails to switch to camera input when the reverse gear is engaged. The interface switches between video sources on its own. Camera draws power directly from the reverse light. Camera input video settings can be adjusted in AV2 mode only. PDC function is enabled in OSD interface. RET or ALL function (designed for the Asian market) is enabled in OSD menu. CAN bus interface does not support this function for your car. Button presses are too short. CAN bus interface does not support this function for your car. CAN bus interface has limited compatibility with your vehicle. configure image parameters for the corresponding video input. Use an extra relay for a stable signal. Set video interface DIP 3 switch to ON (if AV2 input is not activated yet) and connect the camera to AV2. Then switch to AV2 and configure the parameters. After that, connect the camera to camera input and disconnect AV2 unless it is used for another video source. In compatible vehicles, distance data from the factory-installed PDC system will be displayed on the monitor. If this function is disabled, set All ON in UI-CONTROL menu item. Set PDC to ON in UI- CTRL display interface menu. Use an external keyboard or a white CAN unit cable to switch between video sources; + 12V voltage must be supplied. A longer button press (about 2.5 seconds) is required to switch to another video source. Cut the green wire connecting CAN unit with the video interface and supply + 12V from the reverse light. Use an extra relay for a stable signal. Cut the gray wire connecting CAN unit with the video interface and insulate both of its ends. If the problem persists, clip the white wire as well and insulate both of its ends. 14
Gazer VI700A-SYNC2 and VI700W- SYNC2 INSTALLATION MANUAL
 Gazer VI700A-SYNC2 and VI700W- SYNC2 INSTALLATION MANUAL Contents List of compatible cars... 3 Package contents... 4 Special information... 6 Car interior disassembly and connection guide for Ford Focus...
CI-VL2-PSA-HSD. for Citroen and Peugeot vehicles with SMEG or SMEG+ navigation with 4pin HSD LVDS connector on the monitor
 v.link Video-inserter for Citroen and Peugeot vehicles with SMEG or SMEG+ navigation with 4pin HSD LVDS connector on the monitor Video-inserter with 2 video + RGB + rear-view camera input and CAN control
VL2-PC-HSD. Compatible with Citroen and Peugeot vehicles with SMEG or SMEG+ navigation with 4pin HSD LVDS connector on the monitor
 v.link Video-inserter VL2-PC-HSD Compatible with Citroen and Peugeot vehicles with SMEG or SMEG+ navigation with 4pin HSD LVDS connector on the monitor Video-inserter with 2 video and 1 rear-view camera
VL2-PC-HSD and NAL-PC-HSD. Compatible with Citroen and Peugeot vehicles with SMEG or SMEG+ navigation with 4pin HSD LVDS connector on the monitor
 v.link Video-inserter and navigation VL2-PC-HSD and NAL-PC-HSD Compatible with Citroen and Peugeot vehicles with SMEG or SMEG+ navigation with 4pin HSD LVDS connector on the monitor VL2-PC-HSD: Video-inserter
VL2-MIB2-E - Installation Manual
 VL2-MIB2-E - Installation Manual This interface can insert video onto 5 inch Volkswagen vehicles with 5 inch monitors with cd-drive above the monitor and Seat vehicles with Radio Swing (MIB2 Entry). This
Car-Solutions.com. Warning / Caution. Warning. Caution
 Video Interface for Volkswagen Golf 7 with Discover Media Update Date 2013.11.14 Model User Guide QPI-G7-MAIN-V2.0 Firmware Date 131028 Warning / Caution Warning Caution When installing the main unit,
AUDI WITH MMI A4/A5/A6/A8/Q7. -. Product Code : A4L
 AUDI WITH MMI A4/A5/A6/A8/Q7 -. MODEL: QVL-A4L-V6 -. Product Code : A4L-0904-223 -Precaution - You must keep the car key taken off from the car while you work this and finally, connect power of the interface.
Car-Solutions.com
 Warning / Caution Warning Caution When installing the main unit, do not remove or alter existing vehicle fasteners, including nuts, bolts, screw, clips, and fittings. Never detach, move or alter existing
RL2-NBT. Video-inserter for front- and rear-view camera input and additional video source
 r.link Video-inserter for BMW vehicles with Business/Professional NBT navigation systems or radios with 6.5, 8.8 or 10.2 monitor with 4 + 2pin HSD LVDS connector Video-inserter for front- and rear-view
Video-inserter NA-VL2MBN45
 Video-inserter NA-VL2MBN45 for Mercedes Benz vehicles generation NTG4.5-204 with Comand Online, Audio50 APS or Audio 20 with 4pin HSD LVDS connector on the monitor Video-inserter with 2 video + RGB + rear-view
Car-Solutions.com. GVIF Video Interface for Opel, Buick, Chevrolet. ver Manual
 GVIF Video Interface for Opel, Buick, Chevrolet www.car-solutions.com Release date: 2012.02.04 Model: GF08BU-V6.2 / Product code: GF-0811-000 ver. 6.2 Manual support@carsolutions.com.ua Contents 1. Before
RL2-MBN51. Video-inserter for front- and rear-view camera input and additional video source
 r.link Video-Inserter for Mercedes Benz vehicles with Comand Online NTG5/NTG5.1 Audio20 CD NTG5/NTG5.1 Audio20 USB NTG5/NTG5.1 with 4pin HSD LVDS connector to monitor Video-inserter for front- and rear-view
Car-Solutions.com
 Warning / Caution Warning Caution When installing the main unit, do not remove or alter existing vehicle fasteners, including nuts, bolts, screw, clips, and fittings. Never detach, move or alter existing
RL3-PCM41. Compatible with Porsche Panamera from MY 2017 with PCM4.1 infotainment and 12.3inch monitor
 r.link Video inserter RL3-PCM41 Compatible with Porsche Panamera from MY 2017 with PCM4.1 infotainment and 12.3inch monitor Video-inserter with two video inputs, one rear-view camera input and CAN control
MASERATI. Specification & Installation. Your best partner for better driving
 Last updated : 2012.09.12 MODEL : QVI-LVTX-1CH-V7 / Product code : LVTX-1CH-1201-003 MASERATI Specification & Installation Your best partner for better driving Contents 1. Before installation 1.1 Main
Video-inserter with 2 video + RGB + rear-view camera input
 Video-inserter for Opel, Chevrolet and Buick with CD500, DVD600, DVD800, DVD900, CD600 intellilink and DVD950 intellilink navigation systems/radios Video-inserter with 2 video + RGB + rear-view camera
car-solutions.com GVIF Interface v7 for Nissan & Infiniti Specification Release date : Model : QVL-GF08-V7 / Product code : GF
 Release date : 2011.07.04 Model : QVL-GF08-V7 / Product code : GF08-1106-004 GVIF Interface v7 for Nissan & Infiniti Specification www. support@carsolutions.com.ua Contents 1. Before installation 1.1 Main
BMW CIC Video Interface
 BMW CIC Video Interface For 2010 UP With CIC system Round LVDS connector Main Features: 1. It is suitable for all 2010 up version Round connector LVDS CIC monitor system. 2. It is for BMW, 1, 3, 5, X5,
r.link Video-inserter RL3-CIC
 r.link Video-inserter RL3-CIC Compatible with BMW vehicles with Business/Professional CIC-E and CIC-F series navigation systems or radios with colour display and 4pin HSD LVDS monitor plug Product Features
BMW12N-DYNAMIC KIT NTV-KIT717
 3950 NW 120 th Ave, Coral Springs, FL 33065 TEL 561-955-9770 FAX 561-955-9760 www.nav-tv.com info@nav-tv.com BMW12N-DYNAMIC KIT NTV-KIT717 Screen Connector Overview The BMW12-N kit interfaces 2 video inputs
Car-Solutions.com. Car Video Interface for. Mercedes-Benz C-Class (W204) 2012 and New E-Class 2012 User Manual. Last updated :
 2012 and New E-Class 2012 User Manual. Last updated :") Last updated : 2012.03.29 Car Video Interface for Mercedes-Benz C-Class (W204) 2012 and New E-Class 2012 User Manual support@car-solutions.com Contents 1. Before installation 1.1 Main specification 3 1.2
Last updated : 2012.03.29 Car Video Interface for Mercedes-Benz C-Class (W204) 2012 and New E-Class 2012 User Manual support@car-solutions.com Contents 1. Before installation 1.1 Main specification 3 1.2
VL2-MBN4. Video-inserter with 2 video + RGB + rear-view camera input and CAN control
 v.link Video-inserter for Mercedes Benz vehicles with Comand APS HD NTG3, Comand APS NTG4, Audio20 NTG4 and Audio50 APS NTG4 Navigation Systems with 10pin LVDS connector on the monitor Video-inserter with
Car-Solutions.com
 Warning / Caution Warning Caution When installing the main unit, do not remove or alter existing vehicle fasteners, including nuts, bolts, screw, clips, and fittings. Never detach, move or alter existing
RL3-SY3. Compatible with Ford vehicles with Sony Sync3 Touch with 7 or 8inch monitor
 r.link Video-inserter RL3-SY3 Compatible with Ford vehicles with Sony Sync3 Touch with 7 or 8inch monitor Video-inserter for rear-view camera and two additional video sources Product features Video-inserter
BMW12N-H NTV-KIT791. Kit Contents. BMW12N-H Interface. Interface Power Harness
 3950 NW 120 th Ave, Coral Springs, FL 33065 TEL 561-955-9770 FAX 561-955-9760 www.nav-tv.com info@nav-tv.com BMW12N-H NTV-KIT791 Screen Connector Overview The BMW12N-H kit interfaces 2 composite video
CarNavi-Tech MASERATI. Specification & Installation
 MASERATI Specification & Installation Last updated : 2012.09.12 MODEL : QVI-LVTX-1CH-V7 / Product code : LVTX-1CH-1201-003 SUNE TECHNOLOGY CO.,LTD No.9,Lane 606,Anping Rd,Tainan City 70849,TAIWAN TEL:+88662292246
Video Interface for Maserati User Manual
 Last updated : 2012.09.12 MODEL : QVI-LVTX-1CH-V7 / Product code : LVTX-1CH-1201-003 Video Interface for Maserati User Manual Contents 1. Before installation 1.1 Main specification 1.2 Features 1.3 System
(Without MMI version)
") AUDI A4/A5 with Touch Screen (Without MMI version) Last Updated Date : 20 th. May.2009 -. MODEL: QVL-A4L-V6 -. Product Code : A4L-0904-223 -. MODEL: QVL-A4L-V6 -. Product Code : A4L-0904-223 INDEX -. AUDI
AUDI A4/A5 with Touch Screen (Without MMI version) Last Updated Date : 20 th. May.2009 -. MODEL: QVL-A4L-V6 -. Product Code : A4L-0904-223 -. MODEL: QVL-A4L-V6 -. Product Code : A4L-0904-223 INDEX -. AUDI
Car-Solutions.com Update Date QVI-LVTX-1CH-V7.1 Firmware Date
 Update Date 2014.04.25 Model Firmware Date QVI-LVTX-1CH-V7.1 Warning / Caution Warning Caution When installing the main unit, do not remove or alter existing vehicle fasteners, including nuts, bolts, screw,
VL2-NG4-HU. Compatible with Alfa Romeo Giulietta, Citroen and Peugeot with navigation NG4 with colour display and 10pin LVDS monitor connector
 v.link Video-inserter Compatible with Alfa Romeo Giulietta, Citroen and Peugeot with navigation NG4 with colour display and 10pin LVDS monitor connector Video-inserter with 2 video + RGB + rear-view camera
r.link Video-inserter RL3-MBN51
 r.link Video-inserter RL3-MBN51 Compatible with Mercedes Benz vehicles with NTG5-205 or NTG5.1 with 4pin HSD connector at the monitor Comand Online Audio20 CD Audio20 USB Product Features Video-inserter
r.link Video-inserter CI-RL2-RLINK
 r.link Video-inserter CI-RL2-RLINK Compatible with Dacia, Fiat, Smart and Renault vehicles with RLink or MediaNav system and Opel vehicles with Navi 50 or Navi 80 Video-inserter with 2 video inputs and
RL3-MIB92. Example: MIB2 High Discover Pro. Video-inserter for one rear-view camera and two more video inputs
 r.link Video inserter RL3-MIB92 Skoda vehicles with MIB2 High - Columbus infotainment and 9.2inch monitor VW vehicles with MIB2 High - Discover Pro infotainment and 9.2inch monitor Example: MIB2 High Discover
v.link Video-inserter VL3-MIB-STD2
 v.link Video-inserter VL3-MIB-STD2 Compatible with VW vehicles with Composition Media or Discover Media system Skoda vehicles with Amundsen or Bolero system Seat vehicles with Media system plus Video-inserter
VL6-PCM30. Specification & Installation. Compatible with Porsche PCM 3.0 navigation Sports cars and Cayenne
 Last updated: 2014.02.04 (150922) Model: LVTX-STD-V1.0, Product Code: LVSTD-0901-000 VL6-PCM30 Specification & Installation Compatible with Porsche PCM 3.0 navigation Sports cars and Cayenne Contents 1.
FV_CIC2 interface manual_v
 FV_CIC2 interface manual_v20111031 Product type: FV CIC2 This interface can insert RGB/CVBS video into BMW CIC screens(including BMW 5 series,3 series,7 series,x5, X6). It can insert 1 RGB High definition
r.link Video-inserter CI-RL3-NAC
 r.link Video-inserter CI-RL3-NAC Compatible with Citroen, Peugeot and Toyota vehicles with NAC or RCC infotainment Opel vehicles with Navi 5.0 (NAC low) Video-inserter with 2 video inputs, rear-view camera
VL2-MMI3G-Q3 VL2-MMI3G-GW. Compatible with Audi MMI3G basic/high, MMI3G+ basic/high and VW RNS850 navigation systems with 4pin HSD LVDS connector
 v.link Video-inserter VL2-MMI3G-Q3 VL2-MMI3G-GW Compatible with Audi MMI3G basic/high, MMI3G+ basic/high and VW RNS850 navigation systems with 4pin HSD LVDS connector Video-inserter with 2 video + RGB
Video Interface connection:
 Mercedes Benz NTG4.5 Video interface For 2010 Benz ML, GLK, C, E class with Round connector Main Features: 1. It is suitable for 2010 up version Round connector LVDS ML. GLK, C, E Class 5 inch, and 7 inch
r.link Video-inserter RL3-NAC
 r.link Video-inserter RL3-NAC Compatible with Citroen, Peugeot and Toyota vehicles with NAC or RCC infotainment Opel vehicles with Navi 5.0 (NAC low) Video-inserter with 2 video inputs, 1 rear-view camera
VL6-CADVD. Specification & Installation. Compatible with Comand APS DVD (manufactured by Siemens/VDO) also referred to by Mercedes Benz as NTG1
 also referred to by Mercedes Benz as NTG1") Updated date: 2017.05.31 Model: RGB-LE-V3.1 / Product code: RB-100126-013 VL6-CADVD Specification & Installation Compatible with Comand APS DVD (manufactured by Siemens/VDO) also referred to by Mercedes
Updated date: 2017.05.31 Model: RGB-LE-V3.1 / Product code: RB-100126-013 VL6-CADVD Specification & Installation Compatible with Comand APS DVD (manufactured by Siemens/VDO) also referred to by Mercedes
FN_BMW_6Pin Guide+NAVI interface manual
 FN_BMW_6Pin Guide+NAVI interface manual Product type: FV_BMW 6Pin, Ver:20131022 This interface can insert video into BMW, e.g. 1,3,5,7 series starting from 2012,if only the monitor has such a 6Pin connector
DVB-LR10. Compatible with Land Rover touch-screen navigation systems version 2
 dvblogic DVB-T Tuner Compatible with Land Rover touch-screen navigation systems version 2 Product features full plug and play vehicle-specific dual DVB-T Tuner with two active DVB-T glass-mount antennas
Maserati Ghibli Specification & Installation
 Release date : 2015.10.26 model : QVI-LVTX-1CH-V7 / product code : LVTX-1CH-1201-005 Maserati Ghibli Specification & Installation SUNE TECHNOLOGY CO.,LTD No.9,Lane 606,Anping Rd,Tainan City 70849,TAIWAN
Car-Solutions.com. Chrysler/Dodge. Specification & Installation. Release date : model : QVI-LVTX-1CH-V7 / product code : LVTX-1CH
 Release date : 2014.06.12 model : QVI-LVTX-1CH-V7 / product code : LVTX-1CH-1201-005 Chrysler/Dodge Specification & Installation Contents 1. Before installation 1.1 Main specification 1.2 Features 1.3
DVB-E65-TV. Compatible with BMW E65 Professional navigation systems with 8.8 monitor
 dvblogic DVB-T Tuner Compatible with BMW E65 Professional navigation systems with 8.8 monitor Vehicles with factory TV-tuner port (Factory TV-tuner must be uninstalled) Product features Full plug and play
FV_BMW_6Pin interface manual
 FV_BMW_6Pin interface manual Product type: FV_BMW 6Pin, Ver:20120416 This interface can insert video into BMW F20, BMW F30 screens (including All BMW 6Pin connector screen, e.g. 1,3,5,7 series starting
DT1-LR10. Compatible with Land Rover touch-screen navigation systems version 2
 dvblogic DVB-T Tuner Compatible with Land Rover touch-screen navigation systems version 2 Product features Full plug and play vehicle-specific dual DVB-T Tuner + USB-AV-Player DVB-T-Tuner MPEG4 compatible
r.link Video-inserter CI-RL2-MMI3G-Q3 CI-RL2-MMI3G-GW
 r.link Video-inserter CI-RL2-MMI3G-Q3 CI-RL2-MMI3G-GW Compatible with Audi MMI3G basic/high, MMI3G+ basic/high and VW RNS850 navigation systems with 4pin HSD LVDS connector Video-inserter for rear-view
Land Rover EVOQUE Video Interface Specification & Installation
 release date : 2015.02.03 model : QVI-EVQ-V2.0 / product code : EVQ-1207-001 Land Rover EVOQUE Video Interface Specification & Installation Your best partner for better driving Contents 1. Before installation
r.link Video-inserter RL5-UCON7-500 Compatible with Fiat vehicles with Uconnect 7inch infotainment
 r.link Video-inserter RL5-UCON7-500 Compatible with Fiat vehicles with Uconnect 7inch infotainment Video-inserter with 1 video input and 1 rear-view camera input Product features Video-inserter for factory-infotainment
Safety Information. Camera System. If you back up while looking only at the monitor, you may cause damage or injury. Always back up slowly.
 Table of Contents Introduction...3 Safety Information...4-6 Before Beginning Installation...7 Installation Guide...8 Wiring Camera & Monitor...9-10 Replacement Installation Diagram...11 Clip-On Installation
INSTALLATION AND USER S GUIDE DAS M44HD-CI-CAN
 INSTALLATION AND USER S GUIDE DAS M44HD-CI-CAN Warnings: Important Safety Instructions and Caution Please read all of these instructions regarding your unit and retain them for future reference Read this
AUDI 3G MMI Video Interface
 AUDI 3G MMI Video Interface For 2009 UP With 3G MMI system Round LVDS connector Main Features: 1. It is suitable for 2009 up version Round connector LVDS 3G MMI Audi A4, A5, A6, A8, Q5, Q7 series. 2. With
RGB CONVERTER SPECIFICATION. Car Solutions -. MODEL: RGB-LE-V3 -. PRODUCT CODE : RB www. car-solutions.com
 RGB CONVERTER SPECIFICATION -. MODEL: RGB-LE-V3 -. PRODUCT CODE : RB-080125-013 www. car-solutions.com INDEX -. Pre-Caution -. Main Specification -. System Composition Map -. Out-Line Dimension -. MODULE
r.link Video-inserter RL5-MIB-STD2
 r.link Video-inserter RL5-MIB-STD2 Video-inserter with 1 video input and 1 rear-view camera input Compatible with VW vehicles with Composition Media or Discover Media system Skoda vehicles with Amundsen
DT1-LR. for Landrover touch-screen navigation systems version 1
 dvblogic DVB-T Tuner for Landrover touch-screen navigation systems version 1 Product features Full plug and play vehicle-specific dual DVB-T Tuner + USB-AV-Player DVB-T-Tuner MPEG4 compatible (HD) USB-AV-Player
CarNavi-Tech. Maserati Ghibli. Specification & Installation
 Release date : 2014.03.20 model : QVI-LVTX-1CH-V7 / product code : LVTX-1CH-1201-005 Maserati Ghibli Specification & Installation SUNE TECHNOLOGY ELECTRONIC CO., LTD No.9, Land 606,Anping Rd., Tainan City
DVB-C25. Compatible with navigation systems Mercedes Benz Comand 2.5
 dvblogic DVB-T Tuner Compatible with navigation systems Mercedes Benz Comand 2.5 Product features full plug and play vehicle-specific dual DVB-T Tuner with two active DVB-T glass-mount antennas integrated
Be sure to run the vehicle engine while using this unit to avoid battery exhaustion.
 CAUTION: TO REDUCE THE RISK OF ELECTRIC SHOCK DO NOT REMOVE COVER (OR BACK) NO USER-SERVICEABLE PARTS INSIDE REFER SERVICING TO QUALIFIED SERVICE PERSONNE; Please Read all of these instructions regarding
END USER MANUAL DAS-M44HD-R
 END USER MANUAL DAS-M44HD-R Warnings: Important Safety Instructions and Caution Please read all of these instructions regarding your unit and retain them for future reference Read this manual fully and
Instruction Manual. MASERATI LEVANTE TDC2 for LEVANTE 2017, QUATTROPORTE 2017, GHIBLI 2017
 Instruction Manual MASERATI LEVANTE TDC2 for LEVANTE 2017, QUATTROPORTE 2017, GHIBLI 2017 INDEX Specifications 1. Main Spec ------------------------------------3 2. Diagram --------------------------------------4
28 4K LED monitor. User Manual M284K
 28 4K LED monitor User Manual M284K CONTENTS Safety Information... 2 What s included..... 4 Getting Started....... 8 Troubleshooting.... 14 Specification.... 15 2 of 15 SAFETY INFORMATION Read these instructions
P-2 Installing the monitor (continued) Carry out as necessary
 Carry out as necessary") P-2 Installing the monitor (continued) Carry out as necessary Using the monitor without the bezel MDT552S satisfies the UL requirements as long as it is used with the bezel attached. When using the monitor
P-2 Installing the monitor (continued) Carry out as necessary Using the monitor without the bezel MDT552S satisfies the UL requirements as long as it is used with the bezel attached. When using the monitor
NNG-GM2 Navigation interface for GM vehicles equipped with LVDS MYLink/CUE NTV-KIT552
 3950 NW 120 th Ave, Coral Springs, FL 33065 TEL 561-955-9770 FAX 561-955-9760 NNG-GM2 Navigation interface for GM vehicles equipped with LVDS MYLink/CUE NTV-KIT552 This installation manual is for NNG-GM2
DVB-C20. Compatible with navigation systems Mercedes Benz Comand 2.0 Comand APS CD Comand APS 220
 dvblogic DVB-T Tuner Compatible with navigation systems Mercedes Benz Comand 2.0 Comand APS CD Comand APS 220 Product features full plug and play vehicle-specific dual DVB-T Tuner with two active DVB-T
v.link Video-inserter VL3-MIB-4
 v.link Video-inserter VL3-MIB-4 Compatible with Audi vehicles with MMI Navigation Plus based on MIB Bentley vehicles with MIB with 8 monitor Lamborghini vehicles with MIB with monitor in instrument Porsche
Hi-Vision TV Box. High Resolution TV BOX with PIP feature Model:174190
 Operational Manual Hi-Vision TV Box High Resolution TV BOX with PIP feature Model:174190 Thanks for your purchasing this product. Please read the Manual carefully before using it, and keep this manual
OWNER S MANUAL MOTORIZED 7 WIDE TFT LCD COLOR MONITOR CNT-701
 OWNER S MANUAL PW MOTORIZED 7 WIDE TFT LCD COLOR MONITOR CNT-701 ANY CHANGES OR MODIFICATIONS IN CONSTRUCTION OF THIS UNIT DEVICE WHICH IS NOT APPROVED BY THE PARTY RESPONSIBLE FOR COMPLIACE COULD VOID
DT1-NTG2. Compatible with Mercedes Benz Comand APS NTG2 navigation systems
 dvblogic DVB-T Tuner Compatible with Mercedes Benz Comand APS NTG2 navigation systems Product features Full plug and play vehicle-specific dual DVB-T Tuner + USB-AV-Player DVB-T-Tuner MPEG4 compatible
3950 NW 120 th Ave, Coral Springs, FL TEL FAX RGBv2 NTV-KIT885.
 3950 NW 120 th Ave, Coral Springs, FL 33065 TEL 561-955-9770 FAX 561-955-9760 www.nav-tv.com info@nav-tv.com RGBv2 NTV-KIT885 Overview The RGBv2 adds an aftermarket backup camera to the factory navigation
Part names (continued) Remote control
 Remote control") Introduction Part names (continued) Remote control (1) STANDBY ( 25) (1) (2) ON ( 25) (3) (3) ID - 1 / 2 / 3 / 4 s ( 18) (4) (4) COMPUTER 1 ( 27) (7) (5) COMPUTER 2 * (8) (6) COMPUTER 3 * (10) (13) (7)
Introduction Part names (continued) Remote control (1) STANDBY ( 25) (1) (2) ON ( 25) (3) (3) ID - 1 / 2 / 3 / 4 s ( 18) (4) (4) COMPUTER 1 ( 27) (7) (5) COMPUTER 2 * (8) (6) COMPUTER 3 * (10) (13) (7)
MODE MENU /F1 /F2 F3 F4 PLCMHD80
 MODE MENU /F1 /F2 F3 F4 PLCMHD80 ! To insure best use of the unit, please read the user s manual carefully CAUTION 1. Do not use any damaged or leaking battery, if using a battery to power. 2. Do not expose
Satellite Radio. Expand Your Factory Radio ISSR bit & 29-bit LAN. Owner s Manual Gateway. add. Harness Connection USB. Port 1 Port.
 Expand Your Factory Radio Harness Connection add Satellite Radio Dip Switches Port 1 Port 2 (See Manual) USB GM 11-bit & 29-bit LAN Owner s Manual Gateway ISSR12 Table of Contents 1. Introduction 2. Precautions
Introduction 2. Installation 3. Suggested Configuration 4. Using the Remote 5. Adjustment Mode 6. Technical Specifications 7. Technical Support 8
 1 Table of Contents Introduction 2 Installation 3 Suggested Configuration 4 Using the Remote 5 Adjustment Mode 6 Technical Specifications 7 Technical Support 8 Warranty Information 8 2 Introduction Thank
Camera 220C Document Camera User s Guide
 Camera 220C Document Camera User s Guide #401-220C-00 Table of Contents TABLE OF CONTENTS... 0 TABLE OF CONTENTS... 1 COPYRIGHT INFORMATION... 2 CHAPTER 1 PRECAUTIONS... 3 CHAPTER 2 PACKAGE CONTENT...
DT2-LR12. Compatible with Land Rover vehicles with touch-screen navigation systems version 3
 dvblogic DVB-T Tuner Compatible with Land Rover vehicles with touch-screen navigation systems version 3 Product features Full plug and play vehicle-specific dual DVB-T Tuner + USB-AV-Player DVB-T-Tuner
VL2-MIB2-E. Compatible with VW / SEAT / SKODA vehicles with MIB2 Entry infotainment and 5 inch monitor
 v.link Video-inserter VL2-MIB2-E Compatible with VW / SEAT / SKODA vehicles with MIB2 Entry infotainment and 5 inch monitor Video-inserter with 2 video inputs and 1 rear-view camera input with CAN control
DT1-PCM21. for Porsche PCM2.1 navigation systems
 Product features dvblogic DVB-T Tuner for Porsche PCM2.1 navigation systems Full plug and play vehicle-specific dual DVB-T Tuner + USB-AV-Player DVB-T-Tuner MPEG4 compatible (HD) USB-AV-Player for USB-media
COLOR TFT LCD MONITOR. Manual
 COLOR TFT LCD MONITOR Manual Safety defended: Properly maintains your system to be possible to guarantee its service life and to reduce the damage risk. It should avoid the damp and exceeding temperature
Warranty Information
 Accuform Signs does not handle the warranty for the Digital Signage Displays. Please read below for details on the warranty of your product. If you are having trouble and need assistance, please contact
VOLVO S60 XC60 Video GPS Interface
 VOLVO S60 XC60 Video Interface For VOLVO S60 XC60 5inch monitor Main Features: 1. It is suitable for VOLVO 2011 up version 5 inch monitor 2. With 2AV input, RGBS input, Rear camera input, LVDS input 3.
VOH681/VOH681P. ion Manual
 VOH681/VOH681P Operat ation ion Manual Important Notice It is unlawful in most jurisdictions for a person to drive a motor vehicle which is equipped with a television viewer or screen that is located in
isync HD & isync Pro Quick Reference Guide isync HD isync Pro Digital Video Processor and Video/Audio Switcher
 isync HD & isync Pro Digital Video Processor and Video/Audio Switcher Quick Reference Guide isync HD Key Digital, led by digital video pioneer Mike Tsinberg, develops and manufactures high quality, cutting-edge
Video SystemVideo System
 PublishedPublished: May 4, 2005 Video SystemVideo System Video System Component Location ItemItem Part NumberPart Number 1 - Television tuner module 2 - Rear seat entertainment control module 3 - DVD (digital
WCM-758G. user MANUAL
 SKYVISION WCM-758G WIRELESS 7" MONITOR user MANUAL 2 INTRODUCTION Thank you for choosing Elvid. The Elvid WCM-758G SkyVision is a wireless monitor designed to receive signal from your 5.8 GHz composite
DT2-NTG45. for Mercedes Benz vehicles with Comand APS NTG4-212 and Comand Online NTG4.5 navigation systems
 dvblogic DVB-T Tuner for Mercedes Benz vehicles with Comand APS NTG4-212 and Comand Online NTG4.5 navigation systems Product features Full plug and play vehicle-specific dual DVB-T Tuner + USB-AV-Player
VMA ACTIVE MATRIX TFT COLOR LCD MONITOR OWNER S MANUAL INSTALLATION GUIDE
 VMA6491 6.4 ACTIVE MATRIX TFT COLOR LCD MONITOR OWNER S MANUAL INSTALLATION GUIDE OWNER S MANUAL WARNING! THE CLARION VMA6491 LCD MONITOR IS DESIGNED FOR REAR SEAT PASSENGER VIEWING ONLY. THIS PRODUCT
CAR-5N / CAR-5P Video to RGB Converter for CAR display. Operation Manual
 CAR-5N / CAR-5P Video to RGB Converter for CAR display Operation Manual TABLE OF CONTENTS 1. Introduction... 1 2. Features... 1 3. Package Contents... 1 4. Operation Controls and Functions... 2 4.1 Front
OSD. EXECUTIVE / MiniDome USERS MANUAL. USING THE MOTOSAT DISH POINTING SYSTEM EXECUTIVE / MiniDome OSD
 EXECUTIVE / MiniDome OSD USERS MANUAL USING THE MOTOSAT DISH POINTING SYSTEM EXECUTIVE / MiniDome OSD MotoSAT Corporation Created April 22, 2003 1-800-247-7486 CONGRATULATIONS! on your purchase of your
VMA573 and VMA or 7 Wide Screen Color LCD Monitor. Owner s Manual. Installation Guide
 VMA573 and VMA773 5.6 or 7 Wide Screen Color LCD Monitor Owner s Manual Installation Guide 7 headrest / stand alone wide monitor 5.6 headrest / stand alone wide monitor 2 WARINING! The Clarion VMA 573
TFT LCD MONITOR USER MANUAL. L80AP and L101AP
 TFT LCD MONITOR USER MANUAL L80AP - 8.0 and L101AP - 10.1 Table Of Contents Table of contents/ Warning.... 2 Precautions...3 About this user manual and products / Items included in the delivery..... 4
Instruction Guide. The TV Jockey Computer Monitor TV Tuner with Remote COMP2VGATVGB. The Professionals Source For Hard-to-Find Computer Parts
 VIDEO ADAPTER The TV Jockey Computer Monitor TV Tuner with Remote COMP2VGATVGB Instruction Guide * Actual product may vary from photo The Professionals Source For Hard-to-Find Computer Parts FCC COMPLIANCE
Mercedes-Benz Installation Guide Specification
 Mercedes-Benz Installation Guide Specification PIP 1 Contents 2 Spec 3 About Interface - Dimension - External Appearance 4 5 6 7 9 10 19 Connector Pin Assignment Product Composition DIP S/W Setting I-Drive
USER MANUAL. 22" Class Slim HD Widescreen Monitor L215DS
 USER MANUAL 22" Class Slim HD Widescreen Monitor L215DS TABLE OF CONTENTS 1 Getting Started Package Includes Installation 2 Control Panel / Back Panel Control Panel Back Panel 3 On Screen Display 4 Technical
Service FOR SERVICE. Quick Reference Guide. Page 23. Contact your help desk at
 Service Page 2 FOR SERVICE Contact your help desk at Quick Reference Guide 0 Judson Street, Unit 5 Toronto, ON M8Z 5T6 Tel: -800-652-266 www.adcom.ca Copyright 2004 Power Source Page 22 UPS Connect the
Operating Instructions
 Operating Instructions LCDRV700 Digital LCD Color Monitor Please read this manual thoroughly before operating the unit, and keep it for future reference. V1.0 Contents 1. Precautions 2. Features 1 3 3.
Delvcam DELV-HD7-4K User Guide
 Delvcam DELV-HD7-4K User Guide 7" 4K Compatible 1080P Camera Top Monitor with Audio Meter IMPORTANT SAFETY INSTRUCTIONS Read manual before using this product. Keep manual for future reference. Do not place
Multi-function Portable. HD LCD Monitor. User Manual
 Multi-function Portable HD LCD Monitor User Manual Product description: Thank you for purchasing our photography, broadcast color LCD Monitor kit. This product adopts proprietary digital signal processing
Installation Manual FT-VF-KIA REV
 Installation Manual FT-VF-KIA REV 190817 PRESENTATION Congratulations for purchasing the video interface FT-VF-KIA. Please, read this manual with attention before installing your new device. Keep this