Contents Chapter 1: Introduction...8 Features...8 Contents...10 Parts Name and Functions...11 Buttons, Switch, and Indicator...11 Connectors and Termi
|
|
|
- Randolf Ford
- 5 years ago
- Views:
Transcription
1

2
3

4

5
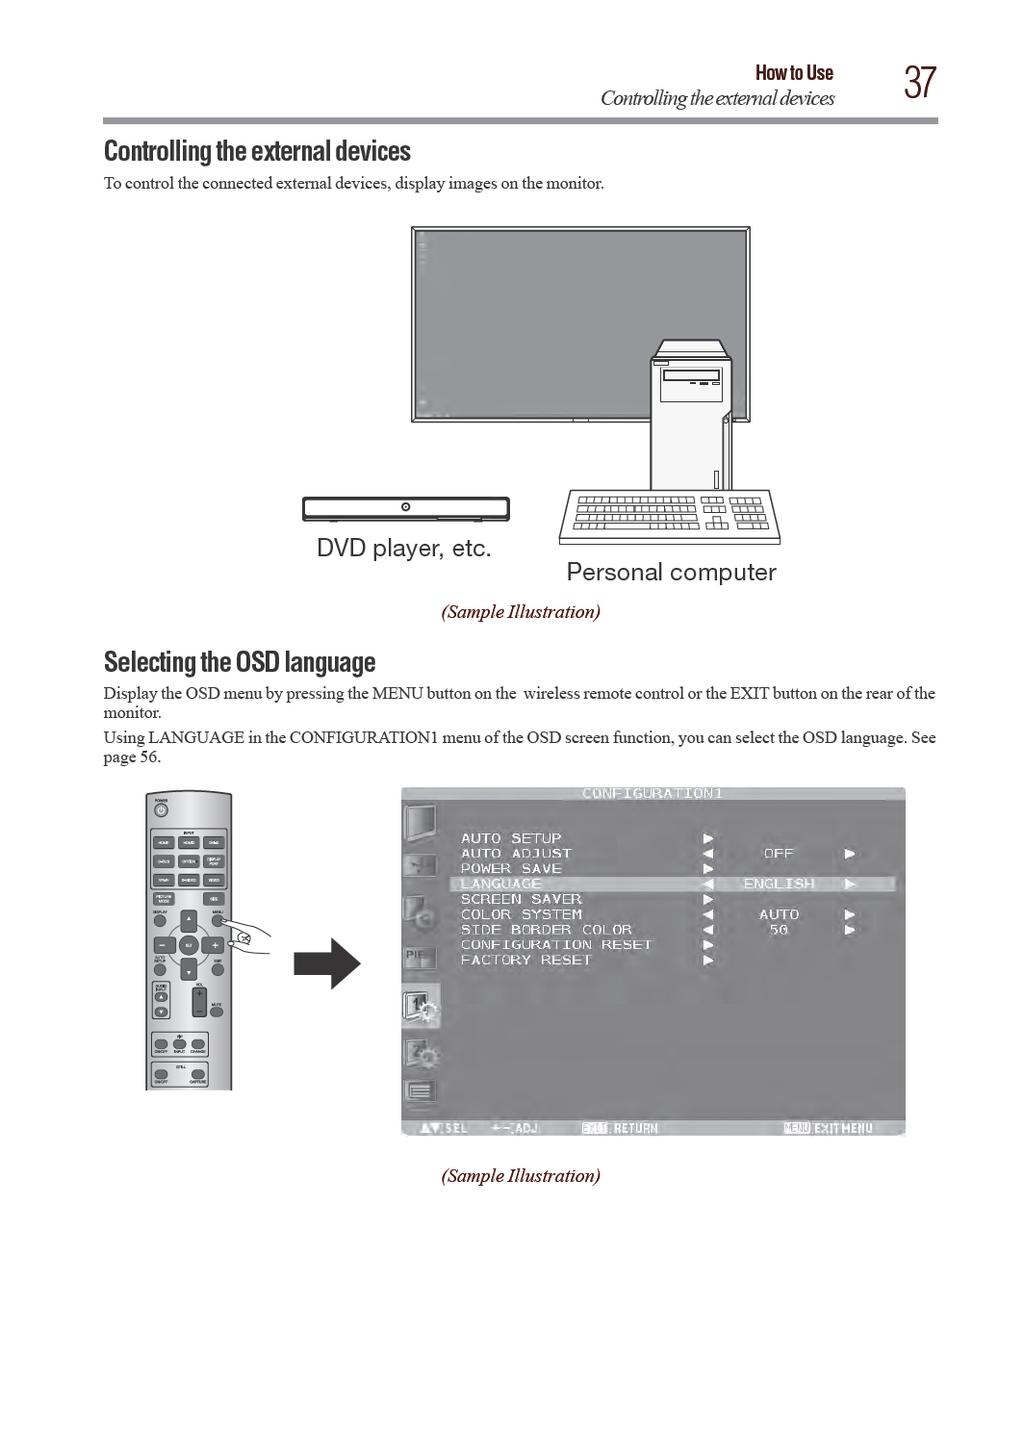
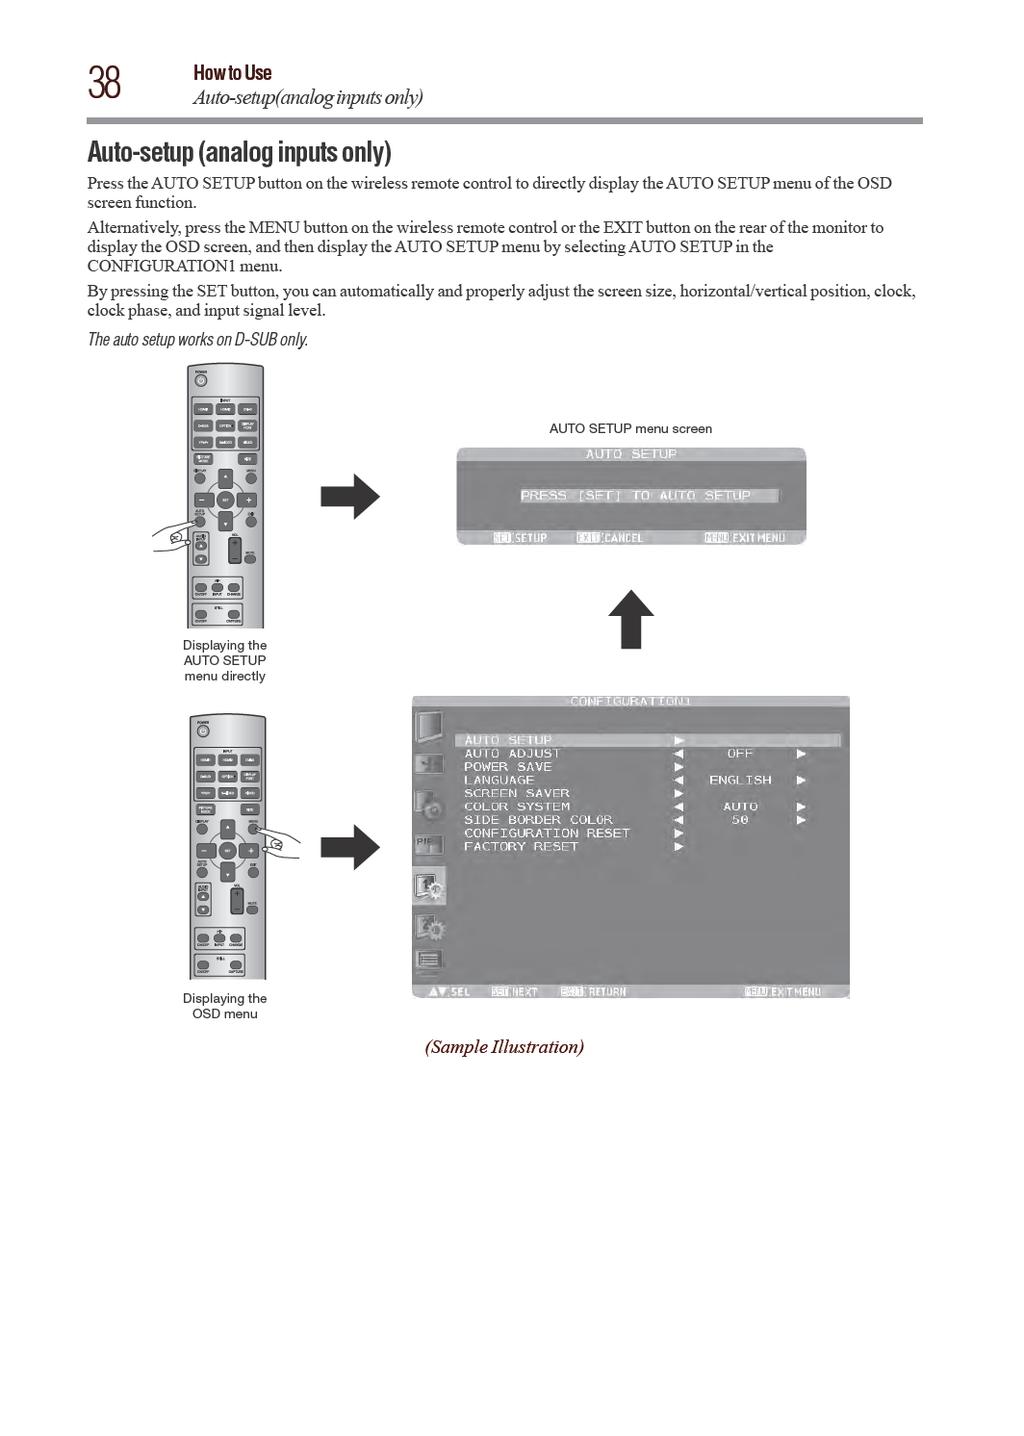
6 Contents Chapter 1: Introduction...8 Features...8 Contents...10 Parts Name and Functions...11 Buttons, Switch, and Indicator...11 Connectors and Terminals...12 Wireless Remote Control...13 How to Use the Wireless Remote Control...14 Chapter 2: Preparation for use...15 Preparation for installation...15 Determine the installation location...15 Ventilation requirements for enclosure mounting...15 Using the wall mount or ceiling mount...16 Installing the monitor...17 Preventing the handles from touching the wall...17 Removing the stand guide frames...17 Using the wall mount spacers...18 Installing in the portrait or face-up position...19 Attaching the corner protectors...19 Using the monitor without the bezel...20 Installing the external speakers...21 Connection procedure...22 Wiring diagram...22 Prevention of disconnection of HDMI cable...23 Connecting with a computer (analog connection)...24 Connecting with a computer (digital connection)...25 Connecting a video device (component video/hdmi device)...26 Connecting a video device (composite video/ S video device)/stereo amplifier...27 Installing the expansion module...28 Installation of the expansion module...28 Connecting OPS-compliant computer...28 Mounting the OPS-compliant computer on the monitor (for 55 )...28 Mounting the OPS-compliant computer on the monitor (for 70 )...29 Connecting RS-232C...30 Monitor control via RS-232C...30 Connecting LAN...31 Monitor connection using LAN...31 Connecting a USB device...32 Connecting multiple USB devices using the USB hub function...32 Connecting the power cord to the monitor...33 Connecting the power source...33 Chapter 3: How to Use...34 Turning on all the connected devices...34 Turning on the monitor...34 Power Management Function...35 Selecting the video input...36 Controlling the external devices...37 Selecting the OSD language...37 Auto-setup (analog inputs only)
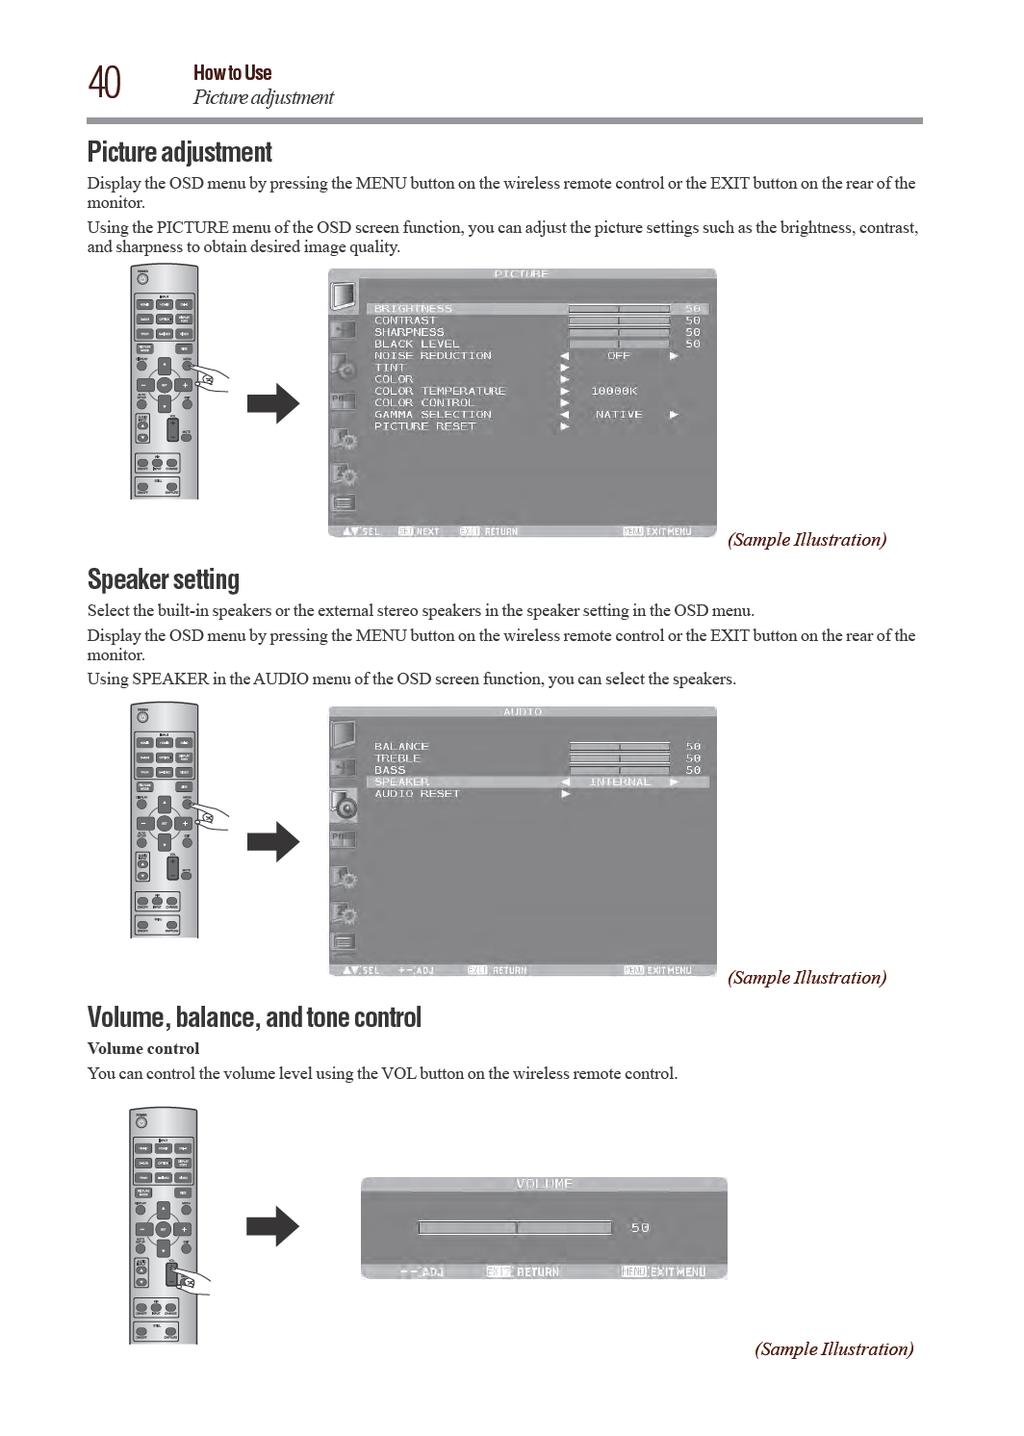
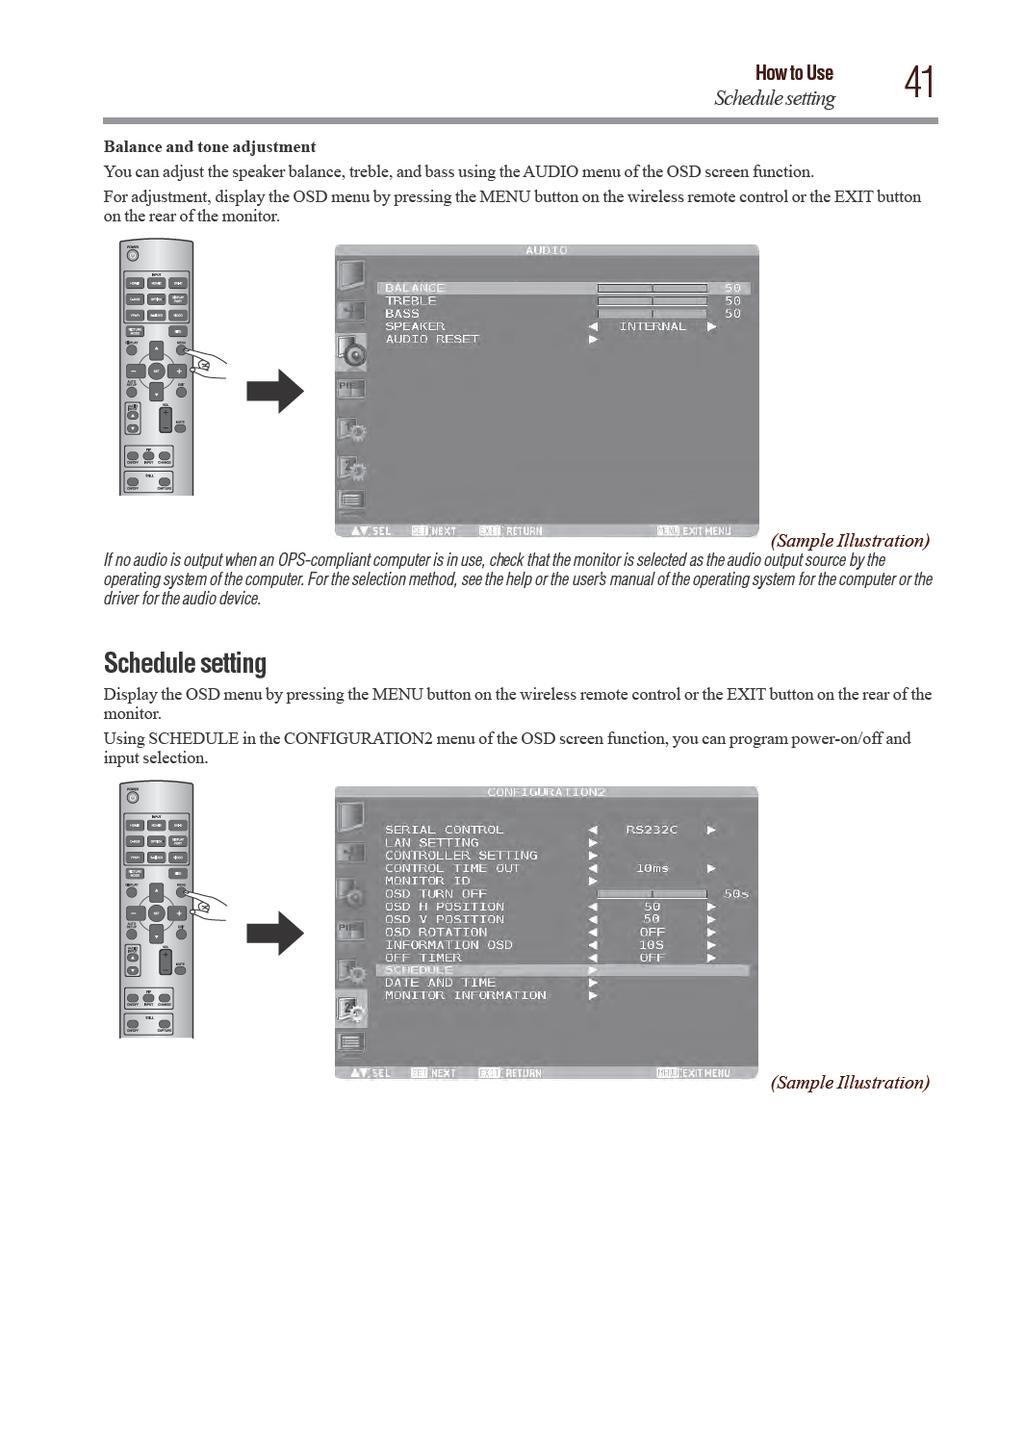
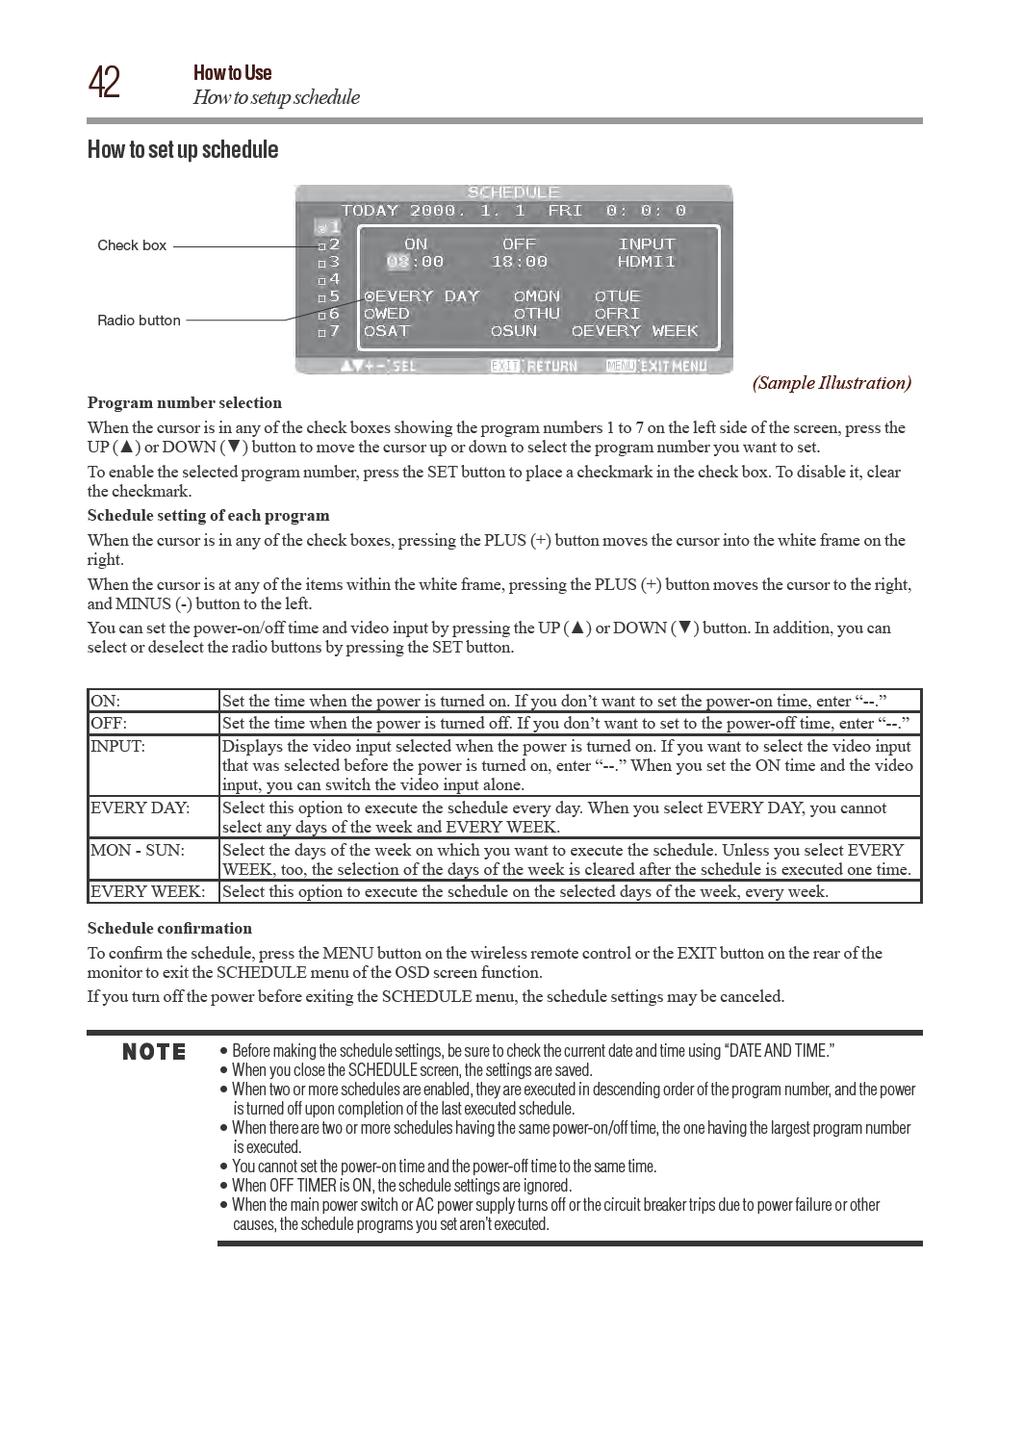
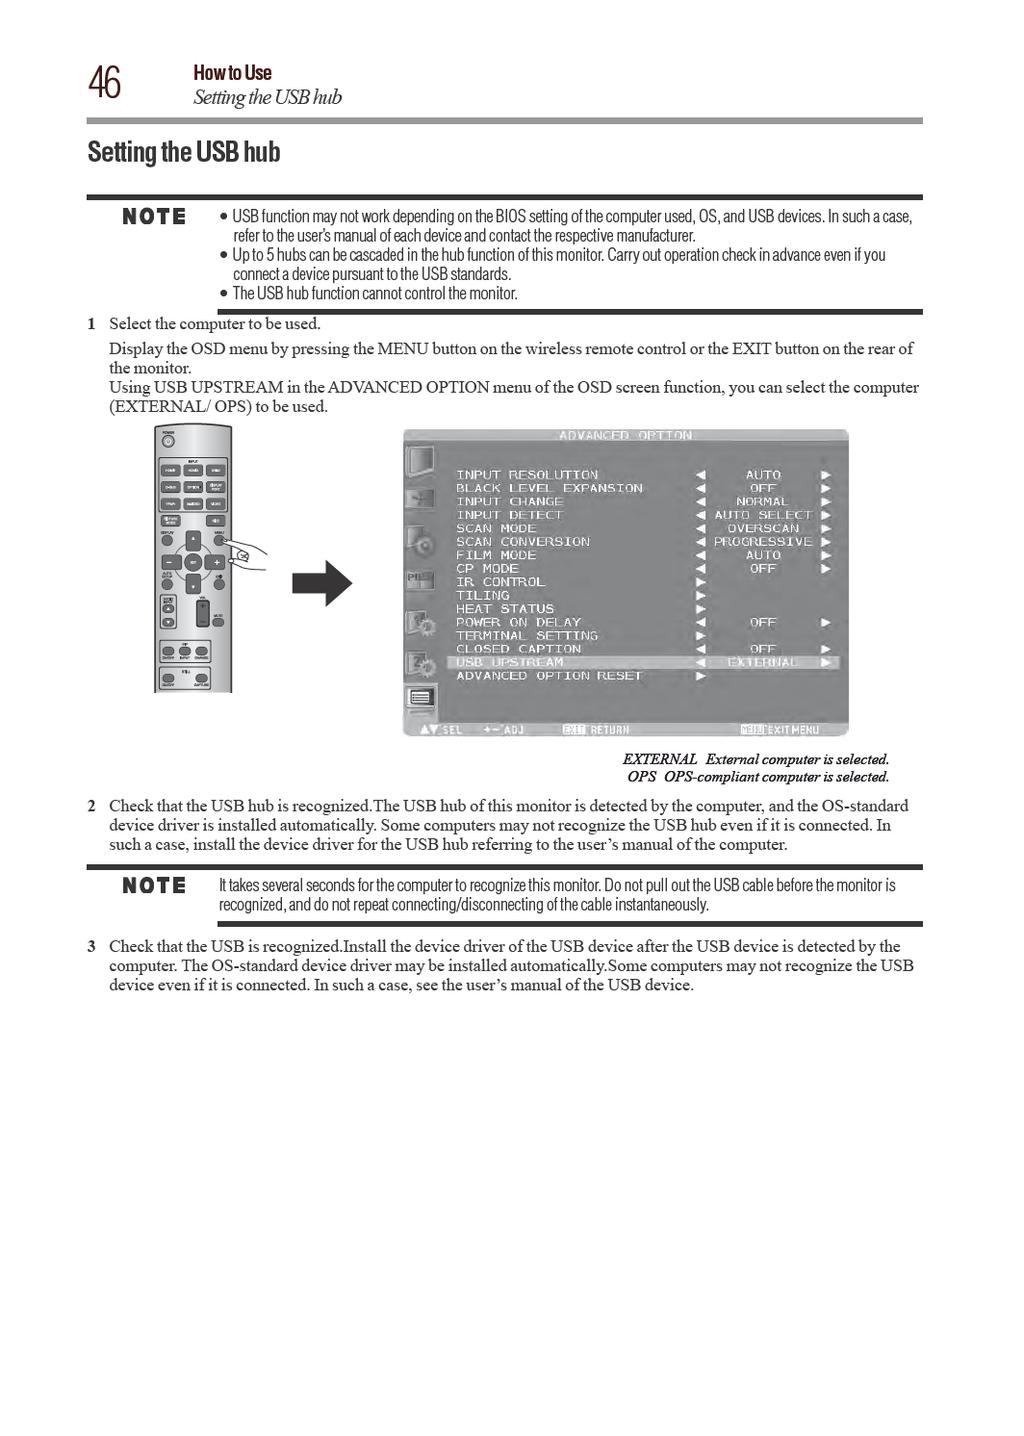
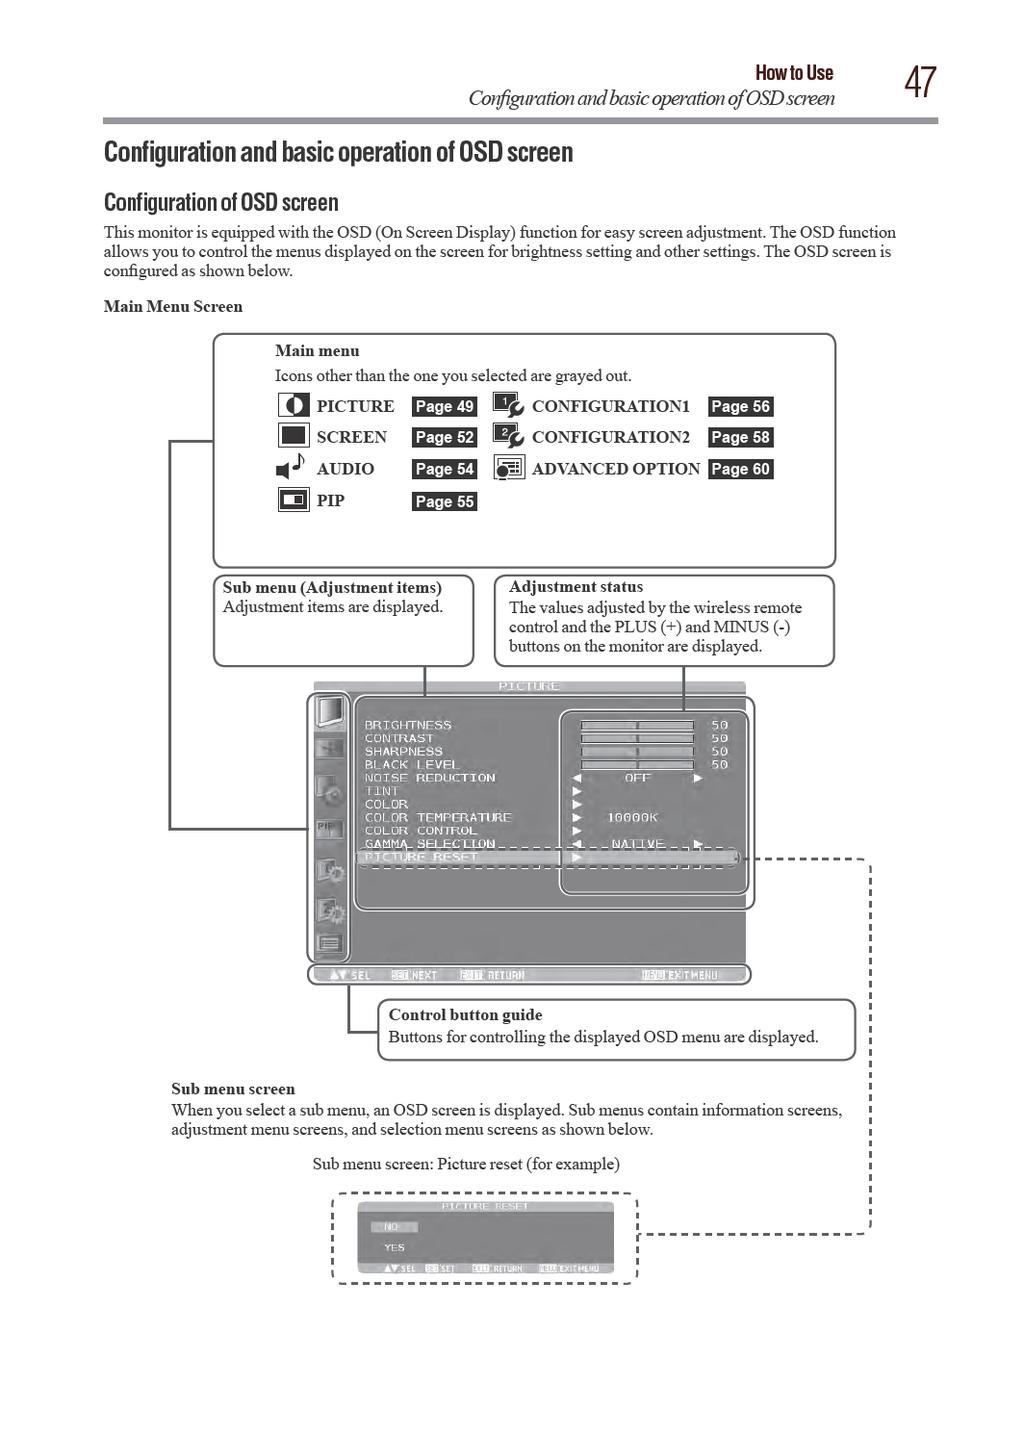
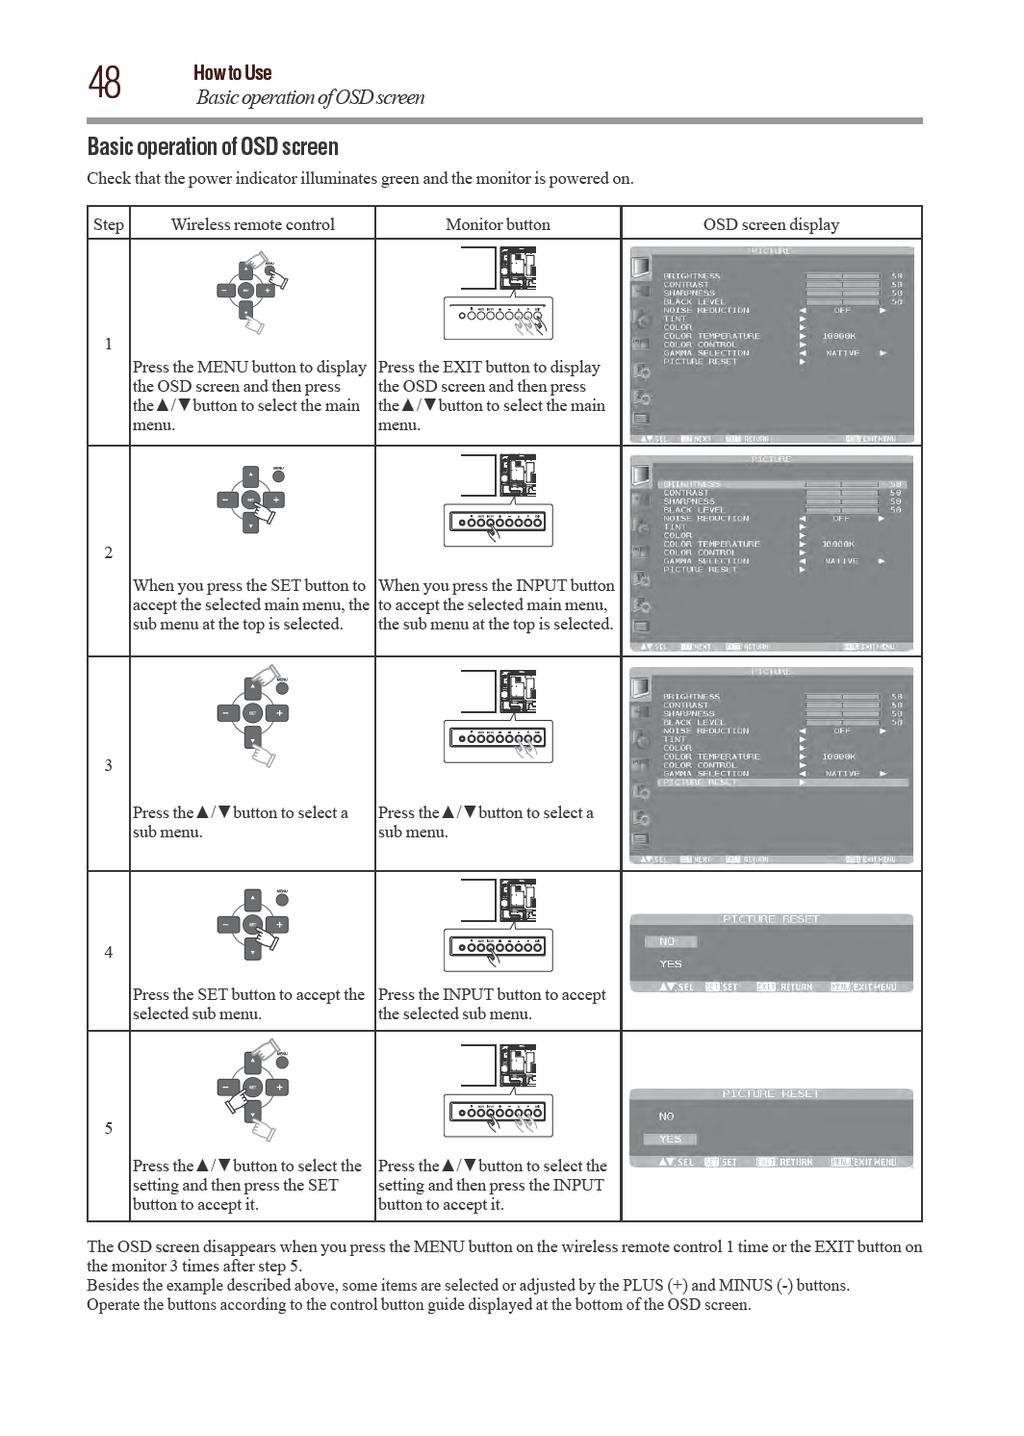
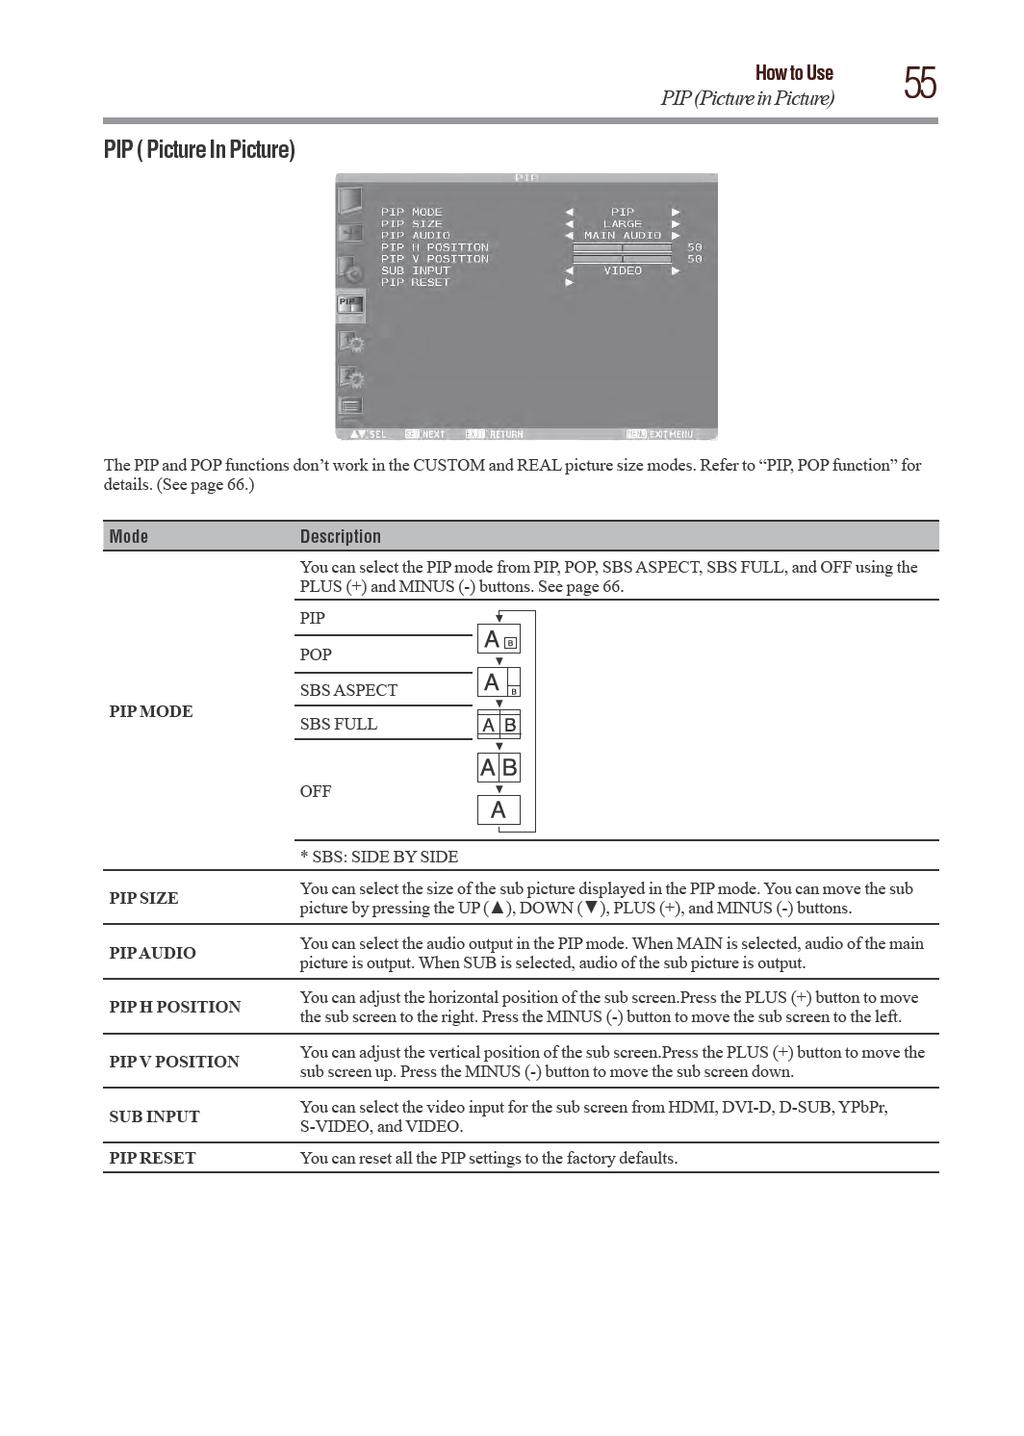
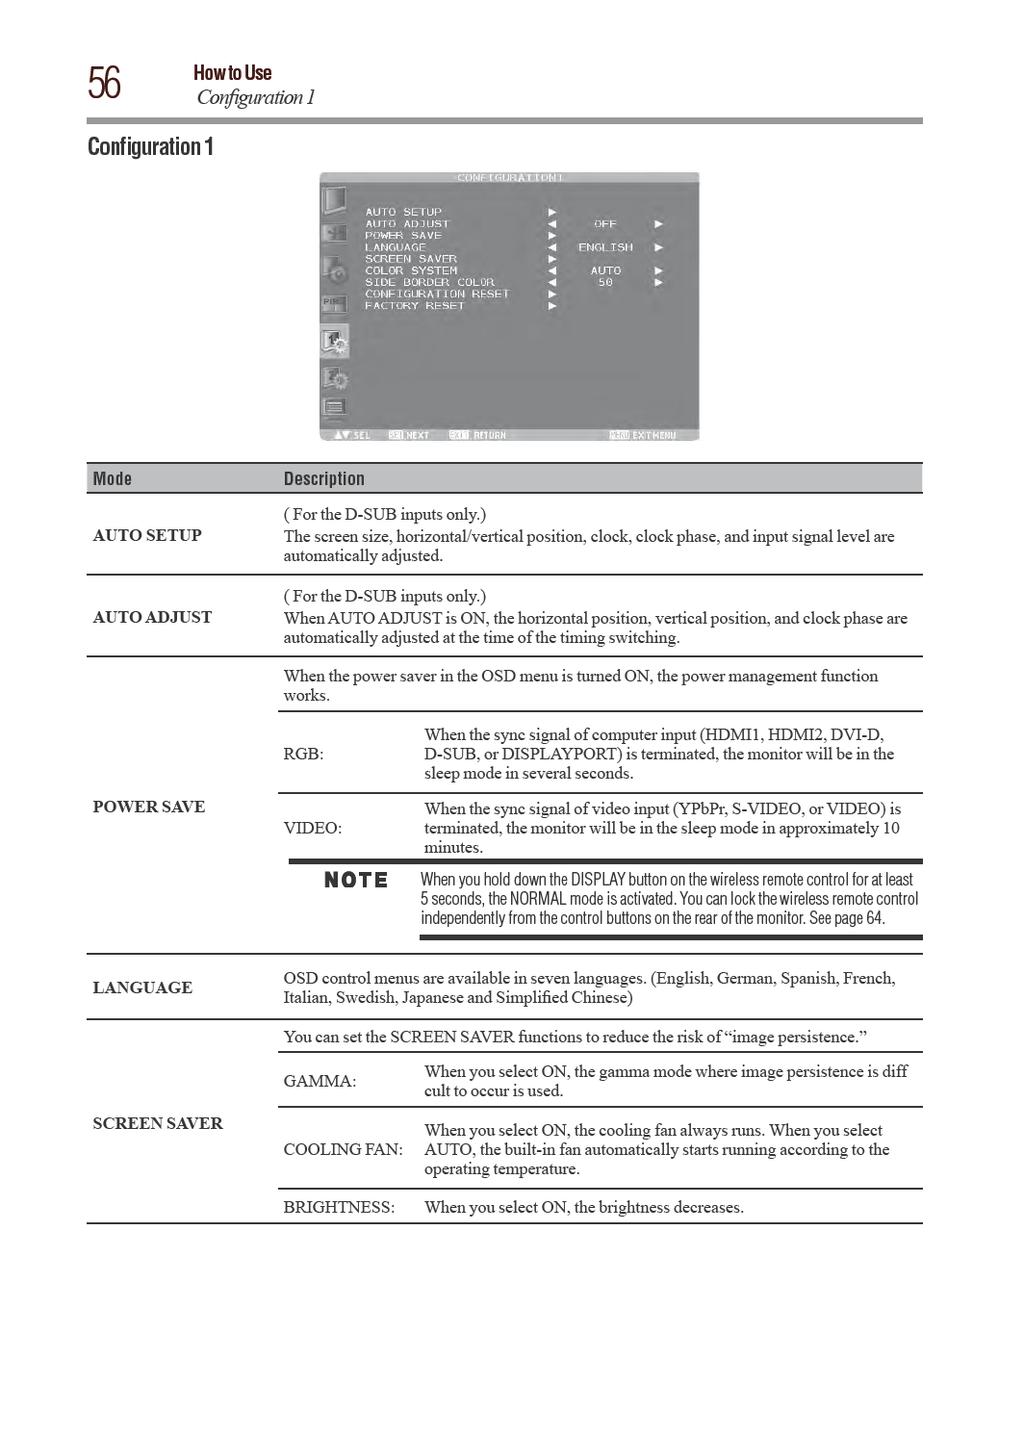
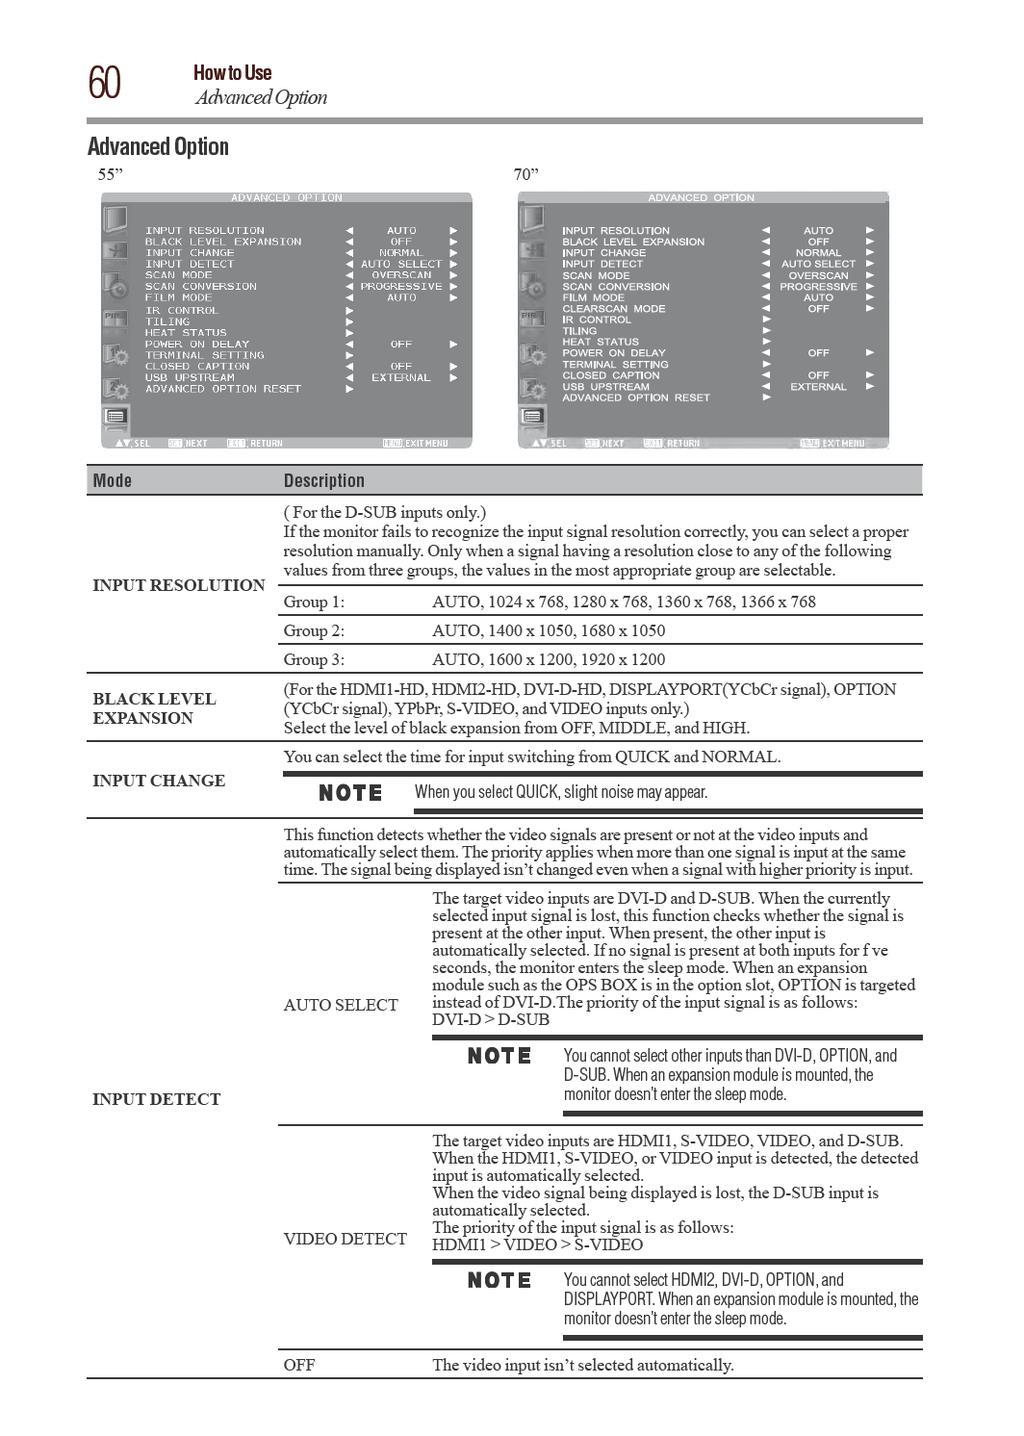
7 Contents 7 Selecting the picture mode...39 Screen adjustment...39 Picture adjustment...40 Speaker setting...40 Volume, balance, and tone control...40 Schedule setting...41 How to set up schedule...42 Remote control...43 RS-232C Remote control...43 LAN Remote control...45 Setting the USB hub...46 Configuration and basic operation of OSD screen...47 Configuration of OSD screen...47 Basic operation of OSD screen...48 Picture...49 Screen...52 Audio...54 PIP ( Picture In Picture)...55 Configuration Configuration Advanced Option...60 Chapter 4: Other functions...63 Picture size...63 Picture mode...63 Control Lock mode...64 OSD information...64 Audio input change...65 Supplemental information of the auto brightness function...65 PIP, POP function...66 Remote control numbering function...67 Chapter 5: Troubleshooting...68 Appendix A: Specifications...70 Appendix B: Pin Assignment...73
8
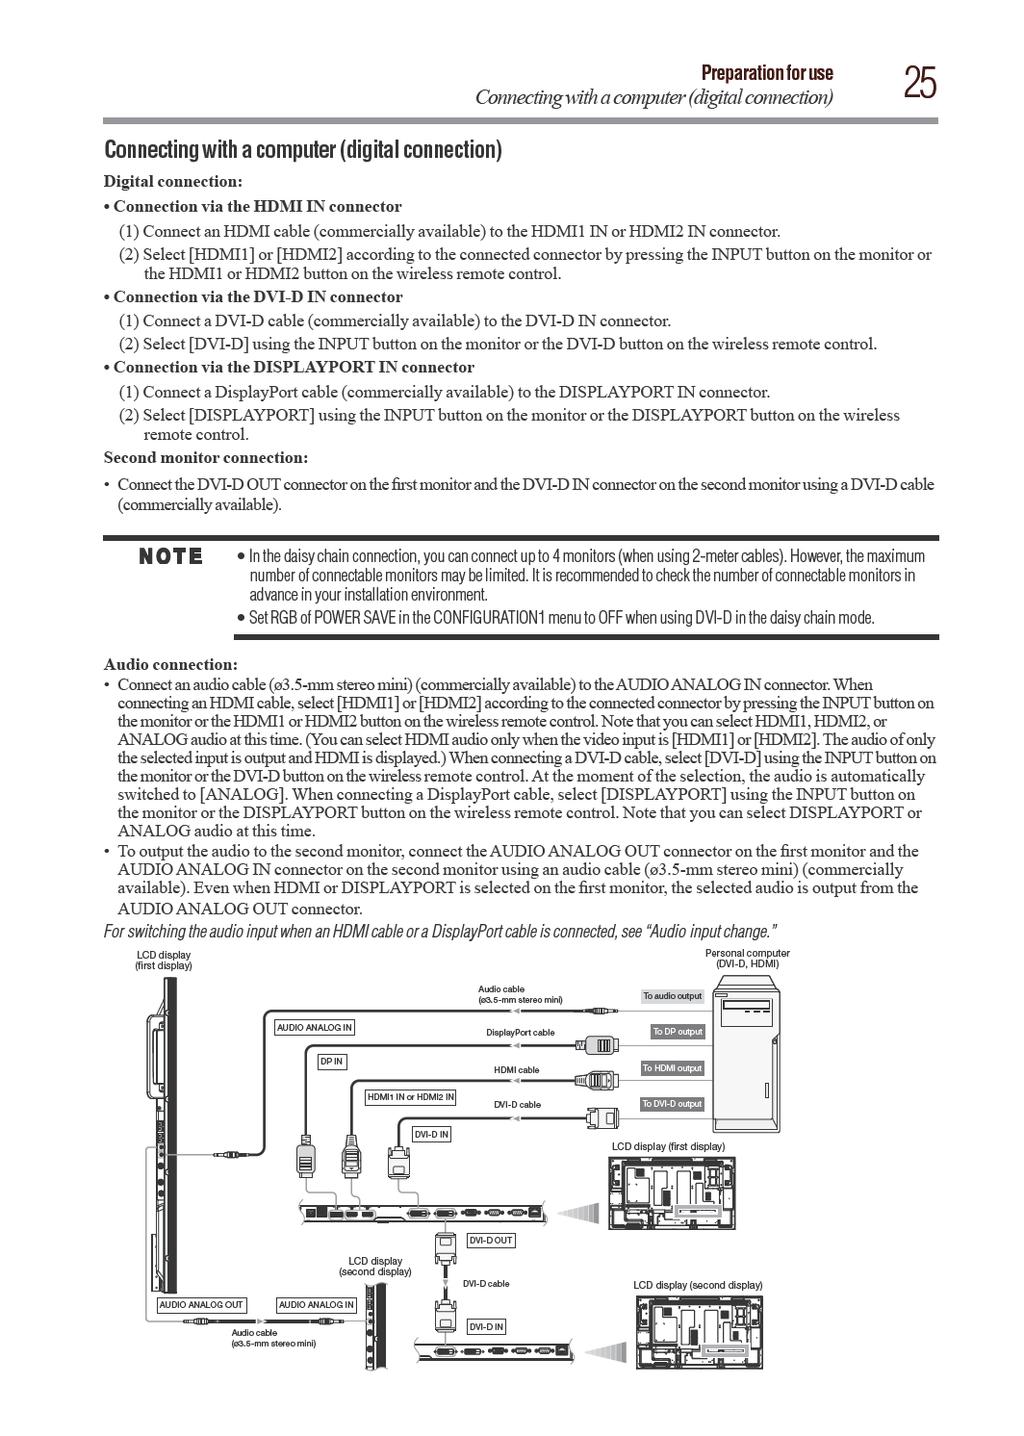
9 Introduction Features 9 v Digital Zoom Zoom mode for expanding 4:3 image to 16:9. Various zoom modes are provided and it is possible to expand 4:3 aspect ratio images to 16:9. In addition, you can select the Dynamic display mode to display naturally widened images with different zooming rates around the screen center and screen edges. You can also optimally change the image size diagonally, horizontally, and vertically. See Page 52. Expansion slot allowing installation of expansion modules according to applications v Option Slot You can mount an expansion module recommended on the monitor. With such expansion module, you can expand the functionality of the monitor according to the purpose of use. See Page 28. Various Management Functions Supporting Efficient Operation and Management v Programmable Scheduling Function The monitor s operating schedule can be programmed for up to seven different scheduled time intervals by time, day of the week and input port. This allows video content from different inputs to be displayed on certain monitors within the same installation according to the schedule, and extends the monitor s life and saves the power by turning it off during those hours or days it is not in use. See Pages 41 and 42. v Screen-saver Functions To reduce image persistence and maximize the panel life in demanding signage applications, this product is equipped with four screen-saver functions. See Page 56. GAMMA COOLING FAN BRIGHTNESS MOTION v Power-on Delay For installations employing numerous monitors, the power-on delay function can power up the monitors sequentially with delay between 2-50 seconds after the power is applied. Using this function can prevent inrush current problems and reduce the overall electrical load requirements when a single power supply is used. See Page 62. v LAN Control You can efficiently and centrally control multiple monitors for reconfiguration and remote diagnosis by sending control commands from a computer via a LAN network. See Pages 31, 45 and 58. Brightness Compensation by the Ambient Light Sensors for Enhanced Visibility and Lower Power Consumption. v Ambient Light Sensors (Brightness sensors) Automatic screen brightness adjustment for enhanced visibility and lower power consumption. The ambient light sensors on the front and rear of the monitor detect not only the light refl ected on the front but also from the rear to automatically adjust the image brightness for optimum viewing. The screen is always easy to view in spite of brightness variation during the day or night. See Page 11 and 65. Others v DisplayPort DisplayPort-compliant terminal is provided. The monitor is equipped with a terminal supporting DisplayPort, a digital interface standard. You can transmit video signals over a single cable up to a maximum of 15-meters long. See Pages 12 and 25. v Built-in Speakers This monitor offers built-in stereo speakers to deliver audio messages. External stereo speakers can also be used. The user has the option to switch between using external or built-in speakers from the menu. See Pages 11 and 40. v Remote Control A wireless remote control is supplied to control the various functions of this monitor, including power on/off, input select, and menu access. See Pages 13 and 14. v Closed Caption You can display captions. When closed-caption is encoded with the video signal, the user can select to display or hide the caption on screen. This monitor is compliant with EIA-608-A. See Page 62. v USB hub function Multiple USB devices can be connected to the computer. The monitor is equipped with the USB hub having 2 self-powered downstream ports, where the USB devices can be connected. You will find this function convenient when mounting a device such as a digital camera and a touch-panel unit on the monitor. See Page 46. v Double-speed Clear Picture (ClearScan ) (Only for 70 PD) Extra frames are generated from the original 60-frame-per-second image based on motion estimation and interpolated to display 120 frames per second. The afterimage effects are reduced and fast-motion images are displayed smoothly. This function also makes moving objects such as scrolling tickers easy to view and shows great effect in digital signage applications where information is conveyed in a short time. See Page 61. v Daisy Chain Connection (DVI-D) By connecting the DVI-D OUT connectors and the DVI-D IN connectors using DVI-D cables (commercially available), you can transmit video signals to up to 4 monitors (when using 2-meter cables). This function is useful in supplying a video signal to multiple monitors. See Page 25.
10
11
12
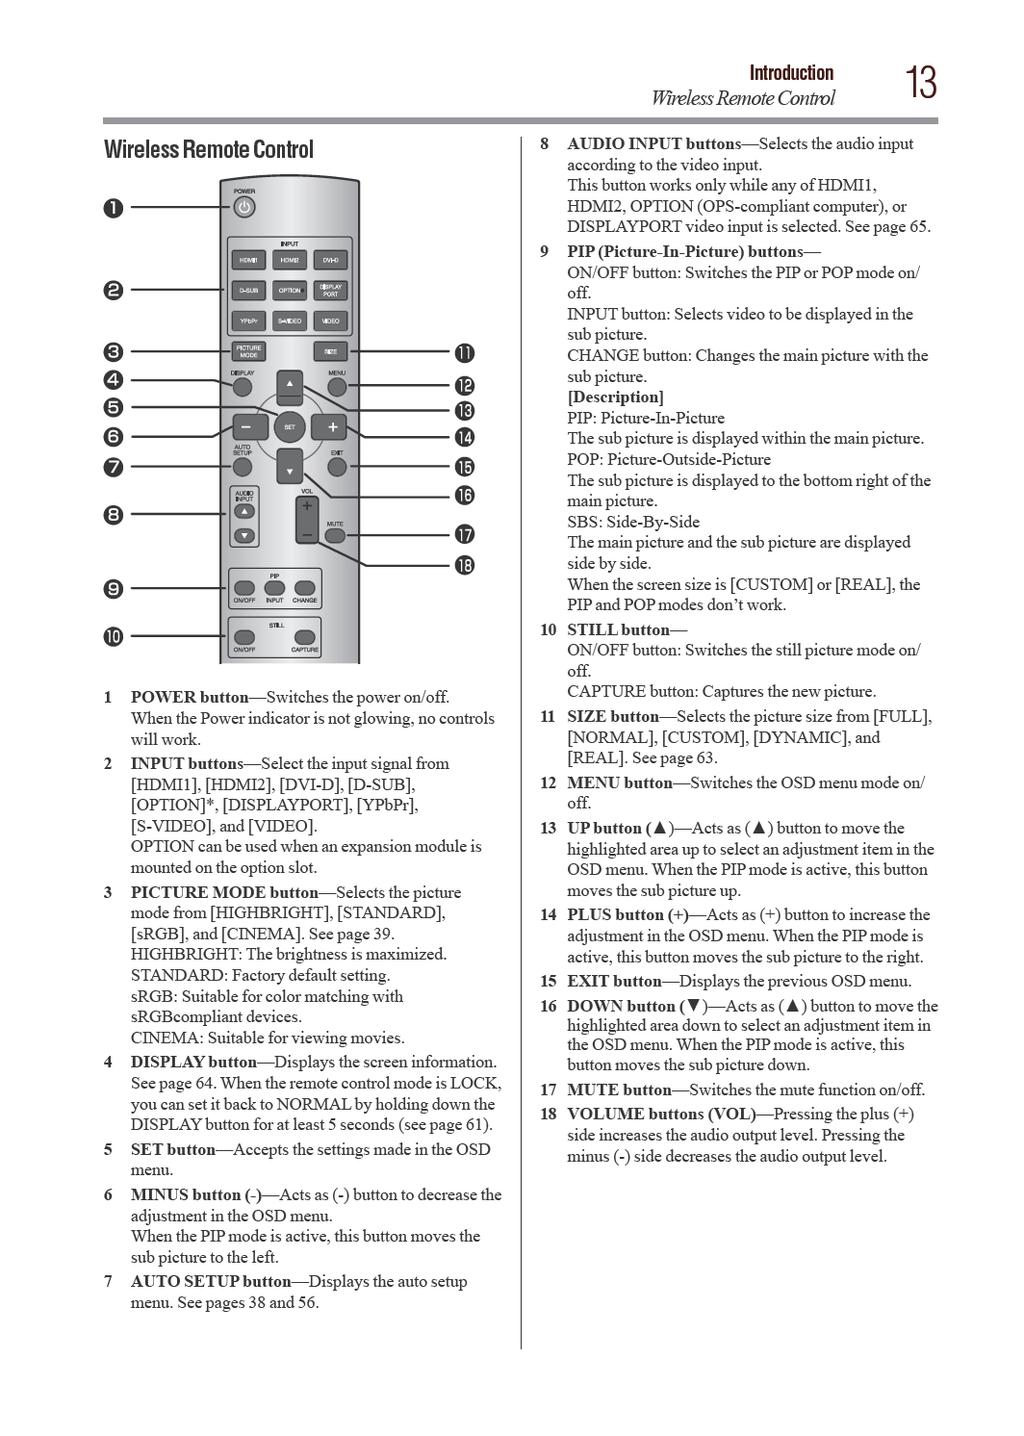
13
14
15
16
17
18
19
20
21
22
23
24
25
26
27
28
29
30
31
32
33
34
35
36
37
38
39
40
41
42
43
44 44 How to Use Remote control 4) Operation commands The operation commands configure the basic operation settings of this LCD display. The commands may not work during signal switchover. The operation commands have no data codes. Operation ASCII HEX POWER ON! 21h POWER OFF " 22h FORCE POWER OFF WITH OPS* " " 22h 22h INPUT HDMI1 _r1 5Fh 72h 31h INPUT HDMI2 _r7 5Fh 72h 37h INPUT DVI-D _r2 5Fh 72h 32h INPUT D-SUB _r3 5Fh 72h 33h INPUT OPTION** _r5 5Fh 72h 35h INPUT DISPLAYPORT _r6 5Fh 72h 36h INPUT VIDEO _v1 5Fh 76h 31h INPUT YPbPr _v2 5Fh 76h 32h INPUT S-VIDEO _v3 5Fh 76h 33h BACKLIGHT LUMINANCE CONTROL _b050 5Fh 62h 30h 35h 30h IR CONTROL ON _i1 5Fh 69h 31h IR CONTROL OFF _i0 5Fh 69h 30h LOCAL-KEY CONTROL ON _k1 5Fh 6Bh 31h LOCAL-KEY CONTROL OFF _k0 5Fh 6Bh 30h * Used when the OPS-compliant computer makes no response. ** OPTION can be used when an expansion module is mounted on the option slot. y After sending the POWER ON or POWER OFF command, wait for at least 12 seconds to send the next command. y After sending a command for video input selection, wait for at least 5 seconds to send the next command. Otherwise, the monitor may not reply within 600 ms. y Set the timeout value of the control device on the host side to 30 seconds or longer. y In the power-off mode, only the POWER ON operation command and the power status acquisition commands described in the next paragraph work. y In the sleep mode, only the POWER ON and POWER OFF operation commands and the power status acquisition commands described in the next paragraph work. When no expansion module is mounted, the FORCE POWER OFF WITH OPS operation command is unavailable. When an expansion module is mounted, all the input connectors don t enter the sleep mode. y After turning off the power using an operation command, wait for at least 2 seconds to turn off the AC power using the main power switch or the breaker. Otherwise, the OSD settings may be reset to the factory defaults. 5) Read command The computer sends the command without datacode to the monitor. After receiving this command, the monitor returns the command with datacode including the current status to the computer. Example: When the computer asks the power status of the monitor, and the status of the monitor is powered-on. Control command from computer Return command from monitor to computer Description of command D 0 0 v P [enter] Sending a command for checking the power status D Monitor is powered-on v P 1 [enter]
45
46
47
48
 button to decrease the brightness. You cannot adjust this item when BRIGHTNESS of SCREEN SAVER in the CONFIGURATION1 menu is ON. You can adjust the contrast.")
49 How to Use Picture 49 Picture Mode BRIGHTNESS CONTRAST SHARPNESS BLACK LEVEL NOISE REDUCTION Description You can adjust the brightness. Press the PLUS (+) button to increase the brightness. Press the MINUS (-) button to decrease the brightness. You cannot adjust this item when BRIGHTNESS of SCREEN SAVER in the CONFIGURATION1 menu is ON. You can adjust the contrast. Adjust the contrast using the PLUS (+) or MINUS (-) button to obtain a desired result. Brightness changes luminance of the backlight. Contrast changes signal levels, and therefore it is likely to lead to whiteness. This adjustment doesn t work in the srgb picture mode. You can adjust the sharpness. Press the PLUS (+) button to make the image look sharper. Press the MINUS (-) button to make the image look softer. If you increase the sharpness setting value too much, lines may appear double. In such a case, decrease the sharpness setting value. You can adjust the brightness in the dark area of the image. Press the PLUS (+) button to brighten dark areas in the image. Press the MINUS (-) button to further darken the dark area of the image. This adjustment doesn t work in the srgb picture mode. ( This function doesn t work on RGB input signals. ) You can adjust the noise reduction level. Press the PLUS (+) button to increase the value to lessen the noise. This adjustment doesn t work in the srgb picture mode. You can adjust all the colors at the same time. Press the PLUS (+) button to add a green tint. Press the MINUS (-) button to add a purple tint. [RED], [MAGENTA], [BLUE], [CYAN], [GREEN], or [YELLOW]:You can adjust each color individually. Press the PLUS (+) button to shift the selected color to the right around the color circle. Press the MINUS (-) button to shift the selected color to the left around the color circle. TINT [TINT]: This adjustment doesn t work in the srgb picture mode.
50 50 How to Use Picture Mode COLOR COLOR TEMPERATURE COLOR CONTROL GAMMA SELECTION AUTO BRIGHTNESS Description [COLOR]:You can adjust all the colors at the same time. Press the PLUS (+) button to deepen the colors. Press the MINUS (-) button to lighten the colors.[red], [MAGENTA], [BLUE], [CYAN], [GREEN], or [YELLOW]:You can adjust each color individually. Press the PLUS (+) button to deepen the selected color. Press the MINUS (-) button to lighten the selected color. This adjustment doesn t work in the srgb picture mode. You can adjust the color temperature.the image becomes reddish as the color temperature decreases, and it becomes bluish as the color temperature increases. This adjustment doesn t work in the srgb picture mode. The color levels of red, green, and blue are adjusted by the color bars. R: Red, G: Green, B: Blue This adjustment doesn t work in the srgb picture mode. You can select the gamma mode from NATIVE, S GAMMA, 2.2, 2.4, OPTION, and PROGRAMMABLE.PROGRAMMABLE can change the GAMMA characteristic curve via a computer.contact your dealer for further details. GAMMA is f xed to 2.2 in the srgb picture mode. When PROGRAMMABLE has been selected, the setting for color temperature i s f xed at 10,000 K (NATIVE). This function controls the screen brightness depending on the ambient light for easy viewing.in addition, it changes the screen brightness depending on the ambient light and what are displayed on the screen to reduce power consumption as low as possible. This adjustment doesn t work in the srgb or CINEMA picture mode. [AUTO BRIGHTNESS] The settings of AUTO BRIGHTNESS are adjusted automatically. AUTO: When you sele ct AUTO, you cannot adjust any other items than [CONTROL] individually. The AUTO BRIGHTNESS function is enabled and you can adjust LOCAL: [CONTROL] and subsequent items individually. The AUTO BRIGHTNESS function is enabled. In addition, the monitor REMOTE: enters the intercommunication mode where multiple monitors are controlled collectively. (See page 65.) OFF: This function is disabled. [CONTROL] Select this setting to conf gure the monitor as Master when controlling PRIMARY: SECONDARY: multiple monitors collectively. Select this setting to use the monitor alone or to conf gure the monitor as Slave when controlling multiple monitors collectively. [LIGHT FROM BACK] This function is enabled only when [REAR SENSOR] is ON.When a light source such as a light and a window is behind the monitor, the rear sensor takes precedence. Select this setting when there is a light source such lighting equipment and YES: a window behind the monitor. Select this setting when there is no light source such lighting equipment NO: and a window behind the monitor. [BACK WALL] This function is enabled only when [REAR SENSOR] is ON.Select the following settings according to the distance between the rear of the monitor and the wall or window. FAR: The distance is 5 meters or longer. NEAR: The distance is 5 meters or shorter. [FRONT SENSOR] Select ON for normal use. OFF: Select this setting when the sensor on the front panel is shielded.
51 How to Use Picture 51 Mode AUTO BRIGHTNESS PICTURE RESET Description [REAR SENSOR] Select ON for normal use. OFF: Select this setting when the sensor on the rear panel is shielded. [SATURATION] ON: The image saturation is adjusted depending on the ambient light. OFF: Image saturation isn t adjusted. [VIDEO DETECT] The screen brightness varies depending on what are displayed on the screen ON: to reduce power consumption of the monitor. The screen brightness doesn t vary and the power consumption isn t OFF: reduced. You can reset all the PICTURE settings to the factory defaults.
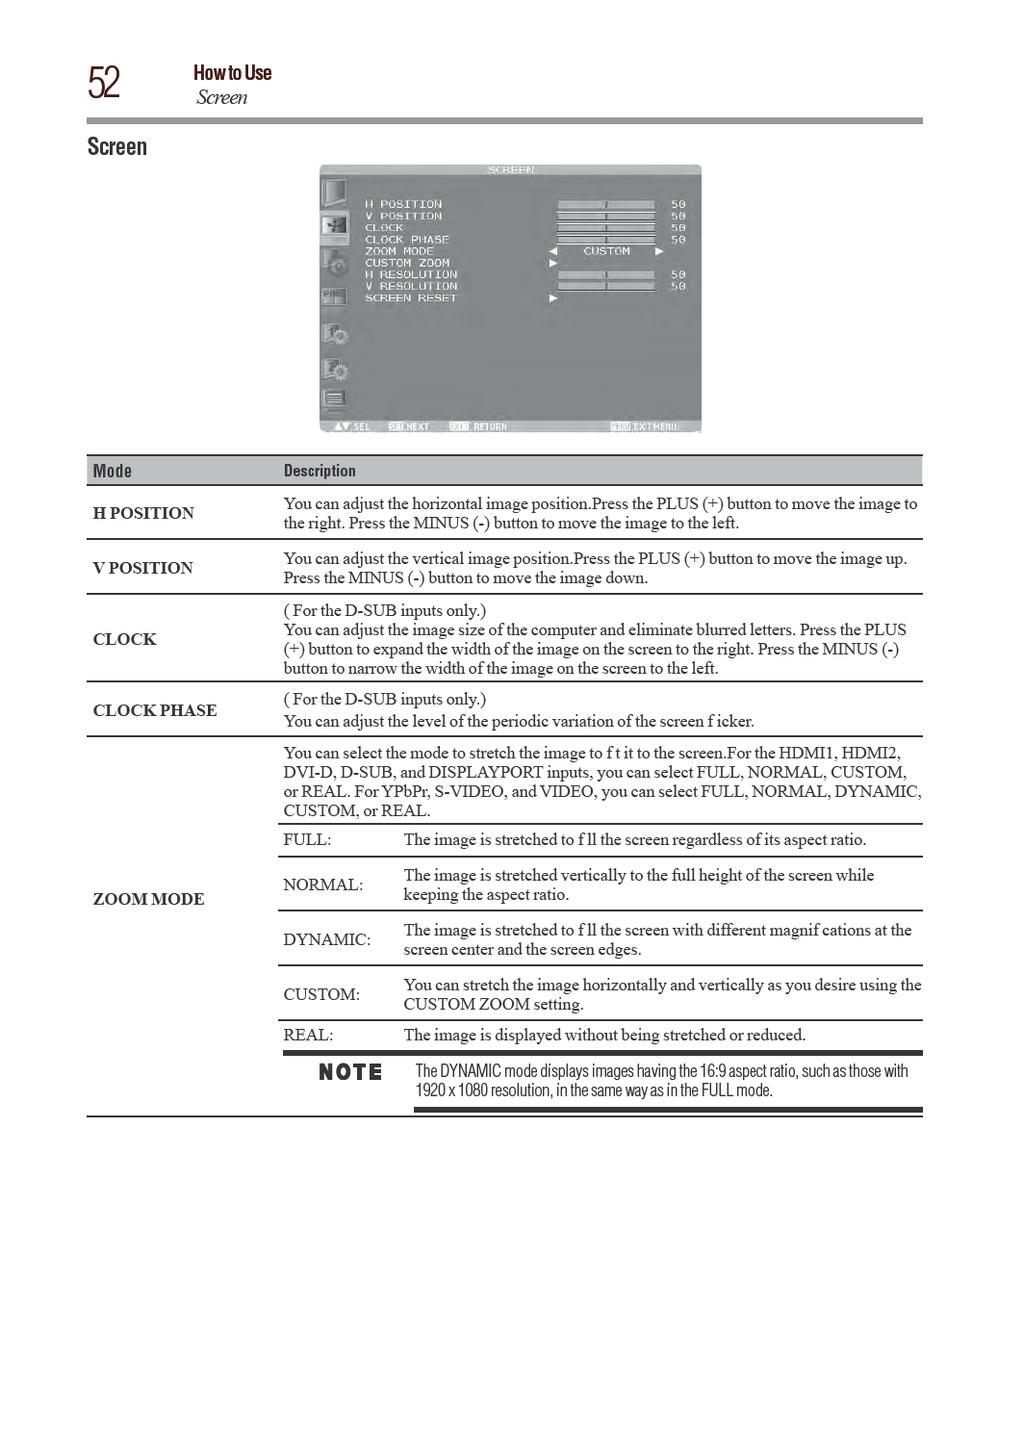
52
53 How to Use Screen 53 Mode Description CUSTOM ZOOM becomes selectable when you set ZOOM MODE to CUSTOM. CUSTOM ZOOM ZOOM: H ZOOM: V ZOOM: H POSITION: V POSITION: You can expand the horizontal and vertical sizes simultaneously. You can expand the horizontal size only. You can expand the vertical size only. Pressing the PLUS (+) button moves the image to the right. Pressing the MINUS (-) button moves the image to the left. Pressing the PLUS (+) button moves the image up. Pressing the MINUS (-) button moves the image down. H RESOLUTION V RESOLUTION SCREEN RESET ( For the D-SUB inputs only.) Use this setting when AUTO SETUP and AUTO ADJUST cannot obtain the horizontal resolution of the input signal. Press the PLUS (+) button to increase the resolution. Press the MINUS (-) button to decrease the resolution. ( For the D-SUB inputs only.) Use this setting when AUTO SETUP and AUTO ADJUST cannot obtain the vertical resolution of the input signal. Press the PLUS (+) button to increase the resolution. Press the MINUS (-) button to decrease the resolution. You can reset all the SCREEN settings to the factory defaults.
 button to decrease the right volume. You can adjust the high frequency sound. Press the PLUS (+) button to increase the treble sound.")
54 54 How to Use Audio Audio Mode BALANCE TREBLE BASS Description You can adjust the balance of the right and left volumes. Press the PLUS (+) button to decrease the left volume. Press the MINUS (-) button to decrease the right volume. You can adjust the high frequency sound. Press the PLUS (+) button to increase the treble sound. Press the MINUS (-) button to decrease the treble sound. You can adjust the low frequency sound. Press the PLUS (+) button to increase the bass sound. Press the MINUS (-) button to decrease the bass sound. You can switch the built-in speakers and external stereo speakers. SPEAKER AUDIO RESET INTERNAL: EXTERNAL: To output from the built-in speakers (Maximum output 10 W + 10 W) To output from external speakers (Maximum output 10 W + 10 W) You can reset all the AUDIO settings to the factory defaults.
55
56
57

58 58 How to Use Configuration 2 Configuration 2 Mode SERIAL CONTROL Description Select the communication interface (RS-232C, OPS (OPS-compliant computer), or LAN) for the serial communication function. For connection of the signal cable, see page 30. You can set the communication parameters for the LAN network. Select whether to use DHCP client or not. Select OFF when not using it, and DHCP CLIENT: select ON when using it. LAN SETTING IP ADDRESS: SUBNET MASK: DEFAULT GATEWAY: PORT: RESET: When DHCP CLIENT is OFF, set the IP address of the monitor. When DHCP CLIENT is ON, you can check the value set by the DHCP server. When DHCP CLIENT is OFF, set the gateway mask. Set it to for normal use. When DHCP CLIENT is ON, you can check the value set by the DHCP server. When DHCP CLIENT is OFF, set the IP address of the gateway router to externally connect the local area including the monitor. When DHCP CLIENT is ON, you can check the value set by the DHCP server. The port number (60822) of the monitor is displayed. LAN settings are reset. When using remote control, the timeout for transmission intervals among codes within the control command can be set. CONTROL TIME OUT MONITOR ID OSD TURN OFF OSD H POSITION OSD V POSITION OSD ROTATION 10 ms: Set the time out intervals to 10 milliseconds. 2 s: Set the time out intervals to 2 seconds. 30 s: Set the time out intervals to 30 seconds. ID numbers for wireless remote control are assigned to TD-Z551 and TD-Z701 monitors that are multi-connected via RS-232C. ID numbers 1 to 26 are selectable. The OSD control menu will stay on as long as it is used.the preset choices are seconds. You can adjust the horizontal position of the OSD menu. You can adjust the vertical position of the OSD menu. The OSD screen is rotated.
59
60
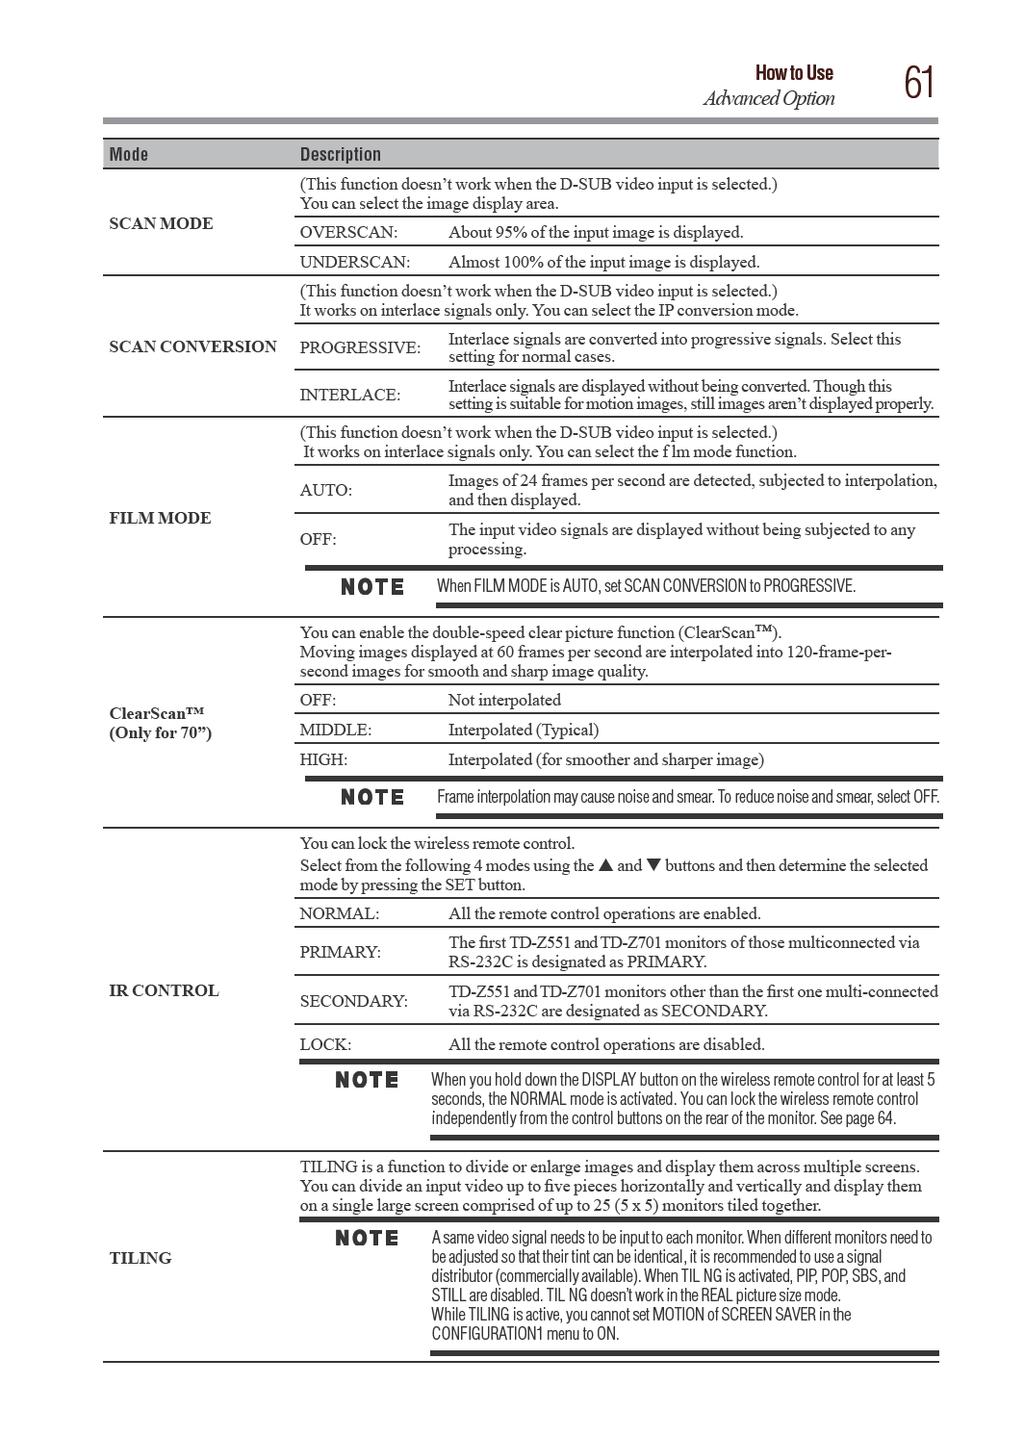
61
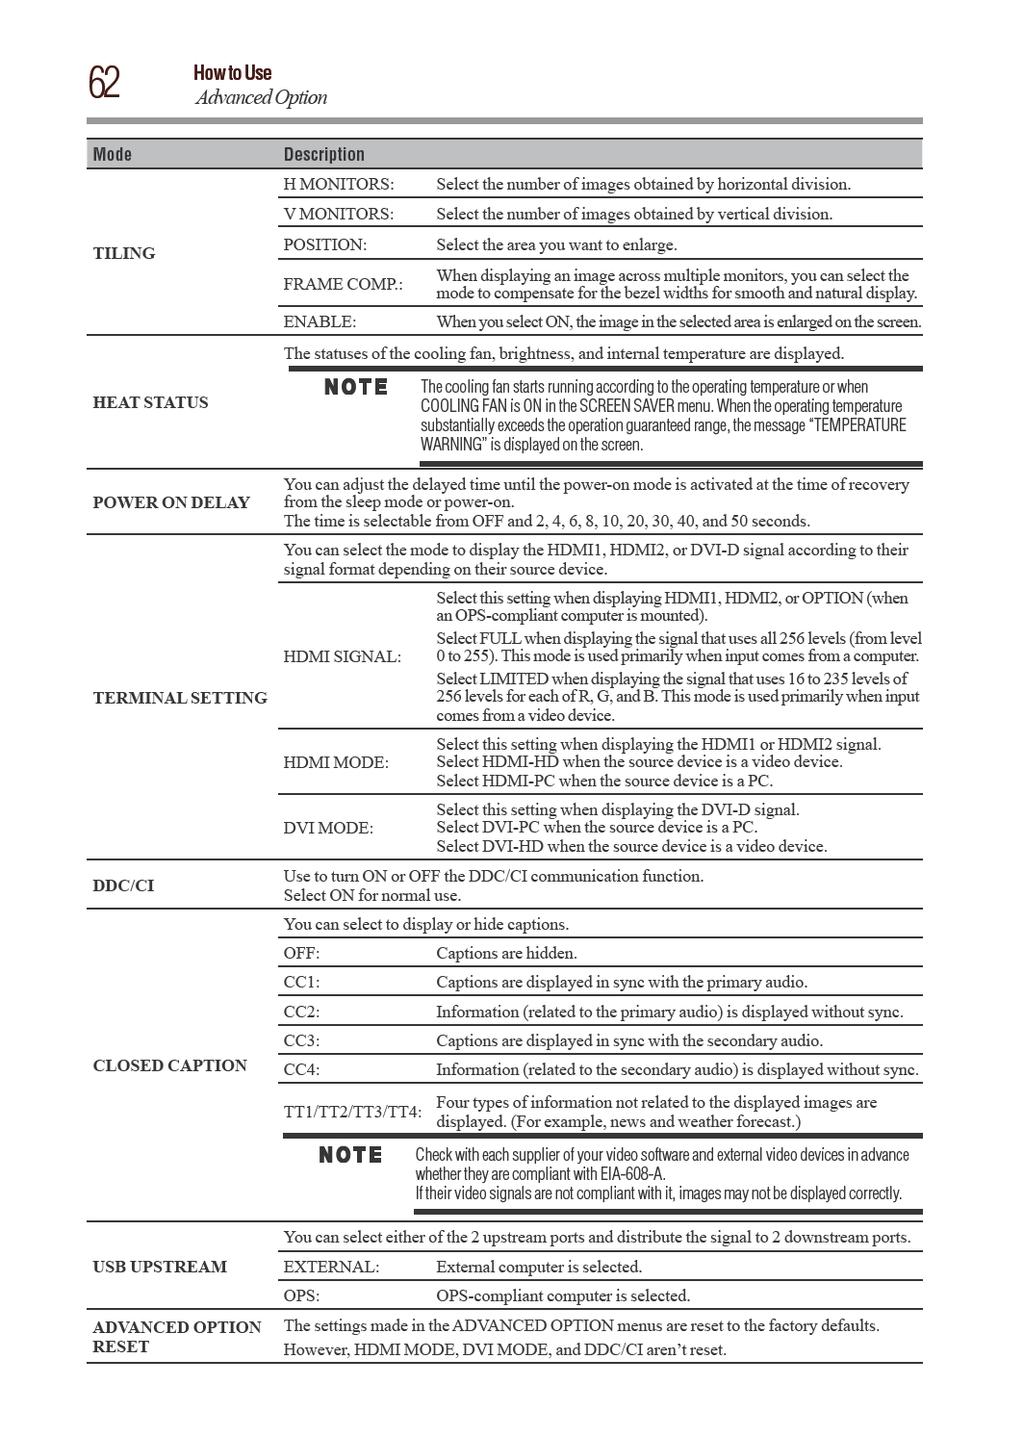
62
63
64 64 Other functions Control Lock mode Control Lock mode You can lock the operation buttons so that the image adjustments you made aren t changed even when the buttons are pressed.by holding down both the and button on the monitor for 3 seconds or longer, you can lock the operation buttons. By holding down both the and button on the monitor for 3 seconds or longer again, you can unlock the operation buttons. OSD information HDMI1, HDMI2, DVI-D, D-SUB, DISPLAYPORT Current selection (DVI-D) Resolution Horizontal/vertical frequency Audio input mode Picture size mode OPTION (OPS-compliant computer) Current selection ((OPTION (OPS-compliant computer))resolution Horizontal/vertical frequency Audio input mode Picture size mode YPbPr Current selection (YPbPr) Audio input mode Picture size mode S-VIDEO, VIDEO Current selection (S-VIDEO) Color system mode Audio input mode Picture size mode PIP, POP Main : DVI-D Sub : S-VIDEO Main picture information Audio input mode Sub picture information Main picture size
65 Other functions Audio input change 65 Audio input change You can select the audio input using the AUDIO INPUT button.note that the selectable audio inputs vary depending on the currently selected video signal input. Selection of the video signal input HDMI1 or HDMI2 DVI-D D-SUB ANALOG only ANALOG only OPTION** PC (OPS-compliant computer) DISPLAYPORT YPbPr S-VIDEO VIDEO ANALOG only ANALOG only ANALOG only ANALOG only * The audio of HDMI1 or HDMI2 being selected is output as the HDMI audio. ** OPTION can be used when an expansion module is mounted on the option slot. Supplemental information of the auto brightness function To control multiple monitors collectively In such a case where the tiling function is used, you can control the auto brightness function by sharing the detection result of the brightness sensor of a certain monitor among the connected monitors. 1 Multi-connect the monitors using RS-232C cables (commercially available) as shown by the example below. Master: Monitor conf gured as Master that detects the outside light (Monitor ID is 1.) Slave: Monitor controlled by the Master monitor (Monitor ID is other than 1.) 2 Assign a monitor ID to each multi-connected TD-Z551/ TD-Z701 using MONITOR ID. (See page 58.) Monitor ID is selectable from 1 to 26. The monitor ID of the Master monitor should be 1 and those of the Slave monitors should be other than 1. You are recommended to assign IDs to the monitors consecutively from 1, 2, 3, and on. 3 Set AUTO BRIGHTNESS on the OSD screen (PICTURE) as follows. AUTO BRIGHTNESS CONTROL Master monitor LOCAL PRIMARY Slave monitors REMOTE SECONDARY To use a computer to control the monitors When using a computer to control the monitors, you must prepare an application software program for control by yourself. Brightness of all the monitors can be controlled centrally using a computer, if the customer create a control application to remotely read the value from two brightness sensors of any monitor and distribute it to all monitors. 1 Connect the RS-232C IN connector of the Master monitor shown above and the RS-232C connector of the computer using an RS-232C cable. The communication control function via LAN isn t supported on the monitor alone, however, it is available when the monitor is used with the computer.
66
67 Other functions Remote control numbering function 67 Remote control numbering function By connecting multiple TD-Z551 and TD-Z701 monitors using RS-232C cables, you can control any one monitor or all the monitors by one remote controller. 1 Assign arbitrary ID number to each of multi-connected TD-Z551 and TD-Z701 monitors using MONITOR ID. ID numbers 1 to 26 are selectable. It is recommended to assign sequential ID numbers from 1 and up. 2 The remote control mode of the first TD-Z551/TD-Z701 monitor is set to PRIMARY and those of the other monitors are set to SECONDARY. 3 When you direct the remote controller at the remote control signal sensor of the PRIMARY monitor and press the DISPLAY button on the remote controller, the ID selection OSD appears at the upper left of the screen. ID number of the currently viewed monitor Select the ID number of the monitor you want to control using the +/- button on the remote controller. The ID of the monitor you want to control is displayed at the upper left of its screen. By selecting ALL, you can control all the multiconnected monitors. 4 Direct the remote controller at the remote control signal sensor of the PRIMARY monitor. OSD appears on the monitor having the ID number you selected. When the ID selection OSD is being displayed on the PRIMARY monitor, press the DISPLAY button on the remote controller again to cancel the ID selection OSD and then control the monitor you selected.if you set the remote control mode wrongly and remote control operation becomes unavailable, press any button on the control panel of the monitor to display the OSD screen and change the remote control mode using ADVANCED OPTION. By pressing and holding down the DISPLAY button on the remote control for 5 seconds or longer, the remote control mode is initialized to NORMAL.
68 Chapter 5 Troubleshooting General troubleshooting Before calling a service technician, review this chapter for possible causes/solutions for the problem you are experiencing. Before you begin to troubleshoot any problem, first unplug the monitor from the AC wall outlet, wait approximately one minute, and then plug the monitor back into the AC wall outlet. If the problem still exists attempt to troubleshoot the problem. No picture The signal cable should be securely connected to the display card/computer. The display card should be securely seated in its slot. The Main Power Switch and the computer power switch should be in the ON position. Make sure that the correct mode has been selected on the display card or system being used. (Please consult the display card or system manual to change the graphics mode.) Check the monitor and your display card with respect to the compatibility and recommended settings. Check the signal cable connectors for bent or pushed-in pins. Power button does not respond Unplug the power cord of the monitor from the AC outlet to turn off and reset the monitor. Image persistence Please be aware that LCD Technology may experience a phenomenon known as image persistence. Image persistence occurs when a residual or ghost image of a previous image remains visible on the screen. Unlike CRT monitors, LCD displays image persistence is not permanent, but constant images being displayed for a long period of time should be avoided. To alleviate image persistence, turn off the monitor for as long as the previous image was displayed. For example, if an image was on the monitor for one hour and a residual image remains, the monitor should be turned off for one hour to erase the image. As with all display devices, recommends displaying moving images and using a moving screen saver at regular intervals whenever the screen is idle or turning off the monitor when not in use. Image is unstable, unfocused or swimming is apparent Signal cable should be securely attached to the computer. Use the OSD Image Adjust controls to focus and adjust the display by increasing or decreasing the fine adjustment. When the display mode is changed, the OSD Image Adjust settings may need to be re-adjusted. Check the monitor and your display card with respect to the compatibility and recommended signal timings. If the displayed text is garbled, change the video mode to the non-interlace mode and use 60 Hz refresh rate. Image of component signal is greenish Check to see if the YPbPr input connector is selected. LED on the monitor is not lit (No green or red color can be seen) Power Switch should be in the ON position and power cord should be connected. Make certain the computer is not in the power-saving mode (touch the keyboard or mouse). RED LED on the monitor is blinking A certain failure may have occurred. Please contact your nearest authorized service facility. Displayed image is not sized properly Use the OSD Image Adjust controls to increase or decrease the coarse adjustment. 68
69 Troubleshooting General troubleshooting 69 Make sure that the correct mode has been selected on the display card or system being used. (Please consult the display card or system manual to change the graphics mode.) Selected resolution is not displayed properly Use OSD Display Mode to enter Information menu and check that the appropriate resolution has been selected. If not, select corresponding option. No sound Check to see if the speaker cable is properly connected. Check to see if the mute is activated. Check to see if the volume is set to the minimum level. Wireless remote control is not available Check the wireless remote control s batteries status. Check if the batteries are inserted correctly. Check if the wireless remote control is pointing at the monitor s remote sensor. SCHEDULE / OFF TIMER function is not working properly The SCHEDULE function will be disabled when the OFF TIMER is set. If the OFF TIMER function is enabled and the power to the LCD display is turned off if the power supply is interrupted unexpectedly, then the OFF TIMER will be reset. Either light vertical or horizontal stripes may appear, depending on the specific display pattern. This is no product fault or degradation.
70
71 Specifications Input / Output Signal 71 External Speaker Output External speaker, impedance 8 ohm, audio output 10W+10W (stereo) Input / Output Signal PC Input / Output Input Connector Analog Digital MINI D-SUB 15-pin (PC/AV Common) Output Connector Digital DVI-D (HDCP supported) Horizontal Frequency Vertical Frequency Pixel Clock Video Signal Sync Signal Supported Resolution HDMI x 2 (PC/AV Common), DVI-D (HDCP supported), DISPLAYPORT Analog: /15.734, 31.5 khz khz, Digital: 31.5 khz khz 50/58 Hz - 85 Hz Analog Digital MHz MHz Analog: Analog RGB, Digital: TMDS (with HDCP) Analog: Separate (TTL), Composite (TTL), Sync on Green, Digital: TMDS 640 x 480, 800 x 600, 1024 x 768, 1280 x 768, 1360 x 768, 1280 x 1024,1600 x 1200 (Compressed/Simplified), 1920 x 1080, 1920 x 1200 (Compressed/Simplified) AV Input / Output Composite <BNC>, Separate (Y/C) <S-TERMINAL>, MINI D-SUB 15-pin Analog Input Connector (PC/AV Common) Digital HDMI x 2 (PC/AV Common) Output Connector Analog Composite <BNC> Supported Resolution Composite/S-terminal: NTSC, PAL, SECAM, 4.43 NTSC, PAL-60 Component: 480i, 480p, 576i, 576p, 1080i, 720p, 1080p Audio Input / Output Analog ø3.5-mm stereo mini jack Input Connector Digital HDMI x 2 (digital audio), DISPLAYPORT Output Connector Analog ø3.5-mm stereo mini jack Option slot Option slot Slot interface Digital (OPS) slot Built-in Speaker Output Audio output 10 W + 10 W (stereo) Control Input / Output Input Connector RS-232C <D-SUB 9-pin>, LAN <Modular 8-pin> Output Connector RS-232C <D-SUB 9-pin>
72
73
74
75
76 HDA51C7002I
P-2 Installing the monitor (continued) Carry out as necessary
 Carry out as necessary") P-2 Installing the monitor (continued) Carry out as necessary Using the monitor without the bezel MDT552S satisfies the UL requirements as long as it is used with the bezel attached. When using the monitor
P-2 Installing the monitor (continued) Carry out as necessary Using the monitor without the bezel MDT552S satisfies the UL requirements as long as it is used with the bezel attached. When using the monitor
Durable and Reliable Design for 24/7 Use. Overview. Narrow Bezel Optimized for Video Walls. 42 Narrow bezel commercial LED display
 Durable and Reliable Design for 24/7 Use 42 Narrow bezel commercial LED display Overview The ViewSonic CDP4260-L is a 42 (42 viewable) commercial LED display designed for use 24 hours a day, 7 days a week.
Advantech Proudly Presents Professional Monitor Series
 Advantech Proudly Presents Professional Monitor Series Model PN-E421 P/N: DSD-420N-70FH-S1E The 42" Class (42-1/16" Diagonal) LCD monitor offers exceptionally high image quality and reliability for use
OPERATING GUIDE. HIGHlite 660 series. High Brightness Digital Video Projector 16:9 widescreen display. Rev A June A
 OPERATING GUIDE HIGHlite 660 series High Brightness Digital Video Projector 16:9 widescreen display 111-9714A Digital Projection HIGHlite 660 series CONTENTS Operating Guide CONTENTS About this Guide...
Expand Your Horizons Public Displays for Wide-ranging Applications
 LCD PUBLIC DISPLAY Expand Your Horizons Public Displays for Wide-ranging Applications MITSUBISHI ELECTRIC VISUAL SOLUTIONS AMERICA Professional Product Sales Phone: 888.307.0349 www.mitsubishi-presentations.com
For safe and correct use, be sure to read the Safety Information in Read This First before using the machine. Operating Instructions
 For safe and correct use, be sure to read the Safety Information in Read This First before using the machine. Operating Instructions Table of Contents 1 Disclaimer...2 1. Using the Remote control... 3
LCD PUBLIC DISPLAY. Slim Eye-catching Bezel Design Advanced High-definition Digital Signage Display
 LCD PUBLIC DISPLAY Slim Eye-catching Bezel Design Advanced High-definition Digital Signage Display Highly Aesthetic Innovative Design Durable Full High-definition Panel Superior Functionality Large-format
Video Wall Installation Guide User Guide
 Video Wall Installation Guide User Guide IMPORTANT: Please read this User Guide to obtain important information on installing and using your product in a safe manner, as well as registering your product
T2210HD/T2210HDA 21.5 Wide-Screen LCD Monitor User Manual
 T2210HD/T2210HDA 21.5 Wide-Screen LCD Monitor User Manual Table of Contents Package contents...3 Installation...4 To connect the monitor to your PC... 4 Adjusting your monitor...5 Functions of the buttons
Expand Your Horizons LCD PUBLIC DISPLAY
 Eco Changes is the Mitsubishi Electric Group s environmental statement, and expresses the Group s stance on environmental management. Through a wide range of businesses, we are helping contribute to the
2013, 2014 Hewlett-Packard Development Company, L.P.
 User Guide 2013, 2014 Hewlett-Packard Development Company, L.P. The only warranties for HP products and services are set forth in the express warranty statements accompanying such products and services.
Warranty Information
 Accuform Signs does not handle the warranty for the Digital Signage Displays. Please read below for details on the warranty of your product. If you are having trouble and need assistance, please contact
USER MANUAL. 27 Full HD Widescreen LED Monitor L27ADS
 USER MANUAL 27 Full HD Widescreen LED Monitor L27ADS TABLE OF CONTENTS 1 Getting Started 2 Control Panel/ Back Panel 3 On Screen Display 4 Technical Specs 5 Care & Maintenance 6 Troubleshooting 7 Safety
MultiSync LCD " LCD Colour Monitor
 User s Manual MultiSync LCD5710 57" LCD Colour Monitor Index Declaration of conformity... English-1 Important Information... English-2 Warning, Caution... English-2 Declaration... English-2 Safety Precautions,
User's Manual USER S MANUAL MANUEL UTILISATEUR MANUAL DEL USUARIO 1-1
 User's Manual USER S MANUAL MANUEL UTILISATEUR MANUAL DEL USUARIO 1-1 Index Important Information... English-1 Safety Precautions, Maintenance & Recommended Use... English-3 Contents... English-4 Parts
XHD inch Widescreen LCD Monitor USERGUIDE
 XHD3000 30-inch Widescreen LCD Monitor USERGUIDE Contents Chapter 1: Checking Out Your Monitor...... 1 Package contents....................................... 2 Monitor features.......................................
A Perfect Solution for Digital Signage in Commercial Areas CDE4600-L
 The ViewSonic is a 46" commercial LED display with a 19.5mm narrow-bezel design. Featuring Full HD 1080p resolution, 350-nit high brightness, 4000:1 high contrast ratio, SuperClear technology for wide
TX-40CX700E TX-50CX700E TX-55CX700E TX-65CX700E. e HELP. English
 TX-40CX700E TX-50CX700E TX-55CX700E TX-65CX700E e HELP English Read first ehelp How to use 12 Features 4K resolution 13 Home Screen 14 Info Frame 15 TV Anywhere 16 DVB-via-IP 17 Easy Mirroring 18 Home
Broadcast A/V Division M-LYNX-702 V.3. Dual 7 LCD Display. User Manual
 Broadcast A/V Division M-LYNX-702 V.3 Dual 7 LCD Display User Manual 1. Package Includes Table of Contents 1. Package Includes Table of Contents 01 02 One M-LYNX-702 Monitor One universal AC power adapter
HP EliteDisplay LED Backlit Monitors. User Guide
 HP EliteDisplay LED Backlit Monitors User Guide 2013 Hewlett-Packard Development Company, L.P. Microsoft and Windows are U.S. registered trademarks of Microsoft Corporation. The only warranties for HP
Part names (continued) Remote control
 Remote control") Introduction Part names (continued) Remote control (1) STANDBY ( 25) (1) (2) ON ( 25) (3) (3) ID - 1 / 2 / 3 / 4 s ( 18) (4) (4) COMPUTER 1 ( 27) (7) (5) COMPUTER 2 * (8) (6) COMPUTER 3 * (10) (13) (7)
Introduction Part names (continued) Remote control (1) STANDBY ( 25) (1) (2) ON ( 25) (3) (3) ID - 1 / 2 / 3 / 4 s ( 18) (4) (4) COMPUTER 1 ( 27) (7) (5) COMPUTER 2 * (8) (6) COMPUTER 3 * (10) (13) (7)
For safe and correct use, be sure to read the Safety Information in Read This First before using the machine. Operating Instructions
 For safe and correct use, be sure to read the Safety Information in Read This First before using the machine. Operating Instructions Table of Contents 1 Disclaimer...2 1. Using the Remote control... 3
Displays Open Frame Monitor Model Number: AND-TFT-150Bxx
 Displays 15.0 Open Frame Monitor Model Number: AND-TFT-150Bxx The AND-TFT-150Bxx 15.0 Open Frame Monitor series are rugged, high performance Industrial LCD Monitors, designed for commercial and industrial
26 Inch CGA/EGA/VGA/DVI to WXGA/1080p LCD - ID#703
 26 Inch CGA/EGA/VGA/DVI to WXGA/1080p LCD - ID#703 Operation Manual Introduction This monitor is an open frame LCD Panel monitor. It features the VESA plug & play system which allows the monitor to automatically
Overview U508CV-UMK. Display
 U508CV-UMK Overview With a Sceptre 49" LED 4K UHD TV (U508CV-UMK), entertainment is transformed into an epic adventure. The unequalled color and clear brilliance of 4K (3,840 x 2,160 or over 8 million
Overview U438CV-UMC. Display
 U438CV-UMC Overview Take in the scenery as 8 million pixels illuminate a world of endless color and stunning detail. Sceptre 4K Ultra High-Definition displays have 4 times the number of pixels as a Full
Operating Instructions
 Marshall Electronics Broadcast A/V Division Model No. VSW-2200 4-Input Seamless SDI A/V Switcher Operating Instructions Table of Contents 1. Overview... 2. Features.... Package Contents... 4. Specifications...
USER MANUAL. 28" 4K Ultra HD Monitor L28TN4K
 USER MANUAL 28" 4K Ultra HD Monitor L28TN4K TABLE OF CONTENTS 1 Getting Started 2 Control Panel/ Back Panel 3 On Screen Display 4 Technical Specs 5 Care & Maintenance 6 Troubleshooting 7 Safety Info &
Broadcast A / V Division M-LYNX-702 V.3. Dual 7 LCD Display. User Manual
 Broadcast A / V Division M-LYNX-702 V.3 Dual 7 LCD Display User Manual Table of Contents Table of Contents 1. Package Includes 2. Product Description 2.1 Front Panel 2.2 Rear Panel Connections 3. On-Screen
42 Freestanding Infrared Multi Touch Screen Kiosk User s Manual
 42 Freestanding Infrared Multi Touch Screen Kiosk User s Manual Manual Version L42HD-T2.2 Safety Instructions Please keep the display away from any heat sources such as radiators or direct sunlight. Place
USER MANUAL Full HD Widescreen LED Monitor L236VA
 USER MANUAL 23.6 Full HD Widescreen LED Monitor L236VA TABLE OF CONTENTS 1 Getting Started 2 Control Panel/ Back Panel 3 On Screen Display 4 Technical Specs 5 Care & Maintenance 6 Troubleshooting 7 Safety
28 4K LED monitor. User Manual M284K
 28 4K LED monitor User Manual M284K CONTENTS Safety Information... 2 What s included..... 4 Getting Started....... 8 Troubleshooting.... 14 Specification.... 15 2 of 15 SAFETY INFORMATION Read these instructions
CP-255ID Multi-Format to DVI Scaler
 CP-255ID Multi-Format to DVI Scaler Operation Manual DISCLAIMERS The information in this manual has been carefully checked and is believed to be accurate. Cypress Technology assumes no responsibility
PLUSTV 1680ex USER S MANUAL
 PLUSTV 1680ex USER S MANUAL Ver 1.0 Contents 1. Instruction... 1 1.1 Functions and features... 1 1.2 Packaged contents... 2 1.3 Technical specifications... 3 2. Remote control instructions... 4 2.1 Diagram
Video Scaler Pro with RS-232
 Video Scaler Pro with RS-232 - ID# 783 Operation Manual Introduction Features The Video Scaler Pro with RS-232 is designed to convert Composite S-Video and YCbCr signals to a variety of computer and HDTV
LA1500R USER S GUIDE.
 LA1500R USER S GUIDE www.planar.com The information contained in this document is subject to change without notice. This document contains proprietary information that is protected by copyright. All rights
Operating Instructions
 Broadcast A/V Division Model No. M-LYNX-702W Dual 7 High Resolution Rack Mount Display with Waveform Operating Instructions V.1.0 Table of Contents 1. PRODUCT DESCRIPTION... 3 2. MENU SETTING... 6 3. SPECIFICATIONS...
FLAT DISPLAY TECHNOLOGY
 15.0 Open Frame Monitor Model Number: LOF1506xx This product is RoHS compliant SPEC No.: SAS-1008002 Version: 0.0 Issue Date: September 6, 2010 1. Introduction: 1.1 About the Product The LOF1506xx 15.0
DVI/PC/HD to DVI/PC Scaler - ID# 15320
 DVI/PC/HD to DVI/PC Scaler - ID# 15320 Operation Manual Introduction This DVI/PC/HD to DVI/PC Scaler is capable of scaling and sourceswitching from PC (VGA), Component Video (SD/HD) and DVI input signals
User Manual. PTN Electronics. SC121D-TN Scaler Switcher, with Digital Amplifier. Please read this manual carefully before using this product.
 PTN Electronics SC121D-TN Scaler Switcher, with Digital Amplifier User Manual SC Series --- Presentation Scaler Switcher Please read this manual carefully before using this product. l Content table 1.
PROLITE TF6537UHSC-B1AG
 PROLITE TF6537UHSC-B1AG 65" 4K PCAP touchscreen built into an eye catching edge-to-edge glass bezel The ProLite TF6537UHSC-B1AG is an excellent 4K (3840 x 2160 pixels) 65" display, offering a gigantic
Important Information... Safety Precautions, Maintenance & Recommended Use... Parts Name and Functions...
 Index Important Information... Safety Precautions, Maintenance & Recommended Use... Contents... Parts Name and Functions... Control Panel... Terminal Panel... Wireless Remote Control... Operating Range
TH-58AX800H. e HELP. English
 TH-58AX800H e HELP English my Home Screen my Home Screen Information 11 How to use 12 Settings 13 OSD Colour 15 APPS List Information 16 How to use 16 Settings 17 Watching Basic Basic connection 18 Selecting
CM-392-Video to HDMI Scaler Box ID#481
 CM-392-Video to HDMI Scaler Box ID#481 Operation Manual Introduction CM-392-Video to HDMI Scaler Box is designed to convert Composite and S-Video to Digital HDMI in a variety of HDTV resolutions. It handles
Model 5250 Five Channel Digital to Analog Video Converter Data Pack
 Model 5250 Five Channel Digital to Analog Video Converter Data Pack E NSEMBLE D E S I G N S Revision 3.1 SW v2.0.1 This data pack provides detailed installation, configuration and operation information
HD Mate Scaler USER MANUAL.
 HD Mate Scaler USER MANUAL www.gefen.com ASKING FOR ASSISTANCE Technical Support: Telephone (818) 772-9100 (800) 545-6900 Fax (818) 772-9120 Technical Support Hours: 8:00 AM to 5:00 PM Monday through Friday
True Home Cinema Experience
 Home Cinema Projectors 16 : 9 WIDE PANEL True Home Cinema Experience 1 High-resolution 16:9 wide-screen LCD panels for extra picture quality 2 Extra short-throw lens allows display of large images in small
PN50A550S1F/PN58A550S1F
 PN50A550SF/PN58A550SF -800-SAMSUNG (767864) Samsung Electronics America, Inc. 05 Challenger Road Ridgefield Park, NJ 07660-05 Samsung Electronics Canada Inc., Customer Service 55 Standish Court Mississauga,
Video wall Precautions when moving and handling. Precaution. Please adhere to the warning signs printed on the box.
 Video wall Precaution 4-1. Precautions when moving and handling Please adhere to the warning signs printed on the box. Model: 47WV30MS 47WV30BR 47WV30BS 47WV30-BAAM 47WV30-BAAL 47WV50BR 47WV50MS 47LV35A
Operating Instructions FULL HD LCD Display
 Model No. TH-55LFV5U Operating Instructions FULL HD LCD Display English Before connecting, operating or adjusting this product, please read these instructions completely. Please keep this manual for future
17 19 PROFESSIONAL LCD COLOUR MONITOR ART
 17 19 PROFESSIONAL LCD COLOUR MONITOR ART. 41657-41659 Via Don Arrigoni, 5 24020 Rovetta S. Lorenzo (Bergamo) http://www.comelit.eu e-mail:export.department@comelit.it WARNING: TO REDUCE THE RISK OF FIRE
English. English. Deutsch. Deutsch. Español. Español. Français. Français. Italiano. Italiano. Nederlands. Nederlands
 Deutsch Deutsch Español Español Français Français Italiano Italiano Nederlands Nederlands Index Important Information... Safety Precautions, Maintenance & Recommended Use... Contents... Parts Name and
Overview U758CV-UMR. Display
 U758CV-UMR Overview At 75", you will feel surrounded by 8 million pixels that are brought to life by unsurpassed clarity and color. Sceptre 4K Ultra High-Definition displays have 4 times the number of
Overview U650CV-UMS. Display
 U650CV-UMS Overview 4K UHD delivers 8 million pixels that immerse you in an unrivaled landscape of lifelike images. Sceptre 4K Ultra High-Definition displays have 4 times the number of pixels as a Full
Winmate Communication INC.
 20.1 Military Grade Display Model: R20L100-RKA2ML User s Manual Winmate Communication INC. May, 2011 1 IMPORTANT SAFETY INSTRUCTIONS Please read these instructions carefully before using the product and
TX-40AX630E TX-48AX630E TX-55AX630E. e HELP. English
 TX-40AX630E TX-48AX630E TX-55AX630E e HELP English my Home Screen my Home Screen Information 12 How to use 13 Settings 14 OSD Colour 15 APPS List Information 16 How to use 16 Settings 17 Watching Basic
USER MANUAL. 22" Class Slim HD Widescreen Monitor L215DS
 USER MANUAL 22" Class Slim HD Widescreen Monitor L215DS TABLE OF CONTENTS 1 Getting Started Package Includes Installation 2 Control Panel / Back Panel Control Panel Back Panel 3 On Screen Display 4 Technical
Quick Setup Guide. Rear Panel / Side Panel Jacks LN37A530P1F/LN40A530P1F/ LN46A530P1F/LN52A530P1F. Video Input Performance Comparison
 Quick Setup Guide LN7A50PF/LN40A50PF/ LN46A50PF/LN5A50PF -800-SAMSUNG (767864) Samsung Electronics America, Inc. 05 Challenger Road Ridgefield Park, NJ 07660-05 Samsung Electronics Canada Inc., Customer
Overview U550CV-UMS. Display
 U550CV-UMS Overview Journey into an incredibly realistic landscape as 8 million pixels of brilliant color and clarity materialize before your eyes. Sceptre 4K Ultra High-Definition displays have 4 times
31.5" LCD Display Monitor MODEL
 31.5" LCD Display Monitor MODEL English English Deutsch Deutsch Español Español Français Français Italiano Italiano Русский Русский Index Features... English-2 Important Information... English-3 Declaration...
Overview U500CV-UMK. Display
 U500CV-UMK Overview With a Sceptre 49" LED 4K UHD TV (U500CV-UMK), entertainment is transformed into an epic adventure. The unequalled color and clear brilliance of 4k (3,840 x 2,160 or over 8 million
TH-48AX670H TH-55AX670H. e HELP. English
 TH-48AX670H TH-55AX670H e HELP English my Home Screen my Home Screen Information 11 How to use 12 Settings 13 OSD Colour 15 APPS List Information 16 How to use 16 Settings 17 Watching Basic Basic connection
User s Guide L1734S Important Precautions
 User s Guide L1734S Make sure to read the Important Precautions before using the product. Keep the User's Guide(CD) in an accessible place for future reference. See the label attached on the product and
USER MANUAL Full HD Widescreen LED Monitor L215IPS
 USER MANUAL 21.5 Full HD Widescreen LED Monitor L215IPS TABLE OF CONTENTS 1 Getting Started 2 Control Panel/ Back Panel 3 On Screen Display 4 Technical Specs 5 Care & Maintenance 6 Troubleshooting 7 Safety
Overview U658CV-UMR. Display
 U658CV-UMR Overview With 4K UHD, 8 million pixels illuminate an extraordinary depth and range in every image on this 65" screen. Sceptre 4K Ultra High-Definition displays have 4 times the number of pixels
DVI-3580a. 4K MultiViewer Switcher / Scaler. Quick Start Guide. Introduction
 Quick Start Guide 4K MultiViewer Switcher / Scaler Introduction Presentation Powerhouse The is a high-performance 4K MultiViewer Switcher / Scaler. This unit is an ideal solution for system designers and
TRANSDUCTION USER S MANUAL. TR-LCD1900-OCD 19 Rack/Panel Mount TFT LCD Monitor with Front LCD Controls
 TRANSDUCTION USER S MANUAL Version 1.0 07/02/09 TR-LCD1900-OCD 19 Rack/Panel Mount TFT LCD Monitor with Front LCD Controls 5155-23 Spectrum Way, Mississauga, ON, Canada L4W 5A1 TEL: 1-800-268-0427, 905-625-1907
CSLUX-300 Multi-Format to HDMI Scaler
 CSLUX-300 Multi-Format to HDMI Scaler Operation Manual DISCLAIMERS The information in this manual has been carefully checked and is believed to be accurate. Cypress Technology assumes no responsibility
G-106Ex Single channel edge blending Processor. G-106Ex is multiple purpose video processor with warp, de-warp, video wall control, format
 G-106Ex Single channel edge blending Processor G-106Ex is multiple purpose video processor with warp, de-warp, video wall control, format conversion, scaler switcher, PIP/POP, 3D format conversion, image
Overview U405CV-UMS. Display
 U405CV-UMS Overview Journey into an incredibly realistic landscape as 8 million pixels of brilliant color and clarity materialize before your eyes. Sceptre 4K Ultra High-Definition displays have 4 times
Overview U550CV-UMR. Display
 U550CV-UMR Overview Journey into an incredibly realistic landscape as 8 million pixels of brilliant color and clarity materialize before your eyes. Sceptre 4K Ultra High-Definition displays have 4 times
YCbCr (480i/576i) and RGBsync. 4 Press Component to change source to component connec tor. This connector supports YPbPr (480p/576p/720p/1080i)
 and RGBsync. 4 Press Component to change source to component connec tor. This connector supports YPbPr (480p/576p/720p/1080i)") Introduction Product Features This product is an XGA single chip 0.7 DLP TM projector. Outstanding features include: u True XGA, 1024 x 768 addressable pixels u Single chip DLP TM technology u NTSC3.58/NTSC4.43/PAL/SECAM
Introduction Product Features This product is an XGA single chip 0.7 DLP TM projector. Outstanding features include: u True XGA, 1024 x 768 addressable pixels u Single chip DLP TM technology u NTSC3.58/NTSC4.43/PAL/SECAM
IPS LED Monitor. (LED Monitor*) OWNER S MANUAL
 OWNER S MANUAL") OWNER S MANUAL IPS LED Monitor (LED Monitor*) * LG LED Monitor applies LCD screen with LED backlights. Please read this manual carefully before operating your set and retain it for future reference. 34UC89G
OWNER S MANUAL IPS LED Monitor (LED Monitor*) * LG LED Monitor applies LCD screen with LED backlights. Please read this manual carefully before operating your set and retain it for future reference. 34UC89G
TH-85X940A. e HELP. English
 TH-85X940A e HELP English my Home Screen my Home Screen Information 12 How to use 13 Settings 14 OSD Colour 16 APPS List Information 17 How to use 17 Settings 18 Watching Basic Basic connection 19 Selecting
Overview U515CV-UMS. Display
 U515CV-UMS Overview Journey into an incredibly realistic landscape as 8 million pixels of brilliant color and clarity materialize before your eyes. Sceptre 4K Ultra High-Definition displays have 4 times
PRODUCT NO.: PT-L735 PRODUCT NAME: Ultra Portable LCD Projector
 PRODUCT NO.: PRODUCT NAME: MAJOR FEATURES Bright - High 2600 ANSI lumens brightness Time-saving - One-touch auto setup - Automatic input signal detector - Speed start - Direct power off - Momentary switch
USER S Manual NGLT104WPD NGLT150WPD LCD TV / Monitor (IP67 Grade)
") USER S Manual NGLT104WPD NGLT150WPD LCD TV / Monitor (IP67 Grade) This Manual is revisable without further notice Contents CONTENTS ------------------------------------------------------------------- 1
USER S Manual NGLT104WPD NGLT150WPD LCD TV / Monitor (IP67 Grade) This Manual is revisable without further notice Contents CONTENTS ------------------------------------------------------------------- 1
USER MANUAL Full HD Widescreen LED Monitor L215ADS
 USER MANUAL 21.5 Full HD Widescreen LED Monitor L215ADS TABLE OF CONTENTS 1 Getting Started 2 Control Panel/ Back Panel 3 On Screen Display 4 Technical Specs 5 Care & Maintenance 6 Troubleshooting 7 Safety
PRODUCT NO.: PT-L735NT PRODUCT NAME: Ultra Portable Wireless LCD Projector
 PRODUCT NO.: PRODUCT NAME: Ultra Portable Wireless LCD Projector MAJOR FEATURES Bright - High 2600 ANSI lumens brightness Easy wireless presentations - Easy-to-use settings - Useful Live mode - PC-free
VIDEOWALL NARROW BEZEL. 40" and 46" I N F I N I T E S O L U T I O N S F O R V I S U A L C O M M U N I C AT I O N
 NARROW BEZEL 40" and 46" I N F I N I T E S O L U T I O N S F O R V I S U A L C O M M U N I C AT I O N I N F I N I T E S O L U T I O N S F O R V I S U A L C O M M U N I C AT I O N LARGE DIGITAL VIDEO WALLS
VITEK VTM-TLM191 VTM-TLM240
 VTM-TLM191 VTM-TLM240 19 & 24 Professional LED Monitors with HDMI, VGA, and Looping BNC VITEK FEATURES 19 & 24 Wide Screen LED Display Panel HDMI, VGA, and Looping BNC Composite Video Inputs & Stereo Audio
Rear Panel / Side Panel Jacks
 LN9A0JD/LN9AJD -800-SAMSUNG (767864) Samsung Electronics America, Inc. 05 Challenger Road Ridgefield Park, NJ 07660-05 Samsung Electronics Canada Inc., Customer Service 55 Standish Court Mississauga, Ontario
Overview U508CV-UMKR. Display
 U508CV-UMKR Overview Immerse yourself in an extraordinary world of stunning color and clarity that take shape before your eyes. Sceptre 4K Ultra High-Definition displays have 4 times the number of pixels
PLL2210MW LED Monitor
 PLL2210MW LED Monitor USER'S GUIDE www.planar.com Content Operation Instructions...1 Safety Precautions...2 First Setup...3 Front View of the Product...4 Rear View of the Product...5 Quick Installation...6
V R171P-HDA R171P-HDA
 Marshall Electronics 1910 East Maple Ave. El Segundo, CA 90245 Tel.: 800-800-6608 310-333-0606 Fax: 310-333-0688 www.lcdracks.com Email: sales@lcdracks.com V-R171P-HDA Users Guide Product Overview Features
High-Definition Scaler. GTV-HIDEFS. User Manual
 High-Definition Scaler GTV-HIDEFS User Manual www.gefentv.com Technical Support: Telephone (818) 772-9100 (800) 545-6900 Fax (818) 772-9120 Technical Support Hours: 8:00 AM to 5:00 PM Monday thru Friday.
Diamond View DV180. Colour LCD Monitor (45.9 cm) LCD Panel Size. User s Manual
 LCD Panel Size. User s Manual") Diamond View DV180 Colour LCD Monitor 18.1 (45.9 cm) LCD Panel Size User s Manual TABLE OF CONTENTS 1. 2. 3. 4. 5. 6. 7. 8. SAFETY INSTRUCTIONS AND MAINTENANCE... 3 INTRODUCTION... 4 UNPACKING THE MONITOR...
Diamond View DV180 Colour LCD Monitor 18.1 (45.9 cm) LCD Panel Size User s Manual TABLE OF CONTENTS 1. 2. 3. 4. 5. 6. 7. 8. SAFETY INSTRUCTIONS AND MAINTENANCE... 3 INTRODUCTION... 4 UNPACKING THE MONITOR...
Quick Setup Guide. Rear Panel / Side Panel Jacks LN32A550P3F/LN37A550P3F/ LN40A550P3F/LN46A550P3F/ LN52A550P3F. Video Input Performance Comparison
 Quick Setup Guide LNA550PF/LN7A550PF/ LN40A550PF/LN46A550PF/ LN5A550PF -800-SAMSUNG (767864) Samsung Electronics America, Inc. 05 Challenger Road Ridgefield Park, NJ 07660-05 Samsung Electronics Canada
Rear Panel / Side Panel Jacks (LN26A450C1D, LN40A450C1D)
") LN6A450CD/LNA450CD/ LN7A450CD/LN40A450CD -800-SAMSUNG (767864) Samsung Electronics America, Inc. 05 Challenger Road Ridgefield Park, NJ 07660-05 Samsung Electronics Canada Inc., Customer Service 55 Standish
LN6A450CD/LNA450CD/ LN7A450CD/LN40A450CD -800-SAMSUNG (767864) Samsung Electronics America, Inc. 05 Challenger Road Ridgefield Park, NJ 07660-05 Samsung Electronics Canada Inc., Customer Service 55 Standish
PROLITE B2791HSU-B1 HAS + PIVOT FLICKER FREE + BLUE LIGHT
 PROLITE B2791HSU-B1 27 solid Full HD monitor your e will love Looking at a screen for long hours can be quite tiring for the e. But it doesn t have to. The new 27 iiyama ProLite B2791HSU is big enough
PX1710M LCD Monitor USER S GUIDE
 PX1710M LCD Monitor USER S GUIDE www.planar.com The information contained in this document is subject to change without notice. This document contains proprietary information that is protected by copyright.
7 3G -SDI Monitor w/ Signal Conversion QUICKSTART GUIDE
 What s included x Monitor x AC Adapter x Camera Shoe Mount (SM-0) x DV Battery Plate (Check one) Checked by DV BATTERY PLATES -: Canon 900, Sony L, Panasonic D Battery Plates VX7 c-: Canon E6, Nikon EL,
22" Touchscreen LED Monitor USER'S GUIDE
 22" Touchscreen LED Monitor USER'S GUIDE Content Operation Instructions...1 Unpacking Instructions...2 Safety Precautions...2 Front View of the Product...3 Rear View of the Product...4 Quick Installation...5
TX-65CZ950E. e HELP. English
 TX-65CZ950E e HELP English Read first ehelp How to use 12 Features 4K resolution 13 Touch Pad Controller 14 TV Anywhere 15 DVB-via-IP 16 Dual Tuner 17 Easy Mirroring 18 Watching Basic Satellite connection
Table of Contents Table of Contents... 1 Usage Notice... 2 Introduction... 4 Installation User Controls Appendices...
 Table of Contents Table of Contents... 1 Usage Notice... 2 Precautions... 2 Introduction... 4 Product Features... 4 Package Overview... 5 Product Overview... 6 Main Unit... 6 Control Panel... 7 Connection
49 inch Full HD 3.5mm Ultra- Narrow Bezel 24/7 Tiling Support with DisplayPort or DVI video wall Commercial Display CDX4952 Ultra-narrow Bezel
 49 inch Full HD 3.5mm Ultra- Narrow Bezel 24/7 Tiling Support with DisplayPort or DVI video wall Commercial Display CDX4952 With stunning brightness, vibrant images, and multi-screen tiling, the ViewSonic
12.1 Inch CGA EGA VGA SVGA LCD Panel - ID #492
 12.1 Inch CGA EGA VGA SVGA LCD Panel - ID #492 Operation Manual Introduction This monitor is an open frame LCD Panel monitor. It features the VESA plug & play system which allows the monitor to automatically
MP 35" Zero-G 100Hz Curved Monitor with AMD FreeSync 2.0
 MP 35" Zero-G 100Hz Curved Monitor with AMD FreeSync 2.0 P/N 31005 User's Manual SAFETY WARNINGS AND GUIDELINES Please read this entire manual before using this device, paying extra attention to these
PLL1920M LED LCD Monitor
 PLL1920M LED LCD Monitor USER'S GUIDE www.planar.com Content Operation Instructions...1 Safety Precautions...2 First Setup...3 Front View of the Product...4 Rear View of the Product...5 Installation...6
User Manual 15" LCD Open frame SAW Touch Monitor KOT-0150US-SA4W. Table of Contents
 User Manual 15" LCD Open frame SAW Touch Monitor KOT-0150US-SA4W Table of Contents Chapter 1. Introduction...2 1.1 Product Description 1.2 About the Product Chapter 2. Installation and Setup...2 2.1 Unpacking