Table of Contents...1 Usage Notice...3. Safety Information...5 Precautions...6 Eye Safety Warnings...8 Recommendations...9. Introduction...
|
|
|
- Bernard Henry Scott
- 6 years ago
- Views:
Transcription
1 Table of contents Table of Contents...1 Usage Notice...3 Safety Information...5 Precautions...6 Eye Safety Warnings...8 Recommendations...9 Introduction...10 Product Features...12 Package Overview...13 Product Overview...13 Projector Part Video Box Part Remote Control Installation...18 Connecting the Projector...12 Connecting HD81 To AV Receiver...13 Powering On/Off the Projector...22 Powering On the Projector Powering Off the projector Warning Indicator Adjusting the Projected Image...24 Adjusting the Projector s Height Adjusting the Projector s Zoom / Focus Adjusting Projected Image Size User Controls...26 Control Panel & Remote Control...26 On-screen Display Menus...29 How to operate Menu Tree...30 Image Adjustments Display Settings Advanced Adjustments System Adjustments Projector Settings Setup Settings Options English 1
2 Table of contents Appendices...53 Troubleshooting...53 Image Problems Intermission Problems LED Problems Remote Control Problems Replacing the Lamp...59 Compatibility Modes In Analog Input...60 Compatibility Modes In Analog Input...60 Ceiling Mount Installation...61 Optoma Global Offi ce
3 Usage Notice ABOUT THIS MANUAL This manual is designed for use with HD81. Information in this document has been carefully checked for accuracy; however, no guarantee is given to the correctness of the contents. The information in this document is subject to change without notice. COPYRIGHY Copyright 2006 This document contains proprietary information protected by copyright. All rights are reserved. No part of this manual may be reproduced by any mechanical, electronic or other means, in any form, without prior written permission of the manufacturer. English TRADEMARKS All trademarks and registered trademarks are the property of their respective owners. FCC COMPLIANCE This device complies with Part 15 of the FCC Rules. Operation is subject to the following two conditions: (1) This device may not cause harmful interference, and (2) This device must accept any interference received, including interference that may cause undesired operation. CE COMPLIANCE This device complies with CE directive. FEDERAL COMMUNICATIONS COMISSION (FCC) STATEMENT This equipment has been tested and found to comply with the limits for a Class B digital device, pursuant to part 15 of the FCC Rules. These limits are designed to provide reasonable protection against harmful interference in a residential installation. This equipment generates uses and can radiate radio frequency energy and, if not installed and used in accordance with the instructions, may cause harmful interference to radio communications. However, there is no guarantee that interference will not occur in a particular installation. If this equipment does cause harmful interference to radio or television reception, which can be determined by turning the equipment off and on, the user is encouraged to try to correct the interference by one or more of the following measures: Reorient or relocate the receiving antenna. Increase the separation between the equipment and the receiver. Connect the equipment to an outlet on a circuit different from that to which the receiver is connected. Consult the dealer or an experienced radio/tv technician for help. 3
4 Usage Notice WEEE Disposal of old Electrical & Electronic Equipment (Applicable throughout the European Union and other European countries with separate collection programs) This symbol found on your product or on its packaging, indicates that this product should not be treated as household waste when you wish to dispose of it. Instead, it should be handed over to an applicable collection point for the recycling of electrical and electronic equipment. By ensuring this product is disposed of correctly, you will help prevent potential negative consequences to the environment and human health, which could otherwise be caused by inappropriate disposal of this product. The recycling of materials will help to conserve natural resources. This symbol is only valid in the European Union. If you wish to discard this product, please contact your local authorities or dealer and ask for the correct method of disposal. 4
5 Usage Notice Safety Information The lightning fl ash with arrowheard within an equilateral triangle is intended to alert the user to the presence of uninsulated dangerous voltage within the product s enclosure that may be of suffi cient magnitude to constitute a risk of electric shock to persons. The exclamation point within an equilateral triangle is intended to alert the user to the presence of import operating and maintenance (servicing) instructions in the literature accompanying the appliance. English WARNING: TO REDUCE THE RISK OF FIRE OR ELECTRIC SHOCK, DO NOT EXPOSE THIS APPLIANCE TO RAIN OR MOISTURE. DANGEROUS HIGH VOLTAGES ARE PRESENT INSIDE THE ENCLOSURE. DO NOT OPEN THE CABINET. REFER SERVICING TO QUALIFIED PERSONNEL ONLY. Class B emissions limits This Class B digital apparatus meets all requirements of the Canadian Interference-Causing Equipment Regulations. Important Safety Instruction 1. Read these instructions before using this projector. 2. Keep these instructions for future reference. 3. Follow all instructions. 4. Install in accordance with the manufacturer s instructions A. Do not block any ventilation openings To ensure reliable operation of the projector and to protect it from overheating, put the projector in a position and location that will not interfere with its proper ventilation. For example, do not place the projector on a bed, sofa, carpet, or similar surface that may block the ventilation openings. Do not put it in an enclosure, such as a bookcase or a cabinet that may keep air from flowing through its ventilation openings. B. Do not use this projector near water or moisture. To reduce the risk of fire or electric shock, do not expose the projector to rain or moisture. C. Do not install near any heat sources, such as radiators, heaters, stoves or other apparatus (including amplifiers) that produce heat. 5. Clean only with a dry cloth. 6. Only use attachments/accessories specified by the manufacturer. 7. Refer all servicing to qualified service personnel. Servicing is required when the projector has been damaged in any way: Such as power supply cord or plug is damaged. Liquid has been spilled or objects have fallen into the apparatus. The projector has been exposed to rain or moisture, does not operate normally, or has been dropped. Do not attempt to service this projector yourself. Opening or removing covers may expose you to dangerous voltages or other hazards. Please call Optoma to be referred to an authorized service center near you. 8. Do not let objects or liquids enter the projector as they may touch dangerous voltage points or short-out parts that could result in a fire or electric shock. 9. See projector enclosure for safety related markings. 10. The projector should not be adjusted or repaired by anyone except properly qualified service personnel. 5
6 Usage Notice When the lamp reaches the end of its life, the projector will not turn back on until the lamp module has been replaced. To replace the lamp, follow the procedures listed under Replacing the Lamp section on page 59. Precautions Please follow all warnings, precautions and maintenance as recommended in this user s guide. Warning- Do not look into the projector s lens when the lamp is on. The bright light may hurt your eyes. Warning- To reduce the risk of fire or electric shock, do not expose this projector to rain or moisture. Warning- Please do not open or disassemble the projector & box as this may cause electric shock. Warning- When replacing the lamp, please allow unit to cool down, and follow all replacement instructions. See page 59. Warning- This projector will detect the life of the lamp itself. Please be sure to change the lamp when it shows warning messages. Warning- Reset the Lamp Reset function from the on-screen display System-->Projector-->Lamp menu after replacing the lamp module (refer to page 46). Warning- When switching the projector off, please ensure the cooling cycle has been completed before disconnecting power. Allow 90 seconds for the projector to cool down. Warning- Do not use lens cap when projector is in operation. Warning- When the lamp is approaching to the end of its life time, the message Replacement suggested will show on the screen. Please contact your local reseller or service center to change the lamp as soon as possible. 6
7 Usage Notice Do: Turn off the product before cleaning. Use a soft cloth moistened with mild detergent to clean the display housing. Disconnect the power plug from AC outlet if the product is not being used for a long period of time. English Don t: Block the ventilation slots and openings on the unit. Use abrasive cleaners, waxes or solvents to clean the unit. Use under the following conditions: - In extremely hot, cold or humid environments. - In areas susceptible to excessive dust and dirt. - Near any appliance that generates a strong magnetic field. - In direct sunlight. 7

8 Usage Notice Eye Safety Warnings Avoid staring directly into the projector beam at all times. Minimize standing facing into the beam. Keep your back to the beam as much as possible. A stick or laser pointer is recommended to avoid the need for the user to enter the beam. Ensure that projectors are located out of the line of sight from the screen to the audience; this ensures that, when presenters look at the audience, they do not also have to stare at the projector lamp. The best way to achieve this is by ceiling-mounting rather than floor or table-mounting the projector. When projector is used in a classroom, adequately supervise students when they are asked to point out something on the screen. In order to minimize the lamp power needed, use room blinds to reduce ambient light levels. 8
9 Usage Notice Recommendations To unleash the performance of the HD81, it is best to input video content in its original form without any processing. This will utilize the full capabilities of the HD81 for de-interlacing, scaling and image enhancement. As an example, if a user has an HDMI DVD player capable of outputting the video signal in a 480i/576i digital format, we recommend feeding it directly to the HD81 without any processing by the DVD player. This will provide the HD81 with the original digital video stream and allow the HD81 to fully unleash its studio grade video processing. In general, we recommend the following: If possible, use digital output (DVD, D-VHS, DTV setup box, etc). If there is no digital output, use the component output terminals (YPbPr) with short and high-quality components cables. If you are unsure of the quality of the internal de-interlacing or scaler of your video source, let HD81 do the processing by connecting to the interlaced component output. If possible, leave out any extra video processing in your video source (DVD, D-VHS, and HDTV STB). Some HDTV STB models have scaling conversion that will output 1080i from a 720p format. Try to output 1080i in its native signal format and let HD81 perform deinterlacing and scaling. Not all HDMI DVD players have a digital interlaced output (480i/576i). For these products, it is suggested that users try 480p/576p first, followed by 720p and 1080i. After viewing the full range of output resolutions, the user can then judge which is the best image quality and set the HD81 for that resolution. Many high-end analog output DVD players also come with high quality DAC with 12 or 14 bits of processing. Again, the users should try setting their 480i/576i output to HD81 first. HD81 has BNC connectors for component video input. If the user plans to use analog component to connect to their video source, for the best image quality, it is recommend using the BNC connectors. For connecting to Laser Disc player or S-VHS deck, we suggest to use S-video output connection to connect to HD81. It is best to have a separate power outlet for audio and video equipment. English 9
10 Introduction Product Features The HD81 is a true 1080P single chips 0.95 DLP TM projector.buildin fully-featured, all digital, video processor with advanced Scaling functions designed to enhance and improve all video signals. The HD81 also provides the best in source content switching, image de-interlacing, image scaling, and color management in one easy to use HD81 also can be the center of you home theater entertainment center. By extensively using HDMI connections as well as a number of other industry standard inputs, all content sources with unparalleled scaling and image de-interlacing, The Box of HD81 goes well beyond the scope of other traditional video processors. Each video source can be fine tuned to provide the best combination for your viewing 10 Complete 10-bit video processing (decoding, de-interlacing, scaling, image enhancement and color Single 16: x 1080 Dark Chip3 TM DLP TM technology Use 7 segment color wheel R/B/GND/G//R/B/G cycle Gennum VXP video processor chip Studio-grade 480i/576i Standard Definition de-interlacing and 1080i High Definition de-interlacing Optimized scaling for each input resolution Video Compatibility: 480i-NTSC, NTSC i-PAL/PAL-M/PAL-N/SECAM HDTV compatible(480p,576p,720p,1080i) RGB signal : SXGA+,SXGA, HD,XGA,SVGA,VGA ressizing Full function IR remote control with back light Macintosh compatible Optoma s patent-pending O 2 Air TM Photo Catalyst air purification technology Dedicated color management chipset 3 x HDMI input, 4 x Components input (2 x RCA and 2 x BNC), 3 x S-Video and 3 x Composite inputs
11 Introduction Unique HDMI switching that outputs HDMI audio to HDMI-capable A/V receiver Front panel inputs for camcorder, portable computer and other video sources Advanced video enhancement engines including: Vivid Color Engine Provides RGBCYM saturation/hue enhancement over 9 regions independently for each color Edge Sharpening Engine Advanced user-definable, boundary-limiting function maximizes Auto Contrast Engine Scene-dependent black and white enhancement for greater picture Adaptive Noise Reduction Engine Scene-specific noise reduction removes unwanted image noise without affecting detail or sharpness Image Gamma Engine Users can define their own gamma curve in 9 regions English 11


 X 2 3 pin for Projector 2 pin for Box HDMI to HDMI")
 X 1 RCA Component Cable for YPbPr (2 m) X 1")


12 Introduction Package Overview The product ships standard with the accessories & items shown below. If anything is missing or damaged, please contact your dealer immediately. HD81 s Video Box X 1 Projector with lens cap Power Cord (1.8m) X 2 3 pin for Projector 2 pin for Box HDMI to HDMI Cable to Projector (2m) X 1 IR Module X 1 HDMI to HDMI Cable (15cm) X 1 RCA Component Cable for YPbPr (2 m) X 1 RS232 Cable (2m) X 2 Due to the difference in applications for each country, some regions may have different accessories. IR Remote Controller X 1 AAA Batteries X 2 Available in European version only Documentation : User s Manual Warranty Card Quick Start Card SCART RGB/S-Video Adaptor VGA Cable 1.8m 12
 5. Elevator Feet 6. Zoom Lens 7. IR Receivers 8. Connection Ports 9. Power Socket & Main Power Switch 10.")
13 Introduction Product Overview Projector Part 2 1 English Control Panel 2. Zoom Lever 3. Focus Ring 4. Elevator Button (one on each side) 5. Elevator Feet 6. Zoom Lens 7. IR Receivers 8. Connection Ports 9. Power Socket & Main Power Switch 10. Tilt-Adjustment Feet 13


14 Introduction Control Panel Power LED 2. Lamp Indicator LED 3. Temp Indicator LED Connection Ports HDMI Connector 2. RS232 Input Connector 3. USB Input Connector 4. Power Socket & Main Power Switch 5. Kensington TM Lock Port 14
 4. Four Directional Select Keys 5. Menu (On/Off) 6. On/Standby 7. Re-Sync 8.")
15 Introduction Video Box Part Front Panel English VGA 2. S-Video 3 (NTSC, PAL and SECAM) 3. Composite 3/CVBS 3 (NTSC, PAL and SECAM) 4. Four Directional Select Keys 5. Menu (On/Off) 6. On/Standby 7. Re-Sync 8. Enter/Source Select 9. IR Receiver 15
 5. S-video 2 (NTSC, PAL and SECAM) 6. Component YPbPr/BNC 1 (NTSC, PAL and SECAM, 480i/ p, 576p, 720p and 1080i) 7.")
16 Introduction Back Panel AC In 2. Composite 1/CVBS 1 (NTSC, PAL and SECAM) 3. Composite 2/CVBS 2 (NTSC, PAL and SECAM) 4. S-video 1 (NTSC, PAL and SECAM) 5. S-video 2 (NTSC, PAL and SECAM) 6. Component YPbPr/BNC 1 (NTSC, PAL and SECAM, 480i/ p, 576p, 720p and 1080i) 7. Component YPbPr/BNC 2 (NTSC, PAL and SECAM, 480i/ p, 576p, 720p and 1080i) 8. DC 12V Output 9. DC 12V Output (Programmable) 10. YPbPr/RGBHV 1 (RGBHV,NTSC, PAL and SECAM, 480i/ p, 576i/p, 720p and 1080i) 11. YPbPr/RGBHV 2 (RGBHV,NTSC, PAL and SECAM, 480i/ p, 576i/p, 720p and 1080i) 12. HDMI 1 (480i/p, 576i/p, 720p and 1080i/p) 13. HDMI 2 (480i/p, 576i/p, 720p and 1080i/p) 14. HDMI 3 (480i/p, 576i/p, 720p and 1080i/p) 15. HDMI To AV Receiver 16. HDMI From AV Receiver 17. To Projector 18. RS232 For Control 19. RS232 To Projector 20. IR Module 16

17 Introduction Remote Control Standby 2. Power On 3. Brite Mode 4. IRIS 5. ISF Day 6. User 1 7. ISF Night 8. User 2 9. User Gamma 11. Edge Enhance 12. Color Vivid 13. B/W Extension 14. Four Directional Select Keys 15. Enter 16. Menu 17. V.Shit +/- 18. Demo 19. Overscan x9 format 21. Letter-Box format 22. Format x3 format 24. Native format 25. Format HDMI S-Video CVBS YPbPr BNC CVBS BNC HDMI HDMI S-Video CVBS VGA 38. Auto 39. S-Video YPbPr 2 English 17
18 Installation Connecting the Projector Due to the difference in applications for each country, some regions may have different accessories Power Cord HDMI To HDMI (To Projector) RS232 Cable (To Projector) 4....HDMI To HDMI (Jumper) : See page HDMI To HDMI YPbPr/RGBHV (BNC)r 7....SCART RGB/S-Video Adaptor (For European Only) 8....S-Video Cable Composite Video Cable 18

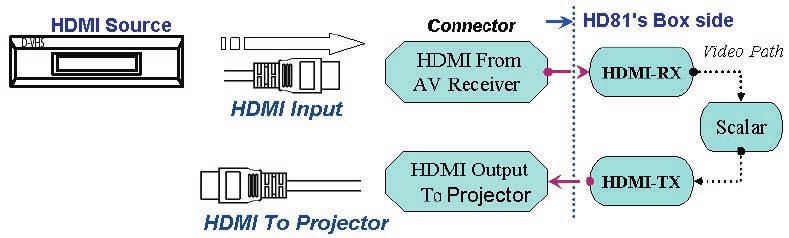
19 Installation Connecting HD81 To AV Receiver For maximum flexibility when integrating into existing entertainment systems, the HD81 Video Box is equipped with 2 HDMI outputs. One output directly sends the signal out to the display and the second output sends the signal out to an HDMI equipped AV receiver. There are three ways to connect the HDMI output from the HD81 s Video Box. English Option 1 Using HD81 s Video Box as video source selector and HDMI equipped AV Receiver for audio: If you have an HDMI equipped AV receiver and wish to send the audio signal to the receiver, but utilize the HD81 s Box as the video source selector: 1) Connect the video sources to the HD81 s video Box. 2) Attach an HDMI cable to the To AV Receiver port on the back of the HD81 s Video Box. Connect the other end to your AV Receiver. This will allow the audio signal to be controlled by the AV Receiver. 3) Attach a 2nd HDMI cable to the AV out port on the back of the AV Receiver. Connect the other end to the From AV Receiver on the back of the HD81 s Video Box. This will return the video signal in a pass through mode. 4) Connect an HDMI Cable to the To Projector on the back of the HD81 s Box side. Connect the other end to HD81 s projector side. 19

20 Installation Option 2 Using HD81 as video source selector and directly connecting the video source to the AV Receiver: If you do not have an HDMI equipped AV receiver, to ensure proper audio connections, you will need to directly connect the Audio out from the Video source to your receiver. The HD81 will be used only to process the Video signals. 1) Connect the video sources to the HD81 s Video Box. 2) Connect the video sources audio out directly to your receiver. 3) Attach the short HDMI cable that comes standard with the unit to the To AV Receiver port on the back of the HD81 s Video Box. Connect the other end to the From AV Receiver port on the back of the HD81 s Video Box. This will allow the video signal to be properly managed. 4) Connect an HDMI Cable to the To Projector on the back of the HD81 s Box side. Connect the other end to HD81 s projector side. Option 3 If you have a single HDMI source, you can hook the Video source directly up to the From AV Receiver port on the back of the HD81 s Video Box. Connect a second HDMI cable to the To Projector port on the back of the HD81 s Video Box and attach the other end to HD81 s Projector side. This configuration only process high resolution video for HD81 s projector. 20
21 Installation English 21
 power cord for Projector and Box and (2) HDMI To HDMI,and RS-232 cable that are from Box to Projector signal cable, (3) Signal cable to Box are securely connected and turn on Main")

22 Installation Powering On/Off the Projector Powering On the Projector 1. Remove the lens cap. 2. Ensure that the (1) power cord for Projector and Box and (2) HDMI To HDMI,and RS-232 cable that are from Box to Projector signal cable, (3) Signal cable to Box are securely connected and turn on Main power switch on Box side. The Power LED will become red on Projector side and Box side. 3. Turn on the lamp by pressing On/Standby button either on the from of the Box or on the remote. The Power LED will turn blue on Box side and flash blue on Projector side. The startup screen will display in approximately 30 seconds and the Power LED on projector side will show blue. The first time you use the projector, you can select your preferred language from quick menu after the startup screen display. 4. Turn on your source (computer, notebook, video player, etc.). Then choice the source that you feed to HD81. If you connected multiple sources at the same time, press the Source button on the control panel or direct source key on the remote control to switch between inputs. Turn on the projector first and then select the signal sources. 1 Lens Cap 22 2 Main Power Switch

23 Installation Powering Off the Projector 1. Press the On/Standby button on Box side or remote to turn off the projector lamp, you will see a message displayed on the projector s screen. English Press the On/Standby button again to confirm, otherwise the message will disappear after 5 seconds. 2. Then Box s Power LED will turn red. The cooling fans continue to operate for about 30 seconds for cooling cycle and the projector s Power LED will flash green. When the projector s Power LED begins red, the projector has entered standby mode. If you wish to turn the projector back on, you must wait until the projector has completed the cooling cycle and has entered standby mode. Once in standby mode, simply press On/Standby button on Box or remote to restart the HD Disconnect the power cord from the electrical outlet and the Projector & Box. 4. Do not turn on the projector immediately following a power off procedure. Warning Indicator When the LAMP indicator flashing orange, the projector will automatically shut itself down. Please contact your local reseller or service center. See page 62. When the TEMP indicator lights solid red, it indicates the projector has overheated. The projector will automatically shut itself down. Under normal conditions, the projector can be switched on again after it has cooled down. If the problem persists, you should contact your local dealer or our service center. See page 62. When the TEMP indicator flashes red, it indicates the fan has failed. Please contact your local dealer or our service center. See page

24 Installation Adjusting the Projected Image Adjusting the Projector s Height The projector is equipped with elevator feet for adjusting the image height. To raise the image: 1. Press the elevator button. 2. Raise the image to the desired height angle, then release the button to lock the elevator feet into position. 3. Use screw in feet to fine-tune the display angle. To lower the image: 1. Press the elevator button. 2. Lower the image, then release the button to lock the elevator feet into position. 3. Use screw in feet to fine-tune the display angle. 1 Elevator Button Elevator Feet 2 3 Tilt-Adjustment Feet 24
 and the projection screen size from 0.775m~7.62m (30.5 ~300 ) at 16:9 mode with mechanical travel.")
=22.47 W 0 (1920x1080)=L/TR H'=L X tan(a) W 1 (1400x1050)=W 0 (1920x1080) X 0.75 H (1920x1080)=W 0 (1920x1080) X 0.56 H (1400x1050)=W 1 (1400x1050) X 0.")
 2.0 2.5 3.0 3.5 4.0 5.0 6.0 Screen Size 16:10 (inch) Screen Size 4:3 (inch) D (in) Max 48.8 61.0 73.3 85.5 97.7 122.1 146.5 Min 40.7 50.9 61.0 71.2 81.4 101.7 122.1 Max 39.")
25 Installation Adjusting the Projector s Zoom / Focus Turn the Zoom Lever to zoom in or zoom out. To focus the image, turn the focus ring until you see a clear image. The projector will focus at distances from 4.9 to 39.4 feet (1.5 to 12.0 meters) and the projection screen size from 0.775m~7.62m (30.5 ~300 ) at 16:9 mode with mechanical travel. English Zoom Lever Focus Ring Adjusting Projection Image Size Side View Front View W1 (1400X1050) B(1920X1080) H(1920X1080) L A H' D(1920X1080) W0 (1920X1080) Throw Ratio (TR)=1.85 as Wide mode A=6.25 B (1920x1080)=22.47 W 0 (1920x1080)=L/TR H'=L X tan(a) W 1 (1400x1050)=W 0 (1920x1080) X 0.75 H (1920x1080)=W 0 (1920x1080) X 0.56 H (1400x1050)=W 1 (1400x1050) X 0.75 Display Format A B L (cm) W (cm) H (cm) H (cm) D (cm) 16:10 (1920x1080) :3 (1400x1050) Projection Distance (M) Screen Size 16:10 (inch) Screen Size 4:3 (inch) D (in) Max Min Max Min
 or digital via DVI (DVI-D), RGB, Component-p, Component-i, S-Video,")
26 User Controls Control Panel & Remote Control There are two ways for you to control the functions: Control Panel and Remote Control. Using the Control Panel Source Menu Four Directional Select Keys Enter Re-Sync Press Source to choose Analog via DVI (DVI-A) or digital via DVI (DVI-D), RGB, Component-p, Component-i, S-Video, Composite Video, HDTV and HDMI sources. Press Menu to launch the on-screen display (OSD) menu. To exit OSD, Press Menu again. Use to select items or make adjustments to your selection. Confirm your item selection. Automatically synchronizes the projector to the input source. 26
27 User Controls Using the Remote Control Power on Standby Brite mode IRIS ISF Day/ISF Night/User1/ User2/User3 Gamma Edge enhance Color vivid B/W Extension Four Directional Select Keys Enter Menu Power on the projector. Refer to the Power On the Projector section on pages Power off the projector. Refer to the Power Off the Projector section on pages Increase the brightness of the image. Refer to IRIS function on page 44 for more information. Select the display mode. Refer to Image--> Mode section on page 27. There are 10 preset gamma curves. After the initial setup and fine tuning is completed, utilize the Gamma Adjustment steps to optimize your image output. There are 5 pre-set modes and one user mode for advanced edge enhancement filter. You can easily switch between the modes to achieve different effects. There are 3 preset color management settings and one user definable setting. You can easily switch between the modes to achieve different effects. Black and White Extension can stretch the black and white levels to automatically increase the contrast of input image. Use to select items or make adjustments to your selection. Confirm your item selection. Press Menu to launch the on-screen display (OSD) menu. To exit OSD, Press Menu again. V. Shift Shifts the projected image position vertically. Demo This function provides the user with a preview window where settings such as Edge Enhancement, Color Vividness and B/W Extension can be viewed. English 27
28 User Controls Overscan 16x9/4x3/Native/LBX/Format 1/Format 2 HDMI 1/ HDMI 2/ HDMI 3 S-Video 1/ S-Video 2/ S-Video 3 CVBS 1/ CVBS 2/ CVBS 3 YPbPr 1/ YPbPr 2 VGA BNC 1/BNC 2 Auto Mask off a few pixels on each edge of the image to be displayed. Use this function to adjust if image source happens to have noise near any edge of the display image. Select the display format. Refer to Display- -> Format section on page 35. Press HDMI 1 / HDMI 2 / HDMI 3 to choose source from HDMI 1/HDMI 2/HDMI 3 connector. Press S-Video 1 / S-Video 2 / S-Video 3 to choose source from S-Video 1/S-Video 2/S-Video 3 connector. Press CVBS 1 / CVBS 2 / CVBS 3 to choose source from CVBS 1/CVBS 2/CVBS 3 connector. Press YPbPr 1 / YPbPr 2 to choose source from YPbPr 1/YPbPr 2 connector. Press VGA to choose source from VGA connector. Press BNC 1 / BNC 2 to choose source from BNC 1/BNC 2 connector. Automatically synchronizes the projector to the input source. 28
29 User Controls On-screen Display Menus There are four main modules in the OSD: IMAGE, DIS- PLAY, SYSTEM, and SETUP: IMAGE enables a powerful interface to tune the picture to the best quality possible DISPLAY provides the ability to set the different scaling formats, both input and output SYSTEM contains other system oriented functions, such as language, changing output resolution, and more SETUP configures video inputs The Projector has multilingual On-screen Display menus that allow you to make image adjustments and change a variety of settings. How to operate 1. To open the OSD menu, press Menu on the Remote Control or Control Panel. 2 When OSD is displayed, use keys to select any item in the main menu. While making a selection on a particular page, press or Select (Enter) key to enter sub menu. 3. Use keys to select the desired item and adjust the settings by key. 4. Select the next item to be adjusted in the sub menu and adjust as described above. 5. Press Select (Enter) to confirm, and the screen will return to the main menu. 6. To exit, press Menu again. The OSD menu will close and the projector will automatically save the new settings. English Main Menu Setting Sub Menu 29
30 User Controls Menu Tree 30
31 User Controls English 31
32 User Controls Image Adjustment The IMAGE adjustment module allows the user to tailor the image to their particular taste, such as frequently-used items like: Contrast, Brightness, Color, Tint and Sharpness. For advanced users, there is an Advanced submenu, which contains more options for image fine-tuning. All functions may be operated by the remote control as shown below. The,,,, Enter are the key control buttons. 1) Press the Menu button on the remote to show the Menu. 2) Use, arrow keys to select IMAGE category, press Enter or key to enter this adjustment category. 3) Use, arrow keys to select the desired adjustment item, press Enter or to enter this adjustment item. The OSD disappears and a small adjustment bar appears. 4) To adjust other adjustment items, use, key to move to other adjustment items. 5) When the adjustment is finished, press Menu button to exit the adjustment item and go back to Menu. Contrast The contrast controls the degree of difference between the lightest and darkest parts of the picture. Adjusting the contrast changes the amount of black and white in the image. Press the Press the Brightness to decrease the contrast. to increase the contrast. Adjust the brightness of the image. Press the Press the Color to darken image. to lighten the image. Adjusts a video image from black and white to fully saturated color. Press the Press the Tint to decrease the amount of color in the image. to increase the amount of color in the image. Adjusts the color balance of red and green. 32
33 User Controls Mode ISF Day ISF Night User 1 User 2 User 3 Press the Press the Sharpness to increase the amount of green in the image. to increase the amount of red in the image. Adjusts the sharpness of the image. Press the Press the Reset to decrease the sharpness. to increase the sharpness. Returns the current menu s settings to factory default. ISF Modes For care-free operation, HD81 comes with ISF Modes. The HD81 is designed to offer exceptional performance out of box ; but since lighting and other factors can affect the performance of your display device, Optoma offers ISF calibration capability. After the ISF calibration, the user can simply switch among the two ISF Day and Night modes to have certified image effects. Day and Night modes are locked at the factory and require certified ISF calibrators to unlock and set-up. Certain factors cannot be set at the factory due to variables during the setup. Professional calibration of Day and Night modes allow for the appropriate setting of contrast, tint, sharpness, color levels and other parameters to exactly match the environment where the display device is used. There are also three user modes which can be modified by the user, allowing a total of five settings per signal/connection to match every condition. For ISF calibration, please visit to find a certified ISF technician in your area. 1) To select an ISF mode, press Menu button and use Enter or to enter the IMAGE category, then use, arrow keys to highlight Mode. Press Enter or to enter ISF Mode menu. 2) Use, to select the desired mode. English User Mode There are three user modes. All fine-tuning under User Modes will be saved for each signal/connection. 33
34 User Controls 1) To select a User mode, press Menu button and use Enter or to enter the IMAGE category, then use, arrow keys to highlight Mode. Press Enter or to enter User Mode. 2) Use, arrow keys to select the desired User Mode. 3) There are three user modes: User1, User2 and User3, each mode can be fine tuned for the desired image performance. The adjustable parameters include Contrast, Brightness, Color, Tint, and Sharpness. 4) The user can switch between all five modes conveniently by using the mode buttons under the power buttons on the remote control. 34
35 User Controls Display Settings Format Use this function to choose your desired aspect ratio. To match the input image to the correct aspect ratio, six modes can be selected: 16:9, 4:3, Native, LBX, Format 1, Format 2. Default modes are 16:9, 4:3, Native and LBX. 4:3: This format is for 4x3 input sources not enhanced for Widescreen TV. 16:9: This format is for 16x9 input sources, like HDTV and DVD enhanced for Widescreen TV. Native: This format displays the original image without any scaling. LBX: This format is for non-16x9, letterbox source and for users who use external 16x9 lens to display 2.35:1 aspect ratio using full resolution. Detail informations about LBX mode : 1) Some Letter-Box DVD contents are not enhanced for 16x9 TV, then image will not look right in 16:9 display. One can use 4:3 mode to view the correct info. But if the content itself is not 4:3, it will have black bars around the image in a 16:9 display. For this kind of content, you can use LBX mode to fill the image in the 16x9 display as much as possible. 2) If you use an external 16x9 lens, this LBX mode also allows you to watch a 2.35:1 content (include Anamorphic DVD and HDTV film source) that support anamorphic wide is enhanced for 16x9 Display in a wide 2.35:1 image. In this case, there are no black bars, the full lamp power and vertical resolution is fully utilized for maximum viewing effects. Other than these two occasions, one should stay with 16:9 and 4:3 modes for most viewing experiences. At this time, the exact aspect ratios for Format 1 and Format 2 have not been defined. For maximum flexibility, Format 1 are pre-set as 16:9 mode and Format 2 is pre-set as Letter Box. User can also quickly select each mode from the remote control by pressing the Display Format button. English 35
36 User Controls 1) Press the Menu button on the remote. 2) Use, to select DISPLAY category and press Enter or, then use, to highlight the Format adjustment item. 3) Press Enter or to select this adjustment item. The Menu disappears as shown. 4) Use, arrow keys to choose the desired format. 5) Once you select Format 1 or 2 on the Display menu, any other adjustments to the display that are made can be saved upon exiting the Display mode. A reminder window will appear asking for confirmation. 6) User can save settings in the Format 1, 2, or choose Exit/ Not Saved to remove the settings. Once the user selects Not Saved, the settings are still temporary and kept until user changes the aspect ratio, signal/channel or HD81 restart. (*): You can use format setting chage format 2 as 16:9 or LBX, then format can support image shift function, too. 36 Image Shift Adjustment The HD81 has the ability to adjust the image position and size to optimize its location on your display by using both an Image Shift and Overscan feature. The function Image Shift can shift the input image up, down, left and right, up to 100 pixels in each direction with Format 16:9, LBX, Format 1.(*) 1) Press the Menu button on the remote. 2) Use, to highlight the DISPLAY category, press Enter or to select this category. Use, arrow keys to highlight the Image Shift adjustment item. 3) Press Enter or to enter this adjustment item. A small adjustment bar is shown, and the user may use the,, and keys to move the image to best fit the display device screen. 4) Press the Shift button on the remote control to vertically shift the image as well. No horizontal shift is possible from the remote control.

 Use, to highlight the DISPLAY category, press Enter or to select this adjustment category. Use, arrow keys to highlight the Edge Masking adjustment item.")
 Press the buttons,,, to select one edge/direction (Up, Down, left or Right) for the edge mask. Press Enter when finished. 6) Use,,, arrow keys to adjust the edge size.")
37 User Controls 16:9 4:3 Native LBX Format 1 (Default 16:9) Format 2 (Default 4:3) Edge Masking O O O O * * Overscan O O X O Step 2 Step 2 Image Shift O X X O O X O : Available X : Not Available Overscan Adjustment Overscan function that removes the noise in a video image. Edge Masking There are four Mask effects -- top, down, left and right -- which provide pure black bars to mask the input image. English 1) Press the Menu button on the remote. 2) Use, to highlight the DISPLAY category, press Enter or to select this adjustment category. Use, arrow keys to highlight the Edge Masking adjustment item. 3) Press Enter or to enter this adjustment item. The Menu disappears and a sub menu as shown. 4) Use, to select Setting, then press Enter or to enter the mask size setting. 5) Press the buttons,,, to select one edge/direction (Up, Down, left or Right) for the edge mask. Press Enter when finished. 6) Use,,, arrow keys to adjust the edge size. 7) User can use Mask Back Color to fine-tune background color (gray level). Select the item and a bar will appear, as follows. Use, to change each bit and use, to change values. The range of values is 0~
38 User Controls Advanced Adjustments Image/Advanced The HD81 is a power image enhancement tool. Many advanced adjustment functions are included, such as noise reduction, gamma curves, and color temperature. These functions will help the user achieve the best image possible. For more details, please see the sections associated with each item. To access the Advanced Adjustments: 1) Press the Menu button on the remote. 2) Use, to highlight the IMAGE category, then press Enter or enter this adjustment category. Use, to select the Advanced adjustment item. 3) Press Enter or to select this item. A menu which contains advanced adjustment items will appear. Noise Reduction 5 Gamma 0 Noise Reduction The HD81 allows for 11 levels of noise reduction, ranging from 0 to 10. 1) Enter the Advanced menu as detailed in the previous section. 2) Use, to highlight the Noise Reduction adjustment item, press Enter or to select. The OSD disappears and a small adjustment bar is shown. 3) Use, to select the preferred noise reduction setting. The value ranges from 0 to 10. A value of 0 means the noise reduction function is off. Gamma HD81 comes with 10 preset gamma curves. After the initial setup and fine tuning is completed, utilize the Gamma Adjustment steps to optimize your image output. 1) Enter the Advanced menu as detailed in the previous section. 2) Use, to highlight the Gamma adjustment item, press Enter or to select. The OSD disappears and a small adjustment bar is shown. 3) Use, to select the preferred gamma value. The value ranges from -5 to 5. A value of 0 equates to a linear gamma curve. 38

39 User Controls Image Mode -User Output Level: 1 Value: 25 Reset Input Image Mode For easy, care-free operation, HD81 comes with preset image modes. Once the front-end is correctly fine tuned in SETUP and IMAGE, user can simply switch among the pre-set modes to have different image effects. 1) Use, arrow keys to select the Image Mode adjustment item, press Enter key or key to enter this adjustment item. 2) Use, arrow keys to select the preferred image mode. There are 5 preset modes: Film, TV, Graphic, PC and one-user modes; each mode is fine tuned for specific desired image performances. Please refer to the following description: Film: Simulate a Movie Theater image performance, darker with great picture depth, more a film-like experience, suitable for a complete dark room environment. TV: Normal mode is brighter, and the image is more TV-like. Graphic: This mode is for image source. PC: This mode is for PC or computer source. User: This Mode allow memorize user s gamma curve in this image mode. 3) User can select and setup their favorite setting on the User mode and an adjust submenu that shows as the following. 4) Use and arrow keys to select a different Input level or select the reset function; user may adjust output value by using, in each input level. 5) A complete gray level bar on the top of screen is shown while adjusting level; it may help user to see different effects with different value to decide a suitable value. (Dana: I don t understand this.) 6) If user wants to set gamma curve as linear, use or arrow keys to move reset and press enter, then select Yes on confirmation notice so that the gamma curve is back as linear. Once user selects reset and gamma curve as linear, the previous setup values are all removed. English 39
 Enter the Advanced menu as detailed in the previous section. 2) Use, to highlight the Color Temp.")
40 User Controls R Contrast G Contrast B Contrast R Brightness G Brightness B Brightness Color Temp -User Color Temperature The HD81 comes with three color temperature presets. The user can switch between the presets to achieve the desired image. 1) Enter the Advanced menu as detailed in the previous section. 2) Use, to highlight the Color Temp. adjustment item, and press Enter or to select. Red Contrast 0 3) Use, arrow keys to select default modes. 4) For User mode adjustment, put cursor on User, and press Enter to select this adjustment item. 5) Use, to highlight the desired adjustment items, then press Enter or to select it. The Menu disappears and only an adjustment bar appears. 6) Use, arrow keys to adjust image. Edge Enhancement There are 5 pre-set modes and one user mode for advanced edge enhancement filter. You can easily switch between the modes to achieve different effects. 1) Use, arrow keys to select the Edge Enhancement adjustment item, and then press Enter key or key to enter this adjustment item. The Menu disappears and a small adjustment bar is shown (as shown below). 2) Use, arrow keys to select default modes. Edge Enhancement Off User 3) For User mode adjustment, put cursor on User, and then press Enter key to enter this adjustment item. The Menu disappears and a sub adjustment menu is shown (as shown below). 4) Use, arrow keys to select and choose Edge enhancement bar, and then press, arrow keys to adjust different enhancements. 40
 The first item Ref.")
41 User Controls 5) User can select and setup different settings for each mode (1 to 5) in User option and adjust submenu shows as the following: When user chooses one mode and presses Enter to see the original settings of each item; user may then adjust the value per the original setting of each mode. 6) The first item Ref. mode has five default value sets for user to fine-tune High Corning, High Width, Low Corning, Low Width and Strength A &B. User can use, arrow keys to select each setting and press Enter to start the fine-tuning. Once user changes value of each item, the updated values are memorized without any old value savings. English Please refer to the following description and graphics about adjusting items. 1) The vertical coordinate is the luminance offset of the selected area on the screen. A lower luminance offset means the selected area of the screen will have smoothed brightness in for items such as human skin or backgrounds. A higher luminance provides for limited enhancement. This will allow the user to set and fine tune different zones (A and B). Zone A is the primary area of enhancement while Zone B is the area for minimal or no adjustment. 2) Using High Corning and Low Corning to divide A and B Zones. 3) Using Strength A and B to have different levels of Edge enhancement. Value of Strength A must be higher than Strength B. 4) Then High width and Low width fine-tune can make settings between A and B zones smooth. 41
 Use, arrow keys to select the Color Vividness adjustment item, press Enter key or key to enter this adjustment item. The Menu disappears and a small adjustment bar is shown (as shown below).")
 For User mode adjustment, put cursor on User, press Enter key to enter this")
42 User Controls Color Vividness The HD81 includes 3 preset color management settings and one user definable setting. You can easily switch between the modes to achieve different effects. 1) Use, arrow keys to select the Color Vividness adjustment item, press Enter key or key to enter this adjustment item. The Menu disappears and a small adjustment bar is shown (as shown below). 2) Use, arrow keys to select default modes. Color Vividness Off User Color Vividness Color : Red Level : 7 Saturation : 8 Reset Level ) For User mode adjustment, put cursor on User, press Enter key to enter this adjustment item. The Menu disappears and a sub adjustment menu is shown (as shown below). 4) Use, arrow keys to select the desired adjustment item, press, arrow keys to adjust image. 5) User can select and setup their favorite settings on User and adjust submenu shows as the following. (Please refer to the following description and graphic about Saturation and Hue adjustment details.) <1> Choose a color (Green, Blue, Cyan, Yellow, Magenta and Red) and move to Saturation or Hue to fine-tune. <2> Enter Saturation to adjust level (brightness level) on Lengthwise gradation from level 0 to 15, and then adjust the value of Saturation from -100 to 100 in accordance with each level selected. <3> Enter Hue to adjust level (brightness level) on Lengthwise gradation from level 0 to 15, and then adjust the value of Saturation from -30 to 30 in accordance with each level selected. 42
.")
43 User Controls <4> A color level bar is shown on the top of screen for user to see the Saturation or Hue effects with different values. <5> Reset option in Saturation or Hue adjustment is to reset Saturation value or Hue value of all levels (0 to 15). Press arrow key while moving on level 15 or arrow key while moving on level 0 to select Reset option. 6) A color level bar is shown on the top of screen for user to see color vividness effects. 7) The item Reset bottom of the menu is for Saturation and Hue values of current Color selected; a confirmation notice shows while selecting Enter to reset settings. English B/W Extension Off B/W Extension Black and White Extension can stretch the black and white levels to automatically increase the contrast of input image. The HD81 has 5 pre-set modes that allow the user to switch among the pre-sets to obtain different image effects. 1) Use, arrow keys to select the B/W Extension adjustment item, and then press Enter key or key to enter this adjustment item. The Menu disappears and a small adjustment bar is shown (as shown below). 2) Use, arrow keys to select default modes. Demo Mode This function provides the user with a preview window where settings such as Edge Enhancement, Color Vividness and B/W Extension can be viewed. 1) Select Demo and a turn on/off bar is shown as following. Using, arrow keys to turn the function on or off. 2) After turning on the Demo function, a rectangular frame is shown. By pressing the pressing, keys the frame will move. 3) User can view immediate enhanced performances only while adjusting these items: Image mode, Edge Enhancement, Color Vividness and B/W Extension. Reset Returns the current menu s settings to factory default. 43
 to finalize the selection. Programmable 12V Trigger There is one 12V Trigger that can be edited on or off according to different aspect ratios. (See page 35.")
44 User Controls System Adjustments Language Choose the multilingual OSD menu. Press or into the sub menu and then use the or key to select your preferred language. Press Select (Enter) to finalize the selection. Programmable 12V Trigger There is one 12V Trigger that can be edited on or off according to different aspect ratios. (See page 35.) 1) Press the Menu button on the remote to show the OSD. 2) Use, arrow keys to select SYSTEM category, press Enter or key to enter this adjustment category (as shown) 3) Use, arrow keys to select the 12V Trigger item, press Enter key or key to enter this item. The OSD disappears and displays a sub menu (as shown below) 4) Use,,, arrow keys to program the 12V Trigger output. 5) Once each format is set as on or off, 12 Trigger function turns on or off accordingly and automatically while changing format any time by user. Projector Settings IRIS The iris function adjusts the contrast optically by opening and closing the lens aperture. The iris can be switched between tree modes, Off (close), On (Open) and Auto. When you press the IRIS button, the current setting appears. When pressing it again while the setting is being displayed, the setting can be changed. It takes about 6 seconds for the iris to shift between Off state, On state, and Auto state. Off: When Off is selected, the image becomes brighter. 44

45 User Controls On: When On is selected, black levels of the image are reproduced with more clarity though the brightness is lowered. There are 17 step for you adjust. Auto: The dynamic image performance manager is active in making sure your greatest pleasure from seeing a movie dynamically with the most dark details revealed, vivid and bright image performed all the way. English Projection Front-Desktop The factory default setting. Rear-Desktop When you select this function, the projector reverses the image so you can project behind a translucent screen. Front-Ceiling When you select this function, the projector turns the image upside down for ceiling-mounted projection. Rear-Ceiling When you select this function, the projector reverses and turns the image upside down at same time. You can project from behind a translucent screen with ceiling mounted projection. V Keystone Press the or to adjust image distortion vertically and makes a squarer image. Brite Mode Choose On to increase the brightness. Choose Off to return normal mode. High Altitude Choose On to turn on High Altitude mode. Operates the fans at full speed continuously to allow for proper high altitude cooling of the projector. 45
46 User Controls Lamp This function can adjust setup about lamp. Lamp Hours: Displays the cumulative lamp operating time. Lamp Reminding: Choose this function to show or to hide the warning message when the changing lamp message is displayed. The message will appear up 30 hours before suggested replacement of lamp. Lamp Reset: Reset the lamp life hour after replacing the lamp. Settings copy This function allow user copy image setting that user adjust from one to another. From I/O Timing Group 1 HDMI 1/2/3 Group 2 HDMI 1/2/3 Group 3 HD 1/ HD 2 (RCA) HD 3/ HD 4 (BNC) Group 4 D-Sub HD 3/ HD 4 (BNC) Group 5 D-Sub S 1/ S 2/ S 3 Reset Returns the settings for all menus to factory default values. Video 1/ Video 2/ Video 3 480i 480i 480i 480i NTSC NTSC 480p 480p 480p 480p PAL PAL 576i 576i 576i 576i 576p 576p 576p 576p 720p 720p 720p 720p 1080i/p 1080i 1080i 1080i PC PC PC (*) HD mean Component; PC signal only can copy to PC signal (*) PC signal only can copy to PC signal 46
47 User Controls Setup Settings Signal During the initial setup, adjustment of the color and image quality should be performed. After this initial setup is completed, the HD81 will automatically store the settings for optimal image viewing. The HD81 OSD is dependent upon the video source signal. It has been designed to show a different OSD display with each input. Please refer to table A and B below for more details on available adjustments for each signal. With the exception of the VGA and BNC connections, if the HD81 is not receiving a signal from the input source device, the OSD will only allow the System Setup module to be adjusted. English TABLE A Type Color Space Composite S-Video RCA BNC Video Decoder Video Decoder YPbPr YPbPr RGBsRGB Auto, SDTV, HDTV Auto YPbPr, RGBs, RGB Auto, SDTV, HDTV Pedestal 0IRE, 7.5IRE 0IRE, 7.5IRE 0IRE, 7.5IRE 0IRE, 7.5IRE Horizontal -50~50-50~50-50~50 Vertical -7~7-7~7-7~7 Frequency -10~10-10~10-10~10 Phase 0~31 0~31 0~31 TABLE B Type YPbPr VGA Auto YPbPr, RGBs, RGB RGBsRGB HDMI Color Space Auto, SDTV, HDTV Auto, SDTV, HDTV Pedestal 0IRE, 7.5IRE DVI-PC, DVI-Video Horizontal -50~50-50~50 Vertical -7~7-7~7 Frequency -10~10-10~10 Phase 0~31 0~31 * Grey color blanks stand for N/A. Please exercise caution when adjusting the Horizontal and Vertical as this may cause the loss of your image if the values are set out of range. We recommend using this adjustment only if you cannot receive the input signal. 47
48 User Controls 1) Press the Menu button on the remote to show the Menu. Use, arrow keys to select SETUP category, press Enter or key to enter this adjustment category. 2) The first line shows the current signal. Use, arrow key to select the item Signal ; User may see different items for adjustment depending on the current signals. Type Pedestal Color Space Horizontal Vertical Frequency Phase Signal Auto 0 IRE Auto ) Press Enter or to enter category. The OSD shows a signal submenu according to the current signal. 4) Press Enter or to enter item. A bar appears according to the current signal, as shown on the next page. Type AUTO YPbPr RGBHV RGBs 5) For Type, Pedestal, and Color Space, use & to select the desired choices, and then press Enter to confirm. For the rest of the items, use & to adjust the slider bar to achieve the desired effect, then press Enter to confirm. Please refer to tables A & B for the range of available values. Type This function is only for BNC signals. The default choice, AUTO, automatically detects the signal type. The other three choices (YPbPr, RGBHV, RGB) force the HD81 to display the selected signal type. Pedestal Black level control: All connected devices besides HDMI can choose between 2 pre-sets: 0 IRE or 7.5 IRE. HDMI devices are given the choice of DVI-PC or DVI-Video; DVI-PC corresponds to 0 IRE and DVI-Video corresponds to 7.5 IRE. 48
49 User Controls Color Space The default choice, AUTO, automatically detects the color space used. The other two choices (SDTV, HDTV) force the HD81 to use the color space mapping associated with SDTV or HDTV. Frequency Changes the display data frequency to match the frequency of your computer s graphic card. When you experience a vertical flickering bar, use this function to make an adjustment. Horizontal Adjusts the horizontal position. Vertical Adjusts the vertical position. Phase Synchronizes the signal timing of the display with the graphics card. If you experience an unstable or flickering image, use this function to correct it. Auto Calibration The HD81 features an Auto Calibration feature. This will automatically optimize and adjust the video image. 1) Activate the OSD by pressing the Menu button. 2) Use, arrow keys to select SETUP category, press Enter or key to enter this adjustment category. 3) Use, arrow keys to select the desired adjustment item (as shown) English 4) Press Enter or to enter this item. The Menu disappears and a small bar appears as shown. 5) Use, arrow keys to turn on or off the auto calibration. 6) Once the Auto Calibration is activated, the HD81 calibrates and fine tunes the image for optimal performance. 49
50 User Controls S-Video and Composite Video This section explains the operation of SETUP when inputting S- Video or Video/CVBS signals. 1) Enters SETUP as described in previous section. White Level ) Use, arrow keys to select the adjustment item, press Enter or to enter this item. The Menu disappears and a small bar appears as shown. 3) Use, arrow keys to calibrate. White Level Allow user adjust White Level when inputting S-Video or Video/ CVBS signals. Black Level Allow user adjust Black Level when inputting S-Video or Video/ CVBS signals. Saturation Adjusts a video image from black and white to fully saturated color. Press the Press the Hue to decrease the amount of color in the image. to increase the amount of color in the image. Adjusts the color balance of red and green. Press the Press the CTI to increase the amount of green in the image. to increase the amount of red in the image. Color transient improver. This function allow user adjust color transient values to get artificial enhancement resulting in all most no bleeding for saturated color transients. DNR Digital Noise Reduction. The motion Adaptive Noise Reduction greatly enhances the quality of interlaced video. Reset Returns the current menu s settings to factory default.
51 User Controls Component YPbPr This section explains the operation of SETUP when inputting Component YPbPr signals. 1) Enters SETUP as described in previous section. English Auto Calibration Off On 2) Use, arrow keys to select the adjustment item, press Enter or to enter this item. The Menu disappears and a small bar appears as shown. 3) Use, arrow keys to calibrate. Auto Calibration Refer to Auto Calibration function on page 49 for more information. Y gain Adjust the gain of Y. Pb gain Adjust the gain of Pb. Pr gain Adjust the gain of Pr. Y bias Adjust the bias of Y. Pb bias Adjust the bias of Pb. Pr bias Adjust the bias of Pr. Reset Returns the current menu s settings to factory default. 51

52 User Controls Analog RGB This section explains the operation of SETUP when inputting Analog RGB signals (PC). 1) Enters SETUP as described in previous section. White Level 0 White Level Allow user adjust White Level when inputting S-Video or Video/ CVBS signals. Black Level Allow user adjust Black Level when inputting S-Video or Video/ CVBS signals. Reset 2) Use, arrow keys to select the adjustment item, press Enter or to enter this item. The Menu disappears and a small bar appears as shown. 3) Use, arrow keys to calibrate. Returns the current menu s settings to factory default. 52
53 Appendices Troubleshooting If you experience a problem with your projector, please refer to the following information. If a problem persists, please contact your local reseller or service center. (See page 62 for details) English Image Problems (#) Break off Rule of HD81 : See page 56. LED lighting message No image appears on-screen Ensure all the cables and power connections are correctly and securely connected as described in the Installation section. Ensure the pins of connectors are not crooked or broken. Not only the RS-232 cable and HDMI cable between projector and Box,but also the cable from source to Box. Check if the projection lamp has been securely installed. Please refer to the Replacing the lamp section. Make sure you have removed the lens cap and the projector is switched on. If projector only show blue image,please check controller box is switched on and HDMI (#) connections between controller box and projector. (*) The resolution: HDMI s 1920 x 1080 i/p and component s 1920 x 1080 i is recommended for this projector. Partial, scrolling or incorrectly displayed image Press source direct key that you feed to HD81 on the remote control or control panel. If you are using a PC: For Windows 95, 98, 2000, XP: 1. From the My Computer icon, open the Control Panel folder, and double click the Display icon. 2. Select the Settings tab. 3. Verify that your display resolution setting is lower than or equal to SXGA+ (1400 x 1050). (*) 4. Click on the Advanced Properties button. If the projector is still not projecting the whole image, you will also need to change the monitor display you are using. Refer to the following steps. 5. Verify the resolution setting is lower than or equal to SXGA+ (1400 x 1050) resolution. 53
54 Appendices 6. Select the Change button under the Monitor tab. 7. Click on Show all devices. Next, select Standard monitor types under the SP box; choose the resolution mode you need under the Models box. 8. Verify that the resolution setting of the monitor display is lower than or equal to SXGA+ (1400 x 1050). (*) If you are using a Notebook: (*) The resolution: HDMI s 1920 x 1080 i/p and component s 1920 x 1080 i is recommended 1. First, follow the steps above to adjust resolution of the computer. 2. Press the toggle output settings. example: [Fn]+[F4] for this projector. Compaq=> [Fn]+[F4] Packard Dell => [Fn]+[F8] Hewlett => [Fn]+[F4] Gateway=> [Fn]+[F4] NEC=> [Fn]+[F3] IBM=> [Fn]+[F7] Toshiba => [Fn]+[F5] Mac Apple: System Preference-->Display-->Arrangement-->Mirror display If you experience difficulty changing resolutions or your monitor freezes, restart all equipment including the projector. 1. If you are using other device (like DVD playe,tuner,..etc), please make sure your device and the cable that link to Box isn t broken. The screen of the Notebook or PowerBook computer is not displaying your presentation If you are using a Notebook PC: Some Notebook PCs may deactivate their own screens when a second display device is in use. Each has a different way to be reactivated. Refer to your computer s manual for detailed information. Unstable or flickering image Use Frequency to correct it. See page 49 for more information. Change the monitor color setting on your computer. 54 Image has vertical flickering bar Use Phase to make an adjustment. See page 49 for more information. Check and reconfigure the display mode of your graphic card to make it compatible with the projector.
55 Appendices Image is out of focus Make sure the Lens cap is removed. Adjusts the Focus Ring on the projector lens. Make sure the projection screen is between the required distance 4.9 to 39.4 feet (1.5 to 12.0 meters) from the projector. See page 25. English The image is stretched when displaying 16:9 DVD title When you play anamorphic DVD or 16:9 DVD, the projector will show the best image in 16: 9 format on projector side. If you play the LBX format DVD title, please change the format as LBX in projector OSD. If you play 4:3 format DVD title, please change the format as 4:3 in projector OSD. If the image is still stretched, you will also need to adjust the aspect ratio by referring to the following: Please setup the display format as 16:9 (wide) aspect ratio type on your DVD player. Image is too small or too large Adjust the zoom lever on the top of the projector. Move the projector closer to or further from the screen. Press [4:3], [16:9], [Letter Box], [Native] button on the remote control or [Menu] on the projector panel, go to Display-->Format. Try the different settings. Use of Keystone is not recommended. Image has slanted sides: If possible, reposition the projector so that it is centered on the screen and below the bottom of the screen. Press [Menu] button, go to System -->Projector -->V Keystone to adjust until the sides are vertical on the remote control. Image is reversed Select System-->Projector-->Projection from the OSD and adjust the projection direction. Intermission Problems The HD81 stops responding to all controls 55
56 Appendices If possible, turn off the projector, then unplug the power cord and wait at least 20 seconds before reconnecting power. Lamp burns out or makes a popping sound When the lamp reaches its end of life, it will burn out and may make a loud popping sound. If this happens, the projector will not turn on until the lamp module has been replaced. To replace the lamp, follow the procedures in the Replacing the Lamp section on page 59. Steady light => No light => LED Problems LED lighting message HD81 s Projector side Normal Operation Message Power LED Lamp-LED Temp-LED Red Dark Blue Bright Blue Orange Blue Red Blue Standby State (Input power cord) Power on (warming) Dark LED for cinema (After Power on 5 mins.) Power off (Cooling) Blinking Error (Lamp fail) Blinking Error (Fan fail) Blinking Error (Over Temp.) Error (HDMI Connection Fail (*2)) Blinking Error (RS232 Connection Fail (*2)) Blinking HD81 s Box Normal Operation Message Red Power LED Bright Blue Standby State (Input power cord) Power on (warming) 56
57 Appendices Ps1: 1. When orange and blue of LED show at same time,the color could show light purple. When red and blue of LED show at same time, the color could show purple. Ps2: (*) Break off Rule of HD81: 1. RS-232 communication failure: OSD will show Projector will shutdown in 30 seconds if RS232 connection is not restored. Please check RS232 connection between controller box and projector. 2. HDMI communication failure. System will show blue image only. Please check HDMI connection between controller box and projector. Or projector will shutdown in 30 seconds if HDMI connection is not restored. 3. RS-232 & HDMI communication failure System will show blue image only. Please check controller box is switched on and RS-232 and HDMI connections between controller box and projector. Or projector will shutdown in 30 seconds if RS-232 and HDMI connections are not restored. 4. The HD81 can t power on if RS232 between projector and Box don t be connect in standby mode 5. The HD81 can t show HDMI connection fail or not if HD81 is in standby. Message Reminders Fan failed: English Over temperature: 57
58 Appendices RS232 connection fail: Replacing the lamp: Projector side don t have IR receiver. IR receiver are only on front of Box side and IR Module. Remote Control Problems If the remote control does not work Check the operating angle for the remote control is approximately ±22.5. Make sure there are not any obstructions between the remote control and the HD81 s Box. Move to within 6 m (20 ft) of the HD81 s Box. Make sure batteries are inserted correctly. Make sure batteries are exhausted. If so, replace weak batteries in the remote control. 58


59 Appendices Replacing the lamp The projector automatically detects the lamp life. When the lamp life is nearing the end of use, you will receive a warning message. English Warning: Lamp compartment is hot! Allow it to cool down before changing lamp! When you see this message, please contact your local reseller or service center to change the lamp as soon as possible. Make sure the projector has been cooled down for at least 30 minutes before changing the lamp Warning: To reduce the risk of personal injury, do not drop the lamp module or touch the lamp bulb. The bulb may shatter and cause injury if it is dropped. Lamp Replacing Procedure: 1. Switch off the power to the projector by pressing the Power button. 2. Allow the projector to cool down at least 30 minutes. 3. Disconnect the power cord. 4. Use a screwdriver to remove the screw from the cover. 5. Push up and remove the cover. 6. Remove the 2 screws from the lamp module. 7. Pull out the lamp module. To replace the lamp module, reverse the previous steps. 8. Turn on the projector and do Lamp Reset after the lamp module is replaced. Lamp Reset: (i)press Menu --> ii)select System --> (iii)select Projector -->(iv)select Lamp -> (v)select Lamp Reset (vi)select Yes. 59
Table of Contents. English. Table of Contents... 1 Usage Notice Introduction Installation User Controls Appendices...
 Table of Contents Table of Contents... 1 Usage Notice... 2 Precautions... 2 Introduction... 4 Product Features... 4 Package Overview... 5 Product Overview... 6 Main Unit... 6 Control Panel... 7 Connection
Table of Contents Table of Contents... 1 Usage Notice... 2 Introduction... 4 Installation User Controls Appendices...
 Table of Contents Table of Contents... 1 Usage Notice... 2 Precautions... 2 Introduction... 4 Product Features... 4 Package Overview... 5 Product Overview... 6 Main Unit... 6 Control Panel... 7 Connection
USER MANUAL. 27 Full HD Widescreen LED Monitor L27ADS
 USER MANUAL 27 Full HD Widescreen LED Monitor L27ADS TABLE OF CONTENTS 1 Getting Started 2 Control Panel/ Back Panel 3 On Screen Display 4 Technical Specs 5 Care & Maintenance 6 Troubleshooting 7 Safety
Table of Contents... 1 Usage Notice Introduction Installation Connecting the Projector...10 Powering On/Off the Projector...
 Table of Contents Table of Contents... 1 Usage Notice... 2 Precautions...2 Introduction... 4 Product Features...4 Package Overview...5 Product Overview...6 Main Unit...6 Control Panel...7 Connection Ports...8
USER MANUAL. 22" Class Slim HD Widescreen Monitor L215DS
 USER MANUAL 22" Class Slim HD Widescreen Monitor L215DS TABLE OF CONTENTS 1 Getting Started Package Includes Installation 2 Control Panel / Back Panel Control Panel Back Panel 3 On Screen Display 4 Technical
Table of Contents. English. Usage Notice. Introduction. Installation. User Controls. Appendices. Precautions... 2
 Table of Contents Usage Notice Precautions... 2 Introduction Product Features... 4 Package Overview... 5 Product Overview... 6 Main Unit... 6 Control Panel... 7 Connection Ports... 8 IR Remote Control...
USER MANUAL. 27 Full HD Widescreen LED Monitor L270E
 USER MANUAL 27 Full HD Widescreen LED Monitor L270E TABLE OF CONTENTS 1 Getting Started 2 Control Panel/ Back Panel 3 On Screen Display 4 Technical Specs 5 Care & Maintenance 6 Troubleshooting 7 Safety
Table of Contents Table of Contents... 1 Usage Notice... 2 Introduction... 4 Installation User Controls Appendices...
 Table of Contents Table of Contents... 1 Usage Notice... 2 Precautions... 2 Introduction... 4 Product Features... 4 Package Overview... 5 Product Overview... 6 Main Unit... 6 Control Panel... 7 Connection
TFT LCD MONITOR USER MANUAL. L80AP and L101AP
 TFT LCD MONITOR USER MANUAL L80AP - 8.0 and L101AP - 10.1 Table Of Contents Table of contents/ Warning.... 2 Precautions...3 About this user manual and products / Items included in the delivery..... 4
USER MANUAL Full HD Widescreen LED Monitor L215ADS
 USER MANUAL 21.5 Full HD Widescreen LED Monitor L215ADS TABLE OF CONTENTS 1 Getting Started 2 Control Panel/ Back Panel 3 On Screen Display 4 Technical Specs 5 Care & Maintenance 6 Troubleshooting 7 Safety
USER MANUAL Full HD Widescreen LED Monitor L215IPS
 USER MANUAL 21.5 Full HD Widescreen LED Monitor L215IPS TABLE OF CONTENTS 1 Getting Started 2 Control Panel/ Back Panel 3 On Screen Display 4 Technical Specs 5 Care & Maintenance 6 Troubleshooting 7 Safety
PXL2760MW LED LCD Monitor
 PXL2760MW LED LCD Monitor USER'S GUIDE www.planar.com Content Operation Instructions...1 Safety Precautions...2 Package Overview...3 First Setup...4 Front View of the Product...5 Rear View of the Product...6
PLL2710W LED LCD Monitor
 PLL2710W LED LCD Monitor USER'S GUIDE www.planar.com Content Operation Instructions...1 Safety Precautions...2 Package Overview...3 First Setup...4 Front View of the Product...5 Rear View of the Product...6
17 19 PROFESSIONAL LCD COLOUR MONITOR ART
 17 19 PROFESSIONAL LCD COLOUR MONITOR ART. 41657-41659 Via Don Arrigoni, 5 24020 Rovetta S. Lorenzo (Bergamo) http://www.comelit.eu e-mail:export.department@comelit.it WARNING: TO REDUCE THE RISK OF FIRE
USER MANUAL. 28" 4K Ultra HD Monitor L28TN4K
 USER MANUAL 28" 4K Ultra HD Monitor L28TN4K TABLE OF CONTENTS 1 Getting Started 2 Control Panel/ Back Panel 3 On Screen Display 4 Technical Specs 5 Care & Maintenance 6 Troubleshooting 7 Safety Info &
USER MANUAL Full HD Widescreen LED Monitor L236VA
 USER MANUAL 23.6 Full HD Widescreen LED Monitor L236VA TABLE OF CONTENTS 1 Getting Started 2 Control Panel/ Back Panel 3 On Screen Display 4 Technical Specs 5 Care & Maintenance 6 Troubleshooting 7 Safety
22" Touchscreen LED Monitor USER'S GUIDE
 22" Touchscreen LED Monitor USER'S GUIDE Content Operation Instructions...1 Unpacking Instructions...2 Safety Precautions...2 Front View of the Product...3 Rear View of the Product...4 Quick Installation...5
Table of Contents Table of Contents... 1 Usage Notice... 2 Introduction... 4 Installation User Controls Appendices...
 Table of Contents Table of Contents... 1 Usage Notice... 2 Precautions... 2 Introduction... 4 Product Features... 4 Package Overview... 5 Product Overview... 6 Main Unit... 6 Control Panel... 7 Connection
Usage Notice Precautions Follow all warnings, precautions and maintenance as recommended in this user s guide to maximize the life of your unit. Warni
 Table of Contents Table of Contents... 1 Usage Notice... 2 Precautions... 2 Introduction... 4 Product Features... 4 Package Overview... 5 Product Overview... 6 Main Unit... 6 Panel Control... 7 Connection
X6 X7. Reference Guide
 X6 X7 Reference Guide Table of Contents Table of Contents... 1 Usage Notice... 2 Precautions...2 Important Operating Considerations for Safety...4 Introduction... 5 Product Features...5 Package Overview...6
1... English. Table of Contents... 1 Usage Notice Introduction Installation User Controls Appendices Precautions...
 Table of Contents Table of Contents... 1 Usage Notice... 2 Precautions... 2 Introduction... 4 Product Features... 4 Package Overview... 5 Product Overview... 6 Main Unit... 6 Panel Control... 7 Connection
PXL2470MW LED LCD Monitor
 PXL2470MW LED LCD Monitor USER'S GUIDE www.planar.com Content Operation Instructions...1 Unpacking Instructions...2 Safety Precautions...2 Package Overview...3 First Setup...4 Front View of the Product...5
PL2410W LCD Monitor USER'S GUIDE.
 PL2410W LCD Monitor USER'S GUIDE www.planar.com Content Operation Instructions...1 Safety Precautions...2 First Setup...3 Front View of the Product...4 Rear View of the Product...5 Quick Installation...6
PLL2210MW LED Monitor
 PLL2210MW LED Monitor USER'S GUIDE www.planar.com Content Operation Instructions...1 Safety Precautions...2 First Setup...3 Front View of the Product...4 Rear View of the Product...5 Quick Installation...6
USER MANUAL. 27" 2K QHD LED Monitor L27HAS2K
 USER MANUAL 27" 2K QHD LED Monitor L27HAS2K TABLE OF CONTENTS 1 Getting Started 2 Control Panel/ Back Panel 3 On Screen Display 4 Technical Specs 5 Troubleshooting 6 Safety Info & FCC warning 1 GETTING
28 4K LED monitor. User Manual M284K
 28 4K LED monitor User Manual M284K CONTENTS Safety Information... 2 What s included..... 4 Getting Started....... 8 Troubleshooting.... 14 Specification.... 15 2 of 15 SAFETY INFORMATION Read these instructions
LCD VALUE SERIES (32 inches)
") LCD VALUE SERIES (32 inches) http://www.orionimages.com All contents of this document may change without prior notice, and actual product appearance may differ from that depicted herein 1. SAFETY INSTRUCTION
LCD VALUE SERIES (32 inches) http://www.orionimages.com All contents of this document may change without prior notice, and actual product appearance may differ from that depicted herein 1. SAFETY INSTRUCTION
Table of Contents... 1 Usage Notice... 2 Precautions... 2 Introduction... 4 Product Features... 4 Package Overview... 5 Product Overview...
 T l charg sur www.lampe-videoprojecteur.info Table of Contents Table of Contents... 1 Usage Notice... 2 Precautions... 2 Introduction... 4 Product Features... 4 Package Overview... 5 Product Overview...
DCL9AW. User Manual. English
 DCL9AW User Manual English PRECAUTIONS Information for users applicable in European Union countries 1 Information for users applicable in United States of America 1 Installation 1 Power connection 1 Maintenance
SAFETY WARNINGS AND GUIDELINES
 SAFETY WARNINGS AND GUIDELINES Please read this manual thoroughly, paying extra attention to these safety warnings and guidelines: Do not expose this monitor to water or moisture of any kind. Do not handle
Evolution Digital HD Set-Top Box Important Safety Instructions
 Evolution Digital HD Set-Top Box Important Safety Instructions 1. Read these instructions. 2. Keep these instructions. 3. Heed all warnings. 4. Follow all instructions. 5. Do not use this apparatus near
CU103 User Manual. Contents
 [Note] The Photos of Light Engine and Control Unit in this manual are for reference only. The items may be different in actual package. Contents 1. PRECAUTIONS... 2 2. PACKAGE CONTENT... 4 3. PORT DESCRIPTION...
DC162 Digital Visualizer. User Manual. English - 1
 DC162 Digital Visualizer User Manual English - 1 Table of Contents CHAPTER 1 PRECAUTIONS... 5 CHAPTER 2 PACKAGE CONTENT... 7 CHAPTER 3 PRODUCT OVERVIEW... 8 3.1 PRODUCT INTRODUCTION... 8 3.2 I/O CONNECTION...
PLL1920M LED LCD Monitor
 PLL1920M LED LCD Monitor USER'S GUIDE www.planar.com Content Operation Instructions...1 Safety Precautions...2 First Setup...3 Front View of the Product...4 Rear View of the Product...5 Installation...6
Informational Blog: Video Guides: User Forums:
 Disclaimer This user manual is provided as a free service by FixYourDLP.com. FixYourDLP is in no way responsible for the content of this manual, nor do we guarantee its accuracy. FixYourDLP does not make
HD Digital Set-Top Box Quick Start Guide
 HD Digital Set-Top Box Quick Start Guide Eagle Communications HD Digital Set-Top Box Important Safety Instructions WARNING TO REDUCE THE RISK OF FIRE OR ELECTRIC SHOCK, DO NOT EXPOSE THIS PRODUCT TO RAIN
AUTO - SCANNING WITH DIGITAL CONTROL LCD COLOR MONITOR FS-L1903C. User manual (Rev.01) SMITHS HEIMANN
 SMITHS HEIMANN") AUTO - SCANNING WITH DIGITAL CONTROL LCD COLOR MONITOR FS-L1903C User manual (Rev.01) SMITHS HEIMANN www.smithsdetection.com Table of Contents Safety Instructions... 5 Accessories... 8 Power Connections...
AUTO - SCANNING WITH DIGITAL CONTROL LCD COLOR MONITOR FS-L1903C User manual (Rev.01) SMITHS HEIMANN www.smithsdetection.com Table of Contents Safety Instructions... 5 Accessories... 8 Power Connections...
LA1500R USER S GUIDE.
 LA1500R USER S GUIDE www.planar.com The information contained in this document is subject to change without notice. This document contains proprietary information that is protected by copyright. All rights
YCbCr (480i/576i) and RGBsync. 4 Press Component to change source to component connec tor. This connector supports YPbPr (480p/576p/720p/1080i)
 and RGBsync. 4 Press Component to change source to component connec tor. This connector supports YPbPr (480p/576p/720p/1080i)") Introduction Product Features This product is an XGA single chip 0.7 DLP TM projector. Outstanding features include: u True XGA, 1024 x 768 addressable pixels u Single chip DLP TM technology u NTSC3.58/NTSC4.43/PAL/SECAM
Introduction Product Features This product is an XGA single chip 0.7 DLP TM projector. Outstanding features include: u True XGA, 1024 x 768 addressable pixels u Single chip DLP TM technology u NTSC3.58/NTSC4.43/PAL/SECAM
2.0 Wall Mount TV Soundbar Instruction Manual
 8010275 2.0 Wall Mount TV Soundbar Instruction Manual Read all of the instructions before using this soundbar and keep the manual in a safe place for future reference. Safety Information CA UT IO N RISK
17" & 19" Color TFT LCD Monitor
 17" & 19" Color TFT LCD Monitor KMC-17B & KMC-19B User's Manual for Operation and installation Screen Size : KMC-17B (17" inch TFT LCD) KMC-19B (19" inch TFT LCD) Display Size : KMC-17B (337.920mm X 270.336mm)
Precautions About the Product... 3 Package Overview... 4
 English 1 Table of Contents Usage Notice Precautions... 2 Introduction About the Product... 3 Package Overview... 4 Installation Product Overview... 5 Connecting the Projection Display... 8 Powering On/Off
Table of Contents Table of Contents... 1 Usage Notice... 2 Introduction... 4 Installation User Controls Appendices...
 Table of Contents Table of Contents... 1 Usage Notice... 2 Precautions... 2 Introduction... 4 Product Features... 4 Package Overview... 5 Product Overview... 6 Main Unit... 6 Control Panel... 7 Connection
DLP PROJECTOR FEATURES USER S GUIDE OUTLINE. 1. High Brightness. 2. High Resolution. 3. Compact Size, Feather Weight for Portability
 DLP PROJECTOR USER S GUIDE Thank you for purchasing the DLP TM Projector. Please read this user s guide to ensure correct use of the device. Save this user s guide for future reference. OUTLINE This DLP
HD Digital MPEG2 Encoder / QAM Modulator
 HD Digital MPEG2 Encoder / QAM Modulator HDMI In QAM Out series Get Going Guide ZvPro 800 Series is a one or two-channel unencrypted HDMI-to-QAM MPEG 2 Encoder / QAM Modulator, all in a compact package
Camera 220C Document Camera User s Guide
 Camera 220C Document Camera User s Guide #401-220C-00 Table of Contents TABLE OF CONTENTS... 0 TABLE OF CONTENTS... 1 COPYRIGHT INFORMATION... 2 CHAPTER 1 PRECAUTIONS... 3 CHAPTER 2 PACKAGE CONTENT...
PX1710M LCD Monitor USER S GUIDE
 PX1710M LCD Monitor USER S GUIDE www.planar.com The information contained in this document is subject to change without notice. This document contains proprietary information that is protected by copyright.
TFT LCD MONITOR USER MANUAL HMDE Series 104AV-HMDE 121AV-HMDE 151/152AV-HMDE 156AV-HMDE, 171/172AV-HMDE 185AV-HMDE 191/192AV-HMDE 215AV-HMDE
 TFT LCD MONITOR USER MANUAL HMDE Series 104AV-HMDE 121AV-HMDE 151/152AV-HMDE 156AV-HMDE, 171/172AV-HMDE 185AV-HMDE 191/192AV-HMDE 215AV-HMDE 220AV-HMDE 236AV-HMDE 240AV-HMDE 270AV-HMDE 320AV-HMDE 420AV-HMDE
BOXLIGHT XD-16n FEATURES USER S GUIDE OUTLINE. 1. High Brightness. 2. High Resolution. 3. Compact Size, Feather Weight for Portability
 BOXLIGHT XD-16n USER S GUIDE Thank you for purchasing the BOXLIGHT XD-16n Multimedia Projector. Please read this user s guide to ensure correct use of the device. Save this user s guide for future reference.
Installation Manual VIP 1003
 Installation Manual VIP 1003 We Caring for the Environment by Recycling When you see this symbol on a Motorola product, do not dispose of the product with residential or commercial waste. Recycling your
Mini Projector User s Guide
 Mini Projector User s Guide Please read this manual before Model P50 Table of Contents 1. Table of Contents---------------------------------1 2. Warnings-----------------------------------------2 3. Accessories---------------------------------------4
Informational Blog: Video Guides: User Forums:
 Disclaimer This user manual is provided as a free service by FixYourDLP.com. FixYourDLP is in no way responsible for the content of this manual, nor do we guarantee its accuracy. FixYourDLP does not make
HD Digital MPEG2 Encoder / QAM Modulator
 HD Digital MPEG2 Encoder / QAM Modulator YPrPb VGA In QAM Out series Get Going Guide ZvPro 600 Series is a one or two-channel Component or VGA-to-QAM MPEG 2 Encoder/ Modulator, all in a compact package
D60 Digital Projector User Manual
 D60 Digital Projector User Manual Table of contents Important safety instructions.. 3 Overview... 5 Shipping contents... 5 Remote control batteries... 5 Remote control operation... 5 Projector features...
Installer Guide. Follow these instructions to set up the PowerLite Pro Cinema 1080 projector and HQV video processor.
 Installer Guide Follow these instructions to set up the PowerLite Pro Cinema 1080 projector and HQV video processor. For more information, see the manuals that came with these products. Setting Up the
CAUTION RISK OF ELECTRIC SHOCK NO NOT OPEN
 Evolution Digital HD Set-Top Box Important Safety Instructions 1. Read these instructions. 2. Keep these instructions. 3. Heed all warnings. 4. Follow all instructions. 5. Do not use this apparatus near
HD Digital MPEG2 Encoder / QAM Modulator Get Going Guide
 series HD Digital MPEG2 Encoder / QAM Modulator Get Going Guide HDb2640 HDb2620 HDb2540 HDb2520 The HDbridge 2000 Series is a combination HD MPEG 2 Encoder and frequency-agile QAM Modulator, all in a 1RU
Table of Contents... 1 Usage Notice... 2 Safety Information...2 Precautions...3 Eye Safety Warnings...5. Introduction... 6
 Table of Contents Table of Contents... 1 Usage Notice... 2 Safety Information...2 Precautions...3 Eye Safety Warnings...5 Introduction... 6 Product Features...6 Package Overview...7 Product Overview...8
Table of Contents... 1 Usage Notice Safety Information...2 Precautions...4 Eye Safety Warnings...6. Introduction... 7
 Table of Contents Table of Contents... 1 Usage Notice... 2 Safety Information...2 Precautions...4 Eye Safety Warnings...6 Introduction... 7 Package Overview...8 Product Overview...9 Main Unit...9 Control
Precautions About the Product... 4 Package Overview Product Overview... 6 Start Your Installation... 8
 2 Table of Contents Usage Notice Precautions... 3 Introduction About the Product... 4 Package Overview... 5 Installation Product Overview... 6 Start Your Installation... 8 User Controls User Control Overview...
Table of Contents Precautions... 2
 Table of Contents -- Usage Notice ------- Precautions... 2 Introduction ------- Product Features... 3 ------- Package Overview... 4 ------- + Product Overview... 5 ------- Main Unit... 5 ------- Panel
Electro Magnetic Compatibility (EMC) Warning. Important notes for users in the U.K. FCC declaration. Caution. Fuse
 Warning. Important notes for users in the U.K. FCC declaration. Caution. Fuse") Warning: to prevent fire or shock hazard, do not expose camera or monitor to rain or moisture. The lightning flash with arrowhead symbol, within a triangle, is intended to alert the user to the presence
Warning: to prevent fire or shock hazard, do not expose camera or monitor to rain or moisture. The lightning flash with arrowhead symbol, within a triangle, is intended to alert the user to the presence
INSTALLATION MANUAL VIP 1903 / VIP 1903 T VIP 1963 / VIP 1963 T
 INSTALLATION MANUAL VIP 1903 / VIP 1903 T VIP 1963 / VIP 1963 T We Declaration of Conformity Motorola Mobility, Inc. 101 Tournament Drive Horsham Pennsylvania 19044 USA declare under our sole responsibility
Operating Instructions
 Operating Instructions SDI Input board Model No. AV-HS04M1 РУССКИЙ FRANÇAIS DEUTSCH ENGLISH ESPAÑOL ITALIANO Before operating this product, please read the instructions carefully and save this manual for
MONOPRICE. Multiformat to SDI Converter with Scaler. User's Manual P/N 15775
 MONOPRICE Multiformat to SDI Converter with Scaler P/N 15775 User's Manual SAFETY WARNINGS AND GUIDELINES This device is intended for indoor use only. Do not expose this device to water or moisture of
Quick Reference Guide
 Multimedia Projector Quick Reference Guide MODEL 103-011100-01 Projection lens is optional. English Use this book as a reference guide when setting up the projector. For detailed information about installation,
27'' Full HD LED Monitor KALED27MONSC Quick Start Guide
 Safety Warnings 27'' Full HD LED Monitor KALED27MONSC Quick Start Guide TO REDUCE THE RISK OF ELECTRIC SHOCK, DO NOT REMOVE ANY COVERS (OR BACKINGS). NO USER SERVICEABLE PARTS ARE INSIDE. REFER ALL SERVICING
MONOPRICE. 27" WQHD Monitor. User's Manual P/N 24659
 MONOPRICE 27" WQHD Monitor P/N 24659 User's Manual CONTENTS SAFETY WARNINGS AND GUIDELINES... 3 FEATURES... 4 CUSTOMER SERVICE... 4 PACKAGE CONTENTS... 4 PRODUCT OVERVIEW... 5 Front... 5 Rear... 5 Rear
Table of Contents... 1 Usage Notice Introduction Installation... 12
 Table of Contents Table of Contents... 1 Usage Notice... 2 Safety Information...2 Precautions...3 Eye Safety Warnings...5 Introduction... 6 Product Features...6 Package Overview...7 Product Overview...8
Acer LCD TV AT2001 User's Guide
 Acer LCD TV AT2001 User's Guide Copyright 2005. Acer Incorporated. All Rights Reserved. Acer AT2001 User' s Guide Original Issue: May 2005 Acer and the Acer logo are registered trademarks of Acer Incorporated.
19 / 20.1 / 22 WIDE SCREEN TFT-LCD MONITOR
 19 / 20.1 / 22 WIDE SCREEN TFT-LCD MONITOR V193/ V220 Series V202 Series USER MANUAL www.viewera.com Rev. 2.0 Table of Contents EMC Compliance......1 Important Precautions...2 1. Package contents....3
FCC Notice. Trademarks
 FCC Notice This euipment has been tested and found to comply with the limits for a Class B digital device, pursuant to Part 15 of FCC Rules. These limits are designed to provide reasonable protection against
USER S Manual NGLT104WPD NGLT150WPD LCD TV / Monitor (IP67 Grade)
") USER S Manual NGLT104WPD NGLT150WPD LCD TV / Monitor (IP67 Grade) This Manual is revisable without further notice Contents CONTENTS ------------------------------------------------------------------- 1
USER S Manual NGLT104WPD NGLT150WPD LCD TV / Monitor (IP67 Grade) This Manual is revisable without further notice Contents CONTENTS ------------------------------------------------------------------- 1
OPERATING GUIDE. M-Vision Cine 3D series. High Brightness Digital Video Projector 16:9 widescreen display. Rev A August A
 OPERATING GUIDE M-Vision Cine 3D series High Brightness Digital Video Projector 16:9 widescreen display 112-022A Digital Projection M-Vision Cine 3D series CONTENTS Operating Guide CONTENTS About this
DH551C/DH550C/DL550C Double Sided Display User Manual
 DH551C/DH550C/DL550C Double Sided Display User Manual Disclaimer BenQ Corporation makes no representations or warranties, either expressed or implied, with respect to the contents of this document. BenQ
LTC 113x & LTC123x FlexiDome Series Fixed Dome Cameras
 LTC 113x & LTC123x FlexiDome Series Fixed Dome Cameras Eng Installation Instructions F D E NL I IMPORTANT SAFEGUARDS 1. Read Instructions All the safety and operating instructions should be read before
MONOPRICE. 27" UHD IPS 4K Ultra Slim Aluminum Monitor. Quick User's Guide P/N 24658
 MONOPRICE 27" UHD IPS 4K Ultra Slim Aluminum Monitor P/N 24658 Quick User's Guide SAFETY WARNINGS AND GUIDELINES Please read this entire manual before using this device, paying extra attention to these
USER MANUAL. VP-435 Component / UXGA HDMI Scaler MODEL: P/N: Rev 13
 KRAMER ELECTRONICS LTD. USER MANUAL MODEL: VP-435 Component / UXGA HDMI Scaler P/N: 2900-000262 Rev 13 Contents 1 Introduction 1 2 Getting Started 2 2.1 Achieving the Best Performance 2 2.2 Safety Instructions
CP-255ID Multi-Format to DVI Scaler
 CP-255ID Multi-Format to DVI Scaler Operation Manual DISCLAIMERS The information in this manual has been carefully checked and is believed to be accurate. Cypress Technology assumes no responsibility
Table of Contents FCC COMPLIANCE STATEMENT... 4 WARNINGS AND PRECAUTIONS... 4 WARRANTY... 5 STANDARD WARRANTY... 5 TWO YEAR WARRANTY... 5 DISPOSAL...
 1 Table of Contents FCC COMPLIANCE STATEMENT... 4 WARNINGS AND PRECAUTIONS... 4 WARRANTY... 5 STANDARD WARRANTY... 5 TWO YEAR WARRANTY... 5 DISPOSAL... 6 1. INTRODUCTION... 7 FEATURES... 7 2. CONNECTIONS
PE7700 Digital Projector Home Theater User s Manual. Welcome
 PE7700 Digital Projector Home Theater User s Manual Welcome Copyright Copyright 2005 by BenQ Corporation. All rights reserved. No part of this publication may be reproduced, transmitted, transcribed, stored
CM-S23349SV. Vari-Focal IR Bullet Camera
 Vari-Focal IR Bullet Camera User s Guide CM-S23349SV SAFETY PRECAUTIONS WARNING 1. Be sure to use only the standard adapter that is specified in the specification sheet. Using any other adapter could cause
Winmate Communication INC.
 20.1 Military Grade Display Model: R20L100-RKA2ML User s Manual Winmate Communication INC. May, 2011 1 IMPORTANT SAFETY INSTRUCTIONS Please read these instructions carefully before using the product and
Wide LCD Monitor. User Manual
 Wide LCD Monitor User Manual PRECAUTIONS Information for users applicable in European Union countries 1 Information for users applicable in United States of America 1 1 Power connection 1 Maintenance 1
ZVOX AccuVoice TV Speaker Model AV203
 ZVOX AccuVoice TV Speaker Model AV203 SETUP & OPERATION www.zvoxaudio.com 2 ZVOX AccuVoice TV Speaker Setup & Operation READ THIS FIRST Important Safety Instructions For ZVOX Audio System WARNING TO PREVENT
Table of Contents English. Table of Contents... 1 Usage Notice... 2
 Table of Contents Table of Contents... 1 Usage Notice... 2 Precautions... 2 Introduction... 4 Product Features... 4 Package Overview... 5 Product Overview... 6 Main Unit... 6 Control Panel... 7 Connection
28 & 32 & 40 & 55 & 65 & 84-INCH TFT-LCD 4K MONITOR
 28 & 32 & 40 & 55 & 65 & 84-INCH TFT-LCD 4K MONITOR INSTRUCTION MANUAL Please read this manual thoroughly before use, and keep it handy for future reference. TABLE OF CONTENTS 1, General information...
Usage Notice Precautions Follow all warnings, precautions and maintenance as recommended in this user s guide to maximize the life of your unit. Warni
 1 English Table of Contents Usage Notice Precautions... 2 Introduction Product Features... 4 Package Overview... 5 Product Overview... 6 Main Unit... 6 Panel Control... 7 Connection Ports... 8 Remote Control
TABLE OF CONTENTS Important Safety Instructions Package Content Setting Up the Display Trouble shooting Specifications Product Dimensions
 TABLE OF CONTENTS Important Safety Instructions...1 1.1 Safety precautions and maintenance....1 1.2 Use.......4 1.3 Installation Notes.......7 Package Content...9 2.1 Unpacking...9 2.2 Accessories......10
ZVOX AccuVoice TV Speaker Model AV203
 ZVOX AccuVoice TV Speaker Model AV203 SETUP & OPERATION www.zvoxaudio.com READ THIS FIRST Important Safety Instructions For ZVOX Audio System WARNING TO PREVENT FIRE OR SHOCK HAZARD, DO NOT EXPOSE THIS
ACUBRITE 23 SS. Manual. Stainless Steel Chassis 23" LCD Display. Content
 ACUBRITE 23 SS Stainless Steel Chassis 23" LCD Display Manual Introduction... 2 Hardware Installation... 2 The Display Timing... 5 The Display Outline Dimensions... 6 The Display Controls... 7 The Screen
18.5, 21.5, 23.8 & 27 Widescreen LED Security Monitors LED22 USER GUIDE
 LED18 / LED22 / LED24 / LED27 18.5, 21.5, 23.8 & 27 Widescreen LED Security Monitors LED27 LED24 LED22 LED18 USER GUIDE 3625 Cincinnati Avenue, Rocklin, CA 95765 855-388-7422 www.northernvideo.com Rev.
39" 1080p LCD Television PLCD3992A
 PROSCAN 39" 1080p LCD Television PLCD3992A Contents Contents Caution Safety Information Unit and Accessories Product Feature 2 3 4 4 Introduction 5-9 1. Front View 5 2. Rear View 6 3. Instruction for
User Manual MODEL: KK1500-TR. Touch Display LCD Monitor. Installation Guide. 15 Resistive Touch LCD Monitor
 Touch Display LCD Monitor User Manual Installation Guide 15 Resistive Touch LCD Monitor MODEL: KK1500-TR i-tech Company LLC TOLL FREE: (888) 483-2418 EMAIL: info@itechlcd.com WEB: www.itechlcd.com User
Hi-Vision TV Box. High Resolution TV BOX with PIP feature Model:174190
 Operational Manual Hi-Vision TV Box High Resolution TV BOX with PIP feature Model:174190 Thanks for your purchasing this product. Please read the Manual carefully before using it, and keep this manual
HDMI 5x1 Switch B-240-HDSWTCH-5X1 INSTALLATION MANUAL
 HDMI 5x1 Switch B-240-HDSWTCH-5X1 INSTALLATION MANUAL IMPORTANT SAFETY INSTRUCTIONS To reduce the risk of fire or electric shock, read and follow all instructions and warnings in this manual. Keep this
Introduction...2. Features...2 Safety Precautions...2. Installation...4
 PE1900 Contents Introduction...2 Features...2 Safety Precautions...2 Installation...4 Unpacking the Display...4 Locations and Functions of Controls...4 Connections...5 Using Your Display...7 Turning the
PB8253/PB8263 Digital Projector Installation Series User's Manual
 PB8253/PB8263 Digital Projector Installation Series User's Manual Welcome Copyright Copyright 2006 by BenQ Corporation. All rights reserved. No part of this publication may be reproduced, transmitted,
USER MANUAL. VP-425 PC / Component to HDMI Scaler MODEL: P/N: Rev 3
 KRAMER ELECTRONICS LTD. USER MANUAL MODEL: VP-425 PC / Component to HDMI Scaler P/N: 2900-300111 Rev 3 Contents 1 Introduction 1 2 Getting Started 2 2.1 Achieving the Best Performance 2 2.2 Safety Instructions