SCENEMASTER 3F QUICK OPERATION
|
|
|
- Darrell Wilfrid Walters
- 6 years ago
- Views:
Transcription
1
2 SETTING PRESET MODE SCENEMASTER 3F QUICK OPERATION 1. Hold [RECORD], and press [CHNS] (above the Channels Master) to set Scenes, Dual, or Wide mode. WIDE MODE OPERATION In Wide mode, both CHANNELS and PARK Masters should be moved together. Start with both Masters DOWN: 1. Preset the next Scene on the Channel faders, and set the cue fade time on the Fade Master. 2. On cue, move both Masters UP to fade to the new cue, press [PARK], and take both Masters DOWN. Repeat these two steps to preset and fade in the next cues. SCENES AND CHASES 1. To set the Record LED on, hold [RECORD] and enter the Record Code on the A Flash Keys. 2. Set up a Scene on the Channel faders and press [RECORD]. Repeat this step to record a Chase. 3. Hold [RECORD] and press a Scenemaster Flash key to assign the recording. 4. For playback, set the desk to Scenes mode, then fade the Scenemaster to Full, or press its Flash key. SCENE TIMED PLAYBACK 1. Set the Speed Master UP, set the fade time on the Fade Master, then set the Scenemaster to Full. RECORDING SHOWS 1. Set up a Scene on the Channel faders and press [RECORD]. Repeat this step for each cue of a Show. 2. Hold [RECORD] and press a Scenemaster Flash key to assign the recording as a Chase. You must then change the Chase to a Show: set the Speed Master to Show Mode then: 3. Hold [RECORD] and [REC SPEED], then press the Scenemaster Flash key. SHOW CUE TIMED PLAYBACK 1. Set Speed at Show mode, set a fade time for Cue 1, then set the Show Scenemaster to Full. 2. Set a fade time and press [CUE GO] for subsequent cues. To go back a cue, hold [CUE GO], then press [HOLD]. For further instructions, refer to the Index or table of contents.
3 INTRODUCTION...1 SCENEMASTER FEATURES...3 PANEL LAYOUT...5 DESK SET-UP 9 DUAL PRESET OPERATION SETTING DUAL PRESET MODE 11 PRESETTING A SCENE 11 CROSS-FADING PRESETS 11 TIMED CROSS-FADING 11 HOLDING A TIMED FADE 12 HOLDING A TIMED FADE 13 FLASHING CHANNELS 13 FLASHING THE CHANNELS MASTERS 13 KILL MODE 13 BLACKOUT 13 WIDE MODE OPERATION SETTING WIDE MODE 15 PRESETTING A SCENE 15 CROSS-FADING PRESETS 15 TIMED CROSS-FADING 15 HOLDING A TIMED FADE 17 FLASHING CHANNELS 17 FLASHING THE CHANNELS MASTER 17 KILL MODE 17 BLACKOUT 17 MEMORY OPERATION RECORDING METHOD 18 SCENEMASTER RECORDINGS 18 RECORDING TYPES 18 SCENEMASTER FLASH KEYS 19 SCENEMASTER FADERS 19 SCENEMASTER PAGES 19 SCENEMASTER TABLE OF CONTENTS RECORD AND ERASE ENABLE...21 RECORD ENABLE 21 ERASE MEMORY 21 RECORD DISABLE 21 RECORD CLEAR 21 SCENE RECORDING AND PLAYBACK...23 RECORDING AND ASSIGNING A SCENE 23 SETTING SCENE MODE 23 SCENE PLAYBACK 23 FLASHING SCENES 23 SCENE FADE PLAYBACK...25 TIMED CROSS-FADING 25 HOLDING A FADE 25 SNAP FADES 25 COMPLETING A FADE 25 SCENE AUTO FADE RECORDING...27 RECORDING SCENE FADE TIMES 27 RECORDING UP FADE TIMES 27 RECORDING DOWN FADE TIMES 27 SCENE AUTO FADE PLAYBACK...29 SCENE FADE PLAYBACK 29 HOLDING A FADE 29 COMPLETING A FADE 29 SCENE EDITING...31 EDITING SCENE LEVELS 31 COPYING A SCENE LIVE 31 COPYING A SCENE BLIND 31 TRANSFERRING A SCENE TO ANOTHER PAGE 33 DELETING A SCENE 33 OVER-WRITING A SCENE 33 SAVING ORIGINAL LEVELS 33 CHASE RECORDING AND PLAYBACK...35 RECORDING AND ASSIGNING A CHASE 35
4 CHASE PLAYBACK 35 FLASHING CHASES 35 STOPPING AND REVERSING CHASES 35 CHASE EDITING...37 RECORDING CHASE BEAT 37 RECORDING CHASE SPEED 37 RECORDING CHASE SPEED LIVE 37 DISPLAYING CHASE SPEED OR CHASE BEAT 37 EDITING CHASE LEVELS 39 DELETING CHASE STEPS 39 INSERTING CHASE STEPS 39 COPYING A CHASE 41 DELETING A CHASE 41 STACKING CHASES 41 SHOW RECORDING AND PLAYBACK...43 RECORDING AND ASSIGNING A show 43 SHOW PLAYBACK 43 SHOW CUE FADE TIMES...45 RECORDING CUE UP AND DOWN FADE TIMES 45 OVER-RIDING A CUE FADE TIME 45 HOLDING A CUE FADE 45 SHOW EDITING...47 EDITING CUE LEVELS 47 DELETING CUES 47 INSERTING CUES 47 INSERTING A NEW FIRST CUE 49 CHANGING CUE ORDER 49 COPYING A SHOW 49 DELETING A SHOW 51 STACKING SCENES AND SHOWS 51 AUTOMATIC PLAYBACK MODES...53 AUTOMATIC SHOW MODE 53 CONTINUOUS CROSS-FADE MODE 53 REMOTE SHOW PLAYBACK...54 REMOTE SHOW SET-UP 54 REMOTE CUE FORWARD 54 REMOTE CUE REVERSE 54 SHOW RESTART 55 REMOTE INPUT SPECIFICATIONS 55 PREVIEW MODES...57 READING CHANNEL LEVELS 57 PREVIEWING THE NEXT CUE 57 PREVIEWING SCENES 57 PREVIEWING CHASES AND SHOWS 57 PREVIEWING PARK 57 SD CARD BACKUP...59 SAVING TO SD CARD 59 RESTORING FROM SD CARD 59 HARD COPY PRINTOUT...61 CONNECTING THE PRINTER 61 PRINTING THE CUE-LIST 61 PRINT CANCEL 61 SCREEN DISPLAY...63 SETTING UP THE VIDEO DISPLAY 63 SCREEN MESSAGES...66 MAINTENANCE...67 SPECIFICATIONS...68 GLOSSARY OF THEATRE LIGHTING TERMS...69 INDEX...71
5
6 INTRODUCTION SCENEMASTER III OPERATION 1 The Theatrelight Scenemaster 3F is a general purpose memory assisted lighting control desk available in two models, the Scenemaster 12/24, and the Scenemaster 24/48. Both models have been designed with a minimum of keys to keep initial appearance and operation simple, but offer more sophisticated functions not usually available in a small control panel. The desks can be switched to work in any of three modes Dual Preset mode, Wide mode, and Scenes mode. The three modes form a natural learning path from a simple manual desk to a multi-function memory controller, and make the Scenemaster 3 a perfect introduction for students of lighting design and operation. In Dual Preset mode, the desk functions like any manual two preset desk: each row of channel faders is controlled by its own master fader, allowing the 12/24 model to control 12 channels of dimmers, and the 24/48 model to control 24 channels. The fade between presets is performed by a split dipless cross-fader, with timed fades from 0.5 second to 10 minutes. In Wide mode, the numbering of the bottom row of faders changes to in the 12/24 model, making a single preset of 24 channels. In the 24/48 model, the bottom preset changes to providing a single preset of 48 channels. This single preset is complemented by a second preset `Park' memory facility with timed dipless cross-fade, which allows the Scenemaster to emulate a two preset manual desk of double the channel capacity without the space and expense of a second set of faders. In Scenes mode, the function of the bottom row of faders changes from channel faders to memory Scene Playback masters. Each master can record one of three types of memorised lighting Scenes for manual or timed fades ; auto-speed Chases, each Chase having its own chase rate; or Shows, a sequence of cues with programmable fade times from 0.2 second to 10 minutes, including instant snap-fades. The 12 playback Master faders of the 12/24 model are arranged in 4 pages for a total of 48 Scenemasters, while the 4 pages of 24 playback Masters of the 24/48 model give a total of 96 Scenemasters. Page overlay memory keeps the last page master active until it is returned to zero thus allowing access to any page without change to the current lighting state. A variety of editing modes are available for easy modification of cue order and recorded levels if required. Since each page can simultaneously play back a number of independent speed Chases or faded Scenes, as well as cross-fade through a large number of push button timed Show cues, the desks can cope with the busiest performance. The Scenemaster 3F can be supplied with a VGA colour display with preview functions, a memory card storage system for backup or library purposes, and a printer socket for a hard copy of all recorded levels and chase speeds on a PC standard printer. The facilities designed into the Scenemaster result in an easy to learn, easy to operate, hands-on control panel for Schools, Theatres, Drama and Television studios, and Disco, Club and Band lighting. It is ideally suited for smaller venues, or as an introductory lighting desk for students.
7
8 SCENEMASTER III OPERATION 3 SCENEMASTER FEATURES Large cue capacity: average 600 cue states on the 24/48 channel model, 1300 cue states on the 12/24 channel model. 5 year memory retention of all cue information during power off. DMX-512 international communication standard to dimmers. Dual mode operation as a two preset manual desk with timed dipless cross-fade between presets. Wide mode doubles channel capacity to emulate two preset manual operation with timed dipless cross-fade. Scenes mode operation gives 4 pages of playback masters for a total of 96 Scenemasters on the 24/48 model desk. Page overlay memory allows changing to any other page without change to the current lighting. Any Scenemaster can hold a Scene, a Chase, or a Show an ordered stack of cues. Programmable Up and Down fade times (instant, or 0.2 second to 10 minutes) for Scenes, or for Show cues. Single button cue cross-fade operation simplifies complex shows. Chases are level sensitive, and can be of any length up to the maximum cue capacity. Multiple chase speeds up to 24 independent speed chases simultaneously on the 24/48 model. Chase beat function for synchronising chase speeds to music. Fast editing of stored cue levels, and chase speeds. Simple insertion, deletion, or stacking of chase steps or show cues. Flash and Add/Kill modes on both Channels and Scenes for Rock or Disco lighting. External control of cues for Audio-Visual applications or remote single button operation. Operator's instruction summary printed on the front panel. Dust guard protection on all faders for extended life. Dynamic VGA colour display option provides live monitoring of desk operation and cue preview. Printer option for memory dump to standard PC parallel printer. Memory card option for memory extension, backup or library purposes.
9
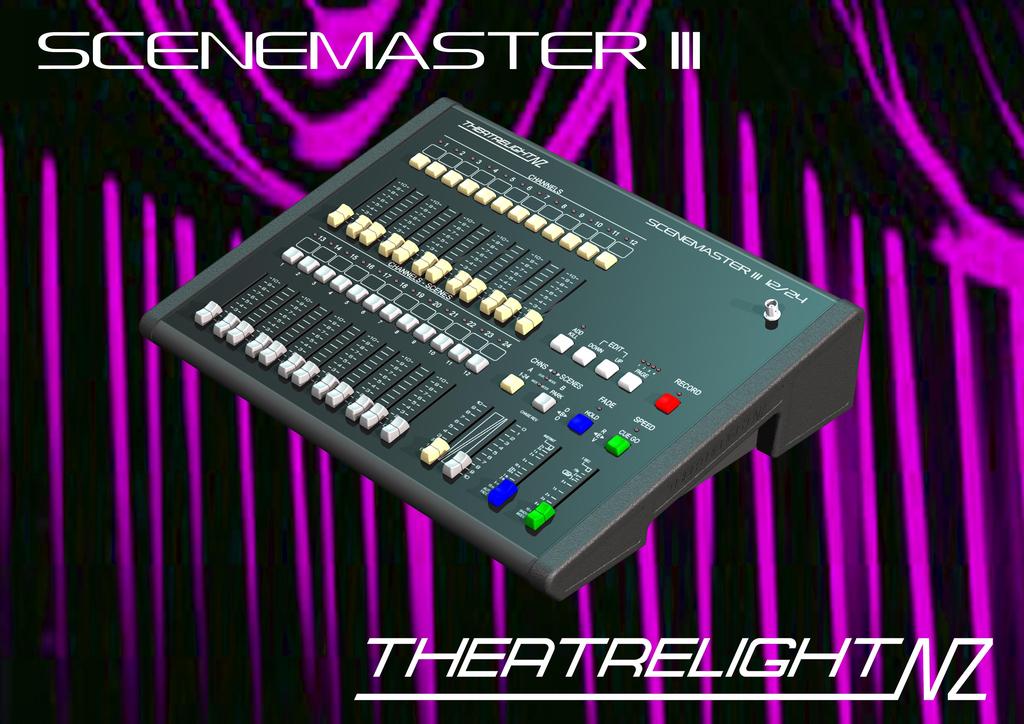
10 PANEL LAYOUT SCENEMASTER III OPERATION 5 A INSTRUCTION SUMMARY lists commands for most Scenemaster functions on the front panel as a memory aid. B CHANNEL A FADERS allow setting of lighting levels for manual playback or recording. CHANNEL A FLASH KEYS give an instant flash of the channel to Full. These keys are also used with the Up and Down keys to edit recorded levels, and for key entry of Record and Erase codes CHANNEL MIMIC DISPLAY shows all live channel outputs, and previewed channel outputs. The first ten LEDs are also used as a 0 to 10 scale (0 to 100%) to indicate channel levels and memory used. TAPE AREAS are provided for identification of Channels above each Flash key. C SCENES-CHANNEL FADERS act as Channel faders in Dual Preset mode or Wide mode. In Scenes mode each fader can store a Scene, an auto-speed Chase, or a Show. SCENES-CHANNEL FLASH KEYS give an instant flash of the Channel to Full in Dual or Wide mode. In Scenes mode, they flash any Scene or Chase to Full. These keys are also used with the Up and Down keys to edit recorded levels, to assign recorded cues, and to record Fade times and Chase speeds. Two different sets of numbers are printed on the panel the lower set is used to number the faders in Dual Preset or Scenes mode, while the higher set of numbers are used in Wide mode, and for editing levels of recorded Scenes and Show Cues using the Up and Down keys. D CHANNELS MASTER controls the output of the Channel faders, whether in Dual Preset, Wide, or Scenes mode. CHANNELS FLASH KEY instantly flashes the Channels Master to Full. With Record, this key enable selection of Dual Preset mode, Wide mode, or Scenes mode. PRESET MODE LEDs indicate the preset mode of the desk: Scenes mode, Dual Preset mode, or Wide mode. PARK KEY changes function with the preset mode selected. In Dual Preset mode, it flashes to Full the B Master fader controlling the bottom preset. In Wide mode, the function changes to Park a single press instantly stores the current lighting levels under the Master fader. In Scenes mode, the key stops all Chases when held, and reverses them when released. With Record, this key enables recording Chase Beat times SCENES MASTER FADER changes function with the preset mode selected. In Dual Preset mode, it acts as the Channels B Master fader controlling the bottom preset. In Wide mode, the function changes to Park Master, enabling split dipless cross-fades between Channel fader levels and levels stored under the Park fader, giving the Scenemaster an extra preset. In Scenes mode, it becomes the Scenes Master fader, controlling the output of all Scenemasters Scenes, Chases, or Shows.
11
12 SCENEMASTER III OPERATION 7 E FADE MASTER defines the fade time of cross-fades between presets, and of recorded Scenes and Show cues. Chases, and Scenes in Show mode are not affected by the fade timer. AUTO FADE setting forces fades of Scenes and Show cues to the pre-recorded Up and Down fade times. FADE LED flashes while a timed cross-fade is in progress. HOLD KEY freezes the current fade while pressed. With Record this key allows recording of fade times to Scenes and Show cues. Hold key is used with Park to give a dead blackout onstage (DBO), and also to cancel a printout. F SPEED MASTER controls the speed at which cues of a Show are stepped, from 10 per second to one step every 10 seconds (600-6 beats per minute). The initial default speed of a Chase (0.25 second per step, 240 BPM) can be edited, so that every Chase can play back at its own speed. SHOW MODE setting is used for single stepping forward or backwards through the cues of a Show, and for changing Chases to Shows, and Shows to Chases with the Record Speed function. CUE GO KEY steps forward (Green) through the cues of the current Show if the Speed Master is set to Show mode, and stops and reverses (Red) Show auto step if the Speed Master is up. With Record, this key allows recording of Chase speeds, and changing Chases to Shows and vice versa. With Hold, this key gives a Cue Back function in Show mode. STEP LED mimics the step rate of the Speed Master, as well as indicating Cue Go (Green) and Cue Back (Red) steps. G KILL KEY sets the flash mode for Channels and Scenes to either Add mode or Kill mode. The Kill LED lights when Kill is on. With Record, this key disables Record mode, while the entry of a 4 digit code erases the entire memory of the desk. Kill used with any Flash key provides a read-out of any channel level on the channel mimic LEDs. DOWN KEY enable channels of recorded Scenes or Show cues to be edited at a fade rate of 4 seconds. With Record, Down key enables the recording of down fade times, and deletion of cues in any Show, or steps in any Chase. UP KEY enable channels of recorded Scenes or Show cues to be edited at a fade rate of 4 seconds. With Record, Up key enables the recording of up fade times, and previously recorded cues to be inserted into any Show or Chase. Cue stacks can be recorded by holding Record, Up key and Down key, and selecting a Scenemaster flash key. PAGE KEY increments the current Scenemaster page. With Record, Page key clears the Record buffer. Page key is also used with the Scenemaster Flash keys to mimic Scenes, Chases, and Shows, and with the Up key to preview the next Show cue. If the desk is fitted with the optional Dynamic display and printout feature, the Page key used with the Down key and a code entry provides a hard copy printout of all Scene, Chase, and Show cue levels. PAGE LEDs show the current Scenemaster page. The LED flashes if a Scenemaster from a previous page is still up. H RECORD ENABLE LED shows the Record status, and can only be turned on by correct entry of a three digit record code. RECORD KEY records the current output of the desk into spare memory. Record is also used as a shift key for other functions.
13
14 SCENEMASTER III OPERATION 9 IMEMORY CARD socket (optional) takes standard 5 year life lithium battery powered Memory Cards for secure backup. POWER SUPPLY socket is wired and labelled for either 120 or 240 volts AC, 50/60 Hertz supplies. REMOTE STEP socket enables show step control from a push-button, or from external Audio-Visual, Midi, or SMPTE decoders. DMX-512 OUTPUT from the Scenemaster carries multiplexed dimmer levels to the remote dimmers. PRINTER AND DISPLAY PORTS (optional) provide outputs to a dynamic VGA colour monitor, and to an PC compatible printer for hard-copy print-out of all recorded levels. FUSE is provided for mains power. DESK SET-UP The Scenemaster 3F is factory set for either 110 or 240 volts: check that it is correctly set for your mains supply. Plug up a correctly wired DMX-512 cable between the Scenemaster and the dimmers, and power up the dimmers and the desk. The desk powers up in the state in which it was last turned off for a clean start, set the following: 1. Set all preset faders DOWN. 2. Set the Channels Master DOWN, and the Scenes and Fade Masters UP. 3. Set the Speed Master down (at Show mode). 4. If the Kill LED is on, press the Kill key to turn the LED off. 5. Press the Page key to select Page 1. THIS PROCEDURE IS NECESSARY FOR CORRECT OPERATION OF THE EXAMPLES ON THE FOLLOWING PAGES
15
16 SCENEMASTER III OPERATION 11 SETTING DUAL PRESET MODE DUAL PRESET OPERATION You can set the desk to Dual Preset mode as follows (the Record LED may be on or off): 1. Hold [RECORD] and press [CHNS] (the key above the Channels Master) until the Dual mode LED lights. The letters defining the master functions are on the same level as the LED in this case the fader to the left is designated the Channels A master (the top preset), while the fader to the right is the Channels B master (the bottom preset). PRESETTING A SCENE You can now preset a lighting state (a Scene) by setting levels on the Channels A faders : 1. Set some levels on the Channels A faders (the top preset) with the Channels A master at zero. 2. Move the Channels A Master up to Full: all the levels on stage fade up together. Channels live on stage are shown by the Channel Mimic LEDs CROSS-FADING PRESETS For a smooth cross-fade, both Channels A and B Master faders should be moved up and down together. Both should now be UP: 1. Preset the next Scene by setting some levels on the Channels B faders (the bottom preset). 2. On cue, fade DOWN both Masters A and B together for a dipless cross-fade to the new lighting. 3. You can now preset the Channels A faders for the next cue and repeat these steps. The Channels B fader is intentionally upside down to make dipless cross-fades easier to operate. TIMED CROSS-FADING You can use the Fade Master to time the cross-fade as follows: 1. Set a suitable fade time, say 5 seconds, on the Fade Master. 2. On cue, move both Masters A and B quickly together for a dipless cross-fade to the new lighting: the Fade LED (above the Fade Master) flashes to show a fade in progress. When the LED goes off (to indicate the fade is complete) you can preset the next scene levels on the OFF preset. The fade time can be changed during the fade the fade will continue at the latest fade rate selected. A timed scene playback will always give a dipless cross-fade, but where thermal lag of higher wattage lamps is a problem, the new scene can be warmed by setting its master at 10% for a few seconds, or raising it a second before the last master is taken out.
17
18 HOLDING A TIMED FADE SCENEMASTER III OPERATION 13 While the Hold key remains down, the action of the fade timer is halted, and the current output lighting state will be held until the key is released. You can use the Hold key to stop a fade in progress, or to cue crossfades of scenes: 1. Set the Fade Master at Instant, then while keeping [HOLD] down, cross-fade to a new scene. 2. On cue, release [HOLD]: the lighting will snap instantly to the new scene. FLASHING CHANNELS If you press any of the Channels Flash keys the output level of that channel is set at Full instantly: 1. Press any Channel Flash keys: those channels flash instantly to Full. The Scenemaster Flash keys are placed above the faders for easy one handed flash-hold operations use your index finger to flash the channel, then raise the fader with your thumb. In Dual Preset mode, the B keys duplicate the A Flash keys. FLASHING THE CHANNELS MASTERS If you press the A Flash key or the B Flash key (above the Channels Masters) the A or B Masters are set instantly to Full: 1. Set the Channels A Master at zero, and set some levels on the Channels A faders. 2. Press [A], the Flash key above the Channels A master. The levels flash instantly to those of the A faders. KILL MODE Normally, pressing a Channel Flash key sets that channel to Full without affecting other levels (Add mode). If Kill is on, all other output is blacked out while the key is held down. Pressing Kill again cancels Kill and restores the normal Add mode. 1. Set some levels live on stage, then press [KILL]: the Kill LED lights red to show that Kill mode is on. 2. Press a Channel Flash key: the selected channel goes instantly to Full, and all other levels are blacked out. 3. Release the Channel Flash Key to restore the original lighting; press [KILL] again to cancel Kill mode. Note that pressing a channel Flash Key with no light connected on stage will cause a blackout in Kill mode. BLACKOUT An instant dead blackout (DBO) on stage is given by pressing the Hold and Park keys together: the blackout is held as long as the keys are down, and the original lighting restored instantly when the keys are released. If you want to remain in a blackout, you can set the Channels A and B masters to zero before releasing the keys: 1. With some Channel faders live on stage, hold down [HOLD], then [PARK]: the lighting goes to black. 2. Release the keys: the original lighting is restored.
19
20 SCENEMASTER III OPERATION 15 SETTING WIDE MODE WIDE MODE OPERATION You can set the desk to Wide mode as follows (the Record LED may be on or off): 1. Hold [RECORD] and press [CHNS] (the key above the Channels Master) until the Wide mode LED lights. In the Scenemaster 12/24 model the Channels B faders now become Channels 13-24, while in the 24/48 model the Channels B faders become Channels In Wide mode the Channels master controls BOTH the top and the bottom presets, while the Park master controls the playback of the Park Store in effect a second preset in memory. PRESETTING A SCENE You can preset a lighting state in Wide mode by setting levels on the Channel faders of BOTH presets : 1. Set the Channels Master and the Park master DOWN (Channels Master at zero, Park Master at Full). 2. Set some levels on the Channels A and B faders. CROSS-FADING PRESETS Having preset a scene as above, you can now cross-fade to those levels and hold them on the Park Master as follows: 1. On cue, fade both the Channels and the Park Masters UP together, press [PARK], then immediately take both Masters DOWN together. 2. Since the Channels Master is at zero, you can preset the next scene on the faders and cross-fade as above. TIMED CROSS-FADING You can use the Fade Master to time the cross-fade in Wide mode as follows: 1. With both masters down, preset the next scene, and set a suitable fade time on the Fade Master. 2. On cue, move both Channels and the Park Masters UP quickly together for a dipless cross-fade to the new lighting. The Fade LED above the Fade Master flashes to show a fade in progress. When the fade is complete (LED off), press [PARK], then take both Masters DOWN together to preset the next scene. The fade time can be changed during the fade the fade will continue at the latest fade rate selected. A timed scene playback will always give a dipless cross-fade, but where thermal lag of higher wattage lamps is a problem, the new scene can be warmed by setting the Channels master at 10% for a few seconds prior to the fade. If the Park Master is left at Full, new flash or fader levels can be added to the total by pressing the Park key after each addition.
21
22 HOLDING A TIMED FADE SCENEMASTER III OPERATION 17 While the Hold key remains down, the action of the fade timer is halted, and the current output lighting state will be held until the key is released. You can use the Hold key to stop a fade in progress, or to cue cross-fades of scenes: 1. Set the Fade Master at Instant, then while keeping [HOLD] down, cross-fade to a new scene. 2. On cue, release [HOLD]: the lighting will snap instantly to the new scene. FLASHING CHANNELS If you press any of the Channels Flash keys on either preset the output level of that channel is set at Full instantly: 1. Press any Channel Flash keys: those channels flash instantly to Full. FLASHING THE CHANNELS MASTER If you press the A Flash key (above the Channels Masters) the Channels Masters is set instantly to Full: 1. Set the Channels Master at zero, and set some levels on the Channels faders. 2. Press the Flash key above the Channels master. The levels flash instantly to those of the Channel faders. KILL MODE The Kill key has the same action in Wide mode as in Dual Preset mode if Kill is on, all other output is blacked out while the channel key is held down. Pressing Kill again cancels Kill mode and restores the normal Add mode. 1. Set some levels live on stage, then press [KILL]: the Kill LED lights red to show that Kill mode is on. 2. Press a Channel Flash key: the selected channel goes instantly to Full, and all other levels are blacked out. 3. Release the Channel Flash Key to restore the original lighting, then press [KILL] again to cancel Kill mode. Note that pressing a channel Flash Key with no light connected on stage causes a blackout in Kill mode. BLACKOUT Blackout action is exactly the same as in Dual Preset mode an instant dead blackout (DBO) on stage is given by pressing the Hold and Park keys together: 1. With some Channel faders live on stage, hold down [HOLD], then [PARK]: the lighting goes to black. 2. Release the keys: the original lighting is restored. The blackout is held as long as the keys are down, and the original lighting restored instantly when the keys are released. If you want to remain in a blackout, you can set the Channels and Park Masters to zero before releasing the keys.
23 RECORDING METHOD MEMORY OPERATION Each time the Record Key is pressed, the channel levels of the current Scene are stored in spare memory. Pressing Record again adds another Scene to that already in memory. In this way you can record either one or a number of Scenes. This single or multiple recording must then be assigned to a Scenemaster for playback by holding Record and selecting a Scenemaster Flash key. A single recording is assigned as a Scene, while multiple recordings are initially assigned as a Chase. Chases can be changed to Shows and vice versa for ease of editing levels, and inserting and deleting cues. $IDeleting;Cues All recording operations can only be performed if the Record LED is lit. SCENEMASTER RECORDINGS The 12/24 model desk has 4 pages of 12 memory playback masters called Scenemasters (24 in the 24/48 model), giving a total of 48 or 96 masters. Each of the Scenemasters can hold any one of three types of recordings a Scene, a Chase, or a Show, each of which can be used for a variety of lighting applications. The page overlay memory feature of the desk allows changing to a new page without changing the current lighting. All playback levels of Scenes, Chases, and Shows, are astered by the Scenes Master fader. To play back any recording under a Scenemaster, the preset mode must be set to Scenes ode. RECORDING TYPES Each recording under a Scenemaster is composed of one or more cue states. Each cue state lists all Channel levels, and may also include a Chase rate. Scenes are one cue long, while Chases and Shows must have a minimum count of two cues. The maximum cue count of a Chase or a Show is limited only by the memory capacity of the desk 600 in the 24/48 model, and 1300 in the 12/24. SCENE A Scene is a single cue recording of all Channel levels under a Scenemaster and includes an up fade time and a down fade time for auto-fade playback. Scene playback fade time is normally set by the Fade time master except when the Speed Master is set to Show mode, when the fade time of all Scenes defaults to instant for manually timed fades independent of the timed fade of a Show cue. If the Fade Master is set to Auto Fade, then the pre-recorded fade times are used on playback. CHASE A Chase is a number of cue steps recorded under a Scenemaster, each cue step listing all Channel levels. In addition each Chase is recorded with a separate Chase Speed, which automatically cycles the Chase in a forward or reverse direction through all the cues. Chase speed may be recorded from the Speed Master, or by holding Record and tapping the Park key in time to the music. Chase playback is not affected by the fade timer the change from one step of a Chase to the next is a
24 SCENEMASTER III OPERATION 19 snap fade. Any Chase can be changed to a Show for single step editing of levels, or insertion or deletion of steps, and then changed back to a Chase. SHOW A Show is a number of cues recorded under a Scenemaster, each cue listing all Channel levels, an Up fade time, and a Down fade time. Show cue fade time is set by the Fade Master. If this is set to Auto Fade, then the pre-recorded Up and Down fade times are used. With the Speed Master set at Show mode, a Show can be single stepped forward through its cues with the Cue Go key, and stepped backward using the Cue Go and Hold keys. Show mode is the normal method of using the desk the main lighting is cued by setting the Fade Master to Auto Fade, and then pressing the Cue Go key, while independently timed effects may be flashed or faded from Scenes or Chases on the same page. If the Speed Master is up (not set at Show mode), Show cues are stepped automatically either forward or reverse, with the fade time between steps controlled by the Fade Master. In this case, if the Fade Master is set to Auto Fade, the next cue waits for the last Up fade time to finish before stepping to the next cue an auto stepped, auto fading Show. SCENEMASTER FLASH KEYS The Scenemaster flash keys can be used for an instant flash to Full of any Scenes or Chases. The flash operation of Shows is disabled to decrease the possibility of mistakes. Kill mode works exactly the same as in Dual Preset or Wide mode pressing the Flash key of a Scene or a Chase blacks out all other lighting. Similarly, pressing a Channel key in Kill mode blacks out all lighting from Scenes, Chases, or Shows. The Scenemaster flash keys are also used to assign recordings, and for various editing and preview functions. SCENEMASTER FADERS The Scenemaster faders are used to fade up and down all Scenes, Chases, and Shows. You can have any number of Scenes or Chases up at once. Scenes are normally cross-faded in pairs the new Scene up with the old Scene down. If you are running a Show using the Cue Go key, only one Show fader should be up at a time. SCENEMASTER PAGES You can change the current Page of Scenemasters by pressing the Page key. The Page memory feature ensures that the playback of any Scenemasters which are up remain unaffected, but the Page LED flashes to show that Scenemasters are still live on the previous page. New Scenemasters can be faded up on the new page to add to those from the previous page. When all the previous page Scenemasters are returned to zero, the Page LED stops flashing.
25
26 RECORD AND ERASE ENABLE SCENEMASTER III OPERATION 21 Before you can record scenes the Record Enable LED must be set on using a key code. The Record and Erase codes will be found on a removable sticker on the back of the desk when you first take delivery. RECORD ENABLE To allow any change to the permanent memory, the LED above the Record key must be on; if it is off all recordings are protected from modification. To turn on this LED (if it is off), enter the code as follows (if for example Record Code is 622): 1. Hold down [RECORD], then press 6, then 2, then 2 in succession on the Channels A Flash keys: after a Mimic flash, the Record LED will light to show Record is enabled. ERASE MEMORY Every Scenemaster has a 4 digit code for erasing all recordings. This is only necessary if you are planning to record a completely new show. If your Erase code is for example, 1187: 1. Ensure that the Record LED is lit by correct entry of the Record code. 2. Hold down [RECORD] and [KILL], then press 1, 1, 8, and 7 in succession on the Channels A Flash keys. 3. Release [RECORD] and [KILL]: a long Mimic flash indicates that all previous recordings have been erased. As with the Record code, the Erase code can only be entered on the Channels A Flash keys, 1 through 9. Entering the wrong Erase code affords extra protection by cancelling the Record LED. RECORD DISABLE To protect your recordings, you can disable Record (if it is on) as follows: 1. Hold [RECORD] then press [REC DISABLE] (the Kill key): after a Mimic flash the Record LED is set off. Attempts to record or edit recorded scenes will now have no effect. RECORD CLEAR If you press Record while enabled, the Record LED will flash to indicate a Recorded Scene. To clear the recording: 1. Hold [RECORD] then press [REC CLEAR] (the Page key): after a Mimic flash the Record LED will stop flashing. Only the Record Buffer memory is cleared. This function is useful if you make a mistake in recording, or if you press the Record key accidentally. You should always make sure the Record LED is NOT flashing before recording any new levels.
27
28 SCENE RECORDING AND PLAYBACK SCENEMASTER III OPERATION 23 Scene levels may be recorded in Dual Preset, Wide, or Scenes mode. In Wide mode you can record ALL fader levels: RECORDING AND ASSIGNING A SCENE 1. Set the desk to Wide mode (if required), the Channels Master at Full, and set up levels on the Channel faders. 2. Press and release [RECORD] to record the scene in spare memory: the Record LED flashes. 3. Hold [RECORD] and press a Scenemaster flash key (on Preset B) to assign the recording to that fader on the current page. After a short Mimic flash the Record LED stops flashing the Record Buffer memory is now empty, and the Scene is recorded under the Scenemaster fader. Scenes may be assigned regardless of the state of Preset mode LEDs. SETTING SCENE MODE The desk must be set to Scene mode to play back recorded Scenes: 1. Hold [RECORD] and press [CHNS] (above the Channels Master) until the green Scene mode LED lights. In the 12/24 desk the bottom preset faders now become Scenes 1-12, while in the 24/48 desk the faders become Scenes In Scenes mode the Channels A master controls the top preset, while the Scenes Master controls the playback of all Scenes recorded on the bottom preset faders. The Scenes Master is normally left DOWN (at Full) for playback in this mode. SCENE PLAYBACK With the Fade Master set at Instant, raising the fader level of a recorded Scene brings up the levels of that scene at the same speed as you move the fader: 1. Set the Chns A Master and the Scenes Master DOWN. 2. Raise the fader level of the Scene recorded above to Full. Channels live are shown on the Mimic LEDs. Scenes add levels on a highest takes precedence basis, and all levels are controlled by the Scenes Master fader. FLASHING SCENES Pressing the Flash key of a Scene instantly recalls the levels of that scene. A flashed Scene adds levels on a latest takes precedence basis flashed levels over 5% over-ride any other output level. This mode of operation is useful for turning some channels effectively off (flashed scene levels recorded at 5%), while others are turned on. Scenes Kill mode operation is similar to pressing a Channel Flash key in Dual Preset or Wide mode when the Kill LED is on, pressing any Scene Flash key blacks out all other output, leaving only that Scene.
29
30 SCENE FADE PLAYBACK SCENEMASTER III OPERATION 25 For applications requiring accurate fade times, the desk allows fade times from 0.2 second to 10 minutes duration. To use timed fade playback, you must first record and assign Scenes as described previously. TIMED CROSS-FADING You can play back Scenes with a timed dipless cross-fade as follows: 1. Set the Speed Master UP, then set a suitable fade time, say 5 seconds, on the Fade Master. 2. Set the new Scene QUICKLY to full, then take the last Scene QUICKLY to zero: the Fade LED (above the Fade Master) flashes to show a fade in progress. After 5 seconds, it goes off to indicate the fade is complete. Repeating this operation gives a series of dipless cross-fades between scenes. The fade time can be changed during the fade the fade will continue at the latest fade rate selected. A timed scene playback will always give a dipless cross-fade, but where thermal lag of higher wattage lamps is a problem, the new scene can be warmed by setting it at 10% for a few seconds, or raised a second before the last scene is taken out. HOLDING A FADE While the Hold key remains down, the action of the fade timer is stopped, and the current output lighting state will be held until the key is released. You can use this if a fade is progressing too fast for the action on stage. Alternatively, you can move the Fade Master to the 10 minute fade rate effectively slowing the fade immediately. SNAP FADES For a snap fade (or a fast cross-fade), better results may be obtained by using the Hold key than by moving the Scenemaster faders. Using this method, you can snap fade Scenes as follows: 1. Set the Fade Master to Instant (or any fast fade time). 2. Prior to the cue, keep [HOLD] down, then set the new Scene at Full, and the last Scene off. 3. On cue, release [HOLD]: the lighting will snap instantly (or fast fade) to the new scene levels. COMPLETING A FADE During rehearsal, you may need to instantly go to a new scene state without waiting for the fade to complete. You can do this by moving the Fade Master timer to Instant for a moment to complete the fade.
31
32 SCENE AUTO FADE RECORDING SCENEMASTER III OPERATION 27 The Scenemaster can record separate Up and Down fade times for each Scene, which can be recalled automatically during playback. To use auto fade playback, you must first record and assign Scenes as described previously. Then both the Up and Down auto fade times may be recorded or edited at once, or each time may be edited separately as follows. RECORDING SCENE FADE TIMES You can record the current setting of the Fade Master to any Scene as follows: 1. Set any suitable fade time from Instant to 10 minutes on the Fade Master. 2. Hold [RECORD] and [HOLD], then press the Flash key of the previously recorded Scene. A short mimic flash shows that the new fade time has been recorded into the Scene. This method sets both the Up fade time and the Down fade time to the same value. RECORDING UP FADE TIMES You can record the current setting of the Fade Master to the UP fade time of any Scene as follows: 1. Set any suitable fade time from Instant to 10 minutes on the Fade Master. 2. Hold [RECORD] and [HOLD] then [UP], then press the Flash key of the previously recorded Scene. A short mimic flash shows that the new Up fade time has been recorded into the Scene. This method changes only the Up fade time of the Scene. RECORDING DOWN FADE TIMES You can record the current setting of the Fade Master to the UP fade time of any Scene as follows: 1. Set any suitable fade time from Instant to 10 minutes on the Fade Master. 2. Hold [RECORD] and [HOLD] then [UP], then press the Flash key of the previously recorded Scene. A short mimic flash shows that the new Down fade time has been recorded into the Scene. This method changes only the Down fade time of the Scene. Note that when you first press Record to record a Scene, the Up and Down fade times are set to that of the Fade Master and stored with the channel levels. You can set both fade times at this moment, or record or edit either or both times later if you wish.
33
34 SCENE AUTO FADE PLAYBACK SCENEMASTER III OPERATION 29 To playback Scenes using auto fade, you must first record and assign a number of Scenes, and set their Up and Down fade times as described on the previous page. SCENE FADE PLAYBACK You can play back Scenes pre-recorded with Up and Down fade times as follows: 1. Set the Fade Master down to the Auto Fade position. 2. Set the first Scene QUICKLY to full: the new scene fades up at the time previously recorded for that scene. The Fade LED (above the Fade Master) flashes to show a fade in progress. At the end of the fade, the Fade LED goes off the fade is now complete. 3. Set the next Scene QUICKLY to full, then take the last Scene QUICKLY to zero: the new scene fades up at the time previously recorded for that scene while all other levels fade down at the rate set by the NEW scene. Repeating this operation gives a series of dipless cross-fades between scenes, each new scene loading a new Up fade time and a new Down fade time. Both fade times can be changed during the fade by moving the Fade Master up to the new time the fade will continue at the latest fade rate selected. The Fade Master must be reset to the Auto Fade position before the next scene is raised. Auto fade scene playback will always give a dipless cross-fade, but where thermal lag of higher wattage lamps is a problem, the new scene should be raised a second or so before the last scene is taken out. HOLDING A FADE While the Hold key remains down, the action of the Up and Down fade timer is stopped, and the current lighting state will be held until the key is released. You can use this if a fade is progressing too fast for the action on stage. COMPLETING A FADE During rehearsal, you may need to instantly go to a new scene state without waiting for the fade to complete. You can do this by moving the Fade Master timer to Instant for a moment to complete the fade, before returning it to the Auto Fade position.
35
36 SCENE EDITING SCENEMASTER III OPERATION 31 You can edit the playback levels of any Scene using the Up and Down keys. Editing must be done with the scene live on stage, with Record enabled. EDITING SCENE LEVELS The Up and Down keys fade channel levels at a default 4 second fade rate. Channels which have been edited are written directly into the Scene memory. 1. Set the Scene to be edited at Full. 2. Hold [UP], and press any flash keys on either preset: the channels selected will fade up. 3. Hold [DOWN] and press any flash keys: the channels will fade down. When either Up or Down are pressed with a Channel Flash key, the first ten Mimic LEDs display the level of that channel to the nearest 10% while the level is fading. COPYING A SCENE LIVE You can copy Scene levels (but not pre-recorded fade times) to any other fader by playing it back live, recording the output of the desk, and then assigning the recording as follows: 1. Set the Scene to copy at Full. You can add other Scenes at any level if required. 2. Press [RECORD] to record the levels. 3. Hold [RECORD], then press the Flash key above the new Scenemaster fader to assign the recording. COPYING A SCENE BLIND You can copy a Scene to any other Scenemaster without it showing on stage: 1. 1 Hold [RECORD] then [UP] then [DOWN (the Record Stack function), then press the Flash key of the Scene to be copied Hold [RECORD], then press the Flash key above the new Scenemaster to assign the recording. The original recording is not changed by this operation. The first operation, the Record Stack function, copies the Scene to the Record Buffer, a useful technique which can also be applied to stacking any number of Scenes, Chases, and Shows as described later. Note that this copying method also copies the Up and Down fade times of the original Scene to the new Scene. The order of key entry is important Record, Up, and Down must be held in that order before pressing the Scene Flash key.
37
38 TRANSFERRING A SCENE TO ANOTHER PAGE SCENEMASTER III OPERATION 33 You can also copy a Scene (with its Up and Down fade times) to any other page as follows: 1. Hold [RECORD] then [UP] then [DOWN] (Record Stack), then press the Flash key of the Scene to be copied. 2. Press [PAGE] to move to another page. 3. Hold [RECORD], then press the Flash key above the new Scenemaster to assign the recording. DELETING A SCENE You can delete any Scene as follows: 1. Hold [RECORD] and [DELETE] (the Down key), then press the Flash key of the Scene to be deleted. A short Mimic flash indicates the Scene has been deleted. OVER-WRITING A SCENE You can over-write any previous recording with a new Scene as follows: 1. Set up a new Scene using the Channel faders. 2. Press [RECORD] to record the levels. 3. Hold [RECORD], and press the Flash key of the old Scene. Wait for a long Mimic flash, then press it again before releasing [RECORD]. The long Mimic flash after the first press of the Scenemaster Flash key is a warning that the master holds a recording. The short Mimic flash on the second press indicates the new Scene has been assigned, and the old Scene over-written. SAVING ORIGINAL LEVELS Since editing Scene channel levels immediately changes the level in memory, you may want to keep a copy of the original levels in case they need to be restored. You can use the Record Buffer memory as a temporary store for this purpose: 1. Set the Scene to be edited at Full. 2. Press [RECORD] to store the Scene levels in spare memory. 3. Edit the Scene levels using the Up and Down keys as above. 4. If after editing you want to restore the original levels, hold [RECORD] and press the Scene flash key. Wait for a long Mimic flash, then press it again to overwrite the edited Scene with the original levels. 5. If you keep the edited Scene, remember to empty the Record buffer: hold [RECORD] and press [REC CLEAR]. If you forget to clear the Record Buffer, the Scene in the Buffer will be added to the start of the next recording..
39
40 RECORDING AND ASSIGNING A CHASE CHASE RECORDING AND PLAYBACK SCENEMASTER III OPERATION 35 You can record a Chase under any Scenemaster in a similar fashion to a Scene. Every time you press the Record key, the current output of the desk is recorded in spare memory. Chases are recorded by pressing the Record key after each scene set-up, and then assigning the recording to a Scenemaster for playback: 1. Set the desk to Wide mode (if required), and set the Channels Master at Full. 2. Set up a lighting state on the Channel faders, then press [RECORD]. Repeat this for each step of the Chase. 3. Hold [RECORD] and press a Scenemaster flash key (B Preset) to assign the recording to the current page. A short Mimic flash indicates a Chase has been recorded under the Scenemaster. CHASE PLAYBACK 1. Set the desk to Scenes mode for memory playback, and raise the fader just assigned as a Chase to Full. Raising the fader level of a Chase fades up the levels of the Chase steps. The Chase plays forward from the first step of the Chase. Subsequent steps forward are played back at an initial default playback speed of 0.25 seconds per step, (4 per second, or 240 steps per minute). This can be edited as described in the next section. Chases raised by the Scenemaster fader add levels on a highest takes precedence basis, and all levels are also controlled by the Scenes Master. Chases are not affected by the Fade Master. FLASHING CHASES Pressing the Flash key of a Chase instantly adds levels on a latest takes precedence basis flashed Chase levels over 5% over-ride any other output level. This mode is useful for turning some channels effectively off (5%) while others are turned on. STOPPING AND REVERSING CHASES When any new Chase is raised to Full either by fader or flash key, it sets the direction of all Chases to cycle forward. Chases can be stopped and reversed using the Chase Reverse key (Park key). In Scenes mode, this key stops all Chases while it is held down; when released it reverses all Chases: 1. With a Chase running, hold down [CHASE REV], the Park key: the Chase will stop. 2. Release [CHASE REV]: the Chase will continue but in the reverse direction. 3. Tap the [CHASE REV] key: the Chase reverses with each tap of the key. Chases may be of any number of steps, up to the maximum cue capacity of the Scenemaster, and are level sensitive.
41
42 CHASE EDITING SCENEMASTER III OPERATION 37 Any number of Chases on a page can be run simultaneously, each at its own pre-recorded speed. When first recorded, the playback speed of a Chase is always set to a default speed of 0.25 seconds per step (240 beats per minute). You can change this speed as follows: RECORDING CHASE BEAT You can set a Chase under any Scenemaster to the same step rate as live music as follows: 1. Hold [RECORD} and tap [REC BEAT] the Park key to the beat 6 to 8 times. 2. Hold [RECORD] and [REC BEAT], and press the Flash key of the Scenemaster to record the new rate. When you play back the Chase, the step rate will be the average rate which you tapped on the Rec Beat key. RECORDING CHASE SPEED You can set a Chase under any Scenemaster to the same speed as the Speed Master as follows: 1. Set the Speed Master to say.5 second. 2. Hold [RECORD] and [REC SPEED], and press the Flash key of the Scenemaster. When you play back the Chase, the time between steps will be.5 second 120 beats per minute. RECORDING CHASE SPEED LIVE You can view a Chase at a variable rate defined by the Speed Master, and then record the speed on the Chase as follows: 1. Set the Chase at Full, the Fade Master at Instant, and the Speed Master at Show mode (down). 2. Hold [RECORD] and [REC SPEED], and press the Scenemaster flash key to change the Chase to a Show. 3. The step rate is now under the control of the Speed Master. Adjust it to a suitable speed. 4. Hold [RECORD] and [REC SPEED], and press the Flash key of the Scenemaster to record the speed. 5. Set the Speed Master at Show mode (down), hold [RECORD] and [REC SPEED], and press the Scene flash key to change the Show back to a Chase. DISPLAYING CHASE SPEED OR CHASE BEAT You can display the Speed Master rate as time interval in seconds or Beats per Minute on the VGA screen: : 6. Hold [RECORD] and press [REC BEAT] to show BPM, or [REC SPEED] to show seconds on the screen. Most dance music ranges from 90 to 130 BPM, with 120 BPM, or 0.5 second interval the most common.
43
44 EDITING CHASE LEVELS SCENEMASTER III OPERATION 39 You can edit the playback levels of any Chase step. Level editing of a step can only be carried out with the Chase stopped: to stop the Chase you must temporarily change it to a Show, and step through it using the Cue Go key and Cue Back function. You can then use the Up and Down keys to edit the step levels as previously described under Scene Editing, before changing the Show back to a Chase. Record must be enabled for level editing. 1. Set the Fade Master at Instant, and the Speed Master at Show mode. 2. Hold [RECORD] and [REC SPEED], and press the Scenemaster flash key to change the Chase to a Show. 3. Set the Scenemaster at Full so the first step is live onstage. 4. Press [CUE GO], or [CUE GO] and [HOLD] to select the cue. You can use the Speed Master for faster access. 5. Hold [UP] or [DOWN] and press the channel flash keys to edit levels. 6. Hold [RECORD] and [REC SPEED], and press the Scenemaster flash key to change the Show back to a Chase. The original Chase speed is left unchanged. Remember that the Up and Down keys fade channel levels at the rate set by the Fade Master. If the time is set to Instant, the fade rate defaults to four seconds. Note that the Speed Master must be at Show mode (at the bottom of the scale) when using the Record Speed function to change Chases to Shows or vice versa. DELETING CHASE STEPS You can delete steps of a Chase one at a time by temporarily changing it to a Show, and setting the step live on stage using the Cue Go key and Cue Back function as at Instruction 4 in the example above. Then proceed as follows: 5. Hold [RECORD] and [DELETE], then press the Flash key of the Scenemaster to delete the current step. 6. Hold [RECORD] and [REC SPEED], and press the Scenemaster flash key to change the Show back to a Chase. Deleting cues does not affect any cues previously recorded in the Record Buffer. INSERTING CHASE STEPS You can insert one or more new steps from the Record buffer into a Chase AFTER the current step. The new steps may be recorded from the channel faders, or by using the Record Stack feature (see pages 37, 45) to stack other pre-recorded Scenes, Chases, or Shows. Assuming you have one or more steps recorded in the Record Buffer, proceed from Instruction 4 in the example above: 7. Hold [RECORD] and [INSERT], then press the Flash key of the Scenemaster to insert the new steps. 8. Hold [RECORD] and [REC SPEED], and press the Scenemaster flash key to change the Show back to a Chase. You can change cue order by selecting steps live and recording them into the Record Buffer, deleting unwanted cues, then inserting the cues into the list at the new position.
DMX-LINK QUICK OPERATION
 DMX-LINK QUICK OPERATION RESETTING THE CURRENT PATCH TO A ONE-TO-ONE OR ZERO PATCH The current Patch List may be initialised as a One-to-One or Zero patch as follows: 1. Ensure the Record LED is on. If
OPERATING MANUAL. including
 OPERATING MANUAL including & If a portable or temporary three phase mains supply is used to power this desk, we recommend that the desk mains plug is removed before connecting or disconnecting the supply.
THE FROG SERIES OPERATING MANUAL
 THE FROG SERIES OPERATING MANUAL THE FROG SERIES OPERATING MANUAL If a portable or temporary three phase mains supply is used to power this desk, we recommend that the desk mains plug is removed before
American DJ. Show Designer. Software Revision 2.08
 American DJ Show Designer Software Revision 2.08 American DJ 4295 Charter Street Los Angeles, CA 90058 USA E-mail: support@ameriandj.com Web: www.americandj.com OVERVIEW Show Designer is a new lighting
Show Designer 3. Software Revision 1.15
 Show Designer 3 Software Revision 1.15 OVERVIEW... 1 REAR PANEL CONNECTIONS... 1 TOP PANEL... 2 MENU AND SETUP FUNCTIONS... 3 CHOOSE FIXTURES... 3 PATCH FIXTURES... 3 PATCH CONVENTIONAL DIMMERS... 4 COPY
DMX48. User s instruction manual. 24 Channel DMX controller
 WWW.LIGHTEMOTIONS.COM.AU DMX48 24 Channel DMX controller User s instruction manual This manual contains important information about the safe installation and use of this product Please read this instruction
24 CHANNEL DIMMER CONSOLE USER MANUAL
 PAGE 1 wdmlighting.com CHANNEL DIMMER CONSOLE USER MANUAL WDM LIGHTING 3 OAK LAWN AVE., STE. 1, DALLAS, TX 7519 Improvement and changes to specifications, design and this manual, may be made at any time
USER'S MANUAL. ADJ R Junostraat EW Kerkrade
 USER'S MANUAL ADJ R Junostraat EW Kerkrade www.adj.com Improvement and changes to specifications, design and this manual, may be made at any time without prior notice. All Rights Reserved Contents Features
Controller DMX DC-1224
 Manual Controller DMX DC-1224 Table of Contents 1. Safety instructions... 4 1.1. FOR SAFE AND EFFICIENT OPERATION... 4 3. Overview... 6 3.1. Front view... 6 3.2. Rear view... 9 4. Operation guide... 10
Modular Memory System
 Page 1 sur 8 Modular Memory System Modular Memory System From MMS Brochure, 1973 Introducing a new Lighting Control For nearly 60 years Rank Strand Electric have been pioneers in the field of lighting
DMX DC User manual. DMX controller
 User manual Musikhaus Thomann Thomann GmbH Hans-Thomann-Straße 1 96138 Burgebrach Germany Telephone: +49 (0) 9546 9223-0 E-mail: info@thomann.de Internet: www.thomann.de 17.08.2018, ID: 216405 Table of
Colour Control48 Order Code: Control48
 Colour Control48 Order Code: Control48 www.cobrainternational.com User Manual Cobra Colour Control 48 Dear Customer, Thank you for purchasing the Cobra Colour Control 48. With decades of experience in
NCM 7216 / 7232 Console OPERATIONS MANUAL
 Console OPERATIONS MANUAL Leviton Mfg. NSI Corporation P.O. Box 2210 Tualatin, OR 97062 Technical Service Phone 800-864-2502 WWW.NSICORP.COM MEMORY LIGHTING CONTROLLER OPERATION MANUAL Document Revised:
DMX DC User manual. DMX controller
 User manual Musikhaus Thomann Thomann GmbH Hans-Thomann-Straße 1 96138 Burgebrach Germany Telephone: +49 (0) 9546 9223-0 E-mail: info@thomann.de Internet: www.thomann.de 20.04.2018, ID: 346647 Table of
Lighting Control Desks Models S & M Operator Manual
 Lighting Control Desks Models S & M Operator Manual Version 3.00 May 2008 LSC Lighting Systems (Aust) Pty. Ltd. ABN 21 090 801 675 Building 3, 66-74 Micro Circuit Dandenong South, Victoria 3175 Australia
THEATRE LIGHTING CONTROL. Strand Lighting
 THEATRE LIGHTING CONTROL Strand Lighting The Standard By Which Others Are Judged Since its introduction, Galaxy has been the unquestioned international leader in memory lighting control systems. There
English. Light Operator 24 USER'S MANUAL. Please read before use
 English Light Operator USER'S MANUAL Please read before use Contents Light Operator Improvement and changes to specifications, design and this manual, may be may at any time without prior notice. All rights
Techni-Lux. COMMANDER 24&48 24&48 Ch DMX Controllers USER'S MANUAL. Please read before use V1.1
 Techni-Lux COMMANDER & & Ch DMX Controllers USER'S MANUAL Please read before use V1.1 COMMANDER & & Ch DMX Controllers Improvement and changes to specifications, design and this manual, may be made at
STAGE 2412 DMX 24 CHANNELS DMX CONSOLE FOR CONVENTIONAL LIGHTING
 English STAGE 1 DMX User Manual Rev. 11 STAGE 1 DMX CHANNELS DMX CONSOLE FOR CONVENTIONAL LIGHTING This symbol on the product or on its packaging indicates that this product shall not be trated as household
VERSION 2.A 10/21/1999. Lightronics Inc. 509 Central Drive, Virginia Beach, VA TEL
 7/ 0(025< /,*+7,1*&21752/ &2162/( 2:1(56Ã0$18$/ VERSION 2.A 10/21/1999 Contents DESCRIPTION OF CONTROLS 3 OPERATION 4 USING THE MENU SYSTEM 5 MENU FUNCTIONS 5 RECORDING SCENES 7 USING SCENES 8 RECORDING
VIBRIO. User Manual. by Toast Mobile
 VIBRIO User Manual by Toast Mobile 1 Welcome Why Vibrio? Vibrio is a lighting control software for the ipad. One intuitive solution to handle lighting for your venue or show. It connects to the lights
1ENGLISH P R O Thanks for your reliability on us having acquired a product WORK. We hope it provides you a long and reliable service. The STAGE is a l
 LIGHTING CONTROL MIXER P R O STAGE 1 DMX R STAGE DMX OPERATING INSTRUCTIONS 1ENGLISH P R O Thanks for your reliability on us having acquired a product WORK. We hope it provides you a long and reliable
Control Console User Manual. Version 1.6
 Control Console User Manual Version 1.6 Copyright Electronic Theatre Controls, Inc. All Rights reserved. Product information and specifications subject to change. Part Number: 7219M1200-1.6.0 Rev A Released:
AVOLITES DIAMOND II OPERATION MANUAL SOFTWARE VERSION 3.x
 AVOLITES DIAMOND II OPERATION MANUAL SOFTWARE VERSION 3.x revision 3.01 Useful phone numbers:- Avolites England sales and service (+44) (0) 181 965 8522 service out of hours (+44) (0) 831 17 88 88 fax
Control Console User Manual. Version 1.1.2
 Control Console User Manual Version 1.1.2 Copyright Electronic Theatre Controls, Inc. All Rights reserved. Product information and specifications subject to change. Part Number: 7219M1200-1.1.2 Rev A Released:
Commander 384. w w w. p r o l i g h t. c o. u k U S E R M A N U A L
 Commander 384 w w w. p r o l i g h t. c o. u k U S E R M A N U A L 1, Before you begin 1.1: Safety warnings...2 3 1.2: What is included...4 1.3: Unpacking instructions...4 2, Introduction 2.1: Features...4
Lightcommander 12 / 2. User s Manual
 Lightcommander 12 / 2 User s Manual Version 1.X June 15., 1995 The following symbols are used in this manual: Important Information! Read carefully. Here, a function will be explained more detailed. Hints
CM-T10-PRO and PRO-E. Wireless Control for ColorMaker Series LED Fixtures with ColorRoll Technology User s Manual
 CM-T10-PRO and PRO-E Wireless Control for ColorMaker Series LED Fixtures with ColorRoll Technology User s Manual Introduction CM-T10-PRO and CM-T10-PRO-E (Enhanced) This manual covers both the CM-T10-PRO
TL5024 MEMORY LIGHTING CONSOLE OWNERS MANUAL. Version 1.01
 TL5024 MEMORY LIGHTING CONSOLE OWNERS MANUAL Version 1.01 09/22/2017 Page 2 of 14 SPECIFICATIONS Total channels Operating modes Scene memory Chase 12 or 24 depending on mode 12 channels x 2 manual scenes
CHASE 10 CHASE CHASE CHASE 9
 American DJ User Instructions TP-DMXF Ch. DMX/Analog Programmable Touch Panel 0 9 5 RECORD 5 7 9 0 FLASH BLIND DIMMER SECOND MINUTE 5 7 9 0 PAGE PAGE MANUAL SIGNAL MIX 0 0.SEC SEC SEC 5 SEC 0 SEC 0 SEC
USER GUIDE 8-CHANNEL DMX CONTROLLER December 2013 Version 1.0 CHASE / STROBE SPEED FADE SPEED RED GREEN BLUE WHITE AMBER DIMMER INSERT
 8-CHANNEL DMX CONTROLLER RED GREEN BLUE YELLOW 1 2 3 4 5 6 CYAN ORANGE PURPLE WHITE RED GREEN BLUE WHITE AMBER DIMMER RECORD INSERT DELETE TAP CLEAR MANUAL MUSIC 1 2 3 5 6 7 AUTO CHASE / STROBE SPEED 4
Chapter 23 Dimmer monitoring
 Chapter 23 Dimmer monitoring ETC consoles may be connected to ETC Sensor dimming systems via the ETCLink communication protocol. In this configuration, the console operates a dimmer monitoring system that
STAGE SETTER-8. User Instructions. Elation Professional 4295 Charter Street Los Angeles Ca
 Introduction STAGE SETTER-8 User Instructions Introduction: Thank you for purchasing the Elation Professional Stage Setter 8. To optimize the performance of this product, please read these operating instructions
III Phrase Sampler. User Manual
 III Phrase Sampler User Manual Version 3.3 Software Active MIDI Sync Jun 2014 800-530-4699 817-421-2762, outside of USA mnelson@boomerangmusic.com Boomerang III Phrase Sampler Version 3.3, Active MIDI
192 Channel DMX Controller
 DM-X 92 Channel DMX Controller USER MANUAL 54. 9UK Vers ion. D M X 5 2 C O N T R O L L E R S E R I E S Content. Before you begin. What is included.......2 Unpacking instructions....3 Safety instructions...
American DJ DMX OPERATOR
 American DJ DMX OPERATOR User Instructions DMX-512 MIDI C A PA B L E American DJ Los Angeles, CA 90058 - DMX OPERATOR 2000 TABLE OF CTENTS FLOW CHART...3 CTROLS & FUNCTIS...4 REAR CTROLS...6 DMX512 ADDRESSING...6
SM DMX LIGHTING CONTROLLER OWNERS MANUAL. May 19, 2009
 SM - 192 DMX LIGHTING CONTROLLER OWNERS MANUAL May 19, 2009 INSTRUCTION MANUAL Page 2 of 8 MAIN FEATURES 192 DMX Channels 30 Scene Banks of 8 programmable scenes each 6 Programmable chases with up to 240
CE Controller - Club64
 CE Controller - Club64 Contents Contents 1. THE ABSTRACT CE CONTROLLER 6 2. A QUICK GUIDE TO THE CONTROLLER 8 3.1 WHAT IS A HEAD, AND HOW DOES THE CONTROLLER TALK TO THEM? 8 3.2 HOW DO I MAKE THE HEADS
TABLE OF CONTENTS. 2 SGM Light Technology 23/08/1999 Ver. 2.00
 Version 2.0 TABLE OF CONTENTS 2 SGM Light Technology 23/08/1999 Ver. 2.00 STUDIO SC USER GUIDE To Clear All the Memory...5 Manual Preset Section...6 The single or double preset:...7 To set the Single or
2002 Martin Professional A/S, Denmark.
 Freekie user manual 2002 Martin Professional A/S, Denmark. All rights reserved. No part of this manual may be reproduced, in any form or by any means, without permission in writing from Martin Professional
DMX OPERATOR PRO. User Manual
 User Manual (24-004-1262 Rev 2.0) E-mail: support@elationlighting.com Internet: http://www.elationlighting.com Sections: Table of Contents DMX OPERATOR PRO 1 : General Introduction..... 3 2 : Safety Information
Manual Addendum For Rerun V1.1 software 12/12/2006, RERUN-A = Serial #06A068, RERUN-P = Serial #06A031
 Manual Addendum For Rerun V1.1 software 12/12/2006, RERUN-A = Serial #06A068, RERUN-P = Serial #06A031 The Rerun product manual was written for V1.0 software. The new release, V1.1, adds a number of new
MC 7516 MC 7524 MC 7516 / 7524 / 7532 MEMORY LIGHTING CONTROLLERS USER GUIDE
 MC 7516 MC 7524 MC 7532 MC 7516 / 7524 / 7532 MEMORY LIGHTING CONTROLLERS USER GUIDE Software Revision 1.29 and above Copyright 2003 Leviton Manufacturing Co., Inc. Page PK-93382-10-00-0A 1 of 32 Page
TL MEMORY CONTROL CONSOLE OWNERS MANUAL 02/17/2005. Version 0.6
 TL - 3012 MEMORY CONTROL CONSOLE OWNERS MANUAL Version 0.6 02/17/2005 Page 2 of 6 SPECIFICATIONS Channels: 12 Operating modes: Two Scene Manual Mode Preset Scene Playback Mode Chase Mode Output connector:
SR - 516D DESK TOP DMX REMOTE STATION. Version: Date: 05/16/2013
 SR - 516D DESK TOP DMX REMOTE STATION Version: 1.10 Date: 05/16/2013 Page 2 of 10 TABLE OF CONTENTS DESCRIPTION 3 POWER REQUIREMENTS 3 INSTALLATION 3 CONNECTIONS 3 POWER CONNECTIONS 3 DMX CONNECTIONS 3
MANUAL ENGLISH Showmaster 48 MKII V1 Ordercode: 50831
 MANUAL ENGLISH Showmaster 48 MKII V1 Highlite International B.V. Vestastraat 2 6468 EX Kerkrade the Netherlands Table of contents Warning... 2 Safety Instructions... 2 Operating Determinations... 3 Connection
KONTROL channels DMX controller USER MANUAL. For safety, please read this user manual carefully before initial use.
 KONTROL192 192 channels DMX controller USER MANUAL For safety, please read this user manual carefully before initial use. Event Lighting reserves the right to revise the manual at any time. Information
Digital Video Recorder From Waitsfield Cable
 www.waitsfieldcable.com 496-5800 Digital Video Recorder From Waitsfield Cable Pause live television! Rewind and replay programs so you don t miss a beat. Imagine coming home to your own personal library
Manhattan Model: Plaza HDR S 500GB LET S GET STARTED YOUR USER GUIDE
 Manhattan Model: Plaza HDR S 500GB LET S GET STARTED YOUR USER GUIDE WELCOME TO FREESAT We are so pleased you bought this 500GB Manhattan Plaza HDR S Freesat+ HD recorder. Now you can enjoy: Quality state-of-the-art
PaletteOS Release Notes Software Version
 Welcome to PaletteOS 10.8.1 Welcome to the PaletteOS 10.8.1 software release. There are many changes and enhancements in this release. Here are some highlights of this highly anticipated software upgrade.
Artistic Licence Engineering Ltd Firmware Version V3.03 Manual Revision V1-9
 Light-Switch & Switch-Edit Artistic Licence Engineering Ltd Firmware Version V3.03 Manual Revision V1-9 Artistic Licence Engineering Ltd. Switch-Edit Manual 2/47 Artistic Licence Engineering Ltd. Switch-Edit
RD RACK MOUNT DIMMER OWNERS MANUAL VERSION /09/2011
 RD - 122 RACK MOUNT DIMMER OWNERS MANUAL VERSION 1.3 03/09/2011 Page 2 of 14 TABLE OF CONTENTS UNIT DESCRIPTION AND FUNCTIONS 3 POWER REQUIREMENTS 3 INSTALLATION 3 PLACEMENT 3 POWER CONNECTIONS 3 OUTPUT
DC162 Digital Visualizer. User Manual. English - 1
 DC162 Digital Visualizer User Manual English - 1 Table of Contents CHAPTER 1 PRECAUTIONS... 5 CHAPTER 2 PACKAGE CONTENT... 7 CHAPTER 3 PRODUCT OVERVIEW... 8 3.1 PRODUCT INTRODUCTION... 8 3.2 I/O CONNECTION...
11: PC MACs RealTime Pulldown
 11: PC MACs RealTime Pulldown This Pulldown Menu is where all the commands having to do with the real time programming of a show can be found. Most of the commands are duplicates of the buttons and checkboxes
Kramer Electronics, Ltd. USER MANUAL. Models: VS-162AV, 16x16 Audio-Video Matrix Switcher VS-162AVRCA, 16x16 Audio-Video Matrix Switcher
 Kramer Electronics, Ltd. USER MANUAL Models: VS-162AV, 16x16 Audio-Video Matrix Switcher VS-162AVRCA, 16x16 Audio-Video Matrix Switcher Contents Contents 1 Introduction 1 2 Getting Started 1 3 Overview
Network Disk Recorder WJ-ND200
 Network Disk Recorder WJ-ND200 Network Disk Recorder Operating Instructions Model No. WJ-ND200 ERROR MIRROR TIMER HDD1 REC LINK /ACT OPERATE HDD2 ALARM SUSPEND ALARM BUZZER STOP Before attempting to connect
BooBox Flex. OPERATING MANUAL V1.1 (Feb 24, 2010) 6 Oakside Court Barrie, Ontario L4N 5V5 Tel: Fax:
 6 Oakside Court Barrie, Ontario L4N 5V5 Tel: Fax:") BooBox Flex OPERATING MANUAL V1.1 (Feb 24, 2010) 6 Oakside Court Barrie, Ontario L4N 5V5 Tel: 905-803-9274 Fax: 647-439-1470 www.frightideas.com Connections The BooBox Flex is available with Terminal Blocks
BooBox Flex OPERATING MANUAL V1.1 (Feb 24, 2010) 6 Oakside Court Barrie, Ontario L4N 5V5 Tel: 905-803-9274 Fax: 647-439-1470 www.frightideas.com Connections The BooBox Flex is available with Terminal Blocks
SHOW DESIGNER 1. user manual. ELATION SHOW DESIGNER 1 user manual
 SHOW DESIGNER 1 user manual ELATION SHOW DESIGNER 1 user manual 2015 ELATION PROFESSIONAL all rights reserved. Information, specifications, diagrams, images, and instructions herein are subject to change
DD E SIG N E D & E N GIN EE R E. Holman Garden Lights App Instruction Manual. Android Android manual
 DD E SIG N E D & E N GIN EE R E Holman Garden Lights App Instruction Manual Android Android manual AUSTRALIAN Mounting the Controller Connecting your Lights Operating the App Troubleshooting Warranty Contact
HOME GUARD USER MANUAL
 HOME GUARD USER MANUAL CONTENTS 1. SAFETY PRECAUTIONS...2 2. INTRODUCTION...3 3. FEATURES...4 4. ACCESSORIES...5 5. INSTALLATION...6 6. NAME and FUNCTION of EACH PART...7 6.1 Front Pannel...7 6.2 Monitoring
GET STARTED. For assistance, call us on or visit manhattan-tv.com/help
 GET STARTED For assistance, call us on 020 8450 0005 or visit manhattan-tv.com/support Check Freeview HD coverage in your area by visiting freeview.co.uk For assistance, call us on 020 8450 0005 or visit
BeoVision MX Guide
 BeoVision MX 4200 Guide BeoVision Avant Guide The information on the CD-rom can also be found on the Bang & Olufsen web-site; www.bang-olufsen.com or you can contact your retailer. An explanation of symbols
ENGLISH Scanmaster 2 MKII
 MANUAL ENGLISH Scanmaster 2 MKII V1 Highlite International B.V. Vestastraat 2 6468 EX Kerkrade the Netherlands Table of contents Warning...2 Safety Instructions...2 Operating Determinations...3 Connection
Kramer Electronics, Ltd. USER MANUAL. Model: VS x 1 Sequential Video Audio Switcher
 Kramer Electronics, Ltd. USER MANUAL Model: VS-120 20 x 1 Sequential Video Audio Switcher Contents Contents 1 Introduction 1 2 Getting Started 1 2.1 Quick Start 2 3 Overview 3 4 Installing the VS-120 in
Using Sliders with the 4201-B Lighting Controller Application Note June 26, 2008
 Using Sliders with the 4201-B Lighting Controller Application Note June 26, 2008 This application note will discuss ways of using potentiometers (sliders or normal rotary volume control type) with the
Owner s Manual LED COMMANDER 16/2
 Owner s Manual LED COMMANDER 16/2 Content Introduction...2 Technical Specification...2 Maintenance and care...2 Notes on safety...3 Features...4 Overview...5 Installation...6 Operation...6 Channel Assignment...7
User's Manual No Rev 1.0
 User's Manual No. --1 Rev 1. Welcome Thanks for your purchasing this Lite- Pro lighting control equipment. This product has the following listed main features: Ch. dimming console with dimming faders,
VLC-3 USER'S MANUAL. Light Program Controller. M rev. 04 K rev. 00 & ( ( 5, 352*5$0 1 : $ 2 ' 6(77,1*6 )81&7,216
81&7,216") Light Program Controller VLC-3 USER'S MANUAL +50,1 +50,1 1 : $ ' 2 7. 6 8 ' 5, 7 6 6. $ ( 3 352*5$0 0,16(& )81&7,216 6(77,1*6 & 8 5 5 ( 1 7 3 ( 5, 2 ' M 890-00189 rev. 04 K 895-00406 rev. 00 GENERAL...
Light Program Controller VLC-3 USER'S MANUAL +50,1 +50,1 1 : $ ' 2 7. 6 8 ' 5, 7 6 6. $ ( 3 352*5$0 0,16(& )81&7,216 6(77,1*6 & 8 5 5 ( 1 7 3 ( 5, 2 ' M 890-00189 rev. 04 K 895-00406 rev. 00 GENERAL...
Stage CL. Made for LEDs. Version 1.0
 Stage CL Made for LEDs Version 1.0 Copyright & disclaimer This product is approved for use in Europe, Australia and New Zealand To ensure continued compliance with EMC Directive 89/336 and the Australian
TELEVISION. Entertainment Plans. Interactive Guide and DVR (Digital Video Recorder) Manual ARVIG arvig.net
 Manual ARVIG arvig.net") TELEVISION Entertainment Plans Interactive Guide and DVR (Digital Video Recorder) Manual 888.99.ARVIG arvig.net . TABLE OF CONTENTS Interactive Guide Remote Control... 3 Changing the Channel... 4 Picture-In-Picture
TELEVISION Entertainment Plans Interactive Guide and DVR (Digital Video Recorder) Manual 888.99.ARVIG arvig.net . TABLE OF CONTENTS Interactive Guide Remote Control... 3 Changing the Channel... 4 Picture-In-Picture
11/09/98 Martin Casemanual (version 6.21) Programming...
 Programming...") 4.1 In general The fixture control channel values can be put in PRESETS. On the console, you can program 70 Pan/tilt presets, 70 Color presets, 70 Gobo presets and 70 effect generator presets. This is
4.1 In general The fixture control channel values can be put in PRESETS. On the console, you can program 70 Pan/tilt presets, 70 Color presets, 70 Gobo presets and 70 effect generator presets. This is
BeoVision Guide
 BeoVision 8-40 Guide Contents Menu overview, 3 See an overview of on-screen menus. Navigate in menus, 4 See how to use the different remote controls for menu operation. First-time setup, 5 Which menus
Part No. ENC-LAB01 Users Manual Introduction EncoderLAB
 PCA Incremental Encoder Laboratory For Testing and Simulating Incremental Encoder signals Part No. ENC-LAB01 Users Manual The Encoder Laboratory combines into the one housing and updates two separate encoder
TABLE OF CONTENTS. Rev. 9 2 Stage Designer 50
 User Manual TABLE OF CONTENTS Table of Contents... 2 WHAT IS INCLUDED... 3 UNPACKING INSTRUCTIONS... 3 MANUAL CONVENTIONS... 3 ICONS... 3 SAFETY INSTRUCTIONS... 4 FEATURES... 4 ADDITIONAL FEATURES... 4
ColorSource AV Console
 ColorSource AV Console User Manual v1.1.1 Part Number: 7225M1210-1.1.1 Rev: A Released: 2017-03 ETC, and ColorSource, are either registered trademarks or trademarks of in the United States and other countries.
Dissolve Control Programming : Projector/Dissolve Control Hook-Up
 Product Information Title: Operating Equipment: Dissolve Control Programming Projector/Dissolve Control Hook-up Sync Track Hook-up Converting Tapes to Digital Sync Signals Recording Signals 80 Vs 140 Slide
Operating instructions. Universal timer switch display
 Operating instructions 1. Function The Time Switch display is a system component and is installed in a box as per DIN 49073 (deep box recommended) in conjunction with the Time Switch insert. The unit facilitates
User s Guide for the Digital Video Recorder
 User s Guide for the Digital Video Recorder with Picture-in-Picture Control Explorer 8000 Home Entertainment Server Record and store from 30 to 50 hours of programs Record your favorite programs when you
Made for LEDs. Quick Start. Version 1.3 Software
 Made for LEDs Quick Start Version 1.3 Software Copyright & disclaimer This product is approved for use in Europe and Australia/New Zealand and conforms to the following standards: EN55103-1 EN55103-2 EN60950
LEDBlinky Animation Editor Version 6.5 Created by Arzoo. Help Document
 Version 6.5 Created by Arzoo Overview... 3 LEDBlinky Website... 3 Installation... 3 How Do I Get This Thing To Work?... 4 Functions and Features... 8 Menus... 8 LED Pop-up Menus... 16 Color / Intensity
The New Contour INTRODUCING
 INTRODUCING The New Contour Welcome to the simplest, fastest and most fun way to search and access all your entertainment on all your devices. Search visually with show title art that is organized by category,
X-Treme/19C. X-Treme Controller
 American DJ user Instructions X-Treme/19C X-Treme Controller 1 2 2b 4 5 11 13 14 15 16 17 3 6 7 8 9 10 12 18 19 1. Selects Projector 2. Preset Motion/direction selectors 3. Show Keys 4. Cut output (blackout)
PRESET TEN ARCHITECTURAL TWO OWNERS MANUAL
 PRESET TEN ARCHITECTURAL TWO OWNERS MANUAL model PRE10-A2 Doug Fleenor Design 396 Corbett Canyon Road Arroyo Grande, CA 93420 (805) 481-9599 Software Version 1.0 Manual Revision 12/2/2008 Serial # 08B001
General Information. Specifications. Introduction. Safety Instructions
 General Information Introduction Thank you for your purchase of the DMX ANALYZER! That success of DMX ANALYZER is the useful features of stylish design, versatility and highly competitive price tag. There
welcome to i-guide 09ROVI1204 User i-guide Manual R16.indd 3
 welcome to i-guide Introducing the interactive program guide from Rovi and your cable system. i-guide is intuitive, intelligent and inspiring. It unlocks a world of greater choice, convenience and control
PRESET 10 PORTABLE OWNERS MANUAL
 PRESET 10 PORTABLE OWNERS MANUAL Doug Fleenor Design 396 Corbett Canyon Road Arroyo Grande, CA 93420 (805)-481-9599 Software Version 2.0 Revision 4 February, 2006 > Serial Number 062119 PRODUCT DESCRIPTION
GLX DMX-16 MANUAL DMX-16. owners manual
 DMX-16 owners manual Instructions Thanks for choosing the GLX DMX-16 controller. In order to make the best use of your GLX controller, please read the following carefully. The DMX-16 is a standard universal
SceneStyle2 User Guide
 SceneStyle2 User Guide Mode Lighting (UK) Limited. The Maltings, 63 High Street, Ware, Hertfordshire, SG12 9AD, UNITED KINGDOM. Telephone: +44 (0) 1920 462121 Facsimile: +44 (0) 1920 466881 e-mail: website:
VSP 198CVS Quick Start
 VIEWSIZE THE WORLD VSP 198CVS Quick Start Max 2048 1152@60Hz/2560 1152 50Hz input/output resolution User customize output resolution 3G/HD/SD-SDI input Multiple cascade mapping for super resolution DVI
USER GUIDE. [part no. I197GB issue 1]
![USER GUIDE. [part no. I197GB issue 1]](/thumbs/86/94473980.jpg "USER GUIDE. [part no. I197GB issue 1]") USER GUIDE [part no. ] Celco PATHFINDR Console User Guide Document EPD01021 (08/03/96) Copyright 1996 Celco, The Live Entertainment Divison of Electrosonic Ltd. All rights reserved. No part of this documentation
USER GUIDE [part no. ] Celco PATHFINDR Console User Guide Document EPD01021 (08/03/96) Copyright 1996 Celco, The Live Entertainment Divison of Electrosonic Ltd. All rights reserved. No part of this documentation
Thank you for purchasing this product. If installing for someone else, please ensure that the instructions are handed to the householder.
 Instruction Manual TPSE201 (181422) - BOSS TM Universal Programmer TPSE101 (569565) - BOSS TM Universal Timeswitch Thank you for purchasing this product. If installing for someone else, please ensure that
Night Hawk Firing System User s Manual
 Firmware Version 2.53 Page 1 of 37 Table of Contents Features of the Night Hawk Panel... 4 A reminder on the safe use of Electronic Pyrotechnic Firing Systems... 5 Night Hawk Firing Panel Controls... 6
Contents. Loudspeaker setup surround sound, 3 Find out how to turn your television into a surround sound system.
 Contents 2 Loudspeaker setup surround sound, 3 Find out how to turn your television into a surround sound system. Connect a set-top box or decoder, 7 Find out how to connect a set-top box or decoder to
DMX512 Digital Dimmer Operator Manual
 DMX512 Digital Dimmer Operator Manual Document number: TEKOU0130 Version V3.0 January 2010 This manual applies to software version 3.0 or later. LSC Lighting Systems (Aust) Pty. Ltd. ABN 21 090 801 675
Dimming actuators GDA-4K KNX GDA-8K KNX
 Dimming actuators GDA-4K KNX GDA-8K KNX GDA-4K KNX 108394 GDA-8K KNX 108395 Updated: May-17 (Subject to changes) Page 1 of 67 Contents 1 FUNCTIONAL CHARACTERISTICS... 4 1.1 OPERATION... 5 2 TECHNICAL DATA...
DMX DC-192. User manual. DMX controller
 User manual Musikhaus Thomann Thomann GmbH Hans-Thomann-Straße 1 96138 Burgebrach Germany Telephone: +49 (0) 9546 9223-0 E-mail: info@thomann.de Internet: www.thomann.de 08.11.2017, ID: 391103 Table of
MSP 200PRO Quick Start
 MSP 200PRO Quick Start Touch Screen control Output a range of signal types Set and select from a range of common output formats Audio output test included Genlock Y&HS outputs Input live signals for preview
Voluntary Product Accessibility Template (VPAT)
") (VPAT) Date: 7/15/2017 Product Name: Desktop Thermal Printers: G-Series, HC1xx, TLP282x ZD4xx, ZD5xx, ZD6xx Organization Name: Zebra Technologies, Inc. Submitter Name: Mr. Charles A. Derrow Submitter Telephone:
(VPAT) Date: 7/15/2017 Product Name: Desktop Thermal Printers: G-Series, HC1xx, TLP282x ZD4xx, ZD5xx, ZD6xx Organization Name: Zebra Technologies, Inc. Submitter Name: Mr. Charles A. Derrow Submitter Telephone:
Next. 6 channels Versatile DMX light desk USER S MANUAL
 Next 6 channels Versatile DMX light desk USER S MANUAL We congratulate you on your purchase of V-MIX 6. Before you proced using this product it should be necessary to read carefully the following user
QUICK START GUIDE MODEL : PHD-VRX2
 Full HD 1080p Dual Tuner Digital HDTV Recorder, Receiver and Media Center Box QUICK START GUIDE MODEL : PHD-VRX2 Copyright 2013, PrimeDTV Technologies, Inc. Front View Menu: Display On-screen (OSD) Main