Great TV viewing is in your hands! A good way to begin learning about your
|
|
|
- Byron Harrison
- 6 years ago
- Views:
Transcription
1 U-Pop Kids: Radio Disney Kids: XM Kids Latino: Caliente Latino: Fuego Lifestyle: Fine Tuning Rock: Big Tracks Rock: Boneyard Rock: Fred Rock: Liquid : Rock: XMU Talk: High Voltage U rban: Th Groove HBO (East) HBO (West) HBO Family (East) HBO Family (West) HBO HD H BO Si ign ture HBO2 (East) DIRECTV HBO2 (West) Starz (East) Starz (West) Starz Edge Starz InBlack St tarz - En core (East) Starz - Encore (West) Starz - Encore Action Starz - Encore Drama Starz - En ncore Lo Starz - Encore HD Mystery Starz Receiver - Encore Wam Starz - Encore Westerns FLIX The Movie Channe el (East) The Movie Channel (West) SHOWTIME (East) SHOWTIME (West) SHOWTIME Ex xtrem me SHOWTIME HD SHOWTIME Showcase SHOWTIME TOO Sundance Channel Cin- em max ( Ea Cinemax (West) MoreMAX Altitude Sports & Entertainment Comcast SportsNet (C Chicag go) Comcast SportsNet (Mid-Atlantic) User Comcast SportsNet Guide (West) CSTV: College Sports Te elevisi ion ESPNU FSN Arizona FSN Bay Area FSN Cincinnati FSN Detroit FSN Florida FSN Midwes st FSN New England FSN New York FSN N DIRECTV HD RECEIVER USER GUIDE Great TV viewing is in your hands! A good way to begin learning about your DIRECTV System is to familiarize yourself with the remote control. You ll fi nd further details throughout the User Guide relating to specifi c functions. Navigating 101 You ll fi nd you can get around nearly all onscreen menus the same simple way. Highlight a menu or button by using the ARROW keys (up, down, left and right). Choose it by pressing SELECT while the item is highlighted. Note: Don t worry about getting stuck in a menu. You can always press EXIT to return to video. To place batteries in your remote control: 1. Remove cover from the battery compartment by sliding it downward. 2. Insert 2 AA batteries (supplied), matching the positive (+) and negative ( ) at each end. 3. Slide the cover back on to complete installation. To program your remote control: 1. See Programming Your Remote Control on page 70. Keys in the shaded area below can be programmed to function with your VCR, DVD player or stand-alone DVR unit. TV INPUT Changes the source the piece of equipment whose signal is displayed on your TV FORMAT Cycles through HD resolution and screen format options STOP REPLAY REWIND PAUSE ACTIVE Displays the DIRECTV Active Channel local weather and more! GUIDE Displays the onscreen program Guide SELECT Selects any highlighted item BACK Takes you to the screen you visited previously MENU Displays a compact menu of settings and services RED In Guide, jumps 12 hours back; other functions vary look for onscreen hints GREEN In Guide, jumps 12 hours forward; other functions vary look for hints onscreen VOLUME Raises or lowers volume MUTE Toggles sound volume on/off NUMBER KEYS & DASH Tune to a channel directly; also input numbers when needed in onscreen menus MODE SWITCH Changes remote to control other equipment, for example, a DVD POWER Turns your DIRECTV HD Receiver and other equipment on and off, as selected with MODE switch DIRECTV & TV POWER ON/OFF Turns your TV and DIRECTV HD Receiver on and off ADVANCE PLAY FFWD RECORD LIST Displays your To Do List EXIT Exits any menu and returns to last channel viewed ARROWS Move highlight to items in whatever direction needed INFO Displays info for a highlighted or fullscreen program BLUE In live TV, displays the Mini Guide; other functions vary look for onscreen hints YELLOW In fullscreen TV, cycles through alternate audio tracks; other functions vary look for onscreen hints CHAN/PAGE In live TV, changes channel up or down; in a menu, such as the Guide, scrolls page up or down PREV Tunes to last channel viewed ENTER Activates channel number entries quickly
2 POWER GUIDE MENU ACTIVE INFO RES SELECT 480i 480p 720i 1080p OPEN Safety & Care Your DIRECTV HD Receiver has been designed and manufactured to stringent quality and safety standards. You should, however, be aware of the following important precautions for safe and optimal use of the equipment. Meaning of symbols printed on the rear panel of the product:! This symbol indicates that dangerous voltage consisting a risk of electric shock is present within this unit. This symbol indicates that there are important operating and maintenance instructions in the literature accompanying this unit. Important Safety Instructions 1) Read these instructions. 2) Keep these instructions. 3) Heed all warnings. 4) Follow all instructions. 5) Do not use this apparatus near water. 6) Clean only with dry cloth. 7) Do not block any ventilation openings. Install in accordance with the manufacturer s instructions. 8) Do not install near any heat sources such as radiators, heat registers, stoves, or other apparatus (including amplifiers) that produce heat. 9) Do not defeat the safety purpose of the polarized or grounding-type plug. A polarized plug has two blades with one wider than the other. A grounding type plug has two blades and a third grounding prong. The wide blade or the third prong are provided for your safety. If the provided plug does not fit into your outlet, consult an electrician for replacement of the obsolete outlet. 10) Protect the power cord from being walked on or pinched particularly at plugs, convenience receptacles, and the point where they exit from the apparatus. 11) Only use attachments/accessories specified by the manufacturer. 12) Use only with the cart, stand, tripod, bracket, or table specified by the manufacturer, or sold with the apparatus. When a cart is used, use caution when moving the cart/apparatus combination to avoid injury from tip-over. 13) Unplug this apparatus during lightning storms or when unused for long periods of time. 14) Refer all servicing to qualified service personnel. Servicing is required when the apparatus has been damaged in any way, such as power-supply cord or plug is damaged, liquid has been spilled or objects have fallen into the apparatus, the apparatus has been exposed to rain or moisture, does not operate normally, or has been dropped. WARNING To reduce the risk of fire or electric shock, do not expose this product to rain or moisture. The apparatus shall not be exposed to dripping or splashing and that no objects filled with liquids, such as vases, shall be placed on the apparatus. CAUTION RISK OF ELECTRIC SHOCK DO NOT OPEN CAUTION: TO REDUCE THE RISK OF ELECTRIC SHOCK, DO NOT REMOVE COVER (OR BACK). NO USER-SERVICEABLE PARTS IN- SIDE. REFER SERVICING TO QUALIFIED SERVICE PERSONNEL.! IMPORTANT: Be sure not to place your DIRECTV HD Receiver near anything WET or HOT! If this product is used at 240VAC, a suitable attachment plug should be used.
3 TIP We highly recommend plugging the DIRECTV HD Receiver into a surge protector to prevent damage from fluctuations in your power supply. CAUTION: Avoid moisture to reduce the risk of fi re or electric shock. The DIRECTV HD Receiver should not be used near water (for example, kitchen sink, bathtub, pool, damp basement). Also, never spill liquid on the receiver, and do not place vases or other vessels containing liquid on top of it. Ensure proper ventilation the vent slots on the DIRECTV HD Receiver must be left uncovered to allow proper airflow to the unit. Blocking the airflow to the unit could impair performance or damage your receiver and other components. Do not stack electronic components or other objects on top of the DIRECTV HD Receiver. Also, do not stack the receiver on top of a hot component such as an audio power amplifier. Protect your components from power surges by connecting all the components before plugging any power cords into the wall outlet. Use of a surge protector is also recommended. Don t overload power outlets or extension cords, which can result in the risk of fi re or shock. It s also important to use only the type of power source indicated on the marking label or in this manual. Avoid audio hum or interference by inserting all cable plugs fi rmly into their jacks. Also, place Audio/Video (A/V) cables to the sides of the TV back panel rather than down the middle once connected. Try not to coil any twin-lead cables and keep them away from A/V cables as much as possible. Never insert objects of any kind into any openings in the DIRECTV HD Receiver (other than the DIRECTV Access Card as detailed in this chapter). Place it on a fl at, hard surface do not operate the DIRECTV HD Receiver on a carpet or other padded surface. Always unplug your DIRECTV HD Receiver before moving it. Always unplug the DIRECTV HD Receiver, TV and other equipment before you connect or disconnect any cables. The mains power connector at the boack of the unit or at the outlet should be accessible to allow quick shutdown in case of emergency. CAUTION: Electric Shock never attempt to disassemble the DIRECTV HD Receiver yourself; always take it to a qualified service person when repair is required. Opening or removing covers may expose dangerous voltage or other risks, and incorrect reassembly can cause shock when receiver is subsequently used. Attempted selfrepair may also void your warranty. Changes or modifications not expressly approved by the party responsible for compliance (by the warranty or by the manufacturer) could void the user s authority to operate the equipment. Do not drop your DIRECTV HD Receiver and always move it with care. Have your DIRECTV HD Receiver professionally serviced (do not attempt to service it yourself) Any changes or modifications in construction of this device which are not expressly approved by the party responsible for compliance could void the user s authority to operate the equipment. To reduce the risk of fi re, use only No. 26 AWG or better telecommunications line cord. Do not install this equipment in a confi ned space such as a book case or similar unit. For your information: The identification sticker can be located underneath or on the back of your receiver. The telecommunication network voltage used is the category number 3. Note to Satellite Dish Installer This reminder is provided to call your attention to articles 810 and 820 of the 2005 National Electrical Code. Refer to article 810, in particular and , for required grounding of the metal structure of the dish antenna. Refer also to the which, by reference to article 820, requires that the satellite dish coaxial cable shield be connected to the grounding system of the building as close to the point of cable entry as practical. iii
4 Getting Started Welcome...2 Installation and Activation...4 DIRECTV HD Receiver Front Panel...5 DIRECTV HD Receiver Rear Panel...6 What s On Watching TV The Guide Autotune Pay Per View The Menu Using the Menu...22 Help & Settings...22 Audio Options...24 Dolby * Digital Category Sort...26 Pay Per View...26 Search...27 Date & Time...28 Favorites...28 Caller ID & Messages...29 Parental Controls...30 Table of Contents iv
5 Other Info Troubleshooting...36 Limited 90-Day Warranty Product Information...50 DIRECTV PROTECTION PLAN FCC Customer Information Installation Before you begin...58 Hardware Reference...58 Making the Video Connections...62 Making the Audio Connections...64 Making the Basic Connections...66 Guided Setup...68 Activate Your DIRECTV Service...69 Programming Your Remote Control...70 Using an IR/RF Remote to Control Your DIRECTV HD Receiver...71 High-Def 101 About High-Definition Options For Changing Video Output...77 Supported Resolutions...79 Wide-Screen vs. Standard Formats...80 Index Icon Reference...xci Important Important: This device incorporates an anticopy process technology that is protected by U.S. patents and other intellectual property rights. The anticopy process is licensed for non-commercial, home use only. Reverse engineering or disassembly is prohibited. Unauthorized changes or modifi cations to this equipment may void the user s authority to operate it. v
6
7 Chapter 1 2 Welcome 4 Installation and Activation 5 DIRECTV HD Receiver Front Panel 6 DIRECTV HD Receiver Rear Panel Getting Started 1
8 Welcome With its astounding variety of channels and choices, crisp digital-quality picture and sound and oneof-a-kind sports and events, DIRECTV HD service offers everything you d want in your television experience. With the DIRECTV HD Receiver you can expect more than ever before, with access to over 225 channels, including our awesome HD selections and over 30 premium movie channels, with something to please everyone in the family. DIRECTV Pay Per View offers a handy choice in recent hit movies, plus exciting live sports, concerts and specials, even Pay Per View selections in HD. There s exclusive sports subscriptions for every taste and team. Even access to 36 commercial-free music channels! TIP You can find additional information and the latest updates at DIRECTV.com. To deliver this unique programming and enhance your entertainment experience, the DIRECTV HD Receiver has been designed to be simple and user-friendly. You ll fi nd that most features are selfexplanatory, with onscreen directions to lead you through them. So, welcome to the family. 2
9 What You Can Watch With the DIRECTV HD Receiver, you have access to all types of televised programming, including: DIRECTV high-definition and standard-definition digital programming via satellite, including network channels if offered in your area (DIRECTV service subscription required). Equipment You ll Need To view HD programming, you ll need, in addition to your DIRECTV HD Receiver: A high-definition TV set (or HDTV monitor) A 5 LNB Multi-Satellite dish antenna MPEG4 and Ka/Ku compatible 3
10 Installation and Activation If you or a professional installer have not yet connected your DIRECTV HD Receiver and other components, please see Appendix A, Installation at the end of this User Guide. Following activation, you will need to activate your DIRECTV service. If you have not activated already, see page 69 for more information. Package Contents The following items are included with your DIRECTV HD Receiver: User Guide IR Remote Control & batteries Phone cord Power cord B-Band Converter Access card Video and audio cables 4
11 SELECT SELECT ACTIVE INFO RES 480i 480p 720i 1080p POWER GUIDE MENU ACTIVE INFO RES 480i 480p 720p 1080p OPEN Locate the access card that came with your DIRECTV HD Receiver. Write down the card number in the space below, then insert the card into the receiver, facing upward, fully into the slot. Card # Your equipment may not look exactly like the model illustrated. DIRECTV HD Receiver Front Panel 1) POWER Turns your DIRECTV HD Receiver on or off. Your Receiver still tunes and receives messages when powered off. 2) REMOTE SENSOR The infrared sensor picks up commands from the remote control. 3) GUIDE Displays the onscreen program guide. 4) MENU Brings up the Menu to access settings and services. 5) ARROWS Move the onscreen highlight up, down, left or right. 6) SELECT Selects the item highlighted. 7) ACTIVE Displays the DIRECTV Active Channel local weather and more! 8) INFO Displays channel banner or info to a highlighted program or channel cell. 9) RESOLUTION/RESOLUTION INDICATOR The RESOLUTION key switches the output resolution of the HD receiver. Each time you press the key, it cycles to the next available resolution: 480i, 480p, 720p and 1080i. The adjacent lights indicate the current resolution setting. 10) DOOR PANEL The access card slot and RESET button are located behind the door panel. 5
12 5 7 COMPONENT OUT SATELLITE IN USB S-VIDEO OUT DIGITAL AUDIO OUT (OPTICAL) HDMI ETHERNET PHONE LINE AC IN VIDEO OUT AUDIO OUT Your equipment may not look exactly like the model illustrated. DIRECTV HD Receiver Rear Panel 1) SATELLITE IN Use to connect the DIRECTV HD Receiver to the satellite dish antenna. 2) USB For future services and accessories. Additional hardware may be required. 3) S-VIDEO OUT Provides the best non-hd picture quality, better than VIDEO RCA-type jacks. If your TV has only RCA and S-Video jacks, use it along with the audio jacks (S-Video only carries picture information, not sound) to connect to your TV. 4) VIDEO OUT Provides good, but non-hd, picture quality. You can connect the second RCAtype composite VIDEO jack to another device, such as a VCR. You must also connect the AUDIO cables when using the VIDEO connection. The Rear Panel may look complicated, but you probably won t use all the connections.
13 Connect video, audio, your satellite dish, a phone line, power, and you re done! 5) COMPONENT OUT/ YPbPr (G, B, R) Provides good HD picture quality, but not as good as HDMI. YPbPr carries only picture information, not sound; use it along with a digital audio connection or Audio Out (L/R white/red) jacks. (Note, some TV sets have component video inputs that are non-hd. In this case, component video has the best available non-hd picture quality.) 6) AUDIO OUT (R and L) Connect a second set of audio cables to another component, such as a VCR or stereo. 7) DIGITAL AUDIO OUT (COAX) Provides digital-quality audio signal. (Cable sold separately.) 8) S/PDIF DIGITAL AUDIO OUT (OPTICAL) Provides digital-quality audio signal. (Cable sold separately.) 9) HDMI Provides the best quality HD picture (better than YPbPr/component video). The HDMI also provides audio, for a high-quality, one-cable solution. (Additional cables sold separately.) 10) ETHERNET For future use. 11) PHONE LINE Connects the DIRECTV HD Receiver to a telephone line. The DIRECTV HD Receiver requires a land-based telephone line connection to communicate periodically with DIRECTV. 12) POWER Use to connect the power cord for your DIRECTV HD Receiver. We recommend you use a surge protector to safeguard your DIRECTV HD Receiver from power spikes. Your DIRECTV HD Receiver is rated to operate at V, with the appropriate power cord. 7
14
15 Chapter 2 11 Watching TV 15 The Guide 17 Autotune 19 Pay Per View What s On 9

16
17 TIP Use the Channel Lineup (included in your Welcome package) to get familiar with our channel numbers. Watching TV Now that everything s set up, you re ready to grab your remote and start surfi ng! With the MODE switch to the left (under the DIRECTV logo), press PWR. To access the channel of your choice, simply key in its numbers on your remote (the channel will appear in a second or two, or press ENTER after the numbers and it will appear right away). You can also navigate to different channels through the Guide, described in detail later in this chapter. Keep in mind, either way, you ll only be able to access those channels in your chosen DIRECTV programming package. For a list of the channels available in the DIRECTV programming packages, visit DIRECTV.com. VOL CHAN PAGE PREV Use the black keys on the left side of your remote control to adjust volume up or down (VOL) or mute the sound ( MUTE - ). The black keys on the right side can take you to the next channel numerically up or down (CHAN), or jump to the previous channel you watched (PREV). DIRECTV Active Channel The DIRECTV Active Channel provides a variety of interactive services, including daily and extended weather forcasts, daily horoscopes, lottery results, pay per view and broadcast TV recommendations, and special DIRECTV promotions. Press the ACTIVE key to access these features. 11

18
19 Current Date & Time DIRECTV Channel Program Info Current Favorites Audio Options Messages Parental Controls Color Hint The Channel Banner Any time you tune to a channel, the Channel Banner appears across the top of the screen, displaying info on the channel and show you are currently watching: 1) Current Date & Time 2) DIRECTV Channel Channel logo, number and call letters of the station you re currently viewing. 3) Program Info Program title, stop and start time and rating of the current program. 4) Current Favorites Favorite Channels list currently in use. 5) Audio Options A fi lled in icon indicates alternate audio options are available. A hollow icon, no alternate audio options are available. 6) Messages A fi lled in icon indicates new DIRECTV messages in Caller ID & Messages. A hollow icon, there are no new or unread messages. 7) Pa r e nt a l C o nt r o l s Parental Controls lock status. Three icons: Locked ( fi lled-in locked icon), unlocked ( hollow unlocked icon) and temporarily unlocked ( fi lled-in unlocked icon). 8) Color Hint The color hint is a reminder that pressing the BLUE key displays the Mini Guide. Other messages or instructions are displayed in this location as needed. To see program details at any time press INFO on your remote (press a second time to clear). Select More Info button to see additional options. Music Channels Your DIRECTV service includes dozens of enjoyable, continuous, commercial-free music channels with something for every taste. Tune to these just as you would to any channel. You ll see a special Channel Banner that initially displays the channel description (for example, The 60s, US Country ). As each song is played, its info will appear in the banner, including song title, artist and record company. 13
20
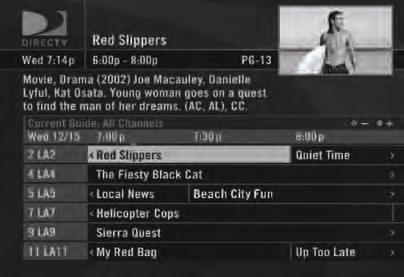
21 The Guide Overview of the DIRECTV Advanced Program Guide The Guide displays listings of current and upcoming programs for up to 7 days in advance. Find out what s on (now or later), change the channel, fi nd and purchase a pay per view movie or event, or search for a program you re interested in. Icons you may see in the Guide: TIP Press the GUIDE key twice to skip the Category Sort screen. GUIDE Broadcast in letterbox (16:9 widescreen) format All Day Ticket Pay Per View showings (pay once, watch all day) HD program Dolby Digital audio available 15
22 Getting Around in the Guide Press the GUIDE key on your remote, then choose how you want to fi lter the Guide (or press GUIDE twice to skip the fi lter). Select All Channels, or channels in a specific category. Moving through the Guide is simple: The UP, DOWN, LEFT and RIGHT arrow keys move you through listings and time slots. Highlight a program or channel cell to view its description. Use the CHAN key up or down to scroll a full page. Press the RED or GREEN keys to move forward or back in time. To tune to a program that is on now, highlight the program and press SELECT. Selecting a future program displays program information. Press INFO when you ve highlighted a show in the Guide to view a more in-depth description and options. Pressing INFO when you ve highlighted the channel name displays the channel s listing for up to 7 days. GUIDE GUIDE BACK ACTIVE SELECT MENU LIST INFO Highlight an item by using the arrow keys to move LEFT, RIGHT, UP or DOWN. Press SELECT to access the information or channel. EXIT Press SELECT when you ve highlighted a channel cell (far left) to view that channel in the TV window. Press MENU to see Guide options, change your Favorites list, or jump to a desired date and time. 16
23 Autotune An even better way to catch all your favorites Autotune is a great way to see your favorite programs on your schedule. You won t forget to tune to your favorite team s playoff game because you got distracted. Just set a program to autotune and your DIRECTV Receiver will tune to it automatically when it starts. To schedule a program for autotuning with specific options: 1) Highlight a program that interests you and press INFO. 2) Highlight and select Autotune. A screen is displayed where you can set Autotune options for that program. Follow the onscreen instructions to set the program to autotune as you wish. 3) Select the Set Autotune button, then OK on the confi rmation screen. To schedule a program for autotuning using the default options: 1) Highlight a program that interests you and press ENTER. 2) Press ENTER again to cancel the autotune. If a program you select to autotune confl icts with another program, you will be notified of the confl ict at the time and given a choice of which autotune to cancel. 17
24 Changing Autotune Options/Canceling an Autotune Once you have scheduled a program to autotune, you can change the autotune options or cancel the autotune by selecting the program in the Guide or the To Do List (press LIST); then, select the Autotune item in the left menu, and follow the onscreen instructions to change the program s options or cancel the Autotune completely. For all programs, you can extend Autotune start and stop times (for example, start 1 minute before the program; stop 5 minutes after the scheduled end of the program). Recording to VCR To record a program on your VCR, make sure you ve connected your VCR properly to your DIRECTV HD Receiver, then set up your VCR to record at the same time as a scheduled autotune and you re set. See your VCR User s Guide for information on how to set it up for scheduled or manual recording. Use Autotune to record your favorite shows to your VCR. Important 18 To obtain optimum picture quality, make sure the receiver is connected directly to the TV. Connecting the receiver to the TV through a VCR or DVD recorder is known to yield less than optimum picture quality, particularly when viewing copyprotected programming.
25 Pay Per View The Latest Movies, 24 Hours a Day You don t have to go out for the best and biggest movies and special events! Recent hits and events like sports, comedy and more are available 24 hours a day on DIRECTV Pay Per View. You ll fi nd them listed in the Guide in the 100s. TIP You can also order DIRECTV Pay Per View movies and events on the Internet at DIRECTV.com or over the phone at Keep in mind, though, there is an additional ordering fee for purchases placed over the phone. Tune to a pay per view program or press INFO on a highlighted pay per view program. Select the Buy option and follow the onscreen instructions. As long as your receiver has been connected to a land-based phone line, you can use your remote to order. You can cancel your pay per view order for any reason as long as none of the program has been viewed. Press LIST to display the To Do List. Press SELECT on the Purchase item in the left menu. Select the desired program and follow the onscreen instructions. 19
26
27 Chapter 3 The Menu 22 Using the Menu 22 Help & Settings 24 Audio Options 25 Dolby * Digital 26 Category Sort 26 Pay Per View 27 Search 28 Date & Time 28 Favorites 29 Caller ID & Messages 30 Parental Controls 21
28 Using the Menu Press MENU on your remote to easily access DIRECTV features. Once the Menu is displayed, use the UP and DOWN arrows to highlight a desired menu item, then press SELECT to access that item. Some menu items will display a submenu, others will take you directly to a new screen. To remove the Menu at any time, press MENU again. The features in the Menu change as needed to display only the most helpful features at any time. For example, when the Menu is displayed over the Guide, it displays special features to help you with the Guide. Help & Settings Selecting Help & Settings in the Menu displays a submenu of items that lets you customize, adjust and keep track of your DIRECTV viewing experience. Help The Help item in the Menu displays a list of help topics and Frequently Asked Questions. Setup The Setup item in the Menu displays the Setup screen, where you can access the Info & Test, Satellite Setup, Remote Setup, Audio Setup, Display Setup, Access Card and System Reset screens. Info & Test: The System Info option lets you view the current system information. The System Test 22 option lets you run a test on the tuner, access card, receiver ID and phone line.
29 Satellite: This option is useful if your DIRECTV HD Receiver has lost signal strength, or you need to realign your satellite dish. Remote: Use this option to setup your remote to control your TV and other equipment. Audio: The Audio option in Setup lets you make lasting adjustments to settings such as language, sound effects and Dolby Digital. To make temporary adjustments, use the Audio Options item in the Menu. Display: This option lets you change display settings such as native mode, screen format, bar color, the Channel Banner display time, the language in onscreen menus, time zone (for the clock), captioning and screen centering. TV Type: The TV Type option is where you can set your TV s aspect ratio and resolution. Access Card: Follow the onscreen directions to replace your access card. You will need your old and new access cards to complete this process. (Note: DIRECTV will provide new access cards and instructions when necessary.) Reset: From here you can restart the receiver, reset to factory defaults, or reset everything. Scheduler This feature gives you an overview of and access to all the programs you ve set to Autotune or purchase. 23
30 Favorites Check the current status of your Favorites list(s) by clicking here, and make changes if you like. See page 28 for more details. Parental Controls Check the current restrictions of your Parental Controls by clicking here, and make any adjustments. See page 30 for more details. Audio Options Some programs have alternate audio available (such as other language tracks or Dolby Digital). This option only appears in the Menu over Live TV when the current program has alternate audio. You can set the default so that whenever a program has alternate audio available, it automatically plays this audio, or you can change the alternate audio temporarily for the program you are watching. In either case, press MENU while in Live TV, then: To change the default audio, from the Menu, select Help & Settings, select Setup, then select Audio in the left menu and follow the onscreen instructions. To temporarily change the audio, from the Menu, select Audio Options, then select the audio track you prefer. Once the program is over or you change the channel, the audio will change back to the default setting. 24
31 Dolby * Digital The recommended audio format for HDTV is Dolby Digital. What is 5.1 Audio? It s 5 channels of audio for theater-style sound, plus a subwoofer for heart-pounding bass. Your DIRECTV HD Receiver is capable of reproducing 5.1-encoded audio: five discrete channels of full-range digital audio, plus one channel of low-frequency (subwoofer) audio, for use by A/V receivers capable of decoding the 5.1-channel signal. The audio signals are broken into left-front, center, rightfront, left-rear, right-rear and low-frequency channels. The result, when your DIRECTV HD Receiver is connected to a compatible Dolby Digital A/V receiver and 5.1 channel speaker setup, is an experience that gives you much of the dynamic range, 360-degree imaging and sonic excitement of a real theater. Not all TV programs deliver 5.1 channel signals, and not all programs are broadcast using Dolby Digital for DIRECTV programming. Programs using this high-quality audio standard are indicated by the words Dolby Digital in the program description in the Channel Banner (see page 13) and the Guide (see page 15). To change the Digital Audio format, press MENU, select Help & Settings, then select Setup. Select Audio in the left menu. Highlight the Dolby Digital tab and press SELECT, then follow the onscreen instructions and select from the following options: On: Turns on Dolby Digital audio ouput. (Note: True Dolby Digital is only available via HDMI or optical outputs. Off: Select this option to turn off Dolby Digital Audio output. Note * Dolby and the Double-D symbol are trademarks of Dolby Laboratories. 25
32 Category Sort This feature lets you temporarily arrange the Guide to list only programs in a particular category such as Movies, Sports or News. This option only appears in the Menu over the Guide. While in the Guide, from the Menu, select Category Sort. To further narrow your search, select the category you want, then select a subcategory if you wish. To quickly move through the Category Search results, use the GREEN or RED key on your remote to advance or reverse in 90-minute increments. Press GUIDE to return to the regular Guide, or EXIT to return to live TV. Pay Per View This option enables you to check out DIRECTV Pay Per View listings by category. This option only appears in the Menu over the Guide. While in the Guide, press MENU, then select Pay Per View. You will see three choices for sorting the listings. Choose All to display all current pay per view programs. Movies will give you listings of all current movies available. Pick Special Events to see specific events such as sports, comedy specials and more. The Guide will display only programs that match the selected choice. 26
33 Search Would you like to locate a particular program, movie or sports event you want to see even shows starring a favorite actor, or games with your favorite team? Search offers some easy ways to spot just what you want to watch. Press MENU, then select Search. You can search for a program by Title, Person, Keyword or Channel. Your search will be quicker if you narrow your search by selecting subcategories; just follow the onscreen instructions. Once you ve found a program you re after, all you have to do is highlight and select the title to display when the program is on. If you d like to repeat a previous search, select Recent Searches, then select your search to view matching programs. Note Keep in mind, when you search with Search, only those programs slated to air within the Guide s number of days of programming supported by your receiver will appear on your list. 27
34 Date & Time This option gives you a convenient way to jump several days ahead in the Guide, without having to scroll through pages of programs. Favorites Favorites allows you to set up a special, customized Guide that shows only those channels you choose. So you can have easy access to the channels you like best, or perhaps a grouping of family channels just for the kids. When you re using a Favorites list, the Guide will only display those channels you ve chosen and you ll also only see those channels when you change channels using CHAN UP/DOWN on y ou r r e m ot e. Keep in mind, no matter what Favorites list you re currently using, you can still always access any channel you receive by keying in its channel number on your remote. You can also edit or delete a list at any time by returning to Favorite and editing your list(s). 28
35 Caller ID & Messages This feature lets you receive important messages from DIRECTV about your service. Also, if you have Caller ID service*, you can also view phone calls you ve received or turn call notification on or off. Press MENU to display the Menu, select Caller ID & Msgs, then select Edit Settings. Select either Caller ID or Messages from the left menu, as desired. Caller ID The Call Log tab displays up to 25 recent incoming calls. Highlight and select a name to delete that listing from your log. The Notifi cation tab lets you turn the notification feature on or off. When the Notifi cation option is on, you ll see a notice on your TV screen whenever a call comes in. DIRECTV Messages This feature lets you view a listing of current DIRECTV messages waiting for you. Simply highlight and select a message in the list to read, then you ll have the choice to keep or delete it. The messages icon will appear brightly on your channel banner whenever there s any new or unread message in your Inbox. Note * You must subscribe to Caller ID service through your local telephone company, and your DIRECTV HD Receiver must be connected to a phone line. 29
36 Parental Controls Parental Controls enables parents to place certain restrictions on just who s watching what, and require a passcode to view restricted programming. Whether it s for mature content or spending amounts, you re always able to keep limitations where you want them for the whole family. Press MENU to display the Menu, SELECT Parental, then Edit Settings, and you ll see the current status showing any restrictions. The system default is unlocked for all categories. Adult Channels You can block all adult channels and programs from your receiver so that they do not appear in the Guide or the Scheduler. Once these channels are hidden, they can t be tuned, so it will be as though they don t exist. Select Adult Channels from the left menu, then press SELECT on Hide Adult. Ratings Here you can set rating limits for Movies and TV: 1) SE L E C T Ratings. 2) Highlight the desired tab using the ARROW keys and press SELECT. Note: You can also use RED or GREEN to cycle tabs. Movies Highlight and select the Movies tab, then set the overall rating limit you wish to impose. Brief 30 descriptions of the ratings appear for your guidance. TIP For ratings limits and channel blocks, as well as most other checkbox-type items, pressing SELECT toggles the item on and off when setting them up. SELECT
37 TV Programs SELECT the TV tab, then highlight and select the TV rating you desire. You can also set ratings for particular content (for example, Fantasy Violence, Dialogue), each of which is described when highlighted. Other Shows To block programming that has no rating such as news and sports select the Other tab. Channel Blocks You can block viewing of a certain channel or channels from this menu. SELECT Chan Blocks in the left menu, then scroll down the channel list to SELECT those you wish to block, or key in channel numbers for quicker access. Use Block All or Allow All to save time if you wish to affect a large number of channels. Spending From the left menu, SELECT Spending, then set your preferred spending limit for any single pay per view purchase. Simply key in the amount using the numbers on your remote. Hours From the left menu, SELECT Hours, then set your preferred hours during which TV can be viewed. You can set hours based on school nights and weekend nights Monday through Thursday, Friday through Saturday, or Sunday. 31
38 Now, lock it Once you ve set the restrictions you want, choose Lock Now from the left menu. You ll be directed to create a passcode (which you ll want to make easy enough to remember, but hard enough that the little ones won t guess it!). This passcode will be your entry to unlocking and adjusting limitations in the future. An onscreen message will appear whenever anyone tries to tune to a channel or program that has been restricted, or attempts to spend or watch beyond limitations that have been set. He or she will not be allowed to proceed without the passcode. Using your passcode, you can easily override the limits. Let me in! 32 Temporarily or permanently unlocking a restriction is easy. To temporarily unlock a particular program: 1) When any controls are currently activated, Unlock Now will appear if you try to tune to a restricted program. 2) Select Unlock Now and enter the password. For more unlock options: 1) Pr e s s M E N U, t he n SE L E C T Parental. 2) Various options for removing restrictions temporarily or permanently will appear. Select one and enter your password. TIP The Parental Control icon in the Channel Banner will tell you if the receiver is locked, unlocked, or temporarily unlocked. Locked Unlocked Temporarily Unlocked
39 Note: If you have Parental Controls set and temporarily unlocked, turning the receiver power off will relock the box. Making multiple entries aimed at guessing the passcode is discouraged by a time delay; each invalid passcode entered lengthens the delay for subsequent entry by one second. Don t use obvious numbers, like birthdays or addresses, for your passcode. To change your passcode at any time: 1) Pr e s s M E N U, SE L E C T Parental, then Edit Settings. 2) Scroll down to Passcode and press SELECT. 3) Enter your old password, then enter a new one twice to confi rm. Your kids are smarter than you think. 33
40
41 Chapter 4 36 Troubleshooting 45 Limited 90-Day Warranty 50 Product Information 51 DIRECTV PROTECTION PLAN 53 FCC Customer Information Other Info 35
42 Troubleshooting Many problems can be corrected by performing a simple reset of the DIRECTV HD Receiver. If you experience image freezes, audio freezes or blank screen, or the system won t respond to front panel button or remote control, try one of these: TIP You can find additional troubleshooting help at DIRECTV.com. Press the RESET button behind the access card panel door on the front of the DIRECTV HD Receiver, then wait for program guide information to be acquired. If the problems persist, try unplugging the power cord of the DIRECTV HD Receiver for 15 seconds, then plug it in again. Running the System Test (later in this section) can also help you diagnose and solve many common problems. System Upgrades Your DIRECTV HD Receiver is able to receive upgrades or modifications to some of its features and functions. These modifications will occur automatically, usually at times when the receiver would likely be turned off. If your receiver is on when an upgrade or modification is sent, you may experience a disruption in reception for a minute or two. Your reception should return to normal after the modification is complete. Your receiver must be plugged in to AC power to receive any 36 Note If preferred, you can have an Authorized Service Representative visit your home for a fee, to set up your digital satellite receiver and instruct you on its operation. For details about this service, call DIRECTV or visit DIRECTV.com.
43 upgrades. Do not unplug your receiver while an upgrade is in progress. Please consult the System Info screen to check for an upgrade or modification planned by DIRECTV. Having a problem? Then check the following: 1. Cables and connections 2. MODE switch on your remote 3. Remote batteries 4. TV Input 5. Power Most problems have simple solutions. DIRECTV HD Receiver or TV Problems Progress bar freezes during Satellite Data Acquisition This may be normal. After five minutes, the screen saver is displayed. Press any key on the remote to see the progress bar again. If Satellite Data Acquisition still does not move forward, press the RESET button behind the access panel door on the front of the DIRECTV HD Receiver and wait for program guide information to be acquired. Wrong picture, blue screen, snow or black/blank picture The DIRECTV HD Receiver and most TVs and VCRs let you toggle between video sources. If you don t see the signal you think you should be seeing, try using these buttons to toggle between the signals: Press the TV/VCR button on the VCR remote or on the VCR s front panel. Press the TV INPUT button on the DIRECTV remote control. If problems persist, turn off all equipment that is connected to your TV, wait a few minutes, then turn the DIRECTV HD Receiver back on. Check your connections and cables. 37
44 Problems with Caller ID You must subscribe to Caller ID service through your local phone company. Also, check to be sure your Caller ID feature is turned on (see page 29). If you are plugging your receiver to a wireless phone jack, note that it typically does not transmit Caller ID information and you may need a special wireless phone jack to use with Caller ID service. See the user s manual that came with the wireless phone jack to see if it transmits Caller ID information. If it doesn t, either connect the phone line directly to a standard wall-mount phone jack or install a wireless phone jack that transmits Caller ID information. The Caller ID feature requires you to sign up for Caller ID service with your phone company. DIRECTV HD Receiver will not turn on Check to make sure the power cord is plugged into the DIRECTV HD Receiver and the wall outlet. Check the wall receptacle (or extension cord) to make sure it is live by plugging in something else. Make sure the remote control is on DIRECTV mode, and press PWR (power key). Press DIRECTV & TV POWER ON, then press it a second time if needed. C he c k b a t t e r ie s i n r e m ot e c ont r ol. Be sure remote control is pointed at remote sensor, and front of receiver is not blocked. Unplug the receiver. Wait five minutes. Plug it in again. 38
45 Turns off while playing Electronic protection circuit may have been activated because of a power surge. Wait 30 seconds, then turn on again. Unplug DIRECTV HD Receiver for a few minutes, then plug back in. If this happens frequently, the voltage in your house may be abnormally high or low. Consider using a surge protector or line conditioner. If your TV turns off while playing, and other lights/appliances in your house do too, you may have blown a circuit breaker or be experiencing a power outage. Consult an electrician if the problem is frequent or severe, especially if other household appliances or electronics are affected. You can get a lot of information at our website: DIRECTV HD Receiver turns on or changes channels unexpectedly An Autotune may have been activated. See page 17. Your TV s timer may have been activated. Check your TV owner s manual. directv.com 39
46 Blank screen Check that all components connected to the input jacks are turned on. Try another channel. Your DIRECTV HD Receiver may be hooked up incorrectly to the TV. Press the INFO button on the front panel of the DIRECTV HD Receiver to see if the channel banner appears. If it does not, check the Setup and Connections section for instructions about connecting your satellite receiver. Press the TV INPUT key on the remote to make sure your TV input is set to the TV input your DIRECTV HD Receiver is connected to. Press the POWER button on the front of the DIRECTV HD Receiver. Press the RESET button behind the door on the front panel of the DIRECTV HD Receiver. If you live in a newly built neighborhood, be sure to place your dish where it is unlikely to become blocked by a fast-growing tree. Temporary loss of the satellite signal or Searching for Satellite Signal message Your satellite system may be experiencing rain fade, a temporary loss of the satellite signal due to unusually heavy rain clouds or rainfall. Rain fade is usually brief, lasting only as long as the heavy rain cloud condition persists. Your dish may be blocked. Check that something is not blocking the dish. 40
47 Partial programming loss/channels missing from the Guide/channel is in the Guide but can t tune to Your satellite dish antenna may be incorrectly configured. Check the dish type set in your receiver s preferences and change if necessary. Press the MENU key on the remote control, then select Help & Settings, then Setup. In the next menu, select Satellite, then Repeat Satellite Dish Setup. Follow the steps. From the Satellite Dish Type screen, make sure the proper dish type is selected (round, oval with a dual LNB or oval with a triple LNB, or a 5 LNB dish). The channels might be excluded from the Favorites list currently in use. Press MENU on the remote, select Favorites, then All Channels, or enter the channel number manually. My video and audio are out of sync. Try changing channels. Press LIST, then EXIT. When all else fails, press the RESET button. If neither of those work, restart your DIRECTV HD Receiver. Press the RESET button behind the access panel door on the front of the DIRECTV HD Receiver. You can also press MENU, press SELECT on Help & Settings, then SELECT Setup. Select the Reset item from the left menu and follow the onscreen instructions. My DIRECTV HD Receiver is frozen on a single frame of a TV picture. If you are on a Pay Per View channel, watching the free portion of a program, the free portion may be completed. You must buy the program to continue watching. If that doesn t work, restart your DIRECTV HD Receiver. Press the RESET button behind the access panel door on the front of the DIRECTV HD Receiver. You can also press MENU, press SELECT on Help & Settings, then SELECT Setup. Select the Reset item from the left menu, then press SELECT on Restart Receiver. 41
48 Remote Control Problems P r o b l e m s w it h t h e r e m o t e c o nt r o l Check that nothing is between the remote control and the remote sensor. Make sure the remote control is in DIRECTV mode. Slide the MODE switch on the remote to the DIRECTV position so the remote will control the DIRECTV HD Receiver. Check the batteries in the remote control. They may be weak, dead or installed incorrectly. Try replacing batteries. If you re entering a channel number that is less than four digits long, the receiver might wait two seconds before tuning to the channel. Press ENTER after entering a channel number to tune immediately. If you are trying to operate a device other than the DIRECTV HD Receiver that you have programmed the remote to control, make sure you fi rst slide the MODE switch to the mode that is programmed for that device (AV1 or AV2). The indicator light for the component you re trying to control should light up when you press a valid key for that component. If it doesn t, make sure the MODE switch is in the correct position. With proper care and fresh batteries, the only problem you should have with the remote is remembering where you left it. A remote control indicator light starts flashing. The batteries in the remote control are running low and should be replaced soon. You may also see an onscreen message that the batteries are low. Note that when you replace the batteries, you should not have to reprogram your remote to control other devices unless the batteries have been completely dead for a month or more. 42
49 If none of the preceding tips helped solve your issues, the System Test may help to figure things out. Fine-Tuning the Signal If you self-installed your satellite dish antenna, you may have already used the Satellite Setup section of Guided Setup to fi nd the dish-pointing coordinates, acquire and fi ne-tune the signal and run a system test. If you need to run Satellite Setup again, press MENU. Select Help & Settings from the Menu, then select S e t u p. When the System Setup screen is displayed, press SELECT on Satellite in the left menu, then select the Repeat Satellite Setup button. Running the System Test The System Test allows you to run a basic diagnostics check on your DIRECTV HD Receiver. If you are experiencing any trouble with your receiver, run the system test. It will also allow you to get your access card and receiver ID numbers or to initiate diagnostic procedures on your digital satellite receiver. First make sure that: All connections jacks, cables, etc. are in place correctly (see Appendix A, Installation, for more information) There are batteries in the remote control, and they are working correctly The access card is installed in the DIRECTV HD Receiver. Follow these steps to run the diagnostics system test on your DIRECTV HD Receiver. 1) Turn on your TV and the DIRECTV HD Receiver. 2) Slide the mode switch to the DIRECTV position to put the remote control in satellite receiver-controlling mode, then press MENU to display the Menu. 3) Select Help & Settings. 4) Select S e t u p, then Info & Test. 5) Highlight the System Test tab and press SELECT, then press SELECT on Run Test. 43
Safety & Care. Safety & Care
 Safety & Care WARNING To reduce the risk of fire or electric shock, do not expose this product to rain or moisture. The apparatus shall not be exposed to dripping or splashing and that no objects filled
TIP. We highly recommend plugging the DIRECTV Receiver into a surge protector to prevent damage from fluctuations in your power supply.
 Safety & Care Your DIRECTV HD Receiver has been designed and manufactured to stringent quality and safety standards. You should, however, be aware of the following important precautions for safe and optimal
DIRECTV Plus HD DVR USER GUIDE
 DIRECTV Plus HD DVR USER GUIDE Great TV viewing is in your hands! A good way to begin learning about your DIRECTV System is to familiarize yourself with the remote control. You ll find further details
Welcome to the DIRECTV Family
 Welcome to the DIRECTV Family Safety & Care WARNING To reduce the risk of fire or electric shock, do not expose this product to rain or moisture. The apparatus shall not be exposed to dripping or splashing
DIRECTV RECEIVER USER GUIDE
 DIRECTV RECEIVER USER GUIDE WARNING: To reduce the risk of fire or electric shock, do not expose this product to rain or moisture. The apparatus shall not be exposed to dripping or splashing and no objects
DIRECTV RECEIVER USER GUIDE
 Great TV viewing is in your hands! A good way to begin learning about your DIRECTV System is to familiarize yourself with the remote control. You ll fi nd further details throughout the User Guide relating
User Guide DIRECTV Plus Receiver
 User Guide DIRECTV Plus Receiver Safety & Care WARNING To reduce the risk of fire or electric shock, do not expose this product to rain or moisture. The apparatus shall not be exposed to dripping or splashing
Important Safety Instructions
 Safety & Care Your DIRECTV Plus HD DVR has been designed and manufactured to stringent quality and safety standards. You should, however, be aware of the following important precautions for safe and optimal
HD Digital Set-Top Box Quick Start Guide
 HD Digital Set-Top Box Quick Start Guide Eagle Communications HD Digital Set-Top Box Important Safety Instructions WARNING TO REDUCE THE RISK OF FIRE OR ELECTRIC SHOCK, DO NOT EXPOSE THIS PRODUCT TO RAIN
Evolution Digital HD Set-Top Box Important Safety Instructions
 Evolution Digital HD Set-Top Box Important Safety Instructions 1. Read these instructions. 2. Keep these instructions. 3. Heed all warnings. 4. Follow all instructions. 5. Do not use this apparatus near
CAUTION RISK OF ELECTRIC SHOCK NO NOT OPEN
 Evolution Digital HD Set-Top Box Important Safety Instructions 1. Read these instructions. 2. Keep these instructions. 3. Heed all warnings. 4. Follow all instructions. 5. Do not use this apparatus near
Welcome to NEED HELP? DIRECTV offers the best entertainment experience. Use this guide to make the most of it LKR FCC ID : ORS
 NEED HELP? Important Tips Do not unplug your receiver If you unplug it you may miss the most recent updates that improve our service. The DIRECTV receiver is designed to consume very little energy while
CHAPTER 6 - SETTINGS & HELP
 CHAPTER 6 - SETTINGS & HELP Settings... 84 Info & Test...84 Display...84 Audio...88 Network Setup...88 Remote Control...89 Satellite...90 Whole-Home...91 Power Saving...91 Reset...92 Parental Controls...
2.0 Wall Mount TV Soundbar Instruction Manual
 8010275 2.0 Wall Mount TV Soundbar Instruction Manual Read all of the instructions before using this soundbar and keep the manual in a safe place for future reference. Safety Information CA UT IO N RISK
Welcome to W light up your life
 USER GUIDE 1 Welcome to light up your life Dear Vision Communications Customer, Thank you for choosing LightWave TV from Vision. LightWave TV will open a whole new world of TV entertainment for you and
HD Digital MPEG2 Encoder / QAM Modulator
 HD Digital MPEG2 Encoder / QAM Modulator HDMI In QAM Out series Get Going Guide ZvPro 800 Series is a one or two-channel unencrypted HDMI-to-QAM MPEG 2 Encoder / QAM Modulator, all in a compact package
HD Digital MPEG2 Encoder / QAM Modulator
 HD Digital MPEG2 Encoder / QAM Modulator YPrPb VGA In QAM Out series Get Going Guide ZvPro 600 Series is a one or two-channel Component or VGA-to-QAM MPEG 2 Encoder/ Modulator, all in a compact package
USER GUIDE DIRECTV HD DVR RECEIVERS
 USER GUIDE DIRECTV HD DVR RECEIVERS When you see the ENERGY STAR label on your set-top box, it means that your set-top box is ENERGY STAR qualified, giving you the benefit of saving energy and helping
Satellite Receiver User s Guide
 Satellite Receiver User s Guide GRD33G3A We bring good things to life. SAFETY INFORMATION WARNING To reduce risk of fire or shock hazard, do not expose this receiver to rain or moisture. WARNING RISK OF
USER GUIDE DIRECTV HD DVR RECEIVERS. Downloaded from manuals search engine
 USER GUIDE DIRECTV HD DVR RECEIVERS When you see the ENERGY STAR label on your set-top box, it means that your set-top box is ENERGY STAR qualified, giving you the benefit of saving energy and helping
DVR RECEIVERS USER GUIDE DIRECTV PLUS DVR DIRECTV PLUS HD DVR. Downloaded from manuals search engine
 DVR RECEIVERS USER GUIDE DIRECTV PLUS DVR DIRECTV PLUS HD DVR When you see the ENERGY STAR label on your set-top box, it means that your set-top box is ENERGY STAR qualified, giving you the benefit of
HD Digital MPEG2 Encoder / QAM Modulator Get Going Guide
 series HD Digital MPEG2 Encoder / QAM Modulator Get Going Guide HDb2640 HDb2620 HDb2540 HDb2520 The HDbridge 2000 Series is a combination HD MPEG 2 Encoder and frequency-agile QAM Modulator, all in a 1RU
DIRECTV Multi-Satellite Receiver SIR-S60W. Owner s Manual
 DIRECTV Multi-Satellite Receiver SIR-S60W Owner s Manual Warning! Important Safety Instructions CAUTION RISK OF ELECTRIC SHOCK DO NOT OPEN CAUTION: TO REDUCE THE RISK OF ELECTRIC SHOCK, DO NOT REMOVE COVER
Notices. Safety and Care. Important Safety Instructions CAUTION RISK OF ELECTRIC SHOCK DO NOT OPEN WARNING:
 Owner s Manual Notices WARNING: To reduce the risk of fi re or electric shock, do not expose this product to rain or moisture. The apparatus shall not be exposed to dripping or splashing and that no objects
SATELLITE RECEIVER USER'S GUIDE
 SATELLITE RECEIVER USER'S GUIDE Safety Information WARNING To reduce risk of fire or shock hazard, do not expose this receiver to rain or moisture. WARNING RISK OF ELECTRIC SHOCK DO NOT OPEN TO REDUCE
The Parts of The System
 2 The Parts of The System THE RECEIVER FRONT PANEL UP DOWN POWER SMART CARD DOOR Behind this door is a slot for a future smart card. No smart card is included with this receiver. UP AND DOWN ARROW BUTTONS
Introduction. Important Safety Instructions
 Introduction Congratulations on purchasing your Eviant Portable Digital TV. On June 12, 2009 the conversion to digital television broadcasting will be complete all throughout the United States and Puerto
DIRECTV GENIE & EARLIER HD DVR RECEIVERS
 P.O. Box 1079 El Segundo, CA 90245 DIRECTV GENIE & EARLIER HD DVR RECEIVERS When you see the ENERGY STAR label on your set-top box, it means that your set-top box is ENERGY STAR qualified, giving you the
Installation Manual VIP 1003
 Installation Manual VIP 1003 We Caring for the Environment by Recycling When you see this symbol on a Motorola product, do not dispose of the product with residential or commercial waste. Recycling your
ATTACHING & REMOVING THE BASE
 TV53DB ATTACHING & REMOVING THE BASE 1. To install or remove the neck, screw in or remove the 4 screws indicated in the picture. 2. To install the base, place the display unit flat on a table. Afterwards
INSTALLATION MANUAL VIP 1903 / VIP 1903 T VIP 1963 / VIP 1963 T
 INSTALLATION MANUAL VIP 1903 / VIP 1903 T VIP 1963 / VIP 1963 T We Declaration of Conformity Motorola Mobility, Inc. 101 Tournament Drive Horsham Pennsylvania 19044 USA declare under our sole responsibility
To reduce the risk of fire or electric shock, do not expose this appliance to rain or moisture.
 ATTENTION SYMBOLS, WARNING SYMBOLS, AND GRAY BOXES You must be aware of safety when you install and use this system. This User Guide provides various procedures. If you do some of these procedures carelessly,
USER S MANUAL SATELLITE RECEIVER DRD203RW. What is the DSS System?...3. Using the Program Guide...6. Using the Menu System...10
 DRD203RW USER S MANUAL What is the DSS System?...3 Using the Program Guide...6 Using the Menu System...10 Using On-line Help...14 Major Features...16 Setting Up the Remote...36 Connecting the Receiver..42
P.O. Box 1079 El Segundo, CA USER GUIDE DIRECTV GENIE & EARLIER HD DVR RECEIVERS
 P.O. Box 1079 El Segundo, CA 90245 USER GUIDE DIRECTV GENIE & EARLIER HD DVR RECEIVERS The ENERGY STAR label on your set-top box means it is ENERGY STAR qualified, delivering energy-saving benefits and
Quick Reference TV guide. Getting Started. with Cogeco Digital TV.
 Quick Reference TV guide Getting Started with Cogeco Digital TV. Welcome to Cogeco Digital TV At Cogeco, we put you first in everything we do. Our goal is to give you a TV experience unlike any other from
ZvBox 150. HD video distribution over COAX Get Going Guide
 ZvBox 150 HD video distribution over COAX Get Going Guide ZvBox 150 is an HD MPEG 2 Encoder and frequency agile QAM Modulator. It allows you to convert any HD video source, Component or RGB (VGA), in real
ZVOX AccuVoice TV Speaker Model AV203
 ZVOX AccuVoice TV Speaker Model AV203 SETUP & OPERATION www.zvoxaudio.com 2 ZVOX AccuVoice TV Speaker Setup & Operation READ THIS FIRST Important Safety Instructions For ZVOX Audio System WARNING TO PREVENT
ZVOX AccuVoice TV Speaker Model AV203
 ZVOX AccuVoice TV Speaker Model AV203 SETUP & OPERATION www.zvoxaudio.com READ THIS FIRST Important Safety Instructions For ZVOX Audio System WARNING TO PREVENT FIRE OR SHOCK HAZARD, DO NOT EXPOSE THIS
Standard Digital Terminal High-Definition Digital Terminal. User Guide
 Standard Digital Terminal High-Definition Digital Terminal User Guide ILL-GDA-STD-001-0709 IN THIS GUIDE IMPORTANT RULES FOR SAFE OPERATION... 4 AVAILABLE ILLICO TERMINALS... 5 REMOTE CONTROLS... 17 CONNECTIONS...
DSS Receiver User s Manual
 DSS Receiver User s Manual Safety Information WARNING To reduce risk of fire or shock hazard, do not expose this receiver to rain or moisture. WARNING RISK OF ELECTRIC SHOCK DO NOT OPEN TO REDUCE THE RISK
IMPORTANT SAFETY INSTRUCTIONS
 IMPORTANT SAFETY INSTRUCTIONS 1. Read, follow and keep these instructions safely. 2. Heed all warnings. 1. Do not use this apparatus near water. 2. Clean only with dry cloth. 3. Do not block any ventilation
 Register your product and get support at www.philips.com/welcome SWS3435S/27 SWS3435H/37 EN User manual Contents 1 Important 4 Safety 4 English 2 Your SWS3435 6 Overview 6 3 Installation 7 Connect the
Register your product and get support at SDV5122/27. EN User manual
 Register your product and get support at www.philips.com/welcome SDV5122/27 User manual Contents 1 Important 4 Safety 4 Notice for USA 5 Notice for Canada 5 Recycling 6 English 2 Your SDV5122 7 Overview
Passport Player Owner s Manual
 Passport Player Owner s Manual Passport_manual_Rev1_1.indd 1 Contents Welcome.......................................................... 1 What s in the box?.......................................................
Check our knowledge base at
 USER MANUAL Check our knowledge base at www.paralinx.net/support Copyright 2015 Paralinx LLC All Rights Reserved TABLE OF CONTENTS 1 Important Notice 10 LCD Screen 2 Safety Instructions 11 Indicators 3
55" Curved Ultra HD LED TV User s Guide for Model TU5587B v For the most up-to-date version of this User s Guide, go to
 55" Curved Ultra HD LED TV User s Guide for Model TU5587B v1922-01 For the most up-to-date version of this User s Guide, go to www.gpx.com Safety Instructions & Warnings CAUTION RISK OF ELECTRIC SHOCK
User s Reference Manual
 A22 User s Reference Manual The Power of i. 1 5 6 6 6 7 7 9 10 10 11 12 13 13 15 17 17 18 18 18 18 20 20 21 21 21 21 22 23 Table of Contents Welcome Digital Cable Box (Set-Top Box) Motorola DCT6208 Recording
USER GUIDE. Get the most out of your DTC TV service!
 TV USER GUIDE Get the most out of your DTC TV service! 1 800-367-4274 www.dtccom.net TV Customer Care Technical Support 615-529-2955 615-273-8288 Carthage Area Carthage Area 615-588-1277 615-588-1282 www.dtccom.net
E325 Series User Guide
 E325 Series User Guide PACKAGE CONTENTS SCEPTRE Display x 1 Display Base x 1 Thick Threaded Screws x 3 Thin Threaded Screws x 4 Circular Metal Plate x 1 Black Plastic Ring x 1 Power Cord x 1 (Attached)
E246 Series User Guide
 E246 Series User Guide PACKAGE CONTENTS SCEPTRE Display x 1 Display Base x 1 Display Neck x 1 Screws x 6 (ST3 x 10mm) Warranty Card x 1 Power Cord x 1 (Attached) Display Remote Control (AAA Batteries included)
User Manual High Definition Digital Set Top Box DVBT9070 Please read this User Manual carefully to ensure proper use of this product and keep this man
 User Manual High Definition Digital Set Top Box DVBT9070 Please read this User Manual carefully to ensure proper use of this product and keep this manual for future reference. Important Safety Instructions
PACE DC700X SET-TOP CUSTOMER SERVICE AND INSTALLATION GUIDE
 PACE DC700X SET-TOP CUSTOMER SERVICE AND INSTALLATION GUIDE Manufactured under license from Dolby Laboratories. Dolby and the double-d symbol are trademarks of Dolby Laboratories. This product incorporates
Wilkes Repair: wilkes.net River Street, Wilkesboro, NC COMMUNICATIONS
 1 Wilkes COMMUNICATIONS 336.973.3103 877.973.3104 Repair: 336.973.4000 Email: wilkesinfo@wilkes.net wilkes.net 1400 River Street, Wilkesboro, NC 28697 2 Table of Contents REMOTE CONTROL DIAGRAM 4 PLAYBACK
Full High Definition LCD TV USER MANUAL
 1080p3 LCD TV Full High Definition LCD TV 1080p3 USER MANUAL Important Safety Precautions Important Safety Precautions 1 CAUTION RISK OF ELECTRIC SHOCK DO NOT OPEN This symbol indicates important instructions
Q-TV2. User Manual. for Screens
 Q-TV2 User Manual for 30-42 Screens Contents Introduction 02 Safety Guidelines 03 Getting started 03 Potential Uses 04 Carton Contents 05 Q-TV2 Controls 05 Remote Fixings 06 Fixing Rails 07 Fitting Q-TV2
BOCS Media Hub. Installation & Usage Manual
 BOCS Media Hub Installation & Usage Manual Important Safety Instructions: 1) Read these instruction 2) Keep these instructions 3) Heed all warnings 4) Follow all instructions 5) Do not use this apparatus
HDMI 5x1 Switch B-240-HDSWTCH-5X1 INSTALLATION MANUAL
 HDMI 5x1 Switch B-240-HDSWTCH-5X1 INSTALLATION MANUAL IMPORTANT SAFETY INSTRUCTIONS To reduce the risk of fire or electric shock, read and follow all instructions and warnings in this manual. Keep this
CONNECTION GUIDE HD TERMINAL MULTI-ROOM HD PVR MULTI-ROOM HD PVR 8X
 CONNECTION GUIDE HD TERMINAL MULTI-ROOM HD PVR MULTI-ROOM HD PVR 8X TNV-GDB-ILLX8-45833-1408 TABLE OF CONTENTS Welcome...3 Activation...4 Your Terminal...5 Connection...8 Your Remote Control...9 Programming
4 PORT HDMI SWITCH
 4 PORT HDMI SWITCH 1518896 IMPORTANT SAFEGUARDS OF HDMI SWITCH PRODUCTS PLEASE READ CAREFULLY THE FOLLOWING SAFEGUARDS THAT ARE APPLICABLE TO YOUR EQUIPMENT 1. Read instructions - All the safety and operating
HD709N INSTRUCTIONS MANUAL IPTV MEDIA PLAYER.
 INSTRUCTIONS MANUAL IPTV MEDIA PLAYER www.zaaptv.com 2. Contents 1. Cover 1 2. Contents 2 3. Safety Information 3 4. Device Introduction 7 5. Connecting your Device 10 6. Setting up your Device 11 7. Basic
User Manual. High Definition Digital Set Top Box HDSTB250
 User Manual High Definition Digital Set Top Box HDSTB250 CHANNEL HDSTB250 Please read this User Manual carefully to ensure proper use of this product and keep this manual for future reference. Important
YOUR GUIDE TO LUS FIBER VIDEO & WHOLE HOME DVR POWERED BY MICROSOFT MEDIAROOM TM
 Welcome to television reinvented with the city s only 100% fiber optic network YOUR GUIDE TO LUS FIBER VIDEO & WHOLE HOME DVR POWERED BY MICROSOFT MEDIAROOM TM 1 Watch what 100% fiber optic video can do
CFT2200. User Guide 0(18 6(/(&7 (17(5 92/80( &+$11(/ ( 6 6 $ * ( 6
 CFT2200 User Guide 0 ( 6 6 $ * ( 6 0(18 6(/(&7 (17(5 92/80( &+$11(/ &$87,21 5,6.Ã2)Ã(/(&75,&Ã6+2&. &$87,21 75('8&(Ã7+(Ã5,6.Ã2)Ã(/(&75,&Ã6+2&. '127Ã5(029(Ã&29(5Ã25Ã%$&. 186(56(59,&($%/(Ã3$576Ã,16,'( 5()(5Ã6(59,&,1*Ã748$/,),('Ã6(59,&(Ã3(56211(/
DM-1CH SD DVB-T MODULATOR INSTRUCTION MANUAL
 DM-1CH SD DVB-T MODULATOR INSTRUCTION MANUAL 2. Caution Statements and Table of Contents Table of Contents 2. Caution Statements and Table of contents 3. Important Safety Instructions 4. Important Safety
HR20QSG0806!HR20QSG0806! 2006 DIRECTV, Inc. Directv, the Cyclone Design logo and the DIRECTV Plus logo are trademarks of DIRECTV, Inc.
 HR20QSG0806!HR20QSG0806! 2006 DIRECTV, Inc. Directv, the Cyclone Design logo and the DIRECTV Plus logo are trademarks of DIRECTV, Inc. Welcome to the DIRECTV Plus HD DVR. Now that you re plugged in, it
Reference WIRING THE SYSTEM TOGETHER. Page 4-1 TWO OR MORE RECEIVERS
 4 Reference WIRING THE SYSTEM TOGETHER TWO OR MORE RECEIVERS Each output on the LNBF can support a single receiver. You cannot connect two receivers to the same output (for example, by using a line splitter),
Operating Instructions
 Operating Instructions SDI Input board Model No. AV-HS04M1 РУССКИЙ FRANÇAIS DEUTSCH ENGLISH ESPAÑOL ITALIANO Before operating this product, please read the instructions carefully and save this manual for
Digital Video User s Guide THE FUTURE NOW SHOWING
 Digital Video User s Guide THE FUTURE NOW SHOWING Welcome The NEW WAY to WATCH Digital TV is different than anything you have seen before. It isn t cable it s better! Digital TV offers great channels,
28 4K LED monitor. User Manual M284K
 28 4K LED monitor User Manual M284K CONTENTS Safety Information... 2 What s included..... 4 Getting Started....... 8 Troubleshooting.... 14 Specification.... 15 2 of 15 SAFETY INFORMATION Read these instructions
TELEVISION. Entertainment Plans. Interactive Guide and DVR (Digital Video Recorder) Manual ARVIG arvig.net
 Manual ARVIG arvig.net") TELEVISION Entertainment Plans Interactive Guide and DVR (Digital Video Recorder) Manual 888.99.ARVIG arvig.net . TABLE OF CONTENTS Interactive Guide Remote Control... 3 Changing the Channel... 4 Picture-In-Picture
TELEVISION Entertainment Plans Interactive Guide and DVR (Digital Video Recorder) Manual 888.99.ARVIG arvig.net . TABLE OF CONTENTS Interactive Guide Remote Control... 3 Changing the Channel... 4 Picture-In-Picture
U65 Series User Guide
 U65 Series User Guide IMPORTANT SAFETY INSTRUCTIONS Electricity is used to perform many useful functions, but it can also cause personal injuries and property damage if improperly handled. This product
passport guide user manual
 passport guide user manual Copyright 2011 Rovi Corporation. All rights reserved. Rovi and the Rovi logo are trademarks of Rovi Corporation. Passport is a registered trademark of Rovi Corporation and/or
Receiver Description and Installation
 The Receiver Front Panel Smart Card Door Behind this door is a slot for a future smart card. No smart card is included with this receiver. Info Button Press the INFO button to see information about a program
BEVCOMM. Control Your Remote. Setup Use for programming sequences of devices controlled by the remote.
 B Contents Your Interactive Program Guide 4 Guide Symbols: Quick Menu Options 5 Search Categories and Listings 6 Program Information 7 Reminders 8 Mini Guide 9 Parental Controls 10 Favorites 11 Setup 12
Digital Video User s Guide THE FUTURE NOW SHOWING
 Digital Video User s Guide THE FUTURE NOW SHOWING Welcome The NEW WAY to WATCH Digital TV is different than anything you have seen before. It isn t cable it s better! Digital TV offers great channels,
Congratulations on purchasing your Eviant Portable Digital TV.
 Introduction Congratulations on purchasing your Eviant Portable Digital TV. On June 12, 2009 the conversion to digital television broadcasting will be complete all throughout the United States and Puerto
2.4 GHz WIRELESS VIDEO SENDER SYSTEM MODEL: VS6234
 2.4 GHz WIRELESS VIDEO SENDER SYSTEM MODEL: VS6234 Please read this manual thoroughly before operating this system OPERATING INSTRUCTIONS 03/02 1 SAFETY INSTRUCTIONS CAUTION! RISK OF ELECTRIC SHOCK. DO
USER GUIDE Pace RNG150N / RNG200N
 USER GUIDE Pace RNG150N / RNG200N BRINGING TECHNOLOGY HOME www.pace.com CONTENTS This guide covers both the RNG150N and the RNG200N set-tops. They are very similar, but the RNG200N has an internal hard
VIZIO. QUICK START GUIDE Model: E390-B1
 VIZIO QUICK START GUIDE Model: E390-B1 IMPORTANT SAFETY INSTRUCTIONS Your TV is designed and manufactured to operate within defined design limits. Misuse may result in electric shock or fire. To prevent
Safety Instructions Power Source Warning
 Safety Instructions This product has been engineered and manufactured to assure your personal safety. However, improper use can result in potential electric shock or fire hazards. In order not to defeat
TelergyT-503. User s Guide. How to use this T-503 set-top box
 TelergyT-503 User s Guide How to use this T-503 set-top box IMPORTANT SAFETY INSTRUCTIONS Read and follow these instructions. Heed all warnings. Do not use this apparatus near water. Clean only with dry
PARENTAL CONTROLS RATINGS LIMITS CHAPTER 6 - SETTINGS & HELP. Movies. TV Programs. Other Shows
 RATINGS LIMITS PARENTAL CONTROLS Set rating limits for Movies, TV and Other (unrated) shows. From the left menu, select Rating Limits then select either Movies, TV or Other. Movies Select the button next
VIZIO. QUICK START GUIDE Model: E500i-B1E
 VIZIO QUICK START GUIDE Model: E500i-B1E IMPORTANT SAFETY INSTRUCTIONS Your TV is designed and manufactured to operate within defined design limits. Misuse may result in electric shock or fire. To prevent
E405 Series User Guide
 PACKAGE CONTENTS E405 Series User Guide SCEPTRE Display x 1 Display Base x 1 Display Neck Thick Threaded Screws (ST4x14mm) x 4 Plastic Ring x 1 Metal Plate x 1 Warranty Card x 1 Display Remote Control
VIZIO. QUICK START GUIDE Models: E420i-A0
 VIZIO QUICK START GUIDE Models: E420i-A0 IMPORTANT SAFETY INSTRUCTIONS Your TV is designed and manufactured to operate within defined design limits. Misuse may result in electric shock or fire. To prevent
Disclaimer. Trademarks. Copyright. Contact Us Control4 Corporation S. Election Road Salt Lake City, UT USA
 Disclaimer Trademarks Copyright Control4 makes no representations or warranties with respect to this publication, and specifically disclaims any express or implied warranties of merchantability or fitness
User Manual of digital Set Top Box PAT1 02
 User Manual of digital Set Top Box PAT1 02 Please read this User Manual carefully to ensure proper use of this product and keep this manual for future reference. Important Safety Instructions 1) Read these
GET STARTED. For assistance, call us on or visit manhattan-tv.com/help
 GET STARTED For assistance, call us on 020 8450 0005 or visit manhattan-tv.com/support Check Freeview HD coverage in your area by visiting freeview.co.uk For assistance, call us on 020 8450 0005 or visit
freesat HD Digital Satellite Receiver The default password is User s Manual FOXSAT-HD
 freesat HD Digital Satellite Receiver The default password is 0000. FOXSAT-HD Notice Thank you for purchasing a HUMAX product. Please read this user s manual carefully to be able to safely install, use
QUICK-START GUIDE LET S JUMP RIGHT IN
 QUICK-START FEATURES GUIDE LET S JUMP RIGHT IN TABLE OF OF CONTENTS INTRODUCING Introduction Page TV Basics Pages 4-6 Remote Control Map Turning Your TV and Receiver On and Off Changing Channels: Remote
Table of contents. Important safety instructions... 2 Introduction... 3 SECTION 1 - Your new terminal DCX700. Favourites Guide reminder...
 Table of contents Important safety instructions... 2 Introduction... 3 SECTION 1 - Your new terminal DCX700 Front panel... 4 Rear panel... 4 DCX3200 Front panel... 5 Rear panel... 6 DCX3400 Recording capacity...
LED TV MODEL NO.: NE22K5BG. Please read this manual carefully before installing and operating the TV. Keep this manual handy for further reference
 LED TV USER MANUAL MODEL NO.: NE22K5BG IMPORTANT Please read this manual carefully before installing and operating the TV. Keep this manual handy for further reference Table Of Contents Preparations Guide
OWNER'S MANUAL MODEL: DTV-2000 STANDBY/ON
 OWNER'S MANUAL MODEL: DTV-2000 STANDBY/ON CH+ CH- TABLE OF CONTENTS SAFETY PRECAUTIONS IMPORTANT SAFETY INSTRUCTIONS and FEATURES ACCESSORIES and LOADING BATTERIES REMOTE CONTROL UNIT FRONT PANEL and REAR
X50 Series User Guide
 X50 Series User Guide IMPORTANT SAFETY INSTRUCTIONS Electricity is used to perform many useful functions, but it can also cause personal injuries and property damage if improperly handled. This product
Digital Video User s Guide
 Digital Video User s Guide THE Future now showing www.ntscom.com Welcome the new way to watch Digital TV is TV different than anything you have seen before. It isn t cable it s better. Digital TV offers
VIZIO. QUICK START GUIDE Models: E480i-B2 & E550i-B2
 VIZIO QUICK START GUIDE Models: E480i-B2 & E550i-B2 IMPORTANT SAFETY INSTRUCTIONS Your TV is designed and manufactured to operate within defined design limits. Misuse may result in electric shock or fire.
HDBaseT RECEIVER B-540-RX-330-IR INSTALLATION MANUAL
 HDBaseT RECEIVER B-540-RX-330-IR INSTALLATION MANUAL IMPORTANT SAFETY INSTRUCTIONS To reduce the risk of fire or electric shock, read and follow all instructions and warnings in this manual. Keep this
VIZIO. QUICK START GUIDE Model: E600i-B3
 VIZIO QUICK START GUIDE Model: E600i-B3 IMPORTANT SAFETY INSTRUCTIONS Your TV is designed and manufactured to operate within defined design limits. Misuse may result in electric shock or fire. To prevent
USER GUIDE Pace TDC788D
 USER GUIDE Pace TDC788D BRINGING TECHNOLOGY HOME www.pace.com CONTENTS SAFETY INFORMATION...3 REAR PANEL...6 CONNECTING THE EQUIPMENT...7 Setup A - Home theater system with HDTV (HDMI connection)...8 Setup
Monitor Display and Media Box...3 Media Box Front Panel...4 Media Box Back Panel...5 Using the Monitor s Inputs...7 Using the Remote Control...
 fety Table of Contents Safety...iii Introduction...1 Monitor Description...3 Monitor Display and Media Box...3 Media Box Front Panel...4 Media Box Back Panel...5 Using the Monitor s Inputs...7 Using the