Radio receiver EXL. 4-channel / up to 1000 memory locations. Mounting and operating instructions for qualified electricians
|
|
|
- Stephany Manning
- 6 years ago
- Views:
Transcription
1 Radio receiver EXL 4-channel / up to 1000 memory locations Mounting and operating instructions for qualified electricians Please keep these instructions so that you have them available if you have any questions later. Not designed for passing on to end customers (users)! Operating instructions must be prepared for the user for "his application". A handover document or acceptance certificate must be prepared. Potential hazards must be pointed out. Operation and maintenance must be explained. Always read before initial operation! G:\TechDoku\Betriebsanleitungen\Arbeitsordner-Vorlagen\EXL\ _EXL_EN_ doc 1 / 15
2 Contents Radio receiver EXL... 1 Mounting and operating instructions for qualified electricians... 1 Contents... 2 Safety instructions... 3 Work on the receiver... 3 Mounting, installation, commissioning and maintenance:... 3 Mounting and operation... 3 Mounting instructions... 4 Storage and transport conditions... 4 Abbreviations used in the instructions... 4 Connections... 4 Scope... 6 Functions... 7 Modes of operation... 7 Technical data... 8 Switch-on signal on the receiver... 9 Programming... 9 Reception Blocking / releasing stations / memory locations Delete Deleting an individual memory location Deleting a complete channel Deleting the whole receiver External input Time function Programming the time function Deleting the time function RS232 serial interface Notes on the operating instructions Replacing the radio module Diagram index Block diagram G:\TechDoku\Betriebsanleitungen\Arbeitsordner-Vorlagen\EXL\ _EXL_EN_ doc 2 / 15
3 Safety instructions Disregarding these safety instructions can lead to personal and property damage! Work on the receiver Switch off the supply voltage! Only switch the voltage on again after you have checked all the connections again. Mounting, installation, commissioning and maintenance: These instructions require specialist knowledge which requires vocational training and qualification in at least one of the following professions: - Electrical fitter - Electrical system fitter - Electrical machine fitter - Electrician - Industrial electrician or knowledge as a qualified electrician in compliance with the German accident prevention regulation BGV A2 (VBG 4). Mounting and operation Reliable operation is only possible following careful mounting according to these instructions. This remote control is only approved for use with devices and systems where a functional problem in the transmitter or receiver does not result in a personal or property hazard or this risk is covered by other safety equipment. The remote control of devices and systems which involve an increased risk of accident (e.g. crane systems) is prohibited! Observe locally applicable regulations. Heed accident prevention regulations, VDE and EVU regulations. Information can be obtained from power stations, VDE and employers' liability insurance companies. Reliable operation is only possible following careful mounting according to these instructions. No technical modifications may be carried out. Any change will result in a loss of liability and warranty. Care must be taken that grounding is in line with ESD requirements during all work on the control unit. Otherwise the control unit could become damaged or destroyed. New goods or repairs may only be dispatched when respective protective measures have been taken (e.g. do not use normal plastic films!). Otherwise the warranty shall be lost. Static charging and discharging must be avoided. G:\TechDoku\Betriebsanleitungen\Arbeitsordner-Vorlagen\EXL\ _EXL_EN_ doc 3 / 15
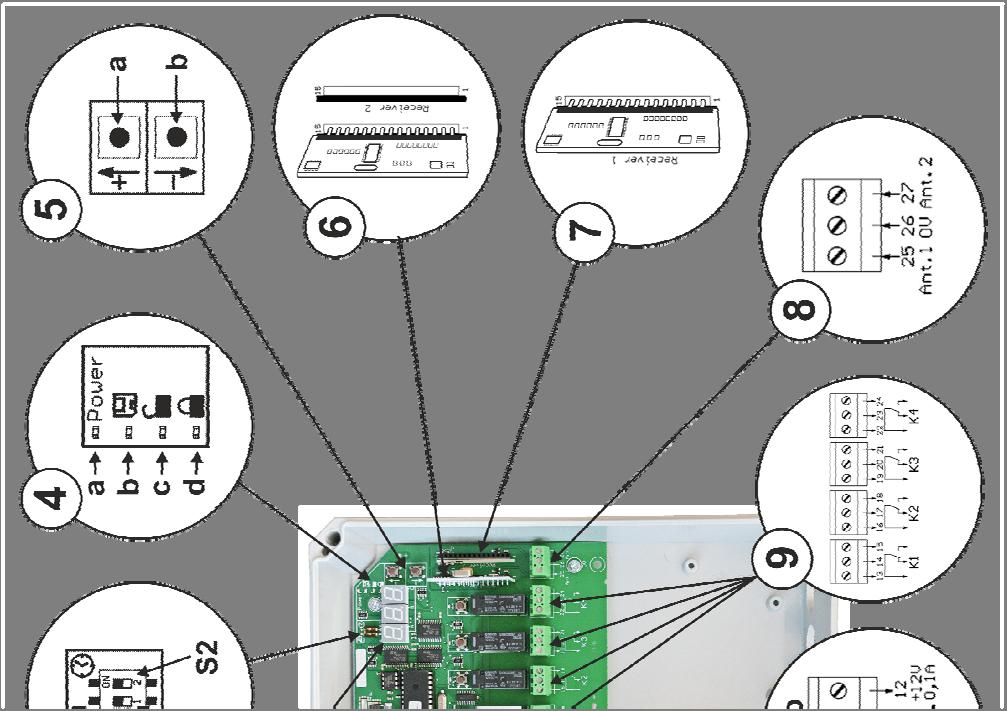
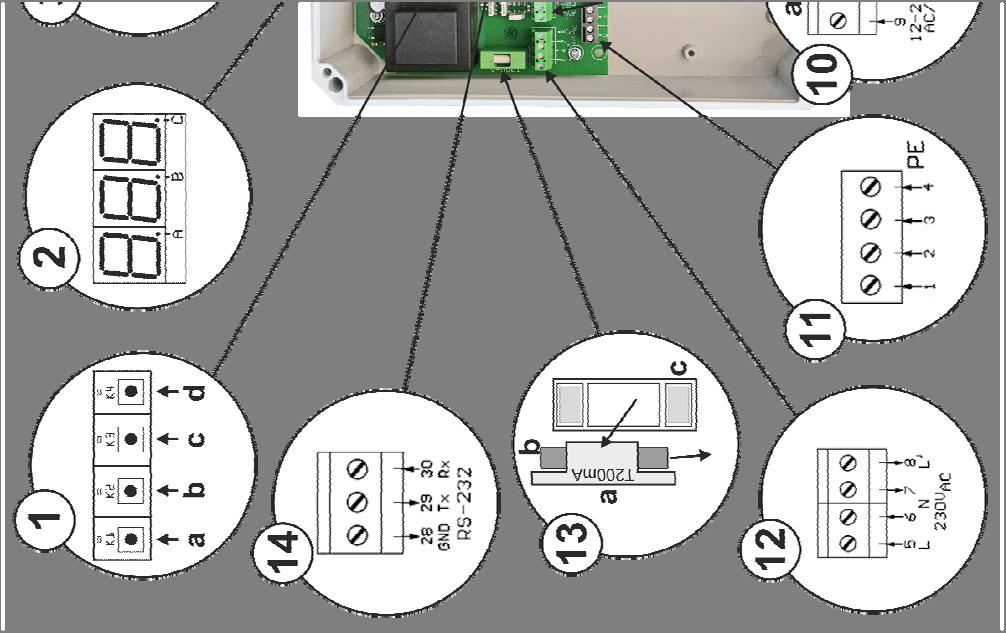
4 Mounting instructions Disregarding these mounting instructions can lead to personal and property damage! Increased inner temperature through direct sun radiation reduces service life. Water or insects inside the control unit lead to failure or destruction To avoid damage to the receiver: Protect the control unit from influences of the weather. Only mount with housing. Only use existing attachment bore holes in the housing. To prevent housing deformation and leaks, mount on a flat surface, only tighten screws moderately. Mount in an upright position, cable feed from below. Open the self-sealing grommet using a round screwdriver. Do not cut open with a blade! Maintenance: The receiver is maintenance-free. The housing must not be opened by the end customer (loss of warranty) Storage and transport conditions Disregard can lead to failure, even after initial operation! Store dry, dust-free and secure against impact and falling. Storage temperature -25 C C at 30 %...60 % rel. humidity. Transport only with sufficient and well-padded additional packaging. The existing packaging is not designed as transport packaging. Damage caused by disregard is not covered by the warranty! Abbreviations used in the instructions [1]...[15] = Refers to an illustration in the diagram index [REC1] = 15-pole slot for radio module 1 [6] [REC2] = 15-pole slot for radio module 2 [7] [Kl.1]..[Kl.30] = Refers to connection terminals [15] [Ta.+] = Key + on the operating panel next to the 7-segment display [5a] [Ta.-] = Key - on the operating panel next to the 7-segment display [5b] [Ta.K1] = Key K1 for channel 1 [1a] [Ta.K2] = Key K2 for channel 2 [1b] [Ta.K3] = Key K3 for channel 3 [1c] [Ta.K4] = Key K4 for channel 4 [1d] [LED.K1] = LED for status display channel 1 [1a] [LED.K2] = LED for status display channel 2 [1b] [LED.K3] = LED for status display channel 3 [1c] [LED.K4] = LED for status display channel 4 [1d] Connections All connections must be made in accordance with the circuit diagram [15] and taking the technical data into consideration. Work on the control unit may only be carried out with the device voltagefree and grounded in line with ESD requirements! G:\TechDoku\Betriebsanleitungen\Arbeitsordner-Vorlagen\EXL\ _EXL_EN_ doc 4 / 15
5 230V mains voltage can be present at [Kl.5]..[Kl.10]. Risk of fatal injury! Never switch mains voltage to [Kl.11] / [Kl.12] and [Kl.25].. [Kl.30]! If this is disregarded, the control unit will be destroyed immediately and the warranty loses its validity! All the connection cables to [Kl.9]..[Kl.30] must not exceed a max. length of 30 m! [Kl.1]..[Kl.4] Protective earth conductor (PE) Internally connected to the protective earth conductor wiring [Kl.5] + [Kl.6] Mains voltage 230V / AC Terminal 5 = L-conductor Terminal 6 = N-conductor The safety conditions valid on site or the valid VDE regulations must be kept. [Kl.7] + [Kl.8] Mains output 230V / AC Terminal 7 = N-conductor (connected internally directly with [Kl.6]) Terminal 8 = L-conductor, via internal fuse Si1, T200mA This output is used to supply consumers which are switched via the receiver. [Kl.9] + [Kl.10] External input V / AC / DC Terminal 9, terminal 10 = Internally dc-insulated via optocoupler. Potential-free to mains and low voltage. The applied voltage provokes the same reaction as pressing a key on a handheld transmitter. [Kl.11] + [Kl.12] Low voltage 12V / DC Terminal 11 = 0V (ground) Terminal 12 = +12V DC, stabilised, max. 0.1A, internal self-resetting fuse This output is used to supply consumers which are switched via the receiver. [Kl.13], [Kl.14], [Kl.15] Relay output channel 1 Terminal 13 = changeover Terminal 14 = relay break contact (normally closed contact) Terminal 15 = relay make contact (normally open contact) Potential-free relay output Switching power see Technical Data G:\TechDoku\Betriebsanleitungen\Arbeitsordner-Vorlagen\EXL\ _EXL_EN_ doc 5 / 15
6 [Kl.16], [Kl.17], [Kl.18] Relay output channel 2 Terminal 16 = changeover Terminal 17 = relay break contact (normally closed contact) Terminal 18 = relay make contact (normally open contact) Potential-free relay output Switching power see Technical Data [Kl.19], [Kl.20], [Kl.21] Relay output channel 3 Terminal 19 = changeover Terminal 20 = relay break contact (normally closed contact) Terminal 21 = relay make contact (normally open contact) Potential-free relay output Switching power see Technical Data [Kl.22], [Kl.23], [Kl.24] Relay output channel 4 Terminal 22 = changeover Terminal 23 = relay break contact (normally closed contact) Terminal 24 = relay make contact (normally open contact) Potential-free relay output Switching power see Technical Data [Kl.25], [Kl.26], [Kl.27] Aerial connection Terminal 25 = Aerial for receiver 1 (radio module [REC1]) Terminal 26 = 0V, shield Terminal 27 = Aerial for receiver 2 (radio module [REC2]) Connection of wire aerial or coax-cable [Kl.28], [Kl.29], [Kl.30] Serial interface RS-232 Terminal 28 = GND (0V) Terminal 29 = Tx (transmit) Terminal 30 = Rx (receive) For more details see Operation with PC in these instructions Scope A wide range of versatile applications result from the 4 potential-free relay outputs, one universal input (12-250V AC / DC) for external keys and up to 1000 radio memory locations. The receiver is suitable as a multi-purpose remote control for electrical consumers in the private or industrial sector, e.g. access control for underground car parks or campsites without safety function. The remote control of devices with safety function (crane systems) is not permitted! G:\TechDoku\Betriebsanleitungen\Arbeitsordner-Vorlagen\EXL\ _EXL_EN_ doc 6 / 15
7 Functions Radio codes that can be used: 12-bit dual code 18-bit tri-state KeeLoq with manufacturer code. Further coding according to agreement Supply voltage 230V AC, 50Hz Individual programming / deletion of memory locations Individual blocking / release of memory locations Switch-off timer 1s 999s, can be programmed for each of the 4 channels 4 Light emitting diodes [LED.K1]...[LED.K4] for channel display [1] 2 keys [Ta. +] and [Ta. -] for selecting memory location [5] 3-digit 7-segment LED display for indicating memory location [2] Special functions: surge current, specific on and off switchable via DIP switch 2 x 15-pole. socket strip for radio modules [6], [7] 3-pole threaded terminal for aerial connection radio modules [8] Multi-purpose input ( V, AC/DC) [10a] internally dc-insulated, can be programmed for external key like transmitter key, but only at memory location E_0 12V DC output, [10b] max. 0.1A (resetting fuse), can be switched to external input via bridge. RS232 interface [14] for logging and remote control via a Windows-PC. Status display via LEDs: Power,[4a] Memory location assignment,[4b] cleared [4c] and blocked [4d] Modes of operation Pulse mode: Surge current: Specific on/off: The output switches as long as the transmitter key selected is actuated. The state of the output changes every time the transmitter key is actuated. A transmitter key is assigned the function on or off. Special functions: surge current, specific on and off switchable via DIP switch G:\TechDoku\Betriebsanleitungen\Arbeitsordner-Vorlagen\EXL\ _EXL_EN_ doc 7 / 15
8 Technical data Parameter Symbol Limits Unit Test condition Min. Typ. Max. Voltage supply Mains voltage U Netz V AC To terminals 5 / 6 at rest/under full load Mains frequency f Netz / Hz Internal logic voltage U V 4,8 5,0 5,2 V Current consumption standby operation I R-Netz ma No radio module, standby operation, no load Current consumption max. I L-Netz ma 2 radio modules, K1-K4 active, load 12V Power consumption P Prim 4,5 5,5 VA Primary, incl. 1 radio module, standby operation Start time voltage / 1st start t Start 7 8 U Netz = 230V AC Inputs External output not actuated U Inp-0 0,0 3,0 V To terminals 9 / 10 External input actuated (AC) U Inp-1-AC 9, V To terminals 9 / 50 Hz External input actuated (DC) U Inp-1-DC 8, V To terminals 9 / 10 Ext. input input current (AC) I Inp-1-AC 3,8 5,0 ma To terminals 9 / 230V AC Ext. input input current (DC) I Inp-1-DC 0,4 0,5 ma To terminals 9 / 24V DC Ext. input debouncing t Inp ms Outputs Power 230V output P VA To terminals 7 / 8 Voltage 12V output U 12V 12 V AC Full load / standby operation Current 12V output I 12V 100 ma To terminals 11 / 12 Switching voltage K1...K4 U K1-K4 250 V AC Switching current K1...K4 I K1-K4 8 A AC With Ohmic load Switching current K1...K4 I K1-K4 4 A AC With inductive load Reaction time radio output t Funk 0,15 1,0 s Actuation radio until reaction K1...K4 RS232-interface Baud rate bps Data bit 8 Stop bit 1 Parity None Max. cable length 100 m Cable type: min. 3-pole, shielded Radio Radio modules that can be used Dickert pin assignment, 15-pole socket strip Programmable stations n Sendertasten 1000 Qty Transmitter keys (keys!) Coding system None 12-bit dual, 18-bit tri-state, KeeLoq Environmental conditions Operating temperature T Betr C Inside the housing, normal installation position Storage temperature T Lag C Relative air humidity RH % No condensation permitted! PCB Controller frequency f Cont 20,000 MHz Length L LP 137 mm Width B LP 164 mm Height H LP 38 mm Weight m LP 405 g Incl. radio module, no further plug-in cards Housing Length L Geh 175 mm Without cable entry Width B Geh 175 mm Height H Geh 76 mm Weight m Geh 820 g Incl. electronics Material ABS, self-extinguishing Protective rating IP54 Connection terminals Mains connection 4 mm² Fixed threaded terminals Low voltage 4 mm² Plug-in screw-type terminals G:\TechDoku\Betriebsanleitungen\Arbeitsordner-Vorlagen\EXL\ _EXL_EN_ doc 8 / 15
9 Fuses Si1 T V AC Melt fuse 5x20 mm Si2 m LP 150mA 12 V DC self-resetting Switch-on signal on the receiver Display: all LEDs and 7-segment display switch on, [1], [2], [4a - 4d] 7-segment display shows software version first (e.g.: 013), = V1.3 then the occupied memory locations (e.g.: 000) [2] Then all the LEDs go off, only the Power LED remains on. [4a] [LED.K1]...[LED.K4] indicate the switching status of the respective channel. Programming Press [Ta. K1] [Ta. K4] 1x briefly for the respective channel [1a-1d] Pulse mode: [LED.K1] [LED. K4] flashes 1x, pause, 1x,... Special functions: Put DIP switch S1 into ON position: [3] Type of operation Pulse Surge current Specific on Specific off Programming Press the programming key 1x briefly Press transmitter key for 3 s Press the programming key 2x briefly Press the transmitter key for 3 s Press the programming key 3x briefly Press the transmitter key for 3 s Press the programming key 4x briefly Press the transmitter key for 3 s LED display flashes 1x pause - flashes 1x flashes quickly flashes 2x pause - flashes 2x flashes quickly flashes 3x pause - flashes 3x flashes quickly flashes 4x pause - flashes 4x flashes quickly Display comes on, indicates the next possible free memory location, starting from 000. [2] Memory location can be changed manually using [Ta.+] / [Ta. -] (only free locations are displayed) [5a/b] Yellow LED memory : Memory location is free [4b] Only the external input can be programmed to memory location E_0! E_0: Press [Ta. -] 1x until E_0 appears on the display If [Ta. +] / [Ta. -] is pressed permanently: Fast run-through of the memory locations. [5a/b], [2] Press transmitter key or external input [10a] After programming has been completed, the respective [LED.K1]...[LED.K4] will flash quickly The number of the memory location lights up permanently as long as the transmitter key or external input is being pressed. LED [4b] goes off and LED [4c] appears Then the number of the next free memory location appears (can be changed using [Ta.+] / [Ta. -]) G:\TechDoku\Betriebsanleitungen\Arbeitsordner-Vorlagen\EXL\ _EXL_EN_ doc 9 / 15
10 The receiver remains in programming mode for the respective channel or channels for another 30s. This means that several transmitter keys can be programmed in succession for the same function without pressing keys on the receiver. End programming mode (only after the word End has appeared in the display for 3s): No more free memory or... Press [Ta.+] as long as required until the last free memory location is displayed (display no longer increases), then release [Ta.+] and press again 1x, display changes to End Put the programming mode for all channels to 0 by pressing [Ta.K1] [Ta.K4] >30s no new programming command and no transmitter key actuation If the set memory location number changes when the station key is pressed, this means that this transmitter key has already been programmed to another memory location. The previously occupied memory location (no matter whether released or blocked) is overwritten with the new function and is then released. Each transmitter key always retains the assigned memory location number! Each transmitter key can only occupy one memory location. Reception If a released transmitter key is received: The respective channel LED [LED.K1]...[LED.K4] flashes quickly as long as a radio signal is being received Green LED released lights up for 3s [4c] Display of memory location number lights up for 3s in the display [2] If a blocked transmitter key is received: The channel LED [LED.K1]...[LED.K4] flashes quickly as long as a radio signal is being received. Display of memory location number in the display [2] Red LED blocked flashes quickly [4d] Display goes off 3 seconds after reception Blocking / releasing stations / memory locations Press [Ta.+] or [Ta. -] [5a/b] The last memory location used / programmed is shown on the display [2] Use [Ta.+] or [Ta. -] to choose the required memory location (only the occupied memory locations are shown) Green LED active on: The respective memory location is released. [4c] Red LED blocked is on: The respective memory location is blocked.[4d] Brief simultaneous actuation (<3s) of the keys [Ta.+] and [Ta. -] switches between released and blocked. [5a/b] The display goes off after 30 seconds without a key being actuated [2] If ALL is selected as memory location number, (press [Ta. -] until ALL appears on the display) all the memory locations are released or blocked. [2] G:\TechDoku\Betriebsanleitungen\Arbeitsordner-Vorlagen\EXL\ _EXL_EN_ doc 10 / 15
11 Delete Deleting an individual memory location Press [Ta.+] or [Ta. -] [5a/b] The last memory location used / programmed appears on the display [2] Use [Ta.+] or [Ta. -] to choose the required memory location. (only the occupied memory locations are shown) When the keys [Ta.+] and [Ta. -] are pressed simultaneously (>3s) the yellow memory LED flashes, after a further 5s the yellow memory LED stays on permanently.[4b].[4c or. 4d ] gone out Now release [Ta.+] or [Ta. -], the memory location is deleted. Deleting a complete channel Keep the programming key [Ta.K1]... [Ta.K4] for the required channel permanently pressed. The LED for this channel will flash quickly after 3s. [LED K1]... [LED K4] The display shows CH1... CH4 (Channel) for the respective channel [2] After a further 5s the flashing stops, all stations of this channel have now been deleted. Now release the programming key [Ta.K1]... [Ta.K4] Deleting the whole receiver Press [Ta.+] or [Ta. -] [5a/b] The last memory location used / programmed appears on the display Use [Ta. -] to select ALL When the keys [Ta.+] and [Ta. -] are pressed simultaneously (>3s) the yellow memory LED flashes, after a further 5s the yellow memory LED goes out.[4b] (4c and/or 4d also go out) Now release [Ta.+] and [Ta. -], the whole receiver is deleted. External input [10a] Potential-free input (optocoupler) input voltage for actuation (ON) V AC/DC To be programmed like transmission key, but only to memory location E_0! ( ALL -> E_0 -> 000 -> 001 etc.) Reaction only to increasing flank (application of voltage). G:\TechDoku\Betriebsanleitungen\Arbeitsordner-Vorlagen\EXL\ _EXL_EN_ doc 11 / 15
12 Time function A time can be programmed for each channel. In the operating modes pulse, current surge and specific on the channel switches off automatically after the respective time has expired. Programming the time function Program the transmission key or input normally Switch S2 ( ) to ON [3] Press the programming key [Ta.K1] [Ta.K4] for the desired channel 1x [1a-d] In the display, 060 appears for time function = 60 seconds, adjustable with [Ta.+] / [Ta. -] from , i.e. max. ca. 17 minutes. [5a/b] Switch S2 to OFF, time is blocked for this channel. [3] After receiving a station or input, the memory location number appears for 3s when the time function has been programmed, then the time countdown. 7- segment display flashes. [LED.K1]... [LED.K4] of the channels affected flashes in step with the 7- segment display. Deleting the time function Switch S2 ( ) to ON [3] Press the programming key [Ta.K1] [Ta.K4] for the desired channel 1x [1a-d] Switch the display value to 000 using [Ta. -].[5b] Switch S2 to OFF, time is deleted for this channel. [3] When deleting a channel or the whole receiver, the time functions are automatically deleted at the same time. RS232 serial interface Output of the following data to a PC: Radio reception: memory location number and channel number Programming: memory location number, channel number, serial number and function Activate / deactivate memory locations Delete memory locations Program a time function / delete a time function Reception of the following commands from a PC: Status query Read-out of all memory locations (for data backup) Delete one / all memory locations Activate / release memory location Program / delete time automatically Release programming mode Switch on channel Switch off channel G:\TechDoku\Betriebsanleitungen\Arbeitsordner-Vorlagen\EXL\ _EXL_EN_ doc 12 / 15
13 Notes on the operating instructions The programming / deletion of transmitter keys may only be carried out by authorised persons (e.g. caretaker)! For this reason, the receiver must be mounted in an inaccessible spot! The remote control of devices with safety function (crane systems) is not permitted! Care must be taken that grounding is in line with ESD requirements during all work on the control unit. Otherwise the control unit could become damaged or destroyed. New goods or repairs may only be dispatched when respective protective measures have been taken (e.g. do not use normal plastic films!). Otherwise the warranty shall be lost. Static charging and discharging must be avoided. Replacing the radio module If problems should occur in the frequency range used, the receiver can be converted to a different frequency by replacing the radio module. The transmitter and radio module must have the same frequency and the same modulation e.g. AM or FM. Switch operating voltage off! (wait about 30s) Pull the radio module carefully out of the plug-in socket. [6/7] Insert the radio module with the required frequency in the right way round, heed the printing on the PCB. Left slot for receiver 1 Right slot for receiver 2 Switch operating voltage on again. Delete radio Program new transmitters. G:\TechDoku\Betriebsanleitungen\Arbeitsordner-Vorlagen\EXL\ _EXL_EN_ doc 13 / 15


14 Diagram index G:\TechDoku\Betriebsanleitungen\Arbeitsordner-Vorlagen\EXL\ _EXL_EN_ doc 14 / 15
15 Block diagram G:\TechDoku\Betriebsanleitungen\Arbeitsordner-Vorlagen\EXL\ _EXL_EN_ doc 15 / 15
Industriefunkuhren. Technical Manual. IRIG-B Generator-Module for analogue / digital Signals of Type: IRIG-B / IEEE C / AFNOR NF S87-500
 Industriefunkuhren Technical Manual IRIG-B Generator-Module for analogue / digital Signals of Type: IRIG-B / IEEE C37.118 / AFNOR NF S87-500 Module 7628 ENGLISH Version: 02.01-06.03.2013 2 / 20 7628 IRIG-B
Operating Manual (Edition 04/2004) sinamics. Line Reactors SINAMICS G130
 sinamics. Line Reactors SINAMICS G130") Operating Manual (Edition 04/2004) sinamics Line Reactors SINAMICS G130 Contents 1. Safety Information 2 2. General 5 3. Mechanical Installation 6 4. Electrical Installation 8 5. Technical Specifications
Operating Manual (Edition 04/2004) sinamics Line Reactors SINAMICS G130 Contents 1. Safety Information 2 2. General 5 3. Mechanical Installation 6 4. Electrical Installation 8 5. Technical Specifications
Instructions for Use P.154-UP (9/4) P.155-UP (9/8) P.150-UP-12 (9/12) P.150-UP-16 (9/16)
 P.155-UP (9/8) P.150-UP-12 (9/12) P.150-UP-16 (9/16)") Satellite multiswitch Instructions for Use P.154-UP (9/4) P.155-UP (9/8) P.150-UP-12 (9/12) P.150-UP-16 (9/16) EMP-CENTAURI is a registered trademark Dear Customer, Thank you for buying the EMP-Centauri
Satellite multiswitch Instructions for Use P.154-UP (9/4) P.155-UP (9/8) P.150-UP-12 (9/12) P.150-UP-16 (9/16) EMP-CENTAURI is a registered trademark Dear Customer, Thank you for buying the EMP-Centauri
HDBaseT EXTENDER B-540-EXT-230-RS INSTALLATION MANUAL
 EXTENDER B-540-EXT-230-RS INSTALLATI MANUAL IMPORTANT SAFETY INSTRUCTIS To reduce the risk of fire or electric shock, read and follow all instructions and warnings in this manual. Keep this manual for
Instructions for Use P.160-AP-8 (13/8) P.160-CP-8 (13/8) P.160-CP-12 (13/12) P.160-CP-16 (13/16)
 P.160-CP-8 (13/8) P.160-CP-12 (13/12) P.160-CP-16 (13/16)") Satellite multiswitch Instructions for Use P.160-AP-8 (13/8) P.160-CP-8 (13/8) P.160-AP-12 (13/12) P.160-CP-12 (13/12) P.160-AP-16 (13/16) P.160-CP-16 (13/16) EMP-CENTAURI is a registered trademark Dear
Satellite multiswitch Instructions for Use P.160-AP-8 (13/8) P.160-CP-8 (13/8) P.160-AP-12 (13/12) P.160-CP-12 (13/12) P.160-AP-16 (13/16) P.160-CP-16 (13/16) EMP-CENTAURI is a registered trademark Dear
Rack mounted telephone- and leased line modem for industrial applications
 Rack mounted telephone- and leased line modem for industrial applications TR-6 Rack modem for industrial PSTNand /-wire leased line applications The TR-6 is an analogue V. 9 -rack PSTN modem as well as
HDBaseT RECEIVER B-540-RX-330-IR INSTALLATION MANUAL
 HDBaseT RECEIVER B-540-RX-330-IR INSTALLATION MANUAL IMPORTANT SAFETY INSTRUCTIONS To reduce the risk of fire or electric shock, read and follow all instructions and warnings in this manual. Keep this
SINAMICS G130. dv/dt filter plus Voltage Peak Limiter. Operating Instructions 03/2013 SINAMICS
 SINAMICS G130 Operating Instructions 03/2013 SINAMICS s dv/dt filter plus Voltage Peak Limiter Safety information 1 General 2 SINAMICS SINAMICS G130 Operating Instructions Mechanical installation 3 Electrical
AK-PVE4 Operating Instructions. Measuring of norm signals in wall-type units. Performance:
 AK-PVE4 Operating Instructions Measuring of norm signals in wall-type units 1 2 P Performance: Digit heights: 20 mm Colour: red Display range: -999 9999 Wall-type housing: light grey made of ABS-plastic
DLP200M 2 Relay Module for Heating and Cooling Plants
 Product Sheet TH6.24 Thermostat Type DLP200M DLP200M 2 Relay Module for Heating and Cooling Plants The DLP 200 M is a relay module for activation of loads (namely thermal actuators or circulators) in wireless
HDBaseT RECEIVER B-520-RX-330-IR INSTALLATION MANUAL
 HDBaseT RECEIVER B-520-RX-330- INSTALLATION MANUAL IMPORTANT SAFETY INSTRUCTIONS To reduce the risk of fire or electric shock, read and follow all instructions and warnings in this manual. Keep this manual
LED MODULES READYLINE DL
 LED MODULES READYLINE DL BUILT-IN MODULE LED-MODULE READYLINE DOWNLIGHT DL WU-M-538 / WU-M-539 / WU-M-540 Typical Applications Downlights Replacement for CFL DIRECT MAINS CONNECTION REDUCED FLICKER HIGH
Product information. Front-door station series with video for surface-mount
 Product information Front-door station series with video for surface-mount series VPES series VPDS 2 05/2006 Table of contents Scope of delivery...3 Safety notices...3 General notes on the cabling in TCS
User Manual. HDBaseT Wallplate Transmitter over Cat6/6A. Front View Panduit Dr, Tinley Park, IL (708)
") User Manual HDBaseT Wallplate Transmitter over Cat6/6A Front View 18900 Panduit Dr, Tinley Park, IL 60487 (708) 532-1800 Back View TABLE OF CONTENTS Introduction 2 Features 3 Package Contents 3 Technical
User Manual HDBaseT Wallplate Transmitter over Cat6/6A Front View 18900 Panduit Dr, Tinley Park, IL 60487 (708) 532-1800 Back View TABLE OF CONTENTS Introduction 2 Features 3 Package Contents 3 Technical
User Manual CC DC 24 V 5A. Universal Control Unit UC-1-E. General Information SET. Universal Control Unit UC-1 Of Central Lubrication PAUSE CONTACT
 Universal Control Unit UC-1-E User Manual General Information Universal Control Unit UC-1 Of Central Lubrication CC DC 24 V 5A / M 15 SL /MK 31 M Z 30 General Information Contents Universal Control Unit
HDBaseT RECEIVER B-520-RX-230-IR INSTALLATION MANUAL
 HDBaseT RECEIVER B-520-RX-230-IR INSTALLATION MANUAL IMPORTANT SAFETY INSTRUCTIONS To reduce the risk of fire or electric shock, read and follow all instructions and warnings in this manual. Keep this
DLP600M 6+1 Relay Module for Heating and Cooling Plants
 Product Sheet TH6.25 Thermostat Type DLP600M DLP600M 6+1 Relay Module for Heating and Cooling Plants The DLP 600 M is a relay module for activation of loads (namely thermal actuators or circulators) in
ACTIVE IF SPLITTER/COMBINER UHP-IFS
 ACTIVE IF SPLITTER/COMBINER UHP-IFS GENERAL DESCRIPTION AND INSTALLATION GUIDE DOCUMENT RELEASE 2 [UHP.IFS.2.EN] JUNE 2016 CONTENT Acronyms and Abbreviations... 4 Introduction... 5 Required level of qualification...
Operating instructions
 108183 2017-05-17 Page 1 0359 Operating instructions TPPL-EX series Hazardous environments luminaires Please read the instructions carefully before starting any works! Content: 1. Safety instructions 2.
EC5415B. B-Tronic EasyControl. Assembly and Operating Instructions. Wall/hand-held transmitter, 15-channel, bidirectional
 B-Tronic EasyControl EC5415B en Assembly and Operating Instructions Wall/hand-held transmitter, 15-channel, bidirectional Important information for: Fitters / Electricians / Users Please forward accordingly!
(1) (2) (3) Bedienungs- und Montageanleitung. Safety instructions. Structure of the device
 (2) (3) Bedienungs- und Montageanleitung. Safety instructions. Structure of the device") 3 x cinch/s-video socket Order no. 33 1532 xx USB/3.5 mm audio socket Order no. 33 1539 xx VGA socket Order no. 33 1540 xx VGA socket with screw-in lift terminals Order no. 33 1541 xx High definition socket
3 x cinch/s-video socket Order no. 33 1532 xx USB/3.5 mm audio socket Order no. 33 1539 xx VGA socket Order no. 33 1540 xx VGA socket with screw-in lift terminals Order no. 33 1541 xx High definition socket
User Manual. HDBaseT Receiver CMHDBTBRX. Front View Panduit Dr, Tinley Park, IL (708)
") User Manual HDBaseT Receiver CMHDBTBRX Front View 18900 Panduit Dr, Tinley Park, IL 60487 (708) 532-1800 Back View TABLE OF CONTENTS Introduction 2 Features 3 Package Contents 3 Technical Specifications
User Manual HDBaseT Receiver CMHDBTBRX Front View 18900 Panduit Dr, Tinley Park, IL 60487 (708) 532-1800 Back View TABLE OF CONTENTS Introduction 2 Features 3 Package Contents 3 Technical Specifications
LINK-RAY TM MODULATORS FOR CONSTANT- VOLTAGE. LinkRay Modulators 12 V / 24 V Constant-voltage Applications MODULATORS
 MUSIUM RESTAURANT SOUVENIR SHOP EXIT LinkRay Modulators 12 V / 24 V Constant-voltage Applications LINK-RAY TM MODULATORS FOR CONSTANT- VOLTAGE LINK-RAY TM MODULATORS FOR CONSTANT-VOLTAGE APPLICATIONS 186755
EGE-IR Bi-directional Infrared Matrix
 DISCLAIMERS The information in this manual has been carefully checked and is believed to be accurate. Geratech assumes no responsibility for any infringements of patents or other rights of third parties
Broadcast A/V Division VAC-HT12-KIT. 4K/UHD/HD/SD HDBaseT Extender Kit Video, Power, and Control over one CAT cable. User Manual
 Broadcast A/V Division VAC-HT12-KIT 4K/UHD/HD/SD HDBaseT Extender Kit Video, Power, and Control over one CAT cable User Manual Table of Contents Introduction... 3 Features... 3 Package Contents... 3 Specifications...
PRO-CoaxExt HDMI extender over Coaxial cable with bi-directional IR User s Guide
 HDMI extender over Coaxial cable with bi-directional IR User s Guide Transmitter Receiver Made in Taiwan Congratulations for owning a gofanco product. Our products aim to meet all your connectivity needs
TRF STEP-DOWN TRANSFORMER USER MANUAL
 TRF STEP-DOWN TRANSFORMER USER MANUA www.ventilation-system.com 2013 ! WARNING The present operation manual consisting of the technical details, operating instructions and technical specification applies
Simply clever! The digital DIN-rail time switches by Grässlin
 Simply clever! The digital DIN-rail time switches by Grässlin talento pro Trends and developments on the market. Maximum energy efficiency at low efforts In a saturated fast-moving market, the trend towards
Marshall Electronics. Broadcast A/V Division VAC-HT12-KIT. 4K HDBaseT Extender Kit. User Manual
 Marshall Electronics Broadcast A/V Division VAC-HT12-KIT 4K HDBaseT Extender Kit User Manual VAC-HT12-KIT Manual Table of Contents Introduction... 3 Features... 3 Package Contents... 3 Specifications...
Guide for installers. METTLER TOLEDO MultiRange System solution analog Ex1. Hazardous area. Safe area
 Guide for installers METTLER TOLEDO MultiRange System solution analog Ex1 Hazardous area Safe area System solution analog Ex1 Contents Contents Page 1 Safety precautions... 2 2 System overview... 3 2.1
Sensor module. Safety instructions. Function Correct use. Product characteristics. Structure of the device. Operation. Ref.No.
 Sensor module Ref.No.: SM 1608 V03 Safety instructions Caution! Electrical devices may only be installed and fitted by electrically skilled persons. Non-compliance with the installation information could
MICROMASTER Encoder Module
 MICROMASTER Encoder Module Operating Instructions Issue 01/02 User Documentation Foreword Issue 01/02 1 Foreword Qualified Personnel For the purpose of this Instruction Manual and product labels, a Qualified
User Manual Entry Line Industrial Fast Ethernet Switch 4x 10/100Base-TX, 1x 100Base-X Fiber Port 4x PoE+ up to 30W
 User Manual Entry Line Industrial Fast Ethernet Switch 4x 10/100Base-TX, 1x 100Base-X Fiber Port 4x PoE+ up to 30W Entry Line Fast Ethernet Switch Fast Ethernet Switch with PoE+ for Industrial Use Page
VGA to DVI Extender over Fiber SET
 VGA to DVI Extender over Fiber SET Model #: FO-VGA-DVI 2011 Avenview Inc. All rights reserved. The contents of this document are provided in connection with Avenview Inc. ( Avenview ) products. Avenview
Standard signal metering in wall-mounting case
 User manual AKV-2VR4C Standard signal metering in wall-mounting case Technical features: Digit height: 20 mm Colour: red Range of display: -999 9999 Wall-mounting case: black, made of ABS-plastic Protection
LONWORKS Fibre Optic Converter
 LONWORKS Fiber Optic Converter LRW-102 and LRW-102/PP LONWORKS to fibre optic link, multidrop and redundant ring applications The LRW-102 is a fibre optic modem designed for multidrop and redundant ring
Industriefunkuhren. Technical Manual. OEM Sync-Module FE1000 (IRIG-B) ENGLISH
 ENGLISH") Industriefunkuhren Technical Manual OEM Sync-Module FE1000 (IRIG-B) ENGLISH Version: 07.02-24.03.2014 2 / 19 FE1000 IRIG-B Synchronisation - V07.02 IMPORTANT NOTES Version Number (Firmware / Manual) THE
Industriefunkuhren Technical Manual OEM Sync-Module FE1000 (IRIG-B) ENGLISH Version: 07.02-24.03.2014 2 / 19 FE1000 IRIG-B Synchronisation - V07.02 IMPORTANT NOTES Version Number (Firmware / Manual) THE
MG-XV operating instruction. Measuring of norm signals, 4-8-digit. Panel instrument type MG-BV Construction instrument type MG-AV
 MG-XV operating instruction Measuring of norm signals, 4-8-digit Panel instrument type MG-BV Construction instrument type MG-AV Contents 1. Brief description... 3 2. Safety instructions... 3 2.1. Proper
Emergency lighting units EM powerled
 E 15 W CE CPS ED Driver for AC and DC power supplies Product description ED Driver for mains operation with integrated Simple CORRIDOR FUCTIO (CF) For use in central battery systems For luminaire installation
HTE Owner s Manual. HDMI, RS-232, IR & Ethernet Extender over HDBaseT with 3D, 4K, POE Support
 HTE Owner s Manual HDMI, RS-232, IR & Ethernet Extender over HDBaseT with 3D, 4K, POE Support HTE Tx HTE Rx PureLink TM 535 East Crescent Ave Ramsey, NJ 07446 Tel: 201.488.3232 Fax: 201.621.6118 Website
AES-402 Automatic Digital Audio Switcher/DA/Digital to Analog Converter
 Broadcast Devices, Inc. AES-402 Automatic Digital Audio Switcher/DA/Digital to Analog Converter Technical Reference Manual Broadcast Devices, Inc. Tel. (914) 737-5032 Fax. (914) 736-6916 World Wide Web:
O P E R A T I O N M A N U A L. RF-Reader. Stand-alone-Reader Leser 2plus with RS-232 interface
 O P E R A T I O N M A N U A L Version 01/05 RF-Reader Stand-alone-Reader Leser 2plus with RS-232 interface Important! Read by all means! To maintain the perfect shipping conditions and to ensure safe operation
Datasheet - SRB301LC 24VAC/DC
 25.02.2016-18:05:23h Datasheet - SRB301LC 24VAC/DC Guard door monitors and Safety control modules for Emergency Stop applications / General Purpose safety controllers (Series PROTECT SRB) / SRB301LC Preferred
ST-FO4K18GB-RS-LC. HDMI over Optical Fiber Extender VER 1.4
 ST-FO4K18GB-RS-LC HDMI over Optical Fiber Extender VER 1.4 Thank you for purchasing this product For optimum performance and safety, please read these instructions carefully before connecting, operating
SPECIFICATION FOR TFT MODULE MODULE NO:AFS128160TG-1.8-N REVISION NO: 01
 SPECIFICATION FOR TFT MODULE MODULE NO:AFS128160TG-1.8-N300001 REVISION NO: 01 Customer s Approval: PREPARED BY (RD ENGINEER) CHECKED BY APPROVED BY SIGNATURE HSH DATE 2011-12-8 2011-12-8 2011-12-8 DOCUMENT
MBUS 10 RS232 TO MBUS LEVEL CONVERTER
 Media and protocol converters MBUS 10 RS232 TO MBUS LEVEL CONVERTER RS232 to MBus level conversion Maximum 10 MBus slaves Baud Rate: 300 to 19200 bps RS232 MBus opto isolation Over-current and short-circuit
Guide for installers. METTLER TOLEDO MultiRange System solution Point Ex.
 Guide for installers METTLER TOLEDO MultiRange System solution Point Ex www.mt.com/support System solution Point Ex Contents Contents Page 1 Safety precautions... 4 2 System overview... 5 2.1 Using the
VGA & RS232 Extender SET over Single CAT5 with RGB Delay Control
 VGA & RS232 Extender SET over Single CAT5 with RGB Delay Control Model #: VGA-C5RS-SET 2010 Avenview Inc. All rights reserved. The contents of this document are provided in connection with Avenview Inc.
Installation Guide. HDMI 4x1 Switcher
 Installation Guide HDMI 4x1 Switcher SY Electronics Ltd, Unit 7, Worrall Street, Salford, Greater Manchester, M5 4TH, United Kingdom Tel: +44 (0) 161 868 3450 Fax: +44 (0) 161 868 3459 The SY-HD-S41 is
16 Amp Electronic 24 Hour/7 Day Time Controller
 16 Amp Electronic 24 Hour/7 Day Time Controller Model: ELU56 Installation & Operating Instructions 1 1. General Information These instructions should be read carefully and retained for further reference
ALM-6813/6812 INSTALLATION AND PROGRAMMING MANUAL
 ALM-6813/6812 INSTALLATION AND PROGRAMMING MANUAL Installation and programming Manual v2.2 1 MARSS Solar Defender SYSTEM This guidebook provides the essential instructions to install and configure the
MENU EXECUTE Shiloh Road Alpharetta, Georgia (770) FAX (770) Toll Free
 FAX (770) Toll Free") Instruction Manual Model 2584-31 Combiner May 2011, Rev. A RF MONITOR GAIN = -15 MENU MODEL 2584 COMBINER CROSS TECHNOLOGIES INC. ALARM REMOTE POWER EXECUTE Data, drawings, and other material contained
Instruction Manual Model 2584-31 Combiner May 2011, Rev. A RF MONITOR GAIN = -15 MENU MODEL 2584 COMBINER CROSS TECHNOLOGIES INC. ALARM REMOTE POWER EXECUTE Data, drawings, and other material contained
SY-HDBT-SLIM-100S Extender Set
 Installation Guide SY-HDBT-SLIM-100S Extender Set with HDMI, Ethernet, IR, RS232 and Power over 100m of cat6 Cable HDBaseT HDMI Extenders SY Electronics Ltd, Unit 7, Worrall Street, Salford, Greater Manchester,
User Manual TL-2X1-HDVC 2x1 HDMI & VGA Switcher with Control All Rights Reserved Version: TL-2X1-HDVC_160630
 User Manual TL-2X1-HDVC 2x1 HDMI & VGA Switcher with Control All Rights Reserved Version: TL-2X1-HDVC_160630 Preface Read this user manual carefully before using this product. Pictures shown in this manual
MINI MCR-SL-F-UI-NC. Frequency transducers. Data sheet. 1 Description
 Frequency transducers Data sheet 105_en_01 PHOENIX CONTACT 01-08-19 1 Description Configurable -way isolated frequency transducer. The device is suitable for the connection of NAMUR proximity sensors (IEC
ABB i-bus EIB Universal dimmer 6155 EB for Installation
 73-1 - 5975 23459 ABB i-bus EIB Universal dimmer 6155 EB - 101-500 for Installation Operating instructions only for authorized, skilled electricians with EIB training Important instructions Attention It
Operating Instructions 07/2007 Edition. SINAMICS G130/G150 Line harmonics filter. sinamics
 Operating Instructions 07/2007 Edition SINAMICS G130/G150 Line harmonics filter sinamics s Safety information 1 General 2 SINAMICS SINAMICS G130/G150 Operating Instructions Mechanical installation 3 Electrical
CH-1602TX & CH-1602RX HDMI/Audio over CAT5e/6/7 Extender with 48V PoE
 CH-1602TX & CH-1602RX HDMI/Audio over CAT5e/6/7 Extender with 48V PoE Operation Manual DISCLAIMERS The information in this manual has been carefully checked and is believed to be accurate. Cypress Technology
02/11/2015
 DIN Rail Mount 17.5 mm MUS/MUSF 80 AC/DC Part number 84872141 Control relays monitoring their own power supply - MUS : Over/undervoltage control Selectable latching (memory) function - MUSF : Over/undervoltage
SCALE & WEIGHT DISPLAYS
 The MICRO SERIES SCALE & WEIGHT DISPLAYS LARGE DIGIT MODELS Mighty-5S DPM MODELS Micro-S & Mighty-1S Mighty-1S Micro-S ELECTRO-NUMERICS, INC. Introduction The Electro-Numerics family of Digital Panel Meters
MONITOR POWER Shiloh Road Alpharetta, Georgia (770) FAX (770) Toll Free
 FAX (770) Toll Free") Instruction Manual Model 2099-10xx 10MHz Frequency Source April 2014, Rev. H MENU INTERNAL LEVEL = +10dBm MONITOR POWER 1 2 MODEL 2099 FREQUENCY SOURCE CROSS TECHNOLOGIES INC. ALARM OVEN REMOTE EXECUTE
Instruction Manual Model 2099-10xx 10MHz Frequency Source April 2014, Rev. H MENU INTERNAL LEVEL = +10dBm MONITOR POWER 1 2 MODEL 2099 FREQUENCY SOURCE CROSS TECHNOLOGIES INC. ALARM OVEN REMOTE EXECUTE
Fibre Optic Modem ODW-622
 Fibre Optic Modem ODW-622 RS-232 to fibre optic link, redundant ring or multidrop applications The ODW-622 can be used to create either redundant ring or multidrop solutions for devices with RS-232 interfaces.
1x4, 1x8, 1x12, 1x16 VGA Extender / Splitter over Single CAT5
 1x4, 1x8, 1x12, 1x16 VGA Extender / Splitter over Single CAT5 User s Guide Models VGA-C5-SP-4 VGA-C5-SP-8 VGA-C5-SP-12 VGA-C5-SP-16 2009 Avenview Inc. All rights reserved. The contents of this document
ES-Mega MegaBeans. Access Control System. User Manual. People in Motion
 ES-Mega MegaBeans Access Control System User Manual / Order No. Device People in Motion Contents 1. General description..3 2. Installation Instructions..4 3. Start-up..4 4. Audible signals..4 5. Operating
MASTR II BASE STATION 12/24V POWER SUPPLY 19A149979P1-120 VOLT/60 Hz 19A149979P2-230 VOLT/50 Hz
 Mobile Communications MASTR II BASE STATION 12/24V POWER SUPPLY 19A149979P1-120 VOLT/60 Hz 19A149979P2-230 VOLT/50 Hz CAUTION THESE SERVICING INSTRUCTIONS ARE FOR USE BY QUALI- FIED PERSONNEL ONLY. TO
DVI over Single CAT5 Series CV-117. DVI over Single CAT5 Direct Plug-in Extender. User Manual. Made in Taiwan
 DVI over Single CAT5 Series CV-117 DVI over Single CAT5 Direct Plug-in Extender User Manual Made in Taiwan Safety and Notice The CV-117 DVI over Single CAT5 Direct Plug-in Extender has been tested for
SY-HDBT-100 Extender Set
 Installation Guide SY-HDBT-100 Extender Set with HDMI, IR, RS232 and Ethernet over 100m of cat6 Cable HDBaseT HDMI Extenders SY Electronics Ltd, Unit 7, Worrall Street, Salford, Greater Manchester, M5
Instruction Manual. Universal Flow Controller Model 261 / 261-EC-01
 Universal Flow Controller Model 261 / 261-EC-01 Instruction Manual Type ARS 261-EC 01 Art.-no: 82212264 Table of Contents 1. Safety Instructions 2. Product ID - Dimensions 3. Function Description 4. Installation
Installation and User Guide 458/CTR8 8-Channel Ballast Controller Module
 Installation and User Guide 458/CTR8 8-Channel Ballast Controller Module Helvar Data is subject to change without notice. www.helvar.com i Contents Section Page Introduction 1 Installation 2 1. Attach
Weekly Timer. Mounting track 50 cm (1.64 ft) length PFP-50N 1 m (3.28 ft) length PFP-100N
 length PFP-50N 1 m (3.28 ft) length PFP-100N") Weekly Timer 1/4 DIN Size Timer Features Prompted Programming and Large LCD Display 24 hours x 7 days programming using just 5 switches 16 program steps and cycle operation Two independent 15 A control
Weekly Timer 1/4 DIN Size Timer Features Prompted Programming and Large LCD Display 24 hours x 7 days programming using just 5 switches 16 program steps and cycle operation Two independent 15 A control
VGA, Audio & RS232 Extender SET over Single CAT5 with RGB Delay Control & IR Pass Through
 VGA, Audio & RS232 Extender SET over Single CAT5 with RGB Delay Control & IR Pass Through Model #: VGA-C5ARS-SET 2010 Avenview Inc. All rights reserved. The contents of this document are provided in connection
SPECIFICATION FOR LCD MODULE MODULE NO: AFS320480TG-3.5-G REVISION NO: 00
 SPECIFICATION FOR LCD MODULE MODULE NO: AFS320480TG-3.5-G010021 REVISION NO: 00 Customer s Approval: PREPARED BY (RD ENGINEER) CHECKED BY APPROVED BY SIGNATURE Alfred Fr. Li Sean DATE 2011-8-19 2011-8-19
VGA / Audio Extender Single CAT5 / CAT6 with RGB Delay Control & EQ
 VGA / Audio Extender Single CAT5 / CAT6 with RGB Delay Control & EQ Model #: VGA-C5A-SET 2010 Avenview Inc. All rights reserved. The contents of this document are provided in connection with Avenview Inc.
Fibre Optic Modem ODW-611
 Fibre Optic Modem ODW-611 PROFIBUS DP to fibre optic link, point-to-point applications The ODW-611 is a fibre optic modem designed for point-to-point fibre optic connections between PROFI- BUS DP networks.
4, 8, 16 Port VGA/ Audio Extender / Splitter With Local Output with SPDIF Model #: VGA-C5SP-8
 4, 8, 16 Port VGA/ Audio Extender / Splitter With Local Output with SPDIF Model #: VGA-C5SP-8 2010 Avenview Inc. All rights reserved. The contents of this document are provided in connection with Avenview
Spectra Batten (Order code: LEDJ95)
") www.prolight.co.uk Spectra Batten (Order code: LEDJ95) Safety WARNING FOR YOUR OWN SAFETY, PLEASE READ THIS USER MANUAL CAREFULLY BEFORE YOUR INITIAL START-UP! CAUTION! Keep this equipment away from rain,
www.prolight.co.uk Spectra Batten (Order code: LEDJ95) Safety WARNING FOR YOUR OWN SAFETY, PLEASE READ THIS USER MANUAL CAREFULLY BEFORE YOUR INITIAL START-UP! CAUTION! Keep this equipment away from rain,
2 CHANNEL RECEIVER DISPLAY POTENTIOMETER COM2 NC2 NO2
 2 CHANNEL RECEIVER RECTSHIVE915-DX Please read this manual carefully before installing the product. 1 DESCRIPTION Receiver Rolling Code, 2 channels with dry contact relay output 20A a 12 Vdc. Programming
Industriefunkuhren. Technical Manual. Model 7248/7248RC. Fibre Optic Converter Board ENGLISH
 Industriefunkuhren Technical Manual Fibre Optic Converter Board Model 7248/7248RC ENGLISH Version: 01.00-04.05.2007 2 / 16 7248/7248RC Fiber Optic Converter Board - V01.00 INPORTANT NOTES Downloading Technical
Power Injector 1520 Series
 Power Injector 1520 Series Technical Specifications Input voltage 100 to 240 VAC Output voltage 56.0 VDC Voltage range tolerance 54 VDC to 57 VDC Maximum current 1.43 A No load current 15 ma 56VDC@0.71A
Tech Support: Customer Service: General Tech Questions: Tech Docs:
 Tech Support: 1-800-407-4545 Customer Service: 1-800-523-2462 General Tech Questions: Tech_Services@beainc.com Tech Docs: www.beasensors.com BR3-X Programmable 3 Relay Advanced Logic Module & Restroom
Figure 1: Device components
 Order No. : 2860 10 Order No. : 2830 10 Operation- and Assembly Instructions 1 Safety instructions Electrical equipment may only be installed and fitted by electrically skilled persons. Failure to observe
User Manual PS-684. HDBaseT Extender Kit 70m. All Rights Reserved. Version: UHBT70P_2016V1.2
 User Manual PS-684 All Rights Reserved Version: UHBT70P_2016V1.2 Preface Read this user manual carefully before using this product. Pictures shown in this manual is for reference only, different model
VGA / Audio Extender Single CAT5 / CAT6 with RGB Delay Control & EQ
 AV Connectivity, Distribution And Beyond... VIDEO WALLS VIDEO PROCESSORS VIDEO MATRIX SWITCHES EXTENDERS SPLITTERS WIRELESS CABLES & ACCESSORIES VGA / Audio Extender Single CAT5 / CAT6 with RGB Delay Control
GE Interlogix Fiber Options S700V & S702V. Instruction Manual FIBER-OPTIC VIDEO TRANSMISSION SYSTEM
 g GE Interlogix Fiber Options Instruction Manual S700V & S702V FIBER-OPTIC VIDEO TRANSMISSION SYSTEM Federal Communications Commission and Industry Canada Radio Frequency Interference Statements This equipment
User Manual M1. Thermocouple type K, B, S, N, E, T, R, L, J. Technical features:
 User Manual M1 Thermocouple type K, B, S, N, E, T, R, L, J Technical features: red display of -1999 9999 digits (optional green, orange or blue display) minimal installation depth: 27 mm without plug-in
Passive DVI Extenders Over single Cat5/6/7 AT-DVI60SRS
 Passive DVI Extenders Over single Cat5/6/7 AT-DVI60SRS User Manual www.atlona.com TABLE OF CONTENTS 1. Introduction 2 2. Features 2 3. Package Contents 2 4. Specifications 3 5. Connection and Operation
SINAMICS G130 / G150. Line harmonics filter. Operating Instructions 05/2010 SINAMICS
 SINAMICS G130 / G150 Line harmonics filter Operating Instructions 05/2010 SINAMICS s Safety information 1 General 2 SINAMICS SINAMICS G130 / G150 Operating Instructions Mechanical installation 3 Electrical
VGA & Audio Receiver SET over Single CAT5 with RGB Delay Control
 VGA & Audio Receiver SET over Single CAT5 with RGB Delay Control Model #: VGA-C5A-R 2010 Avenview Inc. All rights reserved. The contents of this document are provided in connection with Avenview Inc. (
ASP-FIBRS1 User Manual
 ASP-FIBRS1 HDMI Single Fiber Extender with Serial and IR User Manual Manual Number: 100823 Safety and Notice The ASP-FIBRS1 HDMI Extender over 1 fiber with serial and IR have been tested for conformance
VLHDMIEXTFIB_2017V1.0
 User Manual VLHDMIEXTFI ll Rights Reserved Version: VLHDMIEXTFI_2017V1.0 Preface Read this user manual carefully before using the product. Pictures are shown in this manual for reference only, different
Preset counters, electronic
 The multifunction preset counters Codix 923 / 924 can be used universally. These preset pulse counters, tachometers or preset timers with up to 6 presets can solve a wide variety of control and monitoring
Model /29S RF Splitter
 Instruction Manual Model 1584-29/29S RF Splitter March 2013, Rev. 0 LNB VOLTAGE A B MODEL 1584 COMBINER CROSS TECHNOLOGIES INC. GND+DC ON Data, drawings, and other material contained herein are proprietary
User Manual M1. Thermocouple type K, B, S, N, E, T, R, L, J. Technical features:
 User Manual M1 Thermocouple type K, B, S, N, E, T, R, L, J Technical features: red display of -1999 9999 digits (optional: green, orange or blue display) minimal installation depth: from 63 mm with plug-in
Trusted 40 Channel Analogue Input FTA
 PD-T8830 Trusted Trusted 40 Channel Analogue Input FTA Product Overview The Trusted 40 Channel Analogue Input Field Termination Assembly (FTA) T8830 is designed to act as the main interface between a field
HDMI 1.3 Receiver over Signal. CAT5/CAT6 Cable. Model #: HDMI-C5-R-M. 1
 HDMI 1.3 Receiver over Signal CAT5/CAT6 Cable Model #: HDMI-C5-R-M 2010 Avenview Inc. All rights reserved. The contents of this document are provided in connection with Avenview Inc. ( Avenview ) products.
Emergency lighting units EM powerled
 CE CPS 12/15 W ED Driver for AC and DC power supplies Product description ED Driver for mains operation with integrated Simple CORRIDOR FUCTIO (CF) For use in central battery systems For luminaire installation
Process transmitter RMA422
 Technical information TI072R/09/en Mat. No. 51001905 Process transmitter RMA422 Multifunctional 1-2 channel top hat DIN rail unit with intrinsically safe current input and loop power supply, alarm set
AES-404 Digital Audio Switcher/DA/Digital to Analog Converter
 Broadcast Devices, Inc. AES-404 Digital Audio Switcher/DA/Digital to Analog Converter Technical Reference Manual Broadcast Devices, Inc. Tel. (914) 737-5032 Fax. (914) 736-6916 World Wide Web: www.broadcast-devices.com
PRO-HDMI2DP HDMI 2.0a to DisplayPort 1.2a Converter. User s Guide. Made in Taiwan
 HDMI 2.0a to DisplayPort 1.2a Converter User s Guide Made in Taiwan Congratulations for owning a gofanco product. Our products aim to meet all your connectivity needs wherever you go. Have fun with our
CH1 CH2 CH3 CH4. Master /Fade CH5. 600s CH6. 60s SC1 SC2 SC4 SC3 SC5. SC6 Off/Pro. AL Fade 6 Pro. User guide
 1 1 CH1 CH2 1 1 CH4 CH 1 CH3 6s Master /Fade CH6 1 SC1 6s SC4 SC2 SC SC3 SC6 Off/Pro AL Fade 6 Pro User guide CONTENTS INTRODUCTION...2 Welcome 2 Safety 2 Supplied items 3 INSTALLATION...4 Mounting 4