Silhouette SXCD. Compact Disc Player. Owners Manual
|
|
|
- Domenic Hampton
- 6 years ago
- Views:
Transcription


1 Silhouette SXCD Compact Disc Player Owners Manual
2 Perreaux Industries Limited makes no warranty for the use of its products, other than those expressly contained in the warranty detailed herein. The Company assumes no responsibility for any errors which may appear in this document, reserves the right to change products or specifications detailed herein at any time without notice, and does not make any commitment to update the information contained herein. No licenses to patents or other intellectual property of Perreaux are granted by the Company in connection with the sale of Perreaux products, expressly or by implication. mboob^ru is a registered trademark of Perreaux Industries Ltd. Terms and product names in this document may be trademarks of others. 1
3 2 This page has intentionally been left blank.
4 i Introducing the Perreaux Silhouette Series Designed as a range of high quality, yet affordable modules; the Silhouette series will compliment and enhance your existing system. Drawing on our extensive knowledge gained from more than a quarter of a century of developing highest quality audio products, the Silhouette series concentrates our legendary design and buildquality into a compact package without sacrificing performance. The Perreaux Silhouette series provides performance levels never before seen in its class. Key Features Computer optical drive transport Flexible two-box solution Low-jitter, precision master clock Burr-Brown (Texas Instruments) DAC and SPDIF transmitter Option to use external master clock via plink Optimal PCB and ground plane layout Ultra-short signal paths High-quality fibreglass PCB with minimal internal wiring Digital output Scientific Conversion digital output transformer RS232 communication via plink RC-5 remote input Compact and stylish The Perreaux Silhouette series takes you even closer to the elusive goal of The Perfect Re-Creation of a Musical Event. From all of us at Perreaux Industries Limited, thank you for choosing the Perreaux Silhouette Series SXCD Compact Disc Player. 3
5 ii Important Safety Instructions Note: Please read all instructions carefully before attempting to operate your Perreaux Silhouette SXCD Compact Disc Player. ALWAYS switch off power to your system before attempting to connect or disconnect cables. ALWAYS disconnect your system from the mains before attempting to clean your unit. ALWAYS keep electrical equipment out of reach of children. ALWAYS unplug sensitive electronic equipment during electrical storms. NEVER disconnect the mains earth from the system. NEVER operate the SXCD with the cover removed. NEVER use any liquid inside the SXCD. NEVER attempt to repair the SXCD. In the event of a problem, please contact your Perreaux dealer. NEVER expose the SXCD to extremely high or low temperatures. 4
6 iii Table of Contents i Introducing the Perreaux Silhouette Series... 3 ii Important Safety Instructions... 4 iii Table of Contents Unpacking and Placement Instant Install Electronics Module Transport Module Placement Options Special Design Philosophies Special Design Features Care and Maintenance Warranty Information Extended Warranty Registration Form Troubleshooting Guide Specifications Physical Dimensions Contact Details
7 1 Unpacking and Placement Unpacking Procedure Note: Box Contents Placing Your SXCD Ventilation Requirements The two components which comprise the SXCD CD player are packaged for maximum protection. To open, sit each box upright and cut the reinforced tape at the top of each box. Each module can now be removed. Pull the foam protecting end-caps off either side of each of the modules and remove the black material covering. The SXCD Compact Disc Player is now unpacked and ready for further installation. Please retain all packaging material for future transport. 1 x SXCD Compact Disc Player Electronics 1 x SXCD Compact Disc Player Transport 1 x Product manual 1 x Detachable AC power cord 1 x 50-way ribbon cable 1 x 75Ω coaxial cable 1 x BNC to RCA adaptor 3 x Performance analysis charts The SXCD should generally be placed close to your preamplifier or integrated amplifier, thus keeping interconnect cabling between the SXCD and associated components as short as practical. This will reduce the systems susceptibility to radio frequency (RF) interference and the negative effects associated with long cables. The SXCD is a low power electronic device. Ventilation requirements are not considered an important factor in product placement. In the event that the SXCD is to be incorporated into custom cabinetry, please refer to the dimensional information provided in the Physical Dimensions section of the manual (Chapter 13). 6
8 2 Instant Install Note: If you are like us, the first thing you will want to do is to play your favourite piece of music through your new SXCD Compact Disc Player. The following instructions are written to enable you to achieve this as quickly as possible. These are not comprehensive instructions, but are designed to enable you to play music now! Please take the time to read the SXCD manual thoroughly as it incorporates many features, which will enhance its operation. Placement The SXCD is a low power electronic device and best results will be achieved when placed away from potential interference from other components and electrical devices, for example AC mains cords/outlets, transformers, high-power amplifiers, computers, etc. Place the SXCD close or near the preamplifier in order to make as short a connection as possible. Turn off associated components This minimises the potential to damage any other components when connecting your SXCD into the system. Connect Transport module to Electronics module Connect the Transport module to the Electronics module by connecting the 50-way ribbon cable between the header on the underside of the Transport and the header at the rear of the Electronics module. Noting polarity of each connector. Refer to Chapters 3 and 4 for more information about connecting this cable. Connect SXCD to preamplifier Connect the analog output of the SXCD to the input of your preamplifier. Refer to Chapter 3 for Rear Panel information. Connect preamplifier to power amplifier Connect the audio output from the preamplifier to the input of the power amplifier. 7
9 Switch on preamplifier Turn on your preamplifier. Switch on power amplifier Turn on your power amplifier. Plug CD player into AC mains Please check the voltage label to ensure that your unit conforms to the mains voltage in your region then connect to the AC mains using the AC power cord supplied. Caution! Never attempt to connect the unit to the incorrect voltage. Switch on SXCD CD player Power up your SXCD CD Player by setting the power switch at the rear of the electronics unit to the down position. Open disc drawer Open the disc drawer of the SXCD by pressing the EJECT button, topmost button of user interface. Insert disc Place your favourite CD recording in the drawer label-side up, ensuring the disc is properly centered. Press PLAY Start your favourite recording by pressing PLAY, the centre button. The tray will retract and your favourite recording will be playing in seconds. Turn it up Slowly increase the volume of your preamplifier to achieve a comfortable listening level. CONGRATULATIONS! Now that you have achieved your first objective, sit back, relax and please read the rest of the manual at your own pace in your favourite armchair whilst sipping a glass of wine. You ll find the whole experience much more pleasurable whilst listening to music. 8

10 3 Electronics Module Front Panel Functions Status LED This blue LED indicates the status of your SXCD compact disc player. Off This indicates the power to the CD player is switched off. On The LED constantly illuminated indicates the SXCD is powered and either playing a disc or is in an idle state ready for a disc to be played. Slow Flashing If the LED is flashing slowly, the CD player is paused. Moderate Flashing If the LED is flashing at a moderate rate, the CD player is busy and may not respond immediately to any user interface. Fast Flashing If the LED flashes fast, the CD player has encountered an error, such as a bad disc or incompatible media format. Skip/Scan Back Pressing this button momentarily returns to the beginning of the current track. Pressing multiple times quickly in succession returns to the beginning of the applicable track, until the start of the disc is reached. 9
11 Pressing and holding this button will scan backwards through the currently playing disc. Upon releasing the button, the disc will play. If the start of the disc is reached the disc will stop Stop Pressing this button stops a disc that is playing. resumed, the disc will start over from the first track. Skip/Scan Forward If play is Pressing this button momentarily advances to the beginning of the next track. Pressing multiple times quickly in succession advances to the beginning of the applicable track, until the end of the disc is reached. Pressing and holding this button will scan forwards through the currently playing disc. Upon releasing the button, the disc will play. If the end of the disc is reached the disc will stop. Play/Pause Pressing this button starts playing the current disc. If the disc drawer is open, it will close automatically. Normally, the disc will start playing from the first track. However, a different track can be selected using the SKIP buttons before pressing the PLAY button to start playing a different selection. Pressing this button once during playback will suspend play at that point in the track. The disc continues to spin and play will be resumed from the current position. Pressing the PAUSE button a second time will resume play. Eject When the transport drawer is closed, pressing this button opens the drawer. To close the drawer press the EJECT button again. The drawer can also be closed by pressing the PLAY button. 10

12 Rear Panel Functions Caution! Transport Interface The 50-way header allows connection to the SXCD transport unit using the ribbon cable supplied. This header is polarised, please note polarity of mating plug when connecting the ribbon cable. Damage may occur to the transport and/or electronics if ribbon cable is connected with the incorrect polarity. Use only the supplied 50-way ribbon cable. Analog Outputs These single-ended (RCA) outputs provide line-level analog audio, via suitable RCA interconnect cables, to a preamplifier or integrated amplifier. For more information on analog output specifications, please refer to Chapter 12. Digital Output The single-ended (BNC) output provides a Sony/Philips Digital Interface Standard (SPDIF) digital audio signal to an outboard digital to analog converter (DAC) or digital receiver. The SPDIF standard dictates 75Ω transmission of the digital audio signal. Use a digital interconnect cable specifically designed with a characteristic impedance of 75Ω, such as the coaxial cable supplied. A BNC connector has been used in place of the standard RCA type because RCA connectors can never achieve a characteristic impedance of 75Ω. Refer to Chapter 7 Special Design Features for more information on why a BNC connector is used. 11
13 If you already have a suitable high-quality digital interconnect equipped with RCA connectors, please use the supplied adaptor to convert the BNC output to RCA. For more information on digital output specifications, please refer to Chapter 12. Note: Use a 75Ω digital interconnect cable equipped with BNC connectors to get the best possible digital performance, such as the coaxial cable supplied. Using the supplied adaptor to convert the BNC output to RCA will not degrade the signal any more than if an RCA connector was fitted by default. plink Port This RJ45 connector offers two functions communication using the RS232 protocol and the ability to use the master clock of an external source. RS232 Communication Basic functions of the SXCD compact disc player can be controlled using the RS232 serial communication protocol. The RJ45 pins are configured for RS232 as follows: Pin 1: 5V Pin 2: CMOS/TTL Receive (RX) Pin 3: CMOS/TTL Transmit (TX) Pin 4: Ground (GND) An adaptor, available from your Perreaux dealer, enables integration via RS232 with control products; such as AMX, Crestron and Control4. Caution! Attempting to use the plink port for RS232 without the necessary adaptor will result in damage to the SXCD, and may also damage the control device. External Master Clock Best jitter performance in any digital system occurs when there is a single master clock in the entire system and that clock is located as close as possible to the conversion stage. 12
. The RJ45 pins are configured for using an external master clock as follows: Pin 6: Master Clock Input Pin 7: Ground (GND) Pin 8: Internal Clock Disable Caution!")
14 The SXCD compact disc player facilitates this functionality by allowing the internal master clock to be disabled and sourced from an external device, such as an external digital to analog converter (DAC). The RJ45 pins are configured for using an external master clock as follows: Pin 6: Master Clock Input Pin 7: Ground (GND) Pin 8: Internal Clock Disable Caution! To enable this function the internal master clock must first be disabled by connecting the Internal Clock Disable (Pin 8) to GND. The master clock from the external device can then be supplied to the Master Clock Input (Pin 6). The frequency of the external master clock must be MHz. RC-5 Input This 3.5mm stereo jack allows standard CD player RC-5 remote control codes to control the basic functions of the SXCD compact disc player. IR Repeater Port Directly connecting to a device with an infrared (IR) repeater port, via a 3.5mm stereo plug cable, allows easy integration into automation and control solutions such as Niles and Xantech. Each 3.5mm stereo plug must follow the specifications as per the diagram below: Sleeve: Ground (GND) Ring: No connection Tip: Signal Caution! Do not use a mono 3.5mm plug when directly connecting the RC-5 input to an infrared (IR) repeater port. A stereo 3.5mm plug must be used to avoid damage to the SXCD. Using a stereo 3.5mm plug will not harm the infrared (IR) repeater port. 13
15 The SXCD is designed to function with the standard CD player RC-5 remote control codes. For more information about the standard RC-5 remote control codes for CD players please visit on the Perreaux website. External IR Receiver Alternately, by using an external infrared (IR) receiver, commands can be received from a universal or programmable remote control which uses the standard CD player RC-5 remote codes. The stereo 3.5mm plug of the infrared (IR) receiver must follow the specifications as per the diagram below: Sleeve: Ground (GND) Ring: +ve Tip: Signal More information about the infrared (IR) receiver can be obtained from your Perreaux dealer or found on the Perreaux website at Caution! Serial Number/Voltage Label The serial number is unique to your SXCD. Please record this number and store it in a safe place. For any service related enquiry, please be prepared to quote the product serial number to Perreaux personnel or their service representative. The voltage displayed in this area is the ONLY voltage that can be accepted by the unit. Never attempt to connect the unit to the incorrect voltage. AC Mains Input An IEC-standard mains input is provided at the rear of the unit. The AC cord set is removable, allowing it to be upgraded at your will. On/Off Switch When operating the switch down, power is applied to the SXCD compact disc player. 14


16 4 Transport Module Underside Functions Caution! Electronics Interface The 50-way header allows connection to the SXCD electronics unit using the ribbon cable supplied. This header is polarised, please note polarity of mating plug when connecting the ribbon cable. Damage may occur to the transport and/or electronics if ribbon cable is connected with the incorrect polarity. Use only the supplied 50-way ribbon cable. 15

17 Disc Drawer Functions Disc Drawer The disc drawer glides out to accept a compact disc and retracts to play it. Place the disc in the drawer label-side up and make sure the disc is properly centred in the tray. The disc drawer is normally opened by pressing the EJECT button. It may be closed by pressing the EJECT button again or by pressing the PLAY button, where the drawer will retract and playback will commence. Manual Eject In the event that the disc drawer doesn t respond to the EJECT button being pressed; a small thin object, such as a straightened paper clip, can be inserted into the hole to manually eject the disc drawer. Caution! To avoid potentially damaging the transport, the CD player must be switched OFF before attempting to manually eject the disc drawer. 16


18 5 Placement Options Two-Box Solution Stacked The compact two-box solution provides the flexibility and versatility to meet a range of placement and style options. Mixing with other Silhouette Series components creates a system which strikes at the heart of Silhouette Series philosophies minimalist form and function harmoniously encompassing superlative performance. The two modules can be stacked one on top of the other for a narrow front profile. Electronics on top Transport on top Side-by-Side Placing the units side-by-side is gives a sleek modern form. 17
19 6 Special Design Philosophies Minimalist Design Perreaux has been designing and manufacturing only the highest quality audio componentry for more than a quarter of a century. Technology has continued to evolve rapidly over that time and our knowledge and application of design, materials and manufacturing techniques has advanced in tandem with this. Today s Perreaux range comes closer to fulfilling our shared vision than at any other time in the past. The SXCD has been developed to meet customer demands for compact higher quality products. Careful attention has been taken throughout the development phase, not to make compromises that would degrade the high quality of reproduction that the unit is capable of delivering. To follow is a discussion on some of Perreaux design philosophies that have been incorporated into the entire range. Leading British architect, John Pawson, writes: The Minimum can be defined as the perfection that an object achieves when it is no longer possible to improve it by subtraction. This is the quality that an object has when every component, every detail, and every junction has been reduced or condensed to the essentials. It is the result of the omission of the inessentials. Perreaux has historically embraced the minimalist ethic from an audio design perspective only. The concept of less equating to more has been at the heart of all Perreaux audio designs for more than a quarter of a century. Our current product offering takes the minimalist ethic to new levels by totally embracing the concept. Minimalist Electronics We wish to maximise the quality of your listening pleasure by keeping the componentry and signal path as uncluttered, short and clean possible. All components in the signal path, even those of the highest quality have an effect on the signal, thereby altering the quality of the reproduction in some way. Our aim is to recreate in its entirety, the original performance by not adding or subtracting anything, irrespective of the source. 18
20 Minimalist Aesthetics Our products appeal to those who seek the ultimate in audio exclusivity, namely the perfect blend of form and function. Form and function are both tough masters. We make no excuses for producing some of the most distinctive high-end audio products on the planet. We let form and function blend together in perfect harmony. This surely is the essence of true minimalist utilisation. Minimalism in a Wider Context John Pawson writes: Clearly simplicity has dimensions to it that go beyond the purely aesthetic: it can be seen as the reflection of some innate, inner quality, or the pursuit of philosophical or literary insight into the nature of harmony, reason, and truth. 19
21 7 Special Design Features Construction Block Diagram The SXCD is stylish and unobtrusive. The front panel is made from high quality solid 6.0mm (0.2 ) thick aluminium extrusion featuring our trademark machined Perreaux logo and intuitive user-interface. The front-panels are finished in durable and stylish satin chrome finish electroplate. The chassis and cover are both manufactured from heavy gauge steel. No cover fixing screws are visible. These minimalist styling cues combine seamlessly to allow form and function to blend in harmony and are typical hallmarks of the Perreaux brand. Optical Drive RAM I 2 S Generator SPDIF Digital Out Analog Out L Micro Controller Data Clocks DAC Analog Filter R User Interface Master Clock Compact Two-Box Solution Signal Ground Simple User Interface Computer Optical Drive At 216mm (8.5 ) wide x 58mm (2.3 ) high x 172mm (6.8 ) deep, each module of the SXCD is extremely compact the twobox solution providing the flexibility and versatility to meet a wide range of placement options. Special attention has been paid to sensitive analog and digital ground planes to maintain sonic purity. All signal grounding is optimised to provide a platform for a black background and increased dynamic range. The five buttons on the front panel provide a simple and intuitive user interface allowing easy access to all the standard functions of a CD player. Using a computer optical drive to access audio data via the IDE interface, and ATAPI protocol, provides an architecture which keeps the number of jitter contributors to an absolute minimum. Extracting the data in a parallel fashion, rather than serial, via the IDE interface the transport operates independently of the master clock therefore completely eliminating jitter and data timing errors between the controller and the optical mechanism. 20
22 Increased Read Speed Precision Master Clock Ultra Short Signal Paths Digital Output Transformer BNC Digital Output Connector Custom Designed Toroidal Transformer Multiple Regulated Power Supplies The increased 4x-8x read speed of the optical drive, compared with 1x-2x speeds of standard mechanisms, gives the drive more opportunity for error correction ensuring the audio data stream is a true reflection of what is presented on the compact disc. The master clock, and its implementation, is the single most important aspect of any CD player. A precision clock oscillator with high temperature stability, fast 8ns rise and fall times and jitter less than 5ps provides the foundation for best possible jitter performance. Optimal physical location close to the SPDIF transmitter and DAC ensure jitter levels are kept to a minimum. The circuitry for the analog and digital outputs have been laid out with the utmost care components are arranged as compact as physically possible to keep track lengths to a minimum, ensuring signal paths are as short and direct as possible. Utilising what is arguably the best digital audio transformer on the market today, the digital output transformer from Scientific Conversion ensures the SPDIF signal maintains very low levels of jitter. High Common Mode Rejection Ratio (CMMR) and decreased capacitance guarantee greatly reduced interference susceptibility, noise and pulse aberration. RCA connectors are inherently disadvantaged for use with the high frequency (1.4MHz-2.8MHz) signals associated with 44.1kHz/16-bit digital audio. Design limitations mean RCA connectors can never achieve a characteristic impedance of 75Ω, resulting in reflections and signal loss due to impedance mismatch. In contrast, BNC connectors are purposely designed to carry high frequency signals, up to 2GHz for 75Ω therefore overcome the problems exhibited by RCA connectors. The 36VA toroid transformer is custom designed by Toroid International (Noratel) exclusively for Perreaux. The fully screened transformer, along with the low mechanical hum and low exterior magnetic field inherent in toroidal transformers, provides a solid foundation for the low-noise power supplies. Stable, clean power is paramount in any CD player for good performance. Two transformer secondary windings, and three regulated power supplies, ensure power to the optical drive is isolated from the sensitive analog and digital supplies. The DAC is further isolated from the digital supply with its own local voltage regulator. 21
23 Digital Noise Filtering plink Port RC-5 Remote Input Multiple Media Support No Display Conducted and radiated digital noise can wreak havoc on power supplies and sensitive circuits. Filtering is heavily employed throughout to stop conducted digital noise infecting power supplies and sensitive circuits, and greatly reduce radiated noise. The plink port provides communication to an external device via the RS232 protocol, allowing easy integration into automation and control solutions. The plink port also supports the capability to receive a master clock from an external source, such as an external DAC. Standard CD player RC-5 remote control codes can be used to control the basic functions of the SXCD. Directly connecting to a device via a 3.5mm stereo plug cable allows easy integration into automation and control solutions. Alternately, by using an infrared (IR) receiver, commands can be received from any offthe-shelf universal or programmable remote controls which use the standard CD player RC-5 remote codes. By default, the computer optical drive supports a multitude of media types and formats allowing the SXCD to function consistently and reliably with CD-DA, CD-R and CD-RW media, including Mixed Mode audio and data content. Liquid Crystal Displays (LCD) with Cold Cathode Fluorescent Lamp (CCFL) backlighting, and Vacuum Fluorescent Displays (VFD) both require an inverter for operation. Inverters typically run at frequencies greater than 100kHz and are a source of conducted and radiated radio frequency (RF) interference. By excluding the display, this source of RF interference has been eliminated and cannot infect the precious power supplies or sensitive digital and analog circuitry. 22
24 8 Care and Maintenance Note: Cover Front Panel Never apply liquid directly to the SXCD. Never use abrasives. Never rub in a circular motion. The cover features a durable high quality powder coat finish. To remove finger marks and dirt, lightly rub the surface with a soft cloth. If the dirt is not removed, dip your cloth in a mild solution of soap and water, squeeze excess moisture from it and then gently reapply to the surface. Stubborn dirt may be removed by the application of a small quantity of isopropyl alcohol, applied directly to the cleaning cloth only, and reworking the effected area. The SXCD front panel features a high quality electroplate finish. Over time the surface may retain finger marks and may need to be cleaned to restore it to original condition. Regular Cleaning Gently wipe the front panel with a very clean cotton cloth. Wipe across the surface and never in a circular motion. Removing Stubborn Marks Only attempt this infrequently, as too regular or vigorous application may damage the surface. Apply a small quantity of any car polish containing carnauba wax to a very clean cotton cloth. Note: The car polish must state Safe for Clear Coats as the polish will therefore contain the absolute minimum amount of abrasive compound. Gently wipe over the front panel in lateral motion, allow to dry then gently wipe off with a very clean cotton cloth. 23
25 9 Warranty Information 1 Year Limited Warranty 3 Year Extended Warranty Obtaining Service The Perreaux SXCD is warranted free from defects in material and workmanship under normal use for a period of 1-year (365 days) from the date of purchase. To extend the warranty of the Perreaux SXCD to three (3) years from date of purchase, please return a fully completed warranty registration form along with a copy of the original receipt of purchase to: Perreaux Industries Ltd PO Box 305 Mosgiel Dunedin 9053 New Zealand For the Extended Warranty Registration Form, please refer to Chapter 10. The extended warranty for the Perreaux SXCD is three (3) years from the date of purchase. If during the warranty period the SXCD exhibits defects in materials and/or workmanship, it will be repaired or replaced, at our option, without charge for either parts or labour, at our factory in New Zealand. The warranty does not apply to any unit that has been misused, abused or altered. Any unit that is not performing satisfactorily may be returned to the factory in New Zealand for evaluation. Return authorisation must first be obtained by either calling or writing to Perreaux prior to shipping the unit. Perreaux Industries Ltd and its authorised distributors and dealers shall not be held liable for any freight or insurance charges. Freight and insurance charges to and from the Perreaux factory will be the sole responsibility of the owner of the unit. There is no other express warranty on the SXCD. Neither this warranty nor any other warranty, express or implied, including any implied warranties of merchantability of fitness, shall extend beyond the warranty period. No responsibility is assumed for any incidental or consequential damages. In the event that you are experiencing difficulty with your SXCD, please as a first step consult the troubleshooting guide in Chapter 11. For further assistance, please contact your Perreaux dealer. 24
26 10 Extended Warranty Registration Form Please complete this form and either fax, mail or it, along with a copy of the original receipt, to Perreaux Industries Ltd. Fax: Mail: Perreaux Industries Ltd PO Box 305 Mosgiel Dunedin 9053 New Zealand info@perreaux.com Alternatively, complete the online Warranty Registration Form on our website 3 Year Extended Warranty Form Name: Address: Suburb: City: Country: Telephone: Website: Product: Serial No: Dealer: S I L H O U E T T E S X C D Purchase Date: / / d d m m y y y y 25
27 11 Troubleshooting Guide Please use this guide if you are experiencing any problems with the SXCD in your system. It will provide possible solutions for some given symptoms. SXCD won t function The unit is not turned on Check the SXCD power switch is turned on. Power not turned on Check that the SXCD is plugged in to the AC mains and the main power switch is turned on. Faulty wall socket or mains lead Make sure the AC mains wall socket is working properly and the mains lead is not damaged. Fuse is blown A fuse is blown in your SXCD; please contact your Perreaux dealer. SXCD won t play a CD CD in upside down Make sure the disc is inserted the correct way up. Disc is not a compatible format Ensure the disc is a CD and of a compatible format, i.e. CD-DA, CD-R or CD-RW. The SXCD cannot read data discs, unless they are Mixed Mode and contain audio data. The sound skips There is no output from my system Scratched or dirty disc Check the CD is not severely scratched and remove any marks, smudges or dust. Interconnect cables not connected Make sure that the input and output interconnect cables are plugged in and are connected to the respective RCA sockets on the rear of the SXCD. Not set to play Ensure that the SXCD is playing the recording you would like to listen to, and that pause has not been pressed. 26
28 No disc present Check that a disc is inserted for the SXCD to play. No volume setting Make sure that the volume on your preamplifier or integrated amplifier is set to a suitable level. Incorrect input Confirm that the SXCD output is connected to the appropriate source input of the preamplifier or integrated amplifier. Loud speakers not connected Check that your loud speakers are firmly connected via cables into the binding posts n the rear of the amplifier. I can hear a hum coming through my loud speakers plink functions don t work Input sockets and/or output binding posts corroded Check that RCA sockets and binding posts on the SXCD and other associated equipment are all free from corrosion. Interconnect cables damaged Make sure that the integrity of your interconnect cables is sound and they are firmly connected to your preamplifier or integrated amplifier and the SXCD CD player. SXCD is close to external interference Check the proximity of your SXCD to any possible source of EMI and/or RF interference, for example computers, televisions, amplifiers, speakers, etc. Ideally the SXCD should be placed as close as possible to your preamplifier or integrated amplifier. Cable not plugged in Ensure the plink cable is connected at both ends, to the SXCD and the controller device. Connectors wired incorrectly Check that the plink cable is wired correctly to interface with the controller device. RC-5 codes don t work Incompatible remote codes Make sure the remote control supports CD player RC-5 codes. Weak remote batteries The remote control s batteries may need to be replaced, also check they are inserted correctly. 27
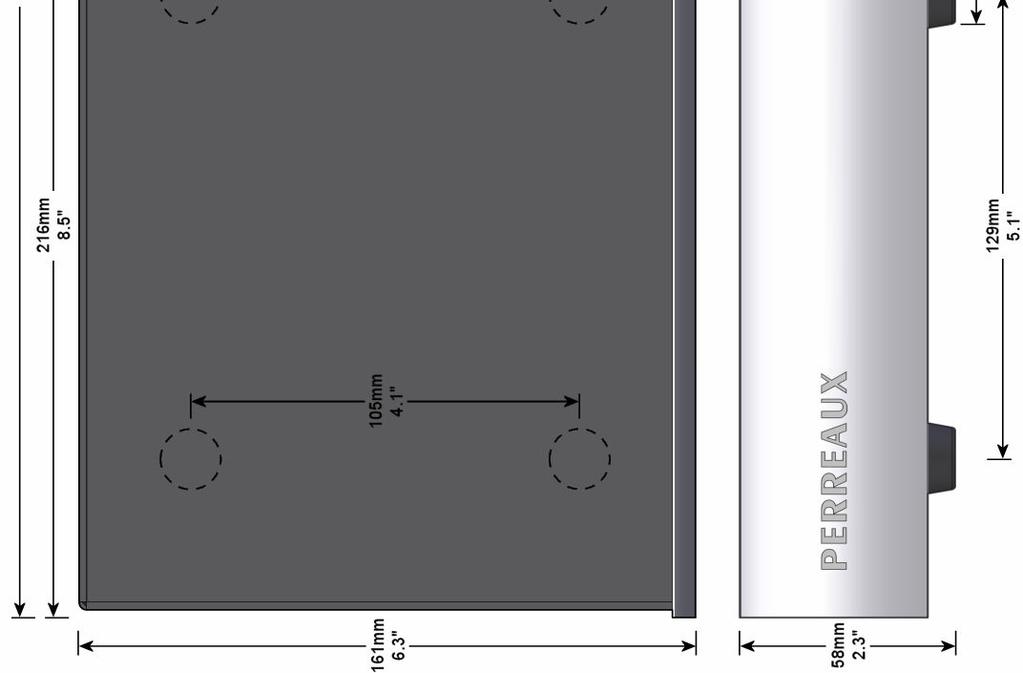
29 12 Specifications Specifications in Brief The correlation between published specifications and sonic quality can be unreliable. A list of numbers reveals virtually nothing. All technical measurements must be subject to qualitative as well as quantitative interpretation. Measurements of the SXCD reveal excellent results by any standards. Total Harmonic Distortion (THD+N): 1kHz 20Hz to 20kHz...< 0.001% Frequency Response: 20Hz 20kHz dB, -0.5dB Analog Output Impedance:...47Ω Analog Output Voltage: V rms Signal to Noise Ratio (unweighted): dB Dynamic Range:... 96dB 1kHz Channel Balance: dB Digital Sampling Frequency: kHz Resolution:...16-bit Digital Output Impedance:...75Ω Digital Output Voltage:...0.6V p-p Compatible Media Formats:...CD, CD-R, CD-RW Audio Connections Outputs... 1 pair analog line-level (RCA)... 1 x digital SPDIF coaxial (BNC) Other Connections Transport...1 x 50-way header plink... 1 x RJ45 modular jack RC x 3.5mm stereo jack Mains...1 x IEC AC mains input receptacle Overall Dimensions Electronics Component: Width...216mm (8.5 ) Depth...167mm (6.6 ) Height... 58mm (2.3 ) 28
30 Transport Component: Width: Disc Drawer Closed...216mm (8.5 ) Disc Drawer Open...335mm (13.2 ) Depth...161mm (6.3 ) Height... 58mm (2.3 ) Weight Gross...4.1kg (9.0lb) Electronics Module kg (3.7lb) Transport Module kg (3.5lb) Specifications Explained 1kHZ Total Harmonic Distortion + Noise is the percentage of output signal which is made up of frequencies added due to harmonics of the fundamental frequency and noise. Frequency Response...20Hz to 20kHz, +0.1dB -0.5dB Shows that the amplitude or strength of the output signal deviates by no more than 0.5dB over the entire audio band. Analog Output Impedance... 47Ω A low output impedance ensures the analog output signal will not be greatly degraded by the use of interconnect cables with high capacitive or inductive properties. Analog Output Voltage V rms This is the maximum output voltage at 0dBFS, or a full scale digital signal. Signal to Noise Ratio (unweighted) dB The ratio of desired signal to noise signals in the output. Perreaux engineers have designed the SXCD to maintain a low noise floor. Dynamic Range...96dB The difference between the highest and lowest amplitude portions of a signal. 29
31 Crosstalk... 1kHz Crosstalk is caused by stray inductances and capacitances between components and lines, which results in unintentional mixing of stereo signals. Meticulous wire routing ensures excellent high-frequency separation. Channel Balance...0.1dB Channel balance is the difference in level between the left and right channels. Digital Sampling Frequency kHz The digital sampling frequency for compact discs conforming to the red-book CD standard is 44.1kHz. Resolution...16-bits The resolution, or data word-length, for compact discs conforming to the red-book CD standard is 16-bits. Digital Output Impedance... 75Ω The SPDIF standard dictates 75Ω transmission of the digital signal. Output impedance which differs from this causes poor jitter and noise performance due to reflections and signal loss. Digital Output Voltage...0.6V p-p The SPDIF standard requires the output voltage to be between 0.4V p-p and 0.6V p-p. Setting the output voltage at the upper limit allows for signal losses due to low terminating impedance or long cable length. Compatible Media Formats... CD, CD-R, CD-RW CD, CD-R and CD-RW media, including Mixed Mode audio and data content, will function consistently and reliably. 30

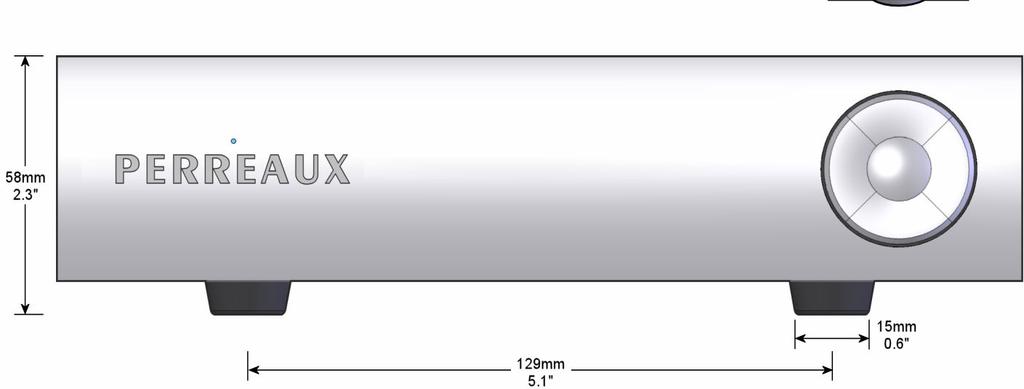
32 13 Physical Dimensions 31

33 32
34 14 Contact Details For more information please contact your Perreaux dealer, or contact: Perreaux Industries Ltd PO Box 305 Mosgiel Dunedin 9053 New Zealand Ph: Fax: info@perreaux.com Internet: 33
35 34 Installation Notes
Silhouette SXP2. Passive Preamplifier. Owners Manual
 Silhouette SXP2 Passive Preamplifier Owners Manual Perreaux Industries Limited makes no warranty for the use of its products, other than those expressly contained in the warranty detailed herein. The Company
Owners Manual PERREAUX
 éloquence Phono Preamplifier Owners Manual PERREAUX 1 The éloquence phono preamplifier Designed and Manufactured in Dunedin, New Zealand Table of Contents INTRODUCTION... 3 Unpacking... 4 Fitting Instructions...
Introduction Front Panel Functions Rear Panel Functions Precautions Placement & Ventilation... 5
 Contents Introduction... 2 Front Panel Functions... 3 Rear Panel Functions... 3 Precautions... 5 Placement & Ventilation... 5 Installation & Operation... 5 Care & Maintenance... 7 Troubleshooting... 8
110LP MOON Series. Phono Preamplifier. Owner s Manual
 Phono Preamplifier Owner s Manual Owner s Manual I Table of Contents Introduction 4 Unpacking 5 Installation & Placement 5 Circuit Board Layout s 6 Internal Adjustments 7 Rear Panel Connections 8 Operating
T L Audio. User Manual C1 VALVE COMPRESSOR. Tony Larking Professional Sales Limited, Letchworth, England.
 T L Audio User Manual C1 VALVE COMPRESSOR Tony Larking Professional Sales Limited, Letchworth, England. Tel: 01462 490600. International +44 1462 490600. Fax: 01462 490700. International +44 1462 490700.
VK-P10SE WARRANTY REGISTRATION FORM
 VK-P10SE WARRANTY REGISTRATION FORM Unit Serial Number: Customer Name: Address: Date of Purchase: Purchased From: Dealer Name: Address: IMPORTANT NOTE: In order to receive the full five-year product warranty,
COMPACT DIGITAL AUDIO. Unpacking and Placement
 COMPACT DIGITAL AUDIO O W N E R ' S M A N U A L C/BD-2000 Belt Drive Compact Disc Transport Congratulations on your purchase of this precision audio component and thank you for your selection of Parasound.
The performance of a lifetime. Owner s Manual MOON 110LP v2 Phono Preamplifier
 The performance of a lifetime Owner s Manual MOON 110LP v2 Phono Preamplifier MOON by Simaudio simaudio.com Simaudio Ltd 1345 Newton Road, Boucherville, Québec J4B 5H2 CANADA Date Code: 20180831 01 INTRODUCTION
SATRI AMPLIFIER AMP-51R. Owner s Manual
 SATRI AMPLIFIER AMP-51R Owner s Manual contents SAFETY INSTRUCTIONS 4 INTRODUCTION 6 OVERVIEW (FRONT PANEL) 8 OVERVIEW (REAR PANEL) 9 OVERVIEW (REMOTE CONTROL) 1 1 OPERATION 12 TROUBLESHOOTING 13 SPECIFICATION
ORPHEUS ZERO U S E R M A N U A L
 ORPHEUS ZERO U S E R M A N U A L I N T R O D U C T I O N FEATURES Class 1 product CD drive (ORPHEUS ZERO Drive) or player (ORPHEUS ZERO Player) Multiple formats reader : CD, CD-R, CD-RW Software controlled
508 Phono Preamplifier. Boulder Amplifiers, Inc. 255 S. Taylor Ave. Louisville, CO (303) /1/2018 Rev. 1.
 /1/2018 Rev. 1.") 508 Phono Preamplifier 6/1/2018 Rev. 1.0 P/N: 91053 Boulder Amplifiers, Inc. 255 S. Taylor Ave. Louisville, CO 80027 (303) 449-8220 www.boulderamp.com About About Boulder Amplifiers, Inc. Boulder was founded
508 Phono Preamplifier 6/1/2018 Rev. 1.0 P/N: 91053 Boulder Amplifiers, Inc. 255 S. Taylor Ave. Louisville, CO 80027 (303) 449-8220 www.boulderamp.com About About Boulder Amplifiers, Inc. Boulder was founded
Hegel HD20 High End D/A Converter
 Hegel HD20 High End D/A Converter www.hegel.com info@hegel.com USER GUIDE Congratulations on your new HEGEL! Every Hegel product is based on a simple philosophy: The audio reproduction instrument shall
CP1 OAD. Owner s Manual. Stereo Control Preamplifier. Ultrafidelity
 OAD Ultrafidelity CP1 Stereo Control Preamplifier Owner s Manual Contents Section Page No. Introduction........................................................................ 1 Warnings.................................................................................
PRO-ScalerHD2V HDMI to VGA & Audio Scaler Converter. User s Guide. Made in Taiwan
 PRO-ScalerHD2V HDMI to VGA & Audio Scaler Converter User s Guide Made in Taiwan Congratulations for owning a gofanco product. Our products aim to meet all your connectivity needs wherever you go. Have
Instruction Manual By Digital & Analog
 FEMTO Instruction Manual By Digital & Analog www.calyxaudio.com 1 Thank you for purchasing FEMTO Music is the most important messenger of human emotion as well as a meaning of its expression since human
PRO-ScalerV2HD VGA to HDMI & Audio Scaler Converter. User s Guide. Made in Taiwan
 VGA to HDMI & Audio Scaler Converter User s Guide Made in Taiwan Congratulations for owning a gofanco product. Our products aim to meet all your connectivity needs wherever you go. Have fun with our products!
TABLE OF CONTENTS. 1) Introduction 2. 2) Unpacking the Ares 2. 3) Installing the Ares in your system 3. 4) Setting the Operational Parameters 4
 Introduction 2. 2) Unpacking the Ares 2. 3) Installing the Ares in your system 3. 4) Setting the Operational Parameters 4") TABLE OF CONTENTS 1) Introduction 2 2) Unpacking the Ares 2 3) Installing the Ares in your system 3 4) Setting the Operational Parameters 4 5) High Output MM/MC Cartridge Setup 6 6) Medium Output Cartridge
TABLE OF CONTENTS 1) Introduction 2 2) Unpacking the Ares 2 3) Installing the Ares in your system 3 4) Setting the Operational Parameters 4 5) High Output MM/MC Cartridge Setup 6 6) Medium Output Cartridge
User Manual PS-684. HDBaseT Extender Kit 70m. All Rights Reserved. Version: UHBT70P_2016V1.2
 User Manual PS-684 All Rights Reserved Version: UHBT70P_2016V1.2 Preface Read this user manual carefully before using this product. Pictures shown in this manual is for reference only, different model
OPERATOR MANUAL OSD390 SERIES 4 CHANNEL VIDEO/AUDIO/DATA FIBER OPTIC TRANSMISSION SYSTEM
 PTY. LTD A.B.N. 83 003 020 504 OPERATOR MANUAL OSD390 SERIES 4 CHANNEL VIDEO/AUDIO/DATA FIBER OPTIC TRANSMISSION SYSTEM OSD390 SERIES 4 CHANNEL VIDEO/AUDIO/DATA FIBER OPTIC TRANSMISSION SYSTEM Document
CONSONANCE PREAMPLIFIER OWNER S MANUAL
 CONSONANCE PREAMPLIFIER OWNER S MANUAL TABLE OF CONTENTS Introduction Initial Inspection Features Installation Input Impedance Adjustments Preamplifier Internal View Impedance Adjustment Diagram Overall
M2 RIAA Owner s Information
 M2 RIAA Owner s Information The M2 RIAA is a Level 2 RIAA phono stage, developed for the best possible sonic performance rather than technical specifications. To this end, the M2 RIAA incorporates thermionic
Contents Introduction Safety Cleaning Connections Cartridge gain and loading Technical specification Fig.1 PS.30R/ PS.30RDT rear panel Fig.
 Contents Introduction Safety Cleaning Connections Cartridge gain and loading Technical specification Fig.1 PS.30R/ PS.30RDT rear panel Fig.2 Basic audio connection Fig.3 Removing the lid Fig 4 Gain and
Owner's Manual PPA-1 Phono Preamp
 Owner's Manual PPA-1 Phono Preamp Contents Legal Notifications 2 Warranty Information 2 Installation and Usage Tips 3 Connections and Controls 3 Front panel Rear panel Connecting the PPA-1 to Your System
Low Noise Solid State Phono Preamplifier User's Guide and Operating Information
 Bel Canto Design PHONO 1 Low Noise Solid State Phono Preamplifier User's Guide and Operating Information Bel Canto Design 212 Third Avenue North Suite 345 Minneapolis, MN 55401 Phone: (612) 317.4550 Fax:
OPERATOR MANUAL OSD553 TRIPLE VIDEO FIBRE OPTIC RECEIVER
 OPERATOR MANUAL OSD553 TRIPLE VIDEO FIBRE OPTIC RECEIVER OSD553 TRIPLE VIDEO FIBRE OPTIC RECEIVER Document No: 101035 Revision 02 PAGE 2 C O N T E N T S 1. TECHNICAL SUMMARY... 4 1.1 BRIEF DESCRIPTION...
PH-1. Italian MM & MC Phono Preamplifier OWNER S MANUAL
 PH-1 Italian MM & MC Phono Preamplifier OWNER S MANUAL IMPORTANT SAFETY INFORMATION CAUTION: TO REDUCE THE RISK OF ELECTRIC SHOCK, DO NOT REMOVE COVER (OR BACK). NO USER-SERVICEABLE PARTS INSIDE. REFER
PRO-CoaxExt HDMI extender over Coaxial cable with bi-directional IR User s Guide
 HDMI extender over Coaxial cable with bi-directional IR User s Guide Transmitter Receiver Made in Taiwan Congratulations for owning a gofanco product. Our products aim to meet all your connectivity needs
User Manual TL-TP70-HDIR 70m Extender with ARC and IR All Rights Reserved Version: TL-TP70-HDIR_180723
 User Manual TL-TP70-HDIR 70m Extender with ARC and IR All Rights Reserved Version: TL-TP70-HDIR_180723 Preface Read this user manual carefully before using this product. Pictures shown in this manual is
KORU. Phono Preamplifier Instruction Manual. The heart of music
 KORU Phono Preamplifier Instruction Manual The heart of music www.pliniusaudio.com Contents Introduction...2 Design Philosophy...3 Unpacking...4 Placement & Ventilation...4 Care & Maintenance...5 Precautions...6
USER INSTRUCTIONS MODEL CSI-200 COAXIAL SYSTEM INTERFACE
 USER INSTRUCTIONS MODEL CSI-200 COAXIAL SYSTEM INTERFACE 9350-7676-000 Rev B, 5/2001 PROPRIETARY NOTICE The RTS product information and design disclosed herein were originated by and are the property of
USER MANUAL GOLDMUND MIMESIS 32.5 Universal Acoustic Processor
 USER MANUAL GOLDMUND MIMESIS 32.5 Universal Acoustic Processor Congratulations. Thank you for purchasing the Goldmund MIMESIS 32.5 UNIVERSAL ACOUSTIC PROCESSOR. You have acquired the best multi-usage acoustic
LavryBlack Series Model DA10 Digital to Analog Converter
 LavryBlack Series Model DA10 Digital to Analog Converter Lavry Engineering, Inc. P.O. Box 4602 Rolling Bay, WA 98061 http://lavryengineering.com email: techsupport@lavryengineering.com January 14, 2008
Full HD Multi-Channel Expandable Wireless HDMI Gateway Extender
 Full HD Multi-Channel Expandable Wireless HDMI Gateway Extender Installation Guide P/N: CE-H22T11-S1/CE-H22U11-S1 04-1097A 1 Introduction The Full HD Multi-Channel Expandable Wireless HDMI Gateway Extender
Operating Manual. Mark Levinson Nº25 Dual Monaural Phono Preamplifier. Madrigal Audio Laboratories, Inc. 1
 Operating Manual Mark Levinson Nº25 Dual Monaural Phono Preamplifier Madrigal Audio Laboratories, Inc. 1 WARNING: TO REDUCE THE RISK OF FIRE OR ELECTRIC SHOCK, DO NOT EXPOSE THIS APPLIANCE TO RAIN OR MOISTURE.
O W N E R ' S M A N U A L. D/AC-1100 Digital/Analog Converter
 O W N E R ' S M A N U A L D/AC-1100 HD Digital to Analog Converter Congratulations on your purchase of this precision audio component and thank you for your selection of Parasound. The D/AC-1100 HD is
Boulder 2020 Advance D/A Converter
 Boulder 2020 Advance D/A Converter Owners Manual V1.2 8/1/98 TABLE OF CONTENTS GETTING STARTED Placement of your 2020 D/A Converter........................................1-1 Connecting the Power Supply
USER MANUAL GOLDMUND METIS 7 Integrated Amplifier
 USER MANUAL GOLDMUND METIS 7 Integrated Amplifier Congratulations. Thank you for purchasing the Goldmund METIS 7. You have acquired the best multi-usage ever made for professional and domestic uses. Please
Reference 150 LINEAR
 Reference 150 LINEAR USER GUIDE Congratulations on your new CONSONANCE! Our products are based on a simple philosophy: The component shall reproduce the original musical sound, purely and naturally. The
Connevans.info. DeafEquipment.co.uk. This product may be purchased from Connevans Limited secure online store at
 Connevans.info Solutions to improve the quality of life Offering you choice Helping you choose This product may be purchased from Connevans Limited secure online store at www.deafequipment.co.uk DeafEquipment.co.uk
Table of Contents. Read This First.2. Introduction by Jim Fosgate...3. Unpacking..4. Tubes and Tube shield Installation 5. Product Placement...
 Owner s Manual Table of Contents Read This First.2 Introduction by Jim Fosgate...3 Unpacking..4 Tubes and Tube shield Installation 5 Product Placement...6 Connecting your Fosgate Signature..7 Phono stage
bel canto SEP2 Single Ended Triode Tube Preamplifier User's Guide and Operating Information
 bel canto SEP2 Single Ended Triode Tube Preamplifier User's Guide and Operating Information Bel Canto Design 212 Third Avenue North, Suite 274 Minneapolis, MN 55401 USA Phone: 612 317.4550 Fax: 612.359.9358
USER MANUAL. DV-HSW-41 HDMI 4x1 SWITCHER LIT Bergen Boulevard, Woodland Park, NJ Tel FAX Web
 USER MANUAL DV-HSW-41 HDMI 4x1 SWITCHER 244 Bergen Boulevard, Woodland Park, NJ 07424 Tel 973-785-4347 FAX 973-785-3318 Web www.fsrinc.com LIT1372 PROPRIETARY INFORMATION All information in this manual
Calaf integrated stereo amplifier
 Calaf integrated stereo amplifier USER GUIDE Congratulations on your new CONSONANCE! Our products are based on a simple philosophy: The component shall reproduce the original musical sound, purely and
music hall pa2.2 INSTRUCTION MANUAL music hall
 music hall pa2.2 INSTRUCTION MANUAL music hall http://www.musichallaudio.com CONGRATULATIONS ON YOUR PURCHASE You have selected an exceptional phono preamplifier. Each component used in the construction
PREAMPLIFIER INTRODUCTION INSTRUCTIONS FOR USE. Thank you for purchasing the Musical Fidelity A3 CR remote control preamplifier.
 INTRODUCTION A3 CR PREAMPLIFIER INSTRUCTIONS FOR USE Thank you for purchasing the Musical Fidelity A3 CR remote control preamplifier. Used properly and carefully, it should give you many years of outstanding
ACCESSORIES MANUAL PART NUMBER: TNP500. Universal Tilt N Plug Interconnect Box USER'S GUIDE
 MANUAL PART NUMBER: 400-0091-003 TNP500 Universal Tilt N Plug Interconnect Box USER'S GUIDE INTRODUCTION Your purchase of the TNP100 Tilt N Plug Interconnect Box is greatly appreciated. We are sure you
Kramer Electronics, Ltd. USER MANUAL. Models: 6410N, Digital to Analog Audio Converter 6420N, Analog to Digital Audio Converter
 Kramer Electronics, Ltd. USER MANUAL Models: 6410N, Digital to Analog Audio Converter 6420N, Analog to Digital Audio Converter Contents Contents 1 Introduction 1 2 Getting Started 1 2.1 Quick Start 1 3
Integrator s Guide Avalon
 Integrator s Guide Avalon HD Component Video / Digital Audio Matrix Switch 2 Table of Contents Table of Contents... 2 Introduction... 3 Features:... 3 Installation... 4 Unpacking... 4 Front Panel Protective
Dual Antenna Wireless Multi-Channel Expandable HDMI Extender Installation Guide
 Dual Antenna Wireless Multi-Channel Expandable HDMI Extender Installation Guide 04-1125A Introduction The Dual Antenna Wireless Multi-Channel Expandable HDMI Extender wirelessly transmits HDMI signals
MX-206 Stereo Microphone Mixer. Operating Manual
 MX-206 Stereo Microphone Mixer Operating Manual ASHLY AUDIO INC. 847 Holt Road Webster, NY 14580-9103 Phone: (585) 872-0010 Toll-Free: (800) 828-6308 Fax: (585) 872-0739 www.ashly.com Operating Manual
Multi Room Audio Matrix Switcher
 Multi Room Audio Matrix Switcher User s Guide 560884 ZONES 1 2 3 4 5 6 7 8 Copyright Clipsal Integrated Systems Pty Ltd 2005. All rights reserved. This material is copyright under Australian and international
USB Phono Plus. Project Series USER S MANUAL. Audiophile Computer Interface
 USB Phono Plus Audiophile Computer Interface Project Series USER S MANUAL IMPORTANT SAFETY INSTRUCTION READ FIRST This symbol, whenever it appears, alerts you to the presence of uninsulated dangerous voltage
DisplayPort Extender over 2 LC Fibers
 DisplayPort Extender over 2 LC Fibers Audio 3GSDI Embedder EXT-DP-CP-2FO User Manual Release A2 DisplayPort Extender over 2 LC Fibers Important Safety Instructions 1. Read these instructions. 2. Keep these
Sphinx II. Owner s Manual. Tube Hybrid Integrated Power Amplifier. Rogue Audio, Inc. 3 Marian Lane Brodheadsville, PA Issue date: 08/01/16
 Sphinx II Tube Hybrid Integrated Power Amplifier Owner s Manual Rogue Audio, Inc. 3 Marian Lane Brodheadsville, PA 18322 Issue date: 08/01/16 TABLE OF CONTENTS 1) Introduction 2 2) Unpacking the Sphinx
ACCESSORIES MANUAL PART NUMBER: PRODUCT REVISION: 1 PNP202. Interconnect Box USER'S GUIDE
 MANUAL PART NUMBER: 400-0109-001 PRODUCT REVISION: 1 PNP202 Interconnect Box USER'S GUIDE INTRODUCTION Your purchase of the PNP202 Interconnect Box is greatly appreciated. We are sure you will find it
OPERATOR MANUAL OSD8865 DIGITAL TRIPLE VIDEO FIBER OPTIC RECEIVER
 OPERATOR MANUAL OSD8865 DIGITAL TRIPLE VIDEO FIBER OPTIC RECEIVER INDEX 1 1 TECHNICAL SUMMARY... 4 1.1 BRIEF DESCRIPTION... 4 1.1.1 OVERVIEW... 4 1.1.2 APPLICATIONS... 4 1.1.3 FEATURES AND BENEFITS...
User s Manual. Digital Media Converter Package Part #: DL-HDCAT
 User s Manual Digital Media Converter Package Part #: DL-HDCAT 800-530-8998 www.libav.com TABLE OF CONTENTS 1-1 Table of Contents 1-2 Welcome and Safety Notes 1-3 Product Description and General Specifications
2.0 Wall Mount TV Soundbar Instruction Manual
 8010275 2.0 Wall Mount TV Soundbar Instruction Manual Read all of the instructions before using this soundbar and keep the manual in a safe place for future reference. Safety Information CA UT IO N RISK
Mapletree Audio Design
 Ultra 4C Preamplifier Mapletree Audio Design Ultra 4C Stereo Phono/Line Preamplifier PS 2D Power Supply User s Manual Rev. Mar. 22, 2019 Mapletree Audio Design R. R. 1, Seeley's Bay, Ontario, Canada, K0H
Pre1. Balanced Control Preamplifier. User's Guide and Operating Information
 Pre1 Balanced Control Preamplifier User's Guide and Operating Information Bel Canto Design 212 Third Avenue North Suite 345 Minneapolis, MN 55401 Phone: (612) 317.4550 Fax: (612) 359.9358 Email: Info@BelCantoDesign.com
User Manual CVA3. HDMI Audio Decoder. All Rights Reserved. Version: CVA3_2016V1.0
 User Manual CVA3 All Rights Reserved Version: CVA3_2016V1.0 Preface Read this user manual carefully before using this product. Pictures shown in this manual is for reference only, different model and specifications
PRO-HDMI2HD. HDMI to SDI/3G-HD-SD Converter. User Manual. Made in Taiwan
 PRO-HDMI2HD HDMI to SDI/3G-HD-SD Converter User Manual Made in Taiwan rev.1008 103 Quality Circle, Suite 210 Huntsville, Alabama 35806 Tel: (256) 726-9222 Fax: (256) 726-9268 Email: service@pesa.com Safety
User s Guide. 5.8GHz Wireless A/V Signal Sender
 1500332 User s Guide 5.8GHz Wireless A/V Signal Sender Thank you for purchasing your A/V Signal Sender from RadioShack. Please read this user s guide before installing, setting up, and using your new sender.
USER MANUAL. Kramer Electronics, Ltd. Models:
 Kramer Electronics, Ltd. USER MANUAL Models: 103AV, 1:3 Audio-Stereo / Video DA 104M, 1:4 Microphone Amplifier 105A, 1:5 Stereo Audio DA 105S, 1:5 High Resolution s-video DA 105V, 1:5 High Resolution Video
User Manual. Model 1372A and 1374A HDMI Switchers. 1T-SX-632 Model 1372A 2X1 Switcher. v1.3 2x1 SWITCHER. v1.3 INPUT ENHANCE POWER
 User Manual 1T-SX-632 Model 1372A 2X1 Switcher v1.3 v1.3 2x1 SWITCHER 1 2 INPUT ENHANCE POWER 1 2 INPUT ENHANCE POWER Model 1372A and 1374A HDMI Switchers Table Of Contents 1.0 Introduction.......................
DisplayPort Extender over 2 LC Fibers
 DisplayPort Extender over 2 LC Fibers Audio 3GSDI Embedder EXT-DP-CP-2FO User Manual Release A2 DisplayPort Extender over 2 LC Fibers Important Safety Instructions 1. Read these instructions. 2. Keep these
clipping; yellow LED lights when limiting action occurs. Input Section Features
 ELX-1A Rack-Mount Mic/Line Mixer Four inputs, one output in a single rack space Very-highery-high-quality audio performance High reliability Extensive filtering circuitry and shielding protect against
DUAL/QUAD DISPLAY CONTROLLER Operation Manual
 DUAL/QUAD DISPLAY CONTROLLER Operation Manual Model PXD524 MicroImage Video Systems division of World Video Sales Co., Inc PO Box 331 Boyertown, PA 19512 Phone 610-754-6800 Fax 610-754-9766 sales@mivs.com
AES-402 Automatic Digital Audio Switcher/DA/Digital to Analog Converter
 Broadcast Devices, Inc. AES-402 Automatic Digital Audio Switcher/DA/Digital to Analog Converter Technical Reference Manual Broadcast Devices, Inc. Tel. (914) 737-5032 Fax. (914) 736-6916 World Wide Web:
User Manual TPHD-BYE. HDBaseT Extender Set 70m. All Rights Reserved. Version: TPHD-BYE_2014V1.0
 User Manual TPHD-BYE HDBaseT Extender Set 70m All Rights Reserved Version: TPHD-BYE_2014V1.0 www.ptn-electronics.com Preface Read this user manual carefully before using this product. Pictures shown in
BP2-MM MM Phono Preamplifier Owner s Manual
 BP2-MM MM Phono Preamplifier Owner s Manual Important Safety Instructions The lightning flash with arrowhead symbol within an equilateral triangle, is intended to alert the user to the presence of un-insulated
INSTRUCTION MANUAL PELLAR PHONO PRE-AMPLIFIER. Extended 5-Year Warranty
 V1.1E INSTRUCTION MANUAL PELLAR PHONO PRE-AMPLIFIER Extended 5-Year Warranty AVID is pleased to extend the normal warranty duration to 5-Years from the date of original shipping. This warranty is transferable
INSTALLATION MANUAL FT-FOTR-1VDE-ST-S
 INSTALLATION MANUAL FT-FOTR-1VDE-ST-S 1-Channel Digital Duplex Baseband Video Transmitter and Receiver With Reverse Data Transmission & Ethernet Transmission v1.0 4/5/11 1 PACKAGE CONTENTS This package
Please take a few minutes to read this manual so that you will better understand the featues and capabilities of your MF80. MF80 Owner s Manual 1
 Congratulations on your purchase of the Conrad-Johnson MF80 amplifier. You have acquired one of the finer pieces of musical reproduction equipment available today. The MF80 is the result of over a decade
32 Channel CPCI Board User Manual
 0 Sections Page 1.0 Introduction 1 2.0 Unpacking and Inspection 1 3.0 Hardware Configuration 1 4.0 Board Installation 5 5.0 I/O Connections and the Front Panel 5 5.1 Front Panel Layout 5 5.2 Input and
OPERATOR MANUAL OSD351 FIBRE OPTIC CCTV TRANSMITTER CARD
 OPERATOR MANUAL OSD351 FIBRE OPTIC CCTV TRANSMITTER CARD OSD351 FIBRE OPTIC CCTV TRANSMITTER CARD Document No:10103701 PAGE 2 C O N T E N T S 1. TECHNICAL SUMMARY...4 1.1 BRIEF DESCRIPTION...4 1.2 TECHNICAL
Integrator s Guide Concord
 Integrator s Guide Concord HD Component Video / Composite Video / Analog Audio Matrix Switch with Cat5 outputs 2 3 Table of Contents Table of Contents... 3 Introduction... 4 Features:... 4 Installation...
Video SystemVideo System
 PublishedPublished: May 4, 2005 Video SystemVideo System Video System Component Location ItemItem Part NumberPart Number 1 - Television tuner module 2 - Rear seat entertainment control module 3 - DVD (digital
SyncGen. User s Manual
 SyncGen User s Manual 1 IMPORTANT SAFETY INSTRUCTION READ FIRST This symbol, whenever it appears, alerts you to the presence of uninsulated dangerous voltage inside the enclosure-voltage that may be sufficient
INSTRUCTION MANUAL PULSUS PHONO PRE-AMPLIFIER. Extended 5-Year Warranty
 V1.3E INSTRUCTION MANUAL PULSUS PHONO PRE-AMPLIFIER Extended 5-Year Warranty AVID is pleased to extend the normal warranty duration to 5-Years from the date of original shipping. This warranty is transferable
ACCESSORIES MANUAL PART NUMBER: PRODUCT REVISION: 1 TNP100. Tilt N Plug Interconnect Box USER'S GUIDE
 MANUAL PART NUMBER: 400-0091-001 PRODUCT REVISION: 1 TNP100 Tilt N Plug Interconnect Box USER'S GUIDE INTRODUCTION Your purchase of the TNP100 Tilt N Plug Interconnect Box is greatly appreciated. We are
Kramer Electronics, Ltd. USER MANUAL. Model: VM Video Component Distributor
 Kramer Electronics, Ltd. USER MANUAL Model: VM-1045 Video Component Distributor Contents Contents 1 Introduction 1 2 Getting Started 1 2.1 Quick Start 1 3 Overview 3 4 Your VM-1045 Video Component Distributor
CV-005B. Mini Component to HDMI Converter. User Manual. Made in Taiwan
 CV-005B Mini Component to HDMI Converter User Manual Made in Taiwan Safety and Notice The CV-005B Mini Component to HDMI Converter has been tested for conformance to safety regulations and requirements,
Owner's Manual. Model PH6 PHONO PREAMPLIFIER.
 Owner's Manual Model PH6 PHONO PREAMPLIFIER 3900 ANNAPOLIS LANE NORTH / PLYMOUTH, MINNESOTA 55447-5447 / PHONE: 763-577-9700 FAX: 763-577-0323 www.audioresearch.com Contents Model PH6 Page No. Preface.......................................................1
DISTRIBUTION AMPLIFIER
 MANUAL PART NUMBER: 400-0045-005 DA1907SX 1-IN, 2-OUT VGA/SVGA/XGA/UXGA DISTRIBUTION AMPLIFIER USER S GUIDE TABLE OF CONTENTS Page PRECAUTIONS / SAFETY WARNINGS... 2 GENERAL...2 GUIDELINES FOR RACK-MOUNTING...2
*Prefer. 600 MHz 4K ULTRA. 60Hz, 4:4:4. over one SC-Terminated Fiber-Optic Cable EXT-DP-4K600-1SC. User Manual. Release A1
 *Prefer 600 MHz 4K ULTRA 60Hz, 4:4:4 DisplayPort 1.2 Extender over one SC-Terminated Fiber-Optic Cable EXT-DP-4K600-1SC User Manual Release A1 Important Safety Instructions 1. Read these instructions.
USER MANUAL. Kramer Electronics, Ltd. Models:
 Kramer Electronics, Ltd. USER MANUAL Models: 707, Video Audio Line Transmitter 708, Video Audio Line Receiver 709, Y/C Line Transmitter 710, Y/C Line Receiver 711xl, Video-Audio Line Transmitter 712xl,
Kramer Electronics, Ltd. USER MANUAL. Model: VA-14. 4x1 Balanced Audio Mixer
 Kramer Electronics, Ltd. USER MANUAL Model: VA-14 4x1 Balanced Audio Mixer Contents Contents 1 Introduction 1 2 Getting Started 2.1 Quick Start 1 1 3 Overview 3 4 Your VA-14 4x1 Balanced Audio Mixer 4
SDP-RFD AC-3 /RF DEMODULATOR (120V/230V) INSTALLATION/ TECHNICAL MANUAL
 INSTALLATION/ TECHNICAL MANUAL") SDP-RFD AC-3 /RF DEMODULATOR (120V/230V) INSTALLATION/ TECHNICAL MANUAL Unpacking and Inspection Save all packing materials in case you ever need to ship the unit. Thoroughly inspect the unit and packing
SDP-RFD AC-3 /RF DEMODULATOR (120V/230V) INSTALLATION/ TECHNICAL MANUAL Unpacking and Inspection Save all packing materials in case you ever need to ship the unit. Thoroughly inspect the unit and packing
User Guide. HDMI Fiber Optic Extender. DVI-7350a
 User Guide HDMI Fiber Optic Extender DVI-7350a Table of Contents Section Page Product Safety.................................... 1 1.0 Introduction...2 2.0 Specifications...3 3.0 Package Contents...3 4.0
AES Channel Digital/Analog Audio Switcher/DA/Digital to Analog Converter
 Broadcast Devices, Inc. AES-408 8 Channel Digital/Analog Audio Switcher/DA/Digital to Analog Converter Technical Reference Manual Broadcast Devices, Inc. Tel. (914) 737-5032 Fax. (914) 736-6916 World Wide
Kramer Electronics, Ltd. USER MANUAL. Model: VM-10xl. Video Audio Distribution Amplifier
 Kramer Electronics, Ltd. USER MANUAL Model: VM-10xl Video Audio Distribution Amplifier Contents Contents 1 Introduction 1 2 Getting Started 1 2.1 Quick Start 1 3 Overview 3 4 Your VM-10xl Video Audio Distribution
INSTRUCTION MANUAL PELLERE PHONO PRE-AMPLIFIER. Extended 5-Year Warranty
 V1.2E INSTRUCTION MANUAL PELLERE PHONO PRE-AMPLIFIER Extended 5-Year Warranty AVID is pleased to extend the normal warranty duration to 5-Years from the date of original shipping. This warranty is transferable
Wireless 1080P HDMI Video Kit - Mid-Range
 Wireless 1080P HDMI Video Kit - Mid-Range Installation Guide Introduction The Wireless 1080P HDMI Video Kit - Mid-Range transmits HDMI A/V signals up to 165ft (line-of-sight) wirelessly and supports high-definition
Kramer Electronics, Ltd. USER MANUAL. Models: OC-1N, Video Isolator OC-2, Dual Channel Video Isolator OC-4, Quad Channel Video Isolator
 Kramer Electronics, Ltd. USER MANUAL Models: OC-1N, Video Isolator OC-2, Dual Channel Video Isolator OC-4, Quad Channel Video Isolator Contents Contents 1 Introduction 1 2 Getting Started 1 2.1 Quick Start
Owner s Manual PRE1. v1.2. Triode Class A Line Preamplifier
 Owner s Manual PRE1 Triode Class A Line Preamplifier www.lab12.gr v1.2 Table of Contents It is yours Features Installation & Placement Front Panel Rear Panel Remote Control Main connections For the safety
DA IN 1-OUT LINE DRIVER WITH EQUALIZATION + AUDIO USER S GUIDE
 MANUAL PART NUMBER: 400-0430-001 1-IN 1-OUT LINE DRIVER WITH UALIZATION + AUDIO USER S GUIDE TABLE OF CONTENTS Page PRECAUTIONS / SAFETY WARNINGS... 2 GENERAL...2 GUIDELINES FOR RACK-MOUNTING...2 INSTALLATION...2
FIM-108 MATRIX FIBER INTERFACE INSTRUCTION MANUAL
 FIM-108 MATRIX FIBER INTERFACE INSTRUCTION MANUAL FIM-108 Matrix Fiber Interface Instruction Manual 2003 Clear-Com Intercom Systems All Rights Reserved Part Number 810291 Rev. A Clear-Com Intercom Systems
RS232 settings are internally definable via jumper blocks, to accommodate interfacing with a wide range of control products.
 Appendix C RS232 Protocol RS232 settings are internally definable via jumper blocks, to accommodate interfacing with a wide range of control products. Baud rate 96ØØ or 192ØØ Echo status AUTO or REQUEST
PRO-HDMI2DP HDMI 2.0a to DisplayPort 1.2a Converter. User s Guide. Made in Taiwan
 HDMI 2.0a to DisplayPort 1.2a Converter User s Guide Made in Taiwan Congratulations for owning a gofanco product. Our products aim to meet all your connectivity needs wherever you go. Have fun with our