HDTV-Sat-Irdeto-Receiver
|
|
|
- Rosa Jefferson
- 6 years ago
- Views:
Transcription

1 HDTV-Sat-Irdeto-Receiver
2
3 TABLE OF CONTENTS 1 SAFETY ADVICE QUICK SETUP FEATURES HOW TO CONNECT YOUR RECEIVER HARDWARE: WATCHING TV MENU OPERATION EDITING CHANNELS INSTALLATION USER SETUP MULTIMEDIA (only with a connected and operational external HDD) CONDITIONAL ACCESS SYSTEM TROUBLE SHOOTING TECHNICAL SPECIFICATIONS NOTE: This User manual is available in different language versions. If you would like to see the list of language versions available and to download a copy, please visit 2
4 INTRODUCTION Congratulations on receiving a HOME2US High-Definition All-Digital Satellite Receiver, one of the most advanced interactive digital receivers available today. The manufacturer of this high-quality product has merged the extraordinary features of digital satellite TV with the flexibility of an external digital video recorder (DVR) [which must be supplied by the user of the receiver] and the incredible picture quality and sound of High-Definition TV (HDTV). This User Guide introduces you to the basic features, outlines important safeguards, and provides several options for integrating this component into your current entertainment system. Please take a few moments to read through this User Guide; the configuration diagrams, on-screen menu description and troubleshooting section will help you make the most of your home entertainment experience. FCC DECLARATION OF CONFORMITY Note: This equipment has been tested and found to comply with the limits for a Class B digital device, pursuant to part 15 of the FCC Rules. These limits are designed to provide reasonable protection against harmful interference in a residential installation. This equipment generates, uses and can radiate radio frequency energy and, if not installed and used in accordance with the instructions, may cause harmful interference to radio communications. However, there is no guarantee that interference will not occur in a particular installation. If this equipment does cause harmful interference to radio or television reception, which can be determined by turning the equipment off and on, the user is encouraged to try to correct the interference by one or more of the following measures: ㆍ Reorient or relocate the receiving antenna. ㆍ Increase the separation between the equipment and receiver. ㆍ Connect the equipment into an outlet on a circuit different from that to which the receiver is connected. ㆍ Consult the dealer or an experienced radio/tv technician for help. Change or modifications not expressly approved by the party responsible for compliance could void the user s authority to operate the equipment under FCC rules. 3
5 1 SAFETY ADVICE This product has been manufactured to comply with international safety standards. Please read the following safety precautions carefully. MAINS SUPPLY: V AC 50/60Hz Operate this product only from the type of power supply indicated on the marking label. If you are not sure of the type of power supplied to your home, consult your local power company. - Disconnect the product from the mains before you start any maintenance or installation procedures. OVERLOADING: Do not overload a wall outlet, extension cord or adapter as this may result in electric fire or shock. LIQUID: The product should not be exposed to liquid of any kind. In addition, no objects filled with liquid should be placed on the apparatus. CLEANING: Disconnect the product from the wall outlet before cleaning. Use a light damp cloth (no solvents) to dust the product. VENTILATION: The slots on top of the product must be left uncovered to allow proper airflow into the unit. - Do not stand the product on soft furnishings or carpets. - Do not stack electronic equipments on top of the product. ATTACHMENTS: Do not use any unsupported attachments as these may be hazardous or cause damage to the product. CONNECTION TO THE AERIAL: Disconnect the product from the mains before connecting or disconnecting the cable from the aerial. Failure to do so can damage the aerial. CONNECTION TO THE TV: Disconnect the product from the mains before connecting or disconnecting the cable from the TV. Failure to do so can damage the TV. LOCATION: Place the product indoors to avoid exposing it to lightning, rain or sun. - Do not place it near a radiator or heat register. - Make sure it has more than 10cm clearance from - Do not block the openings with any object, and do not place the product on a bed, sofa, rug, or other similar surface. - If you place the product on a rack or a bookcase, ensure that there is adequate ventilation and that you have followed the manufacturer s instructions for mounting. 4
6 - Do not place the product on an unstable cart, stand, tripod, bracket, or table where it can fall. A falling product can cause serious injury to a child or adult, and serious damage to the appliance. LIGHTNING, STORM or NOT IN USE: Unplug the product from the wall outlet and disconnect the antenna during a thunderstorm or when left unattended and unused for long periods of time. This will prevent damage to the unit due to lightning and power-surges. EXTRANEOUS OBJECTS: Do not insert anything through the openings in the unit, where they can touch dangerous voltage points or damage parts. REPLACEMENT of PARTS: Replacement of parts may only be made by service technician specified by the manufacturer. WARNING! To avoid damage of the power cord or plug: - Do not modify or process the power cord or plug arbitrarily. - Do not bend or twist the power cord. - Make sure to disconnect the power cord holding the plug. - Keep heating appliances as far as possible from the power cord in order to prevent the cover vinyl from melting. - The main plug shall remain readily operable. To avoid electrical shock: - Do not open the main body. - Do not insert metal or inflammable objects inside the product. - Do not touch the power plug with wet hands. - Disconnect the power cord in case of lightning. To avoid damage of product: - Do not use the product when it is out of order. If you continue to use the product when defective, serious damage can be caused to it. Make sure to contact your local product distributor if the product is out of order. - Do not insert metal or alien substance into the slots for the modules or smartcards. It may cause damage to the product and reduce its life span. The socket-outlet shall be installed near the equipment and shall be easily accessible. 5

7 2 QUICK SETUP 1. Check accessories Please check the giftbox for completeness of accessories. Included should be: Receiver, Remote Control, external Power Supply, User Manual, 2 Batteries 2. Connect the Receiver to the TV Set Connect your Receiver with your TV Set. Details can be found in the User Manual under chapter 4. How to connect your receiver. 3. Connect the Receiver with the Satellite Antenna Connect your Receiver with your Satellite Antenna. Details can be found in the User Manual under chapter 4. How to connect your receiver. 4. Switch on the Receiver and TV Set Switch on the AC-Power Switch on the rear side of the Receiver and then press the Standby button on the Receiver Front Panel (see User Manual for more details: Chapter 5.2 Front Panel and 5.3 Rear Panel) 5. Insert the Batteries Insert the 2 Batteries into the battery case on the underside of the Remote Control. Please make sure that the Battery + and - Poles are correctly aligned. 6. Settings in the OSD Menu After the Receiver has booted it will display the On-Screen Menu on your TV Set. Should this not bet he case, please check the connections as well as the settings of your TV Set. Please use the key on your Remote Control to choose the Menu language and then please confirm with the key. After this please choose the time zone and your desired preprogrammed channel list or channel scan proceeding in the same way. 6
8 Information about changes to the channel list please see chapter 8. Edit Channels in the Users Manual. Under chapter 5.1 you can make yourself familiar with the functions of your remote control. Under chapter 6 the TV- as well as Recording- and Playback-Functions of your receiver are described. 7
9 3 FEATURES Supports SD / HD (MPEG4 AVC/H.264) One Irdeto Smartcard Slot USB PVR Function (by using external HDD) - Time Shift Mode (by using external HDD) High Definition Video output: HDMI Subtitle support : OSD & VBI insertion for TV 4-Digit 7-Segment-Display Channel sorting by FTA, CAS, Satellite, Alphabet and Network EPG : Now and Next and 7 days EPG Satellites can Simultaneous Scan of 10 Satellites Video output resolution: 576p, 720p, 1080i, 1080p User selectable output resolution Multi language OSD in EN, CZ, SK, D, F, I, ES, NL, PL Fast Channel Change Channels (TV und Radio) programmable 8 Favorite List & Unlimited Programs per each Channel Edit Function - Move, Delete, Favorite Edit - Parental Lock, Channel Rename, Channel Skip Manual PID- and Network Search Optical S/PDIF-Output for Digital Audio or Dolby AC3 Software Upgrade via OTA Multifeed-Function for Operator Subchannels Standby < 1 Watt 8
10 4 HOW TO CONNECT YOUR RECEIVER Please note: HD Signals are not transferred via RCA-Video For HDTV Signals and also for the best quality on SDTV please use an HDMI cable where possible. 4.1 Connecting the Receiver to TV by using an HDMI and/or SCART-Cable a. Connect the coaxial cable (Cable from your Satellite Dish) to the connector marked LNB IN at the rear of the receiver. b. Connect an HDMI-Cable between the HDMI-ports of your TV Set and your Receiver. c. Connect the external 12V Power Supply 9

11 4.2 Connecting the Receiver to your TV by using RCA cable a. Connect the coaxial cable (Cable from your Satellite Dish) to the connector marked LNB IN at the rear of the receiver. b. Connect the RCA cable to port Audio L/R and Video of Receiver to the respective RCA ports of your TV Set. c. If the TV has a HDMI input, connect the Receiver & TV using a HDMI cable. d. Connect the external 12V Power Supply 10

12 5 HARDWARE: 5.1 REMOTE CONTROL POWER. By pressing this button, the receiver will go into standby mode. When the receiver is in standby mode, it can be awakened by pressing this button again. MUTE. By pressing this button, all audio outputs of the receiver are muted. When muted, Audio output can be regained by pressing this button again. HELP: Optional Function TV FORMAT: By pressing this button you can change the Screen-Format. Should you experience Display problems press repeatedly until your TV Set displays the best picture. TV/RADIO. By pressing this button the user can jump between TV and radio lists of the receiver. MODE: By pressing this button you can determine the Screen- Aspect Ratio ~ 0-9 NUMBER. By pressing one of the number buttons (0-9), the user can change channel or enter a number to menu. ELECTRONIC PROGRAM GUIDE. By pressing this button, the user can see current and forthcoming programming information for each channel. 7-day program information guide is also available by using this button. RECALL: return to previously viewed channel REWIND: During Playback of recorded files this button can be used to rewind. STOP: By pressing this button Playback or Recording can be stopped. PLAY/PAUSE: By pressing this button the archive on the connected USB HDD is displayed. During Rewind or Fast Forward this button returns to regular playback. Press PAUSE to halt Playback. FAST FORWARD: During Playback of recorded files this button can be used to fast forward RECORD: By pressing this button you can start a recording (only if a USB HDD is connected and operational) CURSOR UP: By pressing this button, the user can jump to next channel on the channel list. In menu structure, user can move up one row. CURSOR LEFT: By pressing this button, the user can decrease the audio volume level of the receiver. In menu structure, user can change between selectable options. 11
13 CURSOR RIGHT: By pressing this button, the user can increase the audio volume level of the receiver. In menu structure, user can change between selectable options. CURSOR DOWN: By pressing this button, the user can jump to previous channel on the channel list. In menu structure, user can move down one row. OK / ENTER: By pressing this button, the user can confirm a selection or save settings in a menu. MENU EXIT MENU: By pressing this button, the user can activate the main menu of the receiver. EXIT: By pressing this button, the user can exit from the menu without saving the made changes or go one step back in the menu structure. FILE: By pressing this button you can access the recorded files on a connected USB Hard-Disk-Drive SLOW MOTION: Slow motion playback JUMP Back: Jump forward by 10 Channels in the Channel-List JUMP Forward: Jump back by 10 Channels in the Channel- List RED / AUDIO: By pressing this button you can choose alternative Audio tracks if provided by the channel operator. GREEN / SUBTITLE: By pressing this button you can display subtitles if provided by the channel operator YELLOW / SLEEP TIMER: By pressing this button one or more times, the user can determine the time after which the receiver will automatically go into Standby. BLUE / TELETEXT: By pressing this button, the user can activate the teletext application. WHITE / FAVORITE: By pressing this button you can open the Favorite Channel Lists, if you have previosly programmed. STATUS STATUS: Optional Function INFORMATION. By pressing this button, the user can see present and following information about the currently watched channel. FIND FIND: Search for a Channel by entering the first letters of the name. 12
. 3 & 4. CHANNEL UP & DOWN Selection of TV/Radio channels 5.")
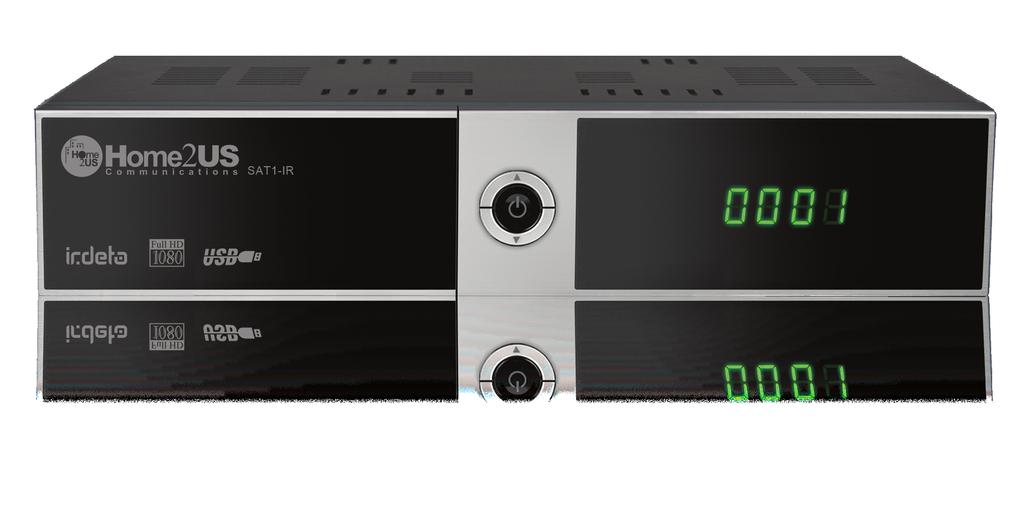
14 5.2 FRONT PANEL 1. FRONT FLAP: - IRDETO SMARTCARD SLOT When you open the front flap, you ll find a Slot for an IRDETO Smartcard. Please insert the smartcard with the chip facing downwards. 2. POWER BUTTON Switch on- and off (Stand-by). 3 & 4. CHANNEL UP & DOWN Selection of TV/Radio channels 5. 7-Segment Display In operation displays the current channel number. 13
15 5.3 REAR PANEL No. Name FUNCTION 1 LNB IN Input for Satellite Signal 2 VIDEO Video Composite Output 3 AUDIO L Audio Output Left 4 POWER AC Power Switch 5 EXT. IR Input external IR-Sensor (Original part) 6 S/PDIF opt. Digital Audio Output optical 7 USB USB 2.0 Port 8 AUDIO R Audio Output Right 9 RS232 Serial Port for System Upgrade 10 HDMI High-Definition Digital Video/Audio Output 11 DV 12V = 3A Connection for external Power Supply 14

16 6 WATCHING TV This chapter describes how to watch TV and listen to Radio using the receiver. Thanks to the advantages of Digital TV transmissions, extra features are added to the broadcast, such as information about the current and next program and extra options such as the ability to choose between different languages for Audio and Subtitling. 6.1 General watching Use the CHANNEL UP or CHANNEL DOWN keys to go to the next and previous channel respectively. Use the NUMBER keys to input a channel number. Use RECALL key on the remote control to open a list of channels that the user was watching before the currently selected channel. Use TV/RADIO key on the remote control to toggle between the last selected TV- or Radio Channel. Press UP or DOWN keys on the front panel of the receiver to select the next/previous channel from the current channel list. Use INFO key to display the information banner about the current program. Press INFO key again to display the information of the current Event. With the CURSOR RIGHT or CURSOR LEFT you can see the next event information. Press again INFO key or the EXIT key to hide the banner and event information. In Live TV Mode, press the i INFO key to display the Information Bar. This contains Information on the current Channel, the current time, the Current and Next Programme on this Channel, Information on the Signal Quality as well as Services broadcast on this Channel (i.e. Subtitles, Teletext) press the i key again and, provided this is broadcast by the operator, you will see detailed information on the current programme press the < / > keys to change to the next programme information Please note: Programme information will only be displayed if it is included in the current transmission. Availability and validity of program information is dependent on the broadcaster. 15


17 In Live TV Mode press the OK key to open the Channel List move the Cursor key UP / DOWN to move in the List channel-by-channel - use the < / > keys to jump 10 channels forward / backward - Choose your desired channel with the OK key Exit the List with the EXIT key. Find a specific channel by pressing the FIND key on your remote control enter the first letters of the desired Channel and press the YELLOW key to jump to the search result in the Channel List. Display Channels in Groups In the Channel List, press the RED key to display options: - All TV - Satellite - Favourite - Provider - CAS (Type of encryption) In the Channel List you can also sort the Channels by pressing the GREEN key. Options are sorting by numerical, Alphabetical or FTA-to-CAS order. 16
18 6.2 Options Pressing OPTION key will open the "Options" menu. The Options menu provides user selectable options that are available for the current channel and the current program. Depending on the Programme some of the options can be available or not. Selection from the available choices is made with CURSOR UP or CURSOR DOWN key and confirmation by OK key. Multifeed: According to Master-Channels you can select from available Sub- Channels. You can exit the Options Menu by pressing the OPT- or EXIT-key. Subtitling language (GREEN key): The user can select from available subtitle languages, if more than one exists. Selection from the available choices is made with CURSOR UP or CURSOR DOWN key and confirmation by OK key. Some broadcasters also provide Subtitles in either, DVB- or Teletext Format. Audio track (RED key): Some TV channels broadcast multiple audio tracks, for example different languages or AC3 Audio tracks. Selection from the available choices can be made by pressing the CURSOR UP or CURSOR DOWN keys and confirming with the OK key. Beside alternative tracks, you can set the mode to Stereo or Mono-left or -right. Providing the broadcaster transmits, also AC3 Sound can be chosen. 6.3 EPG (Electronic Programme Guide) Now & Next as well as 7 days Programme Information EPG application can be activated by pressing the EPG key when watching a TVprogramme or listening to a Radio Channel. EPG application is divided into two levels. The first level gives an overview of 10 continuous channels with information about present and forthcoming programmes. By pressing the EPG key once more the second level provides information of all available events for the selected channel for the next 7 days. Availability of Programme information data is dependent on the individual broadcaster. By again pressing EXIT key you can close the EPG menu. 17

19 Navigating on the first level of EPG (Multi-EPG) The currently active channel and the current programme are highlighted. Depending on how the EPG data is transmitted by the broadcaster it is possible that programme information is not available until one has actually selected the channel. Move the cursor up or down and confirm with the OK key to change to another channel in the list. Move the cursor left or right to move to another time of the current day. Use the blue key to advance to the next day and use the yellow key to go back by one day. For your orientation, please also note the timeline indicating the current time in comparison to the programmes. For more detailed Information on a programme, press the i INFO key. Please note that not all broadcasters provide EPG or detailed EPG data. If you wish to add a programme to your timer for recording, move the cursor to the desired programme and press the REC key on your Remote Control. The event is added to your Record List and, provided a USB Hard-Disk-Drive is connected at the set time, and provided it has enough free space, the event will be recorded to this USB device. Please press the MENU key to return back to the EPG Menu confirming that you want to save the new event in your Record List. Please note: The receiver requires time to boot from Standby and to check the current time from the satellite signal and to descramble the programme including check for new keys for the inserted Irdeto smartcard. When adding an event to the record timer, please allow at least 7-8 minutes before the recording is to begin. Also, when programming more than one event, please allow time in between events accordingly. When programming events via the EPG timer function, you can manually edit the recording list also by default, the receiver will add 5 minutes before and 5 minutes after an EPG event you can edit this padding time (Start and End individually) in the menu MULTIMEDIA / PVR SETTING Please also note, that any user input during an event (via the remote control or the panel keys) will result in the receiver not returning into standby automatically after the timer event is over. 18
20 Navigating on the second level of EPG (Single EPG) By pressing the GREEN (Toggle) key the second level EPG will appear. This application provides complete EPG information for the selected channel. It is possible to scroll between programs in chronological order for a particular day with the CURSOR UP and CURSOR DOWN keys. Choose another day using the LEFT and RIGHT keys. After pressing the OK key detailed information for the Programme will be displayed. Press the OK- or the EXIT- key to exit the detailed Information. Please note: Programme information will only be displayed if provided by the according channel operator. 6.4 EPG-Timer (Timer programming via EPG) In the Single- or Multi-EPG Mode you have the option to reserve programmes in the timer. Move the cursor to the desired programme and simply press the REC key on your remote control. An additional window is opened which displays the timer reservations. If a HDD is connected the recording will be made accordingly to the connected external HDD. If a HDD is not connected the receiver will switch to the according channel at the programmed time. At exiting (EXIT or MENU key) please confirm the Event with the OK key. Please note: Should two timer reservations overlap, and error message will be displayed. You then need to change or delete one of the two reservations. Use the CURSOR UP and CURSOR DOWN keys to move to the reservation you want to change and either delete a reservation with the RED key or change the start or duration time using the blue key. 19
21 6.5 Teletext Teletext application can be activated deactivated by pressing the TTX key. The following operations are supported after activating Teletext: After activating text page 100 will appear after a short time. Specific Teletext pages can be selected using the number keys. If the Teletext page is currently not available, the last selected page will remain on the screen. The next Teletext page can be selected with the CURSOR UP key. The previous Teletext page can be selected with the CURSOR DOWN key. 6.6 PVR Function When connecting an external Hard-Disk-Drive to the USB port, the Receiver can be used as a PVR (Digital Personal Video Recorder) Direct recording To start a recording press the REC (Record) key, choose a duration with the LEFT / RIGHT keys and confirm with the OK key EPG Recording Via the EPG you can programme a Timer reservation Please also see 6.4. for more details Timer Recording via manual Record List Alternatively to programming an Event via the EPG, you can also programme an Event manually (Start-/End-Time, Channel) via the RECORD List. Open the MENU and open the submenu MULTIMEDIA / RECORDING LIST (confirm with OK) 20
 under Channel List Choose the channel you wish to record from under Channel and choose whether you")
22 Add an Event manually by pressing the YELLOW (ADD) key. Enter the desired Date, Start and Stop Time and under Channel, choose the Channel Type (TV or Radio) under Channel List Choose the channel you wish to record from under Channel and choose whether you want to repeat this recording on a daily or weekly basis under Mode TimeShift-Function During Live TV you can press the PAUSE key to activate the TimeShift function. Provided you have connected a USB HDD, the Receiver will pause the programme. With the PLAY key you can continue to watch the timeshifted programme. The Information Bar indicates by how much time you are watching time shifted in relation to the live programme. As with Playback you can Fast-forward and Rewind within the TimeShift Mode. With the EXIT key or by pressing the STOP key you can stop the TimeShift Mode and resume watching in Live Mode. 21


23 6.6.5 Playback After pressing the FILE LIST key, a list is displayed which contains all the recorded programmes on your connected external USB HDD. Use the UP / DOWN keys to move the cursor to the desired programme and confirm with the OK key to start playback. If you have previously watched this specific recording you will be asked if you want to begin playback at the last viewed position. If supported by the Channel operator, by pressing the INFO key in the file list or during playback details about the recorded programme are displayed. Please note: By pressing the FAST FORWARD or REWIND keys you can increase the playback speed to 2, 4, 8 and 16x in both directions. To stop playback press the STOP key depending on the capacity of your USB Drive it may take a little moment to display the FILE LIST again. By pressing the EXIT key you can return to the live channel. Functions such as Recording, Timeshift and Playback require an external HDD to be connected via USB (2.0) and to be ready operational. Only FAT32 formatted Hard-Disk-Drives can be used. Other formats can not be recognized by the receiver. Before recording or TimeShift Operation please make sure that there is enough free capacity on your Hard-Disk-Drive. 22

24 7 MENU OPERATION The main menu can be activated by pressing the MENU key. Main menu provides access to most important functions and features of the receiver. These are divided into the following Menus. Each Menu contains corresponding sub-menus. The Main Menu consists of: Edit Channels Installation User Setup Multimedia Conditional Access System You can move between the Main Menu by pressing the CURSOR UP or CURSOR DOWN key. The available Sub-Menus can be accessed by pressing the CURSOR RIGHT key and confirming using the OK key. You can exit the menu by pressing the EXIT key. 23

25 8 EDITING CHANNELS 8.1 Create Channel List This menu is used to shape your channel list according to your personal preference. Press the MENU key, select Edit Channels by using the RIGHT CURSOR and press OK. Change between TV and Radio Channels by pressing the TV/RADIO key. The individual functions are: Command Key Function Delete RED Delete the highlighted Channel from the Channel List Lock GREEN Lock and unlock a Channel (i.e. for access by minors) Skip YELLOW Mark a Channel for skipping or deactivate with unskip Move BLUE Move the highlighted Channel to another position within the Channel List Rename BLACK Rename the highlighted Channel Select WHITE Select Channels i.e. for moving an entire group of channels in one go Find FIND Find Channels within the Channel List Please note: After editing the channels and pressing the EXIT or MENU key you can confirm your new channel list by pressing OK key. If you don t want to save any changes and keep the previous status, cancel the process by pressing CURSOR LEFT, choosing NO and confirming with the OK key. 24

26 8.2 Edit Favorite Channels This menu is used to create lists of your favourite channels. Thus you can create up to 8 different Favorite Lists. Press the MENU key, select EDIT FAVORITE CHANNELS by using the RIGHT and DOWN key and confirm using the OK key. Use the RIGHT or LEFT keys to jump between All TV and the chosen FAV List. First select the channels you would like to add to your favorite list using the UP and DOWN keys and press the WHITE Select key to mark one or more channels and press the RED key to add to the chosen Favorite List. If required, use the GREEN A-Z key to sort the channels in alphabetical order or use the BLACK FIND key to find a specific channel from the list. Within the Favorite List you can delete a Channel from the FAV List by choosing the channel and pressing the RED DELETE key. You can move a Channel using the BLUE MOVE key and select a group of channels by using the WHITE SELECT key and either delete or move the marked Channels. When finished, use the MENU or EXIT key to save your changes (confirming with YES) or abandon (choosing NO). 9 INSTALLATION This menu contains following items: Multi Satellite Search Satellite Search Default Setting 25
27 9. 1 Multi Satellite Search To perform a Multi Satellite Channel Search, please first choose the Satellites you wish to perform your search on. You will notice, after choosing the first satellite, a window will open. Please configure your antenna setting in this Sub-Menu: Choose between: DiSEqC 1.0 (up to 4 ports), DiSEqC 1.1 (up to 16 ports), DiSEqC 2.0 (Motor) and USALS (Motor) and allocate the according port where applicable. After performing the settings for the first satellite, please confirm using the OK key. Then choose the next Satellite you wish to set up and repeat as for the first satellite. In the same way set up all desired satellites that you would like to perform a search on (and assuming your satellite antenna has the according features). To begin the Search for Channels on the set Satellites press the RED SCAN key and specify whether you would like to search for All Channels, Free-To-Air Channels, Scrambled Channels or Only TV Channels. If you would like to perform a Network Search, please change the according Option to On the receiver will then check the up-to-date channel information as searching services, however, this Search Option will increase the Search time. Begin the Search by pressing RED. 26


28 9. 2 Satellite Search To perform a Channel Search on one Satellite, please choose the Sub Menu Satellite Search. Choose the Satellite you wish to perform the search on and, in case you have not yet set up the antenna, please press GREEN EDIT to make the according changes. Choose between: DiSEqC 1.0 (up to 4 ports), DiSEqC 1.1 (up to 16 ports), DiSEqC 2.0 (Motor) and USALS (Motor) and allocate the according port where applicable. Now either begin your search on the entire Satellite by pressing RED - START SEARCH or choose to search on a single TP then please press GREEN - TP SEARCH by setting the Search Mode in TP Search from Manual to PID, and, assuming that you know the according data, you can also enter specific Video-, Audio- and PCR-PID to search for a single Channel Edit TP List In due time, and by new Frequencies constantly being added by the Satellite Operators, some transponder data will need editing. Enter the Sub MENU INSTALLATION / SATELLITE SEARCH, choose your desired Satellite (confirm with OK) and press the YELLOW (TP) key. In the EDIT TP List Submenu you can either manually add a TP (Transponder) by pressing 27
 key to make the required changes (only advised for expert users). If you want to search on only one TP, after choosing the desired TP, you can use the RED (TP Search) key.")
29 the GREEN (ADD TP) key or make changes to existing ones. Please use the LEFT / RIGHT keys to move the cursor to the desired TP. Press the BLUE (TP Edit) key to make the required changes (only advised for expert users). If you want to search on only one TP, after choosing the desired TP, you can use the RED (TP Search) key. Here you can also make changes to specific Video-, Audio- and PCR-PIDs after changing the Search Mode to PID Default Setting In this menu, you can delete all channels for TV or Radio. Additionally you can perform a factory reset to set back Channels, the Configuration to the original state as well as perform a Default Setting. Default Settings can be chosen for: Delete Channels: Choose to delete either All Channels, TVor Radio-Channels only Factory Reset: The original Factory Programming is re-loaded either for all Parameters (Default Setting), only Channels or only Configuration 28
30 10 USER SETUP Please use the CURSOR keys to select: - Language Setting - Time Setting - Parental Control - A/V Control - OSD Setting - Automatic Power Down 10.1 Language Setting Menu Language: Select the preferred language for the system menus. Audio Language (1 st / 2 nd ): Some TV programs send multiple audio tracks, for example in two different languages. If there are no audio tracks available that match your settings, another language may be used instead. Subtitle Language (1 st / 2 nd ): Select the preferred language for the subtitling and Programme information. EPG Language: Select the preferred language for the Electronic-Programme-Guide 29
31 10.2 Time Setting This menu contains Time Setting, Summer Time and GMT Offset. Select Manual or Auto mode using the CURSOR LEFT or CURSOR RIGHT keys and use OK to confirm. If you wish to change time and date manually in time offset menu, please set the option to Manual. Also Summertime can either be set to Auto, Off or On. In Auto mode the Receiver automatically changes to and from Summertime at the according dates. This menu contains Time Setting, Summer Time and GMT Offset. Select Manual or Auto mode using the CURSOR LEFT or CURSOR RIGHT keys and use OK to confirm. If you wish to change time and date manually in time offset menu, please set the option to Manual. Also Summertime can either be set to Auto, Off or On.In Auto mode the Receiver automatically changes to and from Summertime at the according dates Parental Control To use the Parental Control function you will be asked to enter your access PIN code. All parental control features work on a locking concept with the PIN code as your entrance key. The default PIN code is set to 0000! 30
32 Change PIN code: Use this function to change your PIN code to some other four digit number. New PIN: Enter a new four digit PIN code by pressing the OK key and using the number keys on your remote control. Verify new PIN code: Re-enter the same new four digit PIN code once again to verify the new PIN code. Menu Lock: After turning the Menu Lock to ON, the complete Menu will require your PIN code to be entered before opening Channel Lock: After turning the Menu Lock to ON, Channels that you set a lock on will require your PIN code to be entered before opening 10.4 A/V Control In the Audio/video menu, you can modify the properties of the audio and video signals to suit your TV and audio equipment. TV-Type: Please select the video format consistent with your TV. Aspect ratio: User can inform the receiver about the display aspect ratio of the TV that is connected to the receiver. Possible choices are Auto, 4:3, 16:9 aspect ratios. Display Format: If you select the display aspect ratio of TV as 4:3, then also the preferred aspect ratio conversion scheme for cases in which the transmitted Programme is in 16:9 format can be chosen. The options are: 31
33 - Pan & Scan: The receiver interprets pan & scan vectors encoded in the Programme and crops the 16:9 input signal for display on 4:3 TV. - Letterbox: In this mode the original aspect ratio of the 16:9 input video signal is preserved, thus there are vertical black bars on the top and bottom of the screen. - Ignore: Use this setting, if your TV set handles the aspect ratio conversion. Video Format: Please choose from the available resolutions 1080p / 1080i / 720p or 576p for 1080p you will need to confirm with the numeric key 1 on your Remote control a TV set that does not support 1080p (Full-HD) will not be able to display this setting. AC3: Please choose between Off, SPDIF, SPDIF + HDMI Channel Switch Mode: When changing channels, you can choose with this setting whether the screen is to turn black before the new Live Channel appears or if you prefer the last live picture of the previous Channel to remain on the screen until the new Live Channel appears OSD Setting In this Submenu you can adjust the display time (i.e. time of the appearing of the info bar or other on-screen Messages) and the OSD transparency (in %) over the Live picture. 32

34 10.6 Automatic Power Down In this Submenu you can choose the time after which the receiver will go into Standby (Sleep-Mode). Provided the receiver is not undertaking any task such as recording, and also provided there is no input via the remote control or the front panel keys, the receiver would go into Standby after the set time. Options are: Off (None), 0:30m ~ 3:00h in 30min. steps 11 MULTIMEDIA (only with a connected and operational external HDD) In this Sub Menu you can make some settings for your connected Hard-Disk- Drive for the PVR Operation and also format the HDD. The Sub Menu includes the following functions: Record List (Timer) PVR- Settings HDD-Properties 11.1 Record List (Timer) 33 A Timer is used to Programme the Receiver to switch on and off again at certain times and to tune to a specified channel. Timers are normally used to record a TV Programme on the video recorder or to pre-programme the receiver for other reasons (i.e. wakeup). A set timer causes the receiver to wake up from standby mode at the specified time or change the channel to the specified one.
35 Please note: Timersettings that have been programmed in the EPG (see EPG- Timer point 6.4) are automatically marked in the Timerlist as Recording and can be edited (GREEN) or deleted (RED) here. In the Record List Submenu, please press YELLOW ADD to manually add an Event to the timer. If an external HDD is connected to the USB port and is operational, recordings can be made directly on the HDD. Please enter: - Date - Start Time - Stop Time - Channel List (TV / Radio) - Channel - Mode (Once / Daily / Weekly) Save the newly set Recording Event by pressing the BLUE key PVR Settings Other Options in this Menu are: In this Submenu you can select the default duration for direct recordings. For direct recordings a window appears after pressing the REC key which displays this pre-defined setting. Before beginning the recording this can be adjusted. The 1 st suggested option is automatically the end time of the current event that the receiver draws from the EPG Information if provided by the TV Operator. - Record Start Padding Time: Automatically adds time before your recording to cater for possible delays in the broadcast choose between None, 5, 10, 15, 20, 25 and 30 minutes - Record End Padding Time: Automatically adds time to the end of your recording to cater for possible delays in the broadcast choose between None, 5, 10, 15, 20, 25 and 30 minutes 34


36 - Jump Duration: Set the size of jumps to be performed when you press the / keys during playback Choose between 1%, 5%, 10%, 20% 11.3 HDD Properties In this Sub Menu you can see all information about your connected Hard-Disk Drive as well as an option to format the HDD. HDD Information displays the File System, the Total-, Used- and Free- Size of the connected USB Hard-Disk- Drive HDD Speed gives you the option to perform a speed test to verify that the speed of your connected USB Hard- Disk-Drive suits the tasks you wish to perform. - SD: For recording of SD channels - HD: For recording of HD channels - HD + Tms: For recording of HD channels and TimeShift Playback Formatting After confirming with the OK key the HDD is formatted. Please note: All files on the Hard-Disk-Drive will be deleted when formatting. 35


37 12 CONDITIONAL ACCESS After opening the smartcard settings the menu will display details of the inserted IRDETO Smartcard. Information includes settings and details on subscriptions, age settings and changing of the PIN-Code of the smartcard. 13 SYSTEM The System Menu has 4 Submenus: - Information - Software Upgrade - Default Setting - OTA The Information Submenu is used to display information about the receiver and its hardware, software and loader Software Update This allows you to update the system software to maintain the best possible performance of the receiver. Download the latest software from our website and copy to a USB stick. Connect your USB stick to the USB connector at the rear of the receiver. The available upgrade software is marked with a hook. Please select the latest software and press the OK key. 36

 - at")


38 The upgrade process will start automatically. Please wait until the receiver has rebooted. Please note: Updating the receiver Software may take several minutes. Warning! Please never turn the receiver off while upgrading! OTA Software Update OTA is designed to be able to update your receiver-software via Satellite (Over- The-Air) - at every booting, your Home2US receiver checks if a new Software is available on OTA automatically. If you want to download simply confirm - your receiver will then automatically download and install the new Software. In case you would prefer to manually check if new Software is available, please first choose a TV Channel on the SES-1 Transponder V. Press the MENU key and open the Sub-Menu SYSTÉM / OTA using the keys: and If the initially grey.ota Download. appears with a RED background a new Software is available for download. Press the RED (AUDIO) key and after a few seconds you will be asked to confirm the download by pressing the key. 37

39 After confirming, the receiver restarts and downloads the new Software from Satellite Updating the receiver Software may take 25 minutes or more. Warning! Please never turn the receiver off during the upgrading process! The receiver will re-boot automatically after finished Default Setting In this menu, you can delete all channels for TV or Radio. Additionally you can perform a factory reset to set back Channels, the Configuration to the original state as well as perform a Default Setting. Default Settings can be chosen for: Delete Channels: Choose to delete either All Channels, TVor Radio-Channels only Factory Reset: The original Factory Programming is re-loaded either for all All Parameters (Default Setting), only Channels or only Configuration 38
40 14 TROUBLE SHOOTING Problem Possible causes Remedy LED on front panel does not light No picture or sound Black-and-white screen or V-Hold AC Power cord disconnected Wrong connection of the Video/audio output to TV input terminal Wrong connection of antenna cable No signal or weak signal Wrong setting of channels Information in MENU screen Your TV mode is different from broadcasting mode Connect power cord properly into the power socket Connect correctly with HDMI cable or RCA or RF cable Connect the antenna cable correctly Check the cable connections and Satellite-Dish alignment Type the setting value correctly Use TV of same mode Use the NTSC/PAL converter Connection to the receiver and TV The remote control is not working Battery exhausted Fluorescent light interfering with the remote control Remote control is incorrectly aimed Change the batteries Switch off the light Aim the remote control at the receiver Distorted menu screen Not working Too high brightness and contrast level of TV set Process down Adjust brightness and contrast to low level Switch off the receiver, remove the power cord. After a short moment re-insert the power cord and switch on again. 39
41 15 TECHNICAL SPECIFICATIONS Tuner Input IF Inputfrequency Input Level LNB Power DiSEqC Control Band Switch Modulation method Symbol Rate F-Type 950MHz to 2150MHz -65 dbm~-25 dbm 13 /18VDC / 500mA Max Unicable, 1.0, 1.2 & USALS compatible 22KHz Tone(22 +/- 4KHz,Amplitude :0.6 +/- 0.2V) LDPC/BCH(DVB-S2) 8PSK/QPSK, DVB-S QPSK LDPC/BCH(DVB-S2) 8PSK/QPSK :10~30Msps DVB-S QPSK : 1~45Msps Viterbi Decoding Rate 1/2,2/3,3/4,5/6 and 7/8 Bandwitdth LDPC/BCH 36MHz Punctured Code,1/2,2/3,3/4,3/5,4/5,5/6,8/9,9/10 in DVB-S2 MPEG Stream A/V Decoding Demultiplex Input Stream Aspect Ratio Video Decoding Video Resolution Audio Decoding Audio Mode Video Output According to ISO/IEC (MPEG-2 System) Max. 90Mbit/s 4:3(default), 16:9 letterbox ISO/IEC (MPEG2 Video) MP@HL, ISO/IEC HP@L4 576p, 720p, 1080i or 1080p ISO/IEC (MPEG2 Audio/MUSICAM), Dolby AC-3 Single Channel / Dual Channel, Stereo, Joint Stereo HDMI, RCA 40
42 Front Panel Display 1 Irdeto card reader 7-Segment Display A/V Output Digital Output Audio RCA Audio Digital HDMI 2 Outputs left and right S/PDIF (optical) Rear Side Input F-Type-Connector Video, Audio-L, -R RCA Video, Audio L, Audio R S/PDIF optical HDMI 1.3 USB 1 rear side USB 2.0 Port IR Connector for external IR Sensor 1 RS 232 Port 41
HRM 8760 CI+ User s Manual (ENG)
") HRM 8760 CI+ User s Manual (ENG) TABLE OF CONTENTS 1 SAFETY ADVICE... 3 2 QUICK SETUP... 5 3 FEATURES... 7 4 HOW TO CONNECT YOUR RECEIVER... 7 5 HARDWARE... 9 6 WATCHING TV... 13 7 MENU OPERATION... 21
HRM 8760 CI+ User s Manual (ENG) TABLE OF CONTENTS 1 SAFETY ADVICE... 3 2 QUICK SETUP... 5 3 FEATURES... 7 4 HOW TO CONNECT YOUR RECEIVER... 7 5 HARDWARE... 9 6 WATCHING TV... 13 7 MENU OPERATION... 21
Throughout the whole user manual, pay special attention to the following marks that
 Notice Warnings, Cautions and Notes Throughout the whole user manual, pay special attention to the following marks that indicate hazardous situations. Warning ** Indicates a hazardous situation which could
NMS ETA TM Stereo Advanced Digital TV Set-top Box
 Digital TV HD Set-top Box STB2-T2 NMS ETA TM Stereo Advanced Digital TV Set-top Box User Guide CONTENTS Safety Information... 3 Introduction... 4 Set-top Box Front Panel... 4 Set-top Box Back Panel...
User s Manual Digital Satellite Receiver
 A_ENG_110944 User s Manual Digital Satellite Receiver Please read the entire manual thoroughly and retain it for future reference. ENG - 1 General Safety Warning CAUTION RISK OF ELECTRIC SHOCK DO NOT OPEN
User s Manual Bedienungsanleitung
 HD Digital Receiver HDTV Digital-Receiver The default password is 0000. Das voreingestellte Passwort lautet 0000. Bedienungsanleitung HD-FOX Notice Thank you for purchasing a HUMAX product. Please read
freesat HD Digital Satellite Receiver The default password is User s Manual FOXSAT-HD
 freesat HD Digital Satellite Receiver The default password is 0000. FOXSAT-HD Notice Thank you for purchasing a HUMAX product. Please read this user s manual carefully to be able to safely install, use
MAX T200 HD QUICK INSTALLATION GUIDE
 MAX T200 HD QUICK INSTALLATION GUIDE MAX T200 HD QUICK INSTALLATION GUIDE CONTENT receiver BATTERIES x 2 REMOTE CONTROL Quick installation guide Quick Installation Guide The lightning flash with arrowhead
User Manual High Definition Digital Set Top Box DVBT9070 Please read this User Manual carefully to ensure proper use of this product and keep this man
 User Manual High Definition Digital Set Top Box DVBT9070 Please read this User Manual carefully to ensure proper use of this product and keep this manual for future reference. Important Safety Instructions
User s Manual. ZvSync - NA. HD Digital Tuner/Decoder QAM
 User s Manual ZvSync - NA HD Digital Tuner/Decoder QAM Notice Warnings Cautions and Notes Throughout the entire user s manual, pay special attention to the following marks that indicate hazardous situations:
GENERAL INFORMATION INSTALLATION MENU INFORMATION. Main Features For your Safety Unpacking General Operation RCU Rear Panel.
 GENERAL INFORMATION 3 Main Features For your Safety Unpacking General Operation RCU Rear Panel 3 4 7 7 8 9 INSTALLATION 10 MENU INFORMATION Main Menu 1. Installation 1.1 Satellite list 1.2 Dish Setting
CAUTION RISK OF ELECTRIC SHOCK NO NOT OPEN
 Evolution Digital HD Set-Top Box Important Safety Instructions 1. Read these instructions. 2. Keep these instructions. 3. Heed all warnings. 4. Follow all instructions. 5. Do not use this apparatus near
User s Guide. Digital Satellite Receiver
 User s Guide Digital Satellite Receiver Before Getting Started Information contained in this manual is subject to change without notice. No part of this publication may be copied, reproduced, or translated
S7030PVR User Manual
 S7030PVR User Manual Important Safety Instructions 1) Do not use this apparatus near water. 2) Clean only with dry cloth. 3) Do not block any ventilation openings, install in accordance with the instructions.
The following symbols will serve as follows: Indicates any other additional important or helpful information. Indicates warning information.
 Contents 1 2 HD2011IR User Manual Notice This manual can help you to become familiar with the many great features of our high definition digital Satellite receiver, as well as how to use and operate these
User Manual. High Definition Digital Set Top Box HDSTB250
 User Manual High Definition Digital Set Top Box HDSTB250 CHANNEL HDSTB250 Please read this User Manual carefully to ensure proper use of this product and keep this manual for future reference. Important
DIGITAL SET TOP BOX STB 7017 INSTRUCTION MANUAL
 DIGITAL SET TOP BOX STB7017 INSTRUCTION MANUAL STB 7017 CHANNEL After Sales Support Now you have purchased a Tevion product you can rest assured in the knowledge that as well as your 3 year parts and labour
FV400 DIGITAL TV RECEIVER WITH MODULATOR INSTRUCTION MANUAL
 FV400 DIGITAL TV RECEIVER WITH MODULATOR INSTRUCTION MANUAL Please read this instruction manual carefully before using your receiver Table of Contents Introduction-----------------------------------------------------------------------------
Front and Rear Panel Remote Control Connecting to a Television...4. Connecting to an Audio System...5
 Table of Contents Front and Rear Panel... 1 Remote Control...... 2 Connecting to a Television...4 Connecting to an Audio System...5 Connecting to a DVD Recorder or VCR... 6 First Time Installation... 7
SYMBOLS USED ON THE RECEIVER... 3 SAFETY INSTRUCTIONS... 4 I.GENERAL INFORMATION...
 Table of Contents SYMBOLS USED ON THE RECEIVER... 3 SAFETY INSTRUCTIONS... 4 I.GENERAL INFORMATION... 5 1. Preface... 5 2. Main Features... 5 3. General Operation of the Receiver... 6 4. Front Panel...
Table of Contents. Table of Contents
 Table of Contents Table of Contents 1. SAFETY PRECAUTIONS 2. GENERAL FEATURES 3. HARDWARE DESCRIPTION 4. HOW TO CONNECT YOUR RECEIVER 5. SYSTEM SETUP 6. MENU STRUCTURE 7. MENU OPERATION 7.1. USER SETTING
SET TOP BOX MODEL: GDB01SFV1 USER MANUAL
 SET TOP BOX MODEL: USER MANUAL 1 2 3 4 5 6 7 8 Welcome Your Set Top Box 2.1 In The Box 2.2 Front View 2.3 Rear View Quick Setup 3.1 TV Connection 3.2 Recording from the set top box 3.3 Record one channel
English SAFETY PRECAUTION DO NOT INSTALL THE RECEIVER: PAG. 2
 U4109 SAFETY PRECAUTION The lightning fl ash with arrowhead symbol, within an equilateral triangle, is intended to alert the user to dangerous voltage and to prevent from a risk of electric shock. Warning:
Contents. Safety instructions Reference 1.1 Genareal Features Delivery... 04
 HD 580 user manual Contents Safety instructions... 03 1. Reference 1.1 Genareal Features... 04 1.2 Delivery... 04 2. Names and key assignment 2.1 Front view... 05 2.2 Rear view... 05 2.3 Remote Control...
Notice ** Copyright (Copyright 2001 HUMAX Corporation) GB 1
 GB 1") Notice Copyright (Copyright 2001 HUMAX Corporation) Not to be copied, used or translated in part or whole without HUMAX's prior consent in writing except approval of ownership of copyright and copyright
Notice Copyright (Copyright 2001 HUMAX Corporation) Not to be copied, used or translated in part or whole without HUMAX's prior consent in writing except approval of ownership of copyright and copyright
HD Digital Set-Top Box Quick Start Guide
 HD Digital Set-Top Box Quick Start Guide Eagle Communications HD Digital Set-Top Box Important Safety Instructions WARNING TO REDUCE THE RISK OF FIRE OR ELECTRIC SHOCK, DO NOT EXPOSE THIS PRODUCT TO RAIN
Xpresionn Digital Terrestrial Receiver. User Guide
 Xpresionn 2150 Digital Terrestrial Receiver User Guide GENERAL INFORMATION...3 A) SAFETY PRECAUTIONS...3 B) MAIN FEATURES...4 C) CONTENTS OF THE PACKAGING...4 D) REMOTE CONTROL...5 INSTALLATION...6 A)
Evolution Digital HD Set-Top Box Important Safety Instructions
 Evolution Digital HD Set-Top Box Important Safety Instructions 1. Read these instructions. 2. Keep these instructions. 3. Heed all warnings. 4. Follow all instructions. 5. Do not use this apparatus near
English DMB-118HDMK3
 English DMB-118HDMK3 Table of Contents Safety Information...1 System Connection...1 Remote Control...2 First Time Installation...3 Basic Operation...3 Change Channel...3 Volume and Mute...3 Subtitle/Audio
Quick Start Digital Satellite Receiver
 Quick Start Digital Satellite Receiver Support of SD (MPEG2), DVB-S system Standard resolution video output - SCART Compatible with Diseqc 1.0, 1.1, 1.2, and USALS Electronic Program Guide - EPG Multilingual
HD Digital Satellite Receiver. User s Manual
 HD Digital Satellite Receiver ZDX-670 User s Manual Keep this manual for future reference II General Safety This STB has been manufactured to meet international safety standards. Please read the following
PART 1 English 1.0 Usage
 SAT OUT SAT IN Thank you for choosing this Strong satellite receiver. This receiver is of our latest development and it is designed to be capable of safely install your receiver and to achieve its optimum
User manual FT-8100 HD. English
 User manual FT-8100 HD English WARNING!!! On the USB Memory Function for FT-8100 HD model, user can make recording or playing function using by external USB devices such as USB Flash Memory Disk or external
healing HHR787 HD Digital Terrestrial Twin Tuner Recorder Operating Manual INTRODUCTION... 3 HHR787 FEATURES... 4 SAFETY INSTRUCTIONS...
 CONTENTS INTRODUCTION... 3 HHR787 FEATURES... 4 SAFETY INSTRUCTIONS... 5 FRONT PANEL AND REAR PANEL...6 and 7 REMOTE CONTROL UNIT KEY FUNCTIONS...8 and 9 REMOTE CONTROL BATTERY CARE... 10 INSTALLATION
Digital Terrestrial Television Receiver USER S MANUAL
 # 5024 Digital Terrestrial Television Receiver USER S MANUAL CAUTION RISK OF ELECTRIC SHOCK DO NOT OPEN This symbol is intended to alert the user to the presence of insulated dangerous voltage within the
DVB-T2. Digital Terrestrial Receiver WD-822T2 USER S MANUAL
 DVB-T2 Digital Terrestrial Receiver WD-822T2 USER S MANUAL Index Important Safety Instructions... 3 Main Features.... 5 Front and Rear Panel.... 6 Remote Control..... 7 Installing the Batteries..... 8
Ref SATELLITE. User Manual. High Definition TV Satellite Receiver.
 SATELLITE High Definition TV Satellite Receiver Ref. 717501 User Manual www.televes.com Index SATELLITE 1. Safety recommendations............................................................ 4 2. General
English SAFETY PRECAUTION DO NOT INSTALL THE RECEIVER: PAG. 2
 U4127 SAFETY PRECAUTION The lightning fl ash with arrowhead symbol, within an equilateral triangle, is intended to alert the user to dangerous voltage and to prevent from a risk of electric shock. Warning:
GDB9 INSTRUCTION MANUAL DIGITAL TERRESTRIAL RECEIVER
 GDB9 INSTRUCTION MANUAL DIGITAL TERRESTRIAL RECEIVER Goodmans Support: www.goodmans.co.uk/support Please read these instructions before use and keep for future reference IMPORTANT SAFETY INSTRUCTIONS Thank
Table of Contents. Table of Contents. Safety Warning General Information. Installing Equipment Channel List Guide Menu Guide Main Page
 TABLE OF CONTENTS Table of Contents Table of Contents Safety Warning General Information Package Contents & Features Front Panel Rear Panel Remote Control Unit (RCU) Programing the Remote Control Installing
OPERATION Channel Manager HDD Installation... 22
 1.General Information... 3 2. Main Features... 3 3. FOR YOUR SAFETY... 4 4. ACCESSORIES... 4 OVERVIEW... 6 1. REMOTE CONTROL KEY... 6 2.FRONT PANEL... 8 3.REAR PANEL... 9 CONNECTION DIAGRAMS... 11 1. PVRX2
Alpha Plus. User Guide
 Alpha Plus User Guide Contents Contents i 1 Introduction 1 1.1 Features.............................. 1 1.2 Accessories............................ 2 1.3 The Remote Control....................... 3 1.4
Be sure to run the vehicle engine while using this unit to avoid battery exhaustion.
 CAUTION: TO REDUCE THE RISK OF ELECTRIC SHOCK DO NOT REMOVE COVER (OR BACK) NO USER-SERVICEABLE PARTS INSIDE REFER SERVICING TO QUALIFIED SERVICE PERSONNE; Please Read all of these instructions regarding
The product must be installed in accordance with national regulations.
 Important safety instructions to be kept with the product Please read attentively To prevent fire and electric shock, do not expose this receiver to rain or moisture. In order to avoid any possible risk
SAFETY PRECAUTION ENGLISH DO NOT INSTALL THE RECEIVER: PAG. 2
 MAX S92+ HDMI SAFETY PRECAUTION The lightning fl ash with arrowhead symbol, within an equilateral triangle, is intended to alert the user to dangerous voltage and to prevent from a risk of electric shock.
Digital High Definition Satellite Receiver SRT 7100
 Digital High Definition Satellite Receiver SRT 7100 Picture similar User Manual 1 3 Fig. 1 2 1 6 3 9 10 Fig. 2 2 4 5 7 8 Fig. 3 SCART Fig. 4 A B C HDMI Fig. 5 A B C A A Fig. 6 B C Table of Contents 1.0
User s Manual. Full HD Digital Satellite Receiver. v1310. Please read this User s Manual carefully before installing the receiver.
 User s Manual Full HD Digital Satellite Receiver v1310 Please read this User s Manual carefully before installing the receiver. 2 CONTENTS 1 Introduction 4 1.1 Features 4 1.2 Accessories 4 1.3 The Remote
CONTENTS 8 ACCESSORIES 13 9 TROUBLE SHOOTING AND ADVICE SPECIFICATIONS BATTERY USAGE CAUTION 13
 CONTENTS 1 PREFACE 2 2 SAFETY PRECAUTIONS 2 3 FRONT & BACK VIEW, REAR CONNECTION OF LCD 3 4 TV INSTALLATION DRAWINGS 4 4.1 ANTENNA CONNECTION 4 4.2 AV1 INPUT CONNECTION 4 4.3 AV2 INPUT CONNECTION 4 4.4
User's Manual 700HDMI PVR
 Digital Satellite Receiver User's Manual 700HDMI PVR INDEX INDEX... 3 Precautions... 5 1. Important Safety Instructions... 5 2. Notice... 5 3. Copyright... 6 4. Disclaimer... 6 Before You Begin... 7 1.
T1000n-VM USER MANUAL
 T1000n-VM USER MANUAL IMPORTANT! Safety Instructions 01. Read these Instructions. 02. Follow all Instructions. 03. Keep these Instructions. 04. Do not use this receiver near water. 05. Clean only with
User s Guide. HD Satellite Receiver Pansat 9500HDX
 User s Guide HD Satellite Receiver Pansat 9500HDX Panarex Electronics Sun Valley, California, U.S.A. c 2011 by Panarex Electronics 1 CONTENTS 1 - GETTING STARTED... 4 1.1 Introduction... 4 1.2 Caution...
STM 26 HD. DVB-S2+T2/C Compact meter User Manual. Ref R13. CAHORS Digital CS Cahors Cedex 9 FRANCE
 STM 26 HD DVB-S2+T2/C Compact meter User Manual Ref 0145225R13 Preface USER MANUAL Please read this manual carefully before using your Digital Sat meter for the first time. This operating manual will help
2.0 Wall Mount TV Soundbar Instruction Manual
 8010275 2.0 Wall Mount TV Soundbar Instruction Manual Read all of the instructions before using this soundbar and keep the manual in a safe place for future reference. Safety Information CA UT IO N RISK
EDISION OS mega VIEWS
 + + H.265 HEVC VIEWS 1 2 3 4 5 Front view: 1. Power Button Switch between operation and standby modes 2. Display current menu information and channel name etc. 3. USB Connect to the External HDD or USB
TRIAX T-HD505 VA Digital terrestrial DVB-T/T2 set-top box A
 TRIAX T-HD505 VA Digital terrestrial DVB-T/T2 set-top box 305060-A Contents Safety Precautions... 3 Disposal of batteries and set-top box... 4 Overview... 5 Front panel incl. CA-module and smart card...
IMPORTANT SAFETY INSTRUCTIONS
 IMPORTANT SAFETY INSTRUCTIONS 1. Read, follow and keep these instructions safely. 2. Heed all warnings. 1. Do not use this apparatus near water. 2. Clean only with dry cloth. 3. Do not block any ventilation
CONNECTION TO THE SATELLITE DISH LNB
 Safety Instructions Safety Instructions This product has been manufactured to satisfy the international safety standards. Please read all of safety and operating instructions before operating the product
Instructions for use. UFS 810 English IMPORTANT READ CAREFULLY BEFORE USE
 Instructions for use UFS 810 English IMPORTANT READ CAREFULLY BEFORE USE List of Contents 1 About these instructions...4 1.1 Contents...4 1.2 Markings...4 1.2.1 Pre-requirements for certain functions...4
Table of Contents. Safety Instruction 2. Trademark Information 3 Introduction 4. Package Contents 4. Features 5. Product Overview 6 Front Panel 6
 - 0 - Table of Contents Safety Instruction 2 Trademark Information 3 Introduction 4 Package Contents 4 Features 5 Product Overview 6 Front Panel 6 Rear Panel 7 Remote Control 8 System Installation 11 Setting
SAFETY PRECAUTION ENGLISH PAG. 2. rev 1.2. dangerous voltage and to prevent only. operating and maintenance from a risk of electric shock.
 MAX S93+ SAFETY PRECAUTION The lightning fl ash with arrowhead WARNING: To reduce the risk of The exclamation point within an symbol, within an equilateral triangle, electric shock, don t open the cabinet.
< > ϯϯyyϭ USER MANUAL
 USER MANUAL Contents Contents Safety Precautions Power Supply... 1 Installation... 2 Use and Maintenance... 3 Important Safety Instructions... 4-5 User Guidance Information Names of each part(front View)
Converts any TV to Digital. MFR-300 User Guide
 Converts any TV to Digital MFR-300 User Guide Introduction Thank you for choosing this TVonics Freeview box. Record the serial number in the space provided below (the serial number can be found on the
LCD VALUE SERIES (32 inches)
") LCD VALUE SERIES (32 inches) http://www.orionimages.com All contents of this document may change without prior notice, and actual product appearance may differ from that depicted herein 1. SAFETY INSTRUCTION
LCD VALUE SERIES (32 inches) http://www.orionimages.com All contents of this document may change without prior notice, and actual product appearance may differ from that depicted herein 1. SAFETY INSTRUCTION
KGN&, > Ϯϰs USER MANUAL
 USER MANUAL KGN Contents Contents Safety Precautions Power Supply... 1 Installation... 2 Use and Maintenance... 3 Important Safety Instructions... 4-5 User Guidance Information Names of each part(front
English SAFETY PRECAUTION DO NOT INSTALL THE RECEIVER: PAG. 2
 U4125 SAFETY PRECAUTION The lightning fl ash with arrowhead symbol, within an equilateral triangle, is intended to alert the user to dangerous voltage and to prevent from a risk of electric shock. Warning:
Receiver/Digital Decoder DVB-T2 Set Top Box. Installation Manual & User Manual
 Receiver/Digital Decoder DVB-T2 Set Top Box Installation Manual & User Manual SAFETY PRECAUTION CAUTION: The lightening flash with arrowhead symbol, within an equilateral triangle, is intended to alert
For Freeview HD User s Manual
 extra Terrestrial HD For Freeview HD User s Manual 1 Table of contents 1 INTRODUCTION...4 2 MAIN FUNCTIONS AND FEATURES...4 3 THE REMOTE CONTROL...5 4 FRONT AND REAR PANEL...7 4.1 FRONT PANEL... 7 5 FIRST
Welcome to NEED HELP? DIRECTV offers the best entertainment experience. Use this guide to make the most of it LKR FCC ID : ORS
 NEED HELP? Important Tips Do not unplug your receiver If you unplug it you may miss the most recent updates that improve our service. The DIRECTV receiver is designed to consume very little energy while
Digital High Definition Satellite Receiver SRT 7000
 Digital High Definition Satellite Receiver SRT 7000 Picture similar User Manual Table of Contents 1.0 Instruction 2 1.1 Safety Instructions 2 1.2 Storage 2 1.3 Equipment Set-up 2 1.4 Accessories 3 1.5
Quick Start Digital Satellite Receiver HD
 Quick Start Digital Satellite Receiver HD One slot for Smart Card in Conax system One slot for Common Interface Module Support of SD / HD (MPEG2 / MPEG4 H.264), DVB-S, DVB-S2 system High resolution video
SAFETY PRECAUTION ENGLISH DO NOT INSTALL THE RECEIVER: PAG. 2
 MAX S21 SAFETY PRECAUTION The lightning fl ash with arrowhead symbol, within an equilateral triangle, is intended to alert the user to dangerous voltage and to prevent from a risk of electric shock. Warning:
Safety Instructions Power Source Warning
 Safety Instructions This product has been engineered and manufactured to assure your personal safety. However, improper use can result in potential electric shock or fire hazards. In order not to defeat
Remote Control Unit
 Contents Declaration of Conformity --------------------------------------------------------------------------------- 3 General Information -----------------------------------------------------------------------------------------
S7070rHD-XM USER MANUAL
 S7070rHD-XM USER MANUAL CONTENTS GENERAL INFORMATION 2 Features and Unpacking Remote Control Rear Panel Connections Connecting your S7070rHD Freeview EPG 3 4 5 5 6 FIRST TIME INSTALLATION 7 MENU INFORMATION
OWNER'S MANUAL MODEL: DTV-2000 STANDBY/ON
 OWNER'S MANUAL MODEL: DTV-2000 STANDBY/ON CH+ CH- TABLE OF CONTENTS SAFETY PRECAUTIONS IMPORTANT SAFETY INSTRUCTIONS and FEATURES ACCESSORIES and LOADING BATTERIES REMOTE CONTROL UNIT FRONT PANEL and REAR
USER MANUAL (UK) IMPORTANT! Please read this manual before you connect the receiver! DIGIALITY T-2000 FTA / T-2001 CX
 IMPORTANT! Please read this manual before you connect the receiver! DIGIALITY T-2000 FTA / T-2001 CX") USER MANUAL (UK) IMPORTANT! Please read this manual before you connect the receiver! DIGIALITY T-2000 FTA / T-2001 CX 1 2 DIGIALITY T-2000 FTA / T-2001 CX BASIS USE AND BASIS FUNCTIONS TABLE OF CONTENTS
USER MANUAL (UK) IMPORTANT! Please read this manual before you connect the receiver! DIGIALITY T-2000 FTA / T-2001 CX 1 2 DIGIALITY T-2000 FTA / T-2001 CX BASIS USE AND BASIS FUNCTIONS TABLE OF CONTENTS
The Parts of The System
 2 The Parts of The System THE RECEIVER FRONT PANEL UP DOWN POWER SMART CARD DOOR Behind this door is a slot for a future smart card. No smart card is included with this receiver. UP AND DOWN ARROW BUTTONS
All Rights Reserved. Disclaimer. Trademarks
 WWW.I-CAN.TV i All Rights Reserved The product described in this manual is protected by international copyright laws. Under this copyright law, you are prohibited from duplicating the software or hardware
The User s Manual. Digital Terrestrial Receiver Personal Video Recorder
 TM The User s Manual Digital Terrestrial Receiver Personal Video Recorder Please read this User's Manual carefully. The menu structure and specification can be changed without notice. TABLE OF CONTENTS
Thank you for purchasing STB10HD Digital High Definition Set Top Box.
 Thank you for purchasing STB10HD Digital High Definition Set Top Box. This manual will help you to install, use and maintain the receiver. Please read this manual carefully before operating your unit and
5 Getting Started Connecting the DVB-T Receiver First Steps... 9
 Table of Contents 1. Introduction... 2 2. Features... 3 3. Safety Notes... 4 4. Your Receiver and its Functions... 5 4.1 Remote Control Functions... 5 4.2 Front Panel Controls... 7 4.3 Rear Panel Connections...
1.0, 1.1, 1.2, 1.3 (USALS)
") Main Features Twin Tuner HD Satellite Receiver HDMI Output (up to 1080p) DiSEqC 1.0, 1.1, 1.2, 1.3 (USALS) Compatible Dolby Digital audio output (S/PDIF) Extended EPG and program reservation on EPG Open
Main Features Twin Tuner HD Satellite Receiver HDMI Output (up to 1080p) DiSEqC 1.0, 1.1, 1.2, 1.3 (USALS) Compatible Dolby Digital audio output (S/PDIF) Extended EPG and program reservation on EPG Open
Quick Start Digital Terrestrial Receiver
 Quick Start Digital Terrestrial Receiver Support of SD / HD (MPEG2 / MPEG4 H.264), DVB-T system PVR Ready - possibility to record on external USB drive Time Shift (video pausing, rewinding) HDMI video
Content. Safety Precaution General Features Accessories Front Panel Rear Panel Remote Control Unit...
 Content Safety Precaution...3 1. Reference 1.1 General Features...4 1.2 Accessories...5 2. Basic Function 2.1 Front Panel...6 2.2 Rear Panel...7 2.3 Remote Control Unit...8 3. Installation and Connection
100cm(40 ) LED TV WITH DVB-T
 LED TV WITH DVB-T") 100cm(40 ) LED TV WITH DVB-T PT4088F 6 400mm 400mm Contents Power Supply... 1 Installation... 2 Use and Maintenance... 3 Important Safety Instructions... 4-5 Overview(Front View) / Accessories... 6 Overview(Back
100cm(40 ) LED TV WITH DVB-T PT4088F 6 400mm 400mm Contents Power Supply... 1 Installation... 2 Use and Maintenance... 3 Important Safety Instructions... 4-5 Overview(Front View) / Accessories... 6 Overview(Back
ZvBox 150. HD video distribution over COAX Get Going Guide
 ZvBox 150 HD video distribution over COAX Get Going Guide ZvBox 150 is an HD MPEG 2 Encoder and frequency agile QAM Modulator. It allows you to convert any HD video source, Component or RGB (VGA), in real
User s Manual S9 HD PVR
 User s Manual S9 HD PVR High Definition Digital Satellite Recorder Personal Video Recorder 1 Common Interface 4 CONTENTS 1. REMOTE CONTROLLER...7 2. BASIC OPERATIONS...8 2.1 TURN ON STB..8 2.2 POWER.8
DM-1CH SD DVB-T MODULATOR INSTRUCTION MANUAL
 DM-1CH SD DVB-T MODULATOR INSTRUCTION MANUAL 2. Caution Statements and Table of Contents Table of Contents 2. Caution Statements and Table of contents 3. Important Safety Instructions 4. Important Safety
DIGITAL TERRESTRIAL RECEIVER NVR-2090DU CHANNEL
 DIGITAL TERRESTRIAL RECEIVER NVR-2090DU CHANNEL 1 Espanol ~ Digital Video Broadcasting 2 3 STANDBY DTV/VCR TEXT MUTE VOL+ INFO PLAY/PAUSE EPG VOL- CH+ STOP SETUP EXIT 23 FAV- ENTER FAV+ 24 25 SOURCE CH-
Thank you for purchasing a Humax PVR-9200T product. will automatically be adjusted to record the whole programme (page GB37, GB41)
") Notice Thank you for purchasing a Humax PVR-9200T product. Your PVR-9200T is now compatible with Freeview Playback Group 2 requirements. Freeview Playback explained: Accurate recording The start and end
Notice Thank you for purchasing a Humax PVR-9200T product. Your PVR-9200T is now compatible with Freeview Playback Group 2 requirements. Freeview Playback explained: Accurate recording The start and end
Full High Definition LCD TV. Kogan 1080p42 USER MANUAL
 Full High Definition LCD TV Kogan 1080p42 USER MANUAL Safety information To ensure reliable and safe operation of this equipment, please read carefully all of the instructions in this user guide, especially
SNT7070 SATELLITE & TERRESTRIAL RECEIVER USER MANUAL WORKS WITH A UHF AERIAL. WORKS WITH A Satellite Dish
 SNT7070 SATELLITE & TERRESTRIAL RECEIVER USER MANUAL WORKS WITH A UHF AERIAL WORKS WITH A Satellite Dish Warning: 1. To reduce the risk of fire or electric shock, DO NOT expose this apparatus to rain or
INSTRUCTIONS MANUAL SAVE THESE INSTRUCTIONS IN A SAFE PLACE FOR FUTURE REFERENCE
 High Definition Digital Set Top Box MPF3573HU INSTRUCTIONS MANUAL SAVE THESE INSTRUCTIONS IN A SAFE PLACE FOR FUTURE REFERENCE Important Safety Instructions 1) Read these instructions. 2) Keep these instructions.
S7070rHD - XM USER MANUAL
 S7070rHD - XM USER MANUAL CONTENTS GENERAL INFORMATION 2 Features and Unpacking Remote Control Rear Panel Connections Connecting your S7070rHD Freeview EPG 3 4 5 5 6 FIRST TIME INSTALLATION 7 MENU INFORMATION
Introduction. Important Safety Instructions
 Introduction Congratulations on purchasing your Eviant Portable Digital TV. On June 12, 2009 the conversion to digital television broadcasting will be complete all throughout the United States and Puerto
HD Digital MPEG2 Encoder / QAM Modulator
 HD Digital MPEG2 Encoder / QAM Modulator HDMI In QAM Out series Get Going Guide ZvPro 800 Series is a one or two-channel unencrypted HDMI-to-QAM MPEG 2 Encoder / QAM Modulator, all in a compact package
Before you can install your LCD TV on the wall, you must fi rst remove the base using the steps below:
 Quick Start Guide English CONTENTS INSTALLING LCD TV ON THE WALL.. TV CHANNEL INSTALLATION........ PRESENTATION OF THE LCD TV...... ACCESSORIES.................... BATTERY INSTALLATION............ REMOTE
QUICK INSTALLATION GUIDE
 QUICK INSTALLATION GUIDE SF128 E2 HD HEVC H.265 HD CODEC (DVB-S2) SF138 E2 HD HEVC H.265 HD Codec (DVB-C&T2) http://www.octagon-germany.eu/ http://www.octagon-forum.eu/ SAFETY INSTRUCTIONS INCLUDED CONTENTS
USER S MANUAL. Digital Satellite Receiver
 USER S MANUAL Digital Satellite Receiver E109000257A STRONG & Co. (FAR EAST), LTD. P. O. Box : 85, YOKOHAMA, KANAGAWA-KEN JAPAN 231-91 - FAX : +81 45 662-4957 Website : www.strong-technologies.com E-mail
High Definition Digital Set Top Box With USB Record DFTA45R. The Gold Technical Support Line: (Charges will apply at $2.
 High Definition Digital Set Top Box With USB Record INSTRUCTION MANUAL DFTA45R The Gold Technical Support Line: 1902 215 259 (Charges will apply at $2.95 per minute) Safety Instructions Always read the
Acer LCD TV AT2001 User's Guide
 Acer LCD TV AT2001 User's Guide Copyright 2005. Acer Incorporated. All Rights Reserved. Acer AT2001 User' s Guide Original Issue: May 2005 Acer and the Acer logo are registered trademarks of Acer Incorporated.