Connecting and Using a Source Device. Read below before installing the monitor. 20
|
|
|
- Jordan Bishop
- 6 years ago
- Views:
Transcription

1 User Manual C*H89* The color and the appearance may differ depending on the product, and the specifications are subject to change without prior notice to improve the performance. The contents of this manual are subject to change without notice to improve quality. Samsung Electronics Samsung Electronics owns the copyright for this manual. Use or reproduction of this manual in parts or entirety without the authorization of Samsung Electronics is prohibited. Trademarks other than that of Samsung Electronics are owned by their respective owners. An administration fee may be charged if either (a) an engineer is called out at your request and there is no defect in the product (i.e. where you have failed to read this user manual). (b) you bring the unit to a repair center and there is no defect in the product (i.e. where you have failed to read this user manual). The amount of such administration charge will be advised to you before any work or home visit is carried out.
2 Table of contents Before Using the Product Securing the Installation Space 4 Precautions for storage 4 Safety Precautions 4 Symbols 4 Cleaning 5 Electricity and Safety 5 Installation 6 Operation 7 Preparations Parts 9 Control Panel 9 Direct Key guide 10 Function Key Guide 11 Changing Brightness, Contrast and Eye Saver Mode settings 13 Changing the Volume setting 13 Reverse Side 14 Adjusting the Product Tilt and Height 15 Anti-theft Lock 16 Precautions for moving the monitor 16 Installing a Wall-mount Kit or Desktop Stand 17 Installation 18 Attaching the Stand 18 Removing the Stand 19 Connecting and Using a Source Device Read below before installing the monitor. 20 Connecting and Using a PC 20 Connection Using the HDMI Cable 20 Connection Using the USB Type-C Cable 21 Connection Using the DP Cable 21 Connecting to Headphones 21 Connecting the Product to a PC as a USB HUB 22 Connecting a PC to the Product 22 Utilizing the Product as a USB HUB 22 Connecting the Power 23 Tidying Up the Connected Cables 24 Correct posture to use the product 25 Driver Installation 25 Setting Optimum Resolution 25 Screen Setup SAMSUNG MAGIC Bright 26 Brightness 27 Contrast 27 Sharpness 27 Color 27 SAMSUNG MAGIC Upscale 28 HDMI Black Level 28 Eye Saver Mode 28 Game Mode 28 Response Time 28 Picture Size 29 Screen Adjustment 29 Configuring the PIP/PBP Settings PIP/PBP Mode 30 Size 31 Position 31 Sound Source 31 Source 32 Picture Size 32 Contrast 33 2
3 Table of contents Adjusting OSD (On Screen Display) settings Transparency 34 Position 34 Language 34 Display Time 34 Setup and Reset DisplayPort Ver. 35 HDMI Mode 35 FreeSync 36 Eco Saving Plus 38 Off Timer 38 PC/AV Mode 38 Source Detection 39 Key Repeat Time 39 Power LED On 39 Reset All 39 Information 39 Installing the Software Easy Setting Box 40 Restrictions and Problems with the Installation 40 System Requirements 40 Troubleshooting Guide Requirements Before Contacting Samsung Customer Service Center 41 Testing the Product 41 Checking the Resolution and Frequency 41 Check the following. 41 Q & A 43 Specifications General 44 Standard Signal Mode Table 45 Appendix Responsibility for the Pay Service (Cost to Customers) 47 Not a product defect 47 A Product damage caused by customer's fault 47 Others 47 Extended warranty 48 3
4 Chapter 01 Before Using the Product Securing the Installation Space Safety Precautions Ensure some space around the product for ventilation. An internal temperature rise may cause fire and damage the product. Be sure to allow the amount of space as shown below or greater when installing the product. The exterior may differ depending on the product. Caution RISK OF ELECTRIC SHOCK DO NOT OPEN Caution : TO REDUCE THE RISK OF ELECTRIC SHOCK, DO NOT REMOVE COVER. (OR BACK) THERE ARE NO USER SERVICEABLE PARTS INSIDE. REFER ALL SERVICING TO QUALIFIED PERSONNEL. 10 cm (3.93 Inches) 10 cm (3.93 Inches) This symbol indicates that high voltage is present inside. 10 cm (3.93 Inches) 10 cm (3.93 Inches) It is dangerous to make any kind of contact with any internal part of this product. This symbol alerts you that important literature concerning operation and maintenance has been included with this product. 10 cm (3.93 Inches) Symbols Precautions for storage High-glossy models can develop white stains on the surface if an ultrasonic wave humidifier is used nearby. Contact your nearest Samsung Customer Service Center if you want to clean the inside of the product (Service fee will be charged.) Do not press the monitor screen with hands or other objects. There is a risk of damaging the screen. Warning Caution A serious or fatal injury may result if instructions are not followed. Personal injury or damage to properties may result if instructions are not followed. 4
5 Cleaning Exercise care when cleaning as the panel and exterior of advanced LCDs are easily scratched. Take the following steps when cleaning. 1 Power off the product and computer. 2 Disconnect the power cord from the product. Hold the power cable by the plug and do not touch the cable with wet hands. Otherwise, an electric shock may result. 3 Wipe the monitor with a clean, soft and dry cloth. Do not apply a cleaning agent that contains alcohol, solvent, or surfactant to the monitor. Do not spray water or detergent directly on the product. 4 Wet a soft and dry cloth in water and wring thoroughly to clean the exterior of the product. 5 Connect the power cord to the product when cleaning is finished. 6 Power on the product and computer. Electricity and Safety Warning Do not use a damaged power cord or plug, or a loose power socket. Do not use multiple products with a single power socket. Do not touch the power plug with wet hands. Insert the power plug all the way in so it is not loose. Connect the power plug to a grounded power socket (type 1 insulated devices only). Do not bend or pull the power cord with force. Be careful not to leave the power cord under a heavy object. Do not place the power cord or product near heat sources. Clean any dust around the pins of the power plug or the power socket with a dry cloth. Caution Do not disconnect the power cord while the product is being used. Only use the power cord provided with your product by Samsung. Do not use the power cord with other products. Keep the power socket where the power cord is connected unobstructed. The power cord must be disconnected to cut off power to the product when an issue occurs. Hold the plug when disconnecting the power cord from the power socket. 5
6 Installation Warning DO NOT PLACE CANDLES, INSECT REPELLANTS OR CIGARETTES ON TOP OF THE PRODUCT. DO NOT INSTALL THE PRODUCT NEAR HEAT SOURCES. Do not install the product in poorly ventilated spaces such as a bookcase or closet. Install the product at least 10 cm away from the wall to allow ventilation. Keep the plastic packaging out of the reach of children. Children may suffocate. Do not install the product on an unstable or vibrating surface (insecure shelf, sloped surface, etc.) The product may fall and become damaged and/or cause an injury. Using the product in an area with excess vibration may damage the product or cause a fire. Do not install the product in a vehicle or a place exposed to dust, moisture (water drips, etc.), oil, or smoke. Do not expose the product to direct sunlight, heat, or a hot object such as a stove. The product lifespan may be reduced or a fire may result. Do not install the product within the reach of young children. Caution Do not drop the product while moving. Do not set down the product on its front. When installing the product on a cabinet or shelf, make sure that the bottom edge of the front of the product is not protruding. The product may fall and become damaged and/or cause an injury. Install the product only on cabinets or shelves of the right size. Set down the product gently. Product failure or personal injury may result. Installing the product in an unusual place (a place exposed to a lot of fine dust, chemical substances, extreme temperatures or a significant presence of moisture, or a place where the product will operate continuously for an extended period of time) may seriously affect its performance. Be sure to consult Samsung Customer Service Center if you want to install the product at such a place. The product may fall and injure children. Edible oil (such as soybean oil) may damage or distort the product. Keep the product away from oil pollution. And do not install or use the product in the kitchen or near the kitchen stove. 6
7 Operation Warning There is a high voltage inside the product. Never disassemble, repair or modify the product yourself. Contact Samsung Customer Service Center for repairs. To move the product, first disconnect all the cables from it, including the power cable. If the product generates abnormal sounds, a burning smell or smoke, disconnect the power cord immediately and contact Samsung Customer Service Center. Do not let children hang from the product or climb on top of it. Do not insert metallic objects (chopsticks, coins, hairpins, etc) or objects that burn easily (paper, matches, etc) into the product (via the vent or input/output ports, etc). Be sure to power off the product and disconnect the power cord when water or other foreign substances have entered the product. Then contact Samsung Customer Service Center. Do not place objects containing liquid (vases, pots, bottles, etc) or metallic objects on top of the product. Be sure to power off the product and disconnect the power cord when water or other foreign substances have entered the product. Then contact Samsung Customer Service Center. Children may become injured or seriously harmed. If the product is dropped or the outer case is damaged, turn off the power and disconnect the power cord. Then contact Samsung Customer Service Center. Continued use can result in a fire or electric shock. Do not leave heavy objects or items that children like (toys, sweets, etc.) on top of the product. The product or heavy objects may fall as children try to reach for the toys or sweets resulting in a serious injury. During a lightning or thunderstorm, power off the product and remove the power cable. Do not drop objects on the product or apply impact. Do not move the product by pulling the power cord or any cable. If a gas leakage is found, do not touch the product or power plug. Also, ventilate the area immediately. Do not lift or move the product by pulling the power cord or any cable. Do not use or keep combustible spray or an inflammable substance near the product. Ensure the vents are not blocked by tablecloths or curtains. An increased internal temperature may cause a fire. 7
8 Caution Leaving the screen fixed on a stationary image for an extended period of time may cause afterimage burn-in or defective pixels. Activate power-saving mode or a moving-picture screen saver if you will not be using the product for an extended period of time. Disconnect the power cord from the power socket if you do not plan on using the product for an extended period of time (vacation, etc). Dust accumulation combined with heat can cause a fire, electric shock or electric leakage. Use the product at the recommended resolution and frequency. Your eyesight may deteriorate. Do not hold the product upside-down or move it by holding the stand. The product may fall and become damaged or cause an injury. Looking at the screen too close for an extended period of time can deteriorate your eyesight. Do not use humidifiers or stoves around the product. Rest your eyes for more than 5 minutes or look at distance objects for every 1 hour of product use. Do not touch the screen when the product has been turned on for an extended period of time as it will become hot. Store small accessories out of the reach of children. Exercise caution when adjusting the product angle or stand height. Your hand or finger may get stuck and injured. Tilting the product at an excessive angle may cause the product to fall and an injury may result. Do not place heavy objects on the product. Product failure or personal injury may result. When using headphones or earphones, do not turn the volume too high. Having the sound too loud may damage your hearing. 8
9 Chapter 02 Preparations Parts Icons JOG Button Description Multi directional button that helps navigate. The JOG button is located on the rear left side of the product. The Control Panel button can be used to move up, down, left or right, or as Enter. This LED is power status indicator and works as The color and shape of parts may differ from what is shown. Specifications are subject to change without Power On (Power button): Off notice to improve quality. Power LED Power saving mode: Blinking Power Off (Power button): On The power Indicator operation can be swapped by changing in the menu. (System Power LED On) Actual models because of functional variation maybe haven t this function. Press the JOG button when the screen is turned on. The Function Key Function Key Guide Guide will appear. To access the onscreen menu when the guide is displayed, press the corresponding direction button again. Function Key Guide may vary depending on the function or product Power LED model. Please refer to the actual product. JOG Button UP LEFT RIGHT PRESS(ENTER) DOWN Return Function Key Guide 9
10 Direct Key guide The shortcut button screen (OSD menu) shown below is displayed only when the monitor screen is turned on, the computer resolution changes, or the input source changes. The function buttons page shows if Eye Saver Mode is enabled. : On : Off Eye Saver Mode Volume Features Eye Saver Mode Off / : Adjust Brightness, Contrast, Eye Saver Mode. : Adjust Volume. : Display Function Key Guide. 10
11 Function Key Guide To enter the main menu or to use other items, press the JOG button to display the Function Key Guide. You can exit by pressing the JOG button again. UP/DOWN/LEFT/RIGHT: Move to the item you want. The description for each item will appear when the focus changes. PRESS(ENTER): The selected item will be applied. Return Icons Description Selects to change the input signal by moving the JOG button in the Function Key Guide screen. A message will appear on the top left corner of the screen if the input signal has been changed. Selects by moving the JOG button in the function key guide screen. The OSD (On Screen Display) of your Monitor s feature appears. OSD control lock: Maintain the current settings, or lock the OSD control to prevent unintended changes to settings. Enable/Disable: To lock/unlock the OSD control, press the LEFT button for 10 seconds when the main menu displayed. If the OSD control is locked, Brightness and Contrast can be adjusted. PIP/PBP is available. Eye Saver Mode is available. Information can be viewed. Selects by moving the JOG button in the function key guide screen. Press the button when configuring settings for the PIP/PBP function is required. Selects to turn the Monitor off by moving the JOG button in the function key guide screen. Actual models because of functional variation, Function key guide options will be different. 11
12 When the monitor displays nothing (i.e. Power saving mode or Non-signal mode), 2 direct keys for control source and power could be used as below. JOG Button Power saving/non-signal mode UP Source Change Down PRESS(ENTER) for 2 seconds Power Off When the monitor displays the Main menu the JOG Button could be used as below. JOG Button Action UP/DOWN Move the option Exit the Main menu. LEFT Close Sublist without saving value. Value decreases in the slider. RIGHT PRESS(ENTER) Move to next depth. Value increases in the slider. Move to next depth. Save the value and close Sublist. 12
13 Changing Brightness, Contrast and Eye Saver Mode settings You can adjust Brightness, Contrast or Eye Saver Mode by moving the JOG button up or down, if no OSD menu is displayed. Contrast Eye Saver Mode Brightness The displayed image may differ depending on the model. Eye Saver Mode Not available when PIP/PBP Mode is set to On. Brightness Off SAMSUNG This menu is not available when MAGICBright is set to Dynamic Contrast mode. This menu is not available when Eco Saving Plus is enabled. This menu is not available when Eye Saver Mode is enabled. Changing the Volume setting You can adjust Volume by moving the JOG button left or right, if no OSD menu is displayed. Volume 50 Mute The displayed image may differ depending on the model. If the audio quality of a connected input device is poor, the Auto Mute function on the product may mute the sound or cause choppy audio when applying the headphones or speakers. Set the input volume for the input device to at least 20% and control the volume using the volume control (JOG button LEFT/RIGHT) on the product. What is Auto Mute? The function mutes the audio to improve sound effect when there is sound noise or when the input signal is weak, usually due to a problem with the volume of an input device. To activate the Mute function, access the Volume control screen, then use the JOG button to move the focus down. To deactivate the Mute function, access the Volume control screen, then increase or decrease the Volume. Contrast SAMSUNG This menu is not available when MAGICBright is in Cinema or Dynamic Contrast mode. This menu is not available when Game Mode is enabled. This menu is not available when PIP/PBP Mode is set to On and the Size is set to (PBP Mode). 13
14 Reverse Side The color and shape of parts may differ from what is shown. Specifications are subject to change without notice to improve quality. 1 2 Port Description Port Description Connect the power cord for your monitor to the POWER IN port on the back of the product. Connects to a source device using an HDMI cable or HDMI-DVI cable. 1 2 Connect to a USB device. These ports are enabled when a PC is connected to the using a USB Type-C to A cable or a USB Type-C cable. Connect to a USB device. This port is enabled when a PC is connected to the using a USB Type-C to A cable or a USB Type-C cable. And USB 3.0 is supported only when a PC is connected to the using a USB Type-C to A cable. Connects to a PC using a DP cable. Connect to an audio output device such as headphones. Connects to a source device using a USB Type-C cable. Compatible with a USB cable version 3.0 or lower. 14
15 Adjusting the Product Tilt and Height Caution The color and shape of parts may differ from what is shown. Specifications are subject to change without notice to improve quality (±2.0 ) ~ 30.0 (±2.0 ) -5.0 (±2.0 ) ~ 24.0 (±2.0 ) 0 ~ mm (±5.0 mm) Grasp the left and right sides of the monitor and adjust the tilt. The monitor tilt and height can be adjusted. After adjusting the product tilt and height, if the screen is not level, take the following actions. Hold the top center of the product and adjust the height carefully. When adjusting the stand height, you may hear a noise. This noise is generated because the ball inside the stand slides when the stand height is adjusted. It is a normal noise and not a product malfunction Hold the bezel at both side edges and adjust the monitor angle until the screen becomes level. (Be careful not to directly hold the LCD display.) The monitor angle can be adjusted from -2 to
16 Anti-theft Lock Precautions for moving the monitor An anti-theft lock allows you to use the product securely even in public places. The locking device shape and locking method depend on the manufacturer. Refer to the user guide provided with your anti-theft locking device for details. To lock an anti-theft locking device: Do not directly apply pressure on the screen. Do not hold the screen when moving the monitor. Do not hold the product upside down only by the stand. 1 Fix the cable of your anti-theft locking device to a heavy object such as a desk. 2 Put one end of the cable through the loop on the other end. 3 Insert the locking device into the anti-theft lock slot at the back of the product. 4 Lock the locking device. An anti-theft locking device can be purchased separately. Refer to the user guide provided with your anti-theft locking device for details. Anti-theft locking devices can be purchased at electronics retailers or online. Hold the lower corners or edges of the monitor when moving it. 16
17 Installing a Wall-mount Kit or Desktop Stand Power the product off and remove the power cable from the power socket. 1 3 A 2 4 Notes Using a screw longer than the standard length can damage the internal components of the product. The length of screws required for a wall mount that does not comply with the VESA standards may vary depending on the specifications. Do not use screws that do not comply with the VESA standards. Do not attach the wall-mount kit or desktop stand using excessive force. The product may get damaged or fall and cause personal injury. Samsung shall not be held liable for any damage or injury caused by using improper screws or attaching the wall-mount kit or desktop stand using excessive force. Samsung shall not be held liable for any product damage or personal injury caused by using a wall-mount kit other than the one specified or from an attempt to install the wall-mount kit on your own. To mount the product on a wall, ensure you purchase a wall-mount kit that can be installed 10 cm or farther away from the wall. Be sure to use a wall-mount kit that complies with the national standards. To install the monitor using a wall mount, disconnect the stand base from the monitor. Model name VESA screw hole specs (A * B) in millimeters Standard Screw Unit: mm (inches) Quantity C34H890WJ* x (3.9 x 3.9) 4.0 mm Φ, 0.7 pitch * 10.0 mm long 4 EA Attach the wall-mount kit or desktop stand here Wall-mount bracket (optional) Align the grooves and tightly fasten the screws on the bracket on the product with the corresponding parts on the wall-mount kit or desktop stand you want to attach. Do not install your Wall Mount Kit while your product is turned on. It may result in personal injury due to electric shock. 17
18 Installation Attaching the Stand Before assembling the product, place the product down on a flat and stable surface so that the screen is facing downwards. : The product is curved. Placing pressure on the product when on a flat surface may damage the product. When the product is on the ground facing up or down, do not put pressure on it Insert the stand neck into the stand base in the Check that the stand neck is firmly connected. Place the stand neck of the display on the device as Stand assembly is complete. direction shown in the figure. Tightly fasten the connecting screw at the bottom per the positions of the fasteners. of the stand base. - Caution Do not press down on the monitor. There is a risk of damaging the monitor. 18
19 Removing the Stand Before removing the stand from the monitor, place the monitor on a flat and stable surface with the screen facing down. : The product is curved. Placing pressure on the product when on a flat surface may damage the product. When the product is on the ground facing up or down, do not put pressure on it Place the protective Styrofoam (cushion) included Push the key upward and hold. Turn the stand neck After turning the stand neck of the display Turn the connecting screw at the bottom of the in the package on the floor and place the product of the display counterclockwise for 10. counterclockwise for 10, lift the stand neck to stand base to separate it. facing down on the Styrofoam, as shown in the detach it from the device. image. If Styrofoam is unavailable, use a thick sitting mat. 5 Remove the stand neck from the stand base by - Caution pulling it in the direction of the arrow as shown in the figure. Do not press down on the monitor. There is a risk of damaging the monitor. 19
20 Chapter 03 Connecting and Using a Source Device Read below before installing the monitor. Connecting and Using a PC 1 Check the shapes of both ends of the cables that came with the monitor, and check the shapes and positions of the matching ports on the monitor and external devices. 2 Before connecting signal cables, disconnect the power cables for the monitor and external devices from the power outlet to prevent device damage from a short circuit or overcurrent. 3 After connecting all signal cables, connect the power cables for the monitor and external devices to the power outlet. 4 Read the user manual to familiarize yourself with the monitor functions, precautions, and proper use, before using the installed monitor. Select a connection method suitable for your PC. Connecting parts may differ in different products. Provided ports may vary depending on the product. Connection Using the HDMI Cable Check to make sure that the power cables for the monitor and external devices, such as computers and set-top boxes, are not connected to the power outlet. HDMI IN When connecting an HDMI cable, use the cable that came with the components of the monitor. If you use an HDMI cable other than provided by Samsung, the image quality may be degraded. 20
21 Connection Using the USB Type-C Cable Check to make sure that the power cables for the monitor and external devices, such as computers and set-top boxes, are not connected to the power outlet. Connection Using the DP Cable Check to make sure that the power cables for the monitor and external devices, such as computers and set-top boxes, are not connected to the power outlet. A DP cable shorter under 1.5 m in length is recommended. Using a cable longer than 1.5 m can affect the According to the USB Power Delivery 2.0 specification, our product can charge your notebook when you connect it to our product with a USB Type-C cable. A maximum charging power of 45 W is supported. Charging speed may vary depending on the notebook connected to our product. Because notebooks with a USB Type-C port released on the market are very various, we cannot guarantee picture quality. Connecting to Headphones that our product can charge all types of notebooks with a USB Type-C port. Make sure that the USB Type-C cable complies with the USB PD specification. Otherwise, your devices may be damaged. A Samsung branded cable is recommended. 21
22 Connecting the Product to a PC as a USB HUB Utilizing the Product as a USB HUB Using the product as a hub, connect and use various source devices with the product at the same time. Connecting a PC to the Product The product can function as a HUB by connecting to a PC via a USB Type-C cable. You can connect a source device directly to the product and control the device from the product, without having to connect the device to the PC. A PC cannot connect to multiple source devices at the same time as it has a limited number of input/ output ports available. The HUB feature on the product will improve your work efficiency by allowing you to connect multiple source devices to the USB ports on the product at the same time without connecting them to a PC. To use the product as a USB hub, connect the product to a PC using a USB Type-C cable. If multiple source devices are connected to the PC, the many cables around the PC may look messy. Connecting the devices directly to the product will resolve such inconvenience. Connect a mobile device such as an MP3 player or smartphone to the product when connected to a PC. This allows you to control the device from the PC or charge the device battery. 22
23 The read/write rate will be affected by the USB device and your PC. The product does not support media play. If you need to play a file in your USB device, please connect the Connecting the Power product as a Hub to your PC and play the file on your PC. For USB-related problems caused by OS, drive programs or software, please contact relevant suppliers. With the launch of various USB devices on the market, we cannot guarantee that our products are matched with all USB devices. For an external mass-storage HDD requiring external power supply, be sure to connect it to a power source. The battery can be charged in the power-saving mode, but it cannot be charged when the product is POWER IN powered off. Charging your USB device is not possible if the power cable is disconnected from the power socket. The USB device needs to be purchased separately. To use the product, connect the power cable to a power outlet and the POWER IN port on the product. The input voltage is switched automatically. 23
24 Tidying Up the Connected Cables Tilt the display, as shown in the figure. Connect cables to the appropriate ports. Cover the COVER-REAR SUB. Open the COVER-STAND NECK LEFT, and rotate the open part at the bottom. 5 6 Cover the COVER-STAND NECK LEFT. Arrange the external cables. - Caution 24
25 Correct posture to use the product Driver Installation You can set the optimum resolution and frequency for this product by installing the corresponding drivers. To install the latest version of the product driver, download it from the Samsung Electronics website at Setting Optimum Resolution An information message about setting optimum resolution will appear if you power on the product for the first time after purchase. Use the product in the correct posture as follows: Straighten your back. Select a language on the product and change the resolution on your PC to the optimum setting. If the optimum resolution is not selected, the message will appear up to three times for a specified time even when the product is turned off and on again. The optimum resolution can also be selected in Control Panel on your PC. Allow a distance of 45 to 50cm between your eye and the screen, and look slightly downward at the screen. Keep your eyes directly in front of the screen. Adjust the angle so light does not reflect on the screen. Keep your forearms perpendicular to your upper arms and level with the back of your hands. Keep your elbows at about a right angle. Adjust the height of the product so you can keep your knees bent at 90 degrees or more, your heels attached to the floor, and your arms lower than your heart. Do the Eye excercises or blink frequently,then eye fatigue will be relieved. 25
26 Chapter 04 Screen Setup Configure the screen settings such as brightness. A detailed description of each function is provided. Refer to your product for details. The functions available may vary depending on the product model. The color and shape of parts may differ from what is shown. Specifications are subject to change without notice to improve quality. SAMSUNG MAGIC Bright This menu provides an optimum picture quality suitable for the environment where the product will be used. This menu is not available when Smart ECO Saving is enabled. This menu is not available when Game Mode is enabled. This menu is not available when Eye Saver Mode is enabled. Not available when PIP/PBP Mode is set to On. You can customize the brightness to suit your preferences. In PC mode Custom: Customize the contrast and brightness as required. Standard: Obtain a picture quality suitable for editing documents or using Internet. Cinema: Obtain the brightness and sharpness of TVs suitable for enjoying video and DVD content. Dynamic Contrast: Obtain balanced brightness through automatic contrast adjustment. High-Brightness: Maximize the screen brightness. In AV mode When the external input is connected through HDMI/DP/USB Type-C and PC/AV Mode is set to AV, SAMSUNG MAGICBright has four automatic picture settings (Dynamic, Standard, Movie and Custom) that are preset at the factory. You can activate either Dynamic, Standard, Movie or Custom. You can select Custom which automatically recalls your personalized picture settings. Dynamic: Select this mode to view a sharper image than in Standard mode. Standard: Select this mode when the surroundings are bright. This also provides a sharp image. Movie: Select this mode when the surroundings are dark. This will save power and reduce eye fatigue. Custom: Select this mode when you want to adjust the image according to your preferences. 26
27 Brightness Color You can adjust the general brightness of the picture. (Range: 0~100) A higher value will make the picture appear brighter. SAMSUNG This menu is not available when MAGICBright is set to Dynamic Contrast mode. This menu is not available when Smart ECO Saving is enabled. This menu is not available when Eye Saver Mode is enabled. Adjust the tint of the screen. SAMSUNG This menu is not available when MAGICBright is set to Cinema or Dynamic Contrast mode. This menu is not available when Game Mode is enabled. This menu is not available when Eye Saver Mode is enabled. Not available when PIP/PBP Mode is set to On. Red: Adjust the red saturation level. Values closer to 100 mean greater intensity for the color. Contrast Adjust the contrast between the objects and background. (Range: 0~100) A higher value will increase the contrast to make the object appear clearer. SAMSUNG This option is not available when MAGICBright is in Cinema or Dynamic Contrast mode. This menu is not available when Game Mode is enabled. This menu is not available when PIP/PBP Mode is set to On and the Size is set to (PBP Mode). Sharpness Make the outline of objects more clear or blurry. (Range: 0~100) A higher value will make the outline of objects clearer. SAMSUNG This option is not available when MAGICBright is in Cinema or Dynamic Contrast mode. SAMSUNG This menu is not available when MAGICUpscale is in Mode1 or Mode2 mode. This menu is not available when Game Mode is enabled. Not available when PIP/PBP Mode is set to On. Green: Adjust the green saturation level. Values closer to 100 mean greater intensity for the color. Blue: Adjust the blue saturation level. Values closer to 100 mean greater intensity for the color. Color Tone: Select a color tone that best suits your viewing needs. Cool 2: Set the color temperature to be cooler than Cool 1. Cool 1: Set the color temperature to be cooler than Normal mode. Normal: Display the standard color tone. Warm 1: Set the color temperature to be warmer than Normal mode. Warm 2: Set the color temperature to be warmer than Warm 1. Custom: Customize the color tone. When the external input is connected through HDMI/DP/USB Type-C and PC/AV Mode is set to AV, Color Tone has four color temperature settings (Cool, Normal, Warm and Custom). Gamma: Adjust the middle level of luminance. Mode1 / Mode2 / Mode3 27
28 SAMSUNG MAGIC Upscale Eye Saver Mode SAMSUNG MAGICUpscale function can enhance the layers of the picture details and the vividness of the picture. The function has more obvious effects on low-resolution pictures. SAMSUNG This menu is not available when MAGICBright is set to Cinema or Dynamic Contrast mode. This menu is not available when Game Mode is enabled. Not available when PIP/PBP Mode is set to On. Off / Mode1 / Mode2 Comparing with Mode1, Mode2 has a stronger effect. Set to an optimum picture quality suitable for eye relaxation. TÜV Rheinland Low Blue Light Content is a certification for products which meet requirements for lower blue light levels. When Eye Saver Mode is 'On', the blue light that wavelength is around 400nm will decrease, and it will provide an optimum picture quality suitable for eye relaxation. At the same time, the blue light level is lower than in the default settings, and it was tested by TÜV Rheinland and certified as it met the requirements of TÜV Rheinland Low Blue Light Content standards. Not available when PIP/PBP Mode is set to On. HDMI Black Level If a DVD player or set-top box is connected to the product via HDMI, image quality degradation (contrast/ color degradation, black level, etc.) may occur, depending on the connected source device. In such case, HDMI Black Level can be used to adjust the image quality. If this is the case, correct the degraded picture quality using HDMI Black Level. This function is only available in HDMI mode. Not available when PIP/PBP Mode is set to On. Normal: Select this mode when there is no contrast ratio degradation. Low: Select this mode to reduce the black level and increase the white level when there is a contrast ratio degradation. HDMI Black Level may not be compatible with some source devices. The HDMI Black Level feature is only activated at a certain AV resolution, such as 720P and 1080P. Game Mode Configure the product screen settings for game mode. Use this feature when playing games on a PC or when a game console such as PlayStation or Xbox is connected. This menu is not available when Eye Saver Mode is enabled. This menu is not available when Smart ECO Saving is enabled. When the monitor turns off, enters power-saving mode or changes input sources, Game Mode turns Off even if it is set to On. If you want to keep Game Mode enabled all the time, select Always On. Not available when PIP/PBP Mode is set to On. Response Time Accelerate the panel response rate to make video appear more vivid and natural. Use Standard mode when not playing a video or game. This menu is not available when PIP/PBP Mode is set to On and the Size is set to / / (PIP Mode). 28
29 Picture Size Screen Adjustment Change the picture size. This menu is not available when PIP/PBP Mode is set to On and the Size is set to This option is not available when FreeSync is enabled. (PBP Mode). This menu is only available when Picture Size is set to Screen Fit in AV Mode. When a 480P or 576P or 720P or 1080P signal is input in AV mode and the monitor can display normally, select Screen Fit to adjust horizontal position in 0-6 levels. In PC mode Auto: Display the picture according to the aspect ratio of the input source. Wide: Display the picture in full screen regardless of the aspect ratio of the input source. Configuring H-Position & V-Position H-Position: Move the screen to the left or right. V-Position: Move the screen up or down. In AV mode 4:3: Display the picture with an aspect ratio of 4:3. Suitable for videos and standard broadcasts. 16:9: Display the picture with an aspect ratio of 16:9. 21:9: Display the picture with an aspect ratio of 21:9. Screen Fit: Display the picture with the original aspect ratio without cutting off. The function may not be supported depending on the ports provided with the product. Changing the screen size is available when the following conditions are satisfied. A digital output device is connected using the HDMI/DP/USB Type-C cable. The input signal is 480p, 576p, 720p, or 1080p and monitor can display normally (Not every model can support all of these signals.). This can only be set when the external input is connected through HDMI/DP/USB Type-C and PC/AV Mode is set to AV. 29

30 Chapter 05 Configuring the PIP/PBP Settings A detailed description of each function is provided. Refer to your product for details. The functions available may vary depending on the product model. The color and shape of parts may differ from what is shown. Specifications are subject to change without notice to improve quality. PIP/PBP Mode Enable or disable the PIP/PBP Mode function. The PIP (Picture in Picture) function separates the screen into two parts. One source device is displayed on the main screen at the same time the another source device is displayed in inset windows. The PBP (Picture by Picture) function separates the screen in half displaying output from two different source devices simultaneously on the left and right sides of the screen. PIP/PBP mode is compatible with Windows 7, Windows 8, and Windows 10. The PIP/PBP function may not be available depending on the specifications of the graphics card used. If the screen is blank in PIP/PBP mode when the optimum resolution is selected, go to Control Panel Display Screen Resolution and click Detect on the PC. (Instructions are based on Windows 7.) If the screen is blank when the resolution is set to the optimum resolution, change the resolution to 1280 x The screen may flicker briefly or appear after a delay when you enable or disable the PIP/PBP function or when you change the screen size with the PIP/PBP function activated. This can typically arise when a PC and a monitor are connected to two or more input sources. It has nothing to do with the performance of a monitor. The issue is mainly caused when the video signals are delayed in transmission to the monitor depending on the graphics card performance. To maximize the picture quality, it is recommended to use a graphics card that supports WQHD+ (3440 x 1440) resolution. When using PIP/PBP, automatic switching to the optimum resolution and frequency is not available, due to conformance with the graphics card and Windows. Set PIP/PBP Mode to Off. Alternatively, restart the monitor, then set the resolution to the optimum setting using the Windows interface. 30
31 Size Sound Source Select the size and aspect ratio of the sub-screen. : Select the icon image if you want to use PBP mode where the optimum resolution for the left and right sides of the screen is 1720 x 1440 (width x height). : Select the icon image if you want to use PIP mode where the optimum resolution for the subscreen is 720 x 480 (width x height). : Select the icon image if you want to use PIP mode where the optimum resolution of the subscreen is 1280 x 720 (width x height). : Select the icon image if you want to use PIP mode where the optimum resolution of the subscreen is 1720 x 720 (width x height). Set which screen you want to hear the sound for. PIP mode / PBP mode / Position Select the position of the sub-screen from the available options. / / / Not available when PBP is selected. The screen may flicker if the input signal is unstable. 31
32 Source Picture Size Select the source for each screen. PIP Mode (available in PIP mode(size / / )) The input source for the main screen changes. With the exception of the current input source, the other two input sources can be selected. The screen may flicker if the input signal is unstable. When the Function Key Guide appears, move the JOG button LEFT to select the icon and then press the JOG button. The main screen will switch in the order HDMI DisplayPort USB Type-C. PBP Mode (available in PBP mode(size )) The input source for the main screen changes. The screen may flicker if the input signal is unstable. When the input signal of the left and right screens are the same, the operation cannot be performed. When the Function Key Guide appears, move the JOG button LEFT to select the JOG button. The same PBP source setting menu appears. icon and then press the PIP Mode (available in PIP mode (Size / / )) Select the image size for sub-screen. In PC mode Auto: Display the picture according to the aspect ratio of the each screen input source. Wide: Display the picture in full screen regardless of the aspect ratio of the each screen input source. In AV mode 4:3: Display the picture of the sub-screen with an aspect ratio of 4:3. Suitable for videos and standard broadcasts. 16:9: Display the picture of the sub-screen with an aspect ratio of 16:9. 21:9: Display the picture of the sub-screen with an aspect ratio of 21:9. Screen Fit: Display the picture of the sub-screen with the original aspect ratio without cutting anything off. The function may not be supported depending on the ports provided with the product. Changing the screen size is available when the following conditions are satisfied. A digital output device is connected using the HDMI/DP/USB Type-C cable. The input signal is 480p, 576p, 720p, or 1080p and monitor can display normally (Not every model can support all of these signals.). This can only be set when the external input is connected through HDMI/DP/USB Type-C and PC/AV Mode is set to AV. 32
33 PBP Mode (available in PBP mode(size )) Set the Picture Size for each of the divided screens. In PC mode Auto: Display the picture according to the aspect ratio of the each screen input source. Wide: Display the picture in full screen regardless of the aspect ratio of the each screen input source. In AV mode 4:3: Display the picture of the sub-screen with an aspect ratio of 4:3. Suitable for videos and standard broadcasts. Contrast PIP Mode (available in PIP mode(size / / )) Adjust the contrast level for sub-screen. PBP Mode (available in PBP mode(size )) Adjust the contrast level for each screen. 16:9: Display the picture of the sub-screen with an aspect ratio of 16:9. 21:9: Display the picture of the sub-screen with an aspect ratio of 21:9. Screen Fit: Display the picture of the sub-screen with the original aspect ratio without cutting anything off. The function may not be supported depending on the ports provided with the product. Changing the screen size is available when the following conditions are satisfied. A digital output device is connected using the HDMI/DP/USB Type-C cable. The input signal is 480p, 576p, 720p, or 1080p and monitor can display normally (Not every model can support all of these signals.). This can only be set when the external input is connected through HDMI/DP/USB Type-C and PC/AV Mode is set to AV. 33
34 Chapter 06 Adjusting OSD (On Screen Display) settings A detailed description of each function is provided. Refer to your product for details. The functions available may vary depending on the product model. The color and shape of parts may differ from what is shown. Specifications are subject to change without notice to improve quality. Position Transparency Set the transparency for the menu windows. Adjust the menu position. Language Set the menu language. A change to the language setting will only be applied to the onscreen menu display. It will not be applied to other functions on your PC. Display Time Set the on-screen display (OSD) menu to automatically disappear if the menu is not used for a specified period of time. Display Time can be used to specify the time after which you want the OSD menu to disappear. 34
35 Chapter 07 Setup and Reset A detailed description of each function is provided. Refer to your product for details. The functions available may vary depending on the product model. The color and shape of parts may differ from what is shown. Specifications are subject to change without notice to improve quality. DisplayPort Ver. Select your DisplayPort version. Incorrect settings may cause the screen to go blank. If this occurs, check the device specifications. If the monitor is in HDMI/DisplayPort/USB Type-C mode and the screen says Check Signal Cable or power saving mode activates, press the JOG button to display the function-button screen and then select the icon. You can select 1.1 or 1.2. HDMI Mode Select the HDMI mode to use. The supportable device and resolution may differ depending on its version. When the version is changed, the screen may blink. If you set the HDMI Mode to 1.4, some high resolutions may not be supported because of bandwidth limitation of the HDMI 1.4 protocol. When the setting is not appropriate, a blank screen may appear. In this case, check the specifications of the device. Set the HDMI Mode to 1.4 when there is no sound output from the DVD connected to our product. 35
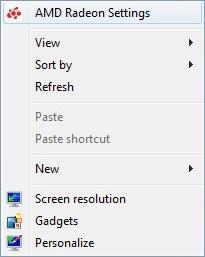
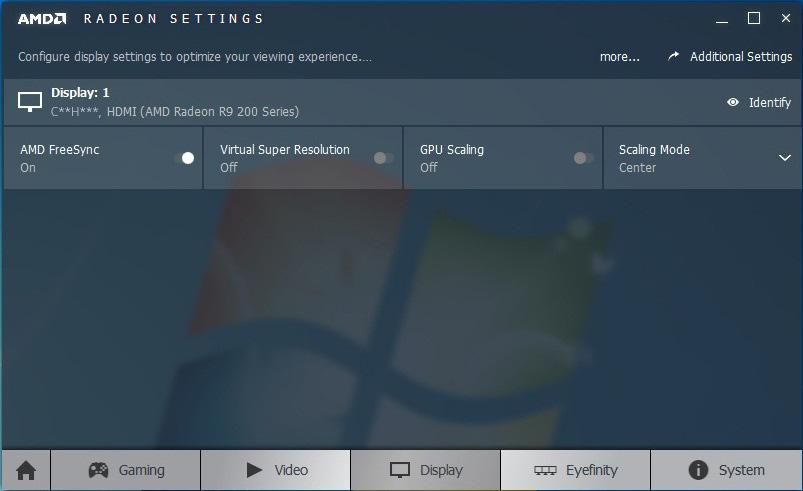
36 FreeSync FreeSync technology is solution that eliminates screen tearing without all the usual lag and latency. This feature will eliminate screen tearing and lag during game play. Improve your gaming experience. Off: Disable FreeSync. Standard Engine: Enable the basic FreeSync functions of the AMD graphics card. Ultimate Engine: Enable the FreeSync feature with a higher screen frame rate. Screen tearing (abnormal sync between the screen and content) is reduced in this mode. Note that screen flickering may occur during game play. The models in the Graphic Cards list supports FreeSync FreeSync can only be used with specific AMD graphics card models. Refer to the following list for supported graphics cards: Make sure to install the latest official graphics drivers from AMD that support FreeSync. For additional AMD graphics card models that support the FreeSync feature, visit the official AMD website. Select FreeSync Off if you are using a graphics card from a different manufacturer. AMD Radeon R9 300 Series (Not include 370 / 370X) AMD Radeon R9 Fury X AMD Radeon R7 360 AMD Radeon R9 290 AMD Radeon R9 285 AMD Radeon R7 260X When enable FreeSync function, please use maximum screen refresh rate for optimal freesync effect. The refresh rate setting method please refer to Q & A How can I change the frequency? When using the FreeSync function, use the HDMI/DP cable provided by the monitor manufacturer. AMD Radeon R9 295X2 AMD Radeon R9 290X AMD Radeon R7 260 AMD Radeon RX 400 Series This function is not available for USB Type-C port. If you use the FreeSync function while playing a game, the following symptoms may occur: The screen may flicker depending on the type of graphics card, the game option settings, or the video being played. Try the following actions: decrease the game setting values, change the current FreeSync mode to Standard Engine, or visit the AMD website to check your graphics driver s version and update it with the latest one. How do you enable FreeSync? 1 Set FreeSync to Standard Engine or Ultimate Engine in the OSD menu. 2 Enable FreeSync in AMD Radeon Settings: Right-click the mouse AMD Radeon Settings Display The "AMD FreeSync" feature should be set to "On". Select to "On" if not already enabled. While you are using the FreeSync function, the screen may flicker due to variation of the output frequency from the graphics card. The response rate during the game may fluctuate depending on the resolution. A higher resolution generally decreases the response rate. The sound quality of the monitor may be degraded. If you encounter any issues when using the function, contact the Samsung Service Center. 36
37 37
38 Eco Saving Plus PC/AV Mode The Eco Saving Plus function reduces power consumption by controlling the electric current used by the monitor panel. SAMSUNG This option is not available when MAGICBright is in Dynamic Contrast mode. This menu is not available when Game Mode is enabled. This menu is not available when Eye Saver Mode is enabled. Not available when PIP/PBP Mode is set to On. Off: Deactivate the Eco Saving Plus function. Auto: The power consumption will automatically be reduced by about 10% over the current setting. (The reduction of power consumption depends on the customer screen brightness condition.) Set PC/AV Mode to AV. The picture size will be enlarged. This option is useful when you view a movie. Set to PC when connected to a PC. Set to AV when connected to an AV device. This feature is only available on the widescreen models that include 16:9, 16:10 and 21:9. If the monitor is in HDMI/DisplayPort/USB Type-C mode and the screen says Check Signal Cable or power saving mode activates, press the JOG button to display the function-button screen and then select the icon. You can select PC or AV. Low: The power consumption will be reduced by 25% over the default setting. High: The power consumption will be reduced by 50% over the default setting. Off Timer Off Timer: Turn on Off Timer mode. Turn Off After: The off timer can be set within a range of 1 to 23 hours. The product will automatically power off after the specified number of hours. This option is only available when Off Timer is set to On. For products for the market in some regions, the Off Timer is set to automatically activate 4 hours after the product powers on. This is done in accordance with power supply regulations. If you do not want the timer to activate, go to System and set Off Timer to Off. 38
USER MANUAL. Curved Monitor CF79*
 USER MANUAL Curved Monitor CF79* The color and the appearance may differ depending on the product, and the specifications are subject to change without prior notice to improve the performance. The contents
User manual U28E590D U24E590D
 User manual U28E590D U24E590D The color and the appearance may differ depending on the product, and the specifications are subject to change without prior notice to improve the performance. BN46-00481B-06
LCD Monitor User Manual
 LCD Monitor User Manual S34E790C The color and the appearance may differ depending on the product, and the specifications are subject to change without prior notice to improve the performance. BN46-00442A-05
User manual U28D590D BN A-01
 User manual U28D590D The color and the appearance may differ depending on the product, and the specifications are subject to change without prior notice to improve the performance. BN46-00410A-01 Table
Connecting and Using a Source Device. Pre-connection Checkpoints 19
 User Manual U28E570D The color and the appearance may differ depending on the product, and the specifications are subject to change without prior notice to improve the performance. The contents of this
USER MANUAL. Curved Monitor
 USER MANUAL Curved Monitor C22F390FH* C22F392FH* C24F390FH* C24F392FH* C24F394FH* C24F396FH* C24F399FH* C27F390FH* C27F391FH* C27F396FH* C27F397FH* C27F398FW* C32F391FW* C32F395FW* C32F397FW* The color
Monitor User Manual S24E500C S27E500C BN C-01
 Monitor User Manual S24E500C S27E500C The color and the appearance may differ depending on the product, and the specifications are subject to change without prior notice to improve the performance. BN46-00474C-01
User manual BN A-05
 User manual S22E360H S22E390H S22E391H S22E393H S22E395H PLUS S24E360HL S24E390HL S24E391HL S24E393HL S24E395H PLUS S27E360F S27E360H S27E390H S27E391H S27E393H S27E395H PLUS The color and the appearance
User manual S27D590C BN A-04
 User manual S27D590C The color and the appearance may differ depending on the product, and the specifications are subject to change without prior notice to improve the performance. BN46-00438A-04 Table
User Manual U*H75* U*H85*
 User Manual U*H75* U*H85* The color and the appearance may differ depending on the product, and the specifications are subject to change without prior notice to improve the performance. The contents of
User Manual C49J890DK*
 User Manual C49J890DK* The color and the appearance may differ depending on the product, and the specifications are subject to change without prior notice to improve the performance. The contents of this
USER MANUAL. Gaming Monitor S*HG5*
 USER MANUAL Gaming Monitor S*HG5* The color and the appearance may differ depending on the product, and the specifications are subject to change without prior notice to improve the performance. The contents
User Manual S27D850T S32D850T
 User Manual S27D850T S32D850T The color and the appearance may differ depending on the product, and the specifications are subject to change without prior notice to improve the performance. BN46-00424A-16
USER MANUAL. Gaming Monitor CFG7*
 USER MANUAL Gaming Monitor CFG7* The color and the appearance may differ depending on the product, and the specifications are subject to change without prior notice to improve the performance. The contents
Connecting and Using a Source Device. Read below before installing the monitor. 20
 User Manual S*H65* The color and the appearance may differ depending on the product, and the specifications are subject to change without prior notice to improve the performance. The contents of this manual
User manual S19E310HY S22E310HY S22E310H S24E310HL S27E310H
 User manual S19E310HY S22E310HY S22E310H S24E310HL S27E310H The color and the appearance may differ depending on the product, and the specifications are subject to change without prior notice to improve
User Manual C27F581FD* C27H580FD*
 User Manual C27F581FD* C27H580FD* The color and the appearance may differ depending on the product, and the specifications are subject to change without prior notice to improve the performance. The contents
User manual S19D300HY S19D300NY S20D300BY S20D300H S20D300HY S22D300BY S22D300HY S22D300NY S24D300BL S24D300H S24D300HL
 User manual S19D300HY S19D300NY S20D300BY S20D300H S20D300HY S22D300BY S22D300HY S22D300NY S24D300BL S24D300H S24D300HL The color and the appearance may differ depending on the product, and the specifications
User manual S19C150N S19C150F S20C150FL S22C150N
 User manual S19C150N S19C150F S20C150FL S22C150N The color and the appearance may differ depending on the product, and the specifications are subject to change without prior notice to improve the performance.
User manual BN G-03
 User manual S19D300HY S19D340HY S19D300NY S20D300BY S20D300H S20D340H S20D300HY S20D340HY S22D300BY S22D300HY S22D340HY S22D300NY S24D300B S24D300BL S24D300H S24D340H S24D300HL S24D340HL The color and
User Manual U24E850R U28E850R U32E850R
 User Manual U24E850R U28E850R U32E850R The color and the appearance may differ depending on the product, and the specifications are subject to change without prior notice to improve the performance. BN46-00482B-08
USER MANUAL. Gaming Monitor C27HG70QQ* C32HG70QQ*
 USER MANUAL Gaming Monitor C27HG70QQ* C32HG70QQ* The color and the appearance may differ depending on the product, and the specifications are subject to change without prior notice to improve the performance.
Monitor User Manual S24E370 S27E370 BN A-01
 Monitor User Manual S24E370 S27E370 The colour and the appearance may differ depending on the product, and the specifications are subject to change without prior notice to improve the performance. BN46-00487A-01
User manual S19C300B S19C300F S19C300N S20C300BL S20C300FL S20C300NL S22C300B S22C300F S22C300H S22C300N S24C300HL
 User manual S19C300B S19C300F S19C300N S20C300BL S20C300FL S20C300NL S22C300B S22C300F S22C300H S22C300N S24C300HL The color and the appearance may differ depending on the product, and the specifications
Connecting and Using a Source Device. Pre-connection Checkpoints 23
 User Manual S22F350FH* S22F352FH* S22F354FH* S24F350FH* S24F352FH* S24F354FH* S24F356FH* S24F359FH* S27F350FH* S27F352FH* S27F354FH* S27F358FW* S27F359FH* S32F351FU* The color and the appearance may differ
USER MANUAL. Gaming Monitor C49HG90DM*
 USER MANUAL Gaming Monitor C49HG90DM* The color and the appearance may differ depending on the product, and the specifications are subject to change without prior notice to improve the performance. The
USER MANUAL. Gaming Monitor C49HG90DM*
 USER MANUAL Gaming Monitor C49HG90DM* The color and the appearance may differ depending on the product, and the specifications are subject to change without prior notice to improve the performance. The
User manual S19B420BW S19B420B S19B420M S22B420BW S24B420BW
 User manual S19B420BW S19B420B S19B420M S22B420BW S24B420BW The color and the appearance may differ depending on the product, and the specifications are subject to change without prior notice to improve
User manual BN A-08
 User manual S19E200BR S19E200BW S19E200NW S19E200NY S19E450BR S19E450BW S19E450MR S19E450MW S22E200B S22E200BW S22E200N S22E200NY S22E450B S22E450BW S22E450D S22E450DW S22E450M S22E450MW S23E200B S23E450B
User manual S22E450F S22E650D S23E650D S23E650K S24E450F S24E650PL S24E650XL S24E650DW S24E650MW S24E650XW S27E650D S27E650X
 User manual S22E450F S22E650D S23E650D S23E650K S24E450F S24E650PL S24E650XL S24E650DW S24E650MW S24E650XW S27E650D S27E650X The color and the appearance may differ depending on the product, and the specifications
User Manual S22E348A S24E348A
 User Manual S22E348A S24E348A The color and the appearance may differ depending on the product, and the specifications are subject to change without prior notice to improve the performance. The contents
USER S MANUAL MANUEL DE L UTILISATEUR MANUAL DEL USUARIO WE28UX8310
 USER S MANUAL MANUEL DE L UTILISATEUR MANUAL DEL USUARIO WE28UX8310 Contents BEFORE USING THE PRODUCT SAFETY INFORMATION PREPARATIONS CONNECTIONS INITIAL SETUP OSD MENU SETTINGS SPECIFICATIONS 3 4 5 6
User manual BN A-02
 User manual SyncMaster S23B550V S27B550V The color and the appearance may differ depending on the product, and the specifications are subject to change without prior notice to improve the performance.
User Manual S24C230BL S24C230JL S24C230JY S27C230B S27C230J
 User Manual S24C230BL S24C230JL S24C230JY S27C230B S27C230J The color and the appearance may differ depending on the product, and the specifications are subject to change without prior notice to improve
USER MANUAL. 22" Class Slim HD Widescreen Monitor L215DS
 USER MANUAL 22" Class Slim HD Widescreen Monitor L215DS TABLE OF CONTENTS 1 Getting Started Package Includes Installation 2 Control Panel / Back Panel Control Panel Back Panel 3 On Screen Display 4 Technical
USER MANUAL. 28" 4K Ultra HD Monitor L28TN4K
 USER MANUAL 28" 4K Ultra HD Monitor L28TN4K TABLE OF CONTENTS 1 Getting Started 2 Control Panel/ Back Panel 3 On Screen Display 4 Technical Specs 5 Care & Maintenance 6 Troubleshooting 7 Safety Info &
User Manual. SyncMaster S23A750D / S27A750D
 User Manual SyncMaster S23A750D / S27A750D The color and the appearance may differ depending on the product, and the specifications are subject to change without prior notice to improve the performance.
USER MANUAL. 27 Full HD Widescreen LED Monitor L27ADS
 USER MANUAL 27 Full HD Widescreen LED Monitor L27ADS TABLE OF CONTENTS 1 Getting Started 2 Control Panel/ Back Panel 3 On Screen Display 4 Technical Specs 5 Care & Maintenance 6 Troubleshooting 7 Safety
28 & 32 & 40 & 55 & 65 & 84-INCH TFT-LCD 4K MONITOR
 28 & 32 & 40 & 55 & 65 & 84-INCH TFT-LCD 4K MONITOR INSTRUCTION MANUAL Please read this manual thoroughly before use, and keep it handy for future reference. TABLE OF CONTENTS 1, General information...
MP Zero-G 27" WQHD 144Hz TN-LED Monitor with AMD FreeSync
 MP Zero-G 27" WQHD 144Hz TN-LED Monitor with AMD FreeSync P/N 31004 User's Manual SAFETY WARNINGS AND GUIDELINES Please read this entire manual before using this device, paying extra attention to these
MP 35" Zero-G 100Hz Curved Monitor with AMD FreeSync 2.0
 MP 35" Zero-G 100Hz Curved Monitor with AMD FreeSync 2.0 P/N 31005 User's Manual SAFETY WARNINGS AND GUIDELINES Please read this entire manual before using this device, paying extra attention to these
PLL2210MW LED Monitor
 PLL2210MW LED Monitor USER'S GUIDE www.planar.com Content Operation Instructions...1 Safety Precautions...2 First Setup...3 Front View of the Product...4 Rear View of the Product...5 Quick Installation...6
USER MANUAL. 27 Full HD Widescreen LED Monitor L270E
 USER MANUAL 27 Full HD Widescreen LED Monitor L270E TABLE OF CONTENTS 1 Getting Started 2 Control Panel/ Back Panel 3 On Screen Display 4 Technical Specs 5 Care & Maintenance 6 Troubleshooting 7 Safety
USER MANUAL. 27" 2K QHD LED Monitor L27HAS2K
 USER MANUAL 27" 2K QHD LED Monitor L27HAS2K TABLE OF CONTENTS 1 Getting Started 2 Control Panel/ Back Panel 3 On Screen Display 4 Technical Specs 5 Troubleshooting 6 Safety Info & FCC warning 1 GETTING
USER MANUAL Full HD Widescreen LED Monitor L236VA
 USER MANUAL 23.6 Full HD Widescreen LED Monitor L236VA TABLE OF CONTENTS 1 Getting Started 2 Control Panel/ Back Panel 3 On Screen Display 4 Technical Specs 5 Care & Maintenance 6 Troubleshooting 7 Safety
4K LED MONITOR 430LED4K & 550LED4K INSTRUCTION MANUAL. Please read this manual thoroughly before use, and keep it handy for future reference.
 4K LED MONITOR 430LED4K & 550LED4K INSTRUCTION MANUAL Please read this manual thoroughly before use, and keep it handy for future reference. CONTENTS 1. GENERAL INFORMATION...3 2. 3. 1.1. 1.2. 1.3. 2.1.
USER MANUAL Full HD Widescreen LED Monitor L215ADS
 USER MANUAL 21.5 Full HD Widescreen LED Monitor L215ADS TABLE OF CONTENTS 1 Getting Started 2 Control Panel/ Back Panel 3 On Screen Display 4 Technical Specs 5 Care & Maintenance 6 Troubleshooting 7 Safety
USER MANUAL Full HD Widescreen LED Monitor L215IPS
 USER MANUAL 21.5 Full HD Widescreen LED Monitor L215IPS TABLE OF CONTENTS 1 Getting Started 2 Control Panel/ Back Panel 3 On Screen Display 4 Technical Specs 5 Care & Maintenance 6 Troubleshooting 7 Safety
PXL2760MW LED LCD Monitor
 PXL2760MW LED LCD Monitor USER'S GUIDE www.planar.com Content Operation Instructions...1 Safety Precautions...2 Package Overview...3 First Setup...4 Front View of the Product...5 Rear View of the Product...6
LCD Monitor User Manual
 SyncMaster BX1950/BX1950N/BX2050/BX2050N/BX2250/BX2250N/BX2350/BX2450/ BX2450L/BX2450N LCD Monitor User Manual The color and the appearance may differ depending on the product, and the specifications are
28 4K LED monitor. User Manual M284K
 28 4K LED monitor User Manual M284K CONTENTS Safety Information... 2 What s included..... 4 Getting Started....... 8 Troubleshooting.... 14 Specification.... 15 2 of 15 SAFETY INFORMATION Read these instructions
PXL2470MW LED LCD Monitor
 PXL2470MW LED LCD Monitor USER'S GUIDE www.planar.com Content Operation Instructions...1 Unpacking Instructions...2 Safety Precautions...2 Package Overview...3 First Setup...4 Front View of the Product...5
PL2410W LCD Monitor USER'S GUIDE.
 PL2410W LCD Monitor USER'S GUIDE www.planar.com Content Operation Instructions...1 Safety Precautions...2 First Setup...3 Front View of the Product...4 Rear View of the Product...5 Quick Installation...6
PLL2710W LED LCD Monitor
 PLL2710W LED LCD Monitor USER'S GUIDE www.planar.com Content Operation Instructions...1 Safety Precautions...2 Package Overview...3 First Setup...4 Front View of the Product...5 Rear View of the Product...6
IPS LED Monitor. (LED Monitor*) OWNER S MANUAL
 OWNER S MANUAL") OWNER S MANUAL IPS LED Monitor (LED Monitor*) * LG LED Monitor applies LCD screen with LED backlights. Please read this manual carefully before operating your set and retain it for future reference. 34UC89G
OWNER S MANUAL IPS LED Monitor (LED Monitor*) * LG LED Monitor applies LCD screen with LED backlights. Please read this manual carefully before operating your set and retain it for future reference. 34UC89G
35 INCH CURVED QHD LED MONITOR
 35 INCH CURVED QHD LED MONITOR eiq-35cmuwq60gafs Thank you for choosing electriq Please read this user manual before using this monitor and keep it safe for future reference. Visit our page www.electriq.co.uk
LG Gaming Monitor. (LED Monitor*) OWNER S MANUAL
 OWNER S MANUAL") OWNER S MANUAL LG Gaming Monitor (LED Monitor*) * LG LED Monitor applies LCD screen with LED backlights. Please read this manual carefully before operating your set and retain it for future reference.
OWNER S MANUAL LG Gaming Monitor (LED Monitor*) * LG LED Monitor applies LCD screen with LED backlights. Please read this manual carefully before operating your set and retain it for future reference.
22" Touchscreen LED Monitor USER'S GUIDE
 22" Touchscreen LED Monitor USER'S GUIDE Content Operation Instructions...1 Unpacking Instructions...2 Safety Precautions...2 Front View of the Product...3 Rear View of the Product...4 Quick Installation...5
Warning & Cautions. Warning. Cautions
 Contents 1. Warning & Cautions 2. Components 3. Monitor Buttons 4. Connecting Monitor Cables 5. On Screen Display Menu 6. Display Specifications 7. Monitor Specifications 8. Troubleshooting (When using
PLL1920M LED LCD Monitor
 PLL1920M LED LCD Monitor USER'S GUIDE www.planar.com Content Operation Instructions...1 Safety Precautions...2 First Setup...3 Front View of the Product...4 Rear View of the Product...5 Installation...6
SMART Signage TV User Manual
 SMART Signage TV User Manual RM40D RM48D The color and the appearance may differ depending on the product, and the specifications are subject to change without prior notice to improve the performance.
Monitor User Manual. SyncMaster S20A550H,S23A550H,S27A550H
 SyncMaster S20A550H,S23A550H,S27A550H Monitor User Manual The color and the appearance may differ depending on the product, and the specifications are subject to change without prior notice to improve
IPS LED Monitor. (LED Monitor*) OWNER S MANUAL
 OWNER S MANUAL") OWNER S MANUAL IPS LED Monitor (LED Monitor*) * LG LED Monitor applies LCD screen with LED backlights. Please read this manual carefully before operating your set and retain it for future reference. 34CB99
OWNER S MANUAL IPS LED Monitor (LED Monitor*) * LG LED Monitor applies LCD screen with LED backlights. Please read this manual carefully before operating your set and retain it for future reference. 34CB99
LG Gaming Monitor (LED MONITOR*)
") Owner s Manual LG Gaming Monitor (LED MONITOR*) * LG LED Monitor applies LCD screen with LED backlights. Please read this manual carefully before operating your set and retain it for future reference.
Owner s Manual LG Gaming Monitor (LED MONITOR*) * LG LED Monitor applies LCD screen with LED backlights. Please read this manual carefully before operating your set and retain it for future reference.
17 19 PROFESSIONAL LCD COLOUR MONITOR ART
 17 19 PROFESSIONAL LCD COLOUR MONITOR ART. 41657-41659 Via Don Arrigoni, 5 24020 Rovetta S. Lorenzo (Bergamo) http://www.comelit.eu e-mail:export.department@comelit.it WARNING: TO REDUCE THE RISK OF FIRE
LG Gaming Monitor (LED MONITOR*)
") Owner s Manual LG Gaming Monitor (LED MONITOR*) * LG LED Monitor applies LCD screen with LED backlights. Please read this manual carefully before operating your set and retain it for future reference.
Owner s Manual LG Gaming Monitor (LED MONITOR*) * LG LED Monitor applies LCD screen with LED backlights. Please read this manual carefully before operating your set and retain it for future reference.
IPS LED Monitor (LED Monitor*)
") OWNER S MANUAL IPS LED Monitor (LED Monitor*) * LG LED Monitor applies LCD screen with LED backlights. Please read this manual carefully before operating your set and retain it for future reference. 38UC99
OWNER S MANUAL IPS LED Monitor (LED Monitor*) * LG LED Monitor applies LCD screen with LED backlights. Please read this manual carefully before operating your set and retain it for future reference. 38UC99
TABLE OF CONTENTS Important Safety Instructions Package Content Setting Up the Display Trouble shooting Specifications Product Dimensions
 TABLE OF CONTENTS Important Safety Instructions...1 1.1 Safety precautions and maintenance....1 1.2 Use.......4 1.3 Installation Notes.......7 Package Content...9 2.1 Unpacking...9 2.2 Accessories......10
LCD VALUE SERIES (32 inches)
") LCD VALUE SERIES (32 inches) http://www.orionimages.com All contents of this document may change without prior notice, and actual product appearance may differ from that depicted herein 1. SAFETY INSTRUCTION
LCD VALUE SERIES (32 inches) http://www.orionimages.com All contents of this document may change without prior notice, and actual product appearance may differ from that depicted herein 1. SAFETY INSTRUCTION
Dell D3218HN. User s Guide. Regulatory model: D3218HNo
 Dell D3218HN User s Guide Regulatory model: D3218HNo Notes, cautions, and warnings NOTE: A NOTE indicates important information that helps you make better use of your computer. CAUTION: A CAUTION indicates
SyncMaster S24A460B Monitor User Manual
 SyncMaster S24A460B Monitor User Manual The color and the appearance may differ depending on the product, and the specifications are subject to change without prior notice to improve the performance. Table
DH551C/DH550C/DL550C Double Sided Display User Manual
 DH551C/DH550C/DL550C Double Sided Display User Manual Disclaimer BenQ Corporation makes no representations or warranties, either expressed or implied, with respect to the contents of this document. BenQ
17" & 19" Color TFT LCD Monitor
 17" & 19" Color TFT LCD Monitor KMC-17B & KMC-19B User's Manual for Operation and installation Screen Size : KMC-17B (17" inch TFT LCD) KMC-19B (19" inch TFT LCD) Display Size : KMC-17B (337.920mm X 270.336mm)
SyncMaster PX2370 LCD Monitor User Manual
 SyncMaster PX2370 LCD Monitor User Manual The color and the appearance may differ depending on the product, and the specifications are subject to change without prior notice to improve the performance.
Table of Contents Precautions... 2
 Table of Contents Precautions... 2 Special notes on LCD monitors... 2 Package contents... 3 Installation instructions... 3 Assembling the monitor... 3 Adjusting the viewing angle... 4 Connecting the devices...
VITEK VTM-TLM191 VTM-TLM240
 VTM-TLM191 VTM-TLM240 19 & 24 Professional LED Monitors with HDMI, VGA, and Looping BNC VITEK FEATURES 19 & 24 Wide Screen LED Display Panel HDMI, VGA, and Looping BNC Composite Video Inputs & Stereo Audio
User s Guide L192WS. LCD Computer Monitor
 User s Guide L192WS LCD Computer Monitor Make sure to read the Important Precautions before using this product. Keep the User's Guide(CD) in an accessible place for furture reference. Have the model and
 www.i3-technologies.com Important Safety Information Please read and understand all safety information before installing and using this product. Follow all instructions marked on the product and described
LED LCD MONITOR. (LED Monitor*) OWNER S MANUAL
 OWNER S MANUAL") OWNER S MANUAL LED LCD MONITOR (LED Monitor*) * LG LED Monitor applies LCD screen with LED backlights. Please read this manual carefully before operating your set and retain it for future reference. 24MN39HM
OWNER S MANUAL LED LCD MONITOR (LED Monitor*) * LG LED Monitor applies LCD screen with LED backlights. Please read this manual carefully before operating your set and retain it for future reference. 24MN39HM
MONOPRICE. 27" WQHD Monitor. User's Manual P/N 24659
 MONOPRICE 27" WQHD Monitor P/N 24659 User's Manual CONTENTS SAFETY WARNINGS AND GUIDELINES... 3 FEATURES... 4 CUSTOMER SERVICE... 4 PACKAGE CONTENTS... 4 PRODUCT OVERVIEW... 5 Front... 5 Rear... 5 Rear
Introduction...2. Features...2 Safety Precautions...2. Installation...4
 PE1900 Contents Introduction...2 Features...2 Safety Precautions...2 Installation...4 Unpacking the Display...4 Locations and Functions of Controls...4 Connections...5 Using Your Display...7 Turning the
DCL9AW. User Manual. English
 DCL9AW User Manual English PRECAUTIONS Information for users applicable in European Union countries 1 Information for users applicable in United States of America 1 Installation 1 Power connection 1 Maintenance
SAFETY WARNINGS AND GUIDELINES
 SAFETY WARNINGS AND GUIDELINES Please read this manual thoroughly, paying extra attention to these safety warnings and guidelines: Do not expose this monitor to water or moisture of any kind. Do not handle
Warranty Information
 Accuform Signs does not handle the warranty for the Digital Signage Displays. Please read below for details on the warranty of your product. If you are having trouble and need assistance, please contact
Owner's Manual IPS LED MONITOR (LED MONITOR*)
") Owner's Manual IPS LED MONITOR (LED MONITOR*) * Disclaimer: LG LED Monitor applies LCD screen with LED backlights. Please read the safety information carefully before using the product. 27MU67 www.lg.com
Owner's Manual IPS LED MONITOR (LED MONITOR*) * Disclaimer: LG LED Monitor applies LCD screen with LED backlights. Please read the safety information carefully before using the product. 27MU67 www.lg.com
I. Safety Prevention Measures
 I. Safety Prevention Measures Please always place this device on a stable surface; otherwise, it may fall and be damaged. The altitude and the tropical environment the adapter fits depend on which adapter
2013, 2014 Hewlett-Packard Development Company, L.P.
 User Guide 2013, 2014 Hewlett-Packard Development Company, L.P. The only warranties for HP products and services are set forth in the express warranty statements accompanying such products and services.
User Manual H32B H40B H46B
 User Manual H32B H40B H46B The color and the appearance may differ depending on the product, and the specifications are subject to change without prior notice to improve the performance. BN46-00281A-01
TFT LCD MONITOR USER MANUAL. L80AP and L101AP
 TFT LCD MONITOR USER MANUAL L80AP - 8.0 and L101AP - 10.1 Table Of Contents Table of contents/ Warning.... 2 Precautions...3 About this user manual and products / Items included in the delivery..... 4
19 / 20.1 / 22 WIDE SCREEN TFT-LCD MONITOR
 19 / 20.1 / 22 WIDE SCREEN TFT-LCD MONITOR V193/ V220 Series V202 Series USER MANUAL www.viewera.com Rev. 2.0 Table of Contents EMC Compliance......1 Important Precautions...2 1. Package contents....3
LCD Monitor User Manual
 SyncMaster BX2035/BX2235/BX2335 LCD Monitor User Manual The color and the appearance may differ depending on the product, and the specifications are subject to change without prior notice to improve the
User s Guide L1734S Important Precautions
 User s Guide L1734S Make sure to read the Important Precautions before using the product. Keep the User's Guide(CD) in an accessible place for future reference. See the label attached on the product and
LCD Monitor User Manual
 SyncMaster 2333TN/2333T LCD Monitor User Manual The color and the appearance may differ depending on the product, and the specifications are subject to change without prior notice to improve the performance.
User s Guide L1718S. LCD Computer Monitor
 User s Guide L1718S LCD Computer Monitor Make sure to read the Important Precautions before using this product. Keep the User's Guide(CD) in an accessible place for furture reference. Have the model and
LED LCD MONITOR. (LED Monitor*) OWNER S MANUAL
 OWNER S MANUAL") OWNER S MANUAL LED LCD MONITOR (LED Monitor*) * LG LED Monitor applies LCD screen with LED backlights. Please read this manual carefully before operating your set and retain it for future reference. 34WK95U
OWNER S MANUAL LED LCD MONITOR (LED Monitor*) * LG LED Monitor applies LCD screen with LED backlights. Please read this manual carefully before operating your set and retain it for future reference. 34WK95U
Operating Instructions
 Operating Instructions LCDRV700 Digital LCD Color Monitor Please read this manual thoroughly before operating the unit, and keep it for future reference. V1.0 Contents 1. Precautions 2. Features 1 3 3.
P-2 Installing the monitor (continued) Carry out as necessary
 Carry out as necessary") P-2 Installing the monitor (continued) Carry out as necessary Using the monitor without the bezel MDT552S satisfies the UL requirements as long as it is used with the bezel attached. When using the monitor
P-2 Installing the monitor (continued) Carry out as necessary Using the monitor without the bezel MDT552S satisfies the UL requirements as long as it is used with the bezel attached. When using the monitor
User s Guide W1941S Important Precautions
 User s Guide W1941S Make sure to read the Important Precautions before using the product. Keep the User's Guide(CD) in an accessible place for future reference. See the label attached on the product and
Safety Precautions and Maintenance
 Safety Precautions and Maintenance 1. Unplug the monitor before cleaning it with a slightly damp cloth. 2. Wiping the screen with a dry cloth is recommendable, and only during the power has been switched
Color TFT LCD Monitor The Art of Surveillance
 Color TFT LCD Monitor The Art of Surveillance User Manual Table of contents Safety Information---------------------------------------------------- 1-3 Accessories----------------------------------------------------------------3