KB1. USER MANUAL english version. rev. A
|
|
|
- Nathan Crawford
- 6 years ago
- Views:
Transcription

1 USER MANUAL english version rev. A
2 rev. A
3 CONTENTS SYMBOLS 4 1. INTRODUCTION 6 2. APPLICATIONS 6 3. ADVANTAGES FOR MUSICIANS 7 4. UNPACKING 9 5. PACKAGE CONTENTS 9 6. SAFETY INSTRUCTIONS PHYSICAL POWER AND VOLTAGE REQUIREMENTS AC Power connector Voltage requirement INPUT PANEL OVERVIEW CONNECTOR WIRING Power INPUT connector wiring Audio signal connector wiring CONFIGURATION OPTIONS AND SET UP MIXER AND DSP K-FRAMEWORK System requirements Installation and set up Getting started CUSTOMER SERVICE KB1 Technical Details 43 APPROVAL 44 rev. A

4 SYMBOLS K-array declares that this device is in compliance with the applicable CE standards and regulations. Before putting the device into operation, please observe the respective country-specific regulations! WEEE Please dispose of this product at the end of its operational lifetime by bringing it to your local collection point or recycling centre for such equipment. This symbol, wherever it appears, alerts you to important operating and maintenance instructions in the accompanying literature. Read the manual! Warning! Dangerous voltages: RISK of electric shock. This symbol alerts the user to the presence of recommendations about product s use and maintenance. This device complies with Restriction of Hazardous Substances Directive. rev. A
5 rev. A
6 KB1 1. INTRODUCTION The KB1 fits perfectly into the K-array brand by combining innovation and quality. What makes it special is that it is immediately recognizable as a product which was developed in an environment (K-array) which is orientated towards the professional sector. Some of the features found on-board the KB1 are unique in the entire panorama of products on offer, and are the same as those used in stage set up during concerts (e.g. the medium-high speaker has the ability to electronically vary the height of sound diffusion). The completeness of the instrumentation, for example the capacity to load different presets simply and at any time from a PC, the control of entry sound through an integrated professional digital mixer, and the ability to electronically modify the extent and the coverage of the sound vertically, make the KB1 versatile and applicable to any situation with notable levels of quality. The materials are the same as those used in high calibre concert systems: steel, aluminium and wood. These high-quality materials are normally used in professional standard products. 2. APPLICATIONS Band Piano bar Solo DJ Light orchestra Audio/Visual Speech 6 rev. A
7 3. ADVANTAGES FOR MUSICIANS KB1 3.1 The musician and his/her sound PCs are becoming ever more part of the musician s personal equipment and with a KB1 you become the true craftsman of your own sound. You can connect to your own amplification system while interacting directly with digital sound processors mounted on board. This is an uncomplicated way of designing the sound according to your personal tastes and preferences. The digital mixer with 4 inputs allows those with more than one instrument to produce a unified sound, either with a sound technician or directly to the public, created according to the musician s personal artistic choices. Input levels, EQ parameters on each input channel, multi-effects with 16 presets, compressors, regulation of an auxiliary output, a headphones output, a main output channel and parameter filters for equalizing the speaker on output, are all instruments you can find on board the main integrated mixer. 3.2 Transportability and easy-handing Compactness, light-weight design and transportability mark the KB1, ensuring its seamless integration into a musician s kit. In fact one of the KB1 s strengths is its easy-handling. The unit is equipped with materials and case which enable you to load and unload easily, even with a small car, such as a hatchback. The sub is protected by a padded cover designed to insulate the sub from bumps and scratching. This allows the KB1 to be transported comfortably together with all the cables needed for set up. The medium-high speaker is contained in a hard case, which ensures it cannot be damaged in transit. The designers of the KB1 have chosen materials which are commonly used in professional quality products. Plastic materials have been deliberately avoided, in order to give the system the resilience required for professional use. Wood, steel and aluminium have been chosen to forge the BlueLine; perfectly matching the characteristic quality of the K-array brand. 3.3 Set up, configuration, performance Standard connections like speakon, XLR and jack guarantee that the cabling is easy and familiar to the user. In this way, even in an emergency, the cables provided in the packaging at the moment of purchase can easily be substituted for commonly available cables of the same type. rev. A 7
8 A 12 subwoofer for bass and eight 3 loudspeakers for medium-high frequencies guarantee elevated performance, preserving the timbre quality of the instruments and voices. Configuration using a central pole for the medium-highs makes the KB1 a true line-array from the point of view of sound emission. It projects sound pressure which remains constant even at distance, and which covers the listening area with great precision and uniformity. The presets which process the output sound enable sound optimization for numerous types of use and varied environments. All of the characteristics which have been described so far, not to mention the facility for modular integration of several KB1s as required, make the system an extremely versatile tool, adaptable as monitor, amplification for solo-artists and, if doubled-up, as the main stereo PA system for an event. A special rubber support accessory, which comes with the kit, enables the system to be used as a monitor or as a front fill, by laying the medium-high unit horizontally and varying the inclination. 8 rev. A


9 4. UNPACKING KB1 Each K-array device is built to the highest standard and thoroughly inspected before leaving the factory. Carefully inspect the shipping carton, then examine and test your new loudspeaker. If you find any damage immediately notify the shipping company. Only the consignee may institute a claim stages in the system s electronic equipment. 5. PACKAGE CONTENT rev. A 9
10 6. SAFETY INSTRUCTIONS WARNING It is important that loudspeaker systems are used in a safe manner. Professional loudspeakers are capable of producing extremely high sound levels and should be used with care. Hearing loss is cumulative and can result from levels above 90 db if people are exposed for an extended period. Never stand close to loudspeakers driven at high volume. Suspending the system should only be done by qualified personnel following safe rigging practices. Secure fixings to the building structure are vital. Seek help from architects, structural engineers or other specialists if in any doubt. Do not operate the speaker for an extended period of time with sound distortion. This is an indication of malfunction, which in turn can generate heat and result in a fire. Only connect the power supply to an appropriate power adapter. Do not install the speaker in wet or humid locations without using weather protection. Do not allow water or any foreign object to get inside the speaker. Do not put objects containing liquid on, or near, the unit. To reduce the risk of overheating the amplifier, avoid exposing it to direct sunlight. Do not install the unit near heat emitting appliances, such as a room heater or stove. No naked flame sources such as lighted candles should be placed near the device. The speaker should be placed so that its location does not interfere with its proper cooling. Do not attempt to disassemble the unit. The unit contains no user-serviceable parts. Repairs should only be performed by factory trained service personnel. Be sure that the adapter has the correct voltage value. 10 rev. A


11 7. PHYSICAL KB cm (70-86 ) 32.5 cm (12.8 ) 43.5 cm (17.13 ) rev. A 11
 must be connected to the AC power distribution in the correct way, preserving AC line polarity and connecting earth ground, so that all grounding points are connected to a single node or common")

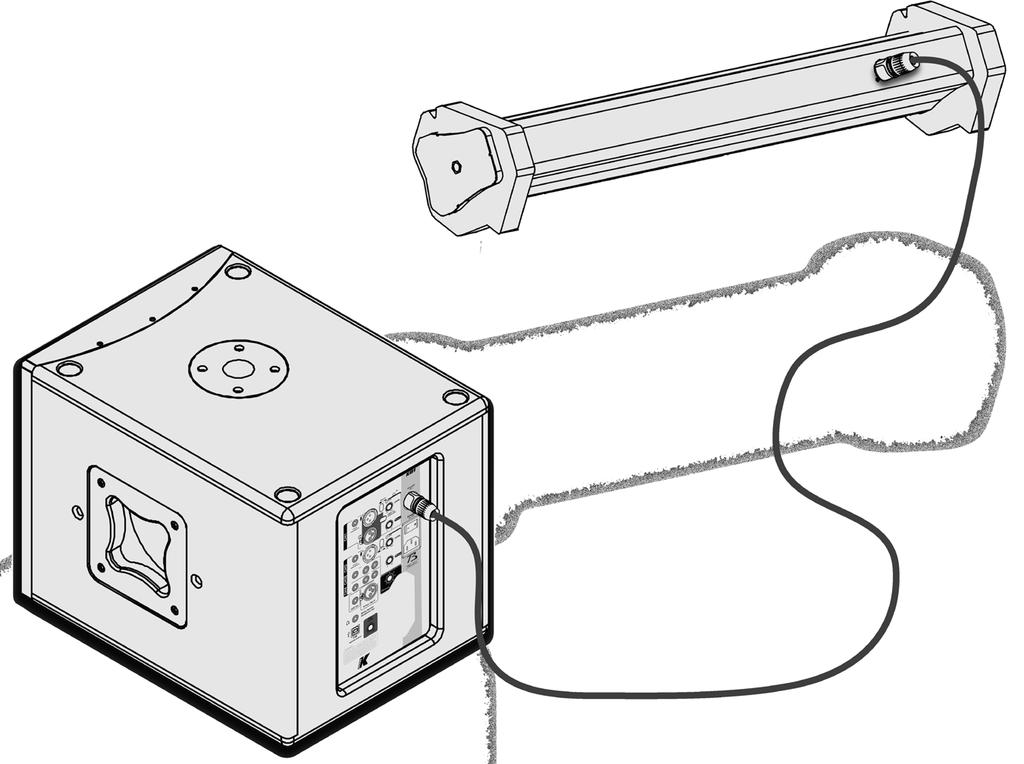
12 8. POWER AND VOLTAGE REQUIREMENTS 8.1 AC Power connector The amplifier module and the rest of the audio equipment connected to it (mixing consoles, processors, etc.) must be connected to the AC power distribution in the correct way, preserving AC line polarity and connecting earth ground, so that all grounding points are connected to a single node or common point using the same cable gauge as the neutral and line(s) cables. Bad grounding connections between speakers and the rest of the audio system may produce noise, hum and/ or serious damage to the input/output stages in the system s electronic equipment. Before applying AC to any K-array self-powered speaker, be sure that the voltage potential difference between neutral and earth ground is less than 5 VAC. Amplified signal to the TOP AC Power INPUT 12 rev. A
13 8.2 Voltage requirement KB1 operates safely and without audio discontinuity if the AC voltage stays within both V and V, at 50 or 60 Hz. KB1 Verify that your mains connection satisfies the power ratings of the device. CAUTION Connecting the system to an AC power mains with a voltage exceeding 270V will cause significant damage to the device and create a serious risk for users! rev. A 13

14 9. INPUT PANEL OVERVIEW D F G H A B C E I J K L N M R T U P O Q V S 14 rev. A
15 A) CH1 TS (unbalanced jack) input. Use this input when using the module as Right side in a stereo configuration. B) CH1 XLR balanced (cannon) phantom powered input. C) CH1 XLR link output. This is a direct physical parallel link ONLY to CH1 XLR input. D) Mic/line Mode Selector. Mic Mode for mic level signals (-50 to -10 db), Line Mode for line level input (-10 to +14 db) E) CH2 TS (unbalanced jack) input. F) DIRECT IN (MIXER OFF) Switch Button. When DIRECT IN is ON all the DSP functions are bypassed, except for the Main LEVEL knob on the physical Mixer Panel (see S) and the virtual Master Volume Fader (see C11 and D18). N.B.: a KB1 in DIRECT IN Mode can only be used as the Right side of a stereo configuration system of 2 x KB1. We advise against connecting any signal to the KB1 serving as Right Side in the stereo configuration, other than the XLR coming from the DI Out / Out R output of the main KB1 (serving as Left Side of the stereo). In a stereo configuration all signals must be connected to the Left Side module, where all DSP functions are active and DIRECT IN is OFF. G) CH1 and CH2 Gain LEVEL Knobs regulate the amount pre-amplification level of the corresponding input. H) SPEAKER OUT NL4 (Speakon) Output. Connect to the Mid-High module of KB1. N.B.: to ensure correct operation of the system, ONLY use a 4-way Speakon connection. I) CH2 XLR balanced (cannon) phantom powered input. J) CH3 TS unbalanced (jack) Input for Line Level signals. K) CH3 double RCA Input for Line Level signals. L) CH4 TS (unbalanced jack) Input for Line Level signals. M) CH1 and CH2 FX Send Knobs regulate the amount of signal to be sent from the corresponding channel to the Effect Processor. N) Aux Out TRS (balanced jack) Output. O) Headphones TRS (stereo jack) Output. P) DI Out / Out R XLR (cannon) Output. Q) USB Remote Control plug for Remote Management via K-Framework software. R) POWER Switch Button. KB1 rev. A 15
16 S) Main Level Knob which regulates the overall amplitude of the output signal. T) Power Plug. U) FX Presets Selector Knob selects one of the 16 available Effects: 1) Slap-back Delay: Short Echo with almost no feedback. 2) Stereo Delay: Long Echo with some feedback. Repetitions are alternated between Left and Right output. 3) Big Ambience: simulates the acoustic response of a very large generic ambience. 4) Early Reflections: simulates the first refelctions of soundwaves against the walls of a generic closed ambience. 5) Chorus: classic chorus effect. 6) Echo: Length and Feedback are similar to nr. 2 (Stereo delay) but repetitions are mono assigned. 7) Flanger: classic flanger effect. 8) Phaser: classic phaser effect. 9) Spring Reverb: digital implementation of a spring reverb. 10) Chapel Reverb: simulates the acoustic response of a chapel. 11) Gated Reverb: reverberation effect with an early and sharp decay. 12) Reverse Reverb: general reverb with reverse output. 13) Church Reverb: simulates the acoustic response of a church. 14) Room Reverb: simulates the acoustic response of a medium-sized room. 15) Big Hall Reverb: simulates the acoustic response of a big concert hall. 16) Small Hall Reverb: simulates the acoustic response of small concert hall. 16 rev. A
.")

17 10. CONNECTOR WIRING KB1 The KB1 receives DC power from a 3-pin DVE connector on the back panel. The white PowerCon connector is a parallel OUTPUT for supplying power to other devices (max supported). When AC power is applied to the speaker, the auto-range power supply automatically selects the correct operating voltage. To create your own power cables, please use the following wiring diagrams: 10.1 Power INPUT connector wiring brown = hot blue = neutral yellow/green = earth ground rev. A 17


18 10.2 Audio signal connector wiring The back panel of the KB1 has different types of audio connector for different types of entry cable. The following diagrams highlight the different characteristics of each entry: XLR wiring Jack wiring INPUT PARALLEL OUTPUT hot cold grd hot hot grd ground cold cold Balanced Jack cold ground hot CH 1,2 MIC INPUT CH 2 MIC PARALLEL OUTPUT MAIN Right OUTPUT / D.I OUT RCA wiring Unbalanced Jack hot ground hot ground Tip Sleeve Tip Sleeve Unbalanced Jack CH 1,2 Instrument INPUT CH 3,4 Line INPUT CH3,4 stereo line INPUT Speakon wiring Balanced Jack Aux OUT Amplified signal for the top. 4-WIRE speaker cable is required 18 rev. A


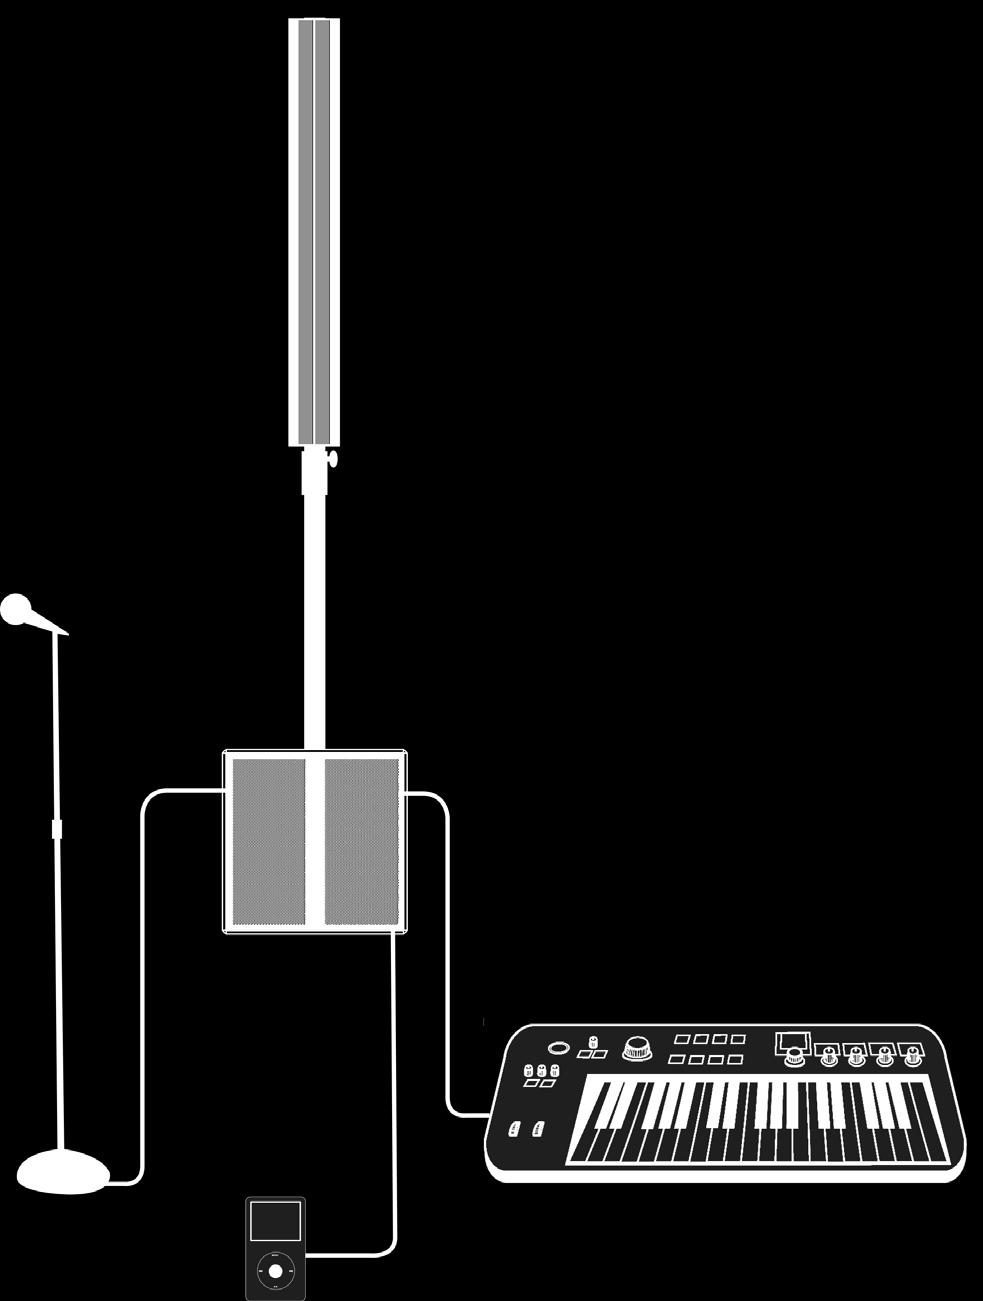
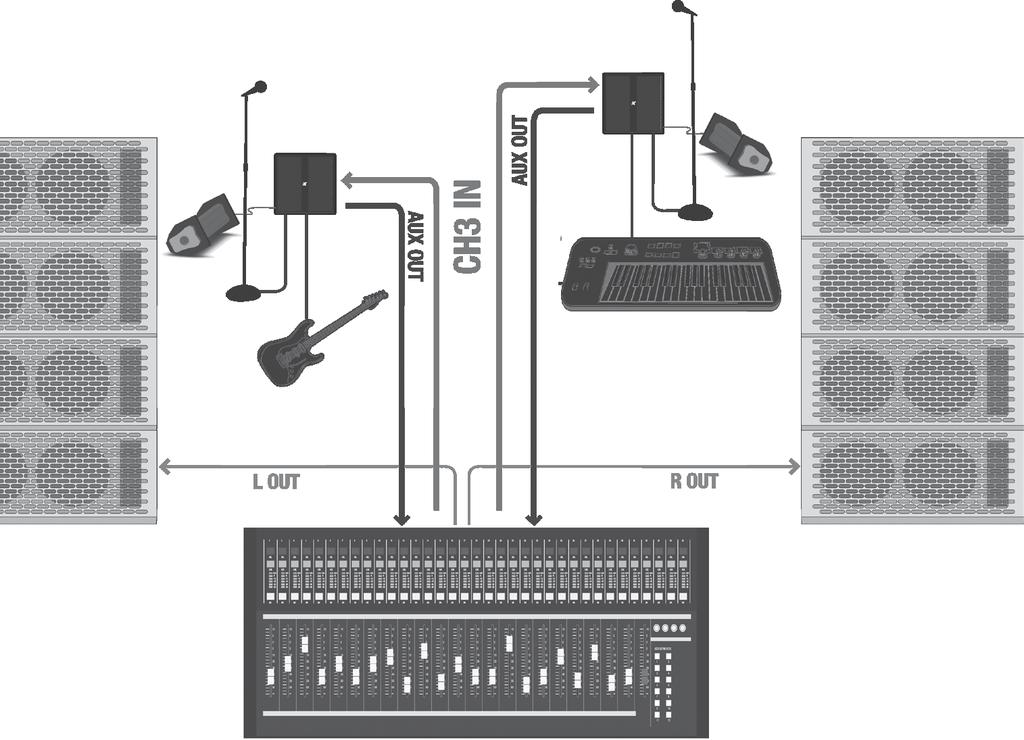
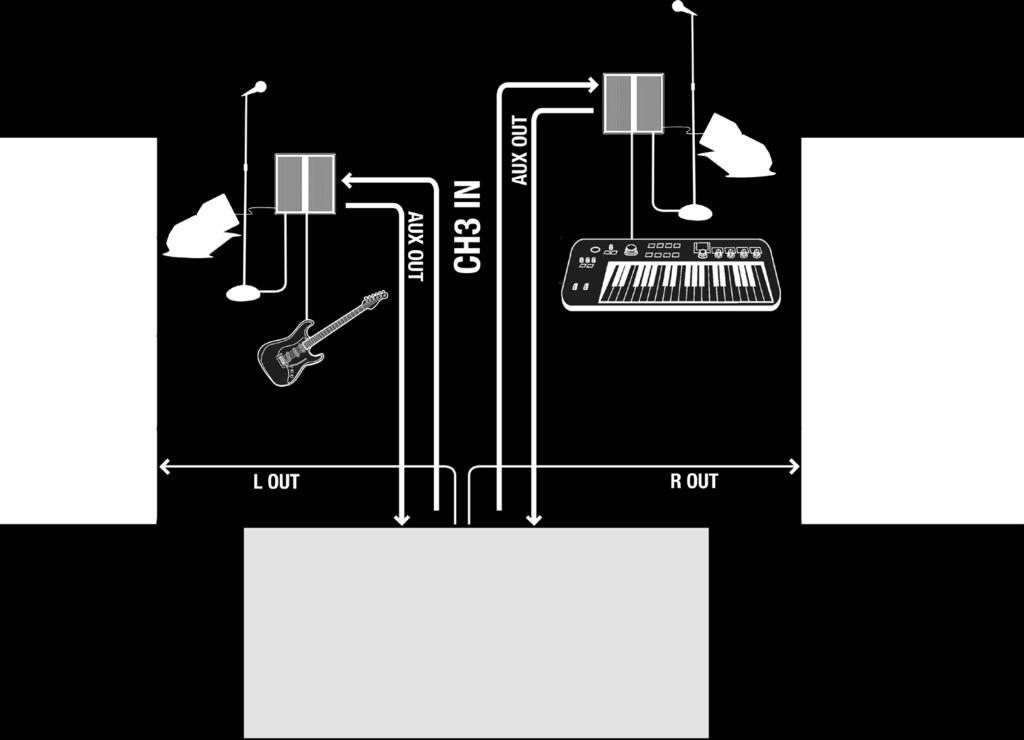
19 11. CONFIGURATION OPTIONS AND SET UP KB1 rev. A 19


20 Amplified signal to the TOP AC Power INPUT 20 rev. A


21 KB1 rev. A 21


22 22 rev. A

23 rev. A 23
24 12. MIXER AND DSP KB1 has all the functions of a real 4-channel mixing desk as well as Dynamic Processing on CH1 and CH2 and Multi Effect for all 4 input channels. Users can operate the main functions directly from the physical Mixer Panel, while using the K-Framework software you can access all the available functions and fully operate the system. Users who are not interested in using the detailed parameter settings can enjoy the basic Mixer Tab, which gives you access to a greater variety of parameter than is available on the physical Mixer Panel. Advanced users can operate the system with the Advanced Mixer Tab where you have access to detailed EQ and Dynamic Processing, and using the Output Tab you can edit the EQ of the Main and Aux outputs, and vary the coverage angle of the KB1 Mid-High module. Channel and Output settings can be stored on the device or saved on any data storage device to be recalled and reloaded later. Mixing features: 2 selectable microphone/line channels with 3 bands of parametric equalizers, independent compressors and phantom power 2 line channels with 3 bands of parametric equalizers. PFL on each of the 4 channels Management of the AUX send and the headphones output Multi-effect processor with 16 presets and independent send for each channel 3-band parametric EQ for each OUTPUT channel Management of PAN balance on each channel Variable coverage in the vocal frequency range INPUT and OUTPUT channel settings 24 rev. A
25 13. K-FRAMEWORK KB System requirements SYSTEM REQUIREMENTS: Operating System: Windows Xp / Vista / 7 CPU: Intel Pentium 2 GHz Memory: 1 Gb REQUIRED COMPONENTS:.NET Framework 4 Microsoft Visual C Redistributable Package (x86) Microsoft Visual C Redistributable Package (x64) Installation and set up To download your free K-Framework license, please go to the Software Download page of the Blueline website ( Once the.zip file is decompressed, it will show a folder containing the file K-Framework.setup. -Users of Windows Vista and 7 can install the software by simply opening the K-Framework.setup file. -Users of Windows XP are required to follow the following simple procedure to install the necessary drivers, once the K-Framework software has been installed: rev. A 25


26 1) Recall the Manage window from Start Menu/My Computer. 2) Select Device Manager from the menu on the left and expand the USB controllers sub-menu. 3) Right click on the upper K-Array_Dsp01 object and select Driver Update to launch the Hardware Update Wizard 4) When asked to allow the online search select the Not now option and click on Next rev. A
 In the search and installation options window, select the Search for the best driver in this location option and check the Include this location in the search")

 The first part of driver installation is now complete, and the unknown K-Array_Dsp01 port has changed its name to a univocal K-Array_Dsp01 A.")
27 5) When asked for the drivers location, select the Install from a list or specific location option. 6) In the search and installation options window, select the Search for the best driver in this location option and check the Include this location in the search checkbox, then browse for the drivers containing folder. The path should read: C:\ProgramFiles\K-array\K-framework\drivers_rev02 Once you have inserted the right search path, click Next. 7) When warned about a failed Windows Logo test, please ignore the content of the warning and click Next. 8) The first part of driver installation is now complete, and the unknown K-Array_Dsp01 port has changed its name to a univocal K-Array_Dsp01 A. Click on Finish and repeat exactly the same procedure for the still unknown port. 9) Now you can see that inside the Device Manager Window both devices now have a univocal name and the alert symbol is no longer associated with them. Now you are 100% ready to get started! rev. A 27
 Connected Devices Indicator shows the quantity of detected connected devices. N.B.")
 Go Online Button detects connected devices. A3) Demo Mode Button runs the software in Demo Mode, in order to let the user operate the software without a connected unit.")
 Network Status Indicator shows the system status: Online means that K-Framework is connected to all devices in the network and the user can edit, store and retrieve parameters.")
28 13.3 Getting started WARNING Please verify that your KB1 is connected to your PC via USB before running K-Framework for the first time! At startup K-Framework will show the following window: A3 A4 A2 A1 A5 img. A A1) Connected Devices Indicator shows the quantity of detected connected devices. N.B.: at startup, the indicator will show 0 devices even if one or more units are connected. To detect all connected devices, just click the Go Online button. A2) Go Online Button detects connected devices. A3) Demo Mode Button runs the software in Demo Mode, in order to let the user operate the software without a connected unit. In demo mode it is possible to edit settings and to save them in.b1cp and.b1op. A4) Network Status Indicator shows the system status: Online means that K-Framework is connected to all devices in the network and the user can edit, store and retrieve parameters. Offline means that no devices are connected or, if the software has just been started up, that the network has not yet been scanned. A5) Device List displays all devices presently connected to the network. N.B.: at startup the List will look empty even if one or more units are connected. To detect all connected devices, just click the Go Online button. A6) Zoom Buttons zoom in (+) and out (-) of the window view. A6 28 rev. A

 Device Menu Button shows and hides the device menu.")
29 Click the Go Online Button to detect all presently connected devices. Once a connected device is detected by K-Framework it will appear in the K-Array Device List as shown in the following picture: B1 B2 B3 img. B B1) Connected Device Name. B2) Device Menu Button shows and hides the device menu. B3) Device Menu displays the basic information about the device and the shortcuts to open all available Editing Tabs. rev. A 29
 Channel Preset Selector opens and closes Channel Preset Window (see img. F). C3) Filter Gain Knobs regulate the gain (negative or positive) of Filter 1, 2 and 3.")
30 13.4 KB1 Editing Tabs: Mixer Tab C1 C2 C9 C3 C4 C5 C6 C10 C11 C12 C7 C8 img. C C1) Channel Preset Name Display shows the name of the preset currently loaded on the channel. C2) Channel Preset Selector opens and closes Channel Preset Window (see img. F). C3) Filter Gain Knobs regulate the gain (negative or positive) of Filter 1, 2 and 3. C4) AUX Send Knob regulates the amount of pre-fader, post-eq and postlimiter signal sent to the auxiliary output. C5) PAN Knob locates the channel in the stereo field. C6) Channel Volume Fader regulates the channel volume. C7) PFL Switch Button activates and deactivates Pre Fader Listening. When PFL is ON, the Master VU Meter will show the amplitude of the signal entering the selected channel, bypassing both the EQ and Volume settings. In the same way, headphones will only output the signals entering the channels where PFL is turned on: pre-fader, post-eq and post-compression. 30 rev. A
31 C8) Channel Note displays an editable 8 character text. C9) Headphones Volume Knob regulates the Headphones Master Volume. C10) FX Mute Button enables and disables the effects return. C11) Master Volume Fader regulates the Output Master Volume. C12) VU Meter displays overall amplitude of Master Output. N.B.: When one or more channels are in PFL mode, the Master VU Meter will show the amplitude of the signal entering the selected channel, bypassing both the EQ and Volume settings. rev. A 31


32 Mixer Advanced Tab D6 D7 D2 D1 D8 D15 D16 D5 D17 D9 D13 D18 D19 D11 D20 D21 D10 D14 D3 D4 D12 img. D 32 rev. A
33 D1) Channel Preset Name Display shows the name of the preset currently loaded on the channel. D2) Channel Preset Selector opens and closes Channel Preset Window (see img. F). D3) Compressor Window Button opens and closes the Channel Compressor Window (see img. E). D4) EQ Window Button opens and closes the Channel EQ Window (see pg. 35) D5) Filter Type Selectors select the type of filter from three options: Low Shelving, Peak/Notch and High Shelving. D6) Filter Frequency Knobs set the central or corner frequency of the corresponding filter. D7) Filter Gain Knobs set the gain (positive or negative) of the corresponding filter. D8) Filter Q / Slope Knobs set the Q or Slope value of the corresponding filter. D9) AUX Send Knob regulates the amount of pre-fader, post-eq and postlimiter signal sent to the auxiliary output. D10) PFL Switch Button activates and deactivates Pre Fader Listening. N.B.: When PFL is ON, the Master VU Meter will show the amplitude of the signal entering the selected channel, bypassing both the EQ and Volume settings. In the same way, headphones will only output the signals entering the channels where PFL is turned on, pre-fader, post-eq and post-compression. D11) Channel Volume Fader regulates the channel volume. D12) FX Send Knob regulates the amount of post-fader signal sent to the effects processor. D13) PAN Knob locates the channel in the stereo field. D14) Channel Note displays an editable 8 character text. D15) FX Master Volume Knob regulates the overall amount of effect to be sent to the Master Output. D16) FX to AUX Knob regulates the amount of effects on the AUX OUTPUT. D17) Headphones Volume Knob regulates the Headphones Master Volume. D18) Master Volume Fader regulates the Output Master Volume. D19) VU Meter displays overall amplitude of Master Output. N.B.: When one or more channels are in PFL mode, the Master VU Meter will show the amplitude of the signal entering the selected channel, bypassing both KB1 rev. A 33
. D21) Speaker OFF Switch Button enables and disables the Master OUTPUT.")
34 the EQ and Volume settings. D20) Mono Switch Button switches between stereo and mono mode. In mono mode the same signal is sent to the unit s speakers and to the Out R/D.I. Out XLR output on the Mixer Panel if Right OUT is selected in the Output Tab (if D.I. OUT is selected, there is no difference between Stereo or Mono mode). D21) Speaker OFF Switch Button enables and disables the Master OUTPUT. Compressor Pop Up Window E1) Compressor Type Drop Down Menu shows all the available compressing and limiting curves available on board, so that the user can choose one. E1 E2 E3 E4 img. E E2) Compressor RMS-TC Knob regulates the compressor attack time in the Time Constant domain expressed as db/sec (ex: 100 db/second = milliseconds, 200 db/sec = ms, db/ sec = 1 ms, etc.) E3) Compressor HOLD Knob sets how long the compression will stay on once the signal has fallen below the threshold in milliseconds. E4) Compressor DECAY Knob regulates the compressor decay time in the Time Constant domain expressed as db/sec (ex: 100 db/sec = ms, 200 db/sec = ms, db/sec = 1 ms, etc.) 34 rev. A
 Channel Preset Name Indicator displays the name of the preset currently selected in the Channel Preset List.")
 Channel Preset Description Text describes the preset currently selected in the Channel Preset List. F4) Channel Preset List displays all the presets available to the system.")
35 EQ Pop Up Window KB1 This windows shows a graph where the user can intuitively see the effect of the corresponding filter on the signal frequency spectrum. Channel Preset Pop Up Window F2 F1 F3 F6 F7 F4 F5 img. F F1) Channel Preset Name Indicator displays the name of the preset currently selected in the Channel Preset List. F2) Channel FX Type Indicator displays the type of effect to be selected on the Mixer Panel to match the preset settings. F3) Channel Preset Description Text describes the preset currently selected in the Channel Preset List. F4) Channel Preset List displays all the presets available to the system. F5) Channel Preset Image displays the picture file associated with the preset that is currently selected in the Channel Preset List. F6) Load Preset Button loads the preset currently selected in the Channel Preset List to the selected channel. F7) Save as New Button opens the New Channel Preset Pop Up Window rev. A 35
 Current Fx Type Drop Down Menu displays all the currently available effect types.")
36 G2 New Channel Preset Popup Window G4 G1 G3 G7 G5 G6 img. G G1) New Channel Preset Name Textbox can be edited to assign a name to a new preset. G2) Current Fx Type Drop Down Menu displays all the currently available effect types. The one that is selected when the new preset is saved will show up in the Channel FX Type Indicator once the new preset is selected in the Preset List. G3) New Channel Preset Description Textbox can be edited to assign a short description to the new preset. G4) New Channel Preset Image Box shows the picture currently associated with the new preset. G5) Cancel Button closes the New Channel Preset Pop Up Window without saving the current settings in a new preset file. G6) Ok Confirmation Button saves all the current settings of the selected channel, the New Preset Name, FX type, Description and Image into a new preset file to be uploaded, further edited and shared with the community of users. G7) Load Image Button opens a dialog window to select an image file to link to the new preset. 36 rev. A

37 Output Tab H1 H2 H3 H4 H5 H6 H7 H10 H9 H8 H12 H11 Generic 3-band parametric EQ strip as found in the OUTPUT TAB img. H H1) Out R/D.I. Out Mode Selector assigns the Right Stereo channel or the pre-fader Direct Output of Channel 1 to the Out R/D.I. Out XLR output on the Mixer Panel. H2) COVERAGE Selector sets the vertical coverage width of the system. (10-60 ) H3) Output Preset Load Button opens a dialog window to select the Output Preset to load onto the system. H4) Output Preset Save Button opens a dialog window to save the current output settings into a re-loadable preset file. H5) L/mono 3-band Parametric Equalizer allows you to equalize the speaker frequency response. H6) R/D.I. OUTPUT 3-band Parametric Equalizer allows you to equalize the frequency response of R/D.I. OUTPUT. H7) AUX OUTPUT 3-band Parametric Equalizer allows you to equalize the frequency response of AUX OUTPUT. rev. A 37
 Filter Frequency Knobs set the central or corner frequency of the corresponding filter on the Left Stereo Output.")
38 H8) L/mono Filter Type Selectors select the type of filter on the Left Stereo Output from three options: Low Shelving, Peak/Notch and High Shelving. H9) Filter Frequency Knobs set the central or corner frequency of the corresponding filter on the Left Stereo Output. H10) Filter Gain Knobs set the gain (positive or negative) of the corresponding filter on the Left Stereo Output. H11) Filter Q / Slope Knobs set the Q or Slope value of the corresponding filter on the Left Stereo Output. H12) Filter Graph shows the effect of the corresponding filter on the signal frequency spectrum. H13) AUX Filter Q / Slope Knobs set the Q or Slope value of the corresponding filter on the Left Stereo Output. Device Configuration Tab i1 i11 i12 i3 i4 i2 i6 i5 i7 i8 i10 i9 img. i 38 rev. A
39 i1) Firmware Upload Button opens a dialog window to select the Firmware file to upload to the system. i2) Firmware Upgrade Button uploads the selected Firmware file to the system. i3) Firmware File Path Indicator displays the system path of the selected Firmware file. i4) Firmware Version Indicator displays the version of the currently selected Firmware. i5) Device Name Textbox can be edited to provide a new name for the currently selected device. i6) Set Name Button stores the text in the Device Name Textbox on the selected device. N.B.: the newly set device name will not be updated in the Device List on the left. i7) Device Model Indicator displays the model name of the currently selected device. i8) Serial Number Indicator displays the Serial Number of the currently selected device. i9) Password Textbox can be edited to insert the system password to give the authorized user access administrator level access. N.B.: Only the staff of K-Array or official authorized services are allowed to login with Factory Privileges. i10) Password OK Button verifies that the text in the Password Textbox matches the required password to access the factory level. i11) Device Configuration Store Button allows the user to store all the current device settings on the device internal memory. i12) Device Configuration Restore Button restores the device settings currently stored on the device. KB1 rev. A 39
 Increment Button A for Filter J4 Frequencies = increment by hundreds, J2 everything else = increment by units.")
40 Precise setting view Double Click on the knobs to open a small interface dedicated to the precise setting of the corresponding knob value. To close the Precise Setting View click on the OK Button (6). J1) Increment Button A for Filter J4 Frequencies = increment by hundreds, J2 everything else = increment by units. J2) Increment Button B for Filter J1 Frequencies = increment by tens, J3 everything tenths. else = increment by J5 J6 J3) Decrement Button A for Filter Frequencies = decrement img. J by hundreds, everything else = decrement by units. J4) Decrement Button B for Filter Frequencies = decrement by tens, everything else = decrement by tenths. J5) Value Textbox can be edited to directly write the desidered Knob value. J6) OK Button sets the number inside the text box as value of the parameter controlled by the corresponding knob and closes the Precise Setting View. 40 rev. A
41 14. CUSTOMER SERVICE KB1 To receive service: 1) Contact the official K-array distributor in your country. They will direct you to the service centre. 2) If you are calling for service, have the serial number(s) of the unit(s) to hand for reference. Ask for Customer Service, and be prepared to describe the problem clearly and completely. 3) If the problem cannot be resolved over the phone, you must return the unit for service. 4) You will be given an RA (Return Authorization) number for job tracking. Refer to this number on shipping materials and in all correspondence concerning the repair. Shipping charges are the responsibility of the purchaser. Any attempt to modify or replace components of the device will invalidate your warranty. Service must be performed by an authorized K-array service centre. Cleaning: Clean the product enclosures using a soft, dry cloth only. Do not use any solvents, chemicals, or cleaning solutions containing alcohol, ammonia, or abrasives. Do not use any sprays near the product or allow liquids to spill into any openings. rev. A 41
 Crossover DSP controlled 200")
 2 x 6,3 mm Jack + 4 unballanced RCA(CH3 and CH4) Mixer Audio Output 1 x XLR CH1 parallel output 1 x XLR (Right / D.I.")
 1 Power to sub 450 W 1 Protection Operating range I.")
42 15. KB1 Technical Details Frequency range KB1 Acoustics 30 Hz - 20 KHz. Maximum SPL 112 db continuous db peak Coverage Horizontal 90 Vertical Type Frequencies Connectors Connectors Connectors Connector Type (digitally controlled) Crossover DSP controlled 200 Hz Mixer Audio Input 2 x balanced XLR + 6,3 mm Jack (CH1 and CH2) 2 x 6,3 mm Jack + 4 unballanced RCA(CH3 and CH4) Mixer Audio Output 1 x XLR CH1 parallel output 1 x XLR (Right / D.I. output) 1 x 6,3 mm Jack (Headphone out) 1 x 4-pin Speakon (2-channel power out to mid-high) Remote control Input 1 x USB Power Input 1 x VDE power plug Amplifiers 1 modules class D - DSP controlled DISPERSION GRAPHS 8 KHz 4 KHz 1 KHz <500 Hz horizontal Power to mid-high 120 W x 2 channels (240 watt total) 1 Power to sub 450 W 1 Protection Operating range I.nom Peak Power Dimensions Weight Dynamic limiter, over current, over temp, short circuits AC power Vac 50 Hz (Auto-switching) Vac 60 Hz (Auto-switching) 2 A / 115 Vac - 1 A / 230 Vac 660 W / 120ms max Physical 32.5 x x 43.5 cm (12.8 x x ) 22 Kg (48.5 lbs) Notes for data 1. Amplifier wattage rating is based on the maximum unclipped burst sine wavwwe RMS voltage that the amplifier will produce into the nominal load impedance. New materials and design are introduced into existing products without previous notice. Present systems may differ in some respects from those presented in this brochure. digital control vertical 42 rev. A
43 APPROVAL K-array declares that this device is in compliance with the applicable CE standards and regulations. Before putting the device into operation, please observe the respective country-specific regulations! WEEE Please dispose of this product at the end of its operational lifetime by bringing it to your local collection point or recycling centre for such equipment. The contents of this manual are furnished for informational purposes only. Hp Sound Equipment s.r.l. assumes no responsibility for any errors or inaccuracies that may appear in this manual. Hp Sound Equipment s.r.l. reserves the right to make modifications without prior notice.
44 K-array is a brand of HP Sound Equipment s.r.l. Viale Roma 7/i San Piero a Sieve (Firenze) - Italy tel fax info@kblueline.com rev. A
CMX-DSP Compact Mixers
 CMX-DSP Compact Mixers CMX4-DSP, CMX8-DSP, CMX12-DSP Introduction Thank you for choosing a Pulse CMX-DSP series mixer. This product has been designed to offer reliable, high quality mixing for stage and/or
T L Audio. User Manual C1 VALVE COMPRESSOR. Tony Larking Professional Sales Limited, Letchworth, England.
 T L Audio User Manual C1 VALVE COMPRESSOR Tony Larking Professional Sales Limited, Letchworth, England. Tel: 01462 490600. International +44 1462 490600. Fax: 01462 490700. International +44 1462 490700.
USER GUIDE MULTI-CHANNEL STEREO MIXER S MIX 4M2S UD
 USER GUIDE MULTI-CHANNEL STEREO MIXER S MIX 4M2S UD FEATURES 4 mono input channels and 2 stereo input channels. Frequency EQ on each input channel. Low-noise mic pre-amp on microphone inputs. Low cut filter
MANUAL ENGLISH Core Club Ordercode: D2314
 MANUAL ENGLISH Core Club Ordercode: Highlite International B.V. Vestastraat 2 6468 EX Kerkrade the Netherlands Table of contents Warning... 2 Unpacking Instructions... 2 Safety Instructions... 2 Operating
PROFESSIONAL 2 CHANNEL SOLID-STATE MIC / LINE PREAMPLIFIER USER S MANUAL
 PROFESSIONAL 2 CHANNEL SOLID-STATE MIC / LINE PREAMPLIFIER USER S MANUAL SAFETY INSTRUCTIONS This symbol, wherever it appears, alerts you to important operating and maintenance instructions in the accompanying
PLAYMATE PROFESSIONAL STEREO 19 MIXER, USB/SD CARD AND BLUETOOTH PLAYER. User Guide and Reference Manual. page 1
 PLAYMATE PROFESSIONAL STEREO 19 MIXER, USB/SD CARD AND BLUETOOTH PLAYER User Guide and Reference Manual page 1 INTRODUCTION Congratulations and thank you for purchasing the NewHank Playmate mixer. This
CM4-BT. Compact Mixer with Bluetooth UK User Manual
 CM4-BT Compact Mixer with Bluetooth 170.804UK User Manual Caution: Please read this manual carefully before operating Damage caused by misuse is not covered by the warranty Introduction: Thank you for
1. SAFETY & WARRANTY 2 2. WHAT IS CGM 3 3. SYSTEM SETUP (LINKING) Master to Group(s) Group to Channel(s) 3 4. CONNECT THE POWER 4
 Master to Group(s) Group to Channel(s) 3 4. CONNECT THE POWER 4") CGM CREATIVE MIXER 1. SAFETY & WARRANTY 2 2. WHAT IS CGM 3 3. SYSTEM SETUP (LINKING) 3 3.1. Master to Group(s) 3 3.2. Group to Channel(s) 3 4. CONNECT THE POWER 4 4.1. Which channel module should be powered
CGM CREATIVE MIXER 1. SAFETY & WARRANTY 2 2. WHAT IS CGM 3 3. SYSTEM SETUP (LINKING) 3 3.1. Master to Group(s) 3 3.2. Group to Channel(s) 3 4. CONNECT THE POWER 4 4.1. Which channel module should be powered
STAGE 250. Owner s Manual TRANSPORTABLE PA WITH BUILT-IN MIXER AND 24 BIT EFFECTS
 STAGE 250 Owner s Manual TRANSPORTABLE PA WITH BUILT-IN MIXER AND 24 BIT EFFECTS Important Safety Instructions For your own safety you must read this section in full first! Intended use This device is
DRM212 DRM215 DRM315 SPECIFICATIONS
 DRM212 DRM215 DRM315 DRM Series Professional Powered Loudspeakers deliver class-leading power via ultra-efficient Class-D amplifiers with next-gen protection and Power Factor Correction technology for
USER MANUAL MX102 & MX1202
 USER MANUAL MX102 & MX1202 WWW.PULSE-AUDIO.CO.UK 1 SAVE THESE SAFETY INSTRUCTIONS Thank you for purchasing our product. To assure the optimum performance, please read this manual carefully and keep it
D-901 PC SOFTWARE Version 3
 INSTRUCTION MANUAL D-901 PC SOFTWARE Version 3 Please follow the instructions in this manual to obtain the optimum results from this unit. We also recommend that you keep this manual handy for future reference.
S MiX 2M2S UF. S MiX 2M2S F
 USER guide MULTI-CHANNEL STEREO MIXER S MiX 2M2S UF S MiX 2M2S F FEATURES 2 stereo input channels and 2 mono input channels. 2-band frequency EQ for each input channel. Low-noise mic pre-amp on microphone
TF5 / TF3 / TF1 DIGITAL MIXING CONSOLE. TF Editor User Guide
 TF5 / TF3 / TF1 DIGITAL MIXING CONSOLE EN Special notices Copyrights of the software and this document are the exclusive property of Yamaha Corporation. Copying or modifying the software or reproduction
20.12 mixer. user manual
 20.12 mixer user manual Musikhaus Thomann Thomann GmbH Hans-Thomann-Straße 1 96138 Burgebrach Germany Telephone: +49 (0) 9546 9223-0 E-mail: info@thomann.de Internet: www.thomann.de 07.09.2018, ID: 433540
Oxygen ORDERCODE D2150
 Oxygen ORDERCODE D2150 Congratulations! You have bought a great, innovative product from DAP Audio. The DAP Audio Oxygen brings excitement to any venue. Whether you want simple plug-&-play action or a
MAW218D7. User s manual. Pol.Ind.Norte-Perpinyà, TERRASSA (Barcelona-SPAIN)
") MAW218D7 User s manual Pol.Ind.Norte-Perpinyà,25 08226 TERRASSA (Barcelona-SPAIN) info@master-audio.com www.master-audio.com Nov 2008 CAUTION RISK OF ELECTRIC SHOCK DON T OPEN WARNING: To reduce the risk
MAW218D7 User s manual Pol.Ind.Norte-Perpinyà,25 08226 TERRASSA (Barcelona-SPAIN) info@master-audio.com www.master-audio.com Nov 2008 CAUTION RISK OF ELECTRIC SHOCK DON T OPEN WARNING: To reduce the risk
Concert Series ORDERCODE D3470 ORDERCODE D3471 ORDERCODE D3472 D3470 D3471 D3472
 Concert Series ORDERCODE D3470 ORDERCODE D3471 ORDERCODE D3472 D3470 D3471 D3472 Congratulations! You have bought a great, innovative product from DAP Audio. The DAP Audio Concert Series brings excitement
CR-6 MIXER USER MANUAL ENGLISH. Order Code: MIXE01
 CR-6 MIXER P R O F E S S I O N A L 1 9 R A C K M I X E R Order Code: MIXE01 w w w. p r o l i g h t. c o. u k USER MANUAL ENGLISH WARNING FOR YOUR OWN SAFETY, PLEASE READ THIS USER MANUAL CAREFULLY BEFORE
TUBE MIX FIVE CHANNEL MIXER WITH USB AND ASSIGNABLE 12AX7 TUBE. User's Manual
 TUBE MIX FIVE CHANNEL MIXER WITH USB AND ASSIGNABLE 12AX7 TUBE User's Manual IMPORTANT SAFETY INSTRUCTIONS READ FIRST This symbol, wherever it appears, alerts you to the presence of uninsulated dangerous
S0 Radio Broadcasting Mixer. June catalogue. Manufacturers of audio & video products for radio & TV broadcasters
 S0 Radio Broadcasting Mixer June 2012 catalogue Manufacturers of audio & video products for radio & TV broadcasters S0 Radio Broadcasting Mixer A simple radio mixer for novice and professional users The
USERS MANUAL GR ONE 300 GR ONE 700 GR ONE 1400
 USERS MANUAL GR ONE 300 GR ONE 700 GR ONE 1400 PURE SOUND USER MANUAL PURPOSE This user manual is dedicated to the use of the bass amplifiers GR-ONE 700, GR-ONE700x2 and GR-ONE 300. The manual includes
A-Line LOUDSPEAKER SYSTEM. Mobile Audio Concert Sound Fixed Installation Pro Entertainment. English
 A-Line LOUDSPEAKER SYSTEM Mobile Audio Concert Sound Fixed Installation Pro Entertainment English A-LINE FAMILY A Perfect Match THE A-LINE IS YOUR ENTRY TO PROFESSIONAL DYNACORD LIVE SOUND Powered loudspeakers
Features/Specifications
 Introduction Thank you for purchasing the DD Audio DSI-1(Digital Signal Integrator). The DSI-1 is a feature rich audio signal processor that will allow you to precisely tune the acoustics of your car audio
TS2.8 Sub OWNER S MANUAL
 TS2.8 Sub OWNER S MANUAL TS2.8 Sub CONTENTS IMPORTANT SAFETY INSTRUCTIONS 03 WARNINGS 03 FUSE PROTECTION 04 WARNING: STRONG MAGNETIC FIELD 04 EMC / EMI 04 ECODESIGN STANDBY POWER CONSUMPTION 04 WARRANTY
IM-53 Installation Mixer ORDERCODE D2178
 IM-53 Installation Mixer ORDERCODE D2178 Congratulations! You have bought a great, innovative product from DAP Audio. The DAP Audio IM-53 brings excitement to any venue. Whether you want simple plug-&-play
HeadAmp 4 Pro. User s Manual. Project Series. Five Channel Headphone Amp with Listen and Talkback
 HeadAmp 4 Pro Five Channel Headphone Amp with Listen and Talkback Project Series User s Manual IMPORTANT SAFETY INSTRUCTIONS READ FIRST This symbol, wherever it appears, alerts you to the presence of
DIGITAL MIXING CONSOLE. TF Editor V3.6 User's Guide
 DIGITAL MIXING CONSOLE TF Editor V3.6 User's Guide EN Special notices Copyrights of the software and this document are the exclusive property of Yamaha Corporation. Copying or modifying the software or
3124mb+ All Discrete 4 Channel Mic/Instrument Preamplifier with Stereo Mixer Operator s Manual
 3124mb+ All Discrete 4 Channel Mic/Instrument Preamplifier with Stereo Mixer Operator s Manual Written by Carl J Houde 2015 Table of Contents 1.0 Introduction... 3 2.0 Overview... 4 2.1 3124mb+ Features
Recording to Tape (Analogue or Digital)...10
...10") c o n t e n t s DUAL MIC-PRE Green Dual Mic Pre (introduction).............................4 Section (i): Setting Up Power Connections...........................................4 Power Supply................................................5
c o n t e n t s DUAL MIC-PRE Green Dual Mic Pre (introduction).............................4 Section (i): Setting Up Power Connections...........................................4 Power Supply................................................5
Connevans.info. DeafEquipment.co.uk. This product may be purchased from Connevans Limited secure online store at
 Connevans.info Solutions to improve the quality of life Offering you choice Helping you choose This product may be purchased from Connevans Limited secure online store at www.deafequipment.co.uk DeafEquipment.co.uk
LX20 OPERATORS MANUAL
 LX20 OPERATORS MANUAL CONTENTS SAFETY CONSIDERATIONS page 1 INSTALLATION page 2 INTRODUCTION page 2 FIRST TIME USER page 3 SYSTEM OPERATING LEVELS page 3 FRONT & REAR PANEL LAYOUT page 4 OPERATION page
Summit Audio Model TLA-50 Tube Leveling Amplifier
 Summit Audio Model TLA-50 Tube Leveling Amplifier ATTACK FAST SLOW MEDIUM 3 4 5 6 7 TUBE LEVELER 40 60 80 100 VU 3 4 5 6 TLA-50 7 FAST SLOW RELEASE OUTPUT RED. METER 2 1 0 10 GAIN 9 8 7 5 3 1 0 1 2 +3
POWERED MIXER MPM 4130 OWNER S MANUAL 4 CHANNEL POWERED MIXER
 POWERED MIXER OWNER S MANUAL MPM 4130 4 CHANNEL POWERED MIXER MPM 4130 4 CHANNEL POWERED MIXER Congratulations on your choice of a powered mixer you have purchased one of the finest powered mixers on the
TF5 / TF3 / TF1 DIGITAL MIXING CONSOLE. TF StageMix User's Guide
 TF5 / TF3 / TF1 DIGITAL MIXING CONSOLE EN Note The software and this document are the exclusive copyrights of Yamaha Corporation. Copying or modifying the software or reproduction of this document, by
DCX-24 ORDERCODE D2020
 DCX-24 ORDERCODE D2020 Congratulations! You have bought a great, innovative product from DAP Audio. The DAP Audio DCX-24 brings excitement to any venue. Whether you want simple plug-&-play action or a
SCM820 Digital IntelliMix Automatic Mixer SEAMLESS MIXING. ADVANCED CONTROL.
 SCM820 Digital IntelliMix Automatic Mixer SEAMLESS MIXING. ADVANCED CONTROL. SCM820 Digital IntelliMix Automatic Mixer The SCM820 is the flagship Shure digital automatic mixer for seamless, natural-sounding
CHAPTER 3 AUDIO MIXER DIGITAL AUDIO PRODUCTION [IP3038PA]
![CHAPTER 3 AUDIO MIXER DIGITAL AUDIO PRODUCTION [IP3038PA]](/thumbs/73/68858919.jpg "CHAPTER 3 AUDIO MIXER DIGITAL AUDIO PRODUCTION [IP3038PA]") CHAPTER 3 AUDIO MIXER DIGITAL AUDIO PRODUCTION [IP3038PA] Learning Objectives By the end of this chapter, students should be able to: 1 State the function of the audio mixer in the sound studio. 2 Explain
CHAPTER 3 AUDIO MIXER DIGITAL AUDIO PRODUCTION [IP3038PA] Learning Objectives By the end of this chapter, students should be able to: 1 State the function of the audio mixer in the sound studio. 2 Explain
TL AUDIO M4 TUBE CONSOLE
 TL AUDIO M4 TUBE CONSOLE USER MANUAL TL AUDIO M4 TUBE CONSOLE M4 INTRODUCTION... 3 M4 MIXER TECHNICAL SPECIFICATION... 4 Mic Input:... 4 Line Input:... 4 Phase Rev:... 4 High Pass Filter:... 4 Frequency
SRP-V110. Table of Contents AUDIO MIXER
 --9-1 (1) AUDIO MIXE SP-V11 Table of Contents Operating instructions Before operating the unit, please read this manual and the supplied WANING thoroughly and retain it for future reference. Precautions
Professional Power Amplifier Specifications...8 SPECIFICATION
 Contents Contents...1 Important note...2 Control elements...3 Rear panel features introduction...4 Rear panel features introduction...5 Audio input and output connections...6 PC Interface...7 Professional
XCELLENCE SERIES X-15LTP
 XCELLENCE SERIES X-15LTP Pol. Ind. Norte - Perpinyà, 25 08226 TERRASSA (Barcelona-SPAIN) Copyright 2012 info@master-audio.com All rights reserved master-audio.com Dec 12 User s manual ENGLISH CAUTION RISK
CFX 12 (12X4X1) 8 mic/line channels, 2 stereo line channels. CFX 16 (16X4X1) 12 mic/line channels, 2 stereo line channels
 8 mic/line channels, 2 stereo line channels. CFX 16 (16X4X1) 12 mic/line channels, 2 stereo line channels") COMPACT CFX MIXERS COMPACT SOUND REINFORCEMENT MIXERS WITH EFX FOR THE GIGGING MUSICIAN THREE MODELS CFX 12 (12X4X1) 8 mic/line channels, 2 stereo line channels CFX 16 (16X4X1) 12 mic/line channels, 2
COMPACT CFX MIXERS COMPACT SOUND REINFORCEMENT MIXERS WITH EFX FOR THE GIGGING MUSICIAN THREE MODELS CFX 12 (12X4X1) 8 mic/line channels, 2 stereo line channels CFX 16 (16X4X1) 12 mic/line channels, 2
XO-231 USER S MANUAL. Crossover ENGLISH
 XO-231 Crossover ENGLISH USER S MANUAL IMPORTANT SAFETY INSTRUCTIONS For your own safety you should read this section in full first! Risk of electrical shock! Connect the device only to a properly wired
X D M PREAMP MIXER
 User Instructions X D M - 3 5 2 PREAMP MIXER Thank you for purchasing this American DJ product. The XDM-352 is ready to be used, there is no assembly required. Please read the following instructions before
innkeeper LTD Digital Hybrid User Guide JK Audio
 innkeeper LTD Digital Hybrid User Guide JK Audio Introduction Innkeeper LTD allows you to send line level signals into the phone line while maintaining excellent separation between your voice and the caller.
Kramer Electronics, Ltd. USER MANUAL. Model: 900xl. Power Amplifier
 Kramer Electronics, Ltd. USER MANUAL Model: 900xl Power Amplifier Introduction Contents 1 Introduction 1 2 Getting Started 1 2.1 Recycling Kramer Products 1 3 Overview 2 4 Your 900xl Power Amplifier 3
USER MANUAL. 27 Full HD Widescreen LED Monitor L27ADS
 USER MANUAL 27 Full HD Widescreen LED Monitor L27ADS TABLE OF CONTENTS 1 Getting Started 2 Control Panel/ Back Panel 3 On Screen Display 4 Technical Specs 5 Care & Maintenance 6 Troubleshooting 7 Safety
DIGITAL SPEAKER MANAGEMENT UK
 DSM2-6mkII DIGITAL SPEAKER MANAGEMENT 170.659UK Features 96kHz sampling frequency, 32-bit A/D and D/A converter, 24-bit DSP processor Input channel: 6-band parametric EQ, Delay, Polarity Output channel:
Natural-sounding telephone audio... Hybrids
 Natural-sounding telephone audio... Hybrids ... for broadcast, conferencing and public address About Comrex DH Series Digital Telephone Hybrids When you want to present, broadcast, or record a telephone
Trace Elliot Transit B Bass Instrument Preamp
 Trace Elliot Transit B Bass Instrument Preamp Owner s Manual FCC Compliancy Statement This device complies with Part 15 of the FCC rules. Operation is subject to the following two conditions: (1) this
2.0 Wall Mount TV Soundbar Instruction Manual
 8010275 2.0 Wall Mount TV Soundbar Instruction Manual Read all of the instructions before using this soundbar and keep the manual in a safe place for future reference. Safety Information CA UT IO N RISK
Compact 60. Solutions. Manual English
 Acoustic Compact 60 Solutions 2 Manual English 1 Acoustic Solutions Compact 602 Operating Manual Contents: 1. Introduction 2. Safety Precautions 3. Controls and Connections 4. Operation Summary 5. Technical
Overview. A 16 channel frame is shown.
 Overview A 16 channel frame is shown. 22 Mono Input Channel 1 - MIC INPUT The mic input accepts XLR-type connectors and is designed to suit a wide range of BALANCED or UNBALANCED signals. Professional
OPERATIONS MANUAL FOR EDISON PROFESSIONAL Professional ABS Molded Loudspeaker M4000
 M4000 Introduction: Congratulations on your purchase of an M-4000 powered loudspeaker, engineered and manufactured by BriteLite Enterprises. The M-4000 includes a high-output compression driver, and 15
DSP 18 Sub active subwoofer. user manual
 DSP 18 Sub active subwoofer user manual Musikhaus Thomann Thomann GmbH Hans-Thomann-Straße 1 96138 Burgebrach Germany Telephone: +49 (0) 9546 9223-0 E-mail: info@thomann.de Internet: www.thomann.de 05.11.2018,
TASCAM DM-24. The DM-24 Basics. TEAC Professional Division. Digital Mixing console
 TASCAM TEAC Professional Division DM-24 Digital Mixing console The DM-24 Basics DM-24 SIGNAL FLOW... 3 INPUTS... 3 RETURNS... 3 OPTIONS... 4 OUTPUTS... 5 AUX SENDS... 5 TRACKING OPTIONS... 5 Using AUX
DR-16.4NF DR CH Digital Mixer
 DR-16.4NF0524-1.0 DR-16.4 16-CH Digital Mixer Notes 11 2 3 11 Notes 1. INTRODUCTION 2. FEATURES 3. USEFULL DATA 4. CONTROLS 5. SOFTWARE UPDATE 6. HOOKUP DIAGRAM 7. BLOCK DIAGRAM 8. TECHNICAL SPECIFICATION.
Achat 115 Sub A active subwoofer. user manual
 Achat 115 Sub A active subwoofer user manual Musikhaus Thomann Thomann GmbH Hans-Thomann-Straße 1 96138 Burgebrach Deutschland Telephone: +49 (0) 9546 9223-0 E-mail: info@thomann.de Internet: www.thomann.de
DPM Owner s Manual POWER MIXER. with 24-bit Digital Effects
 DPM-1122 Owner s Manual POWER MIXER with 24-bit Digital Effects Contents Important Safety Instructions!...3 Cleaning and Care...3 Introduction...4 Features...4 Quick Start...4 Becoming acquainted with
CDM10: Channel USB Mixer. Item ref: UK User Manual
 CDM10:4 19 4 Channel USB Mixer Item ref: 171.135UK User Manual Caution: Please read this manual carefully before operating Damage caused by misuse is not covered by the warranty Introduction Thank you
Portable Speakers. 2,500 Watt 2 Way 8" Powered Loudspeaker with KLARK TEKNIK DSP Technology, Speaker Modelling and ULTRANET Networking
 2 way full range loudspeaker for portable PA and installation applications 2,5 Watt power featuring KLARK TEKNIK Class-D technology KLARK TEKNIK Digital Signal Processing for total system control Speaker
y AW4416 Audio Workstation Signal Flow Tutorial
 y AW44 Audio Workstation Signal Flow Tutorial This tutorial will help you learn the various parts of a CHANNEL by following the signal through #1. Use the Signal Flow Diagram included with this document.
Technical Specifications
 INSTALLATION SHEET AND OPERATORS MANUAL General Description: The is a mixer/preamplifier that includes 6 channels that each include a microphone input at screw terminals and an aux input at an RCA jack.
C Class Signal Processors
 -5-3 -2-7 -1 0-10 -20 +4 VU SAMSON OPTICAL COMPRESSOR A U D I O C Class Signal Processors Safety Instructions Caution: To reduce the hazard of electrical shock, do not remove cover or back. No user serviceable
USB AUDIO INTERFACE I T
 USB AUDIO INTERFACE EN DE FR ES IT JA Contents Introduction...3 Contents in this Operation Manual... 3 Features... 3 Panel Controls and Terminals (Details)...4 Rear Panel... 4 Front Panel... 6 Panel Controls
clipping; yellow LED lights when limiting action occurs. Input Section Features
 ELX-1A Rack-Mount Mic/Line Mixer Four inputs, one output in a single rack space Very-highery-high-quality audio performance High reliability Extensive filtering circuitry and shielding protect against
PXL2470MW LED LCD Monitor
 PXL2470MW LED LCD Monitor USER'S GUIDE www.planar.com Content Operation Instructions...1 Unpacking Instructions...2 Safety Precautions...2 Package Overview...3 First Setup...4 Front View of the Product...5
SR-D8-M, SR-D8-S. (Ver ) SOFTWARE INSTRUCTIONS
 SOFTWARE INSTRUCTIONS") SOFTWARE INSTRUCTIONS active l ine array speak er SYStems SR-D8-M, SR-D8-S (Ver. 1.1.1) Thank you for purchasing TOA's Active Line Array Speaker Systems. Please carefully follow the instructions in this
SOFTWARE INSTRUCTIONS active l ine array speak er SYStems SR-D8-M, SR-D8-S (Ver. 1.1.1) Thank you for purchasing TOA's Active Line Array Speaker Systems. Please carefully follow the instructions in this
Portable Speakers. 3,000 Watt 18" Powered Subwoofer with KLARK TEKNIK DSP Technology, Speaker Modelling and ULTRANET Networking
 Front loaded powered subwoofer for portable PA and installation applications power featuring KLARK TEKNIK Class-D technology KLARK TEKNIK Digital Signal Processing for total system control Speaker modelling
GIULIA Y. combo amplifier for acoustic instruments
 GIULIA Y combo amplifier for acoustic instruments IMPORTANT SAFETY INSTRUCTIONS THE LIGHTNING FLASH WITH ARROWHEAD SYMBOL, WITHIN AN EQUILATERAL TRIANGLE, IS INTENDED TO ALERT THE USER TO THE PRESENCE
AxumVideo 0 intro. Now that you have connected the different AXUM system parts, you are ready to configure the system according to your own needs.
 AxumVideo 0 intro Now that you have connected the different AXUM system parts, you are ready to configure the system according to your own needs. On the left we see the RACK unit and on the right we see
6-Channel Portable Mixer
 6-Channel Portable Mixer Model: MIX-06 User Manual www.talentaudio.com SAFETY PECAUTIONS SAFETY PECAUTIONS WANING - TO EDUCE THE ISK OF FIE O ELECTIC SHOCK, DO NOT EXPOSE THIS UNIT TO AIN O MOISTUE. Do
USER MANUAL Full HD Widescreen LED Monitor L215ADS
 USER MANUAL 21.5 Full HD Widescreen LED Monitor L215ADS TABLE OF CONTENTS 1 Getting Started 2 Control Panel/ Back Panel 3 On Screen Display 4 Technical Specs 5 Care & Maintenance 6 Troubleshooting 7 Safety
DA IN 1-OUT LINE DRIVER WITH EQUALIZATION + AUDIO USER S GUIDE
 MANUAL PART NUMBER: 400-0430-001 1-IN 1-OUT LINE DRIVER WITH UALIZATION + AUDIO USER S GUIDE TABLE OF CONTENTS Page PRECAUTIONS / SAFETY WARNINGS... 2 GENERAL...2 GUIDELINES FOR RACK-MOUNTING...2 INSTALLATION...2
USER MANUAL Full HD Widescreen LED Monitor L215IPS
 USER MANUAL 21.5 Full HD Widescreen LED Monitor L215IPS TABLE OF CONTENTS 1 Getting Started 2 Control Panel/ Back Panel 3 On Screen Display 4 Technical Specs 5 Care & Maintenance 6 Troubleshooting 7 Safety
MX 3BT NF TK MAIN 2TK 2TK BT
 MX.3BT MX 3BT BT MAIN NF03852-1.1 The mains plug or an appliance coupler is used as the disconnect device, the disconnect device shall remain readily operable. 1. INTRODUCTION...4 2. FEATURES...4 3. INSTRUCTION...4
IMPORTANT SAFETY INSTRUCTIONS
 IMPORTANT SAFETY INSTRUCTIONS When using this electronic device, basic precautions should always be taken, including the following: 1. Read all instructions before using the product. 2. Do not use this
Personal Q Guide for VENUE Systems
 Personal Q Guide for VENUE Systems Version 1.0 Digidesign 2001 Junipero Serra Boulevard Daly City, CA 940-3886 USA tel: 650 731 6300 fax: 650 731 6399 Technical Support (USA) tel: 650 731 6100 fax: 650
MULTIMIX 8/4 DIGITAL AUDIO-PROCESSING
 MULTIMIX 8/4 DIGITAL AUDIO-PROCESSING Designed and Manufactured by ITEC Tontechnik und Industrieelektronik GesmbH 8200 Laßnitzthal 300 Austria / Europe MULTIMIX 8/4 DIGITAL Aim The most important aim of
ULN-8 Quick Start Guide
 Metric Halo $Revision: 1671 $ Publication date $Date: 2012-7-21 12:42:12-0400 (Mon, 21 Jul 2012) $ Copyright 2012 Metric Halo Table of Contents 1.... 5 Prepare the unit for use... 5 Connect the ULN-8 to
XB-14 Quick Operation Manual V1 23/10/2013
 XB-14 Quick Operation Manual V1 23/10/2013 14. MIXER ON/OFF SWITCH 19. USB GAIN CONTROL 17. ST1 18. ST16 SELECTOR SELECTOR 7. GAIN CONTROL 6. 100Hz HIGH PASS FILTER 13. MAIN 16. GAIN 5. EQ METERS 12. PHANTOM
Reference Guide 2015 ZOOM CORPORATION. Copying or reprinting this manual in part or in whole without permission is prohibited.
 Reference Guide 2015 ZOOM CORPORATION Copying or reprinting this manual in part or in whole without permission is prohibited. Introduction is a mixer application designed specifically for the. Using a
MAD A-Series...Flat Panel Surface Planar Arrays
 HPV TECHNOLOGIES, Inc. 17752 Fitch Irvine, California 92614 MAD A-Series...Flat Panel Surface Planar Arrays...Concert Sound at it s Finest! Flat Panel Surface Planar Arrays describe a new speaker technology
MS2540 Current Loop Receiver with RS485 Communication
 MS2540 Current Loop Receiver with RS485 Communication User Manual Metal Samples Company A Division of Alabama Specialty Products, Inc. 152 Metal Samples Rd., Munford, AL 36268 Phone: (256) 358 4202 Fax:
USER MANUAL. 22" Class Slim HD Widescreen Monitor L215DS
 USER MANUAL 22" Class Slim HD Widescreen Monitor L215DS TABLE OF CONTENTS 1 Getting Started Package Includes Installation 2 Control Panel / Back Panel Control Panel Back Panel 3 On Screen Display 4 Technical
User Manual. Neve Channel Strip Issue 2. !!!Please read includes important safety instructions!!!
 User Manual Neve 8801 Channel Strip 527 358 Issue 2!!!Please read includes important safety instructions!!! 2007 AMS Neve Ltd own the copyright of all information and drawings contained in this manual
PROFESSIONAL 2-CHANNEL MIXER WITH EFFECTS LOOP
 PROFESSIONAL 2-CHANNEL MIXER WITH EFFECTS LOOP QUICKSTART GUIDE ENGLISH ( 1 4 ) GUÍA DE INICIO RÁPIDO ESPAÑOL ( 5 8 ) GUIDE D UTILISATION SIMPLIFIÉ FRANÇAIS ( 9 12 ) GUIDA RAPIDA ITALIANO ( 13 16 ) KURZANLEITUNG
CL1200 MIXING CONSOLE. Item ref: UK User Manual
 CL1200 MIXING CONSOLE Item ref: 170.881UK User Manual Caution: Please read this manual carefully before operating Damage caused by misuse is not covered by the warranty Introduction Thank you for choosing
T mic preamplifiers with dedicated trim control. Volume
 T228 16 mic preamplifiers with dedicated trim control Volume 2 Important Safety Instructions * T228, are mixers for professional use. They can be used in following electromagnetic environment: residential,
Reference Guide 2014 ZOOM CORPORATION. Copying or reprinting this manual in part or in whole without permission is prohibited.
 Reference Guide 2014 ZOOM CORPORATION Copying or reprinting this manual in part or in whole without permission is prohibited. Introduction is a mixer application designed specifically for the. Using a
English. User Manual sub8 Subwoofer SUBWOOFER. Supporting your digital lifestyle
 English User Manual sub8 Subwoofer U SUBWOOFER Supporting your digital lifestyle Table of Contents Important Safety Precautions........ 2 Introduction / What s in the Box?...... 3 Front & Rear Panels............
CLOCKAUDIO. MR88 Automatic Microphone Mixer. Version 4.2
 CLOCKAUDIO MR88 Automatic Microphone Mixer Version 4.2 Clockaudio Limited,22 Arnside Road WATERLOOVILLE Hampshire. UK Tel : +44 (0)2392 251193 Fax : +44 (0)2392 251201 Email : sales@clockaudio.co.uk CONTENTS
28 & 32 & 40 & 55 & 65 & 84-INCH TFT-LCD 4K MONITOR
 28 & 32 & 40 & 55 & 65 & 84-INCH TFT-LCD 4K MONITOR INSTRUCTION MANUAL Please read this manual thoroughly before use, and keep it handy for future reference. TABLE OF CONTENTS 1, General information...
USER MANUAL Full HD Widescreen LED Monitor L236VA
 USER MANUAL 23.6 Full HD Widescreen LED Monitor L236VA TABLE OF CONTENTS 1 Getting Started 2 Control Panel/ Back Panel 3 On Screen Display 4 Technical Specs 5 Care & Maintenance 6 Troubleshooting 7 Safety
Element 78 MPE-200. by Summit Audio. Guide To Operations. for software version 1.23
 Element 78 MPE-200 by Summit Audio Guide To Operations for software version 1.23 TABLE OF CONTENTS IMPORTANT SAFETY AND GROUNDING INSTRUCTIONS COVER 1. UNPACKING AND CONNECTING...3 AUDIO CONNECTIONS...4
RoomMatch RM and RM TECHNICAL DATA SHEET. asymmetrical array modules. Key Features. Product Overview. Technical Specifications
 RoomMatch RM281 and RM281 Key Features All the benefits of the original 2 RoomMatch array module loudspeakers - Concert-quality sound quality for live music and outstanding spoken-word clarity with industry-leading
MIDAS Venice Pin-Assignments Page 1 / 3 Mono-Channel-PCB Stereo- / Master - PCB CN 1 circuit diagram number CN 6 circuit diagram number CN
 MIDAS Venice Pin-Assignments Page 1 / 3 Mono-Channel-PCB 81346 Stereo- / Master - PCB 82230 CN 1 circuit diagram number CN 6 circuit diagram number CN 7 circuit diagram number CN 1 circuit diagram number
AcoustiSoft RPlusD ver
 AcoustiSoft RPlusD ver 1.2.03 Feb 20 2007 Doug Plumb doug@etfacoustic.com http://www.etfacoustic.com/rplusdsite/index.html Software Overview RPlusD is designed to provide all necessary function to both
C8000. switch over & ducking
 features Automatic or manual Switch Over or Fail Over in case of input level loss. Ducking of a main stereo or surround sound signal by a line level microphone or by a pre recorded announcement / ad input.