Digital Video Switcher SE-2800 (8CH / 12CH) Quick Start Guide.
|
|
|
- Linette McBride
- 6 years ago
- Views:
Transcription
 Quick Start Guide www.datavideo-tek.")
1 Digital Video Switcher SE-2800 (8CH / 12CH) Quick Start Guide
2 Table of Contents Warnings & Precautions... 2 What s in the box?... 3 Introduction... 4 Features... 4 Connections & Controls... 5 Control Panel... 5 Rear Panel... 8 Calibrating the T-bar MENU Function Setting Datavideo Switcher Configuration Utility LOGOS Setup Dimension Specification (SE ) Specification (SE ) Service & Support
3 Warnings & Precautions 1. Read all of these warnings and save them for later reference. 2. Follow all warnings and instructions marked on this unit. 3. Unplug this unit from the wall outlet before cleaning. Do not use liquid or aerosol cleaners. Use a damp cloth for cleaning. 4. Do not use this unit in or near water. 5. Do not place this unit on an unstable cart, stand, or table. The unit may fall, causing serious damage. 6. Slots and openings on the cabinet top, back, and bottom are provided for ventilation. To ensure safe and reliable operation of this unit, and to protect it from overheating, do not block or cover these openings. Do not place this unit on a bed, sofa, rug, or similar surface, as the ventilation openings on the bottom of the cabinet will be blocked. This unit should never be placed near or over a heat register or radiator. This unit should not be placed in a built-in installation unless proper ventilation is provided. 7. This product should only be operated from the type of power source indicated on the marking label of the AC adapter. If you are not sure of the type of power available, consult your Datavideo dealer or your local power company. 8. Do not allow anything to rest on the power cord. Do not locate this unit where the power cord will be walked on, rolled over, or otherwise stressed. 9. If an extension cord must be used with this unit, make sure that the total of the ampere ratings on the products plugged into the extension cord do not exceed the extension cord s rating. 10. Make sure that the total amperes of all the units that are plugged into a single wall outlet do not exceed 15 amperes. 11. Never push objects of any kind into this unit through the cabinet ventilation slots, as they may touch dangerous voltage points or short out parts that could result in risk of fire or electric shock. Never spill liquid of any kind onto or into this unit. 12. Except as specifically explained elsewhere in this manual, do not attempt to service this product yourself. Opening or removing covers that are marked Do Not Remove may expose you to dangerous voltage points or other risks, and will void your warranty. Refer all service issues to qualified service personnel. 13. Unplug this product from the wall outlet and refer to qualified service personnel under the following conditions: a. When the power cord is damaged or frayed; b. When liquid has spilled into the unit; c. When the product has been exposed to rain or water; d. When the product does not operate normally under normal operating conditions. Adjust only those controls that are covered by the operating instructions in this manual; improper adjustment of other controls may result in damage to the unit and may often require extensive work by a qualified technician to restore the unit to normal operation; e. When the product has been dropped or the cabinet has been damaged; f. When the product exhibits a distinct change in performance, indicating a need for service. 2
4 What s in the box? Items Description Q ty 1 DB 9P(F) to DB 9P(F) Cable L:1.5M 1 2 Knob key cap 2 3 Knob key bottom 2 4 PVC Mylar ( Wipe Function ) 1 5 PVC Mylar ( Wipe Function ) 1 6 AC Cord 1 7 AD Switch 12V / 5A 1 8 SE-2800 Instruction Manual 1 3
5 Introduction SE-2800 is designed for the event or activity that needs more then 3 cameras to produce the program. Versatile inputs/ outputs and powerful effects, cost effective on SE-2800 HD/ SD switcher with 12 inputs. Superb 4:2:2 10bit broadcast quality. SE-2800 is also easy for mobile or O.B Van demand. Features Support HD and SD. The input signals can both HD and SD 12 inputs. Part of 12 inputs can be reconfigured. The maximum number of inputs for a certain input format:12hd SDI, 12 SD SDI, 6 CVBS, 3 HDMI 3 BNC output connectors SDI Outputs.2HDMI out for multi screen 2 channel DSK HD & SD output simultaneously Powerful multi screen via HDMI outputs 3 ways operation such as one or two monitors at 1920 x 1080i resolution Wipe with border 6 options Count down counter on multi screen Two PIP display with border PC remote control Separate, rack mountable processing unit DC 12V operation voltage, available for mobile 4
6 Connections & Controls Control Panel PRESET 2. PROGRAM 3. AUX & FS 4. AUDUO LEVEL 5. MENU 6. WIPES 7. LOGO1 & LOGO2 8. PIP & DSK 9. SPEED 10. CUT / TAKE / AUTO 11. T-BAR 12. TIME & CLOCK PRESET Used to select which of the 12 video input channels or background or color bar will be transitioned to or used as a PRESET source in an effect. PROGRAM Used to select which of the 12 video input channels or background or color bar is sent to the PROGRAM video output. 5

7 AUX & FS AUX Input signal switching to internal commutation unit can be invoked in the menu. We suppose it is enough. If you need a faster function control, it is possible to bring in a prefix AUX button. When a prefix AUX is pressed, a line of preview buttons will indicate what has been selected in the additional commutation unit; and it is possible to select a signal for the additional output when the button is kept down. FS Load frame by PC remote control tool (SEConfig) to RESET(Ch1~12), and then push FS key to take. AUDIO LEVEL Setting the control audio levels on PRESET and then push AUDIO LEVEL Button for Main audio output mix. MENU PC Control button is for PC remote control. Press the up, down, left, right arrow button move to another control, and ENTER button to confirm the setting. WIPES Wipe with border 6 options INV Inverse effect move way. MIX Also known as a fade is a transition wherein all the pixels of one source are replaced by all the pixels of another, at a smooth rate, and at the same time. SOFT Controls the border softness of the effect transforming. FREEZE Press the button once and the video freezes press it again, and it returns to the selected source in full motion. LOGO1 & LOGO2 Select SE-2000 Logo1, Logo2 Functions on the screen. 6
. It is prohibited to apply SD titles signal when the HD is the basic format.")

8 PROGR & PRESET Picture In Picture can be set up in one of four preset positions, or manually moved to any position on the screen. It is possible to overlay titles from external signal in 2 ways, i.e. via Luma Keying or via Video + a-channel. The input signals used for the titles must be the same format as the basic output mode (HD or SD). It is prohibited to apply SD titles signal when the HD is the basic format. It is necessary to meet the following condition to realize 2 DSK channels: DSK1 Preview DSK1 Program (titles) DSK2 Preview DSK2 Program(titles) SPEED Selectable of three different speeds for transition effect. CUT Change the main/sub source immediately. TAKE Take the effect by preset speed. FTB Fade to Black is performed upon FTB button stroke only in the Program Channel. The Button is lights with red color in this case. The previously pressed button of a signal source for Prgram Line stays with light on. There is FTB indication multi screen nearby the Program window. A repeated button stroke will escape the mode. When the mode is active, there is Black Field in the Program, but signal switching is still functional, i.e. it is possible to replace the signal at the Program output, and there will be a selected source when the FTB is deactivated. AUTO Take the effect by auto speed. T-Bar The T-Bar is used to carry out a manual transition such as a wipe, fade, mix or key. When it has travelled as far as it can go the transition is complete. For more information, see Calibrating the T-bar * If you don t finish calibrating step, the T-Bar may cause incorrect results. TIME & CLOCK Select SE-2800 TIMER or CLOCK Functions on the screen. 7

9 Rear Panel HD- SDI IN / HDMI IN (12CH) 2. HD- SDI IN / HDMI OUT / REMOTE CONTROL / CONSOLE 3. TALLY OUT 4. GPI 5. RS DC IN 7. AUDIO OUT 8. AUDIO IN HD- SDI IN / HDMI IN The system consists of 3 input modules. Each module has 4 BNC connectors and 1 HDMI connector. There are 12 inputs altogether; part of them can be reconfigured. The maximum number of inputs for a certain input format: 12 HD SDI,12 SD SDI, 6 CVBS, 3 HDMI. Considering the above, it is possible to obtain the following combinations, for example 10 HD SDI + 2 HDMI, or 3HD SDI+ 3 HDMI + 6 CVBS. Besides, we reserve a possibility to switch signal from non-volatile memory instead of 1 input in each input module, i.e. every input has an alternative to the HD SDI signal. It has been cleared up that inputs 1 & 2 are for CVBS, in 3 is for flash static pictures, and in 4 is to HDMI; All the video/audio input signals will be synchronized. The SE-2800 has 2 modes HD- SDI IN (8CH or 12CH), if you want upgrade 8CH to 12CH please update the SE-2800 firmware. 8

10 HD- SDI IN / HDMI OUT / REMOTE CONTROL / CONSOLE There are 3 BNC output connectors: SDI Outputs BNC : SYNC IN 2 HDMI: Multi screen RJ45: Remote controls DB9: CONSOLE. It is possible to assign one of following signals to OUT1, OUT2, OUT 3 1 Program 2 Preview 3 Program without logo overlay 4 Program without logo overlay and without subtitles. 5. One of the input signals It is possible to assign OUT 3 to Signal from HD to SD downscaler. It can be available at one output (Output 3) only and this is for Program out only. TALLY OUT The SE-2800 has Tally Output port, This port provide bi-colour tally information to a number of other Datavideo products, such as the ITC Channel Talkback, TLM-404 LCD Monitor. GPI The GPI socket can be used for simple external control. RS-422 TBD. CONSOLE The Control Panel is a desk mount unit which attaches to the Base Unit via a single (D-SUB 9 pin) cable. The Control Panel has all of the controls, and a series of set up menus for configuring the SE DC IN DC in socket connect the supplied 12V PSU to this socket. The connection can be secured by screwing the outer fastening ring of the DC In plug to the socket. AUDIO OUT Supports two channels XLR Balanced Audio output. AUDIO IN Supports four channels XLR Balanced Audio Input. 9
 4. Set the T-Bar in top position ( ~1mm befor to end) and press CUT. 5. Set the T-Bar in bottom position ( ~1mm befor to end) and press AUTO. 6. Press button CLOCK for finish.(5.")
11 Calibrating the T-bar 1. Turn off the SE Press and hold buttons In1 PRESET and In1 PROGRAM (1. 2. Fig-A) 3. Turn ON SE only 2 LED will flashing - T-Bar bottom and T-Bar top (3. 4 Fig-A) 4. Set the T-Bar in top position ( ~1mm befor to end) and press CUT. 5. Set the T-Bar in bottom position ( ~1mm befor to end) and press AUTO. 6. Press button CLOCK for finish.(5. Fig-A) Fig-A 10
12 MENU Function Setting Press on the ENTER or UP, DOWN, LEFT, RIGHT button for system configuration, press the UP, DOWN, LEFT, RIGHT button to select an item and press the ENT to confirm the setting. VERSION NUMBER - Press the ENTER button into item 1 for VERSION NUMBER. - Press the RIGHT button to see the SE-2800 version. INPUT VIDEO SETTINGS - Press the ENTER button and then press DOWN button select item 2 for INPUT VIDEO SETTINGS. - Press the RIGHT button and then press UP or DOWN button select BRIGHTNESS / CONTRAST / STURATION / APERTURE / Y-C DELAY or SET TO NOMINAL. - Press the RIGHT button into your select. - Press the UP or DOWN button to select your setting. INPUT S STANDARD and FORMAT - Press the ENTER button and then press DOWN button select item 3 for STANDARD and FORMAT. - Press the RIGHT button and then press UP or DOWN button select INPUT1~ INPUT12. - Press the RIGHT button into your select. - Press the RIGHT button selects your mode (HDSDI / SD SDI / HD HDMI / SD HDMI). - Press the UP button to select your setting. INPUT AUDIO SETTINGS - Press the ENTER button and then press DOWN button select item 4 for INPUT AUDIO SETTINGS. - Press the RIGHT button and then press UP or DOWN button select LEVEL or Normal. - Press the RIGHT button into LEVEL and then press the UP or DOWN button to select your setting. SDI IN EMBEDDED AUDIO SET. - Press the ENTER button and then press DOWN button select item 5 for SDI IN EMBEDDED AUDIO SET. - Press the RIGHT button and then press UP or DOWN button select INPUT1~ INPUT12. - Press the RIGHT button into your select (GROUP or PAIR). - Press the UP or DOWN button to select your setting. 11
13 HDMI IN EMB. AUDIO PAIR - Press the ENTER button and then press DOWN button select item 6 for HDMI IN EMB. AUDIO PAIR. - Press the RIGHT button and then press UP or DOWN button select INPUT4 / INPUT8 / INPUT12. - Press the RIGHT button into your select. - Press the UP or DOWN button to select your setting. OUTPUTS EMB. AUDIO PAIR - Press the ENTER button and then press DOWN button select item 7 for OUTPUTS EMB. AUDIO PAIR. - Press the RIGHT button and then press UP or DOWN button select OUT1 / OUT2 / OUT3. - Press the RIGHT button into your select. - Press the UP or DOWN button to select your setting. AUTO AUDIO MIXING TYPE - Press the ENTER button and then press DOWN button select item 8 for AUTO AUDIO MIXING TYPE. - Press the RIGHT button and then press UP or DOWN button select X-TYPE / Y-TYPE. - Press the RIGHT button into your select. - Press the UP button to select your setting. T-BAR AUDIO MIXING TYPE - Press the ENTER button and then press DOWN button select item 9 for T-BAR AUDIO MIXING TYPE. - Press the RIGHT button to select FOLLOW AUDIO MIXING TYPE / BY THE END. - Press the UP button to select your setting. PIP SETTINGS - Press the ENTER button and then press DOWN button select item 10 for PIP SETTINGS. - Press the RIGHT button and then press UP or DOWN button select POSITON PIP1 / SIZE PIP1 / BORDER PIP1 / POSITON PIP2 / SIZE PIP2 / BORDER PIP2 or SET TO NOMINAL. - Press the RIGHT button and then press UP or DOWN button into your select. - Press the RIGHT button into your select. - Press the UP or DOWN button to select your setting. LOGO SETTINGS - Press the ENTER button and then press DOWN button select item 11 for LOGO SETTINGS. - Press the RIGHT button to select LOGO1 / LOGO2. - Press the RIGHT button and select X-POSITON / Y-POSITON. - Press the UP or DOWN button to select your setting. 12
14 SPEED BUTTONS SETTING - Press the ENTER button and then press DOWN button select item 12 for SPEED BUTTONS SETTING. - Press the RIGHT button to select SPEED 1 / SPEED 2 / SPEED3. - Press the RIGHT button into your select. - Press the UP or DOWN button to select your setting. WIPE BUTTONS SETTING - Press the ENTER button and then press DOWN button select item 13 for WIPE BUTTONS SETTING. - Press the RIGHT button and then press UP or DOWN button select BUTTON 1~ BUTTON 6. - Press the RIGHT button into your select (WIPE, SOFT EDGE or COLOR). - Press the RIGHT button into your select. - Press the UP or DOWN button to select your setting. OUTPUTS MODE - Press the ENTER button and then press DOWN button select item 14 for OUTPUTS Mode. - Press the RIGHT button and then press UP or DOWN button select OUT1 / OUT2 / OUT3. - Press the RIGHT button and then press UP or DOWN button select PROGRAM / PROGRAM LOGO FREE / PROGRAM LOGO & TITLES FREE / PREVIEW / AUX. - Press the RIGHT button and then press the UP button to select your setting. DSK SETTINGS - Press the ENTER button and then press DOWN button select item 15 for DSK SETTINGS. - Press the RIGHT button and then press UP or DOWN button select TITLE 1 or TITLE 2. - Press the RIGHT button into your select (TITLES+ a-ch MODE / LUMA KEY MODE / LUMA KEY LEVEL). - Press the RIGHT button and then press the UP or DOWN button to select your setting. BG COLOR SETTING - Press the ENTER button and then press DOWN button select item 16 for BG COLOR SETTING. - Press the RIGHT and then press UP or DOWN button select your setting. T-BAR MODE - Press the ENTER button and then press DOWN button select item 17 for T-BAR MODE. - Press the RIGHT button and then press UP or DOWN button select ONE WAY MODE or TWO WAY MODE. - Press the RIGHT button and then press the UP button to select your setting. 13
15 1kHZ to BARS - Press the ENTER button and then press DOWN button select item 18 for 1kHZ to BARS. - Press the RIGHT and then press UP button select your setting. KEYS BRIGHTNESS - Press the ENTER button and then press DOWN button select item 19 for KEYS BRIGHTNESS. - Press the RIGHT and then press UP or DOWN button select your setting. KEYS MODE - Press the ENTER button and then press DOWN button select item 20 for KEYS MODE. - Press the RIGHT and then press UP button select your setting. AUDIO LEVEL IS SHOWN - Press the ENTER button and then press DOWN button select item 21 for AUDIO LEVEL IS SHOWN. - Press the RIGHT and then press UP or DOWN button select your setting. REFERENCE - Press the ENTER button and then press DOWN button select item 22 for REFERENCE. - Press the RIGHT button and then press UP or DOWN button select EXTERNAL / MODE / H-TIMNG. - Press the RIGHT button and then press the UP button to select your setting. AUX - Press the ENTER button and then press DOWN button select item 23 for AUX. - Press the RIGHT and then press UP or DOWN button select your setting. FACTORY SETTINGS - Press the ENTER button and then press DOWN button select item 24 for FACTORY SETTINGS. - Press the RIGHT and then press UP button select your setting. CLOCK SETTINGS - Press the ENTER button and then press DOWN button select item 25 for CLOCK SETTINGS. - Press the RIGHT button to select X-POSITON / Y-POSITON / SET HOURS / SET MINUTES / CLEAR SECONDS. - Press the RIGHT and then press UP or DOWN button select your setting. 14
16 MULTISCREEN MODE - Press the ENTER button and then press DOWN button select item 26 for MULTISCREEN MODE. - Press the RIGHT button to select - A: W1=9 IN; W2=3 IN+PVW+PGM / B: W1=12 IN+PGM+PVW; W2=PGM / - C: W1=8 IN+PGM+PVW; W2=PGM / D: W1=12 IN+PGM+PVW;W2=W1 / - E: W1=8 IN+PGM+PVW; W2=W1. - Press the RIGHT and then press UP button select your setting. GPI SETTINGS - Press the ENTER button and then press DOWN button select item 27 for GPI SETTINGS. - Press the RIGHT button and then press UP or DOWN button to select INPUT SELECT / TIME DELAY. - Press the RIGHT and then press UP or DOWN button select your setting. COUNT DOWN TIMER SETTINGS - Press the ENTER button and then press DOWN button select item 28 for COUNT DOWN TIMER SETTINGS. - Press the RIGHT button and then press UP or DOWN button to select INPUT1~ INPUT12. - Press the RIGHT and then press UP or DOWN button select COUNT DOWN ON / DOWN COUNTER VALUE. - Press the RIGHT button and then press UP or DOWN button to select your setting. 15

:(about time 15minute) Select Restore from file")
17 Datavideo Switcher Configuration Utility 1. Reanimate Connection choose Enter IP Click Reanimate (about time 2.5HR) 2. Restore from file(profiles):(about time 15minute) Select Restore from file Open file and to execute Multiscreen_a, Multiscreen_b, Multiscreen_c, Setings,WindowsSigns,logo,Clock 16

18 3. Load multi screen background picture (about time 15minute) Select Multiscreen_a, Multiscreen_b, Multiscreen_c Load Multiscreen for editing: multi_a, multi_b, multi_c Open file To execute Write 17

19 LOGOS Setup Static Logos SE-2800 can store 7 static logos. SEConfig bookmark "Logos". The static Logos to be loaded and written into 1 to 7 memory slots must be 256x128 pixels. This Logos must be created in a graphics software package first as: TGA 32bit with a clear Alpha Channel background. PNG 32bit with a clear Alpha Channel background. GIF.Indexed color 8 bit with a transparent background but without translucent shadow. BMP 24bit file - without a transparent background. It is possible to use the pair of BMP files for clear Alpha Channel BG added by SEConfig: The first file - Logo with Black background named as xxx.bmp, the second - Logo with white background named as xxx_w.bmp. The SEConfig accept this pair as one picture. JPG 24bit file - without a transparent background. It can be possible to save logos in the own SEConfig format lbl or bin and Load it by SEConfig 18

20 Dynamic Logo SE can store 1 dynamic logo. SEConfig bookmark "Dynamic Logo". This Logo needs to be created in a graphics software package first as a sequence of up to 75 image. Image size must be 256 x 128 pix, 8 bits/channel Format is the same as for Static Logos: TGA 8 bit/channel - with a clear Alpha Channel background. PNG 8 bit/channel - with a clear Alpha Channel background. GIF Indexed color 8 bit with a transparent background but without translucent shadow. BMP 8 bit/channel file - without a transparent background. It is possible to use the pair of BMP files for clear Alpha Channel BG added by SEConfig: The first file - Logo with Black background named as xxx.bmp, the second - Logo with white t background named as xxx_w.bmp. The SEConfig accept this pair as one picture. JPG 24bit file - without a transparent background. And supplementary: AVI Animated GIF Dynamic Logos' picture display sequence is determined by the number in the name (Note: for the correct sorting, the number in the name must have 2 digits: , 10...) The source files must be imported into the included editor: Button Edit", then button "Import" Each frame can have its own "Show time" (40ms step). The button "Play" can show preview - if everything is fine; the new Dynamic Logo must be saved as xxx.dlb file which can stored in the device : button "Load" ( select xxx.dlb) and then button "Write" - write to Slot1. 19

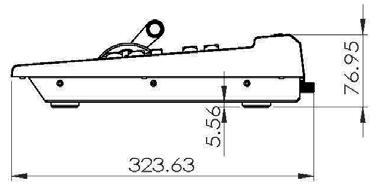

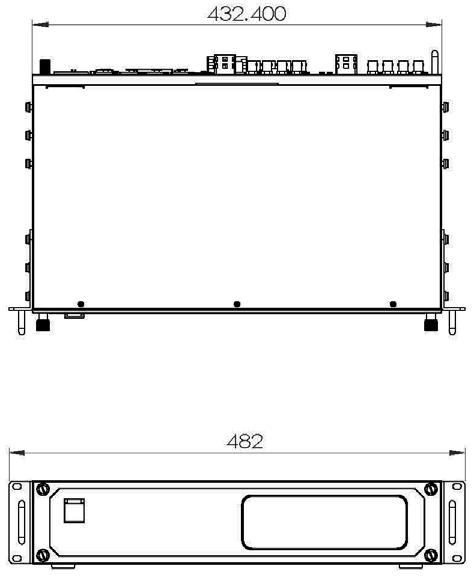
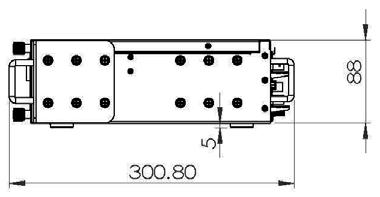
21 Dimension 20
22 Specification (SE ) Inputs Outputs Video Inputs Preview Outputs Other Interface HD SDI signal CV signal SD SDI signal Audio Operating Temperature Maximum 8 inputs, can be configurable to 1. 8 HD SDI or 8 SD SDI, 2. 4 CVBS, (2 HDMI and 2 HD SDI or 2 SD SDI) 3. 4 CVBS, (4 HD SDI or 4 SD SDI) 3 BNC output connectors for SDI Outputs 2 HDMI for Multiscreen RJ-45 for PC Remote controls & Firmware upgrade 2 BNC for Sync-In and Sync-Out DB-9 for Console HD/SDI: 1920 x 1080i/50, 1920 x 1080i/59.94 SD: PAL 720 x 576i /50Hz SD: NTSC 720 x 480i /59.94Hz SD: NTSC 7.5 IRE (US standard)/ 0 IRE (Japan standard) options HDMI 1920 x 1080i/50 HDMI 1920x1080i/59.94Hz HDMI 720 x 576i /50Hz HDMI 720x480i/59.94Hz Y:Cb:Cr, 4:2:2 10 bit 2x HDMI output Way 1: HDMI 1 Multiscreen1: 9 smaller windows for inputs 1-9 with embedded audio level indication (group1, channel 1) HDMI 2 Multiscreen2: 3 smaller windows for inputs with embedded audio level indication (group1, channel 1) + 2 bigger windows for Preview + Program, embedded audio level indication for Program (group1, channel 1) Way 2: HDMI 1 Multiscreen1-12 smaller windows for inputs 1-12 with embedded audio level indication (group1, channel 1) + 2 bigger windows for Preview and Program. embedded audio level indication for Program (group1, channel 1) HDMI 2 Multiscreen2 : Program Way 3: HDMI 1 Multiscreen1-8 smaller windows for inputs 1-8 with embedded audio level indication (group1, channel 1) + 2 bigger windows for Preview and Program. embedded audio level indication for Program (group1, channel 1) HDMI 2 Multiscreen 2 : Program or Multiscreen 1 Resolution is 1920x1080i Serial D-Sub 9 Pin x 1 RS422 Tally Output D-Sub 25 Pin x 1 12 Channel Open Collector Output GPI out SMPTE 292M standard complied with Output return loss : More than 15 db (5MHz to 750MHz) More than 10 db (750MHz to 1.5 GHz) Output level : 0.8 Vpp ± 10% Rise time : Less than 270 ps Fall time : Less than 270 ps Difference between rise time and fall time within 100 ps Alignment jitter : Less than 0.2 UI Timing jitter : Less than 1.0 UI Eye aperture ratio : More than 90% DC offset : 0 ± 0.5V Equalizer use 5C-FB cable support 100 meters 1.0 Vpp NTSC, PAL SMPTE 259M Audio analog and digital inputs outputs: analog audio connectors XLR input analog level, balanced audio 0dB input impedance 10kOhm output analog level, balanced audio at impedance 600Ohm 0dB digital signal dynamic range for 60Hz mode +20dB digital signal dynamic range for 50Hz mode +18dB S/N: for analog, digital to analog*** -75 db or higher B/W: 20 ~20K +/- 3dB THD:B/W: 20 ~20K < 0.01% digital signal sampling frequency 48kHz resolution 20bit 0 C to 40 C (32 F to 102 F) 21
23 Humidity Dimension & Weight Power 10% to 90% (non condensing) Base Unit : 482mm (W) x 88mm (H) x 302mm (D) = 9 Kg Control Panel : 699.4mm (W) x mm (H) x 436.6mm (D) = 10 Kg Input AC 100 ~ 240V Switching Adaptor, output DC 12V / 5A (48W) 22
24 Specification (SE ) Inputs Outputs Video Input Preview Outputs Other Interface HD SDI signal SD SDI signal Operating Temperature Humidity Dimension & Weight Power Maximum 12 inputs, can be configurable to 12 HD SDI, 12 SD SDI, 6 CVBS or 3 HDMI Possible combination, for example 10 HD SDI + 2 HDMI, or 3 HD SDI + 3 HDMI + 6 CVBS 3 BNC output connectors for SDI Outputs 2 HDMI for Multiscreen RJ-45 for PC Remote controls 2 BNC for Sync-In and Sync-Out DB-9 for Console HD/SDI: 1920 x 1080i/50, 1920 x 1080i/60 SD: PAL 720 x 576 /50Hz SD: NTSC 720 x 480 /59.9Hz SD: NTSC 7.5 IRE (US standard)/ 0 IRE (Japan standard) options HDMI 1920 x 1080i/50 HDMI 1920x1080i/60Hz HDMI 720 x 576 /50Hz HDMI 720x480i/60Hz Y:Cb:Cr, 4:2:2 10 bit 2x HDMI output Way 1: HDMI 1 Multiscreen1: 9 smaller windows for inputs 1-9 with embedded audio level indication (group1, channel 1) HDMI 2 Multiscreen2: 3 smaller windows for inputs with embedded audio level indication (group1, channel 1) + 2 bigger windows for Preview + Program, embedded audio level indication for Program (group1, channel 1) Way 2: HDMI 1 Multiscreen1-12 smaller windows for inputs 1-12 with embedded audio level indication (group1, channel 1) + 2 bigger windows for Preview and Program. embedded audio level indication for Program (group1, channel 1) HDMI 2 Multiscreen2 : Program, Multiscreen 1 Way 3: HDMI 1 Multiscreen1-8 smaller windows for inputs 1-8 with embedded audio level indication (group1, channel 1) + 2 bigger windows for Preview and Program. embedded audio level indication for Program (group1, channel 1) HDMI 2 Multiscreen 2 : Program, Multiscreen 1 Resolution is 1920x1080i Serial D-Sub 9 Pin x 1 RS232 Tally Output D-Sub 25 Pin x 12 Channel Open Collector Output Support Line and MIC mode GPI port SMPTE 292M standard complied with Output return loss : More than 15 db (5MHz to 750MHz) More than 10 db (750MHz to 1.5 GHz) Output level : 0.8 Vpp ± 10% Rise time : Less than 270 ps Fall time : Less than 270 ps Difference between rise time and fall time within 100 ps Alignment jitter : Less than 0.2 UI Timing jitter : Less than 1.0 UI Eye aperture ratio : More than 90% DC offset : 0 ± 0.5V Equalizer use 5C-FB cable support 100 meters Analog Y/C, Composite CCIR601 NTSC and PAL 0 C to 40 C (32 F to 102 F) 10% to 90% (non condensing) Base Unit : 482mm (W) x 88mm (H) x 302mm (D) = 9 Kg Control Panel : 699.4mm (W) x mm (H) x 436.6mm (D) = 10 Kg Input AC 100 ~ 240V Switching Adaptor, output DC 12V / 5A (48W) 23
25 Service & Support It is our goal to make your products ownership a satisfying experience. Our supporting staff is available to assist you in setting up and operating your system. Please refer to our web site for answers to common questions, support requests or contact your local office below. Datavideo Global Website: Datavideo Corporation Tel: Fax: contactus@datavideo.us Datavideo Technologies Europe BV Tel: Fax: service@datavideo.nl Datavideo UK Limited Tel: Fax: sales@datavideo.co.uk Datavideo Technologies Co., Ltd Tel: Fax: service@datavideo.com.tw Datavideo Technologies China Co., Ltd Tel: Fax: service@datavideo.cn Datavideo Technologies (S) PTE LTD Tel: Fax: service@datavideo.sg Datavideo HK Limited. Tel: Fax: info@datavideo.com.hk Datavideo France Tel: Fax: jean-marie.huet@datavideo.fr Datavideo India Tel: Fax: sales@datavideo.in All the trademarks are the properties of their respective owners. Datavideo Technologies Co., Ltd. All rights reserved P/N: G B1
HD/SD-SDI to HDMI Converter DAC-8P Quick Start Guide
 HD/SD-SDI to HDMI Converter DAC-8P Quick Start Guide www.datavideo-tek.com Table of Contents Warnings and Precautions... 2 What s in the box?... 5 Introduction... 5 Features... 6 Functions... 7 Front Panel...
HD/SD- SDI to VGA Converter DAC-60 Quick Start Guide
 HD/SD- SDI to VGA Converter DAC-60 Quick Start Guide www.datavideo-tek.com Table of Contents Warnings and Precautions... 2 What s in the box?... 4 Introduction... 4 Features... 4 Functions... 5 Front Panel...
ITC-200B Quick Start Guide
 INTERCOM BASE UNIT ITC-200B Quick Start Guide http:// www.datavideo-tek.com Warnings and Precautions 1. Read all of these warnings and save them for later reference. 2. Follow all warnings and instructions
TBC & Matrix Switcher TBC-5000 Instruction Manual
 TBC & Matrix Switcher TBC-5000 Instruction Manual www.datavideo-tek.com Rev 150509 1 Contents Warnings and Precautions... 3 Warranty... 4 Disposal... 4 Packing List... 4 TBC-5000 Features... 4 Product
2 x 7" TFT LCD MONITOR TLM-702HD
 2 x 7" TFT LCD MONITOR TLM-702HD Instruction Manual Rev 150310 www.datavideo-tek.com Table of Contents Warnings and Precautions... 3 Warranty... 4 Standard Warranty... 4 Two Year Warranty... 4 Disposal...
.Power Distribution Center. PD-1. Instruction Manual
 .Power Distribution Center. PD-1 Instruction Manual www.datavideo-tek.com 1 Contents Warnings and Precautions... 3 Warranty... 4 Standard Warranty... 4 Two Year Warranty... 4 Disposal... 4 Packing List...
RACK MOUNT KIT RMK-2 Quick Start Guide
 RACK MOUNT KIT RMK-2 Quick Start Guide www.datavideo-tek.com Apr-22.2013 P/N: G082060691B1 Warnings and Precautions 1. Read all of these warnings and save them for later reference. 2. Follow all warnings
Repeater & Power Adaptor VP-633 HD/SD SDI Repeater VP-634 Quick Start Guide
 Repeater & Power Adaptor VP-633 HD/SD SDI Repeater VP-634 Quick Start Guide www.datavideo.com Warnings and Precautions 1. Read all of these warnings and save them for later reference. 2. Follow all warnings
TLM 170 / D / M / MD 17 Widescreen LCD TFT Monitor
 TLM 170 / D / M / MD 17 Widescreen LCD TFT Monitor Instruction Manual Rev 060509 www.datavideo-tek.com Table of contents Warnings and Precautions ------------------------------------------------------------------------------------
STC-100 Standards Converter
 STC-100 Standards Converter User s Guide http:// www.datavideo-tek.com Rev: 240106 Warnings and Precautions 1. Read all of these warnings and save them for later reference. 2. Follow all warnings and instructions
Warnings and Precautions
 Warnings and Precautions 1. Read all of these warnings and save them for later reference. 2. Follow all warnings and instructions marked on this unit. 3. Unplug this unit from the wall outlet before cleaning.
Keyer Control Key Source Fill Source Still Load Still Save Still Freeze User Load Memory...
 1 Table of Contents Warnings and Precautions... 4 Warranty... 4 Standard Warranty... 4 Two Year Warranty... 5 Disposal... 5 Packing List... 5 Introduction... 6 Features... 6 System Diagram... 7 Rear Panel...
Table of Contents FCC COMPLIANCE STATEMENT... 4 WARNINGS AND PRECAUTIONS... 4 WARRANTY... 5 STANDARD WARRANTY... 5 TWO YEAR WARRANTY... 5 DISPOSAL...
 1 Table of Contents FCC COMPLIANCE STATEMENT... 4 WARNINGS AND PRECAUTIONS... 4 WARRANTY... 5 STANDARD WARRANTY... 5 TWO YEAR WARRANTY... 5 DISPOSAL... 6 1. INTRODUCTION... 7 FEATURES... 7 2. CONNECTIONS
Disclaimer of Product & Services The information offered in this instruction manual is intended as a guide only. At all times, Datavideo Technologies
 TC-100 Table of Contents FCC COMPLIANCE STATEMENT... III WARNINGS AND PRECAUTIONS... III WARRANTY... V STANDARD WARRANTY... V THREE YEAR WARRANTY... V DISPOSAL... VI INTRODUCTION... 1 FEATURES... 1 HOW
Datavideo TLM x 2 TFT LCD Monitors
 Datavideo TLM-702 7 x 2 TFT LCD Monitors Instruction Manual http://www.datavideo-tek.com Rev: 131205 Table of contents Warnings and Precautions -----------------------------------------------------------------------------------2
Keyer Control Key Source Fill Source Still Load Still Save Still Freeze User Load Memory...
 Table of Contents Warnings and Precautions... 4 Warranty... 4 Standard Warranty... 4 Two Year Warranty... 5 Disposal... 5 Packing List... 5 Introduction... 6 Features... 6 System Diagram... 7 Rear Panel...
Contents. Disclaimer of Product and Services Warnings and Precautions Standard Warranty Two Year Warranty Introduction...
 Contents Disclaimer of Product and Services... 3 Warnings and Precautions... 5 -Standard Warranty... 5 -Two Year Warranty... 5 Introduction... 6 Features... 6 Setup Diagram... 7 Connections & Control...
HD/SD Recorder HDR-60 Quick Start Guide
 HD/SD Recorder HDR-60 Quick Start Guide www.datavideo.com May-20.2013 P/N: G082060647B3 1 Table of contents Warnings and Precautions... 3 Warranty... 4 Disposal... 4 Packing List... 5 Introduction... 5
Digital Video Switcher SE INSTRUCTION MANUAL Rev
 Digital Video Switcher SE-2000 INSTRUCTION MANUAL Rev040510 www.datavideo-tek.com Contents Warnings and Precautions... 3 Warranty... 4 Disposal... 4 Packing List... 4 Introduction... 5 Product Overview...
SE GPI 27 SE-2200
 Contents Warranty... 3 Disposal... 3 Packing List... 4 Connection of SE-2200... 4 Main Unit Front Panel... 5 Main Unit - Rear Panel... 5 Rear Panel Connections... 6 Control Panel... 8 Keyboard Controls...
POWER INPUT F1 F2 EXIT MENU POWER INPUT F1 F2 EXIT MENU TLM-102 DUAL 10 MONITOR. Instruction Manual.
 POWER INPUT F1 F2 EXIT MENU POWER INPUT F1 F2 EXIT MENU TLM-102 DUAL 10 MONITOR DUAL 10 MONITOR TLM-102 Instruction Manual www.datavideo.com Table of Contents FCC COMPLIANCE STATEMENT... 3 WARNINGS AND
.17.3 WIDESCREEN LCD TFT MONITOR. TLM-170H / HR / HM
 .17.3 WIDESCREEN LCD TFT MONITOR. TLM-170H / HR / HM Instruction Manual www.datavideo-tek.com 1 Contents Warnings and Precautions... 3 Warranty... 4 Standard Warranty... 4 Two Year Warranty... 4 Disposal...
Table of Contents FCC COMPLIANCE STATEMENT... 4 WARNINGS AND PRECAUTIONS... 4 WARRANTY... 5 DISPOSAL... 5 CHAPTER 1 INTRODUCTION...
 1 Table of Contents FCC COMPLIANCE STATEMENT... 4 WARNINGS AND PRECAUTIONS... 4 WARRANTY... 5 STANDARD WARRANTY... 5 TWO YEAR WARRANTY... 5 DISPOSAL... 5 CHAPTER 1 INTRODUCTION... 7 1.1 FEATURES... 7 1.2
DAC-07 INSTRUCTION MANUAL
 DAC-07 INSTRUCTION MANUAL www.datavideo-tek.com Rev 100309 Table of Contents Warnings and Precautions... 3 Warranty... 4 Disposal... 4 Packing List... 4 Features... 4 Product Overview... 5 Front Panel...
SE-2800 ( 8 / 12 CHANNEL
 Digital Video Switcher SE-2800 ( 8 / 12 CHANNEL ) Instruction Manual Rev Date: 06-06-2013 P/N: G082060591E2_A4 WWW.DATAVIDEO.COM Contents Warnings and Precautions... 4 Warranty... 5 Standard Warranty...
HD/SD 12-CHANNEL DIGITAL VIDEO SWITCHER SE-2800 ( 8 / 12 CHANNEL ) Instruction Manual
 Instruction Manual") HD/SD 12-CHANNEL ( 8 / 12 CHANNEL ) Instruction Manual Contents Warnings and Precautions 4 Warranty Disposal 5 5 Product Overview 6 Features 7 Connections & Controls 8 Control Panel Overview 8 Main Unit
HD/SD 12-CHANNEL ( 8 / 12 CHANNEL ) Instruction Manual Contents Warnings and Precautions 4 Warranty Disposal 5 5 Product Overview 6 Features 7 Connections & Controls 8 Control Panel Overview 8 Main Unit
HD/SD 8/12-CHANNEL DIGITAL VIDEO SWITCHER SE-2850 ( 8 / 12 CHANNEL ) Instruction Manual
 Instruction Manual") HD/SD 8/12-CHANNEL DIGITAL VIDEO SWITCHER SE-2850 ( 8 / 12 CHANNEL ) Instruction Manual Table of Contents FCC COMPLIANCE STATEMENT... 4 WARNINGS AND PRECAUTIONS... 4 WARRANTY... 5 STANDARD WARRANTY...
HD/SD 8/12-CHANNEL DIGITAL VIDEO SWITCHER SE-2850 ( 8 / 12 CHANNEL ) Instruction Manual Table of Contents FCC COMPLIANCE STATEMENT... 4 WARNINGS AND PRECAUTIONS... 4 WARRANTY... 5 STANDARD WARRANTY...
Contents. Disclaimer of Product and Services
 Instruction Manual Contents FCC COMPLIANCE STATEMENT... 3 WARNINGS AND PRECAUTIONS... 3 WARRANTY... 4 STANDARD WARRANTY... 4 THREE YEAR WARRANTY... 4 DISPOSAL... 4 INTRODUCTION... 5 FEATURES... 5 GO KMU-100
Portable Studio. Quick Start Guide.
 Portable Studio HS-2000L Quick Start Guide www.datavideo-tek.com Contents Warnings and Precautions...3 Warranty...4 Disposal...4 What is in the Package...5 Introduction...5 HS-2000L Connections & Controls...6
WARNINGS AND PRECAUTIONS... 4 WARRANTY...
 Contents WARNINGS AND PRECAUTIONS... 4 WARRANTY... 5 STANDARD WARRANTY... 5 TWO YEAR WARRANTY... 5 DISPOSAL... 5 1. REAR PANEL... 6 1.1 REAR PANEL CONNECTIONS... 7 2. CONTROL PANEL... 10 2.1 KEYBOARD CONTROLS...
HD/SD 12-CHANNEL PORTABLE VIDEO STUDIO HS-2850 ( 8 / 12 CHANNEL ) Instruction manual
 Instruction manual") HD/SD 12-CHANNEL PORTABLE VIDEO STUDIO HS-2850 ( 8 / 12 CHANNEL ) Instruction manual Table of Contents WARNINGS AND PRECAUTIONS... 4 WARRANTY... 5 STANDARD WARRANTY... 5 THREE YEAR WARRANTY... 5 DISPOSAL...
HD/SD 12-CHANNEL PORTABLE VIDEO STUDIO HS-2850 ( 8 / 12 CHANNEL ) Instruction manual Table of Contents WARNINGS AND PRECAUTIONS... 4 WARRANTY... 5 STANDARD WARRANTY... 5 THREE YEAR WARRANTY... 5 DISPOSAL...
FCC COMPLIANCE STATEMENT... 3 WARNINGS AND PRECAUTIONS... 3 WARRANTY...
 Table of Contents FCC COMPLIANCE STATEMENT... 3 WARNINGS AND PRECAUTIONS... 3 WARRANTY... 4 STANDARD WARRANTY... 4 TWO YEAR WARRANTY... 4 DISPOSAL... 4 1. INTRODUCTION... 5 FEATURES... 5 TLM-170L MODEL
Bi-Directional SDI to DV Converter DAC-5 User s Guide
 Bi-Directional SDI to DV Converter DAC-5 User s Guide http://www.datavideo-tek.com Table of contents Warnings and Precautions --------------------------------------------------------------- 2 Warranty
HD/SD 12-CHANNEL PORTABLE VIDEO STUDIO HS-2850 ( 8 / 12 CHANNEL ) Instruction manual
 Instruction manual") HD/SD 12-CHANNEL PORTABLE VIDEO STUDIO HS-2850 ( 8 / 12 CHANNEL ) Instruction manual Table of Contents WARNINGS AND PRECAUTIONS... 4 WARRANTY... 5 STANDARD WARRANTY... 5 THREE YEAR WARRANTY... 5 DISPOSAL...
HD/SD 12-CHANNEL PORTABLE VIDEO STUDIO HS-2850 ( 8 / 12 CHANNEL ) Instruction manual Table of Contents WARNINGS AND PRECAUTIONS... 4 WARRANTY... 5 STANDARD WARRANTY... 5 THREE YEAR WARRANTY... 5 DISPOSAL...
Contents. Warranty...4. Standard Warranty...4. Two Year Warranty...4. Disposal...4. TLM-170H Model Types...5. Packing List...5. Product Overview...
 Contents Warranty...4 Standard Warranty...4 Two Year Warranty...4 Disposal...4 TLM-170H Model Types...5 Packing List...5 Product Overview...6 Features...6 Supported Formats...7 From a Video Source...8
Network Video Decoder NVD-20. Contents
 Contents Warnings and Precautions... 4 Warranty... 5 Standard Warranty... 5 Two Year Warranty... 5 Disclaimer of Product & Services... 6 Disposal... 6 Packing List... 6 Product Overview... 7 Features...
Winmate Communication INC.
 20.1 Military Grade Display Model: R20L100-RKA2ML User s Manual Winmate Communication INC. May, 2011 1 IMPORTANT SAFETY INSTRUCTIONS Please read these instructions carefully before using the product and
4 Channel HD SDI Over Fiber Transmitter and Reciever Extender with RS 485 Channel User Manual L-4SDI-FE-HD-TX/RX
 4 Channel HD SDI Over Fiber Transmitter and Reciever Extender with RS 485 Channel User Manual L-4SDI-FE-HD-TX/RX 1 Contents CHAPTER 1. INTRODUCTION... 2 1.1 OVERVIEW...2 1.2 FEATURE...2 1.3 APPLICATION...3
Contents. Warnings and Precautions...5 Warranty...6 Disposal...6 Packing List...6. Product Overview...7 Features...7
 Contents Warnings and Precautions...5 Warranty...6 Disposal...6 Packing List...6 Product Overview...7 Features...7 Connections & Controls...8 Keyboard Overview...8 Rear Panel...8 Rear Panel Connections...9
Marshall Electronics. Pro A/V Communications VMV-402-SH. 3G/HD/SD-SDI Quad-viewer/Switcher with Audio Meter Display. User Manual.
 Marshall Electronics Pro A/V Communications VMV-402-SH 3G/HD/SD-SDI Quad-viewer/Switcher with Audio Meter Display User Manual Table of Contents 1. Introduction... 3 2. Features... 3 3. Package Contents...
Contents Warnings and Precautions... 2 Warranty... 2 Disposal... 3 Packing List... 3 Product Overview... 4 Features... 5 Functions...
 Contents Warnings and Precautions... 2 Warranty... 2 Standard Warranty... 2 Two Year Warranty... 2 Disposal... 3 Packing List... 3 1. Product Overview... 4 Algorithm Strength of our solution... 4 Setting
TLM-700HD 7" TFT LCD MONITOR VOL. SOURCE PATTERN BLUE MENU ENTER POWER OFF 7" TFT LCD MONITOR TLM-700HD. Instruction Manual.
 TLM-700HD 7" TFT LCD MONITOR POWER VOL. SOURCE ASPECT PATTERN BLUE MENU ENTER OFF ON MIN MAX 7" TFT LCD MONITOR TLM-700HD Instruction Manual www.datavideo.com 7" TFT LCD MONITOR Welcome to the TLM-700HD
Disclaimer of Product and Services - 1 -
 Table of Contents Warnings and Precautions... - 2 - Warranty... - 2 - Standard Warranty... - 2 - Two Year Warranty... - 3 - Disposal... - 3-1. Product Overview... - 4-1.1 Features... - 4-2. Example CCU-100
Teleprompter Remote Controls TP-WRC TP-BTWC. Instruction Manual. Rev Date: P/N: TP Controllers
 Teleprompter Remote Controls TP-WRC TP-BTWC Instruction Manual Rev Date: 03-06-2013 P/N: TP Controllers WWW.DATAVIDEO.COM Contents Warnings and Precautions... 3 Warranty... 4 Disposal... 4 Free App download
DSC928 HD/SD SDI Master Control Switcher.
 DSC928 HD/SD SDI Master Control Switcher. User's Manual 1 Overview. Construction Inputs / Outputs Remote control Console The SHIFT key Program and Preset rows BLACK,BARS,PC Control On Screen Display Menu
ATEM Television Studio Pro HD
 Product Technical Specifications ATEM Television Studio Pro HD ATEM Television Studio Pro HD is the first production switcher designed for both broadcasters and AV professionals with a fully featured hardware
10.4" LCD Monitor with Aluminum Front Bezel YPM1040PHB
 SPECIFICATION FOR APPROVAL M0DEL: 10.4" LCD Monitor with Aluminum Front Bezel YPM1040PHB BASE MODEL Customer's Confirmation Approved by: Reviewed by: Prepared by: Supplier's Confirmation Approved by: Reviewed
CEDAR Series. To learn more about Ogden CEDAR series signal processing platform and modular products, please visit
 CEDAR Series The CEDAR platform has been designed to address the requirements of numerous signal processing modules. Easily-installed components simplify maintenance and upgrade. To learn more about Ogden
Operating Instructions
 Marshall Electronics Broadcast A/V Division Model No. VSW-2200 4-Input Seamless SDI A/V Switcher Operating Instructions Table of Contents 1. Overview... 2. Features.... Package Contents... 4. Specifications...
DIGITAL VIDEO SWITCHER SE-2800 ( 8 / 12 CHANNEL ) Instruction Manual.
 Instruction Manual.") DIGITAL VIDEO SWITCHER SE-2800 ( 8 / 12 CHANNEL ) Instruction Manual www.datavideo.com DIGITAL VIDEO SWITCHER Welcome to the SE-2800 Instruction Manual Thank you for choosing a Datavideo product, please
DIGITAL VIDEO SWITCHER SE-2800 ( 8 / 12 CHANNEL ) Instruction Manual www.datavideo.com DIGITAL VIDEO SWITCHER Welcome to the SE-2800 Instruction Manual Thank you for choosing a Datavideo product, please
.Prompter Kit for Apple ipad. TP-200
 .Prompter Kit for Apple ipad. TP-200 Instruction Manual www.datavideo-tek.com 1 Contents Warnings and Precautions... 3 GLASS - Handle with care... 3 Warranty... 4 Standard Warranty... 4 Two Year Warranty...
Welcome to the ITC-100 Instruction Manual
 INTERCOM TLK BCK SYSTEM Welcome to the ITC-100 Instruction Manual Thank you for choosing a Datavideo product, please visit the support pages on our website for the latest version of the instruction manual.
PRO-3GSDIHDMI. 3G-SDI Extender with HDMI Scaler OPERATION MANUAL
 PRO-3GSDIHDMI 3G-SDI Extender with HDMI Scaler OPERATION MANUAL Safety Precautions Please read all instructions before attempting to unpack or install or operate this equipment, and before connecting the
ATEM 1 M/E Production Studio 4K
 Product Technical Specifications ATEM 1 M/E Production Studio 4K The advanced ATEM 1 M/E Production Studio 4K model switches between SD, HD or Ultra HD video standards so you can connect a wide range of
USO RESTRITO. DAC-70 Instruction Manual UP / DOWN / CROSS CONVERTER.
 UP / DOWN / CROSS CONVERTER DAC-70 Instruction Manual www.datavideo.com 2 UP / DOWN / CROSS CONVERTER Welcome to the DAC-70 Instruction Manual Thank you for choosing a Datavideo product, please visit the
Table of Contents FCC COMPLIANCE STATEMENT... 3 WARNINGS AND PRECAUTIONS... 3 WARRANTY... 4 STANDARD WARRANTY... 4 THREE YEAR WARRANTY...
 7 4K LCD Monitor Table of Contents FCC COMPLIANCE STATEMENT... 3 WARNINGS AND PRECAUTIONS... 3 WARRANTY... 4 STANDARD WARRANTY... 4 THREE YEAR WARRANTY... 5 DISPOSAL... 6 1. INTRODUCTION... 7 TLM-700K
ATEM 2 M/E Production Studio 4K
 Product Technical Specifications ATEM M/E Production Studio 4K The new ATEM M/E Production Studio 4K lets you produce broadcast quality live multi camera production in SD, HD or amazing Ultra HD! Featuring
VP-737 Instruction Manual
 COMPOSITE SIGNAL REPEATER VP-737 Instruction Manual Table of Contents FCC COMPLIANCE STATEMENT... 3 WARNINGS AND PRECAUTIONS... 3 WARRANTY... 5 STANDARD WARRANTY... 5 THREE YEAR WARRANTY... 6 DISPOSAL...
Model: DT-X92H 2. 9 Rack Mount Broadcast 3GSDI LCD Monitor. User Manual. Ver:V1.0.0V01. Please read this User Manual throughout before using.
 Model: DT-X92H 2 9 Rack Mount Broadcast 3GSDI LCD Monitor User Manual Ver:V1.0.0V01 Please read this User Manual throughout before using. Preface Congratulations on your purchase of this product. Please
UP / DOWN / CROSS CONVERTER. DAC-70 Instruction Manual.
 UP / DOWN / CROSS CONVERTER DAC-70 Instruction Manual www.datavideo.com UP / DOWN / CROSS CONVERTER Welcome to the DAC-70 Instruction Manual Thank you for choosing a Datavideo product, please visit the
Broadcast H.264 files live with ATEM Television Studio!
 ATEM Television Studio Broadcast H.264 files live with ATEM Television Studio! Introducing the world's first live production switcher that combines a professional switcher with a broadcast quality H.264
ATEM 2 M/E Production Studio 4K
 Product Technical Specifications ATEM M/E Production Studio 4K The new ATEM M/E Production Studio 4K lets you produce broadcast quality live multi camera production in SD, HD or amazing Ultra HD! Featuring
HD/SD-SDI TO VGA CONVERTER. DAC-60 Quick Start Guide.
 HD/SD-SDI TO VGA CONVERTER DAC-60 Quick Start Guide www.datavideo.com Warranty Standard Warranty Datavideo equipment is guaranteed against any manufacturing defects for one year from the date of purchase.
3G-HD/SD SDI Pattern Generator. User Manual
 3G-HD/SD SDI Pattern Generator User Manual The 1B-SDI-PTG 3G-HD/SD SDI Pattern Generator has been tested for conformance to safety regulations and requirements, and has been certified for international
ATEM 2 M/E Broadcast Studio 4K
 Product Technical Specifications ATEM 2 M/E Broadcast Studio K Advanced technology high frame rate Ultra HD live production switcher includes 20 x 12G-SDI re-synchronized inputs for all formats from 720p,
17.3 Full HD LCD Monitor TLM-170P/ PR/ PM Instruction Manual
 17.3 Full HD LCD Monitor TLM-170P/ PR/ PM Instruction Manual www.datavideo.com Contents Warnings and Precautions...3 Warranty...4 Disposal...4 Packing List...5 TLM-170P Model Types...5 Introduction...6
SD 8-CHANNEL PORTABLE VIDEO STUDIO HS-600 Instruction manual
 SD 8-CHANNEL PORTABLE VIDEO STUDIO HS-600 Instruction manual Table of Contents WARNINGS AND PRECAUTIONS... 5 WARRANTY... 6 STANDARD WARRANTY... 6 THREE YEAR WARRANTY... 6 DISPOSAL... 7 PRODUCT OVERVIEW...
TITLE CREATOR TC-200. Instruction manual.
 TITLE CREATOR TC-200 Instruction manual www.datavideo.com Table of Contents FCC COMPLIANCE STATEMENT... 3 WARNINGS AND PRECAUTIONS... 3 WARRANTY... 5 STANDARD WARRANTY... 5 THREE YEAR WARRANTY... 5 DISPOSAL...
Prompter Kit for PTZ camera TP-150 Instruction Manual
 Prompter Kit for PTZ camera TP-150 Instruction Manual WWW.DATAVIDEO.COM Contents Warnings and Precautions... 3 Warranty... 4 Disposal... 4 Packing List... 5 Product Overview... 6 Normal tripod assembly...
Model: S-1071H(EFP) 7" EFP Field On-camera LCD Monitor. User Manual. Please read this User Manual throughout before using.
 7 EFP Field On-camera LCD Monitor. User Manual. Please read this User Manual throughout before using.") Model: S-1071H(EFP) 7" EFP Field On-camera LCD Monitor User Manual Please read this User Manual throughout before using. Preface Congratulations on your purchase of this product. Please read this user
Model: S-1071H(EFP) 7" EFP Field On-camera LCD Monitor User Manual Please read this User Manual throughout before using. Preface Congratulations on your purchase of this product. Please read this user
ACUBRITE 23 SS. Manual. Stainless Steel Chassis 23" LCD Display. Content
 ACUBRITE 23 SS Stainless Steel Chassis 23" LCD Display Manual Introduction... 2 Hardware Installation... 2 The Display Timing... 5 The Display Outline Dimensions... 6 The Display Controls... 7 The Screen
DC162 Digital Visualizer. User Manual. English - 1
 DC162 Digital Visualizer User Manual English - 1 Table of Contents CHAPTER 1 PRECAUTIONS... 5 CHAPTER 2 PACKAGE CONTENT... 7 CHAPTER 3 PRODUCT OVERVIEW... 8 3.1 PRODUCT INTRODUCTION... 8 3.2 I/O CONNECTION...
HD/SD SDI AND INTERCOM REPEATER BOX VP-781 Instruction Manual
 HD/SD SDI AND INTERCOM REPEATER BOX VP-781 Instruction Manual Table of Contents FCC COMPLIANCE STATEMENT... 3 WARNINGS AND PRECAUTIONS... 3 WARRANTY... 5 STANDARD WARRANTY... 5 THREE YEAR WARRANTY... 5
19 / 20.1 / 22 WIDE SCREEN TFT-LCD MONITOR
 19 / 20.1 / 22 WIDE SCREEN TFT-LCD MONITOR V193/ V220 Series V202 Series USER MANUAL www.viewera.com Rev. 2.0 Table of Contents EMC Compliance......1 Important Precautions...2 1. Package contents....3
KM-H Series. Multi-format digital production switchers KM-H3000E KM-H3000U KM-H2500E KM-H2500U
 KM-H Series Multi-format digital production switchers KM-H3000E KM-H3000U KM-H2500E KM-H2500U KM-H3000 Multi-format digital production switcher Wipes/menu Memory/menu Memory access keys for quickly recalling
.Prompter Kit for Apple ipad. TP-200 Instruction Manual
 .Prompter Kit for Apple ipad. TP-200 Instruction Manual www.datavideo-tek.com 1 Contents Warnings and Precautions... 3 Warranty... 4 Disposal... 4 Packing List... 5 Product Overview... 6 Features... 6
HD/SD-SDI TO VGA CONVERTER. DAC-60 Quick Start Guide.
 HD/SD-SDI TO VGA CONVERTER DAC-60 Quick Start Guide www.datavideo.com Warranty Standard Warranty Datavideo equipment is guaranteed against any manufacturing defects for one year from the date of purchase.
DM-1CH SD DVB-T MODULATOR INSTRUCTION MANUAL
 DM-1CH SD DVB-T MODULATOR INSTRUCTION MANUAL 2. Caution Statements and Table of Contents Table of Contents 2. Caution Statements and Table of contents 3. Important Safety Instructions 4. Important Safety
ATEM Television Studio HD
 Product Technical Specifications ATEM Television Studio HD ATEM Television Studio HD is the first production switcher designed for both broadcasters and AV professionals. It includes 4 SDI and 4 HDMI inputs
ATEM Television Studio
 ATEM Television Studio The new ATEM Television Studio The world s first live production switchers for broadcast, professional and AV users! ATEM Television Studio HD ATEM Television Studio Pro HD ATEM
9" B/W MONITOR CEM-09/09A-2 12" B/W MONITOR CEM-12/12A-2 OPERATION MANUAL
 9" B/W MONITOR CEM-09/09A-2 12" B/W MONITOR CEM-12/12A-2 OPERATION MANUAL CONTENTS PRECAUTIONS FOR USE AND INSTALLATION IMPORTANT SAFEGAURDS SAFETY INSTRUCTIONS INSTRUCTION MANUAL CLASS B COMPUTING DEVICES
ATEM Television Studio HD
 Product Technical Specifications ATEM Television Studio HD ATEM Television Studio HD is the first production switcher designed for both broadcasters and AV professionals. It includes 4 SDI and 4 HDMI inputs
Digital Video Switcher SE-900
 Digital Video Switcher SE-900 Instruction Manual www.datavideo-tek.com Table of contents Warnings and Precautions... 5 Warranty... 6 Standard Warranty... 6 Two Year Warranty... 6 Disposal... 6 For EU Customers
User Manual TL-2X1-HDVC 2x1 HDMI & VGA Switcher with Control All Rights Reserved Version: TL-2X1-HDVC_160630
 User Manual TL-2X1-HDVC 2x1 HDMI & VGA Switcher with Control All Rights Reserved Version: TL-2X1-HDVC_160630 Preface Read this user manual carefully before using this product. Pictures shown in this manual
HD/SD-SDI Over Fiber Transmitter and Receiver Extender Kit. User Manual L-1SDI-SFE-TX/RX
 HD/SD-SDI Over Fiber Transmitter and Receiver Extender Kit User Manual L-1SDI-SFE-TX/RX Table of Contents Table of Contents---------------------------------------------------------------------------------1
DELV-2LCD-7XLPRO DELV-2LCD-7XLRM DELV-2LCD7XLS (SDI) USER MANUAL
 USER MANUAL") DELV-LCD-7XLPRO DELV-LCD-7XLRM DELV-LCD7XLS (SDI) DUAL NTSC 7" COLOR TFT :9 / : LCD RACKMOUNT MONITOR SERIES USER MANUAL I. Product Description Get ready for the new and demanding high resolution video
DELV-LCD-7XLPRO DELV-LCD-7XLRM DELV-LCD7XLS (SDI) DUAL NTSC 7" COLOR TFT :9 / : LCD RACKMOUNT MONITOR SERIES USER MANUAL I. Product Description Get ready for the new and demanding high resolution video
3G/HD/SD-SDI Over Fiber Transmitter and Receiver Extender. User Manual L-1SDI-FE-3G-TX/RX
 3G/HD/SD-SDI Over Fiber Transmitter and Receiver Extender User Manual L-1SDI-FE-3G-TX/RX 1 Contents 1INTRODUCTION... 2 1.1OVERVIEW... 2 1.2FETURE... 2 1.3PPLICTION... 2 2 PNEL DESCRIPTION... 3 2.1 FRONT
Dual Output SDI/HD SDI Video Pattern Generator
 Dual Output SDI/HD SDI Video Pattern Generator User Manual (VPG SDI) All information is subject to change without notice. All names & trademarks are property of their respective owners. Rev.0911 Made in
SE-2850 / HS-2850 /MS CHANNEL UPGRADE I/O CARD SE-2850 UPGRADE I/O CARD. Instruction Manual
 SE-2850 / HS-2850 /MS-2850 4 CHANNEL UPGRADE I/O CARD SE-2850 UPGRADE I/O CARD Instruction Manual Table of Contents FCC COMPLIANCE STATEMENT... 3 WARNINGS AND PRECAUTIONS... 3 WARRANTY... 5 STANDARD WARRANTY...
3G/HD/SD-SDI to HDMI Converter
 3G/HD/SD-SDI to HDMI Converter Model #: 3G/HD/SD-SDI to HDMI Converter 2010 Avenview Inc. All rights reserved. The contents of this document are provided in connection with Avenview Inc. ( Avenview ) products.
PRO-SDIVGA. SDI Extender with PC/HD Scaler & Audio OPERATION MANUAL
 PRO-SDIVGA SDI Extender with PC/HD Scaler & Audio OPERATION MANUAL Safety Precautions Please read all instructions before attempting to unpack or install or operate this equipment, and before connecting
17 19 PROFESSIONAL LCD COLOUR MONITOR ART
 17 19 PROFESSIONAL LCD COLOUR MONITOR ART. 41657-41659 Via Don Arrigoni, 5 24020 Rovetta S. Lorenzo (Bergamo) http://www.comelit.eu e-mail:export.department@comelit.it WARNING: TO REDUCE THE RISK OF FIRE
DAC-90 Instruction Manual
 SDI AUDIO DE-EMBEDDER DAC-90 Instruction Manual Table of Contents FCC Compliance Statement... 3 Warnings and Precautions... 3 Warranty... 4 Standard Warranty... 4 Three Year Warranty... 5 Disposal... 6
USERS GUIDE MCX-HTS. HDMI to 3G SDI Converter. Manual Number:
 USERS GUIDE MCX-HTS HDMI to 3G SDI Converter i Manual Number: 151226 SAFETY INSTRUCTIONS Please review the following safety precautions. If this is the first time using this model, then read this manual
HD/SD 6-CHANNEL DIGITAL VIDEO SWITCHER SE-2200 Instruction manual
 HD/SD 6-CHANNEL DIGITAL VIDEO SWITCHER SE-2200 Instruction manual Table of Contents TABLE OF CONTENTS... 2 FCC COMPLIANCE STATEMENT... 4 WARNINGS AND PRECAUTIONS... 4 WARRANTY... 4 STANDARD WARRANTY...
Acer LCD TV AT2001 User's Guide
 Acer LCD TV AT2001 User's Guide Copyright 2005. Acer Incorporated. All Rights Reserved. Acer AT2001 User' s Guide Original Issue: May 2005 Acer and the Acer logo are registered trademarks of Acer Incorporated.
FCC COMPLIANCE STATEMENT... 4 WARNINGS AND PRECAUTIONS... 4 WARRANTY...
 Contents FCC COMPLIANCE STATEMENT... 4 WARNINGS AND PRECAUTIONS... 4 WARRANTY... 5 STANDARD WARRANTY... 5 TWO YEAR WARRANTY... 5 DISPOSAL... 5 1. PRODUCT OVERVIEW... 6 1.1 FEATURES... 6 2. OVERVIEW OF
Operating Instructions
 Operating Instructions SDI Input board Model No. AV-HS04M1 РУССКИЙ FRANÇAIS DEUTSCH ENGLISH ESPAÑOL ITALIANO Before operating this product, please read the instructions carefully and save this manual for
Model: S-1071H 7" Broadcast On-camera 3GSDI&HDMI LCD Monitor. User Manual. Please read this User Manual throughout before using.
 Model: S-1071H 7" Broadcast On-camera 3GSDI&HDMI LCD Monitor User Manual Please read this User Manual throughout before using. Preface Congratulations on your purchase of this product. Please read this
MVS-X. 1U modular multi-viewer system
 MVS-X is based on modular structure of MVS-X, which up to provide two high-quality individual outputs. There are HDMI and HDSDI dual output interfaces on each output card. The resolution of HDMI is up