Declaration of Conformity Canada Agency Approvals Trademarks FCC Warning EN Warning
|
|
|
- Regina Williams
- 6 years ago
- Views:
Transcription

1
2 Declaration of Conformity Manufacturer: InFocus Corporation, SW Parkway Avenue, Wilsonville, Oregon USA European Office: Louis Armstrongweg 110, 1311 RL Almere, The Netherlands We declare under our sole responsibility that this projector conforms to the following directives and norms: EMC Directive 2004/108/EC EMC: EN EN EN EN Low Voltage Directive 73/23/EEC, Amended by 93/68/EEC Safety: IEC : 1 st Edition September, 2007 Trademarks Microsoft, PowerPoint, Word, Excel and Windows are trademarks or registered trademarks of Microsoft Corporation. Adobe and Acrobat are trademarks or registered trademarks of Adobe Systems Incorporated. DLP and the DLP logo are registered trademarks of Texas Instruments and BrilliantColor is a trademark of Texas Instruments. InFocus, In Focus, and INFOCUS (stylized) are either registered trademarks or trademarks of InFocus Corporation in the United States and other countries. FCC Warning This equipment has been tested and found to comply with the limits for a Class A digital device, pursuant to part 15 of the FCC Rules. These limits are designed to provide reasonable protection against harmful interference when the equipment is operated in a commercial environment. This equipment generates, uses, and can radiate radio frequency energy and, if not installed and used in accordance with the instruction manual, may cause harmful interference to radio communications. Operation of this equipment in a residential area is likely to cause harmful interference in which case the user will be required to correct the interference at his own expense. Changes or modifications not expressly approved by InFocus Corporation may void authority to operate the equipment. Canada This Class A digital apparatus complies with Canadian ICES-003. Cet appareil numérique de la classe A est conforme à la norme NMB-003 du Canada. Agency Approvals UL, CUL, TUV Other specific Country Approvals may apply, please see product certification label. This user s guide applies to models W360: IN35, C250, IN35W, C250W, IN37, C315. InFocus reserves the right to alter product offerings and specifications at any time. EN Warning This is a Class A product. In a domestic environment it may cause radio interference, in which case the user may be required to take adequate measures. The typical use is in a conference room, meeting room or auditorium. 1
3 Table of Contents Introduction 3 Connecting a computer 5 Required computer connections 5 Displaying a computer image 7 Adjusting the image 8 Connecting a video device 9 Displaying a video image 10 Shutting down the projector 12 Troubleshooting your setup 12 Using the keypad buttons 20 Using the remote control 21 Using the audio 22 Optimizing computer images 23 Presentation features 23 Optimizing video images 23 Customizing the projector 23 Using the menus 24 Picture menu 25 Settings menu 28 Maintenance 32 Cleaning the lens 32 Using the security lock 32 Replacing the projection lamp 33 Appendix 35 Projected image size 35 2 Important Operating Considerations for Safety Place the projector in a horizontal position no greater than 15 degrees off axis. Locate the projector in a well-ventilated area without any obstructions to intake or exhaust vents. Do not place the projector on a tablecloth or other soft covering that may block the vents. Locate the projector at least 4' (1.2 m) away from any heating or cooling vents. Use only InFocus-approved ceiling mounts. Only InFocus lamps are tested and certified for use in this projector. InFocus is not liable for the performance, safety or certification of any other lamps. The use of other lamps violates the projector warranty and voids all certification marks on this projector. Use only the power cord provided. A surge-protected power strip is recommended. Refer to this guide for proper startup and shutdown procedures. Warning: Hg Lamp contains mercury. Manage in accordance with local disposal laws. See In the unlikely event of a lamp rupture, particles may exit through the projector side vents. When the projector is turned on, keep people, food, and drinks out of the "keep out" area under and around the projector, as indicated by the "X" areas below. 8 /2.4m 5 /1.5m 3 / 1 m 2 / 0.6 m Follow these instructions to help ensure image quality and lamp life over the life of the projector. Failure to follow these instructions may affect the warranty. For complete details of the warranty, see the Warranty booklet.
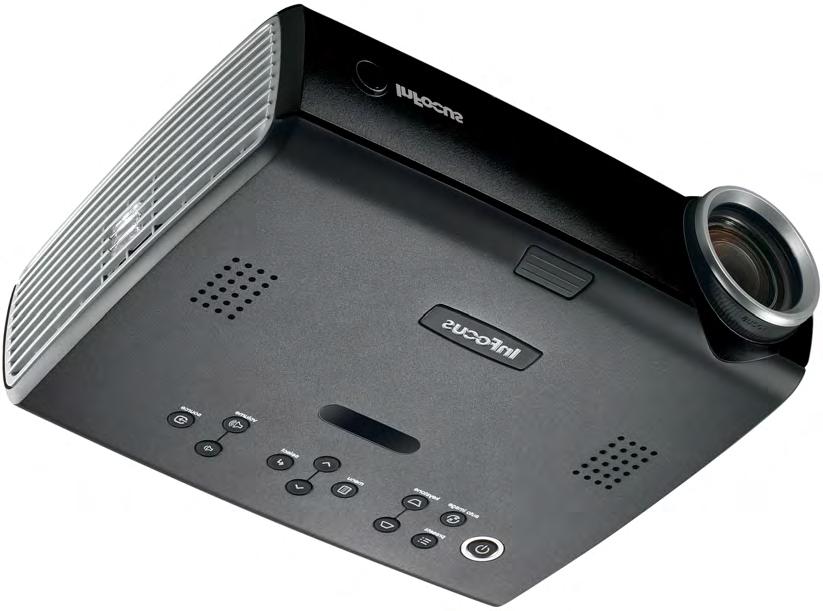
4 Introduction Your new digital projector provides computer and video inputs and delivers outstanding color using BrilliantColor technology. The projector is easy to connect, easy to use, and easy to maintain. The IN35 and IN37 have XGA 1024x768 resolution while the IN35W has WXGA 1280x800 resolution. Projector components and features keypad Product specifications To read the latest specifications on your multimedia projector, be sure to visit our website at as specifications are subject to change. Accessories The standard accessories that came with your projector are listed in the included user s guide. Optional accessories can be found on our website at or at your retailer or dealer. remote control receiver (IR) elevator foot release focus zoom speaker Online Registration Register your projector on our website at to activate your warranty and receive product updates, announcements, and registration incentives. status indicators connectors IR receiver heat vent leveling foot IR receiver 3
5 Connector Panel The projector provides computer and video connectors: one M1-D/A (HD, DVI, and computer) one VESA (HD, HD component, and computer) one VESA (monitor out) one S-video one composite RCA video one audio in/one audio out It also has an RJ-45 connector for serial control. The Command Line Interface (CLI) specifications and commands are on our website. Connector panel M1-D/A computer VESA in composite video RJ-45 serial control s-video monitor out power connector audio in lock external speaker (audio out) 4
6 Connecting a computer Required computer connections Connect the black end of the computer cable to the Computer 1 connector on the projector. Connect the blue end to the video port on your computer. If you are using a desktop computer, you first need to disconnect the monitor cable from the computer s video port. Some Macintosh computers do not have a standard VESA-out video port. If the supplied computer cable will not connect to your computer, purchase the appropriate adapter from your Apple reseller. Connect the black power cable to the connector on the back of the projector and to your electrical outlet. The Power light on the Status Indicator Panel (page 12) turns amber. connect computer cable connect power cable NOTE: Always use the power cable that shipped with the projector. Optional computer connections To advance slides in a PowerPoint presentation using the up and down arrow buttons on the remote, plug the USB connector on the computer cable into the USB mouse connector on your computer. connect computer cable To have sound with your presentation, connect an audio cable (sold separately) to your computer and to the Audio In connector on the projector. connect audio cable 5
7 If you are using a desktop computer and want to see the image on your computer screen as well as on the projection screen, plug the monitor cable to the Monitor Out connector on the projector. connect monitor cable If you prefer connecting your projector to your computer with an optional VESA cable, connect one end of the cable to the VESA port on your computer, and connect the other end of the cable to the blue Computer 2 connector on the projector. connect VESA cable You can control the projector from an LCD control panel or computer by connecting an RS-232 cable to the projector s Serial Control connector. Specific RS-232 commands can be found in the Service and Support section of our website. connect RS-232 cable 6
8 Displaying a computer image Remove the lens cap. remove lens cap Press the Power button on the top of the projector or the remote. The Power light on the Status Indicator Panel (page 12) blinks green and the fans start to run. When the lamp comes on, the start up screen displays and the Power light is steady green. It can take a minute for the image to achieve full brightness.? No startup screen? Get help on page 13. Turn on your computer. The computer s image should appear on the projection screen. If it doesn t, press the Source button on the projector s keypad. press Power button turn on computer Make sure your laptop s external video port is active. Many laptops do not automatically turn on their external video port when a projector is connected. Usually a key combination like FN + F8 or CRT/LCD key turns the external display on and off. Locate a function key labeled CRT/LCD or a function key with a monitor symbol. Press FN and the labeled function key simultaneously. Refer to your laptop s documentation to learn your laptop s key combination.? No computer image? Try pressing the Auto Image button on the keypad. Get help on page 13. activate laptop s external port 7
, if necessary.")
9 Adjusting the image Adjust the height of the projector, if necessary, by pressing the release button to extend the elevator foot. Rotate the leveling foot (located at the bottom back right corner), if necessary. adjust height elevator foot release button rotate leveling foot Position the projector the desired distance from the screen, so that the lens is perpendicular to the screen. See page 35 for a table listing screen sizes and distances. adjust distance Adjust the zoom or focus rings by rotating them until the desired image size and focus are produced. adjust zoom and focus focus zoom If the image is not square, adjust the vertical digital keystone by using the buttons on the keypad. Press the upper Keystone button to reduce the upper part of the image, and press the lower Keystone button to reduce the lower part. You can also adjust the keystone via the menus. See page 25. adjust keystone Adjust the Contrast or Brightness in the Picture menu. See page 24 for help with the menus. adjust Contrast or Brightness 8
10 Connecting a video device No video or audio cables are included with your projector. connect S-video and audio cables If the video device uses a round, four-prong S-video connector, plug an S-video cable into that connector on the video device and into the Video 2 connector on the projector. If the device uses a composite video connector, plug a composite video cable into that connector on the video device and into the Video 1 connector on the projector. For audio, plug a mini-plug audio Y-cable into the Audio in connector on the projector and into the video device s left and right audio out connectors. connect video and audio cables Connect the black power cable to the connector on the back of the projector and to your electrical outlet. connect power cable NOTE: Always use the power cable that shipped with the projector. To connect a progressive scan EDTV or HD source, use the Component to M1 adapter (sold separately). 9
11 Displaying a video image Remove the lens cap. remove lens cap Press the Power button on the top of the projector or the remote. The Power light on the Status Indicator Panel (page 12) blinks green and the fans start to run. When the lamp comes on, the start up screen displays and the Power light is steady green. It can take a minute for the image to achieve full brightness. press Power button.? No startup screen? Get help on page 12. Plug in and turn on the video device. The video device s image should appear on the projection screen. If it doesn t, press the Source button on the keypad. turn on video device Adjust the height of the projector by pressing the release button to extend the elevator foot. Rotate the leveling foot, if necessary. adjust height elevator foot release button rotate leveling foot Position the projector the desired distance from the screen, so that the lens is perpendicular to the screen. See page 35 for a table listing screen sizes and distances to the screen. adjust distance 10
12 Adjust the zoom or focus rings by rotating them until the desired image size and focus are produced. adjust zoom and focus focus zoom If the image is not square, adjust the vertical keystone using the buttons on the keypad. Press the upper Keystone button to reduce the upper part of the image, and press the lower Keystone button to reduce the lower part. You can also adjust the keystone via the menus. See page 25. adjust keystone Adjust the volume on the keypad. adjust volume Adjust the Contrast, Brightness, Color, or Tint in the Picture menu. See page 24 for help with the menus. adjust Picture menu 11
13 Shutting down the projector Turning off the projector To turn off the projector, press the Power button and verify that you want to turn the projector off by pressing the Power button again within 3 seconds. You can cancel the shutdown by not pressing the Power button a second time. The lamp turns off and the LED blinks amber for 1 minute while the fans continue to run to cool the lamp. When the lamp has cooled, the LED lights amber and the fans stop. Unplug the power cable to completely power off the projector. Power Save The projector has a Power Save feature that automatically turns the lamp off after no signal is detected for 20 minutes. After 10 additional minutes with no signal, the projector powers down. If an active signal is received before the projector powers down, the image is displayed. You must press the Power button to display an image after 30 minutes have passed. When Power Save is enabled, Screen Save is disabled. See page 29. Screen Save You can make a blank screen appear five minutes after no signal is detected by turning on Screen Save in the Settings>System menu. See page 29. There are six time options for the Screen Save feature. They range from five minutes to 30 minutes with five minute intervals. Troubleshooting your setup If your image appears correctly on the screen, skip to the next section (page 21). If it does not, troubleshoot the setup. The Status Indicator Panel on top of the projector indicates the state of the projector and can help you troubleshoot.. Table 1: Status indicator light behavior and meaning Status Indicator Panel Symbols Power, solid amber Power, blinking green Power, solid green Power, blinking amber Thermometer Lamp Meaning The projector is plugged in. The power button has been pressed and the software is initializing. The projector is on and initialized. The power button has been pressed twice to turn the projector off and the fans are running to cool the projector. The projector is too hot. Make sure the vents aren t blocked (see page 19). Turn off the projector and wait one minute, then turn the projector on again. Contact Technical Support if the problem persists. Turn off the projector and wait one minute, then turn the projector on again. If the lamp light turns on again, replace the lamp and reset the lamp timer. Wrench/Service Turn off the projector and wait one minute, then turn the projector on again. If the service lamp turns on again, service is required. Visit to contact Service. 12

14 Source Troubleshooting Problem Solution Result No startup screen Plug power cable in, press Power button. Remove lens cap. Correct image Only startup screen appears Press the Source button Activate laptop s external port Computer image projected A A A or restart laptop 13
 Computer image projected A Signal out of range A A You may also need to set a different resolution on your computer, as shown in the")
 For a laptop, disable laptop monitor or turn-on dualdisplay mode Image clear and not")
15 No computer image, just the words Signal out of range Adjust computer refresh rate in Control Panel>Display>Settings>Advanced> Adapter (location varies by operating system) Computer image projected A Signal out of range A A You may also need to set a different resolution on your computer, as shown in the following problem, Image fuzzy or cropped For PC: Image fuzzy or cropped A A Set your computer s display resolution to the native resolution of the projector (Start>Settings>Control Panel>Display>Settings tab, select 1024x768) For a laptop, disable laptop monitor or turn-on dualdisplay mode Image clear and not cropped A 14
 Image clear and not cropped A Only my laptop s")
 Background and Desktop projected A A A A")
16 For Macintosh: Image fuzzy or cropped A A Set your computer s display resolution to the native resolution of the projector (Apple menu>system Preferences>Displays, choose 1024x768) Image clear and not cropped A Only my laptop s background appears, not the Desktop icons Disable Extend my Windows Desktop in Control Panel>Display>Settings>Display 2 (location varies by operating system) Background and Desktop projected A A A A Uncheck this option, then click Apply 15
17 The video embedded in my PowerPoint presentation does not play on the screen A B A Turn off the internal LCD display on your laptop Embedded video plays correctly A B Projector troubleshooting Problem Solution Result Image not square Adjust keystone on keypad or Picture menu Square image Image not sharp Adjust the focus lens or Sharpness in the Picture>Advanced menu Correct image AB AB 16
18 Image does not fit 16:9 screen Change aspect ratio to 16:9 in Picture>Aspect ratio menu Correct image Image upside down Turn off Ceiling in Settings>System menu Correct image B A AB Image reversed left to right Turn off Rear in Settings>System menu Correct image A AB 17

19 Projected colors don t match source Adjust color, tint, color temperature, brightness, contrast in the menus Correct image COLOR COLOR Image not centered on screen Move projector, adjust zoom, adjust height Correct image zoom Adjust horizontal or vertical position in Picture>Advanced menu 18
20 Lamp won t turn on, Temperature light is on Temperature light Make sure vents aren t blocked; allow projector to cool for one minute Unplug projector; wait one minute; plug in projector and turn it on: lamp lights Change lamp message appears at startup, lamp won t turn on, Lamp light is turned on Lamp must be replaced (page 33) Lamp turns on Lamp light Still having problems? If you need assistance, visit the Service and Support section of our website or call us. This product is backed by a limited warranty. An extended warranty plan may be purchased from your dealer. When sending the projector in for repair, we recommend shipping the unit in its original packing material, or having a professional packaging company pack the unit. Please insure your shipment for its full value. 19
21 Using the keypad buttons Most buttons are described in detail in other sections, but here is an overview of their functions: power turns the projector on (page 7) and off (page 12). menu opens the on-screen menus (page 24). select confirms choices made in the menus (page 24). up/down arrows navigates to and adjusts settings in the menus (page 24). auto image resets the projector to the source. presets cycles through the available preset settings (page 26). keystone vertical keystone adjusts the squareness of the image (page 8). You can also adjust the keystone via the menus. See page 25. volume adjusts sound (page 22). source changes the active source. menu navigation buttons 20
22 Using the remote control The remote uses two (2) provided AA batteries. They are easily installed by sliding the cover off the remote s back, aligning the + and - ends of the batteries, sliding them into place, and then replacing the cover. Caution: When replacing the batteries, be aware that using batteries other than the type provided with the projector may risk severe damage to the remote. When disposing of the batteries, be sure to do so in an environmentally proper manner. To operate, point the remote at the front of the projector (not at the computer). The range of optimum operation is about 15 feet (4.5m). Press the remote s Power button to turn the projector on and off (see page 12 for shutdown info). Press the remote s Menu button to open the projector s menu system. Use the arrow buttons to navigate, and the Select button to select features and adjust values in the menus. See page 24 for more info on the menus. The remote also has a Source button to switch between sources. If you connect the USB portion of the M1-DA computer cable (page 5) you can use the up and down arrow navigation buttons to advance slides in a PowerPoint presentation. Troubleshooting the remote Make sure the batteries are installed in the proper orientation and are not dead. Make sure you re pointing the remote at the projector or the screen, not the computer, and are within the remote range of 15 feet (4.5m). For best results, point the remote at the projector. navigation buttons 21
23 Using the audio To play sound from the projector, connect your source to the Audio In connector on the projector. connect audio cable To adjust the volume, use the buttons on the keypad. To adjust the balance or turn off the projector s chime, use the Audio menu (see page 28). Troubleshooting audio If there is no sound, check the following: adjust volume Make sure the audio cable is connected. Make sure mute isn t active. Make sure the volume is turned up enough. Press the Volume button on the keypad. Adjust the audio source. If playing a video, make sure the playback has not been paused. Connecting external speakers The projector can be attached to external speakers that have their own power source by plugging a speaker cable into the projector s Audio Out connector. external speakers speaker cable 22
24 Optimizing computer images After your computer is connected properly and the computer s image is on the screen, you can optimize the image using the onscreen menus. For general information on using the menus, see page 24. Adjust the Keystone, Contrast, or Brightness in the Picture menu. Change the Aspect Ratio. See page 25 for details. Adjust the Color Space, Temperature or Control in the Advanced menu. Adjust the Phase, Tracking, or Horizontal or Vertical position in the Advanced menu. Once you have optimized the image for a particular source, you can save the settings using Presets. This allows you to quickly recall these settings later. See page 26. Presentation features Several features are provided to make giving presentations easier. The following is an overview, details are found in the menu section on page 24. The Custom key, available on several optional remotes only, allows you to assign various features to the button. See page 30 for details. The Startup Logo menu option lets you change the default startup screen to a black, white, or blue screen. See page 29. Two menu options, Power Save and Screen Save, are provided to automatically shut down the projector after several minutes of inactivity or display a blank screen. This helps preserve lamp life. See page 29. Adjust the Keystone, Contrast, Brightness, Color, or Tint in the Picture menu. See page 25. Change the Aspect ratio. Aspect ratio is the ratio of the image width to image height. TV screens are usually 1.33:1, also known as 4:3. HDTV and most DVDs are 1.78:1, or 16:9. Choose the option that best fits your input source. See page 25. Select a Sharpness, Color Temperature, or Video Standard setting. See page 27. Adjust the Color Control or White Peaking settings. See page 27. Customizing the projector You can customize the projector for your specific setup and needs. See page 28 to page 32 for details on these features. For rear projection, turn Rear mode on in the Settings>System menu. For ceiling mounted projection, turn Ceiling mode on in the Settings>System menu. Specify which source the projector checks first for active video during power-up. Specify the function of the Custom Key on the optional remote. Turn the projector s display messages on and off. Turn on power saving features. Specify blank screen colors and startup logos. Specify the menu language. Control your projector using RS-232 commands. See page 6. Optimizing video images After the video device is connected properly and the image is on the screen, you can optimize the image using the onscreen menus. For general information on using the menus, see page


25 Using the menus To open the menus, press the Menu button on the keypad or remote. (The menus automatically close after 60 seconds if no buttons are pressed.) The Main menu appears. Use the arrow buttons to move up and down to highlight the desired submenu, then press the Select button. Menu button To change a menu setting, highlight it, press Select, then use the up and down arrow buttons to adjust the value, select an option using radio buttons, or turn the feature on or off using check boxes. Press Select to confirm your changes. Use the arrows to navigate to another setting. When your adjustments are complete, navigate to Exit, then press Select to go to the previous menu; press the Menu button at any time to close the menus. Main menu Keypad navigation buttons Dots appear before the menu name. The number of dots indicate the menu s level, ranging from one (the Main menu) to four (the most nested menus). The menus are grouped by usage: The Picture menu provides image adjustments. The Settings menu provides set-up type adjustments that are not changed often. The Source Info menu provides a read-only display of information about the projector and source. Certain items will be grayed out or hidden until a particular source is connected. For example, Color is only available for video sources and will be hidden when a computer source is active. Other menu items may be grayed out when they are not available. For example, Brightness is grayed out until an image is active. Picture menu Dots Settings menu Source Info menu 24
26 Picture menu To adjust the following six settings, highlight the setting, press Select, use the up and down arrows to adjust the values, then press select to confirm the changes. Keystone Vertical: adjusts the image vertically and makes a squarer image. You can also adjust keystone from the keypad. Keystone Horizontal: adjusts the image horizontally and makes a squarer image. Contrast: controls the degree of difference between the lightest and darkest parts of the picture and changes the amount of black and white in the image. Brightness: changes the intensity of the image. Color: (video and component sources only) adjusts a video image from black and white to fully saturated color. increasing keystone decreasing keystone Tint: (NTSC video sources only) adjusts the red-green color balance in the image. Auto Image: resets the projector to the source Aspect Ratio: Aspect ratio is the ratio of the image width to image height. TV screens are usually 1.33:1, also known as 4:3. HDTV and most DVDs are 1.78:1, or 16:9. The default is 4:3, which displays the input resized up or down to fill the display area. The 15:9 option is only available on the WXGA version. The aspect ratio selection is saved for each source. Aspect Ratio 25
.")
27 Presets: Presets are provided that optimize the projector for displaying computer presentations and video images in different lighting conditions and on different backgrounds. There are also user-definable presets. To set a preset for the current source, adjust the image, select Save Settings in the Presets menu, then select Save User 1 (or 2 or 3). You can recall these settings in the future by selecting the User 1 preset. Presets If you make any adjustments to the image, Presets Off will automatically be selected in the Preset menu to indicate changes have been made. To restore the factory default settings, choose Factory Reset in the Settings>Service menu. 26


28 Advanced settings The following 4 options are for computer and component sources only. Phase: adjusts the horizontal phase of a computer source. Tracking: adjusts the vertical scan of a computer source. Horizontal/Vertical Position: adjusts the position of a computer source. Sync Threshold Adjust: (enhanced and high definition sources only) If a hardware device, such as a DVD player, is not syncing properly with the projector, select this option to help it sync. Overscan: removes noise around the video image. BrilliantColor : produces an expanded on-screen color spectrum that delivers enhanced color saturation for bright, true-to-life images. Choose Normal Look for most video sources and Bright Look for most computer sources. White Peaking: adjusts the white level processed in the image. It increases the brightness of whites that are near 100%. Color Space: This option applies to computer sources. It allows you to select a color space that has been specifically tuned for the video input. When Auto is selected, the projector automatically determines the standard. To choose a different setting, turn off Auto, then choose RGB for computer sources, choose either REC709 or REC601 for component sources. Color Temperature: changes the intensity of the colors. Select a listed value. colors may not look right or the image may appear torn. If this happens, manually select a video standard by selecting NTSC, PAL, or SECAM from the Video Standard menu. Advanced BrilliantColor Color Space Color Temperature Color Control Color Control: allows you to individually modify each color. Highlight the color, press Select, then use the arrows to adjust the value. Sharpness: changes the clarity of the edges of a video image. Select a sharpness setting. Video Standard: (video sources only) When it is set to Auto, the projector attempts to pick the video standard automatically based on the input signal it receives. (The video standard options may vary depending on your region of the world.) If the projector is unable to detect the correct standard, the 27 Sharpness Video Standard


29 Settings menu Audio: allows adjustments to the volume and balance, and turns the projector s startup Chime on and off. Sources: allows you to assign a particular input to a specific source key when using an optional remote. Also allows selection of a default Power-up Source and enables or disables Autosource. Sources>Power-up Source: this determines which source the projector checks first for active video during power-up. Sources>Autosource: When Autosource is not checked, the projector defaults to the source selected in Power-up Source. If no source is found, a blank screen displays. When Autosource is checked, Power-up Source determines which source the projector defaults to at startup. If no signal is present, the projector checks the sources in order until a source is found or until power down. When Autosource is selected, the Source Enable feature indicates which sources the projector attempts to lock onto. You can use the Source Enable feature to eliminate certain sources from this search, which will speed the search. By default, the check boxes for all sources are checked. Uncheck a source box to eliminate it from the search. When Autosource is not checked, the projector defaults to Computer 1 initially, then defaults to whatever source is selected in the Power-up Source menu. To display another source, you must manually select one by pressing the Source button on the remote or keypad. This cycles through all the sources that are selected in the Source Enable menu. System>OSD Offset: allows you to change the position of the On Screen Display items. Rear: reverses the image so you can project from behind a translucent screen. Ceiling: turns the image upside down for ceiling-mounted projection. Low Power: Turn this on to lower the light output of the lamp. This also lowers the fan speed, making the projector quieter. Auto Power: When Auto Power is checked, the projector automatically goes into the startup state after power is applied. This allows control of ceiling mounted projectors with a wall power switch. Display Messages: displays status messages (such as Searching or Mute ) in the lower-left corner of the screen. 28 Settings Sources System Audio

30 PC Screen Saver Off: prevents your computer from going into Screen Save mode. This feature is only available if the USB portion of the computer cable is connected to your computer (page 5). Power Save: automatically turns the lamp off after no signals are detected for 20 minutes. After 10 additional minutes with no signal, the projector powers down. If an active signal is received before the projector powers down, the image will be displayed. Screen Save: automatically blanks the screen with a black color after no signals are detected for a preset number of minutes. The image returns when an active source is detected or a remote or keypad button is pressed. Screen Save is disabled when Power Save is enabled. System Screen Save Startup Logo: allows you to display a blank Black, White, or Blue screen instead of the default screen at startup and when no source is detected. Startup Logo Blank Screen: determines what color is displayed when no source is detected. Blank Screen 29

. Freeze: pauses the projected image. Source Info: the default effect.")
31 Custom Key (for use with optional remote only): allows you to assign a different function to the Custom button on the remote to quickly and easily use the effect. Only one effect can be enabled at a time. Highlight an effect and press Select to choose a different one. The default effect is About. Service Info: provides information about the projector and lamp. Service Code: only used by authorized service personnel. Blank: displays an empty screen. Mute: turns off all sound. Aspect Ratio: toggles among 4:3, 16:9, and Native (see page 25). Source: cycles through available sources. Auto Image: resets the projector to the source (page 20). Freeze: pauses the projected image. Source Info: the default effect. It opens a window with projector and source information. Source 4: selects Source 4. Service Info: opens a window with projector and source information. Language: allows you to select a language for the onscreen display of menus and messages. Service: to use these features, highlight them and press Select. Factory Reset: restores all settings (except Lamp Hours) to their default after displaying a confirmation dialog box. Reset Lamp Hours: resets the lamp hours counter in the Service Info menu to zero. Do this only after changing the lamp. It displays a confirmation dialog box. PIN: see the next section. Test Pattern: allows you to display certain patterns to adjust the image. This feature only works with an optional remote. To display test patterns, click the Test Pattern check box, exit the menus, then press the Blank button on the remote. To select the patterns, use the up/down arrows on the remote or keypad. To exit the test patterns, press the Blank button again. Serial Port: allows you to select echo status and Baud rate. Language Custom Key Service menu appears only when PIN is disabled appears only when PIN is enabled 30
32 PIN feature The PIN (personal identification number) feature allows you to password protect your projector. Once you enable the PIN feature, you must enter the PIN before you can project an image. To use this feature, you must register your projector at register and follow the instructions there to get a default PIN. The PIN consists of a sequence of 5 navigation button presses. The navigation buttons are menu, select, up arrow and down arrow. Once you have this PIN, select Enable PIN in the Service menu. The Enter PIN dialog box appears. Use the navigation buttons on the remote or keypad to enter the correct button press sequence. After pressing the first button, a dot appears in the current PIN slot and the highlighted cursor moves to the right one slot. When all 5 numbers are entered correctly, press the Select button on the remote or keypad to select OK. If the message Incorrect PIN appears, verify the code and re-enter it. If you mis-enter a number, you must enter 5 numbers and press the Select button in order to access the Incorrect PIN message and re-enter the code. To enter the PIN at projector startup: Power up the projector. The Enter PIN dialog box appears after the startup screen. Enter the PIN. Use the navigation buttons on the remote or keypad to enter the correct button press sequence. See the description above for instructions. If you lose or forget your PIN, go to To change the PIN: Select Change PIN in the Service menu. Enter the existing PIN. Enter the new PIN. You can navigate between OK and Cancel by pressing the up and down buttons on the keypad. Select OK or Cancel by pressing the Select button. Verify the new PIN. To reset the PIN back to the default: Power up the projector. After the Enter PIN dialog box appears, press and hold the Select button down for 10 seconds. Enter the default PIN to use the projector. If you lose or forget your default PIN, go to 31
33 Maintenance Cleaning the lens 1 Apply a non-abrasive camera lens cleaner to a soft, dry cloth. Avoid using an excessive amount of cleaner, and don t apply the cleaner directly to the lens. Abrasive cleaners, solvents or other harsh chemicals might scratch the lens. clean the lens with a soft dry cloth and non-abrasive cleaner 2 Lightly wipe the cleaning cloth over the lens in a circular motion. If you don t intend to use the projector immediately, replace the lens cap. Using the security lock The projector has a security lock for use with a cable lock system. Refer to the information that came with the lock for instructions on how to use it. security lock 32

34 Replacing the projection lamp The lamp hour timer in the Service Info menu counts the number of hours the lamp has been in use. Twenty hours before the specified end of the lamp s life, the message Replace lamp briefly appears on the screen at each startup. When the expected lamp life has been reached, the Lamp indicator icon lights red (page 12). NOTE: You can order new lamp housings from (in select areas), your retailer or your dealer. Only InFocus lamps are tested and certified for use in this projector. InFocus is not liable for the performance, safety or certification of any other lamps. The use of other lamps violates the projector warranty and voids all certification marks on this projector. 1 Turn off the projector and unplug the power cable. turn off and unplug the projector Service Info menu wait 60 minutes 2 Wait 60 minutes to allow the projector to cool thoroughly. 3 Turn the projector upside down and remove the lamp door by placing a flat-blade screwdriver into the space between the lamp door and the projector and gently prying the door off. pry the lamp door off 4 Loosen the captive screw on the lamp module. WARNINGS: To avoid burns, allow the projector to cool for at least 60 minutes before you replace the lamp. Only InFocus lamps are tested with this projector. Use of other lamps may cause electrical shock and fire. Unplug the power cord before replacing the lamp. Do not drop the lamp module. The glass may shatter and cause injury. Do not touch the glass lamp screen. Fingerprints can obscure projection sharpness. 33 loosen the screw on lamp module
35 Be extremely careful when removing the lamp housing. In the unlikely event that the lamp ruptures, small glass fragments may be generated. The lamp module is designed to contain most of these fragments, but use caution when removing it. Before replacing a ruptured lamp, clean the lamp compartment and dispose of cleaning materials. Wash hands after lamp replacement. Hg Lamp contains mercury. Manage in accordance with local disposal laws. See 5 Detach the lamp connector from the projector by gently pulling the connector until it is disconnected from the projector. disconnect lamp connector 6 Carefully remove the lamp module by grasping and lifting the metal bail wire. Dispose of the lamp in an environmentally proper manner. 7 Install the new lamp module, making sure that it is properly seated. Be careful not to touch the interior components of the projector. remove module using bail wire 8 Snap the bail wire back into its flat position against the lamp module. 9 Re-attach the lamp connector to the projector. Make sure the connector is fully inserted. 10 Tighten the screw on the lamp module. 11 Replace the lamp door. 12 Plug in the power cable then press the Power button to turn the projector back on, then reset the lamp hour timer. Resetting the lamp timer To reset the lamp timer, navigate to the Settings>Service menu and select Reset Lamp Hours. reset lamp time in Service menu 34
36 Appendix Projected image size Table 2: Image sizes for XGA Table 3: Image sizes for WXGA Distance to screen (feet/m) Minimum Diagonal (feet/m) Maximum Diagonal (feet/m) Minimum Horizontal (feet/m) Maximum Horizontal (feet/m) 5/ / / / / /3 5.5/ / / / / / / / / /6.1 11/ / / / / / / / / / / / / /5.46 Distance to screen (feet/m) Minimum Diagonal (feet/m) Maximum Diagonal (feet/m) Minimum Horizontal (feet/m) Maximum Horizontal (feet/m) 5/ / / / /.79 10/3 5.1/ / / / / / / / / / / / / / / / / / / / / / / /5.29 NOTE: Visit our website for an interactive image size calculator. 35
37 INDEX A Advanced setting 27 Aspect Ratio 25, 30 audio 22 Audio In connector 5, 9 audio volume 11 audio, troubleshooting 22 Auto Power 28 Autosource 28 B Blank screen 29 Brightness 8 BrilliantColor 27 C Ceiling 28 cleaning the lens 32 Color 11, 25 Color Control 27 Color Space 27 Color Temperature 27 colors are incorrect 18 Computer 2 connector 6 computer connections optional 5 required 5 computer image optimize 23 troubleshooting 13 connecting computer 5 external speakers 22 video device 9 connector panel 4 contacting InFocus 19 Contrast 8, 11, 25 Custom key 23 customer service contact information 19 D Display Messages 28 displaying computer image 7 video image 10 E elevator foot 8 F Factory Reset 30 focus 8, 11 fuzzy image 14 I image display computer 7 display video 10 image does not fit screen 17 image not centered 18 image not sharp 16 image not square 16 image reversed 17 image size matrix 35 image upside down 17 K keypad buttons 20 keystone 8, 25 L lamp replacement 33 Lamp Reset 30 lamp won t turn on 19 Language 30 laptop connecting 5 external video port 7 lens, cleaning 32 leveling foot 8 36
38 lock, security 32 Low Power 28 M Macintosh troubleshooting 15 Main menu 24 menu system 24 Monitor connector 6 N no computer image 14 no startup screen 13 O only startup screen appears 13 onscreen menus 24 Overscan 27 P password-protecting the projector 31 PC Screen Saver 29 personal identification number 31 Picture menu 25 PIN 31 Position 27 power cable 5, 9 Power Save 12, 29 Power-up Source 28 presentation features 23 projected image sizes 35 projector adjusting the height 8, 10 connector panel 4 customizing 23 password-protecting 31 PIN 31 positioning 8 registering 3 safety considerations 2 troubleshooting problems 12 R Rear 28 remote control 21 replacing the lamp 33 Reset 30 resetting the lamp timer 34 resolution 3 RS-232 4, 6 S Screen Save 12, 29 security lock 32 serial connection 6 Service 30 Settings menu 28 Sharpness 27 Source troubleshooting 13 Sources 28 speakers, connecting 22 Startup Logo 29 Sync Threshold Adjust 27 T Tint 11, 25 Tracking 27 Troubleshooting 12, 13 Turning off the projector 12 U using the keypad buttons 20 V VESA connector 6 video connections 9 video images, optimizing 23 Video Standard 27 W White Peaking 27 X XGA 3 37
39 38
IN32/IN34. Reference Guide
 IN32/IN34 Reference Guide Declaration of Conformity Manufacturer: InFocus Corporation, 27700B SW Parkway Avenue, Wilsonville, Oregon 97070 USA European Office: Strawinskylaan 585, 1077 XX Amsterdam, The
> > > > > > > Reference Guide
 > > > > > > > M6 Reference Guide Declaration of Conformity Manufacturer: InFocus Corporation, 27500 SW Parkway Avenue, Wilsonville, Oregon 97070 USA European Office: Louis Armstrongweg 110, 1311 RL Almere,
Meeting Room Projector User s Guide
 Meeting Room Projector User s Guide Trademarks Apple, Macintosh, and PowerBook are trademarks or registered trademarks of Apple Computer, Inc. IBM is a trademark or registered trademark of International
Declaration of Conformity FCC Warning Trademarks Canada Agency Approvals
 Declaration of Conformity Manufacturer: InFocus Corporation, 27500 SW Parkway Ave. Wilsonville, Oregon 97070 USA European Office: Louis Armstrongweg 110, 1311 RL Almere, The Netherlands We declare under
Trademarks. Agency Approvals UL, CUL, NOM, IRAM, GOST, C-tick Other specific Country Approvals may apply. Please see product certification label.
 Declaration of Conformity Manufacturer: InFocus Corporation, 27700B SW Parkway Ave. Wilsonville, Oregon 97070 USA European Office: Strawinskylaan 585, 1077 XX Amsterdam, The Netherlands We declare under
> > > > > > > User s Guide
 > > > > > > > User s Guide Declaration of Conformity Manufacturer: InFocus Corporation, 27700B SW Parkway Ave. Wilsonville, Oregon 97070 USA European Office: Strawinskylaan 585, 1077 XX Amsterdam, The
IN5102/IN5104/IN5106. User s Guide. Regulatory models W50, W55
 IN5102/IN5104/IN5106 Regulatory models W50, W55 User s Guide Declaration of Conformity Manufacturer: InFocus Corporation, 27500 SW Parkway Ave. Wilsonville, Oregon 97070 USA European Office: Louis Armstrongweg
LP 840/LP 850 INSTALLATION & INTEGRATION PROJECTOR. USER S GUIDE
 LP 840/LP 850 INSTALLATION & INTEGRATION PROJECTOR. USER S GUIDE Declaration of Conformity Manufacturer: InFocus Corporation, 27700B SW Parkway Ave. Wilsonville, Oregon 97070 USA European Office: Strawinskylaan
Declaration of Conformity Manufacturer: InFocus Corporation SW 68th Parkway, Portland, Oregon USA.
 Declaration of Conformity Manufacturer: InFocus Corporation 13190 SW 68th Parkway, Portland, Oregon 97223-8368 US We declare under our sole responsibility that this projector conforms to the following
Copyright 2001 by BOXLIGHT Poulsbo, Washington. All rights reserved.
 Copyright 2001 by BOXLIGHT Poulsbo, Washington. All rights reserved. FCC Warning This equipment has been tested and found to comply with the limits for a Class A digital device, pursuant to part 15 of
Declaration of Conformity. Australian Certification C-tick mark. Trademarks
 English Declaration of Conformity Manufacturer: Toshiba Corporation 1-1, Shibaura 1-Chrome, Minato-ku, Tokyo, Japan We declare under our sole responsibility that the TDP-MT100 projector conform to the
Panduan Ringkas. Regulatory model T146 P/N 4J.1C DISPERINDAG No. 0287/ /09.03
 Panduan Ringkas Regulatory model T146 P/N 4J.1C801.001 DISPERINDAG No. 0287/1.824.51/09.03 Please read the safety instructions booklet before setting up the projector. 1 Unpack the box Here's what's included:
Model 28A7100HC User's Guide
 Model 28A7100HC User's Guide 401-599-00 EMC Directive 89/336/EEC, Amended by 93/68/EEC EMC: EN 55022 EN 55024 EN 61000-3-2 EN 61000-3-3 Low Voltage Directive 73/23/EEC, Amended by 93/68/EEC Safety: EN
Safety Certifications UL, CUL, TÜV, NOM, IRAM
 FCC Warning This equipment has been tested and found to comply with the limits for a Class A digital device, pursuant to part 15 of the FCC Rules. These limits are designed to provide reasonable protection
ScreenPlay User s Guide. [ English Français Deutsch Español Italiano Norsk Nederlands]
![ScreenPlay User s Guide. [ English Français Deutsch Español Italiano Norsk Nederlands]](/thumbs/87/95410757.jpg "ScreenPlay User s Guide. [ English Français Deutsch Español Italiano Norsk Nederlands]") ScreenPlay 4805 User s Guide [ English Français Deutsch Español Italiano Norsk Nederlands] Declaration of Conformity Manufacturer: InFocus Corporation, 27700B SW Parkway Ave. Wilsonville, Oregon 97070
ScreenPlay 4805 User s Guide [ English Français Deutsch Español Italiano Norsk Nederlands] Declaration of Conformity Manufacturer: InFocus Corporation, 27700B SW Parkway Ave. Wilsonville, Oregon 97070
This manual is provided as a free service by Projector.com.
 PLEASE READ This manual is provided as a free service by Projector.com. We are in no way responsible for the contents of the manual. We do not guarantee its accuracy and we do not make any claim of copyright.
IN70 Series. User's Guide
 IN70 Series User's Guide Please read the safety instructions booklet before setting up the projector. 1 Unpack the box Here s what s included: Projector emote CD-OM Composite Video Cable Power Cord M1-DA
IN32 IN34 IN36. User's Guide
 IN32 IN34 IN36 User's Guide Reference guide languages: Svenska Registration / Reference guide / Online resources Register to activate your warranty to ensure eligibilty for service and support, and get
IN1501, IN1503 Regulatory models: P1501, P1503
 IN1501, IN1503 Regulatory models: P1501, P1503 009-1313-00 Declaration of Conformity Manufacturer: InFocus Corporation, 27500 SW Parkway Ave. Wilsonville, Oregon 97070-8238 USA We declare under our sole
IN42. User s Guide. English, Deutsch, Español, Français, Italiano, Svensk, Nederlands, Portugués,
 IN42 User s Guide English, Deutsch, Español, Français, Italiano, Svensk, Nederlands, Portugués, Declaration of Conformity Manufacturer: InFocus Corporation, 27700B SW Parkway Ave. Wilsonville, Oregon 97070
SALE on Projector Bulbs at take additional 5% Off with coupon code 5PDF IN72/ IN74/ IN76. User's Guide
 IN7/ IN74/ IN76 User's Guide Please read the safety instructions booklet before setting up the projector. 1 Unpack the box Here s what s included: Projector emote Composite Video Cable 1 CD-OM Power Cord
Quick Start Guide English For other languages, see booklet
 1100 Quick Start Guide English For other languages, see booklet Français voir la brochure Deutsch siehe Broschüre Español ver folleto Italiano vedi opuscolo Nederlands zie boekje Português consulte livreto
IN3114, IN3116 Regulatory models: M3100
 IN3114, IN3116 Regulatory models: M3100 010-0738-00 Declaration of Conformity Manufacturer: InFocus Corporation, 27500 SW Parkway Ave. Wilsonville, Oregon 97070 USA We declare under our sole responsibility
Safety Certifications UL, CUL, TÜV, NOM, IRAM
 FCC Warning This equipment has been tested and found to comply with the limits for a Class A digital device, pursuant to part 15 of the FCC Rules. These limits are designed to provide reasonable protection
The most trusted, dependable name
 The most trusted, dependable name in projector lamp sales. http://www.myprojectorlamps.com http://www.myprojectorlamps.ca http://www.myprojectorlamps.eu The following projector manual has not been modified
IN3102 IN3104 IN3106. English - for other languages, see booklet
 IN3102 IN3104 IN3106 Quick Start English - for other languages, see booklet Français voir la brochure Deutsch siehe Broschüre Español ver folleto Italiano vedi opuscolo Nederlands zie boekje Português
Regulatory models W3220, W3240 and W IN3102 IN3104 IN3106 IN3108
 Regulatory models W3220, W3240 and W3260 010-0710-02 IN3102 IN3104 IN3106 IN3108 Declaration of Conformity Manufacturer: InFocus Corporation, 27500 SW Parkway ve. Wilsonville, Oregon 97070 US European
IN2112, IN2114, IN2116
 IN2112, IN2114, IN2116 010-0735-02 DISPERINDAG No. 0287/1.824.51/09.0 Regulatory models: V2000, M2100 Declaration of Conformity Manufacturer: InFocus Corporation, 13190 SW 68th Parkway, Portland, Oregon
FCC Warning. Canada. Agency Approvals
 Declaration of Conformity Manufacturer: InFocus Corporation, 13190 SW 68th Parkway, Suite 200, Portland, Oregon 97223-8368 USA We declare under our sole responsibility that this projector conforms to the
English. User s Guide. Contents. Warning Please read the safety instructions booklet before setting up the projector. English
 User s Guide Warning Please read the safety instructions booklet before setting up the projector. This manual covers only basic operations, including how to set up the projector, and basic projector operations.
500203W00-GRA-N DISPERINDAG No. 0287/ /09.03 Regulatory models: P103
 I N1 1 1 6, I N 1 1 1 8 H D Us e r Gu i d e s 500203W00-GRA-N DISPERINDAG No. 0287/1.824.51/09.03 Regulatory models: P103 Declaration of Conformity Manufacturer: InFocus Corporation, 13190 SW 68th Parkway,
Informational Blog: Video Guides: User Forums:
 Disclaimer This user manual is provided as a free service by FixYourDLP.com. FixYourDLP is in no way responsible for the content of this manual, nor do we guarantee its accuracy. FixYourDLP does not make
TABLE OF CONTENTS. Safety Summary
 TABLE OF CONTENTS Safety Summary iii Introduction 1 Image Resolution 1 Compatibility 1 Unpacking the Projector 1 Usage Guidelines 4 If You Need Assistance 4 Warranty 4 Setting up the Projector 5 Connecting
User Guide KODAK DP2900 Digital Projector. with Kodak s Exclusive Image Manager
 User Guide KODAK DP2900 Digital Projector with Kodak s Exclusive Image Manager FCC Warning This equipment has been tested and found to comply with the limits for a Class A digital device, pursuant to
QUICK START (English)
") QUICK START 009-0290-01 (English) QUICK START SAFETY SUMMARY : Please read these instructions before using your LitePro. Failure to comply could result in fire, electrical shock, personal injury or equipment
QUICK START 009-0290-01 (English) QUICK START SAFETY SUMMARY : Please read these instructions before using your LitePro. Failure to comply could result in fire, electrical shock, personal injury or equipment
English. User s Guide. Contents. Warning Please read the safety instructions booklet before setting up the projector. English
 English English User s Guide Warning Please read the safety instructions booklet before setting up the projector. This manual covers only basic operations, including how to set up the projector, and basic
X6 X7. Reference Guide
 X6 X7 Reference Guide Table of Contents Table of Contents... 1 Usage Notice... 2 Precautions...2 Important Operating Considerations for Safety...4 Introduction... 5 Product Features...5 Package Overview...6
IN5533, IN5535 User s Guide. in5500. Regulatory model: F DISPERINDAG No. 0287/ /09.03
 IN5533, IN5535 User s Guide in5500 010-0715-06 DISPERINDAG No. 0287/1.824.51/09.03 Regulatory model: F5530 Declaration of Conformity Manufacturer: InFocus Corporation, 13190 SW 68th Parkway, Portland,
Copyright 2001 by BOXLIGHT Poulsbo, Washington. All rights reserved.
 Copyright 2001 by BOXLIGHT Poulsbo, Washington. All rights reserved. FCC Warning This equipment has been tested and found to comply with the limits for a Class B digital device, pursuant to part 15 of
IN5502, IN5504, IN5532, IN5534 User s Guide
 IN5502, IN5504, IN5532, IN5534 User s Guide 5500 SALE on Projector Bulbs at www.bulbamerica.com Regulatory models: F5500, F5530 010-0715-01 SALE on Projector Bulbs at www.bulbamerica.com Declaration of
Table of Contents Table of Contents... 1 Usage Notice... 2 Introduction... 4 Installation User Controls Appendices...
 Table of Contents Table of Contents... 1 Usage Notice... 2 Precautions... 2 Introduction... 4 Product Features... 4 Package Overview... 5 Product Overview... 6 Main Unit... 6 Control Panel... 7 Connection
Table of Contents. English. Table of Contents... 1 Usage Notice Introduction Installation User Controls Appendices...
 Table of Contents Table of Contents... 1 Usage Notice... 2 Precautions... 2 Introduction... 4 Product Features... 4 Package Overview... 5 Product Overview... 6 Main Unit... 6 Control Panel... 7 Connection
Quick Reference Guide
 Multimedia Projector Quick Reference Guide MODEL 103-011100-01 Projection lens is optional. English Use this book as a reference guide when setting up the projector. For detailed information about installation,
FCC Warning. Canada. Agency Approvals
 P139-001-00 Declaration of Conformity Manufacturer: InFocus Corporation, 13190 SW 68th Parkway, Suite 200, Portland, Oregon 97223-8368 US We declare under our sole responsibility that this projector conforms
USER MANUAL. 22" Class Slim HD Widescreen Monitor L215DS
 USER MANUAL 22" Class Slim HD Widescreen Monitor L215DS TABLE OF CONTENTS 1 Getting Started Package Includes Installation 2 Control Panel / Back Panel Control Panel Back Panel 3 On Screen Display 4 Technical
USER MANUAL. 27 Full HD Widescreen LED Monitor L27ADS
 USER MANUAL 27 Full HD Widescreen LED Monitor L27ADS TABLE OF CONTENTS 1 Getting Started 2 Control Panel/ Back Panel 3 On Screen Display 4 Technical Specs 5 Care & Maintenance 6 Troubleshooting 7 Safety
(English)
") 009-0279-00 (English) SAFETY SUMMARY: Please read these instructions before using your LitePro 610 or 620. Failure to comply could result in fire, electrical shock, personal injury or equipment damage.
009-0279-00 (English) SAFETY SUMMARY: Please read these instructions before using your LitePro 610 or 620. Failure to comply could result in fire, electrical shock, personal injury or equipment damage.
TABLE OF CONTENTS. Safety Summary
 TABLE OF CONTENTS Safety Summary iii Introduction 1 Image Resolution 1 Compatibility 2 Unpacking the Projector 2 Usage Guidelines 4 If You Need Assistance 4 Warranty 4 Setting up the Projector 5 Connecting
DCL9AW. User Manual. English
 DCL9AW User Manual English PRECAUTIONS Information for users applicable in European Union countries 1 Information for users applicable in United States of America 1 Installation 1 Power connection 1 Maintenance
Kameleon. HDP p DLP Projector. Users Manual v1.1
 Kameleon HDP6000 1080p DLP Projector Users Manual v1.1 2 FCC Warning Note: This equipment has been tested and found to comply with the limits for a Class B digital device, pursuant to part 15 of the FCC
*36.8ES01G002-A* * * P/N 36.8ES01G002-A. Quick Start Guide English For other languages, see booklet
 39 Quick Start Guide English For other languages, see booklet Français voir la brochure Deutsch siehe Broschüre Español ver folleto Italiano vedi opuscolo Nederlands zie boekje Português consulte livreto
Table of Contents... 1 Usage Notice Introduction Installation Connecting the Projector...10 Powering On/Off the Projector...
 Table of Contents Table of Contents... 1 Usage Notice... 2 Precautions...2 Introduction... 4 Product Features...4 Package Overview...5 Product Overview...6 Main Unit...6 Control Panel...7 Connection Ports...8
Table of Contents Table of Contents... 1 Usage Notice... 2 Introduction... 4 Installation User Controls Appendices...
 Table of Contents Table of Contents... 1 Usage Notice... 2 Precautions... 2 Introduction... 4 Product Features... 4 Package Overview... 5 Product Overview... 6 Main Unit... 6 Control Panel... 7 Connection
Table of Contents. English. Usage Notice. Introduction. Installation. User Controls. Appendices. Precautions... 2
 Table of Contents Usage Notice Precautions... 2 Introduction Product Features... 4 Package Overview... 5 Product Overview... 6 Main Unit... 6 Control Panel... 7 Connection Ports... 8 IR Remote Control...
PLL2210MW LED Monitor
 PLL2210MW LED Monitor USER'S GUIDE www.planar.com Content Operation Instructions...1 Safety Precautions...2 First Setup...3 Front View of the Product...4 Rear View of the Product...5 Quick Installation...6
Mini Projector User s Guide
 Mini Projector User s Guide Please read this manual before Model P50 Table of Contents 1. Table of Contents---------------------------------1 2. Warnings-----------------------------------------2 3. Accessories---------------------------------------4
PL2410W LCD Monitor USER'S GUIDE.
 PL2410W LCD Monitor USER'S GUIDE www.planar.com Content Operation Instructions...1 Safety Precautions...2 First Setup...3 Front View of the Product...4 Rear View of the Product...5 Quick Installation...6
LCD VALUE SERIES (32 inches)
") LCD VALUE SERIES (32 inches) http://www.orionimages.com All contents of this document may change without prior notice, and actual product appearance may differ from that depicted herein 1. SAFETY INSTRUCTION
LCD VALUE SERIES (32 inches) http://www.orionimages.com All contents of this document may change without prior notice, and actual product appearance may differ from that depicted herein 1. SAFETY INSTRUCTION
HD Digital Set-Top Box Quick Start Guide
 HD Digital Set-Top Box Quick Start Guide Eagle Communications HD Digital Set-Top Box Important Safety Instructions WARNING TO REDUCE THE RISK OF FIRE OR ELECTRIC SHOCK, DO NOT EXPOSE THIS PRODUCT TO RAIN
Quick Setup 1 Unpack the projector
 PowerLite 410W Quick Setup 1 Unpack the projector You should have the following items: Projector and lens cover Power cord Remote control and batteries Computer cable Projector CD-ROMs Password protected
DATA PROJECTOR XJ-S30/XJ-S35
 E DATA PROJECTOR XJ-S30/XJ-S35 User s Guide Be sure to read the precautions in the separate User s Guide (Basic Operation). For details about setting up the projector and lamp replacement, see the User
BenQ PB8220 PB8120. User s Guide
 BenQ PB8220 PB8120 User s Guide Copyright Copyright 2003 by BENQ Corporation (formerly Acer Communications & Multimedia Inc.). All rights reserved. No part of this publication may be reproduced, transmitted,
hp mp3130 series digital projector user s guide
 hp mp3130 series digital projector user s guide 1 Notice This manual and any examples contained herein are provided as is and are subject to change without notice. Hewlett-Packard Company makes no warranty
2 Connect your video source
 EX90 2 Connect your video source Quick Setup Connect the projector to a computer or video source using any of the available connections shown below. Check the connectors on your video equipment. If more
PB2220/ PB2120 FEATURES DLP PROJECTOR USER S GUIDE OUTLINE
 DLP PROJECTOR PB2220/ PB2120 USER S GUIDE Thank you for purchasing the BenQ DLP Projector. Please read this user s guide to ensure correct use of the device. Save this user s guide for future reference.
Dell 1510X Projector. User s Guide
 Dell 1510X Projector User s Guide Notes, Notices, and Cautions NOTE: A NOTE indicates important information that helps you make better use of your projector. NOTICE: A NOTICE indicates either potential
USER MANUAL Full HD Widescreen LED Monitor L215ADS
 USER MANUAL 21.5 Full HD Widescreen LED Monitor L215ADS TABLE OF CONTENTS 1 Getting Started 2 Control Panel/ Back Panel 3 On Screen Display 4 Technical Specs 5 Care & Maintenance 6 Troubleshooting 7 Safety
6732ASK_M2_Cover.qxd 4/6/04 3:52 PM Page 1 > > > > > > > User s Guide
 > > > > > >> User s Guide FCC Warning This equipment has been tested and found to comply with the limits for a Class A digital device, pursuant to part 15 of the FCC Rules. These limits are designed to
USER MANUAL Full HD Widescreen LED Monitor L215IPS
 USER MANUAL 21.5 Full HD Widescreen LED Monitor L215IPS TABLE OF CONTENTS 1 Getting Started 2 Control Panel/ Back Panel 3 On Screen Display 4 Technical Specs 5 Care & Maintenance 6 Troubleshooting 7 Safety
Informational Blog: Video Guides: User Forums:
 Disclaimer his user manual is provided as a free service by FixYourDLP.com. FixYourDLP is in no way responsible for the content of this manual, nor do we guarantee its accuracy. FixYourDLP does not make
Precautions About the Product... 3 Package Overview... 4
 English 1 Table of Contents Usage Notice Precautions... 2 Introduction About the Product... 3 Package Overview... 4 Installation Product Overview... 5 Connecting the Projection Display... 8 Powering On/Off
Camera 220C Document Camera User s Guide
 Camera 220C Document Camera User s Guide #401-220C-00 Table of Contents TABLE OF CONTENTS... 0 TABLE OF CONTENTS... 1 COPYRIGHT INFORMATION... 2 CHAPTER 1 PRECAUTIONS... 3 CHAPTER 2 PACKAGE CONTENT...
CAUTION RISK OF ELECTRIC SHOCK NO NOT OPEN
 Evolution Digital HD Set-Top Box Important Safety Instructions 1. Read these instructions. 2. Keep these instructions. 3. Heed all warnings. 4. Follow all instructions. 5. Do not use this apparatus near
2 Connect your video source
 PowerLite 822+/83+ 2 Connect your video source Quick Setup Connect the projector to a computer or video source using any of the available connections shown below. Check the connectors on your video equipment.
PB7200. PB7100 User s Manual
 PB7200 BenQ PB7220 PB7100 User s Manual Copyright Copyright 2003 by BENQ Corporation. All rights reserved. No part of this publication may be reproduced, transmitted, transcribed, stored in a retrieval
DLP PROJECTOR FEATURES USER S GUIDE OUTLINE. 1. High Brightness. 2. High Resolution. 3. Compact Size, Feather Weight for Portability
 DLP PROJECTOR USER S GUIDE Thank you for purchasing the DLP TM Projector. Please read this user s guide to ensure correct use of the device. Save this user s guide for future reference. OUTLINE This DLP
Evolution Digital HD Set-Top Box Important Safety Instructions
 Evolution Digital HD Set-Top Box Important Safety Instructions 1. Read these instructions. 2. Keep these instructions. 3. Heed all warnings. 4. Follow all instructions. 5. Do not use this apparatus near
Table of Contents Table of Contents... 1 Usage Notice... 2 Introduction... 4 Installation User Controls Appendices...
 Table of Contents Table of Contents... 1 Usage Notice... 2 Precautions... 2 Introduction... 4 Product Features... 4 Package Overview... 5 Product Overview... 6 Main Unit... 6 Control Panel... 7 Connection
USER MANUAL Full HD Widescreen LED Monitor L236VA
 USER MANUAL 23.6 Full HD Widescreen LED Monitor L236VA TABLE OF CONTENTS 1 Getting Started 2 Control Panel/ Back Panel 3 On Screen Display 4 Technical Specs 5 Care & Maintenance 6 Troubleshooting 7 Safety
Table of Contents Table of Contents... 1 Usage Notice... 2 Introduction... 4 Installation User Controls Appendices...
 Table of Contents Table of Contents... 1 Usage Notice... 2 Precautions... 2 Introduction... 4 Product Features... 4 Package Overview... 5 Product Overview... 6 Main Unit... 6 Control Panel... 7 Connection
MONOPRICE. 27" WQHD Monitor. User's Manual P/N 24659
 MONOPRICE 27" WQHD Monitor P/N 24659 User's Manual CONTENTS SAFETY WARNINGS AND GUIDELINES... 3 FEATURES... 4 CUSTOMER SERVICE... 4 PACKAGE CONTENTS... 4 PRODUCT OVERVIEW... 5 Front... 5 Rear... 5 Rear
USER MANUAL. 27 Full HD Widescreen LED Monitor L270E
 USER MANUAL 27 Full HD Widescreen LED Monitor L270E TABLE OF CONTENTS 1 Getting Started 2 Control Panel/ Back Panel 3 On Screen Display 4 Technical Specs 5 Care & Maintenance 6 Troubleshooting 7 Safety
Introduction...2. Features...2 Safety Precautions...2. Installation...4
 PE1900 Contents Introduction...2 Features...2 Safety Precautions...2 Installation...4 Unpacking the Display...4 Locations and Functions of Controls...4 Connections...5 Using Your Display...7 Turning the
1 Unpack the projector. Quick Setup. Epson PowerLite 62c/82c. User s Guide. You should have the following items: Computer cable. Power cord.
 Epson PowerLite 62c/82c Quick Setup 1 Unpack the projector You should have the following items: Projector Power cord Computer cable Projector remote control Password protect sticker User s Guide CD-ROM
DC162 Digital Visualizer. User Manual. English - 1
 DC162 Digital Visualizer User Manual English - 1 Table of Contents CHAPTER 1 PRECAUTIONS... 5 CHAPTER 2 PACKAGE CONTENT... 7 CHAPTER 3 PRODUCT OVERVIEW... 8 3.1 PRODUCT INTRODUCTION... 8 3.2 I/O CONNECTION...
Precautions About the Product... 4 Package Overview Product Overview... 6 Start Your Installation... 8
 2 Table of Contents Usage Notice Precautions... 3 Introduction About the Product... 4 Package Overview... 5 Installation Product Overview... 6 Start Your Installation... 8 User Controls User Control Overview...
MONOPRICE. 27" UHD IPS 4K Ultra Slim Aluminum Monitor. Quick User's Guide P/N 24658
 MONOPRICE 27" UHD IPS 4K Ultra Slim Aluminum Monitor P/N 24658 Quick User's Guide SAFETY WARNINGS AND GUIDELINES Please read this entire manual before using this device, paying extra attention to these
Table of Contents... 1 Usage Notice... 2 Precautions... 2 Introduction... 4 Product Features... 4 Package Overview... 5 Product Overview...
 T l charg sur www.lampe-videoprojecteur.info Table of Contents Table of Contents... 1 Usage Notice... 2 Precautions... 2 Introduction... 4 Product Features... 4 Package Overview... 5 Product Overview...
Notations Used in This Guide
 User s Guide Notations Used in This Guide Indicates procedures which may result in damage or injury if sufficient care is not taken. Indicates additional information and points which may be useful to know
Part names (continued) Remote control
 Remote control") Introduction Part names (continued) Remote control (1) STANDBY ( 25) (1) (2) ON ( 25) (3) (3) ID - 1 / 2 / 3 / 4 s ( 18) (4) (4) COMPUTER 1 ( 27) (7) (5) COMPUTER 2 * (8) (6) COMPUTER 3 * (10) (13) (7)
Introduction Part names (continued) Remote control (1) STANDBY ( 25) (1) (2) ON ( 25) (3) (3) ID - 1 / 2 / 3 / 4 s ( 18) (4) (4) COMPUTER 1 ( 27) (7) (5) COMPUTER 2 * (8) (6) COMPUTER 3 * (10) (13) (7)
Reference Guide. Regulatory models T102, T104 5B
 100 Reference Guide Regulatory models T102, T104 5B.13201.001 Table of contents Introduction... 3 Projector features... 3 Shipping contents... 4 Projector exterior view... 5 Controls and functions... 6
2013, 2014 Hewlett-Packard Development Company, L.P.
 User Guide 2013, 2014 Hewlett-Packard Development Company, L.P. The only warranties for HP products and services are set forth in the express warranty statements accompanying such products and services.
1... English. Table of Contents... 1 Usage Notice Introduction Installation User Controls Appendices Precautions...
 Table of Contents Table of Contents... 1 Usage Notice... 2 Precautions... 2 Introduction... 4 Product Features... 4 Package Overview... 5 Product Overview... 6 Main Unit... 6 Panel Control... 7 Connection
DX/S660 DX/S650 User s Guide. BenQ
 DX/S660 DX/S650 User s Guide BenQ Copyright Copyright 2002 by BENQ Corporation (formerly Acer Communications & Multimedia Inc.). All rights reserved. No part of this publication may be reproduced, transmitted,
Contents. Contents About this manual Operation During Projection Image Operations During Projection... 3
 Contents Contents... About this manual...... Operation During Projection... 3 Image Operations During Projection... 3 Adjusting Image Brightness... 3 Selecting the Color Mode... 4 Zooming an Image... 4
Operating Instructions
 Operating Instructions LCDRV700 Digital LCD Color Monitor Please read this manual thoroughly before operating the unit, and keep it for future reference. V1.0 Contents 1. Precautions 2. Features 1 3 3.
USER MANUAL. 28" 4K Ultra HD Monitor L28TN4K
 USER MANUAL 28" 4K Ultra HD Monitor L28TN4K TABLE OF CONTENTS 1 Getting Started 2 Control Panel/ Back Panel 3 On Screen Display 4 Technical Specs 5 Care & Maintenance 6 Troubleshooting 7 Safety Info &
1 Unpack the projector. Quick Setup. EPSON PowerLite S1+ Your projector comes with the following items:
 EPSON PowerLite S1+ Quick Setup 1 Unpack the projector Your projector comes with the following items: Projector Power cord Computer cable Computer Projector Projector remote control Presentation remote
Rain+Birdt. Landscape Irrigation & Maintenance Remote System. Quick Start Guide 4.00 F G H K 9X. c n. System Components
 Rain+Birdt Landscape Irrigation & Maintenance Remote System Quick Start Guide 4.00 D System Components A Transmitter (TX) B Receiver (RX) C Quick Connect (QC) 6-Pin Quick Connect (QC) for use with ESP-Modular
BOXLIGHT XD-16n FEATURES USER S GUIDE OUTLINE. 1. High Brightness. 2. High Resolution. 3. Compact Size, Feather Weight for Portability
 BOXLIGHT XD-16n USER S GUIDE Thank you for purchasing the BOXLIGHT XD-16n Multimedia Projector. Please read this user s guide to ensure correct use of the device. Save this user s guide for future reference.