TABLE OF CONTENTS. RS232 Commands...6. Remote Control Operation...7. Output Format Submenu..8. Auto Power..8. Display Format...8. Sync Tracking..
|
|
|
- Cassandra Chrystal Williamson
- 6 years ago
- Views:
Transcription
1 TABLE OF CONTENTS Safety Instructions 2 Installation. 4 Operation 6 RS232 Commands...6 Remote Control Operation...7 Set Up Menu...8 Output Format Submenu..8 Auto Power..8 Display Format Sync Tracking..9 Main Menu...10 Video Adjustment Submenu.. 10 Input Selection Submenu...11 Memory Submenu.. 11 Aspect Ratio Submenu Film Mode..12 Factory reset...12 Sync configuration Service and Warranty
2 SAFETY INSTRUCTIONS 1. Read and apply all of the safety and operating instructions provided with your Video equipment. 2. Keep all safety and operating instructions for future reference. 3. Unplug this video equipment from the wall outlet before cleaning. Never use liquid or aerosol cleaner-s. Use only a damp cloth for cleaning. 4. Do not use any attachments or accessories not recommended by the manufacturer as they may cause hazards. 5. Do not use this video equipment near water. Avoid placing it near a bathtub, kitchen sink, or laundry tub, in a wet basement, or near a swimming pool. 6 a. Do not place this video equipment on an unstable cart, stand, or table. The video equipment may fall, causing serious injury to a child or an adult and serious damage to the appliance. Use only with a cart or stand recommended by the manufacturer. Wall or shelf mounting should follow the manufacturer s instructions, and should use a mounting kit approved by the manufacturer. b. Move any appliance and cart combination with care. Quick stops, excessive force, and Uneven surfaces may cause the appliance and a cart to overturn. 7. Side openings in the cabinet are provided for ventilation, and to insure reliable operation of the video equipment and protect it from overheating. These openings must not be blocked or covered. Never place the video equipment on a bed, sofa, rug, or other similar surface that may block ventilation openings. Never place this product near or over a radiator or heat register. Do not place this product in a built-in installation such as a bookcase or rack unless proper ventilation is provided. 8. Operate only from the type of power source indicated on the marking label. If you are not sure what the type of power supply to your home, consult with your appliance dealer or local Power Company. 9. This unit is equipped with a three conductor polarized alternating-current line plug. This plug will fit into the power outlet only one way. This is a safety feature. If you are unable to insert the plug fully into the outlet, contact your electrician to replace your obsolete outlet. Do not defeat the safety purpose of the polarized plug. 10. Route power-supply cords so that they will not be walked on or pinched by items that placed on or against them. Pay particular attention to cords at plugs, convenience receptacles, and to the points where they exit the products. 11. Protect your video equipment from lightning during a storm or when it is left unattended and unused for long periods of time, unplug it from the wall outlet. This way will prevent damaging to the unit due to lightning and power-line surges. 12. Do not overload wall outlets and extension cords as this can result in fire or electric shock. 13. Never push objects of any kind into this video equipment through cabinet slots as they may touch dangerous voltage points or short out parts that could result in a fire or electric shock. Never spill liquid of any kind on the video equipment. 14. Do not attempt to do service this unit by yourself as opening or removing cover may expose you to dangerous voltages or other hazards. Refer all servicing to qualified service personnel. 2
3 15. Unplug this video equipment from the wall outlet, and refer servicing to qualified service personnel under the following conditions: a. When the power cord or plug is damaged or frayed. b. If liquid has been spilled into the video equipment. c. If the video equipment has been exposed to rain or water. d. If the video equipment does not operate normally by following the operating instructions; adjust only those controls that are covered by the operating instructions as improper adjustment of other controls may result in damage and will often require extensive work by a qualified technician to restore the video equipment to normal operation. e. If the video equipment has been dropped or the cabinet has been damaged. f. When the video equipment exhibits a distinct change in performance. 16. When replacement parts are required, be sure the service technician has used replacement parts specified by the manufacturer that has the same characteristics as the original pall. Unauthorized substitutions may result in fire, electric shock, or other hazards. 17. Upon completion of any service or repairs to this video equipment, ask the service technician to perform routine safety checks to determine that the system is in safe operating condition. 18. Do not place anything on the video equipment. Heavy objects placed on any part of' this system will cause damage. 19. WARNING: To prevent fire or shock hazard, do not expose this appliance to rain or moisture. 20. CAUTION: TO PREVENT ELECTRIC SHOCK DO NOT USE THIS (POLARIZED) PLUG WITH AN EXTENSION CORD, RECEPTACLE OR OTHER OUTLET UNLESS THE BLADES CAN BE FULLY INSERTED TO PREVENT BLADE EXPOSURE. NOTE 1: This equipment is designed to operate in the U.S.A., Canada and other countries where the broadcasting system and AC house current is exactly the same as in the U.S.A. and Canada. NOTE 2: This equipment has been tested and found to comply with the limits for a Class B digital device, pursuant to Part 15 of the FCC Rules. These limits are designed to provide reasonable protection against harmful interference in a residential installation. This equipment generates, uses and can radiate radio frequency energy and, if not installed and used in accordance with the instructions, ma, cause harmful interference to radio communications. However, there is no guarantee that interference will not occur in a particular installation. If this equipment does cause harmful interference to radio or television reception, which can be determined by turning the equipment off and on, the user is encouraged to try to correct the interference by one or more of the following measures: Reorient or relocate the receiving antenna. Increase the separation between the equipment and receiver. Connect the equipment into an outlet on a circuit different from that to which the receiver is connected. Consult the dealer or an experienced radio/tv technician for help. 3
4 INTRODUCTION CrystalImage Video Scaler (VS) 2.0 is engineered for optimum and high quality performance. Unlike line doublers and quadruplers, the VS 2.0 combines all these in one providing the clearest, crispest, most brilliant detailed video for display on CRT, LCD or DLP projectors and plasma displays. This system uses highly technological processing algorithms to manipulate the image, changing its resolution and refresh rate to exactly match the desired output specifications with virtually no artifacts. Therefore, VS 2.0 exceeds the capabilities of a line doubler or quadrupler, which can only output a signal locked to the input signal. INSTALLATION The VS 2.0 has inputs for three different video sources plus an RGB input via a D15 connector. 1. Red, Green, Blue, and H&V Outputs The output video signal from the VS 2.0 to the display device is made via five BNC connectors for Red, Green, Blue, H/C and V Sync. High quality 75 Ohm coaxial cables are recommended to connect the output of VS 2.0 to the display device. VS 2.0 provides composite and separate H/V outputs. 2. VGA Input This input is provided for sources like personal computers, HDTV decoder box, and other video equipment with a RGB and Sync output. The pin assignments for the 15 pin D plug are as follows: 1. Red Video 6. Ground 11. N/A 2. Green Video 7. Ground 12. N/A 3. Blue Video 8. Ground 13. Horizontal Sync 4. N/A 9. N/A 14. Vertical Sync 5. N/A 10. N/A 15. N/A 4
5 The RGB signals must be an analog signal with a horizontal frequency that is compatible with the scanning frequencies of the monitor. This input can be directly connected to the most personal computers such IBM PS-2 Series, Macintosh MACII Series, and computers with VGA, S-VGA, X-VGA, Graphic Cards. 3. Component Input One component video input is provided. Use that to connect DVD player and other equipment which has a component video output. 4. S-VHS Input (Y/V) The input is provided for video recorders which have an S-VHS (Y/C) output. The tape quality from machines with S-VHS outputs is maximized if the tapes were recorded in the S- VHS format. Although some laser disc machines also have an S-VHS output, this jack is really intended to feed the recording input of an S-VHS VCR. Since laser disc are not recorded with an S-VHS encoded signal, there is no reason to use an S-VHS input when hooking up a laser player to the VS Composite Video Input (Video) One composite input is also provided. Use that to connect laser disc players, non S-VHS tape machines, satellite receivers, video tuners, video cameras and other equipment, which has a composite video output. 6. RS-232 Data Port PC Computer VS Pin Female D 9-Pin Male D RxD 2 3 TxD TxD 3 2 RxD Ground 5 5 Ground RS-232 protocol settings: Bits per second: 9600 Data bits : 8 Parity : None Stop bit : 1 Flow control : None 5
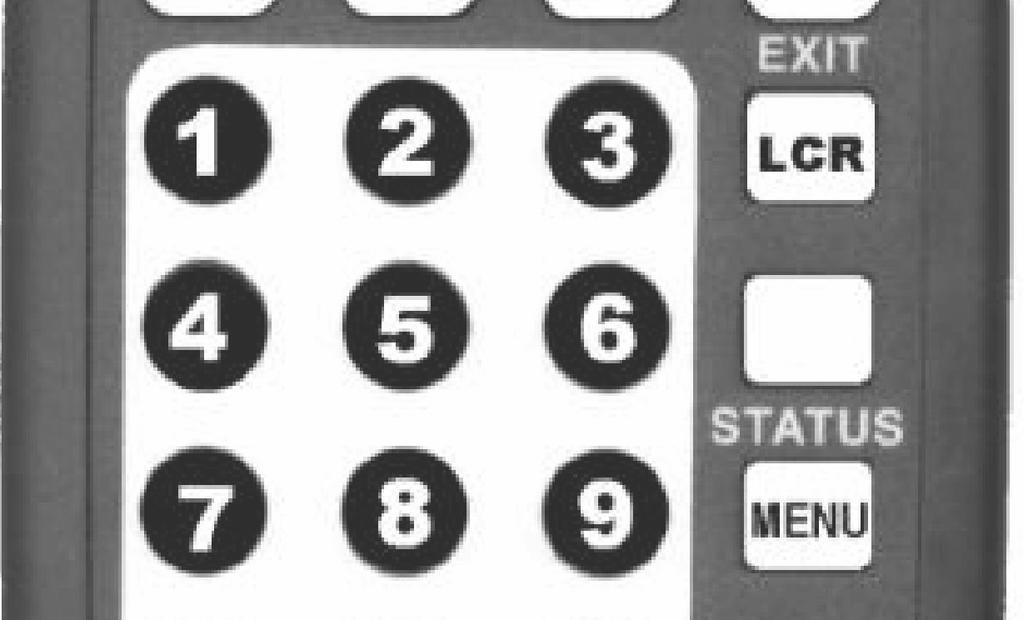
6 RS232 Commands Commands must be upper case characters. All commands are terminated by a carriage return (CR). Example: P1 (CR) = Power On P_ Power on/off (0-1) B_ Brightness (0-1) 0= Off 1= On 0= Decrease 1 level 1= Increase 1 level I_ Input Select (1-4) 1= Video 2= S-Video D_ Detail (0-3) 3= YcrCb 4= VGA 0= Decrease 1 Level (H Detail) A_ Aspect Ratio (1-4) 1= Increase 1 Level 1= Standard 2= Widescreen (H Detail) 3= Anamorphic-1 4= Anamorphic-2 0= Decrease 1 Level (H Detail) R_ Output Format (1-7) 2= Decrease 1 Level 1= 640 x 480 2= HDTV 540p (V Detail) 3= 800 x 600 4= HDTV 720p 3= Increase 1 Level 5= 1024 x 768 6= 1365 x 768 (V Detail) 7= 1280 x = 1365 x 1024 S_ Saturation (0-1) O_ Display Format (1-2) 0= Decrease 1 Level 1= 4 x 3 2= 16 x 9 1= Increase 1 Level 3= 16 x 9 LCD M_ Memory Select (1-3) T_ Tint (0-1) 1= MEM1 2= MEM2 0= Decrease 1 Level 3= MEM3 1= Increase 1 Level C_ Contrast (0-1) F_Film Mode (0-2) 0= Decrease 1 level 0= Auto 1= Increase 1 level 1= Off 2= On OPERATION The remote control or front panel buttons will control your Crystalimage VS 2.0 whenever any programming and adjustments are desired. Panel controls include a set of selection cursors and a set of adjustment cursors, a power button, an IR receiver window, and a LED light that illuminates when the unit is on. The remote control can be operated using the same buttons when pointed at the remote sensor on the player s front panel. 6
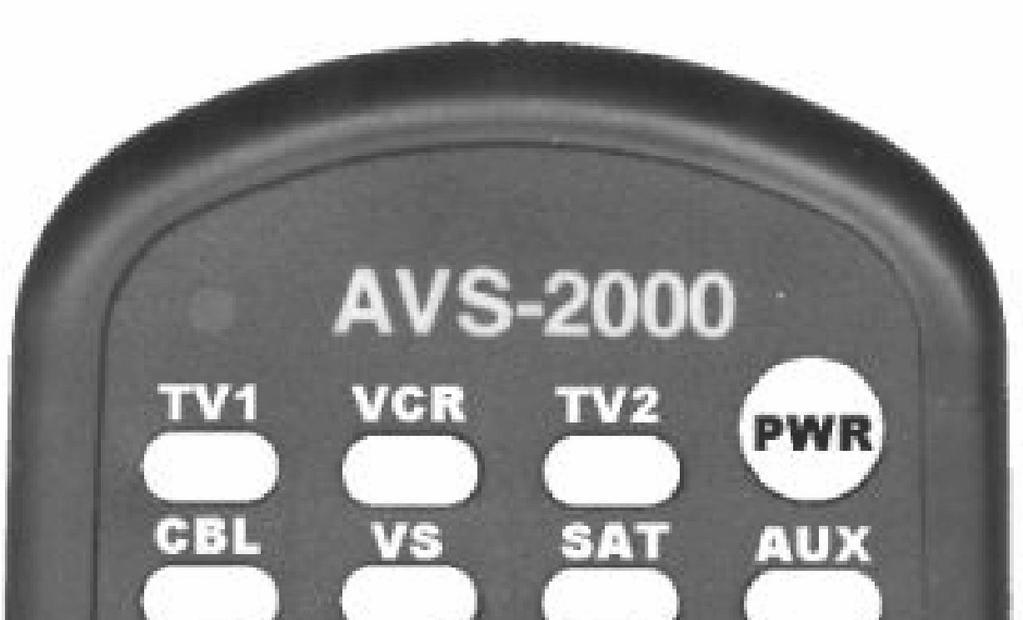


7 NOTE: Crystalimage scaler 3 digit code = 136 7
8 SET-UP MENU The SETUP menu can only accessed by either through front panel or remote control: On the front panel, press and hold both the Up and Down adjustment cursor buttons simultaneously for 10 seconds. On the remote control, press ENT keys in sequence. The Set-Up Menu contains: Output Format, Auto Power, Display Format, Sync Tracking, and Exit. OUTPUT FORMAT Submenu Eight output formats are provided: x HDTV-720p x HDTV-540p x x x x 768 NOTE: The resolution selected should match the native resolution of the projector or display; not the highest resolution that the device will support. AUTO POWER The VS 2.0 is normally turned off and on using the power button on the remote control or front panel. This is only possible when the Auto Power function is turned off. This is the default selection. The Auto Power feature allows the VS 2.0 to automatically turn the unit off when there is no signal and turns it on when there is a video input signal. To activate the Auto Power function, select Auto Power and press. This will turn the function on. DISPLAY FORMAT There are three screen size for Display Format: 16x9, 16x9LCD and 4x3. You must select correct screen size first in order to have the ASPECT RATIO control in main menu to work properly. 4x3 is selected if the screen in the form of 4x3 format. 16x9 is selected if the projector is the CRT type that is vertical height can be compressed in the Anamorphic format or non-crt projector with a permanent installed anamorphic lens adapter. 8
9 16x9LCD is intended for DLP, JVC-DILA projector or 4x3 fixed panel displays which can display 3 aspect ratio (Standard, Widescreen, Anamorphic) images on 16x9 screen. Its output formats are only available in 800x600, 1020x768, 1365x768, 1280x1024, and 1365x1020 for NTSC; and 1020x768, 1280x1020 for PAL Factory preset is 4x3 screen. SYNC TRACKING Allows fine adjustment of the frequency of the digital clocks within the VS2.0 to allow perfect synchronization with the scanning circuitry in your video display, or periodic flashing (and possible bending) in a solid-state displays (D-ILA, LCD, or DLP). Adjust for minimum bending, or to eliminate any periodic flashing of the picture. Range Adjustment: 0 +/- 6 Factory setting at 0 9
10 MAIN MENU Complete Crystalimage controls are provided through onscreen menus listing the various control options. To access the main menu, simply press any cursor button on the remote control or the front panel. The Main Menu will appear on the screen. The Main Menu includes: VIDEO ADJUSTMENT, INPUT SELECT, MEMORY SELECT, ASPECT RATIO, FILM MODE, and EXIT. A boxed cursor arrow will be situated in front of the EXIT option. Pressing either one of the adjustment buttons will immediately clear the screen. Scrolling up and down the main menu with the selection cursor buttons will move the cursor arrow to the desired submenu. To activate the desired menu, simply move the cursor arrow to that function by pressing the selection cursor buttons on the remote control or front panel controls. Then press the cursor button. Various control options for that submenu will then appear on the screen. *Note* A time out feature will automatically clear the onscreen menus within thirty seconds unless a button is pressed on the remote control or panel controls. VIDEO ADJUSTMENT Submenu Adjusting for optimum viewing can be achieved by controlling the Contrast, Brightness, H Detail (sharpness), V Detail, color Saturation and Tint settings to deliver a sharp, clear, crystallike image. The video controls are based on a scaled numeric ratio. Preset manufacturer settings for each control will be displayed and can be adjusted accordingly. The boxed cursor will be position in front of the EXIT function. Pressing will exit the Video Adjustment Menu and return to the Main Menu. To adjust the video settings, simply scroll up or down with the selection cursors to move the boxed cursor to the desired function. Then press the button. The scaled numerical values will be highlighted in white. Pressing will decrease the ratio and pressing will increase the ratio. To adjust a different setting, press the button. Again, scroll up and down to access the desired video settings. You should note your preferred settings for future reference. The contrast level is the amount of white in the picture. For optimum contrast, set the control by pressing the selection cursor buttons until the value of the ratio confers brightness to the white areas while still seeing detail in the picture. This contrast ratio is based on a scale of 100. Brightness level is used to determine the level of black in the picture. The optimum setting is when the dark areas are black, yet maintaining some visible detail. The brightness ratio is based on a scale of
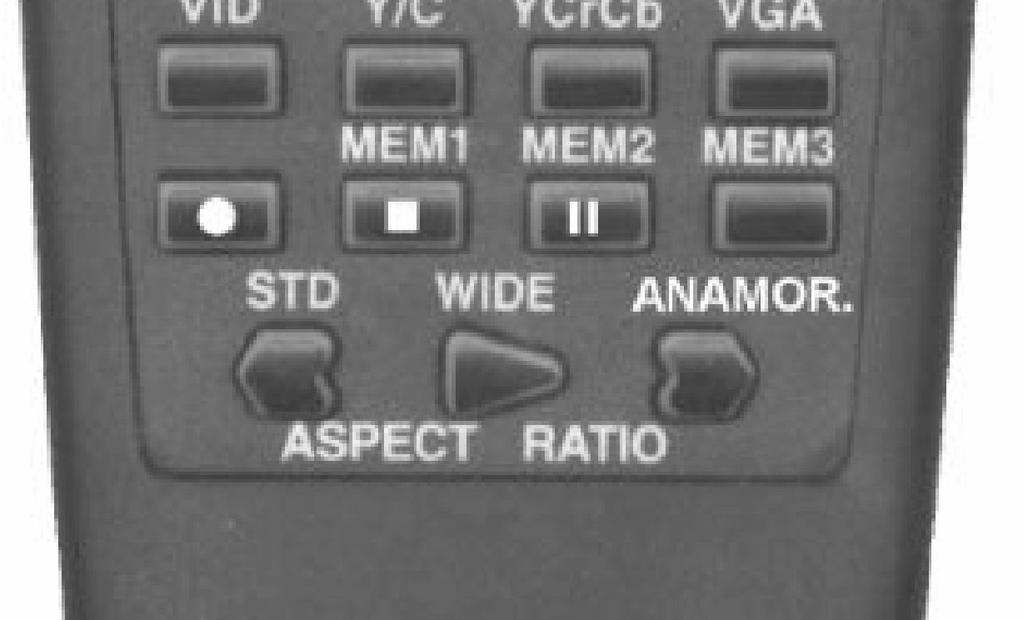
11 H Detail and V Detail level to add more depth and resolution to the image horizontally and vertically. Maximum detail will sharpen the edges of many low quality sources like VHS tapes. These settings are based on a scale of 5. Color saturation level determines the amount of color in the signal. Tint levels, also known as hue and phase, are crucial for realistic color images. Adjust the tint control if the colors have a greenish or magenta-like overtone. The proper setting will drastically improve the flesh coloring. INPUT SELECT Submenu Scrolling up or down the Main Menu will access the Input Select Menu. Press the button to select the Input Select Menu. Source switching for the multiple inputs include: Video, S-Video, YCrCb, VGA and Auto. To switch to the proper input, press the selection cursor buttons on either the remote control or panel controls to sequence through input sources. When the boxed cursor is position in front of the desired input function, pressing will select it. This will be indicated by the highlighted option. If any input is selected but not connected, the image will be blank. The Auto function, when selected, will automatically search for the input signal in this order: VGA component S-Video Video. MEMORY SELECT Submenu Scrolling up or down the Main Menu will access the Memory Menu. Press the button to select the Memory Menu. Three Memories are provided. Memories are automatically saved in each memory, including all video settings and output format settings. ASPECT RATIO Submenu In order to have this function works properly, the DISPLAY FORMAT in Setup menu must be selected correctly. For DISPLAY FORMAT = 4X3, the Apect Ratio of video material can be selected: 1. STANDARD: for 4:3 video source. The image looks normal. 2. WIDESCREEN: for 16:9 video source. The image is stretched vertically and horizontally to fill the screen. The image is being cropped at left and right. 3. ANAMORPHIC-1: for Anamorphic video source. The image has black band on top and bottom (Letterbox). This feature works only at scan rate of 540P or higher. 4. ANAMORPHIC-2: The image is stretched vertically and horizontally to fill the screen. The image is being cropped at left and right. 11
12 For DISPLAY FORMAT = 16X9 (or 16X9LCD), The Aspect Ratio can be selected: 1. STANDARD-1: for 4:3 video source. The image is normally inside of 16:9 screen (black band at left and right). 2. STANDARD-2: for 4:3 video source. The image is stretched to fill screen. (Not implemented for 16X9LCD) 3. WIDESCREEN: for 16:9 video source. The mage looks normal. 4. ANAMORPHIC: for Anamorphic video source. The image looks normal and fill in the 16X9 screen FILM MODE = Auto / On / Off This feature is automatically to detect the video converted from film (2:3 pull-down). For material originated from video cameras, it should be off. Auto: Film is detected and go into film mode automatically. On: Film mode is forced in. Off: Video mode only. Film mode will not be entered. Factory preset at Auto FACTORY RESET * : Press and hold the buttons on front panel until blue LED blink (approximately 3 seconds) to reset the unit for factory preset: Video settings = mid-range, Film mode = Auto, Frame Sync =On, and Display Format and Output Format as following: Power Output Format Display Format Hold 640 x x 3 Hold Hold SETUP menu Hold Hold 540P 4 x 3 Hold Hold 800 x x 9 LCD Hold Hold 720P 4 x 3 Hold Hold 1024 x x 9 LCD Hold Hold 1280 x x 9 LCD 12
13 JX1 JX2 SYNC CONFIGURATION 1-2 EITHER H sync and V sync (Factory preset) Composite sync without serrations Composite sync with serrations JX JX1 JX SERVICE AND WARRANTY Dealers offer service through their own service departments or through one or more authorized repair centers. Situations which may not be resolved to the owner s satisfaction should be reported to: Limited Warranty AVS at (818) This warranty protects the owner of VS 2.0 for one (1) year from the date of purchase for labor and parts. 13
14 Implied warranties of merchant ability and fitness for particular purpose are limited in duration to a period of one year from the date of purchase. AVS shall not be liable or in any way responsible for any incidental or consequential damages of any kind. Some states do not allow limitations on how long a6 implied warranty lasts and/or do not allow the exclusion of incidental or consequential damages, so the above limitations and exclusions may not apply to you. This warranty gives you specific legal rights, and you may also have other rights which vary from state to state. This warranty covers all defects in material and workmanship when shipped in its original container, with the following specific exceptions. These are: damage to or deterioration of any accessory or decorative surface; damage caused by improper installation or adjustment; damage caused by accident, unreasonable use or neglect; damage from failure to follow instructions contained in your operating instructions; damage from the performance of repairs by someone not authorized by AVS; any unit on which the serial number has been effaced, modified, or removed; damage occurring during shipment; Units which have been altered or modified in design, appearance or construction. This warranty covers only the actual defects within the PRODUCT itself, and DOES NOT cover the costs of installation or removal from a fixed installation, normal set-up or adjustments, claims based on any misrepresentation by the seller, or performance variations resulting from installation related circumstance such as signal quality, AC power or incompatibilities with display devices or computer software. AVS will, at its option, either repair or replace the defect, or replace the defective product or part thereof at no charge to the owner for parts and labor covered by this warranty. If necessary repairs are not covered this warranty, or if a unit is examined which is not in need of repair, you will be charged for the repairs of the examination. You must pay shipping charges incurred in getting your product to the factory. We will pay the return shipping charges if the repairs are covered by the warranty. Please save the original shipping cartons. A charge will be made for additional cartons. The original bill of sale with date of purchase will be needed. If your product needs service, you should notify us at: Audio Video Source, Inc Plummer Street Chatsworth, CA Tel (818) Fax (818)
Monochrome Video Monitors
 Instructions for Use Monochrome Video Monitors En F D E NL I LTC 2009 LTC 2012 LTC 2017 Philips Communication & Security Systems GB F D E NL I Instructions for Use...1.1 Mode d emploi...2.1 Bedienungsanleitung...3.1
9" B/W MONITOR CEM-09/09A-2 12" B/W MONITOR CEM-12/12A-2 OPERATION MANUAL
 9" B/W MONITOR CEM-09/09A-2 12" B/W MONITOR CEM-12/12A-2 OPERATION MANUAL CONTENTS PRECAUTIONS FOR USE AND INSTALLATION IMPORTANT SAFEGAURDS SAFETY INSTRUCTIONS INSTRUCTION MANUAL CLASS B COMPUTING DEVICES
2.4 GHz WIRELESS VIDEO SENDER SYSTEM MODEL: VS6234
 2.4 GHz WIRELESS VIDEO SENDER SYSTEM MODEL: VS6234 Please read this manual thoroughly before operating this system OPERATING INSTRUCTIONS 03/02 1 SAFETY INSTRUCTIONS CAUTION! RISK OF ELECTRIC SHOCK. DO
DM-1CH SD DVB-T MODULATOR INSTRUCTION MANUAL
 DM-1CH SD DVB-T MODULATOR INSTRUCTION MANUAL 2. Caution Statements and Table of Contents Table of Contents 2. Caution Statements and Table of contents 3. Important Safety Instructions 4. Important Safety
4 PORT HDMI SWITCH
 4 PORT HDMI SWITCH 1518896 IMPORTANT SAFEGUARDS OF HDMI SWITCH PRODUCTS PLEASE READ CAREFULLY THE FOLLOWING SAFEGUARDS THAT ARE APPLICABLE TO YOUR EQUIPMENT 1. Read instructions - All the safety and operating
Wired to Wireless Camera Converter
 Wired to Wireless Camera Converter Instruction Manual English Version 1.0 MODEL: WL401BNC www.lorexcctv.com Copyright (c) 2006 LOREX Technology Inc. Thank you for purchasing the 2.4 GHz Wireless Camera
USER S MANUAL. Deuce HD User's Manual WORLD HEADQUARTERS
 USER S MANUAL WORLD HEADQUARTERS Artel Video Systems 5B Lyberty Way Westford, MA 01886 Tel: (978) 263-5775 Fax: (978) 263-9755 Email: info@artel.com Web: www.artel.com P/N 1219 Rev. F Copyright 2016 USER
AUTO - SCANNING WITH DIGITAL CONTROL LCD COLOR MONITOR FS-L1903C. User manual (Rev.01) SMITHS HEIMANN
 SMITHS HEIMANN") AUTO - SCANNING WITH DIGITAL CONTROL LCD COLOR MONITOR FS-L1903C User manual (Rev.01) SMITHS HEIMANN www.smithsdetection.com Table of Contents Safety Instructions... 5 Accessories... 8 Power Connections...
AUTO - SCANNING WITH DIGITAL CONTROL LCD COLOR MONITOR FS-L1903C User manual (Rev.01) SMITHS HEIMANN www.smithsdetection.com Table of Contents Safety Instructions... 5 Accessories... 8 Power Connections...
17 19 PROFESSIONAL LCD COLOUR MONITOR ART
 17 19 PROFESSIONAL LCD COLOUR MONITOR ART. 41657-41659 Via Don Arrigoni, 5 24020 Rovetta S. Lorenzo (Bergamo) http://www.comelit.eu e-mail:export.department@comelit.it WARNING: TO REDUCE THE RISK OF FIRE
Color Video Monitor. Instruction Manual. Read this manual thoroughly before use, and retain it for maintenance.
 Color Video Monitor Instruction Manual Read this manual thoroughly before use, and retain it for maintenance. The product s exterior design and specifications may subject to change without prior notice
LF-IRX. 12 Month Limited Warranty LF-IRX. Remote Control Extender. Owner s manual. For customer service and technical information::
 12 Month Limited Warranty Audiovox Electronics Corporation (the company) warrants to the original purchaser of this product that should this product or any part thereof, under normal use and conditions,
Passport Player Owner s Manual
 Passport Player Owner s Manual Passport_manual_Rev1_1.indd 1 Contents Welcome.......................................................... 1 What s in the box?.......................................................
Wireless 4 Channel Receiver with 2 Night Vision cameras
 Wireless 4 Channel Receiver with 2 Night Vision cameras Instruction Manual English Version 2.0 MODEL: SHS-4WLS www.lorexcctv.com Copyright 2006 LOREX Technology Inc. Thank you for purchasing the SHS-4WLS.
Evolution Digital HD Set-Top Box Important Safety Instructions
 Evolution Digital HD Set-Top Box Important Safety Instructions 1. Read these instructions. 2. Keep these instructions. 3. Heed all warnings. 4. Follow all instructions. 5. Do not use this apparatus near
COMMODORE 1802 COLOR MONITOR USER'S GUIDE
 COMMODORE 1802 COLOR MONITOR USER'S GUIDE Warning: This product includes critical mechanical and electrical parts which are essential for X radiation safety. For continued safety replace critical components
10.4 Dual Rack Mount TFT-LCD Monitor INSTRUCTION MANUAL. Please read this manual thoroughly before use. Keep it handy for future reference.
 10.4 Dual Rack Mount TFT-LCD Monitor INSTRUCTION MANUAL Please read this manual thoroughly before use. Keep it handy for future reference. Document Number: V531-LD100-000 Ver. 07/2010 * * * WARNING * *
HD Digital Set-Top Box Quick Start Guide
 HD Digital Set-Top Box Quick Start Guide Eagle Communications HD Digital Set-Top Box Important Safety Instructions WARNING TO REDUCE THE RISK OF FIRE OR ELECTRIC SHOCK, DO NOT EXPOSE THIS PRODUCT TO RAIN
AITech ProA/V Media Extender 5GHz Digital
 AITech ProA/V Media Extender 5GHz Digital 5 GHz Wireless Digital Media Transmitter and Receiver User Manual Table of Contents 1. Package Contents 2. Panels and Functions AV Sender AV Receiver 3. Setup
CR42 LANCASTER
 10-4-08 CR42 LANCASTER 910-262800-0020-100 WARRANTY Crosley Radio Products are warranted against defects in material and workmanship for a period of 90 days beginning from the date of sale to the original
ZvBox 150. HD video distribution over COAX Get Going Guide
 ZvBox 150 HD video distribution over COAX Get Going Guide ZvBox 150 is an HD MPEG 2 Encoder and frequency agile QAM Modulator. It allows you to convert any HD video source, Component or RGB (VGA), in real
USER MANUAL. 22" Class Slim HD Widescreen Monitor L215DS
 USER MANUAL 22" Class Slim HD Widescreen Monitor L215DS TABLE OF CONTENTS 1 Getting Started Package Includes Installation 2 Control Panel / Back Panel Control Panel Back Panel 3 On Screen Display 4 Technical
20-INCH TFT-LCD MONITOR ADMNLCD20
 INSTRUCTION MANUAL 20-INCH TFT-LCD MONITOR ADMNLCD20 Please read this manual thoroughly before use, and keep it handy for future reference. Part Number 8200-0394-00 A 0 WARNING: TO REDUCE THE RISK OF FIRE
HD Digital MPEG2 Encoder / QAM Modulator
 HD Digital MPEG2 Encoder / QAM Modulator HDMI In QAM Out series Get Going Guide ZvPro 800 Series is a one or two-channel unencrypted HDMI-to-QAM MPEG 2 Encoder / QAM Modulator, all in a compact package
Acer LCD TV AT2001 User's Guide
 Acer LCD TV AT2001 User's Guide Copyright 2005. Acer Incorporated. All Rights Reserved. Acer AT2001 User' s Guide Original Issue: May 2005 Acer and the Acer logo are registered trademarks of Acer Incorporated.
HD Digital MPEG2 Encoder / QAM Modulator
 HD Digital MPEG2 Encoder / QAM Modulator YPrPb VGA In QAM Out series Get Going Guide ZvPro 600 Series is a one or two-channel Component or VGA-to-QAM MPEG 2 Encoder/ Modulator, all in a compact package
Instruction Guide. The TV Jockey Computer Monitor TV Tuner with Remote COMP2VGATVGB. The Professionals Source For Hard-to-Find Computer Parts
 VIDEO ADAPTER The TV Jockey Computer Monitor TV Tuner with Remote COMP2VGATVGB Instruction Guide * Actual product may vary from photo The Professionals Source For Hard-to-Find Computer Parts FCC COMPLIANCE
Winmate Communication INC.
 20.1 Military Grade Display Model: R20L100-RKA2ML User s Manual Winmate Communication INC. May, 2011 1 IMPORTANT SAFETY INSTRUCTIONS Please read these instructions carefully before using the product and
2.0 Wall Mount TV Soundbar Instruction Manual
 8010275 2.0 Wall Mount TV Soundbar Instruction Manual Read all of the instructions before using this soundbar and keep the manual in a safe place for future reference. Safety Information CA UT IO N RISK
19 / 20.1 / 22 WIDE SCREEN TFT-LCD MONITOR
 19 / 20.1 / 22 WIDE SCREEN TFT-LCD MONITOR V193/ V220 Series V202 Series USER MANUAL www.viewera.com Rev. 2.0 Table of Contents EMC Compliance......1 Important Precautions...2 1. Package contents....3
LCD VALUE SERIES (32 inches)
") LCD VALUE SERIES (32 inches) http://www.orionimages.com All contents of this document may change without prior notice, and actual product appearance may differ from that depicted herein 1. SAFETY INSTRUCTION
LCD VALUE SERIES (32 inches) http://www.orionimages.com All contents of this document may change without prior notice, and actual product appearance may differ from that depicted herein 1. SAFETY INSTRUCTION
CAUTION RISK OF ELECTRIC SHOCK NO NOT OPEN
 Evolution Digital HD Set-Top Box Important Safety Instructions 1. Read these instructions. 2. Keep these instructions. 3. Heed all warnings. 4. Follow all instructions. 5. Do not use this apparatus near
USER MANUAL. 27 Full HD Widescreen LED Monitor L270E
 USER MANUAL 27 Full HD Widescreen LED Monitor L270E TABLE OF CONTENTS 1 Getting Started 2 Control Panel/ Back Panel 3 On Screen Display 4 Technical Specs 5 Care & Maintenance 6 Troubleshooting 7 Safety
Register your product and get support at SDV5122/27. EN User manual
 Register your product and get support at www.philips.com/welcome SDV5122/27 User manual Contents 1 Important 4 Safety 4 Notice for USA 5 Notice for Canada 5 Recycling 6 English 2 Your SDV5122 7 Overview
USER MANUAL. 27 Full HD Widescreen LED Monitor L27ADS
 USER MANUAL 27 Full HD Widescreen LED Monitor L27ADS TABLE OF CONTENTS 1 Getting Started 2 Control Panel/ Back Panel 3 On Screen Display 4 Technical Specs 5 Care & Maintenance 6 Troubleshooting 7 Safety
2.4 GHz WIRELESS VIDEO SECURITY SYSTEM
 2.4 GHz WIRELESS VIDEO SECURITY SYSTEM Please read this manual thoroughly before operating this system OPERATING INSTRUCTIONS Rev 03/01-1 SPECIFICATIONS WIRELESS CAMERA Image sensor Lens Picture element
COMPOSITE VIDEO (BNC) TO VGA VIDEO FORMAT CONVERTER AND SCALER AT-RGB110
 TO VGA VIDEO FORMAT CONVERTER AND SCALER AT-RGB110") User Manual COMPOSITE VIDEO (BNC) TO VGA VIDEO FORMAT CONVERTER AND SCALER AT-RGB110 TABLE OF CONTENTS 1. Introduction... 2 2. Package Contents... 2 3. Features... 2 4. Specification... 2 5. Panel Description...
User Manual COMPOSITE VIDEO (BNC) TO VGA VIDEO FORMAT CONVERTER AND SCALER AT-RGB110 TABLE OF CONTENTS 1. Introduction... 2 2. Package Contents... 2 3. Features... 2 4. Specification... 2 5. Panel Description...
D108S INSTRUCTION MANUAL
 D108S INSTRUCTION MANUAL Contents Warnings & Precautions... 2 Important Safety Instructions... 3 In the Box & Features... 4 Powering the Unit... 5 Playing and Programming a DVD or CD... 6 Viewing a Photo
CAMERA KIT USE AND CARE GUIDE. Black & White Plastic Casing Camera Kit
 USE AND CARE GUIDE CAMERA KIT Black & White Plastic Casing Camera Kit Before operating the unit, please read this manual thoroughly and retain it for future reference. WARNING WARNING TO REDUCE THE RISK
ACUBRITE 23 SS. Manual. Stainless Steel Chassis 23" LCD Display. Content
 ACUBRITE 23 SS Stainless Steel Chassis 23" LCD Display Manual Introduction... 2 Hardware Installation... 2 The Display Timing... 5 The Display Outline Dimensions... 6 The Display Controls... 7 The Screen
TFT-LCD with DVI-I & composite video (in/out) SD series MANUAL
 SD series MANUAL") TFT-LCD with DVI-I & composite video (in/out) 15 17 19 SD series MANUAL Europe Canvys Visual Technology Solutions A Division of Richardson Electronics GmbH Raiffeisenstraße 5 D-78166 Donaueschingen Tel.:
TFT-LCD with DVI-I & composite video (in/out) 15 17 19 SD series MANUAL Europe Canvys Visual Technology Solutions A Division of Richardson Electronics GmbH Raiffeisenstraße 5 D-78166 Donaueschingen Tel.:
HD Digital MPEG2 Encoder / QAM Modulator Get Going Guide
 series HD Digital MPEG2 Encoder / QAM Modulator Get Going Guide HDb2640 HDb2620 HDb2540 HDb2520 The HDbridge 2000 Series is a combination HD MPEG 2 Encoder and frequency-agile QAM Modulator, all in a 1RU
Standard Digital Terminal High-Definition Digital Terminal. User Guide
 Standard Digital Terminal High-Definition Digital Terminal User Guide ILL-GDA-STD-001-0709 IN THIS GUIDE IMPORTANT RULES FOR SAFE OPERATION... 4 AVAILABLE ILLICO TERMINALS... 5 REMOTE CONTROLS... 17 CONNECTIONS...
VITEK VTM-TLM191 VTM-TLM240
 VTM-TLM191 VTM-TLM240 19 & 24 Professional LED Monitors with HDMI, VGA, and Looping BNC VITEK FEATURES 19 & 24 Wide Screen LED Display Panel HDMI, VGA, and Looping BNC Composite Video Inputs & Stereo Audio
CR10 REMOTE CONTROL SYSTEM
 CR10 REMOTE CONTROL SYSTEM CR10 REMOTE CONTROL SYSTEM IMPORTANT SAFETY INSTRUCTIONS THESE INSTRUCTIONS ARE TO PROTECT YOU AND THE MclNTOSH INSTRUMENT. BE SURE TO FAMILIARIZE YOURSELF WITH THEM 1. Read
USER S MANUAL CCTV LED MONITOR MODEL: ADE-117N1 ADE-119N1 ADE-118W1 ADE-121W1 ADE-124W Atherton Electronics Corp. All rights reserved.
 USER S MANUAL CCTV LED MONITOR MODEL: ADE-117N1 ADE-119N1 ADE-118W1 ADE-121W1 ADE-124W1 2015 Atherton Electronics Corp. All rights reserved. TABLE OF CONTENTS FCC information -------------------------------------------------------------------
PLL2210MW LED Monitor
 PLL2210MW LED Monitor USER'S GUIDE www.planar.com Content Operation Instructions...1 Safety Precautions...2 First Setup...3 Front View of the Product...4 Rear View of the Product...5 Quick Installation...6
Instruction Guide. Component/Composite/S-Video to DVI-D/HDTV Scaler and Converter Component/Composite/S-Video to VGA/HDTV Scaler and Converter
 VIDEO SCALER Component/Composite/S-Video to DVI-D/HDTV Scaler and Converter Component/Composite/S-Video to VGA/HDTV Scaler and Converter VID2DVIDTV (DVI) VID2VGATV (VGA) Instruction Guide * Actual product
PC/HDTV 2-Way Converter
 Vision for Net Media HDView PC/HDTV 2-Way Converter Operation Manual 1. Introduction The HDView is a high-performance universal PC/HDTV to PC/HDTV converter. It combines the functions of a video scaler,
Modulator Installation Manual
 Warranty Multiplex Technology, Inc. warrants this product to be free from defects in materials and workmanship for a period of one year from the date of purchase or MTI will repair, or at its option, replace
~ Instruction Manual ~
 ~ DJ-5 Professional Preamp mixer ~ 0 0 0 0 10 10 10 10 EVE MASTE GAIN GAIN 0 10 CUE EVE CH 1 CH 2 CUE PAN INE INE POWE FADE STAT FADE STAT HEADPHONES ~ Instruction Manual ~ ~ Important Safety Instructions
TR6102HD HDTV/DVD/COMPONENT VIDEO TO RGBHV TRANSCODER USER S GUIDE
 MANUAL PART NUMBER: 400-0031-003 PRODUCT REVISION: 1 HDTV/DVD/COMPONENT VIDEO TO RGBHV TRANSCODER USER S GUIDE INTRODUCTION Thank you for your purchase of the Transcoder. We are certain that you will find
INTRODUCTION. WARNING To prevent fire or shock hazard, do not expose this unit to moisture.
 Multi-function Remote Control Built-in Hands Free Speaker Phone Cable Ready 125 Channel TV Tuner Internal Stereo Speakers Under Cabinet / Table Top Mounting A/V Input AM/FM Radio Tuner - 1 - INTRODUCTION
28 4K LED monitor. User Manual M284K
 28 4K LED monitor User Manual M284K CONTENTS Safety Information... 2 What s included..... 4 Getting Started....... 8 Troubleshooting.... 14 Specification.... 15 2 of 15 SAFETY INFORMATION Read these instructions
USER MANUAL Full HD Widescreen LED Monitor L236VA
 USER MANUAL 23.6 Full HD Widescreen LED Monitor L236VA TABLE OF CONTENTS 1 Getting Started 2 Control Panel/ Back Panel 3 On Screen Display 4 Technical Specs 5 Care & Maintenance 6 Troubleshooting 7 Safety
USER MANUAL Full HD Widescreen LED Monitor L215ADS
 USER MANUAL 21.5 Full HD Widescreen LED Monitor L215ADS TABLE OF CONTENTS 1 Getting Started 2 Control Panel/ Back Panel 3 On Screen Display 4 Technical Specs 5 Care & Maintenance 6 Troubleshooting 7 Safety
ESI VLS-2000 Video Line Scaler
 ESI VLS-2000 Video Line Scaler Operating Manual Version 1.2 October 3, 2003 ESI VLS-2000 Video Line Scaler Operating Manual Page 1 TABLE OF CONTENTS 1. INTRODUCTION...4 2. INSTALLATION AND SETUP...5 2.1.Connections...5
HD/SD- SDI to VGA Converter DAC-60 Quick Start Guide
 HD/SD- SDI to VGA Converter DAC-60 Quick Start Guide www.datavideo-tek.com Table of Contents Warnings and Precautions... 2 What s in the box?... 4 Introduction... 4 Features... 4 Functions... 5 Front Panel...
USER MANUAL Full HD Widescreen LED Monitor L215IPS
 USER MANUAL 21.5 Full HD Widescreen LED Monitor L215IPS TABLE OF CONTENTS 1 Getting Started 2 Control Panel/ Back Panel 3 On Screen Display 4 Technical Specs 5 Care & Maintenance 6 Troubleshooting 7 Safety
 Register your product and get support at www.philips.com/welcome SWS3435S/27 SWS3435H/37 EN User manual Contents 1 Important 4 Safety 4 English 2 Your SWS3435 6 Overview 6 3 Installation 7 Connect the
PL2410W LCD Monitor USER'S GUIDE.
 PL2410W LCD Monitor USER'S GUIDE www.planar.com Content Operation Instructions...1 Safety Precautions...2 First Setup...3 Front View of the Product...4 Rear View of the Product...5 Quick Installation...6
ZVOX AccuVoice TV Speaker MODEL AV150.
 ZVOX AccuVoice TV Speaker MODEL AV150 www.zvoxaudio.com READ THIS FIRST Important Safety Instructions For ZVOX Audio System WARNING TO PREVENT FIRE OR SHOCK HAZARD, DO NOT EXPOSE THIS APPLIANCE TO RAIN
User Manual. AtlonA COMPOSITE VIDEO (BNC) + STEREO AUDIO TO HDMI VIDEO FORMAT CONVERTER AND SCALER AT-HD120
 + STEREO AUDIO TO HDMI VIDEO FORMAT CONVERTER AND SCALER AT-HD120") User Manual AtlonA COMPOSITE VIDEO (BNC) + STEREO AUDIO TO HDMI VIDEO FORMAT CONVERTER AND SCALER AT-HD120 TABLE OF CONTENTS 1. Introduction... 3 2. Package Contents... 3 3. Features... 3 4. Specification...
User Manual AtlonA COMPOSITE VIDEO (BNC) + STEREO AUDIO TO HDMI VIDEO FORMAT CONVERTER AND SCALER AT-HD120 TABLE OF CONTENTS 1. Introduction... 3 2. Package Contents... 3 3. Features... 3 4. Specification...
DA IN 1-OUT LINE DRIVER WITH EQUALIZATION + AUDIO USER S GUIDE
 MANUAL PART NUMBER: 400-0430-001 1-IN 1-OUT LINE DRIVER WITH UALIZATION + AUDIO USER S GUIDE TABLE OF CONTENTS Page PRECAUTIONS / SAFETY WARNINGS... 2 GENERAL...2 GUIDELINES FOR RACK-MOUNTING...2 INSTALLATION...2
HDTV Supply. Mega Scaler. Operating Instructions FEATURES
 Mega Scaler Model No: mega-scaler HDTV Supply Operating Instructions FEATURES 11-inputs-2 outputs multi-function video scaler, could convert AV, S-video, YPBPR, VGA, DVI-I and HDMI signal to two identical
PLL1920M LED LCD Monitor
 PLL1920M LED LCD Monitor USER'S GUIDE www.planar.com Content Operation Instructions...1 Safety Precautions...2 First Setup...3 Front View of the Product...4 Rear View of the Product...5 Installation...6
User Manual. VGA to Component or Component to VGA Converter Scaler AT-VGA300CV
 User Manual VGA to Component or Component to VGA Converter Scaler AT-VGA300CV www.atlona.com TABLE OF CONTENTS 1. Introduction... 2 2. Package Includes... 2 3. Features... 2 4. Specification... 2 5. Panel
PRELIMINARY. Important Safety Precautions. Video Color Corrector. Model SCC. User Manual
 Important Safety Precautions When using this product, basic safety precautions should always be followed to reduce the risk of fire and electric shock, including the following: Video Color Corrector Model
15 LED Backlight LCD Monitor USER MANUAL
 LTV15RS LTV19RS 15 LED Backlight LCD Monitor 19 LCD Monitor HDMI, BNC In, BNC Loop Out & RS485 USER MANUAL FEATURES Compatible with VGA (640 x 480), SVGA (800 x 600), XGA (1024 x 768), SXGA (1280 x 1024)
Contents. Disclaimer of Product and Services
 Instruction Manual Contents FCC COMPLIANCE STATEMENT... 3 WARNINGS AND PRECAUTIONS... 3 WARRANTY... 4 STANDARD WARRANTY... 4 THREE YEAR WARRANTY... 4 DISPOSAL... 4 INTRODUCTION... 5 FEATURES... 5 GO KMU-100
HDMI Converter. Operating Instructions(P/N of this Instructions is INSYH0101)
") HDMI Converter Model No. YH0101 Operating Instructions(P/N of this Instructions is INSYH0101) Dear customer Thank you for purchasing this product. For optimum performance and safety, please read these
HDMI Converter Model No. YH0101 Operating Instructions(P/N of this Instructions is INSYH0101) Dear customer Thank you for purchasing this product. For optimum performance and safety, please read these
LTC 113x & LTC123x FlexiDome Series Fixed Dome Cameras
 LTC 113x & LTC123x FlexiDome Series Fixed Dome Cameras Eng Installation Instructions F D E NL I IMPORTANT SAFEGUARDS 1. Read Instructions All the safety and operating instructions should be read before
Operating Instructions
 Model No.: MS0801-E02 Operating Instructions Thanks for purchasing our product. Please be sure to read this instruction manual carefully before using our product. Introduction MS0801-E02 supports to switch
17" & 19" Color TFT LCD Monitor
 17" & 19" Color TFT LCD Monitor KMC-17B & KMC-19B User's Manual for Operation and installation Screen Size : KMC-17B (17" inch TFT LCD) KMC-19B (19" inch TFT LCD) Display Size : KMC-17B (337.920mm X 270.336mm)
SDM1000. Satellite Demodulator Module INSTRUCTION MANUAL SDM Satellite Demodulator Module
 SDM1000 Satellite Demodulator Module INSTRUCTION MANUAL Model Item # Description SDM1000 1002576 Satellite Demodulator Module 937-746-4556 www.rldrake.com 2015 R.L. Drake Holdings, LLC. Rev: 041715 / 651230500A
Table of Contents FCC COMPLIANCE STATEMENT... 4 WARNINGS AND PRECAUTIONS... 4 WARRANTY... 5 STANDARD WARRANTY... 5 TWO YEAR WARRANTY... 5 DISPOSAL...
 1 Table of Contents FCC COMPLIANCE STATEMENT... 4 WARNINGS AND PRECAUTIONS... 4 WARRANTY... 5 STANDARD WARRANTY... 5 TWO YEAR WARRANTY... 5 DISPOSAL... 6 1. INTRODUCTION... 7 FEATURES... 7 2. CONNECTIONS
Mini Projector User s Guide
 Mini Projector User s Guide Please read this manual before Model P50 Table of Contents 1. Table of Contents---------------------------------1 2. Warnings-----------------------------------------2 3. Accessories---------------------------------------4
KD-CSW2x1. Operating Instructions. 2 Inputs to 1 Output Component Video/Audio Switcher. KD-CSW2x1 Operating Instructions.
 KD-CSW2x1 2 Inputs to 1 Output Video/ Switcher Operating Instructions Key Digital, led by digital video pioneer Mike Tsinberg, develops and manufactures high quality, cutting-edge technology solutions
AtlonA HDMI Media Center 6 inputs 1 output Switcher & Converter & 1080p Up-Scaler AT-LINE-EX. User Manual
 AtlonA HDMI Media Center 6 inputs 1 output Switcher & Converter & 1080p Up-Scaler AT-LINE-EX User Manual TABLE OF CONTENTS 1. Introduction... 1 2. Features... 1 3. Package Contents... 1 4. Operation Controls
DC162 Digital Visualizer. User Manual. English - 1
 DC162 Digital Visualizer User Manual English - 1 Table of Contents CHAPTER 1 PRECAUTIONS... 5 CHAPTER 2 PACKAGE CONTENT... 7 CHAPTER 3 PRODUCT OVERVIEW... 8 3.1 PRODUCT INTRODUCTION... 8 3.2 I/O CONNECTION...
By CHANNEL VISION. Flush Mount Amplifier A0350
 Spkrs Local In IR In 24VDC A0350 10 The A0350 can be used with Channel Vision s CAT5 audio hubs to provide a powerful 50Watts per channel in the listening zone. Alternatively, the A0350 can be added to
HDTV Supply Inc. reserves the right to make changes in the hardware, packaging and any accompanying documentation without prior written
 HDMI Matrix (Router Type) Model No. HDTVMX0404313 HDTV Supply, Inc Features Easy to use: install in seconds, no need for setting. Allows up to four HDMI audio/video devices to be independently switched
CU103 User Manual. Contents
 [Note] The Photos of Light Engine and Control Unit in this manual are for reference only. The items may be different in actual package. Contents 1. PRECAUTIONS... 2 2. PACKAGE CONTENT... 4 3. PORT DESCRIPTION...
CFT2200. User Guide 0(18 6(/(&7 (17(5 92/80( &+$11(/ ( 6 6 $ * ( 6
 CFT2200 User Guide 0 ( 6 6 $ * ( 6 0(18 6(/(&7 (17(5 92/80( &+$11(/ &$87,21 5,6.Ã2)Ã(/(&75,&Ã6+2&. &$87,21 75('8&(Ã7+(Ã5,6.Ã2)Ã(/(&75,&Ã6+2&. '127Ã5(029(Ã&29(5Ã25Ã%$&. 186(56(59,&($%/(Ã3$576Ã,16,'( 5()(5Ã6(59,&,1*Ã748$/,),('Ã6(59,&(Ã3(56211(/
27'' Full HD LED Monitor KALED27MONSC Quick Start Guide
 Safety Warnings 27'' Full HD LED Monitor KALED27MONSC Quick Start Guide TO REDUCE THE RISK OF ELECTRIC SHOCK, DO NOT REMOVE ANY COVERS (OR BACKINGS). NO USER SERVICEABLE PARTS ARE INSIDE. REFER ALL SERVICING
PS600 Digital Visualizer. User Manual. English - 0
 PS600 Digital Visualizer User Manual English - 0 Table of Content COPYRIGHT INFORMATION... 3 CHAPTER 1 PRECAUTIONS... 4 SAFETY PRECAUTIONS... 5 FCC WARNING... 5 EN55022 (CE RADIATION) WARNING... 5 CHAPTER
SW 50. Powered Subwoofer with Built-in Stereo Crossover
 Owner s Manual SW 50 ed Subwoofer with Built-in Stereo Crossover Congratulations on your new purchase and welcome to the AudioSource family of satisfied customers. We trust you will continue to enjoy the
14 4-CHANNEL B&W QUAD OBSERVATION SYSTEM MODEL: HD14Q2144-A
 14 4-CHANNEL B&W QUAD OBSERVATION SYSTEM MODEL: HD14Q2144-A PROFESSIONAL SERIES FOR MORE INFORMATION WWW.STRATEGICVISTA.COM ADT Professional Series Products ( Products ) are manufactured by Strategic Vista
Quick Reference TV guide. Getting Started. with Cogeco Digital TV.
 Quick Reference TV guide Getting Started with Cogeco Digital TV. Welcome to Cogeco Digital TV At Cogeco, we put you first in everything we do. Our goal is to give you a TV experience unlike any other from
2x1 HDMI SWITCH. with Multiview and PIP Vanco Part Number: EVSW21MV
 2x1 HDMI SWITCH with Multiview and PIP Vanco Part Number: EVSW21MV 2x1 HDMI Switch with Multiview and Picture-in-Picture www.vanco1.com 800.626.6445 DEAR CUSTOMER Thank you for purchasing this product.
Kramer Electronics, Ltd. USER MANUAL. Models: VP-715, Video To SXGA / HD Scaler VP-716, Video To SXGA / DVI / HD Scaler
 Kramer Electronics, Ltd. USER MANUAL Models: VP-715, Video To SXGA / HD Scaler VP-716, Video To SXGA / DVI / HD Scaler Contents Contents 1 Introduction 1 2 Getting Started 1 3 Overview 1 3.1 VP-715/6 Scaler
SAFETY INFORMATION. 7. Do not force switched or external connections in any way. They should all connect easily, without needing to be forced.
 SAFETY INFORMATION 1. To ensure the best results from this product, please read this manual and all other documentation before operating your equipment. Retain all documentation for future reference. 2.
DISTRIBUTION AMPLIFIER
 MANUAL PART NUMBER: 400-0045-005 DA1907SX 1-IN, 2-OUT VGA/SVGA/XGA/UXGA DISTRIBUTION AMPLIFIER USER S GUIDE TABLE OF CONTENTS Page PRECAUTIONS / SAFETY WARNINGS... 2 GENERAL...2 GUIDELINES FOR RACK-MOUNTING...2
2.4 GHz WIRELESS SURVEILLANCE SYSTEM
 2.4 GHz WIRELESS SURVEILLANCE SYSTEM Operating Instructions Tested Comply With FCC Standards Model # TBM-18 BEFORE OPERATING THIS PRODUCT, READ, UNDERSTAND, AND FOLLOW THESE INSTRUCTIONS. Be sure to save
VIZIO. QUICK START GUIDE Model: E390-B1
 VIZIO QUICK START GUIDE Model: E390-B1 IMPORTANT SAFETY INSTRUCTIONS Your TV is designed and manufactured to operate within defined design limits. Misuse may result in electric shock or fire. To prevent
KD-CTCA3. Component Video to VGA Adapter
 KD-CTCA3 Component Video to VGA Adapter Model KD-CTCA3 KD-CTCA3 Component Video to VGA Adapter Model KD-CTCA3 Component Video (YPrPb) input to VGA Video (RGBHV) output Video Adapter with added features
10.4" LCD Monitor with Aluminum Front Bezel YPM1040PHB
 SPECIFICATION FOR APPROVAL M0DEL: 10.4" LCD Monitor with Aluminum Front Bezel YPM1040PHB BASE MODEL Customer's Confirmation Approved by: Reviewed by: Prepared by: Supplier's Confirmation Approved by: Reviewed
MON8-1/SDI 1U 8-Channel SDI Digital Multi-Display Video Monitor
 MON8-1/SDI 1U 8-Channel SDI Digital Multi-Display Video Monitor (Document P/N 821626, Rev-A) with Eight Backlit 1.8" LCD Displays, Eight SDI Video Inputs, Eight SDI Re-Clocked Outputs, and Eight CVBS (Analog)
User Guide. Connecting the Explorer 1850 Digital Home Communications Terminal
 User Guide Connecting the Explorer 1850 Digital Home Communications Terminal Notice for CATV Installers Notice for CATV Installers: If you are a CATV installer, read the information in the box below. 2
900-Lumen Portable LED Projector Part #: User manual
 900-Lumen Portable LED Projector Part #: 21797 User manual 900-Lumen LED Projector Manual Page 2 of 14 900-Lumen LED Projector Manual Page 3 of 14! SAFETY WARNINGS AND CAUTIONS WARNING: To reduce the risk
VIZIO MODELS. n E191VA n E221VA QUICK START GUIDE HD PICTURE SLIM DESIGN LED FULL USER MANUAL AVAILABLE AT VIZIO.COM
 MODELS n E191VA n E221VA VIZIO QUICK START GUIDE HD PICTURE SLIM DESIGN LED FULL USER MANUAL AVAILABLE AT VIZIO.COM IMPORTANT SAFETY INSTRUCTIONS Your TV is designed and manufactured to operate within