6 Basic Understanding
|
|
|
- Horatio Gallagher
- 5 years ago
- Views:
Transcription
1 6 Basic Understanding
2 Chapter 1: Basic Understanding of Equipment Topics Covered in this Chapter: 1-1 What is the SE-700? 1-2 What is White Balance? 1-3 How to Setup the PTC- 150 Video Camera 1-4 How to Setup the RMC- 180 Controller 1-5 How to use the TP-300B Teleprompter 1-8 How to Write a News Script 1-9 How to Transfer your Script to the Teleprompter 1-10 Talent Do s and Dont s 1-11 Lighting Basics 1-12 Build Your Set 1-6 Intro to the Audio Mixer 1-7 Microphone Basics Chapter 1 7


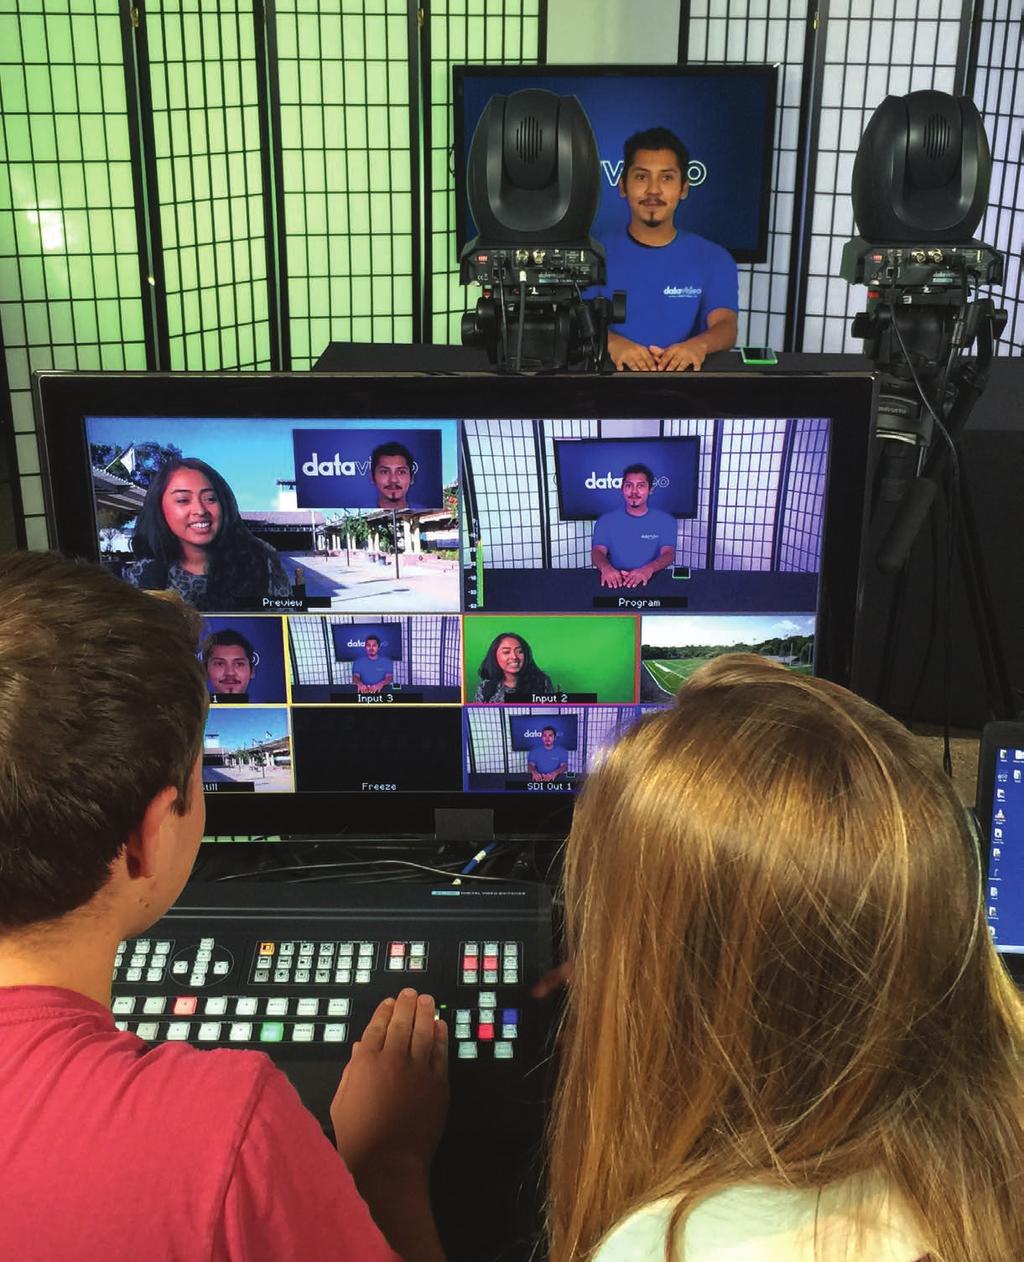
3 WHAT IS THE SE-700? 1-1: What is the SE-700? The video switcher is the center of your entire production. It will switch between input sources and key in effects using a green screen/chroma key. The Datavideo SE-700 is a 4-input HD switcher with an integrated control panel. SE-700 includes 2 HD-SDI, 2 HDMI inputs and supports 1080i and 720p resolutions. Outputs include 2 HD-SDI and 1 HDMI. The SE-700 also includes Chroma key, Luma key, downstream keying, PIP and multiple user settings. Also included are two balanced XLR audio inputs for connecting an external audio mixer. The versatility of the SE-700 allows you to expand your production workflow. For more information on how to connect your SE-700 to your workflow, please check out the SE-700 How to Video that we have created. Figure 1.1 Figure Basic Understanding


4 ETHERNET WEB This diagram shows the configuration for connecting the SE- 700 into your video production workflow. ETHERNET RMC-180 PTC-150 PTC-150 HD-SDI HD-SDI NVS-25 HDMI HD-SDI MEDIA LAPTOP AUDIO HD-SDI TC-200 AUDIO MIXER SE-700 HD SWITCHER HDMI HDMI MICS PREVIEW MONITOR CG LAPTOP Figure 1.3 Chapter 1 9

 Your Video Out choices are SDI and HDMI. (Figure 1.")


5 WHAT IS THE SE-700? & CAMERA 1-1 What is the SE-700? (cont.) First the SE-700 needs to be connected to its power supply. You can connect the power supply in the rear of the switcher on the right side, DC IN 12V. Plug in the provided 12 volt power pack into an 110VAC outlet. (Figure 1.4) Proceed to connect the video Out monitor and then turn the SE-700 on using the ON/OFF switch in the rear of the switcher. The SE-700 has two simultaneous video outputs as seen to the right. (Figure 1.5) Your Video Out choices are SDI and HDMI. (Figure 1.6) The next step is to connect the SE-700 to a monitor for multi-view, which will display all of your video inputs and the SE-700 interface. The multi-view can be output through HDMI or SDI. Most monitors have an HDMI input. Connect the HDMI cable from the SE-700 Video Out to the HDMI connector on your monitor. If you have a monitor that accepts an SDI cable you just connect it to the SDI Video Out on the SE-700. Use SDI 1 for the monitor connection. (Figure 1.7) Figure 1.4 Figure 1.5 The next section will explain white balancing of your video camera and why it is important. 1-2 Camera Almost every moment of the Newscast will depend on your cameras, and it is important that they accurately capture light and color. Most HD video cameras and camcorders will have the ability to manually set white balance. If a shot looks unnaturally orange, or blue, the white balance is not set properly. Figure 1.6 White Balance White balance basically means color balance. It is a camera control function that provides the camera a reference to true white. It sends information to the camera about what the color white looks like, so the camera will render it correctly. Since white light is the sum of all other colors, the camera will then display all colors correctly. HDMI Cable SDI Cable Figure Basic Understanding
 bulbs are strongest in orange color, while mid-day sunlight will be more blue, and fluorescent lamps cast green light. Figure 1.")

6 Incorrect white balance will show up with orange or blue tints with improper skin tones. Every source of white light emits a different mix of colors. Normal household (tungsten) bulbs are strongest in orange color, while mid-day sunlight will be more blue, and fluorescent lamps cast green light. Figure 1.8 It s important to adjust the lighting to get the proper skin tones from the talent. Light is measured in units called Kelvin temperature. Camera Light balance controls will vary from camera to camera. Most will allow you to achieve White Balance by rotating or moving a switch to the indicated type of light you are using. Kelvin temperature is a method of measuring color temperature for your camera. 3200K = Tungsten/Orange K = Daylight/White Daylight is white to the human eye, and tungsten is orange; however, you can manually white balance your video camera for more accuracy. This is simple to do. Just hold a blank white piece of paper in front of your video camera after you have adjusted the lighting of your scene. Press the appropriate button (which depends on your camcorder) and the video camera begins analyzing the light coming into the lens. If the light is reddish, for example, the camera will reduce the red signal until it achieves an equal color balance. The whole process takes just a few seconds and it delivers the most accurate color of any of the white balance methods. Now that you have mastered how to setup your SE-700 and understand why white balancing is important, it s time to move on to the next section and learn how to setup and operate the PTC-150 camera. If you are not using a Datavideo PTC-150 cameras, proceed to section 1-5. Chapter 1 11


7 PTC-150 CAMERA & RMC-180 CAMERA CONTROLLER 1-3 PTC-150 Camera Setup A PTZ camera can perform pan, tilt, and zoom functions with a robotic head operated by a remote control. The PTC-150 HD Video Camera is a PTZ camera and captures high quality digital video with features useful for your production, such as programmable presets, wide dynamic range with backlight compensation, and a motorized 22x optical zoom. 50 programmable position presets including pan, tilt, and zoom positions, allow the camera to quickly move between predetermined camera positions using the tv style remote, or a Datavideo RMC-180 controller. For multi-camera shoots, the built-in tally light can identify when the camera is active. Red indicates when the camera is live, or selected as the program out, and green indicates when the camera is in preview. How to connect the PTC-150 video camera: Plug in the supplied power pack to a wall outlet, the other end screws into the back of the PTC- 150 on the lower right side, DC IN -12 volts. Figure 1.8 Choose either the SDI or the HDMI cable format and connect one end to the PTC-150 camera and the other end to the video input on the SE-700. There is no on and off switch on the PTC-150 when you connect it to a powered outlet it will turn on. You then power the camera on and off using the remote control. The next section will now build on your knowledge of the PTC-150 and introduce you to the RMC-180 PTZ Camera Control Unit. This device will add a tremendous amount of functionality to the PTC-150 by allowing you a way to simultaneously control every function of both your cameras including Pan, Tilt, Zoom, and Focus. It will also provide you with the ability to preset a large number of predetermined angles. Figure Basic Understanding


8 1-4 RMC-180 PTZ Camera Control Unit The Datavideo RMC-180 PTZ camera control unit controls up to 4 Datavideo PTC-150 cameras. It has a responsive joystick and adds another level of unrestricted creativity and functionality to your video production. The Datavideo RMC-180 PTZ camera control unit has the capability to control every movement of up to four Datavideo PTC video cameras. Presets for Multiple Cameras Control Over Ethernet Control of Pan, Tilt and Zoom as well as Iris, Focus, and Gain Tally Lights See which camera is Live Joystick - The joystick is pressure sensitive. You can quickly move or rotate the joystick for faster movement. Using the Datavideo RMC-180 PTZ camera control unit is very easy. It will provide you with the ability to create presets during your production. A preset allows you to program and recall the a camera position. You can use this feature to have the camera automatically move from a wide shot to a close up. Using the ability of the PTZ camera to rotate, zoom and focus in any direction, the RMC-180 will let you predefine your cameras to multiple predetermined positions. The operator can use the camera to setup close up, midrange, and long shots by simply executing the pre assigned function key. This is a very handy feature to have. You can now have one or more cameras producing multiple unique angles, enhancing your production. Figure 1.10 Figure 1.11 As we continue to build our knowledge base, the next section will show you how to operate and use the Datavideo TP-300B teleprompter. The teleprompter will help the news anchors read the news just like a professional television news show. Chapter 1 13

9 TP-300B TELEPROMPTER & YAMAHA MG-10 AUDIO MIXER 1-5 TP-300B Teleprompter The TP-300B Teleprompter helps make your video productions look professional by providing a very easy way for the talent to deliver the verbal content in your script. The purpose of the teleprompter is to provide a simple way for your talent to read a script while looking directly into the camera. The teleprompter performs the following functions: Allows the talent to easily read the script as it scrolls and control the speed of the script as it appears. You do not have to memorize your lines, you can simply read them. The TP-300B is portable and simple to setup. It is a versatile tool that will add a significant degree of professionalism to all your video productions. For step by step instructions on how to assemble and operate the TP-300B, refer to the How to video and quick start guide. The next section introduces you to the Yamaha MG-10 audio mixer. The audio mixer serves a will manage and control all of the audio signals during the video production, and output the live audio mix to the SE-700 switcher. You can conveniently load your word document to a tablet device. The tablet easily fits into the adjustable teleprompter mounting bracket and displays the script onto the teleprompter screen. You can change your script simply by loading the new script to your tablet. You can adjust the speed of the scrolling, font size, and customize colors. To control and interface with your TP-300B teleprompter, you download the free app called DV Prompter from the ios App Store or Google Play store and install it on your tablet. Figure 1.12 It does take practice to master the skill of reading from a teleprompter, a skill well worth developing. Through practice, novice news anchors will learn to to control pace, eye contact and facial expressions. Watching rehearsal Newscasts will let students review their delivery and performance to make improvements. Critique s should be kept positive and constructive as the whole class is learning everything together for the first time as a team. 14 Basic Understanding


10 1-6 Yamaha MG-10 Audio Mixer The audio mixer is a standard piece of equipment that is used in most video production set ups. It performs a very important function, by managing and mixing together all of the audio sources. The audio mixer takes in an array of audio sources including microphones, audio inputs from any type of peripheral equipment such as laptops, computers, playback devices, etc. It then will combine all these audio sources and send a mixed live audio output to the SE- 700 using XLR cables. Typically each audio input has a volume control and other sound controls associated with it. This is called a channel. If you have a 6 input audio mixer, then you can control the individual sounds of 6 different audio sources. Each channel comes with its associated individual controls for volume and frequency. This allows you to very specifically fine tune the sound for each audio input source you will have for bass and treble. It also provides a way for you to balance the sound coming from each source by adjusting the corresponding channel controls. The MG-10 mixer has stereo XLR and TRS outputs for connecting to the SE-700 and headphones or other monitor sources. It also has a 1/4 headphone output with level control for personal monitoring, as well as additional TRS 1/4 stereo monitor outputs for sending to powered speakers, amplifiers or devices such as digital recorders. Microphone mixers use a variety of different types of connectors. Professional video production gear typically uses what is referred to as an XLR connector. (Figure 1.14) Figure /4 microphone XLR connector Figure 1.14 Chapter 1 15

11 LAVALIER MICROPHONE SETUP & NEWS SCRIPTING 1-7 Lavalier Microphone Setup The MXL Lavalier Microphones included with the bundle are excellent for use in your studio. Included is one lavalier microphone with a cardioid pick up pattern, which will capture sound in a narrow area, and a omni-directional pick up pattern that captures sound in all directions. The lavaliers should be placed at chest level with the microphone pointed upward. All microphones have a unique sound response pattern. They can be classified into several different types ( polar patterns ) as to how they pick up sounds and from what direction. Unidirectional or cardioid pickup patterns are most sensitive to sound produced on the front side of the microphone capsule. Omnidirectional or boundary pickup patterns are sensitive to sound from all directions of the microphone capsule. Figure 1.15 Be careful when handling these microphones and be sure to keep an eye on the small lapel clip that is provided as it is tiny and can easily be misplaced. You will want to gently coil the cord and use a wired band to hold it in place after each use. Although these cords are very durable they are thin and do tend to knot. The lavalier microphone easily plugs into your Yamaha MG- 10 mixer. Make sure that the phantom power is turned on when using the Yamaha MG-10 as the MXL lavaliers require phantom power from your mixer to work. As we move on to the next section, you will learn the techniques used to create a news script. 16 Basic Understanding
12 1-8 How to Create a News Script Creating a news script can be challenging. The script will be used by not only the news anchors, but for all members of the crew. The script will format news stories into a format that can be captured into a new show. One of the exercises you can do before creating a script is to answer these two questions: What is the main message of your story? Who is your audience? The next task will be to choose the 5 most important points of each story. In your news broadcast you need to keep in mind that you are going to mention the key points of interest in your story and there is a limited amount of time. Preparing an outline directs your thinking process to eliminate what is not critically important. The number one factor in developing a successful script is organization. The more organized you are the easier it will be to manage and create a solid script. A good place to begin is to first determine how much time you have to deliver your school news presentation. Next you would decide how many topics you want to cover. For example, if you are producing a school broadcast and you want to cover the following topics: 1. Introduction/Local Happenings 2. Daily announcements 3. School activities: dance, club meetings, etc. 4. Sport activities 5. PTA activities Once you have identified the number of individual topics, divide that number into the amount of time you have. If you are covering five topics and you have 10 minutes for the video presentation, you now have a reference point for an average of 2 minutes discussion per topic. You can quickly see that your writing and verbal delivery must be concise. You can also use that reference guide number to increase or decrease the number of topics covered. Once you determine the average amount of time for each topic it is now time to identify your content. The basis of any story in your newscast will answer the following: Who Where How What When Why? Keeping things relevant and to the point is critical. You will want to begin each new topic with an introduction line a very brief summary of the story. Next you will want to immediately deliver only the minimal amount of information possible to get your point across. When presenting a newscast you do not have a lot of time to tell a story, every second that you record must be accounted for with narration and a corresponding visual. An interesting way to approach the development of a news script is to identify the following steps in one or two sentences. 1. Introduction/summary (who) 2. Establish the scene (where, what) 3. Discuss the topic (why) 4. Solutions (how) 5. Follow-up (what s next) Make your script engaging. Make the story you are telling interesting. Production activities will allow you to add graphics and video clip to enhance the ability of the news show to communicate story details to the audience. You can also use props or interviews in the studio. Delivering the script narrative too fast Chapter 1 17

13 NEWS SCRIPTING & DATAVIDEO TABLET APP will tend to confuse the audience and delivering the script too slow will make the audience lose interest quickly. Practicing will help news anchors develop comfortable rhythms for their newscast presentations. A good exercise to perform to help your students understand rhythm and delivery is to listen to a few different newscasts on television. Listen carefully and you will detect that each announcer has a different delivery and a unique style to their delivery. The one thing they will all have in common is the ability to read the script professionally. They maintain eye contact with the cameras and speak to you directly. These little nuances are so important and is what makes a professional narrator so engaging. Encourage your students to practice. A good technique to use when trying to learn how to articulate your script is to first watch two or three different professional broadcasters. Now record yourself, using your teleprompter, while trying to remember the techniques you just observed. Then when you are finished reading your script, watch the replay, you will be able to tell what you did correctly and what you need to improve upon. Remember, this takes practice and it is a learning experience. Most people now rely on pre-formatted scripting templates to organize and keep the timing of the words and visuals in sync. Preformatted scripting templates are readily available for free on the Internet. A quick search will let you choose from a variety of formats. You can also design your own template using any standard word processing program. The main point is that you use some type of template to store, edit, check and time your read (audio narration) against the video A sample news script may look something like this: Figure Basic Understanding
14 (visuals). This sample template is divided into three distinct sections. Timing, Video, and Audio narrative. Notice how the Clock in seconds, is located on the far left hand column. This shows you how long it will take the reader (talent) to read their copy. The next column is the video. This indicates what visuals (video) will coincide with the copy being read. A-Roll typically indicates Live video for that particular section. B-Roll is typically video that has been prerecorded to enhance the presentation for use in that particular scene or at a later date. Many people shoot B-Roll stock footage that they can refer to and use over and over. The Final column, on the far right, is for the audio script. You can see that this template provides you with some very important information. It presents the total picture at a glance. You can quickly see how long it takes to read any section of the narrative (audio) and what images will coincide with the narration. Based on this composite information you can clearly see if the visuals are going to match up with the narrative and make changes accordingly. You may need more or less visuals to stay in sync with what is being read. You may need to increase or shorten the narrative to make your video look better. Using a template is a tremendous tool that will give you an excellent feel for how the overall video production will look and sound before you ever press the record button. Your template forces you to account for every second of video recorded. In the next chapter we will cover how to load your script into your ipad or Android tablet so it can Interface with your teleprompter. 1-9 Using the Datavideo Tablet App Datavideo provides you with a free app that will give you a convenient and simple way to load your script in your ipad or Android tablet. The app is called DV Prompter. It is free to download from the Google Play store or from the app store on your ipad. Your script should be prepared in a plain text file format in order to import the file into your tablet device. Your file extension should be.txt. After you have downloaded and installed the DV Prompter app to your table it is now time to open the app. Upon opening the DV Prompter app, you will see the settings menu on the left hand side. On the right you will notice a black and white sample script that has been included, it is actually the instructions on how to use the app. You may want to familiarize yourself with the controls available to you before you read the instructions as they may scroll too fast for you to read. We will adjust for that shortly. As you look at the menu selections under settings you will see a variety of listed settings that you can make adjustments to customize the script to your preference. Here are the critical settings you will want to familiarize yourself with: Font Size You can adjust from 9pt to 54pt. Remember the larger the font size you select, the larger the type and fewer words that are able to fit on the screen. Prompting Settings Choose from Orientation or Landscape. Mirrored Display - This function is to reverse the type to work in conjunction with the Datavideo teleprompter internal mirror. You do not have to use the teleprompter to use the DV Prompter App, you can use it on the tablet only without the teleprompter. Loop This will repeatedly continue the scroll of the script. Scrolling speed is the important one This function will control the speed your script is displayed at. Set this setting to 1 to begin with a slow speed. You can always speed it up to anytime your desire. Slow Time and Fast Time Chapter 1 19

15 DATAVIDEO TABLET APP & TALENT DOS/DON TS also are speed control functions. To start off with set the Slow Time setting to 10 and the Fast Time to 2. External Display Gives you a choice between using a monitor that is VGA or Composite Auto Start - You can set it to start the script to scroll as soon as you launch the app. Start Delay - It is a way to delay the scroll for a few seconds before it begins. We recommend that you set the delay to about 2 or 3 seconds. This will give you a visual countdown and allow your talent to get ready. what your talent needs to be aware of when they are on camera. 1:10 Talent Do s & Dont s Being the talent for a video production can be a very exciting experience, it can also be a terrifying one. We all love to watch television and go to the theater or movies. We admire our favorite actors. They make it look so much easier than it actually is in reality! Break Marker - It is a function that will allow you to place a Break symbol within your script for the narrator to pause or break up the script into different topics. Remote Type - The TP-300B comes with a universal remote control, WR-450, which can be used as a bluetooth remote or wired remote. Make sure to select the remote type to the correct option depending on how you are using the remote. You are no doubt still wondering how to get your script into your tablet. It is actually quite simple. The easiest way to do this is to yourself the text file. Once you receive it on your tablet, simply copy and paste it into the DV Prompter app. You will notice a blue plus sign in the upper right hand corner of the app menu. Select the plus sign and just paste your script into where it says document text. You can also enter a title on top if you so desire. Make sure to select SAVE in the upper right or your script will be lost. To play your script simply press the arrow play symbol located on the right side directly beneath your script. Now that you know how to load a script onto the tablet for the teleprompter, let s talk about Figure 1.17 Playing the role of the video anchor or spokesperson is a task that one can learn. As in any other profession, it takes practice and a willingness to take direction. For the purpose of this tutorial we will focus in on some of the things that will help you become successful at being in front of a camera. We have created a simple list of Do s and Don t s for you to follow: DO Rehearse your script reading as much as possible. You should first silently read the script and make sure you understand what it says and that you can clearly pronounce all the words. Then you should read the script out loud in private a few times to become familiar with the written word. Your next step would be to rehearse your reading and record your narrative in front of a video camera, preferably using the teleprompter. Make sure you carefully review 20 Basic Understanding
16 your presentation you will learn a lot from watching your playback. Have other people watch your playback with you and discuss your performance. Try to learn what you did correctly and what you need to improve upon. It is important to understand that any criticism is directed at improving your competency. Make a point to watch other professional newscasters on television. Observe their delivery carefully. Try to notice how their delivery has a special timing and cadence to it. Watch how they breathe as they deliver their narrative. This is a very important technique to master. Notice their posture, where their hands are and what do they do that keeps your attention. Practice, Practice, Practice! Try reading a variety of different scripts, you will begin to see and feel improvement with every practice. Make sure you wear color safe clothing when you are recording. The clothing s pattern can cause a problem. Close, high-contrast pin stripes, corduroy, and herringbone all create a wavy rainbow-colored pattern called a moiré effect. Avoid wearing bright reds and oranges as they have a tendency to glow on camera. Wear a jacket or dress that is a solid color or have a faint low-contrast pin stripe or pattern. A light blue, pink, cream or dark burgundy shirt will usually look a lot better under the jacket than a pure white shirt. DON T Wear any type of green clothing on camera. Have anything in your mouth when reading your script. Get upset if someone offers you advice about your performance. Become discouraged if your performance is not perfect you are here to learn remember practice, practice, practice Swivel back and forth when you are reading your script. Fidget with your pen, fingers or any other object when on camera. Forget that you are not the only person on the set There are volumes written and a large variety of resources available to help make your performance continually improve. If being in front of a camera is something you want to pursue there are endless opportunities available. Your resource teacher, guidance teacher or librarian can provide you with significant information to further your learning experience. The next chapter will discuss the basics of video lighting, which is often overlooked but a critical factor in producing a quality video production. Search the Internet for more information about what types of clothing look the best for video. Remember to always look directly into the teleprompter or camera when delivering the news. Chapter 1 21

 light.")
17 LIGHTING BASICS 1-11 Lighting Basics To produce a good looking video, how you position your lighting is critical. The standard basic lighting scenario has 3 different types of lights. The Datavideo LED light kit in your Education Production Bundle includes 3 Daylight LED lights for key and fill, and one bi-color Daylight/Tungsten light for use as a backlight. Key light Fill light Back light Working together, this combination of lighting essentials wraps your subject in light. The Key Light is placed about 45 degrees to the subject, either left or right, usually above and aimed down between 30 and 45-degrees. It is the dominant (key) light. Position this light as you would if it were the only light you had. The key light will create defining shadows on the face which would be lost if the light were on a similar axis to the camera, but you ll notice that, in a room with no other lighting, it will create deep, dark shadows. Toning down those shadows is the job of the next light. two-dimensional view. The job of the third and final light is to create a sense of distance between the subject and the background, giving an illusion of a third dimension on the screen. The backlight, sometimes called a rim or shoulder light, is aimed at the subject s back, and, like the key light, it is usually 45-degrees off the axis and shines down upon the subject. This creates a bright rim around part of the subject, creating an outline which then appears to separate the shoulders from the background. The backlight should be at least as bright as the key, often brighter. The backlight is what pulls everything together by adding a highlight around the talent and providing yet another lighting dimension that defines the talent in the overall scene. There are a variety of devices that will fit over your light and are used to direct, diffuse or focus the light. Light reflectors, diffusers, barn doors, snoots are very useful tools to help accent your lighting. For more information about these additional tools you can research the Internet. The following is a typical illustration of how a three key light is positioned: The fill light is usually two or three stops dimmer than the key light, or placed further away from the background. The fill light is a counter light to the key light. Its placement will depend on the function of the fill such as - what shadows does it create? Where do you need to reduce them for better video production lighting? The fill light can be the same size as the key light in wattage and bulb size, but you might then place it further away than the key. Watch as the fill light starts to change the shadows; though the lighting is not nearly as harsh, the key and fill lights need to work together to create a Figure Basic Understanding

18 Figure :12 Building the set Building a set to record your news cast is a creative endeavor. Ideally, what you would like to have is a room or space for your gear in which everything can stay connected. Having this space readily available saves you a significant amount of time. You do not want to rewire and reconnect your video gear each time you conduct a class as it takes time and requires testing. The location of your video set will many times be determined by the school administration. Perhaps your gear will be located in the AV department, Library, or resource center and you will not have to reconnect the gear each time you use it. You will need a place to locate your equipment.. It could be any type of table, desk, etc. It does not have to be fancy but it does have to be solid! You will need to locate your equipment table near the proper electrical outlets. We recommend that you use an AC power line conditioner to plug the video gear into. A power conditioner is a good device to have as it will keep your voltage stabilized and prevent electrical spikes from damaging your equipment. It is also convenient to have a room with a decent high ceiling so you can extend your light kit higher if necessary. The actual news set table can be a folding table or even two desks pushed together. You need to decide how many people will be acting as talent and measure your table accordingly. The video camera tends to compress the images, so people can actually sit closer together and still look good on the monitor. Chapter 1 23
.")


19 BUILDING THE SET Do not worry about the appearance of the table and its surface. You can get a black or dark colored piece of cloth and use it to cover the table like in the photo below (Figure 1-19). You can also paint the table if it is allowed by your school. Many schools have a carpentry shop or a maintenance crew that will be able to build something you can use that is inexpensive and yet very functional. Some desks on news sets actually have wheels underneath and can be easily moved to where it is needed. What is important is the backdrop behind the news desk. Your typical go to shot for a newscast would be a medium head and Figure 1.19 A sample of the Set Table and lighting technique. Figure 1.19 Figure 1.20 Figure Basic Understanding

20 shoulders shot of the talent. This view will usually not show the news desk. It will frequently show the wall behind where the talent is seated. This is an excellent space where you can be creative. There are a large variety of artificial backdrops you can use to make your set look interesting and professional. For a good example of a low cost, easy to set up news set see Figure This was created as a demo set for this teaching guide and the tutorial videos. It uses two Soji screens, a TV monitor to display a logo, and backlighting used to accent the screens. It was created for under $200, including two fluorescent lights for the accent lighting. There are many other ways to create sets. Educators have used the brick walls of their classrooms, wallpaper, enlarged photographs or professional canvas rolls to create any backdrop scene imaginable (See Figure 1.22). Many companies sell a backdrop kit that essentially consists of three poles two vertical and one horizontal that you can slide a roll of backdrop material onto and just pull down the scene you want to use. These techniques really enhance the appearance of your set. If you have a photograph you would like to use as the backdrop, make sure that it is blown up large enough to cover the entire length and height behind your news desk. It is also recommended that the photograph would be slightly out of focus when you blow it up this technique keeps the photo recognizable, while keeping the main visual focus on the talent. Remember to keep the talent desk uncluttered. The lavalier microphones are wired and will run underneath the table to where the talent will be sitting. Keeping the wires organized and away from an area where students can trip over them will be important to ensure safety in your classroom. Watch for any wires or cable that may be showing in any particular shot as these are avoidable distractions. Be sure to come back and reference chapter 1 as you add elements to your newscast. In chapter 2, we will learn more about operating the equipment in your production workflow and setting up a full camera rehearsal to prepare your class for its first newscast. Figure 1.22 Chapter 1 25
In this issue... NEW! MS input HD PPU Shipping! MCU remote camera controller User story
 In this issue... NEW! MS-3000 16-input HD PPU Shipping! MCU remote camera controller User story Rick Young goes live with Datavideo vision mixers Brochure Spring 2013 Datavideo 2013 Welcome Datavideo
Classroom Setup... 2 PC... 2 Document Camera... 3 DVD... 4 Auxiliary... 5
 Classroom Setup... 2 PC... 2 Document Camera... 3 DVD... 4 Auxiliary... 5 Lecture Capture Setup... 6 Pause and Resume... 6 Considerations... 6 Video Conferencing Setup... 7 Camera Control... 8 Preview
ESI VLS-2000 Video Line Scaler
 ESI VLS-2000 Video Line Scaler Operating Manual Version 1.2 October 3, 2003 ESI VLS-2000 Video Line Scaler Operating Manual Page 1 TABLE OF CONTENTS 1. INTRODUCTION...4 2. INSTALLATION AND SETUP...5 2.1.Connections...5
FACILITIES SUPPORT SERVICES
 Facilities Directorate FACILITIES SUPPORT SERVICES Mechanical Engineering LT B & Dental LT INTERACTIVE LECTURE THEATRE USER OPERATION GUIDE CONTENTS INTRODUCTION... 2 Main Teaching System:... 2 Collaborative
7 3G -SDI Monitor w/ Signal Conversion QUICKSTART GUIDE
 What s included x Monitor x AC Adapter x Camera Shoe Mount (SM-0) x DV Battery Plate (Check one) Checked by DV BATTERY PLATES -: Canon 900, Sony L, Panasonic D Battery Plates VX7 c-: Canon E6, Nikon EL,
Hi! Let s get started.
 Hi! Let s get started. What s in the box LT Roku LT player Roku standard remote 2 x AAA batteries for remote A/V cable (RCA) Power adapter Get to know your Roku LT A LT Front view B C F Back view D E
USER MANUAL. 28" 4K Ultra HD Monitor L28TN4K
 USER MANUAL 28" 4K Ultra HD Monitor L28TN4K TABLE OF CONTENTS 1 Getting Started 2 Control Panel/ Back Panel 3 On Screen Display 4 Technical Specs 5 Care & Maintenance 6 Troubleshooting 7 Safety Info &
S7H-DK S7H 7" High Bright Monitor Deluxe Kit
 S7H-DK S7H 7" High Bright Monitor Deluxe Kit QUICKSTART GUIDE What s Included 1 x S7H Monitor 1 x Camera Shoe Mount 1 x Neoprene Sleeve 1 x Mini-XLR to P-TAP Cable 2 x DV Battery Plate 1 x DV Battery 1
Television Broadcasting II
 EXAM INFORMATION Items 33 Points 48 Prerequisites TELEVISION BROADCASTING 1 Grade Level 11-12 Course Length ONE SEMESTER DESCRIPTION Television Broadcasting is designed to provide students with the advanced
TELEVISION BROADCASTING II (591)
") DESCRIPTION Television Broadcasting is designed to provide students with the advanced knowledge and skills related to the television broadcasting industry. Topics include camera operation, audio systems,
DESCRIPTION Television Broadcasting is designed to provide students with the advanced knowledge and skills related to the television broadcasting industry. Topics include camera operation, audio systems,
Hi! Let s get started.
 Hi! Let s get started. What s in the box Roku 2 player Roku 2 enhanced remote Headphones 2 x AA batteries for remote A/V cable (RCA) Power adapter Get to know your Roku 2 A Front view B E Back view C
SV-LCD50. Installation and User Guide. Thin-Film Transistor (TFT) Liquid Crystal Display (LCD) Color Rear Vision Monitor. Version 1.
 Liquid Crystal Display (LCD) Color Rear Vision Monitor. Version 1.") SV-LCD50 Installation and User Guide Thin-Film Transistor (TFT) Liquid Crystal Display (LCD) Color Rear Vision Monitor Version 1.00 August 2004 SV-LCD50 Installation and User Guide TFT LCD Color Rear Vision
SV-LCD50 Installation and User Guide Thin-Film Transistor (TFT) Liquid Crystal Display (LCD) Color Rear Vision Monitor Version 1.00 August 2004 SV-LCD50 Installation and User Guide TFT LCD Color Rear Vision
DH7-DK QUICKSTART GUIDE. DH7 4K Support HDMI On-Camera Field Monitor Deluxe Kit
 DH7-DK QUICKSTART GUIDE DH7 4K Support HDMI On-Camera Field Monitor Deluxe Kit What s Included 1 x DH7 Monitor 1 x AC Adapter 1 x Camera Shoe Mount 1 x Screen Cleaning Wipe 1 x Screen Protection Film 1
Equipment, Systems, and Network
 7 Equipment, Systems, and Network Focus Watching a technician who s trying to get your videoconferencing gear to work properly is much less stressful than watching an airline mechanic trying to fix the
Recording to Tape (Analogue or Digital)...10
...10") c o n t e n t s DUAL MIC-PRE Green Dual Mic Pre (introduction).............................4 Section (i): Setting Up Power Connections...........................................4 Power Supply................................................5
c o n t e n t s DUAL MIC-PRE Green Dual Mic Pre (introduction).............................4 Section (i): Setting Up Power Connections...........................................4 Power Supply................................................5
AWS-750. Anycast Touch portable live content producer. Overview
 AWS-750 Anycast Touch portable live content producer Overview Ultra-portable and easy-to-use all-in-one live production solution The AWS-750 Anycast Touch is a compact, affordable, all-in-one live production
Multi-function Portable. HD LCD Monitor. User Manual
 Multi-function Portable HD LCD Monitor User Manual Product description: Thank you for purchasing our photography, broadcast color LCD Monitor kit. This product adopts proprietary digital signal processing
Part names (continued) Remote control
 Remote control") Introduction Part names (continued) Remote control (1) STANDBY ( 25) (1) (2) ON ( 25) (3) (3) ID - 1 / 2 / 3 / 4 s ( 18) (4) (4) COMPUTER 1 ( 27) (7) (5) COMPUTER 2 * (8) (6) COMPUTER 3 * (10) (13) (7)
Introduction Part names (continued) Remote control (1) STANDBY ( 25) (1) (2) ON ( 25) (3) (3) ID - 1 / 2 / 3 / 4 s ( 18) (4) (4) COMPUTER 1 ( 27) (7) (5) COMPUTER 2 * (8) (6) COMPUTER 3 * (10) (13) (7)
VITEK VTM-TLM191 VTM-TLM240
 VTM-TLM191 VTM-TLM240 19 & 24 Professional LED Monitors with HDMI, VGA, and Looping BNC VITEK FEATURES 19 & 24 Wide Screen LED Display Panel HDMI, VGA, and Looping BNC Composite Video Inputs & Stereo Audio
Prompter Kit for PTZ camera TP-150 Instruction Manual
 Prompter Kit for PTZ camera TP-150 Instruction Manual WWW.DATAVIDEO.COM Contents Warnings and Precautions... 3 Warranty... 4 Disposal... 4 Packing List... 5 Product Overview... 6 Normal tripod assembly...
ATEM Television Studio
 ATEM Television Studio The new ATEM Television Studio The world s first live production switchers for broadcast, professional and AV users! ATEM Television Studio HD ATEM Television Studio Pro HD ATEM
AC335A. VGA-Video Ultimate Plus BLACK BOX Back Panel View. Remote Control. Side View MOUSE DC IN OVERLAY
 AC335A BLACK BOX 724-746-5500 VGA-Video Ultimate Plus Position OVERLAY MIX POWER FREEZE ZOOM NTSC/PAL SIZE GENLOCK POWER DC IN MOUSE MIC IN AUDIO OUT VGA IN/OUT (MAC) Remote Control Back Panel View RGB
2800-Series HIGH DEFINITION SWITCHERS
 HD/SD SWITCHER 2800-Series HIGH DEFINITION SWITCHERS HD SD Switch 8-12 Sources Use the 2800-Series to switch 8 or 12 HD and SD sources. 9 2800-Series www.datavideo.us (562)696-2324 «SE-2800 Studio Kit
VIDEO JUDGE SYSTEM SETUP & CAPTURE
 VIDEO JUDGE SYSTEM SETUP & CAPTURE TABLE OF CONTENTS GENERAL OVERVIEW... 1 ABOUT THE COMPETITIONS... 1 PRIOR TO THE EVENT... 2 EQUIPMENT LIST... 2 ARRIVAL AT THE VENUE... 3 EQUIPMENT SETUP... 4 Camera
Halsey 106. For assistance and additional equipment, contact Halsey Instructional Technology Services Halsey 259, extension 4979
 The Illustrated manual for Halsey 106 Contents The master power switch...1 Screen...3 Turning on the projectors...4 Turning off the projectors...5 Microphones... 6 projectors... 9 Installed Computers...
VXF7 QUICKSTART GUIDE. 7" 4K Full HD HDMI/3G-SDI On-Camera Monitor
 VXF7 QUICKSTART GUIDE 7" K Full HD HDMI/G-SDI On-Camera Monitor What s Included x VXF7 Monitor x AC Adapter x Camera Shoe Mount (SM-0) x Screen Cleaning Wipe x Screen Protector x Sunhood x Canon E6 Battery
Ethics-TV 2 Std 10 (Week 20, 1 Week)
") (10.0202) (Taught) District High School > 2016-2017 > Intermediate > Skilled & Technical Sciences > (10.0202) (Taught) > Clapier, Michael (Curtis); Virgin, Mike Monday, December 12, 2016, 10:18AM Unit
(10.0202) (Taught) District High School > 2016-2017 > Intermediate > Skilled & Technical Sciences > (10.0202) (Taught) > Clapier, Michael (Curtis); Virgin, Mike Monday, December 12, 2016, 10:18AM Unit
MODE MENU /F1 /F2 F3 F4 PLCMHD80
 MODE MENU /F1 /F2 F3 F4 PLCMHD80 ! To insure best use of the unit, please read the user s manual carefully CAUTION 1. Do not use any damaged or leaking battery, if using a battery to power. 2. Do not expose
The Illustrated manual for. Halsey 107 & 109
 The Illustrated manual for Halsey 107 & 109 Contents The control panel... 1 Microphones... 3 Screens...6 Lights...7 Computers... 8 Connecting a laptop or roll-around computer... 10 Videocassette recorder
DH5e-V2. Delta 5 On-Camera 4K HDMI Monitor with 3D LUTs. Quick Start Guide. What s Included
 DH5e-V2 Quick Start Guide Delta 5 On-Camera 4K Monitor with 3D LUTs What s Included 1 x DH5e-V2 Monitor 1 x L Series Battery Plate 1 x AC Adapter 1 x Screen Cleaning Wipe 1 x Screen Protection Film 1 x
PLL2210MW LED Monitor
 PLL2210MW LED Monitor USER'S GUIDE www.planar.com Content Operation Instructions...1 Safety Precautions...2 First Setup...3 Front View of the Product...4 Rear View of the Product...5 Quick Installation...6
SE GPI 27 SE-2200
 Contents Warranty... 3 Disposal... 3 Packing List... 4 Connection of SE-2200... 4 Main Unit Front Panel... 5 Main Unit - Rear Panel... 5 Rear Panel Connections... 6 Control Panel... 8 Keyboard Controls...
Broadcast H.264 files live with ATEM Television Studio!
 ATEM Television Studio Broadcast H.264 files live with ATEM Television Studio! Introducing the world's first live production switcher that combines a professional switcher with a broadcast quality H.264
TeamWork Kits Installation Guide
 TX 0 RX COM +5V APARATUS US TeamWork Kits Installation Guide TeamWork 400 and TeamWork 600 Kits The TeamWork 400 and TeamWork 600 kits consist of an HDMI switcher, system controller, Cable Cubby, and cables
CDM10: Channel USB Mixer. Item ref: UK User Manual
 CDM10:4 19 4 Channel USB Mixer Item ref: 171.135UK User Manual Caution: Please read this manual carefully before operating Damage caused by misuse is not covered by the warranty Introduction Thank you
INSTALATION PROCEDURE
 INSTALLATION PROCEDURE Overview The most difficult part of an installation is in knowing where to start and the most important part is starting in the proper start. There are a few very important items
MCX-500. Multi-Camera Live Producer. Overview
 MCX-500 Multi-Camera Live Producer Overview The MCX-500 is an affordable, uniquely user-friendly and flexible production switcher that makes it simple for a single operator or small team to produce a broadcast
DIGITAL VIDEO RECORDING (DVR) SERVICES
 SERVICES") DIGITAL VIDEO RECORDING (DVR) SERVICES With a Digital Video Recorder (DVR) set-top box, you can easily record your favorite programs and then play them back anytime. The DVR and Picture-In-Picture (PIP)
DIGITAL VIDEO RECORDING (DVR) SERVICES With a Digital Video Recorder (DVR) set-top box, you can easily record your favorite programs and then play them back anytime. The DVR and Picture-In-Picture (PIP)
Ready. Set. Go make your show. Your guide to creating your first video program with
 Ready. Set. Go make your show. Your guide to creating your first video program with TriCaster Mini Go Make Your Show Guide 01 Table of Contents Part 1: Ready. 1) Power, Monitoring and Control 04 2) Bringing
OWNER S MANUAL MOTORIZED 7 WIDE TFT LCD COLOR MONITOR CNT-701
 OWNER S MANUAL PW MOTORIZED 7 WIDE TFT LCD COLOR MONITOR CNT-701 ANY CHANGES OR MODIFICATIONS IN CONSTRUCTION OF THIS UNIT DEVICE WHICH IS NOT APPROVED BY THE PARTY RESPONSIBLE FOR COMPLIACE COULD VOID
Teleprompter Remote Controls TP-WRC TP-BTWC. Instruction Manual. Rev Date: P/N: TP Controllers
 Teleprompter Remote Controls TP-WRC TP-BTWC Instruction Manual Rev Date: 03-06-2013 P/N: TP Controllers WWW.DATAVIDEO.COM Contents Warnings and Precautions... 3 Warranty... 4 Disposal... 4 Free App download
USER MANUAL Full HD Widescreen LED Monitor L215ADS
 USER MANUAL 21.5 Full HD Widescreen LED Monitor L215ADS TABLE OF CONTENTS 1 Getting Started 2 Control Panel/ Back Panel 3 On Screen Display 4 Technical Specs 5 Care & Maintenance 6 Troubleshooting 7 Safety
.Prompter Kit for Apple ipad. TP-200
 .Prompter Kit for Apple ipad. TP-200 Instruction Manual www.datavideo-tek.com 1 Contents Warnings and Precautions... 3 GLASS - Handle with care... 3 Warranty... 4 Standard Warranty... 4 Two Year Warranty...
Television Broadcasting
 PRECISION EXAMS Television Broadcasting EXAM INFORMATION Items 46 Points 55 Prerequisites NONE Grade Level 10-12 Course Length ONE SEMESTER DESCRIPTION This course is designed to provide students with
VXF17 QUICKSTART GUIDE. 17" Full HD 3G-SDI/HDMI Rackmount Studio and Field Monitor
 VXF7 QUICKSTART GUIDE 7" Full HD 3G-SDI/HDMI Rackmount Studio and Field Monitor What s Included x VXF7 Monitor x AC Adapter x Table Stand (installed) x Rack Ears (installed) CHECKED BY www.ikancorp.com
Delvcam DELV-3GHD-17RM
 Delvcam DELV-3GHD-17RM 17.3" High Resolution 3G-SDI/HDMI Rackmount LCD Video Monitor IMPORTANT SAFETY INSTRUCTIONS Read manual before using this product. Keep manual for future reference. Do not place
RMS 8424S Quick Start
 VIEWSIZE THE WORLD RMS 8424S Quick Start Standard 4 unit rack mount size 8 inch LCD 2 1024 3 (RGB) 600 16:9 / 4:3 adjustable SDI/HDMI embedded audio output via 3.5mm earphone socket Support SDI/DVI audio
USER MANUAL Full HD Widescreen LED Monitor L215IPS
 USER MANUAL 21.5 Full HD Widescreen LED Monitor L215IPS TABLE OF CONTENTS 1 Getting Started 2 Control Panel/ Back Panel 3 On Screen Display 4 Technical Specs 5 Care & Maintenance 6 Troubleshooting 7 Safety
PLL1920M LED LCD Monitor
 PLL1920M LED LCD Monitor USER'S GUIDE www.planar.com Content Operation Instructions...1 Safety Precautions...2 First Setup...3 Front View of the Product...4 Rear View of the Product...5 Installation...6
USER MANUAL Full HD Widescreen LED Monitor L236VA
 USER MANUAL 23.6 Full HD Widescreen LED Monitor L236VA TABLE OF CONTENTS 1 Getting Started 2 Control Panel/ Back Panel 3 On Screen Display 4 Technical Specs 5 Care & Maintenance 6 Troubleshooting 7 Safety
ALO 030 MKII. 30 Watt DMX LED scanner. User manual
 ALO 030 MKII 30 Watt DMX LED scanner User manual Safety instructions WARNING! Always keep this device away from moisture and rain! Hazardous electrical shocks may occur! WARNING! Only connect this device
TELEVISION BROADCASTING (590)
") DESCRIPTION This course is designed to provide students with the basic knowledge and skills related to the television broadcasting industry. This includes instruction and hands-on assignments in the following
DESCRIPTION This course is designed to provide students with the basic knowledge and skills related to the television broadcasting industry. This includes instruction and hands-on assignments in the following
Azatrax Model Railroad Track Signal Control - Single Track
 Installation Guide Azatrax Model Railroad Track Signal Control - Single Track TS2 What it is: The TS2 operates one or two trackside block signals (one in each direction) on one track to simulate the block
OPERATING GUIDE. HIGHlite 660 series. High Brightness Digital Video Projector 16:9 widescreen display. Rev A June A
 OPERATING GUIDE HIGHlite 660 series High Brightness Digital Video Projector 16:9 widescreen display 111-9714A Digital Projection HIGHlite 660 series CONTENTS Operating Guide CONTENTS About this Guide...
M-16DX 16-Channel Digital Mixer
 M-6DX 6-Channel Digital Mixer Workshop Getting Started with the M-6DX 007 Roland Corporation U.S. All rights reserved. No part of this publication may be reproduced in any form without the written permission
Operating Instructions
 Broadcast A/V Division Model No. M-LYNX-702W Dual 7 High Resolution Rack Mount Display with Waveform Operating Instructions V.1.0 Table of Contents 1. PRODUCT DESCRIPTION... 3 2. MENU SETTING... 6 3. SPECIFICATIONS...
P XGA TFT Monitor. User s Manual
 P6151 15 XGA TFT Monitor User s Manual Disclaimers This manual has been carefully checked and believed to contain accurate information. Axiomtek Co., Ltd. assumes no responsibility for any infringements
Making a film for social media or TV broadcast
 Making a film for social media or TV broadcast Why is video important? By 2020 98% of all traffic on the internet will be film based. This is including Amazon, Netflix, BBC, You Tube and Facebook. For
DCL9AW. User Manual. English
 DCL9AW User Manual English PRECAUTIONS Information for users applicable in European Union countries 1 Information for users applicable in United States of America 1 Installation 1 Power connection 1 Maintenance
VL35 QUICKSTART GUIDE. 3.5" 4K HDMI Field Monitor w/ Canon LP-E6 Battery Plate
 VL35 QUICKSTART GUIDE 3.5" 4K Field Monitor w/ Canon LP-E6 Battery Plate What s Included 1 x VL35 Monitor 1 x AC Adapter 1 x Camera Shoe Mount 1 x Canon E6 Battery Plate 1 x AV Break Out Cable 1 x Screen
Operating Instructions
 Marshall Electronics Broadcast A/V Division Model No. VSW-2200 4-Input Seamless SDI A/V Switcher Operating Instructions Table of Contents 1. Overview... 2. Features.... Package Contents... 4. Specifications...
SNG-2150C User s Guide
 SNG-2150C User s Guide Avcom of Virginia SNG-2150C User s Guide 7730 Whitepine Road Revision 001 Richmond, VA 23237 USA GENERAL SAFETY If one or more components of your earth station are connected to 120
Entry Level Assessment Blueprint Audio-Visual Communications Technology
 Entry Level Assessment Blueprint Audio-Visual Communications Technology Test Code: 3005 / Version: 01 Specific Competencies and Skills Tested in this Assessment: Photography Operate an SLR (single lens
P-2 Installing the monitor (continued) Carry out as necessary
 Carry out as necessary") P-2 Installing the monitor (continued) Carry out as necessary Using the monitor without the bezel MDT552S satisfies the UL requirements as long as it is used with the bezel attached. When using the monitor
P-2 Installing the monitor (continued) Carry out as necessary Using the monitor without the bezel MDT552S satisfies the UL requirements as long as it is used with the bezel attached. When using the monitor
Blackmagic SmartView 4K The world s rst full resolution Ultra HD broadcast monitor with 12G-SDI
 Blackmagic SmartView 4K The world s rst full resolution Ultra HD broadcast monitor with 12G-SDI SmartView 4K is the world s rst full resolution rack mount Ultra HD broadcast monitor with 12G-SDI for native
Quick Reference Guide
 Multimedia Projector Quick Reference Guide MODEL 103-011100-01 Projection lens is optional. English Use this book as a reference guide when setting up the projector. For detailed information about installation,
Interview Management System Installation Guide
 Technical Support Interview Management System Installation Guide www.casecracker.com support@casecracker.com (720) 442-7072 Technologies 2017 (v.15) 1 Equipment Checklist Box 1 Box 2 Box 3 (Optional) CaseCracker
Operating Guide. ViewClix offers a revolutionary experience for seniors and their families and friends.
 ViewClix Mini TM Operating Guide ViewClix offers a revolutionary experience for seniors and their families and friends. To make using ViewClix an easy and fun experience for you and your loved ones, we
Crew Positions Outdoor Camera
 Crew Positions Outdoor Camera Description: Your job is to set up and staff the camera and light stands from an outdoor location during the newscasts. You MUST use the light stands EVERY day! They wash
ACUBRITE 23 SS. Manual. Stainless Steel Chassis 23" LCD Display. Content
 ACUBRITE 23 SS Stainless Steel Chassis 23" LCD Display Manual Introduction... 2 Hardware Installation... 2 The Display Timing... 5 The Display Outline Dimensions... 6 The Display Controls... 7 The Screen
The New Contour INTRODUCING
 INTRODUCING The New Contour Welcome to the simplest, fastest and most fun way to search and access all your entertainment on all your devices. Search visually with show title art that is organized by category,
DH5e QUICKSTART GUIDE. 5" 4K Support HDMI On-Camera Field Monitor w/ Touch Screen
 DH5e QUICKSTART GUIDE 5" 4K Support On-Camera Field Monitor w/ Touch Screen What s Included 1 x DH5e Monitor 1 x AC Adapter 1 x Camera Shoe Mount 1 x Screen Cleaning Wipe 1 x Screen Protection Film 1 x
Delvcam DELV-HD7-4K User Guide
 Delvcam DELV-HD7-4K User Guide 7" 4K Compatible 1080P Camera Top Monitor with Audio Meter IMPORTANT SAFETY INSTRUCTIONS Read manual before using this product. Keep manual for future reference. Do not place
USER MANUAL. 27 Full HD Widescreen LED Monitor L27ADS
 USER MANUAL 27 Full HD Widescreen LED Monitor L27ADS TABLE OF CONTENTS 1 Getting Started 2 Control Panel/ Back Panel 3 On Screen Display 4 Technical Specs 5 Care & Maintenance 6 Troubleshooting 7 Safety
J.M. Stewart Corporation 2201 Cantu Ct., Suite 218 Sarasota, FL Stewartsigns.com
 DataMax INDOOR LED MESSAGE CENTER OWNER S MANUAL QUICK START J.M. Stewart Corporation 2201 Cantu Ct., Suite 218 Sarasota, FL 34232 800-237-3928 Stewartsigns.com J.M. Stewart Corporation Indoor LED Message
CONTENTS. Troubleshooting 1
 CONTENTS Introduction...3 Troubleshooting Techniques...3 Preparation...3 Knowledge...3 Tools...4 Spare Parts...4 Backups...4 Troubleshooting Steps...5 Step 1: Identify the Specific Symptoms:...5 Step 2:
Mobile Projector Kit KIT CONTAINS:
 Mobile Projector Kit Enhance your presentations by showing images with this ultra-portable, small, and lightweight projector. It provides bright, crisp, high-resolution LED projection, with a built-in
USER MANUAL. 27" 2K QHD LED Monitor L27HAS2K
 USER MANUAL 27" 2K QHD LED Monitor L27HAS2K TABLE OF CONTENTS 1 Getting Started 2 Control Panel/ Back Panel 3 On Screen Display 4 Technical Specs 5 Troubleshooting 6 Safety Info & FCC warning 1 GETTING
STUDIOVISION SRM-7X2-LT INPUT INPUT MENU. Dual 7 Rack Mount Monitors STUDIOVISION SRM-7X2-LT ENTER ENTER MENU. user MANUAL
 MENU STUDIOVISION SRM-7X2-LT Dual 7 Rack Mount Monitors STUDIOVISION SRM-7X2-LT PUT PUT MENU ENTER ENTER FN FN 1 2 user MANUAL TRODUCTION Thank you for choosing Elvid. The Elvid SRM-7X2-LT StudioVision
22" Touchscreen LED Monitor USER'S GUIDE
 22" Touchscreen LED Monitor USER'S GUIDE Content Operation Instructions...1 Unpacking Instructions...2 Safety Precautions...2 Front View of the Product...3 Rear View of the Product...4 Quick Installation...5
BeoVision Guide
 BeoVision 8-40 Guide Contents Menu overview, 3 See an overview of on-screen menus. Navigate in menus, 4 See how to use the different remote controls for menu operation. First-time setup, 5 Which menus
Table of contents. Introduction Maintenance Positioning your projector Troubleshooting...50 Specifications Connection...
 SALE on Projector Bulbs at www.bulbamerica.com Table of contents Introduction... 3 Projector features... 3 Shipping contents... 4 Projector exterior view... 5 Controls and functions... 6 Positioning your
TELETEST Ltd 4-6 Shelley Road, Bournemouth, BH1 4HY, UK Tel: Intl: Web:
 TELETEST Ltd 4-6 Shelley Road, Bournemouth, BH1 4HY, UK Tel: 01202 900160 Intl: +44 1202... E-Mail: sales@teletest.tv Web: www.teletest.tv 500m Long Range HDSDI Radio Link Data Sheet OZE4640 Transmitter
Overview U508CV-UMK. Display
 U508CV-UMK Overview With a Sceptre 49" LED 4K UHD TV (U508CV-UMK), entertainment is transformed into an epic adventure. The unequalled color and clear brilliance of 4K (3,840 x 2,160 or over 8 million
Programming Manual for Broadcastvision Entertainment
 Programming Manual for Broadcastvision Entertainment 18.5 Widescreen LCD Part Number: AXS19HD2G 18.5 Widescreen Controller Part Number: AXSPVSC-BVE AXS19HD2G AXSPVSC-BVE Other parts and accessories included
Gazer VI700A-SYNC2 and VI700W- SYNC2 INSTALLATION MANUAL
 Gazer VI700A-SYNC2 and VI700W- SYNC2 INSTALLATION MANUAL Contents List of compatible cars... 3 Package contents... 4 Special information... 6 Car interior disassembly and connection guide for Ford Focus...
LAVALLEY LAW LIBRARY MEDIA SERVICES INSTRUCTIONAL MEDIA OPERATIONS MANUAL
 LAVALLEY LAW LIBRARY MEDIA SERVICES INSTRUCTIONAL MEDIA OPERATIONS MANUAL OCTOBER 27, 2007 Page 1 of 29 TABLE OF CONTENTS TABLE OF CONTENTS 03 INTRODUCTON TO MEDIA SERVICES OPERATIONS 04 AUDITORIUM OPERATIONS
HVS-5000 Series. Video Switchers & DSKs. 3G/HD/SD 2M/E - 4M/E Digital Video Switcher
 Video Switchers & DSKs 3G/HD/SD 2M/E - 4M/E Digital Video Switcher HVS-5000 Series FOR-A's flagship production switcher, covering 2M/E to 4M/E. This multi-function switcher brings together a vast array
USER MANUAL. 22" Class Slim HD Widescreen Monitor L215DS
 USER MANUAL 22" Class Slim HD Widescreen Monitor L215DS TABLE OF CONTENTS 1 Getting Started Package Includes Installation 2 Control Panel / Back Panel Control Panel Back Panel 3 On Screen Display 4 Technical
Displays Open Frame Monitor Model Number: AND-TFT-150Bxx
 Displays 15.0 Open Frame Monitor Model Number: AND-TFT-150Bxx The AND-TFT-150Bxx 15.0 Open Frame Monitor series are rugged, high performance Industrial LCD Monitors, designed for commercial and industrial
3CCD Color Video Camera BRC-300 BRC-300P. USA Security Systems
 NTSC/PAL 3CCD Color Video Camera P For More Information Please Call * (888) 875-6091 * info@usasecuritysystems.com * http:// MAIN FEATURES Sony s new is a revolutionary all-in-one compact robotic color
User Guide
 User Guide www.delvcam.com IMPORTANT SAFETY INSTRUCTIONS: l Please read User Guide before using this product. l Please keep User Guide for future reference. l Please read the cautions to prevent possible
RACKMOUNT 7'' 3G-SDI DUAL LCD MONITORS USER MANUAL UMEN V1.0
 RACKMOUNT 7'' 3G-SDI DUAL LCD MONITORS USER MANUAL UMEN-081013-V1.0 SUMMARY 1. INTRODUCTION... 3 2. PACKAGES CONTENT... 3 3. PRODUCT DESCRIPTION... 3 4. PANEL FUNCTION AND BUTTON OPERATING INSTRUCTION...
PL2410W LCD Monitor USER'S GUIDE.
 PL2410W LCD Monitor USER'S GUIDE www.planar.com Content Operation Instructions...1 Safety Precautions...2 First Setup...3 Front View of the Product...4 Rear View of the Product...5 Quick Installation...6
Impressive Image Performance for Presentations
 Impressive Image Performance for Presentations PJD5151 LightStream 3,300 ANSI Lumen SVGA Projector The ViewSonic LightStream Projector PJD5151, the best price-performance projector, is designed with elegant
6.4 Chassis Monitor Model Number: LCM0642xx. SPEC No.: SAS Version: 0.0 Issue Date: April 16, Introduction:
 6.4 Chassis Monitor Model Number: LCM0642xx This product is RoHS compliant SPEC No.: SAS-0908003 Version: 0.0 Issue Date: April 16, 2010 1. Introduction: 1.1 About the Product The LCM0642xx 6.4 Chassis
Quick Help Teaching Room Technology Support
 Quick Help Teaching Room Technology Support Technical assistance is available. If you require assistance, please call Ext 6066 Quick Help Technology Overview INDEX INDEX Touch Screen Is not active 3 Technology
Standards / Objectives / Indicators
 Correlation of Television Production & Broadcast Journalism, Harris and Garcia (Goodheart-Willcox Publisher 2018) to Precision Exams Television Broadcasting Standards Goodheart-Willcox is pleased to partner
ivw-fd122 Video Wall Controller MODEL: ivw-fd122 Video Wall Controller Supports 2 x 2 Video Wall Array User Manual Page i Rev. 1.
 MODEL: ivw-fd122 Video Wall Controller Supports 2 x 2 Video Wall Array User Manual Rev. 1.01 Page i Copyright COPYRIGHT NOTICE The information in this document is subject to change without prior notice
A/V Equipment Manual
 A/V Equipment Manual Setup, Operation and Troubleshooting for the Audio-Visual Equipment Jessica White September 20, 2012 This manual provides comprehensive instructions on how to setup, operate and troubleshoot