8 CH MJPEG DVR USER MANUAL
|
|
|
- Elfrieda Harrell
- 5 years ago
- Views:
Transcription
1 8 CH MJPEG DVR USER MANUAL
2 Contents 1. SAFETY PRECAUTIONS FEATURES PACKING LIST NAME and FUNCTION of EACH PART FRONT PANEL BUTTONS and CONTROLS REAR PANEL BUTTONS and CONTROLS INSTALLATION CAMERA and MICROPHONE INPUT CONNECTION MONITOR CONNECTION DVR and NETWORK CONNECTION POWER-IN OPERATION DESCRIPTIONS LIVE MODE RECORD MODE PLAYBACK MODE SEARCH MENU SETUP DESCRIPTION DATE/ TIME SETUP CAMERA SETUP EDIT CAMERA TITLE VIDEO ADJUST MOTION DETECTION RECORD SETUP SCHEDULE SETUP HARD DISK SETUP CF CARD SETUP CF CARD COPY OTHERS PASSWORD BUZZER RELAY OUTPUT ALARM INPUT SQUENCE DWELL TIME FACTORY DEFAULT NETWORK DVR SETUP Connecting Network DVR Online using Intranet or Fixed IP Online using ADSL (PPPoE) Router Online using DDNS Server Online with DHCP Server Online without DHCP Server Online Connection Install ActiveX
3 9. FUNCTION SETUP Main Display View Image Recording Save as JPEG: Save as AVI: Advanced Setup Network Setting User Setup DDNS Setup TROUBLESHOOTING NETWORK INSTALLATION System Configuration Suggested PC Equipment HARD DISK INFORMATION APPENDIX DB25 Alarm Input/Relay Output Definition SPECIFICATION The author assumes no responsibility for any errors or omissions that may appear in this document nor does the author make a commitment to update the information herein. 2 VER.:1.0, P/N.: /1
4 1. SAFETY PRECAUTIONS WARNING: Alert the user to the presence of un-insulated dangerous voltage. CAUTION: Alert the user the presence of important operating and maintenance (Servicing) instructions in the literature accompanying the appliance. Disposal of Old Electrical & Electronic Equipment (Applicable in the European Union and other European countries with separate collection systems). This symbol on the product or on its packaging indicates that this product shall not be treated as household waste. Instead it shall be handed over to the applicable collection point for the recycling of electrical and electronic equipment. By ensuring this product is disposed of correctly, you will help prevent potential negative consequences for the environment and human health, which could otherwise be caused by inappropriate waste handling of this product. The recycling of materials will help to conserve natural resources. For more detailed information about recycling of this product, please contact your local city office, your household waste disposal service or the shop where you purchased the product. The power cord is the main power connection. Therefore, constantly plug and unplug of the power cord might result in malfunction of the product. Do not install the product in an environment where the humidity is high. Unless the product is waterproof or weatherproof, otherwise poor image quality may occur. Do not drop the product or subject them to physical shocks. Except for vandal-proof or shockproof product, otherwise malfunctions may occur. Never keep the product to direct strong light. It can damage the product. Do not spill liquid of any kind on the product. If it gets wet, wipe it dry immediately. Alcohol or beverage can contain minerals that corrode the electronic components. Do not expose to extreme temperatures. Use the product at temperatures within 5 ~ 40. 3
5 2. FEATURES 8-Channel video recording and 1-Channel audio recording. 1-Video outputs to monitor, 1-video output to SPOT, and 2-audio outputs. Auto NTSC/ PAL video format detection. Auto video loss detection and alarm alert. 8-Alarm signal input and 1-Relay output (auto alarm recording). High-capacity removable hard disk (up to 500 GB capacity), digital image storage replaces tape-based mechanical systems. Auto overwrite or alarm notification when hard disk is full, reduces manpower management. Power-loss memory function, designed to reboot and continue recording. Motion-JPEG video and G.711 audio compression format. Maximum recording rate is (NTSC) or (PAL). Adjustable recording quality and frame rates for recording. 4 Types of record mode: Manual, Schedule Alarm, Schedule Motion Detection and Schedule Continue. Monitoring or recording can be shown by full, quad screen, 9-split and by auto sequential switching. Quick efficient playback search by Date & Time. Recorded images backup is applicable by Compact Flash card (PC supports AVI file playback). Includes RJ-45 interface for network connection. Firmware update by Compact Flash card. 4
 1 2 Power Adaptor and Power Cord Input: AC 100~240V Output: DC 12V/4.")
6 3. PACKING LIST Check and make sure all the items shown below are included in your product package. If something is missing, contact your dealer as soon as possible. No. Item Picture Quantity 1 DVR (Digital Video Recorder) 1 2 Power Adaptor and Power Cord Input: AC 100~240V Output: DC 12V/4.2A 1 3 Manual 1 4 Hard Drive Cartridge Key Lock (optional) And Fixed Screws 1 5
7 4. NAME and FUNCTION of EACH PART 4.1 FRONT PANEL BUTTONS and CONTROLS Camera Select (1-8 Video Channel Button) 2. LED Indicator (Alarm/ Playback/ HDD/ Record). 3. Removable Cartridge Casing: 3.5 IDE HDD, Max.: 500 GB (optional). 4. Function Button: REC: Manual Record. STOP: Stop Button (Manual Record/ Play). PLAY: Play Button. PAUSE: Pause Button. SPLIT: Full Screen/ Quad Screen/ 9-Split Screen (switching). SEQ: Auto Sequencing Button. SEARCH: Quick Search on Data Recorded. MENU: Menu Setup Button. EXIT/ INFO: ENTER/ DISP: Confirm Button/ Message Display Switch. 5. CF Card Slot 6. Direction Button: LEFT: RIGHT: UP: DOWN: Return to Previous Menu/ System Information Display Switch. Decreases the Setting Value under the Menu/ Step Rewind Playback/ Fast Rewind Playback (speed adjustable). Increases the Setting Value under the Menu/ Step Forward Playback/ Fast Forward Playback (speed adjustable). Moves the Cursor Upward/ Forward Switching Channel Display. Moves the Cursor Downward/ Rewind Switching Channel Display. 6
 4. Audio Input: 1-Channel RCA Input Terminal 5. Speaker Output: 2-Channel RCA Output Terminal 6.")
8 4.2 REAR PANEL BUTTONS and CONTROLS Video Input: 8-Channel BNC Input Terminal 2. DC Power Input: 12V/4.2A 3. Alarm Input/ Relay Output: DB25 Female Terminal (Please refer to appendix) 4. Audio Input: 1-Channel RCA Input Terminal 5. Speaker Output: 2-Channel RCA Output Terminal 6. Main Monitor Output: 1-Channel BNC Output Terminal 7. Network Connection: 1-Ethernet Connection Terminal 8. SPOT Monitor Output: 1-Channel BNC Output Terminal 9. Fan 7
9 5. INSTALLATION Main Monitor Spot Monitor Network Function (purchase separately) 5.1 CAMERA and MICROPHONE INPUT CONNECTION Connect the camera output (1-8) to video input (VIDEO IN) terminal of the DVR. Connect the microphone output (1) to audio input (AUDIO IN) terminal of the DVR. 8
10 5.2 MONITOR CONNECTION Connect the main monitor to the main monitor output (VIDEO OUT) terminal of the DVR. Connect SPOT monitor to the SPOT monitor output (SPOT OUT) terminal of the DVR. Connect the speaker to the speaker output (AUDIO OUT) terminal of the DVR. Main Monitor Speaker 5.3 DVR and NETWORK CONNECTION 路 連 Network Connection 9
11 5.4 POWER-IN Use the supplied power adapter to connect this DVR to a power outlet. Note before operation 1. The DVR does not support HDD hot swap function. To prevent damage, please enter main menu to stop all HDD activities, then power-off the device before replacing the hard disk. 2. When the hard disk information icon turns to red, the device is notifying the user to replace a new hard disk. 3. After power-on, system auto detects the video system (NTSC/ PAL) of the first camera connected. When no camera has been connected, the video system will be the same as previous setup. 4. After power-on the system auto enters 9-split screen mode, and previously setup schedule recording mode. 10
12 6. OPERATION DESCRIPTIONS 6.1 LIVE MODE CHANNEL TITLE C H C H C H CHANNEL TITLE C H C H C H DATE & TIME C H C H DISK INFO: REMAIN PERCENT% / / : : SEQ OVERWRITE 1. Press DISP button to switch ON/ OFF channel, date, and time message display. 2. Press INFO to switch ON/ OFF system information display. 3. When the hard disk information icon turns to red, the device is notifying the user to replace a new hard disk. 4. Press CH button to playback full screen images (CH1 CH8). 5. Press SPLIT button to switch to Full Screen/ Quad Screen/ 9-Split Screen. 6. Press SEQ button to switch ON/ OFF sequencing order display. 7. Full screen channel auto sequence will skip the channel with video loss event. 8. When video loss occurs, video loss message will be shown on the screen. 9. During alarm triggered event the corresponding channel name will be changed to color red. 10. During motion triggered event the corresponding channel name will be changed to color red M. 11. When alarm event occurs, SPOT monitor will immediately switch to the video image of the channel that has been triggered by alarm event, and then returns to previous channel switching status. 12. Connect the audio output to speaker input to enable live audio. 13. Live monitoring operations has not affect on recording functions. 11
13 Full Display and Quad Display Switching Order Full Display and Quad Display Sequencing Order S Y S T E M I N F O R M A T I O N S Y S T E M V E R S I O N : V B x x x I M A G E Q U A L I T Y : H I G H M A N U A L I P S : 6 0 C O N T I N U E I P S : 6 0 M O T I O N D E T E C T I O N I P S : 6 0 A L A R M I P S : 6 0 A U D I O : O N D I S K F U L L : O V E R W R I T E H D D T O T A L C A P A C I T Y : M B H D D R E M A I N C A P A C I T Y : M B H D D S T A T U S : N O R M A L System Information 12
14 6.2 RECORD MODE D O O R 2 CAMERA TITLE RECORD EVENT TYPE: ALARM CONTINUE DATE & TIME DISK INFO: REMAIN PERCENT% OVERWRITE / / : : SEQ 1. Live monitoring is operable during recording. 2. When the hard disk information icon turns to red, the device is notifying the user to replace new a hard disk. 3. Manual Record: Under monitoring mode, press REC button to enable all (CH1 CH 8) camera recordings, and STOP button to stop manual recording. 4. When schedule recording (ALARM/ MOTION DETECTION/ CONTINUE RECORD) has been activated. Recording can not be stopped by pressing STOP button, it is ineffective during schedule record time. 5. When the main password or the playback password is switched off, or the password has been copied onto the CF card, and the CF card has been inserted. Press PLAY or SEARCH button, system auto enters the playback or search mode, and the will not request a password to be entered. 6. When the main password is switched off, or the password has been copied onto the CF card, and the CF card has been inserted. Press MENU button, system auto enters main menu, and will not request a password to be entered. 7. After entering playback mode or menu setup, when correct password has been entered, all recording activities will stop. When exiting playback mode or menu setup, once the schedule recording has been switched on, schedule recording will auto start-up. 8. Power-on after power-loss, the system auto returns to the recording mode before power-loss. 13
15 6.3 PLAYBACK MODE D O O R 2 CAMERA TITLE PLAYBACK REWIND STEP BACKWARD PAUSE FAST FORWARD STEP FORWARD EVENT TYPE: DATE & TIME / / : : 1. Press PLAY button, when playback password is setup to ON, system will request to enter a password, when correct password has been entered, all recording activities will stop. 2. When the main password or the playback password is switched off, or the password has been copied onto the CF card, and the CF card has been inserted. Press PLAY button, system auto enters the playback mode, and the password will not be requested again by the system. 3. Press PLAY button, to playback starting from the previous playback end time. 4. Press DISP button to switch ON/ OFF channel, date, and time message display. 5. Press INFO to switch ON/ OFF system information display. 6. Press CH button to playback full screen images (CH1 CH8). 7. Press SPLIT button to switch to Full Screen/ Quad Screen/ 9-Split Screen. 8. SEQ function inapplicable during playback. 9. Press PAUSE button under normal playback to pause. 10. During pause status, press LEFT button to step rewind playback, and RIGHT button to step forward playback. 11. During normal playback, press LEFT button to adjust the rewind playback speed (x1/ x2/ x4/ x8/ x16/ x32/ x64 ), and RIGHT button to adjust forward playback speed (x1/ x2/ x4/ x8/ x16/ x32/ x64). Press PLAY button to return to normal speed and PAUSE button to pause. 12. Connect the audio output to speaker input to enable video and audio playback. 13. Press STOP button to stop playback, and return to live monitoring mode or schedule record mode. 14
16 6.4 SEARCH 1. Press SEARCH button, when playback password is setup to ON, system will request to enter a password, when correct password has been entered, all recording activities will stop. 2. When the main password or the playback password is switched off, or the password has been copied onto the CF card, and the CF card has been inserted. Press SEARCH button, system auto enters the search mode, and will not request a password to be entered. 3. Press SEARCH button for quick search function by date and time, press ENTER or PLAY button to enter 9-split screen display. S E A R C H Y E A R M O N 0 5 D A Y 1 6 H O U R 1 3 M I N 2 3 N O D A T A C O N T. M A N U A L M O T I O N D A T A A L A R M 4. YEAR/ MONTH/ DAY/ HOUR: White Index Bar: No recorded data available under this date period. Green Index Bar: Recorded data available under this date period. 5. MINUTE: White Color Bar: No recorded available under this time period. Red Color Bar: Manual recorded data, motion detection recorded data, and alarm recorded data is available under this time period. Blue Color Bar: Schedule recorded data is available under this time period. 6. Use UP/ DOWN buttons to move the cursor to the desired item (YEAR/ MONTH/ DAY/ HOUR/ MINUTE), use LEFT/ RIGHT buttons or drag the index bar to make changes on the setup. 7. After setup has been completed, press ENTER button to enter play mode, or EXIT button to return to live monitoring mode. 15
17 7. MENU SETUP DESCRIPTION Password is requested after MENU button is pressed. E N T E R P A S S W O R D : X X X X X X X X 1. In order to enter the main menu, password entered must be correct. After entering the main menu all recording activities will stop. 2. Default Password: (CH1~CH8 represents number 1~8). 3. When the main password is switched off, or the password has been copied onto the CF card, and the CF card has been inserted. Press MENU button, system auto enters main menu, and will not request a password to be entered. S E T U P D A T E / T I M E > C A M E R A > R E C O R D > S C H E D U L E > H A R D D I S K > C F C A R D > O T H E R S > F A C T O R Y D E F A U L T > Main Menu 16
18 7.1 DATE/ TIME SETUP D A T E / T I M E S E T U P D A T E F O R M A T : Y / M / D D A T E : / 0 5 / 0 5 T I M E : 2 0 : 3 0 : 0 0 DATE FORMAT (Three Types of Date Format Setup) : 1. Y/M/D: Year/ Month/ Day 2. M/D/Y: Month/ Day/ Year 3. D/M/Y: Day/ Month/ Year 7.2 CAMERA SETUP C A M E R A S E T U P C H 1-8 T I T L E > V I D E O A D J U S T > M O T I O N D E T E C T I O N > 17
19 7.2.1 EDIT CAMERA TITLE 1-8 E D I T C A M E R A T I T L E C H T I T L E 1 C H 1 * * * * * 2 C H 2 * * * * * 3 C H 3 * * * * * 4 C H 4 * * * * * 5 C H 5 * * * * * 6 C H 6 * * * * * 7 C H 7 * * * * * 8 C H 8 * * * * * [ D E F A U L T ] 1. Maximum 8 character title setups. 2. Move the cursor to the desired camera number by using UP/ DOWN button 3. Move between the characters (camera title) by using LEFT/ RIGHT button and use UP/ DOWN button to edit the camera title (letters A-Z, numbers 0-9 or blank spaces) VIDEO ADJUST V I D E O A D J U S T - C H A N N E L : 0 1 B R I G H T N E S S ( ) : 0 5 C O N T R A S T ( ) : 0 5 S A T U R A T I O N ( ) : 0 5 H U E ( ) : 0 5 [ D E F A U L T ] Adjustable brightness, contrast, saturation, and hue for 1 8 CH videos. 18
20 7.2.3 MOTION DETECTION M O T I O N D E T E C T I O N 2-3 C H A N N E L : 0 1 S E T D E T E C T I O N A R E A > S E N S I T I V I T Y : 0 3 M O T I O N V A R I A T I O N Select SET DETECTION AREA to show the screen below: S E L E C T E D W I N D O W M A S K A L L : S E A R C H D E L A L L : M E N U M O T I O N V A R I A T I O N 1. Blue bar shown above indicates the motion variation of the detection window, when motion event exceeds the sensitivity setup, it triggers motion detection recording. 2. Full Screen Display: NTSC is divided into 11 x 10 and PAL is divided into11 x 12 detection block. 3. Area Block Color: Grey: Detection Block. Transparent: Non-Detection Block. Green: Motion Detection Block. 19
21 4. Press SEARCH button to enable whole detection area. 5. Press MENU button to disable whole detection area. 6. Maximum Three Detection Area Setup (Detection area may overlap): Use UP/ DOWN/ LEFT/ RIGHT button to setup the starting point of the detection area. Press ENTER button to confirm the starting point of the detection area. Use UP/ DOWN/ LEFT/ RIGHT button to setup the ending point of the detection area. Press ENTER button to confirm the ending point of the detection area. 7.3 RECORD SETUP R E C O R D S E T U P Q U A L I T Y : H I G H A U D I O : O N D I S K F U L L : O V E R W R I T E P O S T A L A R M S E C : 3 0 M A N U A L I P S : 6 0 C O N T I N U E I P S : 6 0 M O T I O N D E T E C T I O N I P S : 6 0 A L A R M I P S : 6 0 [ D E F A U L T ] 1. QUALITY: LOW/ MEDIUM/ HIGH. 2. AUDIO: ON: Audio recording enabled. OFF: Audio recording disabled. 3. DISK FULL: Overwrite: When the disk is full the system overwrites the old data (overwriting from the oldest data) Stop: When the system is full the system stops recording (message will be displayed). 4. POST ALARM: Recording time after an event (Alarm/ Motion Detection) has been triggered. 5. MANUAL: IPS by manual recording. 6. CONTINUE: IPS by schedule continuous recording. 20
22 7. MOTION DETECT: IPS by schedule motion detection recording. 8. ALARM: IPS by schedule alarm recording. 9. DEFAULT: Reload the factory default setting. 7.4 SCHEDULE SETUP S C H E D U L E S E T U P S C H E D U L E : O N A A A A M M M C C A A A A M M M C C * * * [ D E F A U L T ] * : A L L - : N O N E A : A L A R M M : M O T I O N C : C O N T. Three Types of Schedule Recording Setup: 1. Continue Record: Continuous recording according to the setup of the schedule time. 2. Motion Detect Record: Motion detection recording according to the setup of the schedule time. 3. Alarm Recording: Alarm trigger recording according to the setup of the schedule time. Optional Settings: Each hour individually setup to different recording modes, combined settings or even no settings are acceptable. During schedule recording when manual recording is applied, the system auto switches to manual recording (manual recording is the first priority recording). Record Mode Priority: Manual RecordAlarm RecordMotion Detection RecordContinuous Record 21
23 7.5 HARD DISK SETUP H A R D D I S K S E T U P H D D T O T A L C A P A C I T Y : 1 0 M B H D D R E M A I N C A P A C I T Y : 0 M B B E G I N D A T E : / 0 1 / 0 E N D D A T E : / 0 1 / 1 F O R M A T > 1. Displays the hard disk total capacity and the remaining capacity. 2. Displays the begin and end date of the recorded material and when no recorded materials are available, current date is displayed. 3. FORMAT: Format the HDD. 7.6 CF CARD SETUP C F C A R D S E T U P C F T O T A L C A P A C I T Y : M B C F R E M A I N C A P A C I T Y : M B C F C A R D C O P Y > [ B A C K U P L O G F I L E ] F O R M A T > 1. CF TOTAL CAPACITY: Total Capacity 2. CF REMAIN CAPACITY: Remaining Capacity 3. CF CARD COPY: Copy the selected file to the CF card. 4. FORMAT: Delete all data stored in the CF card. 22
24 7.6.1 CF CARD COPY C F C A R D C O P Y - C H A N N E L : 0 1 A U D I O : B E G I N : / 0 5 / : 2 0 : E N D : / 0 5 / : 2 5 : 4 [ C O P Y ] PROGRESS BAR 1. CH: Selectable 1-8 camera option. 2. AUDIO: Whether audio will be copied or not. 3. BEGIN/ END: The system will start coping according to the setup (begin and end time). 4. COPY: Select COPY to start copy. *When the data size selected exceeds the storage capacity of the CF card, it will start coping from the beginning and stop when CF card is full. Different channels and different events setup generates different AVI files (audio data follows its corresponding video file). PC supports AVI file playback (File size is 720X240. When using a computer to playback, the video aspect ratio is not 1:1, please use a player with adjustable video aspect ratio). 23

25 7.7 OTHERS O T H E R S S E T U P P A S S W O R D : O N S E T P A S S W O R D > K E Y S T O P B U Z Z E R / R E L A Y : O N B U Z Z E R > R E L A Y O U T P U T > A L A R M I N P U T > S E Q U E N C E D W E L L T I M E > C O L O R B A R L A N G U R A G E : E N G L I S H 1. PASSWORD: ON: Enable password protection, password is required before entering the main menu. OFF: Disable password protection, password will not be required before entering the main menu. 2. KEY STOP BUZZER/ RELAY: When buzzer or relay device is triggered by an event, press on any key to deactivate. 3. COLOR BAR: By using the color bar, the user may adjust the color of the monitor. 4. LANGUAGE: Supports English and Chinese on-screen menus and displays. 24
26 7.7.1 PASSWORD S E T P A S S W O R D - P A S S W O R D F O R P L A Y B A C K : O N [ S A V E P A S S W O R D T O C F C A R D ] O L D P A S S W O R D : X X X X X X X X N E W P A S S W O R D : X X X X X X X X C O N F I R M P A S S W O R D : X X X X X X X X 1. Search/ Playback Password: Whether to enter the password during search or playback. 2. When password is stored on the CF card, after inserting the CF card the password will not be requested by the system. 3. Default Password: (CH1~CH8 represents number 1~8). 4. Press ENTER button to enter new password, confirm settings, and press EXIT button to exit. 5. For long- hour searching, one may disable the playback password and enable it after searching has been completed BUZZER B U Z Z E R S E T U P - B U Z Z E R : O N P E R I O D K E Y B E E P : O F F V I D E O L O S S : O N 0 6 S E C A L A R M : O N 0 6 S E C M O T I O N D E T E C T I O N : O F F 0 6 S E C D I S K F U L L : O F F 0 6 S E C [ D E F A U L T ] 25
27 BUZZER: Embedded buzzer sounding. ON: Buzzer is enabled. OFF: Buzzer is disabled. Period: Duration time of the buzzer output. Buzzer event includes the following: 1. KEY PRESSED: Key press beeping. 2. MOTION DETECTION: Triggered by motion detection. 3. ALARM: Triggered by external alarm. 4. VIDEO LOSS: Triggered by video loss. 5. DISK FULL: Triggered when disk full, system stops recording RELAY OUTPUT R E L A Y O U T P U T S E T U P - R E L A Y O U T P U T : O N P E R I O D V I D E O L O S S : O N 0 6 S E C A L A R M : O N 0 6 S E C M O T I O N D E T E C T I O N : O F F 0 6 S E C [ D E F A U L T ] RELAY OUTPUT: Relay output can be connected to external sounding device or warning device. Two Types (NO/ NC) of Relay Output Setup: ON: Relay output enabled. OFF: Relay output disabled. PERIOD: Duration time of the relay output. 26
28 Relay output event includes the following: 1. VIDEO LOSS: Triggered by video loss. 2. MOTION DETECTION: Triggered by motion detection. 3. ALARM: Triggered by external alarm ALARM INPUT A L A R M I N P U T S E T U P - A L C H L C O O O O O O O [ D E F A U L T ] : E A C H : D I S A B L E O : N O C : N C Sensor Type ALL NC Normal Close Alarm ( TTL level input ) Setup NC (Normal Close), the alarm will be triggered during NC status. NO Normal Open Alarm ( TTL level input ) Setup NO (Normal Open), the alarm will be triggered during NO status. + (EACH): Alarm input can be individually setup to NC or NO. - (DISABLE): Disable alarm input can be individually setup. C: All alarm input is setup to NC. O: All alarm input is setup to NO. 27
29 7.7.5 SQUENCE DWELL TIME S E Q U E N C E D W E L L S E T U P - D W E L L S E Q U E N C E : 0 3 S E C S P O T M O N I T O R : 0 3 S E C S P O T M O N I T O R A L A M : 0 5 S E C [ D E F A U L T ] 1. SEQUENCE: Main display sequence dwell time setup. 2. SPOT MONITOR: SPOT monitor dwell time setup. 3. SPOT MONITOR ALARM: SPOT monitor alarm dwell time setup. 7.8 FACTORY DEFAULT F A C T O R Y D E F A U L T S E T U P R E C A L L D E F A U L T N O W? [ Y E S ] [ N O ] To return to factory default setting, select YES option and then press ENTER button to reload the factory default setting. Press EXIT to exit. 28
30 8. NETWORK DVR SETUP Before installing the Network DVR, you need to first setup an IP Address, connect it to the ADSL Modem or LAN Hub, and use IPEdit.exe to test the DVR. 8.1 Connecting Network DVR 3 methods for connecting Network DVR: 1. Online using Intranet or Fixed IP 2. Online using ADSL (PPPoE) Router 3. Online using DDNS Server Online using Intranet or Fixed IP Setup similar to 8.2 Online with DHCP Server Online using ADSL (PPPoE) Router Setup similar to Network Setting Online using DDNS Server
31 8.2 Online with DHCP Server Online with DHCP Server 30

32 8.3 Online without DHCP Server 1. Use IPEdit.exe to find the installed Network DVR. 2. The Internet DVR without IP allocated by DHCP will have a default IP Address of Select this Internet DVR on Camera List Window. 4. The default configuration will be shown on the right window. 5. Under DOS mode enter IPCONFIG to access Geteway, IP, and Netmask setting values. Online without DHCP Server After the Submit button is clicked, the IP information of this Network DVR will be updated. 31


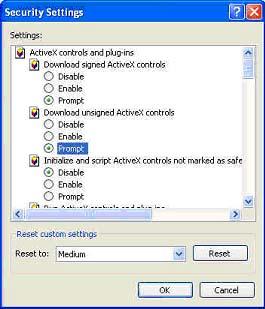
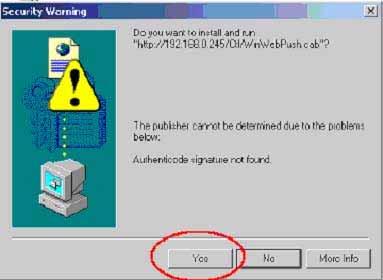
33 8.4 Online Connection Start the Internet Explorer, enter the IP Address of the Network DVR into the Address field, such as or click twice on IPEdit. Before connection, User name and Password will be requested: Default User Name: admin Default Password: Install ActiveX Before entering remote connection, please install ActiveX and check your browser setup by following the procedures below: a. Open Internet Explorer under Tools, select Internet Options. Tools Internet Options b. Select Security, and then press Custom Level. 32

34 33
35 34
36 9. FUNCTION SETUP 9.1 Main Display Best browsing resolution is 1027x Live Display Move the cursor inside the image range, right mouse click to display 5 function selections: View/ Make changes on image display Image Recording/ Record function setup Save Current Picture/ Save the current image Welcome! Administrator/ Display current user name About/ Version Description 35
. Number: Image storage according to number.")
37 9.1.1 View Two types of display method: 1. Resizable: Adjustable image size. 2. Actual size: The actual image size. 3. Status Bar: Reveals current status Image Recording Image Recording Setup Display: 1. Save as JPEG: Save as picture file 2. Save as AVI: Save as AVI animation file Save as JPEG: No Limit: Unrestricted image storage (continuous). Number: Image storage according to number. Save interval: Image storage according to 1/10 second (e.g.: Enter 10, then 1 frame is stored per second. Enter 50, then 1 frame is stored in 5 seconds). Size: Image storage according to size. Time: Image storage according to time. Save Path: Image storage according to Save Path. Pre Name: Image storage according to Prefix Name. 36
38 Save as AVI: No Limit: Unrestricted image storage (continuous). Number: Image storage according to number. Save interval: Image storage according to 1/10 second (e.g.: Enter 10, then 1 avi file is stored per second. Enter 50, then 5 avi files are stored in 5 seconds). Size: Image storage according to size. Frame Rate: Image storage according to frame rate. Time: Image storage according to time. Maximum Number of Frame in Each File: Image storage according to maximum frame. Save Path: Image storage according to Save Path. Pre Name: Image storage according to Prefix Name. SPLIT PLAY Full Screen/ Quad Screen, 9-Split Screen, 10-Split Screen. Play button. PAUSE Pause button. STOP Stops manual recording and playback. REW Relate to direction button (left). FF Relate to direction button (right). REC Manual record button. SEARCH Supports quick search of recorded videos. Return to Previous Menu/ System Information EXIT/INFO Display Switch. Confirm Button/ Message Display Switch. Return to Previous Menu/ System Information ENTER/DISP Display Switch. Confirm Button/ Message Display Switch. Move cursor upward/ switch one channel UP/DOWN forward. Move the cursor downward/ switch one channel backward. CH Camera select button: CH1~16 (relate to DVR CH: 4CH/ 8CH/ 16CH display). 37
39 Resolution Setting 176x x x x x240 (Pre-set Value) 640x480 Quality Setting High Middle Low (Pre-set Value) Brightness/ Contrast/ Saturation/ Sharpness - : Mini. Value STD: Pre-set Value +: Max. Value The higher values are shown to the right and descend in value as you go to the left. Configuration Ad vance setup (this function is applicable only to Admin). Live Video Back to live video display. Record Please refer to Image Recording. Snapshot Press this button to capture one live image and press RIGHT button to store the image. 10 Audio Live audio control On/ Off (IE Audio Pre-set: OFF). 38


40 9.2 Advanced Setup Only Admin can select configuration (advanced setup) Network Setting Lan Setting: LAN IP address setting is the same as IPEdit. DHCP: Select item Automatically by DHCP to gain an IP address. DNS: Fixed IP users needs to setup an IP address, please contact your local ISP dealer. PPPoE: Connecting using ADSL, please contact your local ISP dealer. Select item Send mail (about new IP) after connected, mail will automatically be sent when connected to the ISP (as shown below). Note: Please restart the Network DVR after setup has been completed 39
.")

41 Port Select: IP sharing device enables switching port function, setup the port and enter (as shown on the diagram above). Please restart the Video Server after the setup has been completed, Port1=80 (Pre-set Value). DDNS: To apply dynamic IP address, you may register at DDNS Server: To setup follow the steps below: 1. Register at DDNS Server: 2. Apply domain name. 3. Dial-up using ADSL Router: Click Enable button, then input your UserName, Password, and DomainName (Similar to registering at DDNS Server). Note: Please reboot after setup User Setup 40
. Delete User: Delete user account. Current Users: Currently registered users.")
42 Authorization: User Authorization Setting Needed/ No Need. New user/ Change Password: Add user or change password (Max. user = 30). Note: Under the highest resolution, for optimum effect maximum of 20 users are suggested (English/ Chinese Characters= 11). Delete User: Delete user account. Current Users: Currently registered users. Reboot: Restart the Network DVR. Firmware update: Updates the firmware. 7 Restore factory default configuration: Click Restore factory default configuration the button to return to factory default settings (Please restart the Network DVR after setup has been completed). Note: Standard user may only view live display, record, and capture images DDNS Setup DDNS: To apply dynamic IP address, you may register at DDNS Server: To setup follow the steps below: 4. Register at DDNS Server: 5. Apply domain name. 6. Dial-up using ADSL Router: Click Enable button, then input your UserName, Password, and DomainName (Similar to registering at DDNS Server). Note: Please reboot after setup. 41
43 10. TROUBLESHOOTING Question Answer Unable to detect the Network DVR Reconnect the internet line and make sure that it properly connected and then restart the system. No picture and sound Check that everything is connected properly (camera or microphone). Reconnect everything, make sure that the signal line is properly connected and then restart the system..4.1 Install ActiveX 42
 Monitor Resolution 1G (Above) 256M")
44 11. NETWORK INSTALLATION 11.1 System Configuration 11.2 Suggested PC Equ ipment CPU RAM Sound Card Office System (OS) Monitor Resolution 1G (Above) 256M (Above) YES Microsoft Windows 2000/ XP 1024x768 (Above) 43
45 12. HARD DISK INFORMATION 1. Supports 3.5 ATA 2/ 3/ 4/ 5/ 6 format hard disk. 2. Enables installation of both built-in and removable hard disk. 3. Support high-capacity hard disk storage (up to 500 GB capacity). 4. Hot swap function is not applicable. To prevent damage, please enter the ma in menu to stop all HDD activities, then power-off the device before replacing the hard disk. 5. When the hard disk information icon turns to red, the device is notifying the user to replace a new hard disk. 250GB HDD - Possible Recording Time per Day (NTSC) Frame Rate (Field/ Sec) Image Quality Low High Image Quality 250GB HDD - Possible Recording Time per Day (PAL) Frame Rate (Field/ Sec) Low High
46 13. APPENDIX 13.1 DB25 Alarm Input/Relay Output Definition Pin Definition Pin Definition Pin Definition Pin Definition 1 ALARM 1 2 ALARM 2 3 ALARM 3 4 ALARM 4 5 GND 6 ALARM 5 7 ALARM 6 8 ALARM 7 9 ALARM 8 10 GND RELAY 22 RELAY 23 RELAY OUT-COM OUT-N. C. OUT-N.O. 45
47 14. SPECIFICATION Video Audio Live Record Play Alarm Storage Backup LED Serial OSD Format NTSC/ PAL Auto Detection Video Loss Auto Detection Codec Motion-JPEG Input 8 CH BN C (1.0 Vp-p./ 75 Ohms) Main Display Output 1 CH BNC (1.0 Vp-p./ 75 O hms) Spot Display Output 1 CH BNC (1.0 Vp-p./ 75 O hms) Input 1 CH RCA Samp ling Rate 8 khz Codec G. 711 Output Bit Rate Output Resolution Frame Rate Mode Resolution Frame Rate Quality Mode Speed Mode Input Output Power Supply 12V/ 4.2A Power Dimension Weight Storage Envir. Operation 64 kbps 2 CH RCA 720 x 480 (NTSC), 720 x 576 (PAL) 240 fields/ sec Single/ Quad/ 9-Split/ Sequence 704x240 (NTSC), 704x288 (PAL) Maximum (Total): 60 fields/sec@704x240 (NTSC), 50 fields/sec@704x288 (PAL) Low/ Medium/ High Manual/ Alarm/ Motion Detection/ Continue Normal/ Pause/ Fast Forward (x2, x4, x8, x16, x32, x64)/ Fast Rewind (x1, x2, x4, x8, x16, x32, x64) Fast Rewind (x1, x2, x4, x8, x16, x32, x64) Single/ Quad/ 9-Split 8 CH, NC/ NO (Programmable) 1 CH, NC/ NO 3.5 IDE HDD x 1 (not included), Max. 500 GB, Fixed HDD (optional) Type I CF Card x 1, AVI file format Alarm/ Play/ HDD/ Record RS-232C x 1 (Male connector with remote control protocol) English/ Traditional Chinese AC 100~240 V Input, DC 12V/ 4.2A Output 430 (W) x 70 (H) x 316 (D) mm 3570 g (without HDD) 30 ~ 90% RH, 0 ~ 50 (32 ~ 122) 30 ~ 80% RH, 5 ~ 40 (41 ~ 104) 46
48 Network (optional) Network Ethernet 10/ 100 BaseT Ethernet (RJ45) Protocol TCP/ IPHTTPPPPoEDNSDDNSDHCPSMTP Video Format Compression NTSC/ PAL Auto Detection M-JPEG Audio Compression AC-97 Display Recording Resolution Frame Rate Max. 20 fps Max. 640 x 480 (NTSC), 704 x 576 (PAL) Resolution Ma x. 640 x 480 (NTSC), 704 x 576 (PAL) Frame Rate Max. 20 fps Quality Highes t/ High/ Middle/ Low/ Lowest Mode Manual (Note: Design and specifications are subject to change without prior notice.) 47
49 MEMO 48
HOME GUARD USER MANUAL
 HOME GUARD USER MANUAL CONTENTS 1. SAFETY PRECAUTIONS...2 2. INTRODUCTION...3 3. FEATURES...4 4. ACCESSORIES...5 5. INSTALLATION...6 6. NAME and FUNCTION of EACH PART...7 6.1 Front Pannel...7 6.2 Monitoring
RS Part No Instruction Manual Solid State DVR. (Single Chanel for Mobile) SSD01CA
 SSD01CA") RS Part No. 696-1210 Instruction Manual Solid State DVR (Single Chanel for Mobile) RS PART NO.: 696-1210 MJPEG 1CH CAR DVR (Compact size 1ch Stand Alone DVR) Simple & Max Low cost but great guality MJPEG
RS Part No. 696-1210 Instruction Manual Solid State DVR (Single Chanel for Mobile) RS PART NO.: 696-1210 MJPEG 1CH CAR DVR (Compact size 1ch Stand Alone DVR) Simple & Max Low cost but great guality MJPEG
MPEG4 Digital Recording System THE VXM4 RANGE FROM A NAME YOU CAN RELY ON
 MPEG Digital Recording System THE VXM RANGE FROM A NAME YOU CAN RELY ON 8 6 THE FIRST CONCEPT PRO DIGITAL RECORDING SYSTEM DESIGNED TO OUR SPECIFICATION AND FOCUSED ON YOUR REQUIREMENTS VXM KEY FEATURES
CI-218 / CI-303 / CI430
 CI-218 / CI-303 / CI430 Network Camera User Manual English AREC Inc. All Rights Reserved 2017. l www.arec.com All information contained in this document is Proprietary Table of Contents 1. Overview 1.1
4CH DVR, AS-DVR004A. AL - Aswar Trading Group Co., FEATURES. Pentplex ( Recording, Playback, Network simultaneously ) Up to 60fps Recording Speed
 Up to 60fps Recording Speed") 4CH DVR, AS-DVR004A FEATURES Pentplex ( Recording, Playback, Network simultaneously ) Up to 60fps Recording Speed USB flash disk backup Adjust Up/Down/Left/Right screen position Video Input signal: NTSC/PAL
4CH DVR, AS-DVR004A FEATURES Pentplex ( Recording, Playback, Network simultaneously ) Up to 60fps Recording Speed USB flash disk backup Adjust Up/Down/Left/Right screen position Video Input signal: NTSC/PAL
FEATURES MPEG4/MJPEG DVR
 FEATURES MPEG4/MJPEG DVR Technology Compression format providing crystal clear images with real time performance. Multiplex Allow live display, record, playback, backup and network operation at the same
Quick Operation Guide of LTN7700/7600 Series NVR
 Quick Operation Guide of LTN7700/7600 Series NVR UD.6L0202B0042A02 Thank you for purchasing our product. If there is any question or request, please do not hesitate to contact dealer. This manual is applicable
Digital Video Recorder
 Digital Video Recorder Quick Operation Guide UD.6L0202B0067A02 Thank you for purchasing our product. If there is any question or request, please do not hesitate to contact dealer. This manual is applicable
DINOX&Digital&Video&Recorder&
 DINOX&Digital&Video&Recorder& & & & & & & & & & &&&Quick&Operation&Guide& UD.7L0X02B1228B01& Thank you for purchasing our product. If there is any question or request, please do not hesitate to contact
DMR 1 & 1N, DMR 9 & 9N
 Volume 1 DMR 1 & 1N, DMR 9 & 9N User Guide SUPER/CIRCUITS DMR1, DMR1N, DMR9, DMR9N, / USER MANUAL SUPER/CIRCUITS 11000 NORTH MOPAC EXPRESSWAY SUITE 300 Austin, TX 78759 Phone 800-335-9777 Fax 866-2567-9777
PiXORD Network Video Server Recorder P-4504/8504
 PiXORD Network Video Server Recorder P-4504/8504 User s Manual Version: 1.8 Date: 08/11/2008 CONTENTS CHAPTER 1 INTRODUCTION... - 4-1. WHAT IS PIXORD NETWORK VIDEO SERVER RECORDER?...- 4-2. FEATURES...-
MPEG4 Mobile DVR User Manual
 MPEG4 Mobile DVR User Manual 1 MPEG4 Embedded User Manual A. Installation Environment Installation Guideline In order to ensure the safety with the DVR product and maximize product performance, keep DVR
MPEG4 Digital Recording System THE VXM4B RANGE 100 IPS
 MPEG Digital Recording System THE VXMB RANGE 00 IPS 8 6 THE FIRST CONCEPT PRO DIGITAL RECORDING SYSTEM DESIGNED TO OUR SPECIFICATION AND FOCUSED ON YOUR REQUIREMENTS VXMB KEY FEATURES Enhanced Graphical
Part 1 Basic Operation
 This product is a designed for video surveillance video encode and record, it include H.264 video Compression, large HDD storage, network, embedded Linux operate system and other advanced electronic technology,
NX-series User Manual
 NX-series User Manual http://www.iviewtech.com 1 CONTENT INDEX 1 NX-SERIES OVERVIEW... 4 1.1. NX-Series Features 4 1.2. NVR CONTROL PANEL 5 1.3. NVR BACK PANEL 5 2 GETTING STARTED... 8 3 LIVE VIEW... 10
EVD-L04/100A1-960 EVD-L08/200A1-960 EVD-L16/400A1-960
 EVD-L04/100A1-960 EVD-L08/200A1-960 EVD-L16/400A1-960 www.eurovideo-cctv.com Main Features Main stream supports encoding at up to WD1 resolution in real time and sub stream at CIF/QCIF resolution. Simultaneous
User s Manual. Network Board. Model No. WJ-HDB502
 Network Board User s Manual Model No. WJ-HDB502 Before attempting to connect or operate this product, please read these instructions carefully and save this manual for future use. CONTENTS Introduction...
USER MANUAL V /16CH DVR. This document contains preliminary information and subject to change without notice.
 V. 1.3 USER MANUAL 8/16CH DVR This document contains preliminary information and subject to change without notice. WARNING TO REDUCE THE RISK OF FIRE OR ELECTRIC SHOCK, DO NOT EXPOSE THIS APPLIANCE TO
Provide144ch FREE CMS software. Time / Event / POS / Thumbnail / Panorama
 20CH DVR Real time and Playback Search Mode: Time / Event / POS / Real HD Live Display and Playback Thumbnail / Panorama Full Graphic User Interface(Multiple High-Resolution & High-Quality Language Support)
DS-7200HVI/HFI-SH Series DVR Quick Operation Guide
 DS-7200HVI/HFI-SH Series DVR Quick Operation Guide UD.6L0202B0019A01 Thank you for purchasing our product. If there is any question or request, please do not hesitate to contact dealer. This manual is
LOCAL MONITORING RECORDING HARDDISK MANAGEMENT ALARM & EXCEPTION BACKUP
 FEATURES User-friendly GUI for easy operation Up to 1024 768 resolution Simultaneous VGA and 4CIF/2CIF/CIF resolution Normal and event recording parameters configurable per individual camera Partial digital
1CHDVRD1 USER MANUAL. These instructions apply to unit model 1CHDVRD1 only. Please read carefully before use.
 These instructions apply to unit model 1CHDVRD1 only. Please read carefully before use. 1CHDVRD1 USER MANUAL Description Description... 03 Features... 03 Notes... 03 Packing List... 04 Technical Specifications...
Network Disk Recorder WJ-ND200
 Network Disk Recorder WJ-ND200 Network Disk Recorder Operating Instructions Model No. WJ-ND200 ERROR MIRROR TIMER HDD1 REC LINK /ACT OPERATE HDD2 ALARM SUSPEND ALARM BUZZER STOP Before attempting to connect
EVD-L04/100A1-960, EVD-L08/200A1-960 and. EVD-L16/400A1-960 DVRs. Quick Operation Guide
 EVD-L04/100A1-960, EVD-L08/200A1-960 and EVD-L16/400A1-960 DVRs Quick Operation Guide Thank you for purchasing our product. If there is any question or request, please do not hesitate to contact dealer.
The Diverse Multimedia & Surveillance System Via Dico2000 with PC DICO Operation Manual
 DICO 2000 Operation Manual Main Screen Overview IP Address & Communication Status Disk Status Screen Mode Warning Status Video Recording Status RUN Setup Search Exit SETUP The beginning ID and Password
DS-7200HFI-SL Series DVR. Technical Specification
 DS-7200HFI-SL Series DVR Technical Specification Notices The information in this documentation is subject to change without notice and does not represent any commitment on behalf of HIKVISION. HIKVISION
S-Series Server Setup Quiz
 1. In the System Setup window, System Information displays additional information such as: (a) IP Address (b) Modems (c) Sound Card (d) Video Channels and Audio Channels 2. You can change the Recording
16-CH Color Full Duplex Multiplexer Instruction Manual
 16-CH Color Full Duplex Multiplexer Instruction Manual 707-V1.5(S) Index: 1. Safety Warning 3 2. Introduction 3 3. Features 4 4. Specification 5 5. Front Panel Keypad 6 6. Back Panel Connection 10 7. Menu
ACM-1431 Series. IP IR D/N CCD Outdoor PoE Bullet Camera. (DC 12V / PoE) Ver. 2012/3/12
 Ver. 2012/3/12") ACM-1431 Series IP IR D/N CCD Outdoor PoE Bullet Camera (DC 12V / PoE) Ver. 2012/3/12 Table of Contents 0. Precautions 3 1. Introduction 4 Package Contents... 4 Features and Benefits... 5 Safety Instructions...
ACM-1431 Series IP IR D/N CCD Outdoor PoE Bullet Camera (DC 12V / PoE) Ver. 2012/3/12 Table of Contents 0. Precautions 3 1. Introduction 4 Package Contents... 4 Features and Benefits... 5 Safety Instructions...
Digital Video Recorder VC-DVR6004
 Digital Video Recorder VC-DVR6004 FEATURE 4-Channels Embedded Digital Video Recorder Real time Operating System on embedded high-speed processor Real-time display Compress Functin * Support PAL/NTSC4.
DVR42E 4CH Digital Video Recorder User s Manual
 DVR42E 4CH Digital Video Recorder User s Manual ENGLISH ACI s.r.l. FARFISA INTERCOMS Via E. Vanoni, 3 62029 OSIMO (AN) - ITALY Tel. (+39)071.720.20.38 Fax (+39)071.720.20.37 e-mail: info@acifarfisa.it
DS-7204/7208/7216HVI-ST Series DVR Technical Manual
 DS-7204/7208/7216HVI-ST Series DVR Technical Manual Notices The information in this documentation is subject to change without notice and does not represent any commitment on behalf of HIKVISION. HIKVISION
Video Server SED-2100R/S. Quick Installation Guide
 Video Server SED-2100R/S Quick Installation Guide Feb.10,2006 1 1 Getting Started 1.1 PACKAGE CONTENTS SED-2100 Warranty Card Software CD Hook up & Screws Terminal Blocks for Power & DI/O Power Adaptor
KCM x Zoom H Megapixel IP D/N PoE Box Camera. Hardware User s Manual. (DC 12V / PoE) Ver. 2011/4/8
 Ver. 2011/4/8") KCM-5311 35x Zoom H.264 2-Megapixel IP D/N PoE Box Camera Hardware User s Manual (DC 12V / PoE) Ver. 2011/4/8 Table of Contents 0. Precautions 3 1. Introduction 4 Package Contents... 4 Features and Benefits...
KCM-5311 35x Zoom H.264 2-Megapixel IP D/N PoE Box Camera Hardware User s Manual (DC 12V / PoE) Ver. 2011/4/8 Table of Contents 0. Precautions 3 1. Introduction 4 Package Contents... 4 Features and Benefits...
OPERATING INSTRUCTIONS TOM-0431IP
 OPERATING INSTRUCTIONS TOM-0431IP Table of Contents FCC Information -------------------------------------------------------------------- 2 Safety and Environmental Precautions ------------------------------------------------
16CH 1080p HD-SDI Security MAGIC Lite Series DVR System - Auto detects Analog/960H/HD-SDI
 HD-SDI Magic Lite 1080p 16 CH Magic DVR detects Analog / 960H / HD-SDI camera automatically. H.264 High Compression CODEC Programmable Spot Out iphone Android remote view App Available. Crystal clear 1080p
4CH Digital Video Recorder. User s Manual. This user s manual is subject to change without any previous notice by function upgrade or addition.
 4CH Digital Video Recorder User s Manual This user s manual is subject to change without any previous notice by function upgrade or addition. Version_1.2 May, 2005 SAFETY PRECAUTIONS CAUTION RISK OF ELECTRIC
TCM H.264 Megapixel Outdoor IP IR D/N PoE Bullet Camera Hardware User s Manual. Ver. 2011/11/30
 TCM-1111 H.264 Megapixel Outdoor IP IR D/N PoE Bullet Camera Hardware User s Manual Ver. 2011/11/30 Table of Contents 0. Precautions 3 1. Introduction 4 Package Contents... 4 Features and Benefits... 5
INFORMATION TO USER CAUTION RISK OF ELECTRIC SHOCK, DO NOT OPEN
 INFORMATION TO USER CAUTION RISK OF ELECTRIC SHOCK, DO NOT OPEN! CAUTION: TO REDUCE THE RISK OF ELECTRIC SHOCK, DO NOT REMOVE COVER (OR BACK). NO USER SERVICEABLE PARTS INSIDE. REFER SERVICING TO QUALIFIED
SCode V3.5.1 (SP-601 and MP-6010) Digital Video Network Surveillance System
 Digital Video Network Surveillance System") V3.5.1 (SP-601 and MP-6010) Digital Video Network Surveillance System Core Technologies Image Compression MPEG4. It supports high compression rate with good image quality and reduces the requirement of
V3.5.1 (SP-601 and MP-6010) Digital Video Network Surveillance System Core Technologies Image Compression MPEG4. It supports high compression rate with good image quality and reduces the requirement of
TCM H.264 Megapixel IP Cube Camera w/pir Hardware User s Manual. (PoE) Ver. 2010/4/9
 Ver. 2010/4/9") TCM-4201 H.264 Megapixel IP Cube Camera w/pir Hardware User s Manual (PoE) Ver. 2010/4/9 Table of Contents 0. Precautions 3 1. Introduction 4 Package Contents... 4 Features and Benefits... 5 Safety Instructions...
TCM-4201 H.264 Megapixel IP Cube Camera w/pir Hardware User s Manual (PoE) Ver. 2010/4/9 Table of Contents 0. Precautions 3 1. Introduction 4 Package Contents... 4 Features and Benefits... 5 Safety Instructions...
Model#: IN-MDRI3MF. Hardware User Manual. 3MP Indoor Mini Dome with Basic WDR, Fixed lens. (PoE) Ver. 2013/02/04
 Ver. 2013/02/04") Model#: IN-MDRI3MF 3MP Indoor Mini Dome with Basic WDR, Fixed lens Hardware User Manual (PoE) Ver. 2013/02/04 Table of Contents 0. Precautions 3 1. Introduction 4 Package Contents... 4 Features and Benefits...
Model#: IN-MDRI3MF 3MP Indoor Mini Dome with Basic WDR, Fixed lens Hardware User Manual (PoE) Ver. 2013/02/04 Table of Contents 0. Precautions 3 1. Introduction 4 Package Contents... 4 Features and Benefits...
-TECH DIGITAL. Explore The High DefinitionWorld. Website: Hot Line: [US] USER MANUAL
![-TECH DIGITAL. Explore The High DefinitionWorld. Website: Hot Line: [US] USER MANUAL](/thumbs/80/80689593.jpg "-TECH DIGITAL. Explore The High DefinitionWorld. Website: Hot Line: [US] USER MANUAL") -TECH DIGITAL Explore The High DefinitionWorld Website: www.jtechdigital.com Hot Line: 1-888-610-2818[US] USER MANUAL J-Tech Digital ProAV H.264 Encoder/Decoder Many to Many HDMI Extender RoHS 1 Operating
-TECH DIGITAL Explore The High DefinitionWorld Website: www.jtechdigital.com Hot Line: 1-888-610-2818[US] USER MANUAL J-Tech Digital ProAV H.264 Encoder/Decoder Many to Many HDMI Extender RoHS 1 Operating
TFT LCD MONITOR USER MANUAL IP Series (HDVS) L104IP, L121IP, L152IP, L156IP, L172IP, L192IP, L215IP, L240IP, L270IP, L320IP, L420IP, L460IP.
 L104IP, L121IP, L152IP, L156IP, L172IP, L192IP, L215IP, L240IP, L270IP, L320IP, L420IP, L460IP.") TFT LCD MONITOR USER MANUAL IP Series (HDVS) 10.4 46.0 L104IP, L121IP, L152IP, L156IP, L172IP, L192IP, L215IP, L240IP, L270IP, L320IP, L420IP, L460IP. V 1.4 1. Warning...3 2. Safety Precautions...4 3.
TFT LCD MONITOR USER MANUAL IP Series (HDVS) 10.4 46.0 L104IP, L121IP, L152IP, L156IP, L172IP, L192IP, L215IP, L240IP, L270IP, L320IP, L420IP, L460IP. V 1.4 1. Warning...3 2. Safety Precautions...4 3.
Triplex MPEG-4 DVR 9/16CH
 Triplex MPEG-4 DVR 9/16CH Release Version : 2.2 This document contains preliminary information and subject to change without notice. This Product is the triplex MPEG-4 DVR. THE LIST OF CONTENTS DVR SET
Network Camera Operating Manual
 Network Camera Operating Manual Model No. WV-NW484S Before attempting to connect or operate this product, please read these instructions carefully and save this manual for future use. Preface About these
Total MPEG4/JPEG DVR Solution Provider Intelligent Multiplex DVR!
 Total MPEG4/JPEG DVR Solution Provider Intelligent Multiplex DVR! Best Digital Video Networking Solutions for Complete Security Application ANX-16480 / 8240 / 4120D MPEG4 max. 480 / 240 / 120fps 8/ 8/
SCode V3.5.1 (SP-501 and MP-9200) Digital Video Network Surveillance System
 Digital Video Network Surveillance System") V3.5.1 (SP-501 and MP-9200) Digital Video Network Surveillance System Core Technologies Image Compression MPEG4. It supports high compression rate with good image quality and reduces the requirement of
V3.5.1 (SP-501 and MP-9200) Digital Video Network Surveillance System Core Technologies Image Compression MPEG4. It supports high compression rate with good image quality and reduces the requirement of
DS-7200HVI-ST/RW Series DVR. Technical Manual
 DS-7200HVI-ST/RW Series DVR Technical Manual Notices The information in this documentation is subject to change without notice and does not represent any commitment on behalf of HIKVISION. HIKVISION disclaims
Network Cameras User s Manual
 197Z AVI201 / 202 / 203 / 212 Network Cameras User s Manual Please read instructions thoroughly before operation and retain it for future reference. The image shown above may differ from the actual product
B. The specified product shall be manufactured by a firm whose quality system is in compliance with the I.S./ISO 9001/EN 29001, QUALITY SYSTEM.
 VideoJet 8000 8-Channel, MPEG-2 Encoder ARCHITECTURAL AND ENGINEERING SPECIFICATION Section 282313 Closed Circuit Video Surveillance Systems PART 2 PRODUCTS 2.01 MANUFACTURER A. Bosch Security Systems
CMS MANUAL DIGITAL VIDEO RECORDER CMS. Operation Manual 3CTC-016-5EN8M. For the safe use of the product, please make sure to read Safety Precautions.
 DIGITAL VIDEO RECORDER CMS Operation Manual 3CTC-016-5EN8M For the safe use of the product, please make sure to read Safety Precautions. 1 Copyrights All the contents of this manual are protected under
IMPORTANT! This instruction guide explains how to install your CCTV system.
 IMPORTANT! This instruction guide explains how to install your CCTV system. Which accessories do you need before getting started? 1. Monitor or TV (recommended not less than 19" for clear viewing) 2. HDMI
User Manual V2.2 DVR. Notice: This content is subject to be change without notice. User Manual 1
 V2.2 User Manual DVR Notice: This content is subject to be change without notice. User Manual 1 WARNING TO REDUCE THE RISK OF FIRE OR ELECTRIC SHOCK, DO NOT EXPOSE THIS APPLIANCE TO RAIN OR MOIS- TURE.
D52. 3MP Indoor Dome with Fixed lens Hardware User s Manual. (PoE) Ver. 2012/12/12
 Ver. 2012/12/12") D52 3MP Indoor Dome with Fixed lens Hardware User s Manual (PoE) Ver. 2012/12/12 Table of Contents 0. Precautions 3 1. Introduction 4 Package Contents... 4 Features and Benefits... 5 Safety Instructions...
D52 3MP Indoor Dome with Fixed lens Hardware User s Manual (PoE) Ver. 2012/12/12 Table of Contents 0. Precautions 3 1. Introduction 4 Package Contents... 4 Features and Benefits... 5 Safety Instructions...
Be sure to run the vehicle engine while using this unit to avoid battery exhaustion.
 CAUTION: TO REDUCE THE RISK OF ELECTRIC SHOCK DO NOT REMOVE COVER (OR BACK) NO USER-SERVICEABLE PARTS INSIDE REFER SERVICING TO QUALIFIED SERVICE PERSONNE; Please Read all of these instructions regarding
KCM H Megapixel IP D/N PoE Box Camera. (DC 12V / PoE) Ver. 2012/3/5
 Ver. 2012/3/5") KCM-5111 H.264 4-Megapixel IP D/N PoE Box Camera (DC 12V / PoE) Ver. 2012/3/5 Table of Contents 0. Precautions 3 1. Introduction 4 Package Contents... 4 Features and Benefits... 5 Safety Instructions...
KCM-5111 H.264 4-Megapixel IP D/N PoE Box Camera (DC 12V / PoE) Ver. 2012/3/5 Table of Contents 0. Precautions 3 1. Introduction 4 Package Contents... 4 Features and Benefits... 5 Safety Instructions...
Model#: IN-DI2MIRF 2MP Indoor Dome with True Day/Night, IR, Basic WDR, Fixed lens
 Model#: IN-DI2MIRF 2MP Indoor Dome with True Day/Night, IR, Basic WDR, Fixed lens Hardware User Manual (PoE) Ver.2013/01/17 Table of Contents 0. Precautions 3 1. Introduction 4 Package Contents...4 Features
MAGICLiteSeries-16CH1080pDVRSystem-SupportsEX- SDI/HD-SDI/960H/Analog/IP
 MAGICLiteSeries-16CH1080pDVRSystem-SupportsEX- SDI/HD-SDI/960H/Analog/IP EX-SDI Magic Lite 1080p 16 CH MagicDVRdetectsAnalog/960H/EX-SDI/HD-SDIcamerasautomatically Records up to 4 IP cameras REAL-TIME
HSR-1 Digital Surveillance Recorder Preliminary
 HSR-1 Digital Surveillance Recorder Hybrid Technology - An Essential Requirement for High-Performance Digital Video Recording & Archiving Preliminary How do you rate your security Can it record as long
EDR CHANNEL DIGITAL VIDEO RECORDER INSTRUCTION MANUAL
 EDR1600 16 CHANNEL DIGITAL VIDEO RECORDER INSTRUCTION MANUAL Before installing and using this unit, please read this manual carefully. Be sure to keep the manual handy for later reference. WARNING TO REDUCE
KCM H Megapixel IP D/N Hemispheric Camera with Advanced WDR. (DC 12V / PoE) Ver. 2012/09/05
 Ver. 2012/09/05") KCM-3911 H.264 4-Megapixel IP D/N Hemispheric Camera with Advanced WDR (DC 12V / PoE) Ver. 2012/09/05 Table of Contents 0. Precautions 3 1. Introduction 4 Package Contents... 4 Features and Benefits...
KCM-3911 H.264 4-Megapixel IP D/N Hemispheric Camera with Advanced WDR (DC 12V / PoE) Ver. 2012/09/05 Table of Contents 0. Precautions 3 1. Introduction 4 Package Contents... 4 Features and Benefits...
Marshall Electronics. Pro A/V Communications VMV-402-SH. 3G/HD/SD-SDI Quad-viewer/Switcher with Audio Meter Display. User Manual.
 Marshall Electronics Pro A/V Communications VMV-402-SH 3G/HD/SD-SDI Quad-viewer/Switcher with Audio Meter Display User Manual Table of Contents 1. Introduction... 3 2. Features... 3 3. Package Contents...
EdgeConnect Module Quick Start Guide ITERIS INNOVATION FOR BETTER MOBILITY
 EdgeConnect Module Quick Start Guide ITERIS INNOVATION FOR BETTER MOBILITY 493456301 Rev B April 2009 Table of Contents Installation... 1 Setup... 2 Operation... 4 Live Video... 4 Video Settings... 5 Network
Instruction Manual. Digital Sixteen/Nine Channels Video Recorder
 Instruction Manual Digital Sixteen/Nine Channels Video Recorder EDR1640 EDR1620 EDR920 Federal Communication Commission Interference Statement This equipment has been tested and found to comply with the
Manual. Câmera IP Axis M3047-P
 Manual Câmera IP Axis M3047-P Baixe aqui o Manual da Câmera IP Axis M3047-P e descubra todos os recursos disponíveis neste incríveis dispositivo de segurança, discreto e compacto. www.bztech.com.b r Table
TCM H.264 Megapixel IP Indoor IR Bullet Camera Hardware User s Manual. (DC 12V / PoE) Ver. 2010/1/5
 Ver. 2010/1/5") TCM-1511 H.264 Megapixel IP Indoor IR Bullet Camera Hardware User s Manual (DC 12V / PoE) Ver. 2010/1/5 Table of Contents 0. Precautions 3 1. Introduction 4 Package Contents... 4 Features and Benefits...
TCM-1511 H.264 Megapixel IP Indoor IR Bullet Camera Hardware User s Manual (DC 12V / PoE) Ver. 2010/1/5 Table of Contents 0. Precautions 3 1. Introduction 4 Package Contents... 4 Features and Benefits...
BY-HPE11KTA. Operating Instructions. Coaxial - LAN Converter with PoE function. Indoor Use Only. Model No. Attached Installation Guide
 Operating Instructions Coaxial - LAN Converter with PoE function Model No. Indoor Use Only BY-HPE11KTA Attached Installation Guide Before attempting to connect or operate this product, please read these
KCM M Indoor PTZ with D/N, Advanced WDR, SLLS, 18x Zoom lens. (DC 12V / High PoE) Ver. 2012/11/23
 Ver. 2012/11/23") KCM-8111 2M Indoor PTZ with D/N, Advanced WDR, SLLS, 18x Zoom lens (DC 12V / High PoE) Ver. 2012/11/23 Table of Contents 0. Precautions 3 1. Introduction 4 Package Contents... 4 Features and Benefits...
KCM-8111 2M Indoor PTZ with D/N, Advanced WDR, SLLS, 18x Zoom lens (DC 12V / High PoE) Ver. 2012/11/23 Table of Contents 0. Precautions 3 1. Introduction 4 Package Contents... 4 Features and Benefits...
EasyNet-HD Digital Video Recorder. Compact Series 4/8/16ch
 EasyNet-HD Digital Video Recorder Compact Series 4/8/16ch Thank you for using our product. 1. This is user's manual for EasyNet-HD Compact Series DVR Models 2. This manual contains product specification
TCM-56x1 Series. H.264 Megapixel CMOS IP Box Camera Hardware User s Manual. (DC 12V / PoE) Ver. 2010/1/5
 Ver. 2010/1/5") TCM-56x1 Series H.264 Megapixel CMOS IP Box Camera Hardware User s Manual (DC 12V / PoE) Ver. 2010/1/5 Table of Contents 0. Precautions 3 1. Introduction 4 Package Contents... 4 Features and Benefits...
TCM-56x1 Series H.264 Megapixel CMOS IP Box Camera Hardware User s Manual (DC 12V / PoE) Ver. 2010/1/5 Table of Contents 0. Precautions 3 1. Introduction 4 Package Contents... 4 Features and Benefits...
MAGICQLSeries-4CH1080pDVRSystem-SupportsEX- SDI/HD-SDI/960H/Analog/IP
 MAGICQLSeries-4CH1080pDVRSystem-SupportsEX- SDI/HD-SDI/960H/Analog/IP EX-SDI 1080p 4 CH MagicDVRdetectsAnalog/960H/EX-SDI/HD-SDIcamerasautomatically Records up to 1 IP cameras REAL-TIME Live / 1080p@ Pentaplex
Network Video Decoder NVD-20. Contents
 Contents Warnings and Precautions... 4 Warranty... 5 Standard Warranty... 5 Two Year Warranty... 5 Disclaimer of Product & Services... 6 Disposal... 6 Packing List... 6 Product Overview... 7 Features...
Magic U Series 4CH Octa-brid DVR System, 4K Output, 2 HDD slots, esata, 4CH Audio
 Magic U DVR detects Analog 960H HD-TVI A-HD EX-SDI HD-SDI cameras automatically Records up to 4 IP cameras REAL-TIME Live Programmable Multi-CH HD Spot Out 4K Video output Touch Interface iphone Android
User manual FT-8100 HD. English
 User manual FT-8100 HD English WARNING!!! On the USB Memory Function for FT-8100 HD model, user can make recording or playing function using by external USB devices such as USB Flash Memory Disk or external
Digital Video Recorder SVR-1670 User Guide. Before installing and operating this product, please read this manual thoroughly.
 Digital Video Recorder SVR-1670 User Guide Before installing and operating this product, please read this manual thoroughly. Digital Video Recorder 1 User Guide ENGLISH Firmware Version 1.0.0 Product Warranty
Disclaimer. Warning and Caution CAUTION!
 Disclaimer While every effort has been made to ensure that the information contained in this guide is accurate and complete, no liability can be accepted for any errors or omissions NUVICO reserves the
Wireless Cloud Camera TV-IP751WC (v1.0r)
") TRENDnet s, model, takes the work out of viewing video over the internet. Previously to view video remotely, users needed to perform many complicated and time consuming steps: such as signing up for a
TRENDnet s, model, takes the work out of viewing video over the internet. Previously to view video remotely, users needed to perform many complicated and time consuming steps: such as signing up for a
TCM H.264 Megapixel IP D/N PoE CCD Box Camera. (DC 12V / PoE) Ver. 2010/10/22
 Ver. 2010/10/22") TCM-5311 H.264 Megapixel IP D/N PoE CCD Box Camera (DC 12V / PoE) Ver. 2010/10/22 Table of Contents 0. Precautions 3 1. Introduction 4 Package Contents... 4 Features and Benefits... 5 Safety Instructions...
TCM-5311 H.264 Megapixel IP D/N PoE CCD Box Camera (DC 12V / PoE) Ver. 2010/10/22 Table of Contents 0. Precautions 3 1. Introduction 4 Package Contents... 4 Features and Benefits... 5 Safety Instructions...
Operating Instructions WV-NS950, WV-NS954 WV-NW960, WV-NW964
 Model Nos. Network Camera Operating Instructions WV-NS950, WV-NS954 WV-NW960, WV-NW964 WV-NS950 WV-NS954 WV-NW960 WV-NW964 Before attempting to connect or operate this product, please read these instructions
17 19 PROFESSIONAL LCD COLOUR MONITOR ART
 17 19 PROFESSIONAL LCD COLOUR MONITOR ART. 41657-41659 Via Don Arrigoni, 5 24020 Rovetta S. Lorenzo (Bergamo) http://www.comelit.eu e-mail:export.department@comelit.it WARNING: TO REDUCE THE RISK OF FIRE
TT Channel Embedded Digital Video Recorder User s Instruction Manual
 TT-6508 8-Channel Embedded Digital Video Recorder User s Instruction Manual Contents 1 Introduction...4 1.1 Functions...4 1.1.1 Product overview...4 1.1.2 Main Functions...4 1.2 Panel and Keys...6 1.2.1
GV-3D People Counter 3DPCV10-A
 GV-3D People Counter User's Manual Before attempting to connect or operate this product, please read these instructions carefully and save this manual for future use. 3DPCV10-A 2013 GeoVision, Inc. All
MAGICUSeries-4CH1080pDVRSystem4Kouput- SupportsEX-SDI/HD-SDI/HD-TVI/A-HD/960H/Analog/ IP
 MAGICUSeries-4CH1080pDVRSystem4Kouput- SupportsEX-SDI/HD-SDI/HD-TVI/A-HD/960H/Analog/ IP Magic U 1080p 3MP 4 CH MagicUDVRdetectsAnalog/960H/HD-TVI/A-HD/EX-SDI/HD-SDIcameras automatically Records up to
Contents Model Description Model Application Front & Rear Panel Description Accessories Included...
 Contents 1 INTRODUCTION... 4 1.1. Model Name... 4 1.2. Model Description... 4 1.3. Model Application... 4 1.4. Model Specification... 4 1.5. Front & Rear Panel Description... 5 1.6. Accessories Included...
Refer to the included CD-ROM for the German, French, Spanish and Italian Manual for Remote Operation by Network Connection. Die Bedienungsanleitung
 Refer to the included CD-ROM for the German, French, Spanish and Italian Manual for Remote Operation by Network Connection. Die Bedienungsanleitung für die Fernbedienung über ein Netzwerk in den Sprachen
9 CH Digital Video System. User Manual
 http://www.cpcamcctv.com 9 CH Digital Video System User Manual USER S S MANUAL Please read this instructions thoroughly before operation and retain it for future reference. CPD576W V1.0 WARNING All the
PIPV200 QUAD System. User Manual
 PIPV200 QUAD System User Manual System Features - Connects up to 4/8 Video Camera Adjustable Brightness, Contrast, Saturation, Hue and Sharpness - High Resolution 720X480 60Hz for NTSC 720X576 50Hz for
DTL-4800P. Digital Real Time Recording VCR
 Digital Real Time Recording VCR Digitally encoded picture of more than 520 TV line horizontal resolution Frame recording and frame playback capability Digital recording on S-VHS tapes Packet recording
ViewCommander- NVR Version 3. User s Guide
 ViewCommander- NVR Version 3 User s Guide The information in this manual is subject to change without notice. Internet Video & Imaging, Inc. assumes no responsibility or liability for any errors, inaccuracies,
USER MANUAL v.2.2. Series Specification SAT HD-SDI/AHD/TVI/960H/D1 DVR ATR AHD/TVI/960H/DI DVR ATX AHD/TVI/960H/D1 DVR AHD AHD/960H/D1
 User Manual USER MANUAL v.2.2 This document is an universal User Manual for iview Technology DVR GUI ( Graphic User Interface ) introduction and operations. ( Version 2.2 ) Series Specification FF SAT
Digital Video Recorder. User s Manual. MAGIC Series & TVI MAGIC Series
 Digital Video Recorder User s Manual MAGIC Series & TVI MAGIC Series 1 Thank you for using our product. 1. This is user's manual for Analog / HD-SDI Hybrid DVR(Digital Video Recorder). 2. This manual contains
MAGICUSeries-32CHDVR4Koutput-SupportsEX-SDI/ HD-SDI/HD-TVI/A-HD/960H/Analog/IP
 MAGICUSeries-32CHDVR4Koutput-SupportsEX-SDI/ HD-SDI/HD-TVI/A-HD/960H/Analog/IP Magic U 1080p 3MP 32 CH MagicUDVRdetectsAnalog/960H/HD-TVI/A-HD/EX-SDI/HD-SDIcameras automatically Records up to 4 IP cameras
Quick Guide QUICK INSTALLATION GUIDE. V988D Network 4K Dome Camera XX
 Quick Guide QUICK INSTALLATION GUIDE V988D Network 4K Dome Camera XX305-20-00 Vicon Industries Inc. does not warrant that the functions contained in this equipment will meet your requirements or that the
HD-1603 Single Input MPEG-4 DVB-T HD Encoder/Modulator User Guide and Install Manual
 ZyCastR digi-mod HD Range digi-mod HD-1603 www.digi-modbyzycast.com HD-1603 Single Input MPEG-4 DVB-T HD Encoder/Modulator User Guide and Install Manual Table of Contents www.digi-modbyzycast.com Safety
USERS MANUAL HDA SERIES 8/16 CHANNEL.
 USERS MANUAL HDA SERIES 8/16 CHANNEL www.nightowlsp.com Thank you for choosing Night Owl Security Products! By purchasing a Night Owl product, you receive a one (1) year warranty covering manufacturing
Winmate Communication INC.
 20.1 Military Grade Display Model: R20L100-RKA2ML User s Manual Winmate Communication INC. May, 2011 1 IMPORTANT SAFETY INSTRUCTIONS Please read these instructions carefully before using the product and
Digital Real Time Recording VCR
 Digital Real Time Recording VCR Digitally encoded picture of more than 520 TV line horizontal resolution Frame recording and frame playback capability Digital recording on S-VHS tapes Packet recording
Kramer Electronics, Ltd. USER MANUAL. Model: VS x 1 Sequential Video Audio Switcher
 Kramer Electronics, Ltd. USER MANUAL Model: VS-120 20 x 1 Sequential Video Audio Switcher Contents Contents 1 Introduction 1 2 Getting Started 1 2.1 Quick Start 2 3 Overview 3 4 Installing the VS-120 in
Z-IP Stream 004/008. User Guide and Installation Manual. Four or Eight Input QAM Encoder / Modulator
 Z-IP Stream 004/008 User Guide and Installation Manual Four or Eight Input QAM Encoder / Modulator MPEG-2 / H.264 HD ENCODER with QAM /IP/ & ASI Outputs Contents Safety Precautions... 3 Package Contents...