GreenParking. Commissioning guide. GreenParking
|
|
|
- Cody Marsh
- 5 years ago
- Views:
Transcription


1 GreenParking GreenParking
2 Page Table of Contents Introduction GreenParking...4. Working principle Intended use About this commissioning guide Warnings Before you start...5. Occupancy time Hold time Grace time Check the installation The remote control Check the installation of GreenParking Reset to factory default Creating a network What is a network One network Multiple networks Create a network Place the external battery powered motion sensors Install the external battery powered motion sensors to the network Close the network Test the network...
3 Page 3 5 Selecting a mode What is a mode Choose a mode... 6 Locking the network Changing parameters Unlock and lock the network Set the hold time Set the background light level Set the RF channel Reset a luminaire Check the active mode Repeat an individual setting to another luminaire Check external battery powered motion sensor connectivity to the network and identify failing sensor Add additional external battery powered motion sensor to network Remove external battery powered motion sensor from network Add additional luminaire to network Remove luminaire from network....4 Appendix A...5 What to do if a luminaire cannot be assigned to a network....5
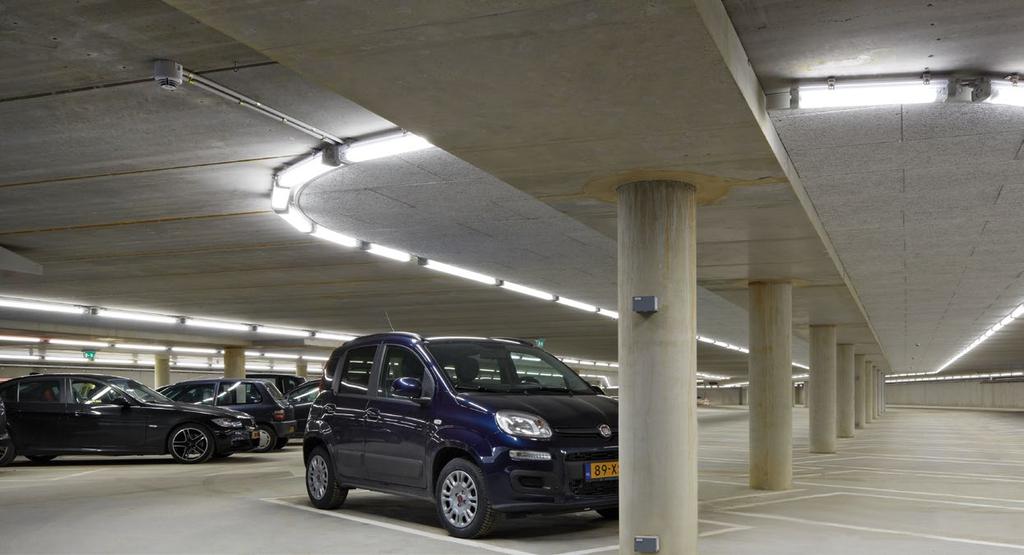
4 Page 4 Introduction. GreenParking.5 Warnings GreenParking is a lighting system for covered parking garages. GreenParking will dim luminaires to background light level when no motion is detected. GreenParking is easy to commission with a specific remote control.. Working principle + GreenParking with motion sensors detects motion in areas that are used, and adjusts the light intensity. The luminaires in GreenParking can be combined. In this way, the lighting in an area can be customized in line with the use of that area. Motion sensors can be added as an external part of the system (external battery powered motion sensor), or can be integrated in the luminaire (integrated motion sensor)?!.3 Intended use GreenParking is designed for use in covered parking garages. B You must have an installation and commissioning plan available before you can install and commission GreenParking..4 About this commissioning guide This commissioning guide helps installers to set up GreenParking. It explains the options, and how to change them to personal wishes. GreenParking System Installation instructions?! B You must have all documentation before you can commission GreenParking.
5 Page 5 Before you start. Occupancy time.3 Grace time 00% 00% The time, in which the sensor detects motion and keeps the system at the maximum light intensity (00%). The time in which the luminaires are dimmed from maximum light intensity (00%) to the background light level.. Hold time 00% This is the time between the last detection of movement and the start of actual dimming of the lights.
6 Page 6 3 Check the installation After the installation, all the luminaires are switched on to 00%. To test if GreenParking is correctly installed (refer to section 3.). 3. Check the installation of GreenParking Before you commission GreenParking you can check to see if the installation of GreenParking luminaire was successful. 3. The remote control Always aim the remote at the sensor in the luminaire precisely. 00% Feed-back message Many actions, like (un)lock network, send parameters, will result in a feed-back message. The lights will flash twice if the action was successful and four times if it failed. You must wait for confirmation before you can send a next command. If a command failed, try again. Contact Philips if the failure persists. Aim the remote control at the luminaire and press the off button. The luminaire should switch off. 3 Press the on button. The luminaire should switch on to 00%. Reset to factory default, when GreenParking does not react as described above and try again (refer to section 3.3).
7 Page Reset to factory default When GreenParking does not react as described in section 3., you must reset the luminaire to factory default. ))) reset Press the reset button. Aim the remote control at the sensor in the luminaire and press the green send button. After a reset the lights will switch off (or remain off). It can take seconds for the luminaire to reset. After this the luminaire will switch on. Note, you will not see any direct response to a reset if the lights were off. This is normal. If the reset did not help, you must check the installation, and replace parts if necessary. Also check if GreenParking is not locked. If necessary unlock (refer to section 7.) and try to reset again. B Do not leave the system in default mode! After resetting a luminaire, continue to apply an application mode and complete the network. In case Out of The Box behavior is needed, apply mode to each individual luminaire (refer to section 5.3.).
8 Page 8 4 Creating a network Start the commissioning of GreenParking by creating a network. 4.3 Multiple networks 00% 0 min 0% min 4. What is a network GreenParking can combine luminaires and sensors to create a network that equals an area. All the luminaires in a network will react in the same way. If GreenParking detects motion in the network, all the luminaires in that network will switch on to 00%. A maximum of 50 luminaires and 0 external battery powered motion sensors can be combined in a network. If you want all luminaires in an area to react on motion detection, make one network. Check the sensor design to determine the location of the networks and if applicable, the location of the external sensors. Always follow this design. (Refer to design guide, chapter ) 4. One network When you make two or more networks, the luminaires in another network can be set in a different mode. Luminaires will only react on motion detection in their own network. Check the sensor design to determine the location of the networks. 4.4 Create a network 6 00% 55 min 0% 5 min 00% 0 min 0% min 3 4 In one network, the luminaires are in one mode. All the luminaires will react on motion detection as set by the current mode. Start in the center of the car park Make certain you start to group 4 or more luminaires in the middle of the network, adjacent to each other. Work your way around this group. Luminaires at the perimeter of the area, especially those that have only neighboring luminaire, should be added last (in example above luminaire 6). This to prevent connectivity issues and ensure smooth commissioning.
9 Page 9 00% 0%. 4.5 Place the external battery powered motion sensors When luminaires with integrated motion sensors are used, go to section 4.7. When external battery powered motion sensors are used, follow the steps below Open the network Walk to the first luminaire that you want to add to the network. Aim the remote control at the sensor and press the open door button to open the network. The luminaire will dim to 0% as confirmation that it is the first in the network. 30 Prepare the sensors Put the battery (included) in the sensor. Set the timer counterclockwise to. You should first group all luminaires in a network before you start adding sensors. 00% 0%. add Walk to the next luminaire Aim the remote control at the sensor and press the add button. After a few seconds, the luminaire will dim to 0% as confirmation that it is added to the network. Activation of the sensors If no indicator light sequence is visible: Remove battery Press button shortly Place battery The sensor starts. The indicator light becomes red, then yellow, then green. When the indicator light is out, the sensor is activated.
10 Page 0 = 6x Place the sensor in the right position, but do not fixate it yet. The position might prove out of range. The sensor should be in sight of at least luminaires. You do not need to use the waterproof housing (if applicable) yet. 4.6 Install the external battery powered motion sensors to the network < 6x Look at the indicator light Good: After several orange flashes the LED flashes green. Go to Final Mounting. Wrong: After several orange flashes the LED flashes red. Reposition the sensor to get it in range of the network and push the button again. Push the button Final Mounting When done do final fixation. Mount the sensor in the waterproof housing (if applicable).

11 Page 4.7 Close the network 4.8 Test the network 50%. 00% Aim the remote at the luminaire and press the closed door button All the luminaires in the network are dimmed to 50%. A network can have a maximum of 50 luminaires and 0 external battery powered sensors. B The commissioning of GreenParking is not completed at this moment. Go to the next step. Aim the remote control at a luminaire. Press the off button. All the luminaires in the network will switch off. Press the on button. All the luminaires in the network will switch on to 00%. If you want to add a luminaire to this network, walk to that luminaire, then go to section 4.4. Continue with setting a mode (chapter 5) or locking the network (chapter 6).
12 Page 5 Selecting a mode After you have made a network, continue to commission GreenParking with the choice of a mode. 5. What is a mode A mode defines in which way the luminaires will react. The mode that you set is for all the luminaires in a network. If you have more networks, different networks can have different modes. 5. Choose a mode There are 3 modes in GreenParking, each with their own luminaire behavior. See the table for the mode that is best for you. Number 3 Name Standard setting Economic setting Comfort setting Description Intermediate between saving and comfort Maximum saving on energy costs The best working area lighting Hold time 4 minutes minutes 6 minutes Background level 0% 0% 30% D Note A mode can only be set, if the network is closed and unlocked. This is the case if you just installed GreenParking.
13 Page Select mode, and Set mode Press the blue mode button. Press. 3 Aim at the sensor in the luminaire and press the green send button. The light will start flashing. Motion Detection: ON Background level: 0% Hold time: 4 minutes Power up setting: ON Set mode Press the blue mode button. Press. 3 Aim at the sensor in the luminaire and press the green send button. The light will start flashing. Motion Detection: ON Background level: 0% Hold time: minutes Power up setting: ON Set mode 3 Press the blue mode button. Press 3. 3 Aim at the sensor in the luminaire and press the green send button. The light will start flashing. Motion Detection: ON Background level: 30% Hold time: 6 minutes Power up setting: ON
14 Page Request the active mode mode? Aim at the sensor in the luminaire and press the mode? button. First, the luminaire will dim to the background level for seconds. Next, the luminaire will go to 00% light level for seconds and after that will start flashing as many times as the amount of the first digit. After the flashing of the first digit, the light will dim to 0% for 4 seconds. After this, again the light level will go up to 00% for seconds and it will start flashing as many times as the amount of the second digit. Finally, the luminaires will go back to the original setting. Max. level Double digit Mode # Min. level State before request s. s. s. s. s. s. State after request = State before request Press mode? button Start of second digit (end of first digit) s. at Min. level followed by s. at Max. level counts as (this example = mode )
15 Page 5 6 Locking the network 3 ))) After you have set a mode (according section 5.3.), you must lock the network to save your settings and to make GreenParking operational. Press the lock button. Enter a code of 4 digits. B You need the code the next time that you want to unlock the network. You need a Philips engineer on the project if you forget the code. 3 Press the green send button. The luminaire will start flashing. Repeat steps, and 3. B Test if the network is locked by pressing the off button on the remote control. If the lights do not switch off, the commissioning of GreenParking is finished and the system is fully operational. B The above procedure only applies in case of a new code. In case the code is used earlier, another procedure applies (refer to section 7.).
16 Page 6 7 Changing parameters You can change system parameters if you like. This works per (section of) luminaire(s). 7. Unlock and lock the network If you want to set parameters, you must first unlock the network. 3 ))) 3 ))) After completion lock the network 4 Press the lock button, aim at the sensor in the luminaire and press send. 5 Type the 4 digit code. 6 Wait for confirmation. Press the unlock button. Type the 4 digit code (refer to chapter 6). 3 Aim the remote control at the sensor in the luminaire and press the green send button. Keep aiming the remote at the sensor till the LED on the remote stops blinking. parameter 3 ))) Now you can set the parameters which are explained on the next pages to individual luminaires in GreenParking. You can make several changes for different luminaires before you need to lock.

17 Page 7 7. Set the hold time The hold time is the time it takes for GreenParking to conclude that the area is empty, after the latest motion detection by the sensors. delay 3 ))) 7.3 Set the background light level The background light level is the light intensity of the luminaires, when no motion is detected anymore by the sensors. The background light level is set as a percentage of GreenParking maximum light intensity. GreenParking enables you to set the background light level per luminaire. 3 ))) background Unlock the network (refer to section 7.). Press the delay button. The LED on the remote control flashes. 3 Enter the hold time that you want to set. Use digits. The entry that you give must be between 0 and 35 minutes. The LED stops flashing. 4 Aim the remote control at the sensor and press the green send button. If you want to apply the same setting to another luminaire, walk to that luminaire. Aim the remote control at the luminair and press the green send button again. When you have set all the luminaires that you want to adjust individually, you must lock the network to save your settings and to make GreenParking operational. parameter Refer to section 7. D Note The system will strive to meet the selected time. Due to normal network operation, the times may deviate up to + minutes. Unlock the network (refer to section 7.). Press the background button. The LED on the remote control flashes. 3 Aim at the sensor in the luminaire and press a number button. Press 0 for the drivers minimum of your system. Press for 0%. Press for 0%. Press 3 for 30%. Press 4 for 40%. Press 5 for 50%. Press 6 for 60%. Press 7 for 70% of GreenParking maximum. The LED stops flashing. 4 Aim the remote control at the sensor and press the green send button. If you want to apply the same setting to another luminaire, walk to that luminaire. Aim the remote control at the luminair and press the green send button again. When you have set all the luminaires that you want to adjust individually, you must lock the network to save your settings and to make GreenParking operational. parameter Refer to section 7.
18 Page Set the RF channel When a network is created the system selects one of the 3 available RF channels. It is not possible to retrieve the channel in use. In exceptional cases it is necessary to change the RF channel due to poor network performance. This can for instance be caused by intense WiFi use near the network. Always consult a Philips representative first. 7.5 Reset a luminaire If the luminaire is not functional, or shows strange behavior, you must reset the luminaire. This action will reset the controller. When you reset a luminaire it will not be part of the network anymore. You have to group it again into a network. The rest of the network is not affected and will continue to operate normally. RF channel 3 ))) reset ))) Unlock the network (refer to section 7.). Press the RF channel button. The LED on the remote control flashes. 3 Press 5 to set RF channel 5, or Press 0 to set RF channel 0, or Press 5 to set RF channel 5. The LED stops flashing. 4 Aim the remote control at the sensor in the luminaire and press the green send button. All luminaires in the network will be set to the same channel. Repeat this for all networks that require changing the RF channel. When a luminaire is added to a network (refer to section 4.4) the luminaire will use the RF channel of the network. When you have selected the channel, you must lock the network to save your settings and to make GreenParking operational. B Warning You must commission the luminaire to the network again. Unlock the network (refer to section 7.). Press the reset button. The LED on the remote control flashes. 3 Aim the remote control at the sensor in the luminaire and press the green send button. The luminaire will switch off, wait for seconds and the luminaire will switch on again. If you want to reset another luminaire, walk to that luminaire. Aim the remote control at the sensor in the luminaire and press the green send button again. When you have set all the luminaires that you want to adjust individually, you must lock the network to save your settings and to make GreenParking operational. parameter parameter Refer to section 7. Refer to section 7.
19 Page Check the active mode mode? Unlock the network (refer to section 7.). Aim the remote to the sensor and press mode?. First, the luminaires will dim to the background level for seconds. Next, the luminaire will go to 00% light level for seconds and after that will start flashing as many times as the amount of the first digit. After the flashing of the first digit, the light will dim to 0% for 4 seconds. After this, again the light level will go up to 00% for seconds and it will start flashing as many times as the amount of the second digit. Max. level Double digit Mode # Min. level State before request s. s. s. s. s. s. State after request = State before request c Press mode? button Start of second digit (end of first digit) s. at Min. level followed by s. at Max. level counts as (this example = mode ) Finally the luminaires will go back to the original setting. 3 When you have finished the procedure, you must lock the network to save your settings and to make GreenParking operational. parameter Refer to section 7.
20 Page Repeat an individual setting to another luminaire To program luminaires quickly, just repeat an individual setting to another luminaire. + ))) 7.8 Check external battery powered motion sensor connectivity to the network and identify failing sensor Walk to the next luminaire. Aim the remote control at the sensor and press the green send button again. Now the luminaire has the same individual setting. B You can repeat one setting at a time. Unlock the network (refer to section 7.). Open the sensor housing. 3 On the sensor briefly press the link button. 4 The luminaires in the network will switch on or off depending on the previous state. 5 In case the lights react, press again to switch the network to the previous state. 6 Continue with the next sensor until the defective sensor is found. 7 Repair the sensor. 8 When you have finished the procedure, you must lock the network to save your settings and to make GreenParking operational.
21 Page 7.9 Add additional external battery powered motion sensor to network This Section describes the steps for adding additional external battery powered motion sensors to the system. When adding additional integrated motion sensors to the system, follow the steps of adding an additional luminaire (refer to section 7.) ))) 30 3 Put a battery in the sensor. Set the timer counterclockwise to. 00% 50%. Unlock the network (refer to section 7.). 00% 50%. 4 Place the sensor in the right position, but do not fixate it yet. The position might prove out of range. Push the button. Open the network where you want to add the sensor(s). The luminaires will dim to 0%.
. = 6x 00% < 6x 5 Look at the indicator light on the sensor.")
22 Page 7.0 Remove external battery powered motion sensor from network This section describes the steps for removing external battery powered motion sensors from the network. To remove an integrated motion sensor from the network, follow the same steps as when removing a luminaire (refer to section 7.). = 6x 00% < 6x 5 Look at the indicator light on the sensor. Correct: after some yellow flashes the LED flashes green. fixate the sensor. Go to step 6. Wrong: after 6 yellow flashes the LED flashes red. Reposition (usually closer to a luminaire) the sensor, then go to step 4. 50%. To remove an external battery powered sensor from the network: Unlock the network (refer to section 7.). The lights dim to 50%. Open the network. The lights dim to 0%. 6 Close the network. The luminaires will go to 00%. 0 seconds 3 Reset the sensor: Press and hold the Link button until LED has turned green. Then release the button. This action resets the OSW device and it is no longer part of a network. 4 Close the network. The lights go to 50%. 5 When you have finished the procedure, you must lock the network to save your settings and to make GreenParking operational. The lights go to 00%.
23 Page 3 7. Add additional luminaire to network 00% 50%. ))) add Unlock the network (refer to section 7.). 00% 50%. 3 Aim the remote control at the sensor in the luminaire you want to add and press the add button. After a few seconds, the luminaire will dim to 0% as confirmation that it is added to the network. 4 Press the closed door button. All the luminaires in the network are dimmed to 50%. 5 When you have finished the procedure, you must lock the network to save your settings and to make GreenParking operational. parameter Refer to section 7. Open the network where you want to add the luminaire
24 Page 4 7. Remove luminaire from network To remove a luminaire from a network, the network needs to be closed but unlocked. The actual action is resetting the luminaire to the Factory new state. 3 When you have finished the procedure, you must lock the network to save your settings and to make GreenParking operational. parameter ))) Refer to section 7. Unlock the network (refer to section 7.). B Warning After resetting a luminaire it needs to be put in application mode, (see chapter 5.3.). ))) reset Press the reset button. The LED on the remote control flashes. Aim the remote control at the sensor in the luminaire and press the green send button. The luminaire will switch off, wait for seconds and the luminaire will switch on again.
25 Page 5 Appendix A What to do if a luminaire cannot be assigned to a network GreenParking uses a.4 GHz radio signal to communicate between the different luminaires and sensors. This radio communication is very difficult to predict. Radio signals reflect on surfaces like floors and may reach a receiver perhaps further away, while nearby receivers may be out of reach. The system has numerous safeguards to prevent loss of communication. These are active in operation mode only, not during commissioning. Fixing poor reception during commissioning may help to get the network completed and enable to start the operation mode. B The following procedure is not a solution to use the system outside the given specifications. At all times the specification should be applied. B The following procedure is not guaranteed to work at all times, but if the normal procedure fails, this is a good fallback to create a network.
26 Page 6 Lowering the luminaire will have a positive effect on the reception of radio signals. In most occasions this is enough to create a network. Mount the luminaire back in position after the network is closed and test if the communication is in place, using the remote control. Communication is less critical during operation. B If a commissioned luminaire is not in reach of its network, all lights in the network will stay on at 00% and sensors will not operate. 3 3
27 Page 7
28 , April Philips Lighting Holding B.V., all rights reserved. Philips reserves the right to make changes in specifications and/or to discontinue any product at any time without notice or obligation and will not be liable for any consequences resulting from the use of this publication.
EasyAir Philips Field Apps User Manual. May 2018
 EasyAir Philips Field Apps User Manual May 2018 Content Introduction to this manual 3 Download App 4 Phone requirements 4 User Registration 5 Sign in 6 Philips Field Apps 7 EasyAir NFC 8 Features overview
Controls Indoor. SpaceWise DT. User manual
 Controls Indoor SpaceWise DT User manual Table of Contents 1. Philips SpaceWise wireless technology DT introduction 3 2. Sensor coverage area 4 3. Philips Field App download and usage instructions 5 4.
Honeywell. Manual DFRC. RF Remote Control Decorative Fire
 Honeywell Manual DFRC RF Remote Control Decorative Fire DISPLAY AND KEYS Display Key Up Key Down Key Stop/Stand-by Key Menu Display Manual operation. Time schedule active. Active time period. Closed (left)
Luminaire installation box Surface-mounted box Ceiling installation box
 -Smart PTM Ambient light sensor and motion detector for constant lighting control uminaire installation box Surface-mounted box Ceiling installation box Overview: -SMART PTM i is an ambient light sensor,
General FAQs Status as of: 22/10/2018
 General FAQs Status as of: 22/10/2018 1. What is tint? tint is a smart lighting system that is both simple and intelligent. Whether via remote control, smart home network or voice control - tint is simple,
A digital version of this document is available to download and submit online at ADDRESS POST CODE
 CHECK LIST i A digital version of this document is available to download and submit online at www.thorlux.com/commissioning To secure your preferred commissioning date please complete this form and email
EXTERNAL. A digital version of this document is available to download and submit online at ADDRESS POST CODE
 CHECK LIST EXTERNAL i A digital version of this document is available to download and submit online at www.thorlux.com/commissioning To secure your preferred commissioning date please complete this form
KNX Dimmer RGBW - User Manual
 KNX Dimmer RGBW - User Manual Item No.: LC-013-004 1. Product Description With the KNX Dimmer RGBW it is possible to control of RGBW, WW-CW LED or 4 independent channels with integrated KNX BCU. Simple
Tailgate module BEXPRO PRINS VSI
 new digital technology For any damage that may arise due to our instructions, we can of course, assume no liability. The publication is solely for informational Purposes has been written and contains no
Aspect 2 Circuit Digital Scene Control
 Aspect 2 Circuit Digital Scene Control S p e c i f i c a t i o n 2 circuits of trailing edge dimming 500W total between the two circuits Both circuits feature independent overload, short-circuit and open-circuit
Pixel LED SPI Digital Controller
 Pixel LED SPI Digital Controller Part number: The Mini LED Pixel Controller provides a wide array of color changing and chasing effects for both PixelPro and PixelControl products. The 32 different effects
EN Wireless programmable thermostat
 EN Wireless programmable thermostat Contents 1. Installation... 31 2. Description... 32 EN 3. Wireless association... 33 4. Configuration... 34 CF01 - Correcting the temperature measured... 34 CF02 - Temperature
User Manual LivingColors Bloom
 User Manual LivingColors Bloom Unpacking and Installing Getting started with your LivingColors If you unpack a LivingColors, the product is already linked to the remote control. You only need to plug it
Installation & Operations Manual
 Lytespan Track Lighting Addressable Track Module System Installation & Operations Manual For Use with Catalog Numbers: CAM250VA, CAM250ND, CAMTM, CAMWRC, & CAMLRC Table of Contents 1. System Overview...........................
EC5415B. B-Tronic EasyControl. Assembly and Operating Instructions. Wall/hand-held transmitter, 15-channel, bidirectional
 B-Tronic EasyControl EC5415B en Assembly and Operating Instructions Wall/hand-held transmitter, 15-channel, bidirectional Important information for: Fitters / Electricians / Users Please forward accordingly!
TITLE BOX PAGE ONLY. DO NOT MAKE FILM DO NOT PRINT. MATERIAL: White 16lb (60g/m sq), uncoated, prefer recycled stock Ink: Black
, uncoated, prefer recycled stock Ink: Black") REV DESCRIPTION INT: REV. DATE APPROVED 1 ECO# C01429 MJS 9/7/05 CG 2 ECO# 02412 DR TITLE BOX PAGE ONLY. DO T MAKE FILM DO T PRINT MATERIAL: White 16lb (60g/m sq), uncoated, prefer recycled stock Ink:
REV DESCRIPTION INT: REV. DATE APPROVED 1 ECO# C01429 MJS 9/7/05 CG 2 ECO# 02412 DR TITLE BOX PAGE ONLY. DO T MAKE FILM DO T PRINT MATERIAL: White 16lb (60g/m sq), uncoated, prefer recycled stock Ink:
Gamma instabus. Technical product information
 Gamma instabus Technical product information Universal dimmer N 554D31, 4 x 300 VA / 1x 1000 VA, AC 230 V Universal dimmer N 554D31 Control of dimmable lamps, including LED without minimum load Output
Mosaic TM Dimmer 3 x 1000 W
 Mosaic TM Dimmer 3 x 1000 W 784 30 Technical characteristics (1) ( * ) 50/60 Hz 240 V~ 100 V~ 1 x 2,5 mm2 2 x 1,5 mm 2 Max. Min. Max. Min. < 2200 W (2) (do not exceed 1000 W per channel) 3 x 40 W < 1100
C O B A R 18R U s e r G u i d e P a g e 1. User Guide COBRA 18R. Wireless Firing System.
 C O B A R 18R U s e r G u i d e P a g e 1 User Guide COBRA 18R Wireless Firing System C O B A R 18R U s e r G u i d e P a g e 2 TABLE OF CONTENTS 1. SYSTEM INTRO... 3 2. POWER ON... 4 3. REMOTE / FIRING
Operating instructions Capacitive level sensor KNQ
 Operating instructions Capacitive level sensor KNQ 708 / 0 0 / 006 Contents Functions and features... 3 Electrical connection... 3 Installation... 4 Adjustment... 4 Locking / unlocking... 6 Operation...
User Manual CC DC 24 V 5A. Universal Control Unit UC-1-E. General Information SET. Universal Control Unit UC-1 Of Central Lubrication PAUSE CONTACT
 Universal Control Unit UC-1-E User Manual General Information Universal Control Unit UC-1 Of Central Lubrication CC DC 24 V 5A / M 15 SL /MK 31 M Z 30 General Information Contents Universal Control Unit
2 CHANNEL RECEIVER DISPLAY POTENTIOMETER COM2 NC2 NO2
 2 CHANNEL RECEIVER RECTSHIVE915-DX Please read this manual carefully before installing the product. 1 DESCRIPTION Receiver Rolling Code, 2 channels with dry contact relay output 20A a 12 Vdc. Programming
ArteorTM Dimmer 3 x 1000 W / /60
 ArteorTM Dimmer 3 x 1000 W / 5740 10/60 Technical characteristics / * ( ) 50/60 Hz 1 x 2.5 mm 2 x 1.5 mm2 2 Max. < 2200 W(2) (do not exceed 1000 W per channel / Special provisions (see page 5) / 240 V~
Ambient Weather WS-01 Intelligent Color Changing Temperature Night Light with Ambient Backlight User Manual
 Ambient Weather WS-01 Intelligent Color Changing Temperature Night Light with Ambient Backlight User Manual Table of Contents 1 Introduction... 1 2 Warnings... 2 3 Getting Started... 2 3.1 Parts List...
Instruction manual. DALI Gateway art Installation manual
 Instruction manual DALI Gateway art. 01544 Installation manual Contents GENERAL FEATURES AND FUNCTIONALITY from page 5 ETS PARAMETERS AND COMMUNICATION OBJECTS from page 6 COMMUNICATION OBJECTS GENERAL
FRQM-2 Frequency Counter & RF Multimeter
 FRQM-2 Frequency Counter & RF Multimeter Usage Instructions Firmware v2.09 Copyright 2007-2011 by ASPiSYS Ltd. Distributed by: ASPiSYS Ltd. P.O.Box 14386, Athens 11510 (http://www.aspisys.com) Tel. (+30)
SINGLE ZONE CLIMATE ZONING SYSTEM. Technical Manual. Polyaire Pty Ltd
 SINGLE ZONE CLIMATE ZONING SYSTEM Technical Manual Polyaire Pty Ltd 11-13 White Road GEPPS CROSS South Australia, 5094 Tel: (08) 8349 8466 Fax: (08) 8349 8446 www.polyaire.com.au CONTENTS Features 1 Application
Keyless Lock Instructions. Switching Modes. About Keyless Locks. Using a Keyless Lock. Factory Codes. Buttons. zkeyless Lock 1
 Keyless Lock About Keyless Locks Keyless Locks have two operating modes: Station (for personal storage) and Locker (allows flex workers and multiple users access to storage throughout the day). Using a
Casambi App FAQ. Version Casambi Technologies Oy.
 Casambi App FAQ Version 1.3 30.9.2016 Casambi Technologies Oy 1 of 12 GENERAL 3 Q: What is Casambi app used for? 3 Q: Which mobile devices are supported? 3 Q: Where can I get the Casambi app? 3 FIRST TIME
ATTENTION YOUR NEW KEY FOBS WILL NOT WORK UNTIL YOU HAVE LOADED THEM ON TO YOUR REMOTE CONTROL SYSTEM
 ATTENTION YOUR NEW KEY FOBS WILL T WORK UNTIL YOU HAVE LOADED THEM ON TO YOUR REMOTE CONTROL SYSTEM Please identify which remote control system is operating your roller shutter/garage door and follow the
Comfort System T-32-P Universal Thermostat. Operation Manual
 TM Comfort System T-32-P Universal Thermostat TM O Operation Manual Your new Comfort System T-32-P Universal Thermostat has been built using the highest quality components and design currently available.
AITech ProA/V Media Extender 5GHz Digital
 AITech ProA/V Media Extender 5GHz Digital 5 GHz Wireless Digital Media Transmitter and Receiver User Manual Table of Contents 1. Package Contents 2. Panels and Functions AV Sender AV Receiver 3. Setup
VLC-3 USER'S MANUAL. Light Program Controller. M rev. 04 K rev. 00 & ( ( 5, 352*5$0 1 : $ 2 ' 6(77,1*6 )81&7,216
81&7,216") Light Program Controller VLC-3 USER'S MANUAL +50,1 +50,1 1 : $ ' 2 7. 6 8 ' 5, 7 6 6. $ ( 3 352*5$0 0,16(& )81&7,216 6(77,1*6 & 8 5 5 ( 1 7 3 ( 5, 2 ' M 890-00189 rev. 04 K 895-00406 rev. 00 GENERAL...
Light Program Controller VLC-3 USER'S MANUAL +50,1 +50,1 1 : $ ' 2 7. 6 8 ' 5, 7 6 6. $ ( 3 352*5$0 0,16(& )81&7,216 6(77,1*6 & 8 5 5 ( 1 7 3 ( 5, 2 ' M 890-00189 rev. 04 K 895-00406 rev. 00 GENERAL...
SCS318. User Instructions. SCS318 comprising of SCS317 7 Day Wireless Programmable Room Thermostat and SSR303 Receiver
 SCS318 User Instructions SCS318 comprising of SCS317 7 Day Wireless Programmable Room Thermostat and SSR303 Receiver Programmable room thermostats are widely recognised as one of the best ways in which
POLARIS 4 ELECTRONIC CONTROL BOARD FOR SLIDING GATES MANUAL
 POLARIS 4 ELECTRONIC CONTROL BOARD FOR SLIDING GATES MANUAL !!! ATTENTION - NOTICE FOR THE INSTALLER!!! The bridges present on the contacts STOP, SENSITIVE EDGE, PHOTOCELLS, will not be installed anymore
MRF-250 INSTALLATION MANUAL
 MRF-250 INSTALLATION MANUAL Multi-Room No-Pointing RF Control of Audio/Video Components MRF-250 Installation Manual 2004 Universal Remote Control, Inc. The information in this manual is copyright protected.
Operating instructions. Universal timer switch display
 Operating instructions 1. Function The Time Switch display is a system component and is installed in a box as per DIN 49073 (deep box recommended) in conjunction with the Time Switch insert. The unit facilitates
BLOCK OCCUPANCY DETECTOR
 BLOCK OCCUPANCY DETECTOR This Block Occupancy Detector recognises the current drawn by moving trains within a block, and can operate a number of built-in programs in response. When used with DC systems,
Ducasa Digital Programmer
 Ducasa Digital Programmer Hand Held Remote Control Unit Instructions for Operation and Programming (Read these instructions carefully and retain for further reference.) Model: DUCASA REMOTE CONTROLLER
Single Station Waterproof Timer
 Single Station Waterproof Timer Installation and Programming Guide Features Up to four irrigation cycles per day Easy installation and programming Battery powered Waterproof and weather resistant 1234
A Motor can be in many groups, by assigning additional channel# on it.
 Timer Remote Control Instruction How to use the channel numbers - There are 32 channels on the Remote Control Timer you can assign to Curtain Motor(s). To operate the Motors individually by itself only,
USER MANUAL FOR THE ANALOGIC GAUGE FIRMWARE VERSION 1.0
 by USER MANUAL FOR THE ANALOGIC GAUGE FIRMWARE VERSION 1.0 www.aeroforcetech.com Made in the USA! WARNING Vehicle operator should focus primary attention to the road while using the Interceptor. The information
PRODUCT MANUAL LUMENTO X3 LED. LED Controller ZN1DI-RGBX3. Program Version: 1.0 Manual Edition: a
 PRODUCT MANUAL LUMENTO X3 LED LED Controller ZN1DI-RGBX3 Program Version: 1.0 Manual Edition: a INDEX 1. Introduction... 3 1.1. LUMENTO X3... 3 1.2. Installation... 4 2. ETS Parameterization... 7 2.1.
Main Display (Red) Displays the incident light level or the function name.
 Displays the incident light level or the function name.") E3X-DA-S/E3X-MDA Operation Reference Main Display (Red) Displays the incident light level or the function name. Sub-Display (Green) Displays the threshold and function settings. Operation Keys Used to
E3X-DA-S/E3X-MDA Operation Reference Main Display (Red) Displays the incident light level or the function name. Sub-Display (Green) Displays the threshold and function settings. Operation Keys Used to
Universal Remote TRAINING SYSTEM
 Owner s Manual Universal Remote TRAINING SYSTEM WARNING: No user-serviceable parts inside. Contact manufacturer or authorized personnel for service. COMPLIANCE STATEMENT (PART 15.19) This device complies
USER MANUAL FOR THE ANALOGIC GAUGE FIRMWARE VERSION 1.1
 by USER MANUAL FOR THE ANALOGIC GAUGE FIRMWARE VERSION 1.1 www.aeroforcetech.com Made in the USA! WARNING Vehicle operator should focus primary attention to the road while using the Interceptor. The information
STX Stairs lighting controller.
 Stairs lighting controller STX-1795 The STX-1795 controller serves for a dynamic control of the lighting of stairs. The lighting is switched on for consecutive steps, upwards or downwards, depending on
MaxLite LED Wall Packs (Cutoff & Standard)
") General Safety Information To reduce the risk of death, personal injury or property damage from fire, electric shock, falling parts, cuts/abrasions, and other hazards read all warnings and instructions
General Safety Information To reduce the risk of death, personal injury or property damage from fire, electric shock, falling parts, cuts/abrasions, and other hazards read all warnings and instructions
Tebis TX100 Configurator
 5 Tebis TX100 Configurator quicklink Radio input products Electrical / Mechanical characteristics: see product user's instructions Product reference Product designation TX100 version TP device RF device
INSTALLATION AND OPERATION MANUAL
 INTELLISIGHT OCCUPANCY SENSOR & RELAY PACKS INSTALLATION AND MANUAL IMPORTANT: RETAIN THESE INSTRUCTIONS FOR THE END USER. DO NOT DISCARD. CEILING OCCUPANCY SENSOR ITSCS ITSCSHB RELAY PACK ITSRP1U ITSRP2U
Warranty Information
 Accuform Signs does not handle the warranty for the Digital Signage Displays. Please read below for details on the warranty of your product. If you are having trouble and need assistance, please contact
DSIM-GI Installation Guide Revision P
 Installation Guide Revision P 1. Quick Start Instructions for Single Pilot AGC Operatation 1. With the ADU jumper in Auto position, turn ADU pot to MIN amplifier output level. Then place the ADU jumper
E3C-LDA. Phone: Fax: Web: - Operating Procedures: Photoelectric Sensors
 E3C-LDA Operating Procedures: Photoelectric Sensors 1 Setting the Operation Mode The operation mode is set with the. Operation mode Operation Light ON L-ON Dark ON D-ON L (Factory-set) D *Advanced Twin-output
Orbit Marine LED Light with 24 hour Ramp Timer Pro LED Controller
 Quick Installation Guide Orbit Marine LED Light with 24 hour Ramp Timer Pro LED Controller What s included: 1 - Orbit Marine LED light fixture with dual actinic/dual daylight LEDs with adjustable docking
DIGITAL TIME SWITCH 7 DAY WITH INPUT DGU100A DGUM100A DGLC100A DGLC200A
 INSTRUCTION MANUAL LISTED DIGITAL TIME SWITCH 7 DAY WITH INPUT DGU100A DGUM100A DGLC100A DGLC200A FOR TECHNICAL SUPPORT: 888.500.4598 A DIVISION OF NSi INDUSTRIES, LLC USA 800.321.5847 www.nsiindustries.com
Scoreboard Operator s Instructions MPCX SCD / DGT / Pitch Time Control
 Scoreboard Operator s Instructions MPCX SCD / DGT / Pitch Time Control Since 1934 Retain this manual in your permanent files Rev. 2/3/2012 135-0136 These Instructions are for the Following Models: LED
HDMI Expander Family EP-HC0408 EP-HC046
 HDMI Expander Family EP-HC0408 EP-HC046 EP-HC0408/EP-HC0416 User Manual Version 1.0 Last Updated: March 2008 Table of Content 3 Notice 4 Package Content 5 Product Introduction 5 Product Features 6 Panel
Quick Start Operating Instructions
 Table of Contents 1. Introduction 1 2. Instrument Controls & Indicators 2 3. Digital Display and Screens Overview 3 4. Setting the Basic Operating Level 4 5. Calibration 6 A The Calibration Menu: Screen
BLINKIN LED DRIVER USER'S MANUAL. REV UM-0 Copyright 2018 REV Robotics, LLC 1
 fg BLINKIN LED DRIVER USER'S MANUAL REV-11-1105-UM-0 Copyright 2018 REV Robotics, LLC 1 TABLE OF CONTENTS 1 OVERVIEW... 3 1.1 CONNECTIONS... 3 1.2 KIT CONTENTS... 3 1.3 ELECTRICAL RATINGS... 3 1.4 SUPPORTED
Casambi App User Guide
 Casambi App User Guide Version 1.5.4 2.1.2017 Casambi Technologies Oy Table of contents 1 of 28 Table of contents 1 Smart & Connected 2 Using the Casambi App 3 First time use 3 Taking luminaires into use:
Owner's Manual DIGITAL TO ANALOG BROADCAST CONVERTER WITH REMOTE CONTROL. Model: CVD508 PLEASE READ BEFORE OPERATING THIS EQUIPMENT.
 Size: 148.5(W) x 210(H)mm (A5) DIGITAL TO ANALOG BROADCAST CONVERTER WITH REMOTE CONTROL Owner's Manual PLEASE READ BEFORE OPERATING THIS EQUIPMENT. Model: CVD508 FCC NOTICE: To assure continued compliance,
CAUTION RISK OF ELECTRIC SHOCK NO NOT OPEN
 Evolution Digital HD Set-Top Box Important Safety Instructions 1. Read these instructions. 2. Keep these instructions. 3. Heed all warnings. 4. Follow all instructions. 5. Do not use this apparatus near
USER GUIDE 8-CHANNEL DMX CONTROLLER December 2013 Version 1.0 CHASE / STROBE SPEED FADE SPEED RED GREEN BLUE WHITE AMBER DIMMER INSERT
 8-CHANNEL DMX CONTROLLER RED GREEN BLUE YELLOW 1 2 3 4 5 6 CYAN ORANGE PURPLE WHITE RED GREEN BLUE WHITE AMBER DIMMER RECORD INSERT DELETE TAP CLEAR MANUAL MUSIC 1 2 3 5 6 7 AUTO CHASE / STROBE SPEED 4
USER MANUAL Model: A5
 Heads Up Display (HUD) USER MANUAL Model: A5 CONTENTS 1. Introduction to the HUD...3 2. Additional Information...3 3. Unit Display & Switch Functions...4 4. Menu Options...6 5. Specifications...8 6. Troubleshooting...9
Chapter 1 : FCC Radiation Norm...3. Chapter 2 : Package Contents...4. Chapter 3 : System Requirements...5. Chapter 4 : Hardware Description...
 Table of Contents Chapter 1 : FCC Radiation Norm...3 Chapter 2 : Package Contents...4 Chapter 3 : System Requirements...5 Chapter 4 : Hardware Description...6 Chapter 5 : Charging Your Video Watch...7
Receiver Customization
 9241_13_Ch11_eng 10/30/08 3:16 PM Page 1 Receiver Customization PERSONALIZING YOUR SATELLITE RECEIVER Take a look through this chapter and you ll find out how to change settings on the receiver to make
OPERATION AND MAINTENANCE
 BAS MS/TP Enabled OPERATION AND MAINTENANCE An Company Contents Powering Up For The First Time... 3 Setting MSTP Communication Parameters... 4 Changing the MSTP Address... 4 Changing the BACNET ID... 5
User interface. Abbreviations / Meanings
 RG66012649 User interface Contents Page Abbreviations / Meanings Abbreviations / meanings... 2 Button Identification... 3 On-screen Indicators... 4 Quick Start... 5 Setting the time and day... 5 Changing
Projector Lift. User Guide INSTALLATION OPERATION SETUP PROGRAM IR REMOTE FACTORY RESET
 INSTALLATION OPERATION SETUP PROGRAM IR REMOTE FACTORY RESET MODELS: Small - Standard Deep - Wide - Large X-Large - XX-Large Projector Lift User Guide ver 26.01.012 2012 PureTheatre CONTENTS Part Checklist...
4.0 Description. 2-channel operation D1 and D2 rated at 200 VA each. 1-channel operation D1 rated at 400 VA (see connection chap. 6.
 _307 238_EN_LUXOR 405_310 410 01_D.qxd 21.09.16 10:54 Seite 1 Operating Manual Dimmer module 4050100 1.0 Designated use The LUXOR dimmer module expands the existing LUXOR series of devices. It switches
802DN Series A DeviceNet Limit Switch Parameter List
 802DN Series A DeviceNet Limit Switch Parameter List EDS file Version 2.01 1. Operate Mode 1 (Sensor Output #1) Normally Open Normally Closed 2. Operate Mode 2 (Sensor Output #2) Normally Open Normally
HD Digital Set-Top Box Quick Start Guide
 HD Digital Set-Top Box Quick Start Guide Eagle Communications HD Digital Set-Top Box Important Safety Instructions WARNING TO REDUCE THE RISK OF FIRE OR ELECTRIC SHOCK, DO NOT EXPOSE THIS PRODUCT TO RAIN
Evolution Digital HD Set-Top Box Important Safety Instructions
 Evolution Digital HD Set-Top Box Important Safety Instructions 1. Read these instructions. 2. Keep these instructions. 3. Heed all warnings. 4. Follow all instructions. 5. Do not use this apparatus near
USER MANUEL. SNIPE 2 Ref R13
 USER MANUEL SNIPE 2 Ref. 0141317R13 Contents 1. General Information 1-1. Introduction 1-2. Proper use and operation 1-3. Safety notes......... 2 3 3 2. Contents 2-1. Accessory included 2-2. Name of parts......
Tebis application software
 Tebis application software LED projector with quicklink radio infrared detector Electrical / Mechanical characteristics: see product user manual Product reference Product designation Application software
The smart valve with 3 Independent programs + 2 extra modes
 All right reserved to netafim / Hendelmade 0901 The smart valve with 3 Independent programs + 2 etra modes o opcion rio pro READ & KEEP E AQUA PRO Irrigation Controller Easy to use battery operated irrigation
LUMINOUS TWO APP USER GUIDE FOR ANDROID
 LUMINOUS TWO APP USER GUIDE FOR ANDROID Disclaimer Please note that the images and instructions contained in this guide are based on app version 2.2.3. While the information is accurate to this app version,
TITLE BOX PAGE ONLY. DO NOT MAKE FILM DO NOT PRINT
 REV DESCRIPTION INT: REV. DATE APPROVED 1 ECO# CO1790 MJS 9/27/06 CG 2 ECO# 02412 DR 10/3/07 CG 3 ECO# 03170 MJS TITLE BOX PAGE ONLY. DO NOT MAKE FILM DO NOT PRINT MATERIAL: White 16lb (60g/m sq), uncoated,
Operating Manual. Basic Control BC16. two-channel for eco moon
 Operating Manual Basic Control BC16 two-channel for eco moon Dear Customer, Thank you for choosing a WALTRON daytime lighting controller. Your daytime lighting controller is a high-quality product that
Installation and User Guide 458/CTR8 8-Channel Ballast Controller Module
 Installation and User Guide 458/CTR8 8-Channel Ballast Controller Module Helvar Data is subject to change without notice. www.helvar.com i Contents Section Page Introduction 1 Installation 2 1. Attach
Thank you for purchasing this product. If installing for someone else, please ensure that the instructions are handed to the householder.
 Instruction Manual TPSRF51 (957707) - BOSS TM Universal RF Programmable Room Thermostat (Wireless) (7 day, 5/2 day and 24 hour programme options) Thank you for purchasing this product. If installing for
Standard Digital Terminal High-Definition Digital Terminal. User Guide
 Standard Digital Terminal High-Definition Digital Terminal User Guide ILL-GDA-STD-001-0709 IN THIS GUIDE IMPORTANT RULES FOR SAFE OPERATION... 4 AVAILABLE ILLICO TERMINALS... 5 REMOTE CONTROLS... 17 CONNECTIONS...
RADIO RECEIVER RGBW CONTROLLING LED STRIP COMMON ANODE
 TELECO AUTOMATION SRL - Via dell Artigianato, 16-31014 Colle Umberto (TV) ITALY TELEPHONE: ++39.0438.388511 FAX: ++39.0438.388536 - www.telecoautomation.com This document is the property of Teleco Automation
Scoreboard Operator s Instructions MPCX Volleyball Control
 Scoreboard Operator s Instructions MPCX Volleyball Control Since 1934 Retain this manual in your permanent files Rev. 2/3/2012 135-0137 These Instructions are for the Following Models: LED models: Incandescent
Automotive 72 Exterior Smart Lighting Kit
 PACKAGE CONTENTS Automotive 72 Exterior Smart Lighting Kit 36 36 8 x Wire Mounting Bracket 16 x Screws 60" Extension Cable 24 ON / OFF 60 Exterior Kit can also function as interior lighting Instruction
Tri-level Control HF Sensor
 Daylight Monitoring TM Ambient daylight threshold oop in oop out Tri-level Control HF Sensor HC403VRC-KD HC404VRC-KD Detached Version with Daylight Monitoring and Remote Control Applications Occupancy
LINK-RAY TM MODULATORS FOR CONSTANT- VOLTAGE. LinkRay Modulators 12 V / 24 V Constant-voltage Applications MODULATORS
 MUSIUM RESTAURANT SOUVENIR SHOP EXIT LinkRay Modulators 12 V / 24 V Constant-voltage Applications LINK-RAY TM MODULATORS FOR CONSTANT- VOLTAGE LINK-RAY TM MODULATORS FOR CONSTANT-VOLTAGE APPLICATIONS 186755
RF Mogul. Quick Start. Model: SDC1. Satellite Dish Controller
 RF Mogul Satellite Dish Controller Model: SDC1 Quick Start 29 February 2012 Minimum required hardware to find a Satellite! This Quick Start document is for connecting and operating a General Dynamics C125M
Owners SW-LCD 2.0 Manual & Specifications
 Owners SW-LCD 2.0 Manual & Specifications Contents 1. Preface. 19 2. Appearance and Size.20 2.1 Material and Color 20 2.2 Display Size and Installation Size 20 3. Function Summary and Button Definition
TDDFM14 OWNER S MANUAL
 TDDFM14 OWNER S MANUAL Table of Contents 3 Installation Features System Selector Switches 6 10 Connecting Wires and Mounting Thermostat 10 Operation (Programming) Programming/Setting Clock Personal Program
Law Enforcement Audio&Video Recorder. User manual Ford Road, Suite # 110, Dallas, TX Tel: Fax:
 Law Enforcement Audio&Video Recorder User manual Model#: IV-PBC-01 12000 Ford Road, Suite # 110, Dallas, TX 75234 Tel: 972-247-1203 Fax: 972-247-1291 www.idview.com 1 1. Introduction Digital IDView sincerely
AES-404 Digital Audio Switcher/DA/Digital to Analog Converter
 Broadcast Devices, Inc. AES-404 Digital Audio Switcher/DA/Digital to Analog Converter Technical Reference Manual Broadcast Devices, Inc. Tel. (914) 737-5032 Fax. (914) 736-6916 World Wide Web: www.broadcast-devices.com
Installing the FOREST SHUTTLE S / L
 2 Installing the FOREST SHUTTLE S / L 1 Assemble the track 2 Install the brackets and fix the track onto the brackets 3 Do not attach the drapery yet. Attach the drapery only after the end positions have
Operating instructions III / 2004
 Operating instructions III / 2004 Light sensor TOUCH DIM LS LI OSRAM GmbH Costumer-Service-Center (CSC) Germany Steinerne Furt 62 86167 Augsburg, Germany www.osram.com www.osram.de Tel. : (+49) 1803 /
VISSIM Tutorial. Starting VISSIM and Opening a File CE 474 8/31/06
 VISSIM Tutorial Starting VISSIM and Opening a File Click on the Windows START button, go to the All Programs menu and find the PTV_Vision directory. Start VISSIM by selecting the executable file. The following
User Guide AC/DC 2 AC/DC 4 AC/DC 6 AC/DC 9 DC IP68 AC IP65
 User Guide AC/DC 2 AC/DC 4 AC/DC 6 AC/DC 9 DC IP68 AC IP65 2 What is in this package? 1 1 2 2 3 What else do I need? 9V 1-9 Moiture sensor (Opional) DC IP68 AC IP65 User Guide F e a t u r e s o f t h e
Access Control Keypad for MK-DV, JB-DV
 #91173 0406 Access Control Keypad for MK-DV, JB-DV - INSTRUCTIONS - The KVI is a surface mount electronic access control keypad for use with Aiphone s MK-DV or JB-DV video door station. Designed with the
THE NEXT GENERATION OF CITY MANAGEMENT INNOVATE TODAY TO MEET THE NEEDS OF TOMORROW
 THE NEXT GENERATION OF CITY MANAGEMENT INNOVATE TODAY TO MEET THE NEEDS OF TOMORROW SENSOR Owlet is the range of smart control solutions offered by the Schréder Group. Owlet helps cities worldwide to reduce
Mini LED Pixel Controller Part number: PX-SPI-mini
 Mini LED Pixel Controller Part number: PX-SPI-mini 11235 West Bernardo Court, Suite 102 San Diego, CA 92127 888-880-1880 Fax: 707-281-0567 EnvironmentalLights.com The Mini LED Pixel Controller provides
Operating instructions Through-beam sensor. OJ51xx laser / / 2010
 Operating instructions Through-beam sensor OJ5xx laser 70480 / 00 05 / 200 Contents Preliminary note. Symbols used 2 Safety instructions Functions and features 4 4 Installation 4 5 Electrical connection5