POLYCOM HDX USER GUIDE. HELP, HINTS, and TIPS
|
|
|
- Kelly Harrell
- 5 years ago
- Views:
Transcription
1 POLYCOM HDX USER GUIDE HELP, HINTS, and TIPS
2 TABLE OF CONTENTS Remote Control...2 Getting to Know Your System. 3 Placing/Receiving Calls... 9 Camera Control. 10 Multipoint Calls,,..10 Monitor View Using Other Peripherals.. 11 Call Statistics Conferencing Tips...12 For additional help, go to Support, Learning Center and Training, End User Training (located on the left in the gray box). For additional help with immediate Polycom equipment problems, please call Lisa King at InLine , ext 537, lking@inline.com. You may also contact Cindy Ham , ext 542, cham@inline.com. 1

3 REMOTE CONTROL 2


4 GETTING TO KNOW YOUR SYSTEM 1. The picture above is the Home (Place a Call) screen. This is where you go to place calls or to access your System (to make changes). 2. Clicking on Directory, brings up your phone book, where frequently called numbers can be stored. 3. Clicking on Recent Calls, brings up the screen below, which shows who was called, the date and time, and whether the call was outgoing or incoming. Where there is a name, it means the call was answered. Where there is an IP address only, it means the call was NOT answered. 4. To get back to the Home screen at anytime, press the Home key on the remote. 5. While on the Home screen, using the remote, arrow down to System and press Enter to get the System screen (shown below). 3


5 6. Admin Settings should be highlighted, press Enter. 7. The next screen, shown below, is the system password. The password is usually the serial number of the Codec. This number should never be cleared out. If it is cleared out, it will have to be typed in time this screen is accessed. Press Enter to get to the next screen. 8. Arrow down and choose Monitors on the Admin Settings page. Press Enter. 4


6 9. On the Monitors page, Monitors should be highlighted. Press Enter. 10. The following series of images will show the setting needed on each of the Monitor pages. 5


7 11. Press the Back (return to the previous screen) button on the remote to go back to the Monitors page. Arrow down and choose Multipoint Setup. 12. Leave Auto Answer Multipoint Video on No. This will allow you to choose to answer or reject a call if another school tries to call in during class when in a Multipoint call. 13. When in a Multipoint call, there are four different viewing modes for the remote site, Automatic, Discussion, Presentation, and Full Screen. 14. Automatic is the default mode and switches between Discussion and Presentation modes automatically (changes about every 15 seconds) based on the interaction between the sites. 15. Discussion mode will show all sites involved in a call in a split screen, which all sites can see. (This will be shown on the back monitor.) 6
 17. Full Screen mode is voice activated and will show whichever site is speaking full screen. 18.")
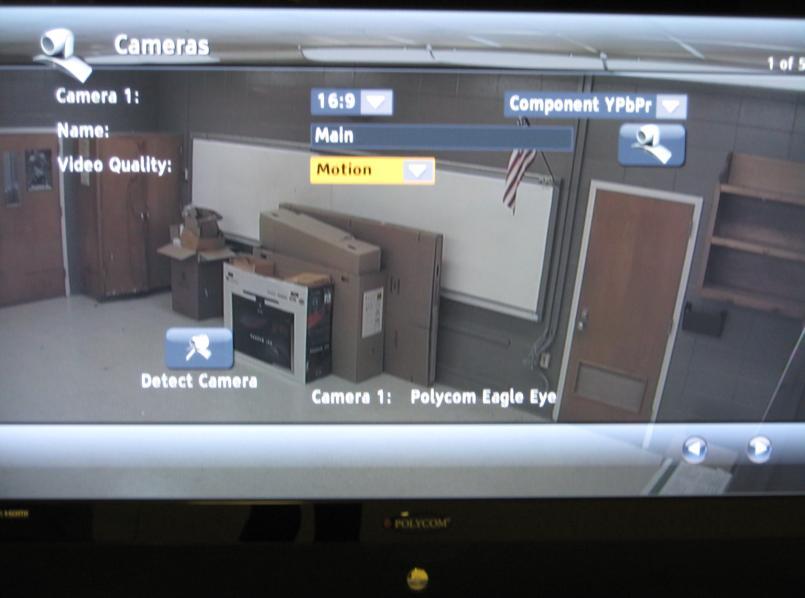
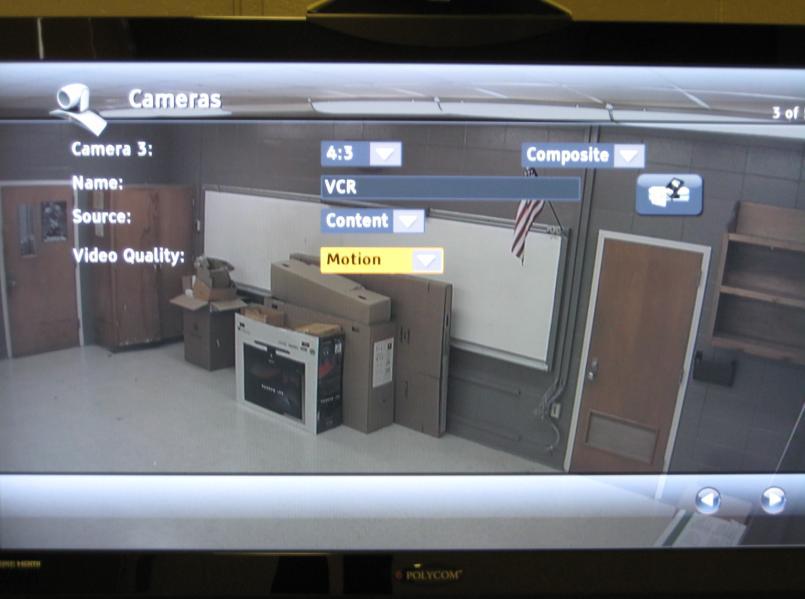
8 16. Presentation mode shows the teacher full screen on the far site s screen. The teacher will see the far site on the back monitor. (This is usually the recommended setting for teaching to multiple sites.) 17. Full Screen mode is voice activated and will show whichever site is speaking full screen. 18. Under Multipoint Mode, choose Presentation for teaching purposes. 19. Press the Back button on the remote to go back to the Admin Settings page (as shown at the top of page 5). Arrow down and choose Cameras. 20. The Main Camera, located in the back of the room, displays the front of the room/teacher. The Front/Auxillary Camera, located in the front of the room, displays People/or your students. Both cameras are connected by S-Video cable. 21. The VCR is really anything that displays Content through the projector, laptop, Elmo, interactive whiteboard, or DVD/VCR. It should be on Content and is connected by a Composite cable. (Some say that changing the VCR setting to People allows a sharper picture when playing a VHS tape, but will also make the picture display on the front monitor, not the projector.) 22. The following series of images will show the settings needed on the cameras. 7
9 8

10 23. Press the Back button on the remote to go back to the Admin Settings page (as shown at the top of page 5). Arrow down and choose Network. 24. Arrow down and choose Call Preferences. 25. Enable H.239 should always be checked. This is your content sharing port, which allows you to share content with other schools when in a call. 26. Enable H.323 should always be checked. This is your internet protocol port, which allows the call to go through. 27. Only check Enable Basic Mode when connecting to a school that has Tandberg equipment. This will allow you to share your content. But checking this box also dummies down the Polycom system and you will not be able to move the Far Camera. Uncheck this box when connecting to other Polycom systems. PLACING/RECEIVING CALLS 1. Calls can be placed manually, from the Directory, or from Recent Calls. 2. The Home screen on the Polycom system is always the Place a Call screen. Pressing the Return to Home button (lower right corner in black section) on the remote will always return the user to the Place a Call screen. 2. To place a call manually, type in the IP address using the keypad on the remote control. Make sure to enter the IP address exactly as shown, including the dot, then press the green Call button on the remote control. 3. To place a call using the Directory, select the Directory button on the screen. Scroll using the up/down arrows, select the entry desired, then press the green Call button on the remote control. 4. To place a call using the Recent Calls list, select the Recent Calls button on the screen. A screen will display up to 99 of the last calls made and/or received, date call was made, time call was 9
11 placed, and if the call was outgoing or incoming. Scroll using the up/down arrows, select the entry desired, then press the green Call button on the remote control or press Enter. 5. To end a call, press the red End a Call button on the right side of the remote control. 6. When receiving a call, the Polycom system is set to Auto Answer or will give a prompt asking if you want to answer the call if you are in a Multipoint call. 7. Volume can be adjusted by pressing Volume (found on the left side) on the remote control. Changing the volume affects only the sound heard at your site. 8. To mute or unmute the microphone, press Mute (large yellow button) on the remote control. (Muting the microphone does not mute audio being sent to the far site from a VCR/DVD or computer.) MULTIPOINT CALLS 1. Point to Point calls are when only two sites are connected. Multipoint calls are when several sites are connected in a call. The HDX8000 can connect up to four sites, your site and three others. 2. To add a second site to a call, return to the Home (Place a Call) screen and either manually type in the IP address or choose the address from the Directory or Recent Call List. 3. A Multipoint call can be ended by hanging up all calls at the same time or individually. Press the red Hang-up button and you will have the choice of hanging up one or all. CAMERA CONTROL 1. The blue buttons on the remote control operate the cameras at both the near (your site) and far site (the receiving site), the ability to preset the camera locations, to zoom in using the selected camera, and to switch between the cameras and other equipment (camera button). 2. Once a particular camera is selected, the buttons with the arrows will move the camera left or right and tilt the camera up or down. 3. When focusing the camera on the teacher, try to fill the screen with the teacher rather than the wall and table. Be careful of extreme close-ups as well. Whatever is appropriate in a face to face classroom is appropriate for a videoconferencing classroom. 4. Always face the camera, talking into the camera. This way the far site feels as if you are looking at them. If students will be seen on camera, make sure they face the camera as well. 5. The microphones are very sensitive, so talk normally, looking into the camera. 6. Pressing the Camera button allows the user to select the Main/Front Camera, Auxilary/Back Camera, DVD/VCR, or Laptop. To select, press Camera, then the corresponding number of the object. 7. Once in a call, each site can control the Far Camera (camera at the other site). Press the blue button at the top of the circle on the remote to select a far-site camera. To change back to operating your cameras, press the blue button at the bottom of the circle on the remote. 8. If operating your camera, the camera icon on screen will say Near. If you are operating the far site s camera, the camera icon on screen will say Far. When operating the far site s camera, 10
12 you can even switch which camera you are operating by pressing the Camera button on the remote and choosing a different camera. 9. Camera presets make it easy to quickly move the cameras to a needed location. (It is recommended that one setting be the ceiling in case of an emergency.) 10. To set camera presets using the remote, select which camera you want to set, move the camera to the desired position, press Preset (2 nd button from the left on top of remote), then hold down the number desired. (Note the same numbers are used for front and back camera.) MONITOR VIEW 1. When sending a course, the front monitor displays the teacher and should be turned so that the teacher will know what the far site is seeing. The back monitor displays the far site so that the teacher can see his/her students. 2. When receiving a course, usually the front monitor shows the teacher and the back monitor displays a self view. The content can be displayed on the front monitor (instead of the teacher) or through the LCD projector. 3. The views on the monitors can be switched while in a call by pressing the Camera button on the remote, and selecting the Main/Front Camera (1). Then pressing the Camera button and 1, will switch the monitor views. 4. If using the Pronto, pressing Main will select the Main/Front Camera. Pressing Main again will switch the monitor views. USING OTHER PERIPHERALS 1. To show Content using the Computer, press the Content button (button on far right at top of remote) on the remote, and turn on the projector. 2. In order for the computer screen to show through the LCD projector, there are several things that must be checked. The computer s display resolution must be set on 1024 x 768, you will need to press the FN (function) key and whatever corresponding F number to change the display from just the computer s monitor to both monitor and projector, then you may need to press the blue button on the Image Share. 3. The Elmo is connected to the computer using a USB cable. Therefore the content shown on the document camera (Elmo) is displayed on the computer screen and can be used with any program on the computer. 4. Press the Content button again on the remote to start and stop displaying content from the computer or document camera. 5. Placing a call will stop the content from being displayed if you have it cued up. After placing the call, pressing the Content button will display the content again. 6. To show a VCR/DVD, make sure the VCR/DVD is powered on before the call is placed. Press the Camera button on the remote and select VCR/DVD (3). 11

13 7. To use the document camera (Elmo), the program is usually loaded on the teacher s computer and its content will be displayed the same way as any other program using the computer. CALL STATISTICS 1. When in a call you can check the quality of the audio and video of a call. If the quality seems poor on either the far or near side, by checking the Call Stats, you can tell which site may be experiencing technical problems. 2. To do this, from the Home (Place a Call Screen), go to System, Diagnostics, then Call Statistics. 3. There are several pages where you can check for Audio and Video problems. CONFERENCING TIPS 1. Have a list of numbers handy for troubleshooting. Numbers needed are school tech coordinator, system tech coordinator, Lisa King at InLine , ext 537, lking@inline.com (for Polycom problems), myself, Cindy Ham , ext 542, cham@inline.com, Interwrite Learning Support (press 3#, then 2), and your ACCESS Support Center. 2. When sending a class, it is helpful to have IP addresses of the sites to be called preprogrammed into the Directory or use the Recent Calls feature. 3. Set your camera presets before the call so that they can be quickly accessed during the call. 4. Have all needed materials ready for use and all peripherals (computer, document camera, and/or VCR/DVD) to be used on and ready. If possible, test the equipment with your content beforehand. 12
14 5. Avoid wearing bright colors, all light or all dark clothing or very busy patterns. Light pastels and muted colors look the best on the screen. Also avoid wearing noisy jewelry. 6. Close any drapes or blinds in the room as daylight is a variable light source and can conflict with interior room lighting. 7. Talk to both sides about noise during the call. The microphones are sensitive and can pick up side conversations or whispers easily. All noises are amplified and paper crumbling can sound like a volcano! 8. Speak normally as the microphones will pick up your voice. If you are a fast talker, you may need to speak slower and clearer. 9. Since each side s volume acts independently, ask the students at the far site if they can hear you. Have them introduce themselves so that you can be sure you can hear them. 10. Avoid muting the near site microphone and only addressing your students. 11. Sometimes the audio has a slight delay, so pause briefly for others to ask or answer questions, participate in discussions, or make comments. 12. Try to keep the screen filled with people or content rather than the wall, table, etc. 13. Have the students make name cards and display them prominently so that you can learn their names. Call on them as if they were in the room with you. 14. Make a sign to display in the room to identify your school. 15. The sending teacher should initiate the connection calls unless there is a problem connecting. This gives the teacher control over when the call is placed and knows when the other students are connected into the call. 16. Remember if it works in your face to face classroom, it will work in the IVC classroom. 17. Establish rules, guidelines, and standards of behavior for videoconferencing and go over them with all sites and students involved. 18. Students at all sites should sit where they can be seen in a camera shot. At no time should students be allowed to sit off to the side out of camera view. 19. Use natural gestures without a lot of movement. It takes the camera about 15 seconds to readjust the focus. Remember body language is intensified on camera and can easily be misread by students who don t know your reputation or your personality. 20. Maintain eye contact with the far site by looking into the camera above the back monitor. Since your students are displayed on the back monitor, this is easy to do so that the students feel as if you are looking at them. 21. Be animated and change activities often to keep the student s attention and to involve the students actively in their learning. Do not give notes or talk the entire time. 22. Plan ahead for interruptions and have a plan on how to handle them. Interruptions should be kept to a minimum for optimal class time. 23. Being prepared is the key to successful videoconferencing. Making sure that all materials needed are on hand and that the receiving site has their materials also. This means organization, planning, and sending information and materials to the receiving site ahead of time. 13
December 2006 Edition /A. Getting Started Guide for the VSX Series Version 8.6 for SCCP
 December 2006 Edition 3725-24333-001/A Getting Started Guide for the VSX Series Version 8.6 for SCCP GETTING STARTED GUIDE FOR THE VSX SERIES Trademark Information Polycom and the Polycom logo design are
VSX Series Getting Started Guide
 VSX Series Getting Started Guide September, 2003 Edition 3725-21286-002/A VSX SERIES GETTING STARTED GUIDE Trademark Information Patent Information Polycom and the Polycom logo design are registered trademarks
Getting Started Guide for the V Series
 product pic here Getting Started Guide for the V Series Version 8.7 July 2007 Edition 3725-24476-002/A Trademark Information Polycom and the Polycom logo design are registered trademarks of Polycom, Inc.,
May 2006 Edition /A. Getting Started Guide for the VSX Series Version 8.5
 May 2006 Edition 3725-21286-008/A Getting Started Guide for the VSX Series Version 8.5 GETTING STARTED GUIDE FOR THE VSX SERIES Trademark Information Polycom, the Polycom logo design, and ViewStation are
February 2007 Edition /A. Getting Started Guide for the VSX Series Version 8.5.3
 February 2007 Edition 3725-21286-009/A Getting Started Guide for the VSX Series Version 8.5.3 GETTING STARTED GUIDE FOR THE VSX SERIES Trademark Information Polycom, the Polycom logo design, and ViewStation
HOW TO USE THE POLYCOM REMOTE CONTROL... 2 MAKING A CALL FROM THE ADDRESS BOOK... 3 ANSWERING A CALL... 4 HANGING UP A CALL... 4 REDIALING A CALL...
 HOW TO USE THE POLYCOM REMOTE CONTROL... 2 MAKING A CALL FROM THE ADDRESS BOOK... 3 ANSWERING A CALL... 4 HANGING UP A CALL... 4 REDIALING A CALL... 4 CAMERA CONTROLS... 5 AUDIO CONTROLS... 5 VIDEO INPUT...
Getting Started Guide for the V Series
 product pic here Getting Started Guide for the V Series Version 9.0.6 March 2010 Edition 3725-24476-003/A Trademark Information POLYCOM, the Polycom Triangles logo and the names and marks associated with
Quick Help Teaching Room Technology Support
 Quick Help Teaching Room Technology Support Technical assistance is available. If you require assistance, please call Ext 6066 Quick Help Technology Overview INDEX INDEX Touch Screen Is not active 3 Technology
Video Conferencing. Participant Orientation Guide
 Video Conferencing Participant Orientation Guide Join your video conference (VC) session 1. Turn on the LG television using the LG remote. The green power button, located in the top centre of the remote,
Multimedia Classroom Guide
 Multimedia Classroom Guide This guide is intended to familiarize the user with the TRU Multimedia equipment and its operation. Please contact Media Services if you require an orientation or you experience
Classroom Setup... 2 PC... 2 Document Camera... 3 DVD... 4 Auxiliary... 5
 Classroom Setup... 2 PC... 2 Document Camera... 3 DVD... 4 Auxiliary... 5 Lecture Capture Setup... 6 Pause and Resume... 6 Considerations... 6 Video Conferencing Setup... 7 Camera Control... 8 Preview
NSU Distance Delivery Teleconference Operations Polycom 2005
 NSU Distance Delivery Teleconference Operations Polycom 2005 Polycom Teleconference & Crestron Control Presentation Room Operations E-learning Studio Mode Classroom Presentation Mode DDN Remote Site Capability
USING MEDIACAST FOR LIVE EVENTS THERE ARE THREE SEPARATE KEYS NEEDED TO ACCESS THE FRONT AND BACK OF THE VIDEO CART.
 USING MEDIACAST FOR LIVE EVENTS THERE ARE THREE SEPARATE KEYS NEEDED TO ACCESS THE FRONT AND BACK OF THE VIDEO CART. 1). Plug in the cart to a power source and a network plug-in drop that is in the sam
SX10/20 with Touchpad 10
 SX10/20 with Touchpad 10 rev 24Sept2018 Page 1 of 19 Table of Contents Table of Contents OVERVIEW.... 3 BASIC NAVIGATION.... 4 GENERAL USE.... 5 Setup... 5 Camera Controls... 6 Microphone.... 8 Volume....
DL-Navigator Operator Manual Post-Network Conversion (Version 6.1) Wisconsin BadgerNet Converged Network Room Control System- Pre-Network Conversion
 Wisconsin BadgerNet Converged Network Room Control System- Pre-Network Conversion") DL-Navigator Operator Manual Post-Network Conversion (Version 6.1) Wisconsin BadgerNet Converged Network Room Control System- Pre-Network Conversion Contents Main Screen Zones How to Power Up Room How
DL-Navigator Operator Manual Post-Network Conversion (Version 6.1) Wisconsin BadgerNet Converged Network Room Control System- Pre-Network Conversion Contents Main Screen Zones How to Power Up Room How
Video Conferencing. Host Orientation Guide
 Video Conferencing Host Orientation Guide Join your video conference (VC) session 1. Turn on the LG television using the LG remote. The green power button, located in the top centre of the remote, will
Service FOR SERVICE. Quick Reference Guide. Page 23. Contact your help desk at
 Service Page 2 FOR SERVICE Contact your help desk at Quick Reference Guide 0 Judson Street, Unit 5 Toronto, ON M8Z 5T6 Tel: -800-652-266 www.adcom.ca Copyright 2004 Power Source Page 22 UPS Connect the
Cisco MX200/MX300/EX90 User Guide
 Cisco MX200/MX300/EX90 User Guide Prepared by: MBTelehealth Rev 13Sept2017 Table of Contents 1.0 OVERVIEW... 3 2.0 GENERAL USE... 5 2.1 How to Use the Touch Screen... 5 2.2 Set Up and Use of Videoconference
SX Series with TRC6 Remote Control User Guide
 SX Series with TRC6 Remote Control User Guide Rev 11May2017 Page 1 of 19 OVERVIEW.... 3 BASIC NAVIGATION.... 4 GENERAL USE.... 5 Setup... 5 Microphone.... 6 Volume.... 6 Site to Site Calls.... 7 Connecting
DX80 Touchscreen User Guide
 DX80 Touchscreen User Guide 07Mar2018 Page 1 of 16 Table of Contents Table of Contents GENERAL USE.... 5 Site to Site Calls.... 6 Connecting to an MBT Site.... 6 Add a Site to Favorites.... 6 Connecting
SX80 with Touchpad 10 User Guide
 SX80 with Touchpad 10 User Guide Rev 11May2017 Page 1 of 19 Table of Contents OVERVIEW.... 3 BASIC NAVIGATION.... 4 GENERAL USE.... 5 Setup... 5 Camera Controls... 6 Microphone.... 8 Volume.... 9 Site
Tandberg 1700 MXP User Guide
 Tandberg 1700 MXP User Guide Rev 08Sept2017 TABLE OF CONTENTS 1.0 OBJECTIVES... 3 2.0 THE TANBERG 1700 MXP... 3 3.0 GENERAL SET UP AND USE... 5 3.1 General Set Up... 5 3.2 Mute/Microphone... 6 3.3 Placing
Basic Use guidelines. TANDBERG 880 MXP System
 Basic Use guidelines TANDBERG 880 MXP System 1 Installing TANDBERG 880MXP Comes in 1 box Videoconferencing System with built-in Camera Power supply Table Microphone Remote Control with Batteries User manual
The surge protector is located on the floor next to the left plasma tv stand. Just hit the black power button and all equipment should turn on.
 IVN Room Layout Turning on the System The surge protector is located on the floor next to the left plasma tv stand. Just hit the black power button and all equipment should turn on. Making a call 1 To
This document contains the latest information about the new Polycom VS4000 TM model, running 5.1 software.
 This document contains the latest information about the new Polycom VS4000 TM model, running 5.1 software. What s New? The VS4000 is now available in a compact form factor, making it even easier to integrate
University of Utah Marriott Library Audio Visual Systems User s Guide
 University of Utah Marriott Library Audio Visual Systems User s Guide 1 3. System Overview 4. System Overview Continued 5. Touch Panel Power Save Mode 6. Main Page 7. Source Selection 8. Niles Control
Theatre A/V Control. Media Services, Library (204) Do Not Remove from Theatre
 Do Not Remove from Theatre") Theatre A/V Control Media Services, Library (204) 632-2231 1 Do Not Remove from Theatre Pg. 3 Adjusting the height of the theatre podium Pg. 4 Introducing the touch screen panel controller Pg. 5 Starting
Theatre A/V Control Media Services, Library (204) 632-2231 1 Do Not Remove from Theatre Pg. 3 Adjusting the height of the theatre podium Pg. 4 Introducing the touch screen panel controller Pg. 5 Starting
Videoconferencing and Telehealth - what you need to know to book a session... and other useful stuff!
 Videoconferencing and Telehealth - what you need to know to book a session.. and other useful stuff! Revised: September 2012 1. Book your room! Part One: Booking a Videoconference (VC) Meeting That s
Date of Test: 26th 30th September CODEC Front view. CODEC Rear view. HD Camera
 APPENDIX 11/3 TEST RESULTS FOR AVerComm H300 Manufacturer: Model: Software Version: Optional Features and Modifications: AVerMedia AVerComm H300 D1.00.02.14 None Date of Test: 26th 30th September 2011
Equipment, Systems, and Network
 7 Equipment, Systems, and Network Focus Watching a technician who s trying to get your videoconferencing gear to work properly is much less stressful than watching an airline mechanic trying to fix the
GEC ITS Teaching and Learning Classroom Hotline Multimedia Classroom
 ITS Teaching and Learning Classroom Hotline Multimedia Classroom GEC 1005 This document is a publication of ITS Teaching and Learning Classroom Hotline at the University of North Carolina. It may be copied
CE 9.1 Cisco TelePresence User Guide Systems Using Touch10
 CE 9.1 Cisco TelePresence User Guide Systems Using Touch10. Contents What s in this guide All entries in the table of contents are active hyperlinks that will take you to the corresponding article. To
How to Videoconference (without being a technical geek)
") How to Videoconference (without being a technical geek) [Revised September 2012) Index Glossary of Commonly Used Terms page 3 10 Step Overview page 5 Overview of How to Connect a Session page 6 The Remote
How to Videoconference (without being a technical geek) [Revised September 2012) Index Glossary of Commonly Used Terms page 3 10 Step Overview page 5 Overview of How to Connect a Session page 6 The Remote
CE 9.0 Cisco TelePresence User Guide Systems Using Touch10
 CE 9.0 Cisco TelePresence User Guide Systems Using Touch0 Contents What s in this guide All entries in the table of contents are active hyperlinks that will take you to the corresponding article. To go
CE 9.2 Cisco TelePresence User Guide Systems Using Touch10
 CE 9. Cisco TelePresence User Guide Systems Using Touch0. Contents What s in this guide All entries in the table of contents are active hyperlinks that will take you to the corresponding article. To go
Guide to Courtroom Technology. July 2017
 16 th Judicial Circuit Court Macomb County Probate Court 42 nd District Courts July 2017 Written by: Michael Whitacre Technology Liaison 16 th Judicial Circuit Court The courts have made certain technologies
Videoconferencing and Telehealth Within FNIH in Canada Place
 Videoconferencing and Telehealth Within FNIH in Canada Place Revised: March 2010 1. Book your room! Part One: Booking a Videoconference (VC) Meeting That s always the first thing to do! Videoconference
Vortex / VSX TM 8000 Integration
 Vortex / VSX TM 8000 Integration Application Note Polycom Installed Voice Business Group December 2004 1 TABLE OF CONTENTS INTRODUCTION...4 CONNECTING THE VSX 8000 INPUTS AND OUTPUTS...4 ENABLING THE VSX
Cisco Telepresence SX20 Quick Set - Evaluation results main document
 Published on Jisc community (https://community.jisc.ac.uk) Home > Advisory services > Video Technology Advisory Service > Product evaluations > Product evaluation reports > Cisco Telepresence SX20 Quick
JONES GRADUATE SCHOOL. Classrooms 116, 212, 214, 218, 312, 314 and 318. Users Guide
 JONES GRADUATE SCHOOL Classrooms 116, 212, 214, 218, 312, 314 and 318 Users Guide i 1 Chapter Tiered and Cluster Classrooms R efer to the touch panel illustration above each section for button placement.
Partner: Tandberg Model: MXP Device Type: Codec
 evice Type: Codec GENERAL INFORMATION SIMPLWINOWS NAME: Tandberg MXP Full Control v3.5 CATEGORY: VERSION: SUMMARY: GENERAL NOTES: Conferencing 3.5 Control all standard videoconference functions This module
TEACHING STATION HANDBOOK
 TEACHING STATION HANDBOOK www.utoronto.ca/teachingstation/ 130312 CONTENTS DIAGRAM 1-15 THE TOUCHSCREEN 16 CABLES and PORTS 17 WIRELESS MIC and DVD 18 tips for the TOUCHSCREEN EVERY TEACHING STATION IS
Troubleshooting the CTS 1100
 CHAPTER 7 Troubleshooting the CTS 1100 Revised: November 2011, Contents You may want to periodically test system components using the hardware and software tests available in the Cisco TelePresence System
Trinity User Guide. The Trinity Conference Room has the capability to provide the following meeting services:
 Trinity User Guide The Trinity Conference Room has the capability to provide the following meeting services: Audio + Video Conferencing - IP based video conferencing is available utilizing the Crestron
Contacts: English Department Office 238 Moreland Media Services 109 Kidder
 Contacts: English Department Office 238 Moreland 7-3244 Media Services 109 Kidder September 2006 Welcome...3 Starting Out...5 Unlocking the Station...5 Touch Panel Operation...5 Projector...6 Selecting
A/V Equipment Manual
 A/V Equipment Manual Setup, Operation and Troubleshooting for the Audio-Visual Equipment Jessica White September 20, 2012 This manual provides comprehensive instructions on how to setup, operate and troubleshoot
User Guide. The system is controlled via a 6 touch panel located in the lectern. Splash page. This is the page shown when the system is off.
 The system is controlled via a 6 touch panel located in the lectern. Splash page This is the page shown when the system is off. 1 of 12 rev 1 Mode Selection page Press to set up for a simple presentation
Video Conference Classroom Documentation
 Updated: 8/18/2017 Video Conference Classroom Documentation Contents About These Classrooms... 2 Where... 2 Podium Overview... 2 On Top of Podium... 2 Inside the Podium... 2 Equipment Information... 2
Document Camera. Set Up Document Camera. Camera. Lamp Arm. Lamp Arm. Base Panel
 Document Camera Set Up Document Camera Camera Lamp Arm Lamp Arm Base Panel 1. To release and raise the camera arm, press the button on the base of the arm in the direction indicated by the arrows. Turn
Electronic Equipment Manual For 101, 102, 301 & 302 Azrieli Theatre For further information, please visit our website at:
 Electronic Equipment Manual For 101, 102, 301 & 302 Azrieli Theatre For further information, please visit our website at: http://www.carleton.ca/ims/ 2 TABLE OF CONTENTS: Topic Page # Logging onto the
Classroom Teaching Station Handbook
 Classroom Teaching Station Handbook www.osm.utoronto.ca Welcome to the University of Toronto Teaching Station This handbook describes the features of the Teaching Station and provides a walkthrough of
CE 9.5 Cisco Webex Room Series User Guide Systems Using Touch10
 CE 9.5 Cisco Webex Room Series User Guide Systems Using Touch0 Contents What s in this guide All entries in the table of contents are active hyperlinks that will take you to the corresponding article.
The Illustrated manual for. Halsey 107 & 109
 The Illustrated manual for Halsey 107 & 109 Contents The control panel... 1 Microphones... 3 Screens...6 Lights...7 Computers... 8 Connecting a laptop or roll-around computer... 10 Videocassette recorder
CE 9.6 Cisco Webex Room Series User Guide Systems Using Touch10
 CE 9.6 Cisco Webex Room Series User Guide Systems Using Touch0 Contents What s in this guide All entries in the table of contents are active hyperlinks that will take you to the corresponding article.
USING THE CENTRAL CONTROL DECK IN THE LEARNING STUDIO
 USING THE CENTRAL CONTROL DECK IN THE LEARNING STUDIO This manual provides detailed information and operating instructions for the Central Control Deck in the learning studios. The learning studio can
Help Desk Video Conferencing Touch-10 Touch Panel Handbook
 Help Desk 888-427-9173 Video Conferencing Touch-10 Touch Panel Handbook Rev. 7/8/16 1 Table of contents Table of contents Troubleshooting 4 Network Map 6 Touch-10 Panel Controls Home Screen 8 Dial Button
First Question: Camera head. Lighting unit. Shooting stage
 Elmo P30 Visualiser First Question: Q. Is everyone familiar with exactly what a visualiser is? A. A visualiser is effectively a camera on an arm, usually with a shooting stage and its own lighting source.
Zoom Pro Classroom Facilitator and User Guide
 Zoom Pro Classroom Facilitator and User Guide Version 1 08/21/2017 Tom M c Kellips, DM 1 Table of Contents Introduction...3 Technical Support...3 Starting a video conference...3 Sharing a screen...4 Recording...4
Audio-Visual Systems Description
 Dawson County Audio-Visual Systems Description The following description of the audio-visual systems for the building is meant to complement the drawings and specifications and provide additional clarification
Tandberg 880 MXP User Guide
 Tandberg 880 MXP User Guide Rev 13Sept2017 Table of Contents 1.0 OBJECTIVES...3 2.0 THE TANDBERG 880 MXP...3 NAVIGATION BUTTONS...6 3.0 GENERAL SETUP AND USE...7 3.1 General Setup...7 3.2 Mute/Microphone...7
Date of Test: 20th 24th October 2015
 APPENDIX 15/03 TEST RESULTS FOR AVER EVC130P Manufacturer: Model: AVer EVC130p Software Version: 00.01.08.62 Optional Features and Modifications: None Date of Test: 20th 24th October 2015 HD Camera CODEC
Vidia The video conference solution from Swisscom. Tips. & Tricks
 The video conference solution from Swisscom Tips & Tricks Contents 1 Conducting efficient video conferences with Vidia 3 2 Optimising picture and sound quality 4 2.1 Picture quality 4 2.1.1 Camera 4 2.1.2
S-Series Server Setup Quiz
 1. In the System Setup window, System Information displays additional information such as: (a) IP Address (b) Modems (c) Sound Card (d) Video Channels and Audio Channels 2. You can change the Recording
Virginia Tech Signature Engineering Audio Visual Systems Operational Guide
 Virginia Tech Signature Engineering Audio Visual Systems Operational Guide Atrium The Atrium system consists of: one (1) projector; one (1) projection screen; and a touch screen controller. The input plate
Harmony Smart Control. User Guide
 Harmony Smart Control User Guide Harmony Smart Control User Guide Table of Contents About this Manual... 6 Terms used in this manual:... 6 At a Glance... 6 Features... 6 Supported devices... 6 Know your
Roku How To. a. Go to if you do not plan on purchasing premium channels or features.
 Roku How To 1. First, create your Roku account. If you already have a Roku account please sign into your account. If you do not have an account please create one using the following options: a. Go to https://my.roku.com/signup/nocc,
Seminar Room & Lecture Theatre
 Seminar Room & Lecture Theatre Audio Visual Equipment Instructions Version: 3.3 (July 2015) Contents System Overview... 3 Usage Basics... 4 2 Powering on the System... 4 Powering off the System... 4 Main
invr User s Guide Rev 1.4 (Aug. 2004)
") Contents Contents... 2 1. Program Installation... 4 2. Overview... 4 3. Top Level Menu... 4 3.1 Display Window... 9 3.1.1 Channel Status Indicator Area... 9 3.1.2. Quick Control Menu... 10 4. Detailed
Contents Contents... 2 1. Program Installation... 4 2. Overview... 4 3. Top Level Menu... 4 3.1 Display Window... 9 3.1.1 Channel Status Indicator Area... 9 3.1.2. Quick Control Menu... 10 4. Detailed
Quickstart User Guide
 1 Cisco TelePresence IX5000 and IX5200 Quickstart User Guide 2 Touch 10 Home screen overview Tips The Share button also enables the Layout Control feature, which allows you to: View system information
GST BOCES Distance Learning Team GST BOCES Distance Learning Rooms
 GST BOCES Distance Learning Rooms Cooper Plains Campus Building 8 Elmira Bush Campus Building 1 Hornell Wildwood Campus Building 1 Instructions Distance Learning Mode Overview: This tutorial will guide
ViewCommander- NVR Version 3. User s Guide
 ViewCommander- NVR Version 3 User s Guide The information in this manual is subject to change without notice. Internet Video & Imaging, Inc. assumes no responsibility or liability for any errors, inaccuracies,
Scan Converter Quick Installation Guide
 Scan Converter Quick Installation Guide Software Note: No software is required to use your scan converter. Please complete the hardware installation and system setup before you determine the need to the
EdgeConnect Module Quick Start Guide ITERIS INNOVATION FOR BETTER MOBILITY
 EdgeConnect Module Quick Start Guide ITERIS INNOVATION FOR BETTER MOBILITY 493456301 Rev B April 2009 Table of Contents Installation... 1 Setup... 2 Operation... 4 Live Video... 4 Video Settings... 5 Network
Supplement to the Operating Instructions. PRemote V 1.2.x. Dallmeier electronic GmbH. DK GB / Rev /
 Supplement to the Operating Instructions PRemote V 1.2.x 1 DK 180.000.000 GB / Rev. 1.2.3 / 030416 PRemote V 1.2.x Copyright All rights reserved. This document may not be copied, photocopied, reproduced,
Notations Used in This Guide
 User s Guide Notations Used in This Guide Indicates procedures which may result in damage or injury if sufficient care is not taken. Indicates additional information and points which may be useful to know
IPTV Features Guide - Version 1.1, Released April 2012 More information on our website 2
 IPTV Feature Guide Table of Contents Internet Protocol Television (IPTV) Introduction... 3 IPTV Set Top Box (STB) Self Installation Guide... 3 Remote Control Functions... 4 Basic Operation Tips... 5 Programming
USER GUIDE. Get the most out of your DTC TV service!
 TV USER GUIDE Get the most out of your DTC TV service! 1 800-367-4274 www.dtccom.net TV Customer Care Technical Support 615-529-2955 615-273-8288 Carthage Area Carthage Area 615-588-1277 615-588-1282 www.dtccom.net
DIGITAL VIDEO RECORDING (DVR) SERVICES
 SERVICES") DIGITAL VIDEO RECORDING (DVR) SERVICES With a Digital Video Recorder (DVR) set-top box, you can easily record your favorite programs and then play them back anytime. The DVR and Picture-In-Picture (PIP)
DIGITAL VIDEO RECORDING (DVR) SERVICES With a Digital Video Recorder (DVR) set-top box, you can easily record your favorite programs and then play them back anytime. The DVR and Picture-In-Picture (PIP)
HCS-4100/20 Series Application Software
 HCS-4100/20 Series Application Software HCS-4100/20 application software is comprehensive, reliable and user-friendly. But it is also an easy care software system which helps the operator to manage the
Dual Projection Lecture theatres
 Dual Projection Lecture theatres Activation 1. When you walk into the room, press the green entry button at the door. That will turn the room lights on and wake the Touch Panel up. You should see the following
COLUMBIA COUNTY, WISCONSIN COURTROOM VIDEO CONFERENCE & AV SYSTEMS REQUEST FOR PROPOSALS
 COLUMBIA COUNTY, WISCONSIN COURTROOM VIDEO CONFERENCE & AV SYSTEMS REQUEST FOR PROPOSALS Optional Pre-Bid Conference: June 7, 2017, at 1:00 p.m. CST Columbia County Administration Building 112 E. Edgewater
C Module Description
 IQMMX -Input Router & ASI Distribution Amplifier C Module Description The IQMMX is an ASI to 1 switch, distribution amplifier and transport stream switcher with up to 8 outputs in double width form or
Using the Equipment in the Presentation Room (TLC 326)
") Using the Equipment in the Presentation Room (TLC 326) The equipment features in this room present many creative possibilities. Although extensive technical skills are not necessary, we recommend familiarizing
Using the Equipment in the Presentation Room (TLC 326) The equipment features in this room present many creative possibilities. Although extensive technical skills are not necessary, we recommend familiarizing
ONE MONTH TRAINING REPORT. TEMDEC 07 Sep 2017
 ONE MONTH TRAINING REPORT TEMDEC 07 Sep 2017 General information Name: Pham Ngoc Dao (Mr.) Ho Chi Minh City University Medical Center Hospital Duration: One month, from14-aug-2017 to 08-Sep-2017 Location:
HCS-4100/50 Series Fully Digital Congress System
 HCS-4100/50 Series Application Software HCS-4100/50 application software is comprehensive, reliable and user-friendly. But it is also an easy care software system which helps the operator to manage the
Electronic Equipment Manual For 204, 213, 215, 217, 219, 234 & 432 Tory Building, 146, 149, 204, 243 Loeb Building and 316, 318 & 501 Southam Hall
 Electronic Equipment Manual For 204, 213, 215, 217, 219, 234 & 432 Tory Building, 146, 149, 204, 243 Loeb Building and 316, 318 & 501 Southam Hall For further information, please visit our website at:
Remote Control/Cloud DVR Guide. Special Instructions INPUT:
 Special Instructions Remote Control/Cloud DVR Guide INPUT: Programming your remote: Turn TV on Press TV Button Press & hold the Setup button until TV button flashes 3 times (1 flash & 2 quick flashes)
Remote Control Operation
 Remote Control Operation When you first switch the TV on, you will be presented with either the preview screen which shows the current program along with a brief summary of future programs or the full
ENGLISH Table of Contents Introduction... 1 Package Contents... 1 Get Familiar with the AVer HVC... 2
 User s Manual Table of Contents Introduction... 1 Package Contents... 1 Get Familiar with the AVer HVC... 2 Main System... 2 MIC... 3 Camera... 3 Remote Control... 4 *Available in HVC330/310 model onlymaking
REMOTE SOFTWARE USER GUIDE V1.0
 REMOTE SOFTWARE USER GUIDE V1.0 TRAINING MANUAL version 1.0 Table of Contents 1. Prerequisites...1 2. Network...1 2. Kontrol operation...2 2.1 First time run Network selection...2 3. Show Setup...3 3.1
XNET-NVR User s Guide
 XNET-NVR User s Guide Ver. 1.0 (070918) 1 of 39 Table of Contents 1. Program Installation... 4 2. Overview... 4 3. Top Level Menu... 5 3.1. Display Window... 9 3.1.1. Channel Status Indicator Area... 9
Ultra-short-throw projectors with connectivity for the BYOD classroom.
 SPECIFICATION SHEET PowerLite Ultra-short-throw 3LCD Projectors 570 XGA Resolution 575W WXGA Resolution 580 XGA Resolution Ultra Bright 585W WXGA Resolution Ultra Bright PowerLite 585W shown Projectors
rio ision USER S GUIDE SPECIALTY FEATURES
 rio USER S GUIDE TM ision SPECIALTY FEATURES 605.425.2238 www.triotel.net R TrioTel Communications, Inc. is proud to offer you quality cable TV entertainment supported by a local cooperative. This User
Digital Video User s Guide THE FUTURE NOW SHOWING
 Digital Video User s Guide THE FUTURE NOW SHOWING Welcome The NEW WAY to WATCH Digital TV is different than anything you have seen before. It isn t cable it s better! Digital TV offers great channels,
Classroom Equipment Guide
 Windows Collaborative Teaching Lab Classroom Equipment Guide 11/17 Help Center (general help) it-help@andrew.cmu.edu 412.268.4357 (HELP) Classroom and Event Support (in-progress events and classes) mediatech@andrew.cmu.edu
TABLE OF CONTENTS INTRODUCTION 1 EQUIPMENT IN THE COURTROOM (SUMMARY) 2 SYSTEM CAPABILITIES: SUMMARY BY COMPONENT 3
 2 SYSTEM CAPABILITIES: SUMMARY BY COMPONENT 3") TABLE OF CONTENTS INTRODUCTION 1 EQUIPMENT IN THE COURTROOM (SUMMARY) 2 SYSTEM CAPABILITIES: SUMMARY BY COMPONENT 3 DETAIL: The ExhibitStation Lectern 5 OPERATION OF EQUIPMENT 6 CONTROLLING MODES OF PRESENTATION:
TABLE OF CONTENTS INTRODUCTION 1 EQUIPMENT IN THE COURTROOM (SUMMARY) 2 SYSTEM CAPABILITIES: SUMMARY BY COMPONENT 3 DETAIL: The ExhibitStation Lectern 5 OPERATION OF EQUIPMENT 6 CONTROLLING MODES OF PRESENTATION:
Precautions and Disclaimers What You Can Do with Geometry Manager Pro Check Your Computer System requirements...
 Operating Instructions Geometric & Setup Management Software Windows Geometry Manager Pro Ver. 4.0 Thank you for purchasing this Panasonic product. Before using this software, please read the instructions
LAVALLEY LAW LIBRARY MEDIA SERVICES INSTRUCTIONAL MEDIA OPERATIONS MANUAL
 LAVALLEY LAW LIBRARY MEDIA SERVICES INSTRUCTIONAL MEDIA OPERATIONS MANUAL OCTOBER 27, 2007 Page 1 of 29 TABLE OF CONTENTS TABLE OF CONTENTS 03 INTRODUCTON TO MEDIA SERVICES OPERATIONS 04 AUDITORIUM OPERATIONS
How-to Note: Quickstart: ITM9000 [This note applies to ITM9000 (handheld tester)] Contents. Overview. Materials Included
![How-to Note: Quickstart: ITM9000 [This note applies to ITM9000 (handheld tester)] Contents. Overview. Materials Included](/thumbs/93/112907906.jpg "How-to Note: Quickstart: ITM9000 [This note applies to ITM9000 (handheld tester)] Contents. Overview. Materials Included") How-to Note: Quickstart: ITM9000 [This note applies to ITM9000 (handheld tester)] Contents Overview... 1 Materials Included... 1 Getting Started... 2 Main Operations... 4 Reference / Additional Notes...
How-to Note: Quickstart: ITM9000 [This note applies to ITM9000 (handheld tester)] Contents Overview... 1 Materials Included... 1 Getting Started... 2 Main Operations... 4 Reference / Additional Notes...
OPERATING GUIDE. HIGHlite 660 series. High Brightness Digital Video Projector 16:9 widescreen display. Rev A June A
 OPERATING GUIDE HIGHlite 660 series High Brightness Digital Video Projector 16:9 widescreen display 111-9714A Digital Projection HIGHlite 660 series CONTENTS Operating Guide CONTENTS About this Guide...