Software Audio Console. Scene Tutorial. Introduction:
|
|
|
- Cori Marion Holt
- 5 years ago
- Views:
Transcription
1 Software Audio Console Scene Tutorial Introduction: I am writing this tutorial because the creation and use of scenes in SAC can sometimes be a daunting subject matter to much of the user base of SAC. So my attempt at a tutorial here is to help make this process easier for users to understand so that more users will embrace and hopefully make good use of the Scene recall ability built into SAC. This tutorial will be geared mostly towards use of SAC in theatrical productions, since that is what I specialize in doing and how I approach the use of SAC. However hopefully all SAC users will find this tutorial of some value and will be able to take some information from it that they can apply to their needs, regardless of what audio environment they are working in. Lastly, before you read this tutorial, please realize that I am going to make the assumption that you have already made yourself familiar with the SAC user interface, that you have read through the Help File/SAC documentation at least once if not several times. I will try to explain some of the more advanced steps in detail, but I am going to glance over steps that I would consider the basic operation of SAC. I feel it's also worth noting that I didn't invent these methods all by myself in a vacuum. Some of the practices I'm following here are based on decades worth of standard mixing practices in professional theatre, most of which I can not take any credit for creating or coming up with myself. I simply took standard theatre mixing practices and applied them to the SAC user interface and way of working. Several of my ideas here have also been implemented from reading and discussing these topics on the SAC User's Forum or from taking suggestions from the forum and adopting them to the needs for my work. Page 1 of 47
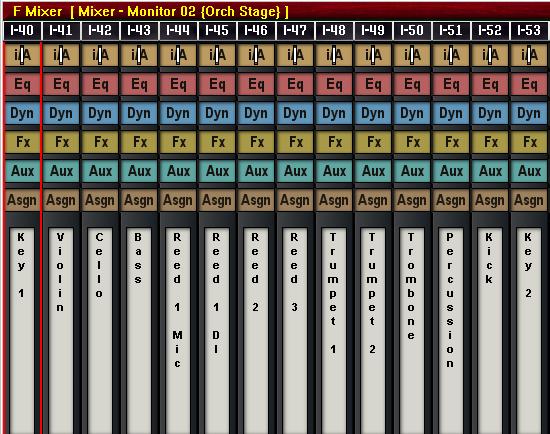
2 Basic Layout of the SAC Channels: Before I discuss my use of Scenes I probably have to explain how and why I set up channel orders in SAC and the thought process behind these methods. My channel orders in the FMixer are set up in a way to allow me to chose which Input or Output channels in SAC will appear on a fader of the control surface used to mix the show. In the above view of the F-Mixer window you can see how I've arranged the first 16 channel strips for a recent show. These 16 channel strips are then all that is used by the mixer/operator of the show to run the show. I always turn off all of the Hardware Link options (under the Mixer Menu Navigation Links). By doing this, the operator will have 16 faders that he or she can manipulate that will always be the first 16 channel strips on any given mixer. Keep in mind that you can place the channels in a different order on each mixer. So I can give the operator the ability to control 16 different channel strips on each of SAC's 25 separate mixers. I do put this ability to use and I will demonstrate how later in this document. You'll see that the first 5 strips are Input channels. These are the principle character s wireless microphones channels. Since they are used fairly often during the show these faders will never change what they do during the show. The next 8 strips are Outputs These outputs are used in Group Latch Mode. These faders are reassigned to multiple tasks during the show via Scenes. These become the replacement for DCA or VCA subgroups typical on mid to high end live sound mixing Page 2 of 47
3 consoles. In the above screen shot, the faders are being used to control 5 individual wireless microphones. However in the very next scene recall those faders are almost completely reassigned to different tasks. In this scene Output 9 & 10 are used to bring up all the Womens' and Mens' wireless mics respectively. So the operator brought up a single fader or pair of faders to bring up all the chorus that were wearing wireless microphones. As it turned out we only ended up using 6 Group Latch Outputs on this production and Output 14 was always assigned to Freddy, so we could have simply moved his Input fader over to the 6th channel strip/slot in the F-Mixer. But we didn't know that when the technical rehearsals started which is why the flexibility was available to use, even though we ended up not making use of it. In some shows I often run out of Group Latches and have to come up with some creative ways to make the 6 to 8 faders that we reassign during the show work. It all depends on the needs and complexity of the show. Page 3 of 47
4 The last 3 channel slots you'll see are Outputs These are also fixed and serve a single purpose during the show. They are used as Master Orchestra Levels to the Stage Monitors, Master Orchestra Levels to the Main Sound System and Master Vocal Levels to the Main Sound System. The two faders for the Master Orchestra levels are set to work in Group Latch Mode. (I'll go into some detail about how I manage my orchestra routing later in this document.) The Master Vocal Fader operated like a traditional Submaster and all Wireless Mics were first mixed down to Output 19, and then they were routed to the Main Outputs for the sound system. This allows the operator to have a single fader that would bring up and down all the wireless mics. Page 4 of 47
5 Recording the Scenes: General Notes Regarding Scenes: I think first with regards to writing scenes in SAC I should cover a couple of basic ideas that are somewhat unique to the way scenes work in SAC. First, I think the most important concept to keep track of when working with scenes within SAC is to try to narrow down the amount of data that is recalled by each scene to only the parameters that need to be changed during the course of the show. This can be somewhat confusing for some users that may be used to some of the more popular hardware digital mixing consoles, since many of them take the approach of saving the current state of every setting in the console (or almost all settings) and then upon recall you may recall safe some of the settings for some or all channels so that when you recall a scene some parameters won't be recalled. SAC works best approached in the opposite manner. Rather than recalling every setting except those that are recall safed, it is easier in SAC to write a scene that will only target the exact parameters on the specific channels you wish change from one scene to the next. Secondly, while it is best to select which channels and parameters of those channels you wish to have recalled by a scene during the creation of the scene, there is no reason you can not save a scene that targets certain channels and parameters at one point in time and then at a later point in time change which channels and parameters are recalled by that scene. (Note: This assumes that you have the latest build of SAC, although this functionality has been in SAC for some time, early builds of SAC may not have all the functionality I will cover within this document.) When you make changes or modify a scene (this is after you have initially created the scenes, so I'm jumping ahead a bit here), there are three basic ways you can do so: 1. You can change which channels and parameters are recalled within a scene, without updating any of the data contained within that scene. Note, that when you do this, the data that will be recalled will be the settings from when the scene was originally created. 2. You can update the data contained within the scene (the settings of the parameters), while not changing the selected channels. This allow you to update the settings of all the selected channels that are part of a scene while not changing which channels are selected within that scene. You'll see why this is very helpful later in this tutorial. 3. Or you can update both the selected channels and parameters as well as updating the settings stored in the scene for those channels. Essentially this is completely overwriting the existing scene with all new data. The only difference between this and creating an entirely new scene is that you don't have to create a new name for the scene. Page 5 of 47
6 Step 1: Creating Selected Channels The first thing I almost always do when I'm ready to start writing scenes is to make it easy to select the channels I'll need to change during the course of a show via Scene control. I do this so that when I am working during rehearsals and I need to create a scene I do not need to take a lot of time to select channels (possibly across multiple mixers even) and then create a new scene. Using one of the two techniques below, I can select the channels I'll need most often fairly quickly and then create a new scene. There are two ways to do this and often I will set up both methods just so I have them at the ready. 1. Method #1 Set up temporary channel groups: So for my work, the channels I am most often going to be creating scenes for are the Group Latch Outputs that I use like DCA Groups, and the Wireless Mic Input channels that will be assigned to those Group Latch Outputs over the course of the show. So above I have selected all the Group Latch Outputs (Outputs 9 16) and Wireless Mic Inputs (Inputs 6 17) that will be addressed via the scene recalls over the course of the show. Next I'll create a temporary group in SAC for these selected channels by right clicking on the title bar of the F Mixer window. The Groups/Latches dialog will pop up. Page 6 of 47

7 And by holding down Ctrl and Clicking on any of the Groups in the left hand column I can create a new Channel Temporary Group. I will then be prompted to name this new group. In this example I have given Group 01 the name DCA Assignment so I will know the purpose of this temporary group. Now that I have created this temporary group, I can now easily recall this channel selection by right clicking on the title bar of the F Mixer and then clicking on Group 01: DCA Assignment. Page 7 of 47

8 And this way I will instantly have all my Outputs and Inputs needed for DCA Assignments selected. Page 8 of 47
9 2. Method #2 Creating a Scene that will select channels for you As odd as it may sound, one way to speed up the creating of scenes can be to create scenes. I guess you could refer to these as helper scenes or shortcut scenes. These likely won't actually be used during the performance itself, but they are used to perform functions quickly that might otherwise take several steps with the mouse and/or keyboard. So typically I would also create a DCA Assignment Scene as well. Basically all this scene is going to do is select specific channels for me but not recall any data. So to do this, I will select my Group Latch Outputs and Wireless Mic Inputs as before. Page 9 of 47

10 Then I go to the SAC Scenes Window and click on New. SAC prompts me to give the new scene a name. (keep in mind that all Scene names must be unique, you can not have two scenes with the same name because SAC creates individual files for each Scene that are stored with your Mix file) Page 10 of 47

11 Once I have typed in the new scene name and hit enter or clicked on the OK button, I am presented with the SAC Scene Properties window. In this window I can double check which Input and Output channels are selected to be part of this scene by clicking on the drop down arrow next to the display labeled Partial. Note that if this box displays All, then no channels were selected when you pressed the New Scene button. This means that basically all channels on all mixers are selected. Typically I avoid creating any scenes that address All channels because unless you really wish to recall every setting on all 25 Mixers within SAC it can cause a lot of issues. If you made a mistake and forgot to select a channel or you selected too many channels, you can always go back to the F Mixer window, even while this Scene Properties dialog box is on the screen and then select additional channels or deselect channels and then click the Update button in the very top left hand corner of the Scene Properties window. After you have done that, you can click on the drop down button again to double check you have the correct channels selected. The channel selections will also still be visible in the F Mixer window as well. Next I will select what data is to be recalled. Page 11 of 47


12 In this example, I have only selected the Select Partial Chans Option. What this lets me do then is to use a Scene Recall in SAC that does nothing but select channels for me in the F Mixer window. No channel data will be recalled. You can see the new Scene that I created now listed at the bottom of the Scenes list. So when I Recall this scene, I can quickly go from this state in SAC: Page 12 of 47
13 To This: Step 2: Assigning Inputs to Group Latches So now that I have a fast and easy way to select all the channels I wish to control in my DCA Assignment Scenes I am ready to start creating the DCA/Fader Assignments and saving them into new scenes. For the sake of this tutorial I am going to show I create a scene where each of my Group Latch faders controls a single wireless mic channel and a scene where I have 2 Group Latches that will bring up all the chorus mics, one fader each for female and male chorus members. This is a pretty typical use of the Group Latch behavior for me on the shows I work on. Below is my default fader layout, which has most of the faders assigned to no wireless mics at all. Page 13 of 47

14 Just so you can have a better visual reference, here is a screen shot of the Z Mixer view showing the output assignments for Inputs Note that they are all assigned only to Output 19 at the moment. Remember that Output 19 is being used a submaster for all wireless mic levels. So all wireless mics will always be assigned to Output 19 for the entire show. Page 14 of 47

15 The next step would be to rename the Group Latch channels, to reflect which wireless mic I want assigned to each fader, as such: Then I will go back to the wireless mic inputs and assign the correct inputs to the corresponding Group Latch. At this point, it's important to note that I also double check to make sure that all my faders are at -inf. The reason I want to double check this is so that faders on the Group Latch outputs will match the input fader. I don't want to move the Group Latch fader and have the input fader either jump to it's maximum level fairly quickly or hardly move at all. Either of those can happen if you are not certain that the faders are at identical levels when you assign an input to a group latch. Page 15 of 47


16 With this done, the Group Latch Faders will now control the corresponding input fader. Typically I will just quickly move each fader to make sure that each latch is correct and that the faders are all at the same levels. Once I have done this, I make sure all my faders are down, and create the scene. (Keep in mind that since the group latch faders are controlled via my control surface, it's a simple matter of bringing each fader up and down quickly on the control surface to check that all the settings are correct.) To write the new scene, I use one of my two methods to select the appropriate channel strips in SAC. For this example, I am going to use the temporary latch groups. Page 16 of 47


17 With the appropriate channels selected, I create a new scene and give it a name. Page 17 of 47
18 Now I select the appropriate channel parameters that I wish this scene to recall. I think it's worth a brief explanation of why I have chosen each of these parameters. 1. In the far left column are the parameters that can be recalled on Inputs. I have selected the Out Assgn parameters because that is the parameter that tells each Wireless Mic Input channel, which Group Latch/DCA fader it is assigned to. 2. I want to recall the input fader level, so that if a scene is recalled while any of the input faders for the wireless mics are currently turned up, this will immediately bring that input fader all the way down. This serves two purposes, first, I want to make sure all the faders are at -inf when the scene is recalled so that Group Latch faders are at the same level as the input faders, and second the board op doesn't have physical faders for the input faders, only the Group Latch outputs, so I don't want them to have accidentally left up a channel which might go unnoticed if the input fader is no longer latched to one of the Group Latch Outputs. 3. The second column is for parameters that are part of the Auxiliary Master Outputs and Auxiliary Return channels. Since I'm not attempting to recall any of those functions I simple leave them all unselected. 4. The third column is for selecting functions that are part of the Output Channels. Here I have selected Out Label, so that as I recall each Scene, the labels on the Group Latch Outputs will change and show an appropriate label for the function they are serving within that Scene. Page 18 of 47

19 5. I selected Out Fader for the same reasons I want to recall the input faders. So that Group Latch and Input faders are in identical positions of -inf and so that no groups are accidentally left up when the scene is recalled. 6. Lastly the far right hand section allows you to recall parameters on specific mixers within SAC. In this case I'm only recalling this data on the FOH Console, so I select FOH Mixer and leave the rest unassigned. Once I have all the correct parameters selected, I can click OK and my new scene is created. You should also notice that SAC has unselected the channels in the F Mixer for you automatically. Page 19 of 47


20 Now I can create my next scene, where I want all the chorus assigned to just two Group Latch faders. I go back and relabel my Group Latch Outputs and adjust my Output Assignments on the Inputs. Note that Wireless Mics 16 and 17 were not part of the Chorus for this show. Page 20 of 47
21 Now we can bring up just two Group Latch Output faders to control 10 channels of Wireless Mics. Page 21 of 47


22 Next I write a new scene that will allow these setting to be recalled during a performance. Page 22 of 47

23 Now that I have these two scenes written, I can quickly and easily recall these scenes during a performance and reassign the Group Latch Outputs to different combinations of hardware faders to control several channels of wireless microphones. As you can see in these screen shots, this particular show had 10 different Group Latch assignments over the course of a performance. This example is actually a fairly simple show even though there were 17 channels of wireless used in the show. Some shows can be much more complex as in some productions actors may swap between chorus roles and smaller Page 23 of 47
24 featured characters several times during the course of a performance. In shows like that, there can be a lot of Group Latch reassignments during the show. Page 24 of 47
25 Mixing the Orchestra: In order to give my mixer the control they will need during the performance, I typically set up two separate mixes of the orchestra microphones. The first is a mix that is created primarily so the actors on stage can hear the music. The second mix is sent to the FOH sound system for the audience. Since there is typically a fair amount of bleed from the on stage monitors into the house, what the audience actually hears is typically some combination of the live orchestra sound, bleed from stage monitors and the FOH mix. Obviously these will all vary greatly depending on the type and style of the show, where the orchestra is located, size of the house and many other factors. So by creating a separate mix for the stage monitors and FOH, I can tailor each to fit the needs at hand as much as possible. For example an onstage monitor mix might have a piano or keyboard mixed in a bit louder than you would want for the audience to hear, but this can help actors find their pitches better in some instances. It's also important that I keep the number of controls my mixer needs to manipulate during the course of a performance to a minimum. Not only do I do this because we don't really have all that many faders available on the control surface, but also because just maintaining a proper mix of the wireless mics from performance to performance can be a big enough challenge that if I can do something to make it easier for my operator to mix the show, I will typically do so. So that leads me to how I accomplish this within the SAC mixing environment. And the best way I have come up with to achieve all that I want to be able to do is to use up two sets of Input channels in SAC for the Orchestral Mics. So each mic in the Orchestra Pit is assigned to two separate inputs in SAC. The first set of inputs are used for my FOH mix and the Second Set of Inputs are for the Stage Monitor Mix. For Example: Page 25 of 47

26 To achieve this, I simply assign the sound card input from each orchestra mic channel to the input designated for the FOH mix and to the input designated for the Stage Monitor Mix. As you may have seen in some of the previous screen shots, I have Group Latch faders that the board op will actually control the over all levels of the orchestra with during the performance. Here is a screen shot showing a Z Mixer view of the Group Latch Outputs and F Mixer view of the Orchestra Mic Inputs. Note that again, I am using a 1 to 1 relationship here between the levels of Group Latch Output faders and the Orchestra Mic Input faders. Of course an orchestra mix where all the inputs are brought up to the exact same level would sound fairly horrendous in most cases. So in order to actually balance the levels for each mix, I use the Monitor Mixers in SAC essentially like a large Matrix Mixer. I do any EQ and Dynamics processing on the FOH console inputs. The show in this example was fairly simple from that standpoint. The orchestra for this show was on a platform upstage, so there was really very little in terms of stage monitor feeds for this show. Page 26 of 47

27 Typically I use Monitor Mixer #1 for my FOH Orchestral Mix and Monitor Mixer #2 for my Orchestra to Stage Monitors Mix. The first thing I'll do is to change the channel order on Monitor Mixer #1 and #2. The reason I do this, is so that my board op can use the faders on the control surface to adjust the balance between orchestra mics quickly and easily by jumping to one of the two Monitor Mixers. Sometimes I'll have more than 16 inputs from the orchestra so I will occasionally set up some Group Latch Outputs on the Monitor Mixers to consolidate the channels down to 16 faders for my operator. However I find the need to do that fairly rare, as typically my board op will only need to tweak the orchestra balance when something isn't working correctly or when we have substitute musicians in the orchestra pit. When we do have subs we typically know about it in advance and so we can plan for that, and it's as simple as making an adjustment on the input attenuators of the FOH console orchestra mic inputs. Occasionally we also just tweak the gain on the preamps themselves. Here is a screen shot of Monitor Mixer #1 and #2 from this sample show: Page 27 of 47
28 Note that the Input Taps on these two monitor consoles are set to post fader from the FOH Mixer. This way, all the volume levels are controlled on the FOH mixer, and hence can be controlled by my board operator during the show, using the control surface. But the balance between instruments is done on Monitor Mixer #1 and #2. Also I typically do all effects processing such as reverbs on the Monitor Consoles. Usually reverbs are only used on the FOH Orchestra Mix. Page 28 of 47


29 Obviously routing each orchestra mic to appropriate system outputs is then also done on each Monitor Mixer. Example FOH Outputs: Example Stage Monitor Outputs: Page 29 of 47
30 Orchestra Automation: Example 1 Mutes: Typical automation needs for the orchestra mix would be to mute microphones for chairs/instruments that are tacet for an entire number or large parts of a number. Occasionally one chair might have two mics, due to doubling of instruments, of which you really only ever want one of the two mics to be up. This can happen often with a reed player that might have flute parts as well as sax or other instruments. So you might have one overhead mic for the flute parts and another mic under the music stand. When I need to do this type of automation, typically I'll just use mute automation and mute/unmute between songs when the orchestra is not playing. So just for example's sake, let's say this show has enough songs where the brass is tacet enough that it merits some scene automation. First I'll set up a temp group for the brass input channels to make the scene creation easier. Page 30 of 47


31 With Channels Selected we again right click on the title bar of the F Mixer window. Shift Click on Group 02: and give it a name. Page 31 of 47


32 Now we can quickly select our Brass Input Channels, mute or unmute them all at once and then save that state into a new Scene. Page 32 of 47

33 In this example, we only care about the Mute Status of our Input Channels on the FOH Mixer. (Note: I did also select the Select Partial Chans parameter as well. I will explain the reason for this below.) Page 33 of 47


34 Now I can easily create the scene to UnMute the Input Channels. Page 34 of 47

35 As you can see I now have one Scene to Mute and another to UnMute the Orchestra Brass. Typically if there is some function that I may need to use multiple times during the performance, I'll create some template scenes like these. This way I can quickly recall these scenes to insert new cues for my board op in the correct order for the show. The reason I turned on the Select Partial Chans parameter is so that when I go to write new scenes that will mute or unmute the orchestra brass, all I need to do is recall one of my template scenes I have now created, and then I can simply write a new scene. All the correct channels will be automatically selected for me. For the sake of example, let's say I need to Mute and then Unmute the Brass during Scene 3 of this production. These two cues would then fall between my DCA Assign cues for Scene 2 and 4. So first I would recall the Brass Mute Template Scene. Page 35 of 47

36 This Scene not only Muted the Brass Input channels, but it also selected those channels for me, so I can immediately start the process of writing a new scene. Page 36 of 47

37 I now move the selected scene bar (the blue bar in the Scenes window) to the point where I will want to insert my new scene, then I click on the New button. I give the Scene an appropriate name, and click OK. Notice that this time I do not have the Select Partial Chans parameter turned on since this is a cue that will be taken by my board op during the course of the performance, I don't Channels to be suddenly selected during the middle of the show. Page 37 of 47


38 My new scene was now created and you'll note that because I took the time to make some template scenes, I didn't have to touch any other windows or controls within SAC except the Scenes window itself to create this new scene. Now I recall the Brass ON Scene and repeat the process to create another new scene that will be used during the performance. Page 38 of 47

39 I now have my Mute and UnMute Scene inserted that would be in the correct order for the performance. I could repeat the same steps again, to insert even more cues where I need to Mute or Unmute the Brass Inputs. Example 2 Mix Automation: Another typical automation task I might need to perform is to adjust the mix on the orchestra inputs during the course of a performance. Again, since I mostly want the operator to be concentrating on wireless mic duties, I will often automate changes to the orchestral mix. For this task I typically will make these adjustments on one or both of the monitor mixes that I use to create the balance for the orchestral inputs. This way, making these adjustments does not change the one to one relationship I try to maintain between my Orchestra Group Latch faders and the Orchestra Input faders I have set up on my FOH Mixer within SAC. As before the first thing I want to do is set up a way to easily select all the channels I will want my future scenes to address. For this example I will use the method of creating a special scene just to select all the appropriate channels. I use this method because that is the only way to select multiple channels across multiple mixers. Using the temporary group latches is faster and easier to access while writing new scenes for you show, however it is limited to only selecting channels in the currently visible mixer. Since for this example I will want to select channels on both Monitor Mixer 1 (my Orchestra to FOH mix) and Monitor Mixer 2 (my Orchestra to Stage Monitor Mix) I will need to use a helper scene. I can start by selecting all the channels I will want my Orchestra Mix Scenes to address. Page 39 of 47

40 Page 40 of 47


41 Now that I have all the appropriate channels selected I write my helper scene. Notice that in the scene properties all the channels show up in the partial channel list and the only parameter I have selected is the Select Partial Chans parameter. I now have my helper scene created to allow for the easy selection of all the orchestra mix channels. Page 41 of 47

42 To create my first Orchestra Mix Automation I adjust the balance of the input channels to my liking. First I will record my current mixes as default mix for the top of the show. Recall the Channel Select Orch Mix Scene I just created. Now write a new Scene for the Top of the show. Page 42 of 47

43 This time I am only going to recall the faders for the input channels on Monitor Mixer 1 and Monitor Mixer 2. Notice that I also put in a 500ms fade time. There is no real reason I likely need to do that for a Scene that will be recalled just before the show starts. However I typically put a fade time in for cues that are moving faders, just to make a smoother transition if the Scene happens to be recalled early or late during the performance. I now have a Scene that my operator would recall just before the performance would begin. Page 43 of 47
44 So for the sake of example let's say I need to adjust the Orchestra Mix during Act I Scene 5. Most of the time I'll use the control surface to adjust my faders while I'm in technical rehearsals to write these cues. However below are a couple of screen shots. Just keep in mind that I can actually create these cues without ever having to actually use the mouse or arrow keys to adjust my faders. Typically I would just use an F Key to jump to the Orchestra to House Mixer or Orchestra to Stage Mixer, make my changes and then jump back to my FOH Mixer to write the scene or scenes. Recall the helper Scene. Page 44 of 47


45 Write the new Scene. Notice that I changed the fade time to 1500 ms, so a 1.5 second fade time is used. Page 45 of 47


46 If I needed to return to my default mix for Scene 6, I would simply recall my Orch Top of Show Scene. Then recall my helper scene. And write the new Scene for Act I Scene 6. Page 46 of 47

47 Here are some screen shots showing the two different mixes. Page 47 of 47
LIO-8 Quick Start Guide
 Metric Halo $Revision: 1051 $ Publication date $Date: 2011-08-08 12:42:12-0400 (Mon, 08 Jun 2011) $ Copyright 2010 Metric Halo Table of Contents 1.... 5 Prepare the unit for use... 5 Connect the LIO-8
Mixers. The functions of a mixer are simple: 1) Process input signals with amplification and EQ, and 2) Combine those signals in a variety of ways.
 Process input signals with amplification and EQ, and 2) Combine those signals in a variety of ways.") Mixers The mixer is the central device in any sound studio. Although you can do a lot without it, sooner or later you are going to want to bring all of your materials together to make a piece of music,
Mixers The mixer is the central device in any sound studio. Although you can do a lot without it, sooner or later you are going to want to bring all of your materials together to make a piece of music,
AxumVideo 0 intro. Now that you have connected the different AXUM system parts, you are ready to configure the system according to your own needs.
 AxumVideo 0 intro Now that you have connected the different AXUM system parts, you are ready to configure the system according to your own needs. On the left we see the RACK unit and on the right we see
Mackie Control and Cubase SX/SL
 Mackie Control and Cubase SX/SL - 1 - The information in this document is subject to change without notice and does not represent a commitment on the part of Steinberg Media Technologies AG. The software
CUE A (activate Clar. mic): m. 395 (beginning of Mvt. IV, just a fraction of a second before the solo Clar. begins to play) - press "a"
: m. 395 (beginning of Mvt. IV, just a fraction of a second before the solo Clar. begins to play) - press a") ECSTATIC WATERS (version 2.0.1) TECHNICAL INSTRUCTIONS AND TIPS February 2017 QUESTIONS: info@stevenbryant.com REHEARSAL AND PERFORMANCE Triggering the Cues: In Ableton Live, you can (and should) simply
ECSTATIC WATERS (version 2.0.1) TECHNICAL INSTRUCTIONS AND TIPS February 2017 QUESTIONS: info@stevenbryant.com REHEARSAL AND PERFORMANCE Triggering the Cues: In Ableton Live, you can (and should) simply
Chapter 23 Dimmer monitoring
 Chapter 23 Dimmer monitoring ETC consoles may be connected to ETC Sensor dimming systems via the ETCLink communication protocol. In this configuration, the console operates a dimmer monitoring system that
Korg Kronos Workflow for Worship
 Korg Kronos Workflow for Worship I have been playing Korg keyboards since the OASYS in 2005. Korg has graciously carried over most of the workflow to their current product the Korg Kronos. This keyboard
ULN-8 Quick Start Guide
 Metric Halo $Revision: 1671 $ Publication date $Date: 2012-7-21 12:42:12-0400 (Mon, 21 Jul 2012) $ Copyright 2012 Metric Halo Table of Contents 1.... 5 Prepare the unit for use... 5 Connect the ULN-8 to
Reason Overview3. Reason Overview
 Reason Overview3 In this chapter we ll take a quick look around the Reason interface and get an overview of what working in Reason will be like. If Reason is your first music studio, chances are the interface
Background. About automation subtracks
 16 Background Cubase provides very comprehensive automation features. Virtually every mixer and effect parameter can be automated. There are two main methods you can use to automate parameter settings:
CLA MixHub. User Guide
 CLA MixHub User Guide Contents Introduction... 3 Components... 4 Views... 4 Channel View... 5 Bucket View... 6 Quick Start... 7 Interface... 9 Channel View Layout..... 9 Bucket View Layout... 10 Using
The simplest way to stop a mic from ringing feedback. Not real practical if the intent is to hear more of the choir in our PA.
 Lose the Feeback Improving Gain-Before-Feedback in Worship Sennheiser HOW Applications Tip #9 Kent Margraves, June 2008 *This discussion focuses on the processing and optimization of miked sources on the
RELEASE NOTES. Introduction. Supported Devices. Mackie Master Fader App V4.5.1 October 2016
 RELEASE NOTES Mackie Master Fader App V4.5.1 October 2016 Introduction These release notes describe changes and upgrades to the Mackie Master Fader app and DL Series mixer firmware since Version 4.5. New
TABLE OF CONTENTS TABLE OF CONTENTS TABLE OF CONTENTS. 1 INTRODUCTION 1.1 Foreword 1.2 Credits 1.3 What Is Perfect Drums Player?
 TABLE OF CONTENTS TABLE OF CONTENTS 1 INTRODUCTION 1.1 Foreword 1.2 Credits 1.3 What Is Perfect Drums Player? 2 INSTALLATION 2.1 System Requirments 2.2 Installing Perfect Drums Player on Macintosh 2.3
SOUND REINFORCEMENT APPLICATIONS
 CHAPTER 6: SOUND REINFORCEMENT APPLICATIONS Though the Studio 32 has been designed as a recording console, it makes an excellent console for live PA applications. It has just as much (if not more) headroom
The 01X Configuration Guide
 The 01X Configuration Guide A Very Brief Introduction Welcome to the world of learning! Like many of you, I have spent countless hours reading and re-reading the 01x and the Cubase SX owner's manuals,
M-16DX 16-Channel Digital Mixer
 M-6DX 6-Channel Digital Mixer Workshop Getting Started with the M-6DX 007 Roland Corporation U.S. All rights reserved. No part of this publication may be reproduced in any form without the written permission
SIGNAL PROCESSOR. Operation Manual
 SIGNAL PROCESSOR Operation Manual Using the PDF manual From the Contents on page 2, click on the desired topic to automatically jump to the corresponding page. Click on a link in this manual to jump to
SIGNAL PROCESSOR. Operation Manual
 SIGNAL PROCESSOR Operation Manual Using the PDF manual From the Contents on page 2, click on the desired topic to automatically jump to the corresponding page. Click on a link in this manual to jump to
DIGITAL MIXING CONSOLE. TF Editor V3.6 User's Guide
 DIGITAL MIXING CONSOLE TF Editor V3.6 User's Guide EN Special notices Copyrights of the software and this document are the exclusive property of Yamaha Corporation. Copying or modifying the software or
G-Stomper Mixer & Master V Mixer & Master... 2
 G-Stomper Studio G-Stomper Rhythm G-Stomper VA-Beast User Manual App Version: 5.7.2 Date: 04/06/2018 Author: planet-h.com Official Website: https://www.planet-h.com/ Contents 11 Mixer & Master... 2 11.1
MP212 Principles of Audio Technology II
 MP212 Principles of Audio Technology II L a b # 1 D M 2000 Version 2.1, 02/22/11 revised AR. Older versions by JL and JMC Version 7, 09/11/13 revised AR Copyright 2007 Berklee College of Music. All rights
LEDBlinky Animation Editor Version 6.5 Created by Arzoo. Help Document
 Version 6.5 Created by Arzoo Overview... 3 LEDBlinky Website... 3 Installation... 3 How Do I Get This Thing To Work?... 4 Functions and Features... 8 Menus... 8 LED Pop-up Menus... 16 Color / Intensity
WAVES Cobalt Saphira. User Guide
 WAVES Cobalt Saphira TABLE OF CONTENTS Chapter 1 Introduction... 3 1.1 Welcome... 3 1.2 Product Overview... 3 1.3 Components... 5 Chapter 2 Quick Start Guide... 6 Chapter 3 Interface and Controls... 7
StudioLive RM32AI RM16AI Applications Guide
 StudioLive RM32AI RM16AI Applications Guide 1. General Control and Recording Control for RM mixers can be done via Firewire or Network connection. Network control requires connecting the mixers to the
Word Tutorial 2: Editing and Formatting a Document
 Word Tutorial 2: Editing and Formatting a Document Microsoft Office 2010 Objectives Create bulleted and numbered lists Move text within a document Find and replace text Check spelling and grammar Format
Video Conference Classroom Documentation
 Updated: 8/18/2017 Video Conference Classroom Documentation Contents About These Classrooms... 2 Where... 2 Podium Overview... 2 On Top of Podium... 2 Inside the Podium... 2 Equipment Information... 2
TF5 / TF3 / TF1 DIGITAL MIXING CONSOLE. TF Editor User Guide
 TF5 / TF3 / TF1 DIGITAL MIXING CONSOLE EN Special notices Copyrights of the software and this document are the exclusive property of Yamaha Corporation. Copying or modifying the software or reproduction
Measuring Delays. A Step by Step instruction. (c) 2017 by Thomas Neumann
 2017 by Thomas Neumann") Measuring Delays A Step by Step instruction A few things to mention This document shows a simple step by step way to determine the distance in time between to audio sources (reproducing Mid High frequency
Measuring Delays A Step by Step instruction A few things to mention This document shows a simple step by step way to determine the distance in time between to audio sources (reproducing Mid High frequency
Installation and Operation Manual. ATEM Television Studio Switchers
 Installation and Operation Manual ATEM Television Studio Switchers March 08 English Welcome Thank you for purchasing an ATEM switcher for your live production work! If you re new to live production switchers,
V4.7 Software Quick Start Guide
 V4.7 Software Quick Start Guide INTRODUCTION TO V4.7 The 4.7 software update for the Vi Series includes a major update to the functionality of the Vi4 console in particular, bringing a new level of power
USER S GUIDE DSR-1 DE-ESSER. Plug-in for Mackie Digital Mixers
 USER S GUIDE DSR-1 DE-ESSER Plug-in for Mackie Digital Mixers Iconography This icon identifies a description of how to perform an action with the mouse. This icon identifies a description of how to perform
Quick Start Guide. Soundcraft Si Series Quick Start Guide Issue 1010
 Quick Start Guide Soundcraft Si Series Quick Start Guide Issue 1010 Page 1 INTRODUCTION IMPORTANT Please read this manual carefully before using your mixer for the first time. Firstly, thanks for choosing
TASCAM DM-24. The DM-24 Basics. TEAC Professional Division. Digital Mixing console
 TASCAM TEAC Professional Division DM-24 Digital Mixing console The DM-24 Basics DM-24 SIGNAL FLOW... 3 INPUTS... 3 RETURNS... 3 OPTIONS... 4 OUTPUTS... 5 AUX SENDS... 5 TRACKING OPTIONS... 5 Using AUX
TF5 / TF3 / TF1 DIGITAL MIXING CONSOLE. TF StageMix User's Guide
 TF5 / TF3 / TF1 DIGITAL MIXING CONSOLE EN Note The software and this document are the exclusive copyrights of Yamaha Corporation. Copying or modifying the software or reproduction of this document, by
2
 328 328 USER GUIDE NB Before you go any further, please read this first page as it will tell you all you need to know about starting off with the Spirit Digital 328 From all of us to you Thank you for
Element 78 MPE-200. by Summit Audio. Guide To Operations. for software version 1.23
 Element 78 MPE-200 by Summit Audio Guide To Operations for software version 1.23 TABLE OF CONTENTS IMPORTANT SAFETY AND GROUNDING INSTRUCTIONS COVER 1. UNPACKING AND CONNECTING...3 AUDIO CONNECTIONS...4
Analyzing and Saving a Signal
 Analyzing and Saving a Signal Approximate Time You can complete this exercise in approximately 45 minutes. Background LabVIEW includes a set of Express VIs that help you analyze signals. This chapter teaches
PN: AUX INPUT INPUT A. Edition Date: 10/17/ TEAC/TASCAM, All Rights Reserved OPERATIONAL TUTORIAL
 PN: 9101437700 MONITOR STEREO AUX INPUT PHONES REMOTE AUX OUTPUT R L MIC / GUIT INPUT D INPUT C INPUT B INPUT A Edition Date: 10/17/00 2000 TEAC/TASCAM, All Rights Reserved OPERATIONAL TUTORIAL 1 Table
CONTENTS Page 1.0 System Requirements Wi-Fi Settings Getting Started Mixer Window... 14
 Welcome: Thank you for downloading the CL StageMix ipad app for the Yamaha CL series digital mixing consoles. The latest firmware version for CL series can be downloaded from https://www.yamaha.com/proaudio/
Harmony Smart Control. User Guide
 Harmony Smart Control User Guide Harmony Smart Control User Guide Table of Contents About this Manual... 6 Terms used in this manual:... 6 At a Glance... 6 Features... 6 Supported devices... 6 Know your
Ready. Set. Go make your show. Your guide to creating your first video program with
 Ready. Set. Go make your show. Your guide to creating your first video program with TriCaster Mini Go Make Your Show Guide 01 Table of Contents Part 1: Ready. 1) Power, Monitoring and Control 04 2) Bringing
Formatting Dissertations or Theses for UMass Amherst with MacWord 2008
 January 2015 Formatting Dissertations or Theses for UMass Amherst with MacWord 2008 Getting started make your life easy (or easier at least) 1. Read the Graduate School s Guidelines and follow their rules.
Liquid Mix Plug-in. User Guide FA
 Liquid Mix Plug-in User Guide FA0000-01 1 1. COMPRESSOR SECTION... 3 INPUT LEVEL...3 COMPRESSOR EMULATION SELECT...3 COMPRESSOR ON...3 THRESHOLD...3 RATIO...4 COMPRESSOR GRAPH...4 GAIN REDUCTION METER...5
Automated Production Control
 Automated Production Control Image courtesy WPEC - West Palm Beach, FL Take Control OverDrive [oh-ver-drahyv] 1 The state of high activity or productivity or concentration; 2 A high gear used at high speeds
CHAPTER 3 AUDIO MIXER DIGITAL AUDIO PRODUCTION [IP3038PA]
![CHAPTER 3 AUDIO MIXER DIGITAL AUDIO PRODUCTION [IP3038PA]](/thumbs/73/68858919.jpg "CHAPTER 3 AUDIO MIXER DIGITAL AUDIO PRODUCTION [IP3038PA]") CHAPTER 3 AUDIO MIXER DIGITAL AUDIO PRODUCTION [IP3038PA] Learning Objectives By the end of this chapter, students should be able to: 1 State the function of the audio mixer in the sound studio. 2 Explain
CHAPTER 3 AUDIO MIXER DIGITAL AUDIO PRODUCTION [IP3038PA] Learning Objectives By the end of this chapter, students should be able to: 1 State the function of the audio mixer in the sound studio. 2 Explain
Operation Manual (not in Cubase LE)
") Operation Manual (not in Cubase LE) Matthias Klag, Michael Ruf Cristina Bachmann, Heiko Bischoff, Christina Kaboth, Insa Mingers, Sabine Pfeifer, Kevin Quarshie, Benjamin Schütte This PDF provides improved
Operation Manual (not in Cubase LE) Matthias Klag, Michael Ruf Cristina Bachmann, Heiko Bischoff, Christina Kaboth, Insa Mingers, Sabine Pfeifer, Kevin Quarshie, Benjamin Schütte This PDF provides improved
X-Panda User s Guide
 X-Panda User s Guide This documentation is intended to be read along side the X-Panda Installation Guide which is available for download from our website www.solidstatelogic.com 82BXEM01A Contents Introduction
MICROSOFT WORD FEATURES FOR ARTS POSTGRADUATES
 MICROSOFT WORD FEATURES FOR ARTS POSTGRADUATES...2 Page Setup...3 Styles...4 Using Inbuilt Styles...4 Modifying a Style...5 Creating a Style...5 Section Breaks...6 Insert a section break...6 Delete a section
After Effects Compositing Basics
 This tutorial is a continuation of the VIllus Capillary tutorial where you went through the basics of creating a Maya scene from A-to-Z. You re now ready to stitch together a final movie from the individual
USER S GUIDE ADX 100. Frequency Conscious Gating, Compression, Limiting, and Expansion. Plug-in for Mackie Digital Mixers
 USER S GUIDE ADX 100 Frequency Conscious Gating, Compression, Limiting, and Expansion TM Plug-in for Mackie Digital Mixers Iconography This icon identifies a description of how to perform an action with
Overview. A 16 channel frame is shown.
 Overview A 16 channel frame is shown. 22 Mono Input Channel 1 - MIC INPUT The mic input accepts XLR-type connectors and is designed to suit a wide range of BALANCED or UNBALANCED signals. Professional
SPL Analog Code Plug-ins Manual Classic & Dual-Band De-Essers
 SPL Analog Code Plug-ins Manual Classic & Dual-Band De-Essers Sibilance Removal Manual Classic &Dual-Band De-Essers, Analog Code Plug-ins Model # 1230 Manual version 1.0 3/2012 This user s guide contains
OPERATING MANUAL. including
 OPERATING MANUAL including & If a portable or temporary three phase mains supply is used to power this desk, we recommend that the desk mains plug is removed before connecting or disconnecting the supply.
MAutoPitch. Presets button. Left arrow button. Right arrow button. Randomize button. Save button. Panic button. Settings button
 MAutoPitch Presets button Presets button shows a window with all available presets. A preset can be loaded from the preset window by double-clicking on it, using the arrow buttons or by using a combination
M7CL V3 Editor. Version 3.5. Contents. Special Notices. Owner s Manual. Yamaha Pro Audio Global Site
 M7CL V3 Editor Version 3.5 Owner s Manual Special Notices The software and this owner s manual are the exclusive copyrights of Yamaha Corporation. Copying of the software or reproduction of this manual
CL StageMix V6 User Guide
 Welcome: Thank you for downloading the CL StageMix ipad app for the Yamaha CL series digital mixing consoles. The latest firmware version for CL series can be downloaded from www.yamahaproaudio.com StageMix
Using Cubase SE with DSP Factory
 Manual by Ludvig Carlson, Anders Nordmark, Roger Wiklander Quality Control: C. Bachmann, H. Bischoff, S. Pfeifer, C. Schomburg The information in this document is subject to change without notice and does
The Digital Audio Workstation
 The Digital Audio Workstation The recording studio traditionally consisted of a large collection of hardware devices that were necessary to record, mix and process audio. That paradigm persisted until
Installing a Turntable and Operating it Under AI Control
 Installing a Turntable and Operating it Under AI Control Turntables can be found on many railroads, from the smallest to the largest, and their ability to turn locomotives in a relatively small space makes
The Complete Guide to Music Technology using Cubase Sample Chapter
 The Complete Guide to Music Technology using Cubase Sample Chapter This is a sample of part of a chapter from 'The Complete Guide to Music Technology', ISBN 978-0-244-05314-7, available from lulu.com.
Remote Control Devices
 Remote Control Devices The information in this document is subject to change without notice and does not represent a commitment on the part of Steinberg Media Technologies GmbH. The software described
StepSequencer64 J74 Page 1. J74 StepSequencer64. A tool for creative sequence programming in Ableton Live. User Manual
 StepSequencer64 J74 Page 1 J74 StepSequencer64 A tool for creative sequence programming in Ableton Live User Manual StepSequencer64 J74 Page 2 How to Install the J74 StepSequencer64 devices J74 StepSequencer64
QL StageMix V8 User Guide
 Welcome: Thank you for downloading the QL StageMix ipad app for the Yamaha QL series digital mixing consoles. The latest firmware version for QL series can be downloaded from http://www.yamahaproaudio.com/
NOTICE: This document is for use only at UNSW. No copies can be made of this document without the permission of the authors.
 Brüel & Kjær Pulse Primer University of New South Wales School of Mechanical and Manufacturing Engineering September 2005 Prepared by Michael Skeen and Geoff Lucas NOTICE: This document is for use only
SynthiaPC User's Guide
 Always There to Beautifully Play Your Favorite Hymns and Church Music SynthiaPC User's Guide A Product Of Suncoast Systems, Inc 6001 South Highway 99 Walnut Hill, Florida 32568 (850) 478-6477 Table Of
Character Users Guide
 Cha r a c t e r Us e r sgui de Character Users Guide Metric Halo $Revision: 1619 $ Publication date $Date: 2012-02-10 20:41:00-0400 (Friday, 10 Feb 2012) $ Copyright 2011 Metric Halo Table of Contents
The. finale. Projects. The New Approach to Learning. finale. Tom Carruth
 The finale Projects The New Approach to Learning finale Tom Carruth Addendum for Finale 2010 The Finale Projects Addendum for Finale 2010 There are seven basic differences between Finale 2010 and Finale
CL Editor. Special Notices. Contents. Owner s Manual. Yamaha Pro Audio Global Site
 CL Editor Owner s Manual Special Notices The software and this owner s manual are the exclusive copyrights of Yamaha Corporation. Copying of the software or reproduction of this manual in whole or in part
LS9 StageMix V6 User Guide
 Welcome: Thank you for downloading the LS9 StageMix ipad app for the Yamaha LS9 digital mixing consoles. The latest firmware version for LS9 can be downloaded from www.yamahaproaudio.com StageMix is an
spiff manual version 1.0 oeksound spiff adaptive transient processor User Manual
 oeksound spiff adaptive transient processor User Manual 1 of 9 Thank you for using spiff! spiff is an adaptive transient tool that cuts or boosts only the frequencies that make up the transient material,
Master Section
 Master Section -18 9 9 18 VU VU The Master section of the Custom Series 75 is host to two linkable (and externally patchable) mono 2254 compressors, the 281 Channel Module routing options, eight Groups,
CYBERMIX Operating Manual
 CYBERMIX Operating Manual 32 Channel Mixer Automation English Version 1.0 August 1996 The information contained in this manual is subject to change without notice. No part of this manual may be reproduced
Chapter 4 Signal Paths
 Chapter 4 Signal Paths The OXF-R3 system can be used to build a wide variety of signal paths with maximum flexibility from a basic default configuration. Creating configurations is simple. Signal paths
Finale Tips and Tricks For Music Teachers
 Finale Tips and Tricks For Music Teachers LAUNCH WINDOW The Launch Window is basically the main menu for the program. document setup tools, tutorials, and exercise tools can be accessed from here. This
Footnotes and Endnotes
 Footnotes and Endnotes Sometimes when writing a paper it is necessary to insert text at the bottom of a page in a document to reference something on that page. You do this by placing a footnote at the
Exercise #1: Create and Revise a Smart Group
 EndNote X7 Advanced: Hands-On for CDPH Sheldon Margen Public Health Library, UC Berkeley Exercise #1: Create and Revise a Smart Group Objective: Learn how to create and revise Smart Groups to automate
User Manual Tube-Tech ME 1B
 User Manual Tube-Tech ME 1B Rev. Jun 28, 2013 Softube User Manual 2007-2013. Amp Room is a registered trademark of Softube AB, Sweden. Softube is a registered trademark of Softube AB, Sweden. All visual
USER MANUAL. Published February 2018 Software Version Deva Zaxcom Deva24. Elevating Recording
 USER MANUAL Published February 2018 Software Version Deva 1.42 Zaxcom Deva24 Elevating Recording 1 FRONT PANEL... 6 LEFT SIDE... 8 RIGHT SIDE... 9 REAR... 10 HOME SCREEN... 11 MAIN MENU... 12 TRACK MIX...
THEATRE DESIGN & TECHNOLOGY MAGAZINE 1993 WINTER ISSUE - SOUND COLUMN WHITHER TO MOVE? By Charlie Richmond
 THEATRE DESIGN & TECHNOLOGY MAGAZINE 1993 WINTER ISSUE - SOUND COLUMN WHITHER TO MOVE? By Charlie Richmond Each time we get a request to provide moving fader automation for live mixing consoles, it rekindles
Introduction to capella 8
 Introduction to capella 8 p Dear user, in eleven steps the following course makes you familiar with the basic functions of capella 8. This introduction addresses users who now start to work with capella
Classroom Setup... 2 PC... 2 Document Camera... 3 DVD... 4 Auxiliary... 5
 Classroom Setup... 2 PC... 2 Document Camera... 3 DVD... 4 Auxiliary... 5 Lecture Capture Setup... 6 Pause and Resume... 6 Considerations... 6 Video Conferencing Setup... 7 Camera Control... 8 Preview
Introducing the PRO2 and PRO2C
 Introducing the PRO2 and PRO2C Think of an audio mixing system which offers unprecedented levels of control integration in terms of speed and ease of workflow. Think of an audio mixing system which has
BEYOND 324 LIVE INPUT LIVE SOUND DIGITAL MIXING CONSOLE
 BEYOND 324 LIVE... DIGITAL 328 LX7 32 Channel Digital Mixing Console LIVE 4 2 12 to 40 Channel 4 Group Live Mixing 24 to 40 Input Live Mixing LIVE 3 2 8 to 24 Channel 3-Buss Live Mixing Spirit 324 Live
Vortex / VSX TM 8000 Integration
 Vortex / VSX TM 8000 Integration Application Note Polycom Installed Voice Business Group December 2004 1 TABLE OF CONTENTS INTRODUCTION...4 CONNECTING THE VSX 8000 INPUTS AND OUTPUTS...4 ENABLING THE VSX
D-901 PC SOFTWARE Version 3
 INSTRUCTION MANUAL D-901 PC SOFTWARE Version 3 Please follow the instructions in this manual to obtain the optimum results from this unit. We also recommend that you keep this manual handy for future reference.
SD5 Operation Manual. User Manual. User Manual Version A for Software Versions
 SD5 Operation Manual User Manual User Manual Version A for Software Versions 1.0.530+ 0-1 SD5 Operation Manual Copyright 2012 Digico UK Ltd All rights reserved. No part of this publication may be reproduced,
Q Light Controller+ Positions and EFX explained
 Q Light Controller+ Positions and EFX explained February 13 th, 2015 Author: Massimo Callegari 1.Introduction When a QLC+ project includes several moving heads or scanners, it is necessary to have the
December 2006 Edition /A. Getting Started Guide for the VSX Series Version 8.6 for SCCP
 December 2006 Edition 3725-24333-001/A Getting Started Guide for the VSX Series Version 8.6 for SCCP GETTING STARTED GUIDE FOR THE VSX SERIES Trademark Information Polycom and the Polycom logo design are
M7CL Editor. Contents. Special Notices. Owner s Manual. Yamaha Pro Audio Global Site
 M7CL Editor Owner s Manual Special Notices The software and this owner s manual are the exclusive copyrights of Yamaha Corporation. Copying of the software or reproduction of this manual in whole or in
An Olde School Langevin Mixer
 An Olde School Langevin Mixer Rick Chinn Uneeda Audio This is a classic mixer with fixed gain blocks, slidewire faders, passive mixing networks, passive equalizers, etc. EVERYTHING IS PATCHED. THERE ARE
Sequential Storyboards introduces the storyboard as visual narrative that captures key ideas as a sequence of frames unfolding over time
 Section 4 Snapshots in Time: The Visual Narrative What makes interaction design unique is that it imagines a person s behavior as they interact with a system over time. Storyboards capture this element
The Switcher: TriCaster 855 Extreme
 The Switcher: TriCaster 855 Extreme OVERVIEW The typical studio production is composed of content from various sources: CAMERAS: Moving images from studio cameras normally three. AUDIO from studio mics
SERAPH 8+ SERAPH 8+ MWX. User Manual
 SERAPH 8+ SERAPH 8+ MWX User Manual The SERAPH 8+ conforms the following standards: EN 55022: 1998 + A1: 2000 + A2: 2003; class A; EN 55024: 1998 + A1: 2000 + A2: 2003; class A; n order for an installation
Stage Management Resource Sheet #2 Scoring Guide Page 1
 Stage Management Resource Sheet #2 Scoring Guide Page 1 TASKS TAPING THE FLOOR A big part of stage managing is showing the actors and other crew members that they are in good hands. One of the ways you
WAVES H-EQ HYBRID EQUALIZER USER GUIDE
 WAVES H-EQ HYBRID EQUALIZER USER GUIDE TABLE OF CONTENTS CHAPTER 1 INTRODUCTION...3 1.1 WELCOME...3 1.2 PRODUCT OVERVIEW...3 1.3 CONCEPTS AND TERMINOLOGY...4 1.4 COMPONENTS...7 CHAPTER 2 QUICK START GUIDE...8
GS122-2L. About the speakers:
 Dan Leighton DL Consulting Andrea Bell GS122-2L A growing number of utilities are adapting Autodesk Utility Design (AUD) as their primary design tool for electrical utilities. You will learn the basics
CFX 12 (12X4X1) 8 mic/line channels, 2 stereo line channels. CFX 16 (16X4X1) 12 mic/line channels, 2 stereo line channels
 8 mic/line channels, 2 stereo line channels. CFX 16 (16X4X1) 12 mic/line channels, 2 stereo line channels") COMPACT CFX MIXERS COMPACT SOUND REINFORCEMENT MIXERS WITH EFX FOR THE GIGGING MUSICIAN THREE MODELS CFX 12 (12X4X1) 8 mic/line channels, 2 stereo line channels CFX 16 (16X4X1) 12 mic/line channels, 2
COMPACT CFX MIXERS COMPACT SOUND REINFORCEMENT MIXERS WITH EFX FOR THE GIGGING MUSICIAN THREE MODELS CFX 12 (12X4X1) 8 mic/line channels, 2 stereo line channels CFX 16 (16X4X1) 12 mic/line channels, 2
USING THE CENTRAL CONTROL DECK IN THE LEARNING STUDIO
 USING THE CENTRAL CONTROL DECK IN THE LEARNING STUDIO This manual provides detailed information and operating instructions for the Central Control Deck in the learning studios. The learning studio can
EndNote for Windows. Take a class. Background. Getting Started. 1 of 17
 EndNote for Windows Take a class The Galter Library teaches a related class called EndNote. See our Classes schedule for the next available offering. If this class is not on our upcoming schedule, it is