Complete TV Users Guide
|
|
|
- Sherilyn Gilmore
- 5 years ago
- Views:
Transcription


1 Celect Communications Complete TV Users Guide Connected Your pathway to the world 1
2 2
3 Contents Setting up your Remote... 4 Remote Guide... 5 Using the Guide Button... 8 Searching...10 Reminders...12 DVR Guide...13 Important Note...26 TV Main Menu...26 Voice Menu...30 Settings Menu Apps Settings...32 Display Settings...33 Guide Settings...33 Parental Controls...34 TV Parental Guidelines Ratings...42 Motion Picture Association of America Ratings...43 Pay Per View...45 ManageMyTV App...45 WatchTVEverywhere...47 Set-Top Box Guides...48 Troubleshooting Guide...53 REV
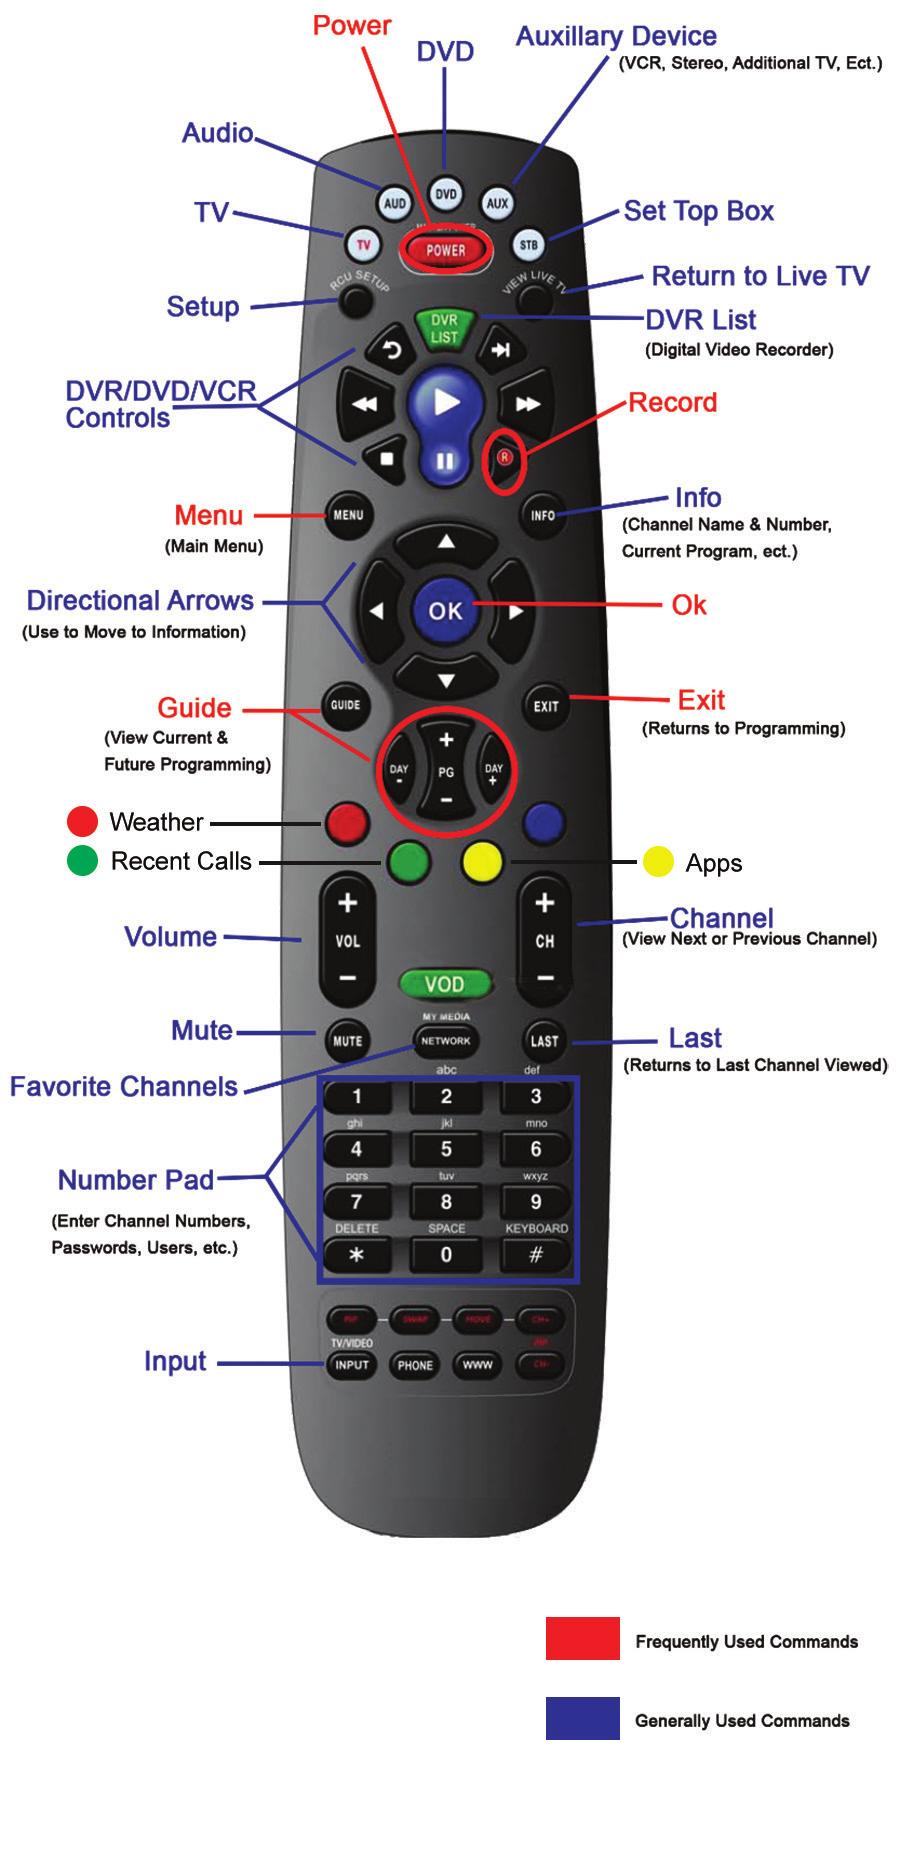
4 Setting up your Remote Before you can use your Remote for additional functions such as your TV or DVD Player, you will need to insert a programmable code into the Remote by doing either the Quick Search or a Manual Entry. These codes are located in the Remote User s Guide that was included in the packaging of the Remote and are listed by brand and model of your device. Quick Search Set-Up Use the following steps to program your TV into your Remote. 1. Turn on your TV. 2. Press the TV button once. 3. Press the SETUP button until the TV button blinks twice. 4. Enter 991 by using the Number Pad. (The TV button should flash two times. If the TV button emits one long flash, repeat steps 2 through 4.) 5. Press and release the CH + button continuously until your TV turns off. 6. Then press the RCU Setup button once to lock in the code. 7. To make sure your device has been programmed correctly, point the Remote at your TV and press the POWER button to turn on. 8. Try your volume button, channel up and down button and STB Button to make sure your guide comes up. If these all work, you are set. Powering On Devices 1. Is your device programmed into your Remote? (If so, continue to step 2. If not, refer to the above steps in Programming your Remote.) 2. Press the button of your selected device (TV, AUD, DVD, AUX, or STB) 3. Press the Power button 4. Your device should now be on 5. Every button that is pressed on the Remote will now control your selected device until another device is activated Additional Info: Multiple devices can be powered at the same time using the same Remote. If the STB is selected and the power button is pushed both the TV & the Set Top Box will power down, if the TV is programmed into your Remote. Adjusting Volume In order to adjust the volume using your Remote, you will need to first program your TV into the Remote. If you have not done so already, refer to Programming your Remote above. Once it is programmed you can: 1. Press the Volume + or - button to adjust the sound 2. Press Mute to turn the sound off, pressing Mute again will turn the sound back on 4
5 5
6 Frequently Used Commands There are a number of controls that you will use on a daily basis. Below is a brief description of what they are used for: MENU: The Menu button allows you to access all of the features that are available to customize your service, such as the way your guide looks, change your parental controls and access your Apps. OK: The OK button allows you to make selections including activating channels and options. GUIDE: The Guide button allows you to view current and future programs in a time-line based display. INFO: The Info button shows you basic information about current and future programs including Channel Name and Number, a brief description of the program, ratings, start and end times and date. EXIT: The Exit button will always return you to programming. This button can be pressed at any time, in any function. : Opens Weather App : Opens Recent Call List : Opens Apps Buttons may vary with each screen, see the legend at the bottom of your screen for more details. Changing Channels There are a number of different ways to change the channel you are currently viewing. 1. Using the Channel button, press the + or - to view the next or previously numbered channel. 2. Using the Number Pad, press the numbers of your desired channel. You will see the numbers entered displayed in the upper right hand corner of your screen, within seconds the channel will change. 3. Using the Directional Arrows, press the up and down arrows to view channel info and press OK to select channel. Press Exit to exit the guide. When watching TV the Last button will take you to the last channel viewed. Using the List Button By pressing the DVR List button on your remote 1 time you will see all your recordings. Press it a 2nd time and you will see your future recordings. Press it a 3rd time and you will see your series rules. Using the Browse Button Press the Browse (right arrow) button on the remote. At the top of the screen, you ll see the channel you re currently tuned to. At the bottom of the screen you ll see the channel number, channel name, current date and time, program name, date and time the program airs, a progress bar showing how far along the program is, and the program that airs next. 6


7 1. Press the Right/Left arrow buttons to view what is showing later on the current channel. Or, press the Up/Down arrow buttons to view what is showing on another channel. 2. Press the Day + and Day buttons to see what is on this channel 24 hours from now. Using the Channel Guide The Channel Guide is your on-screen tool to see what is on television and allows you to surf channels while still watching a program. You can change the settings for the guide so that the TV program is in the upper right-hand corner or behind the text. This can be changed in the settings in the Menu. Using the OK Button (Now Playing) 1. While watching TV press the OK button on the remote. 2. When you press the OK button, you see what program is playing currently. The tower symbol indicates the show you are watching. The red circle with the white S in the center indicates a show that is recording. The Red circle with the yellow check mark indicates a show that was recently watched. If the Weather Application is available, the Now Playing window will also provide the current temperature. Using the Info Button 1. When you press the INFO button, you ll see the name and a description of the current program at the top of the screen. If you re watching a live program, at the bottom of the screen you ll see the channel number, channel name, current date and time, program name, date and time the program airs, program description, the date the program first aired (if available), the current weather, a progress bar showing how far along the program is, and the program that airs next. 2. If you re viewing a live program you can press the Right/Left arrow buttons to view what is showing later on the current channel or, press the Up/Down arrow buttons to view what is showing on another channel. 3. Press the Day + and Day buttons to see what is on this channel 24 hours from now. 7


8 Using the Guide Button 1. Press the GUIDE button on the remote. Information about the program you re tuned to displays at the top of the screen along with indicators showing: Whether a channel is in HD Whether a program is a new episode Whether the broadcast is in HD Whether the program is available for Pay Per View purchase Other channels and their programs will show at the bottom of the screen. Shows that started prior to the current time slot are indicated with a blue arrow before the program name. Shows that continue past the last time slot showing on the guide are indicated with a blue arrow after the program name. Programs scheduled for recording will be marked with a red circle. To move through the guide one channel at a time, use the Up/Down arrow buttons on the remote. As you do this, a description of the highlighted program will display at the top of the screen. Or, press the Channel + and Channel buttons to scroll through the channels more quickly. 2. To move through the guide one page at a time, press the Page + and Page buttons on the remote. 3. To move through the guide one screen at a time, you can use either the Fast Forward and Rewind buttons or the right and left arrow around the OK button. 4. To move through the guide a full 24 hours, press the Day + and Day buttons on the remote. You cannot use the Day button to go back to programs that have already aired. You can use it to page back if you have moved ahead in the guide. 5. To see programs you missed, press the Skip Back button to go back one page in the guide. If there was a program you missed, you can search for other programs of the same name and schedule the DVR to record the program. 8


9 6. While in the Guide, if you press the GUIDE button a second time, you can view the Guide in Corner Guide view where similar information is displayed in a different format. 7. To browse through the guide using a Favorites list, press the Blue button or the FAV button. The list name will appear at the bottom of the screen. Keep pushing the Blue button to scroll through the different Favorites lists. 8. Events marked with the green NEW symbol signify a new episode of the program. 9. To exit the guide, either press the GUIDE button a third time or press the EXIT button on the remote. 9
10 Searching You can use the Search feature to find shows you would like to watch or record. Type in the full title or just a word in the title. This works great if you can t remember the full name of a program or movie. Perform a Title Search From the Guide 1. While viewing the Guide, select the desired program using the arrow buttons and press the Yellow button on the remote. 2. This will perform a full title search to return all shows with the same title. In this example, the search found all shows titled dog. 3. If there is a program in the search results you would like to record, you may schedule a recording from the list of search results. Use the Up/Down arrow buttons to highlight the program and press Record or OK on the remote. Follow the steps to schedule a recording. Perform a Partial or Full Title Search While viewing any program (and not in the Guide or other menus), press the Search button (left arrow) on the remote. This will display a search window where you can enter the first few letters or one or two words in the program title. 1. Use the arrow buttons on the remote to highlight the letters and press the OK button to select a letter. When you have entered all the text, arrow down to Submit and press the OK button or just push the Yellow button to start the search. 10
11 2. In this example, the user has searched for all programs with the word dog in the title. 3. If there is a program in the search results that you would like to record, you may schedule a recording from the list of search results. Use arrow buttons to highlight the program and then press OK or Record on the remote. Follow the steps to schedule a recording. 4. You may also continue to search for more programs by the same name. In this example, selecting Dog the Bounty Hunter and pushing the Yellow button will search for all scheduled airings of the program. Search History The Search History feature will allow you to save your searches so that they can be used again at a later time. Up to 18 searches may be retained in the Search History at any given time. The oldest searches will automatically be removed as a new search is performed. Frequently used searches may be saved to prevent removal, and may be sorted to keep them at the top of the History list. 1. Press the Search button (left arrow) on the remote. 2. Use the down arrow to select History 3. To delete a recent search, select the Red button on your remote. The selected search will be removed. 4. To save a recent search, select the Green button on your remote. The search will now have a yellow star icon next to it acknowledging that it is now a saved search. 5. To use a previous search, select the search and press the Yellow button on your remote. 6. To sort recent searches, select the Blue button on your remote. Searches will be sorted by saved searches in alphabetical order and then unsaved searches in alphabetical order. 11

12 Reminders Your TV can be set to remind you when a program is about to air and to automatically tune to a program you don t want to miss. 1. To set a reminder, press the GUIDE button and use the arrow buttons to find and highlight the upcoming program you wish to flag with a reminder. Press the Record button on the remote. 2. Arrow over to select Reminder. 3. Customize your settings for a one-time reminder, reminders only when a new episode will air, a reminder for all program airings. You can also select how many minutes before the program starts you want your reminder to appear (1, 2, 3, 4, 5, 10 or 15 minutes early) and whether to automatically tune to the channel when the program begins. Arrow down to highlight Create Reminder and press the OK button on the remote. 4. A reminder icon will appear next to the program on the guide to indicate a reminder has been set for that program. 5. A reminder pop-up will appear at the top of your TV screen at the time you designated. Press the OK button to begin watching the program at any time or wait for it to change channels automatically if you set the auto tune feature. Restart TV Using Restart TV Restart TV allows you to watch a program that is already in progress from the beginning. To restart a program: 1. Press the Guide button on your remote 2. If the program is able to be restarted, a green and white Restart icon will be on the left side of the channel 3. Using the Directional Arrows, highlight the program and press the Green button on your Remote Control to restart and watch from the start. 12

13 Cloud DVR Guide Recording Programs Your DVR service gives you the freedom to record the program you are watching as you are watching it, record a program while you watch another, or you can record a program you see in the program guide. You can also schedule a series recording so you always catch all episodes of your favorite programs. Note: If a program you record is either locked by parental rating settings or on a channel that is locked, the DVR will record the program but you will be required to enter a PIN to view it. Record What You Are Currently Watching If you re watching a program and you want to record the remainder of the program, you can easily start recording the show. 1. While watching a program, press the Record button on the remote. 2. Choose whether this is a one-time recording, a series recording, or select the Cancel to not set a recording. 3. Customize your recording selections for start and stop time and which folder to save the recording to. 4. The Reminder function may also be selected from this screen. Select the Reminder function if you would like your television to remind you when: a. The program is going to air b. A new episode of the program is going to air c. Each time a program will air d. You may set the reminder for 1, 2, 3, 4, 5, 10 or 15 minutes prior to the program start. e. You can also choose to have the television automatically tune to the channel when the recording starts. 5. A Red circle will briefly display in the top right of the screen indicating you are recording the program. 13


14 6. If you decide to stop recording the program before it is complete, press the Stop button. Choose from the options regarding how to save the partial recording. The options are: a. Continue Recording Does not stop recording the program. b. Stop Recording and Keep Saves the recording for future viewing. c. Stop Recording, Keep and Protect Saves the recording and protects it from automatic deletion. d. Stop Recording and Delete Deletes the recording from memory. Create a One-Time Recording Whether you re choosing a program from the Guide or if you are currently viewing the program when you decide to record it, the process to create a one-time recording is the same: 1. From the Guide, highlight the program you want to record and press the Record button on the remote. The recording options will display. 2. Choose to create a one-time recording. 3. Use the arrow keys to customize start & stop times, the folder to save the recording to, and auto tune preferences. 4. Arrow down to Create One Time Recording and press the OK button on your remote. 5. A Red circle will display in the guide indicating the program will record. 6. You will also be able to find the recording in the Future Recordings list. 7. If you change your mind and decide against recording the program, with the program highlighted on the guide, press the Stop button on the remote and the Red circle will be removed indicating the program will not record. 14


15 Record a Live Event (Live sporting event, award show, etc.) Recording a Live Event is essentially the same as recording any other program. However, with live events there s a chance of the event running longer than originally scheduled. You ll have the option to record up to one hour longer in order to be sure you record the entire event. An example would be a major league baseball game or football game. 1. From the Guide, highlight the program you want to record and press the Record button on the remote. The recording options will display. 2. The DVR recognizes from the program guide information that this is a live broadcast and warns you that it may extend past the designated end time. Use the Left/Right arrow keys to choose the Stop Recording option. Choose a 15 minute, 30 minute, or 60 minute extension time. 3. Arrow down to Extend Recording and press OK on the remote. Note: Live programming options will only be available when the Guide Data flags the programming as live programming. Record a Series Whether you re choosing a program from the Guide or if you re currently viewing the program when you decide to record it, the process to create a series recording is the same: 1. If you found a program that you would like to record in the Guide, highlight it and press the Record button on the remote. The recording options will display. 2. Arrow over to select Series and press OK on the remote. 3. The Series Recording Options will display. 15

16 a. Choose how many episodes to Keep at Most any given time. Options are 1 10 or All episodes. Use Left/Right arrow buttons to make your selection. b. Choose the Show Type you wish to record. You may choose to record All episodes of a program or only New episodes. c. Choose when to Start Recording. You can begin on time when the program is scheduled to begin. Or you can use the Left/Right arrow buttons to choose 1, 2, 3, 4, 5,10, 15, or 30 minutes early. d. Choose when to Stop Recording. You can stop on time when the program is scheduled to end. Or you can use the Left/Right arrow buttons to choose 1, 2, 3, 4, 5, 10, 15, 30, or 60 minutes late. e. Choose the Folder where you want to save the recording. By default the folder will be All Recordings but you may choose another existing folder or create a new folder. f. Select the Room you would like the Series Rule to apply to (Room must be within the Whole Home Group). g. Select Yes or No for the AutoTune feature h. Arrow down to Create Series Recording and press OK on the remote to save your changes. To cancel your changes, press the EXIT button or highlight Cancel and press OK on the remote. 4. A Red circle with an S will display in the guide indicating the program is part of a series recording. 5. You will also be able to see the scheduled recording in the Future Recordings list as well as in the Series Rules list. Watch a Recorded Program To access the list of recorded programs, press the LIST button on the remote. 1. From the list of recordings, use the Up/Down arrow buttons to choose the folder containing the recorded program you wish to watch. When you highlight a program, it expands to show more information, or you may need to press the INFO button depending on your configuration. 16

17 2. To start playback of the recording, press the Play button on the remote. 3. If the program is one that you had previously viewed and stopped in the middle, you will be asked if you would like to resume playback from where you left off or if you would like to restart from the beginning or if you would like to exit and return to the Recordings List. 4. As you play back a program, you have the ability to Fast Forward, Rewind, Pause, Replay, Jump Forward, Jump Backward or Stop the playback. 5. When you reach the end of the program, you will be asked if you would like to delete the recording. Select either Yes or No. Binge Mode Recording Playback When you re watching programming from a Series Recording and have multiple recordings, this mode will prompt you to watch the next recording in a series once you are done with the initial one. You can also highlight DELETE to delete the episode you just watched. 17

18 Then either RETURN TO TV, RETURN TO LIST, or choose the next recording in the list below. Folders Folders allow you to organize the recordings on your DVR by user, program type, or any other way you may choose. 1. To create folders, choose the [New Folder] option any time you are setting a new recording. Arrow down to select Create One Time Recording and select the OK button. 2. You will then be prompted to name the folder. Enter the folder name and select Submit. 3. Once the recording is complete, it will be placed in the designated folder and you can access it by pressing the LIST button. 4. To move a program to a different folder, find the recorded program by pressing the LIST button. With the program selected, press the Green button to reveal List Action options and choose Move to Folder and select the desired folder. Status Bar The status bar appears whenever you Skip Forward, Skip Back, Pause, Rewind, or Fast Forward a live or recorded program. It gives you information such as the channel you re viewing, the title of the program you re watching, and the length of the live buffer. 18
19 Pause As you watch live TV or recorded programs, press the Pause button and the programming on the screen instantly freezes. Press the Play button to resume normal play of the program from the point where it was paused. Rewind Do you need to see something again? Press the Rewind button. Press it again up to four times to increase the rewind speed. x4, x15, x60 and x300 will display next to the status bar. x4 is the slowest setting and x300 is the fastest. To slow the Rewind speed, press the Fast Forward button. At the point that Rewind mode is slowed as far is it goes, you will return to normal mode and then Fast Forward mode. Press the Play button to resume normal play directly. Fast Forward Press the Fast Forward button to move forward in a recorded program. Press it again up to four times to increase the fast forward speed. x4, x15, x60 and x300 will display next to the status bar. x4 is the slowest setting and x300 is the fastest. To slow the Fast Forward speed, press the Rewind button. At the point that Fast Forward is slowed as far as it goes, you will return to normal mode and then to Rewind mode. Press Play to resume normal play directly. For programs you are watching live, Fast Forward mode will be activated if you have paused or rewound the program. Skip Back With Skip Back, you can go back to see the last play of the game or replay the last scene of your movie. Just press the Skip Back button on your remote to replay the last 10 seconds. Press the Replay button repeatedly to continue skipping back in 10 second increments. Return to Live TV Any time you pause or rewind a live program, the show continues to be broadcast in real time and saved in the buffer. To return to live programming, press the LIVE button. 19
20 Delete a Recording In addition to the option to delete a recording when you have finished viewing it, there are other options for deleting a recording. 1. To access a list of recorded programs, press the LIST button on the remote. 2. From the list of folders, choose the folder that contains the recordings you want to delete and use the Up/Down arrow buttons to highlight the entire folder or the individual episode you want to delete. 3. Press the Red button to Delete the recording or group of recordings. Or, press the Green button to access the Actions menu and then choose Delete. You have the option to cancel the process. Using Bookmarks Your DVR is capable of marking specific spots in a recorded program, called Bookmarks. It s an easy way for you to mark your spot in a program that you might not be able to watch in its entirety, bookmark a great play in a sporting event, or the end of a commercial. 1. To work with bookmarks, press the Play button on the remote to display the status bar. 2. As you are recording a program or watching a recorded program, press the Blue button on the remote to add a Bookmark. You ll notice a black line in the status bar. 20

21 3. When you return to the program, you can press the Up/Down arrow buttons on the remote to advance to your bookmarked spot. If there are multiple Bookmarks, keep pressing the Up/Down arrow buttons until you re at the desired place in the program. 4. You can remove a Bookmark by moving to the Bookmark and pushing the Blue button within three seconds. Bookmarks are helpful in the case of a television movie that you keep and watch over and over. You can bookmark the end of commercials so that you could skip over those sections of the movie. Working with Multiple Streams Your DVR is capable of recording two programs while you watch a third program. You can easily tell what your DVR is doing by pressing the OK button. When you see the red light indicating that something is being recorded on the DVR, you can quickly find out what program is recording. 1. Press the OK button on the remote to see what is Now Playing. In this example, the television is tuned to channel 654 as indicated by the TV symbol. Channel 650 is recording as indicated by the red circle symbol. Channel 635 is a recording that was recently watched indicated by the red circle with the yellow check. 2. You may change to view any of the listed programs by using the Up/Down arrow keys on the remote and pressing the OK button. For example, you can choose to view the program as it is being recorded on Channel When you change to view the program that is recording, the system will start at the last time you viewed that program. You can go back to the beginning of the program using the Rewind button or jump with the down arrow. You have access to Rewind, Skip Back, Skip Forward, and Fast Forward to move within the recording. Recording Conflicts The DVR can record a limited number of programs at a time. If you attempt to record more programs than the system is capable of recording at one time, the DVR will warn you of a recording conflict. 1. You may choose to either resolve the conflict or to cancel your option to record the program. 2. When you choose Resolve Conflict, a guide screen will appear showing the other programs currently scheduled to be recorded. Highlight the program you wish to stop recording and press the Stop button on the DVR controls. Choose from the stop recording options. You may now choose the alternate program you wish to record from the guide and press the Record or OK button. 21

22 Current Recordings Press the LIST button one time to access the list of Recording Folders. The All Recordings folder appears first and includes all of the recordings you have stored on your DVR. If grouping is enabled in your setting, each program will also have a folder including all recordings of that program. To move in and out of the folders, use the Left/Right arrow buttons. At the top of the screen you see the number of folders and the amount of space you have free on the DVR. When you are in a program folder: Delete a recording by pressing the Red button on the remote. View the available Actions by pressing the Green button on the remote. Actions include Play Recording, Edit Item, Information, Go Back, Move to Folder, Protect, Sort List, Close Actions and Delete Recording. Search for programs within the Recording folders by pressing the Yellow button on the remote. Sort the Current Recordings by pressing the Blue button on the remote. By default Current Recordings are displayed by date and time. If you press the Blue button, programs will be sorted by Name. Press the Skip Forward button to view recordings by title rather than group. Current Recording Actions To view the available Actions, press the Green button on the remote. The Actions list displays on the right hand side of the screen. To make it easy for you, the list of Actions on the screen shows the corresponding button that you could press on the remote. It is also possible to highlight your selection and then press OK on the remote. 1. Select Play Recording to start the currently selected recording. 2. To extend the end recording time on a recording in progress, select Edit Item. 3. To show or hide Information about the recording, press the INFO button. Highlight a recording and pausing for a brief moment will also display the information. 4. To Go Back to the previous screen showing All Recording Folders, press LIST. 5. To move the recording to a specific folder arrow to select Move To Folder. 6. To group the recordings by their titles, select the Skip Forward button. 7. To Protect a recording so that it does not automatically get deleted, use the arrow buttons to highlight the protect option and then press the OK button. When you do, a shield symbol will display next to the program name. If you want to remove protection from the recording, choose Protect again. 8. To Sort the List of Current Recordings, press the Blue button on the remote. At the bottom of the screen you will see the sort change to being sorted by Name. Press the Blue button again to change the sort back to date and time. 9. To Close the Actions, either press the Green button or press the EXIT button on the remote. 10. To Delete the Recording, press the Red button on the remote. Select Yes or No to delete and then press the OK button. 22
23 Future Recordings Press the LIST button a second time to view your list of Future Recordings. These are programming events that are waiting to happen. At the top of the screen you see the number of recordings and the amount of space you have free on the DVR. When you are in a program folder: Delete a future recording by pressing the Red button on the remote. View the available Actions by pressing the Green button on the remote. Actions include Edit Item, Information, Go Back, Move to Folder, Sort List, Close Actions, and Delete Recording. Search for programs within the Recording folders by pressing the Yellow button on the remote. Sort the Current Recordings by pressing the Blue button on the remote. By default, Current Recordings are displayed by date and time. Press the Blue button, programs will be sorted by Name. Press the Skip Forward button to view recordings by title rather than group. Future Recording Actions To view the available Actions, press the Green button on the remote. The Actions list displays on the right side of the screen. To make it easy for you, the list of Actions on the screen shows the corresponding button that you could press on the remote. You can also highlight your selection and then press the OK button on the remote. 11. To Edit the Item, press the OK button on the remote. You can change the time that you Start Recording and Stop Recording. This allows you to begin and/or end recording to allow for time padding around the program. 12. To show or hide Information about the recording, press the INFO button. This expands or hides the view of information. Highlight a recording and pausing for a brief moment will also display the information. 13. Go back to thefuture Recordings Folder List press the LIST button. 14. To group the recordings by their titles, select the Skip Forward button. 15. To Move the recording to a specific folder arrow to select Move To Folder. 16. To Sort the List of Future Recordings, press the Blue button on the remote. At the bottom of the screen you will see the sort change to being sorted by Name. Press the Blue button again to change the sort back to date and time. 23
24 17. To Close the Actions, either press the Green button or press the EXIT button on the remote. 18. To Delete the Recording, press the Red button on the remote. Select Yes or No to delete and then press the OK button. Series Recording Rules Press the LIST button a third time to view your Series Recording Rules. These are the programs that you have set to record on a regular basis. You can make adjustments to your series recording rules from this screen. At the top of the screen you ll see the number of Series Rules and the amount of space you have free on the DVR. 1. Delete a rule by pressing the Red button on the remote. 2. View the available Actions by pressing the Green button on the remote. Actions include Edit Item, Information, Increase Priority, Decrease Priority, Sort List, Close Actions and Delete Rule. 3. Search for programs in the recordings folders by pressing the Yellow button on the remote. 4. Sort the Series Rules by pressing the Blue button on the remote. By default, Series Rules are displayed by Priority. If you press the Blue button, programs will be sorted by Name. Series Rules Actions To view the available Actions, press the Green button on the remote. The Actions list displays on the right side of the screen. To make it easy for you, the list of Actions on the screen shows the corresponding button that you could press on the remote. You can also highlight your selection and then press the OK button on the remote. 1. To Edit the Item, press the OK button and choose from these options to edit: 24 a. Choose how many episodes to Keep at Most any given time. Options are 1 10 or All episodes. Use the arrow buttons to make your selection. b. Choose the Show Type that you wish to record. You may choose to record all episodes of a program or just new episodes. c. Choose when to Start Recording. You can begin on time when the program is scheduled to begin. Or you can use the arrow buttons to choose 1, 2, 3, 4, 5,10, or 15 minutes early. d. Choose when to Stop Recording. You can stop on time when the program is scheduled to end. Or you can use the arrow buttons to choose 1, 2, 3, 4, 5,10, 15, 30, 45, or 60 minutes late.
25 e. Finally choose the Folder where you want to save the recording and whether you d like your television to auto tune to the channel. Arrow to highlight Update Series Recording and press the OK button on the remote to save your changes. To Cancel your changes, highlight Exit and press the OK button on the remote. 2. To show or hide information about the recording, press the INFO button. This expands or hides the view of information. Highlighting a recording and pausing for a brief moment will also display the information. 3. The priority of programs is represented by their order in the list. The top program on the list is the highest priority and the bottom one is the lowest priority. So, if you have several programs scheduled to record at once and the system is unable to provide resources to record all of them, the DVR will record based on highest priority. To change Priority, highlight the Action to Increase or Decrease Priority and then press the OK button to adjust priority. 4. To sort the list of Series Rules, press the Blue button on the remote. By default Series Rules are sorted by their Priority. You can change them to sort by Name. Press the Blue button again to change the sort back to Priority. 5. To close the actions, either press the Green button or press the EXIT button on the remote. 6. To delete the rule, press the Red button on the remote. Select Yes or No to delete and then press the OK button. Recordings Menu Most everything that you do with the LIST button on the remote you can do in the Main Menu. 1. Access the Main Menu by pressing the MENU button on the remote. Under Recordings you have options for Current, Future, and Series. 2. If you arrow to the right, highlight Current and press the OK button, you can view the list of recorded programs saved on your DVR. This is the same as if you would press the LIST button on the remote. 3. If you arrow to the right, highlight Future and press the OK button, you can view the list of programs that you have scheduled to be recorded. This is the same as if you would press the LIST button two times on the remote. 25


26 4. If you arrow to the right, highlight Series and press the OK button, you can view the list of series rules. The same as if you would press the LIST button three times on the remote. Important Note Your remote can be programmed to power off the television and the set top at the same time. However, if they do become out of synch and the TV is still on but the set top is turned off, you will see this message on the TV screen. Press the OK button on your remote to turn the power to the set top back on. TV Main Menu Along with being able to access almost all functions with specific buttons on the remote, you can access these controls through the Main Menu. 1. Access the main menu by pressing the MENU button on the remote. Under TV you have options for Guide Corner, Guide - Full, Now Playing, Search, What s Hot. 26


27 2. If you arrow to the right, highlight Guide Corner and press the OK button, you can view the channel guide. This is the same as when you would press the GUIDE button on the remote two times. 3. If you arrow to the right, highlight Now Playing and press the OK button, you can view what is currently playing as well as any programs being recorded. This is the same as when you would press the OK button on the remote. 4. If you arrow to the right, highlight Search and press the OK button, you can search for a program. This is the same as when you would press the Search button on the remote. 27


28 5. If you arrow to the right, highlight What s Hot and press the OK button, you can view the What s Hot menu. Create a Favorites List If you d like to be able to surf in a specific set of channels, you can create Favorites lists. By default, your set top box has grouped channels into several pre-set Favorites lists including: All Channels, Subscribed Channels, Movie Channels, Sports Channels, Music Channels, Entertainment Channels, Kids Channels, News Channels, Business News Channels, Infotainment Channels, Religious Channels, Regional Channels and HD Channels. You can create up to five additional Favorites lists. 1. Press the MENU button to access the Main Menu. Highlight TV. Use the arrow buttons to highlight Edit Favorites and then press the OK button. 2. If you re not already in a New List by default, arrow right to access a New List. 3. All available channels will display. Use the Up/Down arrow buttons on the remote to move through the list of channels. When you are on a channel you want to add to your list, press the OK button to mark it as part of this Favorites list. 4. To name the list, press the Yellow button on the remote. 28


29 5. Use the arrow buttons to move through the letters on the screen. Press the OK button on the remote to choose a letter. When you have named your list, arrow down to select the Submit to accept your name. 6. To Save your favorites list, press the Blue button on the remote and then press the OK button. 7. To Delete a favorites list, press the Red button on the remote. 8. Press the EXIT button on the remote to leave the menu. Favorite List Actions To view the available Actions associated with each Favorites List, press the Green button on the remote. The Actions list displays on the right side of the screen. To make it easy, the list of Actions on the screen shows the corresponding button that you could press on the remote. You can also highlight your selection and then press the OK button on the remote. 1. Selecting the Discard Changes option will exit without making any changes. 2. Rename List allows you to change the name of this list without changing the channels that were previously selected for this list. 3. Save List will save any changes made to this Favorites List. 4. Delete List will delete this list from your Favorites. 5. Invert List lets you select or deselect channels in this Favorites List. For example, if you have selected 10 channels in this Favorites List and tap OK on Invert List, those 10 channels will be deselected and all of your other subscribed channels will be selected. If you tap OK again those 10 previously selected channels will be back in the list while the rest of the subscribed channels will be removed. Access a Favorites List 1. Press the FAV button on the remote. 2. All Favorites lists will display. Lists that you have created will display with a star. 3. Arrow down to highlight the Favorites list you want to use and then press the OK button on the remote. The list you have selected will show just above the channel number. 29

30 4. With the favorites list selected, you will browse channels only within that list. Recent Calls 1. You can also access the Recent Calls list by pressing the Green button on the remote. 2. To delete an entry on the Recent Calls list, highlight it and press the Red button on the remote. Apps Menu The Apps option allows you to view the local weather, play games and see popular programming. 1. Press the Menu button on your remote. 2. Using the Directional Arrows, highlight the Apps option and press OK. a. Games b. Weather c. What s Hot Games The Games option allows you to play Minesweeper, Solitaire, or Sudoku. To play a game, do the following: 1. Press the Menu button on your remote. 2. Using the Directional Arrows, highlight Settings and press OK 3. Using the Directional Arrows, highlight Apps and press OK 4. Using the Directional Arrows, highlight Games and press OK 5. Using the Directional Arrows, highlight the game you would like to play and press OK 30
31 Weather To view the current weather information: 1. Press the Menu button on your remote. 2. Using the Directional Arrows, highlight Settings and press OK 3. Using the Directional Arrows, highlight Apps and press OK 4. Using the Directional Arrows, highlight Weather and press OK 5. A window will appear with the most current weather data for the selected area 6. To view the upcoming Forecast, press the Green button on your remote. 7. To view the Radar, press the Yellow button on your remote. 8. To return to programming, press the Exit button on your remote. What s Hot To see what the most popular programming that is being viewed is, do the following: 1. Press the Menu button on your Remote Control 2. Using the Directional Arrows, highlight Settings and press OK 3. Using the Directional Arrows, highlight Apps and press OK 4. Using the Directional Arrows, highlight What s Hot and press OK 5. A window will appear with the most current popular channel information for the local area 6. The more blue people you see, the more people are watching the program Settings Menu You have the ability to control certain aspects of how your service works according to your preferences. 1. Access the main menu by pressing the MENU button on the remote. Under Settings you have options for Apps, Display, Edit Favorites, Guide, Parental, Phone, Recording. 31
32 Apps Settings The Apps option allows you to view the local weather, play games and see popular programming. 1. Press the Menu button on your remote. 2. Using the Directional Arrows, highlight the Apps option and press OK. Games Weather What s Hot Games The Games option allows you to play different games. 1. Press the Menu button on your remote. 2. Using the Directional Arrows, highlight Settings and press OK. 3. Using the Directional Arrows, highlight Apps and press OK. 4. Using the Directional Arrows, highlight Games and press OK. 5. Using the Directional Arrows, highlight the game you would like to play and press OK. Weather To view the current weather information: 1. Press the Menu button on your remote. 2. Using the Directional Arrows, highlight Settings and press OK. 3. Using the Directional Arrows, highlight Apps and press OK. 4. Using the Directional Arrows, highlight Weather and press OK. 5. A window will appear with the most current weather data for the selected area. 6. To view the upcoming Forecast, press the Green button on your remote. 7. To view the Radar, press the Yellow button on your remote. 8. To return to programming, press the Exit button on your remote. What s Hot To see what the most popular programming that is being viewed: 1. Press the Menu button on your remote. 2. Using the Directional Arrows, highlight Settings and press OK. 3. Using the Directional Arrows, highlight Apps and press OK. 4. Using the Directional Arrows, highlight What s Hot and press OK. 5. A window will appear with the most current popular channel information for the local area. 6. The more blue people you see, the more people are watching the program. 32

33 Display Settings If you arrow to the right, highlight Display, and press the OK button, you can change how the set top box should display specific things. Typically, these items are set at the time of installation and not changed. 1. Turn Closed Captioning On or Off. 2. Set the Audio Language to Descriptive Audio, Canadian Descriptive Audio, English, Spanish, or French. 3. Set Audio Format to Stereo, Dolby Digital, or Dolby Digital Change your Connector settings to Coaxial, Composite, S-Video, Component or HDMI. 5. Set the TV Type to either 16:9 or 4:3. 6. Select the Output Resolution for the television. 7. View the setting for Conversion Mode, Original Size or Fit to Screen (this may also be changed temporarily by pressing the * button on the remote). Guide Settings If you arrow to the right, highlight Guide and press the OK button, you can change how Guide information displays. General Settings 1. Determine what you want to do after changing the channel. Should guide stay open or should it close upon changing the channel? 2. Set Channel Filter to Yes or No. When set to Yes, your favorite selection will be remembered (the favorites list that you selected) 33

34 Guide Settings 1. Determine the Number of Rows to display in the Time Guide. Options are 3, 4, 5, 6, 7, or Determine the Number of Columns to show in the Time Guide. Options are 3, 4, 5, 6, 7, or Determine how long to wait for Inactivity Timeout before the guide disappears. Options range from 1 second to 2 minutes, to never. 4. Specify the Scrolling Behavior to be either channel by channel or page by page as you move through the guide. Browser Settings 1. Specify how long to wait for Inactivity Timeout before the Browser Bar disappears. 2. If you feel you have changed something by accident, you can always choose to set all items back to the original default settings. Parental Controls If you arrow to the right, highlight Parental and press the OK button, you will find Parental Control options to Change PIN, Edit Locked, Set Ratings, Time Restrictions, Cancel Override, and Options. Change PIN 1. Within the Parental menu, arrow to the right and select the Change PIN category (For the Ratings PIN or Purchase PIN). 2. Use the arrow button to highlight change PIN and press the OK button. 3. Enter the Old PIN, arrow down and enter your New PIN, and then arrow down to confirm the New PIN. Select OK to save your new PIN. Until you change it, the default PIN is Once the PIN has been successfully changed, a prompt will appear. Press the OK button. 34


35 Edit Locked 1. Within the Parental Menu, arrow to the right and select the Edit Locked category. The Edit Locked category allows you to lock specific channels. This will require you to enter a PIN in order to view programming on that channel. 2. A list of channels will display. Use the Up/Down arrow buttons to move through the list of channels. When you arrive at one that you want to lock, press the OK button and the channel will be added to the locked list. 3. When you are finished making your selections, press the Blue button on the remote to lock the selected channels. 4. Press the Red button on the remote to discard the changes and return to normal viewing. Set Ratings 1. Within the Parental menu, arrow to the right and select the Set Ratings category. The Set Ratings category allows you to set access to programming based on TV and Movie ratings. This will require that a PIN be entered in order to view programming at or beyond the rating you specify. 2. Use the Left/Right arrow buttons to choose a TV Rating. Options are: TV-Y, TV-Y7, TV-Y7 FV, TV-G, TV-PG, TV-14, TV- MA, off. 35


36 3. Use the Left/Right arrow buttons to choose a Movie Rating. Options are: G, PG, PG-13, R, NC-17, Adults Only, off. Time Restrictions 1. Edit Time Restrictions prompt 2. Within the Parental menu, arrow to the right and select the Time Restrictions category. The Time Restrictions category allows you to set time periods per day where television access requires a PIN. These time restrictions may be set by selecting the Green button to Add Restriction. A new restriction will appear to the right of the week schedule. Arrow to the right to select a day and press the OK button. 3. Once a day has been selected, use the Up/Down arrows to select a time and either AM or PM for both start and end time for the time restriction. When you are done creating time restrictions, select the EXIT button. 36


37 Watch a Locked Channel If you have locked channels from view, you will need to enter a PIN in order to access programming on that channel. See the Settings Menu section for instructions on locking channels. 1. In this example, the channel is locked; you are prompted to enter a PIN. Until you change it through the Settings menu, the default PIN is The Enter PIN screen will remain until a correct PIN is entered or until you press Exit. 3. Pressing Exit will bring up a screen indicating an invalid PIN was entered. Press the GUIDE button to browse for another program to watch. This same result happens when selecting a locked channel from the Guide. Program Outside the Parental Rating Settings If you have set parental ratings in order to prevent viewing shows beyond a rating that you find acceptable, you will need to enter a PIN in order to access programming beyond your specified rating. See the Understanding the Settings Menu section for instructions on setting parental controls. 1. When the program is rated beyond the viewing limits set, you are prompted to enter a PIN. 37


38 2. The Enter PIN screen will remain until a valid PIN is entered or until you press Exit. 3. Pressing Exit will bring up a screen indicating an invalid PIN was entered. Press the GUIDE button to browse for another program to watch. This same result will occur when keying in a channel number on the remote. Cancel Override 1. Within the Parental menu, arrow to the right and select the Cancel Override category. The Cancel Override category allows any previous PIN overrides for an extended period of time to be cancelled. To cancel an existing override, select OK within the Cancel Override prompt. Once the override has been cancelled, the parental PIN will need to be used for all Locked and Rated channels. Options 1. Within the Parental menu, arrow to the right and select the Options category. The Options category requires the Ratings PIN to be entered in order to update any settings. Enter your PIN and select OK and press the OK button 38


39 2. Once the Ratings PIN has been entered, you may choose to have Locked Channels and/or Show Restricted Titles visible. Selecting a No value for either setting will cause these programs to not appear in the Guide. Select OK within the prompt and press the OK button 3. A Parental Controls Options prompt will appear once the changes have been saved successfully. Voice Settings 1. From the Settings Menu, arrow to the right and choose Phone to adjust the Caller ID and Voice Mail Settings. 2. From the Phone Options menu you can turn pop-ups on or off. You may also adjust the length of time the pop-up remains on the screen from 6, 9, 12, 18, or 21 seconds. 3. To save your changes, arrow down to Save and press the OK button. 39


40 Caller ID and Message Waiting Indication on the TV If you are subscribed to Caller ID, it is possible to have your Caller ID information display on the TV as it displays on your regular Caller ID device. Here is an example of Caller ID display on the TV: Press the Green button at any time to see your Caller ID Recent Calls list. This handy feature allows you to review a list of phone numbers that have called your landline phone service. To delete numbers from your recent calls list use the arrow button to highlight the number you want to delete and press the Red button on your remote. Recording Settings From the Settings Menu, arrow to the right and choose Recording to make changes to your settings for recorded programs. 40
41 Group Titles Group all recorded episodes with the same title rather than listing each episode individually. The Skip Forward button will toggle between Grouped and Ungrouped listings. Auto Expand Selection Choose this option to automatically display information for the selected recording. Show Folders When the Show Folders field is set to Yes, all recordings and future recordings will be grouped into folders when you view your Recordings Lists. With Show Folders set to No, all recordings and future recordings will be displayed individually. Keep in mind that if Group Titles is set to Yes, programs will be grouped together even if Show Folders is set to No. When viewing your Recording Lists the Skip Forward button will toggle between folders and individual recordings. Inactivity Timeout This setting adjusts the length of time the Status Bar remains on the screen while you are watching a recorded program after a period of inactivity. Choose from 1-10, 12, 15, 30, 45 seconds, one or two minutes, or Never. Skip Display Choose between displaying the playback bar or the fast forward/replay icons during recorded show playback. Auto Reverse Select if you would like the playback to include an auto reverse feature Always or Never. Skip Ahead Skip ahead while watching a recording or while watching live TV. This can be set from seconds. Skip Back Skip back while watching a recording or while watching live TV. This can be set from seconds. 41
42 TV Parental Guidelines Ratings All Children This program is designed to be appropriate for all children. Whether animated or live-action, the themes and elements in this program are specifically designed for a very young audience, including children from ages 2-6. This program is not expected to frighten younger children. Directed to Older Children This program is designed for children age 7 and above. It may be more appropriate for children who have acquired the developmental skills needed to distinguish between make-believe and reality. Themes and elements in this program may include mild fantasy violence or comedic violence, or may frighten children under the age of 7. Therefore, parents may wish to consider the suitability of this program for their very young children. Directed to Older Children - Fantasy Violence For those programs where fantasy violence may be more intense or more combative than other programs in this category, such programs will be designated TV-Y7-FV. General Audience Most parents would find this program suitable for all ages. Although this rating does not signify a program designed specifically for children, most parents may let younger children watch this program unattended. It contains little or no violence, no strong language and little or no sexual dialogue or situations. Parental Guidance Suggested This program contains material that parents may find unsuitable for younger children. Many parents may want to watch it with their younger children. The theme itself may call for parental guidance and/or the program may contain one or more of the following: some suggestive dialogue (D), infrequent coarse language (L), intense sexual situations (S), or intense violence (V). 42
43 Parents Strongly Cautioned This program contains some material that many parents would find unsuitable for children under 14 years of age. Parents are strongly urged to exercise greater care in monitoring this program and are cautioned against letting children under the age of 14 watch unattended. This program may contain one or more of the following: intensely suggestive dialogue (D), strong coarse language (L), intense sexual situations (S), or intense violence (V). Mature Audience Only This program is specifically designed to be viewed by adults and therefore may be unsuitable for children under 17. This program may contain one or more of the following: crude indecent language (L), explicit sexual activity (S), or graphic violence (V). This information was obtained from the TV Parental Guidelines website at & the Motion Picture Association of America s website at Motion Picture Association of America Ratings General Audience A G-rated motion picture contains nothing in theme, language, nudity, sex, violence, or other matters that, in the view of the Rating Board, would offend parents whose younger children view the motion picture. The G rating is not a certificate of approval, nor does it signify a children s motion picture. Some snippets of language may go beyond polite conversation, but they are common everyday expressions. No stronger words are present in G-rated motion pictures. Depictions of violence are minimal. No nudity, sex scenes, or drug use are present in the motion picture. Parental Guidance Suggested A PG-rated motion picture should be investigated by parents before they let their younger children attend. The PG rating indicates, in the view of the Rating Board, that parents may consider some material unsuitable for their children, and parents should make that decision. The more mature themes in some PG-rated motion pictures may call for parental guidance. There may be some profanity and some depictions of violence or brief nudity. But these elements are not deemed so intense as to require that parents be strongly cautioned beyond the suggestion of parental guidance. There is no drug use content in a PG-rated motion picture. Parents Strongly Cautioned A PG-13 rating is a sterner warning by the Rating Board to parents to determine whether the children under age 13 should view the motion picture, as some material might not be suited for them. A PG-13 motion picture may go beyond the PG rating in theme, violence, nudity, sensuality, language, adult activities or other elements, but does not reach the restricted R category. 43

44 Restricted An R-rated motion picture, in the view of the Rating Board, contains some adult material. An R-rated motion picture may include adult themes, adult activity, hard language, intense or persistent violence, sexually-oriented nudity, drug abuse or other elements, so that parents are counseled to take this rating very seriously. Children under 17 are not allowed to attend R-rated motion pictures accompanied by a parent or adult guardian. Parents are strongly urged to find out more about R-rated motion pictures in determining their suitability for their children. Generally, it is not appropriate for parents to bring their young children with them to R-rated motion pictures. No One 17 and Under Admitted An NC-17 rated motion picture is one that, in the view of the Rating Board, most parents would consider patently too adult for their children 17 and under. No children will be admitted. NC-17 does not mean obscene or pornographic in the common or legal meaning of those words, and should not be construed as a negative judgment in any sense. The rating signals that the content is appropriate only for an adult audience. An NC-17 rating can be based on violence, sex, aberrational behavior, drug abuse or any other element that most parents would consider too strong and therefore offlimits for viewing by their children. 44

45 Pay Per View Pay Per View events may be purchased through the program guide. Programs that are available for Pay Per View purchase will appear in the program guide with a PPV gold ticket symbol, the event price, and the air time. To purchase a Pay Per View event: Select the Pay Per View event and press the OK button. 1. A Purchase Information window will appear showing: a. Event (Title) b. Start Time c. End Time d. Price 2. Select whether or not the purchased Pay Per View event should be shared with all set top boxes in the defined Whole Home Group. Unless the Share Whole Home field is set to Yes, the Pay Per view event will only be viewable on the set top box that the event is purchased from. 3. Enter your Purchase PIN. ManageMyTV App 1. Contact your Celect Communications TV provider to set up a Username and Password. 2. Use the Google Play Store or Apple Store, to download the ManageMyTV App by Innovative Systems. 3. Launch the App 4. In the Service Provider Address enter managemytv.celectcom.net 5. Enter your Username 6. Enter your Password a. If you re using Android Version: i. Tap the Back button on your Phone ii. Reenter your Username & Password iii. Tap the Sign In button b. If you re using Apple Version: i. Touch the Sign In button 45
46 Set Recordings To schedule a recording: 1. From the program guide, touch the program you would like to record. 2. Touch the Record button 3. Select the Recording Type: a. One Time b. Series 4. Enter Start Time 5. Enter Stop Time (Scheduled Time up to 60 minutes later) 6. Select where you would like to Record to (if multiple options) 7. Select Folder you would like to Record to (if applicable) 8. Select if you would like to Record from Start of program (if applicable) 9. Tap the Record button - You will now see a red dot next to the program that is being recorded. Cancel Recordings To cancel a recording: 1. From the program guide, touch the program you want to cancel recording 2. Tap the Cancel button Change Channel To change a channel on a Set Top Box from the app: 1. From the app s Program Guide, tap the program you want to watch 2. Tap the Watch button 3. Select the Set Top Box that you would like to watch the program on ManageMyTV on PC 1. In your Internet browser, go to managemytv.celectcom.net 2. Enter your Username 3. Enter your Password 46
47 WatchTVEverywhere With WatchTVEverywhere, you can watch select TV programs from devices such as smartphones, tablets, laptops, desktops, and Smart TVs. WatchTVEverywhere works anywhere you can receive an Internet signal*: inside your house, office, shopping mall, hotel, airport, vacation home, etc. It includes live TV for some channels & has full episodes of current TV shows. *The quality of WatchTVEverywhere signals while roaming (airports, stores, etc.) will vary depending on the strength of the signal. Data usage and roaming charges apply. Flash-enabled browsers are required to watch TV programs. **Programming availability may vary. Registering 1. Go to celectcom.net/wtve 2. In the dropdown menu next to Select your TV provider scroll down and choose your TV provider: Celect Bloomer Telephone Celect Citizens Connected Celect Elmwood/Spring Valley Celect Mosaic Telecom Celect West WI Telephone 3. Click Register 4. Fill in the form. (A copy of your bill will be helpful here!) 5. Click on Register 6. Check the address you provided. You will find an with your WatchTVEverywhere activation link. 7. Click on the link to complete the registration process. 8. You can now enjoy WatchTVEverywhere! Watch WTVE 1. Go to celectcom.net/wtve 2. In the dropdown menu next to Select your TV provider scroll down and choose your TV provider: Celect Bloomer Telephone Celect Citizens Connected Celect Elmwood/Spring Valley Celect Mosaic Telecom Celect West WI Telephone 3. Click log in 4. Enter and password 5. Select the TV Network you want to watch. 6. Click the network and you will see a list of the available programs. Please be sure to check your data plan before you start watching on a smart phone or a wireless network WatchTVEverywhere programs transmit a lot of data, which can become expensive if you have a limited data plan. 47
, RGB, S-Video, and Analogue Audio.")
 The RF Output/Input is for connecting your Set Top Box to another TV. The Power is the connector for the DC power adapter. The USB (Universal Serial Bus) is a USB 2.")
48 Set-Top Box Guides Amino A140 Front Panel View Rear Panel View Below is an explanation for each of the connections listed above. The Analogue AV Output is for Composite Video, Component (YPrPb), RGB, S-Video, and Analogue Audio. The HDMI (High-Definition Multimedia Interface) connects to a high-definition TV or home theater receiver with an HDMI input (for a DVI input, use an HDMI-to-DVI adapter.) The RF Output/Input is for connecting your Set Top Box to another TV. The Power is the connector for the DC power adapter. The USB (Universal Serial Bus) is a USB 2.0 connector. The Ethernet is a RJ-45 port for IP video output. The Digital Audio Out is for a S/PDIF Optical Cable for surround sound systems. 48
, RGB, S-Video, and Analogue Audio. The Digital Audio Out is for a S/PDIF Optical Cable for surround sound systems.")
 The Reset Button is for restoring the Set Top Box to the factory settings. The USB (Universal Serial Bus) is a USB 2.0 connector. The Ethernet is a RJ-45 port for IP video output.")
49 Amino A540 DVR Below is an explanation for each of the connections listed above. The RF Output is for connecting your Set Top Box to another TV. The Analogue AV Output is for Composite Video, Component (YPrPb), RGB, S-Video, and Analogue Audio. The Digital Audio Out is for a S/PDIF Optical Cable for surround sound systems. The HDMI (High-Definition Multimedia Interface) connects to a high-definition TV or home theater receiver with an HDMI input (for a DVI input, use an HDMI-to-DVI adapter.) The Reset Button is for restoring the Set Top Box to the factory settings. The USB (Universal Serial Bus) is a USB 2.0 connector. The Ethernet is a RJ-45 port for IP video output. The Power is the connector for the DC power adapter 49
 is a USB 2.0 connector.")

50 ADB 3800 Below is an explanation for each of the controls and lights listed above. The Power button, if held for less than five seconds, turns the Set Top Box on or off. If held for five seconds longer, it restarts the TV receiver. When the Set Top Box is on the light is green. The USB (Universal Serial Bus) is a USB 2.0 connector. The HD (High-Definition) light is green when the Set Top Box is receiving a high-definition program. The Menu button displays the Menu. The Directional Arrows allow you to change the channels and move through the program guide. The OK button allows you to select channels or Menu options. Below is an explanation for each of the connections listed above. The TV To Wall (Video In) is for coaxial input for digital signal. The HDMI (High-Definition Multimedia Interface) connects to a high-definition TV or home theater receiver with an HDMI input (for a DVI input, use an HDMI-to-DVI adapter.) The Ethernet is a RJ-45 port for IP video output. The Pr, Pb, & Y are for RCA component video outputs to an HDTV. The S-Video (Super Video or Separated Video) is for a high quality video output to a VCR or TV that accepts S-Video. It carries video only; you must also connect to the TV or home theater receiver for audio. The Optical is for a Toslink (S/PDIF) audio output to a digital home theater receiver. The Video Out is for RCA video outputs to a TV, VCR, or other device. The Audio Out are for left and right RCA stereo audio outputs. The To TV (Video Out) is for coaxial output to connect the TV receiver to the TV or VCR. The USB (Universal Serial Bus) is a USB 2.0 connector. The Power is the connector for the DC power adapter. 50


51 ADB 5721WNX Below is an explanation for each of the controls and lights listed above. The Power button, if held for less than five seconds, turns the Set Top Box on or off. If held for five seconds longer, it restarts the TV receiver. When the Set Top Box is on the light is green. The HD (High-Definition) light is green when the Set Top Box is receiving a high-definition program. The Menu button displays the Menu. The Directional Arrows allow you to change the channels and move through the program guide. The OK button allows you to select channels or Menu options. Below is an explanation for each of the connections listed above. The HDMI (High-Definition Multimedia Interface) connects to a high-definition TV or home theater receiver with an HDMI input (for a DVI input, use an HDMI-to-DVI adapter.) The HCNA (HomePNA over Coax) is the technology, which allows to utilize existing coaxial cable as the network s physical wiring to connect PCs and Ethernet enabled devices, such as STB, to a LAN, thereby eliminating the need to install new wiring. 51
52 The Ethernet is a RJ-45 port for IP video output. The Pr, Pb, & Y are for RCA component video outputs to an HDTV. The S-Video (Super Video or Separated Video) is for a high quality video output to a VCR or TV that accepts S-Video. It carries video only; you must also connect to the TV or home theater receiver for audio. The Video Out is for RCA video outputs to a TV, VCR, or other device. The Audio Out are for left and right RCA stereo audio outputs. The To TV (Video Out) is for coaxial output to connect the TV receiver to the TV or VCR. The USB (Universal Serial Bus) is a USB 2.0 connector. The Power is the connector for the DC power adapter. 52
53 Troubleshooting Guide Here are some solutions to problems you may encounter. If you need further assistance, please contact Citizens Connected at (715) PROBLEM: LED light on the remote blinks, but the component doesn t respond. POSSIBLE SOLUTIONS: 1. Try replacing the batteries. You will need two AAs. 2. The component may not be programmed into your remote. 3. The component may not be selected. Press the component button of the device you re trying to control. PROBLEM: No Power. POSSIBLE SOLUTIONS: 1. The Power cord may be disconnected. Make sure that the Set Top Box is plugged into a live electrical outlet. 2. Make sure the outlet is receiving power. PROBLEM: No Sound. POSSIBLE SOLUTIONS: 1. The Mute button may have been pressed on the remote. Press the Mute button to restore the sound and volume. 2. The audio cables may need to be connected or replaced. PROBLEM: No Picture. POSSIBLE SOLUTIONS: 1. Check all cables. 2. If your TV is hooked up to coax cable, the TV may be on the wrong channel. Try going to Channel 3 or 4. PROBLEM: No Picture or Sound. POSSIBLE SOLUTIONS: 1. The signal may not be reaching your TV. Make sure all the cables are connected properly on the back of your Set Top Box and your TV. 2. Make sure your Set Top Box is turned on and displays a green light. 3. The TV may not be on the right channel to display input. Using the Remote Control for the TV OR if your TV has been programmed into the Set Top Box Remote Control, using the Remote Control for the Set Top Box, make sure the TV is on the correct channel. 4. After trying solutions 1 & 2 and still no picture, you will need to Reboot your system. To do this, unplug the Set Top Box and plug it back in. It will take up to 5 minutes for your system to restart. 53
54 PROBLEM: Picture is distorted. POSSIBLE SOLUTIONS: 1. The TV cable may be disconnected or loose. Make sure the cable is tightened or reconnected. PROBLEM: VCR will not record. POSSIBLE SOLUTIONS: 1. The signal may not be reaching your TV. Make sure all the cables are connected properly on the back of your VCR and your TV. 2. The TV may not be on the right channel to display input. Make sure the TV is on the correct channel. 3. Make sure you are using the correct remote. PROBLEM: Parental Controls are not working. POSSIBLE SOLUTIONS: 1. You will need to activate Parental Controls by pressing the Menu button 2. You need to make sure there is a checkmark next to Parental Controls in the Settings option. 3. You need to make sure that the Movie & TV Ratings are listed to your desired content. PROBLEM: Can t adjust the recorded program that I am watching. POSSIBLE SOLUTIONS: 1. You will need to use the VCR/DVD/PVR Controls on your Set Top Box remote. 2. To stop the program, press the Stop button instead of the Exit button. PROBLEM: Can t get the Menu, Guide, or Info button to work. POSSIBLE SOLUTIONS: 1. Press the STB button located in the upper right hand corner of your remote. Make sure that it lights up when pushed. PROBLEM: TV says No Signal and it s on the right channel. POSSIBLE SOLUTIONS: 1. Most likely the TV is on the wrong input. To correct this, do the following: With the TV and the set top box on, hit the TV button on your remote then the Input button on your remote. Keep pushing the Input button on your remote until it goes through all the options or until your picture comes back on. If the Input button does not do anything, you can change the input or source button on your TV by physically changing the channel using the up or down button on your TV box. 54
55 PROBLEM: Some channels are in Spanish and others don t have any sound at all. POSSIBLE SOLUTIONS: 1. The language in the set top box has been set to Spanish. To correct this, do the following: Press the Menu button on your remote; Select the Settings icon; Using the Directional Arrows, highlight Hardware Settings and press OK; Using the Directional Arrows, highlight Audio and press OK; Both the primary and secondary languages should say English, if both or either one do not say English, highlight primary and/or secondary language and press the Down arrow until English is in the field then press OK; Pressing the Red button on your remote control twice to get back to your program. PROBLEM: Why doesn t my non-dvr Set Top Box show my DVR Recordings? POSSIBLE SOLUTIONS: 1. You will need to make sure you are signed up for Whole Home DVR Access. If you are, unplug your DVR Set Top Box and plug it back in to reboot the system. PROBLEM: Why do I get the message Video Channel is blocked when I try to order a PPV movie? POSSIBLE SOLUTIONS: 1. Check your Parental Control settings to determine if the settings are blocking the movie. 2. Check your Channel Blocking settings to determine if the channels are blocked. 3. The movie may already be playing. Some PPV movies won t let you order the show once it has begun. PROBLEM: Can I restart live TV with my Big Button remote since I do not have a green button? POSSIBLE SOLUTIONS: 1. You will have to swap the Big Button for a black remote. PROBLEM: The CC button on my remote doesn t work. POSSIBLE SOLUTIONS: 1. The CC button on the remote no longer controls the Closed Captioning on the set top box. Closed captioning is now controlled the Menu. (See the Menu settings for more details.) PROBLEM: When I m in the Guide and pick a channel I can t use my OK button to get out of the guide. POSSIBLE SOLUTIONS: 1. Press the Exit button. 2. Go into the Guide and change the settings in there. (See the Guide settings for more details.) 55


56 PROBLEM: Restart TV doesn t work. POSSIBLE SOLUTIONS: 1. Restart TV doesn t work on every channel. It will only work if you see a green circle clock on the guide. PROBLEM: Pausing Live TV doesn t work on all of my TVs. POSSIBLE SOLUTIONS: 1. If the STB is a 3800 you will need to change out the box in order to be able to rewind or pause live TV. PROBLEM: What is the RES button on the front of my box for? POSSIBLE SOLUTIONS: It allows you to quickly adjust the resolution settings on your box. 56
Celect Communications. Complete TV Users Guide
 Celect Communications Complete TV Users Guide 1 Contents Setting up your Remote... 4 Remote Guide... 5 Using the Guide Button... 8 Searching...10 Reminders...12 DVR Guide...13 Important Note...26 TV Main
Wilkes Repair: wilkes.net River Street, Wilkesboro, NC COMMUNICATIONS
 1 Wilkes COMMUNICATIONS 336.973.3103 877.973.3104 Repair: 336.973.4000 Email: wilkesinfo@wilkes.net wilkes.net 1400 River Street, Wilkesboro, NC 28697 2 Table of Contents REMOTE CONTROL DIAGRAM 4 PLAYBACK
USER GUIDE. Get the most out of your DTC TV service!
 TV USER GUIDE Get the most out of your DTC TV service! 1 800-367-4274 www.dtccom.net TV Customer Care Technical Support 615-529-2955 615-273-8288 Carthage Area Carthage Area 615-588-1277 615-588-1282 www.dtccom.net
Remote Control/Cloud DVR Guide. Special Instructions INPUT:
 Special Instructions Remote Control/Cloud DVR Guide INPUT: Programming your remote: Turn TV on Press TV Button Press & hold the Setup button until TV button flashes 3 times (1 flash & 2 quick flashes)
S P E C I A LT Y FEATURES USER GUIDE
 S P E C I A LT Y FEATURES USER GUIDE 605.239.4302 www.triotel.net www.facebook.com/triotelcommunications www.triotel.net/blog enjoy! TrioTel Communications, Inc. is proud to offer a superior television
Digital Video User s Guide THE FUTURE NOW SHOWING
 Digital Video User s Guide THE FUTURE NOW SHOWING Welcome The NEW WAY to WATCH Digital TV is different than anything you have seen before. It isn t cable it s better! Digital TV offers great channels,
TELEVISION. Star Plans. Interactive Guide and DVR (Digital Video Recorder) Manual ARVIG arvig.net
 Manual ARVIG arvig.net") TELEVISION Star Plans Interactive Guide and DVR (Digital Video Recorder) Manual 888.99.ARVIG arvig.net TABLE OF CONTENTS DVR Remote Control Button Features...3 Arvig Digital TV i-guide Quick Reference
TELEVISION Star Plans Interactive Guide and DVR (Digital Video Recorder) Manual 888.99.ARVIG arvig.net TABLE OF CONTENTS DVR Remote Control Button Features...3 Arvig Digital TV i-guide Quick Reference
Digital Video User s Guide
 Digital Video User s Guide THE Future now showing www.ntscom.com Welcome the new way to watch Digital TV is TV different than anything you have seen before. It isn t cable it s better. Digital TV offers
welcome to i-guide 09ROVI1204 User i-guide Manual R16.indd 3
 welcome to i-guide Introducing the interactive program guide from Rovi and your cable system. i-guide is intuitive, intelligent and inspiring. It unlocks a world of greater choice, convenience and control
Digital Video User s Guide THE FUTURE NOW SHOWING
 Digital Video User s Guide THE FUTURE NOW SHOWING Welcome THE NEW WAY TO WATCH Digital TV is different than anything you have seen before. It isn t cable it s better. Digital TV offers great channels,
Digital Video User s Guide THE FUTURE NOW SHOWING
 Digital Video User s Guide THE FUTURE NOW SHOWING Welcome The NEW WAY To WATCH Digital TV is different than anything you have seen before. It isn t cable it s better! Digital TV offers great channels,
TV User s Guide THE FUTURE NOW SHOWING. New and Improved Movies On Demand Screen!
 TV User s Guide THE FUTURE NOW SHOWING New and Improved Movies On Demand Screen! Welcome The NEW WAY to WATCH Endeavor Digital TV is different than anything you have seen before. It isn t cable it s better!
Digital Video User s Guide THE FUTURE NOW SHOWING
 Digital Video User s Guide THE FUTURE NOW SHOWING TV Welcome The NEW WAY to WATCH Digital TV is different than anything you have seen before. It isn t cable it s better! Digital TV offers great channels,
Should you have any questions that aren t answered here, simply call us at Live Connected.
 Interactive TV User Guide This is your video operations manual. It provides simple, straightforward instructions for your TV service. From how to use your Remote Control to Video On Demand, this guide
inside i-guidetm user reference manual 09ROVI1204 User i-guide Manual R16.indd 1
 inside i-guidetm user reference manual 09ROVI1204 User i-guide Manual R16.indd 1 4/6/10 12:26:18 PM Copyright 2010 Rovi Corporation. All rights reserved. Rovi and the Rovi logo are trademarks of Rovi Corporation
rio ision USER S GUIDE SPECIALTY FEATURES
 rio USER S GUIDE TM ision SPECIALTY FEATURES 605.425.2238 www.triotel.net R TrioTel Communications, Inc. is proud to offer you quality cable TV entertainment supported by a local cooperative. This User
Digital Video User s Guide THE FUTURE NOW SHOWING
 Digital Video User s Guide THE FUTURE NOW SHOWING Welcome The NEW WAY to WATCH Digital TV is different than anything you have seen before. It isn t cable it s better! Digital TV offers great channels,
Digital Video User s Guide. the Future. now showing
 Digital Video User s Guide the Future now showing Welcome the new way to watch Digital TV is TV different than anything you have seen before. It isn t cable it s better. Digital TV offers great channels,
IPTV User s Guide THE FUTURE NOW SHOWING
 IPTV User s Guide THE FUTURE NOW SHOWING Welcome the new way to watch is TV different than anything you have seen before. It isn t cable it s better. offers great channels, many features and many choices.
FEATURES GUIDE. One Network Experience
 TM One Network Experience FEATURES GUIDE OPS Voice Features Guide Revision: September, 2016 Technical Support (24/7/365) - (334) 705-1605 www.opelikapower.com Table of Contents Internet Protocol Television
Digital Video Recorder From Waitsfield Cable
 www.waitsfieldcable.com 496-5800 Digital Video Recorder From Waitsfield Cable Pause live television! Rewind and replay programs so you don t miss a beat. Imagine coming home to your own personal library
TELEVISION. Entertainment Plans. Interactive Guide and DVR (Digital Video Recorder) Manual ARVIG arvig.net
 Manual ARVIG arvig.net") TELEVISION Entertainment Plans Interactive Guide and DVR (Digital Video Recorder) Manual 888.99.ARVIG arvig.net . TABLE OF CONTENTS Interactive Guide Remote Control... 3 Changing the Channel... 4 Picture-In-Picture
TELEVISION Entertainment Plans Interactive Guide and DVR (Digital Video Recorder) Manual 888.99.ARVIG arvig.net . TABLE OF CONTENTS Interactive Guide Remote Control... 3 Changing the Channel... 4 Picture-In-Picture
User's Guide. Version 2.3 July 10, VTelevision User's Guide. Page 1
 User's Guide Version 2.3 July 10, 2013 Page 1 Contents VTelevision User s Guide...5 Using the End User s Guide... 6 Watching TV with VTelevision... 7 Turning on Your TV and VTelevision... 7 Using the Set-Top
 Your remote control holds the key to navigating through the features of i-guide. Words appearing in ALL CAPS refer to a specific button on the remote. Note that all remotes may not have all of the buttons.
passport guide user manual
 passport guide user manual Copyright 2011 Rovi Corporation. All rights reserved. Rovi and the Rovi logo are trademarks of Rovi Corporation. Passport is a registered trademark of Rovi Corporation and/or
BEVCOMM. Control Your Remote. Setup Use for programming sequences of devices controlled by the remote.
 B Contents Your Interactive Program Guide 4 Guide Symbols: Quick Menu Options 5 Search Categories and Listings 6 Program Information 7 Reminders 8 Mini Guide 9 Parental Controls 10 Favorites 11 Setup 12
DIGITAL TELEVISION. WELCOME Kit
 DIGITAL TELEVISION WELCOME Kit cablevision.qc.ca 1 800 567-6353 TABLE OF CONTENTS 1. Welcome to Cablevision................ 4 2. Getting Started................... 5 3. Using Your Remote..................
7 DVR. The far right box indicates the current time.
 Introducing DVR DVR allows you to record programs digitally without the need for tapes or discs, as well as pause live TV. Note: If your set top box does not support Recording, please contact customer
GET STARTED. For assistance, call us on or visit manhattan-tv.com/help
 GET STARTED For assistance, call us on 020 8450 0005 or visit manhattan-tv.com/support Check Freeview HD coverage in your area by visiting freeview.co.uk For assistance, call us on 020 8450 0005 or visit
Connecting You to the World YADTEL TV. User Guide
 Connecting You to the World YADTEL TV User Guide 1 Channel Guide Press GUIDE on the remote OR Press MENU and select the Guide option and press OK. Once you are in the Guide, pressing GUIDE again will change
IPTV Features Guide - Version 1.1, Released April 2012 More information on our website 2
 IPTV Feature Guide Table of Contents Internet Protocol Television (IPTV) Introduction... 3 IPTV Set Top Box (STB) Self Installation Guide... 3 Remote Control Functions... 4 Basic Operation Tips... 5 Programming
Digital TV. User guide. Call for assistance
 Digital TV User guide Call 623-4400 for assistance Table of Contents Watch TV with Tbaytel Digital TV 1 Turn On Your TV and Tbaytel Digital TV 1 Turn Off the Screen Saver 1 Turn Off the TV 1 Use the Set
USER GUIDE /4-16/9047
 USER GUIDE 171951/4-16/9047 May 2016 CONTENTS Equipment 4 Connected-Home DVR/Standard Set-Top Box Wireless Set-Top Box Wireless Access Point Remote Controls Residential Gateway Getting Started 12 Turn
User s Reference Manual
 A22 User s Reference Manual The Power of i. 1 5 6 6 6 7 7 9 10 10 11 12 13 13 15 17 17 18 18 18 18 20 20 21 21 21 21 22 23 Table of Contents Welcome Digital Cable Box (Set-Top Box) Motorola DCT6208 Recording
W A T C H. Using Your Remote Control. 145 N. Main Lenora, KS toll free
 W A T C H Using Your Remote Control 145 N. Main Lenora, KS 67645 toll free 877-567-7872 ADB 3800 TV - Sends commands to TV DVD - Sends commands to DVD STB - Sends commands to set-top box Setup AV - Choose
Digital Video Users Guide THE FUTURE NOW SHOWING
 Digital Video Users Guide THE FUTURE NOW SHOWING THE FUTURE NOW Digital TV is TV different than anything you have seen before. It isn t cable it s better. Digital TV offers more channels, more features
IPTV Users Guide THE FUTURE NOW SHOWING
 IPTV Users Guide THE FUTURE NOW SHOWING THE FUTURE NOW SHOWING exclusively on IPTV IPTV is TV different than anything you have seen before. It isn t cable it s better. IPTV offers more channels, more features
The New Contour INTRODUCING
 INTRODUCING The New Contour Welcome to the simplest, fastest and most fun way to search and access all your entertainment on all your devices. Search visually with show title art that is organized by category,
Digital TV. Connected. Amino Set Top Box Instructional Manual. Your pathway to the world. Digital TV powered by Celect Communications
 Digital TV Amino Set Top Box Instructional Manual Digital TV powered by Celect Communications 328 W Main St New Auburn, WI 54757 Connected Your pathway to the world Phone (715)237-2605 Web: www.citizens-tel.net
Fision. User Guide. Sharper. Faster. Smarter with Fiber Optics ver5_0616 CALL
 Fision User Guide Sharper. Faster. Smarter with Fiber Optics ver5_0616 CALL 800.355.5668 Table of Contents REMOTE CONTROL GUIDE... 1 USING THE MENU SCREEN... 2 To Display and Use the Menu Screen... 2
YOUR GUIDE TO LUS FIBER VIDEO & WHOLE HOME DVR POWERED BY MICROSOFT MEDIAROOM TM
 Welcome to television reinvented with the city s only 100% fiber optic network YOUR GUIDE TO LUS FIBER VIDEO & WHOLE HOME DVR POWERED BY MICROSOFT MEDIAROOM TM 1 Watch what 100% fiber optic video can do
Quick Reference Guide
 Quick Reference Guide 1.800.796.4567 3rivers.net The interactive programming guide from TV Guide. It s intuitive, intelligent and inspiring. i-guide unlocks a world of greater choice, convenience and control
passport guide user manual
 passport guide user manual Copyright 2011 Rovi Corporation. All rights reserved. Rovi and the Rovi logo are trademarks of Rovi Corporation. Passport is a registered trademark of Rovi Corporation and/or
TELEVISION. User Guide. Interactive Guide and DVR (Digital Video Recorder) Manual FiberNetMonticello.com
 Manual FiberNetMonticello.com") TELEVISION User Guide Interactive Guide and DVR (Digital Video Recorder) Manual 763.314.0100 FiberNetMonticello.com Table of Contents DVR Remote Control Button Features...3 Getting Started Turning On The
TELEVISION User Guide Interactive Guide and DVR (Digital Video Recorder) Manual 763.314.0100 FiberNetMonticello.com Table of Contents DVR Remote Control Button Features...3 Getting Started Turning On The
Quick Tours. Quick Tour - The TiVo menus 2. Quick Tour - Watching live TV 5
 Quick Tour - The TiVo menus 2 Quick Tour - Watching live TV 5 Quick Tour - The TiVo menus Your starting point TiVo Central TiVo Central is the starting point for just about everything you do with your
Quick Guide MICROSOFT ROVI COPYRIGHT PROTECTION
 WELCOME 2015 TiVo Inc. Reproduction of all or any portion of this Quick Guide without TiVo s express prior written permission (in each instance) is prohibited. All rights reserved. VU-IT! is a trademark
Rogers Enhanced Guide
 Rogers Enhanced Guide Enhanced Guide With your Enhanced Guide, you can see 7 days of TV listings. To access the guide, simply press the your Rogers remote and the program listings will appear. button on
HD Guide. User Manual
 HD Guide. User Manual You ve decided you want better TV. Here s how to enjoy it. Welcome to Shaw HD TV. To get the most out of your experience, it s best to know absolutely everything the service offers.
Welcome to W light up your life
 USER GUIDE 1 Welcome to light up your life Dear Vision Communications Customer, Thank you for choosing LightWave TV from Vision. LightWave TV will open a whole new world of TV entertainment for you and
Welcome Packet and Quick Start Guide
 Fiber Television Services Amino Welcome Packet and Quick Start Guide Contact Information Call us at 1-800-SOCKET-3 (1-800-762-5383) E-mail your billing and account questions to office@socket.net E-mail
Using Your TiVo Remote Control
 Using Your TiVo Remote Control Your TiVo remote control can be used for much more than meets the eye, from setting your recordings and managing your TiVo services, to streaming and downloading videos from
THE TIVO SERVICE QUICK GUIDE
 THE TIVO SERVICE QUICK GUIDE 2017 TiVo Inc. Reproduction of all or any portion of this Quick Guide without TiVo s express prior written permission (in each instance) is prohibited. All rights reserved.
HR20QSG0806!HR20QSG0806! 2006 DIRECTV, Inc. Directv, the Cyclone Design logo and the DIRECTV Plus logo are trademarks of DIRECTV, Inc.
 HR20QSG0806!HR20QSG0806! 2006 DIRECTV, Inc. Directv, the Cyclone Design logo and the DIRECTV Plus logo are trademarks of DIRECTV, Inc. Welcome to the DIRECTV Plus HD DVR. Now that you re plugged in, it
Digital Video Users Guide THE FUTURE NOW SHOWING
 Digital Video Users Guide THE FUTURE NOW SHOWING THE FUTURE NOW SHOWING exclusively on DIGITAL TV Digital TV is TV different than anything you have seen before. It isn t cable it s better. Digital TV offers
RTN Client User Interface. User Guide
 RTN Client User Interface User Guide User Guide Table of Contents Introducing the RTN Client User Interface... 6 Welcome... 6 About the Remote Control... 7 Select TV and Viewing Preferences with the Menu...
DIGITAL VIDEO RECORDING (DVR) SERVICES
 SERVICES") DIGITAL VIDEO RECORDING (DVR) SERVICES With a Digital Video Recorder (DVR) set-top box, you can easily record your favorite programs and then play them back anytime. The DVR and Picture-In-Picture (PIP)
DIGITAL VIDEO RECORDING (DVR) SERVICES With a Digital Video Recorder (DVR) set-top box, you can easily record your favorite programs and then play them back anytime. The DVR and Picture-In-Picture (PIP)
MOXI WHOLE HOME HD DVR
 QUICK REFERENCE GUIDE MOXI WHOLE HOME HD DVR What you record or begin watching here......or here....you can play or continue watching here... A WHOLE NEW CHAPTER IN THE FUTURE OF ENTERTAINMENT! Let s get
Version 3.1. Getting Started Guide. Scientific Atlanta
 Version 3.1 Getting Started Guide Scientific Atlanta September 1, 2008 Passport Echo 3.1 Getting Started Guide (for Scientific Atlanta set-tops) Passport Echo 3.1 September 1, 2008 2008 Macrovision Solutions
TV REMOTE. User Guide. nuvera.net
 MOTE User Guide Table of Contents Remote Reference Guide... 3 Cisco AT6400...3 Eclypse 2025 G...4 Pulse URC2069...5 Channel Guide... 6 How to view the channel guide...6 How to customize channel guide...6
QUICK GUIDE THE TIVO EXPERIENCE
 QUICK GUIDE THE TIVO EXPERIENCE TABLE OF CONTENTS GETTING STARTED... III Basic terms... iii THE HOME SCREEN.... 1 Home Screen menu items... 1 Settings menu.... 2 The SmartBar... 2 Video window & background...
Quick-Start Guide. The New Generation of Television. Important information. Retain for your records. News & updates.
 Quick-Start Guide The New Generation of Television Important information. Retain for your records. Check out the Quick-Start Guide to see all that your remote can do. Turn to the Learn More section for
Quick Reference TV guide. Getting Started. with Cogeco Digital TV.
 Quick Reference TV guide Getting Started with Cogeco Digital TV. Welcome to Cogeco Digital TV At Cogeco, we put you first in everything we do. Our goal is to give you a TV experience unlike any other from
Welcome to the U-verse App
 iphone 2.5.3 Welcome to the U-verse App The U-verse app is an AT&T service that uses your iphone to provide a user interface for U-verse TV. Using Edge, 3G and WiFi technology, the U-verse app provides
OPERATING YOUR DVR. [ a quick reference guide ]
![OPERATING YOUR DVR. [ a quick reference guide ]](/thumbs/90/101820831.jpg "OPERATING YOUR DVR. [ a quick reference guide ]") OPERATING YOUR DVR [ a quick reference guide ] With Digital Video Recording from yondoo, you ll never watch TV the same way again. Watch your favorite programs when it is convenient for you, even live
OPERATING YOUR DVR [ a quick reference guide ] With Digital Video Recording from yondoo, you ll never watch TV the same way again. Watch your favorite programs when it is convenient for you, even live
 QUICK REFERENCE GUIDE Fusion is the first triple-play Gateway providing cable TV, high speed Internet and optional home phone capabilities in one single, simple and elegant solution. The Fusion quick reference
User s Guide for the Digital Video Recorder
 User s Guide for the Digital Video Recorder with Picture-in-Picture Control Explorer 8000 Home Entertainment Server Record and store from 30 to 50 hours of programs Record your favorite programs when you
With FUSION*, you can enjoy your TV experience more with easy access to all your entertainment content on any TV in your home.
 QUICK REFERENCE GUIDE Stark County: 330-833-4134 Wayne County: 330-345-8114 www.mctvohio.com/fusion FUSION AT A GLANCE With FUSION*, you can enjoy your TV experience more with easy access to all your entertainment
VIEWER S GUIDE THE TIVO EXPERIENCE
 VIEWER S GUIDE THE TIVO EXPERIENCE This Viewer s Guide describes features of the TiVo service running on a TiVo DVR or Mini. 2017 TiVo Inc. All rights reserved. Your use of this product is subject to the
Dear Valued Customer,
 Dear Valued Customer, Thank you for choosing BOLT Fiber Optic Services ( BOLT ). We appreciate your patronage and hope to continue providing you with the high level of service that you have come to know
You have made a great decision in selecting Hotwire as your IPTV provider.
 IPTV USER S GUIDE WELCOME TO HOTWIRE COMMUNICATIONS You have made a great decision in selecting Hotwire as your IPTV provider. When it comes to Fiber Optic Technology, Hotwire is on the forefront. Hotwire
Welcome to W light up your life
 Welcome to light up your life Digital Video Recorder With DVR service, you can pause, rewind and restart live TV, record current shows, record an individual show or a series of episodes, schedule future
Ultra Whole Home DVR. User Guide
 Ultra Whole Home DVR User Guide Contents Welcome Horizontal Menu Options... 2 The Main Menu Layout... 3 Using Your Remote...4 Shortcut Buttons...4 Menu Navigation...4 Controlling Live TV... 5 TV Channels
QUICK GUIDE THE TIVO EXPERIENCE
 QUICK GUIDE THE TIVO EXPERIENCE 2018 TiVo Inc. All rights reserved. Your use of this product is subject to the TiVo User Agreement (available at ww.tivo.com/legal/terms) and the TiVo Privacy Policy (available
Rover Quickstart. Enjoying your. Integrated apps do not include paid membership services to the provider. etcrover.com 4/18
 Rover Quickstart Enjoying your room-to-room. mobile streaming. apps. video-on-demand. recording. parental con ding. parental controls. remote control features. helpful hints. room-to-room. mobile s tures.
On-Screen Guide. The guide to your shows.
 On-Screen Guide The guide to your shows. 2 Welcome to XFINITY TV WELCOME TO XFINITY TV ON THE X1 PLATFORM XFINITY on the X1 Platform makes viewing more personal, social and fun. Now it s easier than ever
Vantage. User Guide. Get the most from your Vantage products
 TM Vantage User Guide Get the most from your Vantage products Vantage TM TV by Frontier... 3 How to Use the Remote Control.... 3 Watching Vantage TV by Frontier... 4 Using the Set-Top Box Remote Control...
Digital Video Recorder
 DRAFT 12/6/04 User s Guide for the Digital Video Recorder for the Explorer 8000 DVR Explorer 8000HD DVR Explorer 8300 DVR Explorer 8300HD DVR Get More Out of Your TV Watch Record Watch & Record Your favorite
QUICK REFERENCE GUIDE
 QUICK REFERENCE GUIDE FiDO!_Quickstart_Guide-UpdateQ-017.indd 1 10/11/017 1:1:0 PM TABLE OF CONTENTS Page 1 Page Page Page Page 5 Remote Guide Shortcut Buttons Menu Navigation Player Controls Introduction
enjoy it. you want Here s how to You ve decided Contents
 SHAWDigital TV Contents Check list and Helpful Hints 4 Getting Started 5 Using the Shaw Universal Remote 6 On-screen Interactive Program Guide (IPG) 8 Quick Access Menu 10 On-screen Interactive Program
The world s smartest PVR. User guide 1
 The world s smartest PVR. User guide 1 Get to know your TiVo. Welcome to the TiVo Experience The TiVo experience instantly gives you total control of the TV programming you love, and much more! With six
QUICK START GUIDE TO SERVICES
 QUICK START GUIDE TO SERVICES GET CONNECTED STAY CONNECTED LIVE CONNECTED Welcome to Lake Connections! Thank you for choosing Lake Connections and Lake Communications as your new High Speed Internet, Digital
Welcome to Fetch. Handy Tips 4. Watching Live TV 6. Using the TV Guide 8. Recording TV 10. Managing your Recordings 14. Watching Catch-Up TV on TV 18
 Mighty User Guide Welcome to Fetch Handy Tips 4 Watching Live TV 6 Using the TV Guide 8 Recording TV 0 Managing your Recordings 4 Watching Catch-Up TV on TV 8 Watching shows from the TV Store 9 Adding
Getting Around FibreWire TV. User Guide. onecomm.bm
 Getting Around FibreWire TV User Guide Home Menu GUIDE Scroll through what s coming up on all your Live TV channels. MY CDVR A list of all the programs you ve scheduled or recorded. HIGHLIGHTS Displays
Handy tips Watching live TV Using the TV guide Watching Catch-Up TV Adding more channels Watching movies...
 Mini user guide. Contents Handy tips... 4 Watching live TV... 6 Using the TV guide... 9 Watching Catch-Up TV... 11 Watching shows from the TV Store...12 Adding more channels...14 Watching movies... 15
Fibe TV Reference Guide
 1 Fibe TV Reference Guide 2 Table of contents Your Fibe account information 4 Customer support 5 Fibe TV basics 6 Your remote 8 Accessing How-to tutorial videos 9 Search 10 Capabilities of your Fibe HD
The new name-based recording feature has two key benefits:
 Introduction to Name-Based Recording INTRODUCTION TO NAME-BASED RECORDING The new name-based recording feature has two key benefits: Program recording based on the name, instead of the date and time the
Manhattan Model: Plaza HDR S 500GB LET S GET STARTED YOUR USER GUIDE
 Manhattan Model: Plaza HDR S 500GB LET S GET STARTED YOUR USER GUIDE WELCOME TO FREESAT We are so pleased you bought this 500GB Manhattan Plaza HDR S Freesat+ HD recorder. Now you can enjoy: Quality state-of-the-art
Horizontal Menu Options... 2 Main Menu Layout... 3 Using Your Remote... 4 Shortcut Buttons... 4 Menu Navigation... 4 Controlling Live TV...
 Maestro User Guide Contents Welcome Horizontal Menu Options... 2 Main Menu Layout... 3 Using Your Remote... 4 Shortcut Buttons... 4 Menu Navigation... 4 Controlling Live TV... 5 TV Channels TV Channels
INSTALLING YOUR MANHATTAN SX
 Your USER GUIDE SX INSTALLING YOUR MANHATTAN SX Unpack the following from your Giftbox: 2x AAA batteries Remote control Manhattan SX SCART Adapter HDMI cable Power adapter AV Lead You ll need: A TV with
Welcome to Fetch. Home screen. Everything you do on your Fetch Mini starts from this Main Menu screen.
 Mini User Guide Welcome to Fetch Handy Tips 4 Watching Live TV 6 Using the TV Guide 8 Set and see Recordings on other Fetch boxes 0 Watching Catch-Up TV on TV 4 Watching shows from the TV Store 5 Adding
Handy Tips 4. Watching Live TV 6. Recording TV 10. Managing your Recordings 13. Watching Catch-Up TV on TV 17. Watching shows from the TV Store 18
 Mighty User Guide Welcome to Fetch Handy Tips 4 Watching Live TV 6 Using the TV Guide 8 Recording TV 0 Managing your Recordings Watching Catch-Up TV on TV 7 Watching shows from the TV Store 8 Adding more
BendBroadband User Guide. Alpha. Copyright 2015 ARRIS Group, Inc. All rights reserved.
 BendBroadband User Guide Alpha Copyright 2015 ARRIS Group, Inc. All rights reserved. Contents Welcome..................................8 Alpha Media Player Orientation The Main Menu Layout Horizontal Categories
Welcome to Fetch TV. Welcome to Fetch TV 3. Handy Tips 4. Watching Live TV 6. Using the TV Guide 8. Recording TV 10. Managing your Recordings 13
 Gen User Guide Welcome to Fetch TV Welcome to Fetch TV Handy Tips 4 Watching Live TV 6 Using the TV Guide 8 Recording TV 0 Managing your Recordings Watching Catch-Up TV on TV 7 Watching shows from the
1 Rovi DTA Guide User Manual for SD and HD DTAs. Copyright 2014 Rovi Corporation
 1 Rovi DTA Guide User Manual for SD and HD DTAs LEGAL NOTICE. All rights reserved. Rovi and the Rovi logo are trademarks of Rovi Corporation and/or its subsidiaries. Rovi is registered in the United States
The Advanced TiVo Experience
 The Advanced TiVo Experience IMAGINE BETTER IMAGINE BETTER Welcome to the Advanced TiVo Experience! The TiVo experience instantly gives you total control of the TV programming you love, and much more!
Record Future Programs
 9241_11_Ch9_eng 10/30/08 3:15 PM Page 1 Record Future Programs SETTING UP AND USING TIMERS Have you found yourself having to make a choice between watching your favourite show and living your life away
MyTVs Menu. Recordings. Search. What s Hot. Settings
 MyTVs Menu The following sections provide details for accessing the program guide, searching for a specific program, showing existing recordings or scheduled recordings, and using your smartphone as a
Taking Control of Your TV
 Taking Control of Your TV A Guide to Using AT&T s U-Verse TV Features 2019 Huntington Pointe Association Some Basics Note that the features described in this booklet are keyed to the buttons on the remote
GET STARTED. For assistance, call us on or visit manhattan-tv.com/support
 GET STARTED For assistance, call us on 020 8450 0005 or visit manhattan-tv.com/support Check Freeview HD coverage in your area by visiting freeview.co.uk INSTALLING YOUR T1 Unpack the following from your
User s Manual. Full HD Digital Satellite Receiver. v1310. Please read this User s Manual carefully before installing the receiver.
 User s Manual Full HD Digital Satellite Receiver v1310 Please read this User s Manual carefully before installing the receiver. 2 CONTENTS 1 Introduction 4 1.1 Features 4 1.2 Accessories 4 1.3 The Remote