Table of Contents... i. PART I (Getting Started) About This Manual Introduction Overview... 5
|
|
|
- Rafe Charles
- 5 years ago
- Views:
Transcription


1
2 Revised Dec. 1, 2011 Trademarks: NewTek, TriCaster, TriCaster XD, TCXD850, TCXD850 Extreme, TriCaster TCXD850 Extreme, TriCaster 850 Extreme, TriCaster Extreme, TriCaster 850, TCXD450, TCXD450 Extreme, TriCaster TCXD450 Extreme, TriCaster 450 Extreme, TriCaster Extreme, TriCaster 450, IsoCorder, TCXD300, TriCaster PRO, TriCaster STUDIO, TriCaster BROADCAST, TriCaster DUO, ivga, SpeedEDIT, 3PLAY, 3PLAY 820, 3PLAY 425, 3PXD820, 3PXD425, LiveText, DataLink, LiveSet, LiveMatte, TimeWarp, VT, V[T5], Video Toaster, Toaster, 3D Arsenal, Aura, LightWave, LightWave 3D and LightWave CORE are trademarks of NEWTEK. All other brand names, product names, or trademarks belong to their respective holders.


3 3PLAY
4
5 TABLE OF CONTENTS Table of Contents... i PART I (Getting Started) About This Manual Introduction Overview Recording, Marking and Events What is an Event? NewTek 3Play Control Surface Startup Screen Replay Desktop Features Physical Input, Output & Capture Monitoring Video Processing Recording The Clips List The Play list The Dashboard Setting Up Command and Control Activating & Authorizing Windows License and Registration Online Registration Registering by Telephone i
6 3.4 Input Connections Connect A/V Sources Genlock Connection Timecode Connection Output Connections A/V Output HD and SD Connecting Devices Supplemental Video Outputs Tally Lights Starting a Session Configure Video Output SD Analog Configuration Configure Multiview Output Configure Genlock Configure Video Input Configure Audio Networking Live Production Walkthrough Creating a Session The Replay Desktop Output and Control Modes Record and Speed Marking Events Two Button Marking One Button Marking Clips List Navigation Adding a Memo ii
7 4.8 Trimming Events Managing Events Preparing a Play List Adding Clips Editing and Playback Speed Control Rendering a Play List PART II (Reference) The Startup Screen Introduction to Sessions The Home Page New (Session) Open (Session) Shutdown Utilities Help The Session Page Asset Management Replay Desktop Overview Display Requirements Overview A Few Hints Customizing the Replay Desktop Rename Dual Displays and Monitoring The Dashboard Titlebar Tips Status Bar iii
8 7 I/O Configuration Output Configuration Output A and B Aux/Multiview Genlock Center Frequency Input Configuration Connection Type Name Proc Amp Audio Settings Timecode Configuration Control Surface Overview Qualifier Buttons Record Output Modes (A, B, A+B) Control Modes Clips Mode PLAY LIST Mode Live Page and Bank (P1-P4) Transport Previous Next Stop Play Fast Jog Jog Wheel Play Speed (T-bar section) iv
9 8.9 IN/OUT (Marking) In Out UTILITY Buttons Esc Remove Edit Add to Play List Desktop Monitors Input Monitors Titlebar Features Interactive Control Output A and B Heads-Up Display Record and Marking Record Configuration New Session Recording and the Desktop Clips List Recorded Cameras Record On/Off Marking Events Output & Control Modes Output Modes Control Modes Control and A+B Mode The Clips List Titlebar Features Bank & Page v
10 Add Media Filter Show/Hide Columns Clip Configuration Clips List Table Features In/Out Points, Duration (and Trimming) Memo Fields Managing Events Clip Transport Play Speed Selection & Display Play Indicator Add to Play List The Play List Titlebar features Play List Pages Export Play List Music Tools The Play List Table Play List Preparation Clip Selection Changing a Clip Memo Field Audio 1, 2 3, In and Out Points (Trimming Clips) Speed Crossfade Clip Context Menu Playback Play List EDLs vi
11 14 The Dashboard Displaying the Dashboard Speed Presets Output Mode Live Mode Mark In/Out Transport Buttons Play List Loop PART III (Appendices) A How Do I? A.1 Connections A.1.1 Connect cameras? A.1.2 Color correct mismatched cameras? A.1.3 Connect monitors? A.1.4 Improve the Quality of Multiview Output? A.1.5 Connect the Genlock Reference Signal? A.1.6 Connect the 3Play control surface? A.1.7 Insert/Remove a Drive From a Removable Drive Bay A.1.8 Connect An External Hard Drive? A.1.9 Eject A Hard Drive? A.1.10 Connect to a Network? A.1.11 Enable Termination for Video Inputs? A.2 Sessions A.2.1 Delete a Session (and its Content)? A.2.2 Rename a Session A.2.3 Manage Selected Content inside a Session? A.3 Events and Recording A.3.1 Start recording? A.3.2 End recording? A.3.3 Mark an Event? vii
12 A.3.4 Cancel an Incomplete Marking Operation? A.3.5 Play a Clip? A.3.6 Play a clip in Slow Motion? A.3.7 Prepare a highlight reel? A.3.8 Select a different playlist clip for the same time period? A.4 Files A.4.1 Manage Files? A.4.2 Import Media Files? A.4.3 Prepare clips for the Play List Using Apple Final Cut Pro? A.4.4 Add an External File Location to the Media Browser? A.4.5 Remove a Location From the File Browser? A.4.6 Export files to an External Drive? A.4.7 Export files for use in Apple Final Cut Pro? A.4.8 Import/Export Files Larger Than 4 Gigabytes? A.4.9 Avoid the error copy this file without its properties? A.5 Software, Maintenance and Updates A.5.1 Improve Performance? A.5.2 Resolve Serious Instability or Dropped frames? A.5.3 Update NewTek 3Play software? A.5.4 Install Virus Protection? A.5.5 Install My Favorite Software (or Codec)? A.5.6 Restore the system to Original As-Shipped Condition? A.6 Registration And Tech Support A.6.1 Register the NewTek 3Play system? A.6.2 Contact Technical Support? A.6.3 Find Hardware/Firmware Revision Numbers? A.7 Miscellaneous A.7.1 Set up remote desktop control of 3Play? A.7.2 Deal With Clips or images That Seem Blurry? A.7.3 Access Windows? A.7.4 Return to the Startup Screen from the Windows Desktop A.8 More Questions and Answers A.8.1 Why is my power supply beeping? viii
13 A.8.2 Why are my clip duration and Countdown times different? B Keystroke Shortcuts C Reliability Testing Index Credits ix
14
15 PART I (GETTING STARTED) Introducing NewTek 3Play connections and registration, a top-level overview of primary features, and a hands-on tour to get you started. Page 1
16
17 1 ABOUT THIS MANUAL Hate reading manuals? If so, you are part of the majority. Estimates are that between 60 and 97% of the human race concur. Most prefer to jump right in, maybe asking a friend for occasional help and who can blame them? This manual attempts to tell you what you need to know in a friendly, concise way, while also providing a deeper reference section you can turn to when you really need specifics. Even if you hate reading, please take a moment to peruse at least this section, which explains the manual s organization. You may find you can escape with a minimum of reading. (Or, if you are a devout reader, you can be the hero others turn to for expert advice.) Part I Getting Started: introduction to NewTek 3Play connecting devices (cameras, monitors, etc.) and registration, ending up with the Live Production Walkthrough a brisk jog through fundamentals, about 10 pages (if you re a quick study, this may provide all you need). Part II Reference: chapters in this section cover every arcane detail related to using 3Play (for those who need it, and those who just like to know everything). Part III Appendices: leads off with a handy section titled How do I?, a helpful question and answer section with its own brief index. When you have a specific need, you may well find a quick answer here, along with cross references to more detailed information when appropriate. Appendix B lists shortcut keys. Part III is also home to a comprehensive keyword index. 3PLAY MODEL NOTES This User Guide discusses two 3Play models, 3Play 820 and 425. In most respects, operations and interface are very similar, and a single description will suffice. There are some relatively minor exceptions, however. Wherever these are discussed in the text, they will be flagged in the same manner as this paragraph. Page 3
18 Page 4


19 2 INTRODUCTION Thank you for purchasing NewTek 3Play. 3Play is a member of the NewTek family of video production systems and software, and bears a proud heritage. A bona fide video pioneer, NewTek is justifiably proud of its record of innovation, ongoing commitment to excellence and superb product support. This chapter provides a quick tour of the major components of your NewTek 3Play. 2.1 OVERVIEW Figure 1 Figure 2 NewTek 3Play is a multi-channel high definition video device supporting simultaneous recording, display and instant replay of multiple audio and video sources (up to eight of each for 3Play 820, and four in the case of 3Play 425). Its output possibilities include professional hardware connections capable of conveying two fully independent video streams to external video systems such as live broadcast switching equipment, and of course file export. Output at any time may consist of any combination of the following: I. Live video direct pass-through of an input source II. Delayed video output running somewhat behind live input III. Clip playback of a bookmarked time segment of captured (or imported) media IV. List playback of a prepared playlist that may include clips or other imported media and transitions. Hint: It s important to realize that Delayed, Clip or List playback do not interrupt continuous capture of configured live sources. Page 5
20 Delayed, Clip and List (Play List) video streams can also be played back at variable speeds. The standard (NTSC) 3PLAY supports NTSC video in HD1080i, 720p, and SD formats. Multi-standard 3Play systems support the equivalent formats for NTSC, NTSC-J and PAL video broadcast standards. 2.2 RECORDING, MARKING AND EVENTS Recording is intrinsic to NewTek 3Play, and is configured for each incoming a/v source to be captured prior when creating live production session. When Record is enabled in the live Replay Desktop, configured sources are continuously captured and stored. Typically, each stream might represent a different camera angle. (Other sources supplied to non-recorded inputs can be viewed but will not be captured; thus they are not available for later replay.) Note: When timecode for a session being recorded reaches 24:00:00.00, a new recording is automatically started. A few frames are lost in this process. Use the Subtract 12 hours; feature in Timecode Configuration to avoid problems when necessary see Section WHAT IS AN EVENT? The operator uses the supplied NewTek 3Play external control surface to mark events. Each event entry appears in the Clips List module on the Replay Desktop as a single row of clips identified by an Event ID number shown in the left-most column, along with related data. Events can be thought of as timed segments of the recorded video. These are created when you mark In and Out Points as a live production progresses. The (in and out) timecode values are rather like digital bookmarks, in that they identify a specific portion of the recorded footage. Newly-marked events are successively added to the Clips List for convenient recall. Remember, an event is not merely a clip. Think of it as a bookmarked section of the recordings from each (captured) source. Each event entry denotes a synchronized time slice of all recorded video streams (or angles, if you like). You can recall and display any clip from an event instantly. This involves sending the stream from one particular camera to one of the system outputs (Output A or Output B). Hint: Two different clips from one or more events can be displayed simultaneously using the two outputs. Page 6
 a bookmark does not remove literal pages from a book. Likewise, NewTek 3Play normally captures a complete, uninterrupted record of your production.")

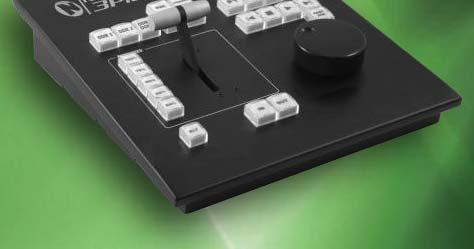
21 Events bear another similarity to literal bookmarks. A bookmark is only a convenient reference to the printed material on the book s pages it does not comprise the actual text. Adding or removing (or moving) a bookmark does not remove literal pages from a book. Likewise, NewTek 3Play normally captures a complete, uninterrupted record of your production. Just like physical bookmarks, the events listed in the Clips List are pointers to this volume of stored information. Add and remove events freely with no fear of losing recorded material. You can even add, remove or reorganize events during recording, or long after your session ends. 2.3 NEWTEK 3PLAY CONTROL SURFACE A dedicated NewTek 3Play external control surface (Figure 3) provides primary operational control see Chapter 8. (Text editing and other supplementary control is supported using the keyboard.) Figure 3 Note: If the control surface is not available for any reason, its core functions can be accessed from the compact Dashboard shown at the bottom of the Replay Desktop, or by keyboard shortcuts. Page 7
22 2.4 STARTUP SCREEN When you power up your NewTek 3Play system, the Startup Screen appears. This is your command center for initiating most other operations. Figure 4 The Home page of the Startup Screen allows you to define and open sessions, essentially custom presets for individual productions or other purposes. Later, when you re-open a session, all of its assets and settings are remembered. After creating a session (or opening an existing one), you are taken to the Sessions page. Here you can launch the Replay Desktop, or perhaps choose to Import Media for your session, or Export Media from an earlier one. 2.5 REPLAY DESKTOP 3Play s live production features are all available from its unique Replay Desktop. The various features, controls and modules on the Replay Desktop are essentially laid out in three horizontal bands, as seen in Figure 5 (depicting the 3Play 820 Replay Desktop). Page 8


.")

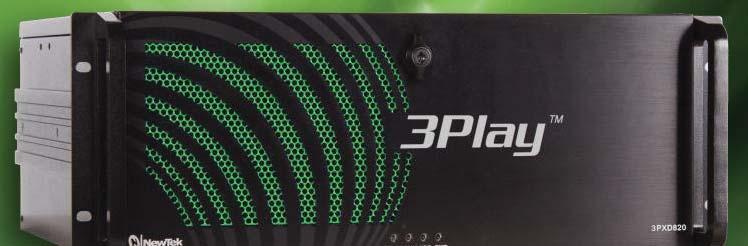
23 Monitoring Clips List Play List Dashboard Figure 5 The uppermost area is devoted to monitoring. The spreadsheet-like Clips List is centrally located, beneath the monitoring section. Below this you will see the Play list, which allows you to create and control more complex sequences (such as highlight reels). A slender Dashboard can optionally be shown at the very bottom of the Replay Desktop. 2.6 FEATURES Here s a brief overview of just some of 3Play s key features: PHYSICAL 3PLAY 820 Rugged 4U rack-mount case with redundant power supplies ensures robust and reliable performance in fixed or mobile installations. Page 9
24 Massive storage capacity each (of up to four) 2TB hot-swappable drive holds approximately 50 hrs of 1080i (or 155 hours of SD video). 3PLAY 425 Sturdy yet compact 2U rack-mount case 40 hours of storage capacity (1080i) (combined internal drive and 1TB removable drive INPUT, OUTPUT & CAPTURE Figure 6 3Play 820 All audio and video, monitoring and network connectors are easily accessible from the rear for convenient installation in industry standard 19 rack-mount configurations. Audio and video connectors are industry standard (XLR or BNC as appropriate), ensuring broad compatibility and secure, locked connections (headphone output uses a standard 1/4 stereo phone jack, and an HDMI port supplies an added output option). Professional BNC video connectors provide increased durability and reliability for camera connections. Supply external audio via analog, AES/EBU (AES3) or SDI Embedded audio. Balanced XLR audio connectors. Multiple simultaneous SDI and analog output connections. Page 10
 and HD simultaneously from HD sessions.")
25 Figure 7 3Play 425 Record up to either four or eight sources (audio and video), freely choosing between SDI and analog HD (or SD) cameras. Capture and play back 16:9 and 4:3 formats in both HD and SD sessions. Output HD sessions as SD (4:3 or 16:9) and HD simultaneously from HD sessions. Play list module supports inserting pre-recorded video, sound and imagery into your live productions. Send output from 3Play to a network connected TriCaster. 3PLAY 820 Supplemental Aux (Auxiliary) Video output to a projection system or secondary monitor at session resolutions up to 1920x MONITORING Figure 8 The Replay Desktop includes two large output monitors, labeled Output A and B, with associated controls. Tabs above the monitor group at left allow you to freely toggle between viewing: Page 11

26 Recorded Cameras onscreen monitors for all sources that are configured for recording (Figure 8, showing 3Play 820). Cameras 1-4 The first four live video sources supplied to 3Play s video inputs. 3PLAY 820 Cameras 1-6 The first six live video sources supplied to 3Play s video inputs only. Cameras 1-8 All eight live video sources supplied to 3Play s video inputs VIDEO PROCESSING Proc Amps allow you to adjust the video signal to preserve pristine image and color fidelity through the entire pipeline to final output. Separate controls are provided for Brightness, Contrast, Hue and Saturation for every video source, along with White Balance and U and V Offset. Likewise, individual Proc Amp controls are provided for Output A and Output B. Conveniently, Input Proc Amps retain independent settings for different Connection Types RECORDING Apart from live throughput, virtually all replay output features depends on recorded data. Figure 9 The Record button is located just below the Output A monitor on the Replay Desktop. Useful information about the recording and remaining space is displayed nearby. Recording can also be enabled from the NewTek 3Play control surface. Page 12
 appear in the Clips List (see Section 2.2.1).")
27 2.6.6 THE CLIPS LIST Figure 10 Segments of recorded data are bookmarked as individual events by setting in and out points. Events and their constituent clips, representing the different recorded sources (or angles ) appear in the Clips List (see Section 2.2.1). Figure 11 Events can be rearranged and trimmed in the Clips List. Memo fields for each clip allow you to enter comments that can be used to quickly locate specific clips for playback or inclusion in playlists. The Clips List offers four banks of four pages each to help you manage your recorded content. In addition, the Clips List supports the import of other media clips (and still images) for use when preparing playlists for various purposes THE PLAY LIST Figure 12 Page 13

28 Individual clips from events appearing in the Clips List can be added to the Play List pane below. Figure 13 The Play List plays all entries in sequence, with optional transitions between clips. Like the Clips List, the Play List pane offers four banks of four pages each, supports clip re-ordering, comments, trimming, and numerous other features THE DASHBOARD The Dashboard replicates major features normally accessed using the NewTek 3Play control surface. It is located at the bottom of the Replay Desktop, just below the Play List, and can serve at least two useful purposes. Figure 14 The Dashboard can be displayed on demand or full-time. Perhaps you ll find you use it only between live events, when you might not want to connect the control surface while working with recorded data. Or you may prefer to have it in view at all times so that you can see the state of various controls with just a quick flick of the eye to the bottom of the screen. Page 14
29 3 SETTING UP This chapter explains how to properly connect power, external control devices, monitors and audio visual sources to your NewTek 3Play system. It also reviews registration for warranty purposes and technical support. After completing this short section, you ll be all set to continue into the Walkthrough chapter that follows it. To begin, let s review what came in the box : 3Play and 3Play CS (control surface) 3PLAY 820 Package of three (3) 2TB hard drives 3PLAY 425 One 1TB hard drive for the removable drive bay A/C power cable(s) and 6 USB cable NewTek mouse and keyboard 3Play Quick Start Guide Registration reminder card BNC removal tool DVI to VGA adapter Keys to front panel of rack mount case (2) Attachable rubber feet for desktop use (4) NewTek TriCaster brochure and 3Play Welcome letter 3.1 COMMAND AND CONTROL 1. Connect an external computer monitor to the Interface DVI port on 3Play s backplate (use an adapter if necessary). 3PLAY 425 Use the DVI connectors nearest to the Video In group for the interface monitor. DVI connectors located at left below the power supply are normally capped and should not be used. Note: The user interface for NewTek 3Play requires a minimum screen resolution of 1440x Connect the mouse and keyboard to USB ports on 3Play. Page 15
30 3. Connect the A/C power cord(s) from the three-prong connection(s) on 3Play s backplate to an external power receptacle (see Hint below). 4. Turn on the computer monitor. 5. Press the Power switch located on 3Play s faceplate. At this point, the blue Power LED will illuminate, and the adjacent hard drive activity light should flicker as the device boots up. (If this does not happen, check your connections and retry). Though not a requirement, we do strongly recommend that you connect 3Play using an uninterruptable power supply (UPS), as for any mission critical system. Likewise, consider A/C power conditioning, especially in situations where local power is unreliable or noisy. A word about UPS devices: Modified sine wave UPS devices are popular due to low manufacturing costs. However, such units should generally be viewed as being of low quality and possibly inadequate to fully protect the system from abnormal power events.. For a modest added cost, consider a "pure sine wave" UPS. These units can be relied on to supply very clean power, eliminating potential problems, and are recommended for applications demanding high reliability. Surge protection is especially important in some locales. Power conditioners can reduce wear on 3Play s power supplies and other electronics, and provide a further measure of protection from surges, spikes, lightning and high voltage. 3.2 ACTIVATING & AUTHORIZING WINDOWS (Your dealer may have performed this operation for you as part of his pre-delivery service.) When you see the Welcome to Windows screen: 1. Click Next at lower right. 2. Choose your time zone. 3. Accept the license agreement. 4. Enter your 25-digit key (on some models, the sticker is on the bottom of the case). 5. Decline automatic updates (by clicking not right now ). 6. Give 3Play a distinct computer name for networking. Page 16

31 You can authorize your Windows installation by network or by telephone. Assuming you have an Internet connection available, and have connected 3Play to it with an Ethernet cable, the Internet is the fastest method of activation. (See Section 3.12 for more on network connections.) 7. Click Obtain IP and DNS automatically. 8. Agree to activate Windows. This activation is permanent, and you won t see these screens again. (Registration with Microsoft is optional). 9. Assign a name to the administrator account. You may type your name, company, or perhaps simply 3Play. 10. Click Finish, and the system will re-start. After restarting and accepting NewTek s User Agreement, the interface will load automatically. 3.3 LICENSE AND REGISTRATION On launch, 3Play presents an End User License Agreement dialog. After you accept this, the Registration dialog shown in Figure 15 is presented. It provides the unique Product ID you need to register your system. If necessary, enter the unique Serial Number and Product ID for your system. TriCaster s video output will show a watermark until the system is registered and unlocked (by entering the registration code. Figure 15 Hint: If the Serial number doesn t appear automatically, and can t find it on your unit, you can obtain it from the registration webpage mentioned in the next section, or by calling Customer Support Desk (open seven days a week). Page 17
32 You can register and obtain your registration code either by telephone, or online (directly from 3Play or from another system connected to the Internet) as described next ONLINE REGISTRATION If you have connected your 3Play to the Internet, simply click the button under Step 3 in the registration dialog. This will take you to the Registration webpage ( in the Customer Care section of NewTek s website where you will find further directions. Hint: More information on connecting to a network can be found in Section Otherwise, you can visit the registration webpage from another system that does have Internet access. In either case, after registering on the website, enter the resulting registration code into the field provided at Step 4 of the dialog. Hint: It s a very good idea to record the login name and password you choose when creating your website profile and keep them in a safe place. Jot down registration code too; it could come in very handy if you ever need to restore the 3Play software to its as-shipped state when you don t have access to the Internet REGISTERING BY TELEPHONE NewTek s Customer Care center can also handle registration requests by telephone, if that is more convenient (when opportunity permits, you should still visit the website as discussed above to gain access to software updates). Please have your Product ID (from the Registration dialog mentioned earlier) handy when you call. The phone numbers for Customer Service follow: Telephone: (US) (Outside US) Fax: Note: For Technical Support contact information, please see Section A.6.2. Page 18

 or Composite (may require RCA to BNC ad")
33 3.4 INPUT CONNECTIONS CONNECT A/V SOURCES External audio and video sources are connected to the appropriate inputs on 3Play s backplate. Figure 16 3Play 820 Figure 17 3Play Connect video sources to the appropriate connectors in the VIDEO IN section (Figure 16), whether SDI, Component, Y/C (S-Video) or Composite (may require RCA to BNC adapter). a. SDI Attach the SDI source connectors to BNC connectors marked SDI in the Video In group. Page 19
34 Hint: If your equipment supports SDI, this is your best quality I/O option. b. Component Attach the appropriate BNC connectors from your sources to all three analog BNC connectors (labeled Y, Pb and Pr) in each column in the Video In group. c. Y/C If your S-Video equipment and cabling has the usual 4-pin mini-din connectors, you will need an S-Video to dual BNC adapter. To connect Y/C sources, attach the Y (luma) connector of your source to the second analog BNC connector (labeled Pb). Attach the source s C (chroma) connector to the bottom connector (labeled Pr). d. Composite - Attach the composite source s connector (may require an RCA to BNC adapter) to the second connector (labeled Y). Note: The video broadcast standard (such as NTSC, NTSC-J or PAL) of all video sources connected for a given session must be the same. 2. To input analog audio along with the video, connect the external audio sources to the XLR or ¼ connectors in the Audio In group box. Two connectors, labeled a and b, are provided for each input group. We ll discuss audio Connection Type options a bit later, in Section Digital Audio Note: To connect AES/EBU (a.k.a, AES3) audio source, use the BNC connectors in the Digital Audio (AES) section. SDI video sources with embedded audio do not need a separate audio connection GENLOCK CONNECTION The Genlock input on 3Play s backplate is for connection of a house sync or reference signal (often a black burst signal intended specifically for this purpose). Many studios use this method to synchronize equipment in the video chain. Genlocking is commonplace in higher-end production environments, and genlock connections are usually found on professional gear. Page 20


.")


35 Figure 18 3Play 820 Figure 19 3Play 425 If your equipment allows you to do so, you should genlock 3Play and all cameras you configure as sources for it (see your camera manual for details). To do so, supply the reference signal from the house sync generator to 3Play s Genlock input connector TIMECODE CONNECTION 3Play supports external linear timecode (LTC). 3PLAY 820 Connect the cable from your timecode generator to one of the connectors in the Audio Input 7 group. Figure 20 3PLAY 425 Connect the cable from your timecode generator to one of the connectors in the Audio Input 3 group OR, connect it to either the blue or red 1/8 audio inputs (Figure 21). Figure 21 External timecode is enabled and configured in the Replay Desktop (see Section 7.2.5). Page 21


36 3.5 OUTPUT CONNECTIONS Next we ll discuss the audio and video output connectors along with relevant settings. We ll start with video output, not only so you can view your results, but because some aspects are best considered before even beginning a 3Play session A/V OUTPUT Figure 22 3Play 820 Figure 23 3Play 425 3Play provides several video and audio output connector groups, and very flexible options for display of your live and recorded video streams. Here are some of the possibilities: Simultaneously send two indpendent outputs to extneral devices. Send 3Play audio and video output to a network-connected TriCaster. Simultaneously send output to both analog and digital devices. Page 22
37 Transmit another output or multi-bridge monitoring layout to a secondary monitor (or projector) via the Multiview port. An additional output is provided via an HDMI port. This output tracks the active 3Play Output Mode (A or B) HD AND SD As mentioned earlier, the Video Output section on 3Play s backplate provides vertical columns of four BNC connectors. These represent: Output A (Row 1) Output B (Row 2) HDMI This output tracks the active 3Play Output Mode (A or B) 3PLAY 820 Aux (Row 3) carries the same signal as either Output A or Output B, depending on 3Play s current Output Mode (see Section 7.1.2). The output connectors provide either SD or HD video output, according to the format specified for the current session, using any of several different device connection types as discussed next CONNECTING DEVICES 1. Connect downstream video devices to the appropriate output connectors in the VIDEO OUT section, whether SDI, Component, Y/C (BNC) or Composite. Please note that the latter two formats may require RCA (cinch plug) or S-video (4 pin mini-din) to BNC adapters, and also that both of these connection options support output at SD resolution only. a. SDI Attach SDI connectors to the uppermost row of BNC connectors in the VIDEO OUT connector groups. Hint: If your equipment supports SDI connections, this is your best quality option. a. Component Attach your device to the second, third and fourth BNC connectors (Y, Pb and Pr) in the VIDEO OUT connector groups. Page 23
38 b. Y/C If your S-Video equipment and cabling has the usual 4-pin mini-din connectors, you will need an S-Video to dual BNC adapter. Attach the Y (luma) connector of your device to the second analog BNC connector row (labeled Pb). Attach the C (chroma) connector to the third analog connector (labeled Pr). c. Composite - Attach the device s connector to the first (top) analog connector. 2. Connect 3Play s audio outputs: a. Analog audio Connect external audio devices to the connectors in the AUDIO OUT section. Note that there are two rows of connectors; Connectors numbered 1a and soon provide Output A sound, while 2a etc. are assigned to Output B. These two output sections are configured and controlled separately in the Replay Desktop. 3PLAY 820 Aux (Row 3) carries the same audio as either Output A or Output B, depending on 3Play s current Output Mode. b. 3PLAY 820 Digital audio Use the two BNC connectors identified as 1ab and 1cd in the AES section (below the analog audio outputs) section to connect downstream AES/EBU (AES3) audio devices. (A separate digital audio connection is not necessary for SDI output with embedded audio.) Hint: 3Play s SDI and analog output sections can be used simultaneously. For example, you could use the Component output to view your program on a local analog video monitor at the same time as you use the HD-SDI connection to supply broadcast equipment SUPPLEMENTAL VIDEO OUTPUTS Additional dedicated video outputs make it possible to connect other devices to 3Play for a variety of purposes, including program output for IMAG (Image Magnification) installations or flexible monitoring for the convenience of the operator. Page 24

39 HDMI A labeled HDMI connector on 3Play s backplate tracks the active 3Play Output Mode (A or B). Simply connect a suitable device to the HDMI connector on the backplane. NETWORK OUTPUT Figure 24 3Play s Output A and Output B are available as Switcher sources to a network connected TriCaster. There is nothing to configure on 3Play. Provided the two units are on the same network (not different subnets), they will appear in the source selector menu for TriCaster s Net 1 and Net 2 inputs as 3Play(A) and 3Play(B), where 3Play is the network name for the system. Conveniently, the output includes embedded audio, freeing up multiple TriCaster a/v inputs for other purposes. MULTIVIEW 3Play s Multiview output is variously supplied by a DVI connector (3Play 820), or HDMI connector (3Play 425) located near the interface DVI connector. Again, connect a suitable external monitor or device. The new device should be recognized and enabled by the system automatically. This output offers a variety of optional monitoring layouts that can be selected at any time in the Replay Desktop. Note: For best results, it is important to configure Multiview Output to the native resolution of the external display (monitor or projector) connected TALLY LIGHTS You may notice that 3Play s backplate connections include a DB-15 port labeled Tally. This is intended for future expansion. At the present time, the connector is not active. Page 25

40 3.6 STARTING A SESSION If 3Play is not already running, power it up now to reveal the Startup Screen. (If 3Play is already running, and is in the Replay Desktop or another area of the interface, you may need to click the small [x] button at upper-right to exit, or click the Back arrow at upper-left in the Session Page to return to the Home Page.) The Startup Screen consists of two similar screens the Home page and the Session page. Among other things, the Home page is where you choose basic 3Play session settings (see Section 5.1 for a discussion of sessions). THE HOME PAGE Figure 25 When no previously created sessions exist, the icon ring dominating the Home page defaults to New, inviting you to create a new session. Page 26
 Note: 3Play supports a variety of optional session configurations for live production.")
41 A link labeled Enter Session Name is shown at the top of the right-hand pane when New is selected on the icon ring. Click in this area to modify the name using the keyboard if you like. (The default name is the current date.) Note: 3Play supports a variety of optional session configurations for live production. You can choose either HD (High Definition) or SD (Standard Definition) operating modes. SD options include both 4:3 and 16:9 (widescreen) image aspects. Multi-standard models permit you to select from three video standards according to your locale NSTC, NTSC-J (Japan) or PAL. Continue with session creation by assigning drives to cameras you intend to record. Qualified storage volumes connected to 3Play or mounted in its removable drive bay(s) are listed in Figure 26 the Drives column of the Record Configuration section (Figure 26). Use the drop-down menus under Inputs to assign sources to hard drive. (Notice that the panel layout encourages you to record just two sources to a given drive.) The hard drives assigned here can be thought of as comprising a drive set for the session. The Session Volume menu allows you to designate the primary member of the session drive set. For multi-standard models only, set the Video Standard as appropriate for your locale. For the moment, let s choose 1080i for Resolution (even if the cameras you plan to connect are SD 4:3), then click the Create Session link below. THE SESSION PAGE Clicking Create Session will display the Session page. Page 27
42 Since our intention at this stage is simply to configure our connections (done in 3Play s Replay Desktop), go ahead and click Start Session on the icon ring. Figure 27 This will launch the Replay Desktop, which is likely where you will spend most of your time working with 3Play. THE REPLAY DESKTOP Figure 28 Initially, as you have yet to configure input devices or add content, the Replay Desktop will look a bit barren (Figure 28). We had a brief glimpse at the Replay Desktop back in section 2.5 (and we ll examine it more closely in Chapter 4, Live Production Walkthrough), but after a quick look around let s continue to configure your input and output connections. 3.7 CONFIGURE VIDEO OUTPUT 3Play provides complete video input monitoring right on the Replay Desktop. This allows you to operate it without even connecting downstream video monitors or devices. Page 28

43 Additionally, however, you will likely also connect external devices to the VIDEO OUT connectors on 3Play s backplate (see Section 3.5). High definition devices will be connected to either SDI or Component connections, while other connection types are available for SD devices and sessions SD ANALOG CONFIGURATION For standard definition monitoring, however, several types of analog connections are currently in popular use. These include Composite, Y/C (also known as S-Video) and at the upper end of the analog quality range Component. To connect an analog standard definition monitor for use in live production, you must specify the connection type in the Output Configuration panel. Figure 29 3Play 820 Figure Move your mouse pointer over the Output Configuration button, identified by a gear icon as shown in Figure 30, and found at upper-right on the Replay Desktop just below the Close button. Click here to open Output Configuration. The first two tabs in this panel are labeled Output A and Output B. Located at the top of both of these tabs is a menu allowing you to select the Analog Output Type for the associated output channel, A or B (see Figure 29). For SD sessions, Component or Composite + Y/C Analog Output Type alternatives are available. For HD sessions, Component is the only valid option, so the menu is locked. Page 29
 controls below in each output tab as well, along with individual output Audio level sliders.")
44 Selecting Composite + Y/C sends composite video output to the second BNC connector for the corresponding output row (labeled Y), and Y/C to the third and fourth connectors, which are labeled Pb and Pr, respectively. You ll notice output Proc Amp (color) controls below in each output tab as well, along with individual output Audio level sliders. The third tab is labeled Aux/Multiview (3Play 820) or simply Multiview (3Play 425). 3.8 CONFIGURE MULTIVIEW OUTPUT Figure 31 We ll just discuss the Multiview control group here (see Section for a more thorough examination). The Multiview output commonly serves supplemental control room monitoring needs, though other possibilities exist, too. The Screen Layout options determine what the Multiview output displays. Use VGA Output Resolution to select a suitable resolution for the device attached to the Multiview connector (if any). Make appropriate selections for your environment in this panel, and then click Close. 3.9 CONFIGURE GENLOCK 1. Click the Genlock tab in the Output Configuration panel. 2. The default Reference Type in the Genlock settings is SD (Bi-level), as this is currently the most common reference signal type. However, if you supply an HD reference signal to the Genlock input, you may want to change the setting to HD (Tri-level). Page 30
 operation is automatically applied.")
45 Figure With the aid of downstream Waveform and Vector Scopes, adjust 3Play s Horizontal and Vertical Position and Phase settings. Again, ideally both the cameras and 3Play should be genlocked. If cameras are not genlocked to the same reference signal as the 3Play, a TBC (Time Base Correction) operation is automatically applied. Time Base Correction may drop or insert frames as necessary to maintain sync, hence it is a less desirable approach. Note: For a deeper explanation of genlocking, please see Section CONFIGURE VIDEO INPUT Let s continue by configuring the video sources you connected earlier (Section 3.4): 1. With the Replay Desktop open, roll your mouse into the titlebar of any input monitor. 2. Notice that a Configure button (gear icon) is highlighted at right in the titlebar of the input monitor as you do so. Page 31
46 Figure Click the Configuration button for Camera 1 to open a settings panel (Figure 33). 4. Click the Connection Type menu to reveal a listing of various connection types. Select the correct format, such as 720p (Component), or 1080i (SDI), etc., for the video source you plan to connect to this input. At this point you should be able to view the (configured) sources on their respective monitors. Before closing the Configuration panel, let s continue to configure the related audio source. Page 32

47 3.11 CONFIGURE AUDIO The Audio Configuration control group in the lower part of the Configuration panel has Input Type and Gain control features for the external audio source in the same input group as the current video input. Figure 34 The upper menu permits you to choose a different audio input to be captured with the video clip for this camera. Input Type options include Mic (with and without phantom power), Line, AES/EBU, and SDI Embedded. After connecting audio sources to the input connectors the first thing to do is select the desired Input and correct Input Type using the drop-down menus: Select Mic for professional grade microphones or other low impedance connections (use the Mic + Phantom option for condenser microphones requiring supplementary power) Choose Line typically for consumer type device connections (such as a CD player, computer audio output or VCR). Select AES/EBU (3Play 820 only) or SDI Embedded to connect a digital audio source. Note: Analog levels conform to SMPTE RP-155. The maximum input/output level is +24 dbu, nominal input level +4 dbu (-20dBFS), and the sample rate is 96 khz. Page 33
48 The Gain slider defaults to their 0dB on first launch. After adding audio sources, slowly adjust the slider to achieve an appropriate signal level (use the VU meters in the titlebar above the monitor as an aid.) Hint: Most numeric controls in on the Replay Desktop can be reset to their defaults using Shift + double-click on the control knob NETWORKING Connecting 3Play to a local area network (LAN) may require additional steps beyond those mentioned back when we discussed Microsoft Windows activation (Section 3.2). Here is the basic procedure involved in joining a workgroup: 1. Connect a suitable cable from the ETHERNET port on 3Play s backplate to your external network. 2. (If necessary) close the Replay Desktop; click the Back arrow to return to the Home Page. 3. Click Shutdown, then select Exit to Windows at right to access the operating system s own desktop. 4. Right-click on the My Computer icon, and select Properties. 5. Scroll down in the right hand pane of the System panel that opens to find the Computer name, domain and workgroups settings area. 6. Click the Change Settings link at right. 7. Click the Computer Name tab of the System Properties panel that opens. 8. Click the Change button, and enter the name of your local workgroup, as provided by your system administrator. 9. Close the OK button. Page 34
49 10. Close the System control panel. 11. At this point, the network connection should be functional. If further help connecting is required, please consult your system administrator. The next section (Chapter 4, Live Production Walkthrough) will guide you through your first experience using 3Play. Page 35
50
51 4 LIVE PRODUCTION WALKTHROUGH This chapter provides a quick hands-on tour of the major components and functions of your NewTek 3Play. In a very short time, these basics will be second nature to you. More detailed reference material on all aspects of 3Play follows in Part II (Reference). Having made the essential external connections in the previous section, let s start your first 3Play session, and skim through some important fundamentals: Startup and Import Monitoring and related features Recording and marking events Playing clips Using metadata Creating a highlight reel. 4.1 CREATING A SESSION We ran through the basics of starting new sessions and configuring devices back in sections 3.6 through 3.9. If you need to review this information, go ahead and do so now. We ll look at these items individually again later in Part II (Reference), too. Figure 35 Page 37
52 1. On the Startup > Home page, click the New button on the icon ring, and configure a new 1080i session. Name it Practice Session (without quotation marks). Figure As part of the session setup process, assign different camera inputs to the individual drives, using the controls in the Drives and Inputs columns under Record Configuration. 3. The Startup > Session page will appear when you click the Create Session link at right. Figure 37 (Glance around this screen, which provides some useful session asset management tools, but we re going to press on to other features right now.) 4. In similar fashion, click Start Session (Figure 37) to leave Startup and launch the Replay Desktop. Page 38
53 4.2 THE REPLAY DESKTOP Figure At this point, you should see the blank Replay Desktop (Figure 38). Figure We discussed configuring input and output connections and devices for new sessions back in sections 3.4 (Input Connections), 3.7 (Configure Video Output), 3.8 (Configure Multiview Output), and 3.11 (Configure Audio). Review these points if necessary, and set up your connections; we re assuming at least 3 cameras are connected below. Page 39
54 By now, you should see live video from the configured connections on the input monitors. 4.3 OUTPUT AND CONTROL MODES 7. Press A on the control surface to designate the Output Mode 8. Press LIVE to set the Control Mode see sections 8.4 and 8.5 for explanations of these modes. 9. Push the P3 button to send the live source from input 3 to the current output (A). 10. Push B on the control surface to update the current Output Mode. 11. Press LIVE again, to set the Control Mode for output B note that outputs have independent Control Modes. 12. Push the P2 button to send the live source from input 1 to the current output (B). 4.4 RECORD AND SPEED 13. Watching Output B, push the Stop button on the control surface. 14. Push the 25% Speed preset button, then press Play, still watching Output B. Well, that was unimpressive. Playback ignored our control surface operations, and continued at full normal speed. Why? This is because we have not yet enabled recording. Stopping or changing the Speed of a LIVE source would automatically kick playback into Delayed mode - if it could. However, this requires 3Play to be recording. Let s try that again, enabling recording first. Remember that Speed (for Output B) is still set to 25% (if you checked, Output A would still be at the default speed, 100%) 15. Press the red REC (Record) button on the control surface, to enable capture. Page 40
55 16. Notice that the Record button on the Replay Desktop beside the Record button (just beneath Output A) lights up, and a nearby time counter starts keeping track of the total amount of video recorded in the current session. Note: Recording is automatically initiated if you simply press IN. To end recording, hold ALT down while pressing REC. 17. Press Stop note that video playback on Output B is arrested (Output A is unaffected and continues playing). 18. Push the 25% Speed preset button, then press Play. Playback on Output B resumes in Delayed mode, at 1/4 normal speed. Hint: In this state, the HUD (Heads Up Display) overlaid on Output B shows a new time field, with a negative value. This shows how far behind live the current frame is. As you watch it, the negative offset will continue to grow, because playing at 25% will mean the output is falling progressively further and further behind live. The HUD also shows the T- Bar Speed value which is 25% just at the moment. 19. Press the 100% Speed preset button. Notice that the HUD s behind live time display locks, since output (though Delayed, not LIVE) is no longer falling further behind the live input. 4.5 MARKING EVENTS With recording enabled, continuous capture of inputs configured for capture when creating the session (in Startup) is taking place. (Notice that the Clips List shows an event row in its tabular pane that tells you when recording commenced.) TWO BUTTON MARKING 20. Push the IN button, which is how you would set an In Point for an event. Note that when you do this, a new event row is added to the Clips List. This new event can be referred to as an incomplete event, because it has an In Point but no Out Point. Page 41

56 21. Keep an eye on the In Point column for this incomplete event, and push IN again. Notice that the In Point updates when you do this. 22. Complete the current event in the Clips List by pressing the OUT button on the control surface. Note that the event now has both an In Point and an Out Point, and the (calculated) Duration for the event is also now shown. Figure Click the small button at the extreme right end of the Clips List header. This opens the Clip Configuration dialog. 24. Notice the One Button Marking menu, which lets you change the default duration value for this handy feature. Hint: Just below the One Button Marking menu, notice the Out Point Padding switch and associated numeric control. Enter a duration in the numeric field and enable the switch if you want playback to continue past the end point of clips you play, rather than stop immediately when the Out Point is reached. 25. Click the Close button to dismiss the Clip Configuration dialog. Page 42
57 4.5.2 ONE BUTTON MARKING 26. Finish marking any incomplete event, if necessary, by pressing OUT. 27. Wait for a few more seconds to elapse, and then press OUT only without pressing IN first. 28. Repeat this step a few times, allowing a few moments to pass between repetitions. Notice that even though you haven t pressed IN first, new complete events have been added to the Clips List. By default, the duration for each of these new events is four seconds. The Out Point was set when you pressed OUT, and a suitable In Point is assigned as required. 4.6 CLIPS LIST NAVIGATION 29. Hold down ALT, and press the (Next) button. Nothing happens. This is because you are still in LIVE mode. 30. Press the CLIP LIST control mode button. A bright border is added to the Clips List module, and the HUD for Output B also updates (to CLIPS). Both of these are indicate that Output B is now in Clips control mode. 31. Hold down ALT, and press the (Next) button again. You ll see that the view on the current output updates to show the second camera angle, and the gold highlight in the Clips List moves to the Memo column for the second clip in the event row. 32. Hold ALT down again, and press (Previous) to return to the first camera angle. (Press Previous or Next without ALT to move up or down in the Clips List. 4.7 ADDING A MEMO 33. Press F2 (or alternatively, the Enter key) on the keyboard. Note that this places the currently highlight Memo field into text edit mode. Page 43
58 34. Type touchdown into the Memo field for the current clip (typically comments on the nature of the action captured). 35. Press Next or Previous to move to another event, then use ALT + Next to move to the Memo field for a different camera angle. (Note that moving the highlight to another field concludes text edit mode.) 36. Press F2 again, enter the text penalty into the Memo field, and press Enter. 37. Press F3 - the cursor jumps into the Filter text field in the Clips List titlebar. 38. Start to type the word penalty notice that even before your are done typing, the Clips List view is filtered to show only events with matching criteria in their memo fields. Hint: Of course judicious use of Memo entries and the Clips List Filter make it easy to find events for Play List construction or other organizational purposes. 39. Press Backspace on the keyboard a few times to clear the Filter criteria, resulting in the Clips List once again displaying all existing events. 4.8 TRIMMING EVENTS 40. Using ALT + Previous, move the Clips List highlight into the In Point for an event. 41. Hold down the EDIT button on the control surface, and rotate the large Jog Wheel, watching the In Point value change as you do so. Hint: The same method allows you to edit the Out Point or Duration values. Alternative, you can either simply drag left or right with the mouse over a numeric field, or press either Enter or F2 to use direct text entry mode to modify the value in a highlighted numeric field. 42. Here s yet another method to change the timing of a marked event: a. Display a clip for the event on the output monitor b. Rotate the Jog Wheel until you find a frame that would make a good In Point c. Then press ALT + IN to update the current In Point. Page 44
59 d. Rotate the Jog Wheel again to locate a suitable Out Point, and press ALT + OUT. 4.9 MANAGING EVENTS 43. With the mouse, drag either the Event ID column entry or the Memo field for any clip in an event up or down to re-order the events in the Clips List. 44. Right-click in the same locations (Event ID or Memo field) to show a context menu with Cut, Copy, Paste and Audio Level options. Alternatively, you can use the standard shortcut key methods (Ctrl + x, Ctrl + c, and Ctrl + v). 45. Multi-select several events, using either SHIFT with control surface Previous and Next, or mouse selection with keyboard Shift or Ctrl. 46. Copy the selected events (into the copy buffer) using the context menu or Ctrl + c. 47. Press P2 to display the second page of the current Clips List bank (each bank has four pages for your use). 48. Press (keyboard) Ctrl + v to paste the copied events into page two of the Clips List PREPARING A PLAY LIST 49. Press P1 to return to Page 1 in the Clips List ADDING CLIPS 50. Use Previous and Next (with or without ALT as necessary) to highlight the Memo field for a clip, and then press Add to Play List on the control surface Repeat these steps until several clips appear in the Play List table. Let s try a different method of adding clips to the Play List pane: 52. Hold down Shift on the keyboard, and use the left and right arrow keys to multi-select several clips (by highlighting their Memo fields). Press Add to Play List. Page 45
60 Let s use yet another approach to add the clips for all recorded camera angles of a single marked Clips List event to the Play List in consecutive order? 53. Using the mouse, drag the Event ID field for the event of interest onto the Play List pane. Clips from all camera angles for the event are added to the Play List in order. 54. Let s clear out the current Play List before continuing: a. Press the PLAY LIST control mode button on the control surface. b. Press keyboard Ctrl + A (select all). c. Press control surface REMOVE, or keyboard Del. 55. Hold down Ctrl on the keyboard, and use the mouse to click two Event ID fields that are not next to each other in the Clips List (or if you prefer, several non-neighboring Memo fields). 56. Drag the highlighted fields onto the Play List pane EDITING AND PLAYBACK 57. Use the controls in the Audio columns of the Play List to adjust audio levels for the clips, and if you wish, adjust the Crossfade timing as well. 58. Roll the Jog wheel to move through the Play List sequence, and watch the output monitor. As play moves from the Out Point of one clip to the In Point of the next, note that the red currently playing highlight in the Clip ID column at left tracks the current playback position. 59. Press Play (or keyboard Spacebar), and notice that playback commences from the current position. 60. Press Stop, then Previous. The play position is reset to the first frame of the first clip in the Play List. 61. Push Fast Jog (to enable it) and use the Jog wheel to advance through the clips until the red play indicator is 3 or 4 clips from the beginning of the playlist again. Page 46
61 62. With playback stopped, press Stop once. The play position is again reset to the first frame of the first clip in the Play List. (Had playback been underway, pressing Stop twice in succession would have accomplished the same thing.) Hint: Note that the Play List (like the Clips List) has four banks of four pages each. In addition, Play List pages can be individually labeled using the Name field in the Play List header SPEED CONTROL You can set Speed independently for each clip in the Play List, in similar fashion to adjusting the Audio levels. But you can also make interactive Speed adjustments even during playback when necessary. 63. Press Play, and then slowly move the T-Bar towards you while watching the output monitor. You ll observe that that the T-Bar (and Speed preset) settings are applied to the setting established for each Play List clip in its own individual Speed column. For example, if the clip s Speed in the Play List table is set to 50%, and the T-Bar is also at 50%, the actual playback rate will be 25%. Hint: Note that although the maximum Speed you can set using presets or the T-Bar is 100%, but the Play List control let you set Speed all the way up to 400% RENDERING A PLAY LIST 64. Click the Export Play List button in the Play List titlebar. Selecting this menu item adds a new clip to the Clips List (and shows the file path to the resulting clip in a dialog while doing so). The exported clip is an exact duplicate of the complete Play List, in one file. Note: Rendered Play Lists, like other Clips List entries, can be exported (to various popular file formats or as-is) using the Export Media feature in the Sessions page in Startup. See Section Page 47
62 65. As we ve reached the end of our introductory walkthrough, press ALT + REC to stop recording. 66. Then click the Exit button at the right hand end of the Replay Desktop titlebar. This takes you back to the Session page in Startup. 67. Press the large arrow icon at upper left to return to the Home page, then click the Shutdown icon 68. Select Shutdown 3Play to power the unit down. Page 48
63 PART II (REFERENCE) A thorough examination of the various aspects of your NewTek 3Play ; every button, menu item, feature and control is considered in this section so you can take full advantage of your system. Page 49
64
65 5 THE STARTUP SCREEN The Startup Screen is the gateway to your NewTek 3Play functionality, and also home to session management and system maintenance features. Icons in the left-hand pane of the Startup Screen provide access to various functions. We ll discuss each of these in the pages that follow, beginning with a review of the concept of sessions. The Startup Screen appears whenever you launch NewTek 3Play. From here, you create, configure, manage and launch 3Play sessions by making selections from the icon ring. Figure 41 Your intention may be to participate in a live production, or perform asset management functions within an existing session. In either case, let s consider a fundamental concept the session. What is a session, and why are sessions both important and valuable to you? Page 51
66 5.1 INTRODUCTION TO SESSIONS Whenever you work with your 3Play system, you provide certain information about the production environment: What broadcast standard is used in your locale? Is it PAL, common in Europe among other places, or perhaps NTSC, standard throughout North American regions? Are your cameras or other live sources HD, SD or a mixture of both? How are cameras connected (are you using component or SDI connections, or a combination of several types)? As you continue, you may make other adjustments relevant to your current production requirements: You might calibrate your cameras individually using the Proc Amp settings in the Input Configuration panels. Perhaps you will also use output Proc Amps to adjust output display characteristics. What are your output device connection preferences? For example, will you send video from Output A to a local reference monitor using component cabling, or perhaps another connection type? Will you connect a downstream switcher to Output B using HD-SDI? What external audio connections and adjustments are required? You might create Play List pages of clips and other content, along with pages full of recorded events in the Clips List. The list of adjustments, activities and assets involved in a specific production goes on, but the main point to grasp here is that the session entails of all of the above, collectively. Assuming you do not deliberately delete the session, all of your media and all of your settings are ready for immediate recall. When you re-open an existing session, it s just as if you were continuing an earlier event. Thus, if you return to the same venue another day under basically similar conditions, you can opt to simply re-open your prior session and be virtually ready to go. (Professional wisdom, of course, calls for testing everything before actually beginning the event.) Naturally, you can store multiple sessions and load any session freely. This greatly simplifies business models that involve regular trips to several venues, a number of similar consecutive events, or different users with their own specific needs. Page 52


67 5.2 THE HOME PAGE Having discussed sessions, let s go on to consider how you create sessions, and choose which one to work on. This and a few other top level functions are found in the 3Play s Home page. Figure 42 This primary screen is the first thing you encounter on launching the system. Figure 42 shows the icon ring that dominates it. When you click an icon on the ring (such as New or Open), that item advances to the front-most position. Hint: Alternatively, you can use the keyboard s arrow keys to cycle through the icons on the ring. When you choose an icon from the ring, the right-hand pane of the Home page updates to provide more options related to your choice. For example, the first thing you will generally do is create a session. In anticipation of that, the New icon is pre-selected automatically whenever no existing sessions are detected. Figure 43 Page 53
 As just mentioned, clicking New on the icon ring populates the pane at right with related options.")
68 This results in the corresponding session options pane being displayed, as shown in Figure 43 (Multi-standard model options shown) NEW (SESSION) As just mentioned, clicking New on the icon ring populates the pane at right with related options. Principally, for each session you must designate (by selecting switches) your local video standard (Multi-standard model only select NTSC, PAL or NTSC-J) and session format 1080i, 1080/24p, 1080/30p, 720p, 720/30p, 720/24p, 480/30i (16:9) or 480/30i (4:3). Multi-standard models offer PAL format equivalents. SESSION NAME You will see a name entry field above the session options in the pane at right. Click in this name field to provide a suitable name using your keyboard. RECORD CONFIGURATION Figure 44 Beneath the Session name you entered, you will notice a control group labeled Record Configuration. In this section, you assign one or more storage devices to the session for replay clips you will record and other assets associated with the session. Hint: The titlebar of the Home page has an Eject button to allow you to disconnect and remove storage media. Page 54

69 Suitable hard drives added to a removable drive bay or otherwise connected are listed in the Drives column. Use the drop-down menus under Inputs to assign inputs for recording to the hard drive listed in the same row. (See also Section 10.1, Record Configuration New Session.) Note: External drives, while suitable for backup and restoration operations, are not recommended for recording applications. To ensure adequate data throughput for capture, the Inputs layout lets you to assign two inputs to any single storage volume. Regarding hard drive specifications for use in 3Play s removable drive bays, see Section A.1.7. VIDEO STANDARD AND RESOLUTION Figure 45 The format of video output by 3Play varies according to the session type. The session settings also affect capture. For example, if your session format is SD 4:3, this is the format captured by the Record function, even when the input Connection Type might be HD, to match a specific camera; the converse is also true. The frame is scaled and cropped as required to properly match the session setting, regardless of input type. Multi-standard 3Play units show the Video Standard option buttons, allowing you to choose NTSC, NTSC-J or PAL for your session, according to your local regional requirements. The Resolution radio button groups allow you to further configure the recording and output format for the new session. Note: See Section 7.1 for more information on Video Output configurations. Page 55
 If there are existing sessions on any currently mounted drive(s), the icon ring on the Home Page will default to the Open icon (Figure 46).")
70 Having made your selections, you would normally click the Create Session button at lower right (then Start Session to launch the Replay Desktop), but first let s explore the features of the Home page a bit more OPEN (SESSION) If there are existing sessions on any currently mounted drive(s), the icon ring on the Home Page will default to the Open icon (Figure 46). Figure 46 Selecting Open causes the Sessions List to appear at right. This pane shows all sessions stored on currently mounted drives. The Session Name and video format for each is listed separately under a header named for the storage volume they are located on (Figure 47). Figure 47 Note: Media configured as Read-only is not shown for the New or Open (session) features, since they cannot be used for sessions. However, Read-only media can be used for import purposes. Page 56
71 CONTEXT MENU Right-click a session name to open a context menu with two items listed in it: Rename and Delete. The Delete function should be used thoughtfully, as it cannot be undone. All content stored in the named session s folders on currently mounted drives will be deleted. This will include clips, images and audio files associated with the session. Note: Content that is not local to the session but which was used in it is not deleted. For example, you may have added still images to your Play List directly from a USB thumb-drive, doing so without actually importing the files into the session. Those external files will not be deleted. OPENING A SESSION Just as you were able to select an icon on the ring using the left and right arrow keys, you can highlight a name in the Session List using the keyboard Up and Down arrows then press the Enter key to open the session (or simply click the session name with the mouse to open it immediately). Selecting a session takes you away from the Home page to the Session page. Let s look at the other Home page features briefly before we go on to open a session, though SHUTDOWN This selection provides Restart 3Play, Shutdown 3Play, and Exit to Windows links in the righthand pane. Click a selection to perform the named action in the usual manner. (In the case of the last-named function, you can return to the 3Play environment later by double-clicking the desktop icon named 3Play.) Page 57
.")

72 5.2.4 UTILITIES Figure 48 Selecting Utilities on the Home Page icon ring (Figure 48) presents a list of functions at right that have to do with the 3Play system (Figure 49). Figure 49 REGISTER 3PLAY Registration is required to remove the watermark from output, in part to encourage you to register early. Among other reasons, doing so will serve to identify the unit to NewTek as yours in case of theft, and will also allow you to check for software updates that may have been recently released. (The steps in the Registration process were outlined back in Section 3.3, so we won t repeat them here.) Page 58


73 UPDATE 3PLAY Periodically, NewTek may provide software updates for your 3Play. Updates can enhance performance, security or even add useful new features. If the system is connected to the internet, clicking Update 3Play will automatically access the appropriate webpage so you can check for new software patches or other downloads provided by NewTek. Use the login details you provided when registering 3Play to enter your personal product page, click the my downloads link at the top of the page, and install any new updates. This way you can be sure the very latest version of the software for your system is installed. 1. Click Update 3Play. 2. Login to the NewTek update webpage, locate the latest update and click on it. 3. At the dialog popup, choose Run. 4. Comply with any onscreen prompts that follow. Hint: If you wish, you can instead access the same webpage from a second computer connected to the internet, then transfer update files to 3Play using a network connection or perhaps a USB thumb-drive. DEFRAGMENT ALL DRIVES Figure 50 Over the course of time, storage volumes devoted to audio and video storage can become fragmented. Eventually, this can degrade playback performance. Defragmenting corrects this condition. You could think of your hard drive as being like a shelf in your library. As time goes along, the shelf fills with books (data). Some are large while others are small, just as 3Play session content may be larger or smaller. Page 59

74 To make room for new additions, you decide to remove books you have finished with from the shelf. You remove a book here, another there, opening up gaps between the remaining books. This makes some shelf space available, but does so in the form of gaps separated by the remaining books. Sadly, when you obtain another large book, it may be too big to fit in any one of the gaps. A foolish librarian might tear the new book into sections just big enough to fit into the open spaces on the shelf. This is would obviously be unwise. When you wish to refer to the book later you will lose a lot of time locating and assembling its sections before you can read it. How much better it would be to slide the remaining books closer together, combining all the free space first. Unfortunately, computers are foolish librarians. They tend to want to fill in all the gaps in their storage areas, even if it means literally shredding your book (in reality large video files from your sessions) into tiny fragments. Defragmenting the storage volume has the same effect as sliding the books together, resulting in less and larger gaps. The end result is that 3Play doesn t have to frantically search in many different places to assemble the video data you have recorded. This process (defragmentation) can take considerable time, so it s not something you want to begin just before an important event. RESTORE TO FACTORY DEFAULTS A complete system restore function is available in the event of an unforeseen problem. This does not merely restore the operating system, or other data files. Rather, it restores the system to an as-shipped software state. Please refer to Section A.5.6 in Appendix A for full details and usage notes HELP Figure 51 Click the 3Play User Guide link to open the manual. Click the License Agreement link to review the 3Play end user license. Click About 3Play to list version information, credits and acknowledgments. Page 60


75 5.3 THE SESSION PAGE Figure 52 Opening a session from the Home page (whether using Open or New) takes you to the Session Page, providing a new set of options as links at right. Figure 53 The name of the current session is shown in the top-left corner of the screen. The session is displayed in the form Home/session name. If you wish to leave the current session and return to the Home page, you can click the large Back Arrow displayed beneath the session name, or the word Home in the session name label. Page 61

76 5.3.1 ASSET MANAGEMENT Figure 54 At times you may find it useful to be able to quickly access the various files associated with the current session. The links at right on the Session page under the heading Browse provide access to default session folders. Clicking one of these links (or selecting it with the up/down arrow keys and pressing Enter) opens a system file explorer. You can use the familiar features and shortcut keystrokes in these windows (Cut, Copy, Paste, Rename, Delete and so-on) to manage session assets. Hint: Of course, you can open several of these folders simultaneously, and navigate these file windows to other locations as well. For example, you might copy files from one session into a folder for another. Several other important features are found here, including Import Media and Export Media as discussed next. IMPORT MEDIA Clicking the Import Media link opens a custom import panel offering batch import of files for use in 3Play s Clips List and Play List. It even allows you to transcode files to appropriate high quality 3Play-friendly file formats at the same time if you wish. Page 62
 items to build a list in the Import Media file pane.")

77 Figure 55 Import Media s quick processing makes this the fastest and most convenient way to prepare production assets for a session. Click Add to open a standard system file window, and select (or multi-select) items to build a list in the Import Media file pane. Some highly compressed video files may not be well suited to live playback. Enable switches in the Transcode column for files you wish to convert to a friendlier format on import. Files can be re-ordered by dragging their entries up or down with the mouse, or removed from the list by highlighting them and clicking Remove. Figure 56 Once the batch import list is prepared, click Import to complete the operation. Files are processed quickly, and are automatically added to Import folders properly located according to type for easy access in different modules as required during live production. Hint: Sections , A.4.2 and A.4.3 discuss other aspects of importing media files. Page 63
, and designating")
78 EXPORT MEDIA Clicking the Export Media link opens a new panel - Figure 57. Figure 57 The Export Media module allows you to create a list of video clips for export, even selecting a new file format for these exports to be converted to (on a per file basis), and designating where to send them. Figure 58 Click the Add button at upper left to open a custom Media Browser (Figure 58). Use this pane to locate and select (or multi-select) video clips for export, choosing from the Clips List entries for the current session (see Section for browser details). Multi-clip selections are supported. Hint: The Export Media panel can be resized by dragging its edges or corners with the mouse. Page 64

79 After selection, click OK to add the clips you chose to the Export Media file pane. The file pane is much like a spreadsheet table, listing all files in the current export batch in its first column, then the current settings for each file in other columns on the same row. A Status column shows the current export status or progress for each file in the list. TOOLS Note that the Export Media file list pane also supports multi-selection. When a file (or group of files) is selected, you may use the Duplicate and Remove buttons at right to either clone or delete entries in the list. The Duplicate feature is very useful for cases when you wish to export a file to multiple target file formats to be used for different purposes or in different applications. Figure 59 The Clip Handles control is a numeric slider that allows you to pad the exported clips beyond the limits of their current in and out point (presuming the recorded frames to support this feature exist). This is often useful for post-production purposes (the value is in seconds.) Hint: Once files have been added to the export list, you can multi-select using standard Shift-click or Ctrl-click techniques, then apply options to all selected files in one operation. TARGET, PRESET & DESTINATION Having prepared the file list, click the triangle button in the Target column to open a drop-down menu listing broad categories of export format presets you can choose. A similar Destination button opens a system file browser to let you designate (or create) a location for file output. Hint: It is possible to selected mapped network locations (with a drive letter assigned) as the Destination, saving time later. Each file to be exported can have its own Target, Preset and Destination settings. The export presets shown vary, according to what is appropriate for a given session format. Page 65
: Application o Adobe Premiere Pro - high quality MPEG-2 Program Stream, full raster, 4:2:2")
80 Figure 60 Available export file formats are updated from time to time to include popular new formats. Here are some examples, as they appear for an HD session (formats and details subject to change): Application o Adobe Premiere Pro - high quality MPEG-2 Program Stream, full raster, 4:2:2 sub-sampling, variable bitrate (100 Mbps nominal). o Apple Final Cur Pro (.mov) very high quality M-JPEG encoding, full raster, 4:2:2 sub-sampling, high compatibility. o Grass Valley Edius high quality HD encoding, full raster, 4:2:0 sub-sampling, high bitrate (up to 100 Mb/s). o NewTek SpeedEDIT high quality MPEG-2 Program Stream, full raster, 4:2:0 sub-sampling, variable bitrate (up to 100 Mb/s). o Sony Vegas high quality MPEG-2 Program Stream, full raster, 4:2:0 subsampling, variable bitrate (up to 100 Mb/s). AVI o o DV/DVCPro (.avi) moderate quality, SD only (NTSC 720x480, PAL 720x576), 25Mbit/s, 4:1:1 (NTSC) or 4:1:0 (PAL) sub-sampling, very broad compatibility. MJPEG (.avi) moderate quality, SD or HD capable, 4:2:0 sub-sampling, broad compatibility. Page 66
81 DVD o (x) minutes (.mpg) SD-only MPEG 2, quality presets up to 9MB/sec bitrate ( 60 minutes) with 4:2:2 sub-sampling. Flash/Flash 9 o A diverse collection of presets suitable for playback in newer or legacy Flash players. Mobile Devices o Presets suitable for use with Android, ipad, iphone or ipod Touch. Quicktime o Renderless Conversion high quality wrapped Quicktime file. o DV/DVCPro (.mov) moderate quality, SD only (NTSC 720x480, PAL 720x576), 25Mbit/s, 4:1:1 (NTSC) or 4:1:0 (PAL) sub-sampling, very broad compatibility. o h.264 Highest Quality (.mov) o h.264 Very Good (.mov) o MJPEG (.mov) Same as Source file copy (no re-rendering) Video Server o Leightronix NEXUS\Ultra NEXUS SD (NTSC 720x480, PAL 720x576), high quality, MPEG2 Program Stream, 9Mb/s variable bitrate, 4:2:2. o TelVUE Princeton SD (NTSC 720x480, PAL 720x576), high quality MPEG2 Program Stream, 9Mb/s variable bitrate, 4:2:2, NTSC 720x480 (PAL 720x576). Hint: The time an export takes is affected by numerous factors the number, duration and resolution of the selected files, the speed of the device selected as target for the files, the designated format, and so on. It is generally unwise to commence a file export shortly before a live event, since you cannot launch 3Play s Replay Desktop during export. If necessary, you can cancel the current export operation. Page 67
82 Next, use the Destination field drop-down to designate a target folder for exported files to be sent. A progress gauge is shown during file processing. Click the Export button at the bottom of the dialogue to begin batch export processing. FORMAT NOTES When export presets that do not support HD are selected during an HD session, the clip is automatically scaled to fit the selected file format. This is a convenience, but be sure to select a preset suitable for your ultimate needs. In a somewhat related matter, note that 3Play records files from external sources in their native formats which may or may not match the session format. For example, an SD camera recorded by 3Play during an HD session is nevertheless recorded as SD. When exported, the recorded SD clip will export as SD. Finally, note that clips you imported into a session are simply exported as-is (that is, without transcoding) if added to the file list in Export Media. Page 68
83 6 REPLAY DESKTOP OVERVIEW The Replay Desktop serves as the principal control center for your production. It provides control over input and output configuration, recording, clip marking, Play List preparation and playback, and so on. This chapter provides a top-level view of the Replay Desktop, with more detailed information following in subsequent chapters. The Replay Desktop is launched by creating (or opening) a session in the Startup Screen, then clicking the large Start Session button. 6.1 DISPLAY REQUIREMENTS The Replay Desktop requires a minimum screen resolution of 1440 x Monitoring 2 Clips List 3 Play List 5 - Dashboard Figure OVERVIEW The Replay Desktop provides visual feedback for operations, including monitoring features, clip marking, and so on. It is divided into four horizontal bands (Figure 61). Page 69
84 From top to bottom, these are: 1 - Monitoring Input Monitors - monitor all inputs, or a sub-set Output Monitors - large full-time monitors of Output A and B, with optional information overlay s(heads-up display) Configurable Multiview display on secondary monitor 2 - Clips List Speadsheet dh style event management pane, listing i user-marked events as rows with In Point, Out Point and Duration Supports instant playback of marked clips Add unique comments for individual clips (camera angles) Filter the list by comment entries Clip management (trim, re-order and organize events into 'banks' and 'pages') 3 - Play List Add clips and other content to create highlights hl h reels, complete with optional transitions and music 4- Dashboard Auxiliary controls for output, playback, speed and marking supplement the control surface 6.3 A FEW HINTS You will find various types of user controls in the Replay Desktop. Some examples are shown in the table below. Several convenience features are associated with these controls. As you would expect, all slider controls (whether their motion is vertical or horizontal) can be set to a new value by holding down the left mouse button and dragging in the direction of the control orientation. Hold down the keyboard Shift key and double-click most controls to reset the associated value to its factory default. Page 70
85 Control Type Type Examples Usage Numeric Field Numeric Slider Text Field Text Field, Clips List and Play List In Point, Out Point, Duration, Crossfade Audio Gain, Proc Amp controls, etc. Input and Output Configuration panels Clip Comment Drag in line with the control orientation to raise or lower the current value. Double-click, or click and either press Enter or F2 to type a new value directly. Drag in line with the control s orientation to raise or lower the current value. Click to directly type in a new value. Click the field to activate it, and then type. (Keyboard shortcut for Clips List Filter, F3.) Navigate to or click the field, and then press Enter (or F2) to enable Text Entry mode, and ESC to cancel. Hint: To make very fine adjustments to slider values, hold down the Ctrl key on your keyboard while dragging with the mouse (this increases accuracy by a factor of 10.) 6.4 CUSTOMIZING THE REPLAY DESKTOP The Replay Desktop offers several convenient provisions for tweaking the user interface to suit your particular needs RENAME As charming as descriptive names like Camera 1, Camera 2 and so on are, we must admit that it s possible you might wish to change these default labels to something localized. Page 71
86 Figure 62 To do so, click the Configuration button (gear icon) at right in the monitor titlebar for a given input. The Input Configuration panels have editable Name text fields DUAL DISPLAYS AND MONITORING The Replay Desktop monitor tabs and Multiview options can be flexibly combined to show what you want to see, where you want to see it. For example, open the Output Configuration panel by clicking the Configuration button (gear icon) at right in the titlebar above Output B. Click the Multiview tab, and select All Inputs in the Screen Layout menu. Then position the mouse pointer over the horizontal drag bar between the monitors section of the Desktop and the Clips List. The mouse pointer becomes a double-headed arrow. Click and hold the mouse button down, and then drag the pointer all the way to the top of the screen. This provides a useful full-screen Clips List and Play List view, while still being able to monitor input and output on the Multiview display. Likewise, you can drag the horizontal divider between the Clips List and Play List to re-size them to taste THE DASHBOARD The Dashboard can alternatively be locked in place, or pop up when you roll your mouse to the bottom of the screen, using the padlock icon at left. 6.5 TITLEBAR TIPS Figure 63 Page 72
87 An information display section at right in the Replay Desktop titlebar (Figure 63) provides useful data. Displayed info includes: Session Name Session format Event Start/Event End (optional time display, counts down to corresponding times set in the Timecode Configuration panel) not illustrated. Timecode (from external timecode input or system clock) Timecode Configuration button (gear icon) QR Code scan with a suitable mobile device to download and read this manual on its screen. [x] Exit button STATUS BAR An information display is conveniently located just above the twin output monitors. From time to time this bar displays information pertaining to operations or system status, including any cautionary indications. Figure 64 For example, a brief initialization is required following a system start (or restart) for video playback to stabilize. During this warm-up period, an initialization countdown is displayed (Figure 64) in the Status Bar. Hint: Status messages disappear on their own after a little while, but you can manually dismiss them by clicking the square icon shown to the left of the text message. Page 73
88


89 7 I/O CONFIGURATION NewTek 3Play provides extensive control over your video signal at both input and output stages. In addition to broad format an connection options for audio and video inputs, each video source has its own realtime Proc Amp. As well, independent Proc Amps are provided for both outputs. Other important options include Multiview support on a secondary monitor, external timecode and genlock configuration. It is very useful to be able to configure each source and also the outputs independently. Source configuration options ensure that you can match camera inputs to each other, and that their signals fall within legal ranges, and even mix and match different types of camera (to a point). Output Proc Amp settings allow you to make adjustments for special purposes. Let s begin with a consideration of Output Configuration tools. 7.1 OUTPUT CONFIGURATION Figure 65 Roll the mouse pointer over the Configure button (Figure 65) above the top-right corner of the monitor for Output B, and click it to open the Output Configuration panel (Figure 66). Output Configuration has four tabbed panes (Figure 66). Two tabs are labeled Output A and Output B, and contain identical controls discussed momentarily. The Aux/Multiview tab relates to optional secondary display(s) for monitoring purposes, while the Genlock tab is home to important video timing calibration controls. Page 75

90 7.1.1 OUTPUT A AND B Figure 66 The video format for NewTek 3Play video Outputs A, B (and Aux on 3Play 820) is identical to the session format. Digital video output is supplied to the SDI output connectors in the corresponding format HD for HD sessions, and SD for SD sessions. ANALOG OUTPUT TYPE Figure 67 Page 76
 Y, Pr and Pb signals.")
91 For HD sessions, the only suitable Analog Output Type in popular use is Component, so options are not provided in this case. The three analog connectors in the VIDEO OUT rows for a given output on the system backplate are supplied with the (component) Y, Pr and Pb signals.for SD sessions, however, you can choose between Component or Composite + Y/C. This selection sends a composite video signal to the fist analog connector (labeled Y) in the VIDEO OUT rows on the system backplate, and simultaneously sends a Y/C video signal to the two connectors in the same output row labeled Pb and Pr, respectively. The following table lists the signal types for each connector in the video output section: Connection Type BNC 1 (SDI) BNC 2 (Y) BNC 3 (Pb) BNC 4 (Pr) Component SDI Y Pb Pr Composite + Y/C SDI Composite Y C NAME Figure 68 The Name field (next to Analog Output Type) is editable, allowing you to enter a custom name for each output. The name supplied will appear in the HUD (Heads-Up Display). PROC AMP Figure 69 Proc Amp adjustments can be toggled on and off using the Enable Proc Amp switch at upper left, or reset by clicking the Restore Defaults button. Page 77
92 Hint: When the Proc Amp is enabled for a specific source, a small yellow indicator is displayed in the upper-right corner, just above the corresponding monitor in any of the three main monitor tabs. (This indicator is itself also a toggle switch.) Each Proc Amp has numeric slider controls for: Brightness: Adjustment range from -50 to +50 IRE (the default being 0). As reference, the full luminance range of a video signal can be thought of as 100 IRE units (named for the Institute of Radio Engineers) ignoring minor regional variations. Contrast Adjustment range from % (default 100%). Hue Adjustment range from -180 to Adjusts the master color of the video signal from the attached source, swinging the entire image through the color wheel s spectrum. Saturation Adjustment range from 0-500%. Zero saturation results in a black and white picture; increased saturation results in richer colors. High saturation values can exaggerate the color portion of the signal. (You should be aware that over-saturated colors are considered illegal for broadcast transmission, and may result in display problems on some devices. ) Note: The input and output Proc Amps are very useful. However, keep in mind that, whenever possible, it is best to perform color adjustments at the source or target device. For example, it is preferable to calibrate a camera's colors at the camera, before sending the signal to the 3Play system. Doing so will yield higher color precision. Similarly, it s often better to adjust output color using controls on down-stream monitors. (The output Proc Amps can never completely compensate for a badly calibrated monitor.) The Proc amps are especially useful for occasions when no external options are available (many cameras lack built-in color controls; at other times, the physical placement of a device can make access inconvenient). Page 78

93 WHITE BALANCE A secondary group labeled White Balance adds U Offset and V Offset controls (Figure 70). The U portion of the video signal carries blue and green color information. When you adjust the U Offset, the change affects only the blue/yellow portion of the video signal. o Rotate U Offset clockwise to shift the signal toward blue and counter-clockwise to shift the signal toward yellow. The V portion of the video signal carries the red and green color information. Adjusting it affects only the red/green portion of the video signal. o Rotate V Offset clockwise to shift the signal toward red and counter-clockwise to shift the signal toward green. Figure 70 To automatically white balance click and hold the mouse button over the Color (eyedropper) button, and then slide the pointer on the monitor for the corresponding source. Release the mouse button over a part of the image that should be white AUX/MULTIVIEW The next tabbed pane in the Output Configuration panel combines controls for two distinct outputs Aux output (3Play 820 only) is a supplemental video output with the same set of video connectors as Output A and B; Multiview supports a multi-bridge or supplemental monitoring layout connected by a DVI cable. Page 79
.")

94 3PLAY 820 AUX OUTPUT The third connector row in the VIDEO OUT group on 3Play s backplate is AUX. As for the other two outputs, there are no configuration options for AUX. For SD sessions, the Component or Y/C + Composite connection type options are available. The video stream displayed on AUX is determined by the active Output Mode (A or B see sections 8.4 and 11.1). That is, whatever is on the output with control is also sent to Aux. MULTIVIEW OUTPUT The Multiview connection supports a secondary display monitor for the 3Play operator or other control room display purposes. The Multiview control group offers Screen Layout and VGA Output Resolution options, along with HUD (Heads Up Display) switches. Hint: See Section for details on the time shown in Multiview layouts with clocks. Figure 71 Figure 72 3Play 820 Note: Changing Multiview output options can cause frames to be dropped briefly. Changing these settings during live production is not recommended. The Screen Layout menu offers a list including several displays as follows: Page 80
95 Recorded Cameras: Shows cameras that are configured to be captured only, with clocks Inputs 1 4: The first four inputs plus large Output A and Output B monitors and clocks 3PLAY 820 Inputs 1 6: The first six inputs plus large Output A and Output B monitors and clocks Inputs 1 8: All inputs plus large Output A and Output B monitors and clocks Outputs: Large Output A and Output B monitors plus clocks Hint: The layouts complement Replay Desktop monitor tab options, and can be used to provide monitoring solutions when the primary monitor is entirely devoted to the Clips List and Play List. The VGA Output Resolution menu provides a long list of popular and useful options to allow you to configure Multiview output to conform to your downstream external device. Note that it is important to select the native resolution of the external display device for best results. SHOW INPUT/OUTPUT HUD The Show Input HUD and Show Output HUD switches toggle the Heads-Up Displays on the secondary Multiview output. See Section for more on the Heads-Up Display GENLOCK The Genlock feature allows the NewTek 3Play system to lock its video output to a reference video signal (house sync, such as black burst ) supplied to its Genlock input connector. This allows 3Play output to be synchronized to other external equipment that is locked to the same reference. Genlocking is not an absolute requirement in most cases, but is recommended if you have the capability. Hint: Genlock refers to generator locking. Professional video devices often provide a genlock input, which allows an external reference signal (often referred to as house sync ) to control its video timing. The output of video devices connected in this manner is synchronized to the reference signal, and they are referred to as genlocked. The 3Play system accepts input from multiple video sources. Miniscule local timing differences between these may result in tiny delays during downstream switching operations. Serving the same reference signal to i) the system s Genlock input and ii) other video devices in the chain is Page 81

96 the best approach, and ensures a match between 3Play system output and any downstream video devices required to handle both it and any other (genlocked) sources. VERTICAL POSITION, HORIZONTAL POSITION AND PHASE Figure 73 Locking all devices to house sync is important, but this alone does not actually ensure a perfect downstream match. Consider an army marching along: each step the soldiers take occurs at precisely the same moment, so we could say their timing is synchronized. Even so, problems result if one soldier leads with the left foot while everyone else is on the right. Or perhaps everyone is evenly spaced and perfectly aligned but for one misfit who tailgates the soldier ahead of him and keeps stepping on his heels. This is essentially why the Genlock tab provides several settings. The Horizontal and Vertical Position settings pin the image in the proper space in the frame, and in doing so could be likened to making sure each marching soldier is in position relative to his fellows (as viewed from above). The Phase setting ensures proper color alignment, corresponding to making sure everyone is on the left or right foot at the same time. Page 82

97 Thus, the Vert Position, Horiz Position and Phase settings allow you to tweak synchronization to arrive at an optimum match between devices. (Typically, these settings are fine-tuned with the aid of downstream vectorscope and waveform monitors.) A discussion of these adjustments goes beyond the scope of this manual, but a quick online search for the keywords genlock and adjust turns up a number of excellent references. REFERENCE TYPE The bi-level reference signal long used for standard definition television is often used for genlocking both SD and HD installations. However, if you are supplying an HD reference signal to the Genlock input (and your other equipment), select the HD (Tri-level) switch in the Reference Type area of the Genlock tab. Note: Reference Type options do not appear for SD sessions CENTER FREQUENCY This setting is applied when a Genlock reference signal is not in use. To adjust the setting, supply color bars to an input, pass that through to a video output, and then to a downstream vectorscope. The vectorscope display is completely stable when Center Frequency is properly adjusted. 7.2 INPUT CONFIGURATION The input preview monitors also have contextual tools that appear when you roll the mouse pointer over them (Figure 74). Figure 74 The Configure button (gear) in the titlebar for an input monitor brightens when you roll the mouse pointer over it. Clicking it opens the Configuration panel for a specific source (Figure 75). Page 83
98 The upper portion of input configuration panels is devoted to video-related settings, while the lower part has audio controls CONNECTION TYPE The Configuration panel for the Camera 1-8 inputs features a Connection Type menu at the top. The available source type options vary depending on the format for the session. Multi-standard systems provide PAL and NTSC-J options according to session type, in addition to NTSC: The Connection Type menu options for a PAL session list PAL HD and SD format options. Choosing NTSC as the session video standard results in a Connection Type list with appropriate formats, and it is similar for NTSC-J. Changing from one video standard to another requires opening a new session. Figure 75 Hint: All connected cameras must conform to the video standard of the current session. The standard options are: 1080i (Component) Analog source, high hdefinition, interlaced 1080/60i or /50i 1920x1080 pixels, 16:9 picture aspect Connected to 3Play by Y, Pr and Pb input connectors Page 84
99 1080i (SDI) Digital source, standard definition, interlaced 1080/60i or /50i 1920x1080 pixels, 16:9 picture aspect Connected to 3Play by SDI input connectors Optionally carries embedded audio 1080/30p (SDI), 1080/24p (SDI), /25p (SDI) Digital source, standard definition, progressive scan 1920x1080 pixels, 16:9 picture aspect Connected to 3Play by SDI input connectors Optionally carries embedded audio 720/60p (Component), 1 720/50p (Component) Analog source, high definition, progressive scan 1280x720 pixels, 16:9 picture aspect Connected to 3Play by Y, Pr and Pb input connectors 720/60p (SDI), 720/30p (SDI), 720/24p (SDI), 1 720/50p (SDI), 1 720/25p (SDI) Digital source, high h definition, progressive scan 1280x720 pixels, 16:9 picture aspect Connected to 3Play by SDI input connectors Optionally carries embedded audio The standard definition options listed below are provided in both 4:3 and 16:9 versions: 480/30i (Component) NTSC analog format, standard definition, interlaced 720x480 pixels, 4:3 picture aspect or anamorphic 16:9 picture aspect Connected to 3Play by Y, Pr and Pb input connectors Page 85
100 480/30i (SDI) NTSC digital format, standard definition, interlaced 720x480 pixels, 4:3 picture aspect or anamorphic 16:9 picture aspect Connected to 3Play by SDI input connectors Optionally carries embedded audio 480/30i (Y/C) NTSC (S-Video) analog format, standard definition, interlaced 720x480 pixels, 4:3 picture aspect or anamorphic 16:9 picture aspect Connected to 3Play by Y and Pb input connectors 480/30i (Composite) NTSC analog format, standard definition, interlaced 720x480 pixels, 4:3 picture aspect or anamorphic 16:9 picture aspect Connected to 3Play by Y input connector 1 576/25i (Component) PAL analog format, Standard definition, interlaced 720x576 pixels, 4:3 picture aspect or anamorphic 16:9 picture aspect Connected to 3Play by Y, Pr and Pb input connectors 1 576/25i (SDI ) PAL digital format, standard definition, interlaced 720x576 pixels, 4:3 picture aspect or anamorphic 16:9 picture aspect Connected to 3Play by SDI input connectors Optionally carries embedded audio Page 86
101 1 576/25i (Y/C) PAL (S-Video) analog format, standard definition, interlaced 720x576 pixels, 4:3 picture aspect or anamorphic 16:9 picture aspect Connected to 3Play by Y and Pb input connectors 1 576/25i (Composite) PAL analog format, standard definition, interlaced 720x576 pixels, 4:3 picture aspect or anamorphic 16:9 picture aspect Connected to 3Play by Y input connector 1 Multi-standard systems only NAME The Name field (next to Connection Type) is editable, allowing you to enter a custom name for each input. The name supplied will appear elsewhere in the user interface, including in the HUD (Heads-Up Display) PROC AMP The largest portion of input configuration panels holds Proc Amp settings. These settings are identical to those discussed in Section Figure 76 Of course, these settings are applied to the individual inputs, thus before output Proc Amp settings (which affect all sources equally). Page 87
 7.2.4 AUDIO SETTINGS Figure 77 The lower part of the Input Configuration panel is devoted to Audio Configuration.")
102 Hint: When the Proc Amp is enabled for a specific source, a small yellow indicator is displayed in the upper-right corner, just above the corresponding monitor in any of the three main monitor tabs. (This indicator is itself also a toggle switch.) AUDIO SETTINGS Figure 77 The lower part of the Input Configuration panel is devoted to Audio Configuration. The Input Type menu offers the following audio connection options: Mic Mic + Phantom Line SDI Embedded (shown only when the video connection is SDI). The neighboring Gain slider adds a range of adjustment beyond the basic level established by the Input Type selection, permitting you to benchmark individual sources. Finally, the Mute switch prevents the audio source from being heard at all in captured files or on output. Note: The Input Type menu for Input 7 is ghosted when the input is in use for timecode (LTC) input (see Section 7.2.5). The audio VU meters (VU stands for Volume Unit) above each of the video input monitors serve several purposes. At the simplest level, as you record audio with your video (or pass it through to output), the input meters assure you that audio is arriving at the audio inputs. Page 88

103 Likewise, the output VU meters provide confidence that you are supplying audio to the outputs. More importantly, you can monitor audio levels to be sure you are not overdriving the system, which would result in clipping of the signal TIMECODE CONFIGURATION NewTek 3Play can supply timecode from its internal system clock, or can refer to an external LTC (Linear Timecode) source supplied to 3Play inputs (see Section 3.4.3). This timecode is embedded in video files captured during the session. A Configuration button (gear) beside the Timecode display in the Desktop s titlebar opens the Timecode Configuration panel. Figure 78 SOURCE The Source control group holds a menu allowing you to select between timecode sources labeled as follows: 3PLAY 820 None (System Clock) External LTC (Input 7 Mic ) External LTC (Input 7 Line) 3PLAY 425 None (System Clock) External LTC (Input 3 Mic ) External LTC (Input 3 Line) 1/8 Mic (Mic Level, Red) 1/8 Mic (Line Level, Blue) Hint: If the LTC source fails, the system automatically reverts to Internal (System Clock) after a moment or two (an error flash message is displayed in the Status Bar see Section 6.5.1). Page 89
104 Another switch in the Source group allows you to optionally Subtract 12 Hours from the system timecode. This permits you to avoid confusion that might arise later when sequencing files based on timecode that wraps around past midnight. Otherwise, for example, a video frame recorded one minute before midnight would be assigned the timecode 23:59:59.00, while frames recorded one minute or more later would have timecode 01:00:00.00 seemingly a lower (i.e., ordinarily earlier) timecode value. Note: The 3Play system assumes the external LTC signal matches session frame rate and timecode format. For example, NTSC and sessions result in drop-frame timecode internally (all others are NDF). Similarly, in a 24fps session LTC is treated as 24fps. PRODUCTION TIME DISPLAY Situated beneath the Source group, the control group labeled Production Time Display allows you to enter time values that are specific to the current event. When the Start switch is lit, the time you set in the numeric field at right is used to supply the Production Start time display in the Replay Desktop titlebar (and many Multiview screen layouts). This provides a convenient warning as the time for your event nears. In similar fashion, enabling the End switch and entering an appropriate time causes the titlebar to display a countdown to the end of the event (shown once the Start time is surpassed). Hint: You can modify these time values by clicking on them and typing, or by dragging the mouse point left or right over them. Conveniently, you can ignore timecode punctuation when entering numbers if you like: simply type the key digits using 24 hour notation. (For example, to set the time to 5:00.00 AM, press 5, and then Enter. Or to set the time to 3:30 PM, type 1530 and press Enter.) Page 90

105 8 CONTROL SURFACE During operation, your principal contact with the NewTek 3Play system will normally be though the use of the control surface. Using its buttons and other controls, you can perform the great majority of necessary functions. This chapter describes the features of the control surface. Further references to the control surface are made in context In subsequent chapters, as well. 8.1 OVERVIEW The NewTek 3Play control surface is specifically designed to provide all of the commonly used production functions of the system, without unnecessary complexity. This apparent simplicity is very deliberate, and makes using your NewTek 3Play straight forward and trouble free. In the sections that follow, we ll review the controls in each group on the control surface. Figure 79 Page 91
, they modify the outcome of other actions, typically providing alternate or extended operations.")
106 8.2 QUALIFIER BUTTONS Figure 80 Figure 81 SHIFT, CTRL, AND ALT SHIFT, CTRL (Control) and ALT are qualifier buttons, similar to their familiar keyboard equivalents. When pressed (and held down), they modify the outcome of other actions, typically providing alternate or extended operations. (These combination operations are described in context as they arise in this section.) 8.3 RECORD Figure 82 The Record button toggles capture of a/v data to file(s) on mounted storage volumes on or off. The specific sources to be recorded are configured in Startup when creating the session (see Section 10.1, and also ). Hint: Whenever you enable recording, a special record event row is added to the Clips List, as a helpful reminder. 8.4 OUTPUT MODES (A, B, A+B) Figure 83 Pressing the buttons labeled A or B switches control to the corresponding Output Mode (see also sections 8.4 and 11.1). These two buttons are mutually exclusive that is, at any given moment, only one can be active. Page 92

107 The active Output Mode selection again, A or B determines i) what is shown in the Clips and Play List panes on the Replay Desktop, ii) the selection states in those modules, as well as iii) the state of various control surface and Dashboard buttons and settings. All of these attributes are stored independently for each of the two Output Modes. Hint: It can help to think of the system as consisting of two virtually independent replay devices, with access to the same media. The larger portion of the Replay Desktop displays just one or the other at any given time i.e., A or B according to the current Output Mode. In contrast, enabling A + B does not really alter the current Output Mode; that is, it does not turn either A or B on or off. Rather, the A+B button toggles a special linked mode. When enabled, certain controls (notably clip transport controls) operate in tandem for both outputs. (The A + B button is somewhat like the Caps Lock key on your keyboard, in that it remains active until you press it again.) 8.5 CONTROL MODES Figure 84 The three Control Mode (see Section 11.2) buttons are likewise mutually exclusive, and your selection determines several things as follows: Which source is sent to the currently active output (A or B) Which module a LIVE source from an input, or CLIPS LIST or PLAY LIST content you are interacting with at the moment CLIPS MODE While the CLIP LIST mode button is active, your control surface (or keyboard/dashboard) operations are directed to the Clips List. A gold outline around the Clips List confirms this, as does the HUD (Heads Up Display see section 9.2.1) when displayed. Hint: Another way to activate Clips mode is to simply click the mouse in the Clips List. Page 93
108 In this Control Mode, the item currently selected in the Clips List is automatically displayed on the active output PLAY LIST MODE While the PLAY LIST mode button is active, your control surface (or keyboard/dashboard) operations are directed to the Play List module. Again, a gold outline around the Play List module confirms this, as does the HUD (Heads Up Display see section 9.2.1) when displayed. Hint: Another way to activate Play List mode is to simply click the mouse in the Play List. In this mode, the item currently selected in the Play List is automatically displayed on the active output. TOGGLE PLAY LIST LOOP Press Ctrl + the PLAY LIST mode button to toggle the Loop (Play List) switch in the Dashboard on the Replay Desktop. When this switch is enabled, playback will begin again when the end of the current playlist is reached, and continue until manually stopped LIVE While LIVE mode is active, as you doubtless expect, you control a live source from the system inputs, and pass it through to the current output (A or B). Note that some operations (such as Stop or using the Jog wheel to move the video output back in time) can only be done in Live mode if Record is enabled. (In such cases, output is actually no longer truly live, but rather is Delayed. In this case, no Control Mode button is highlighted.) Hint: In this Control Mode, select a specific live source for output by clicking its representative input monitor. Page 94
, pressing a button with present the corresponding page, numbered 1 through 4.")
. Use ALT + (P1 - P4) for inputs 5-8. 8.")
109 8.6 PAGE AND BANK (P1-P4) Figure 85 Both the Clips List and Play List modules feature four banks, each with four pages, a total of sixteen discreet repositories each in which to organize your media. According to the Control Mode that is operative (Clips or PLAY LIST), pressing a button with present the corresponding page, numbered 1 through 4. To change banks in the currently active module, hold down ALT when pressing one of the four Page buttons. In LIVE mode, press P1 - P4 to send the corresponding numbered input to the current output (A or B). Use ALT + (P1 - P4) for inputs TRANSPORT Figure 86 The VCR-style controls in this group are familiar at a glance to most, and provide easy to use transport through your media. Page 95
110 8.7.1 PREVIOUS The first button in the upper row selects the previous clip in the Clips List or Play List (when possible, of course.) When SHIFT (see section 8.2) is pressed and held at the same time, pressing the Previous button can multi-select neighboring clips as well NEXT The Next button makes its appearance at the opposite end of the same row in the Transport Control group. Push it to select the next clip in the Clips List or Play List. When SHIFT (see Section 8.2) is pressed and held at the same time, pressing the Next button multi-selects neighboring clips as well STOP A single-press of the Stop button stops playback, if it is underway. Press Stop again to jump to the first frame of the current clip (or double-press Stop during playback to do this). In Play List Mode, pressing Stop a third time jump the playhead to the In Point of the first clip in the current playlist PLAY Pushing Play initiates playback of the currently selected source whether a clip in the Clips List or Play List, or even a Delayed video source FAST JOG The Fast Jog button is a toggle. Press it to turn the feature on, and press it again to disable it. When enabled, the transport effect of the Jog Wheel (discussed next) is multiplied eight times so that you can traverse the frames in your media more quickly JOG WHEEL Rotate the Jog wheel to navigate back and forth through the frames of the current a/v selection. Page 96

111 Hint: Inside Media Browser, you can scroll through the File Pane using the Jog Wheel. 8.8 PLAY SPEED (T-BAR SECTION) This group of controls contains Speed Preset buttons (25%, and so on), and a T-Bar. Pressing a Speed Preset buttons immediately sets the media playback rate to the specified speed. Likewise, making an adjustment to T-Bar position sets playback speed. These controls work together; whether you punch a preset button or use the T-Bar, the current Speed setting is replaced by your action. Figure IN/OUT (MARKING) Figure 88 Marking events is, of course, the core business of NewTek 3Play. These two simple buttons will see a lot of use. Their roles are not complicated, but it would be good to review them anyway IN Pressing the IN button adds a new event (row) to the Clips List. The current timecode supplies the In Point for the event. Of course, marking events would be rather pointless without recording audio visual data, so pressing the IN button automatically enables Record, when necessary. Page 97
112 ALT + IN Hold down ALT while pressing IN to update the In Point for the selected event in the Clips List, or, when the Play List is displayed on the active output (A or B, the selected clip. The timecode for the In Point is revised to match that of the frame that is currently displayed OUT Naturally, if you have pressed the IN button to create a new event, setting an In Point, you realize that you can complete this operation by pressing the OUT button. In this case you set the event s Out Point to the current timecode value, and as a further consequence, establish the Duration for the event. Hint: If for some reason you choose to end recording when an event is incompletely marked i.e., OUT was not pressed an Out Point is supplied automatically. ONE BUTTON MARKING You can also add new events to the Clips List without ever pressing MARK IN. If no In Point has been set (by pressing IN), pressing the OUT button will: I. Create a new event. II. Automatically assign both an In Point and an Out Point to it. By default in such cases, the In Point is set four seconds before the current time when you pressed OUT. One button marking thus permits you to easily create a series of events just by pressing the OUT button only when you observe noteworthy occurrences. Hint: The default duration for these events can be set to a custom value from the One Button Marking menu found in the Clip Configuration panel (see Section ). ALT + OUT Again, just as for the IN button, pressing ALT in conjunction with OUT updates the Out Point for the current Clips List event or Play List clip, using the timecode from the currently displayed frame for the active output (A or B) accordingly. Page 98

113 8.10 UTILITY BUTTONS Figure ESC Press the Esc (Escape) button cancels a popup dialog, or exits from text input without applying changes REMOVE Push the Remove button to remove selected events from the Clips List, or selected clips from the Play List EDIT When held down while operating another control, the EDIT button may provide access to a secondary function. Generally, it is currently implemented to offer another convenient method to modify the value of most numeric controls, as follows: Navigate to a numeric control in the Clips List or Play List. Press Edit and continue to hold it down. Rotate the Jog wheel to modify the current value (for the Speed control in the Play List, you can optionally use the T-Bar rather than the Jog wheel to change settings). Another useful application of the EDIT button is to change a playlist entry to a different camera angle (clip). Navigate to the Clip ID field, then hold down the EDIT button on the control surface and rotate the Jog wheel to cycle the through the available clips for the current time. Page 99
114 ADD TO PLAY LIST Push Add to PLAYLIST to insert the currently selected clips from the Clips List to the current Play List page. (The operation only proceeds if the Operating Mode is set to Clips when the button is pressed.) Page 100

115 9 DESKTOP MONITORS The word monitor comes from the Latin monēre, meaning to warn. The word has taken on additional meaning since Roman times. As a verb, monitor includes such connotations as keeping an eye on something, and checking continually, as when monitoring a process. As a noun, we understand it to mean devices that permit one to do just that. 3Play provides ample monitoring features, as described herein. Fittingly, NewTek 3Play provides monitoring features that are just what you need to prepare and control video replays in your productions. Note: A number of important controls and features are located in the monitoring section for convenience. Among others, these include the Source Connection Type, Proc Amp, Genlock, and Audio controls. To give these features their due, they were treated individually in Chapter 7, which is entitled I/O Configuration. 9.1 INPUT MONITORS Figure 90 3Play 820 Page 101
 display live video sources that are currently connected and configured.")
 monitors.")

116 Clicking a tab labeled Cameras 1-x at left near the top of the screen reveals a group of video preview windows, each representing one input. These previews (often referred to as ISO, or Isolation monitors) display live video sources that are currently connected and configured. Hint: Depending on your selections when creating the session, the sources displayed may or may not be captured to disk when you enable recording. See Section 10.1 for details. 3PLAY 820 Tabs labeled Cameras 1-4 and Cameras 1-6 are very similar, but display correspondingly fewer (and thus larger) monitors. These alternatives are convenient for use when a production does not require the use of the full complement of inputs. The Recorded Cameras tab shows only those sources configured for capture, and can be at once useful and space-saving TITLEBAR FEATURES Several useful features are located in the titlebar of each Input Monitor. Figure 91 When you move your mouse pointer over an Input Monitor, the Configure button (gear) in the titlebar brightens. Click this button to open the Input Configuration panel for that input (see Section 7.2). Among other things, you can supply a custom name for the input in this panel; it also holds Proc Amp and Audio settings. Page 102
117 Hint: Drag the horizontal divider between the monitoring panes and Clips List pane to re-size the monitors. Input monitor titlebars also provide handy audio VU meters. These are useful when initially adjusting levels, as well as to ensure that excessive audio levels during production don t cause clipping in captured files INTERACTIVE CONTROL The input monitors themselves are also actually interactive production controls. You can click a monitor to send it live to the current output. If necessary, doing this will change the Control Mode (see Section 11.2) for the dominant output to Live. Alternatively, when the Control Mode is already LIVE, press 1 - (4 or 8) on the keyboard number pad (or control surface P1 - P4, cameras 1-4; ALT + P1 - P4, cameras 5 8, 3Play 820) to select the corresponding input for display. Note: Input Monitors on the Replay Desktop do not show a HUD (Heads-Up Display), but their equivalents on the Multiview screen can optionally do so (see Section 7.1.2). 9.2 OUTPUT A AND B Figure 92 Page 103
.")
118 NewTek 3Play supports two fully independent video and audio output sections, referred to as Output A and Output B. The corresponding output monitors could hardly be more important. They show what you are displaying to your viewing audience at any moment. At right, just above the monitor for Output B, there is a Configure button (gear). Clicking this button opens a tabbed panel titled Output Configuration. This panel that contains video and audio controls and options for Output A and B, Aux (Auxiliary Output), and the secondary Multiview output, and the Genlock input see Chapter 7 for details. When the A or B button is lit (on the control surface or Dashboard), your actions determine which source is assigned to the corresponding output. For example, if A is lit and you click an input monitor, that source is sent to Output A. When play is stopped, clicking a clip in the Clips List or Play List has two consequences first, the clip is shown on the current output, and second, the Control Mode is set to Clips or Play List respectively. Similarly, pressing the LIVE, CLIPS, or PLAY LIST mode button sends the currently selected item from the corresponding source to output HEADS-UP DISPLAY Figure 93 At right above both output monitors is a small button labeled i (for info ). These buttons toggle the Replay Desktop HUD (Heads-Up Display) for each monitor. Page 104
119 The output HUD provides a wealth of useful information about the video stream assigned to the monitor. It may include any of the following tags: Name the output name, as supplied in Output Configuration (see Section 7.1.1). CONTROL When this label appears, it indicates whether A, B, or A+B buttons are pressed on the control surface. In turn, this serves as a reminder as to which of the two independent outputs is being controlled at the moment, or whether both are. (See Section 8.5 for more on Control Modes.) Current transport mode (always shown) one of the following: 1. PLAY 2. LIVE 3. DELAYED 4. STOP Clips List or Play List details: 1. CLIPS mode Clip ID# and Memo 2. LIST mode Clip ID# and Memo Time display: 1. LIVE or DELAYED mode (Live button on control surface is pressed): Timecode at the current frame Or Behind Live time (Delayed mode only) 2. CLIPS mode (Clips button on control surface is pressed): Countdown to playback end. (Recorded) Timecode at current frame 3. PLAY LIST mode (PLAY LIST button on control surface is pressed): Countdown to playback end. Timecode at current frame (from file) Speed: Shows the T-bar position during play, as a percentage. Page 105
120

121 10 RECORD AND MARKING Recording audio and video from its inputs, and marking timed segments of this data for review, instant replay or other purposes are the core functions of your NewTek 3Play system. This section will explain recording and various approaches to event marking in fine detail, showing how these important operations can be performed using control surface, Replay Desktop controls, or using keyboard shortcuts. We ve previously mentioned marking events timed (or, if you like, bookmarked ) segments of your audio video data (see Sections 2.2 and 8.9). Managing and playing clips from events will be covered in Chapter 12 (The Clips List) and 13 (The Play List). Live, or previously recorded audio/video data, can be sent to 3Play s outputs when Record is off; but as event marking is dependent on recording, let s expand on that matter first RECORD CONFIGURATION NEW SESSION The first step toward recording is deciding which live inputs will be captured, and on which hard drives the data from various inputs will be stored. These important decisions are made in the Startup Screen at the time of first creating a new session. Figure 94 Note: The Record Configuration options you choose are retained with the session, and cannot be altered after launching it. To work with a different Record Configuration, create a new session. Page 107
122 The Record Configuration options controls (Figure 94) list storage volumes that are currently mounted on the system and available for capture purposes. The list may include external drives along with those inserted in the 3Play system s removable drive bay(s). Drives that are clearly too small (or too full to accommodate further capture) are not shown. Note that drives may be shown that are unsuited for capture purposes because of low transfer or disk speed, or perhaps for other reasons. It is up to you when configuring external drives to ensure that the drive (and the connection method it relies on) is suitable for capture. Figure 95 Two columns at right (under the Inputs label) allow you to freely assign different sources (from Cam 1 to Cam 8) to a specific drive. This layout permits one or two cameras, but not more, to be assigned to any qualified hard drive. This means that with only one hard drive attached (not counting the internal system drive) you can record two inputs at most. With two drives, four inputs can be recorded, and so on. Note: Simply configuring inputs for capture in the Startup Screen does not engage recording. Recording is active only when the Record button on the Replay Desktop is lit RECORDING AND THE DESKTOP It s worth noting that you aren t forced to record all active video inputs. (Sometimes, you may wish to supply an input with video for some reference purpose that does not call for it to be captured.) The Input Monitors tabs on the Replay Desktop (and Multiview) show connected sources, whether they are configured for capture or not. This may raise a question in your mind, though. If your configuration includes some sources that are not recorded, how can you distinguish between these ones and sources that are captured? The Replay Desktop provides several clues to help you do so. Understanding these matters will help you comprehend other ramifications of your Record Configuration decisions as well. Page 108
123 CLIPS LIST Figure 96 3Play 820 One way to tell which inputs are configured for recording is to observe the Show/Hide Column buttons located in the Clips List titlebar. The numbered buttons for inputs that are simply being passed through but are not configured for recording are ghosted (disabled). In Figure 96, the second button (Cam 2) is ghosted, as are the buttons for Cam 5 through Cam 8. This indicates that these inputs are not configured for capture. That s the reason why they cannot be shown in the Clips List table below. The buttons for Cam 1 and Cam 3 are lit, indicating that they are visible in the table. Recording is configured for these cameras. Pressing the button for Cam 4 (which is un-lit, but not ghosted) would display a column for it in the Clips List. Even though the column is not displayed at the moment, the fact that it can be tells us recording is also configured for Cam RECORDED CAMERAS Figure 97 3Play 820 An arguably easier way to quickly see which cameras are configured for recording is to click the Recorded Cameras monitor tab. Located at upper left on the Replay Desktop. The only inputs shown in this tabbed pane are those you can record. Figure 98 shows the Recorded Cameras tab content for the same session configuration discussed in the previous section (10.2.1). As you can see, the monitors display previews for Cameras 1, 3, and 4 (even though the column for Camera 4 in the Clips List is currently hidden). Page 109


124 Figure 98 3Play 820 Likewise, the Recorded Cameras layout for the Multiview output shows only those sources configured for recording RECORD ON/OFF Figure 99 Both the Replay Desktop (Figure 99) and control surface (Figure 100) provide Record buttons. As you d expect, these controls do the same thing toggle recording of audio visual data from selected inputs on and off (hold down ALT when pushing RECORD on the control surface to end capture). Figure 100 Page 110
125 Note: For any single session, recording stops and restarts automatically after 24 hours, to create a new sequential file. Roughly 5 frames may be dropped during this process. (Timecode dropouts may also result in a break in the recorded files.) INFORMATION DISPLAYS The Replay Desktop version of the Record button is accompanied by two useful data displays, Recorded (time) and Time left on disk. The former keeps track of the duration of all material recorded for the current session. The latter shows an estimate of space remaining on the most full hard drive which is currently assigned to recording duties (this display takes a moment or two to initialize when recording is started.) AUTOMATIC RECORDING Normally, you would manually enable Record when your production begins. In the event you overlook doing so for any reason, however, certain operations can automatically enable recording for example, pressing the (mark) IN or OUT buttons enables Record when necessary (see Section 8.9). Reminder: Previously recorded data can be sent to 3Play outputs even with Record off; but for live sources, operations such as Stop, or Speed changes can only be applied when Record is enabled, since this permits the system to automatically switch to Delayed playback mode. RECORD EVENTS Each time Record is newly enabled, a special event is automatically added to the Clips List. This record event simply provides a convenient reference, and is given a single frame Duration. Hint: The notations in the Memo columns of record events can be edited in the standard manner (highlight the field and press Enter on the keyboard to enable text edit mode) MARKING EVENTS The Dashboard (Figure 101) and control surface (Figure 102) each provide event marking features, as well. Page 111
126 Figure 101 Figure 102 The IN and OUT buttons on the control surface perform identically to the Mark In and Mark Out buttons in the Dashboard at the bottom of the Replay Desktop. See Sections 8.9 and 14.5 for full details. Reminder: In addition to creating events in the Clips List, and setting their In Points and Out Points, these controls can be used to revise the existing Clips List event or Play List clip start and end times as well, using ALT (or, for the Dashboard version, the Alt key) when pressing the button. Page 112
127 11 OUTPUT & CONTROL MODES An understanding of the NewTek 3Play system s Control and Output Modes is fundamental to its operation. A review of these concepts provides the foundation for understanding the system and its workflow. For that reason, we ll consider them right away, before proceeding to examine other features and operations OUTPUT MODES In many ways, it would not be incorrect to think of your NewTek 3Play system as not just one, but two conjoined playout devices. The system features two independent audio/video output sections Output A, and Output B. Figure 103 Each output is capable of functioning completely independently of the other, and either can be directed to transmit any available audio/video source, whether live or recorded. Physically, the main video outputs (along with their corresponding audio connections) appear on the system s backplate for connection to downstream devices as output 1 (3Play s Output A) and 2 (Output B). During live production, both are represented on the Replay Desktop by individual output monitors (Figure 103). Page 113


128 Activities such as Play, Stop, and many other operations normally affect just one output or the other, as determined by the Output Mode you choose. In most cases, the current Output Mode is selected using the control surface, although you may use either the Dashboard controls located at the bottom of the Replay Desktop or equivalent keystroke shortcuts (see Appendix B, Keystroke Shortcuts), as well. Figure 104 Figure 105 As you would expect, pushing the control surface button labeled A causes ensuing operations to govern Output A. Likewise, pushing B directs operations to Output B. Note: Conveniently, a supplementary output section labeled AUX (Auxiliary) automatically updates to show the display for your current Output Mode A or B. It s also possible to engage both primary outputs at once, by pressing A + B. This button behaves rather like the Caps Lock key on your keyboard, continuing in force until pressed again. We ll discuss A + B mode further momentarily, but first let s consider an equally important matter 3Play s Control Modes CONTROL MODES We ve seen how to tell the 3Play system which output we wish to control, but we ve yet to discover how to tell it which audio/video source we want the current output to display. That s where the Control Mode comes into play. Page 114
 signal from one of the system inputs At a given moment, one of these three sources is always assigned to Output A.")
129 Your NewTek 3Play can deliver audio/video output from one of three possible sources: Clips List the currently selected clip (angle) in the Clips List Play List output from the Play List Live the live (or Delayed) signal from one of the system inputs At a given moment, one of these three sources is always assigned to Output A. At the same time, another, different source (Clips List, Play List or Live) is also assigned to Output B. Output B may transmit the same source as is displayed on Output A, or any other valid alternative. In similar fashion, the transport controls (Play, Stop, Jog, etc.) on the control surface will variously affect the current clip in the Clips List, or the Play List, or even the live signal from the system s inputs, according to the current Control Mode which can be Clips, Play List or Live. Figure 106 Thus both of these related matters which source is displayed on output and governed by control surface manipulations are determined by the current Control Mode. And different Control Modes can be operative for Output A and Output B at the same time. Simply make the appropriate Output Mode selection on the control surface, and then push one of the Control Mode buttons labeled Clips, PLAY LIST or LIVE (Figure 106). Hint: Another way to modify the Control Mode is to click the mouse in the Clips List, Play List or on a live input monitor. Again, the two outputs can (and often will) have different control modes and states. Output A may be in Clips mode, playing a certain clip from the Clips List; meanwhile, Output B can play the same clip in slow motion, or display something else altogether really any source, in any state of play. 3Play stores the Control and Output Mode states for Output A and B independently, along with other important parameters including the Clips List or Play List page, selection state, playhead position, and so on. When you select an Output Mode (A or B), the Replay Desktop updates to show the data that is appropriate for your choice. Page 115
130 This brings us back to the A + B Output Mode. You may wonder what effect different controls will have in this special tandem mode, and what will be displayed on the Replay Desktop CONTROL AND A+B MODE In broad terms, the special A + B mode causes transport control operations (Play, Stop, etc.) to occur in tandem, while other operations such as changes to Control Mode, clip selections, and the like apply exclusively to the dominant (or visible) output. For example, when A is lit along with A + B on the control surface or Replay Desktop: The Replay Desktop displays the operational state for Output A. Pressing Stop or Play affects the sources on both *outputs. Selecting a different clip (or Clips List /Play List page) affects the visible output only in this example, Output A. * For Live video sources, transport control operations are invalid when Record is disabled, and will have no effect. Page 116

131 12 THE CLIPS LIST The core functionality of your NewTek 3Play is to capture multiple views of live events, and allow you to quickly recall and display any portion of that recorded footage with ease and accuracy. The Clips List is first stop for newly recorded media, and also serves as the library where production assets are organized and managed. It provides a wealth of convenient features to help you find and display the perfect clip on a moment s notice. The central band of the Replay Desktop between the upper monitoring section and the Play List pane below is home to the Clips List, along with related controls and features (Figure 107). Figure 107 The Clips List is the receptacle for marked events. It presents all of the different camera views for each event (marked by an In Point and an Out Point) on one row of a spreadsheet style table TITLEBAR FEATURES The Clips List titlebar contains a number of important tools and features, discussed next BANK & PAGE Figure 108 Page 117
132 The first control at left in the titlebar is the Page Selector (Figure 108), a drop-down menu allowing you to choose which of sixteen clip pages you wish to work with. Clip pages are grouped in four banks, with four discreet pages in each bank. Hint: Naturally, newly marked events are always added to the current (visible) page. To display a specific clip page within the current bank, with the Control Mode set to Clips, press the corresponding control surface button (P1 P4 ). Hold down ALT (keyboard Alt) at the same time to select the clip bank ADD MEDIA Figure 109 It is possible to include video clips (and still images) in the Clips List. Such files may have been imported into the session using the Import Media feature in Startup (see Section 5.3.1), or perhaps is stored on another currently mounted volume such as an external drive. An Add (Media) button sits right beside the Page Selector in the Clips List titlebar. This button is identified by an icon displaying a folder with a + sign (Figure 109). Click the button to open 3Play s custom Media Browser, which can be used to add video clips and still images to the current Clips List page. Note: Startup s Import Media stores files in session folders, but does not insert then into the Clips List. Use the Media Browser to add them as described above. Media added in this manner can be played directly from the Clips List, or be used in a Play List. The keyboard shortcut to open the Media Browser is F5. Page 118

133 MEDIA BROWSER Figure 110 The left and right panes of the Media Browser are the Location List and File Pane, respectively. Hint: Press the keyboard Tab key to cycle between the Location List, Filter and File Pane. LOCATION LIST The Location List is a column of favorite locations, grouped under the headings Clips, Stills, and My Media Locations. A list of sub-headings corresponding to named sessions or other content locations (discussed momentarily) can appear under these main headings. Media files that were imported from the Startup Screen will be shown in the File Pane at right when you select a Location sub-heading under Clips or Stills. The third main header in the Location List is somewhat special. Page 119

134 EXTERNAL LOCATIONS Clicking the Add Media Location button (Figure 111) at the bottom of the Location List opens a standard system folder selector. Figure 111 The name of any folder you select using this button is added to the Media Browser s Location List under the main-heading My Media Locations. (These custom locations can be accessed in others sessions opened by the same user as well.) File recursion for listings under My Media Locations is limited to one sub-folder below the folder (sub-heading) selected in the Location List. Note: Adding a custom Location or adding a clip or image to the Clips List does not import content (copy it into a session folder). Rather, external files are added as linked media. Be aware that large linked files, highly compressed video clips, or media storage devices with slow transfer speed can degrade system performance. It s always best to import files beforehand when the opportunity exists. FILE PANE Icons appearing in the File Pane represent content located in folders under the sub-heading selected at left in the Locations List. Figure 112 Page 120
135 These are grouped under horizontal dividers named for sub-folders in the File Pane, which allows related content to be organized conveniently. Double click a file (or press OK, to append it at the end of the current Clips List page. Conveniently, the File Pane supports multi-selection as well. Filenames for media added to the Clips List are initially shown in the Memo field columns for all camera angles. Since the Memo field is editable, you can modify these entries without breaking the link to the file. (This allows the Memo entry to serve as an alias if so desired). The In Point for a video file is initially 00:00:00.00, unless the file has embedded timecode (in which case the clip s start timecode serves as for the In Point). The Out Point and Duration initially reflect the full duration of the file on disk. Still image duration is initially set to the value selected in the Clip Configuration panel (default, 5 seconds) see Section FILE FILTERS The File Pane view is filtered to show only relevant content. For example, the Media Browser is also used in the Play List (discussed later) to let you choose a music file. In this case, only audio files are shown. An additional user-configured filter appears above the File Pane. This is a smart filter which quickly locates files matching criteria you enter, doing so even as you type. If you enter goal into the filter field, the File Pane displays all files at the current location with that text string in their filenames, and so on. CONTEXT MENUS Right-click a Location listed under My Media Locations to show a context menu with just one item in it. Remove de-lists the location (but does not delete the folder and its contents from the hard drive or other volume where it is located). Note: this menu is exclusively for use in the My Media Location section, and is not available for other headings in the Location List. Page 121
136 Right-click on a file icon in the right-hand pane to show a menu providing Rename and Delete options. Be warned Delete really does remove content from the hard drive (this menu is not shown if the selected item is write-protected) FILTER Figure 113 Getting back to the Clips List (after our detour into the Media Browser), another valuable titlebar feature is the Filter. Entries here delimit the events shown below in the Clips List table. The Memo columns for each recorded camera allow you to enter notes about clip content, etc. The Filter allows you to display only events that have one or more matching entries in their Memo fields (clear the field to display all events again) SHOW/HIDE COLUMNS Figure 114 3Play 820 A group of buttons located at the right-hand end of the Clips List titlebar allows you to selectively show or hide the columns associated with the clips recorded from different inputs. Hint: The Clips List never shows columns for un-recorded inputs. For example, if you are recording only from inputs 1-4, columns will not appear for cameras 5-8, and the Show/Hide buttons for those columns will be grayed out during the session. When a numbered button is lit, a Memo column for that input is displayed in the Clips List table. Click the button to toggle visibility for a column. The clips for the input are not affect ted by this operation, of course. Page 122
 that allows you to set several useful default values.")
137 CLIP CONFIGURATION The final titlebar control to discuss is the Clip Configuration button, represented by a gear icon that brightens when your roll the mouse pointer over it. Click this button to open a dialog (Figure 115) that allows you to set several useful default values. Figure 115 3Play 820 The One Button Marking menu allows you to set the standard time value employed for marking when using the one-button marking method see Section for more information on this useful feature. Out Point Padding, when checked, plays the set distance past the Out Point during Clips List playback. Beneath this you will see the default duration assigned to still images when these are added to the Clips List. You can click in the time field to edit the value shown, or drag left-right on it. Press and hold the Shift key, and then double-click the field to reset it to the default value. Page 123

138 12.2 CLIPS LIST TABLE FEATURES By way of reminder (as discussed in depth back in Section 2.2.1), an event is not merely a clip. Rather it can be compared to a bookmarked section of the complete recording, a synchronized time slice of all of the captured a/v streams. The Clips List provides information about the events that have been marked, along with numerous event organization and management features. Figure 116 The Clips List is laid out in a spreadsheet-style table comprised of rows and columns. Labels in the header above the table identify the columns below. The columns, in order from left to right, are as follows: Event ID a non-editable display field showing the numeric event identifier. Hint: Each clip for an event is also numbered, in the format Event ID - camera angle e.g., The Event ID column in the Clips List shows the event prefix (its first 3 digits), while the Play List displays the entire Clip ID in its first column. In Point timecode when the marked event begins Out Point timecode when the marked event ends Duration the total time for the marked event (Camera 1 Camera x) the Memo fields for recorded clips Page 124
139 IN/OUT POINTS, DURATION (AND TRIMMING) The initial values in timecode fields are established by your marking operations (Mark In and Mark Out). Afterward, they can be modified (within the bounds of actually recorded footage) in several different ways: You can simply drag the mouse pointer left or right above a timecode field. Or, double-click it to engage direct text entry using the keyboard. Or, click (or otherwise navigate to) the field and press either Enter or F2) to engage direct text entry using the keyboard. Another approach to trimming is to Jog (using the control surface or Dashboard) or Shuttle (Dashboard only) to a different timecode, and then hold down Alt while pressing Mark In or Mark Out to update the current In Point or Out Point respectively. (See also Section 12.3, Clip Transport.) Of course, changing the value of the In Point or Out Point will have an effect on Duration, and vice versa. (Editing Duration normally affects the Out Point, providing the desired length can be achieved by doing that alone; in rare cases when the Out Point reaches the end of the recorded footage, the In Point is adjusted as required). Hint: The Jog control is normally restricted to the established length of the clip, as established by its In Point and Out Point. If you wish to Jog to frames outside of this range, hold down ALT while jogging. Naturally, all clips for the current event are affected by trimming operation as above. In the case of multi-selected events, only the displayed clip and associated clips for the same event are trimmed. Hint: Individual clips that have been added to a Play List can be trimmed independently, without altering the timing of the original event in the Clips List, or other Play List clips originally added from the same event MEMO FIELDS Memo fields allow you to insert text notes to any clip for an event. These can serve to identify a player and team, the type of event, or provide any other sort of information that is useful to you. Page 125


140 Activating the Memo field for text editing can be accomplished in one of two ways navigate to the field to select it, and then press either Enter or F2 on the keyboard. This will open a text entry field to allow direct keyboard entry. If text edit mode is activated when text already exists in the Memo field, the text is entirely selected initially, and the cursor is placed to the right of the last character. This allows you to overwrite the current comment easily. Figure 117 To conclude text editing, press Enter again, or navigate to a different field on the Desktop. To cancel without accepting changes, press the Esc key. Hint: Remember that events can be shown or hidden based on text values in Memo fields using the Clips List Filter MANAGING EVENTS Events can be trimmed and named as described in prior sections. They can also be re-ordered easily, by clicking anywhere in their row and dragging up or down (you cannot drag an event above the top-most entry). Cut, Copy and Paste functions using keyboard shortcuts (Ctrl + x, Ctrl + c, and Ctrl + v) work just as you would expect (this is how you move events into other Clips List pages). Alternatively, you can access these features from a context menu opened by right-clicking (Figure 118). This menu also provides Audio Level settings for the recorded events (that is entire rows, as opposed to individual clips). The Clips List table supports multi-selection as well. Press Shift when clicking an item to select all items between the existing and newly selected item, or hold down Ctrl while clicking non-adjacent items to select only those individual entries. Figure 118 Page 126
141 Selected items are highlighted. Paste operations within the Clips List (and Play List) will be inserted below the currently selected event, or at the end when no item is selected (as when pasting into new, empty pages). When dealing with multi-selected items, insertions are in order of selection. If a Clips List asset is unavailable for any reason, it is shown with a red border. Hint: Another way to remove selected events from the Clips List is to press the Remove button on the control surface, or the Del key on the keyboard CLIP TRANSPORT You can move through the currently displayed clip by pressing Play (and Stop), or by using the Jog Wheel on the control surface or Dashboard. Clip playback can also be initiated by doubleclicking the Memo field for a clip, or by pressing the keyboard Spacebar (press again to halt play). Transport within a clip is normally constrained by the In Point and Out Point timecode values. Hold Alt while using the Jog/Shuttle controls to move to a position prior to the current In Point, or past the current Out Point. This may be useful when you wish to update the In Point or Out Point using Alt + Mark In/Out as described in the prior sub-heading PLAY SPEED Play Speed is governed by the control surface T-Bar position, Speed Preset (25%, 33%, etc.) selection, and their Dashboard equivalents. Selecting a preset (or adjusting the T-Bar position) sets the speed for playback, but does not initiate it. During play, however, Play Speed changes are applied immediately. This selection is a top level system playback setting, and is applied to all sources (with the exception noted below), as opposed to a setting that applies just to the current clip. Note: Live playback is always at 100% Play Speed (i.e., actual speed) when Record is in-operative. PLAY SPEED AND OUTPUT MODES The Play Speed settings for Output A and Output B are independent of one another, except in cases when the A + B mode is selected. In that case, new settings apply to both Output A and Output B. They both respect the current Speed setting. Page 127
142 12.4 SELECTION & DISPLAY Generally, the highlighted clip in the active event row is shown on the current output (A or B). In the case of multi-event or multi-clip selections, the last-selected clip is the one displayed on output PLAY INDICATOR Clip selection (and consequently, display on output) normally follows Memo field selection, whether by control surface, keyboard or mouse operation when no clip is playing. Moving into a timecode field using the arrow keys or control surface Previous/Next buttons results in the clip viewed being the one from the first camera in the Clips List table. It is different when a clip is already playing. In this case, the new selection does not usurp the output display. To make it clear which clip will be affected by transport operations at any time, the ID field for a playing clip (or clip that would play if you pressed Play) always has a red background. To view a different clip for the current event without jumping to the first frame of the clip (staying at the current timecode), navigate using ALT + Previous/Next, or press 1 - (4 or 8) on the keyboard Numpad. Figure 119 The current selection state is stored for both Output Modes (A and B). For example, if you select a certain clip when the Output Mode is A, then press B and select a different clip, when you reset the Output Mode to A the original clip for that mode is still highlighted ADD TO PLAY LIST Selected clips can be added to the current Play List pane in several ways: Page 128
143 Press the Add to Play List button on the control surface. Drag a clip selection onto the Play List pane with the mouse. Hint: You can also add all clips from one or more events to a Play List in their natural order in one easy operation. Simply select the Event ID field(s) and proceed as above. The target insertion point for clips added to the Play List by dragging is shown by a white line before releasing. The other methods insert the new clips below the currently select Play List entry. Page 129
144

145 13 THE PLAY LIST At times you will likely wish to assemble and play a compilation of clips forming a highlight reel, or prepare such a sequence for other purposes. The Play List module supports these special playback features and more. Multiple Play List banks and pages let you organize and switch from one compilation to another with alacrity. Play Lists can include imported media and music, content can be re-ordered, trimmed, have its speed and audio levels adjusted, and be rendered as a clip. Figure 120 The Play List is similar to the Clips List, but offers a number of additional features and has a different columnar layout. The Play List is outlined by a gold border when it has control (see Section 11.2). Hint: Drag the upper border of the Play List up or down to show more or less rows TITLEBAR FEATURES PLAY LIST PAGES Figure 121 Page 131
 in the Play List titlebar to edit the default page name using the keyboard.")
146 Also like the Clips List, the Play List module offers four banks, each with four pages, for a total of sixteen independent playlists. Pages can be assigned custom names, making it easier to locate just the right one. Click in the Name field (Figure 121) in the Play List titlebar to edit the default page name using the keyboard. Note: There is just one set of Play List Banks and Pages, referenced for both Output A mode and Output B mode. In other words, if you select Play List Bank 1, Page 3 and edit the playlist content while in Output A mode, then enable Output B and access the same page, it will reflect the modifications you made previously EXPORT PLAY LIST The Export Play List button allows you to flatten the entire playlist, including audio, down to a single clip. This clip is then appended to the current Clips List page MUSIC TOOLS Figure 122 At the opposite end of the Play List titlebar you will see controls that allow the addition of a background music track for highlight reels. The common WAVE and MP3 audio file formats are supported. Enable the Music switch, and select Browse from the drop-down menu to open the custom Media Browser. (The menu also lists your most recent selections for convenience. The features of the Media Browser were discussed back in Section , so we won t review them again here. Figure 123 Page 132
. A switch at left of the Music menu allows you to toggle playback of your selection on or off. More elaborate controls are located in the Music Configuration dialog (Figure 124).")
147 Hint: One useful thing to note is that because the Media Browser is context sensitive, when opened from the Music menu it automatically points to Audio locations in its left column (the Locations List). A switch at left of the Music menu allows you to toggle playback of your selection on or off. More elaborate controls are located in the Music Configuration dialog (Figure 124). MUSIC CONFIGURATION To open the Music Configuration panel, click the configuration (gear) button just to the right of the Music menu. The panel contains two controls, and one purely informational display, discussed next. Figure 124 The numeric field labeled Starts At allows play of the selected music file to be delayed until a set time elapses from when Play List playback is first initiated. This can be useful when, for example, an imported bumper clip with its own audio precedes the clips comprising a highlights reel. Click in the number field to manually edit it using the keyboard, or simply drag the mouse pointer left or right above it. Page 133
148 The Duration time value lets you know the length of the selected audio file, for comparison against the length of the playlist. It is not editable. Hint: Playback of files that are longer than the playlist duration will be automatically truncated (and faded out) when Play List playback ends. Finally, a Volume control allows you to adjust the output level of the selected music file THE PLAY LIST TABLE Unlike Clips List rows, each Play List row contains only one clip. As you would expect, playback progresses from clip to clip, playlist-style, beginning at the currently selected row and proceeding until the end of the playlist (or manual interruption). Figure 125 Figure 126 The columns, from left to right (Figure 125 and Figure 126), are labeled as follows: Clip ID a non-editable display field showing the numeric clip identifier. The hyphenated digit identifies the input the clip represents. Memo Field an editable name or comment field. Audio 1, 2 this column contains a switch allowing you to enable or disable the audio from audio channels 1 and 2 recorded with the clip, and a Volume slider that allows you to adjust its level. Audio 3, 4 as above, but for audio channels 3 and 4. In Point timecode field showing the In Point for the clip. Page 134
149 Out Point timecode when the clip will end. Speed a numeric slider allowing you to preset the speed at which the clip will play back. Crossfade an on/off toggle switch for a crossfade type transition to the next clip in the playlist, and a numeric input field allowing you to specify the time for the crossfade. Ends At the total time for the playlist until the end of play for the clip in the current row PLAY LIST PREPARATION Clips are added to a Play List page in any of several methods, as discussed in Section Once in the list, they can be freely re-ordered by dragging them up or down. The standard Cut, Copy and Paste shortcut keys (Ctrl + x, Ctrl + c and Ctrl + v, respectively) allow you to move clips from one Play List page to another, or within the same page CLIP SELECTION A clip can be selected (highlighted) by navigating to it using the control surface, keyboard, or direct mouse click, and multi-selection is supported as follows: Hold down Shift while navigating (by any means) to another clip to select both clips and all others between them. Select a clip, then press and hold Ctrl while clicking another to multi-select clips that are not near one another. Hint: When clips are multi-selected, many operations will affect all selected clips at once. For example, you can turn the sound on or off for a number of clips in this manner. PLAY INDICATOR Similar to the Clips List, the Play List shows a red background in the Clip ID field to indicate the current playback position in the list. Page 135
150 CHANGING A CLIP Perhaps, after adding a clip to a playlist, you decide you want to show the same event from a different camera angle. You could go back to the Clips List, locate the event, and add a different clip to the playlist. There is better way to change clips though. To do so, navigate to the Clip ID field, then hold down the EDIT button on the control surface and rotate the Jog wheel to cycle the through the available clips for the current time. Hint: Copy and paste a clip, then edit the copy in this fashion to inset a clip from the same time segment into the playlist without removing the original MEMO FIELD Initially, newly added clips show the same Memo field content as the corresponding Clips List entry. Play List clips are independent once added, however. Comments can be changed (and the clips can be trimmed) without affecting the original source event AUDIO 1, 2 3, 4 You ll recall that we discussed the music features offered by the Play List back in Section These two Audio columns hold controls governing any audio embedded in the clip on the corresponding row in the Play List. The controls in the first column affect the first two audio channels, while the second column relates to channels 3 and 4. Both columns have switches allowing you to enable or disable the associated channels, and an adjustable volume slider. Hint: Multiple selections are supported for toggling sound on and off, as well as for direct keyboard level adjustments (remember to press Enter to engage Text Entry mode and conclude edits. Page 136
151 IN AND OUT POINTS (TRIMMING CLIPS) To change the timing of clips in the Play List, you can use the same methods described earlier for the Clips List see Section The value in the Ends At field cannot be directly edited. It is a calculated field only, showing the cumulative duration for the current clip and those above it SPEED Each clip can be played at its own speed the range for the control is from 10% to 400%. The numeric slider in the Speed column can be modified in the same ways as the similar audio value control. When playback is stopped, you can use either the control surface Jog wheel or T-bar while holding down the Edit button to change the Speed for selected clip(s). Hint: Multiple selections are supported for direct keyboard adjustments (remember to press Enter to engage Text Entry mode and conclude edits). If Play List playback is underway, you can use the T-bar or Speed Presets on the control surface to further modify Speed interactively. (This does not overwrite established clip speed settings in the playlist). Hint: Adjustments made during playback are applied as multipliers for the set playlist clip speed. For example, if the set speed for a Play List clip is 50%, and you further reduce speed by pressing the 50% Speed Preset on the control surface, the actual playback rate is 25% CROSSFADE Like the two Audio columns, the Crossfade column controls allow you to switch the transition to the next clip on or off, and set a value (in the by now familiar ways) in this case, for the transition duration. When the Crossfade time is (or the switch is off) a hard cut is performed when playback of the current clip ends and the next one begins. Hint: Multiple selections are supported for toggling the effect on and off, as well as for direct keyboard effect duration adjustments (remember to press Enter to engage Text Entry mode and conclude edits. Page 137
. It also has one important additional item.")
152 13.4 CLIP CONTEXT MENU The Play List also features a context menu (Figure 127). Not unlike its Clips List equivalent, the menu provides access to Cut, Copy and Paste (also available using the standard keyboard shortcuts). It also has one important additional item. Figure 127 The Export Play List option flattens the entire playlist, including audio, down to a single clip which is appended to the current Clips List page. (This is the same feature discussed back in Section ) 13.5 PLAYBACK To initiate Play List playback, select a clip and press Play (control surface, dashboard, keyboard Spacebar), or double-click a clip s Memo field. Figure 128 See Section regarding the making of Speed adjustments during playback. Page 138
153 13.6 PLAY LIST EDLS On exiting a session, 3Play creates an EDL (Edit Decision List) file for each existing playlist. These files can be used to reconstitute a playlist in NLE (non-linear editing) applications with EDL file import support. 3Play s EDL files are created on the master Session Drive for the session, in a folder located at drivename:\media\edl\session name\. Page 139
154
155 14 THE DASHBOARD On occasion you may find it useful to control your NewTek 3Play using the mouse for functions normally invoked using the control surface. The Dashboard, located at the bottom of the Replay Desktop, makes this possible. In addition, the Dashboard offers visual feedback of control surface operations, Speed settings, and the like, which you may just appreciate at any time. This section explains its use DISPLAYING THE DASHBOARD Figure 129 By default, the Dashboard appears on the Replay Desktop when you launch it for a new session. You should see it spanning the bottom of the screen. At the far left end of the Dashboard, note a small padlock icon. This is a visibility switch, providing two modes of operation. When highlighted (gold) the Dashboard is locked in place at the bottom of the screen, and will always be visible. Unlocked, the Dashboard pops into view only when you move your mouse pointer to the lower edge of the Play List SPEED PRESETS Figure 130 The Speed Preset buttons on the Dashboard mimic their counterparts on the control surface. Generally, think of these controls as speed settings rather than buttons that directly perform an action they do not initiate playback. Page 141
156 If playback* is underway, selecting a Speed Preset changes the play rate the selected speed. Otherwise, they establish the speed for the next playback operation. * Live throughput is always 100% Speed; if recording is enabled, selecting a lesser Speed value initiates Delayed playback. Thus selecting an event and setting Speed to 50% does not begin slow motion play immediately; but when you subsequently engage Play the clip runs at half the normal rate. However, Speed changes you make during playback of either delayed video or recorded clips are applied immediately. This means that you can adjust playback speed on the fly in these cases by clicking a Speed button in the Dashboard. When newly selected, these buttons override the current T-Bar setting, setting the rate to the indicated speed. If the T-Bar is moved it reasserts control OUTPUT MODE Figure 131 Just as for the Speed buttons, the A, B and A + B buttons can stand in for their equivalents on the control surface. They operate just like the Output Mode buttons, and also show the current state of those controls. See Section 11.1 for more information about Output Modes LIVE MODE Figure 132 In a departure from the control surface, the only Control Mode button provided in the Dashboard is LIVE. Clicking this button has the same result as pushing the LIVE button on the control surface. Page 142
157 Dashboard equivalents for the other two familiar Control Modes (Clips and Play List) are not provided, but you can easily enable either mode by clicking the mouse in the Clips List or Play List, respectively. Hint: You can also send a given live input directly to the current output (A or B) by clicking the mouse on the corresponding input monitor; but, this being slightly less obvious, Live mode is supplied with a Dashboard button MARK IN/OUT Figure 133 The Dashboard buttons labeled Mark In and Mark Out correspond to the IN and OUT buttons on the control surface, and perform the same functions. See Section 10.3 to review these vital features. Note: The Dashboard does not provide an ALT button (since the mouse would have to be in two places at once if it did). The keyboard Alt key serves as a stand-in when you wish to update the In Point or Out Point of a Clips List event or Play List clip using Alt + Mark In/Out TRANSPORT BUTTONS Figure 134 The Stop and Play buttons in the Dashboard mimic the functionality of their control surface equivalents. Likewise, the knurled wheel next to play performs much like the physical Jog wheel. You may, however, notice a difference. While the physical Jog control is supplemented by a FAST JOG mode button, the Dashboard wheel is accompanied by Jog and Shuttle buttons instead (shuttling is often preferable to jogging when using a mouse for input). Page 143
158 14.7 PLAY LIST LOOP When the Loop switch in the Dashboard is enabled, Play List playback will begin again when the end of the current playlist is reached, and continue repeatedly until manually stopped. Hint: Press Ctrl + the PLAY LIST mode button to toggle the Loop (Play List) switch in the Dashboard on the Replay Desktop. Page 144
159 PART III (APPENDICES) A time-saving question and answer section, followed by an extensive listing of Shortcut Keys and keyword index Page 145
160
161 A HOW DO I? In this section, we ll consider the most common questions NewTek 3Play operators may have (and of course we ll provide the answer, too). The answers are intentionally brief perhaps just a reminder of one or two steps required to perform some operation. For this reason, we ll also point you to explanatory information elsewhere in this manual whenever that would be useful. If you ve largely mastered your NewTek 3Play system, but have a specific question, this may be the best place to look first. The headings that follow list related questions and answers together, along with cross-references and other helpful remarks. Hint: The NewTek website includes a comprehensive FAQ database containing a wealth of useful information on all of its products please see How do I... Connections Connect cameras? Color correct mismatched cameras? Connect monitors? Improve the quality of Multiview output? Connect the Genlock source? Connect the 3Play control surface Supplement: My system has suddenly stopped responding to the control surface. What can I do? Insert/Remove a Drive From a Removable Drive Bay Supplement: What hard drives are recommended for NewTek 3Play? Connect an external hard drive? Eject a hard drive? Connect to a network/the Internet? Enable termination for video inputs? Page 147
162 Sessions Supplement: What is a session? Delete a session (and its content)? Rename a Session? Manage selected content inside a session? Events and Recording Start recording? End recording? Mark an Event? Cancel Incomplete Marking Operation? play a Clip? Play in Slow Motion? Prepare a Highlight Reel? Select a different playlist clip for the same time period? Files Manage files? Import media files? Prepare clips for the Playlist using Apple Final Cut Pro? Add an external File Location to the Media Browser? Remove a Location From the File Browser? Export Files to an external drive? Export files for use in Apple Final Cut Pro? Import/Export files larger than 4 Gigabytes? Software, Maintenance and Updates Improve system performance? Resolve serious instability or dropped frames? Update NewTek 3Play software? Install virus protection? Install my favorite software (or codec)? Restore the system to original as-shipped condition? Registration and Tech Support Access Technical Support? Find hardware/firmware revision numbers? Page 148
163 Miscellaneous Set up remote desktop control of 3Play? Deal With Clips or images That Seem Blurry? Access Windows Return to the Startup Screen from the Widows Desktop More Questions and Answers Why is my power supply beeping? Supplement: Where can I obtain replacement or spare Power Supply modules? A.1 CONNECTIONS A.1.1 CONNECT CAMERAS? 1. Connect video sources to the appropriately labeled BNC input connectors on the NewTek 3Play backplate, according to your camera s connection type see Section 3.4. You may find the BNC removal tool shipped with your system helpful. 2. Open a 3Play session (or create a new one) from the 3Play Startup Screen, and launch the Replay Desktop. 3. Click the Cameras 1- (4 or 8) tab at the top of the Replay Desktop, roll the mouse pointer over the preview monitor for the source you want to set up, and click the Configure (gear) button that appears above it. 4. Choose an appropriate Connection Type for your camera in the Input Settings tab (see Sections 3.4 and 7.2.1). A.1.2 COLOR CORRECT MISMATCHED CAMERAS? Your 3Play system permits the use of sources that do not match the current session format. You might connect an SD camera during an HD session, for example. The official broadcast standard for SD video is Rec. 601, but HD video conforms to Rec. 709 and NewTek 3Play output color space is governed by the session format. Page 149
164 When the natural color space for a connected source does not match the current output specification (in this example, Rec. 709), 3Play automatically attempts to compensate but it s always best to refer to downstream scopes for critical accuracy. 1. As required, connect external Waveform and Vectorscope monitors to 3Play outputs 2. Disable Output Proc Amps (Section 7.1.1) or set them to defaults to adjust input settings. 3. Your downstream scopes should be configured to conform to the broadcast color specification for your current session. 4. Calibrate your sources one by one using the Proc Amp tools for individual inputs (see Section ) A.1.3 CONNECT MONITORS? REPLAY DESKTOP MONITOR With the power off, connect an external computer monitor to the Interface DVI port on the NewTek 3Play system backplate. Use a suitable adapter if necessary for your monitor. MULTIVIEW (SECONDARY) MONITOR The secondary monitor output on the backplate is for the Multiview output feature. 5. Connect the external device to the Multiview output on the backplate using an appropriate cable (and/or adapter, if required) see Section Launch a 3Play session (or create a new one) from the Startup Screen. 7. Roll the mouse pointer into the header above the output monitors, and click the Configure (gear) button that appears at right. 8. In the Output Configuration panel s Multiview tab, set VGA Output Resolution to match the native resolution of the external device. 9. Select your preferred display from the Screen Layout menu. Page 150
165 NOTE: Changing Output Resolution can cause frames to be dropped briefly. We do not recommend changing this setting during live production. OUTPUT VIDEO MONITORS/DEVICES Downstream video devices you wish to send 3Play output to must be compatible with the video broadcast standard (such as NTSC or PAL) and format (SD or HD) of the current 3Play session. 1. Connect cables between downstream devices (whether monitors or other devices) and appropriately labeled video output connectors on the backplate (see Section 3.5.1). 2. Open a 3Play session (or create a new one) from the 3Play Startup Screen. 3. For SD sessions and display devices, you may need to adjust the connection options found in Output Configuration: a. Move the mouse over the output monitors, and click the Configure button (gear) that appears at above right to open Output Configuration. b. Click the appropriate output tab (A or B), and select either Composite + Y/C or Component, according to the connection type used by your device. (Please see Section 3.7 for more information.) A.1.4 IMPROVE THE QUALITY OF MULTIVIEW OUTPUT? 3Play s Multiview video output is very high quality, but it is possible for you to manually choose certain settings that will have a negative effect on it. For best quality, be sure that the VGA Output Resolution you choose corresponds to that of the monitor connected. NOTE: Changing Output Resolution can cause frames to be dropped briefly. Thus we do not recommend changing this setting during live production. Page 151
166 A.1.5 CONNECT THE GENLOCK REFERENCE SIGNAL? 1. Connect the reference signal to the Genlock input (BNC connector) on the backplate. 2. See Section 3.9 for details on configuring Genlock settings. A.1.6 CONNECT THE 3PLAY CONTROL SURFACE? Connect the USB cable from the control surface to one of your NewTek 3Play s USB ports. SUPPLEMENTARY QUESTION: Q: My system has suddenly stopped responding to the control surface. What can I do? A: The foremost reason this might happen is if the cable (or extender cable) you are using between the control surface and NewTek 3Play failed to deliver sufficient current consistently. In the short term (if you are in the middle of a show), you can generally resolve this issue by simply unplugging and re-plugging the control surface. However, please note that the use of so-called "USB extenders" is not recommended. Whenever possible, use a single USB cable of the correct length. Each added connector on the signal path is a potential connection problem, and also causes signal reflections. Such an arrangement may seem to work for a while, then fail unpredictably. If you are using a very long USB cable (or a poor quality cable), you should supply a powered hub at the end of the cable nearest the control surface, then complete the connection with a short USB cable from the hub to the control surface (an unpowered hub will be of no help). A.1.7 INSERT/REMOVE A DRIVE FROM A REMOVABLE DRIVE BAY 1. If the system is running, and if applicable Eject the hard drive you wish to remove (see Section A.1.9). 2. Drop the front panel on your NewTek 3Play down. 3. Open the removable drive bay door. 4. Pull the hard drive currently in the drive bay (if applicable) to remove it. 5. Insert the new hard drive ( connector end first) Page 152

167 Figure 135 3P lay Close the drive bay door. 7. Close the front panel. SUPPLEMENTARY QUESTION: Q: What hard drives are recommended for removable drive bays? A: NewTek Sales offers additional hard drives for use in the removable bays. NewTek supplied storage media has been carefully tested to meet exacting specifications, and can be expected to provide optimal performance and reliability. Of course, you are free to purchase storage media from other sources. Keep in mind that manufacturer specifications and reviews may highlight favorable statistics, focusing on results from typical (i.e., less demanding) operating environments. Naturally, NewTek cannot guarantee that hard drives obtained from such sources will provide performance adequate to meet operational requirements. Here are some guidelines to keep in mind if you employ hard drives purchased from other sources: All else being equal, larger drives are normally faster try to use 1TB drives or above. Use SATA 3.0GB/s drives with rotational speed of 7200 R.P.M. (or better). Drives should have a larger onboard cache (32Mb or better is recommended). Page 153
168 A.1.8 CONNECT AN EXTERNAL HARD DRIVE? Connect a suitable cable from the external hard drive to a matching port on the backplate. Note that in general, for use with large video files the hard drive should be formatted using the NTSF file system (the FAT file system chokes on exported files exceeding 4 Gigabytes, as will often be the case). 3PLAY 820 The esata port provided on the backplate supports transfer speeds that are fast enough for live recording to suitable eternal media. The (slower) USB ports should not be used for recording, but may be useful for transferring files to and from the system (it is always best to import media for use in live sessions). 3PLAY 425 The USB ports provided on the backplate do not support transfer speeds that are suitable for live recording to eternal media, thus should not be used for recording. These connections may be useful for transferring files to and from the system, however (it is always best to import media for use in live sessions). A.1.9 EJECT A HARD DRIVE? Click the Eject gadget in the Home page titlebar in 3Play s Startup screen for the hard drive you wish to safely disconnect. A.1.10 CONNECT TO A NETWORK? Please refer to Section A.1.11 ENABLE TERMINATION FOR VIDEO INPUTS? NewTek 3Play provides full-time video termination. If you need to loop through (or t-off from) upstream video devices (such as an external monitor) in your video pipeline, you should ensure termination is turned OFF for earlier devices. Page 154
169 A.2 SESSIONS SUPPLEMENTARY QUESTION: Q: What is a session? A: Sessions can be thought of as top-level presets. They store all of the settings, playlists, device configurations, and so on for a given live production. See Section 5.1. A.2.1 DELETE A SESSION (AND ITS CONTENT)? 1. Right-click the name of the session in the Home page of the Startup screen. 2. Select Delete from the menu. This will delete the session, and any content that is local to the session (external data that has not been imported and data on drives that are not mounted at the time will not be deleted). See Section for more information. A.2.2 RENAME A SESSION 1. If necessary, close the Replay Desktop by clicking the [x] button at the right-hand end of the titlebar. 2. Return to the Home page. 3. Right-click the name of the session you want to rename in the list shown at right to open the context menu. 4. Choose Rename from the menu that appears. A.2.3 MANAGE SELECTED CONTENT INSIDE A SESSION? 1. Click the name of the session containing the content you wish to delete in the Home page of the Startup Screen. Page 155
170 2. Under Browse at (right on the Session page), click the link for the type of content you wish to manage (see Section 5.3.1). A.3 EVENTS AND RECORDING A.3.1 START RECORDING? 1. Press the REC button on the control surface. or 2. Press the IN button on the control surface. or 3. Press the Record button beneath the Output A monitor on the Replay Desktop. A.3.2 END RECORDING? 1. Press ALT + REC on the control surface. or 2. Press the Record button beneath the Output A monitor on the Replay Desktop a second time. A.3.3 MARK AN EVENT? There are two principle methods for marking events: ONE-BUTTON METHOD 1. Watch the input monitors, and press the OUT button on the control surface whenever a notable event occurs (see Section 8.9). 2. This creates a new event in the Clips List, setting an Out Point at the current timecode, and an In Point as required to fulfill the default Duration (see Section 13.4). Of course, you can trim the event afterward any time you wish. Page 156
171 TWO-BUTTON METHOD 1. Press the IN button on the control surface at any convenient time. This creates a new incomplete event in the Clips List. 2. (Optional) If nothing noteworthy occurs in the next while, feel free to press IN again from time to time, updating the In Point of the event. 3. Press OUT to complete the event when something interesting occurs (see Section 8.9). A.3.4 CANCEL AN INCOMPLETE MARKING OPERATION? 1. Press ESC on the control surface (or Esc on the keyboard). A.3.5 PLAY A CLIP? 1. In the Clips List, double-click the Memo field for the input (clip) you want to play or 2. Navigate to a clip using the control surface (see Section 8.7) or keyboard and press Play. RELATED QUESTIONS: Q: I pressed Play, so why is my output frozen? A: Check to see if the control surface T-Bar is at the 0% position (stopped). A.3.6 PLAY A CLIP IN SLOW MOTION? Slide the T-Bar to set the desired playback speed, or choose a Speed Preset (25%, 50%, etc.), and then press Play. Page 157
172 A.3.7 PREPARE A HIGHLIGHT REEL? 1. Select clips for events you want to include in the Clips List and press Add to Play List to add them to a page in the Play List module. 2. Drag clip entries up or down in the Play List table as necessary to place them in the order you want them to play. 3. Optionally, re-trim the clips, to taste. 4. Adjust level controls for embedded audio in the Audio columns (see Section ), Crossfade times (Section ) and Speed (13.3.6) for individual or multi-selected clips. 5. (Optional) Enable the Music switch in the Play List titlebar and load a music file using the nearby menu (see Section ). Adjust its level by clicking the Music Configuration button (gear) at right. A.3.8 SELECT A DIFFERENT PLAYLIST CLIP FOR THE SAME TIME PERIOD? 1. Navigate to the Clip ID field in the Play List 2. Hold down the EDIT button on the control surface 1. Rotate the Jog wheel to cycle the through the available clips for the current time segment. A.4 FILES A.4.1 MANAGE FILES? Please refer to the item (How do I) Manage Selected Content inside a Session? (Section A.2.3). Page 158
173 A.4.2 IMPORT MEDIA FILES? Importing files implies copying them into the session folders, making them local (rather than external) to the system and session. To import media files: 1. Open (or create) a 3Play session. 2. Click the Import Media button (below the Browse > Sound and Music link at right). 3. Click Add, and use the system file explorer that opens to select the file(s) you wish to import into the current session; then click the Open button. Selected files are automatically copied to the appropriate folder (Clips, Stills, etc.) according to their file type (see Section 5.3, Import Media). Hint: External files can be used in a session without being imported, by adding them to Clips List using the Add feature and Media Browser see Section However, it should be noted that the transfer speed of many external devices is too slow for reliable playback of media content, making it wise to use the Import feature instead whenever possible. A.4.3 PREPARE CLIPS FOR THE PLAY LIST USING APPLE FINAL CUT PRO? We are often asked what format to use for export from Final Cut for best compatibility in 3Play, especially for HD clips. Here are recommended steps: 1. Click on Final Cut s File menu and choose Send To > Compressor (Compressor will open automatically). 2. Select your encoder setting as follows: a. Inside Compressor, click on the Settings tab (in the bottom left panel). b. Find the Program Stream setting from the Apple/Formats/Mpeg-2 folder. c. Drag this setting and drop it onto your Sequence. 3. Set your destination setting as follows: a. Click on the Destinations tab (in the bottom left panel). Page 159
174 b. Drag the destination of your choice onto your job item. 4. Click Submit. A.4.4 ADD AN EXTERNAL FILE LOCATION TO THE MEDIA BROWSER? 1. Open a 3Play session. 2. Click the Add Media button in the Clips List titlebar. 3. Click the Add Media Location button at bottom left in the Media Browser. 4. Select the folder you wish to list as a custom location, and click OK. 5. (Optional) Enable the Transcode switches for each item added to ensure smooth playback. (See External Locations in Section ) A.4.5 REMOVE A LOCATION FROM THE FILE BROWSER? 1. Click the Add Media button in the Clips List titlebar. 2. Right-click the name of the location you wish to remove from the list, and select Remove in the menu that opens. (See the sub-heading Context Menus in Section ) A.4.6 EXPORT FILES TO AN EXTERNAL DRIVE? There are several approaches to exporting media files from within 3Play sessions. By far the simplest is to use the Export Media feature in Startup see the Export Media sub-heading in Section (The steps are similar to those described in section A.4.4, but you will select clips for export using a special browser pane that is not unlike the Clips List table). Page 160
175 A.4.7 EXPORT FILES FOR USE IN APPLE FINAL CUT PRO? At the time of writing, importing 3Play s MPEG-2 files into Final Cut requires a few extra steps. There are several approaches pick the one that suits your need best. METHOD 1 1. Open the session containing the recorded files you are interested in. 2. Click the Export Media button, and then click Add to add clips to the export batch list. 3. Use the Target drop-down to select Application. 4. In the Preset column, select Apple Final Cut Pro (.mov) 5. Click the Destination gadget (triangle) and choose a target location for the exported file(s). 6. Click the Export button to commence export. (Please see the sub-heading entitled Export Media in Section for more on this feature.) METHOD 2 7. At step 3 above, Choose Quicktime for the Target, then select Renderless conversion (.mov) as the Format for the files you add. 8. Click the selection gadget (triangle) and choose a target location for the output file(s). 9. Click the Export button to commence transcoding. (Please see the sub-heading entitled Export Media in Section for more on this feature.) A.4.8 IMPORT/EXPORT FILES LARGER THAN 4 GIGABYTES? This question may arise if you are using external media, perhaps portable hard drives or USB thumb drives. These are commonly prepared using the FAT32 file system, which does not Page 161
176 support files larger than 4GB. As video files will often exceed this size, FAT32 is not very suitable for use in that context. You should reformat these drives using the NTFS system to eliminate this limitation (or you might consider transferring larger files over a network connection). A.4.9 AVOID THE ERROR COPY THIS FILE WITHOUT ITS PROPERTIES? Windows shows this error message when you export a media file to an external volume that does not use the NTFS file system. The warning is not really a concern (although we highly recommend using NTFS formatted storage, as noted in Section A.4.8). The files will copy just fine regardless. NewTek 3Play generates metadata attributes for media files for internal use. This metadata is only retained when you export to storage formatted as NTFS. That being said, the metadata is automatically regenerated if you use the files with NewTek 3Play again later, so its loss poses no issue. A.5 SOFTWARE, MAINTENANCE AND UPDATES A.5.1 IMPROVE PERFORMANCE? 1. Click the Utilities icon on the Home page in Startup. 2. Click the Defragment Hard Drive link at right (see Section 5.2.4), and follow further directions provided. This process can take considerable time, so it s best not to commence unless time (before a production) permits. A.5.2 RESOLVE SERIOUS INSTABILITY OR DROPPED FRAMES? If the system should ever become seriously unstable or drop frames (after the warm-up period), consider a full 3Play Restore operation see item A.5.6. A.5.3 UPDATE NEWTEK 3PLAY SOFTWARE? 1. Connect 3Play to a valid Internet connection. Page 162
177 2. Click the Utilities icon on the Home page in Startup. 3. Click Update 3Play, and follow directions provided (see Section 5.2.4). A.5.4 INSTALL VIRUS PROTECTION? Virus and malware protection applications can dramatically impact system performance (this is true even for Windows Defender, which is deliberately disabled for this reason). In general, once additional software or services are enabled on the system, real-time performance cannot be guaranteed. In a perfect world, we'd love to recommend that you do not install virus and/or malware protection software on NewTek 3Play. Certainly you should always take sensible precautions to avoid introducing infected files by rigorously virus-checking media you plan to connect or import before ever connecting it to 3Play. Realistically though, in some settings you may feel the need for protection outweighs the risk. If you really feel you must install virus protection, switch all of its active scanning operations off so that nothing can occur in the background during live production. Anything that provides full-time protection will dramatically reduce memory and disk speed on your system, so you should disable those features. Then, only when you need to do so (perhaps on a daily or weekly schedule), perform a manual scan. Never let scanning continue into a live switching event, and do not assume that you can now omit pre-checking files and external media for nasty surprises. Hint: In the unfortunate event that malware ever does evade defensive measures you employ, you can always use the Restore function to completely rehabilitate your system. A.5.5 INSTALL MY FAVORITE SOFTWARE (OR CODEC)? NewTek 3Play is not a general purpose computer. The installed software suite is finely tuned to provide reliable performance and amazing features. Anything you install apart from official updates places these important goals at risk. Doing so is strongly discouraged. Regarding codecs, NewTek 3Play supports many popular image, audio and video formats for playback. That said, hardly a day passes without another new one appearing on the scene. If a Page 163
178 file you would like to use does not play back well (or at all), consider converting it to a friendlier format. The Import Media module makes this very easy to do. If you feel the format is so popular that it should be supported, please submit the details as a feature request. A.5.6 RESTORE THE SYSTEM TO ORIGINAL AS-SHIPPED CONDITION? We firmly expect you will never need it, but isn t it good to know that a complete 3Play Restore function is available in the event of an unforeseen problem? You can use one of two methods to restore your system, depending on your situation. To restore your 3Play system software after the system launches normally: 1. Click the Utilities icon in Startup. 2. Select the link labeled Restore to Factory Defaults, and follow prompts. If your NewTek 3Play should ever fail to boot up properly, you may need to try a different approach to restoring your software, as follows: 1. Select the menu item labeled Reset to Factory Defaults from the black boot screen that appears shortly after powering up. (If this screen does not automatically appear, reboot and press F8 a few times in quick succession, say once per second, immediately after powering up.) Follow prompts to complete the process. Note: Following a 3Play Restore operation, the Windows system software must be reactivated. To do this, you will need the operating system serial number, which you will find on a sticker affixed to the exterior of your NewTek 3Play system. This procedure restores your system drive ( C: ) to its as-shipped state. Other drives, which may hold content and sessions won't be modified. However any 3Play system software updates you have performed will be overwritten so use this function only if you truly find it necessary (a call to NewTek s excellent Tech Support staff first may often be fruitful see Section A.6.2). When you do restore, remember to update the 3Play system software afterward. Page 164
179 A.6 REGISTRATION AND TECH SUPPORT A.6.1 REGISTER THE NEWTEK 3PLAY SYSTEM? Please refer to Section 3.3, License and Registration. A.6.2 CONTACT TECHNICAL SUPPORT? Visit the NewTek Website, at and select Technical Support from the main Customer Care menu at the top of the page. This page always contains the latest support information for your NewTek products, including FAQs for all products. It also lists the Technical Support Department s hours of operation and contact details. A.6.3 FIND HARDWARE/FIRMWARE REVISION NUMBERS? Click the Help icon and select About 3Play in Startup. Doing this opens an information panel that lists significant version numbers (at the bottom). A.7 MISCELLANEOUS A.7.1 SET UP REMOTE DESKTOP CONTROL OF 3PLAY? Attempts to run screen sharing or remote desktop software on 3PLAY are strongly discouraged (this includes NewTek s own ivga client). Applications of this type require significant system resources. At the same time, 3PLAY s primary functions require unhindered CPU and GPU access. Adding the resource demands of additional software of this type would almost certainly cause 3PLAY to drop frames on output, and should simply never be done. A.7.2 DEAL WITH CLIPS OR IMAGES THAT SEEM BLURRY? When paused or stopped, the system performs motion removal (to avoid unwanted flicker). This can make the image seem slightly blurred when paused, but it should look perfect during playback. Page 165
![A.7.3 ACCESS WINDOWS? 1. If necessary, close the Replay Desktop by clicking the [x] button at the right-hand end of the titlebar. 2. Click the Shutdown icon on the icon ring in Startup. 3.](/docs-images/84/90871046/images/180-0.jpg "Click the Exit to Windows link at right (and confirm the warning dialog). A.7.")
 disconnect or ii) power down just one of the modules, or iii), if a PSU should fail, a beep is sounded to alert you.")
180 A.7.3 ACCESS WINDOWS? 1. If necessary, close the Replay Desktop by clicking the [x] button at the right-hand end of the titlebar. 2. Click the Shutdown icon on the icon ring in Startup. 3. Click the Exit to Windows link at right (and confirm the warning dialog). A.7.4 RETURN TO THE STARTUP SCREEN FROM THE WINDOWS DESKTOP Double-click the 3Play icon on the Windows desktop to return to 3Play s Startup screen. A.8 MORE QUESTIONS AND ANSWERS A.8.1 WHY IS MY POWER SUPPLY BEEPING? NewTek 3Play 3PXD820 has redundant, replaceable power supply units. When you i) disconnect or ii) power down just one of the modules, or iii), if a PSU should fail, a beep is sounded to alert you. If you wish, you can mute the alert by pressing the green button on the back of the unit. Figure 136 Page 166
181 SUPPLEMENTARY QUESTION: Q: Where can I obtain replacement or spare Power Supply modules? A: Contact NewTek Sales for purchase information for spare components. A.8.2 WHY ARE MY CLIP DURATION AND COUNTDOWN TIMES DIFFERENT? At times, the duration shown for a clip in the Clips List may not perfectly match the HUDs countdown timecode. This Duration value is based on the original clip framerate. However the HUD countdown timecode is based on the project framerate. Page 167
182
183 B KEYSTROKE SHORTCUTS Previous row (Clips List and Play List) Up arrow Next row (Clips List and Play List) Down arrow Previous table cell (Clips List and Play List) Left arrow Next table cell (Clips List and Play List) Right arrow One page up in table (Clips List and Play List) Page Up One page down in table (Clips List and Play List) Page Down First cell in row (Clips List and Play List) Home Last cell in row (Clips List and Play List) End First cell in table (Clips List and Play List) Ctrl + Home Last cell in table (Clips List and Play List) Ctrl + End Cut Ctrl + x Copy Ctrl + c Paste Ctrl + v Remove event (Clips List) or clip (Play List) Del Engage text edit mode Enter End text editing Enter Exit text edit without saving changes Esc Activate Clips List filter field (for text entry) F3 Add Media (to Clips List) F5 Send input or camera # to output (LIVE or Clips mode) Numpad 1- (4 or 8) Page 169
184
185 C RELIABILITY TESTING We know our products play vital roles in the productions of our customers. Durability and consistent, robust performance are much more than just adjectives for your business and ours. For this reason, all NewTek products undergo rigorous reliability testing to ensure they meet our exacting test standards. For NewTek 3Play, the following standards are applicable: Test Parameter Evaluation Standard Temperature Mil-Std-810F Part 2, Sections 501 & 502 Ambient Operating 0 C and +40 C Ambient Non-Operating -10 C and +55 C Humidity Mil-STD 810, IEC Ambient Operating 20% to 90% Ambient Non-Operating 20% to 95% Vibration ASTM D ; Mil-STD 810 Sinusoidal Exceeds ASTM D Paragraph 10.4: 3 Hz to 500 Hz Random Mil-Std 810F Part 2.2.2, 60 minutes each axis, Section C-VII Electrostatic Discharge IEC Air Discharge 8K Volts Contact 4K Volts Page 171
186
187 INDEX 3Play Register, 17, A Activate Windows. See Windows Add, 45 Apple Final Cut Pro, 159, 161 Audio AES/EBU, 20 Clip List menu, 126 Configure, 30, 33, 88 Connections, 24 LTC Connection, 21, 89 Music, 132 Play List, 46, 134, 136 VU meters, 103 Audio 1, 2 & Audio 3, 4. See Play List Aux Output (Audio), 24 Aux Output (Video), 23 Beep, 166 B C Clip Trim, 137 Clips List, 6, 7, 13, 41, 117 Add to Playlist, 45, 100, 128, 158 Banks and pages, 118 Clip Configuration options, 123 Cut, Copy, Paste, 126 Media Browser, 119 Add Media Location, 120, 160 Filter, 121 Menus, 121 Memo, 43, 125 Navigation, 43 Play indicator, 128 Playback speed, 127 Re-order, 126 Selection, 128 Show/Hide columns, 122 Table, 124 Titlebar, 117 Transport, 127 Trimming, 125 Codecs, 163 Connect the Genlock source, 152 Connections Cameras, 19, 83, 149 Control Surface, 152 External Drive, 154 Genlock, 20 LTC Timecode, 21 Output, 22, 150, 151 Tally Lights, 25 Control Mode, 40, 43, 46, 93, 94, 95, 103, 104, 114, 116, 118, 142 Control Surface, 6, 152 Add to Playlist, 45, 100, 128, 158 ESC, 157 Fast Jog, 96 IN, 98 Jog wheel, 96 Navigation, 96 One-button marking, 98, 156 OUT, 98 Page and bank, 95 Speed, 142, 157 Page 173
188 Transport, 96 Two-button marking, 157 Crossfade. See Play List Dashboard, 141 Control Mode, 142 Jog/Shuttle, 143 Marking, 143 Play List Loop, 144 Speed, 141 Delayed playback. See Playback mode:delayed D E EDL, 139 Eject, 54, 154 EULA. See 3Play: Register Event, 6, 124 Cut, Copy, Paste, 45, 126 Marking. See Control Surface Re-order, 45, 126 Selection, 45 Trim, 44, 125, 136, 158 Export Media. See Startup Screen F FAQ, 147 Fast Jog. See Control Surface Files Export, 64, 160, 162 Import, 62, 159 Final Cut Pro, 159, 161 G Connect. See Connections H Hard Drive Defrag. See Startup Screen: Utilities Eject, 154 Hard drive (external), 154 Highlight Reel, 135, 158 Home Page. See Startup Screen I/O Configuration Audio, 33 Clipping, 89 Genlock, 81, 82, 83 Proc Amp, 12, 52, 87 Video Input, 31, 83 Connection Type, 84 Video Output, 28, 75 IMAG, 24 Input Connectors, 19 Installing Third-Party Software, 163 Jog. See Control Surface Keyboard, 15 I J K Live playback. See Playback mode:live LTC. See Connections L Genlock Configure. See I/O Configuration Page 174
189 M Marking. See Control Surface Memo. See Clips List Monitors Dual Displays, 72 Interface, 15, 150 Output (external), 151 Replay Desktop, 11 Multiview Output, 80 Music. See Play List N Navigation. See Control Surface and Clips List Network, 10, 16, 34, 65 Network Output, 25 NTSC. See Video Standard O Open Session. See Startup Screen Output Mode, 6, 40, 76, 92, 113, 114, 116, 127, 132, 142 PAL. See Video Standard Play List Loop, 144 Play List, 45, 131 Audio, 136 Crossfade, 137 Memo, 136 Music, 132, 133 Pages and banks, 132 Play Indicator, 135 Render, 47, 138 Selection, 135 Speed, 47, 137 P Table, 134 Transition, 137 Trimming, 136, 137 Playback mode Clip, 5 Delayed, 5, 142 List, 5 Live, 5 Power conditioning, 16 Power Supply, 166 Proc Amp. See I/O Configuration Production Time, 90 Record, 6, 7, 12, 40, 41, 54, 107 Register. See 3Play: Register Rename Input, 71 Render. See Play List Replay Desktop, 8, 28, 69 Dual Displays, 72 Restart. See Startup Screen:Shutdown System Restore 3Play, 60 Restore 3Play, 164 Sessions, 26, 52, 54, 56, 155 Session Volume, 56 Shutdown. See Startup Screen:Shutdown Software Installing Third-Party, 163 Startup Screen, 8, 26, 51 Export Media, 64 Home Page, 8, 26, 53 Open Session, 56, 155 Session Page, 26, 27, 61 Shutdown, 57 Exit to Windows, 57 Utilities R S Page 175
190 Defragment, 59, 162 Restore 3Play, 164 Update 3Play, 162 Storage (external), 154 Support, 165 UPS, 16 U V T Tally Lights. See Connections:Tally Lights Technical Support, 165 Timecode, 21, 88, 90, 97, 111, 121, 124, 125, 134 Configure, 89 Titlebar, 73 Transition. See Play List Video Standard, 20, 55 Virus Checker, 163 VU Meters, 88, 103 W Windows Activate, 16 Exit to. See Startup Screen:Shutdown Page 176
191 CREDITS Acknowledgments: Tim Jenison, Jim Plant Engineering: Andrew Cross, Kevin Rouviere, Nathan Kovner, James Killian, Kirk Morger, Brian Brice, Kevin Nations, Jeremy Wiseman, Masaaki Konno, John Perkins, Mike Watkins, Bennie Pierce, Cary Tetrick, Alvaro Suarez, Steve Bowie, Charles Steinkuehler, Menghua Wang, Shawn Wisniewski, Bob Peene, Greg Heine, Dan Fletcher, Anthony Louviere, Jan Uribe, Jeremy Brosius, Michael Joiner, Jarrod Davis, Ryan Hansberger, Naveen Jayakumar, Todd Bryant Design Consultants: Kris Gurrad Additional thanks to: NewTek Marketing NewTek Technical Support NewTek Customer Service NewTek Business Development NewTek Sales This product uses the following libraries, licensed under the LGPL license (see link below). For the source, and the ability to change and recompile these components, please visit the links provided: FreeImage library LAME library FFMPEG library For a copy of the LGPL licence, please look in the folder c:\tricaster\lgpl\ Portions use Microsoft Windows Media Technologies. Copyright (c) Microsoft Corporation. All Rights reserved. VST PlugIn Spec. by Steinberg Media Technologies GmbH. This product uses Inno Setup. Copyright (C) Jordan Russell. All rights reserved. Portions Copyright (C) Martijn Laan. All rights reserved. Inno Setup is provided subject to its license, which can be found at:
192 Inno Setup is distributed WITHOUT ANY WARRANTY; without even the implied warranty of MERCHANTABILITY of FITNESS FOR A PARTICULAR PURPOSE. All other software with the TriCaster not expressly noted as free is proprietary and subject to NewTek's copyright rights or those of its licensors. Trademarks: NewTek, TriCaster, TriCaster XD, TCXD850, TCXD850 Extreme, TriCaster TCXD850 Extreme, TriCaster 850 Extreme, TriCaster Extreme, TriCaster 850, TCXD450, TCXD450 Extreme, TriCaster TCXD450 Extreme, TriCaster 450 Extreme, TriCaster Extreme, TriCaster 450, IsoCorder, TCXD300, TriCaster PRO, TriCaster STUDIO, TriCaster BROADCAST, TriCaster DUO, ivga, SpeedEDIT, 3PLAY, 3PLAY 820, 3PLAY 425, 3PXD820, 3PXD425, LiveText, DataLink, LiveSet, LiveMatte, TimeWarp, VT, V[T5], Video Toaster, Toaster, 3D Arsenal, Aura, LightWave, LightWave 3D and LightWave CORE are trademarks of NEWTEK. All other brand names, product names, or trademarks belong to their respective holders. (c) NewTek , All Rights Reserved
193

194
Revised Oct. 22, 2010
 Revised Oct. 22, 2010 TriCaster TCXD850, TriCaster TCXD300,TriCaster DUO, TriCaster, TriCaster PRO, TriCaster PRO FX, TriCaster STUDIO, TriCaster BROADCAST, 3Play, SpeedEDIT, DataLink, LiveText, LiveControl,
Revised Jan. 11, 2013
 Revised Jan. 11, 2013 Trademarks: NewTek, TriCaster, TriCaster XD, TCXD8000, TriCaster 8000, TriCaster TCXD8000, TCXD850, TCXD850 EXTREME, TriCaster TCXD850 EXTREME, TriCaster 850 EXTREME, TriCaster EXTREME,
Revised Jan. 11, 2013
 Revised Jan. 11, 2013 Trademarks: NewTek, TriCaster, TriCaster XD, TCXD850, TCXD850 EXTREME, TriCaster TCXD850 EXTREME, TriCaster 850 EXTREME, TriCaster EXTREME, TriCaster 850, TCXD450, TCXD450 EXTREME,
Revised Sept. 14, 2011
 Revised Sept. 14, 2011 Trademarks: NewTek, TriCaster, TriCaster XD, TCXD850, TCXD850 Extreme, TriCaster TCXD850 Extreme, TriCaster 850 Extreme, TriCaster Extreme, TriCaster 850, TCXD450, TCXD450 Extreme,
Ready. Set. Go make your show. Your guide to creating your first video program with
 Ready. Set. Go make your show. Your guide to creating your first video program with TriCaster Mini Go Make Your Show Guide 01 Table of Contents Part 1: Ready. 1) Power, Monitoring and Control 04 2) Bringing
Revised February 17, 2016
 Revised February 17, 016 Trademarks: NewTek, NewTek VMC1, NewTek VMC1 IN, NewTek VMC1 OUT, NewTek NC1, NewTek NC1 IN, TriCaster, TriCaster Advanced Edition, TriCaster XD, TriCaster 8000, TriCaster TCXD8000,
Revised April 26, 2015
 Revised April 26, 2015 Trademarks: NewTek, TriCaster, TriCaster XD, TriCaster 8000, TriCaster TCXD8000, TCXD8000, TriCaster 860, TriCaster TCXD860, TCXD860, TriCaster 460, TriCaster TCXD460, TCXD460, TriCaster
Cablecast SX. Setup Guide. c Tightrope Media Systems For Cablecast version Build 206
 Cablecast SX Setup Guide c Tightrope Media Systems For Cablecast version 5.2.11 Build 206 Printed June 5, 2015 1 Cablecast SX Setup 1.1 Prerequisites 1.2 Overview of Setup Thank you for purchasing a Cablecast
Cablecast Server. Setup Guide. c Tightrope Media Systems For Cablecast version Build 74
 Cablecast Server Setup Guide c Tightrope Media Systems For Cablecast version 6.1.2 Build 74 Printed July 22, 2016 1 Cablecast Server Setup 1.1 Prerequisites 1.2 Overview of Setup Thank you for purchasing
FS1-X. Quick Start Guide. Overview. Frame Rate Conversion Option. Two Video Processors. Two Operating Modes
 FS1-X Quick Start Guide Overview Matching up and synchronizing disparate video and audio formats is a critical part of any broadcast, mobile or post-production environment. Within its compact 1RU chassis,
USER GUIDE FOR NETmc MARINE X-Ops
 USER GUIDE FOR NETmc MARINE X-Ops Rev.2.2 Firmware v.1.2.8 X-Ops, 1.2.9 Pipeline September 2013 NETmc Marine X-Ops Manual-Rev.2.2 September 2013 1 of 17 Contents 1. Introduction... 3 1.1 Multi-channel
FS3. Quick Start Guide. Overview. FS3 Control
 FS3 Quick Start Guide Overview The new FS3 combines AJA's industry-proven frame synchronization with high-quality 4K up-conversion technology to seamlessly integrate SD and HD signals into 4K workflows.
IP LIVE PRODUCTION UNIT NXL-IP55
 IP LIVE PRODUCTION UNIT NXL-IP55 OPERATION MANUAL 1st Edition (Revised 2) [English] Table of Contents Overview...3 Features... 3 Transmittable Signals... 3 Supported Networks... 3 System Configuration
Video Disk Recorder DSR-DR1000
 Video Disk Recorder F o r P r o f e s s i o n a l R e s u l t s 01 FEATURES Features Product Overview Extensive DVCAM-stream recording time The incorporates a large-capacity hard drive, which can record
Marshall Electronics. Pro A/V Communications VMV-402-SH. 3G/HD/SD-SDI Quad-viewer/Switcher with Audio Meter Display. User Manual.
 Marshall Electronics Pro A/V Communications VMV-402-SH 3G/HD/SD-SDI Quad-viewer/Switcher with Audio Meter Display User Manual Table of Contents 1. Introduction... 3 2. Features... 3 3. Package Contents...
V pro8 QUICK START GUIDE
 QUICK START GUIDE Welcome to your V pro8 FIRST STEPS POWERING ON CONNECTING YOUR COMPUTER Thank you for buying the Lawo V pro8, a true high-quality product developed and manufactured in Rastatt, Germany.
FS4 Quick Start Guide
 FS4 Quick Start Guide Overview FS4 is AJA s flagship frame synchronizer and converter, offering incredible versatility and connectivity in a sleek and compact 1RU frame for all your 4K/ UltraHD/2K/HD/SD
The Switcher: TriCaster 855 Extreme
 The Switcher: TriCaster 855 Extreme OVERVIEW The typical studio production is composed of content from various sources: CAMERAS: Moving images from studio cameras normally three. AUDIO from studio mics
Revised Jan. 25, 2011
 Revised Jan. 25, 2011 TriCaster TCXD850, TriCaster TCXD850 CS, TriCaster TCXD300,TriCaster DUO, TriCaster, TriCaster PRO, TriCaster PRO FX, TriCaster STUDIO, TriCaster BROADCAST, 3Play, SpeedEDIT, DataLink,
IQDEC01. Composite Decoder, Synchronizer, Audio Embedder with Noise Reduction - 12 bit. Does this module suit your application?
 The IQDEC01 provides a complete analog front-end with 12-bit composite decoding, synchronization and analog audio ingest in one compact module. It is ideal for providing the bridge between analog legacy
Digital Video Recorder
 Digital Video Recorder Quick Operation Guide UD.6L0202B0067A02 Thank you for purchasing our product. If there is any question or request, please do not hesitate to contact dealer. This manual is applicable
EdgeConnect Module Quick Start Guide ITERIS INNOVATION FOR BETTER MOBILITY
 EdgeConnect Module Quick Start Guide ITERIS INNOVATION FOR BETTER MOBILITY 493456301 Rev B April 2009 Table of Contents Installation... 1 Setup... 2 Operation... 4 Live Video... 4 Video Settings... 5 Network
HD Leeza. Quick Setup Guide
 Page 1 of 15 Model KD-HD1080P Key Digital Video Processor Quick Setup Guide Have a question or a technical issue with your set-up? Call the Key Digital Hotline at: 866-439-8988 or 203-798-7187 E-mail the
DIGITAL MIXING CONSOLE. TF Editor V3.6 User's Guide
 DIGITAL MIXING CONSOLE TF Editor V3.6 User's Guide EN Special notices Copyrights of the software and this document are the exclusive property of Yamaha Corporation. Copying or modifying the software or
VF-STB IP Appliance User Guide
 VF-STB IP Appliance User Guide Copyright 2007 Video Furnace, Inc. All Rights Reserved. Copyright 2002-2007 Video Furnace, Inc. All Rights Reserved This document refers to the current published version
SPG8000A Master Sync / Clock Reference Generator Release Notes
 xx ZZZ SPG8000A Master Sync / Clock Reference Generator Release Notes This document supports firmware version 2.5. www.tek.com *P077122204* 077-1222-04 Copyright Tektronix. All rights reserved. Licensed
MODEL NUMBER SRP-X700P
 BID SPECIFICATION FOR POWERED MIXER / SWITCHER MODEL NUMBER SRP-X700P INSTRUCTIONS: REMOVE THIS COVER PAGE AND ADD TO REQUESTS FOR QUOTATION AND PROPOSALS. THE OBJECTIVE OF THIS BID SPECIFICATION IS TO
Simple all-in-one design style with front stereo speakers and natural ventilation system
 LMD-B170 17-inch cost-effective, lightweight basic grade Full HD LCD monitor for versatile use Overview Lightweight and slim Full HD (1920 x 1080) LMD-B Series monitor with an excellent cost-performance
Quick Operation Guide of LTN7700/7600 Series NVR
 Quick Operation Guide of LTN7700/7600 Series NVR UD.6L0202B0042A02 Thank you for purchasing our product. If there is any question or request, please do not hesitate to contact dealer. This manual is applicable
J6 User Manual. User Manual. Multi-Screen Splicing Processor J6. Xi an NovaStar Tech Co., Ltd. Rev1.0.1 NS
 J6 User Manual User Manual Multi-Screen Splicing Processor J6 Rev1.0.1 NS160110162 Statement Dear users, You are welcome to use the J6, a multi-screen splicing processor of Xi'an NovaStar Tech Co., Ltd.
Video Disk Recorder DSR-DR1000A/DR1000AP
 Video Disk Recorder /DR1000AP 04 INTRODUCTION An Affordable, yet Powerful DVCAM Hard Disk Recorder, Offering a Further Enhanced Level of Operational Convenience and New Opportunities Since its introduction
Statement SmartLCT User s Manual Welcome to use the product from Xi an NovaStar Tech Co., Ltd. (hereinafter referred to as NovaStar ). It is our great
. It is our great") LED Display Configuration Software SmartLCT User s Manual Software Version: V3.0 Rev3.0.0 NS110100239 Statement SmartLCT User s Manual Welcome to use the product from Xi an NovaStar Tech Co., Ltd. (hereinafter
LED Display Configuration Software SmartLCT User s Manual Software Version: V3.0 Rev3.0.0 NS110100239 Statement SmartLCT User s Manual Welcome to use the product from Xi an NovaStar Tech Co., Ltd. (hereinafter
EEG A1452 SCTE-104 Inserter Frame Card
 EEG A1452 SCTE-104 Inserter Frame Card Product Manual EEG Enterprises, Inc. 586 Main Street Farmingdale, New York 11735 TEL: (516) 293-7472 FAX: (516) 293-7417 Copyright EEG Enterprises, Inc. 2017 All
Date of Test: 20th 24th October 2015
 APPENDIX 15/03 TEST RESULTS FOR AVER EVC130P Manufacturer: Model: AVer EVC130p Software Version: 00.01.08.62 Optional Features and Modifications: None Date of Test: 20th 24th October 2015 HD Camera CODEC
CI-218 / CI-303 / CI430
 CI-218 / CI-303 / CI430 Network Camera User Manual English AREC Inc. All Rights Reserved 2017. l www.arec.com All information contained in this document is Proprietary Table of Contents 1. Overview 1.1
AC335A. VGA-Video Ultimate Plus BLACK BOX Back Panel View. Remote Control. Side View MOUSE DC IN OVERLAY
 AC335A BLACK BOX 724-746-5500 VGA-Video Ultimate Plus Position OVERLAY MIX POWER FREEZE ZOOM NTSC/PAL SIZE GENLOCK POWER DC IN MOUSE MIC IN AUDIO OUT VGA IN/OUT (MAC) Remote Control Back Panel View RGB
* Apple and Macintosh are registered trademarks of Apple Computer, Inc. * Mac OS is a trademark of Apple Computer, Inc.
 Owner s Manual Thank you for your purchase of the PR-80 Realtime Video Presenter. 201b Before using this unit, carefully read the sections entitled: USING THE UNIT SAFELY (DV-7DL PRO Owner s Manual P.4),
Broadcast H.264 files live with ATEM Television Studio!
 ATEM Television Studio Broadcast H.264 files live with ATEM Television Studio! Introducing the world's first live production switcher that combines a professional switcher with a broadcast quality H.264
INSTALATION AND OPERATION MANUAL ABYSSAL OS Overlay Module Version 1.0.1
 INSTALATION AND OPERATION MANUAL ABYSSAL OS Overlay Module Version 1.0.1 Thank you for purchasing the Abyssal OS Overlay Module for your ROV. This instruction manual contains all the information you ll
System Interface Unit SIU-100/100T
 System Interface Unit /100T Since its introduction, the Digital Mixer has opened up an entirely new set of opportunities for affordable PA and sound-recording applications. Recognizing the ever-increasing
KM-H Series. Multi-format digital production switchers KM-H3000E KM-H3000U KM-H2500E KM-H2500U
 KM-H Series Multi-format digital production switchers KM-H3000E KM-H3000U KM-H2500E KM-H2500U KM-H3000 Multi-format digital production switcher Wipes/menu Memory/menu Memory access keys for quickly recalling
MSP 200PRO Quick Start
 MSP 200PRO Quick Start Touch Screen control Output a range of signal types Set and select from a range of common output formats Audio output test included Genlock Y&HS outputs Input live signals for preview
CERTIFIED TRAINING CURRICULUM. for the TriCaster 850 EXTREME, 850, 450 EXTREME and 450
 CERTIFIED TRAINING CURRICULUM for the TriCaster 850 EXTREME, 850, 450 EXTREME and 450 Certified Training Curriculum Video Notes for the TriCaster 850 EXTREME, 850, 450 EXTREME and 450 This is the Video
Installation and Operation Manual. ATEM Television Studio Switchers
 Installation and Operation Manual ATEM Television Studio Switchers March 08 English Welcome Thank you for purchasing an ATEM switcher for your live production work! If you re new to live production switchers,
IP LIVE PRODUCTION UNIT NXL-IP55 USO RESTRITO. OPERATION MANUAL 1st Edition (Revised 2) [English]
![IP LIVE PRODUCTION UNIT NXL-IP55 USO RESTRITO. OPERATION MANUAL 1st Edition (Revised 2) [English]](/thumbs/89/99059597.jpg "IP LIVE PRODUCTION UNIT NXL-IP55 USO RESTRITO. OPERATION MANUAL 1st Edition (Revised 2) [English]") IP LIVE PRODUCTIO UIT XL-IP55 USO RESTRITO OPERATIO MAUAL 1st Edition (Revised 2) [English] Table of Contents Overview... 3 Features... 3 Transmittable Signals... 3 Supported etworks... 3 System Configuration
IP LIVE PRODUCTIO UIT XL-IP55 USO RESTRITO OPERATIO MAUAL 1st Edition (Revised 2) [English] Table of Contents Overview... 3 Features... 3 Transmittable Signals... 3 Supported etworks... 3 System Configuration
Manual Version Ver 1.0
 The BG-3 & The BG-7 Multiple Test Pattern Generator with Field Programmable ID Option Manual Version Ver 1.0 BURST ELECTRONICS INC CORRALES, NM 87048 USA (505) 898-1455 VOICE (505) 890-8926 Tech Support
EVD-L04/100A1-960, EVD-L08/200A1-960 and. EVD-L16/400A1-960 DVRs. Quick Operation Guide
 EVD-L04/100A1-960, EVD-L08/200A1-960 and EVD-L16/400A1-960 DVRs Quick Operation Guide Thank you for purchasing our product. If there is any question or request, please do not hesitate to contact dealer.
TF5 / TF3 / TF1 DIGITAL MIXING CONSOLE. TF Editor User Guide
 TF5 / TF3 / TF1 DIGITAL MIXING CONSOLE EN Special notices Copyrights of the software and this document are the exclusive property of Yamaha Corporation. Copying or modifying the software or reproduction
CEDAR Series. To learn more about Ogden CEDAR series signal processing platform and modular products, please visit
 CEDAR Series The CEDAR platform has been designed to address the requirements of numerous signal processing modules. Easily-installed components simplify maintenance and upgrade. To learn more about Ogden
INSTALATION AND OPERATION MANUAL ABYSSAL OS Overlay Module Version 1.3
 INSTALATION AND OPERATION MANUAL ABYSSAL OS Overlay Module Version 1.3 Thank you for purchasing the Abyssal OS Overlay Module for your ROV. This instruction manual contains all the information you ll need
ATEM 1 M/E Production Studio 4K
 Product Technical Specifications ATEM 1 M/E Production Studio 4K The advanced ATEM 1 M/E Production Studio 4K model switches between SD, HD or Ultra HD video standards so you can connect a wide range of
DINOX&Digital&Video&Recorder&
 DINOX&Digital&Video&Recorder& & & & & & & & & & &&&Quick&Operation&Guide& UD.7L0X02B1228B01& Thank you for purchasing our product. If there is any question or request, please do not hesitate to contact
ATEM Television Studio
 ATEM Television Studio The new ATEM Television Studio The world s first live production switchers for broadcast, professional and AV users! ATEM Television Studio HD ATEM Television Studio Pro HD ATEM
DS-7200HVI/HFI-SH Series DVR Quick Operation Guide
 DS-7200HVI/HFI-SH Series DVR Quick Operation Guide UD.6L0202B0019A01 Thank you for purchasing our product. If there is any question or request, please do not hesitate to contact dealer. This manual is
Software Quick Manual
 XX177-24-00 Virtual Matrix Display Controller Quick Manual Vicon Industries Inc. does not warrant that the functions contained in this equipment will meet your requirements or that the operation will be
Model 1476-C SuperQuad HR
 Model 1476-C SuperQuad HR Installation and Operating Instructions Table of Contents Page Table of Content... 2 System Description... 3 Features... 3 Installation... 4 Internal Setups... 4 Connections...
AES-402 Automatic Digital Audio Switcher/DA/Digital to Analog Converter
 Broadcast Devices, Inc. AES-402 Automatic Digital Audio Switcher/DA/Digital to Analog Converter Technical Reference Manual Broadcast Devices, Inc. Tel. (914) 737-5032 Fax. (914) 736-6916 World Wide Web:
SPG700 Multiformat Reference Sync Generator Release Notes
 xx ZZZ SPG700 Multiformat Reference Sync Generator Release Notes This document supports firmware version 3.0. www.tek.com *P077123104* 077-1231-04 Copyright Tektronix. All rights reserved. Licensed software
ATEM 2 M/E Production Studio 4K
 Product Technical Specifications ATEM M/E Production Studio 4K The new ATEM M/E Production Studio 4K lets you produce broadcast quality live multi camera production in SD, HD or amazing Ultra HD! Featuring
Broadcast A/V Division M-LYNX-702 V.3. Dual 7 LCD Display. User Manual
 Broadcast A/V Division M-LYNX-702 V.3 Dual 7 LCD Display User Manual 1. Package Includes Table of Contents 1. Package Includes Table of Contents 01 02 One M-LYNX-702 Monitor One universal AC power adapter
AWS-750. Anycast Touch portable live content producer. Overview
 AWS-750 Anycast Touch portable live content producer Overview Ultra-portable and easy-to-use all-in-one live production solution The AWS-750 Anycast Touch is a compact, affordable, all-in-one live production
Welcome to W light up your life
 USER GUIDE 1 Welcome to light up your life Dear Vision Communications Customer, Thank you for choosing LightWave TV from Vision. LightWave TV will open a whole new world of TV entertainment for you and
May 2006 Edition /A. Getting Started Guide for the VSX Series Version 8.5
 May 2006 Edition 3725-21286-008/A Getting Started Guide for the VSX Series Version 8.5 GETTING STARTED GUIDE FOR THE VSX SERIES Trademark Information Polycom, the Polycom logo design, and ViewStation are
AC334A. VGA-Video Ultimate BLACK BOX Remote Control. Back Panel View. Side View MOUSE DC IN BLACK BOX ZOOM/FREEZE POWER
 AC334A BLACK BOX 724-746-5500 VGA-Video Ultimate BLACK BOX 724-746-5500 Zoom Position PAL ZOOM/FREEZE POWER FREEZE ZOOM NTSC/PAL SIZE RESET POWER Size Power Remote Control DC IN MOUSE MIC IN AUDIO OUT
Model 7600 HD/SD Embedder/ Disembedder Data Pack
 Model 7600 HD/SD Embedder/ Disembedder Data Pack E NSEMBLE D E S I G N S Revision 2.1 SW v2.0.1 This data pack provides detailed installation, configuration and operation information for the 7600 HD/SD
LD-V4300D DUAL STANDARD PLAYER. Industrial LaserDisc TM Player
 LD-V4300D DUAL STANDARD PLAYER Industrial LaserDisc TM Player Designed for Exceptional Versatility and Convenience Pioneer designed the LD-V4300D to make it easier than ever to use LaserDiscs for a broad
UTAH 100/UDS Universal Distribution System
 UTAH 100/UDS Universal Distribution System The UTAH-100/UDS is a revolutionary approach to signal distribution, combining the flexibility of a multi-rate digital routing switcher with the economy of simple
Models 5360 and 5365 Four Channel Analog to Digital Video Converters and Embedders Data Pack
 Models 5360 and 5365 Four Channel Analog to Digital Video Converters and Embedders Data Pack E NSEMBLE D E S I G N S Revision 1.3 SW v2.2.1 This data pack provides detailed installation, configuration
VXF17 QUICKSTART GUIDE. 17" Full HD 3G-SDI/HDMI Rackmount Studio and Field Monitor
 VXF7 QUICKSTART GUIDE 7" Full HD 3G-SDI/HDMI Rackmount Studio and Field Monitor What s Included x VXF7 Monitor x AC Adapter x Table Stand (installed) x Rack Ears (installed) CHECKED BY www.ikancorp.com
Model 7130 HD Downconverter and Distribution Amplifier Data Pack
 Model 7130 HD Downconverter and Distribution Amplifier Data Pack E NSEMBLE D E S I G N S Revision 1.0 SW v1.0 www.ensembledesigns.com 7130-1 Contents MODULE OVERVIEW 3 Audio Handling 3 Control 3 Metadata
OPERATION MANUAL. USF-1013DEMUX Digital Audio Demultiplexer. 2 nd Edition. Software Version Higher
 OPERATION MANUAL USF-1013DEMUX Digital Audio Demultiplexer 2 nd Edition Software Version 2.00 - Higher Precautions Important Safety Warnings [Power] Stop [Circuitry Access] Do not place or drop heavy or
User Manual. Multi-Screen Splicing Processor J6
 User Manual Multi-Screen Splicing Processor J6 Rev1.0.0 NS160100147 Statement Dear users, Welcome to use the J6, a multi-screen splicing processor. This manual is intended to help you to understand and
TELEVISION. Star Plans. Interactive Guide and DVR (Digital Video Recorder) Manual ARVIG arvig.net
 Manual ARVIG arvig.net") TELEVISION Star Plans Interactive Guide and DVR (Digital Video Recorder) Manual 888.99.ARVIG arvig.net TABLE OF CONTENTS DVR Remote Control Button Features...3 Arvig Digital TV i-guide Quick Reference
TELEVISION Star Plans Interactive Guide and DVR (Digital Video Recorder) Manual 888.99.ARVIG arvig.net TABLE OF CONTENTS DVR Remote Control Button Features...3 Arvig Digital TV i-guide Quick Reference
First Time Setup Guide
 First Time Setup Guide www.exhibio.com 1.877.EXHIBIO (394.4246) Exhibio ST-200 Components & Accessories Standing Mount TV Tuner with Input Cable (USB 2.0 only) VESA Mount Over-the-Air Antenna Power Adapter
SONy BID SPECIFICATION FOR POWERED MIXER MODEL NUMBER SRP-X500P
 SONy BID SPECIFICATION FOR POWERED MIXER MODEL NUMBER SRP-X500P INSTRUCTIONS: REMOVE THIS COVER PAGE AND ADD TO REQUESTS FOR QUOTATION AND PROPOSALS. THE OBJECTIVE OF THIS BID SPECIFICATION IS TO ASSIST
Broadcast A / V Division M-LYNX-702 V.3. Dual 7 LCD Display. User Manual
 Broadcast A / V Division M-LYNX-702 V.3 Dual 7 LCD Display User Manual Table of Contents Table of Contents 1. Package Includes 2. Product Description 2.1 Front Panel 2.2 Rear Panel Connections 3. On-Screen
S0 Radio Broadcasting Mixer. June catalogue. Manufacturers of audio & video products for radio & TV broadcasters
 S0 Radio Broadcasting Mixer June 2012 catalogue Manufacturers of audio & video products for radio & TV broadcasters S0 Radio Broadcasting Mixer A simple radio mixer for novice and professional users The
ATEM Production Studio 4K
 Technical Specifications Description ATEM Production Studio 4K ATEM Production Studio 4K lets you connect up to 8 SD, HD or Ultra HD 4K video cameras, disk recorders and computers to do true broadcast
Ultra Whole Home DVR. User Guide
 Ultra Whole Home DVR User Guide Contents Welcome Horizontal Menu Options... 2 The Main Menu Layout... 3 Using Your Remote...4 Shortcut Buttons...4 Menu Navigation...4 Controlling Live TV... 5 TV Channels
About Final Cut Pro Includes installation instructions and information on new features
 apple About Final Cut Pro 1.2.5 Includes installation instructions and information on new features This document includes installation instructions and describes features and enhancements of Final Cut
C8000. sync interface. External sync auto format sensing : AES, Word Clock, Video Reference
 features Standard sync module for a frame Internal sync @ 44.1 / 48 / 88.2 / 96kHz External sync auto format sensing : AES, Word Clock, Video Reference Video Reference : Black Burst (NTSC or PAL) Composite
OPERATING GUIDE. HIGHlite 660 series. High Brightness Digital Video Projector 16:9 widescreen display. Rev A June A
 OPERATING GUIDE HIGHlite 660 series High Brightness Digital Video Projector 16:9 widescreen display 111-9714A Digital Projection HIGHlite 660 series CONTENTS Operating Guide CONTENTS About this Guide...
ATEM 2 M/E Production Studio 4K
 Product Technical Specifications ATEM M/E Production Studio 4K The new ATEM M/E Production Studio 4K lets you produce broadcast quality live multi camera production in SD, HD or amazing Ultra HD! Featuring
Operating Instructions
 Broadcast A/V Division Model No. M-LYNX-702W Dual 7 High Resolution Rack Mount Display with Waveform Operating Instructions V.1.0 Table of Contents 1. PRODUCT DESCRIPTION... 3 2. MENU SETTING... 6 3. SPECIFICATIONS...
Model 5240 Digital to Analog Key Converter Data Pack
 Model 5240 Digital to Analog Key Converter Data Pack E NSEMBLE D E S I G N S Revision 2.1 SW v2.0 This data pack provides detailed installation, configuration and operation information for the 5240 Digital
AVTuner PVR Quick Installation Guide
 AVTuner PVR Quick Installation Guide Introducing the AVTuner PVR The AVTuner PVR allows you to watch, record, pause live TV and capture high resolution video on your computer. Features and Benefits Up
ATEM 2 M/E Broadcast Studio 4K
 Product Technical Specifications ATEM 2 M/E Broadcast Studio K Advanced technology high frame rate Ultra HD live production switcher includes 20 x 12G-SDI re-synchronized inputs for all formats from 720p,
Pacific C-A Feature Highlights
 Pacific C-A Feature Highlights All-in-one, multi-format signal converter with scaler, up/down converting extensive range of graphics and video signals to designated signal format. Automatic sensing of
VSG-401. Compact Video and Audio Signal Generator FEATURES
 Compact Video and Audio Signal Generator The new Videotek is a ½RU-wide, dual-link, 3G/HD/SD signal and sync generator. Part of the Videotek Compact Monitor Series, the unit is small in size and light
Horizontal Menu Options... 2 Main Menu Layout... 3 Using Your Remote... 4 Shortcut Buttons... 4 Menu Navigation... 4 Controlling Live TV...
 Maestro User Guide Contents Welcome Horizontal Menu Options... 2 Main Menu Layout... 3 Using Your Remote... 4 Shortcut Buttons... 4 Menu Navigation... 4 Controlling Live TV... 5 TV Channels TV Channels
Hardware Setup. If you have any further questions after checking this document, please contact
 Hardware Setup If you have any further questions after checking this document, please contact support@cognisens.com Hardware Setup Getting Started: NeuroTracker Pro WHAT TO BUY SETTING UP YOUR 3D TV SETTING
Pro L1500UH/L1500UHNL/L1505UH/ L1505UHNL/L1750UNL/L1755UNL/L1715SNL
 Pro L1500UH/L1500UHNL/L1505UH/ L1505UHNL/L1750UNL/L1755UNL/L1715SNL Quick Reference This Quick Reference card gives brief instructions on connecting your projector and using common features. For details,
Element 78 MPE-200. by Summit Audio. Guide To Operations. for software version 1.23
 Element 78 MPE-200 by Summit Audio Guide To Operations for software version 1.23 TABLE OF CONTENTS IMPORTANT SAFETY AND GROUNDING INSTRUCTIONS COVER 1. UNPACKING AND CONNECTING...3 AUDIO CONNECTIONS...4
Getting Started Guide for the V Series
 product pic here Getting Started Guide for the V Series Version 8.7 July 2007 Edition 3725-24476-002/A Trademark Information Polycom and the Polycom logo design are registered trademarks of Polycom, Inc.,
Projector Management Application Version 7.00 Instruction Guide
 Projector Management Application Version 7.00 Instruction Guide Contents 1 INTRODUCTION... 4 1.1 OUTLINE... 4 1.2 SYSTEM... 4 2 INSTALLATION... 5 2.1 SYSTEM REQUIREMENTS... 5 2.2 PROJECTOR MANAGEMENT APPLICATION
AX20. Atlas 19.5" 3G-SDI/HDMI Field and Studio Monitor with 3D LUTs & Scopes. Quick Start Guide. What s Included CHECKED BY
 AX20 Quick Start Guide Atlas 19.5" 3G-SDI/HDMI Field and Studio Monitor with 3D LUTs & Scopes What s Included 1 x Atlas 19.5" Monitor 1 x AC Adapter 1 x Sunhood CHECKED BY AX20 FRONT 1920 x 1080 19.5 inch
Getting Started Guide for the V Series
 product pic here Getting Started Guide for the V Series Version 9.0.6 March 2010 Edition 3725-24476-003/A Trademark Information POLYCOM, the Polycom Triangles logo and the names and marks associated with
February 2007 Edition /A. Getting Started Guide for the VSX Series Version 8.5.3
 February 2007 Edition 3725-21286-009/A Getting Started Guide for the VSX Series Version 8.5.3 GETTING STARTED GUIDE FOR THE VSX SERIES Trademark Information Polycom, the Polycom logo design, and ViewStation
Operating Instructions
 Marshall Electronics Broadcast A/V Division Model No. VSW-2200 4-Input Seamless SDI A/V Switcher Operating Instructions Table of Contents 1. Overview... 2. Features.... Package Contents... 4. Specifications...
iii Table of Contents
 i iii Table of Contents Display Setup Tutorial....................... 1 Launching Catalyst Control Center 1 The Catalyst Control Center Wizard 2 Enabling a second display 3 Enabling A Standard TV 7 Setting