QUICK START GUIDE 1080P HIGH DEFINITION INTERVIEW RECORDING SYSTEM
|
|
|
- Lester Bell
- 5 years ago
- Views:
Transcription

1 QUICK START GUIDE LEGALTEK LXMONARCH (LXM) 1080P HIGH DEFINITION INTERVIEW RECORDING SYSTEM Simple Button Control Single or Dual Cameras Local/Network H.264 File Capture Removable Memory Time/Date Watermark Create Multiple DVDs Rapidly Your High Definition Interview Recording Solution
2 2
3 Table of Contents Introduction Room Configuration Guide Hardware Overview Component Interconnection Diagrams Installation: Hardware Interconnection Camera Installation 16 Microphone Installation. 17 System Initialize: Initial Adjustments Settings Recording System Errors Using the Reset Button 21 File Viewing File Conversion and DVD Creation Support Downloads. 23 3
4 About Us Legaltek is a unique group of engineers, technical professionals, established equipment providers and manufacturers, that create products and offer services based on the needs and requirements of our core customers, government, law enforcement and the legal community. Through research, innovation and purpose driven design, Legaltek merges future-forward technology with accepted standards and methodology, to develop specialty equipment that is reasonably priced and simple to use. Legaltek has become an established technical resource by providing assistance with equipment selection, system design and audio/video laboratory services. Welcome to the leading edge of law enforcement technology. Introduction The LX Monarch (LXM) turnkey, hardware based high definition recording solution provides the most reliable and secure way for law enforcement to collect and archive custodial interviews. By targeting both removable non-volatile solidstate memory and a network storage location simultaneously, the possibility of critical data loss due to system malfunction or catastrophic hard drive failure is virtually eliminated. Intuitive and easy to use, the LXM requires little or no training or support to operate. Simple button controls initiate recording. Officers are free to focus on the purpose of the interview the gathering and correlation of information to develop a criminal case for prosecution. LXM records high definition video in the universally compatible H.264/MPEG-4 format which equals up to 50% smaller file size. Simple drag and drop tools make burning multiple DVDs as easy as Legaltek equipment can be easily self-installed and is essentially maintenance free. LX systems are shipped as a complete kit, pre-programmed at the factory for optimum performance as a stand-alone recorder. Should you choose to connect the recorder to a network or perform a software update, please defer to a qualified IT specialist. This user guide will familiarize you with the system components, their interconnection and the initial system set-up. Please refer to the resource section of this guide for technical support, access to software, comprehensive manuals and advanced feature optimization. 4
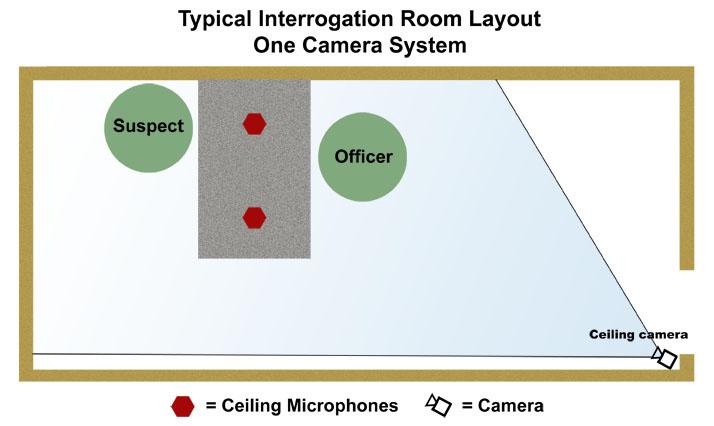
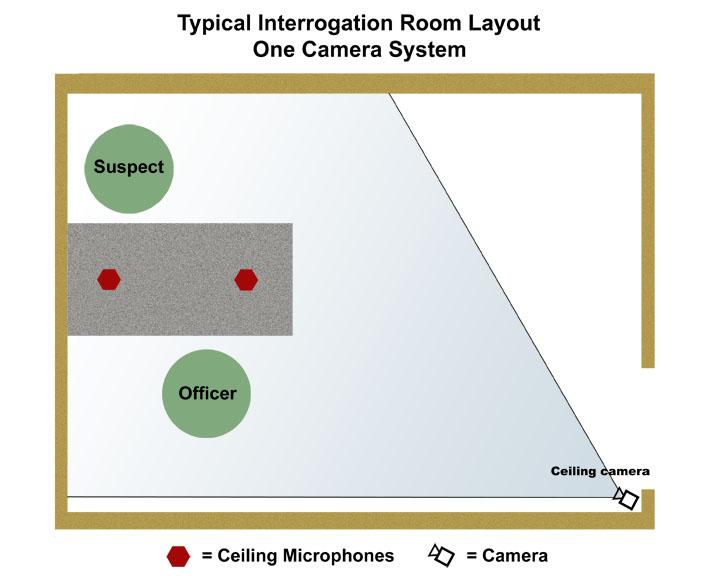
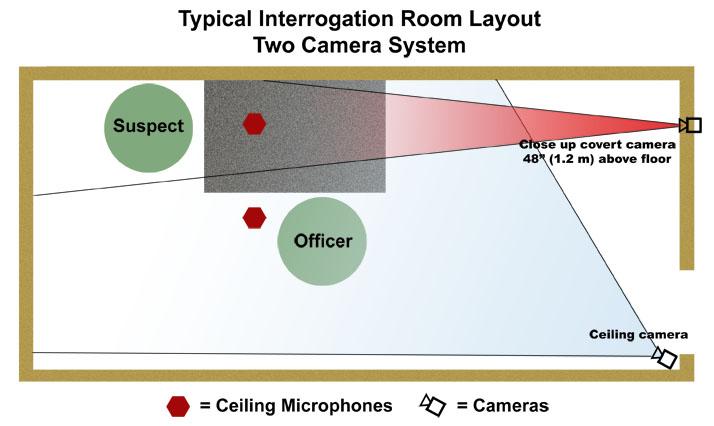
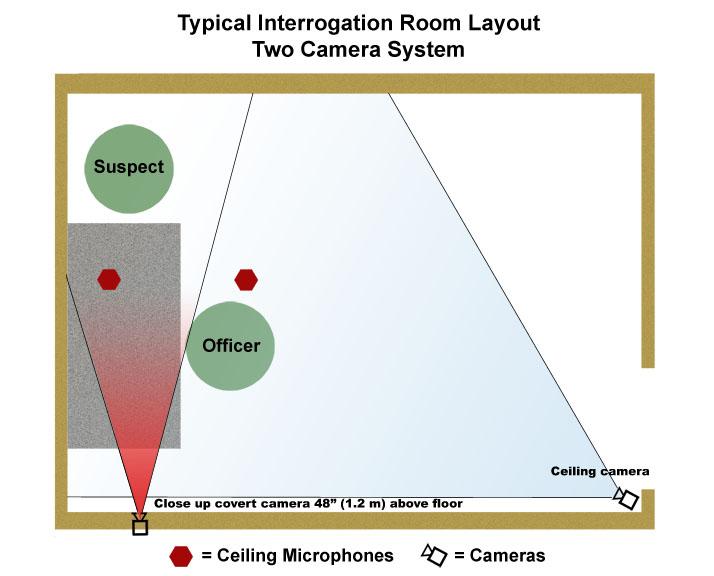
5 Room Configuration Guide 5
6 6
")
 (Rear View)")
7 Hardware Overview LXMonarch (HDX) Hardware (Front View) (Rear View) 7
 (Rear View)")
8 LXMonarch (LCS) Hardware (Front View) (Rear View) 8
 (Rear")
9 LXM Master Clock and Time/Date Inserter (Front View) (Rear View) 9


10 HD High Definition LED Monitor Bose Powered Speaker System HDMI Cable Sony Studio Headphones 10


11 SDI to HDMI Micro Converter BNC/DC Camera Installation Cable BNC Interconnect Cable UPS Power Supply 11


12 PZM Microphone Balanced XLR Microphone Cables Stereo Microphone Preamplifier/Processor 1/8 RCA Stereo Cable 12
13 13
14 14
15 Installation This Quick Start Guide is intended assist you with the initial installation and setup of your LXMonarch HD recording system. Comprehensive user guides, software downloads, development tools and product registration are available directly from the factory. This material can be accessed through links provided in the resource section of this guide. Please review the Room Configuration Guide on pages 5 and 6 will assist with camera and microphone placement, the Hardware Overview on pages 7 thru 12 for component and cable identification and the Component Interface Diagrams on pages 13 and 14 for system component interconnection. Hardware Interconnection Position the equipment on a flat surface in a temperature controlled environment, adjacent to the interview room. Place the powered speakers on each side of the LED monitor, with the recorder positioned centrally in the foreground. The master clock can be placed on top of the SDI time/date inserter to the side of the system, while the audio processor and UPS behind and out of the way. System Power: Connect the supplied multi-outlet power strip to a battery backup outlet on the UPS, and the UPS to a 120V AC mains outlet. The recorder, master clock, time/date inserter, (LCS users: SDI/HDMI Converter), audio processor and camera power supplies should be connected to the power strip and battery backup outlets, while the LED monitor and speakers may be connected to the surge protected outlets. In the event of a significant power interruption, all critical components will continue to function until recording is safely ended. Component Interconnect: HDMI: Connect an HDMI cable from HDMI OUT on the recorder to HDMI IN on the LX LED monitor. (Monarch LCS users: Connect a second HDMI cable from the SDI/HDMI Micro Converter to HDMI IN B on the recorder). BNC: Connect the 3 BNC cable from the ESE OUTPUT on the Master Clock to the ESE INPUT on the SDI Time Code Inserter. Connect the 6 BNC cable from the SDI OUTPUT on the SDI Time Code Inserter to SDI IN on the recorder (Monarch LCS users: to SDI IN A). AUDIO: Connect the 1/8 RCA stereo cable from RCA L/R Line Out on the audio processor to AUDIO IN on the recorder. Connect the 1/8 stereo cable (supplied with the powered speakers) from AUDIO OUT on the recorder to FROM COMPUTER on the rear of the right speaker. Connect the attached 1/8 stereo cable from the left speaker to the TO LEFT SPEAKER jack on the right speaker. 15

16 Camera Installation It is important that cameras be adjusted and positioned correctly before permanent installation. To simplify this step, first route the camera BNC/DC Cable from the equipment area, through the wall and across the ceiling to the approximate camera mounting location in the interview room. Office IT personnel will be able to assist with this step. The HD camera module will have a group of three connectors as illustrated below. Legaltek Fire Sensor ceiling enclosures may feature two cameras. In this configuration there will be two groups of connectors, one for each image sensor. Connect the BNC video connector from the camera installation cable to the silver Camera HD Video Output connector. (The yellow BNC connector provides a standard definition composite video output signal for use with a field installation monitor). Insert the 2.1mm power plug from the camera installation cable into the red (sometimes black) Camera DC IN connector. In the equipment room, connect the BNC video connector from the camera installation cable to the SDI INPUT jack on the rear of the SDI Time Code Inserter. ** If you are installing the second camera for the Monarch LCS system, connect the BNC video cable to the SDI IN jack on the SDI to HDMI Micro Converter. Connect the camera power adapter to a battery backup output of the UPS and the adapter s 2.1mm power plug into the female power connector on the camera installation cable. Temporarily position the camera for the desired angle of view. This can be achieved either by connecting a composite video field installation monitor to the camera s yellow BNC pigtail, or by viewing the camera s HD video feed on the LX LCD monitor after the system has been powered up. Once positioned, mark the screw holes on the camera mounting plate and secure the camera with the provided mounting hardware. Legaltek specialty cameras are factory adjusted for optimal performance under normal lighting conditions. However, they may be adjusted electronically via the rear joystick control to accommodate various environments. Please refer to the guide provided with each camera. Only a qualified technician should perform these adjustments. 16

17 Microphone Installation First, route the Balanced XLR Microphone Cables from the equipment area, through the wall and across the ceiling to the approximate microphone mounting location in the interview room. ** Make sure the female connectors are above the ceiling and the male ends at the equipment location. Again, office IT personnel will be able to assist with this step. Mount the PZM Microphone modules by carefully drilling a ¾ hole in the tile or plaster, taking care not to damage the immediate surrounding surface. With the supplied Allen wrench, loosen the setscrew on the machined retaining ring and carefully slide it off. Place the microphone body through the mounting hole, slide on the retaining ring above the surface and secure the setscrew. Connect the female XLR Microphone connector to the microphone then replace the ceiling tiles. At the equipment location, connect the male XLR Microphone Cable to the DUAL MICROPHONE PREAMPLIFIER LEFT MIC INPUT and RIGHT MIC INPUT as illustrated below. Depress the PHANTOM button on the rear panel which provides power to the active electronics in the microphone elements. On the front panel depress the COMPRESSOR button on to enable the audio processing circuitry. This feature enhances the intelligibility of soft spoken subjects, prevents distortion from loud speech and makes the recorder relatively insensitive to mechanical vibrations such as table and floor thumps and clothing noise. Initially adjust the Left and Right Level controls to the position in the illustration. 17
18 System Initialize LX Monarch recording systems are designed for continuous duty in temperature controlled environments. The LED monitor and Bose speaker system may be powered off when not in use. Depress the power buttons on the UPS, the LED monitor and the Bose speakers. Monarch HDX: Once the recorder boots up, all front panel LEDs will be off except: Power (Green), Input Select SDI (Green), Encoder 1 (Solid Red) and SD CARD (Solid Red). Monarch LCS: Once the recorder boots up, all front panel LEDs will be off except: Power (Green), Input Selection A (Flashing Green), Encode (Solid Blue) and SD Card (Solid Red) Initial Adjustments Audio: Power up the Bose speaker system and set the volume midway. With reference speech in the interview room, adjust the Microphone Preamplifier Input Level controls clockwise until the desired input volume is reached. Output Level indicators may begin to flash Red on voice peaks. Adjust the speaker volume control to a comfortable listening level. Headphones may be connected to the jack on the right speaker for private or critical listening. Video: Position the camera by connecting a composite video field installation monitor to the camera s yellow BNC pigtail, or by viewing the camera s HD video feed on the system s LCD monitor. Once positioned, secure the camera with the provided mounting hardware. SDI Time Code Inserter: The SDI Time Code Inserter has been adjusted by the factory to provide a discreet transparent white, time/date reference overlay in the lower left corner of the recorded image. Should you wish to adjust the format, position or size of the display please refer to the comprehensive factory manual provided with the inserter. Master Clock: Use the momentary toggle switch on the rear panel of the Master Clock to set the system reference time and date. Simply toggle the switch up to select the segment of the time or date to be programmed, then toggle the switch down to adjust the setting. 18
19 Settings LX Monarch recorders are pre-configured at the factory for optimum local standalone performance. HDX devices are factory programmed to record full screen, while the dual camera LCS is programmed for side-by-side recording. You may customize device settings with a computer or via the office LAN with Command Center. Command Center is web-based application that allows you to configure Monarch settings, and control streaming and recording sessions. Links to these utilities can be found in the resource section of this guide. *** Only a qualified IT specialist should institute these operations. Internal Clock: The internal clock has been factory programmed for the user specified time zone and is protected by a battery back up. Recorded files are identified by file name, the start date/time of the recording session and a three-digit number that increments when file segmentation occurs. For example, a recording that is segmented into three (3) files will result in the following: - File 1 - [ _ ]-000.mov/mp4 - File 1 - [ _ ]-001.mov/mp4 - File 1 - [ _ ]-002.mov/mp4 The date/time in the filename only changes when you manually stop a recording and then start a new one, in which case it will be the start date/time of the first file in the new sequence. Recording File Size and Duration: The target video data rate has been set at the factory for 3500kb/sec or about 2GB/hr. Recording is set to the maximum file duration of 4 hours and 50 minutes. The recording will automatically stop when the duration limit is reached and a new file will be simultaneously created. Recording will continue until the SD media has reached capacity. Recording Media: LX Monarch is set by the factory to target the SD card for local recording. Because of its superior write speed, Class 10 media is recommended. *** Media must be formatted NTFS. The included 32GB SD card will yield about 16 hours of recording capacity at factory configuration. Please refer to the Recording File Sizes and Duration chart in the product manual for the approximate correlation of data rate, file size and recording duration. 19
20 Recording LX Monarch HDX: To initiate local recording, press the ENCD 1 button. Both the ENCD 1 and SD CARD red LEDs will begin to flash, indicating that recording is in progress. To end the recording, press the ENCD 1 button again. Both the ENCD 1 and SD CARD LED s will stop flashing and return to continuous red, indicating that recording has terminated and files have been finalized. LX Monarch LCS: To initiate local recording, press the ENCD button. The ENCD blue LED will begin to flash. The SD CARD red LED will also begin to flash, indicating that recording is in progress. To end the recording, press the ENCD 1 button again. The ENCD 1 LED will return to continuous blue, while the SD CARD LED will return to continuous red. Remarks When a recording is ended, it may take a few seconds to finalize. The USB/SD card LED will continue to flash during the finalization process. To avoid corrupted video files, do not remove the USB device or SD card when its LED is flashing. When local memory reaches capacity, an error will be indicated. System Errors The flashing yellow LED indicates that a device error has occurred. The error may indicate the loss of input video signal; local memory has reached capacity or is absent, there has been a power or streaming interruption, device temperature is beyond operational range or a physical disconnection of the network cable (when applicable). *** An error will not be reported if the audio input is lost. If this occurs, the stream and/or recording will continue, but will not contain audio. Once the issue has been resolved, the recorder may be reset locally by instituting a manual reboot or via the Command Center if the recorder is connected to the network. 20
21 Using the Reset Button To reboot the Monarch, use a straightened paper clip or similar device to momentarily depress the tiny RESET pin on the front panel for <1 second. Wait about 2 minutes for the recorder to reboot. *** Note that the RESET logo is the circular one with the arrow. The Reset pinhole is just above it. In addition to the typical reasons for rebooting the Monarch (fixing errors or other issues), a reboot also saves the Monarch s IP address and status to a connected USB device (USB port 2) as a text file. This is a convenient way to find the Monarch s IP address. Remarks The Reset button is recessed in order to prevent unintended activation. Use a straightened paper clip, or similar device, to press the Reset button. *** Note that the RESET logo is the circular one with the arrow. The Reset pinhole is just above it. A power cycle of the Monarch LCS also performs a simple reboot, not a reset to factory defaults. When using the Reset button, any saved profiles for streaming and recording are maintained, and all logged errors are cleared. The device will be finished rebooting when the flashing yellow LED turns off. Holding the Reset button pressed for more than five seconds will reset the device to factory defaults. A reset allows you to switch to a Static IP or load preconfigured Monarch settings from a configuration file on a USB device connected to USB port 2. For information on how to view and clear errors using the Command Center, please refer to the operation manual accessible in the Support section of this Quick Start Guide. 21
22 File Viewing Files may be viewed locally by using VLC Media Player. VLC is a free and open source cross-platform multimedia player and framework that plays most multimedia files as well as DVDs, Audio CDs, VCDs, and various streaming protocols. To download VLC Media Player go to the following link: File Conversion and DVD Creation LXM H.264/MPEG-4 files can be converted to any format and copied to DVD with the included Video Copy and Convert software. Quickly convert video for playback on devices and tablets, and copy files to DVD in 3 easy steps. Install the software and follow the menu paths. Support Questions regarding equipment installation, initial set-up and basic operation, please contact LEGALTEK directly at: support@legalteklx.com Questions regarding third-party Video Copy and Convert or the Burning Studio software should be directed to their respective technical support resources. Questions regarding network connection, the Command Center, firmware, documentation, comprehensive manuals and utilities go to: LXMonarch HDX users, please click on the Monarch HDX link. LXMonarch LCS users, please click on the Monarch LCS link. Here you will be able to download the most recent device utilities software, which include the Command Center and the File Consolidator which will seamlessly join file segments with frame accuracy. The Documentation link will direct you to the product Download Information. 22
23 Downloads Select your product Monarch HDX or Monarch LCS and click next. Then select your operating system and click next. The Download Information page will appear. Here you will find links to: Matrox Monarch Device Setup Sheet Provides instructions on how to perform the initial setup of your Monarch device. Matrox Monarch HDX/LCS Dev Tools Reference Guide Describes how to use Monarch HDX Dev Tools to integrate Monarch HDX into your own application or environment, while providing a unified, consistent, and branded user experience. The Dev Tools include automatic configuration tools and the Monarch HDX Control API. Matrox Monarch HDX/LCS Release Notes Provides important last-minute information specific to Monarch HD firmware version Matrox Monarch HDX/LCS User Guide Explains how to connect, use, and configure Monarch HDX. 23
24 LEGALTEKHD 5753 E. Santa Ana Canyon Rd., Suite G540 Anaheim, CA USA Legalteklx.com 24
Model#: IN-MDRI3MF. Hardware User Manual. 3MP Indoor Mini Dome with Basic WDR, Fixed lens. (PoE) Ver. 2013/02/04
 Ver. 2013/02/04") Model#: IN-MDRI3MF 3MP Indoor Mini Dome with Basic WDR, Fixed lens Hardware User Manual (PoE) Ver. 2013/02/04 Table of Contents 0. Precautions 3 1. Introduction 4 Package Contents... 4 Features and Benefits...
Model#: IN-MDRI3MF 3MP Indoor Mini Dome with Basic WDR, Fixed lens Hardware User Manual (PoE) Ver. 2013/02/04 Table of Contents 0. Precautions 3 1. Introduction 4 Package Contents... 4 Features and Benefits...
VXF7 QUICKSTART GUIDE. 7" 4K Full HD HDMI/3G-SDI On-Camera Monitor
 VXF7 QUICKSTART GUIDE 7" K Full HD HDMI/G-SDI On-Camera Monitor What s Included x VXF7 Monitor x AC Adapter x Camera Shoe Mount (SM-0) x Screen Cleaning Wipe x Screen Protector x Sunhood x Canon E6 Battery
Model#: IN-DI2MIRF 2MP Indoor Dome with True Day/Night, IR, Basic WDR, Fixed lens
 Model#: IN-DI2MIRF 2MP Indoor Dome with True Day/Night, IR, Basic WDR, Fixed lens Hardware User Manual (PoE) Ver.2013/01/17 Table of Contents 0. Precautions 3 1. Introduction 4 Package Contents...4 Features
Video VBOX Lite RLVBVD10LT2. Powerful VBOX data logging and video technology in a user-friendly, affordable product. What can Video VBOX Lite do?
 Powerful VBOX data logging and video technology in a user-friendly, affordable product Video VBOX Lite is a one box solution, incorporating a solid state video recorder, a VBOX 10 Hz GPS data logger and
TeamWork Kits Installation Guide
 TX 0 RX COM +5V APARATUS US TeamWork Kits Installation Guide TeamWork 400 and TeamWork 600 Kits The TeamWork 400 and TeamWork 600 kits consist of an HDMI switcher, system controller, Cable Cubby, and cables
Table of Contents FCC COMPLIANCE STATEMENT... 4 WARNINGS AND PRECAUTIONS... 4 WARRANTY... 5 STANDARD WARRANTY... 5 TWO YEAR WARRANTY... 5 DISPOSAL...
 1 Table of Contents FCC COMPLIANCE STATEMENT... 4 WARNINGS AND PRECAUTIONS... 4 WARRANTY... 5 STANDARD WARRANTY... 5 TWO YEAR WARRANTY... 5 DISPOSAL... 6 1. INTRODUCTION... 7 FEATURES... 7 2. CONNECTIONS
HD Video Capture Pro
 HD Video Capture Pro Quick Start Guide Thanks for purchasing ezcap291 HD Video Capture Pro. The following guides you how to set up. Hope this device will bring you nice digital experience. With this ezcap291
C8000. switch over & ducking
 features Automatic or manual Switch Over or Fail Over in case of input level loss. Ducking of a main stereo or surround sound signal by a line level microphone or by a pre recorded announcement / ad input.
Marshall Electronics. Pro A/V Communications VMV-402-SH. 3G/HD/SD-SDI Quad-viewer/Switcher with Audio Meter Display. User Manual.
 Marshall Electronics Pro A/V Communications VMV-402-SH 3G/HD/SD-SDI Quad-viewer/Switcher with Audio Meter Display User Manual Table of Contents 1. Introduction... 3 2. Features... 3 3. Package Contents...
S7H-DK S7H 7" High Bright Monitor Deluxe Kit
 S7H-DK S7H 7" High Bright Monitor Deluxe Kit QUICKSTART GUIDE What s Included 1 x S7H Monitor 1 x Camera Shoe Mount 1 x Neoprene Sleeve 1 x Mini-XLR to P-TAP Cable 2 x DV Battery Plate 1 x DV Battery 1
VIEW Lite DJ100 Digital AV Decoder JPEG2000 Based Audio/Video Decoder. Quick-Start Guide
 VIEW Lite DJ100 Digital AV Decoder JPEG2000 Based Audio/Video Decoder Quick-Start Guide Table of Contents PRODUCT OVERVIEW... 1 VIEW Lite AV over IP Streaming System... 1 Device Application... 1 ENCODERS
Video Server SED-2100R/S. Quick Installation Guide
 Video Server SED-2100R/S Quick Installation Guide Feb.10,2006 1 1 Getting Started 1.1 PACKAGE CONTENTS SED-2100 Warranty Card Software CD Hook up & Screws Terminal Blocks for Power & DI/O Power Adaptor
P-2 Installing the monitor (continued) Carry out as necessary
 Carry out as necessary") P-2 Installing the monitor (continued) Carry out as necessary Using the monitor without the bezel MDT552S satisfies the UL requirements as long as it is used with the bezel attached. When using the monitor
P-2 Installing the monitor (continued) Carry out as necessary Using the monitor without the bezel MDT552S satisfies the UL requirements as long as it is used with the bezel attached. When using the monitor
Quick Start Guide for Cisco Digital Media Encoder 2200
 Quick Start Guide for Cisco Digital Media Encoder 2200 Revised:, November 10, 2008 There are five requirements for setting up Cisco Digital Media Encoder 2200 for streaming or capturing video, as follows:
Model Colorado Ultra Wide Bandwidth HDTV Matrix Switch
 HDTV Supply, Inc www.hdtvsupply.com Model Colorado Ultra Wide Bandwidth HDTV Matrix Switch Overview: This product is a full featured video & audio matrix switch. It is most commonly used to independently
USER GUIDE FOR NETmc MARINE X-Ops
 USER GUIDE FOR NETmc MARINE X-Ops Rev.2.2 Firmware v.1.2.8 X-Ops, 1.2.9 Pipeline September 2013 NETmc Marine X-Ops Manual-Rev.2.2 September 2013 1 of 17 Contents 1. Introduction... 3 1.1 Multi-channel
Operation Guide Version 1.0, December 2015
 Operation Guide Version 1.0, December 2015 Document Revision History Revision Date Description v1.0 January 8, 2016 Initial release of COLR Operation Manual, based on firmware version 1.0.1 CONTENTS Contents...
Assembling and Mounting the Presentation Display, Speakers, Speaker Screens, and Table Door
 CHAPTER 8 Assembling and Mounting the Presentation Display, Speakers, Speaker Screens, and Table Door July 13, 2012, This document provides you with the procedures you perform to assemble and mount the
7 3G -SDI Monitor w/ Signal Conversion QUICKSTART GUIDE
 What s included x Monitor x AC Adapter x Camera Shoe Mount (SM-0) x DV Battery Plate (Check one) Checked by DV BATTERY PLATES -: Canon 900, Sony L, Panasonic D Battery Plates VX7 c-: Canon E6, Nikon EL,
Operation Guide Version 2.0, December 2016
 Operation Guide Version 2.0, December 2016 Document Revision History Revision Date Description v1.0 January 8, 2016 Initial release of COLR Operation Manual, based on firmware version 1.0.1 CONTENTS Contents...
Contents. Disclaimer of Product and Services
 Instruction Manual Contents FCC COMPLIANCE STATEMENT... 3 WARNINGS AND PRECAUTIONS... 3 WARRANTY... 4 STANDARD WARRANTY... 4 THREE YEAR WARRANTY... 4 DISPOSAL... 4 INTRODUCTION... 5 FEATURES... 5 GO KMU-100
Quick Operation Guide of LTN7700/7600 Series NVR
 Quick Operation Guide of LTN7700/7600 Series NVR UD.6L0202B0042A02 Thank you for purchasing our product. If there is any question or request, please do not hesitate to contact dealer. This manual is applicable
VIDEO MATRIX SWITCHES HDMI 2.0
 DATA SHEET AVS-HDMI2-4X4, AVS-HDMI2-8X8, AVSC-HDMI2-8X2 VIDEO MATRIX SWITCHES HDMI 2.0 24/7 TECHNICAL SUPPORT AT 877.877.2269 OR VISIT BLACKBOX.COM SYSTEM MONITOR FIRMWARE 1 2 3 4 5 6 IR 7 8 OVERVIEW VIDEO
1. Get support Attention Safety Caution Applications View Cameras on Screen (ex. HD TV or PC monitor) 3. Change Time Zone 5
 3. Change Time Zone 5") 1. Get support 1 2. Attention 1 3. Safety Caution 1 4. Applications 1 5. View Cameras on Screen (ex. HD TV or PC monitor) 3 Change Time Zone 5 6. Installation Guide for ONWOTE Cameras 6 7. View Cameras
1. Get support 1 2. Attention 1 3. Safety Caution 1 4. Applications 1 5. View Cameras on Screen (ex. HD TV or PC monitor) 3 Change Time Zone 5 6. Installation Guide for ONWOTE Cameras 6 7. View Cameras
Cablecast Server. Setup Guide. c Tightrope Media Systems For Cablecast version Build 74
 Cablecast Server Setup Guide c Tightrope Media Systems For Cablecast version 6.1.2 Build 74 Printed July 22, 2016 1 Cablecast Server Setup 1.1 Prerequisites 1.2 Overview of Setup Thank you for purchasing
DH7-DK QUICKSTART GUIDE. DH7 4K Support HDMI On-Camera Field Monitor Deluxe Kit
 DH7-DK QUICKSTART GUIDE DH7 4K Support HDMI On-Camera Field Monitor Deluxe Kit What s Included 1 x DH7 Monitor 1 x AC Adapter 1 x Camera Shoe Mount 1 x Screen Cleaning Wipe 1 x Screen Protection Film 1
Six-Channel TDM Multiplexers for 3G, HD, SDI, and ASI. Installation and Operations. Manual
 Manual DigiLink DLC156 Function modules Six-Channel TDM Multiplexers for 3G, HD, SDI, and ASI Installation and Operations Manual WWW.ARTEL.COM ii DLC156 Function Modules Installation and Operations Manual
BodyBeat Metronome Instruction Manual
 BodyBeat Metronome Instruction Manual Peterson Electro-Musical Products, Inc. 2013 Power The StroboPlus contains a powerful internal rechargeable Lithium-Ion battery. Before initial use, we recommend that
Dell Wyse 5030 PCoIP Zero Client
 Dell Wyse 5030 PCoIP Zero Client User Guide Regulatory Model: PxN Regulatory Type: PxN001 Notes, cautions, and warnings NOTE: A NOTE indicates important information that helps you make better use of your
CDM10: Channel USB Mixer. Item ref: UK User Manual
 CDM10:4 19 4 Channel USB Mixer Item ref: 171.135UK User Manual Caution: Please read this manual carefully before operating Damage caused by misuse is not covered by the warranty Introduction Thank you
Overview. Shipped in the Venue Vizion Package: Simplified Integration Process. Installation consists of 6 easy steps:
 Overview Shipped in the Venue Vizion Package: Four two-channel QMOD Encoder-Modulators Each unit can accept up to 2 inputs, providing up to 8 channels in the system. One ICE-HE-DXL Display Control Center
Z-IP Stream 004/008. User Guide and Installation Manual. Four or Eight Input QAM Encoder / Modulator
 Z-IP Stream 004/008 User Guide and Installation Manual Four or Eight Input QAM Encoder / Modulator MPEG-2 / H.264 HD ENCODER with QAM /IP/ & ASI Outputs Contents Safety Precautions... 3 Package Contents...
Model: S-1071H(EFP) 7" EFP Field On-camera LCD Monitor. User Manual. Please read this User Manual throughout before using.
 7 EFP Field On-camera LCD Monitor. User Manual. Please read this User Manual throughout before using.") Model: S-1071H(EFP) 7" EFP Field On-camera LCD Monitor User Manual Please read this User Manual throughout before using. Preface Congratulations on your purchase of this product. Please read this user
Model: S-1071H(EFP) 7" EFP Field On-camera LCD Monitor User Manual Please read this User Manual throughout before using. Preface Congratulations on your purchase of this product. Please read this user
V pro8 QUICK START GUIDE
 QUICK START GUIDE Welcome to your V pro8 FIRST STEPS POWERING ON CONNECTING YOUR COMPUTER Thank you for buying the Lawo V pro8, a true high-quality product developed and manufactured in Rastatt, Germany.
DLP200M 2 Relay Module for Heating and Cooling Plants
 Product Sheet TH6.24 Thermostat Type DLP200M DLP200M 2 Relay Module for Heating and Cooling Plants The DLP 200 M is a relay module for activation of loads (namely thermal actuators or circulators) in wireless
Broadcast A/V Division M-LYNX-702 V.3. Dual 7 LCD Display. User Manual
 Broadcast A/V Division M-LYNX-702 V.3 Dual 7 LCD Display User Manual 1. Package Includes Table of Contents 1. Package Includes Table of Contents 01 02 One M-LYNX-702 Monitor One universal AC power adapter
Broadcast A / V Division M-LYNX-702 V.3. Dual 7 LCD Display. User Manual
 Broadcast A / V Division M-LYNX-702 V.3 Dual 7 LCD Display User Manual Table of Contents Table of Contents 1. Package Includes 2. Product Description 2.1 Front Panel 2.2 Rear Panel Connections 3. On-Screen
Before you can install your LCD TV on the wall, you must fi rst remove the base using the steps below:
 Quick Start Guide English CONTENTS INSTALLING LCD TV ON THE WALL.. TV CHANNEL INSTALLATION........ PRESENTATION OF THE LCD TV...... ACCESSORIES.................... BATTERY INSTALLATION............ REMOTE
QUICK START GUIDE QT ANALOG HD CAMERA & DVR BUNDLE ENGLISH
 QUICK START GUIDE QT ANALOG HD CAMERA & DVR BUNDLE ENGLISH Table of Contents Welcome What s Included...3 Understanding your DVR...4 Get Connected Registration...5 Connect Your Cameras...5 Connect DVR to
HD/SD-SDI TO VGA CONVERTER. DAC-60 Quick Start Guide.
 HD/SD-SDI TO VGA CONVERTER DAC-60 Quick Start Guide www.datavideo.com Warranty Standard Warranty Datavideo equipment is guaranteed against any manufacturing defects for one year from the date of purchase.
PRELIMINARY. Orbis CU. Preliminary Data Sheet!
 Digital Control Unit Order # 725.692 Preliminary Data Sheet! FEATURES Microphone units can be connected in two lines or in a ring Connection of a maximum of 100 microphone units (50 per line) without redundancy
EdgeConnect Module Quick Start Guide ITERIS INNOVATION FOR BETTER MOBILITY
 EdgeConnect Module Quick Start Guide ITERIS INNOVATION FOR BETTER MOBILITY 493456301 Rev B April 2009 Table of Contents Installation... 1 Setup... 2 Operation... 4 Live Video... 4 Video Settings... 5 Network
Setup Guide. Read me BefoRe unpacking!
 Setup Guide Read me BefoRe unpacking! Package Contents In The Replicator package The Replicator SD card (in The Replicator SD card slot) In the Accessory Box found within The Replicator frame Single or
HD-1603 Single Input MPEG-4 DVB-T HD Encoder/Modulator User Guide and Install Manual
 ZyCastR digi-mod HD Range digi-mod HD-1603 www.digi-modbyzycast.com HD-1603 Single Input MPEG-4 DVB-T HD Encoder/Modulator User Guide and Install Manual Table of Contents www.digi-modbyzycast.com Safety
CMX-DSP Compact Mixers
 CMX-DSP Compact Mixers CMX4-DSP, CMX8-DSP, CMX12-DSP Introduction Thank you for choosing a Pulse CMX-DSP series mixer. This product has been designed to offer reliable, high quality mixing for stage and/or
AES-402 Automatic Digital Audio Switcher/DA/Digital to Analog Converter
 Broadcast Devices, Inc. AES-402 Automatic Digital Audio Switcher/DA/Digital to Analog Converter Technical Reference Manual Broadcast Devices, Inc. Tel. (914) 737-5032 Fax. (914) 736-6916 World Wide Web:
INSTALLATION AND OPERATION INSTRUCTIONS EVOLUTION VIDEO DISTRIBUTION SYSTEM
 INSTALLATION AND OPERATION INSTRUCTIONS EVOLUTION VIDEO DISTRIBUTION SYSTEM ATTENTION: READ THE ENTIRE INSTRUCTION SHEET BEFORE STARTING THE INSTALLATION PROCESS. WARNING! Do not begin to install your
Operating Instructions
 Marshall Electronics Broadcast A/V Division Model No. VSW-2200 4-Input Seamless SDI A/V Switcher Operating Instructions Table of Contents 1. Overview... 2. Features.... Package Contents... 4. Specifications...
3GSDI to HDMI 1.3 Converter
 3GSDI to HDMI 1.3 Converter EXT-3GSDI-2-HDMI1.3 User Manual www.gefen.com ASKING FOR ASSISTANCE Technical Support: Telephone (818) 772-9100 (800) 545-6900 Fax (818) 772-9120 Technical Support Hours: 8:00
Gazer VI700A-SYNC2 and VI700W- SYNC2 INSTALLATION MANUAL
 Gazer VI700A-SYNC2 and VI700W- SYNC2 INSTALLATION MANUAL Contents List of compatible cars... 3 Package contents... 4 Special information... 6 Car interior disassembly and connection guide for Ford Focus...
Model CMX3838A2 AV Matrix Switch with DSP audio (firmware 1.0)
") Model CMX3838A2 AV Matrix Switch with DSP audio (firmware 1.0) Overview: This product is a full featured video & audio matrix switch. It is most commonly used to independently distribute video & audio
Model CMX3838A2 AV Matrix Switch with DSP audio (firmware 1.0) Overview: This product is a full featured video & audio matrix switch. It is most commonly used to independently distribute video & audio
Installing the P80 Console Media Adapter
 This addendum accompanies your equipment documentation and is additional information concerning the heart rate features for your equipment and console. Important The heart rate features are intended for
AC335A. VGA-Video Ultimate Plus BLACK BOX Back Panel View. Remote Control. Side View MOUSE DC IN OVERLAY
 AC335A BLACK BOX 724-746-5500 VGA-Video Ultimate Plus Position OVERLAY MIX POWER FREEZE ZOOM NTSC/PAL SIZE GENLOCK POWER DC IN MOUSE MIC IN AUDIO OUT VGA IN/OUT (MAC) Remote Control Back Panel View RGB
Omega 4K/UHD Three-Input Switcher. Introduction. Applications. for HDMI and USB-C with HDBaseT and HDMI Outputs
 Introduction The Atlona AT-OME-ST31 is a 3 1 switcher and HDBaseT transmitter with HDMI and USB-C inputs. It features mirrored HDMI and HDBaseT outputs and is HDCP 2.2 compliant. The USB-C input is ideal
Commander 384. w w w. p r o l i g h t. c o. u k U S E R M A N U A L
 Commander 384 w w w. p r o l i g h t. c o. u k U S E R M A N U A L 1, Before you begin 1.1: Safety warnings...2 3 1.2: What is included...4 1.3: Unpacking instructions...4 2, Introduction 2.1: Features...4
PRO-ScalerHD2V HDMI to VGA & Audio Scaler Converter. User s Guide. Made in Taiwan
 PRO-ScalerHD2V HDMI to VGA & Audio Scaler Converter User s Guide Made in Taiwan Congratulations for owning a gofanco product. Our products aim to meet all your connectivity needs wherever you go. Have
Ultra-ViewRF 8HD Director Monitor. User Operation Manual
 Ultra-ViewRF 8HD 5.8GHz Wireless Director Monitor User Operation Manual 17.1.2013 v2_7 Video Equipment Rentals - VER 912 Ruberta Avenue Glendale, CA 91201 - U.S.A. Office 818-956-1444 Table of Contents
SOURCE COMMANDER MSS433 A/V SELECTOR OWNER S MANUAL INSTALLATION GUIDE
 SOURCE COMMANDER MSS433 R L V R L V R L V R L V M U L T I S T A T I O N A/V SELECTOR OWNER S MANUAL INSTALLATION GUIDE OWNER S MANUAL/INSTALLATION GUIDE WARNING! THE CLARION MSS433 MULTISTATION A/V SELECTOR
TeamWork Installation Guide
 C G G 00-0V/ A MAX TX RX +V APARATUS US 0 TeamWork Installation Guide TeamWork TeamWork is a fully customizable collaboration system comprised of an switcher, Show Me cables, a control processor, and a
Kramer Electronics, Ltd. USER MANUAL. Model: VS x 1 Sequential Video Audio Switcher
 Kramer Electronics, Ltd. USER MANUAL Model: VS-120 20 x 1 Sequential Video Audio Switcher Contents Contents 1 Introduction 1 2 Getting Started 1 2.1 Quick Start 2 3 Overview 3 4 Installing the VS-120 in
CNK221/241/261/321/341/361 Cable-Nook Jr. User s Guide
 Cable-Nook Jr. Welcome! We greatly appreciate your purchase of the Cable-Nook Jr. Interconnect Box. We are sure you will find it reliable and simple to use. Superior performance for the right price, backed
DIGITAL PORTABLE RECORDER TRAINING MANUAL FOR COURT REPORTING OFFICERs
 SUPREME & NATIONAL COURTS OF JUSTICE Court Reporting Service DIGITAL PORTABLE RECORDER TRAINING MANUAL FOR COURT REPORTING OFFICERs Author: Training Manager CRS 15/1/16 1 Contents Page 1. Portable case
Safety Information. Camera System. If you back up while looking only at the monitor, you may cause damage or injury. Always back up slowly.
 Table of Contents Introduction...3 Safety Information...4-6 Before Beginning Installation...7 Installation Guide...8 Wiring Camera & Monitor...9-10 Replacement Installation Diagram...11 Clip-On Installation
Camera Setup Instructions
 Camera Setup Instructions Hopefully this document will help new MallinCam owners set up their systems and get them to successful first light more quickly. Through the use of images, I hope to describe
IRIG-B PTP Clock Converter Output Module Hardware Installation Manual
 IRIG-B PTP Clock Converter Output Module Hardware Installation Manual Kyland Technology Co., LTD. Publication Date: May 2012 Version: V1.2 Customer Service Hotline: (+8610) 88796676 FAX: (+8610) 88796678
Globalmediapro SMR-650
 Globalmediapro SMR-650 16 x 16 Modularized Hybrid 3G-SDI Matrix Operation Manual CONTENTS 1. Introduction... 1 2. Applications... 1 3. Package Contents... 1 4. System Requirements... 1 5. Features... 2
FS1-X. Quick Start Guide. Overview. Frame Rate Conversion Option. Two Video Processors. Two Operating Modes
 FS1-X Quick Start Guide Overview Matching up and synchronizing disparate video and audio formats is a critical part of any broadcast, mobile or post-production environment. Within its compact 1RU chassis,
insors Grid Room System Installation Guide
 insors Grid Room System Installation Guide May 2006 insors Integrated Communications www.insors.com 312-786-9169 Introduction insors Grid is a state-of-the-art software-based system that supports a highly
Home Roam TV Basic User Manual
 Page1 Home Roam TV Basic User Manual Table of Contents 1. Safety Disclaimer... 2 2. Introduction... 2 3. What s in the Box... 2 4. Specifications... 2 5. Unit Functions... 3 5-1. Transmitter Module...
INSTALLATION INSTRUCTIONS FOR
 INSTALLATION INSTRUCTIONS FOR MODEL 2240LED www.sportablescoreboards.com 1 Table of Contents 8 X 7 INDOOR SCOREBOARD... 3 THE SCOREBOARD SYSTEM SHOULD INCLUDE THE FOLLOWING PARTS:... 3 INSTRUCTIONS FOR
Model 6527 & 6827 Single Line Scoreboard Owner s Manual
 Model 6527 & 6827 Single Line Scoreboard Owner s Manual Portatree Eliminator 2000 Compatible Rev C RaceAmerica Corp. 280 Martin Ave. Unit#1 Santa Clara, CA 95050 (408) 988-6188 www.raceamerica.com info@raceamerica.com
QIP7232 P2. Hybrid QAM/IP High-definition Set-top. Quick Start Guide
 QIP7232 P2 Hybrid QAM/IP High-definition Set-top Quick Start Guide Before You Begin Introduction Congratulations on receiving a Motorola QIP7232 Hybrid QAM/IP High-definition Set-top. This document will
DLP600M 6+1 Relay Module for Heating and Cooling Plants
 Product Sheet TH6.25 Thermostat Type DLP600M DLP600M 6+1 Relay Module for Heating and Cooling Plants The DLP 600 M is a relay module for activation of loads (namely thermal actuators or circulators) in
CM4-BT. Compact Mixer with Bluetooth UK User Manual
 CM4-BT Compact Mixer with Bluetooth 170.804UK User Manual Caution: Please read this manual carefully before operating Damage caused by misuse is not covered by the warranty Introduction: Thank you for
EEG A1452 SCTE-104 Inserter Frame Card
 EEG A1452 SCTE-104 Inserter Frame Card Product Manual EEG Enterprises, Inc. 586 Main Street Farmingdale, New York 11735 TEL: (516) 293-7472 FAX: (516) 293-7417 Copyright EEG Enterprises, Inc. 2017 All
Manual. Simrad IS80 Heading Repeater HR80. English
 Manual Simrad IS80 Heading Repeater HR80 English www.simrad-yachting.com A brand by Navico - Leader in Marine Electronics Manual Simrad IS80 Heading Repeater HR80 English Document no: 20223194 Revision:
Instruction Guide. The TV Jockey Computer Monitor TV Tuner with Remote COMP2VGATVGB. The Professionals Source For Hard-to-Find Computer Parts
 VIDEO ADAPTER The TV Jockey Computer Monitor TV Tuner with Remote COMP2VGATVGB Instruction Guide * Actual product may vary from photo The Professionals Source For Hard-to-Find Computer Parts FCC COMPLIANCE
Classroom Setup... 2 PC... 2 Document Camera... 3 DVD... 4 Auxiliary... 5
 Classroom Setup... 2 PC... 2 Document Camera... 3 DVD... 4 Auxiliary... 5 Lecture Capture Setup... 6 Pause and Resume... 6 Considerations... 6 Video Conferencing Setup... 7 Camera Control... 8 Preview
Multi-function Portable. HD LCD Monitor. User Manual
 Multi-function Portable HD LCD Monitor User Manual Product description: Thank you for purchasing our photography, broadcast color LCD Monitor kit. This product adopts proprietary digital signal processing
Hardware User s Manual
 Hardware User s Manual Megapixel Day & Night Economy Bullet Network Camera English 1 Table of Contents Before You Use This Product... 2 Regulatory Information... 3 Chapter 1 - Package Contents... 4 Chapter
FS4 Quick Start Guide
 FS4 Quick Start Guide Overview FS4 is AJA s flagship frame synchronizer and converter, offering incredible versatility and connectivity in a sleek and compact 1RU frame for all your 4K/ UltraHD/2K/HD/SD
HCS-8131M Professional Audio & Video Recorder for Conference
 HCS-8131M Professional Audio & Video Recorder for Conference The ability of remote upgrading through network With DSP processing chips, embedded operating system, stable and reliable due to immunity to
CI-218 / CI-303 / CI430
 CI-218 / CI-303 / CI430 Network Camera User Manual English AREC Inc. All Rights Reserved 2017. l www.arec.com All information contained in this document is Proprietary Table of Contents 1. Overview 1.1
Hardware Guide BrightSign, LLC Version:.1 Los Gatos, CA, USA. MODELS: XD Product Line
 Hardware Guide BrightSign, LLC Version:.1 Los Gatos, CA, USA MODELS: XD Product Line Contents Overview... 1 Block Diagram... 2 Ports... 2 XD230... 2 XD1030... 2 XD1230... 3 Power Connector... 3 Ethernet...
Model: S-1071H 7" Broadcast On-camera 3GSDI&HDMI LCD Monitor. User Manual. Please read this User Manual throughout before using.
 Model: S-1071H 7" Broadcast On-camera 3GSDI&HDMI LCD Monitor User Manual Please read this User Manual throughout before using. Preface Congratulations on your purchase of this product. Please read this
Pablo II. The Picasso IV video-encoder. Manual. 18 August Copyright c 1997 Village Tronic Marketing GmbH Mühlenstraße Sarstedt Germany
 Pablo II The Picasso IV video-encoder Manual 18 August 1997 Copyright c 1997 Village Tronic Marketing GmbH Mühlenstraße 2 31157 Sarstedt Germany Technical Hotline: Tel. +49 (0)5066 / 7013-10 FAX: Tel.
HDCVI Camera User s Manual
 HDCVI Camera User s Manual Version 1.0.0 Table of Contents 1 General Introduction... 1 1.1 Overview... 1 1.2 Features... 1 2 Device Framework... 2 3 Device Cable Structure... 4 4 Device Installation...
Dejero LIVE+ 20/20 Transmitter
 Dejero LIVE+ 20/20 Transmitter This Dejero kit will allow you to broadcast live from the field, using an NX5 camera kit. Please follow the following steps in order!! 1. Preliminary Check: To set up the
HDMI Cross Converter
 SDI HDMI Cross Converter User's Manual Model No :VCF-HS01 Please read this manual carefully before using this product. Please keep this manual for future reference. As we are always improving our products
192 Channel DMX Controller
 DM-X 92 Channel DMX Controller USER MANUAL 54. 9UK Vers ion. D M X 5 2 C O N T R O L L E R S E R I E S Content. Before you begin. What is included.......2 Unpacking instructions....3 Safety instructions...
Show Designer 3. Software Revision 1.15
 Show Designer 3 Software Revision 1.15 OVERVIEW... 1 REAR PANEL CONNECTIONS... 1 TOP PANEL... 2 MENU AND SETUP FUNCTIONS... 3 CHOOSE FIXTURES... 3 PATCH FIXTURES... 3 PATCH CONVENTIONAL DIMMERS... 4 COPY
HDS-42AVR HDMI Switcher INSTALLATION MANUAL
 HDS-42AVR HDMI Switcher INSTALLATION MANUAL -42AVR-Manual.indd 1 Table Of Contents Introduction...3 Safety Information...4 Kit Contents...4 Feature Set...4 HDS-42AVR Remote Control/Operation...5 Specifications...6
HD/SD-SDI TO VGA CONVERTER. DAC-60 Quick Start Guide.
 HD/SD-SDI TO VGA CONVERTER DAC-60 Quick Start Guide www.datavideo.com Warranty Standard Warranty Datavideo equipment is guaranteed against any manufacturing defects for one year from the date of purchase.
OWNERS MANUAL LUNATEC V3 MICROPHONE PREAMPLIFIER AND A/D CONVERTER
 OWNERS MANUAL LUNATEC V3 MICROPHONE PREAMPLIFIER AND A/D CONVERTER LUNATEC 35 +48 35 +48 30 40 30 40 0 25 45 25 45 3 192 1 1 6 176.4 20 50 20 50 9 96 12 PEAK 88.2 55 55 RESET 48 10 60 2 10 60 2 21 44.1
PRO-ScalerV2HD VGA to HDMI & Audio Scaler Converter. User s Guide. Made in Taiwan
 VGA to HDMI & Audio Scaler Converter User s Guide Made in Taiwan Congratulations for owning a gofanco product. Our products aim to meet all your connectivity needs wherever you go. Have fun with our products!
Cablecast SX. Setup Guide. c Tightrope Media Systems For Cablecast version Build 206
 Cablecast SX Setup Guide c Tightrope Media Systems For Cablecast version 5.2.11 Build 206 Printed June 5, 2015 1 Cablecast SX Setup 1.1 Prerequisites 1.2 Overview of Setup Thank you for purchasing a Cablecast
SX7. Saga 7" Super Bright HDMI/3G-SDI Field Monitor with 3D-LUTs. Quick Start Guide. What s Included CHECKED BY
 SX7 Quick Start Guide Saga 7" Super Bright HDMI/3G-SDI Field Monitor with 3D-LUTs What s Included 1 x Saga X7 Monitor 1 x V-Mount Plate (Attached) 1 x Mini-XLR to P-TAP Cable 1 x Dual Sony L Battery Adapter
Ohio Valley HD Replay Integration
 DVSport is proud to announce its partnership with the Ohio Valley Conference to be the HD Instant Replay provider for Football and Men s and Women s Basketball. As part of this process DVSport will be
Model: S-4904T/R. Wireless HD Transmission System. User Manual. Please read this User Manual throughout before using.
 Model: S-4904T/R Wireless HD Transmission System User Manual Please read this User Manual throughout before using. Preface Congratulations on your purchase of this product. Please read this user manual
HD Leeza. Quick Setup Guide
 Page 1 of 15 Model KD-HD1080P Key Digital Video Processor Quick Setup Guide Have a question or a technical issue with your set-up? Call the Key Digital Hotline at: 866-439-8988 or 203-798-7187 E-mail the