ivw-fd122 Video Wall Controller MODEL: ivw-fd122 Video Wall Controller Supports 2 x 2 Video Wall Array User Manual Page i Rev. 1.
|
|
|
- Moris McCoy
- 5 years ago
- Views:
Transcription


1 MODEL: ivw-fd122 Video Wall Controller Supports 2 x 2 Video Wall Array User Manual Rev Page i
2 Copyright COPYRIGHT NOTICE The information in this document is subject to change without prior notice in order to improve reliability, design and function and does not represent a commitment on the part of the manufacturer. In no event will the manufacturer be liable for direct, indirect, special, incidental, or consequential damages arising out of the use or inability to use the product or documentation, even if advised of the possibility of such damages. This document contains proprietary information protected by copyright. All rights are reserved. No part of this manual may be reproduced by any mechanical, electronic, or other means in any form without prior written permission of the manufacturer. TRADEMARKS All registered trademarks and product names mentioned herein are used for identification purposes only and may be trademarks and/or registered trademarks of their respective owners. Page ii
3 Table of Contents COPYRIGHT... II TABLE OF CONTENTS... III LIST OF FIGURES... V LIST OF TABLES... VII 1 INTRODUCTION INTRODUCTION BENEFITS FEATURES EXTERNAL INTERFACES, SWITCHES AND LEDS Front Panel Rear Panel TECHNICAL SPECIFICATIONS DIMENSIONS UNPACKING LIST UNPACKING PRECAUTIONS PACKING LIST INSTALLATION INSTALLATION OVERVIEW Four Panel Overview Panel Overview INSTALLATION STEPS INSTALL LCD PANELS MOUNTING CONNECT CABLES Connect the Video Source and ivw-fd Connect the ivw-fd122 to the Power Supply INPUT AND OUTPUT RESOLUTION Screen Ratio Page iii
4 3.6.2 Input Resolution Output Resolution DISPLAY MODE MASK SETUP OSD FUNCTIONS SMARTOSD Pre-installation Notice Software Illustration Install Software Troubleshooting USING THE OSD OSD Buttons OSD Lock Menu Structure Display Menu System Menu REMOTE CONTROL TROUBLESHOOTING AND MAINTENANCE MAINTENANCE OVERVIEW TROUBLESHOOTING No Image on One Monitor No Image Two or Three Monitors No Image on Any Monitor Page iv
5 List of Figures Figure 1-1: ivw-fd Figure 1-2: Overview (Front View)... 3 Figure 1-3: Overview (Rear View)... 4 Figure 1-4: ivw-fd122 Embedded System Dimensions... 6 Figure 3-1: Four Panel Setup Figure 3-2: 16 Panel Setup Figure 3-3: Mounting Brackets Figure 3-4: Cable Connections Figure 3-5: Video Source Figure 3-6: ivw-fd122 Video Input Figure 3-8: Display Mode Figure 3-9: Mask Calculation Figure 4-1: SmartOSD Interface Page Figure 4-2: SmartOSD Display Page Figure 4-3: SmartOSD Setting Page Figure 4-4: SmartOSD About Page Figure 4-5: SmartOSD Setup Wizard Figure 4-6: SmartOSD Select Installation Folder Figure 4-7: SmartOSD Confirm Installation Figure 4-8: SmartOSD Installing Figure 4-9: SmartOSD Installation Complete Figure 4-10: DLL Missing Figure 4-11: Windows Vista Error Figure 4-12: Install as Administrator Figure 4-13: OSD Buttons Figure 4-14: Display Menu Figure 4-15: Mask Control Figure 4-16: Display Menu Figure 4-17: Information Screen Figure 4-19: Input Select Page v
6 Figure 4-20: Input Select Figure 4-21: Remote Control Page vi
7 List of Tables Table 1-1: Technical Specifications... 5 Table 3-1: Package List Contents... 8 Table 3-1: Screen Ratios and Input Resolutions Table 4-1: SmartOSD Menu Structure Table 4-2: OSD Menu Structure Page vii
8
9 Chapter 1 1 Introduction Page 1

10 1.1 Introduction Figure 1-1: ivw-fd122 The ivw-fd122 video wall controller box is for displaying a single video input on an array of monitors, implementing a large display without the inherent high costs of a single large monitor. The ivw-fd122 is for large displays, typically for advertising in public places. The video wall controller accepts a single DVI input. A single controller can control up to four monitors, or by connecting four child controllers to the first controller, an array of up to 16 panels is possible. The ivw-fd122 video controller box can be controlled remotely using either the included remote control for adjusting the image, using the digital I/O port or RS-232 serial port. 1.2 Benefits The benefits of the ivw-fd122 include: Scalable up to 16 monitors Silent operation Simple setup Cheaply implements a large display 1.3 Features The features of the ivw-fd122 include: One DVI video input Four DVI video outputs Support for up to 1920 x 1200 output resolution Multiple video output combinations including full mode, clone mode, vertical replication mode and PIP mode Mask control compensates for gaps between monitors Page 2
 1.4.")
11 1.4 External Interfaces, Switches and LEDs Front Panel The front panel has the following buttons and indicators (shown in Figure 1-2 below): Power button Power indicator LED Video output LEDs Video input LED OSD menu keypad Figure 1-2: Overview (Front View) Rear Panel The rear panel has the following connectors, switches and indicators (shown in Figure 1-3 below): 4 x DVI video outputs 1 x DVI video input 1 x Digital I/O port (8-bit) 1 x RS-232 serial communications port 1 x Power input Page 3

12 Figure 1-3: Overview (Rear View) 1.5 Technical Specifications ivw-fd122 video wall controller features are listed in Table 1-1. See Chapter 2 for details. Specification Model Name Main Features Inputs Outputs Detail ivw-fd Multiple viewing modes 2. Software OSD 3. Remote control 4. Auto-scaling of the image to match output resolution DVI-D 4 x DVI-D Dimensions (H x W x D) mm x 47 mm x mm Cooling Input Resolution Output Resolution Power Adapter Input Fanless 720x350, 640x400, 720x400, 640x480, 800x 600, 832x624, 1024x768, 1152x864, 1152x 870, 1152x900, 1280x768, 1280x960, 1280x 1024, 1600x1200, 1680x1050, 1920x x768, 1360x768, 1366x768, 1280x1024, 1400x 1050, 1680x1050, 1600x1200, 1920x1080, 1920x VAC to 264 VAC / 47 Hz to 63 Hz Page 4
13 Specification Power Adapter Output Safety and Emission Detail 25 W CE, FCC, LVD Temperature 0ºC 40ºC Power Consumption 20 W Table 1-1: Technical Specifications 1.6 Dimensions The dimensions of the ivw-fd122 are listed below and shown in Figure 1-4: Height: 47 mm Width: mm Depth: mm Page 5

14 Figure 1-4: ivw-fd122 Embedded System Dimensions Page 6
15 Chapter 2 2 Unpacking List 2.1 Unpacking Precautions When the ivw-fd122 is unpacked, please do the following: Make sure the packing box is facing upwards so the ivw-fd122 does not fall out of the box. Make sure all the components shown in Section 2.2 are present. 2.2 Packing List NOTE: If some of the components listed in the checklist below are missing, please do not proceed with the installation. Contact the reseller or vendor that sold the ivw-fd122 from or contact a sales representative directly. To contact a sales representative, please send an to ds_sales@indstech.com. The ivw-fd122 is shipped with the following components: Page 7
 1 Power adapter 1 Remote control")

16 No. Description Image 1 ivw-fd122 1 Power cord (US standard) 1 Power adapter 1 Remote control 1 Mounting brackets & screws 1 DVI cable 1 RS-232 cable Table 2-1: Package List Contents Page 8
17 Chapter 3 3 Installation Page 9
. 3.1.1 Four Panel Overview The implementation of a 4-panel array is shown in Figure 3-1 below.")
18 3.1 Installation Overview The ivw-fd122 supports a 4-panel and 16-panel setup (16-panel setup requires five video wall controlleres) Four Panel Overview The implementation of a 4-panel array is shown in Figure 3-1 below. Figure 3-1: Four Panel Setup Page 10

19 Panel Overview The implementation of a 16-panel array is shown in Figure 3-2 below. Figure 3-2: 16 Panel Setup Page 11
20 3.2 Installation Steps To install the ivw-fd122 please follow the installation steps below: Step 1: Install the LCD panels. Step 2: Mount the ivw-fd122. Step 3: Connect DVI cables, video input cable, and power adapter to the ivw-fd122. Step 4: Adjust the screen resolution output settings. Step 5: Select a screen mode for display output. Step 6: Adjust the ivw-fd122 mask settings to align the images.step0: 3.3 Install LCD Panels The LCD panels are installed as a square array, with two rows and two columns, for a total of four monitors. Recommended installation procedures are to Use all identical monitors Keep gaps between panels as small as possible for the best image Keep all horizontal gaps between monitors in the array consistent Keep all vertical gaps between monitors in the array consistent 3.4 Mounting The ivw-fd122 must be placed on a table, desk or other firm surface. Optionally, the ivw-fd122 can be mounted using the included mounting brackets. The installation location must be: Out of direct sunlight Without anything on top of it On a firm surface Away from moisture and liquids Page 12

21 Figure 3-3: Mounting Brackets 3.5 Connect Cables The cables that need to be attached are listed below and their connections are shown in Figure 3-4: Video input cable from the video source or computer through the DVI cable Video output cables attached to the LCD panels or another ivw-fd122. Make sure the cables are connected to the correct monitors as shown in Figure 3-4. Power cable from the power adapter Page 13


22 Figure 3-4: Cable Connections Connect the Video Source and ivw-fd122 Connect the video source to the ivw-fd122. If the video source is a computer with the SmartOSD software installed, that computer can be used to adjust the monitor settings without using the OSD. The video source connects directly to the ivw-fd122 through a DVI cable. To connect the video source to the ivw-fd122, follow the steps below. Page 14

23 Step 1: Attach the DVI cable to the video source. Figure 3-5: Video Source Step 2: Attach the video cable to the ivw-fd122.step 0: Figure 3-6: ivw-fd122 Video Input Connect the ivw-fd122 to the Power Supply Connect the included PSU into an AC power supply then connect the PSU to the ivw-fd122. The figure below shows the typical setup. There is no power switch, and the ivw-fd122 turns on as soon as it is connected to the PSU. Page 15
24 3.6 Input and Output Resolution Correct adjustment of the input and output resolutions gives a much better quality final image. Follow the steps outlined in the subsections below to get the best image quality from the video wall controller Screen Ratio Matching the screen ratio of the video source and the output resolution settings provides the best image. Make sure these two ratios match. The video input resolutions and corresponding ratios is shown below. Screen Size Ratio Video Input Resolution 5:4 1280x1024 4:3 640x x x x x x x :9 1366x x :10 640x x x x1200 5:3 1280x768 9:5 720x400 Table 3-1: Screen Ratios and Input Resolutions Input Resolution Input resolution should be set as high as possible, pick a resolution that meets the following criteria: Page 16

25 Matches the LCD panel screen ratio (as shown in Table 3-1) Is the maximum possible (without exceeding input resolution limits) Output Resolution The output resolution should be set as high as possible, and meet the following criteria for best results: Matches video input and LCD panel resolution ratios Is the maximum possible Has a minimum width greater than half input width Has a minimum height greater than half input height 3.7 Display Mode There are seven display mode options available. The display mode can be set through the SmartOSD ( ) or OSD menu (4.2.1). The modes are shown in Figure 3-7 below. Figure 3-7: Display Mode 3.8 Mask Setup Mask control displays the images slightly larger than the visible screen size to compensate for the gaps between the LCD panels in the video wall array. Use either the SmartOSD ( ) or OSD menu ( ) to set the mask value. Page 17
26 To calculate the appropriate mask value, use the formula shown in Figure 3-8 below: Page 18

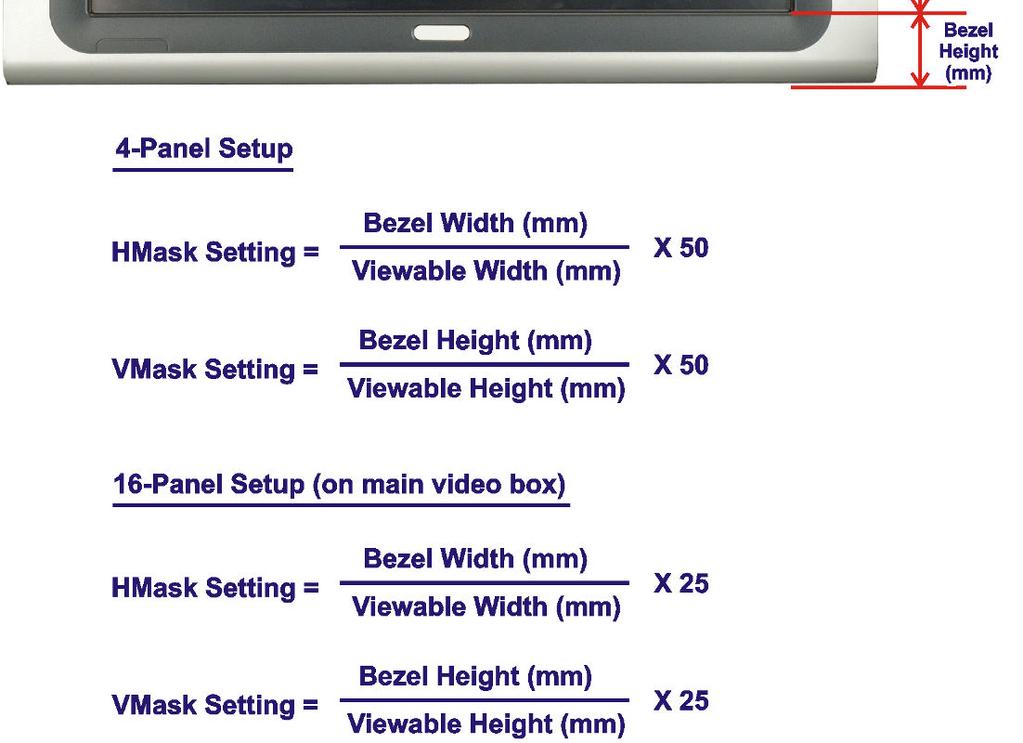
27 Figure 3-8: Mask Calculation Page 19
28 Chapter 4 4 OSD Functions Page 20
29 4.1 SmartOSD SmartOSD is a proprietary On-Screen-Display (OSD) software solution that enables easy, remote monitor setting adjustments in a Windows environment. SmartOSD delivers excellent performance and provides more flexibility than the typical OSD hardware solutions when adjusting a monitor. SmartOSD also allows the screen output screen resolution and mask size to be adjusted using the DVI connection Pre-installation Notice Before installing SmartOSD software, please make sure one of the following operating systems is installed: Windows 2000 Windows XP Windows Vista Windows Software Illustration The table below shows the SmartOSD menu structure (Table 4-1). Menu Interface Display Setting About Options Interface Selection Display Resolution Display Mode Mask Setting Digital I/O Test Input Source Power Factory Reset OSD Lock OSD Rotation Company Contact Details Table 4-1: SmartOSD Menu Structure Page 21

30 Interface Page The interface page is for choosing the interface between the computer and the ivw-fd122. Figure 4-1: SmartOSD Interface Page Interface Select The Interface Select option selects the data communication method between the computer and the ivw-fd122. If the computer also provides the video input then communication can be done over the DVI cable. Serial ports can also be used for data communication. The dropdown list shows all communications ports by default. The following are shown for reference, as the exact ports available are system dependent. Page 22

31 DDC2Bi COM1 COM3 DVI input First serial port Third serial port Display Page The Display Page adjusts the configuration of the panels in the video wall array. Figure 4-2: SmartOSD Display Page Display Resolution The Display Resolution setting shows the resolution of the video image output. Display output setting options are shown below. Page 23
32 1024 x 60 MHz 1360 x 60 MHz 1280 x 60 MHz 1400 x 60 MHz 1680 x 60 MHz 1600 x 60 MHz 1920 x 60 MHz 1920 x 60 MHz 1366 x 60 MHz Display Mode The display mode option configures how the image is displayed on the screen. 1 x 1 2 x 1 2 x 2 Mode 1 Mode 2 Mode 3 Mode 4 DEFAULT The video input is cloned on all the monitors The video input is shown on the top two panels and repeated on the bottom two. The video input is tiled over all the panels. Same as 2 x 2, but the top left panel shows the full image Same as 2 x 2, but the top right panel shows the full image Same as 2 x 2, but the bottom left panel shows the full image Same as 2 x 2, but the bottom right panel shows the full image Mask Mode Mask mode toggles the masking function. Off The video wall controller doesn t compensate for gaps between LCD panels On DEFAULT The video wall controller compensates for the gaps between LCD panels Page 24

33 H Mask % The horizontal mask compensates for the horizontal gap between panels. Use the formula in Figure 3-8 to calculate the correct figure. V Mask % The vertical mask compensates for the vertical gap between panels. Use the formula in Figure 3-8 to calculate the correct figure Setting Page Figure 4-3: SmartOSD Setting Page Page 25
34 Power The power option turns the ivw-fd122 on and off. Select one of the options below. On Off The video wall controller displays the video source image onto the video outputs. The video wall controller is in standby mode. No images are displayed on the video outputs, but the video wall controller is ready to receive data commands. Factory Mode Factory mode resets the ivw-fd122 to default settings. Two options are available for resetting the values. Factory Default Resets the video wall controller to the factory defaults. OSD Mode Two sets of options are available. The lock/unlock option sets whether the front panel OSD buttons can be used for adjusting settings. The normal/rotation option sets the onscreen OSD to a horizontal or vertical position. Lock Unlock The front panel OSD buttons cannot be used to adjust settings The front panel OSD buttons can be used to adjust settings Normal Rotation Suitable for panels aligned in a landscape layout. Suitable for panels aligned in a portrait layout. Page 26

35 About Page The About Page displays contact information. Figure 4-4: SmartOSD About Page Install Software To install the software, please follow the steps below: Step 1: Follow the instructions from the interactive installer to install the SmartOSD on the system. Step 2: Insert the installation disk that came with the system and open the installation file. Page 27

36 Step 3: The welcome screen shown below appears. Figure 4-5: SmartOSD Setup Wizard Step 4: Click Next to continue. Step 5: The screen below appears. Page 28

37 Figure 4-6: SmartOSD Select Installation Folder Step 6: Select the installation folder from the screen shown above. Step 7: Click Next to continue. Step 8: The screen shown below appears. Page 29


38 Figure 4-7: SmartOSD Confirm Installation Step 9: Confirm the installation by clicking Next in the screen above. Step 10: The program starts to install and the progress bar shown below appears. Figure 4-8: SmartOSD Installing Page 30
39 Step 11: When the installation is complete the screen below appears. Figure 4-9: SmartOSD Installation Complete Step 12: Click Close in the screen above. Step 13: After quick setup is complete, the SmartOSD wizard logo appears on the desktop as shown in the screen below. Step 14: To access the SmartOSD, click the SmartOSD wizard logo on the desktop. Step0: Page 31


40 4.1.4 Troubleshooting For troubleshooting, please see the steps below: Windows 2000 Installation Failure Installation fails under Windows 2000 and shows the following image: Figure 4-10: DLL Missing Solution: Download and install service pack Windows Installer Vista Installation Failure Installation fail under Vista while showing following image: Figure 4-11: Windows Vista Error Page 32

41 Solution: Install SmartOSD.exe as the administrator authority Figure 4-12: Install as Administrator Page 33

42 4.2 Using the OSD The OSD menu functions are described below OSD Buttons There are several on-screen-display (OSD) control buttons oriented either vertically on the right side of the monitor front panel or on the bottom of the monitor front panel. Figure 4-13 shows a typical arrangement of OSD controls. Figure 4-13: OSD Buttons Power. Turns the video wall controller on and off. Menu/Enter. Enters the OSD, selects items and sets the new values entered. Left. Moves the selection left. Right. Moves the selection right. Up. Moves the selection up. Down. Moves the selection down. Auto/Exit. Exits from any menu OSD Lock The OSD front panel buttons can be locked using the OSD lock function. To turn the OSD lock on and off, follow the steps below. (The OSD can also be locked using the SmartOSD). Step 1: Push the Right and Auto/Exit buttons simultaneously for a few seconds. Step 2: The OSD display shows the current status as locked or unlocked. Step0: Page 34
43 4.2.3 Menu Structure The table below shows the OSD menu structure. Menu Options / Submenu Options Display Output Display Mode Mask -> Horizontal Mask Vertical Mask Mask On/Off Setting Factory Information Input -> DVI Component Miscellaneous -> OSD -> OSD Timer OSD Rotation Identify Table 4-2: OSD Menu Structure Page 35

44 4.2.4 Display Menu Image menu options are shown in Figure 4-14 and described below. Figure 4-14: Display Menu Display Resolution The Display Resolution setting shows the resolution of the video image output. Display output setting options are shown below x 60 MHz 1360 x 60 MHz 1280 x 60 MHz 1400 x 60 MHz 1680 x 60 MHz 1600 x 60 MHz 1920 x 60 MHz 1920 x 60 MHz 1366 x 60 MHz Display Mode The display mode option configures how the image is displayed on the screen. Page 36
45 1 x 1 2 x 1 2 x 2 Mode 1 Mode 2 Mode 3 Mode 4 DEFAULT The video input is cloned on all the monitors The video input is shown on the top two panels and repeated on the bottom two. The video input is tiled over all the panels. Same as 2 x 2, but the top left panel shows the full image Same as 2 x 2, but the top right panel shows the full image Same as 2 x 2, but the bottom left panel shows the full image Same as 2 x 2, but the bottom right panel shows the full image Mask Control The Mask control compensates for the gaps between monitors in the video wall array. These settings are shown in Page 37

46 Mask Control The mask control menu adjusts the mask settings. The mask settings compensate for the gaps between monitors in the video wall array. The mask control options are shown and described below. Figure 4-15: Mask Control Horizontal Mask Set the horizontal mask according to the formula in Figure 3-8. Vertical Mask Set the vertical mask according to the formula in Figure 3-8. Mask Control The mask control option turns the mask control on and off. Off DEFAULT On The video wall controller doesn t compensate for the gap between monitors The video wall controller compensates for the gap between monitors Page 38

47 4.2.5 System Menu System menu options are shown in Figure 4-16 and described in the subsections below. Figure 4-16: Display Menu Factory Reset Factory reset returns all the settings to the factory default settings. Information Shows video wall controller version information. The information details are shown in Misc Misc allows other OSD features to be adjusted. Misc options are shown in Identify Monitors Identify monitors displays the monitor s ID within the monitor array. Page 39

48 Information The information screen in Figure 4-17 shows some basic information about the video wall controller and the monitor. The details are described below. Figure 4-17: Information Screen Model name, firmware version and date Input type Video box ID (identifies the current video wall controller in a larger array of video wall controlleres) Page 40

49 Miscellaneous The miscellaneous menu (Figure 4-18) allows the option to go to the OSD setup menu. Figure 4-18: Input Select OSD Configuration OSD configuration adjusts the display settings for the OSD display. OSD configuration settings are shown in Page 41

50 OSD Configuration The OSD configuration menu (Figure 4-19) adjusts the rotation of the OSD, and how long it displays for. Figure 4-19: Input Select OSD Timer The OSD Timer sets how long the OSD screen stays on after the last button press. OSD Rotation OSD rotation allows the OSD menu to be rotated. This setting is for monitors that are oriented in a portrait layout. Page 42

51 4.3 Remote Control The ivw-fd122 comes with a remote control for easy configuration of OSD settings. Figure 4-20 shows the remote control and its function keys. Figure 4-20: Remote Control Power. Turns the video wall controller on and off. Menu/Enter. Enters the OSD, selects items and sets the new values entered. Left. Moves the selection left. Right. Moves the selection right. Up. Moves the selection up. Down. Moves the selection down. Auto/Exit. Exits from any menu. Page 43
52 Chapter 5 5 Troubleshooting and Maintenance Page 44
53 WARNING: Take Anti-Static precautions whenever maintenance is being carried out on the embedded system components. Failure to take anti-static precautions can cause permanent embedded system damage. 5.1 Maintenance Overview NOTE: There are no user-serviceable parts inside. Make sure to carefully follow all the instructions in this section to diagnose any problems. If the problem persists, for help from a sales representative To preserve the working integrity of the ivw-fd122 embedded system, the embedded system must be properly maintained. If embedded system components need replacement, the proper maintenance procedures must be followed to ensure the embedded system can continue to operate normally. 5.2 Troubleshooting This section provides some simple troubleshooting suggestions No Image on One Monitor If there is no image on one monitor, follow these steps to remedy the problem Check Monitor Power Step 1: Check that the monitor is turned on. Step 2: Check that the power source for the monitor is turned on. Page 45
54 Step 3: Check that the power source has the correct power rating (check panel specifications for details). Step 4: Make sure the LCD panel power cables are securely fastened to the monitor and to the power source.step0: Check Panel Video Connection Check to see that the video cable is fitted correctly. Step 1: Check that the monitor is connected to the ivw-fd122. Step 2: Securely attach the video cable to the panel and to the ivw-fd122. Step 3: Fasten the video cable at both ends and tighten the video cable screws.step0: No Image Two or Three Monitors If there is no image on more than one of the panels, then repeat the steps in Section for all of the monitors in the array No Image on Any Monitor If no image displays on any monitors, repeat the steps in Section for all the monitors in the array, then try the following additional steps Check Video Wall Controller Power Make sure that the video wall controller is powered on. Step 1: Check the power supply is connected to the power source. Step 2: Check that the ivw-fd122 is connected to the power supply.step0: Check Source Video Connection Check to that the source video cable is securely connected to the ivw-fd122. Step 1: Securely attach the video cable from the video source to the ivw-fd122. Page 46
55 Step 2: Fasten the video cable at both ends and tighten the video cable screws. Step 0: Page 47
ivw-fd133 Video Wall Controller MODEL: ivw-fd133 Video Wall Controller Supports 3 x 3 and 2 x 2 Video Wall Array User Manual Page i Rev. 1.
 MODEL: ivw-fd133 Video Wall Controller Supports 3 x 3 and 2 x 2 Video Wall Array User Manual Rev. 1.01 Page i Copyright COPYRIGHT NOTICE The information in this document is subject to change without prior
ivw-fh122 ivw-fh122 User Manual Model: Video Wall Controller Supports 2 x 2, 2 x 1 and 1 x 1 Video Wall Array Rev. 1.0
 Model: ivw-fh122 ivw-fh122 Video Wall Controller Supports 2 x 2, 2 x 1 and 1 x 1 Video Wall Array User Manual Rev. 1.0 Copyright The information in this document is subject to change without prior notice
ivw-ud322 / ivw-ud322f
 ivw-ud322 / ivw-ud322f Video Wall Controller Supports 2 x 2, 2 x 1, 3 x 1, 1 x 3, 4 x 1 & 1 x 4 Video Wall Array User Manual Rev. 1.01 i Notice Thank you for choosing inds products! This user manual provides
UltraVista LC II HDMI 2x2 HDMI Video Controller/Splitter
 UltraVista LC II HDMI 2x2 HDMI Video Controller/Splitter INSTALLATION AND OPERATIONS MANUAL VWL-B122/FH 10707 Stancliff Road Phone: (281) 933-7673 Houston, Texas 77099 WWW.ROSE.COM LIMITED WARRANTY Rose
2013, 2014 Hewlett-Packard Development Company, L.P.
 User Guide 2013, 2014 Hewlett-Packard Development Company, L.P. The only warranties for HP products and services are set forth in the express warranty statements accompanying such products and services.
P XGA TFT Monitor. User s Manual
 P6151 15 XGA TFT Monitor User s Manual Disclaimers This manual has been carefully checked and believed to contain accurate information. Axiomtek Co., Ltd. assumes no responsibility for any infringements
DH551C/DH550C/DL550C Double Sided Display User Manual
 DH551C/DH550C/DL550C Double Sided Display User Manual Disclaimer BenQ Corporation makes no representations or warranties, either expressed or implied, with respect to the contents of this document. BenQ
User Manual MODEL: KK1500-TR. Touch Display LCD Monitor. Installation Guide. 15 Resistive Touch LCD Monitor
 Touch Display LCD Monitor User Manual Installation Guide 15 Resistive Touch LCD Monitor MODEL: KK1500-TR i-tech Company LLC TOLL FREE: (888) 483-2418 EMAIL: info@itechlcd.com WEB: www.itechlcd.com User
User Guide. 20 Widescreen LED Monitor NS-20EM50A13
 User Guide 20 Widescreen LED Monitor NS-20EM50A13 Contents Introduction.....................................................1 Safety Precautions...............................................1 WARNINGS:......................................................
Dell D3218HN. User s Guide. Regulatory model: D3218HNo
 Dell D3218HN User s Guide Regulatory model: D3218HNo Notes, cautions, and warnings NOTE: A NOTE indicates important information that helps you make better use of your computer. CAUTION: A CAUTION indicates
PLL2210MW LED Monitor
 PLL2210MW LED Monitor USER'S GUIDE www.planar.com Content Operation Instructions...1 Safety Precautions...2 First Setup...3 Front View of the Product...4 Rear View of the Product...5 Quick Installation...6
PL2410W LCD Monitor USER'S GUIDE.
 PL2410W LCD Monitor USER'S GUIDE www.planar.com Content Operation Instructions...1 Safety Precautions...2 First Setup...3 Front View of the Product...4 Rear View of the Product...5 Quick Installation...6
User Manual. Multi-Screen Splicing Processor J6
 User Manual Multi-Screen Splicing Processor J6 Rev1.0.0 NS160100147 Statement Dear users, Welcome to use the J6, a multi-screen splicing processor. This manual is intended to help you to understand and
19 / 20.1 / 22 WIDE SCREEN TFT-LCD MONITOR
 19 / 20.1 / 22 WIDE SCREEN TFT-LCD MONITOR V193/ V220 Series V202 Series USER MANUAL www.viewera.com Rev. 2.0 Table of Contents EMC Compliance......1 Important Precautions...2 1. Package contents....3
QuickSpecs. HP V19b 18.5-inch Monitor. Overview. 1. Menu 3. Plus ( + ) 5. Power 2. Minus ( - ) 4. OK. 1. Power connector 3. Security lock slot 2.
 5. Power 2. Minus ( - ) 4. OK. 1. Power connector 3. Security lock slot 2.") Overview 1. Menu 3. Plus ( + ) 5. Power 2. Minus ( - ) 4. OK 1. Power connector 3. Security lock slot 2. VGA Brazil Version 1 April 20, 2018 Page 1 Model: 2XM32AA Panel Type 18.5-inch TN Viewable Image
Overview 1. Menu 3. Plus ( + ) 5. Power 2. Minus ( - ) 4. OK 1. Power connector 3. Security lock slot 2. VGA Brazil Version 1 April 20, 2018 Page 1 Model: 2XM32AA Panel Type 18.5-inch TN Viewable Image
User Manual MODEL: KKF1500-PCAP. True FLAT P-CAP LCD Monitor. Installation Guide. 15 True FLAT P-CAP Touch LCD Monitor
 True FLAT P-CAP LCD Monitor User Manual Installation Guide 15 True FLAT P-CAP Touch LCD Monitor MODEL: KKF1500-PCAP i-tech Company LLC TOLL FREE: (888) 483-2418 EMAIL: info@itechlcd.com WEB: www.itechlcd.com
PLL2710W LED LCD Monitor
 PLL2710W LED LCD Monitor USER'S GUIDE www.planar.com Content Operation Instructions...1 Safety Precautions...2 Package Overview...3 First Setup...4 Front View of the Product...5 Rear View of the Product...6
MP 35" Zero-G 100Hz Curved Monitor with AMD FreeSync 2.0
 MP 35" Zero-G 100Hz Curved Monitor with AMD FreeSync 2.0 P/N 31005 User's Manual SAFETY WARNINGS AND GUIDELINES Please read this entire manual before using this device, paying extra attention to these
LA1500R USER S GUIDE.
 LA1500R USER S GUIDE www.planar.com The information contained in this document is subject to change without notice. This document contains proprietary information that is protected by copyright. All rights
J6 User Manual. User Manual. Multi-Screen Splicing Processor J6. Xi an NovaStar Tech Co., Ltd. Rev1.0.1 NS
 J6 User Manual User Manual Multi-Screen Splicing Processor J6 Rev1.0.1 NS160110162 Statement Dear users, You are welcome to use the J6, a multi-screen splicing processor of Xi'an NovaStar Tech Co., Ltd.
USER MANUAL. 27 Full HD Widescreen LED Monitor L27ADS
 USER MANUAL 27 Full HD Widescreen LED Monitor L27ADS TABLE OF CONTENTS 1 Getting Started 2 Control Panel/ Back Panel 3 On Screen Display 4 Technical Specs 5 Care & Maintenance 6 Troubleshooting 7 Safety
USER MANUAL. 28" 4K Ultra HD Monitor L28TN4K
 USER MANUAL 28" 4K Ultra HD Monitor L28TN4K TABLE OF CONTENTS 1 Getting Started 2 Control Panel/ Back Panel 3 On Screen Display 4 Technical Specs 5 Care & Maintenance 6 Troubleshooting 7 Safety Info &
CP-255ID Multi-Format to DVI Scaler
 CP-255ID Multi-Format to DVI Scaler Operation Manual DISCLAIMERS The information in this manual has been carefully checked and is believed to be accurate. Cypress Technology assumes no responsibility
USER MANUAL. 22" Class Slim HD Widescreen Monitor L215DS
 USER MANUAL 22" Class Slim HD Widescreen Monitor L215DS TABLE OF CONTENTS 1 Getting Started Package Includes Installation 2 Control Panel / Back Panel Control Panel Back Panel 3 On Screen Display 4 Technical
Safety Precautions and Maintenance
 Safety Precautions and Maintenance 1. Unplug the monitor before cleaning it with a slightly damp cloth. 2. Wiping the screen with a dry cloth is recommendable, and only during the power has been switched
Introduction...2. Features...2 Safety Precautions...2. Installation...4
 PE1900 Contents Introduction...2 Features...2 Safety Precautions...2 Installation...4 Unpacking the Display...4 Locations and Functions of Controls...4 Connections...5 Using Your Display...7 Turning the
PRO-ScalerHD2V HDMI to VGA & Audio Scaler Converter. User s Guide. Made in Taiwan
 PRO-ScalerHD2V HDMI to VGA & Audio Scaler Converter User s Guide Made in Taiwan Congratulations for owning a gofanco product. Our products aim to meet all your connectivity needs wherever you go. Have
INSTRUCTIONAL MANUAL FOR LCD ZOOM MICROSCOPE
 INSTRUCTIONAL MANUAL FOR LCD ZOOM MICROSCOPE ? 8 LCD Screen? 10.4 LCD Screen LCD Zoom Microscope Instruction Manual Please read the Instruction Manual carefully before installation and keep it for future
LM/TM-30xx, 31xx Series LCD Monitor User s Manual Rev. A0
 LM/TM-30xx, 31xx Series LCD Monitor User s Manual Rev. A0 FCC NOTICE This equipment generates, uses, and can radiate radio frequency energy and, if not installed and used in accordance with the instructions
MP Zero-G 27" WQHD 144Hz TN-LED Monitor with AMD FreeSync
 MP Zero-G 27" WQHD 144Hz TN-LED Monitor with AMD FreeSync P/N 31004 User's Manual SAFETY WARNINGS AND GUIDELINES Please read this entire manual before using this device, paying extra attention to these
User Manual 15" LCD Open frame SAW Touch Monitor KOT-0150US-SA4W. Table of Contents
 User Manual 15" LCD Open frame SAW Touch Monitor KOT-0150US-SA4W Table of Contents Chapter 1. Introduction...2 1.1 Product Description 1.2 About the Product Chapter 2. Installation and Setup...2 2.1 Unpacking
Table of Contents. Versa TILE & Versa DRIVE D2 Quick Start Manual
 Versa TILE & Versa DRIVE D2 Table of Contents 1. Introduction 2 2. Versa TILE Assembly & Cabling 2 3. Computer & Versa DRIVE Connections 2 4. RasterMAPPER 3 5. Buffer Board 4 6. Testing the System 5 7.
User Manual rev: Made in Taiwan
 CV-500S HDMI to Component/CVBS & Audio Scaler Converter User Manual rev: 131218 Made in Taiwan The CV-500S HDMI to Component/CVBS & Audio Scaler Converter has been tested for conformance to safety regulations
HP EliteDisplay LED Backlit Monitors. User Guide
 HP EliteDisplay LED Backlit Monitors User Guide 2013 Hewlett-Packard Development Company, L.P. Microsoft and Windows are U.S. registered trademarks of Microsoft Corporation. The only warranties for HP
COLOR TFT LCD MONITOR. Manual
 COLOR TFT LCD MONITOR Manual Safety defended: Properly maintains your system to be possible to guarantee its service life and to reduce the damage risk. It should avoid the damp and exceeding temperature
LM6100 Series. LCD Monitor USER S MANUAL I. FEATURES. Rev. : B P/N:
 LM6100 Series LCD Monitor USER S MANUAL Rev. : B I. FEATURES Light weight and high luminance LCD monitor for industrial and commercial use Application covers POS, POIS (Kiosk), Factory Automation etc.
Operating Instructions
 Marshall Electronics Broadcast A/V Division Model No. VSW-2200 4-Input Seamless SDI A/V Switcher Operating Instructions Table of Contents 1. Overview... 2. Features.... Package Contents... 4. Specifications...
PXL2470MW LED LCD Monitor
 PXL2470MW LED LCD Monitor USER'S GUIDE www.planar.com Content Operation Instructions...1 Unpacking Instructions...2 Safety Precautions...2 Package Overview...3 First Setup...4 Front View of the Product...5
USER MANUAL Full HD Widescreen LED Monitor L236VA
 USER MANUAL 23.6 Full HD Widescreen LED Monitor L236VA TABLE OF CONTENTS 1 Getting Started 2 Control Panel/ Back Panel 3 On Screen Display 4 Technical Specs 5 Care & Maintenance 6 Troubleshooting 7 Safety
USER S Manual NGLT104WPD NGLT150WPD LCD TV / Monitor (IP67 Grade)
") USER S Manual NGLT104WPD NGLT150WPD LCD TV / Monitor (IP67 Grade) This Manual is revisable without further notice Contents CONTENTS ------------------------------------------------------------------- 1
USER S Manual NGLT104WPD NGLT150WPD LCD TV / Monitor (IP67 Grade) This Manual is revisable without further notice Contents CONTENTS ------------------------------------------------------------------- 1
PX1710M LCD Monitor USER S GUIDE
 PX1710M LCD Monitor USER S GUIDE www.planar.com The information contained in this document is subject to change without notice. This document contains proprietary information that is protected by copyright.
22" Touchscreen LED Monitor USER'S GUIDE
 22" Touchscreen LED Monitor USER'S GUIDE Content Operation Instructions...1 Unpacking Instructions...2 Safety Precautions...2 Front View of the Product...3 Rear View of the Product...4 Quick Installation...5
OPERATING GUIDE. HIGHlite 660 series. High Brightness Digital Video Projector 16:9 widescreen display. Rev A June A
 OPERATING GUIDE HIGHlite 660 series High Brightness Digital Video Projector 16:9 widescreen display 111-9714A Digital Projection HIGHlite 660 series CONTENTS Operating Guide CONTENTS About this Guide...
28 4K LED monitor. User Manual M284K
 28 4K LED monitor User Manual M284K CONTENTS Safety Information... 2 What s included..... 4 Getting Started....... 8 Troubleshooting.... 14 Specification.... 15 2 of 15 SAFETY INFORMATION Read these instructions
PLL1920M LED LCD Monitor
 PLL1920M LED LCD Monitor USER'S GUIDE www.planar.com Content Operation Instructions...1 Safety Precautions...2 First Setup...3 Front View of the Product...4 Rear View of the Product...5 Installation...6
Durable and Reliable Design for 24/7 Use. Overview. Narrow Bezel Optimized for Video Walls. 42 Narrow bezel commercial LED display
 Durable and Reliable Design for 24/7 Use 42 Narrow bezel commercial LED display Overview The ViewSonic CDP4260-L is a 42 (42 viewable) commercial LED display designed for use 24 hours a day, 7 days a week.
ACUBRITE 23 SS. Manual. Stainless Steel Chassis 23" LCD Display. Content
 ACUBRITE 23 SS Stainless Steel Chassis 23" LCD Display Manual Introduction... 2 Hardware Installation... 2 The Display Timing... 5 The Display Outline Dimensions... 6 The Display Controls... 7 The Screen
T2210HD/T2210HDA 21.5 Wide-Screen LCD Monitor User Manual
 T2210HD/T2210HDA 21.5 Wide-Screen LCD Monitor User Manual Table of Contents Package contents...3 Installation...4 To connect the monitor to your PC... 4 Adjusting your monitor...5 Functions of the buttons
TABLE OF CONTENTS Important Safety Instructions Package Content Setting Up the Display Trouble shooting Specifications Product Dimensions
 TABLE OF CONTENTS Important Safety Instructions...1 1.1 Safety precautions and maintenance....1 1.2 Use.......4 1.3 Installation Notes.......7 Package Content...9 2.1 Unpacking...9 2.2 Accessories......10
Translator VGA to HDMI
 Translator VGA to HDMI VGA to HDMI Converter/Scaler Installation and Operation Manual 10707 Stancliff Road Houston, Texas 77099 Phone: (281) 933-7673 techsupport@rose.com LIMITED WARRANTY Rose Electronics
USER MANUAL Full HD Widescreen LED Monitor L215IPS
 USER MANUAL 21.5 Full HD Widescreen LED Monitor L215IPS TABLE OF CONTENTS 1 Getting Started 2 Control Panel/ Back Panel 3 On Screen Display 4 Technical Specs 5 Care & Maintenance 6 Troubleshooting 7 Safety
PXL2760MW LED LCD Monitor
 PXL2760MW LED LCD Monitor USER'S GUIDE www.planar.com Content Operation Instructions...1 Safety Precautions...2 Package Overview...3 First Setup...4 Front View of the Product...5 Rear View of the Product...6
QuickSpecs. Overview. Key features: HP V193f 18.5-inch Monitor. Technical Specifications
 1. Menu button 4. OK/Auto 2. Minus 5. Power button 3. Plus Overview Get quality presentation features at a price point that doesn t break the bank with the HP V193f 18.5-inch LED Backlit Monitor. Key features:
It will cause malfunction if the monitor is operating with unspecified power supply
 User Manual / Installation Guide Model No. PTM-1525R/RT Warning! It will cause malfunction if the monitor is operating with unspecified power supply unit or incorrect power voltage. Do not exposure this
P-2 Installing the monitor (continued) Carry out as necessary
 Carry out as necessary") P-2 Installing the monitor (continued) Carry out as necessary Using the monitor without the bezel MDT552S satisfies the UL requirements as long as it is used with the bezel attached. When using the monitor
P-2 Installing the monitor (continued) Carry out as necessary Using the monitor without the bezel MDT552S satisfies the UL requirements as long as it is used with the bezel attached. When using the monitor
USER MANUAL. 27" 2K QHD LED Monitor L27HAS2K
 USER MANUAL 27" 2K QHD LED Monitor L27HAS2K TABLE OF CONTENTS 1 Getting Started 2 Control Panel/ Back Panel 3 On Screen Display 4 Technical Specs 5 Troubleshooting 6 Safety Info & FCC warning 1 GETTING
MaxView Cinema Kit Quick Install Guide
 SYSTEM SETUP The MaxView will work at any of the following display settings: INSTALLATION MaxView Cinema Kit Quick Install Guide Step 1 - Turn off your computer. Disconnect your monitor s VGA cable from
USER'S MANUAL DoubleSight DS-2700DW LCD MONITOR
 1 - (877) TWO - LCDS Part No. 90-X-DS2700DW-EUEX03 Made in Korea USER'S MANUAL DoubleSight DS-2700DW LCD MONITOR Safety Precautions Safety Precautions 27 Type - 1920x120@60Hz Safety Precautions Introduction
USER MANUAL. 27 Full HD Widescreen LED Monitor L270E
 USER MANUAL 27 Full HD Widescreen LED Monitor L270E TABLE OF CONTENTS 1 Getting Started 2 Control Panel/ Back Panel 3 On Screen Display 4 Technical Specs 5 Care & Maintenance 6 Troubleshooting 7 Safety
RMS 8424S Quick Start
 VIEWSIZE THE WORLD RMS 8424S Quick Start Standard 4 unit rack mount size 8 inch LCD 2 1024 3 (RGB) 600 16:9 / 4:3 adjustable SDI/HDMI embedded audio output via 3.5mm earphone socket Support SDI/DVI audio
USER MANUAL. Vidifox Document Camera DV 550S
 Vidifox Document Camera DV 550S USER MANUAL Please read this User Manual thoroughly before you use the document camera. Keep the CD-ROM in a convenient place so you can use it quickly if you need to. Please
BRIGHTLINK HD Video Wall Controller BRIGHTLINKAV.COM
 BRIGHTLINK HD Video Wall Controller MODEL: BL-VW22 Operating Instructions BRIGHTLINKAV.COM Dear Customer Thank you for purchasing this product. For optimum performance and safety, please read these instructions
Crescent Walls User Manual
 HDMI-8x8 Crescent Walls User Manual COPYRIGHT and TRADEMARK All rights reserved by APANTA LCC, Porland, Oregon, USA. No part of this document may be reproduced in any form or by any means without written
SC-HD-2A HDMI Scaler & Audio Embedder / Extractor
 User s Manual SC-HD-2A HDMI Scaler & Audio Embedder / Extractor Scale HDMI or DVI video Embed Digital or Analog Audio into HDMI output Extract (De-embed) Digital and Analog Audio from HDMI input UMA1246
VITEK VTM-TLM191 VTM-TLM240
 VTM-TLM191 VTM-TLM240 19 & 24 Professional LED Monitors with HDMI, VGA, and Looping BNC VITEK FEATURES 19 & 24 Wide Screen LED Display Panel HDMI, VGA, and Looping BNC Composite Video Inputs & Stereo Audio
DVDO VS4 HDMI Switch. User s Guide How to install, set up, and use your new DVDO product
 DVDO VS4 HDMI Switch User s Guide How to install, set up, and use your new DVDO product TABLE OF CONTENTS Table of Contents... 1 Introduction... 1 Installation and Set-Up... 2 Remote Control Operation...
DC162 Digital Visualizer. User Manual. English - 1
 DC162 Digital Visualizer User Manual English - 1 Table of Contents CHAPTER 1 PRECAUTIONS... 5 CHAPTER 2 PACKAGE CONTENT... 7 CHAPTER 3 PRODUCT OVERVIEW... 8 3.1 PRODUCT INTRODUCTION... 8 3.2 I/O CONNECTION...
BY-HPE11KTA. Operating Instructions. Coaxial - LAN Converter with PoE function. Indoor Use Only. Model No. Attached Installation Guide
 Operating Instructions Coaxial - LAN Converter with PoE function Model No. Indoor Use Only BY-HPE11KTA Attached Installation Guide Before attempting to connect or operate this product, please read these
DISTRIBUTION AMPLIFIER
 MANUAL PART NUMBER: 400-0045-005 DA1907SX 1-IN, 2-OUT VGA/SVGA/XGA/UXGA DISTRIBUTION AMPLIFIER USER S GUIDE TABLE OF CONTENTS Page PRECAUTIONS / SAFETY WARNINGS... 2 GENERAL...2 GUIDELINES FOR RACK-MOUNTING...2
Warning...1 Safety Precaution...3
 PL1910W Contents Preface...1 Warning...1 Safety Precaution......3 Installation...4 Introduction...4 Features...4 Unpacking...5 Attaching the Base...6 Removing the Base...7 Preparing The Monitor For Wall-Mounting...8
Quick Setup 1 Unpack the projector
 PowerLite 410W Quick Setup 1 Unpack the projector You should have the following items: Projector and lens cover Power cord Remote control and batteries Computer cable Projector CD-ROMs Password protected
User Manual TL-2X1-HDVC 2x1 HDMI & VGA Switcher with Control All Rights Reserved Version: TL-2X1-HDVC_160630
 User Manual TL-2X1-HDVC 2x1 HDMI & VGA Switcher with Control All Rights Reserved Version: TL-2X1-HDVC_160630 Preface Read this user manual carefully before using this product. Pictures shown in this manual
Uni700 LCD Controller
 Landmark Technology Inc. Uni700 LCD Controller For TFT LCDs with Resolution up to 1,920 x 1,200 (Version A) January 27, 2009 1 1. Introduction The Uni700 controller board is designed for LCD panels of
QuickSpecs. HP ProDisplay P19A 19-inch LED Backlit Monitor. Overview
 Overview 1. OK/Menu If the OSD menu is on, press to select the highlighted menu item. Opens, selects or exits the OSD menu. 2. Auto/Minus If the OSD menu is inactive, press to activate the auto adjustment
EDITION NOTES. Document Revision
 User Manual EDITION NOTES The VIP Drive 43Nova User Manual includes a description, safety precautions, installation, programming, operation, and maintenance instructions for the VIP Drive 43Nova as of
PLUSTV 1680ex USER S MANUAL
 PLUSTV 1680ex USER S MANUAL Ver 1.0 Contents 1. Instruction... 1 1.1 Functions and features... 1 1.2 Packaged contents... 2 1.3 Technical specifications... 3 2. Remote control instructions... 4 2.1 Diagram
Video Wall Installation Guide User Guide
 Video Wall Installation Guide User Guide IMPORTANT: Please read this User Guide to obtain important information on installing and using your product in a safe manner, as well as registering your product
User Guide. Single-Link DVI Active Cable Extender. DVI-7171c
 User Guide Single-Link DVI Active Cable Extender DVI-7171c TABLE OF CONTENTS SECTION PAGE PRODUCT SAFETY...1 PRODUCT LIABILITY...1 1.0 INTRODUCTION...2 2.0 SPECIFICATIONS...3 3.0 PACKAGE CONTENTS...4 4.0
PRO-ScalerV2HD VGA to HDMI & Audio Scaler Converter. User s Guide. Made in Taiwan
 VGA to HDMI & Audio Scaler Converter User s Guide Made in Taiwan Congratulations for owning a gofanco product. Our products aim to meet all your connectivity needs wherever you go. Have fun with our products!
User Manual. PC / HD Scaler. with advanced video processing. VGA to Component Video Component Video to VGA VGA to VGA Component to Component
 User Manual PC / HD Scaler with advanced video processing VGA to Component Video Component Video to VGA VGA to VGA Component to Component Model 1366 WARNINGS Read these instructions before installing or
PT1500MX / PT1550MX PT1555MU / PT1505MU Touch Screen LCD Monitors
 PT1500MX / PT1550MX PT1555MU / PT1505MU Touch Screen LCD Monitors USER S GUIDE www.planar.com Important Recycle Instructions: Lamp(s) inside this product contains mercury. This product may contain other
QuickSpecs. HP N220h 21.5-inch Monitor. Overview. 1. Menu/OK 3. Plus ( + ) 5. Power 2. Minus ( - ) 4. Exit/Back
 5. Power 2. Minus ( - ) 4. Exit/Back") Overview 1. Menu/OK 3. Plus ( + ) 5. Power 2. Minus ( - ) 4. Exit/Back 6. Security lock slot 8. HDMI 7. Power connector 9. VGA APJ Version 2 July 24, 2018 Page 1 Models: 4JF58A* Panel Type 21.5-inch IPS
Overview 1. Menu/OK 3. Plus ( + ) 5. Power 2. Minus ( - ) 4. Exit/Back 6. Security lock slot 8. HDMI 7. Power connector 9. VGA APJ Version 2 July 24, 2018 Page 1 Models: 4JF58A* Panel Type 21.5-inch IPS
MX Quasi Quad-View Video Processor. User Manual. Made in Taiwan
 MX-1004 Quasi Quad-View Video Processor User Manual Made in Taiwan Safety and Notice The MX-1004 Quasi Quad-View Video Processor has been tested for conformity to safety regulations and requirements, and
Quick Operation Guide of LTN7700/7600 Series NVR
 Quick Operation Guide of LTN7700/7600 Series NVR UD.6L0202B0042A02 Thank you for purchasing our product. If there is any question or request, please do not hesitate to contact dealer. This manual is applicable
LCD MONITOR. quick start guide P2070,P2270,P2370,P2070G,P2270G,P2370G
 LCD MONITOR quick start guide P2070,P2270,P2370,P2070G,P2270G,P2370G ii Introduction Package Contents Please make sure the following items are included with your monitor. If any items are missing, contact
QuickSpecs. HP VH27 27-inch Monitor. Overview. 1. Menu 3. Plus ( + ) 5. Power 2. Minus ( - ) 4. Exit
 5. Power 2. Minus ( - ) 4. Exit") Overview 1. Menu 3. Plus ( + ) 5. Power 2. Minus ( - ) 4. Exit 6. Security lock slot 8. DisplayPort TM 7. Power connector 9. HDMI 10. VGA NA Version 2 April 5, 2017 Page 1 Models: 2KZ36A - 3PL18A Panel
Overview 1. Menu 3. Plus ( + ) 5. Power 2. Minus ( - ) 4. Exit 6. Security lock slot 8. DisplayPort TM 7. Power connector 9. HDMI 10. VGA NA Version 2 April 5, 2017 Page 1 Models: 2KZ36A - 3PL18A Panel
Advantech Proudly Presents Professional Monitor Series
 Advantech Proudly Presents Professional Monitor Series Model PN-E421 P/N: DSD-420N-70FH-S1E The 42" Class (42-1/16" Diagonal) LCD monitor offers exceptionally high image quality and reliability for use
FTC AGL System Controller Reference Manual Part Number
 SERIAL NUMBER FTC 190-1 AGL System Controller Reference Manual Part Number 7911901 Flash Technology, 332 Nichol Mill Lane, Franklin, TN 37067 (615) 261-2000 Front Matter Abstract This manual contains information
Manual Version Ver 1.0
 The BG-3 & The BG-7 Multiple Test Pattern Generator with Field Programmable ID Option Manual Version Ver 1.0 BURST ELECTRONICS INC CORRALES, NM 87048 USA (505) 898-1455 VOICE (505) 890-8926 Tech Support
IPS LED Monitor. (LED Monitor*) OWNER S MANUAL
 OWNER S MANUAL") OWNER S MANUAL IPS LED Monitor (LED Monitor*) * LG LED Monitor applies LCD screen with LED backlights. Please read this manual carefully before operating your set and retain it for future reference. 34UC89G
OWNER S MANUAL IPS LED Monitor (LED Monitor*) * LG LED Monitor applies LCD screen with LED backlights. Please read this manual carefully before operating your set and retain it for future reference. 34UC89G
LG Digital Signage *MFL * Easy Setup Guide (MONITOR SIGNAGE)
") Easy Setup Guide LG Digital Signage (MONITOR SIGNAGE) Please read this manual carefully before operating your set and retain it for future reference. 47LV35A 55LV35A *MFL68621511* P/NO : MFL68621511(1608-REV00)
Easy Setup Guide LG Digital Signage (MONITOR SIGNAGE) Please read this manual carefully before operating your set and retain it for future reference. 47LV35A 55LV35A *MFL68621511* P/NO : MFL68621511(1608-REV00)
QuickSpecs. HP V inch Monitor. Overview
 Overview 1. Power 6. Power connector 2. Exit 7. HDMI 3. Plus ( + ) 8. DVI 4. Minus ( - ) 9. VGA 5. Menu 10. Security lock slot c05943581 DA16181 Worldwide Version 5 February 27, 2019 Page 1 Models: 2KZ35A
Professional Media Server Quick Start Guide
 ipump 6400 Professional Media Server Quick Start Guide Figure 4. ipump Web Interface Status Page 6. Shut down your ipump from the front panel. Navigate from the home screen to the Shutdown screen as follows:
COLOR TFT LCD MONITOR WITH MULTI-TOUCH FUNCTION Manual
 COLOR TFT LCD MONITOR WITH MULTI-TOUCH FUNCTION Manual DEAR CUSTOMERS Thank you for choosing our TFT LCD (liquid crystal display) monitor. This product employs integrate circuits, low power consumption,
CDV07. Analog video distribution amplifier(s)
") CDV07 Analog video distribution amplifier(s) TECHNICAL MANUAL CDV07 Analog video distribution amplifier Lange Wagenstraat 55 NL-5126 BB Gilze The Netherlands Phone: +31 161 850 450 Fax: +31 161 850 499
CDV07 Analog video distribution amplifier(s) TECHNICAL MANUAL CDV07 Analog video distribution amplifier Lange Wagenstraat 55 NL-5126 BB Gilze The Netherlands Phone: +31 161 850 450 Fax: +31 161 850 499
Marshall Electronics. Pro A/V Communications VMV-402-SH. 3G/HD/SD-SDI Quad-viewer/Switcher with Audio Meter Display. User Manual.
 Marshall Electronics Pro A/V Communications VMV-402-SH 3G/HD/SD-SDI Quad-viewer/Switcher with Audio Meter Display User Manual Table of Contents 1. Introduction... 3 2. Features... 3 3. Package Contents...
Composite to HDMI Scaler
 Composite to HDMI Scaler GTV-COMPSVID-2-HDMIS User Manual Version A2 gefen.com ASKING FOR ASSISTANCE Technical Support: Telephone Email 1-707-283-5900 1-800-472-5555 support@gefen.com Technical Support
QuickSpecs. HP V214a 20.7-inch Monitor. HP V214a 20.7-inch Monitor. Overview. 1. Menu 3. Plus ( + ) 5. Power 2. Minus ( - ) 4. OK
 5. Power 2. Minus ( - ) 4. OK") Overview 1. Menu 3. Plus ( + ) 5. Power 2. Minus ( - ) 4. OK 1. Security lock slot 4. VGA 2. Power connector 5. Audio in 3. HDMI 1.4 c05547340 DA 15984 Worldwide Version 2 April 5, 2018 Page 1 Models:
Overview 1. Menu 3. Plus ( + ) 5. Power 2. Minus ( - ) 4. OK 1. Security lock slot 4. VGA 2. Power connector 5. Audio in 3. HDMI 1.4 c05547340 DA 15984 Worldwide Version 2 April 5, 2018 Page 1 Models:
CS-802D HD High Resolution Scaler
 CS-802D HD High Resolution Scaler Operation Manual DISCLAIMERS The information in this manual has been carefully checked and is believed to be accurate. Cypress Technology assumes no responsibility for
17 19 PROFESSIONAL LCD COLOUR MONITOR ART
 17 19 PROFESSIONAL LCD COLOUR MONITOR ART. 41657-41659 Via Don Arrigoni, 5 24020 Rovetta S. Lorenzo (Bergamo) http://www.comelit.eu e-mail:export.department@comelit.it WARNING: TO REDUCE THE RISK OF FIRE