QUICK GUIDE TV / PVR CONNECTION
|
|
|
- Lesley O’Brien’
- 6 years ago
- Views:
Transcription

1
2 QUICK GUIDE TV / PVR CONNECTION
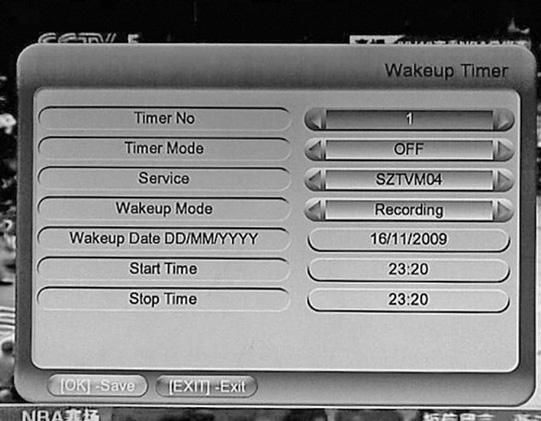
3 A. Tuning QUICK GUIDE Twin Tuner PVR Recording HD Set Top Box 1. Menu, Set Up 2. Tuning i. Search Mode : Select Auto ii. Press OK to save data after scanning completed B. SUMMER TIME / DAYLIGHT SAVING TIME Setting To ensure accurate EPG ( Electronic Program Guide) Setting, particularly for areas where Daylight Saving Time is applicable. Using the remote control, please follow these steps : 1. Menu 2. Set Up 3. Time/OSD 4. Region Setting, Select : USER ( instead of NSW or Vic) 5. Time Offset, set to : +11:00 6. Press OK to save data 7. Ready to use HD Set Top Box now C. FOUR (4) RECORDING MODES 1. Live Recording : press Record button while watching a TV program (Press Stop button, to stop recording. ) Note: Selecting a second channel program can also be recorded by pressing Record button simultaneously. And a third program from either of the two TV Stations/carriers can be watched while recording 2 programs at the same time. 2. Time Shift Recording : i. Press Pause button, then Play to playback the program. ii. Press >>> Fast Forward to catch on the Live program iii. Press STOP to stop recording Note: Selecting a second channel program can also be recorded by pressing Pause button simultaneously. And a third program from either of the two TV Stations/carriers can be watched while recording 2 programs at the same time. 3 EPG (Electronic Program Guide) Recording : ( refer to page 15 of user manual ) i. Press EPG on the Remote Control ii. Select program & preferred time/day schedule. iii. Press Red (not record button) to set PVR into recording mode iv. PVR will record automatically on selected time schedule Note: Selecting a second channel program from the EPG, please follow these steps: i. Press EPG, to show other channel listings. ii. Select TV program from the list on the left using Remote Up/Down Key iii Press OK, then Press 3 to show weekly schedule. iv. Select Program and preferred time schedule v Pressing Record button to program recording mode. Note: During playing back of both programs, a third program from either of the two TV Stations/carriers can be watched while these 2 programs are still being recorded. at the same time. 4 Time Set Recording : i. Menu, Select : Time Set Up ii. Wake Up Menu: 1. Timer Mode: Select Off / Once/Daily/Weekly 2. Service : Select Programs 3. WakeUp Mode: Select : Service / Record 4. WakeUp Date : Enter Day/Month/Year 5. Start Time : Enter Time 6. Stop Time : Enter Time Note: Selecting a second channel program from the EPG can also be recorded by pressing Record button simultaneously.
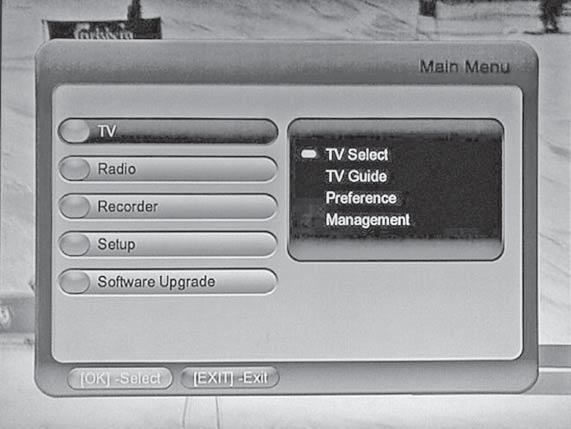
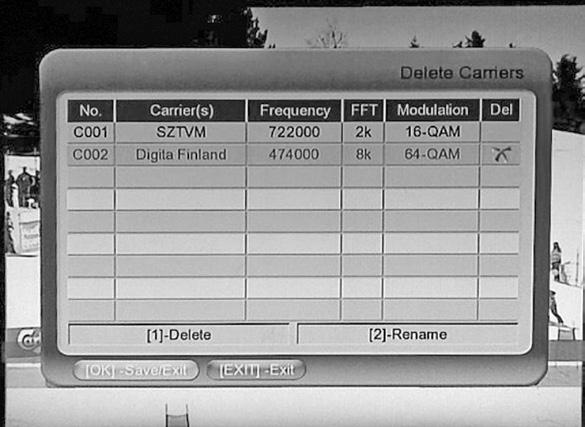
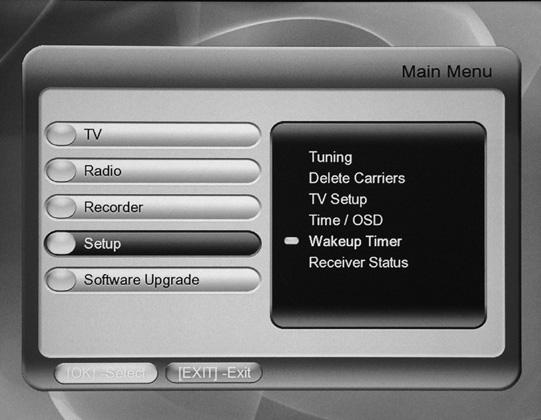
4 Content 1. SAFETY REMARK 1 2. Accessories Supplied 2 3. Features 3 4. Front Panel 4 PROPER INSERT OF Hard Disk 4 5. Rear Panel 5 6. Remote Control Unit 6 7. Connecting to a TV 7 8. Quick Start Guide 8 -Tuning Local Digital TV/Radio Station 8 -TV Screen Setup 9 -Location & Time Offset Set Up 11 -Perform Factory Default Basic Operations 14 -Change TV/Radio Channel 14 -Change Volume Level 14 -Change TV/Radio Operation Mode 14 -Mute 14 -Audio Selection 15 -Electronic Program Guide (EPG) 15 -TV/Radio Channel Information 16 -Teletext/DVB Subtitle/Subtitle Function 17 -Wakeup Timer 19 -Power On/ Off 19 -Recording Main Menu 20 - Main Menu 20 TV Select 21 TV Guide 21 TV Preference 22 TV Management 22 - Radio Menu 23 Radio Select 23 Radio Guide 24 Radio Preference 24 Radio Management 25 - Setup Menu 26 Tuning Menu 26 Delete Carriers 27 TV Setup Menu 27 Time/OSD Menu 31 Wakeup Timer 32
5 - PVR Function 33 Record Browser (Video Program Browser) 33 Storage Device Info 35 Playlist Manager 36 Digital Photo 37 Safe Remove 38 Password Setup 38 - Software Upgrade Trouble Shooting Glossary 43 Basic Information Getting Start Basic Operations Menu Operations Others
6 1. SAFETY REMARK Basic Information Be sure to use the machine correctly, please read and understand this User Manual before starting the operation of the receiver. DO NOT open the cover. It is dangerous to touch the inner part of the receiver due to electric shock hazard. DO NOT personnel. Disconnect the receiver from the wall outlet before cleaning. Us only a soft dry cloth to clean the case of the receiver. Please unplug the power adaptor from the wall outlet when the receiver is unused for a long time. DO NOT connect or modify cables when the receiver is plugged-in. Unplug the power adaptor of the receiver at the wall outlet before connecting or disconnecting any cables. DO NOT use a damaged power cord. Damaged power cords may Cause Fire or Electric Shock. DO NOT touch a power cord with wet hands. It may cause Electric Shock. NEVER cover the receiver with soft furnishing or carpets. For indoor Use Only. DO NOT use or store the receiver where it is exposed to sunlight or near a heater. NEVER put other electronic equipment on top of the receiver. DO NOT use any attachments that are not recommended by the manufacturer as this could cause damage to, or impair the operation of the equipment. DO NOT expose the receiver to dripping or splashing. DO NOT The ventilation would be impeded by covering the ventilation openings with items, such as newspapers, tablecloths, curtains etc.. ventilation. apparatus. Dispose of remote control batteries properly in accordance with local, state or federal regulations. Remark: This manual provides complete instructions for installing and using the receiver. All functions of the receiver can be carried out from the buttons on the remote control. If you have any problems with the operation of your receiver, please refer to the relevant section of this manual. As hard disk drive inside might be damaged and/or lost all the video data. In such event, the manufacturer is not liable for such lost of data or pre-recorded video contents. Factors such as shaking or mishandling the receiver with hard disk drive inside will cause lost of all data. 1
7 2. Accessories Supplied Link to User Manual Remote Control Unit Batteries:2xAAA Basic Information A/V Cable RF Loop Cable 12V 2A AC-DC Adaptor 2
8 3. Features of function Basic Information Support the decoding system in MPEG-4 AVC H.264, MPEG 2 and fully DVB-T compliant. Support MPEG-4 AVC H.264, MPEG 2(MP@HL) HD channel format and MPEG1 audio Layer 1,2 Double conversion DVB-T tunner with Loop Throught output Frequency input from 177.5MHz to 816.5MHz (Centre Frequency) Automatic parameter discovery & update User-friendly OSD Menu with full function 256 Colours Graphic User interface Variable aspect ratio 4:3or 16:9 with Pan, Scan or Letter Box Advanced 7 days 24 hours EPG (Digital Program Guide) Current or Next Event Guide Auto update (PMT/ PAT) Customized channel data saving Carriers & Frequency Table Editing with add, delete, rename and modify. Small Screen Picture on EPG and TV Channel list Support TELETEXT decoding or Re-insert into VBI Support Subtitle Support PAL Advanced Automation Tuning 9 Favorite Channel Preset 30 Events timer Channel Editing, Delete, Move, Rename, Lock and Skip Channel Sorting Support software upgrade via USB interface and OTA Program Recording and Play by internal harddisk & USB2.0 external harddisk Signal LED indicator SPDIF for digital audio, RCA & Optical Option 2 HDMI channel input and HDMI output YPbPr Comonent Output Video, Audio L, Audio R Output (RCA) S-Video output Support output formats: 1080i, 720p, 576p and 480p Support dual tuner Support 2 channels recording at the same time Large capability inside, more recording can be saved MEPS function, power is less than 1 Watt when stand by Manufactured under license from Dolby Laboratories. Dolby and the double-d symbol are trademarks of Dolby Laboratories. 3
 Carefully unpack & insert the Hard Disk Drive into the Open Slot (Fig 4.1.")

9 4.Front Panel G F E D B A. Power Button B. Channel Up / Channel Down Button C. Volume Up / Volume Down Button D. Remote Control IR sensor E. LED Display F. Standby LED G. Hard Disk Drive Swappable Slot C A Basic Information PROPER INSERT of HARD DISK DRIVE into Opening Slot (SATA Connector) Carefully unpack & insert the Hard Disk Drive into the Open Slot (Fig 4.1.1) Using both your thumbs with equal pressure on both edges, ( Fig 4.1.2), push all the way in to connect Hard Disk Drive securely into the SATA connector inside the Open Slot. Fig IMPORTANT: Make sure that the Hard Disk Drive is properly connected into the SATA connector inside this can be achieved by applying further push after the Clicking Sound from the Locking Mechanism inside. TV screen will show SATA Device Initializing upon switching-on the machine (refer to page 8). After initializing, your can start using the recording function. Fig
10 5. Rear Panel Basic Information ANT IN 1 & 2 Connect to external and indoor antenna. ANT OUT 1 & 2 Connect to TV and VCR RF input. (ANT OUT 1 Loop Through with the use of a RF cable connect to ANT IN 2 to attain Dual Tuner PVR Function) POWER INLET Connect this to the an adaptor (12V 2A) AUDIO OUT (L/R) Left, Right audio output S/PDIF Out / OPT OUT Sony/ Philips Digital interface output for digital audio, optical option out VOUT VIDEO Composite video output. S-VIDEO OUTPUT S-VIDEO output connector. YPbPr OUTPUT Progressive Component output connector. USB PORT USB interface output Ethernet PORT ETHERNET connector HDMI INPUT1 HDMI input 1 connector HDMI INPUT2 HDMI input 2 connector HDMI OUTPUT HDMI output connector 5
,(GREEN),(YELLOW),(BLUE) 19. PAUSE 20. AUDIO 21. FORMAT 22. ARC 23. FILE 24.")
11 6. Remote Control Unit The following details the remote control buttons and their functions. 1. POWER 2. TV/R 3. MUTE 4. VOL+/VOL- 5. CH+/ CH- 6. Numeric Keys( 0-9) 7. FAV 8. MENU 9. EPG 10. Capture Still Image 11. HDMI S 12. INFO 13. TIMER 14. EXIT 15. CH UP/DOWN 16. VOL-/VOL+ 17. OK 18. Function key (RED),(GREEN),(YELLOW),(BLUE) 19. PAUSE 20. AUDIO 21. FORMAT 22. ARC 23. FILE 24. SUBT 25. LANG 26. TEXT 27. REC 28. STOP 29. PLAY 30. JUMPTO 31. FB(Fast Backward) 32. FF(Fast Forward) 33. C SKIP Basic Information 6
12 7. Setup TV SET Basic Information AERIAL AV AMP There are few ways to inter-connect your TV, VCR, Blu Ray / DVD Player, Hi Fi System and other devices. Shown above are the most common inter-connections that you can normally apply. If you've experienced difficulties with the connections, please contact your retailer as soon as possible. Connecting to the TV via HDMI/ YPbPr for Optimum Quality to enjoy HDTV. Note : HDMI & YPbPr cables are not provided. Please purchase your HDMI cable from your local retailers. 1. Connect Aerial / Antenna to ANT IN 1 2. Using the RF cable ( provided ), connect ANT OUT 1 with ANT IN 2 to attain Dual TUNER PVR function. 3. Use a second RF cable ( not provided ), connect ANT OUT 2 to RF IN of TV 4. Use AV cable ( provided with Yellow, White, Red cable also called Composite ) to connect Composite OUT to TV's Composite Input. For HDTV Quality Viewing : 1. Connect HDMI OUT to TV HDMI IN using HDMI cable ( not provided)optional Connection; if HDMI is not availabe on your TV set: a. connect Y PR PB ( cable not provided ) OUT to Y PR PB of TV Set. 2. Turn On TV and Select HDMI or Component input mode from TV Select. For Additional Devices using the Extra HDMI INPUT : 1. Using HDMI cable ( not provided ), connect to Blu Ray Player HDMI OUT or 2. Connect to Game Console HDMI OUT Use of built-in HDMI switching together with other devices such as BLU-Ray Player & Game Console : 1. From HDMI S ( S means Select ) button of remote control, press accordingly each time to select either the following : a. IN 1 ( for input Device 1 ), b. IN 2 ( for input Device 2 ), c. TV Program 7

![Fig. 8.1.2 Carriers scan completed, programs will be detected in the [Auto Detect] window,then, the Scan Completed! will be displayed, refer to : Fig.8.1.3 Note: Note: The Hard Disk Drive (HDD) will initialize every time the receiver is switched on.](/docs-images/74/70572524/images/13-1.jpg "Fig. 8.1.3 8")
13 8. Quick Start Guide 1. Tuning Local Digital TV /Radio Station Step 1: Power Up When Set Top Box starts up, internal Hard Disk Drive(HDD) will be initializing. Refer to : Fig Getting Start Fig Step 2: Auto channel Detect Initialization completed, select the appropriate country, Aspect ratio, width height ratio, Region name, or use defualt. Figure as: Fig Press [OK] button to confirm and enter the [Auto Detect] window, Carriers will be detected. Fig Carriers scan completed, programs will be detected in the [Auto Detect] window,then, the Scan Completed! will be displayed, refer to : Fig Note: Note: The Hard Disk Drive (HDD) will initialize every time the receiver is switched on. Fig
14 2. TV Screen Setup The default TV resolution is {1080i} and the screen ratio is {Auto}. Change the TV resolution or screen ratio, if your TV does not match. Getting Start Step 1: TV Setup Press [MENU] button to pop up Main Menu Press [CH +/-, ] button to move cursor to {Setup}, press [OK]. Press [CH +/-, ] button to move cursor to {TV Setup} as shown in Figure Press [OK] to go to next menu. Step 2: Choose TV Screen Resolution Press [CH +/-, ] button to move cursor to {HD Resolution} as shown in Figure Press [VOL+/-, ] button to select {1080i}or {720p} or {576p} or {480p} or {Native}. (When changing the TV resolution, status will appear on the front panel and TV screen.) Step 3a: Choose TV Aspect Ratio Fig Fig Press [CH +/-, ] button to move cursor to {Aspect Ratio} as shown in Figure Press [VOL +/-, ] button to select {Auto}, {Horz Stretch}, {Centered}, {Half Zoom}, {Full Zoom}. (Width Height Ratio with16:9) Press [OK] button to save setting {Full Screen}, {Letter box3}, {Auto} (Width Height Ratio with 4:3) Fig
15 Step3b: Choose TV Width Height Ratio Press [CH +/-, ] button to move cursor to {Width Height Ratio} as shown in Figure Press [VOL +/-, ] button to select {4:3} or {16:9} Press [OK] button to save setting. Fig Fig Step3c: Choose TV Full Screen Ratio, Brightness and Contrast Press [CH +/-, ] button to move cursor to {Sataration,Brightness,Contast} as shown in Figure Press [VOL +/-, ] button to select 1%- 100% Press [OK] button to save setting Refer to above operations to set up brightness and contrast Getting Start Fig Step 4: Set the Digital Video Output Press [CH +/-, ] button to move cursor to {Digital Video}as shown in Figure Press [VOL +/-, ] button to select between {Auto} or {HDMI Output}or {DVI Output}. Press [OK] button to save setting. ( Note : DVI OUTPUT option is not included in this particular model ) Note: You can select {Auto} to optimize the hand-shaking and compatibility between your TV setting, Display Panel and the Set Top Box digital output {HDMI socket}. In the event of incompatibility in Auto mode, or if an adaptor is being used, manually select {HDMI Output} or your viewing device does not support HDMI digital audio, you may have to 10
16 3. Location & Time Offset Set Up There are 30-event timers. To ensure they work properly. The default timer mode is pre-set at auto. If your region is different, please select your own region. Getting Start Step1: Main Menu Press [MENU] button to pop up top menu as shown in Figure Press [CH +/-, ] button to move cursor to {Setup} Press [OK] button Fig Step 2:Select Time /OSD Press [CH +/-, ] button to move cursor to {Time /OSD}as shown in Figure Press [OK] button Fig
17
18
19

![Press [VOL +/-, / ] button to select particular day of the week within the 7 Days EPG. Press [1] to select currently shown program, Refer to Fig 9.6.2.](/docs-images/74/70572524/images/20-1.jpg "From this sub-menu, press [CH +/-, / ] to select channel / program. Press [OK] to confirm selected channel / program. Press [EXIT] to exit from Main Menu. Fig. 9.6.1 6A.")
![Recording from EPG Time Setting Press [EPG] on remote control for TV Program Guide, refer to Fig. 9.6.1. Press [VOL +/-, / ] button to select particular day of the week within the 7 Days EPG.](/docs-images/74/70572524/images/20-2.jpg "Press [CH +/-, / ] to select the TV program from the selected day. PRESS the RED button ( not the RECORDER red button) to set the selected program to be recorded at the specified EPG schedule.")
20 6. Electronic Program Guide (EPG) User may access the 24 hours / 7 days electronic program guide (EPG) if available. Press [EPG] button to pop up the TV Guide or Radio Guide depend on TV or Radio mode as shown in Figure Press [VOL +/-, / ] button to select particular day of the week within the 7 Days EPG. Press [1] to select currently shown program, Refer to Fig From this sub-menu, press [CH +/-, / ] to select channel / program. Press [OK] to confirm selected channel / program. Press [EXIT] to exit from Main Menu. Fig A. Recording from EPG Time Setting Press [EPG] on remote control for TV Program Guide, refer to Fig Press [VOL +/-, / ] button to select particular day of the week within the 7 Days EPG. Press [CH +/-, / ] to select the TV program from the selected day. PRESS the RED button ( not the RECORDER red button) to set the selected program to be recorded at the specified EPG schedule. Fig B. To edit or delete previously set EPG timer recording: Press [EPG] on remote control for TV Program Guide. Press 'GREEN' button on remote control to initiate list of programs set for recording. Fig
![1. To Delete: Press RED Button on the remote control, refer to Fig 9.6.4. Select [Yes] to confirm or [No] to cancel and exit from main menu. Fig. 9.6.4 2.](/docs-images/74/70572524/images/21-1.jpg "To Edit Press GREEN button on the remote control, refer to Fig. 9.6.5. Press [CH +/-, / ] to select [Timer Mode], [Start Time] or [End Time]. Press [VOL +/-, / ] and [0-9] to edit date and time.")
21 1. To Delete: Press RED Button on the remote control, refer to Fig Select [Yes] to confirm or [No] to cancel and exit from main menu. Fig To Edit Press GREEN button on the remote control, refer to Fig Press [CH +/-, / ] to select [Timer Mode], [Start Time] or [End Time]. Press [VOL +/-, / ] and [0-9] to edit date and time. Press [OK] to confirm or [EXIT] to exit from main menu. Fig

22
23
![12. Recording a. Begin to record Press [REC] button to record. The sign of recording will be shown on the upper left corner of the screen. 2 programs allow to record at the same time. b. Recording status When recording, press [INFO] button, you can get the record status information.](/docs-images/74/70572524/images/24-0.jpg "Fig. 9.12.1 c. Time Shift Press [PAUSE] button to pause the video and record. Fig 9.12.2 Press play button to continue the program from pause.")

24 12. Recording a. Begin to record Press [REC] button to record. The sign of recording will be shown on the upper left corner of the screen. 2 programs allow to record at the same time. b. Recording status When recording, press [INFO] button, you can get the record status information. Fig c. Time Shift Press [PAUSE] button to pause the video and record. Fig Press play button to continue the program from pause. In receive mode or record mode, press FF button to catch up the live program. Press FF button once, the speed of playback become faster, Fast Forward 5 is the fastest. Fig d. Stop Recording Press [STOP] to stop recording and save it. If there are 2 program recording, you should select which one you want to stop, and then press [OK] to stop it. Menu Operations e. Playback Files Press [File] button to [Record Brower], Press [OK] button to playback. f. Change speed of Playback Press FB, FF button to change speed of file playing, speed sign will be shown on the upper left corner of the screen Fig g. Skip play-back location Press [C Skip] to play forward, play back button can widely jump backward or fordward Attention: DO NOT cut off the power when recording, otherwise data in hard disk driver maybe lost. Fig
25 20
![1a. TV Select Press [CH +/-, ] buttons to highlight the desire TV channel as shown in Figure 10.1.2. Press [OK] button to select.](/docs-images/74/70572524/images/26-0.jpg "Press [EPG] button to toggle the channel list between {ALL} and {By Alphabet} Press [1] button to display Movie channel. Press [2] button to display News channel.")
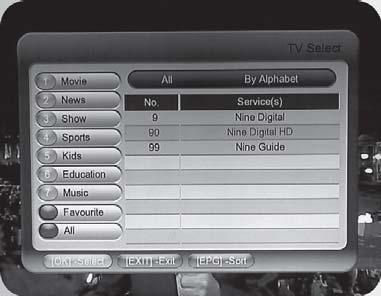
26 1a. TV Select Press [CH +/-, ] buttons to highlight the desire TV channel as shown in Figure Press [OK] button to select. Press [EPG] button to toggle the channel list between {ALL} and {By Alphabet} Press [1] button to display Movie channel. Press [2] button to display News channel. Press [3] button to display Show channel. Press [4] button to display Sports channel. Press [5] button to display Kids channel. Press [6] button to display Education channel Press [7] button to display Music channel. Press BLUE button to display Favourite channel. Press RED button to display All channel. Fig Menu Operations 1b. TV Guide Press [CH +/-, ] buttons to highlight the desire TV channel as shown in Figure Press [OK] button to select. The selected channel will be displayed in the right sub-window. The EPG (if available) will be shown in low half window. Press [EXIT] to exit the menu. Fig
27 Press [1] button to assign as Movie channel. Press [2] button to assign as News channel. Press [3] button to assign as Show channel. Press [4] button to assign as Sports channel. Press [5] button to assign as Kids channel. Press [6] button to assign as Education channel. Press [7] button to assign as Music channel. Press BLUE button to assign as Favourite channel. Press RED button to skip channel.
![2. Radio Menu Press [CH +/-, ] buttons to move cursor and highlight selection {Radio Select},{Radio Guide},{Preference} Fig.10.2.1 2a.](/docs-images/74/70572524/images/28-0.jpg "Radio Select Menu Operations Press [CH +/-, ] buttons to highlight the desire radio channel Press [OK] button to select Press [EPG] to toggle the channel list between {All} and {By Alphabet} Press")
28 2. Radio Menu Press [CH +/-, ] buttons to move cursor and highlight selection {Radio Select},{Radio Guide},{Preference} Fig a. Radio Select Menu Operations Press [CH +/-, ] buttons to highlight the desire radio channel Press [OK] button to select Press [EPG] to toggle the channel list between {All} and {By Alphabet} Press [1] button to display Pop channels. Press [2] button to display News channel. Press [3] button to display Show channel. Press [4] button to display Sports channel. Press [5] button to display Kids channel. Press [6] button to display Education channel. Press [7] button to display Classic channel. Press BLUE button to display Favourite channel. Press RED button to display All channel. (If Live Signal can support) 23
![2b. Radio Guide Press [CH +/-, ] buttons to highlight the desire radio channel Press [OK] button to select.](/docs-images/74/70572524/images/29-0.jpg "The EPG will be shown in low half window (if available). Fig.10.2.2 2c. Radio Preference Press [1] button to assign as Movie channel.")
![Press [2] button to assign as News channel. Press [3] button to assign as Show channel. Press [4] button to assign as Sports channel.](/docs-images/74/70572524/images/29-1.jpg "Press [5] button to assign as Kids channel. Press [6] button to assign as Education channel. Press [7] button to assign as Music channel.")
29 2b. Radio Guide Press [CH +/-, ] buttons to highlight the desire radio channel Press [OK] button to select. The EPG will be shown in low half window (if available). Fig c. Radio Preference Press [1] button to assign as Movie channel. Press [2] button to assign as News channel. Press [3] button to assign as Show channel. Press [4] button to assign as Sports channel. Press [5] button to assign as Kids channel. Press [6] button to assign as Education channel. Press [7] button to assign as Music channel. Press BLUE button to assign as Favourite channel. Press RED button to skip channel. Menu Operations 24
30
31
32
33
34
35
36
37
![4. PVR Function Press [CH +/-, ] to move cursor and highlight {Record Brower} or {Digital Photo}(if available ) or{storage Device Info} or {Save Remove} as shown in Figure:10.4.1 Menu Operations 4.](/docs-images/74/70572524/images/38-0.jpg "1 Record Browser (Video Program Browser) Press [CH +/-, ] button to highlight desire TV channel as shown in Figure: 10.4.")
![2 Press [OK] button to select Press [Red] button to delete video channel Press [Green] button to rename video channel. Keypad menu will pop up as shown in Figure10.4.](/docs-images/74/70572524/images/38-2.jpg "3 Press [VOL +/-, ] button to delete a string Press [CH +/-, ] to move name cursor Press [CH +/-, ; VOL +/-, ] button to move symbol cursor Press [OK] button to input a character Press [EXIT] button")
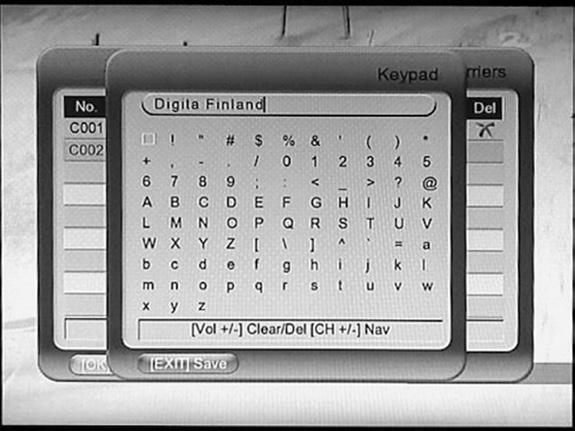
38 4. PVR Function Press [CH +/-, ] to move cursor and highlight {Record Brower} or {Digital Photo}(if available ) or{storage Device Info} or {Save Remove} as shown in Figure: Menu Operations 4.1 Record Browser (Video Program Browser) Press [CH +/-, ] button to highlight desire TV channel as shown in Figure: Press [OK] button to select Press [Red] button to delete video channel Press [Green] button to rename video channel. Keypad menu will pop up as shown in Figure Press [VOL +/-, ] button to delete a string Press [CH +/-, ] to move name cursor Press [CH +/-, ; VOL +/-, ] button to move symbol cursor Press [OK] button to input a character Press [EXIT] button to choose [YES] to Fig Fig Press [EXIT] button to choose [NO] to cancel saving and exit Press [EXIT] button again to leave Main Menu. Fig NOTE: Hotkey of {Record Browser} is the FILE button on remote unit, press this button to quickly 33
![Fig.10.4.4 Press [YELLOW] button to cycle the record of Audio, Photo and Video. Press [RED] button to delete video channel Press [Green] button to rename video recording.](/docs-images/74/70572524/images/39-0.jpg "Keypad menu will pop up as shown in Figure: 10.4.")
39 Fig Press [YELLOW] button to cycle the record of Audio, Photo and Video. Press [RED] button to delete video channel Press [Green] button to rename video recording. Keypad menu will pop up as shown in Figure: Press [VOL +/-, ] button to delete a string Press [CH +/-, Special Note : ] to move name cursor Press [CH +/-, ; VOL +/-, ] button to move symbol cursor Press [OK] button to input a character Press [EXIT] button to choose [YES] to Pl Press [EXIT] button to choose [NO] to cancel saving and exit Press [EXIT] button again to leave Main Menu Press [YELLOW] button to enter video recording (Photo Option is used to capture the MPEG2 video screen.) Press [EPG] button to enter EPG event record list Press [OK] button to select Press [EXIT] button to leave menu Menu Operations Special Note : Playback only of MPEG 4 video programs & captured still pictures that were recorded from this model of PVR device. 34
 The receiver can identify a USB system.")
40 Menu Operations 4.2 Storage Device Info a. No.: Storage device number b. Interface: Storage device type, such as SATA & USB c. Disc Status: such as Active & 'Inactive. When there are two hard disks, press green button to switch. d. Driver: Driver symbol. e. File System(FAT & Proprietary) The receiver can identify a USB system. If USB device is an External Hard Disk Drive, formatting this Hard Disk Drive is necessary. By pressing the "RED" button function (not RED Rec button ) of the remote control, formatting will be achieved. Note that all previously stored data will be erased after formatting is completed. The format uses a Proprietary file format which is NOT compatible to format being used in a Personal Computer ( PC), therefore, playback or file transferof data using a PC is not possible. This can only be playback using this particular SetTop Box. f. Drive Type: Recorder, JPEG & Unknown Recorder: hard disk is active formatted with Proprietary JPEG: A USB memory stick with Unknown: device is inactive or not be formatted g. Rec When recording, a recording icon appear 4.3 Playlist Manager & Digital Photo The receiver supports JPEG photo, when insert a USB memory stick, Digital photo is active and Playlist Manager appear. Special Note : Playback only of MPEG 4 video programs & captured still pictures that were recorded from this model of PVR device. Fig Fig Fig

![Press [VOL +/-, & CH +/-, ] move cursor to the photo which you want to play, press red button to add to playlist When the cursor stays on a picture, press OK](/docs-images/74/70572524/images/41-2.jpg "button to preview the photo in a window. Fig.10.4.9 c. Repeat the operation to add photos. d.")
![Press green button to save the playlist, keypad menu will be popped up. Press [VOL+] button to clear entire string. Press [VOL-] button to delete one character.](/docs-images/74/70572524/images/41-3.jpg "Press [CH +/-, ;VOL +/-, ] to move cursor. Press [OK] to enter one character. Press [EXIT] button and choose [YES] to e.")
41 Fig Playlist Manager Move the cursor and make Playlist Manager highlight, press OK to enter Create new playlist, edit and rename playlist a. Press red button to create a photo list b. Press [VOL +/-, & CH +/-, ] move cursor to the photo which you want to play, press red button to add to playlist When the cursor stays on a picture, press OK button to preview the photo in a window. Fig c. Repeat the operation to add photos. d. Press green button to save the playlist, keypad menu will be popped up. Press [VOL+] button to clear entire string. Press [VOL-] button to delete one character. Press [CH +/-, ;VOL +/-, ] to move cursor. Press [OK] to enter one character. Press [EXIT] button and choose [YES] to e. Return Playlist Manager menu, move the cursor to the playlist built. f. Press OK to play, press STOP to exit. Fig Menu Operations Fig Special Note: File Transfer between HDD and USB connection is not possible for this model. 36
42
![4.4 Safety Removal of Hard Disk Drive (Please [Safe Remove] before remove the USB device/hdd.) Press [CH +/-, ] button to move cursor to [Safe Remove] will be shown (Fig. 10.4.16) Fig.10.4.16 remove The USB device can be removed safely Special Note: Recommanded brands of hard disk drive to be used with this particular model of PVR: Seagate & HITACHI.](/docs-images/74/70572524/images/43-0.jpg "Fig.10.4.17 4.5 Password Setup In main MENU, enter \"Recorder\", then enter \"Storage Device Info\", User can press Yellow button to enter Password Setup function.")

43 4.4 Safety Removal of Hard Disk Drive (Please [Safe Remove] before remove the USB device/hdd.) Press [CH +/-, ] button to move cursor to [Safe Remove] will be shown (Fig ) Fig remove The USB device can be removed safely Special Note: Recommanded brands of hard disk drive to be used with this particular model of PVR: Seagate & HITACHI. Fig Password Setup In main MENU, enter "Recorder", then enter "Storage Device Info", User can press Yellow button to enter Password Setup function. In "Storage Device Info", press YELLOW button to pop up the Password Setup window, and enter the new password. User may change the password any time. Press [0-9] numeric keys to input old password, and the new password twice. Press [EXIT] to leave the menu. Default Password is "0000" Menu Operations Fig

44 5 Software upgrade 1. Software Upgrade Via OTA 2. Software Upgrade Via USB a. Insert the USB memory device in PC. (the format must be FAT / FAT32) b. Create a folder named PAC7101- DVBT in a FAT32 USB memory device c. Copy the new software to the folder d. Insert the USB memory device into the USB port of the recorder. e. Choose Software Upgrade Via USB Fig f. The receiver restarts and enters the software upgrade interface. Till the upgrade complete, the receiver will restart again. Menu Operations Attention: During upgrading, do not cut off the power or power off the receiver, otherwise software upgrade will not be completed. Fig
45
46
47 - A/V & Data Port Component output : YPbPr progressive component output HDMI output : HDMI video & audio output Video Output : CVBS/RCA connector S-Video Output : Y/C Mini- DIN Connector Audio R/L : RCA Audio L & R SPDIF : RCA coaxial and optical SPDIF for Doblly Digital, MPEG Bit Stream - Front Panel Display 5 Buttons : Power, Channel Up, Channel Down, Volume Up, Volume Down Power LED (RED) : Light up when in Standby mode - Power Supply Input Voltage : 12V dc Power Consumption : 24W max Standby : 1Wmax Operation Temperature : 0 to 40 C Storage Temperature : -10 to 60 C - Weight & Dimension Weight : 1.5kg approx Dimension : 300(W) x 230(D) x 60(H) mm Others 42
48
49
NMS ETA TM Stereo Advanced Digital TV Set-top Box
 Digital TV HD Set-top Box STB2-T2 NMS ETA TM Stereo Advanced Digital TV Set-top Box User Guide CONTENTS Safety Information... 3 Introduction... 4 Set-top Box Front Panel... 4 Set-top Box Back Panel...
FV400 DIGITAL TV RECEIVER WITH MODULATOR INSTRUCTION MANUAL
 FV400 DIGITAL TV RECEIVER WITH MODULATOR INSTRUCTION MANUAL Please read this instruction manual carefully before using your receiver Table of Contents Introduction-----------------------------------------------------------------------------
User manual FT-8100 HD. English
 User manual FT-8100 HD English WARNING!!! On the USB Memory Function for FT-8100 HD model, user can make recording or playing function using by external USB devices such as USB Flash Memory Disk or external
Front and Rear Panel Remote Control Connecting to a Television...4. Connecting to an Audio System...5
 Table of Contents Front and Rear Panel... 1 Remote Control...... 2 Connecting to a Television...4 Connecting to an Audio System...5 Connecting to a DVD Recorder or VCR... 6 First Time Installation... 7
Throughout the whole user manual, pay special attention to the following marks that
 Notice Warnings, Cautions and Notes Throughout the whole user manual, pay special attention to the following marks that indicate hazardous situations. Warning ** Indicates a hazardous situation which could
Content. Information. Basic. Getting Start. Operations. Basic. Operations. Menu. Others
 C 1. 2. 3. 4. 5. 6. 7. 8. 9. 10 11 12 13 Content 1. Safety Information 1 2. Accessories Supplied 2 3. Features 3 4. Front Panel 4 5. Rear Panel 5 6. Remote Control Unit 6 7. Connecting to a TV 7 8. Quick
Thank you for purchasing STB10HD Digital High Definition Set Top Box.
 Thank you for purchasing STB10HD Digital High Definition Set Top Box. This manual will help you to install, use and maintain the receiver. Please read this manual carefully before operating your unit and
DVB-T2. Digital Terrestrial Receiver WD-822T2 USER S MANUAL
 DVB-T2 Digital Terrestrial Receiver WD-822T2 USER S MANUAL Index Important Safety Instructions... 3 Main Features.... 5 Front and Rear Panel.... 6 Remote Control..... 7 Installing the Batteries..... 8
User Manual High Definition Digital Set Top Box DVBT9070 Please read this User Manual carefully to ensure proper use of this product and keep this man
 User Manual High Definition Digital Set Top Box DVBT9070 Please read this User Manual carefully to ensure proper use of this product and keep this manual for future reference. Important Safety Instructions
DIGITAL SET TOP BOX STB 7017 INSTRUCTION MANUAL
 DIGITAL SET TOP BOX STB7017 INSTRUCTION MANUAL STB 7017 CHANNEL After Sales Support Now you have purchased a Tevion product you can rest assured in the knowledge that as well as your 3 year parts and labour
Digital Terrestrial Television Receiver USER S MANUAL
 # 5024 Digital Terrestrial Television Receiver USER S MANUAL CAUTION RISK OF ELECTRIC SHOCK DO NOT OPEN This symbol is intended to alert the user to the presence of insulated dangerous voltage within the
MAX T200 HD QUICK INSTALLATION GUIDE
 MAX T200 HD QUICK INSTALLATION GUIDE MAX T200 HD QUICK INSTALLATION GUIDE CONTENT receiver BATTERIES x 2 REMOTE CONTROL Quick installation guide Quick Installation Guide The lightning flash with arrowhead
SYMBOLS USED ON THE RECEIVER... 3 SAFETY INSTRUCTIONS... 4 I.GENERAL INFORMATION...
 Table of Contents SYMBOLS USED ON THE RECEIVER... 3 SAFETY INSTRUCTIONS... 4 I.GENERAL INFORMATION... 5 1. Preface... 5 2. Main Features... 5 3. General Operation of the Receiver... 6 4. Front Panel...
English DMB-118HDMK3
 English DMB-118HDMK3 Table of Contents Safety Information...1 System Connection...1 Remote Control...2 First Time Installation...3 Basic Operation...3 Change Channel...3 Volume and Mute...3 Subtitle/Audio
Safety warning Important Safety Instructions. Wall Mount Specifications. Electronic Program Guide. Lock Menu 18. PVR File System
 LT-32N370Z 32 INPUT Safety warning Important Safety Instructions Wall Mount Specifications Electronic Program Guide Lock Menu 18 PVR File System 11 11 11 14 15 16 17 19 20 21 21 22 23 24 25 INPUT AAA
healing HHR787 HD Digital Terrestrial Twin Tuner Recorder Operating Manual INTRODUCTION... 3 HHR787 FEATURES... 4 SAFETY INSTRUCTIONS...
 CONTENTS INTRODUCTION... 3 HHR787 FEATURES... 4 SAFETY INSTRUCTIONS... 5 FRONT PANEL AND REAR PANEL...6 and 7 REMOTE CONTROL UNIT KEY FUNCTIONS...8 and 9 REMOTE CONTROL BATTERY CARE... 10 INSTALLATION
For Freeview HD User s Manual
 extra Terrestrial HD For Freeview HD User s Manual 1 Table of contents 1 INTRODUCTION...4 2 MAIN FUNCTIONS AND FEATURES...4 3 THE REMOTE CONTROL...5 4 FRONT AND REAR PANEL...7 4.1 FRONT PANEL... 7 5 FIRST
KGN&, > Ϯϰs USER MANUAL
 USER MANUAL KGN Contents Contents Safety Precautions Power Supply... 1 Installation... 2 Use and Maintenance... 3 Important Safety Instructions... 4-5 User Guidance Information Names of each part(front
< > ϯϯyyϭ USER MANUAL
 USER MANUAL Contents Contents Safety Precautions Power Supply... 1 Installation... 2 Use and Maintenance... 3 Important Safety Instructions... 4-5 User Guidance Information Names of each part(front View)
User Manual. High Definition Digital Set Top Box HDSTB250
 User Manual High Definition Digital Set Top Box HDSTB250 CHANNEL HDSTB250 Please read this User Manual carefully to ensure proper use of this product and keep this manual for future reference. Important
USER MANUAL KGN1080P32VD
 USER MANUAL KGN1080P32VD USB... Power cord Remote control/batteries Power/Standby button Picture mode button Sound mode button Multi-digits channel buttton P.MODE S.MODE FREEZE SLEEP 1 2 3 4 5 6 7 8 9
SET TOP BOX MODEL: GDB01SFV1 USER MANUAL
 SET TOP BOX MODEL: USER MANUAL 1 2 3 4 5 6 7 8 Welcome Your Set Top Box 2.1 In The Box 2.2 Front View 2.3 Rear View Quick Setup 3.1 TV Connection 3.2 Recording from the set top box 3.3 Record one channel
OPERATION Channel Manager HDD Installation... 22
 1.General Information... 3 2. Main Features... 3 3. FOR YOUR SAFETY... 4 4. ACCESSORIES... 4 OVERVIEW... 6 1. REMOTE CONTROL KEY... 6 2.FRONT PANEL... 8 3.REAR PANEL... 9 CONNECTION DIAGRAMS... 11 1. PVRX2
The product must be installed in accordance with national regulations.
 Important safety instructions to be kept with the product Please read attentively To prevent fire and electric shock, do not expose this receiver to rain or moisture. In order to avoid any possible risk
Be sure to run the vehicle engine while using this unit to avoid battery exhaustion.
 CAUTION: TO REDUCE THE RISK OF ELECTRIC SHOCK DO NOT REMOVE COVER (OR BACK) NO USER-SERVICEABLE PARTS INSIDE REFER SERVICING TO QUALIFIED SERVICE PERSONNE; Please Read all of these instructions regarding
QUICK START GUIDE MODEL : PHD-VRX2
 Full HD 1080p Dual Tuner Digital HDTV Recorder, Receiver and Media Center Box QUICK START GUIDE MODEL : PHD-VRX2 Copyright 2013, PrimeDTV Technologies, Inc. Front View Menu: Display On-screen (OSD) Main
GDB9 INSTRUCTION MANUAL DIGITAL TERRESTRIAL RECEIVER
 GDB9 INSTRUCTION MANUAL DIGITAL TERRESTRIAL RECEIVER Goodmans Support: www.goodmans.co.uk/support Please read these instructions before use and keep for future reference IMPORTANT SAFETY INSTRUCTIONS Thank
Xpresionn Digital Terrestrial Receiver. User Guide
 Xpresionn 2150 Digital Terrestrial Receiver User Guide GENERAL INFORMATION...3 A) SAFETY PRECAUTIONS...3 B) MAIN FEATURES...4 C) CONTENTS OF THE PACKAGING...4 D) REMOTE CONTROL...5 INSTALLATION...6 A)
Table of Contents. Table of Contents. Safety Warning General Information. Installing Equipment Channel List Guide Menu Guide Main Page
 TABLE OF CONTENTS Table of Contents Table of Contents Safety Warning General Information Package Contents & Features Front Panel Rear Panel Remote Control Unit (RCU) Programing the Remote Control Installing
S7030PVR User Manual
 S7030PVR User Manual Important Safety Instructions 1) Do not use this apparatus near water. 2) Clean only with dry cloth. 3) Do not block any ventilation openings, install in accordance with the instructions.
USER MANUAL KGNPRO19VD
 USER MANUAL KGNPRO19VD X P.MODE S.MODE SLEEP AUDIO 1 2 3 4 5 6 7 8 9 A/DTV USB/SD FAV + 0 SOURCE MENU OK INFO EXIT MUTE VOL CH ASPECT TTX TITLE /AUTO DVD.SETU P EPG SU BTITL E D.MENU ZOOM/REC.LIST GOTO
GENERAL INFORMATION INSTALLATION MENU INFORMATION. Main Features For your Safety Unpacking General Operation RCU Rear Panel.
 GENERAL INFORMATION 3 Main Features For your Safety Unpacking General Operation RCU Rear Panel 3 4 7 7 8 9 INSTALLATION 10 MENU INFORMATION Main Menu 1. Installation 1.1 Satellite list 1.2 Dish Setting
User s Manual Bedienungsanleitung
 HD Digital Receiver User s Manual Bedienungsanleitung icord Cable The default password is 0000. Das voreingestellte Passwort lautet 0000. Notice Thank you for purchasing a HUMAX product. Please read this
Before you can install your LCD TV on the wall, you must fi rst remove the base using the steps below:
 Quick Start Guide English CONTENTS INSTALLING LCD TV ON THE WALL.. TV CHANNEL INSTALLATION........ PRESENTATION OF THE LCD TV...... ACCESSORIES.................... BATTERY INSTALLATION............ REMOTE
EDISION OS mega VIEWS
 + + H.265 HEVC VIEWS 1 2 3 4 5 Front view: 1. Power Button Switch between operation and standby modes 2. Display current menu information and channel name etc. 3. USB Connect to the External HDD or USB
User Manual of digital Set Top Box PAT1 02
 User Manual of digital Set Top Box PAT1 02 Please read this User Manual carefully to ensure proper use of this product and keep this manual for future reference. Important Safety Instructions 1) Read these
<'E&, > WZKϮϰs USER MANUAL
 USER MANUAL Contents Contents Safety Precautions Power Supply... 1 Installation... 2 Use and Maintenance... 3 Important Safety Instructions... 4-5 User Guidance Information Names of each part(front View)
26 Wide screen LCD TV With DVD Model No.: DVT-2621
 26 Wide screen LCD TV With DVD Model No.: DVT-2621 For information and support, www.lenco.eu Contents Contents Caution Safety Information Unit and Accessories Product Feature Introduction 1. Front View
Quick Start Guide. Full HD 1080p Dual Tuner Digital HDTV Recorder, Receiver and Media Center Box MODEL : PHD-VRX. To view full version of
 Full HD 1080p Dual Tuner Digital HDTV Recorder, Receiver and Media Center Box Quick Start Guide MODEL : PHD-VRX To view full version of PHD VRX user manual, USB DTV Recording and Timeshifting Operation
DIGITAL TERRESTRIAL RECEIVER NVR-2090DU CHANNEL
 DIGITAL TERRESTRIAL RECEIVER NVR-2090DU CHANNEL 1 Espanol ~ Digital Video Broadcasting 2 3 STANDBY DTV/VCR TEXT MUTE VOL+ INFO PLAY/PAUSE EPG VOL- CH+ STOP SETUP EXIT 23 FAV- ENTER FAV+ 24 25 SOURCE CH-
S7070rHD - XM USER MANUAL
 S7070rHD - XM USER MANUAL CONTENTS GENERAL INFORMATION 2 Features and Unpacking Remote Control Rear Panel Connections Connecting your S7070rHD Freeview EPG 3 4 5 5 6 FIRST TIME INSTALLATION 7 MENU INFORMATION
HRM 8760 CI+ User s Manual (ENG)
") HRM 8760 CI+ User s Manual (ENG) TABLE OF CONTENTS 1 SAFETY ADVICE... 3 2 QUICK SETUP... 5 3 FEATURES... 7 4 HOW TO CONNECT YOUR RECEIVER... 7 5 HARDWARE... 9 6 WATCHING TV... 13 7 MENU OPERATION... 21
HRM 8760 CI+ User s Manual (ENG) TABLE OF CONTENTS 1 SAFETY ADVICE... 3 2 QUICK SETUP... 5 3 FEATURES... 7 4 HOW TO CONNECT YOUR RECEIVER... 7 5 HARDWARE... 9 6 WATCHING TV... 13 7 MENU OPERATION... 21
High Definition Digital Set Top Box With USB Record DFTA45R. The Gold Technical Support Line: (Charges will apply at $2.
 High Definition Digital Set Top Box With USB Record INSTRUCTION MANUAL DFTA45R The Gold Technical Support Line: 1902 215 259 (Charges will apply at $2.95 per minute) Safety Instructions Always read the
Full High Definition LCD TV. Kogan 1080p42 USER MANUAL
 Full High Definition LCD TV Kogan 1080p42 USER MANUAL Safety information To ensure reliable and safe operation of this equipment, please read carefully all of the instructions in this user guide, especially
INSTRUCTIONS MANUAL SAVE THESE INSTRUCTIONS IN A SAFE PLACE FOR FUTURE REFERENCE
 High Definition Digital Set Top Box MPF3573HU INSTRUCTIONS MANUAL SAVE THESE INSTRUCTIONS IN A SAFE PLACE FOR FUTURE REFERENCE Important Safety Instructions 1) Read these instructions. 2) Keep these instructions.
AX1919/AX1922/AX1924/AX /24V LED DVD/TV
 AX1919/AX1922/AX1924/AX1932 12/24V LED DVD/TV PANEL - Display Size: 19 (48cm) - AX1919 22 (56cm) - AX1922 24 (60cm) - AX1924 32 (81cm) - AX1932 - High Definition LED TV - AX1919/32 - Full High Definition
QIP7232 P2. Hybrid QAM/IP High-definition Set-top. Quick Start Guide
 QIP7232 P2 Hybrid QAM/IP High-definition Set-top Quick Start Guide Before You Begin Introduction Congratulations on receiving a Motorola QIP7232 Hybrid QAM/IP High-definition Set-top. This document will
Table of Contents. Safety Instruction 2. Trademark Information 3 Introduction 4. Package Contents 4. Features 5. Product Overview 6 Front Panel 6
 - 0 - Table of Contents Safety Instruction 2 Trademark Information 3 Introduction 4 Package Contents 4 Features 5 Product Overview 6 Front Panel 6 Rear Panel 7 Remote Control 8 System Installation 11 Setting
UNFOLD THE BASE. Quick Start Guide CONTENTS INSTALLING LCD TV ON THE WALL
 Quick Start Guide English CONTENTS INSTALLING LCD TV ON THE WALL.. UNFOLD THE BASE............... TV CHANNEL INSTALLATION........ PRESENTATION OF THE LCD TV..... ACCESSORIES.................... BATTERY
TV CHANNEL INSTALLATION
 LCD TV TV CHANNEL ATION Immediately after unpacking and plugging in your new television, run the auto program function to set up the TV for the broadcast or cable channels available in your area. If you
LT-50N530Z 50" class INPUT
 LT-50N530Z 50" class INPUT Safety warning Important Safety Instructions Wall Mount Specifications Electronic Program Guide Lock Menu 18 PVR File System 11 11 11 14 15 16 17 19 20 21 21 22 23 24 25 Safety
freesat HD Digital Satellite Receiver The default password is User s Manual FOXSAT-HD
 freesat HD Digital Satellite Receiver The default password is 0000. FOXSAT-HD Notice Thank you for purchasing a HUMAX product. Please read this user s manual carefully to be able to safely install, use
IMPORTANT SAFETY INSTRUCTIONS
 IMPORTANT SAFETY INSTRUCTIONS 1. Read, follow and keep these instructions safely. 2. Heed all warnings. 1. Do not use this apparatus near water. 2. Clean only with dry cloth. 3. Do not block any ventilation
AVTuner PVR Quick Installation Guide
 AVTuner PVR Quick Installation Guide Introducing the AVTuner PVR The AVTuner PVR allows you to watch, record, pause live TV and capture high resolution video on your computer. Features and Benefits Up
GET STARTED. For assistance, call us on or visit manhattan-tv.com/support
 GET STARTED For assistance, call us on 020 8450 0005 or visit manhattan-tv.com/support Check Freeview HD coverage in your area by visiting freeview.co.uk INSTALLING YOUR T1 Unpack the following from your
IMPORTANT SAFETY INSTRUCTIONS
 USER MANUAL 1 2 3 IMPORTANT SAFETY INSTRUCTIONS 1. Be sure to read this user manual before operating your PVR. 2. Never open the cover. It is very dangerous to touch the inside of the unit due to possible
HDTV-Sat-Irdeto-Receiver
 HDTV-Sat-Irdeto-Receiver TABLE OF CONTENTS 1 SAFETY ADVICE... 4 2 QUICK SETUP... 6 3 FEATURES... 8 4 HOW TO CONNECT YOUR RECEIVER... 9 5 HARDWARE:... 11 6 WATCHING TV... 15 7 MENU OPERATION... 23 8 EDITING
Safety Instructions Power Source Warning
 Safety Instructions This product has been engineered and manufactured to assure your personal safety. However, improper use can result in potential electric shock or fire hazards. In order not to defeat
Safety Instructions. General Safety Instructions
 Table of Contents Safety Instructions...2 General Safety Instructions...2 Installation...3 Cleaning...4 General Description...5 Specifications & Accessories...5 Specifications...5 Accessories...5 Overview...6
TFD-2622 USER S MANUAL
 26 Wide Screen LCD TV with DVD player TFD-2622 USER S MANUAL Contents Contents Caution Safety Information Unit and Accessories Product Feature Introduction 1. Front View 2. Rear View 3. Remote Control
KALED24DVDWA USER MANUAL
 KALED24DVDWA USER MANUAL Contents Contents Safety Precautions Power Supply... 1 Installation... 2 Use and Maintenance... 3 Important Safety Instructions... 4-5 User Guidance Information Names of each part(front
32 (80cm) HD LED LCD TV
 HD LED LCD TV") 32 (80cm) HD LED LCD TV / GVADLED32 Instruction Manual 2 Contents Preface 4 Safety Precautions 4 Important Safety Instructions 7 In the Carton 10 Connections and Functions 11 Basic Installation 12 Remote
32 (80cm) HD LED LCD TV / GVADLED32 Instruction Manual 2 Contents Preface 4 Safety Precautions 4 Important Safety Instructions 7 In the Carton 10 Connections and Functions 11 Basic Installation 12 Remote
Full High Definition LCD TV USER MANUAL
 1080p3 LCD TV Full High Definition LCD TV 1080p3 USER MANUAL Important Safety Precautions Important Safety Precautions 1 CAUTION RISK OF ELECTRIC SHOCK DO NOT OPEN This symbol indicates important instructions
High Definition Digital Terrestrial Receiver USER S MANUAL
 High Definition Digital Terrestrial Receiver USER S MANUAL Important Safety Instructions To avoid electric shock, do not open the unit. There are no user-serviceable parts inside. Servicing can only be
User s Manual Digital Satellite Receiver
 A_ENG_110944 User s Manual Digital Satellite Receiver Please read the entire manual thoroughly and retain it for future reference. ENG - 1 General Safety Warning CAUTION RISK OF ELECTRIC SHOCK DO NOT OPEN
T1000n-VM USER MANUAL
 T1000n-VM USER MANUAL IMPORTANT! Safety Instructions 01. Read these Instructions. 02. Follow all Instructions. 03. Keep these Instructions. 04. Do not use this receiver near water. 05. Clean only with
S8100-ZC DIGITAL SATELLITE RECEIVER USER MANUAL. Works only with a Satellite Dish. Version 1.3 AUGUST 2017
 S8100-ZC DIGITAL SATELLITE RECEIVER USER MANUAL Version 1.3 AUGUST 2017 Works only with a Satellite Dish Welcome Thank you for choosing the Dish TV S8100-ZC Satellite Receiver. The S8100-ZC is a Freeview
S7070rHD-XM USER MANUAL
 S7070rHD-XM USER MANUAL CONTENTS GENERAL INFORMATION 2 Features and Unpacking Remote Control Rear Panel Connections Connecting your S7070rHD Freeview EPG 3 4 5 5 6 FIRST TIME INSTALLATION 7 MENU INFORMATION
S8100-ZC USER MANUAL
 S8100-ZC USER MANUAL Welcome Thank you for choosing this Dish TV FreeviewPlus Satellite Set Top Box. You will be able to receive all Freeview Satellite TV and Radio Channels, as well as On Demand Catchup
TOPFIELD. TF 5810 PVRt. User Guide. Digital Terrestrial Receiver. Personal Video Recorder
 TOPFIELD TF 5810 PVRt User Guide Digital Terrestrial Receiver Personal Video Recorder Contents iii Contents Contents iii 1 Introduction and getting started 1 1.1 Unpacking..............................
Safety Instructions. General Safety Instructions
 Table of Contents Safety Instructions...2 General Safety Instructions...2 Installation...3 Cleaning...4 General Description...5 Specifications & Accessories...5 Specifications...5 Accessories...5 Overview...6
19 HD Ready Digital LCD TV with DVD Player
 19 HD Ready Digital LCD TV with DVD Player Instruction Manual L19DVDP10 L19DVDB20 Logik L19DVDP10_B20_IB_100914_Zell.indd 1 14/09/2010 3:02 PM Logik L19DVDP10_B20_IB_100914_Zell.indd 2 14/09/2010 3:02
Safety Instructions. General Safety Instructions
 Table of Contents Safety Instructions...2 General Safety Instructions...2 Installation...3 Cleaning...4 General Description...5 Specifications & Accessories...5 Specifications...5 Accessories...5 Input
CONTENTS 8 ACCESSORIES 13 9 TROUBLE SHOOTING AND ADVICE SPECIFICATIONS BATTERY USAGE CAUTION 13
 CONTENTS 1 PREFACE 2 2 SAFETY PRECAUTIONS 2 3 FRONT & BACK VIEW, REAR CONNECTION OF LCD 3 4 TV INSTALLATION DRAWINGS 4 4.1 ANTENNA CONNECTION 4 4.2 AV1 INPUT CONNECTION 4 4.3 AV2 INPUT CONNECTION 4 4.4
Digital Terrestrial Television Receiver USER S MANUAL
 Digital Terrestrial Television Receiver USER S MANUAL CAUTION RISK OF ELECTRIC SHOCK DO NOT OPEN This symbol is intended to alert the user to the presence of insulated dangerous voltage within the products
English CONTENTS 1. GUIDE OUTLINE THE MENU OSD INSTRUCTION TECHNICAL SPECIFICATION TROUBLE SHOOTING...
 USER S MANUAL English CONTENTS 1. GUIDE...2 1.1 IMPORTANT SAFETY INSTRUCTIONS...2 1.2 UNPACKING...2 1.3 PRODUCT OVERVIEW& ILLUSTRATION...3 1.4 INSTALLATION OF METER...4 2. OUTLINE...5 3. THE MENU OSD INSTRUCTION...6
STM 26 HD. DVB-S2+T2/C Compact meter User Manual. Ref R13. CAHORS Digital CS Cahors Cedex 9 FRANCE
 STM 26 HD DVB-S2+T2/C Compact meter User Manual Ref 0145225R13 Preface USER MANUAL Please read this manual carefully before using your Digital Sat meter for the first time. This operating manual will help
OWNER'S MANUAL MODEL: DTV-2000 STANDBY/ON
 OWNER'S MANUAL MODEL: DTV-2000 STANDBY/ON CH+ CH- TABLE OF CONTENTS SAFETY PRECAUTIONS IMPORTANT SAFETY INSTRUCTIONS and FEATURES ACCESSORIES and LOADING BATTERIES REMOTE CONTROL UNIT FRONT PANEL and REAR
Alpha Plus. User Guide
 Alpha Plus User Guide Contents Contents i 1 Introduction 1 1.1 Features.............................. 1 1.2 Accessories............................ 2 1.3 The Remote Control....................... 3 1.4
TWIN TUNER HIGH DEFINITION DIGITAL RECORDER PVR 6600
 TWIN TUNER HIGH DEFINITION DIGITAL RECORDER PVR 6600 CONTENTS CONTENTS... 2 SAFETY INSTRUCTION... 3 FRONT PANEL... 4 REAR PANEL... 4 REMOTE... 5 PRECAUTIONS ABOUT BATTERIES... 5 PREPARATION OF REMOTE CONTROL...
60cm(23.6 ) LED TV WITH DVD & DVB-T
 LED TV WITH DVD & DVB-T") 60cm(23.6 ) LED TV WITH DVD & DVB-T INSTRUCTION MANUAL TFTV6045LEDR Contents Power Supply... 1 Installation... 2 Use and Maintenance... 3 Important Safety Instructions... 4-5 Overview(Front View) / Accessories...
60cm(23.6 ) LED TV WITH DVD & DVB-T INSTRUCTION MANUAL TFTV6045LEDR Contents Power Supply... 1 Installation... 2 Use and Maintenance... 3 Important Safety Instructions... 4-5 Overview(Front View) / Accessories...
Quick Use and Hookup Guide
 Quick Use and Hookup Guide English CONTENTS ING LCD TV ON THE WALL.. TV CHANNEL ATION........ PRESENTATION OF THE LCD TV...... ACCESSORIES.................... BATTERY ATION............ REMOTE CONTROL OPERATION......
The following symbols will serve as follows: Indicates any other additional important or helpful information. Indicates warning information.
 Contents 1 2 HD2011IR User Manual Notice This manual can help you to become familiar with the many great features of our high definition digital Satellite receiver, as well as how to use and operate these
TFTV7450M 72cm(29")HD LED TV/DVD Combo
HD LED TV/DVD Combo") TFTV7450M 72cm(29")HD LED TV/DVD Combo Table Of Contents Important Safety Instructions...2 View of Unit...4 Front Panel... 4 Right Side Panel... 4 Rear Panel... 5 Remote Control...6 Remote Control Drawing...
TFTV7450M 72cm(29")HD LED TV/DVD Combo Table Of Contents Important Safety Instructions...2 View of Unit...4 Front Panel... 4 Right Side Panel... 4 Rear Panel... 5 Remote Control...6 Remote Control Drawing...
Channel Management Favorite Management Country Auto Search DTV Manual Search ATV Manual Search
 C20230F-LED 3 4 5 6 7-8 9 9 10 10 11 11 12 12 13 13 14-15 15 15 15 15 16-17 18 18 18 Management Favorite Management Country Auto Search DTV Manual Search ATV Manual Search 19 19 19 20 20 21 21 Setting
24 HD Ready 1080p Digital LCD TV. Instruction Manual L24DIGB10
 24 HD Ready 1080p Digital LCD TV Instruction Manual L24DIGB10 Contents Preparation... 4 Unpacking the TV...4 Installing / Removing the Base Stand...5 Front / Top / Side View and Controls...6 Rear View
English SAFETY PRECAUTION DO NOT INSTALL THE RECEIVER: PAG. 2
 U4127 SAFETY PRECAUTION The lightning fl ash with arrowhead symbol, within an equilateral triangle, is intended to alert the user to dangerous voltage and to prevent from a risk of electric shock. Warning:
HD Digital Recorder. User s Manual HDR-1800T HDR-2000T. The default password is 0000.
 HD Digital Recorder User s Manual HDR-1800T HDR-2000T The default password is 0000. Notice Thank you for purchasing a HUMAX product. Please read this user s manual carefully to be able to safely install,
KGNϭϬϴϬWWZKϮϮs USER MANUAL
 USER MANUAL KGN X P.MODE S.MODE SLEEP AUDIO 1 2 3 4 5 6 7 8 9 USB/SD A/DTV FAV + 0 SOURCE MENU OK INFO EXIT MUTE VOL CH ASPECT /C AN CE L TTX /SIZE D.MENU/HOLD U P G /AUTO DVD.SETU P /S B A E TITLE EPG
Converts any TV to Digital. MFR-300 User Guide
 Converts any TV to Digital MFR-300 User Guide Introduction Thank you for choosing this TVonics Freeview box. Record the serial number in the space provided below (the serial number can be found on the
English CONTENTS 1. GUIDE OUTLINE THE MENU OSD INSTRUCTION TECHNICAL SPECIFICATION TROUBLE SHOOTING...
 English CONTENTS 1. GUIDE...2 1.1 IMPORTANT SAFETY INSTRUCTIONS...2 1.2 UNPACKING...2 1.3 PRODUCT OVERVIEW& ILLUSTRATION...3 1.4 INSTALLATION OF METER...4 2. OUTLINE...5 3. THE MENU OSD INSTRUCTION...6
I.General Information Preface Main Features For Your Safety General Operation of the Receiver Front Panel...
 I.General Information...3 1. Preface...3 2. Main Features...3 3. For Your Safety...4 4. General Operation of the Receiver...4 5. Front Panel...5 6. Rear Panel...6 7. Remote control unit...7 8. Installation
Ref SATELLITE. User Manual. High Definition TV Satellite Receiver.
 SATELLITE High Definition TV Satellite Receiver Ref. 717501 User Manual www.televes.com Index SATELLITE 1. Safety recommendations............................................................ 4 2. General
32 LED TV C32227T2WAKEUP
 32 LED TV C32227T2WAKEUP Contents Unpacking the TV / Accessory s Installing / Removing the Base Stand Front / Right Side View and Controls Rear View and Sockets 1 2 3 4 Remote Control 5-6 Installing Batteries
HD Digital Satellite Receiver. User s Manual
 HD Digital Satellite Receiver ZDX-670 User s Manual Keep this manual for future reference II General Safety This STB has been manufactured to meet international safety standards. Please read the following
V17. Quick Guide. Smart Media Player A new way to watch live TV & online entertainment
 V17 Quick Guide Smart Media Player A new way to watch live TV & online entertainment 4K Ultra HD IPTV Wi-Fi LAN Movies 2 x USB Product & Services Informations Most Beautiful Android System with support
Goodmans Helpline Phone Number
 Goodmans Helpline Phone Number 0870 873 0080 contents Introduction 4 Connecting up 5 Overview diagrams 6 Getting started 8 Using the main menu 10 Troubleshooting 15 Technical Specifications 16 3 introduction
TDT HD 3 handling and care. Do not disassemble, repair, or reorganize the product. Leave a minimum 10cm gap all around the product
 27 User manual 1. INTRODUCTION Thank you for purchasing this Energy TDT HD 3. First of all, welcome to the Energy HD DVB-T receivers world. The following sections provide an overview of your new device
GET STARTED. For assistance, call us on or visit manhattan-tv.com/help
 GET STARTED For assistance, call us on 020 8450 0005 or visit manhattan-tv.com/support Check Freeview HD coverage in your area by visiting freeview.co.uk For assistance, call us on 020 8450 0005 or visit
HD Digital Television Recorder. User s Manual HDR-7500T. The default password is 0000.
 HD Digital Television Recorder User s Manual HDR-7500T The default password is 0000. Notice English Thank you for purchasing a HUMAX product. Please read this user s manual carefully to be able to safely