Instructions for use UFSconnect 906 English
|
|
|
- Britton Cain
- 5 years ago
- Views:
Transcription
1 Instructions for use UFSconnect 906 English IMPORTANT Read carefully before use
2 Contents 1 Preface About these instructions Contents Markings Symbols Signal words Operating instructions Abbreviations and technical terms First installation of extended systems Live TV basic operation Basic functions of the remote control Operating functions on the unit Switching between channels and live TV/radio Loading operating software on switch-on Watching TV / listening to radio (viewing the programme currently being broadcast) Showing videotext Watching TV/listening to radio with a timeshift Recording a programme immediately Recording a later programme (planning a recording) Playing back a recording Deleting a recording Live TV advanced functions Selecting a Channel from a List or in the EPG Selecting a channel from the complete list Selecting a Channel from a List of your Choice Selecting a channel in the programme guide (EPG) Programme information Setting menus Setting menus, general Setting menu (live TV/radio) Coloured buttons Audio selection Home Cinema mode Subtitles Videotext/HbbTV Text entry of 160
3 5.10 Automatic timeshift OTR (One-Touch Recording) Channel lists Function Basic operation Operation of the complete list Operation of favourites lists EPG General information on the EPG Operation Showing the EPG (initial state) Showing a programme currently being broadcast Displaying comprehensive programme information Setting menu (EPG) Page-by-page scrolling Setting the time window Showing programmes sorted according to category Showing programmes sorted according to actor Recording current or future programmes Timer list Listening to the radio Media libraries Overview of EPG operation Recording Archive (My recordings) General Information on the Recording Archive Operation Opening the Recording Archive Playing Back a Recording Displaying Comprehensive Programme Information Opening a Folder Setting menu (initial state) Setting menu (playback) Editing a Recording Highlighting Several Recordings for Editing Overview of Recording Archive Operation MediaCenter Opening the MediaCenter Video, Music, Images Internet Radio Network Interface of 160
4 9 HbbTV UFSconnect Main Menu Important Operating Functions Overview of the main menu Edit Channel List Channel Search Automatic Channel Search Manual Channel Search Search with Service ID ASTRA Channel List Management (LCN) Service Menu Overview Automatic Software Update Updating via the Network/Satellite Software Update by USB Factory Reset Software Information Settings First Installation Basic Settings User Defined Settings UFSconnect (Receiver Network) Antenna & Satellite Interface Setup CI+ Decryption System HDD Management Ethernet Settings Wake On LAN (Starting via Network) Applications Start FTP Access at Booting GB File Limit (FAT32) Start UPnP Server at Booting Start HbbTV Applications Language Selection Antenna & Satellite Reception via Tuner Configuration DiSEqC 1.0, DiSEqC 1.1 and Single LNB Motorized Antenna (DiSEqC 1.2, DiSEqC 1.3) of 160
5 OneCable System SAT>IP Edit Satellites Edit Transponders Sat Finder Service Connection Examples Advanced Connection Example, Receiver Connection Examples for Satellite Reception Systems Single-unit System Community Antenna Network System, 1 Satellite Community Antenna Network System, 2 Satellites OneCable System Third Party Copyrights and License Terms of 160
6 Preface 1 Preface Dear customer, These instructions for use are intended to help you make the fullest use of the extensive range of functions offered by your new receiver. We have tried to make the operating instructions as easy as possible to understand, and to keep them as concise as possible. To aid understanding, technical terms are explained in section 2.4, p. 10. The on/off switch and the auto standby function are environmentally friendly features. Turn your receiver off with the on/off switch (on the rear of the receiver) if you will not be watching the TV for an extended period of time. For shorter breaks, you can use the remote control (on/off button) to switch the receiver to standby, which uses only a minimal amount of energy. We hope your reception will always be brilliant and you will enjoy using your new HDTV receiver. Your KATHREIN team 6 of 160
7 2 About these instructions Warning Please note the general safety instructions contained in the Quick Start Guide supplied when installing and using the unit. Notice The descriptions in these instructions for use assume that the unit has been correctly connected in accordance with the Quick Start Guide. 2.1 Contents These instructions for use contain the following information: First installation of extended satellite reception systems, p. 13 ff Operation and functions of live TV/radio, EPG, Recording Archive and Mediacenter, p. 14 ff Functions of HbbTV and UFSconnect, p. 73 ff Main menu functions, p. 76 ff Connection examples, p. 136 ff Third-party copyrights and licence terms, p. 139 ff All further details can be found in the Quick Start Guide and the Mediacenter guide at Go to Sat Product overview Receiver Satellite receivers (DVB-S) UFSconnect 906/to product page Manuals. Tip As a rule, the figures contained in these instructions are examples. This applies in particular when the contents of screen shots show TV programmes. 7 of 160
8 About these instructions 2.2 Markings Symbols General warning sign Risk of damage to property Tip Information regarding installation or operation of the unit, or use of the instructions. An external USB storage medium must be connected to the receiver. Tip The external USB storage medium must be formatted with FAT/ FAT32. The receiver is only able to read USB storage media formatted with NTFS. WWW The receiver must be connected to the Internet. The receiver must be connected to a local network (LAN) Signal words The following signal words are used in conjunction with the warning symbols listed in 2.2.1: Warning Caution Notice This signal word indicates a hazard with a medium level of risk which can lead to death or severe injuries. This signal word indicates a hazard with a low level of risk which can lead to minor or moderate injuries. This signal word indicates a hazard which can lead to damage to property. 8 of 160
 is in its initial state.")
9 2.3 Operating instructions The following applies to the operating (step-by-step) instructions contained in these instructions for use: Unless otherwise specified, the operating instructions assume that the feature being described (live TV/radio, EPG, Recording Archive, main menu) is in its initial state. Where possible, remote control buttons are referred to by name, rather than depicted graphically. Examples: BACK rather than, MENU rather than. The following buttons must be pressed as standard. Their operation is only described in certain places by way of example: highlight an item (programme, menu, list, etc.) OK confirms an entry or opens a sub-menu. Tip In the operating instructions, a distinction is made between highlighting and selecting elements (menu items, list items, etc.) as follows: Highlight: Navigate to an element so it is highlighted in colour. For example: In Fig. 1, p. 9, ZDF HD is highlighted. Select: Highlight an element and confirm/open it with OK. The operating instructions are shown in either the short form or long form: Short form Step 1 Step 2 Step 3... Example Long form Example 1. Step 1 1. Press MENU. 2. Step 2 2. Select Media libraries. 3. Step Select programme MENU Media libraries Select programme... Fig. 1: Example of highlighting elements 9 of 160
10 About these instructions 2.4 Abbreviations and technical terms Antenna Automatic timeshift CEC Common Interface/ CI module DHCP DiSEqC EPG, Gracenote EPG FAT32 FTP HbbTV HbbTV HDCP HDMI See Satellite antenna. Automatic timeshift runs in the background automatically and enables recordings to be made retrospectively in conjunction with the OTR function. CEC (Consumer Electronics Control) facilitates cross-unit control functions such as One-Touch Play/Record, System Standby, Preset Transfer, etc. The CEC interface has been derived from AV.link, which was previously the prevailing control standard in Europe. The Common Interface (CI) is an interface which can accept CI modules. CI modules can accept a smart card, such as is required to receive encrypted pay TV channels. The smart card contains the subscriber's data, together with data on the channels that have been paid for and can be received. DHCP (Dynamic Host Configuration Protocol) allows a unit (a computer/ receiver) to link automatically into an existing network (automatic reference to the IP address, network screen, gateway, etc.). DiSEqC (Digital Satellite Equipment Control) is a digital control signal system which allows reception from more than one satellite. EPG (Electronic Programme Guide) is a programme guide which the receiver displays on the TV set. Gracenote EPG is an editorially pre-processed EPG supplied by the company Gracenote. Gracenote EPG supplies programme data for more than 160 channels up to 14 days in advance. FAT32 (File Allocation Table) is a widely-used file system for files up to 4 GB. FTP (File Transfer Protocol) is a network protocol for transferring files over IP networks. HbbTV (Hybrid broadcast broadband TV) can be used to show supplementary information from the programme provider in addition to the videotext. This information can be received via the TV signal and also via the Internet. Mit HbbTV (Hybrid broadcast broadband TV) können Zusatzinformationen der Programmanbieter zusätzlich zum Videotext angezeigt werden. Diese Informationen können sowohl mit dem TV-Signal als auch über das Internet empfangen werden. HDCP (High-bandwidth Digital Content Protection) is a coding system used for the HDMI and DVI interfaces for transmitting video and audio data in a protected format. HDMI (High Definition Multimedia Interface) is a digital interface for video and audio. 10 of 160
11 IP address LAN LCN Live mode LNB Multi-switch Multi-feed reception Every device in a network must have its own IP address (Internet Protocol address), so that it can be uniquely addressed in the course of network communication. LAN (Local Area Network) is a local network, for instance a home network. LCN (Logical Channel Numbering) enables the channels broadcast by the ASTRA satellite to be updated easily. In this case: When updating, the receiver compares its channel list with the current ASTRA LCN channel list. If the receiver finds modified channels in the current ASTRA LCN channel list, it replaces these channels in its channel list. In so doing, the channels remain in the positions defined by the customer. If the receiver finds new channels in the ASTRA LCN channel list, it adds them to the end of its channel list After switch-on, the receiver shows whether it has found modified or new channels The receiver always updates the channel list after the Gracenote EPG data has been updated In Live mode the TV set shows a programme that is currently being broadcast. Other operating modes are Timeshift Playing back a programme from the Recording Archive Playing content from the Internet, e.g. HbbTV, Internet radio The LNB (Low Noise Block Converter) is located at the focal point of a satellite antenna. The LNB converts the satellite frequencies into lower frequencies which can be processed by a satellite receiver. A multi-switch distributes the signals supplied by the LNB to the various different satellite receivers. Multiple satellites are received simultaneously at one satellite reception system. NAS, An NAS (Network Attached Storage)/NAS hard disk is network storage which NAS hard disk all devices connected to the network can access. NIT NTFS NIT (Network Information Table) is a transponder list transmitted by satellites, which the receiver can use to perform a channel search relatively quickly and to find hitherto unknown channels. Background: Each transponder transmits a separate NIT that contains only some of all the transponders. Firstly, the receiver scans all the transponders it knows for NITs. Next, it receives information about transponders previously unknown to it, which the receiver then scans. NTFS (New Technology File System) is a proprietary Microsoft file system. 11 of 160
12 About these instructions OTR PIP Reception level Satellite antenna S/PDIF SCART Timeshift Transponder Transponder frequency UTC WLAN OTR (One-Touch Recording) enables the programme currently being broadcast to be recorded including retrospectively. See 5.11, p. 37ff for more information. With the PIP (Picture In Picture) display, a second, small image is shown in which a live programme can be watched at the same time as a recording. Satellite signals are transmitted on four reception levels: horizontal high, horizontal low, vertical high, vertical low. Within this document, satellite antenna means a parabolic antenna (parabolic reflector, "satellite dish"). S/PDIF (Sony/Philips Digital Interface Format) is a digital interface for electrical or optical transmission of digital audio signals such as Dolby Digital AC-3. SCART (Syndicat des Constructeurs d Appareils Radiorécepteurs et Téléviseurs) is a European standard for connecting audio and video units via a 21-pin plug-connection cable. The timeshift function enables a programme currently being broadcast to be viewed with a timeshift, paused and fast-forwarded/rewound. Timeshift must be started manually. See Transponder Frequency. A transponder is a frequency converter within the satellite, which broadcasts the TV and radio signals to earth at a specific Transponder Frequency. Each satellite has several transponders. Analogue transponders broadcast only one TV channel and possibly several radio stations on a single transponder frequency. Digital transponders broadcast several TV channels and radio stations on a single transponder frequency. UTC (Universal Time, Coordinated) is the coordinated world time based on the London Greenwich zero meridian. Central European Time (CET) corresponds to UTC+1:00. In summer the time used is Central European Summer Time (CEST) which corresponds to UTC+2:00. WLAN (Wireless Local Area Network) is a local wireless network (radio network). Tip Tip See also SAT Glossary. For information videos about our UFSconnect receivers on YouTube, go to 12 of 160
13 3 First installation of extended systems Notice The descriptions in these instructions assume that the unit has been correctly connected in accordance with the Quick Start Guide supplied. Tip The connection of optional Kathrein components for extended systems is described in the instructions for the optional components. The following applies to the first installation of extended systems: The first installation of extended systems is always performed exactly as described in the Quick Start Guide for simple systems. That is, during first installation the (green)/ (red) buttons jump one step forwards/back. The receiver has comprehensive possible settings for extended systems, which can be individually adapted during first installation can be modified retrospectively in the main menu at any time are described in Main Menu, p. 76 ff. The first installation can be restarted at any time in the main menu Related topics Main Menu, p. 76 Antenna & Satellite, p. 106 Tuner Configuration, p. 118 First Installation, p. 92 Factory Reset, p of 160
14 Live TV basic operation 4 Live TV basic operation 4.1 Basic functions of the remote control The basic functions of the remote control are described in the Quick Start Guide. 4.2 Operating functions on the unit Switching between channels and live TV/radio If the remote control is unavailable, the receiver can be operated with limited functionality using the buttons on the front of the unit (Tab. 1). Functions that are password-protected cannot be operated using these buttons (numeric buttons required!) When the receiver is switched on, it is set to start with the same settings as when it was last switched off. Button Description + Switches to the next channel up (in the currently selected channel list). Tab. 1: Switches to the next channel down (in the currently selected channel list). Functions of the control buttons on the front of the unit Loading operating software on switch-on An up-to-date version of the operating software can be loaded to the receiver during switchon. For this to happen, the following preconditions must be met: An FAT32-formatted USB stick is available. The USB stick contains the folder kathrein and sub-folder ufs906. The up-to-date operating software has been downloaded from Sat Service and saved on the USB stick in sub-folder ufs906. How to load the up-to-date operating software when switching on the receiver 1. Switch the receiver to standby, then turn it off with the on/off switch. 2. Insert the prepared USB stick into a free USB port on the receiver. 3. Press and hold down the Plus button (on the front of the unit), then turn the receiver on with the on/off switch. 4. Release the Plus button. The receiver loads the operating software automatically, then restarts. 5. Remove the USB stick. 14 of 160
15 4.3 Watching TV / listening to radio (viewing the programme currently being broadcast) Live TV/radio (programme currently being broadcast) is displayed. Switches between TV and radio. decreases or increases the volume. switches to the next/previous channel. switches programme information between compact/ comprehensive/off. mutes the sound.... switches to a channel directly. You switch to higher channels by pressing several numeric buttons immediately after one another, e.g. and for the channel in channel slot 19,, and for the channel in channel slot 248. switch to the next/previous channel (in the currently selected channel list). switches between the two channels most recently selected and closes on-screen displays (press several times if required). 15 of 160
16 Live TV basic operation 4.4 Showing videotext Live TV/radio (programme currently being broadcast) is displayed. 1. Shows videotext. 2a. Go to a videotext page (enter three-digit page number). 2b. go to the next/previous videotext page. go to the next/previous sub-page. 3. or Returns to the TV picture. 16 of 160
. skip 30 s forwards and back 1).")
17 4.5 Watching TV/listening to radio with a timeshift Live TV/radio (programme currently being broadcast) is displayed. Pauses playback of the programme currently being broadcast; see example in the figure below. skip one chapter forwards and back 1). skip 30 s forwards and back 1). resumes playback or switches to normal playback speed. interrupts playback (= pause). switches to the live picture. increases/decreases the fast-forward/rewind speed. 1) If the Automatic Timeshift function is on, it is possible to skip back to the time when the programme currently being broadcast was switched on. If Automatic Timeshift is off, it is only possible to skip back to the time when Pause was pressed. See 5.10, p of 160

18 Live TV basic operation 4.6 Recording a programme immediately Live TV/radio (programme currently being broadcast) is displayed. Opens the Record window (see the example in the figure below). starts the recording immediately or set the recording conditions and starts the recording. or Closes the Record window without starting the recording. Stops the current recording. A dialogue appears. Here the title of the recording must be highlighted with and the fact you want to stop the recording confirmed with. 18 of 160
. 2. Scrolls one day forwards/back if required. 3. and highlight a channel.")

19 4.7 Recording a later programme (planning a recording) Live TV/radio (programme currently being broadcast) is displayed. 1. Opens the EPG (see the example in the figure on the right). 2. Scrolls one day forwards/back if required. 3. and highlight a channel. 4. Opens the Record window (see the example in the figure on the right). 5. saves the recording to the timer list immediately or set the recording conditions and saves the recording to the timer list; see 6.2.9, p. 53 for more information. 6. or Closes the EPG. 19 of 160
. 2. and highlight a recording. resumes playback from the place it was last stopped. 3.")
20 Live TV basic operation 4.8 Playing back a recording Live TV/radio (programme currently being broadcast) is displayed. 1. or Opens the recording archive My recordings (see the example in the figure on the right). 2. and highlight a recording. resumes playback from the place it was last stopped. 3. Starts playback from the start of the recording and closes the recording archive. 4. increases/decreases the fast-forward/rewind speed. interrupts playback (= pause). switches to normal playback speed. stops playback and goes to the recording archive. 5. Closes the recording archive and shows the live picture. 20 of 160
21 4.9 Deleting a recording Live TV/radio (programme currently being broadcast) is displayed. 1. or Opens the recording archive My recordings (see the example in the figure on the right). 2. and highlight a recording. 3. Opens the window for editing the recording; Delete recording is highlighted (see the example in the figure on the right) Press. The dialogue Are you sure? appears. 2. Use to highlight Delete. 3. Confirm with. The message Please wait deleting recording appears. 5. Closes the recording archive and shows the live picture. 21 of 160

22 Live TV advanced functions 5 Live TV advanced functions Tip The following comments apply to this chapter: If nothing is specified to the contrary, the operating instructions assume that live TV/radio is shown Please note the general information about operating instructions in 2.3, p Selecting a Channel from a List or in the EPG Selecting a channel from the complete list Live TV/radio (programme currently being broadcast) is displayed. 1. Press OK twice. he Complete List 1) appears (see figure on the left). 2. Select a channel, then press OK. The channel is shown. 1) After first installation, the Complete List always appears, otherwise the most recently selected list is displayed. 22 of 160
. 3. Select a list (Complete List or a Favourites list) and press OK. The list appears. 4. Select a channel, then press OK. The channel is shown.")
23 5.1.2 Selecting a Channel from a List of your Choice Live TV/radio (programme currently being broadcast) is displayed. 1. Press OK twice. The most recently selected list 1) appears. 2. Press (red). Select favourites list appears (see figure on the left). 3. Select a list (Complete List or a Favourites list) and press OK. The list appears. 4. Select a channel, then press OK. The channel is shown. 1) After first installation, the Complete List always appears, otherwise the most recently selected list is displayed. Related topics Channel lists, p Selecting a channel in the programme guide (EPG) Sww 6.2, p of 160
 Comprehensive")
 Information about the current programme More episodes and preview images (Fig. 4, p. 25 und Fig. 5, p. 26), Information about the next programme More episodes and preview images (Fig. 4, p. 25 und Fig. 5, p. 26) Programme information off 1 2 3 4 5 6 7 Fig.")
24 Live TV advanced functions 5.2 Programme information WWW switches between the following programme information: Programme information Compact programme information (appears briefly every time a channel is changed) Comprehensive programme information Comprehensive programme information Contents Information about the current and next programme (Fig. 2) Information about the current programme More episodes and preview images (Fig. 4, p. 25 und Fig. 5, p. 26), Information about the next programme More episodes and preview images (Fig. 4, p. 25 und Fig. 5, p. 26) Programme information off Fig. 2: Compact programme information 1 Channel slot in the channel or favourites list 2 Favourites list from which the channel has been selected 1) 3 Channel name with key symbol 2) 4 Information about the available picture, audio and text formats; see Fig. 3, p. 25 for more information 5 Time 6 Title of the current programme 7 Title of the next programme 1) If the channel has been selected from the complete list, 2 is empty. 2) Key symbol only appears for encrypted channels. 24 of 160
 : <Select Audio")

25 Fig. 3: Information about the available picture, audio and text formats 1 Selected audio track: Stereo, Dolby Digital 2 Additional information about audio tracks or optional channels 1) : <Select Audio track>/<number of available audio tracks> or OPT <selected optional channel>/<number of available optional channels> 3 Resolution of the current HD channel (720p, 1080i) 4 UT = subtitles are available 5 VT = videotext is available; HbbTV = HbbTV is available 6 Age restriction for the current programme (FSK 6, FSK 12, FSK 16, FSK 18; fig. above) 1) Optional channels are additional channels that are usually only offered via pay TV. C D E B A Fig. 4: Comprehensive programme information with more episodes A Comprehensive programme information D Broadcaster logo 3) B More episodes (B in Fig. 4) or preview icon 3) (B in Fig. 5) E Remaining running time 1) for the programme shown graphically (progress bar) C Remaining running time 1) for the programme (in minutes) or transmission time 2) (day/date) 1) Only if the programme information for a current programme is displayed. 2) Only if the programme information for a future programme is displayed. 3) An Internet connection is required. 25 of 160

26 Live TV advanced functions Fig. 5: Comprehensive programme information with preview icon How to navigate through the comprehensive programme information Navigate through the comprehensive programme information as follows: Press to scroll up/down through the comprehensive programme information (only if there is more than one page). Press to select further functions; see descriptions below. Press to go back through the further functions step by step. Press BACK to close the comprehensive programme information. How to show more episodes and their comprehensive programme information Comprehensive programme information is displayed (Fig. 4, p. 25). 1. Press. More episodes are shown (B in Fig. 4). 2. Select a future episode. Comprehensive programme information is displayed (A in Fig. 4). 26 of 160
 (Fig. 7). 1) Internet connection is required. B Fig. 6: Contributors to a programme B A Fig.")
27 How to show information about contributors (actors, directors) Comprehensive programme information is displayed (Fig. 4, p. 25). 1. Press twice. Contributors are shown (B in Fig. 6). 2. Select a contributor. Information about the contributor and more episodes featuring him/her are shown 1) (Fig. 7). 1) Internet connection is required. B Fig. 6: Contributors to a programme B A Fig. 7: Information about a contributor A and more episodes B 27 of 160
28 Live TV advanced functions Related topics Showing the EPG (initial state), p. 48 Displaying comprehensive programme information, p. 49 Display period for compact programme information: Customise Screen Menu, p. 101 Selecting an audio track: Audio selection, p. 32 Subtitles, p. 34 Videotext/HbbTV, p of 160
29 5.3 Setting menus Setting menus, general The setting menus enable frequently used settings and functions to be accessed quickly. The following applies: There is a separate setting menu for each of the areas live TV/radio, EPG and Recording Archive. The setting menu is displayed via the MENU button. The setting menu shows which items can be opened with the coloured buttons. The assignment of coloured buttons to items can be changed in the setting menu. The setting menus can be switched on/off universally in the main menu. Related topics Coloured buttons, p. 31 Setting menu (live TV/radio), p. 30 Setting menu (EPG), p. 50 Setting menu (initial state), p. 64 Setting menu (playback), p. 65 Switching setting menus on/off universally: Customise Screen Menu, p of 160
30 Live TV advanced functions Setting menu (live TV/radio) Fig. 8: Live TV/radio setting menu 1 Select the matching method by which programmes in 4:3 format are displayed on a TV set with 16:9 format. Possible settings: Normal (Pillarbox) Stretched (full screen) Zoom in (Pan & Scan) 2 Select the picture format output at the HDMI port (= picture format of the TV set) 3 Go to a favourites list 1) 4 Open the main menu 5 Select an audio track (in this case: the yellow coloured button has been assigned) 6 Switch Home Cinema mode on/off 7 Switch between live TV and radio (in this case: the blue coloured button has been assigned) 8 Select subtitles 1) Goes to the favourites list and displays the channel which has the same channel slot in the new list as the previous channel had in the old list. Operation: Favourites lists 3 select list. Related topics Setting menus, general, p. 29 Coloured buttons, p. 31 Watching TV / listening to radio (viewing the programme currently being broadcast), p. 15 Selecting a Channel from a List or in the EPG, p. 22 Audio selection, p. 32 Home Cinema mode, p. 32 Subtitles, p. 34 Channel lists, p. 39 Main Menu, p. 76 Displaying 4:3 format on a 16:9 TV set: Video Settings, p of 160
 1) Exceptions: The assignment cannot be changed, for example,")
31 5.4 Coloured buttons The coloured buttons enable frequently used setting menu functions to be accessed quickly. The coloured buttons can be freely assigned to the items in the setting menu 1). Fig. 9: Coloured buttons on the remote control How to assign the coloured buttons to functions MENU select function press coloured button 2) 1) Exceptions: The assignment cannot be changed, for example, for HbbTV (live TV setting menu) and Open close timer list (recording archive setting menu). 2) The assignment of the coloured button is displayed immediately. 31 of 160
32 Live TV advanced functions 5.5 Audio selection Audio selection enables a different audio track to be played back, e.g. in a different language or with Dolby Digital sound. How to select the audio track MENU Select Audio track select the audio track 1) and adjust if required 1) The selected audio track is played back immediately. 5.6 Home Cinema mode Home Cinema mode enables you to use the remote control for the satellite receiver to operate an AV receiver which is connected to the satellite receiver. Preconditions: The AV receiver must support control via CEC The satellite and AV receivers must be cabled as shown in Fig. 10, p. 33. Home Cinema mode can be set to On, Manual or Off as described below. On Manual Off The AV receiver is switched on/off automatically when the satellite receiver is turned on/off. Furthermore: The AV receiver must be in standby prior to being switched on The remote control for the satellite receiver controls the AV receiver volume The satellite receiver outputs the Dolby Digital audio track, if available, to the AV receiver automatically The AV receiver is switched on/off manually via the live TV/radio setting menu of the satellite receiver (menu item Home Cinema mode On Off). The above points apply too. The AV receiver is not controlled by the satellite receiver. Menu item Home Cinema mode On Off is not shown in the live TV/radio setting menu. 32 of 160
33 Sat-Receiver HDMI AV-Receiver HDMI TV Out In Out In Sat-Receiver Out HDMI TV HDMI 1) In In Out AV-Receiver Out In S/PDIF / TOS-Link Fig. 10: Cabling options for Home Cinema mode How to set up Home Cinema mode in Main menu MENU MENU Settings Basic settings Audio Settings Home Cinema mode How to switch the AV receiver on/off manually Home Cinema mode is set to Manual (in the main menu). MENU Home Cinema mode On Off Related topics Setting menu (live TV/radio), p. 30 Main menu: Audio Settings, p of 160
34 Live TV advanced functions 5.7 Subtitles Subtitles can only be shown if the programme contains corresponding data. How to select subtitles or switch them off MENU Subtitle select item Related topics Programme information, p Videotext/HbbTV Videotext and HbbTV can only be shown if the programme contains corresponding data. How to show videotext/hbbtv TEXT 1) enter page number using or select it with 1) TEXT switches between HD videotext 2), standard videotext and videotext off. 2) Only if HbbTV is available. Related topics Programme information, p. 24 HbbTV, p. 73 Ethernet Settings, p. 111 Start HbbTV Applications, p of 160


35 5.9 Text entry Some parts of the menu require text to be entered. Examples: full-text search in the EPG or renaming a favourites list. Text can be entered with the numeric buttons or the on-screen keyboard. How to open the text-entry screen in the EPG The EPG is displayed. 1. Select MENU Search through or press TEXT. Fig. 11 erscheint. 2. If required, press to switch between the numeric buttons and the on-screen keyboard. How to enter text with the numeric buttons 1. Enter the letters as you would on a mobile phone. The assignment of letters to numeric buttons is shown on the buttons themselves and in Fig If required, press to delete characters. 3. Complete your entry with OK. How to enter text with the on-screen keyboard 1. Highlight a letter or a button and press OK. 2. Repeat step 1 several times until you have entered the text in full. 3. Complete your entry with the Done button. Fig. 11: Assignment of numeric buttons Fig. 12: On-screen keyboard 35 of 160
36 Live TV advanced functions 5.10 Automatic timeshift The Automatic timeshift function enables live TV/a channel to be paused and resumed at a later time. The following applies: The live channel is continuously recorded onto the connected USB storage medium in the background After the channel is changed, the current recording is deleted and the new channel is recorded (in the background) instead. This function is switched on in its factory setting. It can be switched off in the main menu. Tip Use the OTR function if you want to view a channel with a timeshift and, if required, subsequently save it on a permanent basis. The Automatic timeshift function is operated as follows: Pauses the current programme Resumes playback Switches from fast-forward/rewind to playback at normal speed Skips forwards and back within the time-shifted playback; the skip time can be set Increases/decreases the playback speed gradually Stops time-shifted playback and shows the channel in real time (live TV/radio) How to switch automatic timeshift on/off in the main menu MENU MENU Settings User Defined Settings PVR Setup Automatic Timeshift On/Off (select one) Related topics OTR (One-Touch Recording), p. 37 Automatic timeshift in the main menu: PVR Setup, p. 103 Setting the skip time: PVR Setup, S of 160
.")
37 5.11 OTR (One-Touch Recording) This function enables you to record the programme currently being broadcast. You can record the programme retrospectively, from the point when you switched the channel on (setting Recording from beginning; see below). Tip If a current timeshift recording comprises several programmes, the OTR function always saves the programme being played back at the time. The following settings are available for the OTR function: Recording from start (1 in Fig. 13, p. 37) Start 2 The recording starts from the time (in the past) since when the programme has been played back without the channel being changed. Precondition: Automatic timeshift is switched on. as from now The recording starts from now. The start time is determined automatically and cannot be changed. End 3 The end time can be changed with or entered with Duration 4 Target 5 Decrypt (only for encrypted channels) The duration of the recording can be changed with or entered with Change or create a recording destination (folder). No Yes The programme is recorded in encrypted format. The programme is recorded in unencrypted format. It may not be possible to watch other encrypted channels at the same time which are decrypted by the CI module used Fig. 13: OTR settings 37 of 160
38 Live TV advanced functions How to record a programme immediately REC 1) REC 1) change settings with and How to cancel a current recording 2) select recording 1) REC / BACK cancels the operation. 2) A dialogue containing a list of current recordings appears. Related topics Automatic timeshift, p. 36 CI+ Decryption System, p of 160
.")
39 5.12 Channel lists Function The channel is always selected from a channel list; this can be either the complete list or one of the favourites lists. Complete list The Complete List contains all the channels found by the receiver 1). Favourites lists Favourites lists are channel lists which, unlike the complete list, contain only certain channels defined by the user. These channels can therefore be accessed quickly. Favourites lists can be edited as follows: Add channels from the complete list to a favourites list Rename a favourites list Move channels around within a favourites list Delete channels from a favourites list Several channels can be edited (moved, deleted, etc.) simultaneously. Fig. 14 explains the information shown in the channel lists Fig. 14: Information in channel lists 1 Content of the list (TV or radio) 2 Name of the list 3 Channel slots (numbers) 4 F 2) = channel is included in at least one favourites list 5 2) Gracenote EPG information is available, Gracenote is switched on 2) Gracenote EPG information is available, Gracenote is switched off 6 Channel name After first installation, provided that no channels have been deleted yet 2) Only shown after REC has been pressed Related topics How to switch Gracenote-/DVB-SI data on/off for channels, p of 160
, p.")
40 Live TV advanced functions Basic operation Selecting a channel from a channel list See the following sections: Watching TV / listening to radio (viewing the programme currently being broadcast), p. 15ff Selecting a Channel from a List or in the EPG, p. 22ff Setting menu (live TV/radio), p. 30ff How to open the edit menu for the current channel list OK OK REC REC The edit menu appears (Fig. 15 and Fig. 16). How to open the edit menu for a channel list of your choice OK OK (rot) Select list REC REC The edit menu appears (Fig. 15 and Fig. 16). Fig. 15: Edit menu for the complete list Fig. 16: Edit menu for favourites lists Tip The operating items which are identical in the complete list and the favourites lists are described below. For the other operating items, see , p. 42f and , p of 160
41 How to move channels around within a list 1. Open list: OK OK (red) select list. 2. Select and move channels: Highlight channel REC (repeat if required) 1) REC Move select new slot. 3. Complete edit operations: See How to complete edit operations, p ) After has been pressed, the channels are identified with a check mark. Highlight channel again + removes the check mark, BACK removes all check marks. For an alternative highlighting method, see How to perform block selection. How to perform block selection Tip Block selection is suitable for editing consecutive channels (a channel block) simultaneously. 1. Open list: OK OK (red) select list. 2. Highlight channels: Highlight the first or last channel in the channel block REC REC Start block selection highlight the other channels in tte channel block ( ) 1) REC. 3. Edit the channel block: Move: Move select new slot. Other functions: Select function enter password, if required. 4. Complete edit operations: See How to complete edit operations below. 1) The channels are identified with a check mark. Highlighting the channels again removes the check marks, BACK removes all check marks. How to complete edit operations 1. Press BACK. 2. Highlight one of the following items: Yes, save changes or No, do not save changes 3. Press OK. 41 of 160
42 Live TV advanced functions Operation of the complete list How to delete channels from the complete list 1. Open complete list: OK OK (red) Complete List. 2. Highlight and delete channels 1) : Highlight channel REC (repeat if required) REC Delete. 3. Complete edit operations: See How to complete edit operations, p ) Channels deleted from the complete list can only be restored by performing a channel search again. How to skip channels in the complete list 1. Open complete list: OK OK (red) Complete List. 2. Highlight channels and set to skip : Highlight channel REC (repeat if required) REC Skip. The channels are highlighted in the complete list by means of a narrower font and are skipped when changing channels in live TV/radio with or. 3. Cancel function: Repeat the above steps, but select Unskip. 4. Complete edit operations: See How to complete edit operations, p. 41. How to lock channels in all channel lists 1. Open complete list: OK OK (red) Complete List. 2. Highlight channels and set to lock: Highlight channel REC (repeat if required) REC Lock enter password. The channels are marked in all channel lists with a padlock and are not shown until the password is entered. 3. Unlock: Repeat the above steps, but select Unlock. 4. Complete edit operations: See How to complete edit operations, p of 160
43 How to add channels to a favourites list 1. Open complete list: OK OK (red) Complete List. 2. Highlight channels and add to a favourites list 1) : Highlight channel REC (repeat if required) REC To favourites set favourites list (destination) ( ). 3. Check the result in the favourites list (destination): (red) select favourites list (destination). 4. Complete edit operations: See How to complete edit operations, p ) The channels are copied to the favourites list from the complete list, so remain in the complete list too. How to switch Gracenote-/DVB-SI data on/off for channels Tip If several channels use the same Gracenote data, on switch-off the message The Gracenote data is used for several channels appears. If you switch off Gracenote data nevertheless, it will be unavailable for all affected channels. For example: RTL 2, RTL 2 CH and RTL 2 Austria use the same Gracenote data. 1. Open complete list: OK OK (red) Complete List. 2. Highlight channels 1) and set Gracenote data to on/off: Highlight channel REC (repeat if required) REC gracenote data on (off). The Gracenote symbol for the channel changes in all channel lists. 3. Complete edit operations: See How to complete edit operations, p ) Only highlight channels marked with the Gracenote symbol. Related topics EPG, p. 45ff Gracenote symbol: See Fig. 14, p. 39 Channel Search, p of 160
44 Live TV advanced functions Operation of favourites lists How to add channels to a favourites list See How to add channels to a favourites list, p. 43. How to remove channels from a favourites list 1. Open list: OK OK (red) select favourites list. 2. Highlight and remove channels 1) : Highlight channel REC (repeat if required) REC Remove from favourites list. 3. Complete edit operations: See How to complete edit operations, p ) The channel is retained within the complete list. How to rename a favourites list 1. Open list: OK OK (red) select favourites list. 2. Rename favourites list: REC REC Rename favourites list enter new name. 3. Complete edit operations: See How to complete edit operations, p. 41. Related topics Text entry, p of 160
45 6 EPG 6.1 General information on the EPG What is the EPG? The EPG is an editorially pre-processed electronic programme guide containing free information about approximately 160 TV channels. The EPG displays information for TV channels up to two weeks in advance. Tip EPG data is obtained from Gracenote or the programme provider. If no EPG data is available, the receiver shows the message No data available! Following first installation, EPG data is available at the latest After the EPG data is first updated during the night or After the receiver has been switched off in standby for 24 hours for the first time Which channels are supported by Gracenote? The channels supported by Gracenote are marked in the channel list with the Gracenote logo 1). 1) Preconditions: The EPG data has been updated and REC has been pressed in the open channel list. Are there limitations with the Gracenote EPG? Due to the large amounts of data involved, the receiver cannot store Gracenote data for all channels. Therefore, Gracenote is only switched on for some channels when the unit leaves the factory. If Gracenote is activated for other channels, the amount of Gracenote data for future programmes decreases accordingly. Where does the EPG data come from? The EPG data is transmitted via ASTRA satellites, transponder 12, MHz horizontal 22,000 KS/s. Tip If you have accidentally deleted the transponder 12, MHz, restore it by performing a channel search for ASTRA/Transponder 12, MHz horizontal 22,000 KS/s. 45 of 160
46 EPG Is there any reason external to the receiver that might mean the EPG does not work? If satellite reception systems from other manufacturers are used, EPG data transmission can fail if those systems do not work with transponder 12, MHz horizontal 22,000 KS/s. Tip If you can receive the WDR Bonn TV channel, you should also be able to receive EPG data. WDR Bonn is transmitted on the same transponder as the EPG data. What about EPG data for channels that are not broadcast via ASTRA? EPG data for channels broadcast via the HOTBIRD 13 East satellite cannot be received until a channel search has been performed via HOTBIRD 13 East. Tip Some HOTBIRD channels are supported by Gracenote EPG and are transmitted by ASTRA. Related topics EPG Setup, p. 102 Channel Search, p. 78 Fig. 14: Information in channel lists, S.39 How to switch Gracenote-/DVB-SI data on/off for channels, p of 160
. Please note the general information about operating instructions in 2.3, p. 9. Fig. 26, p.")

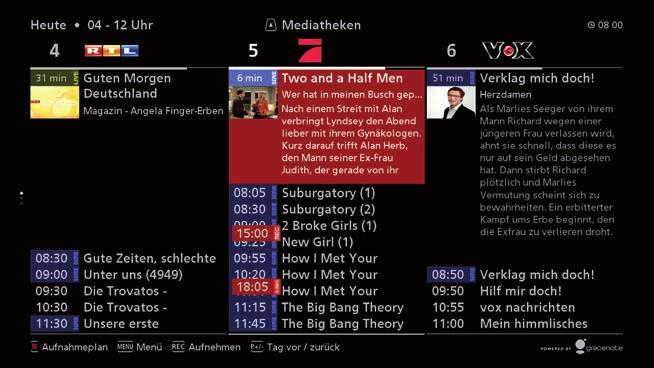
47 6.2 Operation Tip If nothing is specified to the contrary, the operating instructions in this section assume that the EPG is in its initial state (Fig. 17). Please note the general information about operating instructions in 2.3, p. 9. Fig. 26, p. 58 shows an overview of EPG operation. D C A B Fig. 17: Initial state of the EPG A Current programmes B Future programmes C Page-by-page scrolling is switched on D goes to the media libraries; only available if a current programme is highlighted. 47 of 160
48 EPG Showing the EPG (initial state) Live TV/radio (programme currently being broadcast) is displayed. 1. Press EPG. The EPG appears in its initial state (Fig. 17). The following messages may appear: ~ ~ The message in Fig. 18 appears when the EPG is opened for the first time (Gracenote EPG data unavailable). EPG data from the programme providers is displayed nevertheless, but it is less comprehensive than the Gracenote EPG data (e.g. no broadcaster logos) ~ ~ The message in Fig. 19 appears when there is an Internet connection and Gracenote EyeQ data 1) has not yet been loaded 1) Gracenote EyeQ data is additional information to the EPG data. An Internet connection is required in order to receive it. Fig. 18: Message about unavailable Gracenote EPG data Fig. 19: Message about unavailable Gracenote EyeQ data 48 of 160
49 6.2.2 Showing a programme currently being broadcast Tip What happens when OK and are pressed is described below by way of example. 1. Highlight a programme currently being broadcast in Fig. 17, p. 47). 2. Press OK. A selection menu appears. 3. Select Watch with. 4. Press OK. The selected programme is shown. See also A/B F in Fig. 26, p Displaying comprehensive programme information For a current programme 1. Select a programme currently being broadcast (A in Fig. 17, p. 47). A selection menu appears. 2. Select Info about the programme. Comprehensive information about the programme is displayed. See also A/B G in Fig. 26, p. 58. For a future programme Select a programme to be broadcast in future (B in Fig. 17, p. 47). Comprehensive information about the programme is displayed. See also C G in Fig. 26, p. 58. Related topics Description of comprehensive programme information: Programme information, p. 24ff 49 of 160
 2 Go to the media libraries (Internet connection required) 3 Find programmes featuring a certain actor 4")
50 EPG Setting menu (EPG) Fig. 20: Setting menu of the EPG 1 Search through EPG via a full-text search (text entry) 2 Go to the media libraries (Internet connection required) 3 Find programmes featuring a certain actor 4 Open/close timer list 5 Switch the start of the time window shown in the EPG between Current and 20:15 6 Show programmes sorted according to category 7 Switch the duration of the time window between 4 h, 6 h, 8 h and 12 h 8 Switch between live TV and radio 9 Switch page-by-page scrolling on/off How to open the setting menu of the EPG Press MENU. The setting menu appears. See also MENU K in Fig. 26, p. 58. Related topics Text entry, p. 35 Media libraries, p. 57 Showing programmes sorted according to actor, p. 52 Timer list, p. 56 Setting the time window, p. 51 Showing programmes sorted according to category, p. 51 Listening to the radio, p of 160

51 6.2.5 Page-by-page scrolling To navigate through the EPG quickly, you can switch on page-by-page scrolling. If this feature is activated, it is indicated in the EPG by a red border; see C in Fig. 17, p. 47. How to switch page-by-page scrolling on/off MENU Scroll through the pages On Off Setting the time window You can set the start and the duration of the time window shown. How to set the start of the time window MENU Current Today 20:15 How to set the duration of the time window MENU Change the timeframe 4h 6h 8h 12h Showing programmes sorted according to category You can show the programmes in a category/sub-category, e.g. Series/Soap operas or Series/ Detective series. How to show the programmes in a category MENU by Category select category select sub-category Fig. 21: Select category 51 of 160

52 EPG Showing programmes sorted according to actor You can show all programmes featuring a certain actor. Only actors in programmes included in the current EPG are available for selection. Fig. 22: Select initial letters How to show programmes featuring a certain actor MENU Actors list select initial letters select actor 52 of 160
53 6.2.9 Recording current or future programmes In the EPG you can start recording programmes currently being broadcast immediately and plan to record future programmes. The following possible settings are available in the recording menu for this purpose (Fig. 23): once-only recording OK records a programme currently being broadcast immediately or adds a future programme to the timer list. extends the recording time in 10 minute increments. Series recording OOK records all episodes of a series; see Series recording, p. 54. Recording with options Optional recording settings can be modified: Series recording, limited to certain days, times and seasons A repeated recording: Daily, Weekly or User-defined Reminder; see Reminder, p. 54 for more information Target for the recording (folder), newly created or changed Decrypt an encrypted programme; see Decrypt, p. 54 for more information Fig. 23: Recording menu Tip The general pre-recording and post-recording times for recordings are set in the main menu. You can also record to an NAS. For more information, see the Mediacenter guide at 53 of 160
54 EPG Series recording Up-to-date EPG data must be available for series recordings. Therefore, switch the receiver to standby with on/off (remote control) if possible. The parameters Avoid repeating episodes and Only record this scale can only be set if the season/ episode number has been specified in the EPG. Otherwise, you can only set the parameters Limit recording start from/to. Reminder A reminder for a programme can be set instead of a recording. The following applies: The reminder consists of the receiver switching to the programme concerned. So the reminder only works if the receiver is switched on The programme for which a reminder is set is marked in the EPG with! (C3 in Fig. 26, p. 58). Decrypt You can record encrypted programmes in unencrypted format. Possible settings: Yes No Programme is recorded in unencrypted format Programme is recorded in encrypted format Tip If the recording times for encrypted programmes to be recorded in unencrypted format overlap (Decrypt = Yes), it may be the case that only the first programme will be recorded in unencrypted format, as the CI card can only decrypt one programme at a time. 54 of 160
55 How to record a programme currently being broadcast or one to be broadcast in future 1. Highlight a programme and press REC. The recording menu appears. 2. Set the recording parameters. The programme is then marked in the EPG with REC and appears in the timer list. See also Fig. 26, p. 58: A/B/C H (record a current or future programme) C1 und C2 (programmes marked with REC) Tipp If you want to record a programme that overlaps with a programme that has already been set to record, the message Error timer overlap appears. The programme causing the overlap is marked in the timer list with the lightning symbol. If a programme is not available in the EPG, select a programme of your choice from the same channel and adjust the recording settings manually How to change a recording setting Highlight a programme marked with REC REC change recording setting Related topics Recording a programme immediately, p. 18 Recording a later programme (planning a recording), p. 19 Timer list, p. 56 EPG Setup, p. 102 CI+ Decryption System, p. 107ff 55 of 160

56 EPG Timer list The timer list contains all planned recordings. This includes recordings currently being made. The settings for a planned recording can be edited subsequently in just the same way as those for a new recording. Fig. 24: Timer list How to open the timer list and edit a recording MENU Timer list Open Close select recording REC change recording setting Related topics Recording current or future programmes, p Listening to the radio MENU TV Radio The EPG for radio appears. Related topics Watching TV / listening to radio (viewing the programme currently being broadcast), p of 160
 highlight programme + OK 1)")
57 Media libraries WWW All the programmes offered by programme providers in their media libraries are shown (Fig. 25). Playback control can differ in each media library. Fig. 25: Contents of media libraries, sorted by broadcaster How to open media libraries and start playing back a programme MENU Media libraries highlight programme + OK or 1) highlight programme + OK 1) Only available if a current programme is highlighted. How to stop playing back a programme Press BACK. The contents of the media libraries are shown (Fig. 25). Tip Depending on the speed of your Internet connection, it may take some time for the contents of the media libraries to be displayed. The playback options differ for each programme provider. The contents of the media libraries originate from an external partner and the programme providers. Therefore, Kathrein does not accept any liability for any inaccurate, incomplete or out-of-date content. Related topics Ethernet Settings, p of 160


58 EPG Overview of EPG operation 1 G 2 F 1 a 1 2 e E Live-TV/-Radio B B A C C D K H HDD Fig. 26: Overview of EPG operation 58 of 160 2
59 A Info on the programme currently being broadcast on the selected channel a1 Remaining running time for the programme a2 Selected category/recording/reminder B Info on the programmes currently being broadcast on other channels C Future programmes 1 once-only recording (REC) 2 Series recording ( REC) 3 Reminder (!) D Available operating functions E Time window properties e1 Position of the time window (Today/Tomorrow/ date in the future) e2 Duration of the time window (start end) F Live TV/radio G Comprehensive programme information 1 Information on a programme 2 More episodes H Archive hard disk K Setting menu 59 of 160
60 Recording Archive (My recordings) 7 Recording Archive (My recordings) 7.1 General Information on the Recording Archive What is the recording archive? The recording archive is an external storage medium that is connected to the receiver. The storage medium may consist of An archive hard disk connected to the USB port or An NAS connected via the home network The recording archive becomes available approximately 30 s after the receiver is switched on. Can programmes from the recording archive be copied to a PC? You can copy programmes from the recording archive to a PC as follows: USB data carrier: You can copy recordings from the recording archive to a USB data carrier you have connected to the receiver Network: You can copy recordings from the recording archive to a PC in the home network via the receiver s network interface (web interface) PC: You can connect the archive hard disk to a PC directly and copy the recordings locally Related topics Editing a Recording, p. 66ff Highlighting Several Recordings for Editing, p. 68 HDD Management, p. 110 Ethernet Settings, p. 111 Network Interface, p. 72 Setting up an NAS: see the MediaCenter guide at 60 of 160

61 7.2 Operation Tip If nothing is specified to the contrary, the operating instructions in this section assume that the recording archive is in its initial state (Fig. 27). Please note the general information about operating instructions in 2.3, p. 9. Fig. 31, p. 70 shows an overview of recording archive operation. B A Fig. 27: Initial state of the recording archive; A = recordings B = folders Opening the Recording Archive Live TV/radio (programme currently being broadcast) is displayed. Press MEDIA. The recording archive appears in its initial state (Fig. 27). 61 of 160
62 Recording Archive (My recordings) Playing Back a Recording You control the playback of recordings as follows: or Start playback 1) ; if the recording has already been played back at all, this new playback resumes from the place where it was stopped last time During playback, show the recording archive (playback continues to run in the background) Start playback 1) ; playback always starts from the beginning of the recording Resume a paused recording Switch playback speed to normal Brief press: Skip 30 s back/forwards Long press: Rewind/fast-forward Brief press: Skip one chapter 2) back/forwards Long press: Rewind/fast-forward Increase/decrease playback speed gradually Pause/resume playback Create chapter manually 2) Stop playback; see also H A in Fig. 31, p ) See also A H in Fig. 31, p ) Recordings are divided into chapters automatically. The type of division depends on whether the recording has been made using EPG data or not. EPG data has been used: The chapters Start, Main title and End are created. EPG data has not been used: The division into chapters is based on the duration of the recording. Manually created chapters are added to the automatically generated ones. Manually creating and deleting chapters does not change the recording. 62 of 160
63 7.2.3 Displaying Comprehensive Programme Information How to display comprehensive programme information (initial state of the recording archive) The initial state of the recording archive is shown. 1. Highlight a recording (A in Fig. 27, p. 61). If required, first open the folder (B) that contains the recording. 2. Press button i. Comprehensive programme information about the recording is displayed. See also A G in Fig. 31, p. 70. How to display comprehensive programme information when playing back a recording A recording is being played back. Press button i. Comprehensive programme information about the recording is displayed. Related topics Programme information, p Opening a Folder Tip What happens when OK is pressed is described below by way of example. Select a folder (B in Fig. 27, p. 61). The contents of the folder are displayed. See also B K in Fig. 31, p of 160
64 Recording Archive (My recordings) Setting menu (initial state) Fig. 28: Setting menu in the recording archive s initial state 1 Search through recording archive via a fulltext search (text entry); also possible using TEXT 2 Change the sorting of the recordings: Date: Most recent recordings first alphabetically: In ascending order from A to Z Duration: Shortest recordings first 3 Open/close timer list 4 Show all recordings 5 Show recordings in a certain category. A sub-menu appears where you can select the category 6 Change the size of the view and, consequently, the extent of the information displayed 7 Show recordings for a certain channel How to open the setting menu of the recording archive s initial state Press MENU. The setting menu in Fig. 28 appears. See also MENU F in Fig. 31, p. 70. Related topics Text entry, p. 35 Timer list, p of 160
65 7.2.6 Setting menu (playback) Fig. 29: Setting menu when a recording is being played back 1 Set how 4:3 programmes are displayed 2 Picture-in-Picture; when a recording is played back, a live programme is shown in a small window 3 Set the video resolution 4 Chapter view for selecting or deleting a chapter directly 5 Show recording archive; the sorting/filter settings made most recently are displayed 6 Audio selection 7 Home Cinema mode 8 Subtitles How to open the setting menu when playing back a recording A recording is being played back. Press MENU. The setting menu in Fig. 29 appears. Related topics Display of 4:3 programmes: Video Settings, p. 93ff Video resolution: Video Settings, p. 93ff Audio selection, p. 32 Home Cinema mode, p. 32 Subtitles, p. 34 Coloured buttons, p of 160
66 Recording Archive (My recordings) Editing a Recording REC opens the edit menu in the recording archive s initial state (Fig. 30). The menu always relates to the folder or the recording(s) highlighted in the recording archive. The menu also contains various items for editing recordings and folders. Fig. 30: Menu for editing a recording The table below describes the edit menu. Menu item Sub-menu item Description Delete recording or Delete folder Mark as NEW Rename Only empty folders can be deleted. Tip Deleted recordings cannot be restored. Mark a recording in the archive as New Rename folder. Further options... Delete recording As above Mark as NEW Lock or Unlock Rename Change category Create new folder... As above This function requires a PIN to be entered. Locked recordings are marked with a padlock. Locked recordings can only be played back after entering a PIN. Rename recording; only applies to individual recordings. Assign recording(s) to a different category. The title of the recording most recently highlighted is suggested as the folder name. The folder is created as a sub-folder in the most recent view (recording archive or folder). 66 of 160
67 Menu item Sub-menu item Description Move to folder... Decrypt in standby Copy to USB device... Move recording(s) to an existing folder or one created using TEXT. Decrypts the recording the next time the receiver is in standby. The function is only available for encrypted recordings that have been recorded in unencrypted format. Copy recording(s) to an external USB data carrier or an NAS. The USB data carrier must be formatted with FAT/FAT 32. Data carriers with not enough storage capacity are highlighted in red; copying is blocked. The function has only been tested with Kathrein hard disks. Start Block selection see 7.2.8, p. 68 Tab. 2: Menu for editing recordings and folders in the recording archive See also Fig. 31, p. 70: A2 (recording marked as New) A3 (locked recording) Related topics Highlighting Several Recordings for Editing, p. 68 Parental Lock, p. 100 Text entry, p. 35 OTR (One-Touch Recording), p. 37 Recording current or future programmes, p. 53 CI+ Decryption System, p. 107 HDD Management, p. 110 Setting up an NAS: see MediaCenter guide at 67 of 160
68 Recording Archive (My recordings) Highlighting Several Recordings for Editing How to highlight recordings of your choice 1. In the recording archive, highlight a recording and press. The recording is identified with a check mark. 2. Repeat step 1 for any other recordings of your choice or press several times to select consecutive recordings with a check mark. 3. Remove check marks as follows if required: Highlight a recording identified with a check mark again and press or BACK to delete all markings and start again with step Press REC and execute a function from the edit menu for the highlighted recordings. How to highlight consecutive recordings using block selection 1. In the recording archive, highlight the first or last of several consecutive recordings and press REC. 2. Select Further options... Start Block selection. The recording is identified with a check mark. 3. Press or several times until all recordings are highlighted. 4. If required, press BACK to delete all markings and start again with step Press REC and execute a function from the edit menu for the highlighted recordings. 68 of 160
69 69 of 160


70 Recording Archive (My recordings) Overview of Recording Archive Operation H K D C Live-TV/-Radio B A A E G F 1 2 Fig. 31: Overview of recording archive operation 70 of 160
71 A Recordings 1 Current recording (REC) 2 Recording that has not yet been played back (NEW). 3 Locked recording (padlock symbol) B Folders, user-defined C Selected sorting/category/channel My recordings (...) = All recordings are shown (no filter by category/channel) D Free storage space on the archive hard disk E Available operating functions F Setting menu G Comprehensive programme information 1 Programme information on a recording 2 More episodes H Playback K Contents of the user-defined folder 71 of 160
72 MediaCenter 8 MediaCenter Tip A comprehensive MediaCenter guide can be found at Sat on the receiver product page under Downloads. 8.1 Opening the MediaCenter Live TV/radio (programme currently being broadcast) is displayed. Live-TV/-Radio PORTAL. 8.2 Video, Music, Images Play back content from the following storage media: External USB storage media, e.g. NAS, archive hard disk UPnP server generated by the receiver (setting in the main menu) with the data of external USB storage media External UPnP server, e.g. server running on a PC/laptop or NAS systems with integrated server 8.3 Internet Radio WWW Play back content from Internet radio stations. 8.4 Network Interface Shows the network address in the local network (LAN) at which you can reach the receiver using the PC browser. Related topics Ethernet Settings, p. 111 Network interface: see MediaCenter guide at 72 of 160

73 9 HbbTV WWW Some broadcasters provide limited HbbTV information via satellite, e.g. Das Erste HD. To be able to benefit from HbbTV to its full extent, an Internet connection is required. If HbbTV is available, the programme information will contain the item HbbTV. What s more, when watching live TV an automatic display will usually appear at the bottom right (Fig. 32), if this has been activated in the main menu. The HbbTV start bar (Fig. 33). appears after pressing the red coloured button. This start bar also contains information about the function of the coloured buttons. Fig. 32: HbbTV display Fig. 33: HbbTV start bar Tip The contents of HbbTV originate from the programme providers. Therefore, Kathrein does not accept any liability for any inaccurate, incomplete or out-of-date content. The use of HbbTV is the responsibility of the user, and at his or her own risk Related topics Programme information, p. 24 Ethernet Settings, p. 111 Start HbbTV Applications, p. 113 Coloured buttons, p of 160
74 UFSconnect 10 UFSconnect Smarter than your TV set. With UFSconnect receivers from Kathrein you can break through the limits of previous TV island solutions: The Auto-Tuner-Share function automatically uses the receiver of another UFSconnect receiver in the home network whilst a recording is being made. This allows an undisturbed live TV experience, even when the built-in receiver is blocked by a recording. With each UFSconnect receiver you have access to all your TV recordings, regardless of where you made them. Enjoy satellite TV in the accustomed quality even in rooms that do not have any satellite cabling. Via the UFScontrol app you can see live TV on your tablet/ smartphone, program recordings or conveniently control your receiver within a home network. The Wake-on-LAN (WOL) function enables units such as receivers, tablets and smartphones to wake a UFSconnect receiver from standby via the home network. You will find more information about UFSconnect in the Mediacenter guide at Bedroom Instructions for use Kathrein Portal (Mediacenter) UFSconnect 906 English IMPORTANT Read carefully before use UFSconnect 906 Hybrid receiver ufs connect Vous trouverez la version française du document sur Internet 74 of 160
75 Multi-switch Living room Nursery UFSconnect 906 Hybrid receiver UFSconnect TWIN hard disk receiver Switch Smartphone/Tablet App UFScontrol Modem/Router Notebook/PC 75 of 160

76 Main Menu 11 Main Menu Tip The following comments apply to this chapter: The descriptions assume that you have available an operational receiver with a TV set on which you can perform the functions that are described. If nothing is specified to the contrary, the operating instructions assume that live TV/radio is shown Please note the general information about operating instructions in 2.3, p Important Operating Functions How to open the main menu Live TV/radio MENU MENU or Live TV/radio MENU Main menu Tip The main menu can only be opened in Live mode. Changing settings There are three options for changing settings: Change option Change setting with the arrow keys. Select setting from a list. To do this, open the list with OK. Enter numbers with the numeric buttons directly. Operating note The arrow keys are displayed next to the setting; see 1 in Fig. 34. OK is displayed next to the setting; (2 in Fig. 34). Closing the main menu and saving changes When the main menu is closed with MENU or by pressing BACK several times the changes previously made are saved automatically. A dialogue appears at crucial points to enable the user to confirm or reject changes Fig. 34: Operating notes on the TV screen 76 of 160

77 11.2 Overview of the main menu Edit Channel List 11.3, p. 78 Channel Search 11.4, p. 78 Service Menu 11.5, p. 85 Settings 11.6, p. 92 Interface Setup 11.7, p. 107 Applications 11.8, p. 112 Language Selection 11.9, p. 114 Automatic Channel Search, p. 78 Automatic Software Update, p. 85 First Installation, p. 92 CI+ Decryption System, p. 107 Start FTP Access at Booting, p. 112 Manual Channel Search, p. 81 Updating via the Network/Satellite, p. 86 Basic Settings, p. 93 HDD Management, p GB File Limit (FAT32), p. 112 Search with Service ID, p. 83 Software Update by USB, p. 89 User Defined Settings, p. 100 Ethernet Settings, p. 111 Start UPnP Server at Booting, p. 113 ASTRA Channel List Management (LCN), p. 83 Factory Reset, p. 91 UFSconnect (Receiver Network), p. 105 Wake On LAN (Starting via Network), p. 111 Start HbbTV Applications, p. 113 Software Information, p. 91 Antenna & Satellite, p. 106 Tab. 3: Overview of the main menu Fig. 35: Initial state of the main menu 77 of 160
78 Main Menu 11.3 Edit Channel List MENU MENU Edit channel list See 5.12, p Channel Search MENU MENU Channel Search You can perform the channel search in the following ways: Automatic Channel Search , p. 78 Manual Channel Search , p. 81 Search with Service ID , p. 83 ASTRA channel list management (LCN) , p. 83 Channel search via one satellite or via all satellites that are set. Channel search via a certain frequency of a satellite. Search for a channel (service ID) on a certain frequency of a satellite. Search for channels in the ASTRA channel list Automatic Channel Search MENU MENU Channel Search Automatic Channel Search Fig. 36: Automatic Channel Search 78 of 160
79 Satellite Select a certain satellite 1) or the setting All Satellites. If All Satellites is selected, all the individual satellites that have been set up 2) will be searched for new channels. The reception system must be aligned with these satellites. 1) The position of the satellite must be known if satellites with the same name are available for selection in different positions. For example: ASTRA 1 at 19.2 east and ASTRA 3 at 23.5 east. For Germany, Austria and Switzerland, ASTRA 1 at 19.2 east usually applies. 2) Adding satellites: See Antenna & Satellite, p. 106ff. Channel Search Mode Channel Search mode determines the type of channels to search for. free & scrambled free only scrambled only All channels are searched for Only free-to-air channels are searched for Only encrypted channels are searched for Tip To show encrypted channels, you will need A CI (Common Interface) module A valid smart card from a pay TV provider A valid subscription with a pay TV provider NIT search (Network Search) On Off Additional transponders which have not yet been saved can be found by networking transponders. Newly found transponders are saved and also searched for new channels. Only the transponders pre-set on delivery for the selected satellite are searched for new channels. 79 of 160

80 Main Menu Start Search Start Search starts the automatic channel search. The result is displayed and continuously updated as per Fig. 37, the final result is displayed as per Fig. 38. Once the automatic channel search is complete, the newly found channels will be added to the end of the channel list Fig. 37: Result display for the on-going automatic channel search 1 TV channels found 3 Number of TV channels found 5 Number of radio stations found 2 Radio stations found 4 Number of newly added TV channels 6 Number of newly added radio stations How to perform the search 1. Press Start Search to start the channel search. Press BACK to cancel the search, if required. 2. Press OK to confirm the the result of the channel search (Fig. 38). The new channels found are saved. Press BACK to reject the changes. 3. Press BACK to show Live-TV. Fig. 38: Result of the channel search 80 of 160
81 Manual Channel Search MENU MENU Channel Search Manual Channel Search Tip This section describes the possible settings available in addition to the automatic search function. Information about possible settings Each channel package is permanently assigned to a transponder frequency, polarisation, DVB type, symbol rate and error rate (Viterbi rate). You can find these specifications, for example, at For example: ARD at ASTRA 19.2 east (as of August 2014): Europe (Satellites / 73 E 0 E) 19.2 E (Astra 1KR/Astra 1L/ Astra 1M/Astra 1N) ARD: Transponder Frequency (Freq.) Polarisation H (horizontal) DVB Type DVB-S Symbol Rate (SR) Error rate (FEC) 5/6 Fig. 39: Manual Channel Search Transponder Frequency Transponder frequency on which the channel to be searched for is transmitted. A saved transponder frequency can be selected or a new one entered with the numeric buttons. 81 of 160
82 Main Menu DVB Type The type of the DVB standard (DVB-S, DVB-S2) with which the channel to be searched for is transmitted only has to be entered if a new transponder frequency has been entered. Polarisation Polarisation only has to be set (Horizontal or Vertical) if a new transponder frequency has been entered. Symbol Rate The symbol rate only has to be entered if a new transponder frequency has been entered. An existing symbol rate can be selected with or a new one entered with the numeric buttons. FEC The FEC (error rate) only has to be entered if a new transponder frequency has been entered. Related topics Automatic Channel Search, p. 78f 82 of 160
83 Search with Service ID MENU MENU Channel Search Search with Service ID Tip This section only describes the possible settings available in addition to the automatic and manual search functions. Fig. 40: Search with Service ID Service ID Use the numeric buttons to enter the service ID of the channel to be searched for ASTRA Channel List Management (LCN) MENU MENU Channel Search ASTRA channel list management (LCN) Use ASTRA channel list On Off The receiver reports changes to the ASTRA channel list automatically. If the message is confirmed, the receiver adopts the changes. The ASTRA channel list of the receiver must be updated manually (via Update ASTRA channel list). 83 of 160

84 Main Menu Update ASTRA channel list This function updates the ASTRA channel list of the receiver. Tip Channels that you have previously deleted from the receiver's complete list are not restored if you perform Update ASTRA channel list. Select Reset ASTRA channel list to restore channels you have deleted from the complete list. Once the ASTRA channel list has been updated, you will receive one of the following messages: The ASTRA channel list is already the current version!(fig. 41) The following new broadcasters have been added to the broadcaster list. No new channels have been found. The message disappears after a few seconds. New channels have been found and are shown in the message: BACK closes the message. The channels found are saved to the channel slots as indicated in the message OK skips to Edit Channel List. Here you can set the channel slots for the channels that have been found Fig. 41: Message after updating the ASTRA channel list Reset ASTRA channel list This function deletes the complete list saved in the receiver and replaces it with the current ASTRA channel list. The same messages as those described under Update ASTRA channel list appear. Tip Channels that you have previously deleted from the complete list on the receiver are added to the end of the channel list when reset. Related topics Channel lists, p of 160
, Reset the receiver to factory settings (11.5.5, p. 91), Obtain information about the device s software (11.5.6, p. 91). 11.5.2 Automatic Software Update MENU MENU Service Menu Automatic software update Define whether the receiver should update the software automatically.")
85 11.5 Service Menu MENU MENU Service Menu Fig. 42: Service Menu Overview In the Service Menu, you can Update the receiver s operating software ( ), Update, load, back up or restore the channel list ( ), Reset the receiver to factory settings (11.5.5, p. 91), Obtain information about the device s software (11.5.6, p. 91) Automatic Software Update MENU MENU Service Menu Automatic software update Define whether the receiver should update the software automatically. On Off When updating the EPG data, the receiver checks whether more up-to-date software is available. The receiver does not automatically search for more up-to-date software. If the receiver finds a new software version, the message New software available (similar to Fig. 43) appears on the next switch-on (from standby). Press one of the following buttons: Press OK to perform the update as per After the update has been completed, the 85 of 160
86 Main Menu receiver will restart. Press BACK to cancel the update (the message appears again on the next restart).! New software available UFSconnect 906 information dated xx.xx. xxxx Dear customer, New Software V x.xx is available. xxx For more information, go to Cancel Update Software Fig. 43: New software available message Updating via the Network/Satellite WWW The software can be updated via the network (Internet) or satellite, depending on whether the receiver is connected to the network (Internet) or not. The menu item changes accordingly: The menu item says Software Update by Network if the receiver is connected to the Internet. The receiver searches the Internet for a new software version. If the Internet connection is interrupted, the receiver continues the search using the satellite signal. The menu item says Software Update by Satellite if the receiver is not connected to the Internet. The receiver searches for a new software version using the satellite signal only. Once the update has started, the message in Fig. 44 appears. If a new software version is available, a message similar to Fig. 45 appears. Notice Risk of damage to property due to damaged operating software! Do not switch the receiver off during the update; rather, wait until the automatic reboot has been completed in full. Follow all instructions contained in the receiver messages. 86 of 160
87 MENU MENU Service Menu Software Update by Satellite Check in the Service Menu whether the new software has been installed. To do this, compare the software information before and after the update. After the update, check the receiver s time setting. Tip The time for which updates to software and channel lists are available via satellite is restricted. If an update should no longer be available via satellite, you can also download the update from the Internet and transfer it to the receiver using a USB stick. Fig. 44: Message when searching for a new software version New Software is available: x.xx Channel list is available: xx.xx.xxxx Show info text Update software: Update channel list : Yes Yes Start update Fig. 45: Message that a new software version has been found The items in Fig. 45 have the following functions: Show info text Highlight item and press OK. The versions of the software available for download are shown. By comparing them to the existing software, you can decide whether you want to install the new software. Update software Yes The new operating software is installed. No The new operating software is not installed. 87 of 160
88 Main Menu Update channel list Yes The new channel list is installed. No The new channel list is not installed. Tip The existing channel list can be backed up to a USB stick prior to the update and, if required, reloaded from there. When the channel list is updated, the current version is restored automatically once the receiver has been reset to its factory setting. Start update Highlight item and press OK or start the update as per the above settings. Related topics Software Information, p. 91 Software Update by USB, p. 89 Factory Reset, p. 91 Time Setting, p. 96 Ethernet Settings, p of 160
89 Software Update by USB Notice Risk of damage to property due to damaged operating software! Do not switch the receiver off during the update; rather, wait until the automatic reboot has been completed in full. Follow all instructions contained in the receiver messages. MENU MENU Service Menu Software Update by USB The Software Update by USB menu item is only available if a USB stick is connected to the receiver. The following functions are available: Load operating software Update Channel List Save Channel List to USB Load operating software An FAT32-formatted USB stick is available. The USB stick contains the folder kathrein and sub-folder ufs906. The current operating software (*.zip) has been downloaded from Service, unzipped and the contents (*.bin) have been saved to sub-folder ufs906 on the USB stick. 1. Note down the software information under Main menu Service Menu. 2. Insert the prepared USB stick into a free USB port on the receiver. 3. Select (Main menu Service Menu) Software Update by USB Update firmware. The message Are you sure? appears. 4. Press OK to confirm the message. The receiver loads the operating software and restarts. 5. Select Main menu Service Menu and compare the software information displayed to that noted down in step 1. If the software information displayed is for a later version than that noted down, the update was successful. If the software information displayed is the same as that noted down, the downloaded operating software was not a later version than the existing one. 6. Check the time setting under Main menu Settings Basic settings Time setting. 7. Remove the USB stick. 89 of 160
90 Main Menu Related topics Showing software information: Software Information, p. 91 Loading operating software on switch-on, p. 14 Update Channel List The channel list has either been Saved previously onto a USB stick, as described under Save Channel List to USB, or Downloaded from Service and saved onto an FAT32-formatted USB stick, in sub-folder kathrein/ufs Insert the prepared USB stick into a free USB port on the receiver. 2. Select Main menu Service Menu Software Update by USB Update Channel List. The message Are you sure? appears. 3. Press OK to confirm the message. The receiver saves the channel list in folder kathrein/ufs906. Save Channel List to USB Tip Save the existing channel list to a USB stick so you can access it if required. Name of the channel list: channel.xml. Only one version of the channel list can be saved to a USB stick (in folder kathrein/ufs906). An FAT32-formatted USB stick with approximately 50 MB free storage space is available. The USB stick contains the folder kathrein and sub-folder ufs Insert the prepared USB stick into a free USB port on the receiver. 2. Select Main menu Service Menu Software Update by USB Save Channel List to USB. The message Are you sure? appears. 3. Press OK to confirm the message. The receiver saves the channel list in folder kathrein/ufs of 160

91 Factory Reset MENU MENU Service Menu Factory Reset Select whether the channel list and/or the receiver settings should be reset. If required, you can have the first installation start automatically following the reset. Start the operation with Load factory setting Software Information MENU MENU Service Menu Software information, including the version number, is shown in the lower part of the Service Menu. The version number can consist of various specifications, e.g. the software version and the build number; see Fig. 46. Fig. 46: Software information including version number 91 of 160
, Change User Defined Settings (parental lock/screen menu/epg/recording/mediacenter; 11.6.3, p. 100ff), Change UFSconnect settings (11.6.4, p.")
92 Main Menu 11.6 Settings MENU MENU Settings Fig. 47: Settings In the Settings menu, you can Perform the First Installation again (11.6.1), Change the Basic Settings (video/audio/time/power-saving/remote control; , p. 93ff), Change User Defined Settings (parental lock/screen menu/epg/recording/mediacenter; , p. 100ff), Change UFSconnect settings (11.6.4, p. 105), Set Antenna & Satellite (tuner/sat<ip/edit satellite/find satellite/transponders; , p. 106) First Installation For information about first installation, see the descriptions in the Quick Start Guide supplied and those in section 3, p of 160
93 Basic Settings MENU MENU Settings Basic Settings Video Settings Tip Please refer to the instructions for your TV set for information about video settings. Only select video settings that your TV set can process: The possible video settings depend on whether the type HDMI or SCART is set for Video Output via. Fig. 48: Video Settings Type 1) Menu item Description Video Output via Select HDMI or SCART to display and set the associated interface parameters (see indication in the Type column). HDMI HDMI / YPbPr Resolution Video resolution of the signal at the HDMI output. Possible settings: 1080p: Resolution 1920 x 1080, full-screen images 1080i: Resolution 1920 x 1080, half-screen images 720p: Resolution 1280 x 720, full-screen images 576p: Resolution 720 x 576, full-screen images Automatic: The receiver passes the transmitted video resolution to the HDMI output unchanged. This means that the video resolution may change when the channel is switched. 93 of 160
94 Main Menu Type 1) Menu item Description HDMI HDMI standard setting Interface with which the TV set and the receiver are connected (HDMI, DVI). HDMI HDCP for free channels On HDCP (digital copy protection) is switched on for free channels without copy protection. Off HDCP is switched off for free channels. HDMI TV control box via HDMI (CEC) On The TV set is switched on/off automatically when the receiver is turned on/off. Preconditions: The TV set is in standby prior to switch-on. The TV set supports CEC control. Off The TV set must be switched on/off manually. HDMI Show 4:3 Event Matching method by which programmes in 4:3 format are displayed on a TV set with 16:9 format. Possible settings: Normal (Pillarbox): Black borders are added to the 4:3 image, the image is visible in full. Stretched (full screen): The 4:3 image is stretched not in proportion, the image is visible in full. Zoom in (Pan & Scan): The 4:3 image is stretched proportionally, protruding edges of the image are cut off. SCART TV Aspect Ratio TV aspect ratio (4:3, 16:9) SCART Picture Format TV Aspect Ratio = 4:3 Letterbox: Similar to Normal (Pillarbox) Pan & Scan: Similar to Zoom in (Pan & Scan) TV Aspect Ratio = 16:9 Automatic: Automatic adjustment Always 16:9: The picture format is always 16:9. 1) Type of interface set under Video Output via. 94 of 160

95 Audio Settings Fig. 49: Audio Settings Preferred Audio Language Preferred Subtitle Language Preferred audio language. If this is not available, the first available audio language will be used. Preferred subtitle language. If this is not available, the first available subtitle language will be used. Home Cinema mode See 5.6, p. 32. Audio Format via HDMI 1) Type of audio signal transmitted via the HDMI interface together with the TV picture (Decoded PCM, S/PDIF Format). Automatic Dolby Digital Output 1) On The receiver plays back the Dolby Digital signal if available. Off The receiver does not play back a Dolby Digital signal. AV receiver on-off mode 2) Audio Delay (Lip Sync) Select the CEC command with which the AV receiver is switched on/off (SystemAudioControl, Power On/Off function; determine the appropriate command through trial and error). Delay in the audio signal compared to the video signal, which can be adjusted in milliseconds. This enables a delay in the TV signal between the picture and the audio to be compensated (lip synchronicity). 1) Only if Home Cinema mode = Off 2) Only if Home Cinema mode = On or Manual 95 of 160

96 Main Menu Time Setting Fig. 50: Time Setting Set Local Time Time setting via Offset of the local time zone from UTC (previously GMT). Setting for Germany: 01:00. Satellite from which time information is obtained. Only satellites which are received and have been selected in the tuner configuration are available. 96 of 160
97 Power-saving functions Fig. 51: Power-saving functions Sleep Timer On The Sleep Timer function is switched on. Off The Sleep Timer function is switched off. The Sleep Timer function enables the receiver to be switched to standby automatically after a pre-set time. If this function is switched on, you have the following options after pressing on/off: Shut down in xx min: The receiver is switched off after xx minutes. Sleep timer off: The receiver remains switched on. on/off: The receiver is switched off immediately. No action: The receiver switches off after 10 s. Automatic standby after 4 hours On The receiver switches to standby after the remote control has not been operated for four hours. Off The function is switched off. 97 of 160
98 Main Menu Remote Control Code You can assign one of the codes Code 1 to Code 4 to both the remote control and the receiver. Tip Code assignment is possible with all Kathrein receivers delivered with an RC 660 or RC 67x remote control. See the instructions for the relevant receiver for more information. How to assign a different remote control code to the receiver 1. On the receiver, go to Live TV/radio MENU MENU Settings Basic Settings Remote Control Code. This page shows the shortcuts for the codes Code 1 to Code On the RC67x remote control, press one of the following shortcuts at the same time: Code 1: BACK Code 2: BACK Code 3: BACK Code 4: BACK The following message appears: The remote control code has been changed successfully. The receiver is now restarted automatically. Tip This function changes the code of the receiver and of the remote control. This enables the receiver to still be operated after the code has been changed. Assign a different remote control code to each receiver. You can control several Kathrein receivers with the same remote control by changing the remote control code as described below under How to assign a different remote control code to the remote control. How to assign a different remote control code to the remote control On the RC67x remote control, press one of the following shortcuts at the same time: Code 1: BACK + 1 Code 2: BACK + 2 Code 3: BACK + 3 Code 4: BACK + 4 If you have selected the same code that is set on the receiver too, the receiver can now be operated. Tip This function only changes the code of the remote control. 98 of 160
99 How to use a type RC67x remote control to operate a receiver delivered with type RC 660 On the RC67x remote control, press one of the following shortcuts at the same time: Code 1: BACK + 5 Code 2: BACK + 6 Code 3: BACK + 7 Code 4: BACK + 8 If you have selected the same code that is set on the (RC 660) receiver too, the receiver can now be operated. Tip This function changes the code of the RC 67x remote control to that of type RC of 160
100 Main Menu User Defined Settings MENU MENU Settings User Defined Settings Fig. 52: User Defined Settings Parental Lock In order to set the parental lock, you must first enter the four-digit PIN code (factory setting: 0000). Lock Main Menu On The main menu cannot be operated until the PIN code has been entered. Off The main menu is not protected by a PIN code. Lock Receiver On The receiver cannot be operated until the PIN code has been entered. Off The receiver is not protected by a PIN code. Define new PIN Code The new PIN code must be entered twice for security reasons. Tip Keep the new PIN code safe. If you forget the PIN code, contact your dealer so he can cancel the PIN code block. 100 of 160
101 Customise Screen Menu Simple mode On MENU opens the main menu (only in Live mode). Off MENU opens the setting menu (in Live mode, EPG, recording archive). Colour scheme Foreground colour Background colour Background transparency Channel banner Duration Pre-defined combinations of foreground and background colours. Colour (RGB value) of highlighted elements. Background colour (RGB value) of displays and menus. Background transparency of displays and menus. Period for which compact programme information is displayed after the channel is changed. Display volume bar On The volume bar is displayed when the volume is being changed. Off The volume bar is not displayed. Front display brightness Front display notification Brightness of the display on the front of the receiver. Changes are shown on the display immediately. Channel: The front display shows information in the following sequence after a channel has been changed: channel name programme title channel name. Clock: Display as for Channel; in addition, the time is shown continuously after approximately 20 s. Related topics Setting menus, p. 29 Programme information, p of 160
102 Main Menu EPG Setup Fig. 53: EPG Setup EPG Grabbing EPG Grabbing Time Pre-Recording Time Post-Recording Time gracenote Services: EPG data is grabbed from Gracenote automatically at the EPG grabbing time. DVB-SI: EPG data is grabbed from the programme provider automatically at the EPG grabbing time. Off: EPG data is not grabbed automatically. Time when the receiver updates the EPG data. The following applies: The receiver is not available to play back programmes/ recordings and so on during the update. The EPG Grabbing Time should therefore be set during the night The update can take up to 45 minutes The receiver must be in standby in order for the update to start. After updating, the receiver switches back to standby If recordings are planned during the update period, the update is shifted automatically TV recordings start earlier than indicated in the EPG, by this many minutes. This provides contingency for minor variations in transmission times. TV recordings stop later than indicated in the EPG, by this many minutes. This provides contingency for minor variations in transmission times. Related topics EPG, p. 45ff 102 of 160
103 PVR Setup Fig. 54: PVR Setup Automatic Timeshift On The automatic timeshift function is switched on. Default Record Duration Default Record Folder Skip time forwards Skip time backwards 1) Off The automatic timeshift function is switched off. The default record duration is used for programmes for which no start and end time is available in the EPG. Recordings are saved in the default record folder. The default record folder is usually the archive hard disk (Recording Archive). However, an NAS that has been set up can also be selected as the default record folder. Automatic: The skip time is adjusted to the duration of the timeshift recording automatically. The maximum skip time is 30 s. xx Seconds: Adjustable fixed value for the skip time xx Seconds: Adjustable fixed value for the skip time Preview icon 1) On A preview icon of the skip destination is displayed for each skip. Off The preview icon is not displayed 2). 1) This menu item is only available if the Skip time forwards is not set to Automatic. 2) If the Skip time forwards is set to Automatic, the preview icon is displayed even if Preview icon was previously set to Off. Related topics Automatic timeshift, p. 36 Setting up an NAS: see MediaCenter guide at of 160
104 Main Menu MediaCenter setup Fig. 55: MediaCenter Setup Simple MP3 Mode On Select this setting if the receiver, in conjunction with the UPnP server, encounters problems with playing MP3 files. For example: Playback ends automatically after the first title. Off Default setting MP3 Player Screensaver On The screensaver shows information about the MP3 file being played in different positions. Off The screensaver is switched off when playing MP3 files. 104 of 160
105 UFSconnect (Receiver Network) MENU MENU Settings UFSconnect (receiver network) Fig. 56: UFSconnect (receiver network) Collective archive On The receiver can access the recordings of other UFSconnect receivers. The UFSconnect receivers only appear in the recording archive as UFS 9xx (<IP address>). Off The receiver cannot access the recordings of other UFSconnect receivers. Reset all ignored receivers Reset UFSconnect If the receiver detects another receiver connected via UFSconnect, it adds the detected receiver to a special list. If one of the detected receivers no longer appears in the list, it can be hidden, e.g. because it is no longer available. Reset all ignored receivers adds all hidden receivers back to the list. Removes all UFSconnect receivers from the internal list. On the next switch-on, the receiver searches for UFSconnect receivers available in the home network from scratch. Related topics Recording Archive (My recordings), p. 60 UFSconnect, p of 160
106 Main Menu Antenna & Satellite MENU MENU Settings Antenna & Satellite The Antenna & Satellite menu is very extensive and is therefore described in a separate section; see Antenna & Satellite, p. 115ff. 106 of 160
 insert position serves to accommodate a CI/CI+ module with a smart card.")
107 11.7 Interface Setup CI+ Decryption System MENU MENU Interface Setup CI+ Decryption System Fig. 57: CI+ Decryption System The Common Interface (CI+) insert position serves to accommodate a CI/CI+ module with a smart card. The CI/CI+ module with smart card is required to view encrypted pay TV channels. Please note that CI/CI+ module and smart card are not included in the scope of delivery,... CI/CI+ module and smart card must be purchased from a pay TV provider,... the user is responsible for inserting the smart card into the CI/CI+ module,... each smart card is only suitable for one encryption technology,... the instructions of the pay TV provider, the module and the smart card must be followed. Store your smart card and PIN code securely when not in use. The CI+ Decryption System page contains the following items Menu item <Insert Position 1> Installed Operator Profiles Description Displays the name and version number of the inserted CI/CI+ module. Depends on the pay TV provider 107 of 160
108 Main Menu Menu item Description Multidecryption On Several channels are decrypted simultaneously, if this is supported by the CI/CI+ module: When recording an encrypted channel, other encrypted channels can be viewed in unencrypted format 1). How many encrypted channels can be viewed will depend on the CI/CI+ module. This function is optimised for AlphaCrypt modules and may lead to malfunctions with other modules. Off Only one channel is decrypted. When recording an encrypted channel in unencrypted format, no other encrypted channels can be viewed in unencrypted format 1). Automatic decryption in standby On Off Programmes recorded in encrypted format are decrypted in standby mode automatically 2). Manual decryption is not necessary. Programmes recorded in encrypted format have to be decrypted manually in standby via the recording archive (My recordings). 1) Precondition: The other encrypted channels are transmitted on the same transponder and can be decrypted with the same CI/CI+ module. 2) Precondition: CI/CI+ module and smart card are located in a Common Interface (CI/CI+) insert position. How to insert the smart card into the CI/CI+ module Push the smart card 1 without force into the the CI/CI+ module 2 as per Fig. 58. How to insert the CI/CI+ module into the CI/CI+ insert position Push the CI/CI+ module, with the top facing up, without force into the CI/CI+ insert position 3. Please note the alignment information found on the CI/CI+ module when pushing it in. How to remove the CI/CI+ module from the CI/CI+ insert position 1. Press the button to eject CI/CI+ modules on the receiver. 2. Pull the ejected module straight out of the CI/CI+ insert position. 108 of 160
109 3 2 CI/CI+ module 1 Smart Card Fig. 58: Pushing the smart card 1 in CI/CI+ module 2; pushing the CI/CI+ module into insert position 3 on the receiver Related topics Markings, p of 160
110 Main Menu HDD Management MENU MENU Interface Setup HDD Management Fig. 59: HDD Management Format Record Archive Important When the recording archive is formatted, all recorded programmes are deleted. The deleted data cannot be restored. Formatting of the recording archive must be confirmed separately or can be cancelled. This function is only available if an archive hard disk has been created previously. Related topics Set up the archive hard disk, p. 111 Format Media Archive Notice When the recording archive is formatted, all media files (MP3, images, AVI) are deleted. The deleted data cannot be restored. See Format Record Archive. 110 of 160

111 Set up the archive hard disk Notice Setting up an archive hard disk deletes all data from the hard disk. The deleted data cannot be restored. This user-guided function creates an archive hard disk on which the data of the recording archive, the MediaCenter and the timeshift memory is saved. The storage space proportions can be adjusted. The proportion of the MediaCenter and timeshift memory are set, with the remainder being assigned to the recording archive automatically Ethernet Settings MENU MENU Interface Setup Ethernet Settings Fig. 60: Ethernet Settings You will find a description of the Ethernet settings Wi-Fi connection, Select network.. and Ethernet Settings in the Mediacenter guide at Wake On LAN (Starting via Network) MENU MENU Interface Setup Wake On LAN This function can be used to wake other devices in the same network as the receiver from standby mode. You will find a description of the Wake On LAN function in the Mediacenter guide at of 160

112 Main Menu 11.8 Applications MENU MENU Applications Fig. 61: Applications Start FTP Access at Booting MENU MENU Applications Start FTP access at booting Yes No FTP access to the archive hard disk is activated when the receiver is switched on. This means that it is possible to access the archive hard disk from the PC using an FTP program. Access via FTP is not possible GB File Limit (FAT32) MENU MENU Applications 4GB File Limit (FAT32) On Off When copying recordings from the archive hard disk to a USB data carrier, they are divided into 4 GB sub-files automatically and saved as such. Reason: USB data carriers are typically formatted with FAT32. FAT32 can only handle files of up to 4 GB. Recordings larger than 4 GB can be transferred to the PC in their entirety via the network. Preconditions: The PC hard disk is formatted with NTFS. Start FTP access at booting is set to Yes. 112 of 160
. If available, HbbTV contents are shown on the TV set after pressing the following button: (red) HbbTV contents are never shown. Fig. 62: Display of HbbTV contents 113 of 160")
113 Start UPnP Server at Booting MENU MENU Applications Start UPnP server at booting Yes No The UPnP server of the receiver is activated on switch-on. The UPnP server is not switched on Start HbbTV Applications MENU MENU Applications Start HbbTV applications Yes Manual No If available, HbbTV contents are shown at the bottom right of the TV set automatically (Fig. 62). If available, HbbTV contents are shown on the TV set after pressing the following button: (red) HbbTV contents are never shown. Fig. 62: Display of HbbTV contents 113 of 160
114 Main Menu 11.9 Language Selection MENU MENU Language Selection Fig. 63: Language selection The operating menus are displayed in the selected language. 114 of 160
115 12 Antenna & Satellite Notice A certain degree of specialist knowledge is needed to make changes in the Antenna & Satellite menu. Only change these settings if you are very familiar with the properties of your satellite reception system. Otherwise, consult your specialist dealer. Tip The following comments apply to this chapter: If nothing is specified to the contrary, the operating instructions assume that live TV/radio is shown The following applies for the tables from p. 119: The hierarchy of the menu items is indicated as follows (example): Satellite Top menu level Satellite Sub-menu level 1 LNB Type Sub-menu level 2 In the right-hand columns, an x indicates to which types of satellite reception system the menu items apply. Please note the general information about operating instructions in 2.3, p. 9. Overview The Antenna & Satellite menu offers a wide range of possible settings. Below is an overview of the higher-level menu items and their functions: Higher-level menu item Reception via, p. 117 Tuner Configuration, p. 118ff DiSEqC 1.0, DiSEqC 1.1 and Single LNB, p. 119ff Motorized Antenna (DiSEqC 1.2, DiSEqC 1.3), p. 122ff SAT>IP, p. 129 OneCable System, p. 125ff Function Select source via which the receiver obtains satellite signals: Internal tuner and/or SAT>IP server. Configure internal tuners Possible settings for satellite reception systems of type DiSEqC 1.0, DiSEqC 1.1 and Single LNB. Possible settings for satellite reception systems with a motorized antenna of type DiSEqC 1.2 and DiSEqC 1.3. Possible settings for SAT>IP server Possible settings for one-cable systems 115 of 160
116 Antenna & Satellite Edit Satellites, p. 129f Edit Transponders, p. 131f Sat Finder, p. 133f Change/delete/add set satellites Change/delete/add transponders of the satellites Help to align the satellite antenna with a satellite Fig. 64: Antenna & Satellite How to open the Antenna & Satellite menu MENU MENU Settings Antenna & Satellite 116 of 160
117 12.1 Reception via MENU MENU Settings Antenna & Satellite Reception via Internal tuner The receiver uses only the internal tuners for reception purposes. Internal tuner & SAT>IP The receiver uses the internal tuners and the SAT>IP server 1) in the home network for reception purposes. SAT>IP The receiver uses only the SAT>IP server 1) in the home network for reception purposes. 1) Precondition: An SAT>IP server has been installed in the home network. Related topics Tuner Configuration, p. 118 SAT>IP, p of 160

118 Antenna & Satellite 12.2 Tuner Configuration MENU MENU Settings Antenna & Satellite Tuner Configuration Fig. 65: Tuner Configuration OneCable System Used Yes The receiver is connected to a one-cable system. Tuner 1 No The receiver is not connected to a one-cable system. Type of the satellite reception system/the one-cable system. OK opens the configuration menu. The following types of satellite reception system are available: DiSEqC 1.0 DiSEqC 1.1 Motorized antenna (with types Single LNB DiSEqC 1.2 and DiSEqC 1.3) The following types of one-cable system are available: EXR.../EXU... UAS 481 SCD2 User-defined Related topics For a description of the one-cable system: See Quick Start Guide, 6.1 Preconditions, p.10 Konfigurationsmenü: DiSEqC 1.0, DiSEqC 1.1 and Single LNB, p. 119 Konfigurationsmenü: Motorized Antenna (DiSEqC 1.2, DiSEqC 1.3), p. 122 Konfigurationsmenü: OneCable System, p of 160
119 DiSEqC 1.0, DiSEqC 1.1 and Single LNB MENU MENU Settings Antenna & Satellite Tuner Configuration Tuner 1 Fig. 66: Tuner Configuration DiSEqC 1.0 Required tuner configuration: Tuner 1 = DiSEqC 1.0 or DiSEqC 1.1 or Single LNB OneCable System Used = No Menu item Description DiSEqC 1.0 DiSEqC 1.1 Single LNB Number of Satellites Number of satellites received by the satellite antenna and whose signal is present at the tuner input of the receiver. x Satellite Satellite location to be set (64 satellite locations available). x Satellite Satellites, as set under Number of Satellites. x <Satellite Name> Uninstall Satellite Satellite assigned to the satellite location selected under Satellite. Uninstall the satellite from the satellite location selected under Satellite. x x 119 of 160
120 Antenna & Satellite Menu item Satellite and Position Description Satellite for which the settings are to be edited. The settings are saved separately for each satellite. Select Satellite List where you can select the satellite for which the settings are to be edited. DiSEqC 1.0 DiSEqC 1.1 Single LNB x x x x x x LNB Type LNB type of the satellite reception system 1) x x x LNB Type LNB type of the satellite reception system 1) x x x Low Frequency Lower limit frequency of the LNB 1) 2) x x x High Frequency Upper limit frequency of the LNB 1) 2) x x x Switch Frequency Limit frequency of the LNB 1) 2) x x x Uncommitted switch Number of Uncommitted Switches (Disabled, ) 1). x DiSEqC Input (Disabled, ) 1). x DiSEqC Repeat Test transponder Frequency of repetition of DiSEqC commands (Off, ) 1). Test transponder against which the strength and quality of the satellite signal should be compared 3). x x x x x Select Transponder List where you can select the test transponder. x x x 1) If required, see the instructions for the satellite reception system for more information or consult an expert. 2) The availability of the parameter depends on the LNB Type selected. 3) Signal strength and quality are shown in the right-hand side of the window; see 1 in Fig of 160

121 1 Fig. 67: Display of signal strength and quality Related topics Tuner Configuration, p of 160
 Required tuner configuration: Tuner 1= Motorized Antenna OneCable System Used = No Menu item Description DiSEqC 1.2 DiSEqC 1.")
122 Antenna & Satellite Motorized Antenna (DiSEqC 1.2, DiSEqC 1.3) MENU MENU Settings Antenna & Satellite Tuner Configuration Tuner 1 Fig. 68: Tuner Configuration Motorized Antenna (in this case: DiSEqC 1.2) Required tuner configuration: Tuner 1= Motorized Antenna OneCable System Used = No Menu item Description DiSEqC 1.2 DiSEqC 1.3 Motor Control Type of motor control (DiSEqC 1.2 or DiSEqC 1.3). x x My Longitude Enter the longitude of the location. x My Latitude Enter the latitude of the location. x Go to Null Position Moves the motorized antenna to the null position, so the borders of the swing path can then be defined. x Set Borders The swing path of the motorized antenna can be restricted if required, to prevent the antenna swinging into an obstacle (wall, tree, etc.). x x Buttons used to rotate the motorized antenna to an east or west limit. East = clockwise rotation, west = anti-clockwise rotation x x 122 of 160
123 Menu item Description DiSEqC 1.2 DiSEqC 1.3 Set current position for 'East' border Set current position for West border Sets the current position as the east limit (= clockwise stop). Sets the current position as the west limit (= anti-clockwise stop). x x x x Reset border positions Resets the limit positions to 0 (swing path = 360 ). x x Select Satellites Open the satellite list. x x Select Satellite List where you can highlight the satellites to be received by the motorized antenna. The highlighted satellites are identified with a check mark. x x Configure Satellites Configure the previously highlighted satellites. x x Satellite Satellite for which the settings are to be edited. The settings are saved separately for each satellite. x x Select Satellite List where you can select the satellite for which the settings are to be edited. The list contains the satellites previously identified with a check mark under Select Satellite. x x LNB Type LNB type of the satellite reception system 1) x x LNB Type LNB type of the satellite reception system 1) x x LNB Low Frequency Lower limit frequency of the LNB 1) 2) x x LNB High Frequency Upper limit frequency of the LNB 1) 2) x x LNB Limit Frequency Limit frequency of the LNB 1) 2) x x Test transponder Test transponder against which the strength and quality of the satellite signal should be compared 3). x x Select Transponder List where you can select the test transponder. x x Stop on signal On If the motorized antenna is moved with the Move antenna function, it stops automatically as soon as the signal from the satellite set under Satellite is received. Off The motorized antenna does not stop automatically. x 123 of 160
124 Antenna & Satellite Menu item Move antenna Store actual Position Description Rotate the motorized antenna manually with the buttons shown until the optimum satellite signal strength and quality is achieved 3). For more information about the buttons, see Set Borders above. Saves the position set under Move antenna. If more than one satellite was previously highlighted under Select Satellites, the page for configuring the next satellite will then appear. DiSEqC 1.2 DiSEqC 1.3 x x 1) If required, see the instructions for the satellite reception system for more information or consult an expert. 2) The availability of the parameter depends on the LNB Type selected. 3) Signal strength and quality are shown in the right-hand side of the window; see 1 in Fig. 67, p Related topics Tuner Configuration, p of 160
125 OneCable System MENU MENU Settings Antenna & Satellite Tuner Configuration Tuner 1 Fig. 69: Tuner Configuration OneCable System Required tuner configuration: OneCable System Used = Yes 125 of 160
126 Antenna & Satellite Tip Information about the one-cable system In the one-cable system several receivers/subscribers are connected to a common antenna cable Furthermore: Channels from several satellites are transmitted on up to 32 transmission channels. EXR.../EXU... / User-defined: 2 satellites, 8 channels, UAS 481: 1 satellite, 4 channels, SCD2: 64 satellites, 32 channels (in accordance with EN 50494) Each transmission channel is permanently assigned to a receiver/subscriber. Note: Each transmission channel may only be assigned to one receiver/ subscriber, to prevent cross-channel interference. Each twin receiver requires two transmission channels. One transmission frequency is assigned to each transmission channel. Refer to the documentation of the one-cable system multi-switch to determine which frequency you must assign to which transmission channel. Fig. 70, p. 128 shows an example channel/frequency assignment of multiswitch EXR If the one-cable system supports it, the assignment of a transmission channel to a transmission frequency can be protected with a PIN. The PIN prevents the transmission frequency being inadvertently assigned to a second receiver/tuner/subscriber. It may be possible to permanently define the one-cable system PIN. Refer to the documentation of the one-cable system for more information. Menu item Description EXR.../EXU... UAS 481 SCD 2 User-defined Configure System Read SCD2 data The following types of one-cable system are available: EXR.../EXU... UAS 481 User-defined See Tab. 4, p. 128 for more information. Reads out the available SCD2 data when the SCD2 configuration starts. x x x x x 126 of 160
127 Menu item Description MDU Yes The transmission channel to transmission frequency assignment is protected by a PIN. No The assignment is not protected. Tuner 1 PIN-code If Secure channels with PIN = Yes: Enter a PIN code between 0 and 255. EXR.../EXU... UAS 481 SCD 2 User-defined x x x x x x Tuner 1 Set the transmission channel for tuner 1. x x x x Tuner 1 SCR Frequency Select one of the pre-defined transmission frequencies or enter a new one (not UAS 481). x x x Number of Satellites Number of satellites fed into the one-cable system. x x x Satellite Satellite and Position Configuration of the satellites set under Number of Satellites. See also the Tip on p Satellite for which the settings are to be edited. The settings are saved separately for each satellite. Select Satellite List where you can select the satellite for which the settings are to be edited. x x x x x x x x x x x x LNB Type LNB type of the satellite reception system 1) x x x Test transponder LNB Type LNB type of the satellite reception system 1) x x x Low Frequency Lower limit frequency of the LNB 1) 2) x x x High Frequency Upper limit frequency of the LNB 1) 2) x x x Switch Frequency Limit frequency of the LNB 1) 2) x x x Test transponder against which the strength and quality of the satellite signal should be compared 3). x x x x Select Transponder List where you can select the test transponder. x x x x 1) If required, see the instructions for the satellite reception system for more information or consult an expert. 2) The availability of the parameter depends on the LNB Type. 3) Signal strength and quality are shown in the right-hand side of the window; see Fig. 67, p of 160
128 Antenna & Satellite Setting... Suitable for... EXR.../EXU... UAS 481 SCD2 User-defined All Kathrein multi-switches The one-cable LNB UAS 481 from Kathrein Downward-compatible extension to the Unicable protocol All other one-cable systems Tab. 4: Types of one-cable system Fig. 70: Channel/frequency combination for the EXR 1581 multi-switch Related topics Tuner Configuration, p of 160
129 12.3 SAT>IP MENU MENU Settings Antenna & Satellite SAT>IP For more information, see the Mediacenter guide at Edit Satellites MENU MENU Settings Antenna & Satellite Edit Satellites Fig. 71: Edit Satellites Menu item Satellite Select Satellite Frequency Select Transponder Polarisation 1) Symbol Rate 1) Satellite Longitude 1) New Satellite Description Satellite for which the settings are to be edited. The settings are saved separately for each satellite. List where you can select the satellite for which the settings are to be edited. Transponder frequency for which the polarisation, symbol rate and orbital position are shown underneath. List where you can select the transponder frequency. Polarisation of the transponder frequency previously selected. Symbol rate of the transponder frequency previously selected. Orbital position of the satellite previously selected. Add another satellite to the satellite list. 129 of 160
130 Antenna & Satellite Menu item <Satellite Name> Satellite Longitude Band Delete Satellite Edit Satellite Name Description Enter the name of the new satellite. Enter the orbital position of the new satellite using the numeric buttons. switch between east (E) and west (W). Select the frequency band (transmission range) of the new satellite. Delete the satellite shown under Satellite from the satellite list. The deletion must be confirmed. Change the name of the satellite shown under Satellite. 1) Display only, no entries can be made. Related topics Text entry, p of 160
131 12.5 Edit Transponders MENU MENU Settings Antenna & Satellite Edit Transponders Fig. 72: Edit Transponders Menu item Satellite Select Satellite Frequency Select Transponder Polarisation 1) Symbol Rate 1) New Transponder Frequency Polarisation Symbol Rate Description Satellite for which the settings are to be edited. The settings are saved separately for each satellite. List where you can select the satellite for which the settings are to be edited. Transponder frequency for which the polarisation, symbol rate and orbital position are shown underneath and whose settings are to be edited. List where you can select the transponder frequency. Polarisation of the transponder frequency previously selected. Symbol rate of the transponder frequency previously selected. Add another transponder to the transponder list. Enter the frequency of the new transponder using the numeric buttons. Select the polarisation of the new transponder. Enter the symbol rate of the new transponder using the numeric buttons. 131 of 160
132 Antenna & Satellite Menu item Delete Transponder Edit Transponder Description Delete the transponder shown under Frequency from the transponder list. The deletion must be confirmed. Change the frequency, polarisation and symbol rate of the transponder shown under Frequency. 1) Display only, no entries can be made. Related topics Text entry, p of 160

133 12.6 Sat Finder MENU MENU Settings Antenna & Satellite Sat Finder Fig. 73: at Finder If no meter is available to align the satellite antenna, you can use the Sat Finder to help you. The Sat Finder shows the signal strength and quality of a satellite/transponder available for selection; see also 1 in Fig. 67, p Menu item Satellite Select Satellite Transponder Frequency 1) Select Transponder Polarisation 1) Symbol Rate 1) Description Satellite with which the satellite antenna is to be aligned. List where you can select the satellite with which the satellite antenna is to be aligned. Transponder frequency for which the polarisation and symbol rate are shown underneath. List where you can select the transponder frequency. Polarisation of the transponder frequency previously selected. Symbol rate of the transponder frequency previously selected. 1) If an existing transponder frequency is selected under Transponder Frequency, the associated Polarisation and Symbol Rate are shown. If a new transponder frequency is entered under Transponder Frequency using the numeric buttons, the Polarisation and Symbol Rate can be set. 133 of 160
Instructions for use. UFS 810 English IMPORTANT READ CAREFULLY BEFORE USE
 Instructions for use UFS 810 English IMPORTANT READ CAREFULLY BEFORE USE List of Contents 1 About these instructions...4 1.1 Contents...4 1.2 Markings...4 1.2.1 Pre-requirements for certain functions...4
Alpha Plus. User Guide
 Alpha Plus User Guide Contents Contents i 1 Introduction 1 1.1 Features.............................. 1 1.2 Accessories............................ 2 1.3 The Remote Control....................... 3 1.4
User s Manual. Full HD Digital Satellite Receiver. v1310. Please read this User s Manual carefully before installing the receiver.
 User s Manual Full HD Digital Satellite Receiver v1310 Please read this User s Manual carefully before installing the receiver. 2 CONTENTS 1 Introduction 4 1.1 Features 4 1.2 Accessories 4 1.3 The Remote
dlan TV Sat 2400-CI+.book Seite 1 Dienstag, 1. November :03 22 devolo dlan TV Sat 2400-CI+
 dlan TV Sat 2400-CI+.book Seite 1 Dienstag, 1. November 2011 10:03 22 devolo dlan TV Sat 2400-CI+ dlan TV Sat 2400-CI+.book Seite 2 Dienstag, 1. November 2011 10:03 22 2011 devolo AG Aachen (Germany) While
User s Manual Bedienungsanleitung
 HD Digital Receiver User s Manual Bedienungsanleitung icord Cable The default password is 0000. Das voreingestellte Passwort lautet 0000. Notice Thank you for purchasing a HUMAX product. Please read this
Front and Rear Panel Remote Control Connecting to a Television...4. Connecting to an Audio System...5
 Table of Contents Front and Rear Panel... 1 Remote Control...... 2 Connecting to a Television...4 Connecting to an Audio System...5 Connecting to a DVD Recorder or VCR... 6 First Time Installation... 7
GENERAL INFORMATION INSTALLATION MENU INFORMATION. Main Features For your Safety Unpacking General Operation RCU Rear Panel.
 GENERAL INFORMATION 3 Main Features For your Safety Unpacking General Operation RCU Rear Panel 3 4 7 7 8 9 INSTALLATION 10 MENU INFORMATION Main Menu 1. Installation 1.1 Satellite list 1.2 Dish Setting
HD Digital Television Recorder. User s Manual HDR-7500T. The default password is 0000.
 HD Digital Television Recorder User s Manual HDR-7500T The default password is 0000. Notice English Thank you for purchasing a HUMAX product. Please read this user s manual carefully to be able to safely
E-MANUAL. Thank you for purchasing this Samsung product. To receive more complete service, please register your product at.
 E-MANUAL Thank you for purchasing this Samsung product. To receive more complete service, please register your product at www.samsung.com/register Model Serial No. Contents Quick Guides Connecting the
IMPORTANT READ CAREFULLY BEFORE USE
 Quick Start Guide Connection and set-up UFSconnect 916 English You will fi nd an English version of this document at www.kathrein.com Vous trouverez la version française du document sur www.kathrein.com
HDS-600RS. User Guide
 HDS-600RS User Guide IMPORTANT SAFETY INFORMATION! Read these instructions carefully before using the product. Install Safely Place the unit on its feet on a firm, stable, horizontal surface. Unplug the
S8100-ZC DIGITAL SATELLITE RECEIVER USER MANUAL. Works only with a Satellite Dish. Version 1.3 AUGUST 2017
 S8100-ZC DIGITAL SATELLITE RECEIVER USER MANUAL Version 1.3 AUGUST 2017 Works only with a Satellite Dish Welcome Thank you for choosing the Dish TV S8100-ZC Satellite Receiver. The S8100-ZC is a Freeview
NMS ETA TM Stereo Advanced Digital TV Set-top Box
 Digital TV HD Set-top Box STB2-T2 NMS ETA TM Stereo Advanced Digital TV Set-top Box User Guide CONTENTS Safety Information... 3 Introduction... 4 Set-top Box Front Panel... 4 Set-top Box Back Panel...
S8100-ZC USER MANUAL
 S8100-ZC USER MANUAL Welcome Thank you for choosing this Dish TV FreeviewPlus Satellite Set Top Box. You will be able to receive all Freeview Satellite TV and Radio Channels, as well as On Demand Catchup
E-MANUAL. Thank you for purchasing this Samsung product. To receive more complete service, please register your product at.
 E-MANUAL Thank you for purchasing this Samsung product. To receive more complete service, please register your product at www.samsung.com/register Model Serial No. Contents Quick Guides Connecting the
What's included? RCU. Easy Setup Guide. HDMI Cable. Loop-through Cable. Power Cord. SATA Cable. RCU Battery
 English What's included? RCU Easy Setup Guide HDMI Cable SATA Cable Power Cord Loop-through Cable RCU Battery 1 Front Panel LCD Display Displays graphic logos of channels and uploaded user s favorite images.
English DMB-118HDMK3
 English DMB-118HDMK3 Table of Contents Safety Information...1 System Connection...1 Remote Control...2 First Time Installation...3 Basic Operation...3 Change Channel...3 Volume and Mute...3 Subtitle/Audio
Ref SATELLITE. User Manual. High Definition TV Satellite Receiver.
 SATELLITE High Definition TV Satellite Receiver Ref. 717501 User Manual www.televes.com Index SATELLITE 1. Safety recommendations............................................................ 4 2. General
Manhattan Model: Plaza HDR S 500GB LET S GET STARTED YOUR USER GUIDE
 Manhattan Model: Plaza HDR S 500GB LET S GET STARTED YOUR USER GUIDE WELCOME TO FREESAT We are so pleased you bought this 500GB Manhattan Plaza HDR S Freesat+ HD recorder. Now you can enjoy: Quality state-of-the-art
GET STARTED. For assistance, call us on or visit manhattan-tv.com/help
 GET STARTED For assistance, call us on 020 8450 0005 or visit manhattan-tv.com/support Check Freeview HD coverage in your area by visiting freeview.co.uk For assistance, call us on 020 8450 0005 or visit
User s Manual S9 HD PVR
 User s Manual S9 HD PVR High Definition Digital Satellite Recorder Personal Video Recorder 1 Common Interface 4 CONTENTS 1. REMOTE CONTROLLER...7 2. BASIC OPERATIONS...8 2.1 TURN ON STB..8 2.2 POWER.8
User manual FT-8100 HD. English
 User manual FT-8100 HD English WARNING!!! On the USB Memory Function for FT-8100 HD model, user can make recording or playing function using by external USB devices such as USB Flash Memory Disk or external
Manual for TV software. TT-Viewer version Figure: TT-budget S2-3200
 Manual for TV software TT-Viewer version 2.7.0 Figure: TT-budget S2-3200 Index Manual TT-Viewer 3 1. Starting TT-Viewer software 3 2. General settings 5 3. Assignment of hardware 6 3.1 Unicable 7 4. Renderer
Digital Terrestrial Television Receiver USER S MANUAL
 # 5024 Digital Terrestrial Television Receiver USER S MANUAL CAUTION RISK OF ELECTRIC SHOCK DO NOT OPEN This symbol is intended to alert the user to the presence of insulated dangerous voltage within the
HD Digital Recorder. User s Manual HDR-1800T HDR-2000T. The default password is 0000.
 HD Digital Recorder User s Manual HDR-1800T HDR-2000T The default password is 0000. Notice Thank you for purchasing a HUMAX product. Please read this user s manual carefully to be able to safely install,
Digital Satellite Module. Guide
 Digital Satellite Module Guide 2 This product fulfils the conditions stated in the EEU directives 89/336 and 73/23. Contents 3 Daily use, 4 Find out how to use the Beo4 remote control with the Digital
HDTV-Sat-Irdeto-Receiver
 HDTV-Sat-Irdeto-Receiver TABLE OF CONTENTS 1 SAFETY ADVICE... 4 2 QUICK SETUP... 6 3 FEATURES... 8 4 HOW TO CONNECT YOUR RECEIVER... 9 5 HARDWARE:... 11 6 WATCHING TV... 15 7 MENU OPERATION... 23 8 EDITING
S8300 DIGITAL SATELLITE RECORDER USER MANUAL. Works only with a Satellite Dish. Version 1.0 APRIL 2017
 S8300 DIGITAL SATELLITE RECORDER USER MANUAL Version 1.0 APRIL 2017 Works only with a Satellite Dish 02 Welcome Welcome Thank you for choosing the Dish TV S8300 Digital Satellite Recorder. The S8300 is
S7030PVR User Manual
 S7030PVR User Manual Important Safety Instructions 1) Do not use this apparatus near water. 2) Clean only with dry cloth. 3) Do not block any ventilation openings, install in accordance with the instructions.
DVB HD T/C/S2. Guide
 DVB HD T/C/S2 Guide Contents 3 Introducing the module and remote control, 4 Find out how to use your remote control with the DVB Module. Daily use, 6 How to bring up and use the menus on the screen. See
E-MANUAL. Thank you for purchasing this Samsung product. To receive more complete service, please register your product at. M o d e l S e r i a ln o.
 E-MANUAL Thank you for purchasing this Samsung product. To receive more complete service, please register your product at www.samsung.com M o d e l S e r i a ln o. To directly go to the page that provides
1.0, 1.1, 1.2, 1.3 (USALS)
") Main Features Twin Tuner HD Satellite Receiver HDMI Output (up to 1080p) DiSEqC 1.0, 1.1, 1.2, 1.3 (USALS) Compatible Dolby Digital audio output (S/PDIF) Extended EPG and program reservation on EPG Open
Main Features Twin Tuner HD Satellite Receiver HDMI Output (up to 1080p) DiSEqC 1.0, 1.1, 1.2, 1.3 (USALS) Compatible Dolby Digital audio output (S/PDIF) Extended EPG and program reservation on EPG Open
English DOWNLOAD ONLY
 English What's included? English Easy Setup Guide HDMI Cable Power Adapter Power Cord External IR Cable RCU Battery RCU 1 Front Panel Idle Server Mode Left Side CI Module slot Smartcard reader slot 2 Rear
User s Manual Digital Satellite Receiver
 A_ENG_110944 User s Manual Digital Satellite Receiver Please read the entire manual thoroughly and retain it for future reference. ENG - 1 General Safety Warning CAUTION RISK OF ELECTRIC SHOCK DO NOT OPEN
User Manual High Definition Digital Set Top Box DVBT9070 Please read this User Manual carefully to ensure proper use of this product and keep this man
 User Manual High Definition Digital Set Top Box DVBT9070 Please read this User Manual carefully to ensure proper use of this product and keep this manual for future reference. Important Safety Instructions
Safety warning Important Safety Instructions. Wall Mount Specifications. Electronic Program Guide. Lock Menu 18. PVR File System
 LT-32N370Z 32 INPUT Safety warning Important Safety Instructions Wall Mount Specifications Electronic Program Guide Lock Menu 18 PVR File System 11 11 11 14 15 16 17 19 20 21 21 22 23 24 25 INPUT AAA
AX1919/AX1922/AX1924/AX /24V LED DVD/TV
 AX1919/AX1922/AX1924/AX1932 12/24V LED DVD/TV PANEL - Display Size: 19 (48cm) - AX1919 22 (56cm) - AX1922 24 (60cm) - AX1924 32 (81cm) - AX1932 - High Definition LED TV - AX1919/32 - Full High Definition
KGN&, > Ϯϰs USER MANUAL
 USER MANUAL KGN Contents Contents Safety Precautions Power Supply... 1 Installation... 2 Use and Maintenance... 3 Important Safety Instructions... 4-5 User Guidance Information Names of each part(front
OPERATING INSTRUCTIONS
 55/65 X98 Series OPERATING INSTRUCTIONS Contents Environmental Information... 2 Disposal Information... 2 Ultra HD (UHD)... 3 High Dynamic Range (HDR) / Hybrid Log-Gamma (HLG)... 3 Dolby Vision... 3 OLED
< > ϯϯyyϭ USER MANUAL
 USER MANUAL Contents Contents Safety Precautions Power Supply... 1 Installation... 2 Use and Maintenance... 3 Important Safety Instructions... 4-5 User Guidance Information Names of each part(front View)
Digital High Definition Satellite Receiver SRT 7000
 Digital High Definition Satellite Receiver SRT 7000 Picture similar User Manual Table of Contents 1.0 Instruction 2 1.1 Safety Instructions 2 1.2 Storage 2 1.3 Equipment Set-up 2 1.4 Accessories 3 1.5
freesat HD Digital Satellite Receiver The default password is User s Manual FOXSAT-HD
 freesat HD Digital Satellite Receiver The default password is 0000. FOXSAT-HD Notice Thank you for purchasing a HUMAX product. Please read this user s manual carefully to be able to safely install, use
USER MANUAL KGN1080P32VD
 USER MANUAL KGN1080P32VD USB... Power cord Remote control/batteries Power/Standby button Picture mode button Sound mode button Multi-digits channel buttton P.MODE S.MODE FREEZE SLEEP 1 2 3 4 5 6 7 8 9
QUICK START GUIDE MODEL : PHD-VRX2
 Full HD 1080p Dual Tuner Digital HDTV Recorder, Receiver and Media Center Box QUICK START GUIDE MODEL : PHD-VRX2 Copyright 2013, PrimeDTV Technologies, Inc. Front View Menu: Display On-screen (OSD) Main
ebay Price: ( )
") HD Media HM-9001 S The HD Media HM-9001 S has a stunning array of high-end features and this latest HD receiver that supports 3G and wifi connections. The HD Media HM-9001s supports web browsing through
HD Media HM-9001 S The HD Media HM-9001 S has a stunning array of high-end features and this latest HD receiver that supports 3G and wifi connections. The HD Media HM-9001s supports web browsing through
OPERATION Channel Manager HDD Installation... 22
 1.General Information... 3 2. Main Features... 3 3. FOR YOUR SAFETY... 4 4. ACCESSORIES... 4 OVERVIEW... 6 1. REMOTE CONTROL KEY... 6 2.FRONT PANEL... 8 3.REAR PANEL... 9 CONNECTION DIAGRAMS... 11 1. PVRX2
User Manual 24PFS PFS5863
 Register your product and get support at www.philips.com/tvsupport 5863 series User Manual 24PFS5863 32PFS5863 Contents 1 Get Support 1.1 Identify and Register your TV 3 1.2 TV Help and User Manual 3 1.3
GDB9 INSTRUCTION MANUAL DIGITAL TERRESTRIAL RECEIVER
 GDB9 INSTRUCTION MANUAL DIGITAL TERRESTRIAL RECEIVER Goodmans Support: www.goodmans.co.uk/support Please read these instructions before use and keep for future reference IMPORTANT SAFETY INSTRUCTIONS Thank
Skyworth HS18. Miniature HDTV Receiver TEST REPORT
 TEST REPORT Miniature HDTV Receiver Skyworth HS18 Ideal for hidden installation on the back of TVs Perfectly suited as a fully featured camping receiver Fully functional PVR thanks to the USB interface
MKV, MOV, MPEG-1/2/4, H.264)
") dvblink DVB-T tuner Dual DVB-T tuner Product features Dual DVB-T tuner DVB-T MPEG2 and MPEG4 compatible (HD) AFS* - auto frequenzy switching USB AV-player port USB-devices up to 2TB (FAT32 and NTFS), supports
dvblink DVB-T tuner Dual DVB-T tuner Product features Dual DVB-T tuner DVB-T MPEG2 and MPEG4 compatible (HD) AFS* - auto frequenzy switching USB AV-player port USB-devices up to 2TB (FAT32 and NTFS), supports
EDISION OS mega VIEWS
 + + H.265 HEVC VIEWS 1 2 3 4 5 Front view: 1. Power Button Switch between operation and standby modes 2. Display current menu information and channel name etc. 3. USB Connect to the External HDD or USB
DVB-T Receiver UFD 570/S
 User's Guide DVB-T Receiver UFD 570/S Order No.: 20210035 2 Foreword Foreword Dear customer, This User's Guide is designed to help you to use the extensive functions of your new DVB-T receiver most effectively.
healing HHR787 HD Digital Terrestrial Twin Tuner Recorder Operating Manual INTRODUCTION... 3 HHR787 FEATURES... 4 SAFETY INSTRUCTIONS...
 CONTENTS INTRODUCTION... 3 HHR787 FEATURES... 4 SAFETY INSTRUCTIONS... 5 FRONT PANEL AND REAR PANEL...6 and 7 REMOTE CONTROL UNIT KEY FUNCTIONS...8 and 9 REMOTE CONTROL BATTERY CARE... 10 INSTALLATION
THD601DC Set-top box
 THD601DC Set-top box Contents 1. Safety... 1 2. Appearance... 2 3. Rear Panel Connection... 3 4. Remote... 4 5 First Time Set-Up... 7 6. Network Settings... 8 6.1 Available Networks and Checking Current
Quick Start Guide. Full HD 1080p Dual Tuner Digital HDTV Recorder, Receiver and Media Center Box MODEL : PHD-VRX. To view full version of
 Full HD 1080p Dual Tuner Digital HDTV Recorder, Receiver and Media Center Box Quick Start Guide MODEL : PHD-VRX To view full version of PHD VRX user manual, USB DTV Recording and Timeshifting Operation
19 HD Ready Digital LCD TV with DVD Player
 19 HD Ready Digital LCD TV with DVD Player Instruction Manual L19DVDP10 L19DVDB20 Logik L19DVDP10_B20_IB_100914_Zell.indd 1 14/09/2010 3:02 PM Logik L19DVDP10_B20_IB_100914_Zell.indd 2 14/09/2010 3:02
HRM 8760 CI+ User s Manual (ENG)
") HRM 8760 CI+ User s Manual (ENG) TABLE OF CONTENTS 1 SAFETY ADVICE... 3 2 QUICK SETUP... 5 3 FEATURES... 7 4 HOW TO CONNECT YOUR RECEIVER... 7 5 HARDWARE... 9 6 WATCHING TV... 13 7 MENU OPERATION... 21
HRM 8760 CI+ User s Manual (ENG) TABLE OF CONTENTS 1 SAFETY ADVICE... 3 2 QUICK SETUP... 5 3 FEATURES... 7 4 HOW TO CONNECT YOUR RECEIVER... 7 5 HARDWARE... 9 6 WATCHING TV... 13 7 MENU OPERATION... 21
S7070rHD - XM USER MANUAL
 S7070rHD - XM USER MANUAL CONTENTS GENERAL INFORMATION 2 Features and Unpacking Remote Control Rear Panel Connections Connecting your S7070rHD Freeview EPG 3 4 5 5 6 FIRST TIME INSTALLATION 7 MENU INFORMATION
User's Manual 980HD micro PVR
 High Definition Digital Satellite PVR User's Manual 980HD micro PVR INDEX INDEX... 3 Precautions... 5 1. Important Safety Instructions... 5 2. Notice... 5 3. Copyright... 6 4. Disclaimer... 6 5. Trademarks...
Xpresionn Digital Terrestrial Receiver. User Guide
 Xpresionn 2150 Digital Terrestrial Receiver User Guide GENERAL INFORMATION...3 A) SAFETY PRECAUTIONS...3 B) MAIN FEATURES...4 C) CONTENTS OF THE PACKAGING...4 D) REMOTE CONTROL...5 INSTALLATION...6 A)
E-MANUAL. Thank you for purchasing this Samsung product. To receive more complete service, please register your product at.
 E-MANUAL Thank you for purchasing this Samsung product. To receive more complete service, please register your product at www.samsung.com/register Model Serial No. Contents Quick Guides Connecting the
E-MANUAL. Thank you for purchasing this Samsung product. To receive more complete service, please register your product at.
 E-MANUAL Thank you for purchasing this Samsung product. To receive more complete service, please register your product at www.samsung.com/register Model Serial No. Contents Quick Guides Using Smart Hub
Quick start manual DIGIT ISIO STC DIGIT ISIO STC+ Digital Multituner-UHD Receiver with Internet access
 Quick start manual DIGIT ISIO STC DIGIT ISIO STC+ Digital Multituner-UHD Receiver with Internet access Dear Customer, Congratulations for choosing the DIGIT ISIO STC / DIGIT ISIO STC+ digital receiver.
TX-65EZ1002B TX-77EZ1002B TX-55EZ952B TX-65EZ952B HELP
 TX-65EZ1002B TX-55EZ952B TX-77EZ1002B TX-65EZ952B e HELP English Read first Before use Licence 13 Features 4K resolution 16 Home Screen 17 Info Frame 18 Touch Pad Controller 19 TV Anywhere 20 Freeview
User s Manual Bedienungsanleitung
 HD Digital Receiver HDTV Digital-Receiver The default password is 0000. Das voreingestellte Passwort lautet 0000. Bedienungsanleitung HD-FOX Notice Thank you for purchasing a HUMAX product. Please read
Operating manual. DVB Satellite Receiver UFS 640si
 Operating manual DVB Satellite Receiver UFS 640si PREFACE Dear customer, This operating manual is intended to help you make the fullest use of the extensive range of functions offered by your new satellite
DVB-T2. Digital Terrestrial Receiver WD-822T2 USER S MANUAL
 DVB-T2 Digital Terrestrial Receiver WD-822T2 USER S MANUAL Index Important Safety Instructions... 3 Main Features.... 5 Front and Rear Panel.... 6 Remote Control..... 7 Installing the Batteries..... 8
SNT7070 SATELLITE & TERRESTRIAL RECEIVER USER MANUAL WORKS WITH A UHF AERIAL. WORKS WITH A Satellite Dish
 SNT7070 SATELLITE & TERRESTRIAL RECEIVER USER MANUAL WORKS WITH A UHF AERIAL WORKS WITH A Satellite Dish Warning: 1. To reduce the risk of fire or electric shock, DO NOT expose this apparatus to rain or
INSTALLING YOUR MANHATTAN SX
 Your USER GUIDE SX INSTALLING YOUR MANHATTAN SX Unpack the following from your Giftbox: 2x AAA batteries Remote control Manhattan SX SCART Adapter HDMI cable Power adapter AV Lead You ll need: A TV with
FV400 DIGITAL TV RECEIVER WITH MODULATOR INSTRUCTION MANUAL
 FV400 DIGITAL TV RECEIVER WITH MODULATOR INSTRUCTION MANUAL Please read this instruction manual carefully before using your receiver Table of Contents Introduction-----------------------------------------------------------------------------
User Manual. High Definition Digital Set Top Box HDSTB250
 User Manual High Definition Digital Set Top Box HDSTB250 CHANNEL HDSTB250 Please read this User Manual carefully to ensure proper use of this product and keep this manual for future reference. Important
Quick Start Guide Connection and Set-up. UFT 930 English IMPORTANT. Read carefully before use!
 Quick Start Guide Connection and Set-up UFT 930 English IMPORTANT Read carefully before use! Contents 1 About This Guide... 3 2 Explanation of Symbols and Signal Words... 3 2.1 Symbols and Signal Words...
24 HD Ready 1080p Digital LCD TV. Instruction Manual L24DIGB10
 24 HD Ready 1080p Digital LCD TV Instruction Manual L24DIGB10 Contents Preparation... 4 Unpacking the TV...4 Installing / Removing the Base Stand...5 Front / Top / Side View and Controls...6 Rear View
SAFETY PRECAUTION ENGLISH DO NOT INSTALL THE RECEIVER: PAG. 2
 MAX S92+ HDMI SAFETY PRECAUTION The lightning fl ash with arrowhead symbol, within an equilateral triangle, is intended to alert the user to dangerous voltage and to prevent from a risk of electric shock.
Re:source. Communication Module. SAT Version. Dominating Entertainment. Revox of Switzerland. E2.00
 Re:source Communication Module SAT Version Dominating Entertainment. Revox of Switzerland. E2.00 Please note: Software update! Unlike the software for the Standard communication module, the SAT control
Operating instructions. Digital CI. Innovative Mobile Technology
 Operating instructions Digital CI Innovative Mobile Technology Stand: 08/2008 Sprache: englisch Proper use and operation This product has been designed for use in a fixed installation on mobile homes or
STM 26 HD. DVB-S2+T2/C Compact meter User Manual. Ref R13. CAHORS Digital CS Cahors Cedex 9 FRANCE
 STM 26 HD DVB-S2+T2/C Compact meter User Manual Ref 0145225R13 Preface USER MANUAL Please read this manual carefully before using your Digital Sat meter for the first time. This operating manual will help
GET STARTED. For assistance, call us on or visit manhattan-tv.com/support
 GET STARTED For assistance, call us on 020 8450 0005 or visit manhattan-tv.com/support Check Freeview HD coverage in your area by visiting freeview.co.uk INSTALLING YOUR T1 Unpack the following from your
Daily use, 6 How to bring up and use the menus on the screen. First-time setup, 15 See what the first-time setup sequence consists of.
 DVB HD Guide Contents 3 Introducing the module and remote control, 4 Find out how to use your remote control with the DVB Module. Daily use, 6 How to bring up and use the menus on the screen. See programme
Table of contents. 1. Before initial operation of the receiver. 2. Installation. 3. First Time Installation (using Wizard) 4.
 4.") Table of contents 1. Before initial operation of the receiver 2. Installation 3. First Time Installation (using Wizard) 4. Basic operation 5. Electronic Program Guide-EPG 6. Edit the channel list 7. Hard
Table of contents 1. Before initial operation of the receiver 2. Installation 3. First Time Installation (using Wizard) 4. Basic operation 5. Electronic Program Guide-EPG 6. Edit the channel list 7. Hard
INDEX Precautions Important Safety Instructions Notice Copyright Disclaimer Trademarks...
 Full HD Digital Satellite Receiver Digital Innovation Life User s Manual HD 7474 PVR INDEX INDEX... 3 Precautions... 5 1. Important Safety Instructions... 5 2. Notice... 5 3. Copyright... 6 4. Disclaimer...
S7070rHD-XM USER MANUAL
 S7070rHD-XM USER MANUAL CONTENTS GENERAL INFORMATION 2 Features and Unpacking Remote Control Rear Panel Connections Connecting your S7070rHD Freeview EPG 3 4 5 5 6 FIRST TIME INSTALLATION 7 MENU INFORMATION
BeoVision Guide
 BeoVision 8-40 Guide Contents Menu overview, 3 See an overview of on-screen menus. Navigate in menus, 4 See how to use the different remote controls for menu operation. First-time setup, 5 Which menus
USER MANUAL KGNPRO19VD
 USER MANUAL KGNPRO19VD X P.MODE S.MODE SLEEP AUDIO 1 2 3 4 5 6 7 8 9 A/DTV USB/SD FAV + 0 SOURCE MENU OK INFO EXIT MUTE VOL CH ASPECT TTX TITLE /AUTO DVD.SETU P EPG SU BTITL E D.MENU ZOOM/REC.LIST GOTO
MAX T200 HD QUICK INSTALLATION GUIDE
 MAX T200 HD QUICK INSTALLATION GUIDE MAX T200 HD QUICK INSTALLATION GUIDE CONTENT receiver BATTERIES x 2 REMOTE CONTROL Quick installation guide Quick Installation Guide The lightning flash with arrowhead
UFS 910. Operating manual - englisch - HDTV receiver for satellite reception
 UFS 910 Operating manual - englisch - HDTV receiver for satellite reception PREFACE Dear customer, this Operating Manual is intended to help you make the fullest use of the extensive range of functions
English SAFETY PRECAUTION DO NOT INSTALL THE RECEIVER: PAG. 2
 U4109 SAFETY PRECAUTION The lightning fl ash with arrowhead symbol, within an equilateral triangle, is intended to alert the user to dangerous voltage and to prevent from a risk of electric shock. Warning:
Digital TV. User guide. Call for assistance
 Digital TV User guide Call 623-4400 for assistance Table of Contents Watch TV with Tbaytel Digital TV 1 Turn On Your TV and Tbaytel Digital TV 1 Turn Off the Screen Saver 1 Turn Off the TV 1 Use the Set
User Manual 32PFT PHT PFT PFT4131
 Register your product and get support at www.philips.com/welcome 4131 series User Manual 32PFT4131 32PHT4131 43PFT4131 49PFT4131 Contents 1 TV tour 12.2 Play your videos 12.3 View your photos 12.4 Play
Throughout the whole user manual, pay special attention to the following marks that
 Notice Warnings, Cautions and Notes Throughout the whole user manual, pay special attention to the following marks that indicate hazardous situations. Warning ** Indicates a hazardous situation which could
DIGIT ISIO S International Edition
 Quick start manual and warranty documentation DIGIT ISIO S International Edition Digital HD Receiver with Internet Functionality DiSEeqC 1.2 1 Illustrations On/Stand-by Arrow keys VF display USB port Socket
E-MANUAL. Thank you for purchasing this Samsung product. To receive more complete service, please register your product at.
 E-MANUAL Thank you for purchasing this Samsung product. To receive more complete service, please register your product at www.samsung.com/register Model Serial No. Contents Quick Guides Connecting the
E-MANUAL. Thank you for purchasing this Samsung product. To receive more complete service, please register your product at. Model Serial No.
 E-MANUAL Thank you for purchasing this Samsung product. To receive more complete service, please register your product at www.samsung.com Model Serial No. To directly go to the page that provides instructions
User Manual 22PFT PHT4031
 Register your product and get support at 4031 series www.philips.com/welcome User Manual 22PFT4031 24PHT4031 Contents 1 TV tour 12.2 Play your videos 12.3 View your photos 12.4 Play your music 3 3 1.1
Operating Manual - Englisch - DVB combi receiver (SAT + DVB-T) UFS 790si/sw
 UFS 790si/sw") Operating Manual - Englisch - DVB combi receiver (SAT + DVB-T) UFS 790si/sw FOREWORD/IMPORTANT INFORMATION Dear customer, This operating manual is intended to help you make the fullest use of the extensive
Operating Manual - Englisch - DVB combi receiver (SAT + DVB-T) UFS 790si/sw FOREWORD/IMPORTANT INFORMATION Dear customer, This operating manual is intended to help you make the fullest use of the extensive
High Definition Digital Satellite PVR. User's Manual F-9000HD PVR
 High Definition Digital Satellite PVR User's Manual F-9000HD PVR INDEX INDEX... 3 Precautions... 5 1. Important Safety Instructions... 5 2. Notice... 5 3. Copyright... 6 4. Disclaimer... 6 5. Trademarks...
QIP7232 P2. Hybrid QAM/IP High-definition Set-top. Quick Start Guide
 QIP7232 P2 Hybrid QAM/IP High-definition Set-top Quick Start Guide Before You Begin Introduction Congratulations on receiving a Motorola QIP7232 Hybrid QAM/IP High-definition Set-top. This document will
TOPFIELD. TF 5810 PVRt. User Guide. Digital Terrestrial Receiver. Personal Video Recorder
 TOPFIELD TF 5810 PVRt User Guide Digital Terrestrial Receiver Personal Video Recorder Contents iii Contents Contents iii 1 Introduction and getting started 1 1.1 Unpacking..............................
User's Guide. Version 2.3 July 10, VTelevision User's Guide. Page 1
 User's Guide Version 2.3 July 10, 2013 Page 1 Contents VTelevision User s Guide...5 Using the End User s Guide... 6 Watching TV with VTelevision... 7 Turning on Your TV and VTelevision... 7 Using the Set-Top
Jynxbox How2 for V1, V2, V3 Pg 1
 Jynxbox How2 for V1, V2, V3 Pg 1 Where to start Get the latest bin file that works. This may require some work but as of this writing JX_NA_Firmware_v233_dual.bin works best for V2. JX_NA_Firmware_v237_dual.bin