Contents. Disclaimer of Product and Services
|
|
|
- Derick Owen
- 5 years ago
- Views:
Transcription

1 Instruction Manual
2 Contents FCC COMPLIANCE STATEMENT... 3 WARNINGS AND PRECAUTIONS... 3 WARRANTY... 4 STANDARD WARRANTY... 4 THREE YEAR WARRANTY... 4 DISPOSAL... 4 INTRODUCTION... 5 FEATURES... 5 GO KMU-100 STUDIO... 6 INSTALLATION... 7 TRANSPORT & PLACEMENT... 7 OPENING THE CASE... 7 SETTING UP THE TLM-102 DUAL 10.1 LCD MONITOR... 7 HOW TO CONNECT INTERNAL CABLES... 8 POWERING ON...13 POWERING OFF...13 PACKING AWAY...13 DIMENSIONS...14 WEIGHTS...16 SPECIFICATIONS...16 SERVICE AND SUPPORT...20 Disclaimer of Product and Services The information offered in this instruction manual is intended as a guide only. At all times, Datavideo Technologies will try to give correct, complete and suitable information. However, Datavideo Technologies cannot exclude that some information in this manual, from time to time, may not be correct or may be incomplete. This manual may contain typing errors, omissions or incorrect information. Datavideo Technologies always recommend that you double check the information in this document for accuracy before making any purchase decision or using the product. Datavideo Technologies is not responsible for any omissions or errors, or for any subsequent loss or damage caused by using the information contained within this manual. Further advice on the content of this manual or on the product can be obtained by contacting your local Datavideo Office or dealer. 2

3 FCC Compliance Statement This device complies with part 15 of the FCC rules. Operation is subject to the following two conditions: 1. This device may not cause harmful interference, and 2. This device must accept any interference received, including interference that may cause undesired operation. Warnings and Precautions The GO KMU-100 Studio is HEAVY, the weigh is about 14kg. At least two people are required to move this unit. It needs two people to move the GO KMU-100 Studio out of the carton. If the system is packed in the 19 flight case, it needs one person only to move the GO KMU-100 Studio. The GO KMU-100 Studio should be always moved and placed in a horizontal position; do not place or try to move the unit in any other position as damage or injury could result. Always use a trolley to safely transport the unit over distances of 2 metres or more. 1. Read all of these warnings and save them for later reference. 2. Follow all warnings and instructions marked on this unit. 3. Unplug this unit from the wall outlet before cleaning. Do not use liquid or aerosol cleaners. Use a damp cloth for cleaning. 4. Do not use this unit in or near water. 5. Do not place this unit on an unstable cart, stand, or table. The unit may fall, causing serious damage. 6. Slots and openings on the cabinet top, back, and bottom are provided for ventilation. To ensure safe and reliable operation of this unit, and to protect it from overheating, do not block or cover these openings. Do not place this unit on a bed, sofa, rug, or similar surface, as the ventilation openings on the bottom of the cabinet will be blocked. This unit should never be placed near or over a heat register or radiator. This unit should not be placed in a built-in installation unless proper ventilation is provided. 7. This product should only be operated from the type of power source indicated on the marking label of the AC adapter. If you are not sure of the type of power available, consult your Datavideo dealer or your local power company. 8. Do not allow anything to rest on the power cord. Do not locate this unit where the power cord will be walked on, rolled over, or otherwise stressed. 9. If an extension cord must be used with this unit, make sure that the total of the ampere ratings on the products plugged into the extension cord do not exceed the extension cord rating. 10. Make sure that the total amperes of all the units that are plugged into a single wall outlet do not exceed 15 amperes. 11. Never push objects of any kind into this unit through the cabinet ventilation slots, as they may touch dangerous voltage points or short out parts that could result in risk of fire or electric shock. Never spill liquid of any kind onto or into this unit. 12. Except as specifically explained elsewhere in this manual, do not attempt to service this product yourself. Opening or removing covers that are marked Do Not Remove may expose you to dangerous voltage points or other risks, and will void your warranty. Refer all service issues to qualified service personnel. 13. Unplug this product from the wall outlet and refer to qualified service personnel under the following conditions: a. When the power cord is damaged or frayed; b. When liquid has spilled into the unit; c. When the product has been exposed to rain or water; d. When the product does not operate normally under normal operating conditions. Adjust only those controls that are covered by the operating instructions in this manual; improper adjustment of other 3


4 controls may result in damage to the unit and may often require extensive work by a qualified technician to restore the unit to normal operation; e. When the product has been dropped or the cabinet has been damaged; f. When the product exhibits a distinct change in performance, indicating a need for service. Standard Warranty Warranty Datavideo equipment are guaranteed against any manufacturing defects for one year from the date of purchase. The original purchase invoice or other documentary evidence should be supplied at the time of any request for repair under warranty. The product warranty period begins on the purchase date. If the purchase date is unknown, the product warranty period begins on the thirtieth day after shipment from a Datavideo office. All non-datavideo manufactured products (product without Datavideo logo) have only one year warranty from the date of purchase. Damage caused by accident, misuse, unauthorized repairs, sand, grit or water is not covered under warranty. Viruses and malware infections on the computer systems are not covered under warranty. Any errors that are caused by unauthorized third-party software installations, which are not required by our computer systems, are not covered under warranty. All mail or transportation costs including insurance are at the expense of the owner. All other claims of any nature are not covered. All accessories including headphones, cables, and batteries are not covered under warranty. Warranty only valid in the country or region of purchase. Your statutory rights are not affected. Three Year Warranty All Datavideo products purchased after July 1st, 2017 are qualified for a free two years extension to the standard warranty, providing the product is registered with Datavideo within 30 days of purchase. Certain parts with limited lifetime expectancy such as LCD panels, DVD drives, Hard Drive, Solid State Drive, SD Card, USB Thumb Drive, Lighting, Camera module, PCIe Card are covered for 1 year. The three-year warranty must be registered on Datavideo's official website or with your local Datavideo office or one of its authorized distributors within 30 days of purchase. Disposal For EU Customers only - WEEE Marking This symbol on the product or on its packaging indicates that this product must not be disposed of with your other household waste. Instead, it is your responsibility to dispose of your waste equipment by handing it over to a designated collection point for the recycling of waste electrical and electronic equipment. The separate collection and recycling of your waste equipment at the time of disposal will help to conserve natural resources and ensure that it is recycled in a manner that protects human health and the environment. For more information about where you can drop off your waste equipment for recycling, please contact your local city office, your household waste disposal service or the shop where you purchased the product. CE Marking is the symbol as shown on the left of this page. The letters "CE" are the abbreviation of French phrase "Conformité Européene" which literally means "European Conformity". The term initially used was "EC Mark" and it was officially replaced by "CE Marking" in the Directive 93/68/EEC in "CE Marking" is now used in all EU official documents. 4
5 Introduction The Datavideo GO KMU-100 Studio is a small studio video production system. The system integrates virtual camera, video switching and audio delaying for synchronization, monitoring, encoding and streaming functionalities in one box. With two 4K cameras, the KMU-100 plus can create up to 8 different virtual cameras for built-in video switching. Features Total solution with suitcase design, rugged protection and easy to carry. Full integration including Switching, Streaming, Virtual Camera, Recording and Monitoring. Power center for supplying power to all devices: pushing one button to boot the whole system. Quad link/12g SDI for broadcast quality. Recorded on USB thumb drives or SD card (Class 10), record + stream bitrate up to 30Mbps. 5


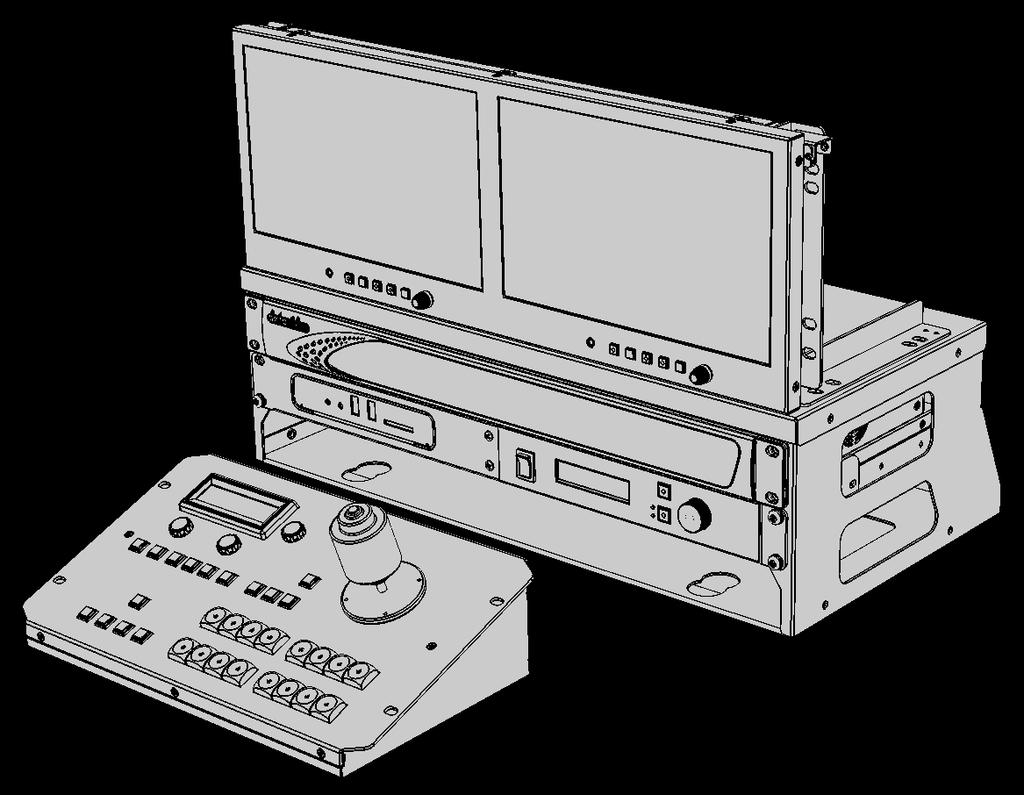
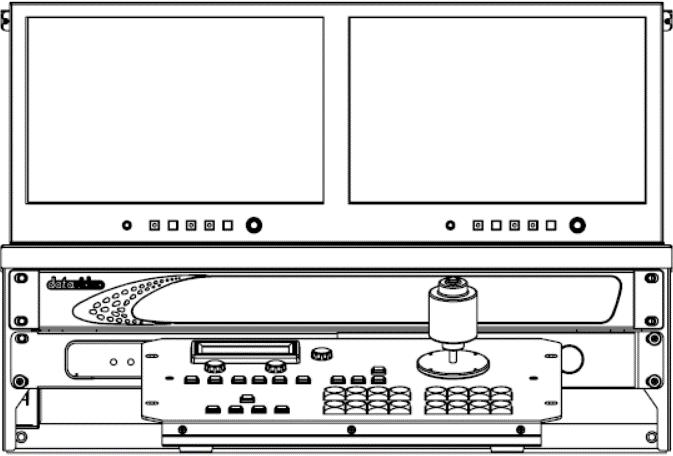
6 GO KMU-100 Studio Front Panel TLM-102: Foldable 4RU rack mount dual monitor providing connections for SDI and HDMI videos KMU-100 Plus: 2 Channel 4K multicamera processor for converting up to 2 4K UHD input signals to up to 8 HD output signals. AD-100M: Audio Delay Box for users to adjust audio delay related parameters such as Audio Delay on/off, delay time and attenuation. NVS-30 H.264 video streaming server for streaming HDMI videos over the Ethernet network. The NVS-30 supports simultaneous live streaming and recording. RMC-185 Plus: RMC-185 plus is an RS-422 interface control panel for the KMU-100+ which provides physical switcher-like operating experience for users. Rear Panel RMK-6: The LAN port provides video stream OUT to destination devices. GO KMU 5V Power Module: This 5 V power module is used to convert 12V power source into 5V input power for the NVS-30. DC IN socket connects the 12V power and supplies power to all integrated devices. 6


7 Transport & Placement Installation The GO KMU-100 Studio is heavy and the weight is about 14kg Do not attempt to lift or move it on your own. It s recommended to have at least two people to move the GO KMU-100 Studio out of the carton. If the GO KMU-100 Studio is packed in the 19 flight case, it needs one person only to move the system. Always use a trolley to safely transport the GO KMU-100 Studio over distances of 2 Metres or more. The unit should be always moved and placed in a horizontal position; do not place or try to move the unit in any other way as damage or injury could result. Place the GO KMU-100 Studio on a strong, stable, flat surface that is capable of supporting the weight. Do not use a folding or single leg table to support the GO KMU-100 Studio. Opening the Case 1. Rest the HC-800 on a flat horizontal surface with the carry handle facing the user 2. Open the buckles on two sides of the carry handle. 3. Lift open the cover 4. Remove the GO KMU-100 Studio system from the case. Setting up the TLM-102 Dual 10.1 LCD Monitor 1. Bring the LCD panel into an upright viewing position. 2. After that, please refer to following chapter How to Connect Internal Cables to connect all the cables according to the instructions. 3. After all of the cables are connected properly, just remember to turn on the power switch and then it s time for you to enjoy the efficiency and the convenience of the GO KMU-100 Studio. 7
8 Cable requirements: How to Connect Internal Cables Cable No. 1-5: DC Plug Cable built into the RMK-6(1 & 2: 85CM. 3 & 4 & 5: 45CM ) Cable No. 6: Mini DIN Cable ( 25 CM) Cable No. 7: HDMI Cable (50 CM) Cable No. 8: HDMI Cable (30CM) Cable No. 9: HDMI Cable (50CM) Cable No. 10: RCA Cable (25CM) Cable No. 11: Ethernet Cable (40CM) Cable No. 12 RS-422(male) to RJ-45(male) adapter cable (120CM) 1. Please connect the Cable No. 6 (Mini DIN cable) from the 5V DC power module on the rear panel of the GO KMU-100 Studio to the 5V power connector on the rear panel of the NVS
9 2. Please connect the Cable No.7 (HDMI Cable) from the Multiview HDMI OUT interface on the rear panel of the KMU-100 to the HDMI IN1 interface on the rear panel of the TLM Please connect the Cable No. 8 (HDMI Cable) from the PGM HDMI OUT interface on the rear panel of the KMU-100 to the HDMI IN interface on the rear panel of the NVS
10 4. Please connect the Cable No. 9 (HDMI Cable) from the HDMI OUT interface on the rear panel of the NVS-30 to the HDMI IN2 interface on the rear panel of the TLM Please connect the Cable No. 10 (RCA Cable) from the RCA output interface on the rear panel of the AD-100M to the 3.5mm unbalanced analog audio input interface on the rear panel of the NVS
11 6. Please connect the Cable No. 11 (Ethernet Cable) from the LAN interface on the rear panel of the NVS-30 to the RMK-6 s RJ-45 interface on the inner side of the RMK Please connect Cable No. 12 (RS-422 to RJ-45 adapter cable) from the RS-422 interface on the rear panel of the KMU-100 to the RJ-45 interface on the rear panel of the RMC
 to the RMC-185, TLM- 102, AD-100M, NVS-30 and KMU-100 DC jacks respectively and secure by tightening the outer fastening")
12 8. First locate the DC jack on the RMK-6 and on the inner side of the DC jack, you should find five DC plug cables attached. Connect Cable No. 1 / 2 / 3 / 4/5 (DC Plug Cable) to the RMC-185, TLM- 102, AD-100M, NVS-30 and KMU-100 DC jacks respectively and secure by tightening the outer fastening ring
13 Powering On Each product built into the GO KMU-100 Studio receives DC power from the power connection on the rear of the RMK-6 unit of the GO KMU-100 Studio. Please ensure the RMK-6 is fed with a DC power supply before attempting to switch on the GO KMU- 100 Studio. If a product within the GO KMU-100 Studio fails to start after the power switch on the rear of the RMK-6 is switched on please locate the on/off switch for that product which has not yet started. For further advice on using a product within the GO KMU-100 Studio please refer to the related manual. Powering Off Before powering off the GO KMU-100 Studio via the power switch on the rear of the RMK-6 please ensure that the NVS-30 has been stopped. Packing Away Carefully fold the 10.1 TLM-102 monitor to its horizontal 1U shipping position. Please remember to secure its position so it cannot move when in transit. Now return the GO KMU-100 Studio to the HC-800 case and the product is ready to be moved. 13
14 Dimensions 14
15 All dimensions in mm. 15
16 Weights The GO KMU-100 Studio is heavy and the weight is about 14kg. If you want to move the GO KMU- 100 Studio from the carton, it needs two people. If the GO KMU-100 Studio is packed in the 19 flight case, it needs one person only to move the GO KMU-100 Studio. A minimum of two people are required to lift or move this product. There are two carry handles on either side of the product, please use these handles to safely share the weight between the people lifting the unit. Always use a trolley to safely transport the GO KMU-100 Studio over distances of 2 Metres or more. The unit should be always moved and placed in an upright position; do not place or try to move the unit in any other way as damage or injury could result. Place the GO KMU-100 Studio on a strong, stable, flat surface that is capable of supporting the weight. Do not use a folding or single leg table to support the GO KMU-100 Studio. Specifications The GO KMU-100 Studio is a combination of Datavideo products, for the specifications of a particular product please refer to its related manual. Device Video Processor/Switcher KMU Controller Audio Delay Recorder Streaming Encoder Monitor Rack Mount Frame Model KMU-100 Plus RMC-185 Plus AD-100M NVS-30 NVS-30 TLM-102 RMK-6 16
17 Note 17
18 Note 18
19 Note 19

20 Sept Version E1
Disclaimer of Product & Services The information offered in this instruction manual is intended as a guide only. At all times, Datavideo Technologies
 TC-100 Table of Contents FCC COMPLIANCE STATEMENT... III WARNINGS AND PRECAUTIONS... III WARRANTY... V STANDARD WARRANTY... V THREE YEAR WARRANTY... V DISPOSAL... VI INTRODUCTION... 1 FEATURES... 1 HOW
Contents. Disclaimer of Product and Services Warnings and Precautions Standard Warranty Two Year Warranty Introduction...
 Contents Disclaimer of Product and Services... 3 Warnings and Precautions... 5 -Standard Warranty... 5 -Two Year Warranty... 5 Introduction... 6 Features... 6 Setup Diagram... 7 Connections & Control...
Table of Contents FCC COMPLIANCE STATEMENT... 4 WARNINGS AND PRECAUTIONS... 4 WARRANTY... 5 STANDARD WARRANTY... 5 TWO YEAR WARRANTY... 5 DISPOSAL...
 1 Table of Contents FCC COMPLIANCE STATEMENT... 4 WARNINGS AND PRECAUTIONS... 4 WARRANTY... 5 STANDARD WARRANTY... 5 TWO YEAR WARRANTY... 5 DISPOSAL... 6 1. INTRODUCTION... 7 FEATURES... 7 2. CONNECTIONS
POWER INPUT F1 F2 EXIT MENU POWER INPUT F1 F2 EXIT MENU TLM-102 DUAL 10 MONITOR. Instruction Manual.
 POWER INPUT F1 F2 EXIT MENU POWER INPUT F1 F2 EXIT MENU TLM-102 DUAL 10 MONITOR DUAL 10 MONITOR TLM-102 Instruction Manual www.datavideo.com Table of Contents FCC COMPLIANCE STATEMENT... 3 WARNINGS AND
.Power Distribution Center. PD-1. Instruction Manual
 .Power Distribution Center. PD-1 Instruction Manual www.datavideo-tek.com 1 Contents Warnings and Precautions... 3 Warranty... 4 Standard Warranty... 4 Two Year Warranty... 4 Disposal... 4 Packing List...
RACK MOUNT KIT RMK-2 Quick Start Guide
 RACK MOUNT KIT RMK-2 Quick Start Guide www.datavideo-tek.com Apr-22.2013 P/N: G082060691B1 Warnings and Precautions 1. Read all of these warnings and save them for later reference. 2. Follow all warnings
Repeater & Power Adaptor VP-633 HD/SD SDI Repeater VP-634 Quick Start Guide
 Repeater & Power Adaptor VP-633 HD/SD SDI Repeater VP-634 Quick Start Guide www.datavideo.com Warnings and Precautions 1. Read all of these warnings and save them for later reference. 2. Follow all warnings
SE-2850 / HS-2850 /MS CHANNEL UPGRADE I/O CARD SE-2850 UPGRADE I/O CARD. Instruction Manual
 SE-2850 / HS-2850 /MS-2850 4 CHANNEL UPGRADE I/O CARD SE-2850 UPGRADE I/O CARD Instruction Manual Table of Contents FCC COMPLIANCE STATEMENT... 3 WARNINGS AND PRECAUTIONS... 3 WARRANTY... 5 STANDARD WARRANTY...
REAR PANEL FOR SDI OUTPUT PP-ONE X. Instruction Manual.
 REAR PANEL FOR SDI OUTPUT PP-ONE X Instruction Manual www.datavideo.com Table of Contents FCC COMPLIANCE STATEMENT... 3 WARNINGS AND PRECAUTIONS... 3 WARRANTY... 4 STANDARD WARRANTY... 4 THREE YEAR WARRANTY...
Warnings and Precautions
 Warnings and Precautions 1. Read all of these warnings and save them for later reference. 2. Follow all warnings and instructions marked on this unit. 3. Unplug this unit from the wall outlet before cleaning.
TALLY LIGHT INDICATOR TD-3. Instruction manual.
 TALLY LIGHT INDICATOR TD-3 Instruction manual www.datavideo.com Table of Contents FCC COMPLIANCE STATEMENT... 3 WARNINGS AND PRECAUTIONS... 3 WARRANTY... 4 STANDARD WARRANTY... 4 THREE YEAR WARRANTY...
Table of Contents FCC COMPLIANCE STATEMENT... 3 WARNINGS AND PRECAUTIONS... 3 WARRANTY... 4 STANDARD WARRANTY... 4 THREE YEAR WARRANTY...
 7 4K LCD Monitor Table of Contents FCC COMPLIANCE STATEMENT... 3 WARNINGS AND PRECAUTIONS... 3 WARRANTY... 4 STANDARD WARRANTY... 4 THREE YEAR WARRANTY... 5 DISPOSAL... 6 1. INTRODUCTION... 7 TLM-700K
REAR PANEL WITH VP-633x3 & SDI BNC I/Ox8 RP-75. Instruction Manual.
 REAR PANEL WITH VP-633x3 & SDI BNC I/Ox8 RP-75 Instruction Manual www.datavideo.com Table of Contents FCC COMPLIANCE STATEMENT... 2 WARNINGS AND PRECAUTIONS... 2 WARRANTY... 3 STANDARD WARRANTY... 3 THREE
VP-737 Instruction Manual
 COMPOSITE SIGNAL REPEATER VP-737 Instruction Manual Table of Contents FCC COMPLIANCE STATEMENT... 3 WARNINGS AND PRECAUTIONS... 3 WARRANTY... 5 STANDARD WARRANTY... 5 THREE YEAR WARRANTY... 6 DISPOSAL...
Network Video Decoder NVD-20. Contents
 Contents Warnings and Precautions... 4 Warranty... 5 Standard Warranty... 5 Two Year Warranty... 5 Disclaimer of Product & Services... 6 Disposal... 6 Packing List... 6 Product Overview... 7 Features...
HD/SD SDI AND INTERCOM REPEATER BOX VP-781 Instruction Manual
 HD/SD SDI AND INTERCOM REPEATER BOX VP-781 Instruction Manual Table of Contents FCC COMPLIANCE STATEMENT... 3 WARNINGS AND PRECAUTIONS... 3 WARRANTY... 5 STANDARD WARRANTY... 5 THREE YEAR WARRANTY... 5
LOOK-BACK/RECORDER REMOTE CONTROLLER. RMC-200 Instruction Manual.
 LOOK-BACK/RECORDER REMOTE CONTROLLER RMC-200 Instruction Manual www.datavideo.com Table of Contents FCC COMPLIANCE STATEMENT... 2 WARNINGS AND PRECAUTIONS... 2 WARRANTY... 4 STANDARD WARRANTY... 4 THREE
TBC & Matrix Switcher TBC-5000 Instruction Manual
 TBC & Matrix Switcher TBC-5000 Instruction Manual www.datavideo-tek.com Rev 150509 1 Contents Warnings and Precautions... 3 Warranty... 4 Disposal... 4 Packing List... 4 TBC-5000 Features... 4 Product
FCC COMPLIANCE STATEMENT... 3 WARNINGS AND PRECAUTIONS... 3 WARRANTY...
 Table of Contents FCC COMPLIANCE STATEMENT... 3 WARNINGS AND PRECAUTIONS... 3 WARRANTY... 4 STANDARD WARRANTY... 4 TWO YEAR WARRANTY... 4 DISPOSAL... 4 1. INTRODUCTION... 5 FEATURES... 5 TLM-170L MODEL
30M / 50M / 100M HDMI ACTIVE OPTICAL CABLE CB-60/61/62 Instruction manual
 30M / 50M / 100M HDMI ACTIVE OPTICAL CABLE CB-60/61/62 Instruction manual Table of Contents FCC COMPLIANCE STATEMENT... 3 WARNINGS AND PRECAUTIONS... 3 WARRANTY... 4 STANDARD WARRANTY... 4 THREE YEAR WARRANTY...
AUDIO ISOLATION TRANSFORMER. DAC-80 Instruction Manual.
 AUDIO ISOLATION TRANSFORMER DAC-80 Instruction Manual www.datavideo.com Table of Contents FCC COMPLIANCE STATEMENT... 3 WARNINGS AND PRECAUTIONS... 3 WARRANTY... 5 STANDARD WARRANTY... 5 THREE YEAR WARRANTY...
2 x 7" TFT LCD MONITOR TLM-702HD
 2 x 7" TFT LCD MONITOR TLM-702HD Instruction Manual Rev 150310 www.datavideo-tek.com Table of Contents Warnings and Precautions... 3 Warranty... 4 Standard Warranty... 4 Two Year Warranty... 4 Disposal...
HD/SD-SDI to HDMI Converter DAC-8P Quick Start Guide
 HD/SD-SDI to HDMI Converter DAC-8P Quick Start Guide www.datavideo-tek.com Table of Contents Warnings and Precautions... 2 What s in the box?... 5 Introduction... 5 Features... 6 Functions... 7 Front Panel...
ITC-200B Quick Start Guide
 INTERCOM BASE UNIT ITC-200B Quick Start Guide http:// www.datavideo-tek.com Warnings and Precautions 1. Read all of these warnings and save them for later reference. 2. Follow all warnings and instructions
KMU-100 Instruction manual
 4K MULTICAMERA PROCESSOR KMU-100 Instruction manual Table of Contents FCC COMPLIANCE STATEMENT... 4 WARNINGS AND PRECAUTIONS... 4 WARRANTY... 5 STANDARD WARRANTY... 5 THREE YEAR WARRANTY... 5 DISPOSAL...
HD/SD- SDI to VGA Converter DAC-60 Quick Start Guide
 HD/SD- SDI to VGA Converter DAC-60 Quick Start Guide www.datavideo-tek.com Table of Contents Warnings and Precautions... 2 What s in the box?... 4 Introduction... 4 Features... 4 Functions... 5 Front Panel...
TLM 170 / D / M / MD 17 Widescreen LCD TFT Monitor
 TLM 170 / D / M / MD 17 Widescreen LCD TFT Monitor Instruction Manual Rev 060509 www.datavideo-tek.com Table of contents Warnings and Precautions ------------------------------------------------------------------------------------
SDI AUDIO EMBEDDER. DAC-91 Instruction Manual.
 SDI AUDIO EMBEDDER DAC-91 Instruction Manual www.datavideo.com Table of Contents FCC COMPLIANCE STATEMENT... 2 WARNINGS AND PRECAUTIONS... 2 WARRANTY... 4 STANDARD WARRANTY... 4 THREE YEAR WARRANTY...
TITLE CREATOR TC-200. Instruction manual.
 TITLE CREATOR TC-200 Instruction manual www.datavideo.com Table of Contents FCC COMPLIANCE STATEMENT... 3 WARNINGS AND PRECAUTIONS... 3 WARRANTY... 5 STANDARD WARRANTY... 5 THREE YEAR WARRANTY... 5 DISPOSAL...
Datavideo TLM x 2 TFT LCD Monitors
 Datavideo TLM-702 7 x 2 TFT LCD Monitors Instruction Manual http://www.datavideo-tek.com Rev: 131205 Table of contents Warnings and Precautions -----------------------------------------------------------------------------------2
DAC-90 Instruction Manual
 SDI AUDIO DE-EMBEDDER DAC-90 Instruction Manual Table of Contents FCC Compliance Statement... 3 Warnings and Precautions... 3 Warranty... 4 Standard Warranty... 4 Three Year Warranty... 5 Disposal... 6
Disclaimer of Product and Services - 1 -
 Table of Contents Warnings and Precautions... - 2 - Warranty... - 2 - Standard Warranty... - 2 - Two Year Warranty... - 3 - Disposal... - 3-1. Product Overview... - 4-1.1 Features... - 4-2. Example CCU-100
Keyer Control Key Source Fill Source Still Load Still Save Still Freeze User Load Memory...
 1 Table of Contents Warnings and Precautions... 4 Warranty... 4 Standard Warranty... 4 Two Year Warranty... 5 Disposal... 5 Packing List... 5 Introduction... 6 Features... 6 System Diagram... 7 Rear Panel...
BLUETOOTH TELEPROMPTER REMOTE CONTROL WR-500. Instruction manual.
 BLUETOOTH TELEPROMPTER REMOTE CONTROL WR-500 Instruction manual www.datavideo.com Table of Contents FCC COMPLIANCE STATEMENT... 3 WARNINGS AND PRECAUTIONS... 3 WARRANTY... 4 STANDARD WARRANTY... 4 THREE
DAC-60 Instruction Manual
 HD/SD-SDI TO VGA CONVERTER DAC-60 Instruction Manual Table of Contents FCC COMPLIANCE STATEMENT... 4 WARNINGS AND PRECAUTIONS... 4 WARRANTY... 5 STANDARD WARRANTY... 5 THREE YEAR WARRANTY... 5 DISPOSAL...
Keyer Control Key Source Fill Source Still Load Still Save Still Freeze User Load Memory...
 Table of Contents Warnings and Precautions... 4 Warranty... 4 Standard Warranty... 4 Two Year Warranty... 5 Disposal... 5 Packing List... 5 Introduction... 6 Features... 6 System Diagram... 7 Rear Panel...
HD/SD-SDI TO VGA CONVERTER. DAC-60 Quick Start Guide.
 HD/SD-SDI TO VGA CONVERTER DAC-60 Quick Start Guide www.datavideo.com Warranty Standard Warranty Datavideo equipment is guaranteed against any manufacturing defects for one year from the date of purchase.
Welcome to the ITC-100 Instruction Manual
 INTERCOM TLK BCK SYSTEM Welcome to the ITC-100 Instruction Manual Thank you for choosing a Datavideo product, please visit the support pages on our website for the latest version of the instruction manual.
HD/SD-SDI TO VGA CONVERTER. DAC-60 Quick Start Guide.
 HD/SD-SDI TO VGA CONVERTER DAC-60 Quick Start Guide www.datavideo.com Warranty Standard Warranty Datavideo equipment is guaranteed against any manufacturing defects for one year from the date of purchase.
Teleprompter Remote Controls TP-WRC TP-BTWC. Instruction Manual. Rev Date: P/N: TP Controllers
 Teleprompter Remote Controls TP-WRC TP-BTWC Instruction Manual Rev Date: 03-06-2013 P/N: TP Controllers WWW.DATAVIDEO.COM Contents Warnings and Precautions... 3 Warranty... 4 Disposal... 4 Free App download
STC-100 Standards Converter
 STC-100 Standards Converter User s Guide http:// www.datavideo-tek.com Rev: 240106 Warnings and Precautions 1. Read all of these warnings and save them for later reference. 2. Follow all warnings and instructions
2X6 3G HD/SD-SDI DISTRIBUTION AMPLIFIER. VP-597 Instruction Manual
 2X6 3G HD/SD-SDI DISTRIBUTION AMPLIFIER VP-597 Instruction Manual 2 Warranty Standard Warranty Datavideo equipment are guaranteed against any manufacturing defects for one year from the date of purchase.
AITech ProA/V Media Extender 5GHz Digital
 AITech ProA/V Media Extender 5GHz Digital 5 GHz Wireless Digital Media Transmitter and Receiver User Manual Table of Contents 1. Package Contents 2. Panels and Functions AV Sender AV Receiver 3. Setup
.Prompter Kit for Apple ipad. TP-200
 .Prompter Kit for Apple ipad. TP-200 Instruction Manual www.datavideo-tek.com 1 Contents Warnings and Precautions... 3 GLASS - Handle with care... 3 Warranty... 4 Standard Warranty... 4 Two Year Warranty...
User Manual TL-2X1-HDVC 2x1 HDMI & VGA Switcher with Control All Rights Reserved Version: TL-2X1-HDVC_160630
 User Manual TL-2X1-HDVC 2x1 HDMI & VGA Switcher with Control All Rights Reserved Version: TL-2X1-HDVC_160630 Preface Read this user manual carefully before using this product. Pictures shown in this manual
HD/SD Recorder HDR-60 Quick Start Guide
 HD/SD Recorder HDR-60 Quick Start Guide www.datavideo.com May-20.2013 P/N: G082060647B3 1 Table of contents Warnings and Precautions... 3 Warranty... 4 Disposal... 4 Packing List... 5 Introduction... 5
USERS GUIDE MCX-HTS. HDMI to 3G SDI Converter. Manual Number:
 USERS GUIDE MCX-HTS HDMI to 3G SDI Converter i Manual Number: 151226 SAFETY INSTRUCTIONS Please review the following safety precautions. If this is the first time using this model, then read this manual
User Manual TL-2X1-HDV 2x1 HDMI & VGA Switcher All Rights Reserved Version: TL-2X1-HDV_160630
 User Manual TL-2X1-HDV 2x1 HDMI & VGA Switcher All Rights Reserved Version: TL-2X1-HDV_160630 Preface Read this user manual carefully before using this product. Pictures shown in this manual are for reference
Contents Warnings and Precautions... 2 Warranty... 2 Disposal... 3 Packing List... 3 Product Overview... 4 Features... 5 Functions...
 Contents Warnings and Precautions... 2 Warranty... 2 Standard Warranty... 2 Two Year Warranty... 2 Disposal... 3 Packing List... 3 1. Product Overview... 4 Algorithm Strength of our solution... 4 Setting
VLHDMIEXTFIB_2017V1.0
 User Manual VLHDMIEXTFI ll Rights Reserved Version: VLHDMIEXTFI_2017V1.0 Preface Read this user manual carefully before using the product. Pictures are shown in this manual for reference only, different
UP / DOWN / CROSS CONVERTER. DAC-70 Instruction Manual.
 UP / DOWN / CROSS CONVERTER DAC-70 Instruction Manual www.datavideo.com UP / DOWN / CROSS CONVERTER Welcome to the DAC-70 Instruction Manual Thank you for choosing a Datavideo product, please visit the
Winmate Communication INC.
 20.1 Military Grade Display Model: R20L100-RKA2ML User s Manual Winmate Communication INC. May, 2011 1 IMPORTANT SAFETY INSTRUCTIONS Please read these instructions carefully before using the product and
MS-2800A/B Instruction manual
 HD/SD 12-CHANNEL MOBILE VIDEO STUDIO MS-2800A/B Instruction manual Contents FCC COMPLIANCE STATEMENT... 3 WARNINGS AND PRECAUTIONS... 3 WARRANTY... 4 STANDARD WARRANTY... 4 THREE YEAR WARRANTY... 4 DISPOSAL...
USER MANUAL. 27 Full HD Widescreen LED Monitor L27ADS
 USER MANUAL 27 Full HD Widescreen LED Monitor L27ADS TABLE OF CONTENTS 1 Getting Started 2 Control Panel/ Back Panel 3 On Screen Display 4 Technical Specs 5 Care & Maintenance 6 Troubleshooting 7 Safety
KMU CONTROLLER RMC-185 Instruction manual
 KMU CONTROLLER RMC-185 Instruction manual Table of Contents FCC COMPLIANCE STATEMENT... 4 WARNINGS AND PRECAUTIONS... 4 WARRANTY... 5 STANDARD WARRANTY... 5 THREE YEAR WARRANTY... 5 DISPOSAL... 5 1. INTRODUCTION...
8 Port HD/SD-SDI Switch
 8 Port HD/SD-SDI Switch User s Guide Models SW-HDSDI-8X1 2008 Avenview Inc. All rights reserved. The contents of this document are provided in connection with Avenview Inc. ( Avenview ) products. Avenview
USO RESTRITO. DAC-70 Instruction Manual UP / DOWN / CROSS CONVERTER.
 UP / DOWN / CROSS CONVERTER DAC-70 Instruction Manual www.datavideo.com 2 UP / DOWN / CROSS CONVERTER Welcome to the DAC-70 Instruction Manual Thank you for choosing a Datavideo product, please visit the
USER MANUAL. 27 Full HD Widescreen LED Monitor L270E
 USER MANUAL 27 Full HD Widescreen LED Monitor L270E TABLE OF CONTENTS 1 Getting Started 2 Control Panel/ Back Panel 3 On Screen Display 4 Technical Specs 5 Care & Maintenance 6 Troubleshooting 7 Safety
.Prompter Kit for Apple ipad. TP-200 Instruction Manual
 .Prompter Kit for Apple ipad. TP-200 Instruction Manual www.datavideo-tek.com 1 Contents Warnings and Precautions... 3 Warranty... 4 Disposal... 4 Packing List... 5 Product Overview... 6 Features... 6
Prompter Kit for PTZ camera TP-150 Instruction Manual
 Prompter Kit for PTZ camera TP-150 Instruction Manual WWW.DATAVIDEO.COM Contents Warnings and Precautions... 3 Warranty... 4 Disposal... 4 Packing List... 5 Product Overview... 6 Normal tripod assembly...
User Manual PS-684. HDBaseT Extender Kit 70m. All Rights Reserved. Version: UHBT70P_2016V1.2
 User Manual PS-684 All Rights Reserved Version: UHBT70P_2016V1.2 Preface Read this user manual carefully before using this product. Pictures shown in this manual is for reference only, different model
User Manual CVA3. HDMI Audio Decoder. All Rights Reserved. Version: CVA3_2016V1.0
 User Manual CVA3 All Rights Reserved Version: CVA3_2016V1.0 Preface Read this user manual carefully before using this product. Pictures shown in this manual is for reference only, different model and specifications
User Manual TP70L. HDBaseT Extender. All Rights Reserved. Version: TP70L2016V1.1
 User Manual TP70L HDBaseT Extender All Rights Reserved Version: TP70L2016V1.1 Preface Read this user manual carefully before using this product. Pictures shown in this manual is for reference only, different
OPERATING INSTRUCTIONS TOM-0431IP
 OPERATING INSTRUCTIONS TOM-0431IP Table of Contents FCC Information -------------------------------------------------------------------- 2 Safety and Environmental Precautions ------------------------------------------------
Contents. Warranty...4. Standard Warranty...4. Two Year Warranty...4. Disposal...4. TLM-170H Model Types...5. Packing List...5. Product Overview...
 Contents Warranty...4 Standard Warranty...4 Two Year Warranty...4 Disposal...4 TLM-170H Model Types...5 Packing List...5 Product Overview...6 Features...6 Supported Formats...7 From a Video Source...8
HD Digital MPEG2 Encoder / QAM Modulator
 HD Digital MPEG2 Encoder / QAM Modulator HDMI In QAM Out series Get Going Guide ZvPro 800 Series is a one or two-channel unencrypted HDMI-to-QAM MPEG 2 Encoder / QAM Modulator, all in a compact package
HDMI to VGA Converter with Audio
 Introduction HDMI to VGA Converter with Audio Quick Installation Guide The HDMI to VGA Converter with Audio allows you to convert digital HDMI to VGA and analog stereo audio. Features and Benefits Converts
Bi-Directional SDI to DV Converter DAC-5 User s Guide
 Bi-Directional SDI to DV Converter DAC-5 User s Guide http://www.datavideo-tek.com Table of contents Warnings and Precautions --------------------------------------------------------------- 2 Warranty
9" B/W MONITOR CEM-09/09A-2 12" B/W MONITOR CEM-12/12A-2 OPERATION MANUAL
 9" B/W MONITOR CEM-09/09A-2 12" B/W MONITOR CEM-12/12A-2 OPERATION MANUAL CONTENTS PRECAUTIONS FOR USE AND INSTALLATION IMPORTANT SAFEGAURDS SAFETY INSTRUCTIONS INSTRUCTION MANUAL CLASS B COMPUTING DEVICES
DAC-07 INSTRUCTION MANUAL
 DAC-07 INSTRUCTION MANUAL www.datavideo-tek.com Rev 100309 Table of Contents Warnings and Precautions... 3 Warranty... 4 Disposal... 4 Packing List... 4 Features... 4 Product Overview... 5 Front Panel...
8 Port HD/SD-SDI Video Switch with 2 Port Splitter
 8 Port HD/SD-SDI Video Switch with 2 Port Splitter User s Guide Models SW-HDSDI-8X2 2008 Avenview Inc. All rights reserved. The contents of this document are provided in connection with Avenview Inc. (
PoE Over Coax Extender Kit
 Comply with IEEE.802.3af User Manual Data Sheet PoE Over Coax Extender Kit PoEoC-15K PoEoC-15-HOST PoEoC-15-D Host Unit - PSE Side Device Unit PD Side By using RF technology, this kit can extend the transmission
User Manual TL-TP70-HDIR 70m Extender with ARC and IR All Rights Reserved Version: TL-TP70-HDIR_180723
 User Manual TL-TP70-HDIR 70m Extender with ARC and IR All Rights Reserved Version: TL-TP70-HDIR_180723 Preface Read this user manual carefully before using this product. Pictures shown in this manual is
 Register your product and get support at www.philips.com/welcome SWS3435S/27 SWS3435H/37 EN User manual Contents 1 Important 4 Safety 4 English 2 Your SWS3435 6 Overview 6 3 Installation 7 Connect the
4 PORT HDMI SWITCH
 4 PORT HDMI SWITCH 1518896 IMPORTANT SAFEGUARDS OF HDMI SWITCH PRODUCTS PLEASE READ CAREFULLY THE FOLLOWING SAFEGUARDS THAT ARE APPLICABLE TO YOUR EQUIPMENT 1. Read instructions - All the safety and operating
ZVOX AccuVoice TV Speaker MODEL AV150.
 ZVOX AccuVoice TV Speaker MODEL AV150 www.zvoxaudio.com READ THIS FIRST Important Safety Instructions For ZVOX Audio System WARNING TO PREVENT FIRE OR SHOCK HAZARD, DO NOT EXPOSE THIS APPLIANCE TO RAIN
Operating Instructions
 Operating Instructions SDI Input board Model No. AV-HS04M1 РУССКИЙ FRANÇAIS DEUTSCH ENGLISH ESPAÑOL ITALIANO Before operating this product, please read the instructions carefully and save this manual for
USER MANUAL Full HD Widescreen LED Monitor L215ADS
 USER MANUAL 21.5 Full HD Widescreen LED Monitor L215ADS TABLE OF CONTENTS 1 Getting Started 2 Control Panel/ Back Panel 3 On Screen Display 4 Technical Specs 5 Care & Maintenance 6 Troubleshooting 7 Safety
USER MANUAL Full HD Widescreen LED Monitor L215IPS
 USER MANUAL 21.5 Full HD Widescreen LED Monitor L215IPS TABLE OF CONTENTS 1 Getting Started 2 Control Panel/ Back Panel 3 On Screen Display 4 Technical Specs 5 Care & Maintenance 6 Troubleshooting 7 Safety
CU103 User Manual. Contents
 [Note] The Photos of Light Engine and Control Unit in this manual are for reference only. The items may be different in actual package. Contents 1. PRECAUTIONS... 2 2. PACKAGE CONTENT... 4 3. PORT DESCRIPTION...
HD/SD 4-CHANNEL DIGITAL VIDEO SWITCHER SE-500HD Instruction Manual
 HD/SD 4-CHANNEL DIGITAL VIDEO SWITCHER SE-500HD Instruction Manual Table of Contents FCC COMPLIANCE STATEMENT... 4 WARNINGS AND PRECAUTIONS... 4 WARRANTY... 5 STANDARD WARRANTY... 5 THREE YEAR WARRANTY...
LF-IRX. 12 Month Limited Warranty LF-IRX. Remote Control Extender. Owner s manual. For customer service and technical information::
 12 Month Limited Warranty Audiovox Electronics Corporation (the company) warrants to the original purchaser of this product that should this product or any part thereof, under normal use and conditions,
UP / DOWN / CROSS CONVERTER. DAC-70 Instruction Manual.
 UP / DOWN / CROSS CONVERTER DAC-70 Instruction Manual www.datavideo.com Table of Contents FCC COMPLIANCE STATEMENT... 4 WARNINGS AND PRECAUTIONS... 4 WARRANTY... 5 STANDARD WARRANTY... 5 THREE YEAR WARRANTY...
HD Digital MPEG2 Encoder / QAM Modulator
 HD Digital MPEG2 Encoder / QAM Modulator YPrPb VGA In QAM Out series Get Going Guide ZvPro 600 Series is a one or two-channel Component or VGA-to-QAM MPEG 2 Encoder/ Modulator, all in a compact package
TV Ears Wireless Speaker User Manual
 TV Ears Wireless Speaker User Manual Congratulations! You ve taken the first step toward the TV Ears television experience. TV Ears Wireless System will help you hear TV better. To ensure the best TV listening
HD Digital MPEG2 Encoder / QAM Modulator Get Going Guide
 series HD Digital MPEG2 Encoder / QAM Modulator Get Going Guide HDb2640 HDb2620 HDb2540 HDb2520 The HDbridge 2000 Series is a combination HD MPEG 2 Encoder and frequency-agile QAM Modulator, all in a 1RU
1X4 HDMI Splitter with 3D Support
 AV Connectivity, Distribution And Beyond... VIDEO WALLS VIDEO PROCESSORS VIDEO MATRIX SWITCHES EXTENDERS SPLITTERS WIRELESS CABLES & ACCESSORIES 1X4 HDMI Splitter with 3D Support Model #: SPLIT-HDM3D-4
DM-1CH SD DVB-T MODULATOR INSTRUCTION MANUAL
 DM-1CH SD DVB-T MODULATOR INSTRUCTION MANUAL 2. Caution Statements and Table of Contents Table of Contents 2. Caution Statements and Table of contents 3. Important Safety Instructions 4. Important Safety
ANALOGUE TO SDI CONVERTER DAC-7. Instruction Manual.
 ANALOGUE TO SDI CONVERTER DAC-7 Instruction Manual www.datavideo.com Table of Contents FCC COMPLIANCE STATEMENT... 3 WARNINGS AND PRECAUTIONS... 3 WARRANTY... 4 STANDARD WARRANTY... 4 THREE YEAR WARRANTY...
ACCESSORIES MANUAL PART NUMBER: PRODUCT REVISION: 1 TNP100. Tilt N Plug Interconnect Box USER'S GUIDE
 MANUAL PART NUMBER: 400-0091-001 PRODUCT REVISION: 1 TNP100 Tilt N Plug Interconnect Box USER'S GUIDE INTRODUCTION Your purchase of the TNP100 Tilt N Plug Interconnect Box is greatly appreciated. We are
CVSB/ S-video/ HDMI to HDMI Scaler with 720p and 1080p Switching.
 CVSB/ S-video/ HDMI to HDMI Scaler with 720p and 1080p Switching. Model #: C-CVID-HDM 2012 Avenview Inc. All rights reserved. The contents of this document are provided in connection with Avenview Inc.
TR6102HD HDTV/DVD/COMPONENT VIDEO TO RGBHV TRANSCODER USER S GUIDE
 MANUAL PART NUMBER: 400-0031-003 PRODUCT REVISION: 1 HDTV/DVD/COMPONENT VIDEO TO RGBHV TRANSCODER USER S GUIDE INTRODUCTION Thank you for your purchase of the Transcoder. We are certain that you will find
VideoSplitter HDMI 4K PT
 VideoSplitter HDMI 4K PT 4K HDMI Splitter Pigtail Type Installation and Operation Manual 10707 Stancliff Road Houston, Texas 77099 Phone: (281) 933-7673 tech-support@rose.com LIMITED WARRANTY Rose Electronics
DA1909 COMPUTER VIDEO LINE DRIVER WITH EQUALIZATION USER S GUIDE
 MANUAL PART NUMBER: 400-0108-002 PRODUCT REVISION: 1 COMPUTER VIDEO LINE DRIVER WITH EQUALIZATION USER S GUIDE INTRODUCTION Altinex appreciates your purchase of the Line Driver. We are sure you will find
COMMODORE 1802 COLOR MONITOR USER'S GUIDE
 COMMODORE 1802 COLOR MONITOR USER'S GUIDE Warning: This product includes critical mechanical and electrical parts which are essential for X radiation safety. For continued safety replace critical components
3G/HD/SD-SDI to HDMI Converter
 3G/HD/SD-SDI to HDMI Converter Model #: 3G/HD/SD-SDI to HDMI Converter 2010 Avenview Inc. All rights reserved. The contents of this document are provided in connection with Avenview Inc. ( Avenview ) products.
VGA / Audio Extender Single CAT5 / CAT6 with RGB Delay Control & EQ
 AV Connectivity, Distribution And Beyond... VIDEO WALLS VIDEO PROCESSORS VIDEO MATRIX SWITCHES EXTENDERS SPLITTERS WIRELESS CABLES & ACCESSORIES VGA / Audio Extender Single CAT5 / CAT6 with RGB Delay Control
USER MANUAL. 28" 4K Ultra HD Monitor L28TN4K
 USER MANUAL 28" 4K Ultra HD Monitor L28TN4K TABLE OF CONTENTS 1 Getting Started 2 Control Panel/ Back Panel 3 On Screen Display 4 Technical Specs 5 Care & Maintenance 6 Troubleshooting 7 Safety Info &
Golf ball tracker. Instruction manual
 Golf ball tracker Instruction manual General Intended use The Prazza golf ball finder is intended for use on the golf course only and should never be used inside the home or any other enclosed environment.the
TV Ears TV Speaker Installation Guide
 TV Ears TV Speaker Installation Guide Safety Instructions 1. Read all instructions completely and heed all warnings. Install in accordance with TV Ears, Inc. s instructions. 2. Keep these instructions