User s manual. Sirus Pro MXA 6000
|
|
|
- Matilda Golden
- 5 years ago
- Views:
Transcription


1 User s manual Sirus Pro MXA 6000
2 Table of content 1. Safety instructions Control Elements Microphone channels Microphone channel Monitor Section Master Section Crossfader Section D Sourround Effect Auto BPM Counter Internal Effect Processor Connections Installation Audio connections Specifications...13 Importeur: / 14
3 1. Safety instructions FOR SAFE AND EFFICIENT OPERATION Be careful with heat and extreme temperatureavoid exposing it to direct rays of the sun or near a heating appliance. Not put it in a temperature bellow 41 F /5 C, or exceeding 95 F /35 C. Keep away from humidity, water and dust Do not place the set in a location with high humidity or lots of dust. Containers with water should not be placed on the set. Keep away from sources of hum and noise Such as transformer motor, tuner, TV set and amplifier. To avoid placing on un-stable location Select a level and stable location to avoid vibration. Do not use chemicals or volatile liquids for cleaning Use a clean dry cloth to wipe off the dust, or a wet soft cloth for stubborn dirt. If out of work, contact sales agency immediately Any troubles arose, remove the power plug soon, and contact with an engineer for repairing, do not open the cabinet by yourself, it might result a danger of electric shock. Take care with the power cable Never pull the power cable to remove the plug from the receptacle, be sure to hold the plug. When not using the player for an extended period of time be sure to disconnect the plug from the receptacle. CAUTION: To reduce the risk of electric shock, do not remove the top cover (or the rear section). No user serviceable parts inside; refer servicing to qualified personnel. WARNING: To reduce the risk of fire or electric shock, do not expose this appliance to rain and moisture. 3 / 14
 Do not block any ventilation openings. Install in accordance with the manufacturer s instructions.")
4 (1) Read these instructions. (2) Keep these instructions. (4) Follow all instructions. (5) Do not use this device near water. (6) Clean only with a dry cloth. (7) Do not block any ventilation openings. Install in accordance with the manufacturer s instructions. (8) Do not install near any heat sources such as radiators, heat registers, stoves, or other apparatus (including amplifiers) that produce heat. (9) Do not defeat the safety purpose of the polarized or grounding-type plug. A polarized plug has two blades with one wider than the other. A grounding type plug has two blades and a third grounding prong. The wide blade or the third prong are provided for your safety. If the provided plug does not fit into your outlet, consult an electrician for replacement of the obsolete outlet (10) Protect the power cord from being walked on or pinched particularly at plugs, extension cords, and the point at which they exit the unit. (11) Only use attachments/accessories specified by the manufacturer. (12) Use only with the cart, stand, tripod, bracket, or table specified by the manufacturer, or sold with the device. When a cart is used, use caution when moving the cart/ device combination to avoid injury from stumbling over it. (13) Unplug this device during lightning storms or when not used for long periods of time. (14) Refer all servicing to qualified service personnel. Servicing is required when the unit has been damaged in any way, such as power supply cord or plug is damaged, liquid has been spilled or objects have fallen into the device, the unit has been exposed to rain or moisture, does not operate normally, or has been dropped. 4 / 14
 You determine the input signals for the channels 2 to 4 with the PHONO/CD i.e. PHONO/LINE switch (channels 3 and 4).")
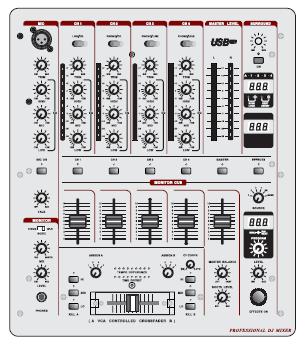
5 2. Control Elements 2.1. Microphone channels (1) Use the LINE/CD switch to select the input signal for channel 1. Unlike other channels, channel 1 features two line inputs (2) You determine the input signals for the channels 2 to 4 with the PHONO/CD i.e. PHONO/LINE switch (channels 3 and 4). Phono is intended for connecting a turntable. Line i.e CD must be selected for all other signal sources (e.g. CD or MD players). The input sensitivity of the phono input can be switched to line level, allowing utmost flexibility (see(41)). Never connect devices with line level to the highly sensitive phono inputs! The output level of phono pick-up systems is measured in millivolts, whereas CD players and tape decks have levels measured in volts, i.e.the level from line signals is up to 100 times higher than that of the phono inputs 5 / 14
6 (3) The TRIM control in the CHANNEL section is used to adjust the level of the input signal. The level meter (5) reads the input level (4) Each of the input channels features a 3-band equalizer (HI, MID and LOW) with kill characteristic. Thus, the signal can be attenuated to a much greater extent (-32 db) than it can be raised (+12 db). This function can be very useful when, for example, fading a frequency range out of a music track. The overall level also depends on the EQ setting. Thus, you should adjust the equalizer before setting the input gain with the TRIM control (5) The 10-digit LED chains display the signal level of the input signals. (6) Adjust the channel volume using the CHANNEL fader Microphone channel (7) The MIC IN connector is the balanced XLR input for your dynamic microphone (8) Set the volume of the microphone signal with the TRIM control in the MIC section. (9) There is a 3-band equalizer (HI, MID and LOW, no kill characteristic) in the microphone section. This allows you to fine-tune your voice to adapt perfectly to your sound (10) Activate the microphone channel using the MIC ON switch. The channel is active when the corresponding LED is lit. (11) The PRO MIXER is equipped with a talkover function, which works very simply: if you speak into the microphone while a track is running, the volume of the music is automatically reduced, so that your voice is always in front. The TALK control allows you to determine how much the music volume is lowered (max. -24 db). This function can come in handy when your own voice needs to be prominently heard, as in when making an announcement etc Monitor Section The MONITOR signal is your headphones signal, allowing you to listen to music without affecting the MASTER output signal. (12) When the MODE switch is in the Split position, channel PFL is located on the left side of the stereo image, while the Master signal is on the right. In this case, the MIX control (see below) serves no function. While in Stereo mode, you can use the MIX control to alternate between MASTER signal and PFL. 6 / 14
7 (13) When in Stereo mode, the MIX control lets you determine which signal can be heard via the headphones. When the control is turned to its left-most position (CUE), you hear the headphone signal only; when the control is turned to its right-most position, you hear the MASTER signal only. Alternating the MIX control between the two end positions lets you dermine the relative ratio between the two signals in your headphones. (14) The LEVEL control determines the volume of the headphones signal (15) Connect you headphones using the unbalanced PHONES OUT connector. Your headphones should have a minimum impedance of 32 Ohms. (16) To select the PFL signal for the headphones, use the MONITOR CUE keys (CH-1 to CH-4, MASTER, EFFECTS). You can also select multiple signal sources and listen to them simultaneously. LEDs on corresponding keys are lit when a channel is routed to the headphones Master Section (17) The LEVEL METER displays the level of the MASTER signal. (18) The MASTER fader allows you to adjust the output volume at the MASTER output (see (44)). (19) The MASTER BALANCE control for the MASTER output is for setting the stereo image (20) The BOOTH LEVEL control adjusts the output level of the BOOTH output (see (45)) Crossfader Section (21) ASSIGN A and ASS/GN B selectors let you determine which input signals are routed to CROSSFADER sides A and B You can also alternate between these two signals by using the CROSSFADER (see below). (22) The VCA CONTROLLED CROSSFADER is used to fade between the channels you have selected (see (21). Like the channel faders, the crossfader section is equipped with a professional 45- mm fader (23) The TIME OFFSET LED indicates the synchronisation of tracks (see chapter 2.7) (24) The VOL control determines the volume of the headphone signal. (24) The TEMPO DIFFERENCE LED displays tempo differences between the tracks (see chapter 2.7). 7 / 14
8 (25) A 3-band kill switch is available for use with both the left and the right side of the crossfader (KILL A and KILL B respectively). Kill switches are used to lower three separate frequency ranges (LOW, MID and HIGH) up to -32 db. When using the kill switch, the equalizer of ordinary DJ mixers usually loses its functionality. Not the case with the 5 channel mixer: the EQS can be used to achieve an even more pronounced lowering of a particular frequency range (27) The CF CURVE control lets you alter the control characteristic of the crossfader between linear and logarithmic in an infite number of steps. When set to linear, the crossfader engages directly proportionally to the fader s incremental movement. When set to logarithmic, the fader s movement yields higher volume increases as the fader moves farther along its range of motion D Sourround Effect The 3D surround function is a built-in effect that puts the finishing touch to your music and turns every gig into a real experience. The widening of the stereo base makes for a livelier, more transparent sound. You can determine the intensity of the effect by using the SURROUND control (27), while the ON switch (28) turns the effect on (the respective LED is lit) Auto BPM Counter The integrated auto BPM counter is an extremely useful feature. It ensures smooth transition from one track to the next, taking a lot of the guesswork out. It can calculate the various tempos of tracks in BPM(beats per minute). Both BPM counter sections are identical and both show the BPM value of the two signals routed to the crossfader. The LEDs located above the DISPLAYs 1-4 (29) indicate which of the four input channels are routed to the respective BPM counter. The tempo of the track assigned by using the ASSIGN A or ASSIGN B keys is shown in the respective DISPLAY (30) Several tempo changes in one track would produce a constant display of various BPM values and thus lead to unnecessary confusion. That s why the beat counter sections each have a SYNC LOCK button (31) that can be used during the song to limit the range of possible tempo values. This makes sense if the counter has already calculated a realistic value. You can do the same thing manually with the BEAT ASS/ST button (32). Pushing this button at least three times in sync with the song s tempo results in the calculated tempo appearing in the DISPLAY. The BEAT ASSIST and SYNC LOCK buttons are each equipped with a LED. When you have limited the tempo of the tracks on both channels with the SYNC LOCK or BEAT ASSIST buttons, the difference in tempo from both channels is illustrated in the form of a ninecharacter message on the TEMPO DIFFERENCE-LED (24). The extent of the difference in tempo is indicated by a corresponding swing to the right (signal A is slower) or to the Left (signal B is slower). When the middle LED lights up, the tempi are the same. The TIME OFFSET LED (23) below that displays the signal A and B synchronisation. Should the middle LED light up, the tracks are synchronised. Should the display move to the left or right, the channels 8 / 14
, the BPM display shows only dashes.")
9 are not synchronised. The TEMPO DIFFERENCE and TIME OFFSET displays are only active if the tempi of both channels have been fixed in one of the ways described. When no signal is present (or when the signal level is too low), the BPM display shows only dashes. When the signal is present but can not be identified, the display shows 160 BPM and the shows the said dashes. The beat counter then attempts to get another readout. Therefore, 160 BPM is no usable value; rather, it is simply an error message whten the signal can not be analyzed. To exit the SYNC LOCK or BEAT ASSIST modes, simply push the SYNC LOCK button once more on both channels Internal Effect Processor The built-in digital effects processor of your mixer can process the MASTER signal, the input channels signal or the microphone signal. Use the SOURCE selector (33) to select the signal on which you want to run the effects. The PROGRAM display (34) located below shows the effect presets that can be recalled by turning and then pressing the effect presets that can be (35). The LEVEL control (36) is used to determine the volume of the effects signal. Use the EFFECTS ON switch (37) to turn the effects on and off. Various effects are segmented into seven different groups, offering such standard effects as reverb, delay, echo etc. As well as additional filter and combination effects. 9 / 14
 The PHONO input for channels 2 to 4 are for connecting a turntable (40) The GND connectors ground the turntables.")
10 3. Connections (38) These are the LINE i.e. CD inputs to connect a tape deck, CD or MD player etc. Unlike other channels, channel 1 features two line inputs. (39) The PHONO input for channels 2 to 4 are for connecting a turntable (40) The GND connectors ground the turntables. (41) With the PHONO/LINE switch it is possible to switch the input sensitivity of the PHONO inputs 2 to 4 to line level. This allows you to connect a tape deck or a CD player to the PHONO inputs. (42) The 5 channel mixer features an integrated effects loop for the connection of an external effects device. The MONITOR signal is taken at the SEND output and routed, fox example, to a reverb processor. Thus, the signal at the SEND connector is identical to the headphones signal and is selected with the MONITOR CUE buttons (16). (43) The externally processed signal is added to the MASTER output signal via the RETURN connectors. The effect signal volume may only be adjusted at the output control of the effects device itself. (44) The MASTER output is for connecting to an amplifier and can be adjusted with the MASTER fader (18). Always turn the power amps on last to avoid inrush currents that can easily damage your speakers. And, to avoid sudden and unpleasant surprises for your ears, make sure there is no signal at the mixer before turning on the power amps. To be sure, slide all the faders to the bottom and switch all controls to the zero position. 10 / 14
11 (45) The BOOTH output gives you an additional option of connecting an amplifier in order to, for example, feed the signal into your monitors or to bring sound to an extra area. The BOOTH output level is regulated by using the BOOTH LEVEL control (20) of the MASTER section (46) Using the TAPE output you can record your music by connecting devices such as tape decks, DAT recorders etc. Unlike the MASTER output, the output volume is fixed, making it necessary for you to adjust the input level on the recording device (47) The POWER switch power the mixer on. You should always make sure that the POWER switch is in the Off position when initially connecting the unit to the mains. Please take note: Merely switching the unit off does not mean that it is fully disconnected from the mains. When not using the unit for prolonged periods of time, please unplug the unit s power cord from the power outlet. (48) This is the connector for the power cable. This is where the advantage of a sophisticated internal power supply can be seen: the pulse behaviour of each amplifying circuit is mainly determined by the voltage reserves available. Each mixing console is equipped with numerous operational amplifier (op amps) to process line level signals. Due to limited output of their power supplies, many mixing consoles show signs of stress when subjected to heavy loads. But not your mixer: the sound is always clear and transparent. (49) FUSE HOLDER / VOLTAGE SETTING Before connecting the unit to the mains, ensure that the voltage setting matches your local voltage. Blown fuses should only be replaced by a fuse of the same type and rating. On some units, the fuses holder can be switched to on of two positions, i.e. 230 V and 120 V. Please note: should you desire to operate the unit outside Europe at 120 V, a higher fuse rating is required. (50) USB input connector.this is allow the DJ MIXER get the signal from the computer directly, Channel 1 is used for USB signal adjust. (51) USB/ Line switch. When you press the button, it changes to Line input, otherwise, it is USB input. To disconnect power from main, pull out the main cord plug. When installing the product, ensure that the plug is easily accessible. If mounting in a rack, ensure that the mains can be easily disconnected by a plug or by an all-pole disconnect switch on or near the rack 11 / 14


12 4. Installation 4.1. Audio connections For various applications, you will need a number of different cables. The following illustrations show how these cables are to be connected. Always make sure to use high-grade cables. mixer are performed only by qualified personnel. During as well as after installation, sufficient grounding of both your equipment and persons handling it must be assured. Otherwise, electrostatic discharge may lead to undesirable operation or permanent damage. 12 / 14
13 5. Specifications 13 / 14

14 Importeur: B & K Braun GmbH Industriestraße 1 D Karlsbad info@bkbraun.com 14 / 14
~ Instruction Manual ~
 ~ DJ-5 Professional Preamp mixer ~ 0 0 0 0 10 10 10 10 EVE MASTE GAIN GAIN 0 10 CUE EVE CH 1 CH 2 CUE PAN INE INE POWE FADE STAT FADE STAT HEADPHONES ~ Instruction Manual ~ ~ Important Safety Instructions
Controller DMX DC-1224
 Manual Controller DMX DC-1224 Table of Contents 1. Safety instructions... 4 1.1. FOR SAFE AND EFFICIENT OPERATION... 4 3. Overview... 6 3.1. Front view... 6 3.2. Rear view... 9 4. Operation guide... 10
After Ref.No:
 Ref.No:171.130 Safety Instructions 1. Read Instructions-All the safety and operating instructions should be read before this product is operated. 2. Retain Instruction- The safety and operating instruction
PLAYMATE PROFESSIONAL STEREO 19 MIXER, USB/SD CARD AND BLUETOOTH PLAYER. User Guide and Reference Manual. page 1
 PLAYMATE PROFESSIONAL STEREO 19 MIXER, USB/SD CARD AND BLUETOOTH PLAYER User Guide and Reference Manual page 1 INTRODUCTION Congratulations and thank you for purchasing the NewHank Playmate mixer. This
CONGRATULATIONS CONTENTS
 OWNER'S MANUAL CONGRATULATIONS Thank you for your purchasing the VESTAX PMC-05ProIII, Professional Mixing Controller. We suggest that you read through this owner's manual thoroughly so that you may enjoy
PH-1. Italian MM & MC Phono Preamplifier OWNER S MANUAL
 PH-1 Italian MM & MC Phono Preamplifier OWNER S MANUAL IMPORTANT SAFETY INFORMATION CAUTION: TO REDUCE THE RISK OF ELECTRIC SHOCK, DO NOT REMOVE COVER (OR BACK). NO USER-SERVICEABLE PARTS INSIDE. REFER
X D M PREAMP MIXER
 User Instructions X D M - 3 5 2 PREAMP MIXER Thank you for purchasing this American DJ product. The XDM-352 is ready to be used, there is no assembly required. Please read the following instructions before
Technical Specifications
 INSTALLATION SHEET AND OPERATORS MANUAL General Description: The is a mixer/preamplifier that includes 6 channels that each include a microphone input at screw terminals and an aux input at an RCA jack.
CR-6 MIXER USER MANUAL ENGLISH. Order Code: MIXE01
 CR-6 MIXER P R O F E S S I O N A L 1 9 R A C K M I X E R Order Code: MIXE01 w w w. p r o l i g h t. c o. u k USER MANUAL ENGLISH WARNING FOR YOUR OWN SAFETY, PLEASE READ THIS USER MANUAL CAREFULLY BEFORE
1812R Blues King 12. User Manual
 1812R Blues King 12 User Manual All contents c Absara Audio LLC 2018 1. Important Safety Information The triangle surrounding an exclamation mark alerts users to the presence of important warnings or information.
GIULIA Y. combo amplifier for acoustic instruments
 GIULIA Y combo amplifier for acoustic instruments IMPORTANT SAFETY INSTRUCTIONS THE LIGHTNING FLASH WITH ARROWHEAD SYMBOL, WITHIN AN EQUILATERAL TRIANGLE, IS INTENDED TO ALERT THE USER TO THE PRESENCE
2.0 Wall Mount TV Soundbar Instruction Manual
 8010275 2.0 Wall Mount TV Soundbar Instruction Manual Read all of the instructions before using this soundbar and keep the manual in a safe place for future reference. Safety Information CA UT IO N RISK
Truss Light COB LED 30W
 User manual Truss Light COB LED 30W User manual Focusing tube Truss Light COB LED 30W 2 / 11 Table of contents 1. Safety instructions... 4 1.1. FOR SAFE AND EFFICIENT OPERATION... 4 2. Technical data...
KD-CTCA3. Component Video to VGA Adapter
 KD-CTCA3 Component Video to VGA Adapter Model KD-CTCA3 KD-CTCA3 Component Video to VGA Adapter Model KD-CTCA3 Component Video (YPrPb) input to VGA Video (RGBHV) output Video Adapter with added features
MIC CUE MIC 1 MIC 2 TREBLE BASS MIC1/2 Tone Controls GROUND
 /V-/ Hz Your PYRAMID Series Performance Mixer is a sophisticated control center, perfect for mixing sound from multiple playback sources such as microphones, tuners, CD players, turntables or the audio
Model 1606 Super. User Manual
 Model 1606 Super User Manual All contents c Absara Audio LLC 2014 1. Important Safety Information The triangle surrounding an exclamation mark alerts users to the presence of important warnings or information.
HDMI 5x1 Switch B-240-HDSWTCH-5X1 INSTALLATION MANUAL
 HDMI 5x1 Switch B-240-HDSWTCH-5X1 INSTALLATION MANUAL IMPORTANT SAFETY INSTRUCTIONS To reduce the risk of fire or electric shock, read and follow all instructions and warnings in this manual. Keep this
PRO MIXER VMX300USB. User Manual. 3-channel DJ mixer with BPM counter
 User Manual PRO MIXER VMX300USB 3-channel DJ mixer with BPM counter Thank you With the BEHRINGER PRO MIXER VMX300USB, you have purchased an absolutely state-of-the-art DJ mixer. Its extensive features,
MANUAL ENGLISH Core Club Ordercode: D2314
 MANUAL ENGLISH Core Club Ordercode: Highlite International B.V. Vestastraat 2 6468 EX Kerkrade the Netherlands Table of contents Warning... 2 Unpacking Instructions... 2 Safety Instructions... 2 Operating
MANUAL DE INICIO RÁPIDO ESPAÑOL ( 7 10 ) GUIDE D UTILISATION RAPIDE FRANÇAIS ( ) MANUALE RAPIDO DI UTILIZZAZIONE ITALIANO ( )
 GUIDE D UTILISATION RAPIDE FRANÇAIS ( ) MANUALE RAPIDO DI UTILIZZAZIONE ITALIANO ( )") QUICKSTART GUIDE ENGLISH ( 6 ) MANUAL DE INICIO RÁPIDO ESPAÑOL ( ) GUIDE D UTILISATION RAPIDE FRANÇAIS ( 4 ) MANUALE RAPIDO DI UTILIZZAZIONE ITALIANO ( 5 ) KURZANLEITUNG DEUTSCH ( 22 ) INTRODUCTION Welcome
QUICKSTART GUIDE ENGLISH ( 6 ) MANUAL DE INICIO RÁPIDO ESPAÑOL ( ) GUIDE D UTILISATION RAPIDE FRANÇAIS ( 4 ) MANUALE RAPIDO DI UTILIZZAZIONE ITALIANO ( 5 ) KURZANLEITUNG DEUTSCH ( 22 ) INTRODUCTION Welcome
TS2.8 Sub OWNER S MANUAL
 TS2.8 Sub OWNER S MANUAL TS2.8 Sub CONTENTS IMPORTANT SAFETY INSTRUCTIONS 03 WARNINGS 03 FUSE PROTECTION 04 WARNING: STRONG MAGNETIC FIELD 04 EMC / EMI 04 ECODESIGN STANDBY POWER CONSUMPTION 04 WARRANTY
IMPORTANT SAFETY INSTRUCTIONS
 IMPORTANT SAFETY INSTRUCTIONS When using this electronic device, basic precautions should always be taken, including the following: 1. Read all instructions before using the product. 2. Do not use this
HD Digital Set-Top Box Quick Start Guide
 HD Digital Set-Top Box Quick Start Guide Eagle Communications HD Digital Set-Top Box Important Safety Instructions WARNING TO REDUCE THE RISK OF FIRE OR ELECTRIC SHOCK, DO NOT EXPOSE THIS PRODUCT TO RAIN
Evolution Digital HD Set-Top Box Important Safety Instructions
 Evolution Digital HD Set-Top Box Important Safety Instructions 1. Read these instructions. 2. Keep these instructions. 3. Heed all warnings. 4. Follow all instructions. 5. Do not use this apparatus near
FF DUAL FORMAT DJ MIXER USERS MANUAL
 FF - 4000 DUAL FORMAT DJ MIXER USERS MANUAL FF - 4000 INTRODUCTION The features and layout of the FF-4000 were determined in collaboration with leading loudspeaker manufacturers Funktion One, who canvassed
XDM-2221 SKILZ professional preamp mixer USER INSTRUCTIONS
 XDM-2221 SKILZ professional preamp mixer USER INSTRUCTIONS djs wanted. XDM-2221 SKILZ The Ultimate DJ Scratch Mixer! Main Features 2 phono, 2 line, 2 auxiliaries, & 1 microphone input Hamster Switch for
DM900 BLUE DOG OWNER S MANUAL
 Professional Disc Jockey Products DM900 BLUE DOG OWNER S MANUAL NUMARK INDUSTRIES 11 Helmsman Road, North Kingstown, RI 02852 http://www.numark.com CONGRATULATIONS! You have purchased the DM900 Blue Dog
PROFESSIONAL DJ MIXER OWNER S MANUAL. STANTON MAGNETICS, INC
 M.303 PROFESSIONAL DJ MIXER OWNER S MANUAL STANTON MAGNETICS, INC information@stantondj.com www.stantondj.com WELCOME! Thank you for making Stanton your first choice in professional DJ mixers. This innovative
Operating Instructions
 Operating Instructions SDI Input board Model No. AV-HS04M1 РУССКИЙ FRANÇAIS DEUTSCH ENGLISH ESPAÑOL ITALIANO Before operating this product, please read the instructions carefully and save this manual for
SA-3 OWNER S MANUAL. (954) STANTON MAGNETICS, INC PROFESSIONAL DJ MIXER
 STANTON MAGNETICS, INC PROFESSIONAL DJ MIXER") SA3_manual_FINAL 2/18/0 2:26 PM Page 1 2003, Stanton Magnetics, INC SA-3 PROFESSIONAL DJ MIXER OWNER S MANUAL STANTON MAGNETICS, INC info@stantonmagnetics.com (94) 689-8833 www.stantondj.com SA3_manual_FINAL
SA3_manual_FINAL 2/18/0 2:26 PM Page 1 2003, Stanton Magnetics, INC SA-3 PROFESSIONAL DJ MIXER OWNER S MANUAL STANTON MAGNETICS, INC info@stantonmagnetics.com (94) 689-8833 www.stantondj.com SA3_manual_FINAL
QUICKSTART GUIDE ENGLISH ( 1 4 ) GUÍA DE INICIO RÁPIDO ESPAÑOL ( 5 8 ) GUIDE D UTILISATION SIMPLIFIÉ FRANÇAIS ( 9 12 )
 GUÍA DE INICIO RÁPIDO ESPAÑOL ( 5 8 ) GUIDE D UTILISATION SIMPLIFIÉ FRANÇAIS ( 9 12 )") PROFESSIONAL 3-CHANNEL SCRATCH MIXER QUICKSTART GUIDE ENGLISH ( 1 4 ) GUÍA DE INICIO RÁPIDO ESPAÑOL ( 5 8 ) GUIDE D UTILISATION SIMPLIFIÉ FRANÇAIS ( 9 12 ) GUIDA RAPIDA ITALIANO ( 13 16 ) KURZANLEITUNG
PROFESSIONAL 3-CHANNEL SCRATCH MIXER QUICKSTART GUIDE ENGLISH ( 1 4 ) GUÍA DE INICIO RÁPIDO ESPAÑOL ( 5 8 ) GUIDE D UTILISATION SIMPLIFIÉ FRANÇAIS ( 9 12 ) GUIDA RAPIDA ITALIANO ( 13 16 ) KURZANLEITUNG
Prodipe DSP UHF systems and microphones
 Prodipe DSP UHF systems and microphones DSP M850 Solo/Duo UHF Microphones DSP B210 Solo/Duo UHF Voice and Instrument Systems User Manuel: M850 DSP Solo / M850 DSP Duo / B210 DSP Solo / B210 DSP Duo / B210
Oxygen ORDERCODE D2150
 Oxygen ORDERCODE D2150 Congratulations! You have bought a great, innovative product from DAP Audio. The DAP Audio Oxygen brings excitement to any venue. Whether you want simple plug-&-play action or a
MON8-1/SDI 1U 8-Channel SDI Digital Multi-Display Video Monitor
 MON8-1/SDI 1U 8-Channel SDI Digital Multi-Display Video Monitor (Document P/N 821626, Rev-A) with Eight Backlit 1.8" LCD Displays, Eight SDI Video Inputs, Eight SDI Re-Clocked Outputs, and Eight CVBS (Analog)
USER GUIDE MULTI-CHANNEL STEREO MIXER S MIX 4M2S UD
 USER GUIDE MULTI-CHANNEL STEREO MIXER S MIX 4M2S UD FEATURES 4 mono input channels and 2 stereo input channels. Frequency EQ on each input channel. Low-noise mic pre-amp on microphone inputs. Low cut filter
KD-CSW2x1. Operating Instructions. 2 Inputs to 1 Output Component Video/Audio Switcher. KD-CSW2x1 Operating Instructions.
 KD-CSW2x1 2 Inputs to 1 Output Video/ Switcher Operating Instructions Key Digital, led by digital video pioneer Mike Tsinberg, develops and manufactures high quality, cutting-edge technology solutions
MON8-1 1U 8-Channel Multi-Display Video Monitor
 MON8-1 1U 8-Channel Multi-Display Video Monitor with Eight Backlit 1.75" LCD Displays, Eight CVBS Video Inputs, and Eight Loop-through Outputs Document P/N 821568 Rev-A User Manual CONTENTS Title and Contents...
AT-MX351a SmartMixer. Automatic Mixer. Installation and Operation. Output Level Gain 1 Gain 2 Gain 3 Gain 4 Aux In Master Monitor. Priority Pre-select
 AT-MX351a SmartMixer Automatic Mixer AUTOMATIC MIXER AT-MX351a Output Level Gain 1 Gain 2 Gain 3 Gain 4 Aux In Master Monitor -20-10 -6-3 0 +3 +6 Priority Pre-select Power Selected Channel 1 2 3 4 MANUAL
SW 50. Powered Subwoofer with Built-in Stereo Crossover
 Owner s Manual SW 50 ed Subwoofer with Built-in Stereo Crossover Congratulations on your new purchase and welcome to the AudioSource family of satisfied customers. We trust you will continue to enjoy the
Utility Amplifier GA6A Model
 Utility Amplifier GA6A Model Installation and Use Manual 2004 Bogen Communications, Inc. All rights reserved. Specifications subject to change without notice. 54-5757-03D 1503 NOTICE: Every effort was
BP2-MM MM Phono Preamplifier Owner s Manual
 BP2-MM MM Phono Preamplifier Owner s Manual Important Safety Instructions The lightning flash with arrowhead symbol within an equilateral triangle, is intended to alert the user to the presence of un-insulated
PROFESSIONAL 2-CHANNEL MIXER WITH EFFECTS LOOP
 PROFESSIONAL 2-CHANNEL MIXER WITH EFFECTS LOOP QUICKSTART GUIDE ENGLISH ( 1 4 ) GUÍA DE INICIO RÁPIDO ESPAÑOL ( 5 8 ) GUIDE D UTILISATION SIMPLIFIÉ FRANÇAIS ( 9 12 ) GUIDA RAPIDA ITALIANO ( 13 16 ) KURZANLEITUNG
ATTACHING & REMOVING THE BASE
 TV53DB ATTACHING & REMOVING THE BASE 1. To install or remove the neck, screw in or remove the 4 screws indicated in the picture. 2. To install the base, place the display unit flat on a table. Afterwards
ZVOX AccuVoice TV Speaker Model AV203
 ZVOX AccuVoice TV Speaker Model AV203 SETUP & OPERATION www.zvoxaudio.com 2 ZVOX AccuVoice TV Speaker Setup & Operation READ THIS FIRST Important Safety Instructions For ZVOX Audio System WARNING TO PREVENT
ZVOX AccuVoice TV Speaker Model AV203
 ZVOX AccuVoice TV Speaker Model AV203 SETUP & OPERATION www.zvoxaudio.com READ THIS FIRST Important Safety Instructions For ZVOX Audio System WARNING TO PREVENT FIRE OR SHOCK HAZARD, DO NOT EXPOSE THIS
USER MANUAL MX102 & MX1202
 USER MANUAL MX102 & MX1202 WWW.PULSE-AUDIO.CO.UK 1 SAVE THESE SAFETY INSTRUCTIONS Thank you for purchasing our product. To assure the optimum performance, please read this manual carefully and keep it
Q-TV2. User Manual. for Screens
 Q-TV2 User Manual for 30-42 Screens Contents Introduction 02 Safety Guidelines 03 Getting started 03 Potential Uses 04 Carton Contents 05 Q-TV2 Controls 05 Remote Fixings 06 Fixing Rails 07 Fitting Q-TV2
PROFESSIONAL 2 CHANNEL SOLID-STATE MIC / LINE PREAMPLIFIER USER S MANUAL
 PROFESSIONAL 2 CHANNEL SOLID-STATE MIC / LINE PREAMPLIFIER USER S MANUAL SAFETY INSTRUCTIONS This symbol, wherever it appears, alerts you to important operating and maintenance instructions in the accompanying
Check our knowledge base at
 USER MANUAL Check our knowledge base at www.paralinx.net/support Copyright 2015 Paralinx LLC All Rights Reserved TABLE OF CONTENTS 1 Important Notice 10 LCD Screen 2 Safety Instructions 11 Indicators 3
Specifications PYLE PRO MIXERS. warranty registration card PYD1010/1015/1020. Model No. Serial # (if available) Date of Purchase
 Date of Purchase") Specifications PYD1010/1015/1020 Input Sensitivity/Impedance Distortion Mic Phono 1-2 Line 1-6 1.5 mv/600 Ohms 3.0 mv/50k Ohms 150.0 mv/27k Ohms Mic Phono Line 0.50% 0.08% 0.05% Output Level Master Zone
Specifications PYD1010/1015/1020 Input Sensitivity/Impedance Distortion Mic Phono 1-2 Line 1-6 1.5 mv/600 Ohms 3.0 mv/50k Ohms 150.0 mv/27k Ohms Mic Phono Line 0.50% 0.08% 0.05% Output Level Master Zone
arthur ART48 - L/RMAST ACOUSTIC FIDELITY USER MANUAL Assembling instruction inside
 ACOUSTIC FIDELITY arthur ART48 - L/RMAST USER MANUAL Assembling instruction inside WARNINGS PRECAUTIONS WARNINGS Read carefully this manual and follow these precautions before operating the device Keep
User Manual MINIMIX MIX800. Ultra-Compact Karaoke Processor with Voice Canceller and Echo/Reverb Effects
 User Manual MINIMIX MIX800 Ultra-Compact Karaoke Processor with Voice Canceller and Echo/Reverb Effects 2 MINIMIX MIX800 User Manual Table of Contents Thank you...2 Important Safety Instructions...3 Legal
S MiX 2M2S UF. S MiX 2M2S F
 USER guide MULTI-CHANNEL STEREO MIXER S MiX 2M2S UF S MiX 2M2S F FEATURES 2 stereo input channels and 2 mono input channels. 2-band frequency EQ for each input channel. Low-noise mic pre-amp on microphone
SwiftMix Automation Safety
 Operations Manual SwiftMix TM Automation Thank you for your purchase of the SwiftMix automation for the 5088 console. Everyone at Rupert Neve Designs hopes you enjoy using this tool as much as we have
LED TV MODEL NO.: NE22K5BG. Please read this manual carefully before installing and operating the TV. Keep this manual handy for further reference
 LED TV USER MANUAL MODEL NO.: NE22K5BG IMPORTANT Please read this manual carefully before installing and operating the TV. Keep this manual handy for further reference Table Of Contents Preparations Guide
28 4K LED monitor. User Manual M284K
 28 4K LED monitor User Manual M284K CONTENTS Safety Information... 2 What s included..... 4 Getting Started....... 8 Troubleshooting.... 14 Specification.... 15 2 of 15 SAFETY INFORMATION Read these instructions
CDM10: Channel USB Mixer. Item ref: UK User Manual
 CDM10:4 19 4 Channel USB Mixer Item ref: 171.135UK User Manual Caution: Please read this manual carefully before operating Damage caused by misuse is not covered by the warranty Introduction Thank you
HD Digital MPEG2 Encoder / QAM Modulator
 HD Digital MPEG2 Encoder / QAM Modulator HDMI In QAM Out series Get Going Guide ZvPro 800 Series is a one or two-channel unencrypted HDMI-to-QAM MPEG 2 Encoder / QAM Modulator, all in a compact package
Reveal 402 / 502 / 802. English Manual
 Reveal 402 / 502 / 802 English Manual English manual English manual Important safety instructions 1. Read these instructions. 2. Keep these instructions. 3. Heed all warnings. 4. Follow all instructions.
Monochrome Video Monitors
 Instructions for Use Monochrome Video Monitors En F D E NL I LTC 2009 LTC 2012 LTC 2017 Philips Communication & Security Systems GB F D E NL I Instructions for Use...1.1 Mode d emploi...2.1 Bedienungsanleitung...3.1
USER GUIDE 8-CHANNEL DMX CONTROLLER December 2013 Version 1.0 CHASE / STROBE SPEED FADE SPEED RED GREEN BLUE WHITE AMBER DIMMER INSERT
 8-CHANNEL DMX CONTROLLER RED GREEN BLUE YELLOW 1 2 3 4 5 6 CYAN ORANGE PURPLE WHITE RED GREEN BLUE WHITE AMBER DIMMER RECORD INSERT DELETE TAP CLEAR MANUAL MUSIC 1 2 3 5 6 7 AUTO CHASE / STROBE SPEED 4
MX-1400 User Guide and Reference Manual
 MX-1400 User Guide and Reference Manual 3/07 4295 Charter Street Los Angeles Ca. 90058 www.americanaudio.us CONTENTS MAIN FEATURES...2 ELECTRICAL PRECAUTIONS...4 SAFETY PRECAUTIONS...5 INTRODUCTION...6
MON3-2W/HR MON4-2W/HR (Document P/N Rev-B)
") MON3-2W/HR MON4-2W/HR (Document P/N 821647 Rev-B) HD/SDI High-Res Video Monitors with 4.3" High-Resolution LCD Video Displays, Selectable 16:9 or 4:3 Aspect Ratio, SDI or HD-SDI Inputs and Buffered/Equalized
MON3-2W/HR MON4-2W/HR (Document P/N 821647 Rev-B) HD/SDI High-Res Video Monitors with 4.3" High-Resolution LCD Video Displays, Selectable 16:9 or 4:3 Aspect Ratio, SDI or HD-SDI Inputs and Buffered/Equalized
52 LIFT Page
 OPERATIONS MANUAL Bedienungsanleltung Manual de funcionamiento Manual de fonctionnement Manual del utente PS-1000 PRO PROFESSIONAL STEREO PREAMP MIXER Professionneller Stereo Vorverstärkermischpult Mezclador-preamplificador
Orpheus. Phono Preamplifier. by Thrax Audio. Operating Manual. Manual issued 05/03/2012 CAUTION
 Orpheus Phono Preamplifier by Thrax Audio Operating Manual Manual issued 05/03/2012 CAUTION THE UNIT CONTAINS NO USER SERVICEABLE PARTS. DO NOT REMOVE THE COVERS. LETHAL VOLTAGES ARE PRESENT WITHIN THE
OWNER S MANUAL EVOLUTION SERIES POWERED SUBWOOFER ES-SUB-EVO6-100
 OWNER S MANUAL EVOLUTION SERIES POWERED SUBWOOFER ES-SUB-EVO6-100 Important Safety Instructions CAUTION RISK OF ELECTRIC SHOCK! DO NOT OPEN! ATTENTION! RISQUE DE CHOC! ÉLECTRIQUE PAS OUVRIR! The lightning
ZvBox 150. HD video distribution over COAX Get Going Guide
 ZvBox 150 HD video distribution over COAX Get Going Guide ZvBox 150 is an HD MPEG 2 Encoder and frequency agile QAM Modulator. It allows you to convert any HD video source, Component or RGB (VGA), in real
DisplayPort Extender over 2 LC Fibers
 DisplayPort Extender over 2 LC Fibers Audio 3GSDI Embedder EXT-DP-CP-2FO User Manual Release A2 DisplayPort Extender over 2 LC Fibers Important Safety Instructions 1. Read these instructions. 2. Keep these
4-PROJECTOR BAR WITH 3 X 9W LEDS AND 1 X 1W FLASH LED USER GUIDE
 4-PROJECTOR BAR WITH 3 X 9W LEDS AND 1 X 1W FLASH LED USER GUIDE 10482 - Version 1 / 04-2016 English LIVESET - LIVESET - 4-Projector bar with 3 x 9W LEDs and 1 x 1W Flash LED 1 - Safety information Important
BP2-MM/MC Phono Preamplifier Owner s Manual
 BP2-MM/MC Phono Preamplifier Owner s Manual Important Safety Instructions The lightning flash with arrowhead symbol within an equilateral triangle, is intended to alert the user to the presence of un-insulated
LED PAR 64 floor 12x8W RGBWAUV incl. remote
 Manual LED PAR 64 floor 12x8W RGBWAUV incl. remote Table of contents 1. Safety instructions... 3 1.1. For safe and efficient operation... 3 2. Designated use... 4 2.1. Overhead installation... 5 3. Introduction...
SRP-V110. Table of Contents AUDIO MIXER
 --9-1 (1) AUDIO MIXE SP-V11 Table of Contents Operating instructions Before operating the unit, please read this manual and the supplied WANING thoroughly and retain it for future reference. Precautions
DM-1CH SD DVB-T MODULATOR INSTRUCTION MANUAL
 DM-1CH SD DVB-T MODULATOR INSTRUCTION MANUAL 2. Caution Statements and Table of Contents Table of Contents 2. Caution Statements and Table of contents 3. Important Safety Instructions 4. Important Safety
CAUTION RISK OF ELECTRIC SHOCK NO NOT OPEN
 Evolution Digital HD Set-Top Box Important Safety Instructions 1. Read these instructions. 2. Keep these instructions. 3. Heed all warnings. 4. Follow all instructions. 5. Do not use this apparatus near
DX4. Professional Preamp Mixer. AMERICAN AUDIO 4295 Charter Street Los Angeles Ca ASSIGN CH ASSIGN CH MIC 1 MASTER LEVEL
 MASTER PHONO 1 PHONO 2 LINE 3 LINE 5 LEFT RIGHT LINE 1 LINE 2 LINE 4 LINE 6 +5-5 - -15-15 - -5 +5 POWER 5 5 5 5 5 5 5 5 BASS MID LOW MID HIGH TREBLE MIC 2 MASTER PGM BOOTH MIXING PHONES DX4 Professional
DJLab.3 OWNER'S MANUAL
 DJLab.3 OWNER'S MANUAL S T A N T O N MA G N E T I C S, I N C information@stantondj.com + 1 954-689-8833 w w w. s t a n t o n d j. c o m IMPORTANT TO SAFETY 1. Read these Instructions 2. Keep these Instructions
Register your product and get support at SDV5122/27. EN User manual
 Register your product and get support at www.philips.com/welcome SDV5122/27 User manual Contents 1 Important 4 Safety 4 Notice for USA 5 Notice for Canada 5 Recycling 6 English 2 Your SDV5122 7 Overview
User Manual SONIC ULTRAMIZER SU9920. Ultimate Stereo Sound Enhancement Processor
 User Manual SONIC ULTRAMIZER SU9920 Ultimate Stereo Sound Enhancement Processor 2 SONIC ULTRAMIZER SU9920 User Manual Table of Contents Thank you... 2 Important Safety Instructions... 3 Legal Disclaimer...
User Manual CONTENTS. Title and Contents Introduction and Warranty Section 1: General Features and Specifications... 3
 MON1 HR Series (Document P/N 821633 Rev-A) 3U Half-Rack HD/SDI Digital High-Resolution LCD Video Monitors (MON1-T/7W-HR and MON1/7W-HR) with 7" Wide 16:9 High-Resolution LCD Video Display, SDI and HD-SDI
14MXR User Guide and Reference Manual
 14MXR User Guide and Reference Manual 10/12 6122 S. Eastern Ave. Los Angeles Ca. 90040 www.americanaudio.us CONTENTS MAIN FEATURES...2 ELECTRICAL PRECAUTIONS...3 SAFETY PRECAUTIONS...5 INTRODUCTION...6
Wireless 4 Channel Receiver with 2 Night Vision cameras
 Wireless 4 Channel Receiver with 2 Night Vision cameras Instruction Manual English Version 2.0 MODEL: SHS-4WLS www.lorexcctv.com Copyright 2006 LOREX Technology Inc. Thank you for purchasing the SHS-4WLS.
HDBaseT RECEIVER B-520-RX-330-IR INSTALLATION MANUAL
 HDBaseT RECEIVER B-520-RX-330- INSTALLATION MANUAL IMPORTANT SAFETY INSTRUCTIONS To reduce the risk of fire or electric shock, read and follow all instructions and warnings in this manual. Keep this manual
M Channel Scratch Mixer
 M.203 2-Channel Scratch Mixer User Manual Important Safety Instructions 1. Read Instructions All the safety and operating instructions should be read before this product is operated. 2. Retain Instructions
CM.203 DUAL TABLETOP CD PLAYER WITH MIXER
 CM.203 DUAL TABLETOP CD PLAYER WITH MIXER USER MANUAL IMPORTANT SAFETY INSTRUCTIONS 1. Read Instructions All the safety and operating instructions should be read before this product is operated. 2. Retain
CMX-DSP Compact Mixers
 CMX-DSP Compact Mixers CMX4-DSP, CMX8-DSP, CMX12-DSP Introduction Thank you for choosing a Pulse CMX-DSP series mixer. This product has been designed to offer reliable, high quality mixing for stage and/or
HD Digital MPEG2 Encoder / QAM Modulator
 HD Digital MPEG2 Encoder / QAM Modulator YPrPb VGA In QAM Out series Get Going Guide ZvPro 600 Series is a one or two-channel Component or VGA-to-QAM MPEG 2 Encoder/ Modulator, all in a compact package
START MIXER & SD CARD PLAYER & RECORDER "EASY, FAST, & RELIABLE"
 "Q" START MIXER & SD CARD PLAYER & RECORDER "EASY, FAST, & RELIABLE" User Guide and Reference Manual 5/09 6122 S. Eastern Ave. Los Angeles Ca. 90040 www.americanaudio.us Q-SD RECORD MAIN FEATURES...2 ELECTRICAL
EUROPA I PREAMPLIFIER MANUAL VER E5th street Superior WI USA davehilldesigns.com
 EUROPA I PREAMPLIFIER MANUAL VER 1.04 20120521 2117 E5th street Superior WI USA 54880 davehilldesigns.com See the next page for startup switch settings 2011, 2012 Dave Hill Designs Start Up Settings 2
LIGHT COPILOT II. elationlighting.com Internet:
 LIGHT COPILOT II E-mail: info@ elationlighting.com Internet: http://www.elationlighting.com 1 Introduction Thank you for your purchase of the LIGHT COPILOT II. The LIGHT COPILOT II is an intelligent lighting
TUBE MIX FIVE CHANNEL MIXER WITH USB AND ASSIGNABLE 12AX7 TUBE. User's Manual
 TUBE MIX FIVE CHANNEL MIXER WITH USB AND ASSIGNABLE 12AX7 TUBE User's Manual IMPORTANT SAFETY INSTRUCTIONS READ FIRST This symbol, wherever it appears, alerts you to the presence of uninsulated dangerous
HEX16 Strip User Manual
 User Manual www.showtech.com.au 1 Table of Contents 1. Safety instructions 3 1.1 Overhead rigging.4 1.2 Power Connection..5 1.3 Cleaning and Maintenance..6 2. Menu Navigation..7 3. DMX Allocation..9 4.
HDBaseT RECEIVER B-520-RX-230-IR INSTALLATION MANUAL
 HDBaseT RECEIVER B-520-RX-230-IR INSTALLATION MANUAL IMPORTANT SAFETY INSTRUCTIONS To reduce the risk of fire or electric shock, read and follow all instructions and warnings in this manual. Keep this
BM5 mkiii Owner s manual
 BM5 mkiii Owner s manual Introduction Introduction Important safety instructions The lightning flash with an arrowhead symbol within an equilateral triangle, is intended to alert the user to the presence
SATRI AMPLIFIER AMP-51R. Owner s Manual
 SATRI AMPLIFIER AMP-51R Owner s Manual contents SAFETY INSTRUCTIONS 4 INTRODUCTION 6 OVERVIEW (FRONT PANEL) 8 OVERVIEW (REAR PANEL) 9 OVERVIEW (REMOTE CONTROL) 1 1 OPERATION 12 TROUBLESHOOTING 13 SPECIFICATION
E246 Series User Guide
 E246 Series User Guide IMPORTANT SAFETY INSTRUCTIONS Electricity is used to perform many useful functions, but it can also cause personal injuries and property damage if improperly handled. This product
UK. Multi Channel Programmable Filter-Equalizer. User Manual FEATURES. - Designed for both digital and analogue channels,
 Multi Channel Programmable Filter-Equalizer User Manual 6506 6506UK FEATURES - Designed for both digital and analogue channels, - 2 UHF input / 1 output, - 8 programmable clusters, - UHF channels 21 to
pro series PYD1919/PYD1929 PYD1939/PYD1949 PYD1959 Specifications PYLE PRO MIXERS warranty registration card PYD1919/1929/1939/1949/1959 Name Address
 Limited Warranty All PYLE PRO products are carefully constructed and tested before shipment. Units purchased in the USA are warranted to be free of defects in material and workmanship for two (2) years
 Register your product and get support at www.philips.com/welcome SWS3435S/27 SWS3435H/37 EN User manual Contents 1 Important 4 Safety 4 English 2 Your SWS3435 6 Overview 6 3 Installation 7 Connect the
ART48 - MICIN/MIC-ULN. arthur ACOUSTIC FIDELITY USER MANUAL. Assembling instruction on ART48-L/Rmast manual
 V2 ACOUSTIC FIDELITY arthur ART48 - MICIN/MIC-ULN USER MANUAL Assembling instruction on ART48-L/Rmast manual WARNINGS PRECAUTIONS WARNINGS Read carefully this manual and follow these precautions before
User Manual CONTENTS. Title and Contents Important Safety Instructions and Introduction... 2
 MON2-3W/HR (Document P/N 821632 Rev-B) 3U Dual Display HD/SDI Digital High-Resolution LCD Video Monitor with Two 7" Wide 16:9 High-Resolution LCD Video Displays, Two SDI or HD-SDI Inputs and Buffered/Equalized