CM-CU21 Commentator Unit. User Handbook
|
|
|
- Charleen Short
- 6 years ago
- Views:
Transcription

1 CM-CU21 Commentator Unit User Handbook
2 CM-CU21 COMMENTATOR UNIT CM-CU21 COMMENTATOR UNIT HANDBOOK Sonifex Ltd, 2013 All Rights Reserved Revision 1.03, December 2013 Sonifex Ltd, 61, Station Road, Irthlingborough, Northants, NN9 5QE, England. Tel: +44 (0) Fax: +44 (0) Website: Information in this document is subject to change without notice and does not represent a commitment on the part of the vendor. Sonifex Ltd shall not be liable for any loss or damage whatsoever arising from the use of information or any error contained in this manual. No part of this manual may be reproduced or transmitted in any form or by any means, electronic or mechanical, including photocopying, recording, information storage and retrieval systems, for any purpose other than the purchaser s personal use, without the express written permission of Sonifex Ltd. Unless otherwise noted, all names of companies, products and persons contained herein are part of a completely fictitious adaptation and are designed solely to document the use of Sonifex product. Made in the UK by b CM-CU21 Commentator Unit User Handbook
3 CONTENTS Warranty i Warranty and Liability i Unpacking the Commentator Unit iii Returning the Warranty Card iii Safety Information iv Safety of Mains Operated Equipment iv Voltage Setting Checks iv Fuse Rating iv Power Cable and Connection iv Ordering the Correct Mains Lead v Installation Information v Atmosphere v Electromagnetic Radiation v WEEE & RoHS Directives - Sonifex Statement vi 1 CM-CU21 Commentator Unit 1 Introduction 1 2 Main Panel Controls & Indicators 3 On Air Buttons 3 Talkback Buttons 3 Headphone Monitor Controls 4 Commentator 3 Line Input Level Control 4 PPM Meter Display 4 Limit LED 5 Power LED 5 3 Front Panel Controls & Connections 6 Phantom Power Select Switches 6 Microphone Input Gain Controls 6 Headphone Outputs 6 Microphone/Line Inputs 6 4 Rear Panel Controls & Connections 7 On Air Lock Controls 7 Talkback Gang Switch 7 Limiter Controls 7 Test Tone Switch 7 Return Audio Inputs 8 Audio Outputs 8 DC Supply Input 8 GPIO Port 8 Mains Power 9 5 Configuration Options 10 Configuration option settings for page 1 10 Configuration option settings for page 2 11 Configuration option settings for page 3 12 Configuration option settings for page 4 12 Configuration option settings for page 5 13 Configuration option settings for page 6 13 Configuration options for page Technical Specification For CM-CU21 Commentator Unit 16 CONTENTS CM-CU21 Commentator Unit User Handbook c
4 FIGURES Figures Fig A: Packing List iii Fig B: Power Connections iv Fig C: Mains Lead Table v Fig 1-1: CM-CU21 Commentator Unit 1 Fig 1-2: CM-CU21 Commentator Unit Block Diagram 2 Fig 2-1: Top Panel View Of CM-CU21 3 Fig 3-1: Front Panel View Of CM-CU21 6 Fig 3-2: Rear Panel View Of CM-CU21 7 FIGURES d CM-CU21 Commentator Unit User Handbook
5 WARRANTY Warranty Warranty and Liability Important: the purchaser is advised to read this clause (a) The Company agrees to repair or (at its discretion) replace Goods which are found to be defective (fair wear and tear excepted) and which are returned to the Company within 12 months of the date of despatch provided that each of the following are satisfied: (i) (ii) (iii) (iv) (v) (vi) (vii) notification of any defect is given to the Company immediately upon its becoming apparent to the Purchaser; the Goods have only been operated under normal operating conditions and have only been subject to normal use (and in particular the Goods must have been correctly connected and must not have been subject to high voltage or to ionising radiation and must not have been used contrary to the Company s technical recommendations); the Goods are returned to the Company s premises at the Purchaser s expense; any Goods or parts of Goods replaced shall become the property of the Company; no work whatsoever (other than normal and proper maintenance) has been carried out to the Goods or any part of the Goods without the Company s prior written consent; the defect has not arisen from a design made, furnished or specified by the Purchaser; the Goods have been assembled or incorporated into other goods only in accordance with any instructions issued by the Company; WARRANTY (viii) the defect has not arisen from a design modified by the Purchaser; (ix) the defect has not arisen from an item manufactured by a person other than the Company. In respect of any item manufactured by a person other than the Company, the Purchaser shall only be entitled to the benefit of any warranty or guarantee provided by such manufacturer to the Company. (b) (c) In respect of computer software supplied by the Company the Company does not warrant that the use of the software will be uninterrupted or error free. The Company accepts liability: (i) for death or personal injury to the extent that it results from the negligence of the Company, its employees (whilst in the course of their employment) or its agents (in the course of the agency); CM-CU21 Commentator Unit User Handbook i
6 WARRANTY (ii) for any breach by the Company of any statutory undertaking as to title, quiet possession and freedom from encumbrance. WARRANTY (d) (e) (f) Subject to conditions (a) and (c) from the time of despatch of the Goods from the Company s premises the Purchaser shall be responsible for any defect in the Goods or loss, damage, nuisance or interference whatsoever consequential economic or otherwise or wastage of material resulting from or caused by or to the Goods. In particular the Company shall not be liable for any loss of profits or other economic losses. The Company accordingly excludes all liability for the same. At the request and expense of the Purchaser the Company will test the Goods to ascertain performance levels and provide a report of the results of that test. The report will be accurate at the time of the test, to the best of the belief and knowledge of the Company, and the Company accepts no liability in respect of its accuracy beyond that set out in Condition (a). Subject to Condition (e) no representation, condition, warranty or other term, express or implied (by statute or otherwise) is given by the Company that the Goods are of any particular quality or standard or will enable the Purchaser to attain any particular performance or result, or will be suitable for any particular purpose or use under specific conditions or will provide any particular capacity, notwithstanding that the requirement for such performance, result or capacity or that such particular purpose or conditions may have been known (or ought to have been known) to the Company, its employees or agents. (g) (i) To the extent that the Company is held legally liable to the Purchaser for any single breach of contract, tort, representation or other act or default, the Company s liability for the same shall not exceed the Price of the Goods. (ii) (h) The restriction of liability in Condition (g)(i) shall not apply to any liability accepted by the Seller in Condition (c). Where the Goods are sold under a consumer transaction (as defined by the Consumer Transactions (Restrictions on Statements) Order 1976) the statutory rights of the Purchaser are not affected by these Conditions of Sale. ii CM-CU21 Commentator Unit User Handbook
7 WARRANTY Unpacking the Commentator Unit The Commentator Unit is shipped with the following equipment. Please check your packaging to ensure that you have all of the items below. If anything is missing, please contact the supplier of your equipment immediately. Item Quantity Commentator Unit Commentator Unit 1 IEC mains lead fitted with moulded mains plug 1 Handbook and warranty card 1 Fig A: Packing List Each Commentator Unit is shipped in protective packaging and should be inspected for damage before use. Where an item is found to have transit damage, notify the carrier immediately with all the relevant details of the shipment. Packing materials should be kept for inspection and also for if the product needs to be returned. Returning the Warranty Card In order to register the date of purchase so that we can keep you informed of any design improvements or modifications, it is important to complete the warranty registration document that is enclosed and return it to Sonifex Ltd in the UK. WARRANTY For your own records you should write down the serial number (which can be found on the rear of the Commentator Unit). Serial Number CM-CU21 Commentator Unit User Handbook iii
8 SAFETY INFORMATION Safety Information Safety of Mains Operated Equipment This equipment has been designed to meet the safety regulations currently advised in the country of purchase and it conforms to the safety regulations specified by use of the CE Mark. SAFETY INFORMATION Warning : There are no user serviceable parts inside the equipment. If you should ever need to look inside the unit, always disconnect the mains supply before removing the equipment covers. Voltage Setting Checks Ensure that the machine operating voltage is correct for your mains power supply by checking the box in which your Commentator Unit was supplied. The voltage is shown on the box label. Please note that all Commentator Units have a universal power supply. Fuse Rating The Commentator Unit is supplied with a single fuse in the live conducting path of the mains power input. For reasons of safety it is important that the correct rating and type of fuse is used. Incorrectly rated fuses could present a possible fire hazard, under equipment fault conditions. The fuse rating for the Commentator Unit is: Universal V operation - 1A 5x20mm SB The active fuse is fitted on the outside rear panel of the unit. Power Cable and Connection An IEC power connector is supplied with the Commentator Unit which has a moulded plug attached this is a legal requirement. If no moulded plug has been supplied with your Commentator Unit, please contact your supplier, because an IEC connector is always supplied from the Sonifex factory. If for any reason, you need to use the Commentator Unit with a different power cable, you should use the following wiring guidelines. Wire Colour Green, or green and yellow Blue, or black Brown, or red Fig B: Power Connections Connection Earth (E) Neutral (N) Live (L) Connect the equipment in accordance with the connection details and before applying power to the unit, check that the machine has the correct operating voltage for your mains power supply. Important Note : The terminal marked on the rear panel must be earthed. iv CM-CU21 Commentator Unit User Handbook
9 SAFETY INFORMATION Ordering the Correct Mains Lead When ordering a Commentator Unit from Sonifex, it is helpful if you can specify your required operating voltage and mains lead. After the product code add: UK, for 230V, UK 3 pin to IEC lead EC, for 230V, European Schuko 2 pin to IEC lead US, for 115V, 3 pin to IEC lead AU for 230V, Australasian 3 pin to IEC lead Fig C: Mains Lead Table E.g. order CM-CU21 UK for a UK IEC lead to be supplied. Installation Information Atmosphere The units should be installed in an area that is not subject to excessive temperature variation (<0 C, >50 C), moisture, dust or vibration. Electromagnetic Radiation The cover is connected to earth by means of the fixing screws. It is essential to maintain this earth ground connection to ensure a safe operating environment and provide electromagnetic shielding. SAFETY INFORMATION CM-CU21 Commentator Unit User Handbook v
10 WEEE & ROHS DIRECTIVE WEEE & RoHS Directives - Sonifex Statement The Waste Electrical and Electronic Equipment (WEEE) Directive was agreed on 13 February 2003, along with the related Directive 2002/95/EC on Restrictions of the use of certain Hazardous Substances in electrical and electronic equipment (RoHS). WEEE & ROHS DIRECTIVE The Waste Electrical and Electronic Equipment Directive (WEEE) aims to minimise the impacts of electrical and electronic equipment on the environment during their life times and when they become waste. It applies to a huge spectrum of products. It encourages and sets criteria for the collection, treatment, recycling and recovery of waste electrical and electronic equipment. All products manufactured by Sonifex Ltd have the WEEE directive label placed on the case. It gives a contact for individuals who are unsure about the correct procedure when the product has reached its end of use. Sonifex Ltd will be happy to give you information about local organisations that can reprocess the products, or alternatively all products that have reached end of use can be returned to Sonifex and will be reprocessed correctly free of charge. Sonifex Ltd has phased out the use of certain hazardous substances identified in the European Union s Restriction of Hazardous Substances (RoHS) directive. The RoHS directive limits the use of certain hazardous substances currently used in EEE manufacture, including lead, mercury, cadmium, hexavalent chromium, and halide-containing compounds PBB (polybrominated biphenyl) and PBDE (polybrominated diphenyl ether). Elimination of these substances will result in more environmentally friendly recycling of electronic equipment. For the products which Sonifex manufacture, the main area where products were affected was in the use of lead for manufacturing and assembling electronics circuit boards. Sonifex Ltd practices lead-free (LF) manufacturing processes. LF solder is used on the surface-mount PCB manufacturing processes and for hand soldering. The printed circuit boards (PCBs) used are either gold plated, or immersion tin plated, both of which use no lead. Historically the PCBs were hot air solder levelled (HASL) PCBs which used tin/lead based solder. The manufacturing processes include the assembly of purchased components from various sources. Product is offered as RoHS compliant, or LF, only after sufficient evidence is received from the component manufacturers that their components are RoHS compliant. Sonifex Ltd relies solely on the distributor, or manufacturer, of the components for identification of RoHS compliance. Thus whilst every effort is made to ensure compliance, Sonifex Ltd makes no warranty, or certification, or declaration of compliance concerning said components. Sonifex Ltd defines Lead Free as pertaining to any product, which has been manufactured by Sonifex Ltd using components which have been declared by the manufacturers as Lead Free. All statements by Sonifex Ltd of RoHS compliance are based on component manufacturer documentation. vi CM-CU21 Commentator Unit User Handbook

11 CM-CU21 COMMENTATOR UNIT 1 1 CM-CU21 Commentator Unit Introduction INTRODUCTION Fig 1-1: CM-CU21 Commentator Unit The CM-CU21 Commentator Unit is a high quality, portable broadcast mixer and 4-wire talkback unit. Its sturdy construction and flexibility of features make it suitable for use in a wide variety of environments. It provides two fully featured commentator positions and a third guest position that can alternatively be used as a line-level input, allowing program idents/effects to be mixed with the commentator inputs. Each position has an individual output, with two additional outputs providing a mix of all active commentary channels. A limit indicator on the main panel shows when the adjustable limiter on the mix outputs is active, and a bright 21 segment LED PPM meter, which can be disabled, shows the main output level. Two talkback output channels, with a built in limiter, are available to each of the two main commentators. They have adjustable gain and can be linked to provide simultaneous operation. A wide input gain range and switchable phantom power on each commentary position provides supports for a variety of microphone types, from high output phantom units to low output ribbon microphones. There are 4 transformer balanced return audio inputs which, along with the commentator inputs, are routed to the headphone monitor controls. With these headphone controls, any input can be level adjusted, and sent to either the left, right or both ears. CM-CU21 Commentator Unit User Handbook 1
12 CM-CU21 COMMENTATOR UNIT 1INTRODUCTION A GPIO port gives an open-collector driven output indication of any active on-air or talkback channels, and four remote inputs provide an external call/alert to each of the talkback controls. The Commentator Unit has a built in line-up tone generator for easy channel identification and cabling checks, and a flexible range of options allow the unit to be customised to better suit the operational and users personal requirements. Fig 1-2: CM-CU21 Commentator Unit Block Diagram 2 CM-CU21 Commentator Unit User Handbook

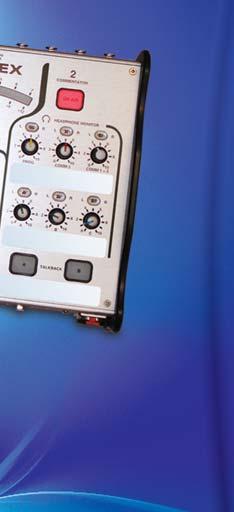
13 CM-CU21 COMMENTATOR UNIT 2 2 Main Panel Controls & Indicators Fig 2-1: Top Panel View Of CM-CU21 The main or top panel of the Commentator Unit is split into four areas. To the left and right are the main commentator position controls, with the third commentator/guest position controls located in the centre, below the power indicator, mix output limiter active indicator and the PPM meter display. MAIN PANEL CONTROLS & INDICATORS On Air Buttons The On Air buttons route the commentator microphone input signal to the corresponding Comm output and to both of the Mix Outputs, where it is mixed with all other active commentator signals. These buttons have a latching action; press to activate and press again to deactivate. When an On Air control is active, the button illuminates red and the corresponding open collector driver output on the GPIO port is activated. Talkback Buttons The Talkback A and B buttons allow either of the two main commentators microphone signals to be redirected to the corresponding Talkback output. The associated Comm output is muted and the commentators signal is removed from the Mix Outputs. The four CM-CU21 Commentator Unit User Handbook 3
14 2 CM-CU21 COMMENTATOR UNIT return audio inputs Prog, A, B and C function normally when a Talkback channel is active, allowing full-duplex communication between the commentator and a third party. These buttons have a momentary action by default; press to activate, release to deactivate. See section 5 Configuration Options on page 10 for details of how to change the button action. When a Talkback control is active, the button illuminates green and the corresponding open collector driver output on the GPIO port is activated. MAIN PANEL CONTROLS & INDICATORS Headphone Monitor Controls The two main commentator positions have six sets of headphones controls which allow them to monitor all of units return audio and active commentator inputs. Each available input has an associated level adjustment potentiometer and a headphone channel selector switch. Each potentiometer provides a level adjustment from full off to full on, and the headphone channel selector determines which ear the associated signal is routed to; either the left, the right or to both ears when the switch is in the centre position. By default, the commentator input signals are only routed to the headphone monitor controls when the corresponding On Air control is active. It is possible to route each of these signals to the headphones permanently, regardless of the state of the corresponding On Air control. See section 5 Configuration Options on page 10 for details. The guest position, commentator 3, can be set to accept a line level input, and an additional option can be configured to prevent this signal from being routed to the commentator 1 and 2 headphone monitors. The headphone controls for the third commentator position consist of left and right level adjustment potentiometers, and a switch to select the routing for the commentator input signals. With the switch in the left position, commentator 1 is heard in the left ear and commentator 3 is heard in the right ear. With the switch in the right position, commentator 2 is heard in the right ear and commentator 3 is heard in the left ear. When the switch is in the centre position, commentator 1 is heard in the left ear, commentator 2 is heard in the right ear and commentator 3s own signal is heard in both ears. Commentator 3 Line Input Level Control When the third commentator input is set to accept a line input, this potentiometer sets the gain applied to the signal prior to being routed to the headphone monitor and main output channels. The gain range is -83dB to +10dB with a maximum input level of +25dBu. PPM Meter Display The 21 segment LED PPM meter display indicates the level of the signal on the mix outputs. The PPM scale conforms to IEC a and a db scale is also shown. There are options to set the brightness level of the PPM meter, or it can be disabled if it is not required. See section 5 Configuration Options on page 10 for details. 4 CM-CU21 Commentator Unit User Handbook
15 CM-CU21 COMMENTATOR UNIT 2 Limit LED The limit LED illuminates when the adjustable limiter on the mix outputs is enabled and active. See section 4 Rear Panel Controls on page 7 for details of how to enable and adjust the limiter. The colour and brightness level of the limit LED can be changed if required, see section 5 Configuration Options on page 10 for details. Power LED The power LED indicates that the unit has power from either of its mains or DC inputs when it illuminates red. If this indicator is not on when mains power is connected to the unit, this may indicate a ruptured mains fuse or a problem with the internal power supply module. The power LED also indicates when the unit is in setup mode by flashing amber/red. MAIN PANEL CONTROLS & INDICATORS CM-CU21 Commentator Unit User Handbook 5

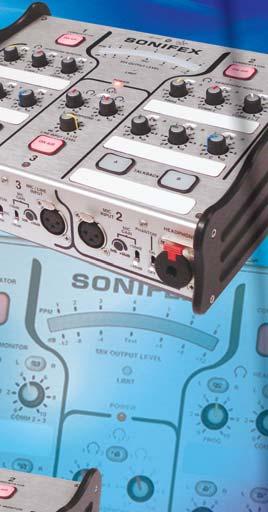
16 CM-CU21 COMMENTATOR UNIT 3FRONT PANEL CONTROLS & CONNECTIONS 3 Front Panel Controls & Connections Fig 3-1: Front Panel View Of CM-CU21 The front panel of the Commentator Unit has all of the commentator inputs and headphone outputs as well as the microphone power and gain controls. Phantom Power Select Switches Each of the three commentator inputs support phantom powered microphones. The two main commentator positions have dedicated phantom power switches that enable the 48V supply. The third commentator position has a three way switch that sets the input type. When the switch is in the bottom position, the input is a line level input. With the switch in the centre position, the input is for microphones not requiring phantom power. The top switch position enables the microphone input phantom power. Microphone Input Gain Controls Each of the commentator microphone inputs has an individually adjustable gain setting. The total gain range of +20dB to +86dB is split into two, to provide greater accuracy of adjustment. The mic gain switch sets the base gain value of either +20dB or +50dB for the corresponding input. The associated mic gain potentiometer can then be adjusted to add up to 36dB of additional gain. Headphone Outputs The front panel mounted headphone outputs are via ¼ stereo jack sockets. The two main commentator positions have locking sockets to prevent the headphone plug from being accidentally pulled out. Microphone/Line Inputs The microphone inputs for the two main commentators and the microphone/line level input for the third position are via 3 pin female XLR-3 connectors with the following connections: Pin 1: Ground Pin 2: Phase Pin 3: Non-phase 6 CM-CU21 Commentator Unit User Handbook

17 CM-CU21 COMMENTATOR UNIT 4 4 Rear Panel Controls & Connections Fig 3-2: Rear Panel View Of CM-CU21 The rear panel of the Commentator Unit carries the four return audio inputs and all comm., talkback and mix output connectors. Four additional controls are located on the rear panel; On Air Lock, Talkback Gang, Limiter and Test Tone. On Air Lock Controls The on air lock prevents any of the commentators on air buttons from being deactivated accidentally. When the on air lock is enabled, an on air channel can only be deactivated by first pressing the pushbutton located next to the on air lock switch. A slot in the rear panel makes locating the on air lock pushbutton easy; simply position your finger in the slot in the rear panel, indicated by the ON AIR LOCK text on the top panel, then slide your finger down the slot until you reach the pushbutton. Talkback Gang Switch The talkback gang switch links the operation of each of the main commentators talkback A and B buttons. When this switch is on, pressing one of the talkback buttons will automatically activate the commentators other talkback button. Limiter Controls The limiter enable switch and level potentiometer control the limiter that is applied to the main mix outputs. The potentiometer sets the threshold level at which the limiter becomes active, and has a range of between -13dB to the maximum output level of +25dB. REAR PANEL CONTROLS & CONNECTIONS Test Tone Switch The Commentator Unit has a built in Test Tone generator which selectively routes a line-up tone to all outputs to assist channel identification and cabling checks. There are two test tone modes; manual and auto. Regardless of mode, a 1 khz tone is permanently routed to the mix outputs and the PPM meter will indicate that the signal level is 0dBu. The test tone is enabled by sliding the switch to the upper ON position. To change the test tone mode; keep the Commentator 1 and Commentator 2 On Air buttons pressed for 2.5 seconds. With the test tone in manual mode, all On Air and Talkback buttons will flash amber. The test tone can be routed to the Comm and Talkback outputs by pressing the corresponding CM-CU21 Commentator Unit User Handbook 7
18 4 CM-CU21 COMMENTATOR UNIT On Air or Talkback buttons. The On Air buttons will illuminate red when pressed and the Talkback buttons will illuminate green. When the button is released, the tone on that output will be muted. With the test tone in auto mode, each of the Comm and Talkback outputs are automatically identified by a unique number of short tone bursts, lasting 0.25 seconds each, which are repeated every 3 seconds. Each button flashes when tone is being routed to the corresponding output. The number of pulses on each output is shown below: Comm 1 1 pulse REAR PANEL CONTROLS & CONNECTIONS Comm 2 Comm 3 Talkback A Talkback B 2 pulses 3 pulses 4 pulses 5 pulses The 4 return audio inputs function normally when the test tone is enabled. This could be useful in allowing the user to receive instructions on which channel to output tone to when using the test tone in manual mode. When the test tone is disabled, normal operating mode is resumed and the On Air and Talkback buttons will be returned to the state they were in prior to entering test tone mode. Return Audio Inputs The four transformer balanced return audio inputs, Prog, A, B and C are via 3 pin female XLR-3 connectors with the following connections: Pin 1: Ground Pin 2: Phase Pin 3: Non-phase Audio Outputs The three electronically balanced commentator outputs Comm1-3, and the transformer balanced talkback A and B and mix outputs are all via 3 pin male XLR-3 connectors with the following connections: Pin 1: Ground Pin 2: Phase Pin 3: Non-phase DC Supply Input The commentator unit can be powered from an external, regulated 12V or 24V DC power source. The DC input is via a 4 pin male XLR-4 connector with the following connections: Pin 1: 0V Pin 2: No connection Pin 3: No connection Pin 4: +VE (12-24 Volt DC) 8 CM-CU21 Commentator Unit User Handbook
19 CM-CU21 COMMENTATOR UNIT 4 When powering the Commentator Unit via the DC supply input, it is important to ensure the unit is suitably earthed. An earth connection point is provided on the rear panel in the form of a M4 stud and screw and this should be connected directly to a technical earth. GPIO Port The Commentator Units GPIO port has 7 open-collector driven outputs and 4 active low inputs. The 7 open-collector outputs, which are low (conducting) when active, indicate which of the On Air or Talkback channels are active. Each of the 4 active low inputs drives a call/alert signal on the corresponding Talkback button. When an input is active, the associated Talkback button will flash amber. The GPIO port connector is a 15-way female D-type with the following pin assignments: Pin Number I/O Function 1 O Commentator 1 ON AIR active open collector output 2 O Commentator 1 TALKBACK A active open collector output 3 O Commentator 1 TALKBACK B active open collector output 4 O Commentator 2 ON AIR active open collector output 5 O Commentator 2 TALKBACK A active open collector output 6 O Commentator 2 TALKBACK B active open collector output 7 O Commentator 3 ON AIR active open collector output 8 - no connection 9 - Digital ground (0V) 10 I Commentator 1 TALKBACK A call/alert active low input 11 I Commentator 1 TALKBACK B call/alert active low input 12 - Digital ground (0V) 13 I Commentator 2 TALKBACK A call/alert active low input REAR PANEL CONTROLS & CONNECTIONS 14 I Commentator 2 TALKBACK B call/alert active low input 15 - Digital ground (0V) Mains Power Mains power is applied via a standard three-pin IEC male socket. Mains voltages between 85V and 264V AC at frequencies between 47 and 63Hz are accepted without adjustment. A 1A, 5 x 20mm SB fuse is used. The Earth pin MUST be connected to ensure safety. CM-CU21 Commentator Unit User Handbook 9
20 CM-CU21 COMMENTATOR UNIT 5CONFIGURATION OPTIONS 5 Configuration Options The Commentator Unit has several user configurable options that can be changed to suit specific operational or personal requirements. These options can only be changed by entering a setup mode, which is accessible when the unit is powered-up. To enter setup mode: apply power to the unit whilst keeping the Commentator 1 and Commentator 2 On Air buttons pressed for 5 seconds. The power indicator LED will flash red and amber to indicate setup mode has been entered. The Commentator 1 and Commentator 2 On Air buttons can now be released. The configuration options are arranged in 7 pages, with up to 7 options in each page. The current page number is indicated on the PPM display by a single illuminated segment. Please note, when page 6 is selected, all the segments in the PPM display are enabled to indicate the current PPM illumination level setting. Each option within the selected page is associated with one of the 7 main control buttons on the top panel of the unit. Each button flashes in a recurring sequence to indicate the current mode setting of the associated option. One flash equals mode 1, two flashes equals mode 2 etc. Buttons that do not have an associated option in the current page do not flash. To change the current page: press and hold the Commentator 3 On Air button for at least 1 second. The PPM display will change to indicate the new page. To change the option mode setting: press the appropriate button once. The number of flashes will increase to indicate the new mode setting. Once the maximum option mode setting has been reached, the value will wrap around to mode 1. The configuration option settings for each page are listed below. The factory default settings for each option are shown in brackets: Configuration option settings for page 1 Commentator 1 ON AIR button: Mode 1 Commentator 1 ON AIR is permanently disabled and cannot be selected. Mode 2 Commentator 1 ON AIR can be selected as normal (default). Mode 3 Commentator 1 ON AIR is permanently selected and cannot be disabled. Commentator 1 TALKBACK A button: Mode 1 Commentator 1 TALKBACK A button momentary mode enabled (default). Mode 2 Commentator 1 TALKBACK A button latching mode enabled. Mode 3 Commentator 1 TALKBACK A button momentary and latching modes enabled. Commentator 1 TALKBACK B button: Mode 1 Commentator 1 TALKBACK B button momentary mode enabled (default). Mode 2 Commentator 1 TALKBACK B button latching mode enabled. Mode 3 Commentator 1 TALKBACK B button momentary and latching modes enabled. 10 CM-CU21 Commentator Unit User Handbook
21 CM-CU21 COMMENTATOR UNIT 5 Commentator 2 ON AIR button: Mode 1 Commentator 2 ON AIR is permanently disabled and cannot be selected. Mode 2 Commentator 2 ON AIR can be selected as normal (default). Mode 3 Commentator 2 ON AIR is permanently selected and cannot be disabled. Commentator 2 TALKBACK A button: Mode 1 Commentator 2 TALKBACK A button momentary mode enabled (default). Mode 2 Commentator 2 TALKBACK A button latching mode enabled. Mode 3 Commentator 2 TALKBACK A button momentary and latching modes enabled. Commentator 2 TALKBACK B button: Mode 1 Commentator 2 TALKBACK B button momentary mode enabled (default). Mode 2 Commentator 2 TALKBACK B button latching mode enabled. Mode 3 Commentator 2 TALKBACK B button momentary and latching modes enabled. Commentator 3 ON AIR button: Mode 1 Commentator 3 ON AIR is permanently disabled and cannot be selected. Mode 2 Commentator 3 ON AIR can be selected as normal (default). Mode 3 Commentator 3 ON AIR is permanently selected and cannot be disabled. Please note: Momentary mode button operation press to activate, release to deactivate. Latching mode button operation press once to activate, press again to deactivate. Configuration option settings for page 2 Commentator 1 ON AIR button: Mode 1 Commentator 3 line mode input is routed to Commentator 1 headphones (default). Mode 2 Commentator 3 line mode input is not routed to Commentator 1 headphones. CONFIGURATION OPTIONS Commentator 1 TALKBACK A button: Commentator 1 TALKBACK B button: Commentator 2 ON AIR button: Mode 1 Commentator 3 line mode input is routed to Commentator 2 headphones (default). Mode 2 Commentator 3 line mode input is not routed to Commentator 2 headphones. Commentator 2 TALKBACK A button: Commentator 2 TALKBACK B button: Commentator 3 ON AIR button: CM-CU21 Commentator Unit User Handbook 11
22 5 CM-CU21 COMMENTATOR UNIT Configuration option settings for page 3 Commentator 1 ON AIR button: Mode 1 Commentator 1 input permanently routed to Commentator 1 headphones. Mode 2 Commentator 1 input routed to Commentator 1 headphones only when Commentator 1 ON AIR is active (default). CONFIGURATION OPTIONS Commentator 1 TALKBACK A button: Mode 1 Commentator 2 input permanently routed to Commentator 1 headphones. Mode 2 Commentator 2 input routed to Commentator 1 headphones only when Commentator 2 ON AIR is active (default). Commentator 1 TALKBACK B button: Mode 1 Commentator 3 input permanently routed to Commentator 1 headphones. Mode 2 Commentator 3 input routed to Commentator 1 headphones only when Commentator 3 ON AIR is active (default). Commentator 2 ON AIR button: Mode 1 Commentator 2 input permanently routed to Commentator 2 headphones. Mode 2 Commentator 2 input routed to Commentator 2 headphones only when Commentator 2 ON AIR is active (default). Commentator 2 TALKBACK A button: Mode 1 Commentator 1 input permanently routed to Commentator 2 headphones. Mode 2 Commentator 1 input routed to Commentator 2 headphones only when Commentator 1 ON AIR is active (default). Commentator 2 TALKBACK B button: Mode 1 Commentator 3 input permanently routed to Commentator 2 headphones. Mode 2 Commentator 3 input routed to Commentator 2 headphones only when Commentator 3 ON AIR is active (default). Commentator 3 ON AIR button: Configuration option settings for page 4 Commentator 1 ON AIR button: Commentator 1 TALKBACK A button: Commentator 1 TALKBACK B button: 12 CM-CU21 Commentator Unit User Handbook
23 CM-CU21 COMMENTATOR UNIT 5 Commentator 2 ON AIR button: Commentator 2 TALKBACK A button: Commentator 2 TALKBACK B button: Commentator 3 ON AIR button: Configuration option settings for page 5 Commentator 1 ON AIR button: Mode 1 Limit indicator illuminates blue when active (default). Mode 2 Limit indicator illuminates green when active. Mode 3 Limit indicator illuminates red when active. Mode 4 Limit indicator illuminates white when active. This setting can be used when a brighter limit indication is required. Commentator 1 TALKBACK A button: Commentator 1 TALKBACK B button: Commentator 2 ON AIR button: Mode 1 Power and limit indicator brightness level 1 (minimum brightness). Mode 2 Power and limit indicator brightness level 2. Mode 3 Power and limit indicator brightness level 3 (default). Mode 4 Power and limit indicator brightness level 4. Mode 5 Power and limit indicator brightness level 5. Mode 6 Power and limit indicator brightness level 6. Mode 7 Power and limit indicator brightness level 7. Mode 8 Power and limit indicator brightness level 8 (maximum brightness). CONFIGURATION OPTIONS Commentator 2 TALKBACK A button: Commentator 2 TALKBACK B button: Commentator 3 ON AIR button: CM-CU21 Commentator Unit User Handbook 13
24 CM-CU21 COMMENTATOR UNIT Configuration option settings for page 6 5CONFIGURATION OPTIONS Commentator 1 ON AIR button: Mode 1 ON AIR and TALKBACK button brightness level 1 (minimum brightness). Mode 2 ON AIR and TALKBACK button brightness level 2. Mode 3 ON AIR and TALKBACK button brightness level 3. Mode 4 ON AIR and TALKBACK button brightness level 4. Mode 5 ON AIR and TALKBACK button brightness level 5. Mode 6 ON AIR and TALKBACK button brightness level 6. Mode 7 ON AIR and TALKBACK button brightness level 7 (maximum brightness) (default). Commentator 1 TALKBACK A button: This button illuminates green to indicate button brightness level. Commentator 1 TALKBACK B button: This button illuminates amber to indicate button brightness level. Commentator 2 ON AIR button: Mode 1 PPM display brightness level 1 (minimum brightness). Mode 2 PPM display brightness level 2. Mode 3 PPM display brightness level 3. Mode 4 PPM display brightness level 4. Mode 5 PPM display brightness level 5 (default). Mode 6 PPM display brightness level 6. Mode 7 PPM display brightness level 7 (maximum brightness). Mode 8 PPM display disabled. Commentator 2 TALKBACK A button: This button illuminates amber to indicate button brightness level. Commentator 2 TALKBACK B button: This button illuminates green to indicate button brightness level. Commentator 3 ON AIR button: This button illuminates red to indicate button brightness level. Configuration options for page 7 The last page allows you to save the current option settings to either of two available backup sets that are unaffected by subsequent changes to the option settings. The backup sets can then be reloaded when required. The load/save functions will only work whilst in page 7. Page 7 also shows the current firmware version by flashing the Limit LED in a recurring sequence i.e. 1 flash for version 1, 2 flashes for version2 etc. 14 CM-CU21 Commentator Unit User Handbook
25 CM-CU21 COMMENTATOR UNIT 5 To save the current option settings to backup set 1: press and hold the Commentator 1 On Air and Talkback B buttons for 2 seconds. These buttons will then illuminate red to verify that the options have been saved to backup set 1. To save the current option settings to backup set 2: press and hold the Commentator 2 On Air and Talkback B buttons for 2 seconds. These buttons will then illuminate red to verify that the options have been saved to backup set 2. To load backup set 1 and overwrite the current option settings: press and hold the Commentator 1 On Air and Talkback A buttons for 2 seconds. These buttons will then illuminate red to verify that backup set 1 has been loaded. To load backup set 2 and overwrite the current option settings: press and hold the Commentator 2 On Air and Talkback A buttons for 2 seconds. These buttons will then illuminate red to verify that backup set 2 has been loaded. To exit setup mode: press and hold the Commentator 1 and Commentator 2 On Air buttons for 3 seconds. When the power indicator stops flashing, the On Air buttons can be released and the unit will enter normal operating mode. In addition to being able to load and save options, it is also possible to return the setup options to their factory default settings. Please note: all changes made to the options settings will be lost. Loading of the factory defaults does not affect the options stored in the backup sets. To return the current option settings to factory defaults: apply power to the unit whilst keeping Commentator 1 Talkback B and Commentator 2 Talkback A buttons pressed for 5 seconds. These buttons will then illuminate red to verify that the default options have been loaded. After the default options have been restored, the unit will return to normal operating mode. CONFIGURATION OPTIONS CM-CU21 Commentator Unit User Handbook 15
26 6TECHNICAL SPECIFICATION CM-CU21 COMMENTATOR UNIT 6 Technical Specification For CM-CU21 Commentator Unit Microphone Input Gain Range: Maximum Input Level: +20dB to +86dB. -6dBu. Equivalent Input Noise: 130dB Ref. 80dB gain with 150Ω termination. Equivalent Input Noise: 128dB Ref. 50dB gain with 150Ω termination. C.M.R.R.: Frequency Response: >60dB. ±0.5dB 20Hz to 22kHz Ref 50dB 1kHz. Electronically Balanced Line Input Gain Range: Maximum Input Level: C.M.R.R.: Frequency Response: -83dB to +10dB. +25dBu. >70dB. ±0.2dB 20Hz to 22kHz Ref 1kHz. Transformer Balanced Monitor Inputs Gain Range: Maximum Input Level: C.M.R.R.: Frequency Response: -70dB to +7dB Headphone output. +25dBu. >60dB. ±0.5dB 20Hz to 22kHz Ref 1kHz. Transformer Balanced Main Outputs Maximum Output Level (limiter off): Frequency Response: Noise: THD & N: THD & N: +24dBu. ±0.5dB 20Hz to 22kHz Ref 1kHz. -94dB Average weighting Ref +8dB Line input. <0.02% Ref. +8dBu. <0.065% Ref. +18dBu. 1% Distortion Point: 24Hz. 16 CM-CU21 Commentator Unit User Handbook
27 CM-CU21 COMMENTATOR UNIT 6 Transformer Balanced Talkback Outputs Maximum Output Level Limited: Frequency Response: Noise: THD & N: Gain Adjustment: +8dBu. ±0.5dB 20Hz to 22kHz Ref 1kHz. -94dB Average weighting Ref +8dB Line input. <0.02% Ref. +8dBu. 0-12dB Electronically Balanced Comm Outputs Maximum Output Level Limited: Frequency Response: Noise: THD & N: Headphone Outputs Gain Range: +25dBu. ±0.2dB 20Hz to 22kHz Ref 1kHz. -98dB Average weighting Ref +8dB Line input. <0.002% Ref. +8dBu. -66dB to +11dB. Maximum Output Level: +19dBu. Frequency Response: ±0.5dB 20Hz to 22kHz Ref 1kHz. TECHNICAL SPECIFICATION Noise: THD & N: -85dB Average weighting Ref +8dB Line input. <0.005% Ref. +8dBu. Connections Headphone Outputs: 3 x ¼ (6.35mm) A/B gauge 3-pole stereo jack socket - locking for positions 1 and 2. Microphone/Line Inputs: 3 x XLR-3 pin female latching (electronic balanced). Return Audio Inputs (Prog, A, B & C): Commentator Outputs (Comm1-3): 4 x XLR-3 pin female latching (transformer balanced). 3 x XLR-3 pin male (electronic balanced). Talkback A & B Outputs: 2 x XLR-3 pin male (transformer balanced). CM-CU21 Commentator Unit User Handbook 17
28 6 CM-CU21 COMMENTATOR UNIT Mix 1 & 2 Outputs: GPIO Port: Mains Input: Fuse Rating: 2 x XLR-3 pin male (transformer balanced). 15-way D -type socket. Universal filtered IEC, continuously rated VAC, 47-63Hz, 10W. Anti-surge fuse 1A 20 x 5mm. TECHNICAL SPECIFICATION DC Input: Earth Point: Dimensions Dimensions: Weight: Accessories CM-CU21CP CM-CU21TP Dimensions (Raw): (CM-CU21TP) XLR-4 pin male. 12V DC, 650mA Typical, 850mA Maximum. 24V DC, 325mA Typical, 425mA Maximum. M4 stud. 270mm (W) x 230mm (D) x 70mm (H - front) x 95mm (H - rear) 10.6 (W) x 9 (D) x 2.8 (H - front) x 3.74 (H - rear) Nett: 3.34kg Gross: 4.32kg Nett: 7.35lbs Gross: 9.5lbs Commentator Unit Front Cover Plate Commentator Unit Transport Case 530mm (W) x 210mm (D) x 415mm (H) 20.9 (W) x 8.3 (D) x 16.3 (H) Dimensions (Boxed): (CM-CU21TP) Weight: (CM-CU21TP) 600mm (W) x 260 (D) x 420 (H) 23.6 (W) x 10.2 (D) x 16.5 (H) Net: 4.0kg Gross: 5.0kg Net: 8.8lbs Gross: 11.0lbs 18 CM-CU21 Commentator Unit User Handbook
29 NOTES NOTES CM-CU21 Commentator Unit User Handbook 19
30 NOTES NOTES 20 CM-CU21 Commentator Unit User Handbook
31 NOTES NOTES CM-CU21 Commentator Unit User Handbook 21
1933 650")

32 t:+44 (0) f:+44 (0)
Commentator Units. CM-CU1 Commentator Unit for 1 Commentator & Line Input CM-CU21 Commentator Unit for 2 Commentators & 1 Guest HANDBOOK
 HANDBOOK Commentator Units CM-CU1 Commentator Unit for 1 Commentator & Line Input CM-CU21 Commentator Unit for 2 Commentators & 1 Guest Manufacturers of audio & video products for radio & TV broadcasters
User Handbook No 2. Redbox. Matching Converters, Distribution Amplifiers & Headphone Amplifiers RB-UL1. Single stereo unbalanced to balanced converter
 Redbox User Handbook No 2 Matching Converters, Distribution Amplifiers & Headphone Amplifiers RB-UL1 RB-UL2 RB-UL4 RB-LU4 RB-BL2 RB-BL4 RB-PA2 RB-LI2 RB-PLI6 Single stereo unbalanced to balanced converter
S0 Radio Broadcasting Mixer. June catalogue. Manufacturers of audio & video products for radio & TV broadcasters
 S0 Radio Broadcasting Mixer June 2012 catalogue Manufacturers of audio & video products for radio & TV broadcasters S0 Radio Broadcasting Mixer A simple radio mixer for novice and professional users The
Confidence Monitors RM-CA2 HANDBOOK
 HANDBOOK Confidence Monitors RM-CA2 Confidence Monitor, 2 LED Meters & 2 Analogue Stereo Inputs RM-CAD8 Confidence Monitor, 2 LED Meters, 2 Analogue & 6 Digital Stereo Inputs Manufacturers of audio & video
RB-OA3,(R&C) 3 Studio On-Air Switcher. Catalogue
 3 Studio On-Air Switcher. Catalogue") RB-OA3,(R&C) 3 Studio On-Air Switcher 2016 Catalogue RB-OA3 3 Studio On-Air Switcher Category: Mixers, Source Selectors & Switchers. Product Function: To switch the on-air transmission output between multiple
RB-OA3,(R&C) 3 Studio On-Air Switcher 2016 Catalogue RB-OA3 3 Studio On-Air Switcher Category: Mixers, Source Selectors & Switchers. Product Function: To switch the on-air transmission output between multiple
GS-CU001M COMMENTATOR UNIT PRODUCT DETAILS
 GLENSOUND ELECTRONICS LTD GS-CU001M COMMENTATOR UNIT PRODUCT DETAILS 6 BROOKS PLACE, MAIDSTONE, KENT, ME1 1HE. ENGLAND. TEL: + (0) 1622 7020 Visit our Website at www.glensound.co.uk + (0) 1622 7662 FAX:
S1 Digital/Analogue Radio Broadcast Mixer September 2009
 S1 Digital/Analogue Radio Broadcast Mixer September 2009 www.sonifex.co.uk t: +44 (0)1933 650 700 f: +44 (0)1933 650 726 sales@sonifex.co.uk S1 Radio Digital/Analogue Broadcast Mixer Radio Broadcast Mixer
RB-DSD8. 8 Channel Silence Switcher. Catalogue
 RB-DSD8 8 Channel Silence Switcher 2016 Catalogue RB-DSD8 8 Channel Silence Switcher Category: Synchronisers, Delays & Silence Detectors. Product Function: A multi channel (4 stereo) silence detector which
S1 Digital/Analogue Radio Broadcast Mixer
 S1 Digital/Analogue Radio Broadcast Mixer September 2009 www.sonifex.co.uk t: +44 (0)1933 650 700 f: +44 (0)1933 650 726 sales@sonifex.co.uk S1 Radio Digital/Analogue Broadcast Mixer Radio Broadcast Mixer
T L Audio. User Manual C1 VALVE COMPRESSOR. Tony Larking Professional Sales Limited, Letchworth, England.
 T L Audio User Manual C1 VALVE COMPRESSOR Tony Larking Professional Sales Limited, Letchworth, England. Tel: 01462 490600. International +44 1462 490600. Fax: 01462 490700. International +44 1462 490700.
clipping; yellow LED lights when limiting action occurs. Input Section Features
 ELX-1A Rack-Mount Mic/Line Mixer Four inputs, one output in a single rack space Very-highery-high-quality audio performance High reliability Extensive filtering circuitry and shielding protect against
There is a button to select either the AES/EBU or S/PDIF input for the D/A converter, which is located on the rear panel.
 4 RB-DAC1 Digital to Analogue Converter Introduction Fig 4-1: RB-DAC1 Front Panel Using 24 bit, 96kHz capable devices, the RB-DAC1 Digital to Analogue Converter is a 1U rack-mount which produces a stereo
PSC UHF Log Periodic Antenna
 PSC UHF Log Periodic Antenna Frequency Range of 450Mhz to 900Mhz Excellent RF Performance Robust, Skeletal Design Durable, Water Resistant Coating Competitively priced, and Made in the U.S.A Introduction:
Connevans.info. DeafEquipment.co.uk. This product may be purchased from Connevans Limited secure online store at
 Connevans.info Solutions to improve the quality of life Offering you choice Helping you choose This product may be purchased from Connevans Limited secure online store at www.deafequipment.co.uk DeafEquipment.co.uk
FWD8000 Dante enabled four wire box
 FWD8000 Dante enabled four wire box by CTP Systems Product warranty This unit is guaranteed for a period of one year from dispatch of the goods. This guarantee is a return to base warranty. In the unlikely
User Handbook No 1. Redbox. Digital Audio Converters, Synchronisers, Delays & Silence Detectors RB-ADDA
 Redbox User Handbook No 1 Digital Audio Converters, Synchronisers, Delays & Silence Detectors RB-ADDA RB-ADDA2 RB-SC1 RB-DAC1 RB-SP1 Combined A/D and D/A unit (24 bit, 96kHz capable) (1U) Combined A/D
User Guide. Single-Link DVI Active Cable Extender. DVI-7171c
 User Guide Single-Link DVI Active Cable Extender DVI-7171c TABLE OF CONTENTS SECTION PAGE PRODUCT SAFETY...1 PRODUCT LIABILITY...1 1.0 INTRODUCTION...2 2.0 SPECIFICATIONS...3 3.0 PACKAGE CONTENTS...4 4.0
Kramer Electronics, Ltd. USER MANUAL. Model: VA-14. 4x1 Balanced Audio Mixer
 Kramer Electronics, Ltd. USER MANUAL Model: VA-14 4x1 Balanced Audio Mixer Contents Contents 1 Introduction 1 2 Getting Started 2.1 Quick Start 1 1 3 Overview 3 4 Your VA-14 4x1 Balanced Audio Mixer 4
MWT-FM. Operation Manual. FM Single Channel Transmitter. man_mwtfm.
 MWT-FM FM Single Channel Transmitter Operation Manual man_mwtfm www.myeclubtv.com CONTENTS FCC COMPLIANCE STATEMENT. 3 INDUSTRY CANADA COMPLIANCE 3 MWT-FM ORIENTATION. 4 SAFETY PRECAUTIONS 5 FINDING FM
AES-404 Digital Audio Switcher/DA/Digital to Analog Converter
 Broadcast Devices, Inc. AES-404 Digital Audio Switcher/DA/Digital to Analog Converter Technical Reference Manual Broadcast Devices, Inc. Tel. (914) 737-5032 Fax. (914) 736-6916 World Wide Web: www.broadcast-devices.com
Dragonfly Quad. User Manual V1.4. Order code: EQLED101
 Dragonfly Quad User Manual V1.4 Order code: EQLED101 Safety advice WARNING FOR YOUR OWN SAFETY, PLEASE READ THIS USER MANUAL CAREFULLY BEFORE YOUR INITIAL START-UP! Before your initial start-up, please
AES-402 Automatic Digital Audio Switcher/DA/Digital to Analog Converter
 Broadcast Devices, Inc. AES-402 Automatic Digital Audio Switcher/DA/Digital to Analog Converter Technical Reference Manual Broadcast Devices, Inc. Tel. (914) 737-5032 Fax. (914) 736-6916 World Wide Web:
MX-206 Stereo Microphone Mixer. Operating Manual
 MX-206 Stereo Microphone Mixer Operating Manual ASHLY AUDIO INC. 847 Holt Road Webster, NY 14580-9103 Phone: (585) 872-0010 Toll-Free: (800) 828-6308 Fax: (585) 872-0739 www.ashly.com Operating Manual
Installation and Operation Manual. for the. SM-6 Programmable Stereo Mixer
 for the Copyright 1996 2001 by Broadcast Tools, Inc. All rights reserved. Except as permitted under the United States Copyright Act of 1976, no part of this document may be reproduced or distributed without
Kramer Electronics, Ltd.
 Kramer Electronics, Ltd. Preliminary USER MANUAL Model: VM-1110xl Balanced Audio Distributor Contents Contents 1 Introduction 1 2 Getting Started 1 2.1 Quick Start 2 3 Overview 3 4 Your VM-1110xl Balanced
Installation and Operation Manual. for the. IPC-2, Twin stereo level matching interface
 Preliminary Preliminary Preliminary Preliminary for the Copyright 1996 by All rights reserved. Except as permitted under the United States Copyright Act of 1976, no part of this document may be reproduced
Peak Atlas IT. RJ45 Network Cable Analyser Model UTP05. Designed and manufactured with pride in the UK. User Guide
 GB05-7 Peak Atlas IT RJ45 Network Cable Analyser Model UTP05 Designed and manufactured with pride in the UK User Guide Peak Electronic Design Limited 2001/2013 In the interests of development, information
Distribution Unit. User Guide
 Distribution Unit User Guide CONTENTS 1. Introduction Page 2 2. Technical Specifications Page 3 3. Installation 3.1 Inspection and un-packing Page 4 3.2 Operating environment Page 4 3.3 Power requirements
Access Converter/ 3. Operation Manual. International Headquarters. European Headquarters. B&B Electronics. 707 Dayton Road Ottawa, IL USA
 Access Converter/ 3 International Headquarters B&B Electronics Operation Manual 707 Dayton Road Ottawa, IL 61350 USA Phone (815) 433-5100 General Fax (815) 433-5105 Email: support@bb-elec.com Website:
USER GUIDE MULTI-CHANNEL STEREO MIXER S MIX 4M2S UD
 USER GUIDE MULTI-CHANNEL STEREO MIXER S MIX 4M2S UD FEATURES 4 mono input channels and 2 stereo input channels. Frequency EQ on each input channel. Low-noise mic pre-amp on microphone inputs. Low cut filter
S MiX 2M2S UF. S MiX 2M2S F
 USER guide MULTI-CHANNEL STEREO MIXER S MiX 2M2S UF S MiX 2M2S F FEATURES 2 stereo input channels and 2 mono input channels. 2-band frequency EQ for each input channel. Low-noise mic pre-amp on microphone
SR - 516D DESK TOP DMX REMOTE STATION. Version: Date: 05/16/2013
 SR - 516D DESK TOP DMX REMOTE STATION Version: 1.10 Date: 05/16/2013 Page 2 of 10 TABLE OF CONTENTS DESCRIPTION 3 POWER REQUIREMENTS 3 INSTALLATION 3 CONNECTIONS 3 POWER CONNECTIONS 3 DMX CONNECTIONS 3
AMU2-2MHD+ Audio monitoring Unit
 AMU2-2MHD+ Audio monitoring Unit Handbook TSL Vanwall Road, Maidenhead, Berkshire, SL6 4UB Telephone +44 (0)1628 676200, FAX +44 (0)1628 676299 AMU2-2MHD+-6 1 ISSUE 5 SAFETY Installation. Unless otherwise
Operations Manual. Last Updated: 11/10/2013. P Squared Ltd
 Operations Manual Last Updated: 11/10/2013 P Squared Ltd Limited Warranty Definitions the Company means P Squared Ltd and where relevant includes companies within the same group of companies as P Squared
Chameleon Labs Model 7720
 Chameleon Labs Model 7720 Stereo Compressor Owner s Manual 704 228 th Avenue NE, # 826 Sammamish, WA 98074 206-264-7602 www.chameleonlabs.com Revision C - December, 2007 UNPACKING AND INSPECTION Carefully
ENG-44 Field Portable Audio Mixer. Operator s Manual. SignVideo SE Gideon Street - Portland, Oregon
 Field Portable Audio Mixer Operator s Manual SignVideo - 1226 SE Gideon Street - Portland, Oregon 97202 503.236.0000 www.signvideo.com Safety Warning Protect your ears. Always turn down the headphone volume
Redbox RB-DD4 4 Channel Digital Audio Delay Synchroniser. User Handbook
 Redbox RB-DD4 4 Channel Digital Audio Delay Synchroniser User Handbook RB-DD4 USER HANDBOOK RB-DD4 USER HANDBOOK This handbook is for use with the following product: Redbox RB-DD4 4 Channel Digital Audio
RMX-44 & RMX-62 MIXING MATRIX. Installation & Operation Manual
 RMX-44 & RMX-6 MIXING MATRIX Installation & Operation Manual TABLE OF CONTENTS RMX-44 & RMX-6 INTRODUCTION... RMX-44 CALLOUTS... RMX-44 BLOCK DIAGRAM... RMX-6 CALLOUTS... 4 RMX-6 BLOCK DIAGRAM... 5 RMX-44
Recording to Tape (Analogue or Digital)...10
...10") c o n t e n t s DUAL MIC-PRE Green Dual Mic Pre (introduction).............................4 Section (i): Setting Up Power Connections...........................................4 Power Supply................................................5
c o n t e n t s DUAL MIC-PRE Green Dual Mic Pre (introduction).............................4 Section (i): Setting Up Power Connections...........................................4 Power Supply................................................5
BSM Evolution USB - Compact ON AIR console. BSM Evolution USB. AEV On Air compact broadcast console
 BSM Evolution USB AEV On Air compact broadcast console 1 Guarantee The equipment is warranted for a period of 2 years from the date of invoice (ex-works). The warranty does not cover faults provoked by
Vocia VI-6. Operation Manual
 Vocia VI-6 Operation Manual Biamp Systems 9300 S.W. Gemini Drive, Beaverton, Oregon 97008 U.S.A. (503) 641-7287 www.biamp.com table of contents vocia INPUT 6 (vi-6) features..............................................................
PRO-HDMI2HD. HDMI to SDI/3G-HD-SD Converter. User Manual. Made in Taiwan
 PRO-HDMI2HD HDMI to SDI/3G-HD-SD Converter User Manual Made in Taiwan rev.1008 103 Quality Circle, Suite 210 Huntsville, Alabama 35806 Tel: (256) 726-9222 Fax: (256) 726-9268 Email: service@pesa.com Safety
AEQ BRAVO Broadcast Mixing Console
 AEQ Broadcast Mixing Console USER S MANUAL ED 12/07 V 11-17/12/2007 CONTENTS 1 INTRODUCTION 3 11 General 3 12 Maintenance 3 13 Warranty 4 2 EQUIPMENT POWER SUPPLY 5 21 General 5 22 Switching on the equipment
CR-R880-BL: Indoor/Outdoor Proximity Reader with 10cm (4in) read range
 read range") CR-R880-BL: Indoor/Outdoor Proximity Reader with 10cm (4in) read range Installation Manual Table of Contents Basic Operation...2 CR-R880-BL Block Diagram...2 Technical Specifications...3 Features...4
CR-R880-BL: Indoor/Outdoor Proximity Reader with 10cm (4in) read range Installation Manual Table of Contents Basic Operation...2 CR-R880-BL Block Diagram...2 Technical Specifications...3 Features...4
The Dangerous Music D-Box user s operating guide
 The Dangerous Music D-Box user s operating guide Thank you for choosing products from the exciting line of Dangerous Music recording equipment. Many years of dependable and trouble-free service can be
VK-P10SE WARRANTY REGISTRATION FORM
 VK-P10SE WARRANTY REGISTRATION FORM Unit Serial Number: Customer Name: Address: Date of Purchase: Purchased From: Dealer Name: Address: IMPORTANT NOTE: In order to receive the full five-year product warranty,
TRANSCENSION 6-CHANNEL DMX DIMMER PACK (order code: BOTE40) USER MANUAL
 USER MANUAL") www.prolight.co.uk TRANSCENSION 6-CHANNEL PACK (order code: BOTE40) USER MANUAL SAFETY WARNING FOR YOUR OWN SAFETY, PLEASE READ THIS USER MANUAL CAREFULLY BEFORE YOUR INITIAL START-UP! CAUTION! Keep this
www.prolight.co.uk TRANSCENSION 6-CHANNEL PACK (order code: BOTE40) USER MANUAL SAFETY WARNING FOR YOUR OWN SAFETY, PLEASE READ THIS USER MANUAL CAREFULLY BEFORE YOUR INITIAL START-UP! CAUTION! Keep this
PROFESSIONAL DJ MIXER OWNER S MANUAL. STANTON MAGNETICS, INC
 M.303 PROFESSIONAL DJ MIXER OWNER S MANUAL STANTON MAGNETICS, INC information@stantondj.com www.stantondj.com WELCOME! Thank you for making Stanton your first choice in professional DJ mixers. This innovative
HP6E Operating Manual. August 2012
 HP6E Operating Manual August 2012 SAFETY INSTRUCTIONS CAUTION: To reduce the risk of electrical shock, do not remove the cover or rear panel of this unit. No user serviceable parts inside. Please refer
INSTRUCTION MANUAL PELLAR PHONO PRE-AMPLIFIER. Extended 5-Year Warranty
 V1.1E INSTRUCTION MANUAL PELLAR PHONO PRE-AMPLIFIER Extended 5-Year Warranty AVID is pleased to extend the normal warranty duration to 5-Years from the date of original shipping. This warranty is transferable
User Manual. Model 1372A and 1374A HDMI Switchers. 1T-SX-632 Model 1372A 2X1 Switcher. v1.3 2x1 SWITCHER. v1.3 INPUT ENHANCE POWER
 User Manual 1T-SX-632 Model 1372A 2X1 Switcher v1.3 v1.3 2x1 SWITCHER 1 2 INPUT ENHANCE POWER 1 2 INPUT ENHANCE POWER Model 1372A and 1374A HDMI Switchers Table Of Contents 1.0 Introduction.......................
6170 Shiloh Road Alpharetta, Georgia (770) FAX (770) Toll Free
 FAX (770) Toll Free") Instruction Manual Model 2115-202 Upconverter November 2011, Rev. C MODEL 2115 UPCONVERTER CROSS TECHNOLOGIES INC. EXT 10MHZ ALARM POWER Data, drawings, and other material contained herein are proprietary
Instruction Manual Model 2115-202 Upconverter November 2011, Rev. C MODEL 2115 UPCONVERTER CROSS TECHNOLOGIES INC. EXT 10MHZ ALARM POWER Data, drawings, and other material contained herein are proprietary
PRO Mixer Distro User Guide
 PRO Mixer Distro 17. The apparatus shall be connected to a mains socket outlet with a protective earthing connection. 18. Mains plug is used as the disconnect device. It shall remain readily operable and
AES Channel Digital/Analog Audio Switcher/DA/Digital to Analog Converter
 Broadcast Devices, Inc. AES-408 8 Channel Digital/Analog Audio Switcher/DA/Digital to Analog Converter Technical Reference Manual Broadcast Devices, Inc. Tel. (914) 737-5032 Fax. (914) 736-6916 World Wide
HeadAmp 4 Pro. User s Manual. Project Series. Five Channel Headphone Amp with Listen and Talkback
 HeadAmp 4 Pro Five Channel Headphone Amp with Listen and Talkback Project Series User s Manual IMPORTANT SAFETY INSTRUCTIONS READ FIRST This symbol, wherever it appears, alerts you to the presence of
Instruction Manual Model # Block Upconverter
 Instruction Manual Model 2115-278# Block Upconverter August 2018, Rev. A MODEL 2115 UPCONVERTER CROSS TECHNOLOGIES INC. EXT 10MHZ ALARM POWER Data, drawings, and other material contained herein are proprietary
User Guide. HDMI Fiber Optic Extender. DVI-7350a
 User Guide HDMI Fiber Optic Extender DVI-7350a Table of Contents Section Page Product Safety.................................... 1 1.0 Introduction...2 2.0 Specifications...3 3.0 Package Contents...3 4.0
MANUAL ENGLISH Core Club Ordercode: D2314
 MANUAL ENGLISH Core Club Ordercode: Highlite International B.V. Vestastraat 2 6468 EX Kerkrade the Netherlands Table of contents Warning... 2 Unpacking Instructions... 2 Safety Instructions... 2 Operating
Bell and Light System tm RF Remote Control
 Bell and Light System tm RF Remote Control Copyright 2017, Professional Sound Corp. All Rights Reserved Thank you for purchasing the Professional Sound Corporation Bell and Light System RF Remote Control.
Instruction Manual Model BlockUpconverter
 Instruction Manual Model 2115-55 BlockUpconverter June 2009 - Rev. 0 MODEL 2115 UPCONVERTER CROSS TECHNOLOGIES INC. EXT 10MHZ ALARM POWER Data, drawings, and other material contained herein are proprietary
MYE TV Audio Grabber
 Radio MYE TV Audio Grabber Model: MAG98 Operation Manual Man_MAG_V2 www.myeclubtv.com FCC Compliance Statement NOTE: This equipment has been tested and found to comply with the limits for a class B digital
Stratos Duo RGB. User Manual. Order code: EQLED371
 Stratos Duo RGB User Manual Order code: EQLED1 Safety advice WARNING FOR YOUR OWN SAFETY, PLEASE READ THIS USER MANUAL CAREFULLY BEFORE YOUR INITIAL START-UP! Before your initial start-up, please make
INSTRUCTION MANUAL PELLERE PHONO PRE-AMPLIFIER. Extended 5-Year Warranty
 V1.2E INSTRUCTION MANUAL PELLERE PHONO PRE-AMPLIFIER Extended 5-Year Warranty AVID is pleased to extend the normal warranty duration to 5-Years from the date of original shipping. This warranty is transferable
S1 Radio Broadcast Mixer
 HANDBOOK S1 Radio Broadcast Mixer 10 Channel Analogue-Digital Manufacturers of audio & video products for radio & TV broadcasters S1 Handbook For the latest Sonifex handbook information please visit the
Kramer Electronics, Ltd. USER MANUAL. Model: 900xl. Power Amplifier
 Kramer Electronics, Ltd. USER MANUAL Model: 900xl Power Amplifier Introduction Contents 1 Introduction 1 2 Getting Started 1 2.1 Recycling Kramer Products 1 3 Overview 2 4 Your 900xl Power Amplifier 3
CH1 CH2 CH3 CH4. Master /Fade CH5. 600s CH6. 60s SC1 SC2 SC4 SC3 SC5. SC6 Off/Pro. AL Fade 6 Pro. User guide
 1 1 CH1 CH2 1 1 CH4 CH 1 CH3 6s Master /Fade CH6 1 SC1 6s SC4 SC2 SC SC3 SC6 Off/Pro AL Fade 6 Pro User guide CONTENTS INTRODUCTION...2 Welcome 2 Safety 2 Supplied items 3 INSTALLATION...4 Mounting 4
APSPB PUSH BUTTON ZERO Installation Manual
 APSPB PUSH BUTTON ZERO Installation Manual CARDINAL SCALE MFG. CO. 8527-0579-0M Rev A 203 E. Daugherty, Webb City, MO 64870 USA Printed in USA 12/14 Ph: 417-673-4631 Fax: 417-673-2153 www.detectoscale.com
GLENSOUND ELECTRONICS LTD
 GLENSOUND ELECTRONICS LTD GS-TALENT X DIGITAL COMMENTATOR UNIT PRODUCT DETAILS 6 BROOKS PLACE, MAIDSTONE, KENT, ME14 1HE. ENGLAND. TEL: +44 (0) 1622 753662 Visit our Website at www.glensound.co.uk FAX:
INSTRUCTION MANUAL PULSUS PHONO PRE-AMPLIFIER. Extended 5-Year Warranty
 V1.3E INSTRUCTION MANUAL PULSUS PHONO PRE-AMPLIFIER Extended 5-Year Warranty AVID is pleased to extend the normal warranty duration to 5-Years from the date of original shipping. This warranty is transferable
Edition 1, August 2011 Copyright 2011 Smart-e (UK) Ltd.
 Ltd.") Notice The information contained in this document is subject to change without notice. Smart-e makes no warranty of any kind with regard to this material, including but not limited to, implied warranties
Notice The information contained in this document is subject to change without notice. Smart-e makes no warranty of any kind with regard to this material, including but not limited to, implied warranties
Single 3 Way AES/EBU Passive Splitter With XLR Connectors CM-AESB3. Single 3 Way Passive AES3ID Splitter With BNC Connectors CM-MS3
 CM-AESX3 Single 3 Way AES/EBU Passive Splitter With XLR Connectors CM-AESB3 Single 3 Way Passive AES3ID Splitter With BNC Connectors CM-MS3 Single 3 Way Passive Microphone Splitter 2016 Catalogue CM-AESX3
OWNERS MANUAL. Revision /01/ Lightronics Inc. 509 Central Drive Virginia Beach, VA Tel
 OWNERS MANUAL Revision 1.8 09/01/2002 OWNERS MANUAL Page 2 of 12 AR-1202 UNIT DESCRIPTION The AR-1202 consists of a processor and 12 dimmer channels of 2.4KW each. Each dimmer channel is protected by a
.Power Distribution Center. PD-1. Instruction Manual
 .Power Distribution Center. PD-1 Instruction Manual www.datavideo-tek.com 1 Contents Warnings and Precautions... 3 Warranty... 4 Standard Warranty... 4 Two Year Warranty... 4 Disposal... 4 Packing List...
3-DRX. AUTOMATIC THREE CHANNEL DIGITAL AES/EBU REPEATER and ANALOG AUDIO SWITCHER INSTALLATION AND OPERATING MANUAL
 3-DRX AUTOMATIC THREE CHANNEL DIGITAL AES/EBU REPEATER and ANALOG AUDIO SWITCHER INSTALLATION AND OPERATING MANUAL 3-DRX SECTION 1 INTRODUCTION The TITUS TECHNOLOGICAL LABORATORIES 3-DRX AUTOMATIC THREE
PROFESSIONAL 2 CHANNEL SOLID-STATE MIC / LINE PREAMPLIFIER USER S MANUAL
 PROFESSIONAL 2 CHANNEL SOLID-STATE MIC / LINE PREAMPLIFIER USER S MANUAL SAFETY INSTRUCTIONS This symbol, wherever it appears, alerts you to important operating and maintenance instructions in the accompanying
HD-CM HORIZON DIGITAL CABLE METER
 HD-CM OFF! Max RF i/p = +17dBm 75Ω Max AC/DC i/p = 120Vrms MENU INPUT ON HORIZON DIGITAL CABLE METER Horizon Global Electronics Ltd. Unit 3, West Side Flex Meadow Harlow, Essex CM19 5SR Phone: +44(0) 1279
LIGHT COPILOT II. elationlighting.com Internet:
 LIGHT COPILOT II E-mail: info@ elationlighting.com Internet: http://www.elationlighting.com 1 Introduction Thank you for your purchase of the LIGHT COPILOT II. The LIGHT COPILOT II is an intelligent lighting
INSTALLATION AND OPERATION MANUAL
 INSTALLATION AND OPERATION MANUAL for the Broadcast Tools 6 x 1 Six Input, Single Output Stereo Switcher/Router Broadcast Tools is a registered trademark of Copyright 1994-2002 by All rights reserved.
XO-231 USER S MANUAL. Crossover ENGLISH
 XO-231 Crossover ENGLISH USER S MANUAL IMPORTANT SAFETY INSTRUCTIONS For your own safety you should read this section in full first! Risk of electrical shock! Connect the device only to a properly wired
USER INSTRUCTIONS MODEL CSI-200 COAXIAL SYSTEM INTERFACE
 USER INSTRUCTIONS MODEL CSI-200 COAXIAL SYSTEM INTERFACE 9350-7676-000 Rev B, 5/2001 PROPRIETARY NOTICE The RTS product information and design disclosed herein were originated by and are the property of
Kramer Electronics, Ltd.
 Kramer Electronics, Ltd. Preliminary USER MANUAL Model: VP-2K 1:2 UXGA / Audio Distributor Contents Contents 1 Introduction 1 2 Getting Started 1 2.1 Quick Start 2 3 Overview 3 4 Your VP-2K 1:2 UXGA /
ITC-200B Quick Start Guide
 INTERCOM BASE UNIT ITC-200B Quick Start Guide http:// www.datavideo-tek.com Warnings and Precautions 1. Read all of these warnings and save them for later reference. 2. Follow all warnings and instructions
Fusion 120 Zoom. User Manual. Order code: EQLED068
 Fusion 120 Zoom User Manual Order code: EQLED068 Safety advice WARNING FOR YOUR OWN SAFETY, PLEASE READ THIS USER MANUAL CAREFULLY BEFORE YOUR INITIAL START-UP! Before your initial start-up, please make
LavryBlack Series Model DA10 Digital to Analog Converter
 LavryBlack Series Model DA10 Digital to Analog Converter Lavry Engineering, Inc. P.O. Box 4602 Rolling Bay, WA 98061 http://lavryengineering.com email: techsupport@lavryengineering.com January 14, 2008
Metal Electrode Meter
 Metal Electrode Meter INSTRUCTION MANUAL FOR Metal Electrode Meter MODEL 2900 Serial # Date PO Box 850 Carlsborg, WA 98324 U.S.A. 360-683-8300 800-426-1306 FAX: 360-683-3525 http://www.a-msystems.com Version
Kramer Electronics, Ltd. USER MANUAL. Model: VS-211HDxl. 3G HD-SDI Automatic Standby Switcher
 Kramer Electronics, Ltd. USER MANUAL Model: VS-211HDxl 3G HD-SDI Automatic Standby Switcher Contents Contents 1 Introduction 1 2 Getting Started 1 2.1 Quick Start 2 3 Overview 3 4 Your VS-211HDxl 3G HD-SDI
Installation and Operation Manual. for the. 3 x 2, Ver C. Three Input, Dual Output Stereo Audio Switcher
 for the 3 x 2, Ver C Three Input, Dual Output Stereo Audio Switcher Copyright 1995 2001 by All rights reserved. Except as permitted under the United States Copyright Act of 1976, no part of this document
CHECK LINE. Model LS-36-LED. Stationary Stroboscope. Operating Manual BY ELECTROMATIC
 CHECK LINE BY ELECTROMATIC Stationary Stroboscope Model LS-36-LED Operating Manual Table of Contents 1.0 Introduction... 02 1.1 Unpacking 1.2 Optional Accessories 2.0 Safety Information... 3 3.0 Controls...
Kramer Electronics, Ltd. USER MANUAL. Model: VM Video Component Distributor
 Kramer Electronics, Ltd. USER MANUAL Model: VM-1045 Video Component Distributor Contents Contents 1 Introduction 1 2 Getting Started 1 2.1 Quick Start 1 3 Overview 3 4 Your VM-1045 Video Component Distributor
User Manual PS-684. HDBaseT Extender Kit 70m. All Rights Reserved. Version: UHBT70P_2016V1.2
 User Manual PS-684 All Rights Reserved Version: UHBT70P_2016V1.2 Preface Read this user manual carefully before using this product. Pictures shown in this manual is for reference only, different model
12 Channel Media Splitter MS12 Mk2 User manual
 12 Channel Media Splitter MS12 Mk2 User manual 01. 12 Channel Media Splitter MS12 Mk2 An audio distribution amplifier primarily designed to feed multiple ENG cameras from a single lectern microphone at
Model /29S RF Splitter
 Instruction Manual Model 1584-29/29S RF Splitter March 2013, Rev. 0 LNB VOLTAGE A B MODEL 1584 COMBINER CROSS TECHNOLOGIES INC. GND+DC ON Data, drawings, and other material contained herein are proprietary
AEQ BRAVO Broadcast Mixing Console
 AEQ Broadcast Mixing Console USER S MANUAL ED. 12/07 V. 1.5-20/05/2008 CONTENTS 1. INTRODUCTION... 3 1.1. General... 3 1.2. Maintenance... 3 1.3. Warranty... 4 2. EQUIPMENT POWER SUPPLY... 5 2.1. General...
User Instructions. 16 SCB Sync Station.
 User Instructions 16 SCB Sync Station Contents Overview... 1 Specifications... 1 Compliance and approvals... 2 Safety instructions... 3 Set up... 4 How to charge multiple devices... 4 How to synchronize
Spectra Flood Q40. Exterior Fixture User Manual. Order code: LEDJ Version LEDJ284N - 15 Version
 Spectra Flood Q40 Exterior Fixture User Manual Order code: LEDJ284-40 Version LEDJ284N - 15 Version Safety advice WARNING FOR YOUR OWN SAFETY, PLEASE READ THIS USER MANUAL CAREFULLY BEFORE YOUR INITIAL
AEQ TH-03 Digital Hybrid of 1 (TH-03.1) or 2 lines (TH-03.2) with Frequency Extender
 or 2 lines (TH-03.2) with Frequency Extender") Digital Hybrid of 1 (TH-03.1) or 2 lines (TH-03.2) with Frequency Extender USER S MANUAL ED. 01/12 V. 1.0-31/01/2012 CONTENTS 1. INTRODUCTION... 3 1.1. General description... 3 1.2. General precautions...
Digital Hybrid of 1 (TH-03.1) or 2 lines (TH-03.2) with Frequency Extender USER S MANUAL ED. 01/12 V. 1.0-31/01/2012 CONTENTS 1. INTRODUCTION... 3 1.1. General description... 3 1.2. General precautions...
Kramer Electronics, Ltd.
 Kramer Electronics, Ltd. Preliminary USER MANUAL Models: VS-44AV, 4x4 Video Audio Matrix Switcher VS-81AV, 8x1 Video/Audio-Stereo Switcher VS-81AYC, 8x1 s-video/audio-stereo Switcher VS-81V, 8x1 Video
Colour Explosion Proof Video Camera USER MANUAL VID-C
 Colour Explosion Proof Video Camera USER MANUAL VID-C Part Number: MAN-0036-00 Rev 4 Copyright 2002 Net Safety Monitoring Inc. Printed in Canada This manual is provided for informational purposes only.
Contents. Instruction Manual T-Rex Page 2 of 16 Release 1.01
 Contents 1 Safety Precautions... 3 2 Introduction:... 5 3 Theory of Operation... 7 4 Unpacking Procedure... 8 5 Operating TR-Mark III with T-Rex... 9 6 Operating a TR-Mark II with a T-Rex... 13 7 Technical
Atlona HDBaseT-Lite Transmitter over Single CAT5e/6/7
 Atlona HDBaseT-Lite Transmitter over Single CAT5e/6/7 AT-HDTX User Manual Table of Contents 1. Introduction... 3 2. Package Contents... 3 3. Features... 3 4. Specifications... 3 5. Panel Descriptions a.