XC4929. User Manual. High Definition Digital Set Top Box With Recording Via USB
|
|
|
- Prosper McLaughlin
- 6 years ago
- Views:
Transcription
1 User Manual High Definition Digital Set Top Box With Recording Via USB XC4929 Please read this User Manual carefully to ensure proper use of this product and keep this manual for future reference.
2 Important Safety Instructions 1) Read these instructions. 2) Keep these instructions. 3) Heed all warnings. 4) Follow all instructions. 5) Do not use this apparatus near water. 6) Clean only with dry cloth. 7) Do not block any ventilation openings, install in accordance with the instructions. 8) Do not install near any heat sources such as air conditioners, stoves, or other apparatus (including amplifiers) that produce heat. 9) Ensure mains plug fits correctly in its socket. Poor connection can result in picture interference and potential safety hazards. 10) Protect the power cord from being walked on or pinched particularly at plugs, convenience receptacles, and the point where they exit from the apparatus. 11) Only use attachments/accessories specified by the m a n u f a c t u r e r. 12) Unplug this apparatus and its antenna connections before the approach of lightning storms or when unused for long periods of time. 13) Refer all servicing to qualified service personnel. Servicing is required when the apparatus has been damaged in any way, such as power-supply cord or plug is damaged, liquid has been spilled or objects have fallen into the apparatus, the apparatus has been exposed to rain or moisture, does not operate normally, or has been dropped. 14) This device does not have an AC mains switch. The mains plug is used as the primary power disconnect device, and it must remain readily accessible and operable. 15) Ventilation should not be impeded by covering the ventilation openings with items such as newspapers, table-cloth, curtains, etc. 16) No naked flame sources, such as lighted candles, should be placed on or near the apparatus. 17) Your attention is drawn to the environmental aspects of battery disposal. 18) This device is not warranted for use in unreasonably hot, cold, or humid environments 19) The apparatus shall not be exposed to dripping or splashing, and no objects filled with liquids, such as vases, shall be placed on or near the apparatus. 20) This device is designed for indoor, fixed location use only. It must not be used in portable or mobile applications as vibration or excessive forces may cause damage. This symbol indicates that dangerous voltages constituting a risk of electric shock are present within this unit. This symbol indicates that there are important operating and maintenance instructions in the literature accompanying this unit. This symbol indicates that this product incorporates double insulation between hazardous mains voltage and user accessible parts. When servicing, use only identical replacement parts. CAUTION: If the apparatus has been exposed to an electrostatic discharge, (lightning or similar) it may malfunction and need to be reset by the user. Remove the mains power lead from the wall socket for a few minutes, then re-apply mains power. You may need to re-scan the TV channels and check that any programmed events (eg. PVR recording) have been correctly retained. WARNING: When using a USB memory stick with this unit, it should be plugged into the unit directly. USB extension cables or hubs should NOT be used, to avoid data transfer errors or interference caused to TV reception. WARNING: To reduce the risk of fire or electric shock, do not expose this apparatus to rain or moisture.
.... 6 USB Personal Video Recorder (PVR).... 9-11 Troubleshooting.")
3 Table of Contents Front and Rear Panel Remote Control....2 Connecting to a Television Front and Rear Panel 1. Front panel Connecting to a DVD Recorder or VCR Connecting to an Audio System First Time Installation Menu settings Electronic Program Guide (EPG) USB Personal Video Recorder (PVR) Troubleshooting Technical Specifications USB: Data input from USB storage devices. 2 LED DISPLAY WINDOW: Used to display the channel number. 3 STANDBY: used to switch the set top box between On and Standby modes. 4 STANDBY INDICATOR: Green in normal operation, turns to red in standby mode. 5 MENU: Turns on the Main Menu. 6 REMOTE CONTROL SENSOR: Used to receive the infra-red signal from the remote control (Make sure this is not blocked by cables). 7 VOLUME+/-: Used to increase/decrease the volume without using the Remote control. 8 CHANNEL +/-: Used to change channels without using the remote control. 9 OK: Confirms an entry or selection. 2. Rear panel Using the XC4929 in New Zealand 13 Frequently Asked Questions 14 Remote Control Quick Guide RF IN: Connect to your TV antenna. 2 RF LOOP THROUGH: Feeds auxiliary TV antenna signal to your TV (Allows you to watch one channel while recording another ) 3 COAXIAL: Connects to the Coaxial digital audio socket on a surround sound system. 4 HDMI: High Definition Multimedia Interface: Connects high definition audio and video to an HDMI equipped device (eg. flat screen TV). 5 VIDEO: (Yellow socket) Composite video signal for older model TVs 6 COMPONENT VIDEO OUT: Y, Cr, Cb analog outputs for older model TVs AUDIO L/R: Analog Audio L/R signals for older model TVs. MAINS CABLE: This is used to connect to the 240V mains power supply.
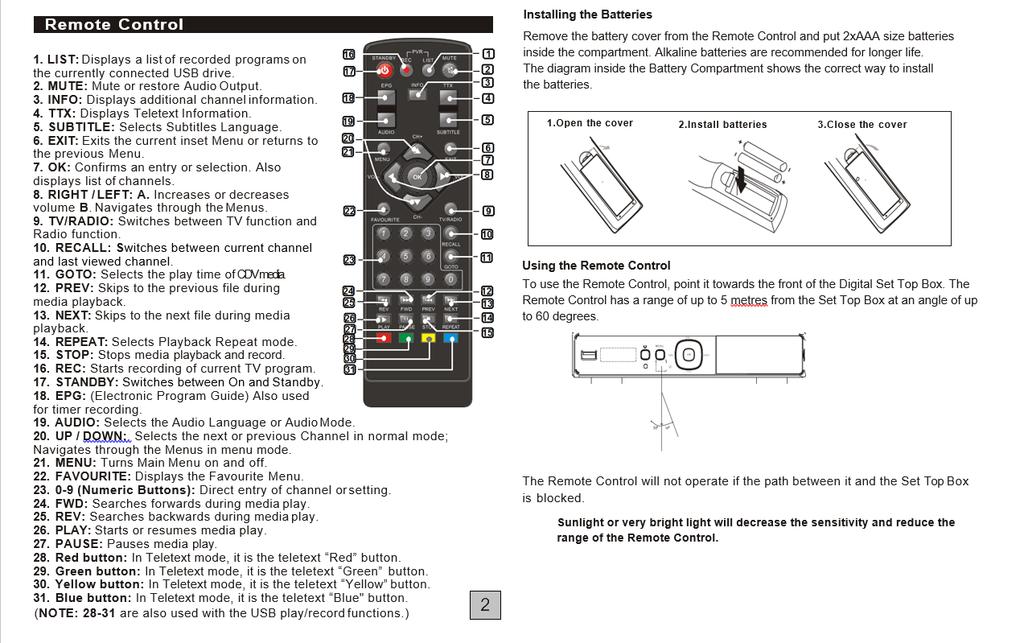
4


5 Connecting to a Television For a basic connection from this Set Top Box to your television, use the Composite video connection outlined below. For a higher quality connection, use the Component Video connection outlined below combined with the L/R Audio outputs. For the highest quality connection use a direct HDMI connection, see below. TV Antenna Connecting to a DVD Recorder or VCR TV Antenna V~ 50/60Hz Composite video and audio HDMI NOTE: HDMI does not normally require setup. It just works. If you don t have an HDMI cable, you can use the supplied red-yellow-white cable in the meantime. 3
6 Connecting to an Audio System First Time Installation Coaxial Coaxial cable (Digital audio) (Analogue audio) Getting Started: Once you have connected this Set Top Box (STB) to the appropriate video and audio input sockets on your TV, and have selected the matching inputs on the TV to receive these signals, you will need to be comfortable with selecting several basic operations before setting up your Set Top Box for the first time. Firstly, the STB has two power modes: Standby and On. In Standby mode, the STB is powered up, but awaits a "Power On" command from either the Remote Control or from the Standby push-button located on the front of the STB. In this mode, the front panel LED indicator glows red. When the STB is switched from Standby to the On mode, the power LED indicator on the front panel will change from Red to Green to indicate that the unit is fully powered up. As most receiver operations are accessed using the supplied Remote Control, please take the time to review the button designations on page 2 of this manual. Especially take note of the most commonly used buttons; the cursor arrow buttons (LEFT, RIGHT, UP, DOWN) surrounding the OK button in the middle section of the remote control, as well as the MENU button at the top-left of the cursor keys, and the EXIT button at the top-right of the cursor keys. (If you get stuck, pressing exit several times should always get you back to the main screen). First Powering on the STB: When you first power up your STB, (or you reset the STB to its factory settings), it will automatically display the Installation Guide menu. This is where the Set Top Box searches for available TV stations and stores the station details it finds. Make sure a suitable TV antenna is connected before proceeding with this operation. Alternatively, at any time you can select the Channel Search menu and use the "Auto Search" option" to force the receiver to locate all the available TV stations. Amplifier 4
7 By default, the Installation Guide will be locked to English as the On-Screen Display (OSD) language. Use the DOWN cursor key on the Remote Control to select the Country entry line (which should be pre-set to AUSTRALIA), and then use the DOWN cursor key to select the Channel Search line. Press OK to start the channel tuning process and display a Channel Search progress screen. Your STB will now scan through all the digital TV stations that it can receive using the connected antenna. This process may take several minutes, but once completed, the STB will skip to the first DTV program that was located during the Search process. NB. For operation in New Zealand, you will need to set country to Italy. You will also need to manually set the time zone to GMT+12 (or GMT +13 for summer time). Please also see pages 10 and 13. Any Radio programs located during the channel tuning process are sound-only services associated with the TV networks, they are not DAB+ radio broadcasts. Basic Operation: Once your STB has completed the tuning process and is receiving a digital TV service, you can either use the UP/DOWN cursor keys to manually change the channel, or enter it directly with the numeric keypad. To adjust the sound level, set the volume control on your TV to a commonly used level, and then use the STB LEFT/RIGHT cursor buttons to increase or decrease the volume to a comfortable level. To gain better use of your Set Top Box, please now review the Menu settings on the following pages of this User Manual. (1) Program Settings To access this Menu, press the MENU button on the Remote and select [Program] from the icon selections at the top of the screen. This Menu provides options to adjust the Program Settings. Select an option and press OK or RIGHT to adjust that setting. Press the EXIT button to exit the Menu. Set Favourite Program You can create a shortlist of favourite programs that you can easily access. Set Favourite TV or Radio program: 1. Select the preferred program then press the FAVOURITE button on the remote control. A Favourite Type sub-menu will appear, use the cursor keys on the Remote Control to select one of the 4 types of favourites, then press OK. 2. Repeat the previous step to select more Favourite programs. 3. To confirm and exit the Menu, press the EXIT key Disable favourite TV or Radio Program: Select the TV channel from the list on screen, the press the FAVOURITE button on the Remote Control. Use the favourite Type sub-menu to select Disable, then press OK. View Favourite Program 1. Press the Favourite button on the remote and the Favourite Menu will appear. 2. Press the LEFT/RIGHT cursor buttons on the remote to select the type of Favourite channel to recall. Options are: Movies, News, Sport, Music. 3. Press UP/DOWN to select your Favourite Programs. 4. Press OK to select your favourite program. Delete a TV or Radio Program 1. Select the Program and then press the BLUE button on the remote. A message will appear on screen. Press OK to delete the program 2. Repeat the previous step to select more programs to delete. 3. To return a deleted channel to the Program list, perform a Channel Scan. (2) Program Edit To edit your program viewing preferences (lock, skip, favourite, move or delete), you will need to enter the Program Edit Menu. This Menu requires a password to access. Enter the default password '000000'. 5 Skip TV or Radio Program 1. Select the program you would like to skip and press the GREEN button. A skip symbol is displayed. The program is marked as a skip. 2. Repeat the previous step to select more programs. 3. To confirm and exit the menu, press the EXIT key. Disabling a skip TV or Radio program: Press the GREEN button on the skip program when a TV channel with the skip symbol is shown.

8 Move a TV or Radio Program 1. Select the preferred program then press the RED button. A move symbol will appear 2. Press UP/DOWN to move the program within the list of TV or Radio stations. 3. Press OK to confirm 4. Repeat the above steps to move more channels Lock Program You can lock selected programs for restricted view. To Lock a TV or Radio Program: 1. Select the preferred program then press the YELLOW button. A lockshaped symbol is displayed. The program is now marked as locked 2. Repeat the previous step to select more programs 3. To confirm and exit the menu, press the EXIT button 4. Press the YELLOW button to disable the locked program 5. To view the locked program, you will then be required to enter the default password '000000' or your last set password. [Service Name] - Sorts the channels according to the station. [Service ID] - Sorts the channels by station ID. (5) LCN (Logical channel number) Sets LCN On or Off. If LCN is off, during tuning, stations are simply numbered in the order they are found. If LCN is on, station numbers are assigned by the TV station themselves, eg ABC is number 2, 7 network is number 7, 9 in number 9 and so on. Note: If you want to use the Sort by LCN method, LCN must be set to on before scanning the channels. (6) Video Setting To access this Menu, press MENU then select [Picture]. The Menu provides options to adjust the video settings. Press UP/DOWN to select an option and press RIGHT/LEFT to adjust that setting. Press EXIT to exit the menu and save the changed setting. (3) EPG - Electronic Program Guide (NZ users please see Page 13) The EPG is an on-screen TV guide that shows scheduled programs up to seven days ahead for every tuned channel. It also allows you to automatically set timer recordings (see page 10). Press the EPG button on the Remote Control to access, press again to remove. (1). Aspect Ratio (ie Width to height of your TV screen) Your choices are 4:3 PanScan, 4:3 Letter Box,16:9 Wide Screen, 4:3 Full, 16:9 Pillar Box, 16:9 PanScan, or Auto to get the maximum display available from your TV. Use the UP/DOWN keys to step through the listing; the red and green buttons allow you to jump through the listing a page at a time. On the right side, a program description is displayed for the highlighted program. If there is more than one page of information, the yellow and blue buttons allow you access to the second page, or you can simply use the up and down cursor buttons to step through the available programs. Use the left and right cursor buttons to step through the different TV or radio stations. (4) Sort Sort your channels from the following options: [LCN] - Sorts the channels in ascending order, (Logical channel Number) [Name] - Sorts the channels in alphabetical order. (2). Resolution If the video does not appear correctly, change this setting. This setting is to match the most common setting for HDMI. [576i] for PAL system TV (most common old analog TVs) [576P]: for progressive scan CRT TV (more recent CRT TVs) [720P]: for older flat panel TV [1080i]: for more modern flat panel TV [1080p]: for most recent flat panel TV. (3). TV format If the TV reception does not appear correctly, you may need to change this setting. This should match the most common setting for TVs in your country. [NTSC]: for NTSC system TV. [PAL]: for PAL system TV. (PAL settings are the ones most commonly used in Australia and NZ).
![(7) Channel Search (In NZ please see page 13) To access the menu, press MENU and select [Channel Search]. The Menu provides options to adjust the Search Channel settings.](/docs-images/76/74249539/images/9-0.jpg "Select an option and press RIGHT/LEFT to adjust the settings. Press EXIT to exit the Menu. 1. Auto Search Search and install all DTV and Radio channels automatically.")
![This option overwrites all preset channels. 1. Select [Auto Search] and press OK or RIGHT to start the channel search. 2. To cancel channel search, press EXIT. 2. Press the RIGHT/LEFT key to select the channel frequency 3.](/docs-images/76/74249539/images/9-1.jpg "Press OK to start searching channels If a channel is found, it is saved and added to the channels list. If channels can't be found, please exit the menu and check your antenna connection.")
9 (7) Channel Search (In NZ please see page 13) To access the menu, press MENU and select [Channel Search]. The Menu provides options to adjust the Search Channel settings. Select an option and press RIGHT/LEFT to adjust the settings. Press EXIT to exit the Menu. 1. Auto Search Search and install all DTV and Radio channels automatically. This option overwrites all preset channels. 1. Select [Auto Search] and press OK or RIGHT to start the channel search. 2. To cancel channel search, press EXIT. 2. Press the RIGHT/LEFT key to select the channel frequency 3. Press OK to start searching channels If a channel is found, it is saved and added to the channels list. If channels can't be found, please exit the menu and check your antenna connection. (3) Country (default is Australia) Select your country of residence. ( Italy or Russia for New Zealand) (4) Antenna power Enables Antenna Power (5V dc, 100mA) to be connected to the RF IN socket for use by an external active antenna. Warning: Do not activate the Antenna Power option unless you are certain that any devices in the coax line between your TV antenna and set top box are compatible with passing or operating from 5V dc. If in doubt, consult with a TV or installation technician. (8) Time Setting (In NZ please see page 13) To access the Menu, press MENU then select [Time]. The Menu provides options to adjust the time settings. Press UP/DOWN to select an option and press RIGHT/LEFT to adjust the settings. Press EXIT to exit the menu. 2. Manual Search Install new channels manually. This option adds new channels without changing the current channels list. 1. Select [Manual Search] then press OK or RIGHT. The channel search screen will appear. (1) Time offset Select Auto or Manual for GMT offset adjustments. (2) Country Region Select the Country Region when [Time Offset] is set to Auto. (3) Time Zone Select the Time Zone Offset when [Time Offset] is set to Manual. (4) Auto Standby When this setting is on, the Set Top Box will go into sleep mode after 3 hours of no user-operation. (ie no button presses detected.) (9) Option Press MENU and select [Option]. The menu provides options to adjust the OSD Language, Subtitle Language and Audio Language. Select an option and press RIGHT/LEFT to adjust the setting. Press EXIT to exit the Menu.
10 (2) Set Password Set or change the password for locked programs. Enter your old password or the default password '000000'. You will then be asked to enter your new password. To confirm, re-enter your new password again. Once it is confirmed, press EXIT to exit the Menu. (1). OSD Language The OSD (On Screen Display) language is fixed to English. (2). Subtitle Language Selects the preferred subtitle language. When on, subtitles will always be shown during DTV reception (but only when subtitles are available). (3). Audio Language Selects the preferred audio language for watching TV channels. If the language is not available, the default program language will be used. (4) Digital Audio Selects the digital audio output mode. Refer to your audio amplifiers user manual for its required input format. (10) System Setting To access the Menu, press MENU and select [System]. The menu provides options to adjust the system settings. Press the UP/DOWN key to select an option and press RIGHT/LEFT to adjust the setting. Press EXIT to exit the Menu and save any changed settings. (3) Restore Factory Default Resets your Set Top Box to the out of box settings. In Main Menu select [Restore Factory Default] and press OK or RIGHT to select. Enter your password or the default password '000000' and press OK to confirm. This option will delete all preset channels and settings. (4) Information View model, hardware and software information. (5) Software update 1. OAD ( Over the Air Upgrades) If the status is set 'ON ', it will look for new software upgrades in TV broadcasts at your preferred time in ''Start time''. We recommend this be left 'OFF' unless advised otherwise. 2. USB upgrade This is for updating the STB s internal software. DO NOT activate this function unless you have valid software as the only file on a USB drive that is connected to the STB. If you load the wrong software the STB will be destroyed ( Bricked ). (11) USB Multimedia playback: (1) Parental Guidance You can restrict access to channels that are unsuitable for children. To restrict/lock the channel you will need to enter either password '000000' or your own password if you have changed it. Use the RIGHT cursor button to select the required classification restriction, then press OK to confirm and press EXIT to exit the menu.
![To access this Menu, press the MENU button and select [USB] using the RIGHT/LEFT keys. The menu provides options to playback Music, Photo and Multimedia files.](/docs-images/76/74249539/images/11-0.jpg "It can support off-air DTV recordings made by this unit, as well as various AVI, MPEG4, MP3, JPEG and BMP format files.")
11 To access this Menu, press the MENU button and select [USB] using the RIGHT/LEFT keys. The menu provides options to playback Music, Photo and Multimedia files. It can support off-air DTV recordings made by this unit, as well as various AVI, MPEG4, MP3, JPEG and BMP format files. (a) Multimedia: When a USB device is attached you can select from Music, Photo, Movie or PVR options using the RIGHT/LEFT keys and OK to select. If a USB device is not connected, the warning message "No USB device is Found" will appear. Note: - We cannot guarantee compatibility (operation and/or bus power requirement) with all USB mass storage devices and assume no responsibility for any loss of data that may occur when connected to this unit. - With large amounts of data already recorded, it will take longer for the system to read the contents of a USB device. - Some USB devices may not be properly recognized. - Even when they are in an apparently supported format, some files still may not play or display, depending on the content. - USB extension cables should be avoided as they may degrade performance. (b) Photo configure: -Slide Time: adjust slide show interval to 1~8 seconds. -Slide Mode: adjust slide show effect as mode 0~59 or random. -Aspect Ratio: [Keep]: Play picture in its original aspect. [Discard]: Play picture in full screen mode. (c) Movie Configure: - Subtitle Font: [Small]: Displays the subtitle as small mode. [Normal]: Displays the subtitle as normal mode. [Big]: Displays the subtitle as big mode. - Subtitle Background: [White]: Displays the subtitle in white background. [Transparent]: Displays the subtitle in transparent background. [Grey]: Displays the subtitle in grey background. [Yellowgreen]: Displays the subtitle in yellowgreen background. - Subtitle Font Color: Choose the subtitle font colors from Red, Blue, Green, Black or White. PVR FUNCTION The XC4929 can also function as a Personal Video Recorder (PVR), allowing you to record off-air Digital TV programs onto a (minimum) USB 2.0 flash drive or USB 2.0 hard drive. Media Requirements and Limitations: FAT32 and NTFS-formattable USB drives are suitable. Standard drives in a USB adaptor harness are unlikely to work. Most modern USB Hard drives use the NTFS format file system. This STB can format most USB hard-drives and flash drives to either the FAT32 or NTFS formats. Press Menu, select USB > PVR Configure >Format. There will be a short delay while the drive is inspected, followed by details of the drive size and format type. Select the File System line, press or to select the format type, then select the Format line (typically USB I/C ) then press OK to format the drive. Warning: All existing data and recordings will be erased by the formatting process. Desired programs should first be copied onto another storage medium (eg. via a computer's USB connection). The USB PVR function relies on the use of high quality USB 2.0 drives (or USB 3.0 drives operating in USB2.0 compatibility mode), and as such may not be compatible with all USB devices. USB drives up to at least 2 Terabytes (2,000GB) can be used; however: USB-powered drives larger than 500MB may exceed the USB socket's power rating and need to be powered using an external power supply. Drives above 500GB may also take an unacceptably long time to start recording or playing back material. Most Flash Drives can record Standard Definition TV; drives with slower memory components may not reliably record HDTV. Camera Cards (SD etc) may work through a card-to-usb adaptor; but not all adaptors are compatible with this unit. There are no line inputs; recording is only possible from digital TV broadcasts. Recordings are made by directly storing the unaltered data stream, so playback quality is identical to transmitted quality (unlike VCRs and DVD recorders). 9
12 Data Rates: Australia: About 2GB/hr for SD broadcasts and about 4GB/hr for HD broadcasts, although this can vary considerably depending on the program. NZ Approximately 2GB/hr regardless of resolution (See Page 13) RECORDING : To record the program the Set-top Box is currently tuned to: With a USB drive connected, press Record (next to the red Standby button on the remote control). An on-screen message Record Initializing will appear briefly, followed by Record 30 Minutes. This means it will stop recording after 30 minutes. Successive presses of the Record button will increase this in 30 minute increments. After 300 minutes you will get a message: Records until Disk Full meaning the record time is no longer limited. Once recording is under way, only the STOP, EXIT, CHANNEL and STANDBY buttons will be operative. An elapsed time counter will appear in the top left hand corner of the screen. This will disappear after a few seconds, or you can press the EXIT button to hide it. Press the INFO button once to display the elapsed time counter, or press INFO twice to display a detailed INFO screen showing remaining space on the USB drive, recording bit rate and file name. During recording, it is possible to watch one program while recording another, but only if the second program is from the same transmitter as the one being recorded. For example, you can record ABC1, while also watching ABC2, ABC3, or ABC News 24, but not a program from another network (such as 7, 72 or 7 Mate). If you attempt to change to a program on a different network, you will get a RECORD message, meaning you need to terminate the recording first. NB: The Pause button is non-functional during recording. If the USB drive is full or is an unsuitable format, you will get an error message. If the USB device has an indicator light, it may also blink when recording is taking place. To stop recording, simply press the Stop button (above the yellow button on the Remote Control), then OK to confirm. PLAYBACK (NOTE: you can remove the USB drive and play back the recordings on another XC4929, rather like changing tapes on a VCR). To view a list of recorded DTV files on the USB drive, press the LIST button on the Remote Control (next to the Mute button), or use the Menu function to select USB>Multimedia>PVR>HBPVR>OK. 10 A list of the recorded files will appear in the following format: {TV Channel name} {Month/Day/Year} {Start time of Recording}.mts The ".mts" at the end of each recording is the file name extension for the recorded digital TV data stream. For example, a program recorded from channel ABC2 at 10.30am on 27 th July 2016 would appear in the recorded file list as: ABC mts The names of the recordings can be altered to something more meaningful using the Rename function (see below). Immediate Playback: Once you have the list of recorded files visible, use the Up/Down cursor buttons on the Remote Control to select the required file for playback, and press the PLAY button (directly above the Red coloured button at the bottom of the Remote Control). The file will play back in full screen mode, and you can use the Forward, Reverse, and Pause buttons on the Remote during playback. For Fast Forward or Fast Reverse operation, press the Forward or Reverse buttons repeatedly to select between 2x to 32x speed options. PLAYBACK FILE MANAGEMENT: Select your preferred recorded file as above, but press OK instead of Play. The list of files now remains on the screen and a small window shows playback of your selected file, plus information about its length etc. To switch between full-screen playback and the small window, press the Red button at the bottom of the remote. Deleting files: To delete a selected file that is playing, you must first press Stop; then press the yellow button on the Remote control. A tick symbol will appear beside the selected file. Further files may be selected by using the up and down arrows and further presses of the yellow button; (To see what you are deleting, press the OK button before the yellow button; this will start windowed playback). When you have selected all the files to be deleted, press OK. You will see a confirm deletion option message; pressing OK a second time will delete the files. The deletion process may take several minutes for larger files. Renaming files: Select a file using the up and down arrows and press the Green button. An image of a keypad will appear in screen. Use the arrow keys to select the letters, OK to confirm selection. Extend gives an alternative character set, Back deletes the last character entered, OK completes the task, Cancel exits without changing the file name. Note: you can also rename and delete the files more conveniently using a computer (see FILE FORMAT on page 11)
13 TIMER FUNCTIONS: This device can carry out Scheduled recordings, similar to the timer record function in a VCR or DVD recorder. As well as allowing the user to manually enter the date and time, the timer can also be automatically set using the Electronic Program Guide (EPG). Timer functions will activate whether or not the PVR is switched to standby. When the timer is ready to activate, a warning message will appear. IMPORTANT: Make sure the time zone is set correctly! (see Time Menu) In NZ see Page 13 Manually setting the timer: During normal DTV reception press the blue button, then the red button on the Remote control. A box titled Schedule should appear. Select the desired channel with the left and right arrow buttons, select start and finish boxes with the up and down arrows, and enter the dates and times using the number keys on the remote control. Mode: This has two options: Record and View. If MODE is set to view, at the set time the PVR will automatically turn itself on and switch to the selected channel, but not record. This is useful if you want to record onto a separate device such as a VCR or DVD recorder. (You must also set a matching record time on your recording device). It can also be used to ensure that you do not miss the start of a particular program while you are watching another. (For example it will automatically switch to the 6PM news while you are watching another channel, or something you recorded earlier). If MODE is set to Record (default), the PVR will record the program. Repeat: This allows you to record the same program on a daily or weekly basis. For example, the evening news or favourite weekly program(s). Options are once (default), daily or weekly. If set to daily or weekly, when the recording is completed, the scheduled record time shown is automatically advanced by another 24 hours (or 7 days). When you are done, press OK, then press Exit. Setting the timer using the EPG: (In NZ see page 13) The PVR's timer can also be set automatically by the Electronic Program Guide. Press EPG, find your desired program using the arrow buttons, then press OK. The Event Add box will appear, except this time all the information from the selected EPG item will have been automatically inserted. Press OK to add it to the Schedule list. TIME SHIFT ( LIVE PAUSE ) When a live program is being viewed while a USB device is inserted, pressing the Pause button will effectively freeze the live program. What actually happens is that the PVR starts recording the program, and when you press Play it starts playing back the recording from the beginning, while 11 simultaneously recording the rest of the program. If you allow at least 15 minutes before pressing Play you will be able to Fast Forward through undesired parts of the program. (However, once you catch up with the live recording point, obviously you cannot Fast Forward past that!) CAUTION: 1. Programs are not always transmitted at the time stated in the EPG: programs often run a few minutes late. To avoid missing the end of a program, you can modify the finish time manually. For example, a finish time of 14:30 can be manually bumped to 14:40 to ensure the entire program gets recorded. Use the left and right arrows to select the character position, and enter the new time numbers with the numeric keypad. Alternatively the coloured buttons at the bottom of the remote can be used to advance or retard settings one minute per press. 2. The timer function always over-rides the record off-timer setting. (ie the etc setting) FILE FORMAT: All recordings are stored in a main folder named HB PVR. The actual program data is stored as MTS files in subfolders carrying the recording's name e.g. ABC mts MTS format files are similar to MPEG files and can be read by most programs that can read MPEG files. NB: Each.mts file is accompanied by a metadata file ending in.mts.meta. You can rename the.mts files to something more meaningful using your computer, but if you do so you must change the metadata file to the same name. For example, if you change ABC mts to CoffeeTime.mts, you also must change ABC mts.meta to CoffeeTime.mts.meta. Otherwise the.mts file will not play in the XC4929. PLAYING BACK OTHER MEDIA FILES: This unit can also play back other types of video files, including various resolutions of MPEG4 /H264 movie downloads, files from tapeless video cameras and JPEG image files (see page 8). Note: This unit will not play DV-AVI files from MiniDV and Digital-8 video cameras. It some cases it is possible to play directly from camera SD cards via an SD to USB adaptor, but the preferred procedure is to transfer the files onto a USB type drive first, to avoid risk of losing your original files. All playback modes (PVR and Movie) will play sequentially. That is, when one program finishes, the next one will automatically start playing. By pressing the blue repeat button you can also set the unit to continuously repeat the current program, repeat the entire list of programs, or play back programs in a random sequence.
14 Troubleshooting Technical Specifications Problem Potential Reasons What to do No picture 240V Power isn't connected Check Power Socket Screen shows No Signal No sound from speaker Only sound, no image on the screen Remote control unit not working The image stops or freezes suddenly or produce mosaic patterns USB Playback has onscreen message Resume Restart that exit won t remove Aspect Ratio wrong Unit is in standby (red light) Antenna not connected Box not tuned in Audio cable not connected, wrongly connected or faulty. Sound is muted or turned right down Incorrect sound track Video cable not connected, wrongly connected or faulty. HDMI or Component output incompatible with TV (You may have inadvertently pressed the green button) The program is a radio program The batteries are exhausted Remote not actually pointed at set top box or is too far away from it. The signal is too weak, or could be mobile phone (4G) interference STB is asking whether you want to start from the beginning or jump to where you were up to last time. You may have inadvertently pressed the blue button. Switch to on (green). Check antenna cable and plug Check setup Check plug colours match sockets Adjust volume control or Press Mute button Press Audio button Check plug colours match sockets Press green button repeatedly to select compatible format. Troubleshooting Hint: Red-Yellow-White AV connection will always work. Press <TV/RADIO> button to switch to TV mode Replace batteries, and ensure they are fitted correctly Adjust the way you hold the remote control unit and/or operate it closer to the Set Top Box (Try pointing it at wall opposite TV). Improve the antenna and/or its cabling (or fit 4G filter) Select Restart or Resume and press enter Press blue button repeated to restore correct aspect ratio Item Sub Item Parameter Tuner Input Frequency 177.5MHz~226.5MHz 522.5MHz~830.5MHz RF Input level IF Bandwidth Modulation -25~-78dBm 7MHz and 8MHz QPSK,16QAM,64QAM Video Decoder Format MPEG4 AVC/H.264HP@L4 MPEG2 MP@ML.HL Audio Output Format 576p, 720p, 1080i, 1080p, 4:3 and 16:9 Output Port Audio output HDMI via HDMI-A Socket Composite/Component via RCA phono sockets Digital audio: S/PDIF RCA Black Analog audio: RCA sockets R & W Power Voltage V~ 50/60Hz 12 Power Max 8W Less than 1W standby (Typically 0.3W)
15 Using the XC4929 in New Zealand. Although we do not currently sell the XC4929 in New Zealand, we are aware that people there have been ordering Set Top Boxes from Australia, as they are considerably cheaper than Freeview Compliant boxes, and generally have better instruction manuals and user interfaces than the cheaper non-compliant models available in NZ. The XC4929 can be made to work in NZ, with certain limitations, and certain advantages: 1. There is no New Zealand country setting, so you need to choose another country that uses the same TV channel frequency spacings as New Zealand. Australia has 7MHz channel spacings on both VHF and UHF, while NZ has 7MHz on VHF and 8MHz on UHF. Italy and Russia use the same spacings as NZ, but then you won t be able to use the automated time zone feature because they are in the wrong time zone. Thus, you will need to manually set the time zone to +12 GMT for winter time and +13 GMT for summer time (You will only need to do this twice a year). 2. The New Zealand Digital TV transmissions (usually called Freeview in NZ) are not exactly the same as Australian Digital TV (which is now generally just called TV ). This means the XC4929 has not been fully tested with NZ transmissions. WHAT EXACTLY IS FREEVIEW? This is a bit of a can of worms. In Australia, Freeview is a privately-run consortium of broadcasters and content providers, mostly known for their efforts to encourage the public to change to Digital TV when Analog broadcasts were still available. Currently, their efforts are directed toward promoting the benefits of Free TV programming, (vs Pay-TV and Downloading). Freeview Australia does not have any authority to regulate TV broadcast standards, which are independently controlled by the ACMA (Australian Communications and Media Authority). In New Zealand, Freeview is a similar organization except that it does have government input, and has some legislative control of NZ broadcast standards. Both organizations offer licensing for Freeview Compliant TVs and Set Top boxes. As far as the user is concerned, the principal advantages are: 1. Access to a more advanced Electronic Program Guide (EPG) and 2. Guaranteed MPEG4 compatibility What is not generally known is that Freeview also represents the interests of Content providers, and in particular Freeview Compliant Set Top Boxes are specifically engineered to supposedly defeat the copying of High Definition Copyrighted material as followsl: 1. The HDMI outputs will not operate unless they are plugged into an HDCP (Highbandwidth Digital Content Protection) compliant recording or display device. 2. The analog component outputs (Y, Cr, Cb) are deliberately downgraded to Standard Definition resolution, to prevent illegal copying by HD Component recorders (such as the VHS-based D9). Ironically, neither product ever materialized in the marketplace! In any event, there turned out to be much simpler and cheaper ways of copying digitally broadcast copyright material, for anyone so inclined. However, this deliberate (and largely pointless) nobbling of the component outputs means that it is then not possible to use them to legitimately display HD images on older model HDTVs or monitors, that lack a digital tuner or HDMI input. In Australia, it is possible to buy an HD Set Top box and convert an old Flat Panel display to a perfectly serviceable HDTV for well under $100; no such option is available with a much more expensive Freeview-Compliant product. Aside from that, virtually all Set Top Boxes manufactured since 2008 are fully MPEG4 compatible anyway, even sub-$30 units available in supermarkets EPG (Electronic Program Guide) issues. Freeview-compliant Set Top Boxes use a system called MHEG-5 (Multimedia and Hypermedia Experts Group) for their Electronic Program Guide, which offers a number of advanced interactive programming features if an Internet connection is available. The European Terrestrial Digital TV standard (DVB-T) allows MHEG-5 to be added to the Digital TV signals as Metadata, but a properly compliant DVB-T transmission also includes a more basic Electronic Program Guide, basically a plain text recitation of a transmitter s entire program schedule for the next 7 days, repeated every 30 seconds or so. To reduce the appeal of Non-Freeview-Compliant equipment, the Freeview Consortia in Australia and NZ sought to have this basic EPG removed from the transmissions. The New Zealand regulators agreed to this, the ACMA (Australian Communications and Media Authority) did not. The Australian experience has been that few viewers require anything more complicated than the standard DVB-T EPG, and a significant percentage never even use that. Thus Freeview- Certified equipment has not sold particularly well here. In New Zealand, if the user wants a fully operational EPG, they have no choice but to purchase a Freeview Compliant TV or Set Top Box. A limited Electronic Program Guide is available for non-compliant equipment, but it only guarantees the current and upcoming programs (so called Now-Next data). In most cases some of the upcoming programs are available, but usually only a couple of hours worth. (The XC4929 can however still be programmed with Channel, Date and Time, the same way you would do it with a VCR or DVD recorder). Unlike Freeview-Compliant devices, the recordings are simply a direct transcription of the MPEG data stream, so there is no transcoding or other degradation of quality. You can also plug the USB device into any other XC4929 and play back the recordings, much the same way you can interchange VHS tapes or recordable DVD discs. (Unlike VHS, you can t usually do this with other brands of Set Top box, although it sometimes works). In this product the component and HDMI outputs are not restricted or crippled in any way. (Component outputs are not regarded as suitable for output resolutions higher than 1080i or 720p, but these can still give an excellent picture).
16 Frequently Asked Questions 1. Q. Do I need to format a USB drive before I use it? A. It s not essential; the XC4929 makes its own recording folder and ignores any other files or folders on the drive. If it finds what looks like a media file it will try to play it, but you have to direct it to the file manually by treating it as a movie file. However, for best results we recommend you let the XC4929 reformat the drive, to de-fragment it. 2. Q. I have another brand of Set Top Box; can I play recordings from it on the XC4269? A. It depends on the file format it uses. You will have to treat the recordings as movie files and direct the XC4269 to the folder they re in. Most likely you will see something like this: data001.ts data002.ts data003.ts Those three files are segments of the recording. The Set Top Box that recorded them joins them seamlessly to give continuous playback. If you play them on the XC4929 you will get a Please Wait message at the end of each segment while it loads up the next file. Other than that they should play OK. If it doesn t see any files in the folder then you can be fairly sure it can t play them. 3. Q: Why do I sometimes get the sound out of sync with the screen action, on HD playback? A. This is normally caused by the USB drive being too slow. Cheap drives are generally slow drives. It can also be caused by other files fragmenting the drive. Try a re-format. 4. Q. What is the largest USB drive I can use? A. There doesn t seem to be any specific limitation, but large USB-powered Hard Discs may overload the USB socket s power supply. We have successfully run 2 terabyte drives without needing external power. However, your other problem is that larger drives take a long time to get indexed, so there can be a long delay in commencing record and playback. We don t recommend drive sizes larger than 1 terabyte for this reason. 5. Q. Is there any way to record from local video sources (Cameras etc)? A: No. The XC4929 simply records the incoming digital data stream directly onto the USB drive. It does not have the necessary Analog to Digital converter needed for line inputs. The only way you could do that would be to buy a digital TV modulator to convert the AV signal to a digital TV (DVB-T) signal. Such devices are available, but are quite expensive. We currently don t sell such a device. 6. Q: Will the XC4269 work overseas? A. Generally, it will work in countries that formerly used the CCIR PAL system, but you have to find the appropriate Country setting. Former NTSC countries (US, Canada, Japan etc) use the ATSC digital system, and many Asian countries use DVBT-2, neither of which are compatible with this product. 7. Q. What is the power consumption of this product? A. Typically about 4 Watts in operation, 0.3 Watts standby. If a USB drive is used it will increase the power consumption. 8. Q. Can I change the recording quality to get more recording time, as I can with a DVD recorder? A. No, the recording function simply records the incoming data stream as is. Whatever the received data rate is, that is what it records.
17
User Manual High Definition Digital Set Top Box DVBT9070 Please read this User Manual carefully to ensure proper use of this product and keep this man
 User Manual High Definition Digital Set Top Box DVBT9070 Please read this User Manual carefully to ensure proper use of this product and keep this manual for future reference. Important Safety Instructions
User Manual. High Definition Digital Set Top Box HDSTB250
 User Manual High Definition Digital Set Top Box HDSTB250 CHANNEL HDSTB250 Please read this User Manual carefully to ensure proper use of this product and keep this manual for future reference. Important
User Manual of digital Set Top Box PAT1 02
 User Manual of digital Set Top Box PAT1 02 Please read this User Manual carefully to ensure proper use of this product and keep this manual for future reference. Important Safety Instructions 1) Read these
Front and Rear Panel Remote Control Connecting to a Television...4. Connecting to an Audio System...5
 Table of Contents Front and Rear Panel... 1 Remote Control...... 2 Connecting to a Television...4 Connecting to an Audio System...5 Connecting to a DVD Recorder or VCR... 6 First Time Installation... 7
DVB-T2. Digital Terrestrial Receiver WD-822T2 USER S MANUAL
 DVB-T2 Digital Terrestrial Receiver WD-822T2 USER S MANUAL Index Important Safety Instructions... 3 Main Features.... 5 Front and Rear Panel.... 6 Remote Control..... 7 Installing the Batteries..... 8
S7030PVR User Manual
 S7030PVR User Manual Important Safety Instructions 1) Do not use this apparatus near water. 2) Clean only with dry cloth. 3) Do not block any ventilation openings, install in accordance with the instructions.
Throughout the whole user manual, pay special attention to the following marks that
 Notice Warnings, Cautions and Notes Throughout the whole user manual, pay special attention to the following marks that indicate hazardous situations. Warning ** Indicates a hazardous situation which could
High Definition Digital Set Top Box With USB Record DFTA45R. The Gold Technical Support Line: (Charges will apply at $2.
 High Definition Digital Set Top Box With USB Record INSTRUCTION MANUAL DFTA45R The Gold Technical Support Line: 1902 215 259 (Charges will apply at $2.95 per minute) Safety Instructions Always read the
FV400 DIGITAL TV RECEIVER WITH MODULATOR INSTRUCTION MANUAL
 FV400 DIGITAL TV RECEIVER WITH MODULATOR INSTRUCTION MANUAL Please read this instruction manual carefully before using your receiver Table of Contents Introduction-----------------------------------------------------------------------------
English DMB-118HDMK3
 English DMB-118HDMK3 Table of Contents Safety Information...1 System Connection...1 Remote Control...2 First Time Installation...3 Basic Operation...3 Change Channel...3 Volume and Mute...3 Subtitle/Audio
NMS ETA TM Stereo Advanced Digital TV Set-top Box
 Digital TV HD Set-top Box STB2-T2 NMS ETA TM Stereo Advanced Digital TV Set-top Box User Guide CONTENTS Safety Information... 3 Introduction... 4 Set-top Box Front Panel... 4 Set-top Box Back Panel...
CAUTION RISK OF ELECTRIC SHOCK NO NOT OPEN
 Evolution Digital HD Set-Top Box Important Safety Instructions 1. Read these instructions. 2. Keep these instructions. 3. Heed all warnings. 4. Follow all instructions. 5. Do not use this apparatus near
DIGITAL SET TOP BOX STB 7017 INSTRUCTION MANUAL
 DIGITAL SET TOP BOX STB7017 INSTRUCTION MANUAL STB 7017 CHANNEL After Sales Support Now you have purchased a Tevion product you can rest assured in the knowledge that as well as your 3 year parts and labour
High Definition Digital Set Top Box With USB Record
 High Definition Digital Set Top Box With USB Record INSTRUCTION MANUAL DFTA46R Toll Free Warranty and Service: 1800 509 394 The Gold Technical Support Line: 1902 215 259 (Charges will apply at $2.95 per
MAX T200 HD QUICK INSTALLATION GUIDE
 MAX T200 HD QUICK INSTALLATION GUIDE MAX T200 HD QUICK INSTALLATION GUIDE CONTENT receiver BATTERIES x 2 REMOTE CONTROL Quick installation guide Quick Installation Guide The lightning flash with arrowhead
INSTRUCTIONS MANUAL SAVE THESE INSTRUCTIONS IN A SAFE PLACE FOR FUTURE REFERENCE
 High Definition Digital Set Top Box MPF3573HU INSTRUCTIONS MANUAL SAVE THESE INSTRUCTIONS IN A SAFE PLACE FOR FUTURE REFERENCE Important Safety Instructions 1) Read these instructions. 2) Keep these instructions.
HD Digital Set-Top Box Quick Start Guide
 HD Digital Set-Top Box Quick Start Guide Eagle Communications HD Digital Set-Top Box Important Safety Instructions WARNING TO REDUCE THE RISK OF FIRE OR ELECTRIC SHOCK, DO NOT EXPOSE THIS PRODUCT TO RAIN
Digital Terrestrial Television Receiver USER S MANUAL
 # 5024 Digital Terrestrial Television Receiver USER S MANUAL CAUTION RISK OF ELECTRIC SHOCK DO NOT OPEN This symbol is intended to alert the user to the presence of insulated dangerous voltage within the
SYMBOLS USED ON THE RECEIVER... 3 SAFETY INSTRUCTIONS... 4 I.GENERAL INFORMATION...
 Table of Contents SYMBOLS USED ON THE RECEIVER... 3 SAFETY INSTRUCTIONS... 4 I.GENERAL INFORMATION... 5 1. Preface... 5 2. Main Features... 5 3. General Operation of the Receiver... 6 4. Front Panel...
Xpresionn Digital Terrestrial Receiver. User Guide
 Xpresionn 2150 Digital Terrestrial Receiver User Guide GENERAL INFORMATION...3 A) SAFETY PRECAUTIONS...3 B) MAIN FEATURES...4 C) CONTENTS OF THE PACKAGING...4 D) REMOTE CONTROL...5 INSTALLATION...6 A)
TDT HD 3 handling and care. Do not disassemble, repair, or reorganize the product. Leave a minimum 10cm gap all around the product
 27 User manual 1. INTRODUCTION Thank you for purchasing this Energy TDT HD 3. First of all, welcome to the Energy HD DVB-T receivers world. The following sections provide an overview of your new device
healing HHR787 HD Digital Terrestrial Twin Tuner Recorder Operating Manual INTRODUCTION... 3 HHR787 FEATURES... 4 SAFETY INSTRUCTIONS...
 CONTENTS INTRODUCTION... 3 HHR787 FEATURES... 4 SAFETY INSTRUCTIONS... 5 FRONT PANEL AND REAR PANEL...6 and 7 REMOTE CONTROL UNIT KEY FUNCTIONS...8 and 9 REMOTE CONTROL BATTERY CARE... 10 INSTALLATION
Evolution Digital HD Set-Top Box Important Safety Instructions
 Evolution Digital HD Set-Top Box Important Safety Instructions 1. Read these instructions. 2. Keep these instructions. 3. Heed all warnings. 4. Follow all instructions. 5. Do not use this apparatus near
SET TOP BOX MODEL: GDB01SFV1 USER MANUAL
 SET TOP BOX MODEL: USER MANUAL 1 2 3 4 5 6 7 8 Welcome Your Set Top Box 2.1 In The Box 2.2 Front View 2.3 Rear View Quick Setup 3.1 TV Connection 3.2 Recording from the set top box 3.3 Record one channel
IMPORTANT SAFETY INSTRUCTIONS
 IMPORTANT SAFETY INSTRUCTIONS 1. Read, follow and keep these instructions safely. 2. Heed all warnings. 1. Do not use this apparatus near water. 2. Clean only with dry cloth. 3. Do not block any ventilation
Be sure to run the vehicle engine while using this unit to avoid battery exhaustion.
 CAUTION: TO REDUCE THE RISK OF ELECTRIC SHOCK DO NOT REMOVE COVER (OR BACK) NO USER-SERVICEABLE PARTS INSIDE REFER SERVICING TO QUALIFIED SERVICE PERSONNE; Please Read all of these instructions regarding
User manual FT-8100 HD. English
 User manual FT-8100 HD English WARNING!!! On the USB Memory Function for FT-8100 HD model, user can make recording or playing function using by external USB devices such as USB Flash Memory Disk or external
GHDD1782DVBT Freeview Digital Tapeless Video Recorder User Guide
 GHDD1782DVBT Freeview Digital Tapeless Video Recorder User Guide www.goodmans.co.uk Table of Contents Quick Guide...4 Connecting to a TV set...4 Introduction...5 Getting Started...7 In the box...7 Identification
Safety Instructions Power Source Warning
 Safety Instructions This product has been engineered and manufactured to assure your personal safety. However, improper use can result in potential electric shock or fire hazards. In order not to defeat
FD Trinitron Colour Television
 R 4-205-569-32(1) FD Trinitron Television Instruction Manual GB KV-14LM1U 2000 by Sony Corporation NOTICE FOR CUSTOMERS IN THE UNITED KINGDOM A moulded plug complying with BS1363 is fitted to this equipment
The product must be installed in accordance with national regulations.
 Important safety instructions to be kept with the product Please read attentively To prevent fire and electric shock, do not expose this receiver to rain or moisture. In order to avoid any possible risk
User s Manual. ZvSync - NA. HD Digital Tuner/Decoder QAM
 User s Manual ZvSync - NA HD Digital Tuner/Decoder QAM Notice Warnings Cautions and Notes Throughout the entire user s manual, pay special attention to the following marks that indicate hazardous situations:
GENERAL INFORMATION INSTALLATION MENU INFORMATION. Main Features For your Safety Unpacking General Operation RCU Rear Panel.
 GENERAL INFORMATION 3 Main Features For your Safety Unpacking General Operation RCU Rear Panel 3 4 7 7 8 9 INSTALLATION 10 MENU INFORMATION Main Menu 1. Installation 1.1 Satellite list 1.2 Dish Setting
Full High Definition LCD TV USER MANUAL
 1080p3 LCD TV Full High Definition LCD TV 1080p3 USER MANUAL Important Safety Precautions Important Safety Precautions 1 CAUTION RISK OF ELECTRIC SHOCK DO NOT OPEN This symbol indicates important instructions
ESPAÑOL PORTABLE MULTIMEDIA HDTV ENERGY LED TV3170 / 3190 HDTV. Manual de usuario / User manual / Manuel de l utilisateur
 ESPAÑOL Manual de usuario / User manual / Manuel de l utilisateur PORTABLE MULTIMEDIA HDTV ENERGY LED TV3170 / 3190 HDTV ESPAÑOL User manual 29 1. Important Safety Instructions To ensure your safety and
Safety warning Important Safety Instructions. Wall Mount Specifications. Electronic Program Guide. Lock Menu 18. PVR File System
 LT-32N370Z 32 INPUT Safety warning Important Safety Instructions Wall Mount Specifications Electronic Program Guide Lock Menu 18 PVR File System 11 11 11 14 15 16 17 19 20 21 21 22 23 24 25 INPUT AAA
TWIN TUNER HIGH DEFINITION DIGITAL RECORDER PVR 6600
 TWIN TUNER HIGH DEFINITION DIGITAL RECORDER PVR 6600 CONTENTS CONTENTS... 2 SAFETY INSTRUCTION... 3 FRONT PANEL... 4 REAR PANEL... 4 REMOTE... 5 PRECAUTIONS ABOUT BATTERIES... 5 PREPARATION OF REMOTE CONTROL...
GDB9 INSTRUCTION MANUAL DIGITAL TERRESTRIAL RECEIVER
 GDB9 INSTRUCTION MANUAL DIGITAL TERRESTRIAL RECEIVER Goodmans Support: www.goodmans.co.uk/support Please read these instructions before use and keep for future reference IMPORTANT SAFETY INSTRUCTIONS Thank
LT-50N530Z 50" class INPUT
 LT-50N530Z 50" class INPUT Safety warning Important Safety Instructions Wall Mount Specifications Electronic Program Guide Lock Menu 18 PVR File System 11 11 11 14 15 16 17 19 20 21 21 22 23 24 25 Safety
Goodmans Helpline Phone Number
 Goodmans Helpline Phone Number 0870 873 0080 contents Introduction 4 Connecting up 5 Overview diagrams 6 Getting started 8 Using the main menu 10 Troubleshooting 15 Technical Specifications 16 3 introduction
Thank you for purchasing STB10HD Digital High Definition Set Top Box.
 Thank you for purchasing STB10HD Digital High Definition Set Top Box. This manual will help you to install, use and maintain the receiver. Please read this manual carefully before operating your unit and
For Freeview HD User s Manual
 extra Terrestrial HD For Freeview HD User s Manual 1 Table of contents 1 INTRODUCTION...4 2 MAIN FUNCTIONS AND FEATURES...4 3 THE REMOTE CONTROL...5 4 FRONT AND REAR PANEL...7 4.1 FRONT PANEL... 7 5 FIRST
OWNER'S MANUAL MODEL: DTV-2000 STANDBY/ON
 OWNER'S MANUAL MODEL: DTV-2000 STANDBY/ON CH+ CH- TABLE OF CONTENTS SAFETY PRECAUTIONS IMPORTANT SAFETY INSTRUCTIONS and FEATURES ACCESSORIES and LOADING BATTERIES REMOTE CONTROL UNIT FRONT PANEL and REAR
DIGITAL TERRESTRIAL RECEIVER NVR-2090DU CHANNEL
 DIGITAL TERRESTRIAL RECEIVER NVR-2090DU CHANNEL 1 Espanol ~ Digital Video Broadcasting 2 3 STANDBY DTV/VCR TEXT MUTE VOL+ INFO PLAY/PAUSE EPG VOL- CH+ STOP SETUP EXIT 23 FAV- ENTER FAV+ 24 25 SOURCE CH-
Welcome to W light up your life
 USER GUIDE 1 Welcome to light up your life Dear Vision Communications Customer, Thank you for choosing LightWave TV from Vision. LightWave TV will open a whole new world of TV entertainment for you and
T1000n-VM USER MANUAL
 T1000n-VM USER MANUAL IMPORTANT! Safety Instructions 01. Read these Instructions. 02. Follow all Instructions. 03. Keep these Instructions. 04. Do not use this receiver near water. 05. Clean only with
 Register your product and get support at www.philips.com/welcome SWS3435S/27 SWS3435H/37 EN User manual Contents 1 Important 4 Safety 4 English 2 Your SWS3435 6 Overview 6 3 Installation 7 Connect the
HD Digital MPEG2 Encoder / QAM Modulator
 HD Digital MPEG2 Encoder / QAM Modulator HDMI In QAM Out series Get Going Guide ZvPro 800 Series is a one or two-channel unencrypted HDMI-to-QAM MPEG 2 Encoder / QAM Modulator, all in a compact package
GET STARTED. For assistance, call us on or visit manhattan-tv.com/help
 GET STARTED For assistance, call us on 020 8450 0005 or visit manhattan-tv.com/support Check Freeview HD coverage in your area by visiting freeview.co.uk For assistance, call us on 020 8450 0005 or visit
AX1919/AX1922/AX1924/AX /24V LED DVD/TV
 AX1919/AX1922/AX1924/AX1932 12/24V LED DVD/TV PANEL - Display Size: 19 (48cm) - AX1919 22 (56cm) - AX1922 24 (60cm) - AX1924 32 (81cm) - AX1932 - High Definition LED TV - AX1919/32 - Full High Definition
USER MANUAL KGN1080P32VD
 USER MANUAL KGN1080P32VD USB... Power cord Remote control/batteries Power/Standby button Picture mode button Sound mode button Multi-digits channel buttton P.MODE S.MODE FREEZE SLEEP 1 2 3 4 5 6 7 8 9
Register your product and get support at SDV5122/27. EN User manual
 Register your product and get support at www.philips.com/welcome SDV5122/27 User manual Contents 1 Important 4 Safety 4 Notice for USA 5 Notice for Canada 5 Recycling 6 English 2 Your SDV5122 7 Overview
Converter Box DTA Digital ATSC Converter Box. ATSC / 8VSB Converter Box. User manual
 Converter Box Digital ATSC Converter Box User manual DTA 1000 1. Safety measures...2 2. Before beginning...3 2.1 Preface...3 2.2 General specifications...3 2.3 Equipment...3 3. Description of panels and
HD Digital MPEG2 Encoder / QAM Modulator
 HD Digital MPEG2 Encoder / QAM Modulator YPrPb VGA In QAM Out series Get Going Guide ZvPro 600 Series is a one or two-channel Component or VGA-to-QAM MPEG 2 Encoder/ Modulator, all in a compact package
WARNING/CAUTION FCC NOTICE
 WARNING/CAUTION The lightning flash with ar rowhead symbol, within an equilateral triangle, is intended to alert the user to the presence of uninsulated dangerous voltage within the product s enclosure
INSTALLATION MANUAL VIP 1903 / VIP 1903 T VIP 1963 / VIP 1963 T
 INSTALLATION MANUAL VIP 1903 / VIP 1903 T VIP 1963 / VIP 1963 T We Declaration of Conformity Motorola Mobility, Inc. 101 Tournament Drive Horsham Pennsylvania 19044 USA declare under our sole responsibility
USER GUIDE. Get the most out of your DTC TV service!
 TV USER GUIDE Get the most out of your DTC TV service! 1 800-367-4274 www.dtccom.net TV Customer Care Technical Support 615-529-2955 615-273-8288 Carthage Area Carthage Area 615-588-1277 615-588-1282 www.dtccom.net
GET STARTED. For assistance, call us on or visit manhattan-tv.com/support
 GET STARTED For assistance, call us on 020 8450 0005 or visit manhattan-tv.com/support Check Freeview HD coverage in your area by visiting freeview.co.uk INSTALLING YOUR T1 Unpack the following from your
Before you can install your LCD TV on the wall, you must fi rst remove the base using the steps below:
 Quick Start Guide English CONTENTS INSTALLING LCD TV ON THE WALL.. TV CHANNEL INSTALLATION........ PRESENTATION OF THE LCD TV...... ACCESSORIES.................... BATTERY INSTALLATION............ REMOTE
 Register your product and get support at www.philips.com/welcome SWW1890 User manual Contents 1 Important 4 Safety 4 English 2 Your Philips Wireless HD Net Connect 5 What is in the box 5 3 Overview 6
DM-1CH SD DVB-T MODULATOR INSTRUCTION MANUAL
 DM-1CH SD DVB-T MODULATOR INSTRUCTION MANUAL 2. Caution Statements and Table of Contents Table of Contents 2. Caution Statements and Table of contents 3. Important Safety Instructions 4. Important Safety
Digital Terrestrial Television Receiver USER S MANUAL
 Digital Terrestrial Television Receiver USER S MANUAL CAUTION RISK OF ELECTRIC SHOCK DO NOT OPEN This symbol is intended to alert the user to the presence of insulated dangerous voltage within the products
LED TV MODEL NO.: NE22K5BG. Please read this manual carefully before installing and operating the TV. Keep this manual handy for further reference
 LED TV USER MANUAL MODEL NO.: NE22K5BG IMPORTANT Please read this manual carefully before installing and operating the TV. Keep this manual handy for further reference Table Of Contents Preparations Guide
32" LED Television. Initial Assembly B. Main Unit. 1. Fix the Left Base Stand to the main unit using 2 pcs provided screws.
 2 3 4 8047922B 32" LED Television Initial Assembly 8047922 Main accessories: Installation Steps: 1. Fix the Left Base Stand to the main unit using 2 pcs provided screws. 2. Fix the Right Base Stand to
2.0 Wall Mount TV Soundbar Instruction Manual
 8010275 2.0 Wall Mount TV Soundbar Instruction Manual Read all of the instructions before using this soundbar and keep the manual in a safe place for future reference. Safety Information CA UT IO N RISK
H LIS G EN User manual
 User manual 1. INTRODUCTION Thank you for purchasing this Energy TDT HD5. First of all, welcome to the Energy HD DVB-T receivers world. The following sections provide an overview of your new device and
ZVOX AccuVoice TV Speaker Model AV203
 ZVOX AccuVoice TV Speaker Model AV203 SETUP & OPERATION www.zvoxaudio.com 2 ZVOX AccuVoice TV Speaker Setup & Operation READ THIS FIRST Important Safety Instructions For ZVOX Audio System WARNING TO PREVENT
HD-1603 Single Input MPEG-4 DVB-T HD Encoder/Modulator User Guide and Install Manual
 ZyCastR digi-mod HD Range digi-mod HD-1603 www.digi-modbyzycast.com HD-1603 Single Input MPEG-4 DVB-T HD Encoder/Modulator User Guide and Install Manual Table of Contents www.digi-modbyzycast.com Safety
Installation Manual VIP 1003
 Installation Manual VIP 1003 We Caring for the Environment by Recycling When you see this symbol on a Motorola product, do not dispose of the product with residential or commercial waste. Recycling your
Quick Start Digital Terrestrial Receiver
 Quick Start Digital Terrestrial Receiver Support of SD / HD (MPEG2 / MPEG4 H.264), DVB-T system PVR Ready - possibility to record on external USB drive Time Shift (video pausing, rewinding) HDMI video
Daily use, 6 How to bring up and use the menus on the screen. First-time setup, 15 See what the first-time setup sequence consists of.
 DVB HD Guide Contents 3 Introducing the module and remote control, 4 Find out how to use your remote control with the DVB Module. Daily use, 6 How to bring up and use the menus on the screen. See programme
User s Manual Digital Satellite Receiver
 A_ENG_110944 User s Manual Digital Satellite Receiver Please read the entire manual thoroughly and retain it for future reference. ENG - 1 General Safety Warning CAUTION RISK OF ELECTRIC SHOCK DO NOT OPEN
HD Digital MPEG2 Encoder / QAM Modulator Get Going Guide
 series HD Digital MPEG2 Encoder / QAM Modulator Get Going Guide HDb2640 HDb2620 HDb2540 HDb2520 The HDbridge 2000 Series is a combination HD MPEG 2 Encoder and frequency-agile QAM Modulator, all in a 1RU
28 4K LED monitor. User Manual M284K
 28 4K LED monitor User Manual M284K CONTENTS Safety Information... 2 What s included..... 4 Getting Started....... 8 Troubleshooting.... 14 Specification.... 15 2 of 15 SAFETY INFORMATION Read these instructions
M5-H002. Multiview T-35. DVB-T to PAL / 5 channels on all TV s
 120531 M5-H002 Multiview T-35 DVB-T to PAL / 5 channels on all TV s Contents Multiview... 3 Features... 3 Caution... 3 Front & Rear Panel... 4 Connecting... 5 Programming... 6 Information... 7 Installation...8
ZVOX AccuVoice TV Speaker Model AV203
 ZVOX AccuVoice TV Speaker Model AV203 SETUP & OPERATION www.zvoxaudio.com READ THIS FIRST Important Safety Instructions For ZVOX Audio System WARNING TO PREVENT FIRE OR SHOCK HAZARD, DO NOT EXPOSE THIS
Wilkes Repair: wilkes.net River Street, Wilkesboro, NC COMMUNICATIONS
 1 Wilkes COMMUNICATIONS 336.973.3103 877.973.3104 Repair: 336.973.4000 Email: wilkesinfo@wilkes.net wilkes.net 1400 River Street, Wilkesboro, NC 28697 2 Table of Contents REMOTE CONTROL DIAGRAM 4 PLAYBACK
Converts any TV to Digital. MFR-300 User Guide
 Converts any TV to Digital MFR-300 User Guide Introduction Thank you for choosing this TVonics Freeview box. Record the serial number in the space provided below (the serial number can be found on the
Manhattan Model: Plaza HDR S 500GB LET S GET STARTED YOUR USER GUIDE
 Manhattan Model: Plaza HDR S 500GB LET S GET STARTED YOUR USER GUIDE WELCOME TO FREESAT We are so pleased you bought this 500GB Manhattan Plaza HDR S Freesat+ HD recorder. Now you can enjoy: Quality state-of-the-art
OPERATION Channel Manager HDD Installation... 22
 1.General Information... 3 2. Main Features... 3 3. FOR YOUR SAFETY... 4 4. ACCESSORIES... 4 OVERVIEW... 6 1. REMOTE CONTROL KEY... 6 2.FRONT PANEL... 8 3.REAR PANEL... 9 CONNECTION DIAGRAMS... 11 1. PVRX2
UNFOLD THE BASE. Quick Start Guide CONTENTS INSTALLING LCD TV ON THE WALL
 Quick Start Guide English CONTENTS INSTALLING LCD TV ON THE WALL.. UNFOLD THE BASE............... TV CHANNEL INSTALLATION........ PRESENTATION OF THE LCD TV..... ACCESSORIES.................... BATTERY
TOPFIELD. TF 5810 PVRt. User Guide. Digital Terrestrial Receiver. Personal Video Recorder
 TOPFIELD TF 5810 PVRt User Guide Digital Terrestrial Receiver Personal Video Recorder Contents iii Contents Contents iii 1 Introduction and getting started 1 1.1 Unpacking..............................
Table of Contents. 1. Safety Use. 2. General Description. 3. Connection Diagram. 4. Operations and Management. 4.1 Display Status. 4.
 DTM-HD01 Thank you for buying this encoder modulator. Please read this manual carefully to install, use and maintain the encoder modulator in the best conditions of performance. Keep this manual for future
Table of Contents Safety Precautions 1.1 Safety Precautions... Introduction to the Product 2.1 Features Important Information
 best, and Table of Contents Safety Precautions 1.1 Safety Precautions..... 1 Introduction to the Product 2.1 Features..... 3 2.2 Important Information... 4 2.3 The Device and Accessories... 5 Functional
Quick Start Digital Satellite Receiver
 Quick Start Digital Satellite Receiver Support of SD (MPEG2), DVB-S system Standard resolution video output - SCART Compatible with Diseqc 1.0, 1.1, 1.2, and USALS Electronic Program Guide - EPG Multilingual
High Definition SET TOP BOX
 High Definition SET TOP BOX HVBT-4100S HVBT-4100S Scan Setup System Setting Screen Setting Setting Upgrade By USB 6 Olin_HVBT-4100_Series_User_Manual_V.1 6.15 Resolution 6.16 Aspect Ratio 6.17 Nine-picture
LED LCD TV OWNER' S MANUAL
 LED LCD TV OWNER' S MANUAL MODEL: LE22T1000F LE24T1000F Please READ this manual carefully before operating your TV, and retain it for future reference Contents 1 Safety and warnings...2-3 2 Introduction...4
Digi-Scart. Digital Terrestrial Receiver. Ref MET802
 Digi-Scart Ref. 441816 Digital Terrestrial Receiver MET802 WARNING - IMPORTANT Before installing your digital terrestrial receiver it is important that you read and understand the instructions completely.
Celect Communications. Complete TV Users Guide
 Celect Communications Complete TV Users Guide 1 Contents Setting up your Remote... 4 Remote Guide... 5 Using the Guide Button... 8 Searching...10 Reminders...12 DVR Guide...13 Important Note...26 TV Main
Remote Control. degraded, causing unreliable operation. The recommended effective distance for remote operation is about 16 feet (5 meters).
.") Media Streaming Sound Bar RTS736W User Manual Remote Control using the remote control Point the remote control at the REMOTE SENSOR located on the unit (see Front Panel illustration for precise location).
Media Streaming Sound Bar RTS736W User Manual Remote Control using the remote control Point the remote control at the REMOTE SENSOR located on the unit (see Front Panel illustration for precise location).
USER MANUAL KGNPRO19VD
 USER MANUAL KGNPRO19VD X P.MODE S.MODE SLEEP AUDIO 1 2 3 4 5 6 7 8 9 A/DTV USB/SD FAV + 0 SOURCE MENU OK INFO EXIT MUTE VOL CH ASPECT TTX TITLE /AUTO DVD.SETU P EPG SU BTITL E D.MENU ZOOM/REC.LIST GOTO
Owner's Manual DIGITAL TO ANALOG BROADCAST CONVERTER WITH REMOTE CONTROL. Model: CVD508 PLEASE READ BEFORE OPERATING THIS EQUIPMENT.
 Size: 148.5(W) x 210(H)mm (A5) DIGITAL TO ANALOG BROADCAST CONVERTER WITH REMOTE CONTROL Owner's Manual PLEASE READ BEFORE OPERATING THIS EQUIPMENT. Model: CVD508 FCC NOTICE: To assure continued compliance,
Complete TV Users Guide
 Celect Communications Complete TV Users Guide Connected Your pathway to the world 1 2 Contents Setting up your Remote... 4 Remote Guide... 5 Using the Guide Button... 8 Searching...10 Reminders...12 DVR
Full High Definition LCD TV. Kogan 1080p42 USER MANUAL
 Full High Definition LCD TV Kogan 1080p42 USER MANUAL Safety information To ensure reliable and safe operation of this equipment, please read carefully all of the instructions in this user guide, especially
Single & Dual Input HD Digital DVB-T Modulators
 Radio Frequency Range Installation Diagram digi-mod HD-1000DM / HD-2000DM www.resi-linx.com Single & Dual Input HD Digital DVB-T Modulators ANT IN 1 2 3 4 AUX MOD RF IN TV OUTPUTS MOD RF IN (PWR/IR PASS)
TKSTB14 EXCLUSIVELY FROM. Owner s Handbook. Freeview HD receiver
 EXCLUSIVELY FROM TKSTB14 Owner s Handbook Freeview HD receiver Index... 1 Important safety information... 2 Introduction... 3 Preliminaries... 3 Controls and connections... 4 Connecting to an aerial...
Introduction. Important Safety Instructions
 Introduction Congratulations on purchasing your Eviant Portable Digital TV. On June 12, 2009 the conversion to digital television broadcasting will be complete all throughout the United States and Puerto
Safety Instructions. General Safety Instructions
 Table of Contents Safety Instructions...2 General Safety Instructions...2 Installation...3 Cleaning...4 General Description...5 Specifications & Accessories...5 Specifications...5 Accessories...5 Input
Attention. Please handle this product with care and inspect it regularly to ensure it is in good working order.
 Attention Please handle this product with care and inspect it regularly to ensure it is in good working order. If the product, power supply cord or plug shows any signs of damage: stop use, unplug and
Safety Instructions. General Safety Instructions
 Table of Contents Safety Instructions...2 General Safety Instructions...2 Installation...3 Cleaning...4 General Description...5 Specifications & Accessories...5 Specifications...5 Accessories...5 Overview...6