SAFETY PRECAUTION ENGLISH DO NOT INSTALL THE RECEIVER: PAG. 2
|
|
|
- Stephen Perry
- 6 years ago
- Views:
Transcription
1 MAX S21
2 SAFETY PRECAUTION The lightning fl ash with arrowhead symbol, within an equilateral triangle, is intended to alert the user to dangerous voltage and to prevent from a risk of electric shock. Warning: To reduce the risk of electric shock, don t open the cabinet. Refer servicing to qualifi ed personnel only. The exclamation point within an equilateral triangle is intended to alert the user to important operating and maintenance (servicing). Please read the manual carefully before installing the receiver. Caution: Never open the device by yourself. Dangerously high voltages are present inside the unit. Refer servicing to qualifi ed staff only. When installing the receiver, always unplug the receiver from the mains voltage. Unplug the receiver from the mains in case of long periods without operating the receiver (for example, during holidays!). To prevent shock hazard, do not touch the power plug with wet hands. Always unplug the receiver before cleaning it or working on the connections. Do not install the receiver close to strong heat sources, and ensure a good aeration if you plan to install the receiver in a small cabinet. Before you start operating the receiver, make sure that the satellite antenna is properly built up, optimally connected and aligned. The correct place to install the receiver is, of course, near your TV set and any other A/V signal sources (DVD, VCR, CD, game console, etc.). Choose a stable support, in which you can easily lay the necessary connecting cables without stumblingdanger. The receiver should be installed near an easily accessible outlet. Do not install the receiver in a place where it can be reached by liquid spills. Do not put any heavy objects as, for example, a TV-device over the receiver; the receiver could be damaged. DO NOT INSTALL THE RECEIVER: - On an unstable surface - Subject to direct sunlight - In high humidity environment - Outside the receiver s temperature range ( C) If the receiver is subject to severe temperature changes, it can suffer from water condensation inside. Switch off the receiver in these cases for at least 2 hours before resuming operation. PAG. 2


3 QUICK INSTALLATION GUIDE In order to download the complete user s guide and get more information about receivers, please visit the website QUICK INSTALLATION GUIDE STEP 1: CONNECTIONS Follow next steps for the correct installation of this receiver. The remote control transmits a directional infrared beam. Be sure to aim the remote control directly at the infrared sensor of the receiver during operation. If the sensor has been covered or there is a large object between the remote control and the sensor, the sensor will not respond. The sensor may not able to receive the remote signal when it is exposed to direct sunlight or a strong artifi cial light (fl urescent or strobe light). In this case, change the direction of the light or reposition the sensor to avoid direct lighting. The coaxial cable, with satellite signal, must be connected to the IF IN connector. The TV SCART connector must be connected to the TV set. Depending on the type of installation, the receiver should be connected and confi gured following next examples. Example 1 Basic System PAG. 3
 that will help you to setup the different parameters.")
 and Turksat (at position 4 of the DISEqC). If your installation is different to this case, please follow installation steps to search the channels.")
4 QUICK INSTALLATION GUIDE Example 2 DISEqC switches Example 3 Combined with terrestrial STEP 2: BASIC CONFIGURATION OF THE RECEIVER IMAGE 1 The receiver includes an installation assistant (Quick Setup) that will help you to setup the different parameters. When the receiver is turned on at fi rst time (IMAGE 1): The receiver is programmed with all the channels of Astra (at position 1 of the DISEqC), Hotbird (at position 2 of the DISEqC), Hispasat (at position 3 of the DISEqC) and Turksat (at position 4 of the DISEqC). If your installation is different to this case, please follow installation steps to search the channels. In order to move through the different options of this menu, please use the keys [ ] and [ ] of your remote control. Note: On there is a short-circuit in the LNB, the receiver will make a reset. Please verify your cables and connections. Once the crossed is solved, the receiver will stop making resents and it will start normally. Language: Press [ ] to select languages. The selection of languages include: English, German, French, Spanish, Italian, Portuguese, Turkish, Polish, Russian, Arabic. First Audio: Some channels offer more than one audio language. This function allows you to set the preferred audio language for those channels using [ ]. If a channel offers the same audio language as the First Audio you set the system will play this audio language as default. If the channel does not offer this audio language then the system will compare the offered PAG. 4


5 QUICK INSTALLATION GUIDE languages with the second audio language. The selections of audio languages include: English, German, French, Spanish, Italian, Portuguese, Turkish, Polish, Russian, Arabic. Second Audio: If the channel has no audio language that corresponds with First Audio but with Second Audio the system will play the second audio language as default. If no audio language corresponds with the Second Audio then the default language of the current channel will be played instead. The selections of audio languages include: English, German, French, Spanish, Italian, Portuguese, Turkish, Polish, Russian, Arabic. Subtitle Language: Press [ ] to select subtitle languages. The selection of languages include: English, German, French, Spanish, Italian, Portuguese, Turkish, Polish, Russian, Arabic. IMAGE 2 LNB Power: Here you can set the power output to the LNB. If your receiver is connected to the LNB directly then you need to set the LNB Power to On. If your receiver is connected to a multi switch (SMATV signal distribution system) then it may be that you don t need to provide the power to the LNB (IMAGE 2). But since this is depending on the kind of installed distribution system we recommend you to contact your installer or to refer to the user manual of this system to get the correct information. Press [ ] to switch between On / Off. IMAGE 3 Satellite List When you enter the Satellite List menu you can see a window like the one beside (IMAGE 3): 1. Move through the satellite list using [ ] and mark/ unmark the satellites that you want pressing [OK] 2. Press [Red] button to enter edit satellite menu. You can edit the satellite s name and its longitude. Once you have edited the satellite, select Save option and confi rm with [Yellow] button. If you prefer to exit without saving the changes press [Blue] button. 3. Press [Green] button to open the Add satellite window. You can edit the satellite s name and its longitude. Once you have edited the satellite, select Save option and confi rm with [Yellow] button. If you prefer to exit without saving the changes press [Blue] button. 4. After pressing [Blue] button you will be asked Are you sure to delete?. Select Yes to delete the marked satellite. Select No to cancel the operation. Press [Exit] to save the changes and go to the previous window to continue confi guring the antenna. PAG. 5
![QUICK INSTALLATION GUIDE IMAGE 4 Single search: You can edit the following items (IMAGE4): 1. Satellite: Press [ ] to switch Satellites or press [OK] to enter satellite list to select directly. 2.](/docs-images/76/74285884/images/6-0.jpg "In the FTA Only item, press [ to select to scan only free channels or even scrambled channels. If you select Yes it will scan free channels only. 3.")
![In Scan Channel item, press [ ] to select to scan TV + Radio Channels, or just TV channels or just Radio channels. 4.](/docs-images/76/74285884/images/6-1.jpg "Network Search: If you select this option as Off, the receiver will search the selected Satellite.")

6 QUICK INSTALLATION GUIDE IMAGE 4 Single search: You can edit the following items (IMAGE4): 1. Satellite: Press [ ] to switch Satellites or press [OK] to enter satellite list to select directly. 2. In the FTA Only item, press [ to select to scan only free channels or even scrambled channels. If you select Yes it will scan free channels only. 3. In Scan Channel item, press [ ] to select to scan TV + Radio Channels, or just TV channels or just Radio channels. 4. Network Search: If you select this option as Off, the receiver will search the selected Satellite. In case you select On, the NIT (Network Identifi cation) will be identifi ed and the receiver will automatically search all the TP of this network. 5. In Scan Mode item you can select Auto Scan to blind scan or Preset Scan to scan all preset transponders. 6. Move the highlight to Search and press [OK] button to start scanning. Bars are showing the progress of the channel scanning in the lower part of the window and the found channels are listed. You can stop the scan with [Exit] and save the so far found channels (IMAGE 5). IMAGE 5 Multi search: Entering in this menu, you can make a search in all the satellites of the list confi gured in the Satellites list option. The confi guration options are the same as in the individual search section (IMAGE 6). IMAGE 6 PAG. 6
7 QUICK INSTALLATION GUIDE Channel TV Channel List: This option shows the list of TV stored channels. Radio Channel List: This option shows the list of Radio stored channels. Delete All: This option deletes all TV and Radio stored channels. Installation Antenna connexion: It allows choosing the type of installed antenna, between fi xed or motorized. Satellite List: This option shows all the stored satellites. This list can be modifi ed. Antenna Setup: It allows confi guring all the installation options of the antenna. Single Search: Once the antenna is confi gured, this option allows search for the channels of one satellite. Multi Search: Once the antenna is confi gured, this option allows search for the channels of various satellites. TP List: This option shows all the stored TP. This list can be modifi ed. Once the antenna is confi gured, this option allows search for the channels of one TP. PAG. 7
8 QUICK INSTALLATION GUIDE System Configuration Language: This option allows choosing the language of the menus. TV System: This option allows choosing the video Standard and other parameters of the screen. Local Time Setting: Time setting menu. Timer: It allows activating/deactivating and confi guring timers. Parental Lock: In this option, user can lock the access to the menu and change the password of the receiver. OSD Setting: This option allows confi guring the subtitles of the channel information. Favorite: It allows changing the name of the favourite groups. Other: It allows confi guring other additional parameters, such as LNB feeding or automatic switch off. Accesories Information: Shows all the receiver s information. Factory Default: This option resets the receiver and loads the factory default values. SW Upgrade by USB: To update the receiver by USB. Games Othello. Sudoku PAG. 8
9 INDEX 1. Connexion & Remote Control Description 1.1. Connexion Description Remote Control Description Basic Operations 2.1. Standby TTX Mute Channel Number Multi-Pictures PR + / PR TV/RADIO Vol+/Vol Exit Menu Recall Channel List EPG Find Favourites Audio Track / Mode Information SAT ZOOM Sleep LNB Short Edit Channel 3.1. TV Channel List Favourite Move Edit Channel Sort Delete Edit Skip Lock Radio Channel List Delete All PAG. 9
10 INDEX 4. Installation 4.1. Antenna Connection Satellite List Antenna Setup Single Search Multi Search TP List System Setup 5.1. Language TV System Local Time Setting Timer Setting Parental Lock OSD Setting Favorite Other LNB Power Channel Play Type Channel Change AutoStandby Tools 6.1. Information Factory Setting Software upgrade by USB Game 7.1. Othello Sudoku Technical Specification Conformity declaration...33 PAG. 10
. 3. IR-SENSOR: External IR sensor 4.")
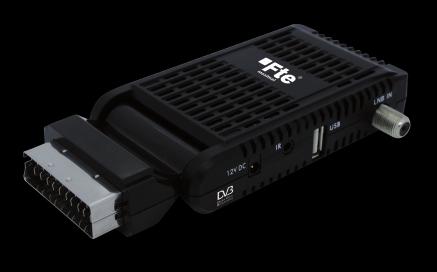
11 CONNEXION & REMOTE CONTROL DESCRIPTION 1. CONNEXION & REMOTE CONTROL DESCRIPTION 1.1. CONNEXION DESCRIPTION TV SCART: Output SCART for the connection to a TV set. 2. IN 12 VDC: 12 VDC connection (power supply). 3. IR-SENSOR: External IR sensor 4. USB: USB Connector LNB IN: Satellite input. PAG. 11

12 CONNEXION & REMOTE CONTROL DESCRIPTION 1.2. REMOTE CONTROL DESCRIPTION POWER: Switches receiver ON or in stand-by-mode. 2. PR+ / PR-: Changes channel up and down. 3. VOL+ / VOL-: Adjusts audio volume up and down. 4. NUMERIC KEYS: For direct typing values and names. 5. TV/Radio: Switches between TV and Radio channels. 6. OK/List: Confi rms selections or opens channel list. 7. Find: To fi nd channel by their names. 8. EPG: Shows the EPG information. 9. TXT: Opens and closes teletext. 10. EXIT: Exit menus or stop operations. 11. MENU: Opens the main menu. 12. (mute): Switches audio on and off. 13. (Recall/Back): Watch the last viewed channel :9/4:3: It changes the video format mode in Tv mode. 15. Fav: Opens favourite channel list. 16. (Pup / Pdw): Moves cursor in block steps 17. Zoom: Zoom function. 18. (Audio): Opens audio menu. 19. SAT: It shows the satellite list 20. Sleep: It opens the Sleep Timer menu 21. PAUSE: If you press it once, you will stop the image, and it will come back to normal mode when you press it again. 22. (Multi-Picture): The screen will display 9 channels preview window (static) 23. Info: Shows channel information with signal bar. PAG. 12

13 BASIC OPERATIONS 2. BASIC OPERATIONS? FREQUENTLY ASKED QUESTION Q: The power of my STB is on and it is running in TV mode but the TV screen shows nothing: A: Make sure the TV set has been set to the correct video input (not the TV channels). For example, if you have connected the STB to the Video1 input of the TV set, then you need to select the corresponding Input on the TV. Mostly it is done with the AV button of the TVs remote control unit. Q: My STB is running in TV mode but the TV screen shows nothing except one ball and No Signal. A: That means the channel you selected has no signal. This can be caused by several reasons: 1. The channel you selected is not from the satellite to which your dish is pointing. Select another channel. 2. The signal of current TV channel is too weak. You can try to change to other channels with a stronger signal. If the problems still exist, please consult your local dealer or installer for technical service. 3. You selected the wrong LNB type in the installation menu or your DiSEqC switch confi guration is not correct STANDBY 1. Press [Power] button to switch from TV mode to Standby mode. 2. In Standby mode press [Power] button again to switch back to TV mode. The last active channel will be showed. OSD 1 OSD TTX 1. Press [TXT] button in TV mode to open the teletext page (OSD 1). This service is depending on the support of the channel provider. 2. If the channel does not support teletext information, it will show No Teletext Data on the screen MUTE 1. Press the [ ] button to mute the sound. On the screen an icon will be displayed to indicate the muted sound (OSD 2). 2. Press the [ ] button again to restore the sound CHANNEL NUMBER In TV mode you can enter the channel number directly with your remote control unit and confi rm the number with the OK button to change to the desired channel. PAG. 13
![BASIC OPERATIONS OSD 3 2.5. MULTI-PICTURES In TV mode, press [ ] button to enter the Multi-Picture mode (OSD 3). 1.](/docs-images/76/74285884/images/14-0.jpg "In Multi-Picture mode the screen will display 9 channels preview window (static), starting from the current channel. Only the marked preview program is continuously playing. 2.")
![Press [ ] to change the marked channel among the preview programs. 3. With [OK] you return to full screen mode in the marked channel. 2.6. PR +/ PR - In TV mode press [ ] to change channel. 2.7.](/docs-images/76/74285884/images/14-1.jpg "TV/RADIO In TV mode, press [TV/Radio] to switch to Radio mode. In Radio mode press [TV/Radio] again to switch back to TV mode. 2.8. VOL+/VOL- In TV mode, press [ ] to adjust volume. 2.9.")
14 BASIC OPERATIONS OSD MULTI-PICTURES In TV mode, press [ ] button to enter the Multi-Picture mode (OSD 3). 1. In Multi-Picture mode the screen will display 9 channels preview window (static), starting from the current channel. Only the marked preview program is continuously playing. 2. Press [ ] to change the marked channel among the preview programs. 3. With [OK] you return to full screen mode in the marked channel PR +/ PR - In TV mode press [ ] to change channel TV/RADIO In TV mode, press [TV/Radio] to switch to Radio mode. In Radio mode press [TV/Radio] again to switch back to TV mode VOL+/VOL- In TV mode, press [ ] to adjust volume EXIT Press [Exit] button to exit the current menu MENU Press [Menu] button to enter or exit the current menu RECALL/BACK Pressing the [ ] button allows you to toggle between the actual and the last selected channel CHANNEL LIST In TV mode press [OK/LIST] button to open the Channel List window (OSD 4): 1. You can use [ ] keys to navigate this list. 2. Press [ ] keys in order to change satellite or favorites list. Once you have selected a satellite, the list will show only the channels of such satellite or group of favorites. 3. Once the desired channel is selected, press [OK[ to change and display the marked channel. OSD 4 PAG. 14
 to give you information about the actual programs of certain channels like event name, subtitle, description, start and fi nish time.")
![This feature is depending on the service of the channel provider. Press [EPG] to open the EPG window (OSD 5). 2.](/docs-images/76/74285884/images/15-1.jpg "You can select an event with [ ] and display the event s detailed description with [OK] (OSD 6). With the [Green] button you can program a timer with the start and fi nish time and date of this event.")
![3. With the key [Red], you will get new options that will allow you to move through the EPG on the most comfortable way, moving event by event, by sites or by days. 4.](/docs-images/76/74285884/images/15-2.jpg "To close the EPG menu press [Exit]. 2.14. FIND 1. Press [FIND] key can open the Find window like (OSD 7). 2. After input each character, the program list on the left will search the channel according your input, and list the matched channel.")
![3. Press [Blue] key can close Find window. 2.15. FAVOURITES 1. In TV mode press the [Favourite] button to display the Favourite Group window on the screen as the picture beside shows (OSD 8). 2. In the Favourite Group window you can select the desired favourite channel with [ ] and confi rm it with [OK] to switch to it.](/docs-images/76/74285884/images/15-3.jpg "In bigger groups you can navigate with [ ]. 3. With [ ] you can select different Favourite Group. 4. Press [Exit] to close the Favourite Group window. OSD 7?")
15 BASIC OPERATIONS OSD 5 OSD EPG 1. The STB supports Electronic Program Guides (EPG) to give you information about the actual programs of certain channels like event name, subtitle, description, start and fi nish time. This feature is depending on the service of the channel provider. Press [EPG] to open the EPG window (OSD 5). 2. You can select an event with [ ] and display the event s detailed description with [OK] (OSD 6). With the [Green] button you can program a timer with the start and fi nish time and date of this event. 3. With the key [Red], you will get new options that will allow you to move through the EPG on the most comfortable way, moving event by event, by sites or by days. 4. To close the EPG menu press [Exit] FIND 1. Press [FIND] key can open the Find window like (OSD 7). 2. After input each character, the program list on the left will search the channel according your input, and list the matched channel. 3. Press [Blue] key can close Find window FAVOURITES 1. In TV mode press the [Favourite] button to display the Favourite Group window on the screen as the picture beside shows (OSD 8). 2. In the Favourite Group window you can select the desired favourite channel with [ ] and confi rm it with [OK] to switch to it. In bigger groups you can navigate with [ ]. 3. With [ ] you can select different Favourite Group. 4. Press [Exit] to close the Favourite Group window. OSD 7? FREQUENTLY ASKED QUESTION Q: Why the screen displays No FAV Channel after pressing the [Favourite] button? A: No channels have been assigned to a Favourite Group yet. You can do this in the channel menu AUDIO TRACK / MODE 1. In TV mode, press the [ ] button to open the Audio Mode window (OSD 9). 2. Select the item you want to adjust with [ ] and change the value with [ ]. 3. Press [Exit] to leave this window. OSD 8 PAG. 15
, in the window shows the parameters of current channel. OSD 9 2.18.")
![SAT Press [SAT] button to open the SAT list. After selecting a satellite the channel list will be reduced to the channels of this satellite. 2.19. ZOOM 1.](/docs-images/76/74285884/images/16-1.jpg "Press [Zoom] button in TV mode to zoom the image. Image can be augmented x16 times (OSD 11). 2. Press [Exit] to exit this function. OSD 10 2.20.")
![SLEEP In TV mode, press [SLEEP] button if you want shut down the receiver automatically, you can choose here the time for the sleep timer.](/docs-images/76/74285884/images/16-2.jpg "Selection: 10, 30, 60, 90, 120 or Off Please change it with the [SLEEP] button. 2.21.")
16 BASIC OPERATIONS INFORMATION In TV mode, press [INFO] button can open information screen (OSD 10), in the window shows the parameters of current channel. OSD SAT Press [SAT] button to open the SAT list. After selecting a satellite the channel list will be reduced to the channels of this satellite ZOOM 1. Press [Zoom] button in TV mode to zoom the image. Image can be augmented x16 times (OSD 11). 2. Press [Exit] to exit this function. OSD SLEEP In TV mode, press [SLEEP] button if you want shut down the receiver automatically, you can choose here the time for the sleep timer. Selection: 10, 30, 60, 90, 120 or Off Please change it with the [SLEEP] button LNB SHORT On there is a short-circuit in the LNB, the receiver will make a reset. Please verify your cables and connections. Once the crossed is solved, the receiver will stop making resents and it will start normally. OSD 11 PAG. 16
![CHANNEL 3. EDIT CHANNEL OSD 12 OSD 13 Press [Menu] in the TV mode to enter the main menu (OSD 12). 1. Press [ ] to select the Edit Channel item. 2. Press [OK] to enter the selected item. 3. Press [ ] to select the wanted menu item.](/docs-images/76/74285884/images/17-2.jpg "4. Press [OK] to enter the selected item among. - TV Channel List - Radio Channel List - Delete All 3.1.")
. 1. You can move the highlighted channel with [ ] and press [OK] to preview the highlighted program in the preview window. 2.")
17 CHANNEL 3. EDIT CHANNEL OSD 12 OSD 13 Press [Menu] in the TV mode to enter the main menu (OSD 12). 1. Press [ ] to select the Edit Channel item. 2. Press [OK] to enter the selected item. 3. Press [ ] to select the wanted menu item. 4. Press [OK] to enter the selected item among. - TV Channel List - Radio Channel List - Delete All 3.1. TV CHANNEL LIST If you enter the Channel List menu a window like the one besides will open (OSD 13). 1. You can move the highlighted channel with [ ] and press [OK] to preview the highlighted program in the preview window. 2. You can enter directly the number of the desired channel with the remote control. The selection will select that channel, but it will not be previewed until you confi rm with [OK] button. 3. Press [ ] on the RCU to jump between the channels by pages. 4. Press [ ] to switch the Program Group. 5. The colour buttons offer further functions to manage the channel list. OSD FAVOURITE 1. Press [FAV] and [OK] to open the Favourite window (OSD 14). 2. You can select between 8 favourites groups with [ ]. Press [OK] to assign the channel to a Favourite group. 3. Press [OK] again to remove the channel from the marked Favourite group. 4. Press [Exit] button to return to the TV Channel List. The channels of Favourites Groups are indicated with a favourite icon behind the name MOVE 1. To move/change channels: Pushing the [Yellow] button and then [OK] button, you will see a picture like OSD 15. You will be able to move or change the position of the channels: 2. Move the channel to the desired position with [ ]. 3. Press [OK] to confi rm the position. OSD 15 PAG. 17
![CHANNEL 3.1.3. EDIT CHANNEL 1. Press [Blue] button to open the Edit window. 2. You can Delete, Sort, and Edit the channel (OSD 16). 3. Press [Exit] to leave the Channel Editing.](/docs-images/76/74285884/images/18-1.jpg "The system will ask you to confi rm the saving of the changes you made. OSD 16 OSD 17 3.1.3.1. SORT 1. Press [Red] to open the Sort window (OSD 17).")
![Press [ ] to select and [OK] to confi rm your choice. 2. The ways of sorting are: - Name (A-Z): Sorting in Alphabetical Order, ignoring $ symbol.](/docs-images/76/74285884/images/18-2.jpg "- Name (Z-A): Sorting in Alphabetical Order, ignoring $ symbol. - FTA: Sort channel by free and scrambled sequence.")
 will be deleted after you confi rm to save the changes when you leave this menu.")
18 CHANNEL EDIT CHANNEL 1. Press [Blue] button to open the Edit window. 2. You can Delete, Sort, and Edit the channel (OSD 16). 3. Press [Exit] to leave the Channel Editing. The system will ask you to confi rm the saving of the changes you made. OSD 16 OSD SORT 1. Press [Red] to open the Sort window (OSD 17). Press [ ] to select and [OK] to confi rm your choice. 2. The ways of sorting are: - Name (A-Z): Sorting in Alphabetical Order, ignoring $ symbol. - Name (Z-A): Sorting in Alphabetical Order, ignoring $ symbol. - FTA: Sort channel by free and scrambled sequence. Free channels will be listed fi rst and scrambled channels behind in the channel list. - Lock: Unlocked channels are listed fi rst end locked channels at the end DELETE In Channel Edit menu press [Blue] button to mark a channel for deleting. Marked channels (OSD 18) will be deleted after you confi rm to save the changes when you leave this menu. OSD EDIT In Channel Edit menu, press [Green] button and [OK] key to enter edit box like OSD 19: After modifi cation, pressing [Yelloy] button can save the modifi ed value and exit Edit mode SKIP In TV Channel List menu, press [Green] button and press [OK] key to place a Skip icon behind the name of the highlighted channel. Marked channels (OSD 20) will be skipped when you change channels in TV mode after you confi rm to save the changes when you leave this menu. OSD LOCK In TV Channel List menu, press [Red] button and then [OK] to place a Lock icon behind the name of the highlighted channel. Marked channels (OSD 21) will be locked and displayed only after password has been entered if you confi rm to save the changes when you leave this menu. PAG. 18

19 CHANNEL 3.2. RADIO CHANNEL LIST Basically the operation of Radio Channel List is same as TV Channel List, except that in the small channel window a static background will be displayed (OSD 22). OSD DELETE ALL A safety question will show up where you have to confi rm fi rst. Select Yes to delete all channels or No to cancel and confi rm with [OK]. Pressing [Exit] will exit the function directly without saving.? FREQUENTLY ASKED QUESTION Q: IF I incautiously delete all channels, what should I do? A: There are two ways to restore: - To re-search all channels at the Installation menu. - Use Factory Default function to restore all channels in the Tools menu. The receiver will load the factory channels. OSD 21 OSD 22 PAG. 19
![CHANNEL 4. INSTALLATION OSD 23 Press [Menu] in the TV mode to enter the main menu. 1. Press [ ] to select the Installation item. 2. Press [OK] to enter the selected item. 3.](/docs-images/76/74285884/images/20-0.jpg "Press [ ] to select the wanted menu item. 4. Press [OK] to enter the selected item among.")
.")
![LNB: Press the arrows [ ] on the remote to select the Motorized Antenna option in case you have an installation with an engine. If you do not have an engine, choose Fixed Antenna. OSD 25](/docs-images/76/74285884/images/20-3.jpg "OSD 26 4.2. SATELLITE LIST When you enter the Satellite List menu you can see a window like the one beside (OSD 25): 1.")
20 CHANNEL 4. INSTALLATION OSD 23 Press [Menu] in the TV mode to enter the main menu. 1. Press [ ] to select the Installation item. 2. Press [OK] to enter the selected item. 3. Press [ ] to select the wanted menu item. 4. Press [OK] to enter the selected item among. - Antenna Connection - Satellite List - Antenna Setup - Single Satellite Search - Multi Satellite Search - TP List OSD ANTENNA CONNECTION When you enter the Antenna connection menu you can see a window like the one beside (OSD 24). LNB: Press the arrows [ ] on the remote to select the Motorized Antenna option in case you have an installation with an engine. If you do not have an engine, choose Fixed Antenna. OSD 25 OSD SATELLITE LIST When you enter the Satellite List menu you can see a window like the one beside (OSD 25): 1. Move through the satellite list using [ ] and mark/ unmark the satellites that you want pressing [OK] 2. Press [Red] button to enter edit satellite menu (OSD 26). You can edit the satellite s name and its longitude. Once you have edited the satellite, select Save option and confi rm with [Yellow] button. If you prefer to exit without saving the changes press [Blue] button. 3. Press [Green] button to open the Add satellite window. You can edit the satellite s name and its longitude. Once you have edited the satellite, select Save option and confi rm with [Yellow] button. If you prefer to exit without saving the changes press [Blue] button. 4. After pressing [Blue] button you will be asked Are you sure to delete?. Select Yes to delete the marked satellite. Select No to cancel the operation. 5. Press [Exit] to save the changes and go to the previous window ANTENNA SETUP Depending on how the Antenna Connexion section is confi gured, it will allow confi guring different parameters: PAG. 20
![CHANNEL OSD 27 (Fixed Antenna) (OSD 27): - Satellite: Press [ ] to switch Satellites or press [OK] to enter satellite list to select directly.](/docs-images/76/74285884/images/21-0.jpg "- LNB frequency: Use [ ] in order to change among Universal, a specifi c Polarity and Band, Unicable or a specifi c frequency of the local oscillator.")

![- On Transponder item use [ ] to select the desired transponder. - DiSEqC1.0: Use [ ] to switch the options of DiSEqC switches. - DiSEqC1.1: Use [ ] to switch the options of DiSEqC1.1 switches.](/docs-images/76/74285884/images/21-2.jpg "- 22K: Use [ ] to switch ON and Off. The 22 khz signal is used in KU Universal LNBs to change between low band and high band. After choosing LNB type Universal you cannot modify 22K.")
21 CHANNEL OSD 27 (Fixed Antenna) (OSD 27): - Satellite: Press [ ] to switch Satellites or press [OK] to enter satellite list to select directly. - LNB frequency: Use [ ] in order to change among Universal, a specifi c Polarity and Band, Unicable or a specifi c frequency of the local oscillator. Note: If you have an Unicable installation that allows you to distribute a satellite signal through a unique cable up to 8 receivers as maximum, in this menu option you can confi gure the receiver. If you select Unicable, press the [green] button to select a center frequency to the receiver and press the [red button to choose the frequency of a channel. - On Transponder item use [ ] to select the desired transponder. - DiSEqC1.0: Use [ ] to switch the options of DiSEqC switches. - DiSEqC1.1: Use [ ] to switch the options of DiSEqC1.1 switches. - 22K: Use [ ] to switch ON and Off. The 22 khz signal is used in KU Universal LNBs to change between low band and high band. After choosing LNB type Universal you cannot modify 22K. - Toneburst (0/12V): Press [ ] to switch this function On or Off. - Polarity: Press [ ] to switch between Auto / H / V. OSD 28 (Motorized Antenna) (OSD 28): - LNB type: Use [ ] in order to change among Universal, Unicable or a specifi c frequency of the local oscillator. Note: If you have an Unicable installation that allows you to distribute a satellite signal through a unique cable up to 8 receivers as maximum, in this menu option you can confi gure the receiver. If you select Unicable, press the [green] button to select a center frequency to the receiver and press the [red button to choose the frequency of a channel. - Motor Type: Press [ ] to select between DiSEqC1.2 and USALS. - Local Longitude: Geographic length of your position (USALS). - Local Latitude: Geographic latitude of your position (USALS). - Delete all: Deletes all the satellite positions saved. - Motor Setting: It allows confi guring all the engine positions. - Limit Setup: It allows confi guring the East and West position of the engine. Press [Exit] to save the changes. OSD 29 PAG. 21

![If you select Yes it will scan free channels only. 3. In Scan Channel item, press [ ] to select to scan TV + Radio Channels, just TV channels or just Radio channels. 4.](/docs-images/76/74285884/images/22-1.jpg "Network Search: If you select this option as No, the receiver will search the selected Satellite.")
22 INSTALLATION OSD SINGLE SEARCH When you enter the Single Satellite Search menu you can see a window like OSD 29: You can edit the following items: 1. Satellite: Press [ ] to switch Satellites or press [OK] to enter satellite list to select directly. 2. In the FTA Only item, press [ to select to scan only free channels or even scrambled channels. If you select Yes it will scan free channels only. 3. In Scan Channel item, press [ ] to select to scan TV + Radio Channels, just TV channels or just Radio channels. 4. Network Search: If you select this option as No, the receiver will search the selected Satellite. In case you select Yes, the NIT (Network Identifi cation) will be identifi ed and the receiver will automatically search all the TP of this network. 5. In Scan Mode item you can select Auto Scan to blind scan or Preset Scan to scan all preset transponders. 6. Move the highlight to Search and press [OK] button to start scanning. Bars are showing the progress of the channel scanning in the lower part of the window and the found channels are listed. You can stop the scan with [Exit] and save the so far found channels (OSD 30). OSD 31 OSD 32 OSD MULTI SEARCH Entering in this menu, you can make a search in all the satellites of the list confi gured in the Satellites list option. The confi guration options are the same as in the individual search section. After selecting Antenna Setup another window will be opened (OSD 31). You can edit the following items: 1. Satellite: Press [OK] to enter satellite list. 2. In the FTA Only item, press [ to select to scan only free channels or even scrambled channels. If you select Yes it will scan free channels only. 3. In Scan Channel item, press [ ] to select to scan TV + Radio Channels, just TV channels or just Radio channels. 4. Network Search: If you select this option as No, the receiver will search the selected Satellite. In case you select Yes, the NIT (Network Identifi cation) will be identifi ed and the receiver will automatically search all the TP of this network. 5. In Scan Mode item you can select Auto Scan to blind scan or Preset Scan to scan all preset transponders. 6. Move the highlight to Search and press [OK] button to start scanning. Bars are showing the progress of the channel scanning in the lower part of the window and the found channels are listed. You can stop the scan with [Exit] and save the so far found channels (OSD 32). PAG. 22
![INSTALLATION OSD 34 OSD 35 OSD 36 4.6. TP LIST When you open the TP List menu you will see a window like the one beside (OSD 33). 1. Press [ ] to change the marked satellite.](/docs-images/76/74285884/images/23-0.jpg "Press [ ] to change the marked TP. 2. Press [Red] button to open the Edit TP menu (OSD 34). Here you can edit the Transponder s data like frequency, polarity and Symbol Rate.")
![In this window, the search of the channels of the TP can be done selecting the Search option and pressing [OK]. 3. Press [Green] button to open the Add TP menu (OSD 35).](/docs-images/76/74285884/images/23-1.jpg "Here you can add a new TP and setup its parameters like frequency, polarity and Symbol Rate. 4.")
23 INSTALLATION OSD 34 OSD 35 OSD TP LIST When you open the TP List menu you will see a window like the one beside (OSD 33). 1. Press [ ] to change the marked satellite. Press [ ] to change the marked TP. 2. Press [Red] button to open the Edit TP menu (OSD 34). Here you can edit the Transponder s data like frequency, polarity and Symbol Rate. In this window, the search of the channels of the TP can be done selecting the Search option and pressing [OK]. 3. Press [Green] button to open the Add TP menu (OSD 35). Here you can add a new TP and setup its parameters like frequency, polarity and Symbol Rate. 4. Press [Yellow] button will open a dialog box asking you to confi rm the deletion of the current TP (OSD 36). If you select Yes all the related channels will be deleted. If you select No the operation will be cancelled. 5. Press the key [Blue] to make a searching of the selected TP. When selecting this option a new window will appear, here you will be able to confi gure the following parameters (OSD 37): - On FTA Only item, press [ ] to select scanning of all channels or just scanning of free channels. If you select Yes it will scan free channels only. - On Scan Channel item, press [ ] to select the scanning range from TV + Radio Channels, only TV channels or only Radio channels. - Network Search: If you select this option as No, the receiver will search the selected TP. In case you select Yes, the NIT (Network Identifi cation) will be identifi ed and the receiver will automatically search all the TP of this network. 6. Press [OK] to start scanning. 7. On the TP Scan item, press [Exit] to cancel the scanning and saving the found channels. OSD 37 PAG. 23
![INSTALLATION 5. SYSTEM SETUP OSD 38 Press [Menu] in the TV mode to enter the main menu. 1. Press [ ] to select the System Setup item. 2. Press [OK] to enter the selected item.](/docs-images/76/74285884/images/24-0.jpg "In the System Setup menu (OSD 38): 3. Press [ ] to select the wanted menu item. 4. Press [OK] to enter the selected item among.")
24 INSTALLATION 5. SYSTEM SETUP OSD 38 Press [Menu] in the TV mode to enter the main menu. 1. Press [ ] to select the System Setup item. 2. Press [OK] to enter the selected item. In the System Setup menu (OSD 38): 3. Press [ ] to select the wanted menu item. 4. Press [OK] to enter the selected item among. - Language - TV System - Local Time Setting - Timer Setting - Parental Lock - OSD Setting - Favorite - Other OSD LANGUAGE After selecting the Language menu you will see a window like beside (OSD 39): 1. Language: press [ ] to select languages. The selection of languages include: English, German, French, Spanish, Italian, Portuguese, Turkish, Polish, Russian, Arabic. 2. First Audio: Some channels offer more than one audio language. This function allows you to set the preferred audio language for those channels using [ ]. If a channel offers the same audio language as the First Audio you set the system will play this audio language as default. If the channel does not offer this audio language then the system will compare the offered languages with the second audio language. The selections of audio languages include: English, German, French, Spanish, Italian, Portuguese, Turkish, Polish, Russian, Arabic. 3. Second Audio: If the channel has no audio language that corresponds with First Audio but with Second Audio the system will play the second audio language as default. If no audio language corresponds with the Second Audio then the default language of the current channel will be played instead. The selections of audio languages include: English, German, French, Spanish, Italian, Portuguese, Turkish, Polish, Russian, Arabic. 4. Teletext language: You can choose the predetermined teletext language by using [ ] keys. The selection of the subtitles language includes: English, German, French, Spanish, Italian, Portuguese, Turkish, Polish, Russian, Arabic, Farsi. 5. Press [Exit] to return back from Language menu. PAG. 24

25 INSTALLATION OSD 40 OSD 41 OSD TV SYSTEM When you enter the TV System menu you will see the screen like below (OSD 40): 1. Display Mode is used to switch the display mode. You can select from Auto / PAL / PAL-M / PAL-N / NTSC/ SECAM. Press [ ] to select the desired mode. 2. Aspect Mode is used to switch the screen aspect ratio mode. You can select from Auto / 4:3 PanScan / 4:3 LetterBox / 16:9. Press [ ] to select the needed mode. 3. Video Output is use for switching the screen aspect ratio mode. Now we provide below options: RGB / CVBS. You can press [ ] key to select each mode circularly. 4. Press [Exit] to close the TV System menu LOCAL TIME SETTING When you select Local Time Setting and press [OK] then you will see a window like the one beside (OSD 41): 1. GMT Usage: This item is used to set the time by using the time signal from the satellite. Press [ ] to change the setting. 2. The GMT Offset item is only available when GMT Usage is set to On. Press [ ] to set the GMT Offset value. With every time you press the button the time offset will be increased / decreased by half an hour. 3. Summer Time: this option is only available when USE GMT is enabled. Use [ ] to switch on/off the summer timetable. 4. Date and Time items are only available when the GMT Usage is set to Off. Press [ ] to select one item and use number buttons to input time and date directly. NOTE: If the current channel provides the correct time information, you will see the current time after you entered Time menu. If the channel doesn t provide time information, you have to input the date and time information manually. The most channels support the time signal. 5. Press [Exit] to exit the menu. OSD TIMER SETTING When you enter Timer Setting, you will see the window like OSD 42. You can press [ ] keys to set Timer number, and there are 8 timers in total. When you press [OK] key you will see a screen like beside (OSD 43): 1. Timer Mode: There are several modes for Timer to setting, include Off, Once and Daily. 2. Wakeup Channel: press [OK] key to enter channel list and select channel that you want to setting. 3. Wakeup Date: use number keys to input your wakeup date. PAG. 25
26 INSTALLATION 4. On Time: use number keys to input your wakeup time. Once the time s up, no matter what the system is in standby mode or in playing mode, the system will automatically switch to the channel you want and start to play. 5. Duration: After you set a time for Duration item, once the time s up, the system will automatically switch to standby mode. 6. Press [Exit] key to draw back from Program Timer menu. OSD PARENTAL LOCK You can set a password for anyone who wishes to operate the Installation menu. You can also set the password to lock channels. Below you fi nd how to set and change the password. 1. On Parental Lock, press [OK] to open a dialogue box and input the password. After you entered the correct password, you will see a screen like beside (OSD 44): 2. Menu Lock: If Menu Lock is set to On then you need to enter the password every time you want to open some menus. If it is set to Off then you can open the menu without entering the password fi rst. 3. Channel Lock: If set to On then you need to enter the password before you can see those channels which have been marked as locked channels in the Channel menu. If it is set to Off then even those channels can be selected without entering the password fi rst. 4. New Password: Here you can change the existing password. You should do this after you set up the receiver the fi rst time and every time when you think that your password is known by unauthorized persons. To change the password, enter the new password in the New Password item and repeat the same one in the Confi rm Password item. If the passwords are not identically then you will see a warning message. If you entered the same new password in both fi elds then you will see the message Saving Data, Please Wait. From now on you need to use the new password to open locked menus or locked channels. NOTE: The default password is Press [Exit] to leave the Parental Lock menu. OSD OSD SETTING When you select OSD Setting you will see a screen like beside (OSD 45): 1. OSD Timeout: This setting determines the duration the info window is displayed on the screen when you change channels. Press [ ] to set the time between 1 to 10 seconds. 2. OSD Transparency: With this parameter you can set the transparency of the menus. Press [ ] select the value PAG. 26
![SYSTEM SETUP between 10%, 20%, 30%, and 40% and NO (means no transparency function). 3. Press [Exit] button to leave the OSD Setting menu. OSD 46 5.7.](/docs-images/76/74285884/images/27-0.jpg "FAVORITE In this menu, user is able to change the name of the Favourite Groups. Press [OK] to enter this menu and you will see a screen like beside (OSD 46).")
27 SYSTEM SETUP between 10%, 20%, 30%, and 40% and NO (means no transparency function). 3. Press [Exit] button to leave the OSD Setting menu. OSD FAVORITE In this menu, user is able to change the name of the Favourite Groups. Press [OK] to enter this menu and you will see a screen like beside (OSD 46). To change the name of the Favourites Groups: 1. Press [ ] and select a Favorite Group. 2. Press [Ok] button to edit the name of the Group. 3. Once the name is correct, confi rm pressing [Blue] button. 4. If the name is used by other group, an alert message will appear on the TV. 5. Select Exit and press [OK] to leave this menu OTHER When you select Other you will see a screen like OSD 47: OSD LNB POWER Here you can set the power output to the LNB. If your receiver is connected to the LNB directly then you need to set the LNB Power to On. If your receiver is connected to a multi switch (SMATV signal distribution system) then it may be that you don t need to provide the power to the LNB. But since this is depending on the kind of installed distribution system we recommend you to contact your installer or to refer to the user manual of this system to get the correct information. You also just can change this setting and check if you still can receive the channels. If the LNB Power is off and you still can see all channels then we recommend this setting CHANNEL PLAY TYPE In this option you will be able to choose which type of channels the receiver shown every time it starts. Press [ ] in order to select among All, Free or Scrambled CHANNEL CHANGE From this option you will be able to select the effect that will be shown in the screen every time you change the channel. Press [ ] in order to select between Black screen or Freeze (it will show the frozen image of the cannel you were watching). PAG. 27
28 SYSTEM SETUP AUTO STANDBY This option will allow you to activate or deactivate the automatic Standby option. Options: On, Off. -On: The receiver will be in standby mode automatically after 3 hours, as long as during this time no commands have been sent to the receiver through the remote control or buttons of the front panel, and no programmed timers are run. -Off: Auto standby function gets deactivated. Use [ ] in order to turn this option on/off. PAG. 28
![TOOLS 6. TOOLS OSD 48 Press [Menu] in the TV mode to enter the main menu. 1. Press [ ] to select the Tools item. 2. Press [OK] to enter the selected item. 3. Press [ ] to select the wanted menu item.](/docs-images/76/74285884/images/29-1.jpg "4. Press [OK] to enter the selected item among. - Information - Factory Setting - Software Upgrade by USB 6.1. INFORMATION 1.")

29 TOOLS 6. TOOLS OSD 48 Press [Menu] in the TV mode to enter the main menu. 1. Press [ ] to select the Tools item. 2. Press [OK] to enter the selected item. 3. Press [ ] to select the wanted menu item. 4. Press [OK] to enter the selected item among. - Information - Factory Setting - Software Upgrade by USB 6.1. INFORMATION 1. When you select the Information menu you will see a screen like beside (OSD 49). The screen displays data about the current channel. This function is the same as the function [Info] in the full screen TV mode. 2. Press [Exit] button to leave the information display. OSD FACTORY SETTING When you press [OK] on the Factory Setting item: 1. A warning message will be displayed like the one beside (OSD 50). 2. If you select Yes then all changes you made will be reset to default values. Make sure you really want to do this! 3. Press [Exit] in both steps will close the window without resetting the receiver. OSD 50 OSD UPGRADE BY USB This option allows updating the software of the receiver with the received data from a USB memory device. To do it, connect a USB memory device to the receiver and accede to this menu option (OSD 51). The last software version to be loaded must be placed at the root path of your USB device. 1. Update fi le: Select with [ ], the name of the fi le to be loaded. 2. Upgrade mode: Select with [ ], the mode of upgrading. 3. Select Start and press [OK]. An alert message appears indicating not to take out the memory device during the loading process. 4. Once the fi le has been loaded, it requires the conformity to end the upgrading process, writing into the receiver the PAG. 29
30 TOOLS upgrading. Press [OK] to upgrade the receiver. In case during the reading of the fi le, it is corrupted or it would be a not appropriated for this model of receiver, an alert message would appear Error reading the USB disk. 5. After pressing [OK] the receiver will write into the Flash memory, and it will reboot to end the upgrading process. For further information about the upgrading of the receivers, please visit in the chapter about upgrading receivers. PAG. 30
![GAMES 7. GAMES OSD 52 Press [Menu] in the TV mode to enter the main menu. 1. Press [ ] to select the Game item. 2. Press [OK] to enter the selected item. In the Games menu (OSD 52): 3.](/docs-images/76/74285884/images/31-0.jpg "Press [ ] to select the wanted menu item. 4. Press [OK] to enter the selected item among. - Othello - Sudoku 7.1. OTHELLO 1.")
![Mark Setup and press [ ] to select the game level (degree of diffi culty) (OSD 53). 2. Mark Start and press [OK] to start the game. 3. Mark Cancel and press [OK] to leave the game. 4.](/docs-images/76/74285884/images/31-1.jpg "Play the game: - Press [ ] to position the round mark. - Press [OK] to set your stone. - Press [Exit] to quit the game and return to the Game menu. OSD 53 7.2. SUDOKU 1.")
![Moving highlight to Setup and press [ ] keys to select the game level (degree of diffi culty) (OSD 54). 2. Moving highlight to Start and press [OK] key to start the game. 3.](/docs-images/76/74285884/images/31-2.jpg "Select the option Replay and press [OK] in order to start again the same game. 4. Select the option Solve and press [OK] in order to see the solution of the game. 5.")
31 GAMES 7. GAMES OSD 52 Press [Menu] in the TV mode to enter the main menu. 1. Press [ ] to select the Game item. 2. Press [OK] to enter the selected item. In the Games menu (OSD 52): 3. Press [ ] to select the wanted menu item. 4. Press [OK] to enter the selected item among. - Othello - Sudoku 7.1. OTHELLO 1. Mark Setup and press [ ] to select the game level (degree of diffi culty) (OSD 53). 2. Mark Start and press [OK] to start the game. 3. Mark Cancel and press [OK] to leave the game. 4. Play the game: - Press [ ] to position the round mark. - Press [OK] to set your stone. - Press [Exit] to quit the game and return to the Game menu. OSD SUDOKU 1. Moving highlight to Setup and press [ ] keys to select the game level (degree of diffi culty) (OSD 54). 2. Moving highlight to Start and press [OK] key to start the game. 3. Select the option Replay and press [OK] in order to start again the same game. 4. Select the option Solve and press [OK] in order to see the solution of the game. 5. Moving highlight to [Exit] keys and press [OK] key to draw back from the game. 6. Use the keys [ ] to guide the pointer. 7. Use the numeric keypad in order to add a number in every square. 8. [Exit] Quit game and draw back to Game menu. OSD 54 PAG. 31
32 TECHNICAL SPECIFICATION 8. TECHNICAL SPECIFICATION VIDEO Decoding Bit rate Output Active pixel Output connector MPEG-2 & MEPG-1 compatible Max 15Mbps PAL/NTSC/SECAM 30fps; Scart AUDIO Decoding Mode Bit rate Output connector MPEG-2/MPEG-1 layer I & II Mono, Dual, Stereo, Joint stereo Max 384Kbps Scart DEMODULATOR Demodulation Symbol rate Outer code Inner code Energy dispersion INPUT SIGNAL Frequency Input level Channel bandwidth Input socked LNB CONTROL Power supply Polarized control DiSEqC control MISCELLANEOUS Connector USB Supply voltage Power consumption Operation temperature Storage temperature Dimension (W x D x H) Weight QPSK SCPC/MCPC RS (204, 188, 8) ALL DVB rates DVB-S recommendation 950MHz ~ 2150MHz -65dBm ~ -25dBm 36MHz F-type connector 13/18V (500mA max) with short circuit protection 13/18V polarization (vertical/horizontal) DiSEqC1.0 DiSEqC1.1 and DiSEqC 1.2 USB ~240VAC 50~60 Hz Max. 5 W, Standby < 1 W +5 a a x70x25 mm 330 g PAG. 32
33 CONFORMITY DECLARATION WE, FTE MAXIMAL, DECLARE THAT THE PRODUCT MAX S21 IS IN CONFORMITY WITH FOLLOWING DIRECTIVES LOW VOLTAGE DIRECTIVE 2006/95/EC EMC DIRECTIVE 2004/108/EC PAG. 33
English SAFETY PRECAUTION DO NOT INSTALL THE RECEIVER: PAG. 2
 U4127 SAFETY PRECAUTION The lightning fl ash with arrowhead symbol, within an equilateral triangle, is intended to alert the user to dangerous voltage and to prevent from a risk of electric shock. Warning:
English SAFETY PRECAUTION DO NOT INSTALL THE RECEIVER: PAG. 2
 U4109 SAFETY PRECAUTION The lightning fl ash with arrowhead symbol, within an equilateral triangle, is intended to alert the user to dangerous voltage and to prevent from a risk of electric shock. Warning:
SAFETY PRECAUTION ENGLISH DO NOT INSTALL THE RECEIVER: PAG. 2
 MAX S92+ HDMI SAFETY PRECAUTION The lightning fl ash with arrowhead symbol, within an equilateral triangle, is intended to alert the user to dangerous voltage and to prevent from a risk of electric shock.
English SAFETY PRECAUTION DO NOT INSTALL THE RECEIVER: PAG. 2
 U4125 SAFETY PRECAUTION The lightning fl ash with arrowhead symbol, within an equilateral triangle, is intended to alert the user to dangerous voltage and to prevent from a risk of electric shock. Warning:
SAFETY PRECAUTION ENGLISH PAG. 2. rev 1.2. dangerous voltage and to prevent only. operating and maintenance from a risk of electric shock.
 MAX S93+ SAFETY PRECAUTION The lightning fl ash with arrowhead WARNING: To reduce the risk of The exclamation point within an symbol, within an equilateral triangle, electric shock, don t open the cabinet.
Receiver/Digital Decoder DVB-T2 Set Top Box. Installation Manual & User Manual
 Receiver/Digital Decoder DVB-T2 Set Top Box Installation Manual & User Manual SAFETY PRECAUTION CAUTION: The lightening flash with arrowhead symbol, within an equilateral triangle, is intended to alert
Xpresionn Digital Terrestrial Receiver. User Guide
 Xpresionn 2150 Digital Terrestrial Receiver User Guide GENERAL INFORMATION...3 A) SAFETY PRECAUTIONS...3 B) MAIN FEATURES...4 C) CONTENTS OF THE PACKAGING...4 D) REMOTE CONTROL...5 INSTALLATION...6 A)
SIRD-FTA Free-to-Air Digital Satellite Receiver PICO MACOM. SIRD-FTA-2 Owners Manual
 VOL- VOL+ MENU OK CH- CH+ P O W E R L O C K Free-to-Air Digital Satellite Receiver SIRD-FTA Free-to-Air Digital Satellite Receiver Owners Manual Please read this manual thoroughly before use. Keep this
GENERAL INFORMATION INSTALLATION MENU INFORMATION. Main Features For your Safety Unpacking General Operation RCU Rear Panel.
 GENERAL INFORMATION 3 Main Features For your Safety Unpacking General Operation RCU Rear Panel 3 4 7 7 8 9 INSTALLATION 10 MENU INFORMATION Main Menu 1. Installation 1.1 Satellite list 1.2 Dish Setting
SYMBOLS USED ON THE RECEIVER... 3 SAFETY INSTRUCTIONS... 4 I.GENERAL INFORMATION...
 Table of Contents SYMBOLS USED ON THE RECEIVER... 3 SAFETY INSTRUCTIONS... 4 I.GENERAL INFORMATION... 5 1. Preface... 5 2. Main Features... 5 3. General Operation of the Receiver... 6 4. Front Panel...
Quick Start Digital Satellite Receiver
 Quick Start Digital Satellite Receiver Support of SD (MPEG2), DVB-S system Standard resolution video output - SCART Compatible with Diseqc 1.0, 1.1, 1.2, and USALS Electronic Program Guide - EPG Multilingual
User Manual High Definition Digital Set Top Box DVBT9070 Please read this User Manual carefully to ensure proper use of this product and keep this man
 User Manual High Definition Digital Set Top Box DVBT9070 Please read this User Manual carefully to ensure proper use of this product and keep this manual for future reference. Important Safety Instructions
Table of Contents. Table of Contents. Safety Warning General Information. Installing Equipment Channel List Guide Menu Guide Main Page
 TABLE OF CONTENTS Table of Contents Table of Contents Safety Warning General Information Package Contents & Features Front Panel Rear Panel Remote Control Unit (RCU) Programing the Remote Control Installing
User s Manual S9 HD PVR
 User s Manual S9 HD PVR High Definition Digital Satellite Recorder Personal Video Recorder 1 Common Interface 4 CONTENTS 1. REMOTE CONTROLLER...7 2. BASIC OPERATIONS...8 2.1 TURN ON STB..8 2.2 POWER.8
S7030PVR User Manual
 S7030PVR User Manual Important Safety Instructions 1) Do not use this apparatus near water. 2) Clean only with dry cloth. 3) Do not block any ventilation openings, install in accordance with the instructions.
User s Manual Digital Satellite Receiver
 A_ENG_110944 User s Manual Digital Satellite Receiver Please read the entire manual thoroughly and retain it for future reference. ENG - 1 General Safety Warning CAUTION RISK OF ELECTRIC SHOCK DO NOT OPEN
MAX T200 HD QUICK INSTALLATION GUIDE
 MAX T200 HD QUICK INSTALLATION GUIDE MAX T200 HD QUICK INSTALLATION GUIDE CONTENT receiver BATTERIES x 2 REMOTE CONTROL Quick installation guide Quick Installation Guide The lightning flash with arrowhead
Be sure to run the vehicle engine while using this unit to avoid battery exhaustion.
 CAUTION: TO REDUCE THE RISK OF ELECTRIC SHOCK DO NOT REMOVE COVER (OR BACK) NO USER-SERVICEABLE PARTS INSIDE REFER SERVICING TO QUALIFIED SERVICE PERSONNE; Please Read all of these instructions regarding
Digital Terrestrial Television Receiver USER S MANUAL
 # 5024 Digital Terrestrial Television Receiver USER S MANUAL CAUTION RISK OF ELECTRIC SHOCK DO NOT OPEN This symbol is intended to alert the user to the presence of insulated dangerous voltage within the
GDB9 INSTRUCTION MANUAL DIGITAL TERRESTRIAL RECEIVER
 GDB9 INSTRUCTION MANUAL DIGITAL TERRESTRIAL RECEIVER Goodmans Support: www.goodmans.co.uk/support Please read these instructions before use and keep for future reference IMPORTANT SAFETY INSTRUCTIONS Thank
FV400 DIGITAL TV RECEIVER WITH MODULATOR INSTRUCTION MANUAL
 FV400 DIGITAL TV RECEIVER WITH MODULATOR INSTRUCTION MANUAL Please read this instruction manual carefully before using your receiver Table of Contents Introduction-----------------------------------------------------------------------------
User Manual. High Definition Digital Set Top Box HDSTB250
 User Manual High Definition Digital Set Top Box HDSTB250 CHANNEL HDSTB250 Please read this User Manual carefully to ensure proper use of this product and keep this manual for future reference. Important
Throughout the whole user manual, pay special attention to the following marks that
 Notice Warnings, Cautions and Notes Throughout the whole user manual, pay special attention to the following marks that indicate hazardous situations. Warning ** Indicates a hazardous situation which could
User manual FT-8100 HD. English
 User manual FT-8100 HD English WARNING!!! On the USB Memory Function for FT-8100 HD model, user can make recording or playing function using by external USB devices such as USB Flash Memory Disk or external
Quick Start Digital Satellite Receiver HD
 Quick Start Digital Satellite Receiver HD One slot for Smart Card in Conax system One slot for Common Interface Module Support of SD / HD (MPEG2 / MPEG4 H.264), DVB-S, DVB-S2 system High resolution video
DIGITAL SET TOP BOX STB 7017 INSTRUCTION MANUAL
 DIGITAL SET TOP BOX STB7017 INSTRUCTION MANUAL STB 7017 CHANNEL After Sales Support Now you have purchased a Tevion product you can rest assured in the knowledge that as well as your 3 year parts and labour
Instructions for use. UFS 810 English IMPORTANT READ CAREFULLY BEFORE USE
 Instructions for use UFS 810 English IMPORTANT READ CAREFULLY BEFORE USE List of Contents 1 About these instructions...4 1.1 Contents...4 1.2 Markings...4 1.2.1 Pre-requirements for certain functions...4
User s manual MAX IPS100. Table of contents
 Table of contents 0. Control elements and connections...3 0.1. Receiver front panel...3 0.2. Receiver back panel...3 0.3. Remote control...4 1. First installation...5 1.1. Complete Content...5 1.2. Accessories
Xsarius Satmeter Pro. Manual
 Xsarius Satmeter Pro Manual 1 2 Directory of content Introduction Directory of content 3 Introduction 3 Satmeter Pro 02 Frontpanel & buttons 6 Xsarius provides high quality products that enable you to
I.General Information Preface Main Features For Your Safety General Operation of the Receiver Front Panel...
 I.General Information...3 1. Preface...3 2. Main Features...3 3. For Your Safety...4 4. General Operation of the Receiver...4 5. Front Panel...5 6. Rear Panel...6 7. Remote control unit...7 8. Installation
CONNECTION TO THE SATELLITE DISH LNB
 Safety Instructions Safety Instructions This product has been manufactured to satisfy the international safety standards. Please read all of safety and operating instructions before operating the product
User s Guide. Digital Satellite Receiver
 User s Guide Digital Satellite Receiver Before Getting Started Information contained in this manual is subject to change without notice. No part of this publication may be copied, reproduced, or translated
SET TOP BOX MODEL: GDB01SFV1 USER MANUAL
 SET TOP BOX MODEL: USER MANUAL 1 2 3 4 5 6 7 8 Welcome Your Set Top Box 2.1 In The Box 2.2 Front View 2.3 Rear View Quick Setup 3.1 TV Connection 3.2 Recording from the set top box 3.3 Record one channel
Contents. Safety instructions Reference 1.1 Genareal Features Delivery... 04
 HD 580 user manual Contents Safety instructions... 03 1. Reference 1.1 Genareal Features... 04 1.2 Delivery... 04 2. Names and key assignment 2.1 Front view... 05 2.2 Rear view... 05 2.3 Remote Control...
User's Manual 700HDMI PVR
 Digital Satellite Receiver User's Manual 700HDMI PVR INDEX INDEX... 3 Precautions... 5 1. Important Safety Instructions... 5 2. Notice... 5 3. Copyright... 6 4. Disclaimer... 6 Before You Begin... 7 1.
NMS ETA TM Stereo Advanced Digital TV Set-top Box
 Digital TV HD Set-top Box STB2-T2 NMS ETA TM Stereo Advanced Digital TV Set-top Box User Guide CONTENTS Safety Information... 3 Introduction... 4 Set-top Box Front Panel... 4 Set-top Box Back Panel...
Thank you for purchasing STB10HD Digital High Definition Set Top Box.
 Thank you for purchasing STB10HD Digital High Definition Set Top Box. This manual will help you to install, use and maintain the receiver. Please read this manual carefully before operating your unit and
PART 1 English 1.0 Usage
 SAT OUT SAT IN Thank you for choosing this Strong satellite receiver. This receiver is of our latest development and it is designed to be capable of safely install your receiver and to achieve its optimum
User s manual U6000. Index. 0 Control elements and connections Front Panel Rear Panel Remote control...
 Index 0 Control elements and connections...3 0.1 Front Panel... 3 0.2 Rear Panel... 3 0.3 Remote control... 4 1 First installation...5 1.1 Box content... 5 1.2 Accessories and installation examples...
SAFETY PRECAUTION. PDF 文件使用 "pdffactory Pro" 试用版本创建
 1 SAFETY PRECAUTION 1 2 CAUTION: The lightning flash with arrowhead Warning: The exclamation point within an symbol, within an equilateral triangle, To reduce the risk of electric shock, equilateral triangle
User s manual MAX IP90. Table of contents
 Table of contents 0. Control elements and connections...3 0.1. Receiver front panel...3 0.2. Receiver back panel...3 0.3. Remote control...4 1. First installation...5 1.1. Complete Content...5 1.2. Installation
User s manual MAX IPT150. Table of contents
 Table of contents 0. Control elements and connections...3 0.1. Receiver front panel...3 0.2. Receiver back panel...3 0.3. Remote control...4 1. First installation...5 1.1. Complete Content...5 1.2. Accessories
Quick Start Digital Terrestrial Receiver
 Quick Start Digital Terrestrial Receiver Support of SD / HD (MPEG2 / MPEG4 H.264), DVB-T system PVR Ready - possibility to record on external USB drive Time Shift (video pausing, rewinding) HDMI video
Front and Rear Panel Remote Control Connecting to a Television...4. Connecting to an Audio System...5
 Table of Contents Front and Rear Panel... 1 Remote Control...... 2 Connecting to a Television...4 Connecting to an Audio System...5 Connecting to a DVD Recorder or VCR... 6 First Time Installation... 7
Remote Control Unit
 Contents Declaration of Conformity --------------------------------------------------------------------------------- 3 General Information -----------------------------------------------------------------------------------------
User s Guide. HD Satellite Receiver Pansat 9500HDX
 User s Guide HD Satellite Receiver Pansat 9500HDX Panarex Electronics Sun Valley, California, U.S.A. c 2011 by Panarex Electronics 1 CONTENTS 1 - GETTING STARTED... 4 1.1 Introduction... 4 1.2 Caution...
User Manual. Digital Satellite Receiver. Model ID: ALi CX. mod. English 1/2010 jp
 User Manual Digital Satellite Receiver Model ID: ALi CX mod. English 1/2010 jp CONTENTS 1. SAFETY PRECAUTIONS... 3 2. ENVIRONMENT PROTECTION... 4 3. REMOTE CONTROL... 5 4. FRONT PANEL... 7 5. REAR PANEL...
Warning: To reduce the risk of electric shock, don't open the cabinet. Refer servicing to qualified personnel only.
 SAFETY PRECAUTION CAUTION: The lightning flash with arrowhead symbol, within an equilateral triangle, is intended to alert the user to "dangerous voltage" and to prevent from a risk of electric shock.
1. Safety precautions Environment protection Features Accessories Front panel Rear panel...
 Contents 1. Safety precautions... 1 2. Environment protection... 3 3. Features... 4 4. Accessories... 4 5. Front panel... 4 6. Rear panel... 5 7. Remote controller... 6 8. Basic connection... 7 8.1. Connecting
DVB-T2. Digital Terrestrial Receiver WD-822T2 USER S MANUAL
 DVB-T2 Digital Terrestrial Receiver WD-822T2 USER S MANUAL Index Important Safety Instructions... 3 Main Features.... 5 Front and Rear Panel.... 6 Remote Control..... 7 Installing the Batteries..... 8
English CONTENTS 1. GUIDE OUTLINE THE MENU OSD INSTRUCTION TECHNICAL SPECIFICATION...17
 USER S MANUAL English CONTENTS 1. GUIDE...2 1.1 IMPORTANT SAFETY INSTRUCTIONS...2 1.2 UNPACKING...2 1.3 PRODUCT OVERVIEW& ILLUSTRATION...3 1.4 INSTALLATION OF METER...4 2. OUTLINE...5 3. THE MENU OSD INSTRUCTION...6
Table of Contents. Table of Contents
 Table of Contents Table of Contents 1. SAFETY PRECAUTIONS 2. GENERAL FEATURES 3. HARDWARE DESCRIPTION 4. HOW TO CONNECT YOUR RECEIVER 5. SYSTEM SETUP 6. MENU STRUCTURE 7. MENU OPERATION 7.1. USER SETTING
OWNER'S MANUAL MODEL: DTV-2000 STANDBY/ON
 OWNER'S MANUAL MODEL: DTV-2000 STANDBY/ON CH+ CH- TABLE OF CONTENTS SAFETY PRECAUTIONS IMPORTANT SAFETY INSTRUCTIONS and FEATURES ACCESSORIES and LOADING BATTERIES REMOTE CONTROL UNIT FRONT PANEL and REAR
CONTENT RECEIVER ENGLISH BATTERIES X 2 REMOTE CONTROL QUICK INSTALLATION GUIDE. rev 1.0 PAG. 2
 MAX T90 HD CONTENT RECEIVER BATTERIES X 2 REMOTE CONTROL QUICK INSTALLATION GUIDE PAG. 2 QUICK INSTALLATION GUIDE The lightning fl ash with arrowhead symbol, within an equilateral triangle, is intended
DVB-S2 REC10 MANUAL (p. 2) High definition DVB-S2 receiver
 High definition DVB-S2 receiver") DVB-S2 REC10 MANUAL (p. 2) High definition DVB-S2 receiver 2013-03-15 ENGLISH High definition DVB-S2 receiver Introduction: We recommend that you read this manual before installing/using this product.
DVB-S2 REC10 MANUAL (p. 2) High definition DVB-S2 receiver 2013-03-15 ENGLISH High definition DVB-S2 receiver Introduction: We recommend that you read this manual before installing/using this product.
Digital Terrestrial Receiver SRT 5200/SRT 5202/SRT5205
 Digital Terrestrial Receiver SRT 5200/SRT 5202/SRT5205 Picture similar User manual Table of Contents 1.0 Instruction 2 1.1 Safety Instructions 2 1.2 Storage 3 1.3 Equipment Set-up 4 1.4 Features & Accessories
CONTENTS SAFETY PRECAUTION...3 ENVIRONMENT PROTECTION...4 FRONT PANEL...5 REAR PANEL...5 CONNECTING YOUR SYSTEM...6 REMOTE CONTROLLER...
 CONTENTS SAFETY PRECAUTION...3 ENVIRONMENT PROTECTION...4 FRONT PANEL...5 REAR PANEL...5 CONNECTING YOUR SYSTEM...6 REMOTE CONTROLLER...7 1. BASIC OPERATIONS...9 1.1 TURN ON STB...9 1.2 POWER... 9 1.3
USER S MANUAL. Digital Satellite Receiver
 USER S MANUAL Digital Satellite Receiver E109000257A STRONG & Co. (FAR EAST), LTD. P. O. Box : 85, YOKOHAMA, KANAGAWA-KEN JAPAN 231-91 - FAX : +81 45 662-4957 Website : www.strong-technologies.com E-mail
User Manual of digital Set Top Box PAT1 02
 User Manual of digital Set Top Box PAT1 02 Please read this User Manual carefully to ensure proper use of this product and keep this manual for future reference. Important Safety Instructions 1) Read these
Digital Terrestrial Receiver SRT 5300
 Digital Terrestrial Receiver SRT 5300 Picture similar User manual www.strong.tv 17 Feb 2011 21:16 1 2 3 4 5 1 Table of Contents 1.0 Instruction 2 1.1 Safety Instructions 2 1.2 Storage 3 1.3 Equipment Set-up
Alpha Plus. User Guide
 Alpha Plus User Guide Contents Contents i 1 Introduction 1 1.1 Features.............................. 1 1.2 Accessories............................ 2 1.3 The Remote Control....................... 3 1.4
Digital High Definition Satellite Receiver SRT 7000
 Digital High Definition Satellite Receiver SRT 7000 Picture similar User Manual Table of Contents 1.0 Instruction 2 1.1 Safety Instructions 2 1.2 Storage 2 1.3 Equipment Set-up 2 1.4 Accessories 3 1.5
IMPORTANT SAFETY INSTRUCTIONS
 IMPORTANT SAFETY INSTRUCTIONS All the safety and operating instructions should be read before operating this product. The safety and operating instructions should be retained for future reference. All
DIGITAL SATELLITE RECEIVER ESR-D101 INSTRUCTION MANUAL
 DIGITAL SATELLITE RECEIVER ESR-D101 INSTRUCTION MANUAL 1 SATETY INSTRUCTION Please read the following instructions carefully Do not overload the following wall outlets, extension cords or integral convenience
Contents. 1. Introduction Overview 1.2 Main Features. 2. Safety/Precautions Safety 2.2 Precautions
 HTS 9300 Contents 1. Introduction 2 1.1 Overview 1.2 Main Features 2. Safety/Precautions 3 2.1 Safety 2.2 Precautions 3. Check Point before Use 5 3.1 Accessories 4. Controls/Functions 6 4.1 Front Panel
ASF 2050 COMBO USER MANUAL
 ASF 2050 COMBO USER ASF 2050 COMBO USER 1. BUTTONS AND INDICATORS... 2 2. BASIC FUNCTIONS.... 4 2.1 Satellite... 5 2.2Terrestrial... 24 2.3 Cable... 33 2.4 Saving... 41 2.5 System Setting... 42 2.6 USB
OPERATION Channel Manager HDD Installation... 22
 1.General Information... 3 2. Main Features... 3 3. FOR YOUR SAFETY... 4 4. ACCESSORIES... 4 OVERVIEW... 6 1. REMOTE CONTROL KEY... 6 2.FRONT PANEL... 8 3.REAR PANEL... 9 CONNECTION DIAGRAMS... 11 1. PVRX2
CONTENTS 8 ACCESSORIES 13 9 TROUBLE SHOOTING AND ADVICE SPECIFICATIONS BATTERY USAGE CAUTION 13
 CONTENTS 1 PREFACE 2 2 SAFETY PRECAUTIONS 2 3 FRONT & BACK VIEW, REAR CONNECTION OF LCD 3 4 TV INSTALLATION DRAWINGS 4 4.1 ANTENNA CONNECTION 4 4.2 AV1 INPUT CONNECTION 4 4.3 AV2 INPUT CONNECTION 4 4.4
HRS 8590 LAN. User s Manual
 HRS 8590 LAN User s Manual Content Safety Precaution...3 1. Reference... 4 1.1 General Features... 4 1.2 Accessories... 4 2. Product Overview... 5 2.1 Front Panel... 5 2.2 Rear Panel... 6 2.3 Remote Control
WARNING/CAUTION FCC NOTICE
 WARNING/CAUTION The lightning flash with ar rowhead symbol, within an equilateral triangle, is intended to alert the user to the presence of uninsulated dangerous voltage within the product s enclosure
STM 26 HD. DVB-S2+T2/C Compact meter User Manual. Ref R13. CAHORS Digital CS Cahors Cedex 9 FRANCE
 STM 26 HD DVB-S2+T2/C Compact meter User Manual Ref 0145225R13 Preface USER MANUAL Please read this manual carefully before using your Digital Sat meter for the first time. This operating manual will help
HD Digital Satellite Receiver. User s Manual
 HD Digital Satellite Receiver ZDX-670 User s Manual Keep this manual for future reference II General Safety This STB has been manufactured to meet international safety standards. Please read the following
TTR 100 Digital Terrestrial Receiver. TTR 110 Digital Terrestrial Twin Tuner Receiver. Look, Listen & Live.
 TTR 100 Digital Terrestrial Receiver TTR 110 Digital Terrestrial Twin Tuner Receiver User manual Look, Listen & Live www.thomsonstb.net Table of Contents 1.0 Instruction 2 1.1 Safety Instructions 2 1.2
1. Before Getting Started Main Features Accessories 2
 çêðð Ð Í» Š ̱ Š Þ± Ë» Ž Ù«¼» For your safety Information contained in this manual is subject to change without notice. No part of this publication may be copied, reproduced, or translated to another
Safety warning Important Safety Instructions. Wall Mount Specifications. Electronic Program Guide. Lock Menu 18. PVR File System
 LT-32N370Z 32 INPUT Safety warning Important Safety Instructions Wall Mount Specifications Electronic Program Guide Lock Menu 18 PVR File System 11 11 11 14 15 16 17 19 20 21 21 22 23 24 25 INPUT AAA
English CONTENTS 1. GUIDE OUTLINE THE MENU OSD INSTRUCTION TECHNICAL SPECIFICATION TROUBLE SHOOTING...
 English CONTENTS 1. GUIDE...2 1.1 IMPORTANT SAFETY INSTRUCTIONS...2 1.2 UNPACKING...2 1.3 PRODUCT OVERVIEW& ILLUSTRATION...3 1.4 INSTALLATION OF METER...4 2. OUTLINE...5 3. THE MENU OSD INSTRUCTION...6
USER MANUAL KGN1080P32VD
 USER MANUAL KGN1080P32VD USB... Power cord Remote control/batteries Power/Standby button Picture mode button Sound mode button Multi-digits channel buttton P.MODE S.MODE FREEZE SLEEP 1 2 3 4 5 6 7 8 9
CONNECTION TO THE SATELLITE DISH LNB
 Safety Instructions Safety Instructions This product has been manufactured to satisfy the international safety standards. Please read all of safety and operating instructions before operating the product
Goodmans Helpline Phone Number
 Goodmans Helpline Phone Number 0870 873 0080 contents Introduction 4 Connecting up 5 Overview diagrams 6 Getting started 8 Using the main menu 10 Troubleshooting 15 Technical Specifications 16 3 introduction
INSTRUCTIONS MANUAL SAVE THESE INSTRUCTIONS IN A SAFE PLACE FOR FUTURE REFERENCE
 High Definition Digital Set Top Box MPF3573HU INSTRUCTIONS MANUAL SAVE THESE INSTRUCTIONS IN A SAFE PLACE FOR FUTURE REFERENCE Important Safety Instructions 1) Read these instructions. 2) Keep these instructions.
USER S Manual NGLT104WPD NGLT150WPD LCD TV / Monitor (IP67 Grade)
") USER S Manual NGLT104WPD NGLT150WPD LCD TV / Monitor (IP67 Grade) This Manual is revisable without further notice Contents CONTENTS ------------------------------------------------------------------- 1
USER S Manual NGLT104WPD NGLT150WPD LCD TV / Monitor (IP67 Grade) This Manual is revisable without further notice Contents CONTENTS ------------------------------------------------------------------- 1
DIGITAL SATELLITE METER
 DIGITAL SATELLITE METER THE PROFESSIONAL EQUIPMENT DIGITAL SATELLITE METER THE PROFESSIONAL EQUIPMENT USER S MANUAL Product Description 1.Guide 2. Menu 1.1 Face Panel & Button 1.2 Power On/Off 1.3Power
The product must be installed in accordance with national regulations.
 Important safety instructions to be kept with the product Please read attentively To prevent fire and electric shock, do not expose this receiver to rain or moisture. In order to avoid any possible risk
Ref SATELLITE. User Manual. High Definition TV Satellite Receiver.
 SATELLITE High Definition TV Satellite Receiver Ref. 717501 User Manual www.televes.com Index SATELLITE 1. Safety recommendations............................................................ 4 2. General
8.2 EPG Subtitle Teletext Additional Information Trouble Shooting Technical Specification...
 HD AX 150 Content 1. Reference... 4 1.1 General Features... 4 2. Product Overview... 5 2.1 Front Panel... 5 2.2 Rear Panel... 5 2.3 Remote Control Unit (RCU)... 6 3. Installation... 7 3.1 Antenna Settings...
HDTV-Sat-Irdeto-Receiver
 HDTV-Sat-Irdeto-Receiver TABLE OF CONTENTS 1 SAFETY ADVICE... 4 2 QUICK SETUP... 6 3 FEATURES... 8 4 HOW TO CONNECT YOUR RECEIVER... 9 5 HARDWARE:... 11 6 WATCHING TV... 15 7 MENU OPERATION... 23 8 EDITING
Table of Contents Safety Precautions 1.1 Safety Precautions... Introduction to the Product 2.1 Features Important Information
 best, and Table of Contents Safety Precautions 1.1 Safety Precautions..... 1 Introduction to the Product 2.1 Features..... 3 2.2 Important Information... 4 2.3 The Device and Accessories... 5 Functional
English CONTENTS 1. GUIDE OUTLINE THE MENU OSD INSTRUCTION TECHNICAL SPECIFICATION TROUBLE SHOOTING...
 USER S MANUAL English CONTENTS 1. GUIDE...2 1.1 IMPORTANT SAFETY INSTRUCTIONS...2 1.2 UNPACKING...2 1.3 PRODUCT OVERVIEW& ILLUSTRATION...3 1.4 INSTALLATION OF METER...4 2. OUTLINE...5 3. THE MENU OSD INSTRUCTION...6
English DMB-118HDMK3
 English DMB-118HDMK3 Table of Contents Safety Information...1 System Connection...1 Remote Control...2 First Time Installation...3 Basic Operation...3 Change Channel...3 Volume and Mute...3 Subtitle/Audio
healing HHR787 HD Digital Terrestrial Twin Tuner Recorder Operating Manual INTRODUCTION... 3 HHR787 FEATURES... 4 SAFETY INSTRUCTIONS...
 CONTENTS INTRODUCTION... 3 HHR787 FEATURES... 4 SAFETY INSTRUCTIONS... 5 FRONT PANEL AND REAR PANEL...6 and 7 REMOTE CONTROL UNIT KEY FUNCTIONS...8 and 9 REMOTE CONTROL BATTERY CARE... 10 INSTALLATION
DSR 9500A FTA, CI, EM VIA, VIA CI. Instructions for use REV 1.0 DIGITAL SATELLITE RECEIVER MF A
 DSR 9500A FTA, CI, EM VIA, VIA CI Instructions for use REV 1.0 GB MF68-00247A DIGITAL SATELLITE RECEIVER SAFETY INSTRUCTIONS This STB has been manufactured to satisfy international safety standards. Please
Content. Safety Precaution General Features Accessories Front Panel Rear Panel Remote Control Unit...
 Content Safety Precaution...3 1. Reference 1.1 General Features...4 1.2 Accessories...5 2. Basic Function 2.1 Front Panel...6 2.2 Rear Panel...7 2.3 Remote Control Unit...8 3. Installation and Connection
DSR 5580 Digital SAT-Receiver
 DSR 5580 Digital SAT-Receiver Operating Instructions Operating Instructions Contents Contents...2 General information...4 Safety and installation information...4 Connecting up the receiver...6 Controls,
CONTENTS 1. SAFETY INTRODUCTION FEATURES REMOTE CONTROL FRONT PANEL REAR PANEL CONNECTING YOUR SYSTEM...
 CONTENTS 1. SAFETY...3 2. INTRODUCTION...4 3. FEATURES...4 4. REMOTE CONTROL...5 5. FRONT PANEL....6 6. REAR PANEL...6 7. CONNECTING YOUR SYSTEM...6 8. BASIC OPERATIONS...8 8.1 TURN ON STB...8 8.2 POWER...8
1. GUIDE Important Safety Instructions Unpacking PRODUCT OVERVIEW&ILLUSTRATION INSTALLATION OFMETER
 1. GUIDE... 3 1.1 Important Safety Instructions... 3 1.2 Unpacking... 3 1.3 PRODUCT OVERVIEW&ILLUSTRATION... 4 1.4 INSTALLATION OFMETER... 6 2. OUTLINE... 6 3. THE MENU OSD INSTRUCTION... 7 3.1 DVB S2...
Contents. English - 1 -
 Contents Accessories... 2 Features... 2 Introduction... 2 Preparation... 2 Safety Precautions... 2 Power Source... 2 Power Cord... 2 Moisture and Water... 2 Cleaning... 3 Heat and Flames... 3 Lightning...
Table of Contents. Safety Instruction 2. Trademark Information 3 Introduction 4. Package Contents 4. Features 5. Product Overview 6 Front Panel 6
 - 0 - Table of Contents Safety Instruction 2 Trademark Information 3 Introduction 4 Package Contents 4 Features 5 Product Overview 6 Front Panel 6 Rear Panel 7 Remote Control 8 System Installation 11 Setting
High Definition Digital Set Top Box With USB Record DFTA45R. The Gold Technical Support Line: (Charges will apply at $2.
 High Definition Digital Set Top Box With USB Record INSTRUCTION MANUAL DFTA45R The Gold Technical Support Line: 1902 215 259 (Charges will apply at $2.95 per minute) Safety Instructions Always read the
DIGITAL TERRESTRIAL RECEIVER NVR-2090DU CHANNEL
 DIGITAL TERRESTRIAL RECEIVER NVR-2090DU CHANNEL 1 Espanol ~ Digital Video Broadcasting 2 3 STANDBY DTV/VCR TEXT MUTE VOL+ INFO PLAY/PAUSE EPG VOL- CH+ STOP SETUP EXIT 23 FAV- ENTER FAV+ 24 25 SOURCE CH-
Operating manual. DVB Satellite Receiver UFS 640si
 Operating manual DVB Satellite Receiver UFS 640si PREFACE Dear customer, This operating manual is intended to help you make the fullest use of the extensive range of functions offered by your new satellite