MOMENTUM PHONOSTAGE OWNER S MANUAL
|
|
|
- Karen Morton
- 6 years ago
- Views:
Transcription

1 MOMENTUM PHONOSTAGE OWNER S MANUAL

2 A note from Dan D Agostino FOUNDER, CEO, AND CHIEF DESIGNER OF DAN D AGOSTINO MASTER AUDIO SYSTEMS Thank you for investing in my Momentum phonostage. For me, this component is a dream come true. I always knew there was more music in the grooves of vinyl records than we were hearing, and finding those hidden depths and details was the reason I designed the Momentum phonostage. I knew when I began work on the Momentum phonostage that I couldn t change the fundamentals. Those classic analog phono preamps many of which I designed have a natural, musical sound we all love. But what if I could combine the soul of a traditional analog phono preamp with the precision and adjustability available through modern technology? That s how the Momentum phonostage works. Remove the cover and you see classic analog circuitry, all built by hand in my Arizona factory using through-hole construction for the best possible sound quality (and maximum reliability, too). Look at the front panel, though, and you ll see this circuitry is controlled in precise steps, all made possible through digitally controlled resistors and other state-of-the-art components. It s the best of both worlds. The audio path is 100% analog, but with none of the imprecision and performance compromises we normally have to settle for in analog circuits with oldfashioned mechanical controls. For me, this component is a dream come true. Another major inspiration behind the Momentum phonostage is the explosion of interest in analog, and the ever-growing variety of cartridges. Every cartridge presents its own unique set of loading requirements, and finding them often requires experimentation. There s no better and easier way to experiment with your vinyl setup than with the Momentum phonostage! I put all the controls right on the front panel with individual displays to show all the settings. No DIP switches, no menus. Just push and listen. Find a new setting or go back to an old favorite. It s all easy, just as it should be. The product you see before you was built by hand by skilled artisans and technicians, all within about 20 feet from my desk. We tested it before we shipped it to make sure it performs perfectly and that it will give you the same musical joy it gives me. I would like to recognize and thank William Hughes, one of my engineers, for his invaluable help in the design of the Momentum phonostage. Sincerely,
3 UNPACKING AND INSTALLATION CAUTION: NO USER SERVICEABLE PARTS INSIDE. Do not open the amplifier s chassis or remove any of its screws. Contact Dan D Agostino Master Audio Systems or your dealer if you have service needs. WARNING: Do not expose this amplifier to moisture or excessive humidity, and do not use it outdoors. Fire hazard may result. The lightning flash with arrowhead, within an equilateral triangle, is intended to alert the user to the presence of uninsulated dangerous voltage within the product s enclosure that may be of sufficient magnitude to constitute a risk of electrical shock to persons. The exclamation point within an equilateral triangle is intended to alert the user to the presence of important operating maintenance (servicing) instructions in the literature accompanying the appliance. LEGAL NOTIFICATIONS Dan D Agostino Master Audio Systems is a registered trademark of Dan D Agostino Master Audio Systems. The information in this owner s manual is subject to change without notice. Current Version 1.0 of this manual was produced by the Dan D Agostino Master Audio Systems engineering, sales and marketing departments. The information in this manual is the sole property of Dan D Agostino Master Audio Systems. Any reproduction in whole or part without the expressed written permission of Dan D Agostino Master Audio Systems is prohibited. No material herein may be transmitted in any way including either electronic or mechanical methods for any purpose without expressed written permission of Dan D Agostino Master Audio Systems. PACKAGE CONTENTS If any of the following items are missing, please contact your dealer: 1 Momentum phonostage encased in protective static cling vinyl 1 power regulator base encased in protective static cling vinyl 1 external transformer encased in protective static cling vinyl 1 owner s manual 1 pair of white lifting gloves 1 microfiber cleaning cloth 1 AC power cord 1 multipin DIN cable (power regulator base to main unit) 1 multipin XLR cable (transformer to power regulator base) Unpacking the Momentum phonostage from the Pelican case While the component is still in its case, please move it to a location near the place where it will be installed. Remove all jewelry including watches, rings and belts from your person to avoid damage to the exterior during removal and installation. We recommend that two people lift the phonostage. Because it is machined from solid aluminum, it is much heavier than it looks. The finish of the Momentum phonostage is extremely delicate. To avoid damaging its surface, we suggest wearing the supplied white lifting gloves when handling to avoid abrasion, fingerprints caused by oils from skin, etc. See Operation: Maintenance for instructions on cleaning. Installation requirements This component s dense metal chassis and its separate power regulator base make it much heavier than most other phono preamps, so make sure the surface that will support it can safely hold its weight. You can place the transformer on the floor, or anywhere it will be separated from the phonostage by at least a couple of feet. Adequate ventilation must be provided. There should be at least 3 inches of clearance on each side and at the top. The top and bottom vents must not be obstructed. We recommend that the component and its base be installed in an open equipment rack to assure proper ventilation. It may be installed in a closed cabinet or in an equipment closet, but the cabinet or closet must be designed with substantial ventilation at top and bottom; active ventilation (i.e., powered fans) is preferred. Do not plug the Momentum phonostage or any other Dan D Agostino Master Audio Systems product into a power strip or power conditioner. The Momentum phonostage is designed with special cone feet that screw into the bottom of the main chassis and match up with indentations on the top of the power regulator base. The bottom of the power regulator base has soft feet designed to isolate the main chassis assembly from vibration. (These feet will not stain or mar the surface underneath them.) To attach the cone feet, first remove the vinyl wrap that covers the amplifier and protects the finish. (Save the vinyl wrap in the case to use again if you ever need to ship the phonostage.) Use two people to turn the phonostage chassis upside down and place it on a soft but secure surface a few towels draped over a sturdy table, for example and place the vinyl wrap atop the towels for extra protection. Screw the feet all the way into the threaded holes on the bottom of the chassis. Now place the power regulator base in the place where you want to install the phonostage. Use two people to turn the phonostage back over again. Place it carefully atop the power regulator base, lining up the points of the cone feet with the indentations on the top of the power supply. If you need to return the phonostage for service If you should need to return the Momentum phonostage for service, be sure to use the original box and materials for shipment. Before you ship the phonostage, unplug the transformer from the wall and let the phonostage, the power regulator base and the transformer cool down for 6 hours. To protect the finish during shipping, rewrap all components in the vinyl covering they came in. Make sure the components are completely cool and have not been plugged in for 6 hours before you do this. Wrapping the phonostage when it is warm will cause the vinyl to leech into the surface and will permanently damage the finish. 2 3
 switch 5. Phonostage DC input 2.")
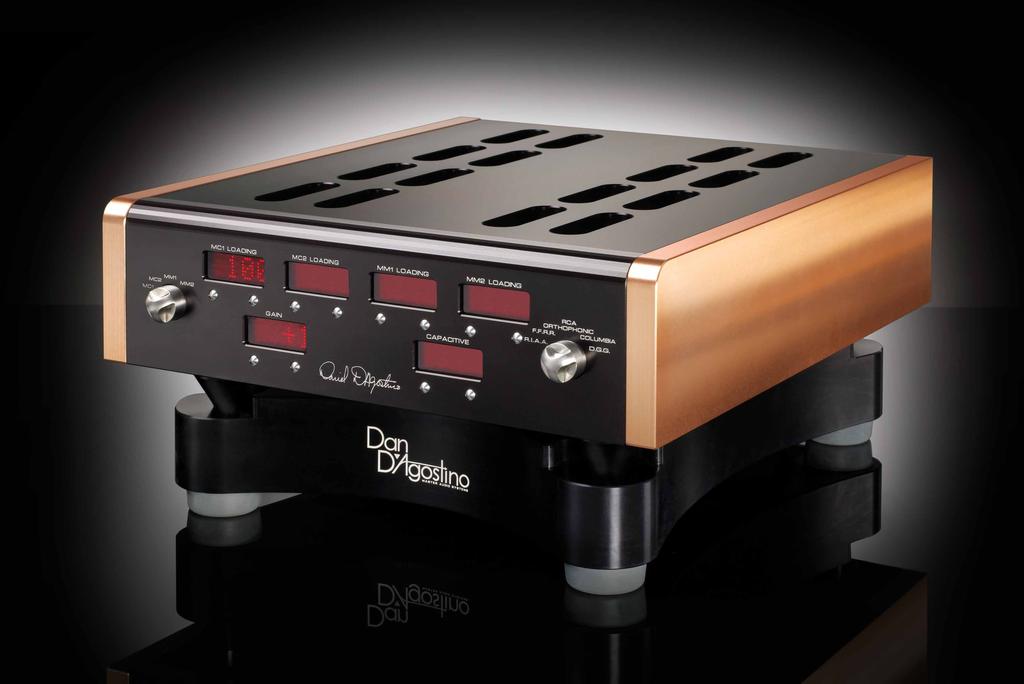
4 FRONT PANEL 1. MC1 input loading display and buttons 5. Input selector 2. MC2 input loading display and buttons 6. Gain display and buttons 3. MM1 input loading display and buttons 7. MM capacitance display and buttons 4. MM2 input loading display and buttons 8. EQ curve selector REAR PANEL 1. Single-Ended/Balanced (RCA/XLR) switch 5. Phonostage DC input 2. XLR outputs (to preamp) 6. Power regulator base DC output 3. XLR inputs (to turntables/tonearms) 7. RCA inputs 4. Ground connector 8. Power regulator base DC input TRANSFORMER Power switch 2. Fuse holder 3. IEC AC cord connection 4. DC output to power regulator base (rear of transformer)
5 MAKING CONNECTIONS TO THE MOMENTUM PHONOSTAGE Analog interconnect cables We recommend the use of high-quality balanced XLR audio interconnect cables between your turntable and the Momentum phonostage. However, we do recognize that many turntables do not offer XLR output, so we have also provided RCA jacks for each input. Use high-quality balanced XLR cables between the Momentum phonostage and your preamplifier or integrated amplifier. If your preamp or integrated amp does not offer XLR input, please contact your D Agostino Master Audio Systems dealer to acquire the proper adapters. Connect each XLR cable to the appropriate XLR jack by pushing the plug into the jack. To release the plug, push on the small tab atop the jack or on the plug, and gently pull the plug loose. For RCA connections, hold each plug by the barrel and push it firmly onto the connector. To remove a plug, grasp it by the barrel and gently pull it loose. Never grasp an interconnect cable by the cable itself you could damage the cable. Be sure to connect left channel to left input, right channel to right input. Begin by connecting the turntable or tonearm to the appropriate input. If you are using a moving coil (MC) cartridge, be sure to use one of the two MC inputs on the phonostage. If you are using a moving magnet (MM) cartridge, use one of the two MM inputs on the phonostage. Repeat this for any additional tonearms or turntables you are using. You can use either XLR or RCA connections, not both. Set the switch on the back for Single-Ended if you use RCA connections, or Balance if using XLR connections. Connect a ground cable from each turntable or tonearm to the white binding post on the rear of the phonostage. Many purpose-built phono cables include a ground cable. If your cables do not, use a spare piece of speaker cable instead. As with any phono preamp, using a ground connection between the turntable/tonearm and the phono preamp is usually beneficial, but may induce hum. If you hear hum in your system, try disconnecting the ground connection from the turntable or tonearm currently in use. Now connect the phonostage s XLR outputs to any unused input on your preamp or integrated amp. DC cables for power supply The Momentum phonostage is supplied with a two multiconductor DC cables. One connects the transformer to the power regulator base, and the other connects the power regulator base to the phonostage main chassis. Be sure to hook up both DC cables before you connect the power supply to the AC outlet, and disconnect the AC before you remove the DC cables. The shortest of the two DC cables is a mini-din type that connects the power regulator base to the phonostage main chassis. To connect this cable, align the connections on the plug with the pins on the chassis connector and push it gently in until it locks. To remove it, pull back on the metal collar surrounding the plug and gently pull the plug loose. The longer of the two cables connects the transformer (which generally sits on the floor a few feet from the phonostage) with the power regulator base. This cable uses five-pin XLR connectors. To connect this cable, align the holes on the plug with the pins on the chassis connector and push it gently in until it locks. To remove the cable, press the tab on the plug and gently pull the cable out. AC cord The transformer includes a high-quality AC cord tipped with a 15-amp IEC connector at the power supply end and a three-conductor AC plug at the other end. You may use a different power cord if you wish, as long as it is tipped with a 15-amp IEC connector and a three-conductor AC plug. After all of the system components are connected, the phonostage transformer is connected to the power regulator base, and the power regulator base is connected to the phonostage main chassis, push the IEC connector on the power cord into the IEC jack on the transformer and plug the other end into the AC socket. Do not plug the Momentum phonostage or any other Dan D Agostino Master Audio Systems product into a power strip or power conditioner. OPERATION Initial power-up Once the connections between the transformer and the power regulator base, and between the power regulator base and the main chassis have been made, plug the transformer into a wall socket and flip the power switch on the transformer. The displays on the front panel of the phonostage will illuminate. The Momentum phonostage is designed to be left on all the time, so it is always warmed up and will always deliver maximum performance. The phonostage will sound excellent even on a cold start, but the sound quality will improve as it warms up, much as the flavor of a fine red wine improves if it is allowed to breathe for a few minutes. We suggest you give it at least 30 minutes to warm up before you do any serious listening. Basic operation Input selector: Turn this knob to select among inputs MC1, MC2, MM1 and MM2. MC/MM loading adjustment: This adjusts the impedance of each input to optimize it for the cartridge. The correct setting should be listed in the specifications for the phono cartridge, which you can usually find on the cartridge manufacturer s website or in the manual for the cartridge. You can also experiment with different settings; sometimes better sound can be achieved this way. The Momentum phonostage was designed to make experimenting easy. Just change the setting, listen and repeat until you find the one you like for that cartridge. A separate display and controls are provided for each input. To adjust loading, press the left button under the display to reduce the load impedance and the right button under the display to raise it. The display will show you the load impedance in ohms. A K appearing after a number on the display means 1,000, so 31K equals 31,000 ohms. Different ranges of adjustment are provided for MC and MM cartridges, with the ranges optimized for each type of cartridge. 6 7
6
7 Gain: This adjusts the amount of amplification the phonostage will apply for each input. Different phono cartridges provide different output levels, and this control adjusts for those differences. Usually, the gain provided at the phonostage s default setting will be fine for any one cartridge, but if you are using multiple tonearms or turntables, you may wish to match their levels using this control. Just reduce the gain for the input that sounds too loud until it matches the volume from the other input(s). TROUBLESHOOTING Power is not on If the front displays are not illuminated, follow the procedure outlined below. If one step succeeds in activating the power, stop there and ignore the other steps. Do not make any adjustments to the DC power cables while the AC power is plugged into the wall. To adjust gain, first select the desired input. Now press the left button under the display to reduce the gain and the right button under the display to raise it. The adjustments are in 1 db increments, so +5 raises the level by 5 db. Maximum settings are +/-6 db. The gain setting will be memorized for each input, so when you change inputs, you may see the gain setting change. Capacitive loading adjustment: This control affects only the MM inputs, because MC inputs do not require capacitive loading. If the cartridge manufacturer recommends an optimum capacitive loading setting (listed in picofarads, or pf), start with that one. If the cartridge manual or specifications do not recommend a specific load capacitance, start at the lowest setting available (18.75 pf). Raise the setting if you hear noise or interference from other electronic devices in your home. You will notice that the capacitive loading setting will affect the sound. Let your ears be your guide here just experiment with the adjustment until you get the best result. To adjust capacitive loading, press the left button under the display to reduce the capacitance and the right button under the display to raise it. EQ curve selector: Turn this knob to select the EQ curve appropriate for the vinyl record you are playing. Almost all records pressed since the mid-1950s use the R.I.A.A curve, but some records made before about 1960 use other curves, such as F.F.R.R., RCA Orthophonic, Columbia and D.G.G. If you are playing a record pressed before 1960, check the sleeve to see what EQ curve is recommended. If in doubt, use R.I.A.A. Maintenance The Momentum phonostage requires no user maintenance other than to keep it clean and ensure that the vents remain unobstructed. Like a piece of fine furniture, the Momentum phonostage has a fine, highly polished finish that can be easily damaged. Do not rub or polish the finish, and do not allow objects to come in contact with it. To clean the surface, spray a small amount of distilled water onto the supplied microfiber cloth and gently wipe it along the direction of the metal grain, with light pressure only. Never use a circular motion or heavy pressure, as this can permanently scratch the machined surfaces. Do not rub the surface with the cloth, and do not spray any liquid directly onto the phonostage. If dust or other contaminants or objects collect around the vents at the top and bottom of the phonostage, remove small objects by hand and use a shop vacuum or hand vacuum to remove the dust. Use a brush attachment on the vacuum to avoid scratching the phonostage s surface. If you should need to transport or ship the phonostage, be sure to use the original packing materials. Allow the phonostage, the power regulator base and the transformer to cool down for at least six hours before you wrap or package them. 1. Check at the back of the transformer to make sure the 15-amp IEC connector is pushed all the way into the jack on the power supply, and that the AC cord is plugged into the wall. 2. Check to make sure the DC power cable between the transformer and the power regulator base is firmly connected. If it is not, disconnect the AC cord from the wall socket, reconnect the DC power cable, and plug the AC cord back in. 3. Check to make sure the DC power cable between the power regulator base and the phonostage main chassis is firmly connected. If it is not, disconnect the AC cord from the wall socket, reconnect the DC power cable, and plug the AC cord back in. 4. Pull out the fuse connector at the back of the transformer, between the power switch and the IEC power cord connector. Check to see if the fuse is blown. (The conductor inside the fuse will be severed and you may see burn marks on the fuse.) Be sure to replace the fuse with one of the proper value and type. Consult your dealer or Dan D Agostino Master Audio Systems. 5. Check your household electrical box to make sure the circuit breaker has not been tripped. If it has, flip the breaker back on. 6. If all of these steps fail to return power to the Momentum phonostage, consult your dealer for service. Front displays are illuminated but you hear no sound Follow these steps in order. If one step succeeds in restoring the sound, stop there and ignore the other steps. 1. Make sure you have the correct input selected on the phonostage. 2. Make sure the tonearm is lowered and the record is spinning. 3. Make sure the volume is turned up on your preamp or integrated amp, and if you are using a separate amplifier, make sure it is powered up. 4. Check the Single-Ended/Balance switch on the back of the phonostage. If you are using XLR connections, the switch should be set to Balance. If you are using RCA connections, the switch should be set to Single-Ended. 5. Switch to a different source on your preamp or integrated amp and start that source playing. If you hear sound, it s possible the cables connecting the phonostage to the other components have become disconnected. (If you don t hear sound, it s likely something else is wrong with your system; check the connections between your preamp 10 11
8 and amp and between the amp and the speakers.) Turn off your preamp or integrated amp, then check the connections between the turntable or tonearm and the phonostage, and between the phonostage and the preamp or integrated amp. Also check to make sure the connections on the back of your phono cartridge have not come loose. If any cables or connections have become loose or disconnected, fix the connections then turn the system back on and see if it works. 6. Try using some different cables (ones that you re sure are in good condition) between the turntable or tonearm and the phonostage, and between the phonostage and the preamp or integrated amp. If this restores sound, the original cables are likely damaged or defective and should be replaced. 7. If all of these steps fail to restore sound, consult your dealer for service. Sound comes from only one channel Follow the below steps in order. If one of these steps succeeds in restoring the sound, stop there and ignore the other steps. 1. Check the connections between the turntable or tonearm and the phonostage to make sure the cables are securely connected. Do the same for the connections between the phonostage and the preamp or integrated amp, and the connections on the back of the phono cartridge. If a cable has become disconnected, turn off your preamp or integrated amp, fix the connection, then turn the system back on. 2. Try using a different source device, such as a CD player or DAC. If both channels work, it is likely that a connection between the phonostage and turntable or tonearm, or between the phonostage and preamp or integrated amp, has come loose or been damaged. If the same channel is out when you switch sources, check the connections between your preamp and amp (if you re using separates) and the amp and the speakers. Makes sure all cables are properly connected and not damaged. Replace any damaged cables. 3. Swap the left-channel cable from the turntable to the phonostage with the rightchannel interconnect cable. If the malfunctioning channel now works but the other channel does not, replace the defective interconnect cable with one of the exact same type. You may have to replace both right and left cables to make sure they match. 4. Swap the left-channel cable from the phonostage to your preamp or integrated amp with the right-channel interconnect cable. If the malfunctioning channel now works but the other channel does not, replace the defective interconnect cable with one of the exact same type. You may have to replace both right and left cables to make sure they match. 5. If all of these steps fail to restore proper sound, consult your dealer for service. Tonal balance of record sounds wrong If the record you re playing doesn t sound the way you expect it to i.e., there s too much or too little bass or treble follow the below steps in order. If one of these steps fixes the problem, you can stop there and ignore the other steps. 1. Check the record EQ selector on the front panel of the phonostage. In almost all cases, this should be set for R.I.A.A. If it is not, try the R.I.A.A. setting. 2. If you are playing a record pressed before about 1960, it may use a different record EQ curve than R.I.A.A. Check the record sleeve to find out the recommended EQ curve. The phonostage offers F.F.R.R., RCA Orthophonic, Columbia and D.G.G. curves. If your record uses one of these curves and not R.I.A.A., set the phonostage s record EQ selector for that curve. 3. Try playing a different record a modern one, such as a 1970s or 1980s pop recording and set the record EQ selector to R.I.A.A. If it sounds good, then the first record you played might be a bad pressing or a bad recording. Playback level is too low Follow the steps below in order. If one step brings the volume up to an adequate level, you can skip the rest of the steps. 1. Make sure the volume on your preamp or integrated amp is turned up to an appropriate level. 2. If you are using an MC cartridge, make sure you are using one of the phonostage s MC inputs. If not, turn off your preamp or integrated amp, connect the cables from the turntable or tonearm to the MC input, then turn the system back on. Adjust the load impedance for the MC input as needed. 3. Use the phonostage s gain control to increase the gain and bring the volume up to an adequate level. Playback level is too high Follow the steps below in order. If one step brings the volume down to an appropriate level, you can skip the rest of the steps. 1. Make sure the volume on your preamp or integrated amp is set to a reasonable listening level. 2. If you are using an MM cartridge, make sure you are using one of the phonostage s MM inputs. If not, turn off your preamp or integrated amp, connect the cables from the turntable or tonearm to the MM input, then turn the system back on. Adjust the load impedance and capacitance for the MM input as needed. 3. Use the phonostage s gain control to reduce the gain and bring the volume down to an adequate level
9 Excessive hum and/or noise Vinyl record playback is never as quiet and noise-free as high-quality digital sources such as CDs, but noise or hum should not intrude to the point where it distracts you. If your system is producing too much noise or hum, try the following steps in order. If one step eliminates or adequately reduces the hum or noise, you can ignore the other steps. 1. Check the ground connection between the turntable or tonearm and the phonostage. If it has become loose, reconnect it. 2. If the ground connection is not loose but you re still hearing hum, try disconnecting the ground. If this does not reduce the hum, reconnect the ground wire. 3. If you are using an MM cartridge, try increasing the load capacitance on the phonostage. If this does not fix the problem, adjust the load capacitance back to the original setting. 4. Switch to a digital source device such as a CD player or DAC. If this stops the hum or noise, you may have a bad connection between the turntable or tonearm and the phonostage, or between the phonostage and the preamp or integrated amp. Check these connections. If you need to reconnect anything or replace a damaged cable, first turn off your preamp or integrated amp. Fix the connection, then turn the system back on. 5. If you still hear the hum or noise when you switch to a digital source device, the problem is elsewhere in your system. If you re using separates, make sure the connection between your preamp and amp is secure and that the interconnect cables are not damaged. 6. If none of these steps eliminates most or all of the hum or noise, please contact your dealer for assistance. MOMENTUM PHONOSTAGE LIMITED WARRANTY Dan D Agostino Master Audio Systems warrants the Momentum phonostage against manufacturing defects and defects in materials for five years from the date of purchase from an authorized Dan D Agostino Master Audio Systems dealer, subject to the conditions listed below: 1. The warranty covers only new products purchased from an authorized Dan D Agostino Master Audio Systems dealer. 2. The warranty is non-transferable and is valid only for the original purchaser. 3. The warranty is valid only if the product has been used according to the instructions in the owner s manual. Damage due to accidents or owner abuse or neglect is not covered under this warranty. 4. All service must be performed by an authorized Dan D Agostino Master Audio Systems dealer. Damage resulting from service by other parties is not covered under this warranty. 5. All products returned for service must be packaged in the original container and must include a photocopy of the original purchase receipt. If the original container has been lost or discarded, contact Dan D Agostino Master Audio Systems for a replacement. 6. If the product must be shipped back to Dan D Agostino Master Audio Systems for warranty service, the customer shall pay shipping costs. Dan D Agostino Master Audio Systems will pay for return shipping. 7. Before shipping the product to Dan D Agostino Master Audio Systems for service, the customer must first obtain a Return Authorization (RA) number by calling Dan D Agostino Master Audio Systems. The RA number must be marked clearly on the side of the package. 8. This warranty covers only defects in products made by Dan D Agostino Master Audio Systems. It does not cover incidental or consequential damages, or damages to other products resulting from defects in Dan D Agostino Master Audio Systems products. 9. U.S. residents: Depending on which state you live in, you may have other rights not elaborated in this document. For further information, contact Dan D Agostino Master Audio Systems. 10. Residents of other countries: Your authorized importer or dealer bears the direct responsibility for warranty coverage of your amplifier. Please contact your importer or dealer with requests for service under warranty. Dan D Agostino Master Audio Systems will work with your importer or dealer to assure that the terms of the warranty are fulfilled. For questions on warranty and service matters, contact Dan D Agostino Master Audio Systems at: or , or service@dandagostino.com 14 15
 MC: 70 db balanced, 70 db unbalanced at 0 db setting MM: 50 db balanced, 50 db")
10 MOMENTUM PHONOSTAGE S P E C I F I C A T I O N S Frequency response 20 Hz to 100 khz, ±1 db Distortion <0.003%, 20 Hz to 20 khz Signal-to-noise ratio -75 db, standard reference, unweighted Gain (±6 db depending on setting) MC: 70 db balanced, 70 db unbalanced at 0 db setting MM: 50 db balanced, 50 db unbalanced at 0 db setting Power consumption at standby 25 watts Inputs 4 balanced XLR stereo, 4 unbalanced RCA stereo, ground Outputs balanced XLR stereo Load impedance adjustment options MC: 5, 10, 15, 25, 50, 100, 200, 420, 1200, 47K ohms MM: 23K, 25K, 27K, 29K, 31K, 34K, 38K, 42K, 47K, 54K, 63K, 75K, 95K, 126K, 191K, 391K ohms Capacitive loading options (MM only) 18.75, 37.5, 56.25, 75, 93.75, 112.5, , 150, , 187.5, 206, 225, , 262.5, pf Weight 48 lbs / 21.8 kg with base / 31.2 lbs / 14.2 kg shipping weight Dimensions (phonostage) 3.5 x 15.5 x inches (hwd) / 8.9 x 39.4 x 32.4 cm (hwd) Dimensions (power regulator base) 2.5 x 13.5 x 11 inches (hwd) / 6.4 x 34.3 x 27.9 cm (hwd) Dimensions (phonostage + base) 7 x 15.5 x inches (hwd) / 17.8 x 39.4 x 32.4 cm (hwd) Dimensions (transformer) 2 x 4 x 10.5 inches (hwd) / 5.1 x 10.2 x 26.7 cm (hwd)
11 HANDMADE AND BUILT BY HAND IN THE USA USING USA MACHINISTS, VENDORS AND PARTS PROCUREMENT. For more information about Dan D Agostino Master Audio Systems, please visit: DAN D AGOSTINO MASTER AUDIO SYSTEMS. ALL RIGHTS RESERVED.
Owner's Manual PPA-1 Phono Preamp
 Owner's Manual PPA-1 Phono Preamp Contents Legal Notifications 2 Warranty Information 2 Installation and Usage Tips 3 Connections and Controls 3 Front panel Rear panel Connecting the PPA-1 to Your System
WARNING To reduce risk of fire or electric shock, do not expose this preamplifier to moisture, rain, or excessive humidity.
 CAUTION To reduce risk of electric shock, do not remove any of the phono preamplifier s cover plates or screws. There are no user serviceable parts inside. Contact qualified service personnel. WARNING
508 Phono Preamplifier. Boulder Amplifiers, Inc. 255 S. Taylor Ave. Louisville, CO (303) /1/2018 Rev. 1.
 /1/2018 Rev. 1.") 508 Phono Preamplifier 6/1/2018 Rev. 1.0 P/N: 91053 Boulder Amplifiers, Inc. 255 S. Taylor Ave. Louisville, CO 80027 (303) 449-8220 www.boulderamp.com About About Boulder Amplifiers, Inc. Boulder was founded
508 Phono Preamplifier 6/1/2018 Rev. 1.0 P/N: 91053 Boulder Amplifiers, Inc. 255 S. Taylor Ave. Louisville, CO 80027 (303) 449-8220 www.boulderamp.com About About Boulder Amplifiers, Inc. Boulder was founded
ModWright Instruments, Inc. PH 150 Tube Phono Stage Owner s Manual
 ModWright Instruments, Inc. PH 150 Tube Phono Stage Owner s Manual Manufactured by ModWright Instruments, Inc. 21919 399th St., Amboy, WA 98601 USA www.modwright.com 1 CAUTIONS: Do not operate or power
CP1 OAD. Owner s Manual. Stereo Control Preamplifier. Ultrafidelity
 OAD Ultrafidelity CP1 Stereo Control Preamplifier Owner s Manual Contents Section Page No. Introduction........................................................................ 1 Warnings.................................................................................
Table of Contents. Read This First.2. Introduction by Jim Fosgate...3. Unpacking..4. Tubes and Tube shield Installation 5. Product Placement...
 Owner s Manual Table of Contents Read This First.2 Introduction by Jim Fosgate...3 Unpacking..4 Tubes and Tube shield Installation 5 Product Placement...6 Connecting your Fosgate Signature..7 Phono stage
WARNING To reduce risk of fire or electric shock, do not expose this preamplifier to moisture, rain, or excessive humidity.
 CAUTION To reduce risk of electric shock, do not remove any of the phono preamplifier s cover plates or screws. There are no user serviceable parts inside. Contact qualified service personnel. WARNING
Sphinx II. Owner s Manual. Tube Hybrid Integrated Power Amplifier. Rogue Audio, Inc. 3 Marian Lane Brodheadsville, PA Issue date: 08/01/16
 Sphinx II Tube Hybrid Integrated Power Amplifier Owner s Manual Rogue Audio, Inc. 3 Marian Lane Brodheadsville, PA 18322 Issue date: 08/01/16 TABLE OF CONTENTS 1) Introduction 2 2) Unpacking the Sphinx
TABLE OF CONTENTS. 1) Introduction 2. 2) Unpacking the Ares 2. 3) Installing the Ares in your system 3. 4) Setting the Operational Parameters 4
 Introduction 2. 2) Unpacking the Ares 2. 3) Installing the Ares in your system 3. 4) Setting the Operational Parameters 4") TABLE OF CONTENTS 1) Introduction 2 2) Unpacking the Ares 2 3) Installing the Ares in your system 3 4) Setting the Operational Parameters 4 5) High Output MM/MC Cartridge Setup 6 6) Medium Output Cartridge
TABLE OF CONTENTS 1) Introduction 2 2) Unpacking the Ares 2 3) Installing the Ares in your system 3 4) Setting the Operational Parameters 4 5) High Output MM/MC Cartridge Setup 6 6) Medium Output Cartridge
Operating Manual. Mark Levinson Nº25 Dual Monaural Phono Preamplifier. Madrigal Audio Laboratories, Inc. 1
 Operating Manual Mark Levinson Nº25 Dual Monaural Phono Preamplifier Madrigal Audio Laboratories, Inc. 1 WARNING: TO REDUCE THE RISK OF FIRE OR ELECTRIC SHOCK, DO NOT EXPOSE THIS APPLIANCE TO RAIN OR MOISTURE.
BP2-MM/MC Phono Preamplifier Owner s Manual
 BP2-MM/MC Phono Preamplifier Owner s Manual Important Safety Instructions The lightning flash with arrowhead symbol within an equilateral triangle, is intended to alert the user to the presence of un-insulated
BP2-MM MM Phono Preamplifier Owner s Manual
 BP2-MM MM Phono Preamplifier Owner s Manual Important Safety Instructions The lightning flash with arrowhead symbol within an equilateral triangle, is intended to alert the user to the presence of un-insulated
The performance of a lifetime. Owner s Manual MOON 110LP v2 Phono Preamplifier
 The performance of a lifetime Owner s Manual MOON 110LP v2 Phono Preamplifier MOON by Simaudio simaudio.com Simaudio Ltd 1345 Newton Road, Boucherville, Québec J4B 5H2 CANADA Date Code: 20180831 01 INTRODUCTION
Introduction Front Panel Functions Rear Panel Functions Precautions Placement & Ventilation... 5
 Contents Introduction... 2 Front Panel Functions... 3 Rear Panel Functions... 3 Precautions... 5 Placement & Ventilation... 5 Installation & Operation... 5 Care & Maintenance... 7 Troubleshooting... 8
Owner s Manual. Model PH8 Phono Preamplifier
 Owner s Manual Model PH8 Phono Preamplifier 2 Contents Model PH8 Phono Preamplifier Illustrations 4 Preface 5 Warnings 5 Packaging 5 Front Panel Controls 5 6 Remote Control Functions 6 Connections 6 Installation
INSTRUCTION MANUAL PELLAR PHONO PRE-AMPLIFIER. Extended 5-Year Warranty
 V1.1E INSTRUCTION MANUAL PELLAR PHONO PRE-AMPLIFIER Extended 5-Year Warranty AVID is pleased to extend the normal warranty duration to 5-Years from the date of original shipping. This warranty is transferable
VK-P10SE WARRANTY REGISTRATION FORM
 VK-P10SE WARRANTY REGISTRATION FORM Unit Serial Number: Customer Name: Address: Date of Purchase: Purchased From: Dealer Name: Address: IMPORTANT NOTE: In order to receive the full five-year product warranty,
INSTRUCTION MANUAL PELLERE PHONO PRE-AMPLIFIER. Extended 5-Year Warranty
 V1.2E INSTRUCTION MANUAL PELLERE PHONO PRE-AMPLIFIER Extended 5-Year Warranty AVID is pleased to extend the normal warranty duration to 5-Years from the date of original shipping. This warranty is transferable
USER MANUAL GOLDMUND PH3 Phono Preamplifier
 USER MANUAL GOLDMUND PH3 Phono Preamplifier Congratulations. Thank you for purchasing the Goldmund PH3 Phono Preamplifier. You have acquired the best Phono Preamplifier ever made for professional and domestic
Operating Manual. Mark Levinson Nº28 Preamplifier. Madrigal Audio Laboratories, Inc. 15
 Operating Manual Mark Levinson Nº28 Preamplifier Madrigal Audio Laboratories, Inc. 15 WARNING: TO REDUCE THE RISK OF FIRE OR ELECTRIC SHOCK, DO NOT EXPOSE THIS APPLIANCE TO RAIN OR MOISTURE. CAUTION RISK
Owner's Manual. Model PH6 PHONO PREAMPLIFIER.
 Owner's Manual Model PH6 PHONO PREAMPLIFIER 3900 ANNAPOLIS LANE NORTH / PLYMOUTH, MINNESOTA 55447-5447 / PHONE: 763-577-9700 FAX: 763-577-0323 www.audioresearch.com Contents Model PH6 Page No. Preface.......................................................1
Rhea PHONO STAGE. Aesthetix Audio Corporation 5220 Gabbert Rd., Suite A Moorpark, CA Phone: (805)
") Rhea PHONO STAGE Aesthetix Audio Corporation 5220 Gabbert Rd., Suite A Moorpark, CA. 93021 Phone: (805) 529-9901 INTRODUCTION Thank you for purchasing the Rhea Phono Stage. The Rhea is a groundbreaking
Rhea PHONO STAGE Aesthetix Audio Corporation 5220 Gabbert Rd., Suite A Moorpark, CA. 93021 Phone: (805) 529-9901 INTRODUCTION Thank you for purchasing the Rhea Phono Stage. The Rhea is a groundbreaking
Thank you for purchasing the Constellation Pictor Line Stage. Contents Page Topic Warranty information Before you install the Pictor
 Thank you for purchasing the Constellation Pictor Line Stage. Using the same revolutionary Line Stage Gain Module circuit pioneered in our Altair and Viego preamps, and a fully separate, physically isolated
Contents Introduction Safety Cleaning Connections Cartridge gain and loading Technical specification Fig.1 PS.30R/ PS.30RDT rear panel Fig.
 Contents Introduction Safety Cleaning Connections Cartridge gain and loading Technical specification Fig.1 PS.30R/ PS.30RDT rear panel Fig.2 Basic audio connection Fig.3 Removing the lid Fig 4 Gain and
USER MANUAL Goldmund PH3.8 Phono Preamplifier
 USER MANUAL Goldmund PH3.8 Phono Preamplifier Congratulations. Thank you for purchasing the Goldmund PH3.8 Phono Preamplifier. You have acquired the best Phono Preamplifier ever made for professional and
Low Noise Solid State Phono Preamplifier User's Guide and Operating Information
 Bel Canto Design PHONO 1 Low Noise Solid State Phono Preamplifier User's Guide and Operating Information Bel Canto Design 212 Third Avenue North Suite 345 Minneapolis, MN 55401 Phone: (612) 317.4550 Fax:
PH-1. Italian MM & MC Phono Preamplifier OWNER S MANUAL
 PH-1 Italian MM & MC Phono Preamplifier OWNER S MANUAL IMPORTANT SAFETY INFORMATION CAUTION: TO REDUCE THE RISK OF ELECTRIC SHOCK, DO NOT REMOVE COVER (OR BACK). NO USER-SERVICEABLE PARTS INSIDE. REFER
Utility Amplifier GA6A Model
 Utility Amplifier GA6A Model Installation and Use Manual 2004 Bogen Communications, Inc. All rights reserved. Specifications subject to change without notice. 54-5757-03D 1503 NOTICE: Every effort was
Owners Manual PERREAUX
 éloquence Phono Preamplifier Owners Manual PERREAUX 1 The éloquence phono preamplifier Designed and Manufactured in Dunedin, New Zealand Table of Contents INTRODUCTION... 3 Unpacking... 4 Fitting Instructions...
INSTRUCTION MANUAL PULSUS PHONO PRE-AMPLIFIER. Extended 5-Year Warranty
 V1.3E INSTRUCTION MANUAL PULSUS PHONO PRE-AMPLIFIER Extended 5-Year Warranty AVID is pleased to extend the normal warranty duration to 5-Years from the date of original shipping. This warranty is transferable
RoHS. Atma-Sphere Music Preamplifier. model P-2 OWNER'S MANUAL. Please study this document carefully before using equipment
 1742 Selby Av. St. Paul, MN 55104 651 690 2246 atma sphere.com Atma-Sphere Music Preamplifier model P-2 OWNER'S MANUAL Please study this document carefully before using equipment RoHS CONGRATULATIONS!
Owner s Manual. Model REFERENCE PHONO 2 P R E A M P L I F I E R
 Owner s Manual Model REFERENCE PHONO 2 P R E A M P L I F I E R 3900 ANNAPOLIS LANE NORTH / PLYMOUTH, MINNESOTA 55447-5447 / PHONE: 763-577-9700 FAX: 763-577-0323 www.audioresearch.com Contents 1 Model
Owner s Manual. Reference Phono 2 SE Phono Preamplifier
 Owner s Manual Reference Phono 2 SE Phono Preamplifier 2 Contents Model Reference Phono 2 SE Phono Preamplifier Illustrations 4 Preface 5 Warnings 5 Packaging 5 Front Panel Controls 5 6 Remote Control
KORU. Phono Preamplifier Instruction Manual. The heart of music
 KORU Phono Preamplifier Instruction Manual The heart of music www.pliniusaudio.com Contents Introduction...2 Design Philosophy...3 Unpacking...4 Placement & Ventilation...4 Care & Maintenance...5 Precautions...6
Orpheus. Phono Preamplifier. by Thrax Audio. Operating Manual. Manual issued 05/03/2012 CAUTION
 Orpheus Phono Preamplifier by Thrax Audio Operating Manual Manual issued 05/03/2012 CAUTION THE UNIT CONTAINS NO USER SERVICEABLE PARTS. DO NOT REMOVE THE COVERS. LETHAL VOLTAGES ARE PRESENT WITHIN THE
110LP MOON Series. Phono Preamplifier. Owner s Manual
 Phono Preamplifier Owner s Manual Owner s Manual I Table of Contents Introduction 4 Unpacking 5 Installation & Placement 5 Circuit Board Layout s 6 Internal Adjustments 7 Rear Panel Connections 8 Operating
INSTRUCTION MANUAL. Extended 5-Year Warranty
 V2.1E INSTRUCTION MANUAL PULSARE II PHONO PRE-AMPLIFIER Extended 5-Year Warranty AVID is pleased to extend the normal warranty duration to 5-Years from the date of original shipping. This warranty is transferable
ECP 2. Owner's Manual. High Performance Balanced Phono Stage. Version 1.0 ENGLISH
 ECP 2 High Performance Balanced Phono Stage Owner's Manual Version 1.0 EN ENGLISH Welcome to the world of Electrocompaniet! We thank you for choosing an Electrocompaniet high-end product. At Electrocompaniet
SATRI AMPLIFIER AMP-51R. Owner s Manual
 SATRI AMPLIFIER AMP-51R Owner s Manual contents SAFETY INSTRUCTIONS 4 INTRODUCTION 6 OVERVIEW (FRONT PANEL) 8 OVERVIEW (REAR PANEL) 9 OVERVIEW (REMOTE CONTROL) 1 1 OPERATION 12 TROUBLESHOOTING 13 SPECIFICATION
The Phono Box SUMIKO Fifth Street Berkeley, CA sumikoaudio.com
 The Phono Box SUMIKO 2431 Fifth Street Berkeley, CA 94710 510.843.4500 sumikoaudio.com In the past, all audio system control components (integrated amplifiers, receivers and system pre-amplifiers) had
English. User Manual sub8 Subwoofer SUBWOOFER. Supporting your digital lifestyle
 English User Manual sub8 Subwoofer U SUBWOOFER Supporting your digital lifestyle Table of Contents Important Safety Precautions........ 2 Introduction / What s in the Box?...... 3 Front & Rear Panels............
Mapletree Audio Design
 Ultra 4C Preamplifier Mapletree Audio Design Ultra 4C Stereo Phono/Line Preamplifier PS 2D Power Supply User s Manual Rev. Mar. 22, 2019 Mapletree Audio Design R. R. 1, Seeley's Bay, Ontario, Canada, K0H
User Guide. REFERENCE PHONO 10 Phono Preamplifier D E F I N I T I O N
 User Guide REFERENCE PHONO 10 Phono Preamplifier H I G H D E F I N I T I O N 2 Contents Preface 3 Illustrations Audio Chassis 4 Power Supply Chassis 5 Warnings 6 Installation Installation of Vacuum Tubes
INSTRUCTION MANUAL PULSARE PHONO PRE-AMPLIFIER. Extended 5-Year Warranty
 V1.3E INSTRUCTION MANUAL PULSARE PHONO PRE-AMPLIFIER Extended 5-Year Warranty AVID is pleased to extend the normal warranty duration to 5-Years from the date of original shipping. This warranty is transferable
Adagio Vacuum Tube Phono Stage (MM / MC)
") Adagio Vacuum Tube Phono Stage (MM / MC) Owner s Manual TAVISH DESIGN, LLC Made in U.S.A. TABLE OF CONTENTS 1. Introduction & Quick Start 2 2. Safety Considerations 3 3. Setup & Operation 4 3.1. Initial
Adagio Vacuum Tube Phono Stage (MM / MC) Owner s Manual TAVISH DESIGN, LLC Made in U.S.A. TABLE OF CONTENTS 1. Introduction & Quick Start 2 2. Safety Considerations 3 3. Setup & Operation 4 3.1. Initial
PH 1.1 Phono Preamplifier Owner s Manual
 PH 1.1 Phono Preamplifier Owner s Manual Nerve Audio, Inc. 822 SW 75th Way Gainesville, FL 32607 INTRODUCTION Thank you for your purchase!! The Nerve Audio PH-1.1 represents our statement about the quality-versus-value
Monolith Turntable P/N User's Manual
 Monolith Turntable P/N 27749 User's Manual SAFETY WARNINGS AND GUIDELINES Please read this entire manual before using this device, paying extra attention to these safety warnings and guidelines. Please
AG 500SC. Owners Manual. Manual Version 1.7
 AG 500SC Owners Manual Manual Version 1.7 1. Table of Contents I. Getting Started page 3. A. Safety Instructions B. Manual Conventions C. Basic Setup D. Protection Modes II. Features and Functions page
2.0 Wall Mount TV Soundbar Instruction Manual
 8010275 2.0 Wall Mount TV Soundbar Instruction Manual Read all of the instructions before using this soundbar and keep the manual in a safe place for future reference. Safety Information CA UT IO N RISK
COHERENCE ONE PREAMPLIFIER
 COHERENCE ONE PREAMPLIFIER OWNER S MANUAL TABLE OF CONTENTS Introduction Features Unpacking Instructions Installation Phono Cartridge Loading Basic Troubleshooting Technical Specifications Introduction
music hall pa2.2 INSTRUCTION MANUAL music hall
 music hall pa2.2 INSTRUCTION MANUAL music hall http://www.musichallaudio.com CONGRATULATIONS ON YOUR PURCHASE You have selected an exceptional phono preamplifier. Each component used in the construction
H I G H D E F I N I T I O N. Reference Phono 3
 H I G H D E F I N I T I O N Reference Phono 3 Thank you for choosing the Reference Phono 3 to be a part of your high performance music listening system. Since 1970, Audio Research has been creating some
Model 1421 Distribution Amplifier
 Model 1421 Distribution Amplifier Installation and Operating Instructions The 1421 Distribution Amplifier provides four independent, wide bandwidth outputs from one video input. The unit is color compatible
USB Phono Plus. Project Series USER S MANUAL. Audiophile Computer Interface
 USB Phono Plus Audiophile Computer Interface Project Series USER S MANUAL IMPORTANT SAFETY INSTRUCTION READ FIRST This symbol, whenever it appears, alerts you to the presence of uninsulated dangerous voltage
IMPORTANT SAFETY INSTRUCTIONS
 IMPORTANT SAFETY INSTRUCTIONS When using this electronic device, basic precautions should always be taken, including the following: 1. Read all instructions before using the product. 2. Do not use this
PH60B Phono Stage. User Guide
 PH60B Phono Stage User Guide is a division of Radial Engineering Ltd. 1588 Kebet Way, Port Coquitlam BC, Canada V3C 5M5 (604) 942-1001 info@hafler.com www.hafler.com PH60B Phono stage USER GUIDE Table
H I G H D E F I N I T I O N. Reference 75 SE
 H I G H D E F I N I T I O N Reference 75 SE Thank you for choosing the Reference 75 SE to be a part of your high performance music listening system. Since 1970, Audio Research has been creating some of
Please take a few minutes to read this manual so that you will better understand the featues and capabilities of your MF80. MF80 Owner s Manual 1
 Congratulations on your purchase of the Conrad-Johnson MF80 amplifier. You have acquired one of the finer pieces of musical reproduction equipment available today. The MF80 is the result of over a decade
C22 Stereophonic Preamplifier Owner s Manual
 McIntosh Laboratory, Inc. 2 Chambers Street Binghamton, New York C22 Stereophonic Preamplifier Owner s Manual 13903-2699 Phone: 607-723-3512 www.mcintoshlabs.com 2 The lightning flash with arrowhead, within
M2 RIAA Owner s Information
 M2 RIAA Owner s Information The M2 RIAA is a Level 2 RIAA phono stage, developed for the best possible sonic performance rather than technical specifications. To this end, the M2 RIAA incorporates thermionic
Phono Amplifier brinkmann «EDISON» Manual.
 Phono Amplifier brinkmann «EDISON» ----------------------------------------------------------------------------------------------- Manual Preface We congratulate you on the purchase of our «EDISON» phono
Pre1. Balanced Control Preamplifier. User's Guide and Operating Information
 Pre1 Balanced Control Preamplifier User's Guide and Operating Information Bel Canto Design 212 Third Avenue North Suite 345 Minneapolis, MN 55401 Phone: (612) 317.4550 Fax: (612) 359.9358 Email: Info@BelCantoDesign.com
THE NOVA PHONOMENA MUSICAL SURROUNDINGS PRESENTS: PHONOGRAPH PREAMPLIFIER OWNER S MANUAL. Musical Surroundings. status
 MUSICAL SURROUNDINGS PRESENTS: THE NOVA PHONOMENA PHONOGRAPH PREAMPLIFIER Musical Surroundings Nova Phonomena Phono Preamplifier status OWNER S MANUAL TABLE OF CONTENTS 1.0) INTRODUCTION..3 2.0) INTERNAL
Issue date : 9/11/00. Rogue Audio Tempest Vacuum Tube Integrated Amplifier. Owners Manual. Vacuum Tube Amplifiers
 Issue date : 9/11/00 Rogue Audio Tempest Vacuum Tube Integrated Amplifier Owners Manual Vacuum Tube Amplifiers TABLE OF CONTENTS 1) Introduction 1 2) Setting up your amplifier 1 3) Using an external preamplifier
OPERATIONS MANUAL FOR EDISON PROFESSIONAL Professional ABS Molded Loudspeaker M4000
 M4000 Introduction: Congratulations on your purchase of an M-4000 powered loudspeaker, engineered and manufactured by BriteLite Enterprises. The M-4000 includes a high-output compression driver, and 15
VPS 100 YPSILON PHONO STAGE. OWNERS MANUAL V1 01/01/2010 All rights reserved
 VPS 100 YPSILON PHONO STAGE OWNERS MANUAL V1 01/01/2010 All rights reserved INTRODUCTION Thank you for trusting YPSILON ELECTRONICS. We assure you that you have made an excellent purchase. Your phono stage
HP6E Operating Manual. August 2012
 HP6E Operating Manual August 2012 SAFETY INSTRUCTIONS CAUTION: To reduce the risk of electrical shock, do not remove the cover or rear panel of this unit. No user serviceable parts inside. Please refer
Concert Series ORDERCODE D3470 ORDERCODE D3471 ORDERCODE D3472 D3470 D3471 D3472
 Concert Series ORDERCODE D3470 ORDERCODE D3471 ORDERCODE D3472 D3470 D3471 D3472 Congratulations! You have bought a great, innovative product from DAP Audio. The DAP Audio Concert Series brings excitement
HeadAmp 4 Pro. User s Manual. Project Series. Five Channel Headphone Amp with Listen and Talkback
 HeadAmp 4 Pro Five Channel Headphone Amp with Listen and Talkback Project Series User s Manual IMPORTANT SAFETY INSTRUCTIONS READ FIRST This symbol, wherever it appears, alerts you to the presence of
PROFESSIONAL 2 CHANNEL SOLID-STATE MIC / LINE PREAMPLIFIER USER S MANUAL
 PROFESSIONAL 2 CHANNEL SOLID-STATE MIC / LINE PREAMPLIFIER USER S MANUAL SAFETY INSTRUCTIONS This symbol, wherever it appears, alerts you to important operating and maintenance instructions in the accompanying
COMPACT DIGITAL AUDIO. Unpacking and Placement
 COMPACT DIGITAL AUDIO O W N E R ' S M A N U A L C/BD-2000 Belt Drive Compact Disc Transport Congratulations on your purchase of this precision audio component and thank you for your selection of Parasound.
This Level 3 amplifier features Audio Note Silver wire and Audio Note signal capacitors. UNPACKING AND INSTALLATION
 Congratulations on your purchase of the Audio Note Meishu Line Integrated Amplifier. The Meishu is a Pure Class A Singled Ended valve amplifier that uses the highly regarded 300B direct heated triode valve.
DM900 BLUE DOG OWNER S MANUAL
 Professional Disc Jockey Products DM900 BLUE DOG OWNER S MANUAL NUMARK INDUSTRIES 11 Helmsman Road, North Kingstown, RI 02852 http://www.numark.com CONGRATULATIONS! You have purchased the DM900 Blue Dog
CR-6 MIXER USER MANUAL ENGLISH. Order Code: MIXE01
 CR-6 MIXER P R O F E S S I O N A L 1 9 R A C K M I X E R Order Code: MIXE01 w w w. p r o l i g h t. c o. u k USER MANUAL ENGLISH WARNING FOR YOUR OWN SAFETY, PLEASE READ THIS USER MANUAL CAREFULLY BEFORE
Power Source The equipment should be connected to a power supply only of the type described in this manual or as marked on the equipment.
 Linear 1 Vacuum Tube Preamplifier SAFETY INSTRUCTION To avoid personal injury or damage to equipment, please ensure that you read this manual in its entirety before attempting to operate the equipment.
OTO Phono SE Signature
 OTO Phono SE Signature INTEGRATED AMPLIFIER OWNER S INFORMATION CONTENTS 1) IMPORTANT SAFETY INFORMATION 2) CE DECLARATION OF CONFORMITY DISPOSAL POWER REQUIREMENTS 3) INTRODUCTION 4) OVERVIEW UNPACKING
H I G H D E F I N I T I O N. Reference 75 SE
 H I G H D E F I N I T I O N Reference 75 SE 2 Thank you for choosing the Reference 75 SE to be a part of your high performance music listening system. Since 1970, Audio Research has been creating some
MclNTOSH MODEL C-4 and C-4P
 INSTRUCTION MANUAL MclNTOSH MODEL C-4 and C-4P AUDIO COMPENSATORS McINTOSH LABORATORY, INC. 320 Water St. Binghamton, N. Y. U.S.A. - 1 - INSTRUCTION MANUAL McINTOSH MODEL C-4 and C-4P AUDIO COMPENSATORS
HDMI 5x1 Switch B-240-HDSWTCH-5X1 INSTALLATION MANUAL
 HDMI 5x1 Switch B-240-HDSWTCH-5X1 INSTALLATION MANUAL IMPORTANT SAFETY INSTRUCTIONS To reduce the risk of fire or electric shock, read and follow all instructions and warnings in this manual. Keep this
Valve Amplification Company
 Valve Amplification Company Standard Musicbloc 160 Monoblock Tube Amplifier Instructions 15 February 2005 Please read carefully before installing Copyright 2006 by Valve Amplification Company. All rights
INSTRUCTIONS FOR USE Pro-Ject Phono Box DS2 USB
 INSTRUCTIONS FOR USE Pro-Ject Phono Box DS2 USB Dear music lover, thank you for purchasing a Pro-Ject Audio phono amplifier. In order to achieve maximum performance and reliability you should study these
Ios english manual:ios english manual.qxd 07/08/ :35 Page 1
 Ios english manual:ios english manual.qxd 07/08/2008 10:35 Page 1 Ios english manual:ios english manual.qxd 07/08/2008 10:35 Page 2 Contents Introduction...1 Design Innovation...2-3 Installation...3 Ventilation...4
A wireless turntable for new way of enjoying vinyl records
 Bluetooth Turntable TN-280BT 2-speed Analog Turntable with Phono EQ and Bluetooth A wireless turntable for new way of enjoying vinyl records Main Features 2-speed Belt-drive turntable Built-in MM phono
X D M PREAMP MIXER
 User Instructions X D M - 3 5 2 PREAMP MIXER Thank you for purchasing this American DJ product. The XDM-352 is ready to be used, there is no assembly required. Please read the following instructions before
MANUAL ENGLISH Core Club Ordercode: D2314
 MANUAL ENGLISH Core Club Ordercode: Highlite International B.V. Vestastraat 2 6468 EX Kerkrade the Netherlands Table of contents Warning... 2 Unpacking Instructions... 2 Safety Instructions... 2 Operating
MEISHU Phono INTEGRATED AMPLIFIER OWNER S INFORMATION
 ! MEISHU Phono INTEGRATED AMPLIFIER OWNER S INFORMATION CONTENTS 1) IMPORTANT SAFETY INFORMATION 2) CE DECLARATION OF CONFORMITY DISPOSAL POWER REQUIREMENTS 3) INTRODUCTION 4) OVERVIEW UNPACKING AND INSTALLATION
OWNER S MANUAL EVOLUTION SERIES POWERED SUBWOOFER ES-SUB-EVO6-100
 OWNER S MANUAL EVOLUTION SERIES POWERED SUBWOOFER ES-SUB-EVO6-100 Important Safety Instructions CAUTION RISK OF ELECTRIC SHOCK! DO NOT OPEN! ATTENTION! RISQUE DE CHOC! ÉLECTRIQUE PAS OUVRIR! The lightning
We extend our regards from Bochum and wish you much musical satisfaction from your new EINSTEIN The Absolute Tune.
 Dear customer! With the EINSTEIN The Absolute Tune stereo integrated amplifier, you have acquired that rarest of Hifi components one that conforms to the most stringent standards of electrical design and
S/PDIF & USB D/A Converter. User Manual. Rev.A3, May 2010 Audial d.o.o Belgrade, Serbia
 S/PDIF & USB D/A Converter User Manual Rev.A3, May 2010 Audial d.o.o Belgrade, Serbia www.audialonline.com, info@audialonline.com IMPORTANT PRECAUTIONS 1. Make sure you use earthed mains socket and three
Boulder 1010 Preamplifier
 Boulder 1010 Preamplifier Owners Manual 10/1/03 Boulder Amplifiers, Inc. 3235 Prairie Ave. Boulder, CO 80301 www.boulderamp.com APPENDIX RECORDING BOULDER LINK PROGRAMMING REMOTE CONTROL OPERATION GETTING
CONSONANCE PREAMPLIFIER OWNER S MANUAL
 CONSONANCE PREAMPLIFIER OWNER S MANUAL TABLE OF CONTENTS Introduction Initial Inspection Features Installation Input Impedance Adjustments Preamplifier Internal View Impedance Adjustment Diagram Overall
SW 50. Powered Subwoofer with Built-in Stereo Crossover
 Owner s Manual SW 50 ed Subwoofer with Built-in Stereo Crossover Congratulations on your new purchase and welcome to the AudioSource family of satisfied customers. We trust you will continue to enjoy the
CLASSÉ AUDIO CP-60 REMOTE CONTROL BALANCED PREAMPLIFIER CP-60 OWNER'S MANUAL
 CLASSÉ AUDIO CP-60 REMOTE CONTROL BALANCED PREAMPLIFIER CP-60 OWNER'S MANUAL CLASSÉ DESIGN PHILOSOPHY 1. REPEATED LISTENING DESIGN SESSIONS: Fine tuning of sound by exchanging and mixing of parts (transistors,
USER MANUAL. GOLDMUND MIMESIS 20.7 D/A Converter
 USER MANUAL GOLDMUND MIMESIS 20.7 D/A Converter Thank you for purchasing the Goldmund MIMESIS 20.7 D/A CONVERTER. Please take some time to read this manual. It will provide you with useful information
DSP 18 Sub active subwoofer. user manual
 DSP 18 Sub active subwoofer user manual Musikhaus Thomann Thomann GmbH Hans-Thomann-Straße 1 96138 Burgebrach Germany Telephone: +49 (0) 9546 9223-0 E-mail: info@thomann.de Internet: www.thomann.de 05.11.2018,
XO-231 USER S MANUAL. Crossover ENGLISH
 XO-231 Crossover ENGLISH USER S MANUAL IMPORTANT SAFETY INSTRUCTIONS For your own safety you should read this section in full first! Risk of electrical shock! Connect the device only to a properly wired
Hi-fi for music lovers...
 REGA RESEARCH LIMITED QUALITY HI-FI DESIGNED AND BUILT IN ENGLAND SINCE 1973. Hi-fi for music lovers... Rega Research Ltd first started making specialist Hi-Fi equipment in 1973. Back then life and the
TUBE MIX FIVE CHANNEL MIXER WITH USB AND ASSIGNABLE 12AX7 TUBE. User's Manual
 TUBE MIX FIVE CHANNEL MIXER WITH USB AND ASSIGNABLE 12AX7 TUBE User's Manual IMPORTANT SAFETY INSTRUCTIONS READ FIRST This symbol, wherever it appears, alerts you to the presence of uninsulated dangerous
A y r e. K-1x Preamplifier. Owner s Manual
 A y r e K-1x Preamplifier Owner s Manual Table of Contents Welcome to Ayre........................... 2 Installation and Operation......................... 3 Optimizing the Phono Stage........................
M2 Phono Balanced. Owner's Information. Music's Finest Conductor. Level 2 pre-amplifier
 M2 Phono Balanced Level 2 pre-amplifier Owner's Information Music's Finest Conductor Introduction to the M2 Phono Balanced pre-amplifier Congratulations on your purchase of the Audio Note M2 Phono Balanced