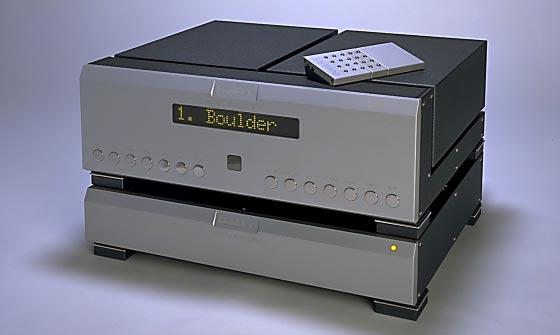
Boulder 2020 Advance D/A Converter
|
|
|
- Frederica Cameron
- 5 years ago
- Views:
Transcription
1
2 Boulder 2020 Advance D/A Converter Owners Manual V1.2 8/1/98
3 TABLE OF CONTENTS GETTING STARTED Placement of your 2020 D/A Converter Connecting the Power Supply to the Main Chassis Connecting to the Mains Outlet Connecting a Hardwire Digital Audio Source Connecting an Optical Digital Audio Source Connecting to a Balanced Input Preamplifier Polarity Connecting to an Unbalanced Input Preamplifier Connecting to an Analog Recording Device OPERATION Powering Up Input Selections Display Advance Digital Maximum Indication REMOTE CONTROL Expansion Batteries Operation APPENDIX RECORDING REMOTE PROGRAMMING PROGRAM- MING REMOTE CONTROL OPERATION GETTING STARTED
4 PROGRAMMING Program Mode Inputs Advance Parameter Digital Maximum Indication Master Reset PROGRAMMING FROM THE REMOTE CONTROL Inputs Advance Parameter Digital Maximum Indication USING A DIGITAL AUDIO RECORDER Connections Main Out Connection Record Out Connection Record Source Selection Programming for Recording APPENDIX Block Diagram Specifications Troubleshooting Notes APPENDIX RECORDING REMOTE PROGRAMMING PROGRAM- MING REMOTE CONTROL OPERATION GETTING STARTED
5 GETTING STARTED PLACEMENT OF YOUR 2020 D/A CONVERTER Your Boulder 2020 is designed to reduce interference from external magnetic and radio fields (RF). While placement is not critical, known magnetic fields should be avoided. Line of sight from the listening position is necessary for the remote control to function properly. Because the converter and its power supply are heavy, a solid, stable surface should be used. As both will generate some heat, they should be allowed to have good air circulation around them. In particular, make certain that the fins on the rear of the supply are not blocked. You may want to have some access to the rear panels for cable changes. 1-1 GETTING STARTED

6 CONNECTING THE POWER SUPPLY TO THE MAIN CHASSIS Your Boulder 2020 Converter is supplied with a Boulder 2000 Triple Power Supply. Each of the three supplies is independent of the others except for the front panel LED which confirms correct power supply operation of all three supplies. Three cables are provided for connecting the power supply to the main chassis. Two of these cables have 4 pin connectors and are used for connecting the left and right audio supplies (±27V). The third one has 5 pin connectors and is used for the digital supplies (+5V). Care must be taken not to confuse these as any attempt to insert the wrong connector will result in a damaged connector. CAUTION: Connect and disconnect these cables only with the power supply turned off. 1-2 GETTING STARTED
7 CONNECTING TO THE MAINS OUTLET Your 2000 Power Supply is supplied with a mains cord suitable to the location where it was purchased. One of the features of the 2000 is its universal automatic voltage-selecting power supply. Simply plug it into any standard outlet. (Exact voltage and frequency compatibility is stated in the specifications section.) 1-3 GETTING STARTED
8 Toslink Input #6 ST Glass Input #5 AES/EBU Input #4 AES/EBU Input #1 CONNECTING AHARDWIRE DIGITALAUDIO SOURCE Four balanced AES/EBU digital audio inputs are provided on the rear panel of the main chassis. Each input may be converted to unbalanced 75Ω coax by the use of a Boulder Digital Input Adapter. This adapter has a special internal network to properly terminate the cable, and must not be confused with one made for analog audio. Connect each source to one of the four inputs provided. Later, you will be able to name each input with the source s name, so you might want to make a list as you connect them. 1-4 GETTING STARTED
9 CONNECTING AN OPTICAL DIGITAL AUDIO SOURCE Two optical inputs are also provided on the main chassis a glass fiber connection known as ST Glass and a plastic fiber known as Toslink. Remove the protective caps before trying to insert the connector. (Store the caps in a safe place.) The ST Glass input will be selected as input 5, and the Toslink input will be selected as input 6. Again, keep track of what sources you connect because you will be able to name them later. 1-5 GETTING STARTED
10 Right Main Output Left Main Output CONNECTING TO ABALANCED INPUT PREAMPLIFIER Because your 2020 Converter s balanced output has a very low output impedance, any practical distance between converter and preamplifier will not be a problem. The Boulder series Balanced Cables will give the best possible sonic connection. Connect each of the 2020 s outputs marked MAIN OUTPUT on the channel audio assemblies to the inputs on your preamplifier. POLARITY Please note that your Boulder 2020 Converter conforms to the new standard of pin 2 as the high or hot pin for all balanced outputs. 1-6 GETTING STARTED
11 CONNECTING TO AN UNBALANCED INPUT PREAMPLIFIER The Boulder series Output Adapting Cables may be used to connect the balanced converter outputs to an unbalanced preamplifier input. This cable connects pin 1 to the shield and pin 2 to the center pin. It leaves the output pin 3 unconnected. If another brand of cable is used, be certain that this same electrical connection is made. Connecting the unused output pin (usually pin 3) to ground will cause excessive ground currents and degrade performance. Use an ohmmeter or continuity checker to determine how a cable is wired. 1-7 GETTING STARTED

12 CONNECTING AN ANALOG RECORDING DEVICE If desired, the REC OUTPUT on each channel audio assembly may be connected directly to a recording device, thus bypassing a preamplifier. This output will always have the same digital source as the main output. Right Analog Record Output Left Analog Record Output 1-8 GETTING STARTED


13 OPERATION POWERING UP With all your connections made, you are ready to listen to your Boulder 2020 Converter. Push on the upper portion of the rocker switch on the rear panel of the 2000 Triple Power Supply. The indicator on the supply will first turn red, then amber. The indicator will be amber during normal operation. If for any reason, any of the power supplies voltages are low, the indicator will change to red. During the powerup sequence, Boulder and then 2020 will slowly appear in the display window. The front panel power switch can later be used for everyday turn on and off. This switch mutes the audio, turns off the display, and puts the converter in a standby mode. 2-1 OPERATION
14 INPUT SELECTIONS Select an input by pressing one of the pushbuttons labeled ONE through SIX. The respective input will be displayed in the display and that signal will be routed to the audio assemblies outputs. For example, if input one is chosen, 1. AES 1 will show in the display. Holding down any of the pushbuttons labeled ONE through SIX for several seconds will cause no input to be selected, and SOURCE NONE will show in the display. 2-2 OPERATION

15 DISPLAY The display brightness may be set to any of 8 brightness levels and also completely off. To change the brightness level, press the DISPLAY pushbutton. DISPLAY 8 will show in the display. Continue pressing the DISPLAY pushbutton until the desired brightness is obtained such as DISPLAY 6. The number in the display will reflect the relative brightness. After several seconds of not changing the brightness level, the display will return to the source indication. With the display at a brightness less than that of 8, any operation of a pushbutton will cause the display to go to full brightness for several seconds, and then return to the desired brightness. This ensures that if a function is changed, it will be noticed whether intentional or inadvertent. 2-3 OPERATION
16 ADVANCE Your 2020 Converter features an advance feature which actually moves one channel (left or right) in time relative to the other channel. There are several uses for this feature. One use is to correct for listening positions which are off-center. Perhaps a favorite chair or desk is placed to one side. Or if your main listening position is in the center of a couch, you might like to recline at one end of the couch from time to time. Another is a difficult listening room where certain objects or walls prevent the speakers from being placed equidistant from the main listening position. While some correction for these problems can be made using only a balance control on a preamplifier, the ultimate solution is to use that balance control together with the time advance feature. The 2020 s advance feature works in time similar to the way a balance control works in level. When we speak of advancing a channel, say the left channel, it means that we are sending the audio signal to the left speaker sooner than to the right speaker. The effect is as though someone is moving the left speaker closer to the listener, making it seem more prominent if you are sitting in the physical center. If you are sitting to the right as the left channel is advancing, the soundstage will seem to come around to a more natural feeling. 2-4 OPERATION
17 Let us assume that INCHES is chosen as the units of advance. To advance the left channel, press the L ADVANCE pushbutton. ADV 0.00 will show in the display. Holding down the L ADVANCE pushbutton will cause increasingly higher numbers of advance until the button is released. The advance can be further increased in the left channel or swept through 0 and then start advancing the right channel by use of the L ADVANCE and R ADVANCE pushbuttons. This works much like a balance control. The ADVANCE pushbutton will turn on and off the advance without changing the setting. The ADV CLEAR pushbutton will clear the setting to zero. Determining the correct amount of delay to use is possible to do by ear with some practice. It is best to use a recording which has a strong mono content such as a single voice or instrument along with some accompaniment to give a feeling of soundstage. It also helps to have a rough idea of how much delay will work for a given situation. Let s take the example of sitting 24 inches to the right of center. Assuming that the two speakers and the center listening position form an equal sided triangle, and that they are some 120 inches from the listener, a left advance of 23.7 inches would be correct. (This is a number very nearly that of the lateral offset of the listener. So for small changes, a distance slightly less than the lateral offset can be used as a starting point.) 2-5 OPERATION
18 To verify this by listening, press the L ADVANCE pushbutton until ADV L appears in the display. Now by successive presses of the ADVANCE pushbutton, the advance will be turned on and off as indicated by the display. First try sitting in the center with the advance turned off. Listen to the music and get a mental picture of the image. Then sit 24 inches to the right and turn on the delay. The sound image will be very nearly that of the one first heard in the center. Nine advance times may be stored for later use. See the section on operating the remote control. If you are using different advance units, then the display would read either ADV L 60.1cm or ADV L1.746 ms. To make only a small adjustment in the location of one speaker, clear the advance feature by pressing the CLEAR pushbutton, and then use the L ADVANCE and R ADVANCE pushbuttons to obtain small increments of advance. Even small increments such as 1.3cm can make the soundstage noticeably different. 2-6 OPERATION
19 DIGITAL MAXIMUM INDICATION Analog sources have an inherent maximum voltage limit known as clipping. Similarly, all digital sources have an inherent maximum numerical limit in the recording process. A special circuit which detects that this limit was reached is included in your Boulder 2020 D/A Converter. If DIG MAX ON is selected in the programming mode, then DIGITAL MAX will be displayed when the limit is detected. 2-7 OPERATION

20 Screws for 2 Modules REMOTE CONTROL The remote control for your Boulder 2020 D/A Converter is in three sections the transmitter, the 2020 module and the Transmitter battery pack. These sections are held together by long screws inserted into the top of the transmitter and running 2020 Module through all sections. Additional longer screws are provided for adding sections from other Battery Pack Boulder series 2000 products to make one convenient control. A special screwdriver designed to fit the end of the screws is provided. The modules may be assembled in any order desired. When removing sections, it is important to use the screws to maintain connector alignment. DO NOT PULL THE SCREWS OUT FIRST. To separate sections, loosen the screws while slowly pulling the battery pack from the 2020 module. Slide the battery pack off the screws. Then slide the module off the screws. Once all sections are removed from the transmitter, you may remove the screws from the transmitter. 3-1 REMOTE CONTROL
21 To reassemble the remote control, insert the 2-module screws into the transmitter section first. Carefully slide the module you want at the top onto the screws. Continue to push it up to the transmitter allowing the connector to engage. Slide the next module onto the screws. 3-2 REMOTE CONTROL
22 Continue to push the second module up to the first module allowing the connector to engage. Slide the battery pack onto the screws just enough so that the screws can be started simultaneously. Use the special screwdriver to tighten the screws, drawing up the battery pack. Make sure the connector properly engages. 3-3 REMOTE CONTROL

23 3-4 REMOTE CONTROL When finished, be certain to keep the original single-module screws and screwdriver for future use.

24 3-5 REMOTE CONTROL BATTERIES It is not necessary to remove the above mentioned screws to install batteries in the remote control. However, a standard #1 Phillips screwdriver is required to install the 3 AAA batteries. Turn the remote control over and remove the two screws located on the cover of the battery pack (the bottom module). Lift off the cover and set aside. Install the batteries with the positive (+) terminals facing toward the top of the remote control and replace the cover.

25 3-6 REMOTE CONTROL REMOTE CONTROL OPERATION Operation of the Boulder 2020 D/A Converter by remote control uses buttons on both the transmitter and 2020 module sections.
26 SOURCE SELECTION To select an input (source) press the button marked SRC on the converter module. While ENTER SOURCE is then showing in the display, press the desired input number (1-6) on the transmitter module. You will now be listening to your desired source, and it will be showing in the display. Entering a 0 will cause no input to be selected, and SOURCE NONE will show in the display. If SRC is inadvertently pushed, and no change is desired, pressing the SRC button again will maintain the previously selected source. ADVANCE To advance the left channel, press the ADV L button. Holding down the ADV L button will cause increasingly higher numbers of advance until the button is released. The advance can be further increased in the left channel or swept through 0 and then start delaying the right channel by use of the ADV L and ADV R buttons. The ADV button will turn on and off the delay without changing the setting. The CLR button will clear the setting to zero. It is possible to save nine advance settings. To do so, first make certain that the desired advance is engaged. Then press the ENTER button. While SAVE MEMORY # is showing in the display, press the desired memory number 3-7 REMOTE CONTROL
27 from 1 to 9 on the transmitter module. The display will return to the advance setting chosen. To recall an advance setting, press the MEM button. While LOAD MEM- ORY # is showing in the display, press the desired memory number. The display will show the new advance setting recalled from memory. 3-8 REMOTE CONTROL
28 PROGRAMMING While it is not necessary to ever use any optional programming functions, you will probably find them helpful in using your Boulder 2020 Converter. All programming is done by pressing the PROGRAM pushbutton which causes PROGRAM MODE to be shown in the display. This is the starting point for all of the following programming options. You may leave program mode at any time by again pressing the PROGRAM pushbutton. 4-1 PROGRAM- MING
29 4-2 PROGRAM- MING INPUTS Each input has several features associated with it. These include assigning an alphanumeric name of your choosing, and setting recordability. From PROGRAM MODE press the input source number you wish to program from ONE through SIX. 1._ AES 1 will be displayed in the display with a blinking cursor in the name s first character. Press the L ADVANCE and the R ADVANCE pushbuttons until the desired character appears. Press the same input source number to accept the displayed character and go to the next character. Continue in this manner until all 10 characters are set. For example, 1.Boulder CD can be used for the Boulder Series 2000 CD Transport. If you make a mistake repeatedly press the same input source number until all ten characters are passed by and then continue until the other settings are passed through and the name assignment display reappears. After the tenth character is assigned, 1.RECORDABLE will show in the display. Use of this program feature will be described in the Recording section. Press the same input source number to return to the program mode starting point. Press PROGRAM to return to normal mode.
30 4-3 PROGRAM- MING ADVANCE PARAMETER The time and distance units used in the advance feature can be programmed for one of three choices. From PROGRAM MODE press the ADVANCE pushbutton. As you continue to successively press the ADVANCE pushbutton, INCHES, CEN- TIMETERS, and MILLISECONDS will alternately be displayed. When the desired units are shown, press the PROGRAM pushbutton to set your selection and return to normal mode.
31 4-4 PROGRAM- MING DIGITAL MAXIMUM INDICATION The digital maximum detector can be turned on or off. From PROGRAM MODE press the DISPLAY pushbutton. DIG MAX OFF will show in the display. As you continue to successively press the DISPLAY pushbutton, DIG MAX ON and DIG MAX OFF will alternately be displayed. When your desired mode is shown, press the PROGRAM pushbutton to set your selection and return to normal mode.
32 4-5 PROGRAM- MING MASTER RESET Should you wish to have all settings reset to original factory defaults, you may execute a master reset. Normally, this function is not used. From PROGRAM MODE press the POWER pushbutton. RESET ALL? will show in the display for 5 seconds, and then 1=YES 2=NO will show in the display. To leave all settings as they currently are, press the TWO pushbutton. To reset all settings, press the ONE pushbutton. All other pushbuttons are inoperative during this time. The 2020 Converter will then return to normal operating mode.
33 5-1 REMOTE PROGRAMMING PROGRAMMING FROM THE REMOTE CONTROL Programming may also be conveniently done from the remote control. Similar to programming from the front panel, all programming is done by pressing the PGM button which causes PROGRAM MODE to be displayed in the left display. You may leave program mode at any time by again pressing the PGM pushbutton. INPUTS From PROGRAM MODE press the SRC button. ENTER SOURCE will be displayed and you may press the input source number you wish to program from 1 through 6. If you selected 1, then 1._ AES 1 will be shown in the display with a blinking cursor in the name s first character. Press the ADV L and ADV R buttons until the desired character appears. Press the SRC button to accept the displayed character and go to the next character. Continue in this manner until all 10 characters are set. If you make a mistake repeatedly press the SRC button until all ten characters are passed by and then continue until the other settings are passed through and the name assignment display reappears. After the tenth character is assigned, 1.RECORDABLE will show in the display. Use of this program feature will be described in the Using a Digital Recorder section.
34 Press the SRC button to return to the program mode starting point. Press PGM to return to normal mode. ADVANCE PARAMETER From PROGRAM MODE press the ADV pushbutton. As you continue to successively press the ADV pushbutton, INCHES, CENTIMETERS, and MILLISECONDS will alternately be displayed. When the desired units are shown, press the PGM pushbutton to set your selection and return to normal mode. DIGITAL MAXIMUM INDICATION From PROGRAM MODE press the DISPLAY pushbutton on the transmitter section of the remote control. DIG MAX OFF will show in the display. As you continue to successively press the DISPLAY pushbutton, DIG MAX ON and DIG MAX OFF will alternately be displayed. When your desired mode is shown, press the PGM button to set your selection and return to normal mode. 5-2 REMOTE PROGRAMMING
35 Digital Output 2 Digital Output 1 USING A DIGITAL AUDIO RECORDER CONNECTIONS Two balanced AES/EBU digital audio outputs are provided on the rear panel of the main chassis. Each output may be converted to unbalanced 75Ω coax by the use of a Boulder XXXX Digital Output Adapter. This adapter has a special internal network to properly match the level and impedance of the cable, and must not be confused with one made for analog audio. Any attempt to use other adapters will result in overloading the coax input and may cause damage to that input. MAIN OUT CONNECTION The digital audio output labeled DIGITAL OUTPUT 1 is provided on the main chassis rear panel. This output always follows the selected listening source. Connect this to the input of your recording device or to any other digital audio input desired. 6-1 RECORDING
36 RECORD OUT CONNECTION A digital audio recording device may be connected to the Boulder 2020 Converter. A digital audio output labeled DIGITAL OUTPUT 2 is provided on the main chassis rear panel. Connect this to the input of your recording device. RECORD SOURCE SELECTION Any one of the 6 inputs may be routed to the digital record outputs. Select an input by pressing the RECORD pushbutton on the front panel, and then one of the pushbuttons labeled ONE through SIX. The respective input will be displayed in the display. For example, if input one is chosen, R1 AES 1 will show in the display. While R... is showing in the display, holding down any of the pushbuttons labeled ONE through SIX for several seconds will cause no input to be selected, and RECORD NONE will show in the display. To return to the listening input selection, press the RECORD pushbutton. The display will show the input previously chosen for listening. If the input selected has not been programmed for recording, R...REC ERROR will show in the display and the record output will not be connected to any source. See the following section. 6-2 RECORDING
37 PROGRAMMING FOR RECORDING Instead of having hardware-dedicated inputs for playback (tape) monitors, any input may be chosen for this purpose through software selection. Connect the outputs of these recorders to any of the 6 inputs you choose. Then for the chosen input, follow the instructions in the programming section for inputs until...recordable shows in the display. To prevent that input from being connected to the record outputs (which would cause feedback) press the R ADVANCE until...not RECORD shows in the display. Similarly the L ADVANCE pushbutton my be used to return the input to...recordable. This feature may be changed at any time by going through the programming steps. You would need to do so if you wanted to dub from one recorder to another. Just make certain that only the inputs connected to the playback device are changed to...recordable and not the recording device. It is good practice to return that input s mode back to...not RECORD immediately after the dubbing is finished. The recordable function may also be changed from the remote control. Follow the instructions in the programming from the remote control section for inputs until...recordable shows in the display. Press the ADV L and ADV R buttons until the desired mode is reached. 6-3 RECORDING
38 BOTTOM CHASSIS INPUT 1 INPUT 2 INPUT 3 INPUT 4 INPUT 5 INPUT 6 LISTEN SELECT DIGITAL AES/SPDIF RECEIVER FIR DIGITAL FILTER BOULDER ANTI-JITTER PHASE LOCK VCXO DIGITAL BALANCED DRIVERS WORD CLOCK BIT CLOCK DATA RECORD SELECT DIGITAL OUTPUT 1 DIGITAL OUTPUT 2 CHANNEL CHASSIS WORD CLOCK BIT CLOCK I TO V FIVE CONVERTER PARALLEL BURR BROWN ANTI-IMAGING FILTER (6 POLE BESSEL) DATA MAIN AND RECORD BALANCED OUTPUT 993 BOULDER 2020 ADVANCE CONVERTER AUDIO BLOCK DIAGRAM 7-1 APPENDIX
39 BOULDER 2020 ADVANCE D/A CONVERTER SPECIFICATIONS Digital Inputs 4 AES/EBU, Converts to SPDIF 1 ST Glass Fiber 1 Toslink Digital Outputs 2 AES/EBU, Converts to SPDIF Sampling Rates 32, 44.1, 48 khz Decoding System 20 bit, 8X oversampling Converters per Channel 5 Analog Anti-Imaging Filter Boulder 3 stage, 6 pole Bessel Analog Balanced Outputs 2 Normal Output Level 4 Vrms Analog Headroom 10 db THD+N, 0 dbfs, from 20 Hz to 1 khz % (-101 db) at 20 khz % (-94 db) S/N Ratio, A wtd. 118 db S/N Ratio, unweighted 115 db Frequency Response, 0.03 Hz to 20 khz +0.00, db Crosstalk, L to R or R to L -122 db or better, 20 Hz to 20kHz Output Impedance 100Ω Converter Size, W X H X D 18.0 x x inches Power Supply Size, W X H X D 18.0 x 4.25 x 15.5 inches Power Requirements V / V, Hz, 240 W Max. (160 W nominal) 7-2 APPENDIX
40 TROUBLESHOOTING SYMPTOM CAUSE REMEDY No power indication Power switch is not on Turn on power switch Converter is not plugged in Connect to an AC outlet Home circuit breaker is tripped Reset circuit breaker Red power indication Low line voltage Have line voltage checked Power supply s breakers tripped Reset breakers on rear panel Defective power supply cables Have cables tested Defective power supply or converter Return to dealer for service Amber power indication, but no No signal from source Check source controls, cables, sound is heard in one channel and connections No signal out to preamplifier Check connections to preamplifier No power supply to this channel Turn off power supply, check cables Converter is faulty Return to dealer for servicing Amber power indication, but sound No signal from source Check source controls, cables, is not heard from either channel and connections No signal out to preamplifier Check connections to preamplifier No power supply to audio channels Check power supply cables Converter is faulty Return to dealer for servicing 7-3 APPENDIX
Boulder 1012 DAC Preamplifier
 Boulder 1012 DAC Preamplifier Owners Manual 10/27/03 Boulder Amplifiers, Inc. 3235 Prairie Ave. Boulder, CO 80301 www.boulderamp.com APPENDIX RECORDING BOULDER LINK PROGRAMMING REMOTE CONTROL OPERATION
Boulder 1010 Preamplifier
 Boulder 1010 Preamplifier Owners Manual 10/1/03 Boulder Amplifiers, Inc. 3235 Prairie Ave. Boulder, CO 80301 www.boulderamp.com APPENDIX RECORDING BOULDER LINK PROGRAMMING REMOTE CONTROL OPERATION GETTING
508 Phono Preamplifier. Boulder Amplifiers, Inc. 255 S. Taylor Ave. Louisville, CO (303) /1/2018 Rev. 1.
 /1/2018 Rev. 1.") 508 Phono Preamplifier 6/1/2018 Rev. 1.0 P/N: 91053 Boulder Amplifiers, Inc. 255 S. Taylor Ave. Louisville, CO 80027 (303) 449-8220 www.boulderamp.com About About Boulder Amplifiers, Inc. Boulder was founded
508 Phono Preamplifier 6/1/2018 Rev. 1.0 P/N: 91053 Boulder Amplifiers, Inc. 255 S. Taylor Ave. Louisville, CO 80027 (303) 449-8220 www.boulderamp.com About About Boulder Amplifiers, Inc. Boulder was founded
ORPHEUS ZERO U S E R M A N U A L
 ORPHEUS ZERO U S E R M A N U A L I N T R O D U C T I O N FEATURES Class 1 product CD drive (ORPHEUS ZERO Drive) or player (ORPHEUS ZERO Player) Multiple formats reader : CD, CD-R, CD-RW Software controlled
AES-404 Digital Audio Switcher/DA/Digital to Analog Converter
 Broadcast Devices, Inc. AES-404 Digital Audio Switcher/DA/Digital to Analog Converter Technical Reference Manual Broadcast Devices, Inc. Tel. (914) 737-5032 Fax. (914) 736-6916 World Wide Web: www.broadcast-devices.com
Recording to Tape (Analogue or Digital)...10
...10") c o n t e n t s DUAL MIC-PRE Green Dual Mic Pre (introduction).............................4 Section (i): Setting Up Power Connections...........................................4 Power Supply................................................5
c o n t e n t s DUAL MIC-PRE Green Dual Mic Pre (introduction).............................4 Section (i): Setting Up Power Connections...........................................4 Power Supply................................................5
AES Channel Digital/Analog Audio Switcher/DA/Digital to Analog Converter
 Broadcast Devices, Inc. AES-408 8 Channel Digital/Analog Audio Switcher/DA/Digital to Analog Converter Technical Reference Manual Broadcast Devices, Inc. Tel. (914) 737-5032 Fax. (914) 736-6916 World Wide
AES-402 Automatic Digital Audio Switcher/DA/Digital to Analog Converter
 Broadcast Devices, Inc. AES-402 Automatic Digital Audio Switcher/DA/Digital to Analog Converter Technical Reference Manual Broadcast Devices, Inc. Tel. (914) 737-5032 Fax. (914) 736-6916 World Wide Web:
OWNERS MANUAL LUNATEC V3 MICROPHONE PREAMPLIFIER AND A/D CONVERTER
 OWNERS MANUAL LUNATEC V3 MICROPHONE PREAMPLIFIER AND A/D CONVERTER LUNATEC 35 +48 35 +48 30 40 30 40 0 25 45 25 45 3 192 1 1 6 176.4 20 50 20 50 9 96 12 PEAK 88.2 55 55 RESET 48 10 60 2 10 60 2 21 44.1
Owners Manual PERREAUX
 éloquence Phono Preamplifier Owners Manual PERREAUX 1 The éloquence phono preamplifier Designed and Manufactured in Dunedin, New Zealand Table of Contents INTRODUCTION... 3 Unpacking... 4 Fitting Instructions...
CONSONANCE PREAMPLIFIER OWNER S MANUAL
 CONSONANCE PREAMPLIFIER OWNER S MANUAL TABLE OF CONTENTS Introduction Initial Inspection Features Installation Input Impedance Adjustments Preamplifier Internal View Impedance Adjustment Diagram Overall
SoundPals. ADC-24 User Guide. Stereo A-to-D Converter
 SoundPals Stereo A-to-D Converter Printing History SoundPals ADC-24 A-to-D converter Rev. N/C SEPTEMBER 2016 Printed in U.S.A. Part Number 08-2045-00 The information contained in this guide is subject
Professional Fidelity Mastering Grade Listening
 Professional Fidelity Mastering Grade Listening Director ON SOURCE VOLUME VOLTAiR 120V DC Audio Rail DAC Preamplifier This User Manual is optimized for Acrobat Reader. Interactive buttons may not appear
Instruction Manual By Digital & Analog
 FEMTO Instruction Manual By Digital & Analog www.calyxaudio.com 1 Thank you for purchasing FEMTO Music is the most important messenger of human emotion as well as a meaning of its expression since human
LavryBlack Series Model DA10 Digital to Analog Converter
 LavryBlack Series Model DA10 Digital to Analog Converter Lavry Engineering, Inc. P.O. Box 4602 Rolling Bay, WA 98061 http://lavryengineering.com email: techsupport@lavryengineering.com January 14, 2008
The Dangerous Music D-Box user s operating guide
 The Dangerous Music D-Box user s operating guide Thank you for choosing products from the exciting line of Dangerous Music recording equipment. Many years of dependable and trouble-free service can be
Hegel HD20 High End D/A Converter
 Hegel HD20 High End D/A Converter www.hegel.com info@hegel.com USER GUIDE Congratulations on your new HEGEL! Every Hegel product is based on a simple philosophy: The audio reproduction instrument shall
CONVI104 SWITCHER & ANALOG TO SDI CONVERTER CONVI 104-M 15/03/2006
 PAL and NTSC compatible 10-bit sampling Five-stage comb filter EDH generation and insertion Twin SDI output Frame Synch. with optional board (FS104) CONVI 104-M 15/03/2006 1 INSTALLATION AND USE OF THE
Model 6010 Four Channel 20-Bit Audio ADC Data Pack
 Model 6010 Four Channel 20-Bit Audio ADC Data Pack Revision 3.1 SW v1.0.0 This data pack provides detailed installation, configuration and operation information for the Model 6010 Four Channel 20-bit Audio
USER MANUAL GOLDMUND MIMESIS 32.5 Universal Acoustic Processor
 USER MANUAL GOLDMUND MIMESIS 32.5 Universal Acoustic Processor Congratulations. Thank you for purchasing the Goldmund MIMESIS 32.5 UNIVERSAL ACOUSTIC PROCESSOR. You have acquired the best multi-usage acoustic
560A 500 SERIES COMPRESSOR/LIMITER OWNER S MANUAL
 500 SERIES COMPRESSOR/LIMITER OWNER S MANUAL Warranty 1. Please register your product online at www.dbxpro.com. Proof-of-purchase is considered to be the responsibility of the consumer. A copy of the original
110LP MOON Series. Phono Preamplifier. Owner s Manual
 Phono Preamplifier Owner s Manual Owner s Manual I Table of Contents Introduction 4 Unpacking 5 Installation & Placement 5 Circuit Board Layout s 6 Internal Adjustments 7 Rear Panel Connections 8 Operating
GAMBIT DAC1 OPERATING MANUAL
 digital audio weiss engineering ltd. Florastrasse 42, 8610 Uster, Switzerland +41 1 940 20 06 +41 1 940 22 14 http://www.weiss.ch / http://www.weiss-highend.com GAMBIT DAC1 OPERATING MANUAL Software Version:
O W N E R ' S M A N U A L. D/AC-1100 Digital/Analog Converter
 O W N E R ' S M A N U A L D/AC-1100 HD Digital to Analog Converter Congratulations on your purchase of this precision audio component and thank you for your selection of Parasound. The D/AC-1100 HD is
500 SERIES DE-ESSER OWNER S MANUAL
 500 SERIES DE-ESSER OWNER S MANUAL Warranty 1. Please register your product online at www.dbxpro.com. Proof-of-purchase is considered to be the responsibility of the consumer. A copy of the original purchase
bel canto SEP2 Single Ended Triode Tube Preamplifier User's Guide and Operating Information
 bel canto SEP2 Single Ended Triode Tube Preamplifier User's Guide and Operating Information Bel Canto Design 212 Third Avenue North, Suite 274 Minneapolis, MN 55401 USA Phone: 612 317.4550 Fax: 612.359.9358
USER MANUAL GOLDMUND METIS 7 Integrated Amplifier
 USER MANUAL GOLDMUND METIS 7 Integrated Amplifier Congratulations. Thank you for purchasing the Goldmund METIS 7. You have acquired the best multi-usage ever made for professional and domestic uses. Please
PAD-2 2 Channel A-D Converter Mk2 Rev. 3 Sept. 24, 2017
 PAD-2 2 Channel A-D Converter Mk2 Rev. 3 Sept. 24, 2017 USER MANUAL 1 Thank you for purchasing our product. We strive to provide you with a professional product, a toolbox you will use for several years
DIGITAL C==:D 0... ~ 0 ~ 0 ~ 0 REFERENCE 64 OWNER S REFERENCE
 DIGITAL C==:D 0... ~ 0 ~ 0 ~ 0 REFERENCE 64 OWNER S REFERENCE INTRODUCTION Thank you for your purchase of the Krell REFERENCE 64 Digital-to-Analog Processor and welcome to the Krell family of audio components.
Reference 150 LINEAR
 Reference 150 LINEAR USER GUIDE Congratulations on your new CONSONANCE! Our products are based on a simple philosophy: The component shall reproduce the original musical sound, purely and naturally. The
COHERENCE ONE PREAMPLIFIER
 COHERENCE ONE PREAMPLIFIER OWNER S MANUAL TABLE OF CONTENTS Introduction Features Unpacking Instructions Installation Phono Cartridge Loading Basic Troubleshooting Technical Specifications Introduction
OPERATION NOTES FOR PSIDEX AUDIO PGP-1A PRE-AMPLIFIER DESCRIPTION INSTALLATION
 OPERATION NOTES FOR PSIDEX AUDIO PGP-1A PRE-AMPLIFIER DESCRIPTION The Psidex Audio Laboratory PGP- 1A is a vacuum tube based microphone preamp and program line amplifier designed to provide solid, robust
LavryBlack Series Model AD10 Analog to Digital Converter
 LavryBlack Series Model AD10 Analog to Digital Converter Lavry Engineering, Inc. P.O. Box 4602 Rolling Bay, WA 98061 http://lavryengineering.com email: techsupport@lavryengineering.com Rev 1.20 January
SOURCE COMMANDER MSS433 A/V SELECTOR OWNER S MANUAL INSTALLATION GUIDE
 SOURCE COMMANDER MSS433 R L V R L V R L V R L V M U L T I S T A T I O N A/V SELECTOR OWNER S MANUAL INSTALLATION GUIDE OWNER S MANUAL/INSTALLATION GUIDE WARNING! THE CLARION MSS433 MULTISTATION A/V SELECTOR
Owners Manual. Microphone Preamplifier and A/D Converter. Manual Rev E
 Owners Manual Microphone Preamplifier and A/D Converter Manual Rev E 2434 30th Street, Boulder, CO 80304 USA tel 303.443.7454 fax 303.444.4634 www.gracedesign.com email: info@gracedesign.com Revision D
USB Phono Plus. Project Series USER S MANUAL. Audiophile Computer Interface
 USB Phono Plus Audiophile Computer Interface Project Series USER S MANUAL IMPORTANT SAFETY INSTRUCTION READ FIRST This symbol, whenever it appears, alerts you to the presence of uninsulated dangerous voltage
Integre4. Audiophile integrated amplifier. v1.2
 Owner s Manual Integre4 Audiophile integrated amplifier www.lab12.gr v1.2 Table of Contents It is yours Features Unpacking and Warnings Installation & Placement Front Panel Rear Panel Connections Remote
DCX-24 ORDERCODE D2020
 DCX-24 ORDERCODE D2020 Congratulations! You have bought a great, innovative product from DAP Audio. The DAP Audio DCX-24 brings excitement to any venue. Whether you want simple plug-&-play action or a
Operating Manual. Mark Levinson Nº25 Dual Monaural Phono Preamplifier. Madrigal Audio Laboratories, Inc. 1
 Operating Manual Mark Levinson Nº25 Dual Monaural Phono Preamplifier Madrigal Audio Laboratories, Inc. 1 WARNING: TO REDUCE THE RISK OF FIRE OR ELECTRIC SHOCK, DO NOT EXPOSE THIS APPLIANCE TO RAIN OR MOISTURE.
Modula SDI Digital Video Enclosures
 Modula SDI Digital Video Enclosures This Boards & Specifications section contains specific board installation information for boards available for the following SDI Modula enclosure models: Modula Enclosure
Model 7130 HD Downconverter and Distribution Amplifier Data Pack
 Model 7130 HD Downconverter and Distribution Amplifier Data Pack E NSEMBLE D E S I G N S Revision 1.0 SW v1.0 www.ensembledesigns.com 7130-1 Contents MODULE OVERVIEW 3 Audio Handling 3 Control 3 Metadata
M A S T E R S E C T I O N. User Manual
 M A S T E R S E C T I O N User Manual Version 1.02: July 2007 Contents. Safety Information.... 3 Welcome.... 4 Connections.... 5 A Basic Set-up 5 Setting Up.... 7 Adjusting Input Levels 7 Taking Account
T L Audio. User Manual C1 VALVE COMPRESSOR. Tony Larking Professional Sales Limited, Letchworth, England.
 T L Audio User Manual C1 VALVE COMPRESSOR Tony Larking Professional Sales Limited, Letchworth, England. Tel: 01462 490600. International +44 1462 490600. Fax: 01462 490700. International +44 1462 490700.
Bel Analogue/AES Audio Delay Synchroniser. User s Guide Version /05/04
 Bel 7150 Analogue/AES Audio Delay Synchroniser User s Guide Version 1.0 06/05/04 BEL (Digital Audio) Ltd. has made every effort to ensure the accuracy of information contained within this document which
THE GOLDMUND MIMESIS 36 CD TURNTABLE
 THE GOLDMUND MIMESIS 36 CD TURNTABLE THE GOLDMUND MIMESIS 36 CD TURNTABLE USER MANUAL WARNING! This high quality CD player possess new technical features which are necessary for an accurate tracking of
DP1 DYNAMIC PROCESSOR MODULE OPERATING INSTRUCTIONS
 DP1 DYNAMIC PROCESSOR MODULE OPERATING INSTRUCTIONS and trouble-shooting guide LECTROSONICS, INC. Rio Rancho, NM INTRODUCTION The DP1 Dynamic Processor Module provides complete dynamic control of signals
DRS-SA STAND ALONE AUDIO ROUTER
 USER GUIDE DRS-SA STAND ALONE AUDIO ROUTER Publication: 81-9059-0693-0, Rev. A www.pesa.com June, 2011 Phone: 256.726.9200 DRS-SA AUDIO ROUTER Thank You!! for purchasing your new PESA audio router. We
RA-RS232, RB-RS232. Setup and Installation Guide Addendum For RadioRA RS232 Interface
 RA-RS232, RB-RS232 Setup and Installation Guide Addendum For RadioRA RS232 Interface A Comprehensive Step-by-Step Guide for Programming and Operating the Lutron RadioRA RS232 Interface Note: Please leave
PROFESSIONAL 2 CHANNEL SOLID-STATE MIC / LINE PREAMPLIFIER USER S MANUAL
 PROFESSIONAL 2 CHANNEL SOLID-STATE MIC / LINE PREAMPLIFIER USER S MANUAL SAFETY INSTRUCTIONS This symbol, wherever it appears, alerts you to important operating and maintenance instructions in the accompanying
J R Sky, Inc. tel: fax:
 STEREO OPTICAL RECORDING SYSTEM N UOPTIX STEREO OPTICAL RECORDING MONITOR LEFT SYSTEM MODE PREVIEW RECORD BIAS RECORD REV SETUP TEST RIGHT INPUT SETUP INPUT BIAS SETUP BIAS INPUT STEREO AUX MONO DIRECT
National Park Service Photo. Utah 400 Series 1. Digital Routing Switcher.
 National Park Service Photo Utah 400 Series 1 Digital Routing Switcher Utah Scientific has been involved in the design and manufacture of routing switchers for audio and video signals for over thirty years.
Technical Specifications
 INSTALLATION SHEET AND OPERATORS MANUAL General Description: The is a mixer/preamplifier that includes 6 channels that each include a microphone input at screw terminals and an aux input at an RCA jack.
Dream. Prism. Operation Manual
 Prism Dream Operation Manual st Issue 2.01 21 January 1998 Prism Media Products Limited William James House Cowley Road Cambridge CB4 4WX UK Phone: +44-(0)1223-424988 Fax: +44-(0)1223-425023 Email: support@prismsound.com
USER MANUAL. GOLDMUND MIMESIS 20.7 D/A Converter
 USER MANUAL GOLDMUND MIMESIS 20.7 D/A Converter Thank you for purchasing the Goldmund MIMESIS 20.7 D/A CONVERTER. Please take some time to read this manual. It will provide you with useful information
spider a bit of information
 spider a bit of information Please read this before connecting power to the unit. There are important things about the power cable and cooling that must be done to allow for long life and reliable operation.
Element 78 MPE-200. by Summit Audio. Guide To Operations. for software version 1.23
 Element 78 MPE-200 by Summit Audio Guide To Operations for software version 1.23 TABLE OF CONTENTS IMPORTANT SAFETY AND GROUNDING INSTRUCTIONS COVER 1. UNPACKING AND CONNECTING...3 AUDIO CONNECTIONS...4
Sphynx Modular High Resolution Audio Interface User Manual
 Sphynx Modular High Resolution Audio Interface User Manual Version: DOC-1.71 (September 2001) 2000 Merging Technologies Inc. Table of Contents TABLE OF CONTENTS...I IMPORTANT NOTICE:... III STATIC DANGER
CP1 OAD. Owner s Manual. Stereo Control Preamplifier. Ultrafidelity
 OAD Ultrafidelity CP1 Stereo Control Preamplifier Owner s Manual Contents Section Page No. Introduction........................................................................ 1 Warnings.................................................................................
ADAT DC Coupling Modifications for Laser Graphic Recording
 Technical Committee ADAT DC Coupling Modifications for Laser Graphic Recording Introduction... 1 ADAT PCB Modifications... 2 Additional ADAT Information... 3 Footnotes... 6 Revision 002, October 1995 ADAT
TeamWork Kits Installation Guide
 TX 0 RX COM +5V APARATUS US TeamWork Kits Installation Guide TeamWork 400 and TeamWork 600 Kits The TeamWork 400 and TeamWork 600 kits consist of an HDMI switcher, system controller, Cable Cubby, and cables
audionet SAM G2 User's Manual Stereo Amplifier
 audionet SAM G2 Stereo Amplifier User's Manual 1 2 Contents 1 Preface... 5 1.1 Included... 6 1.2 Transport... 6 2 Overview front panel... 7 3 Overview back panel... 8 4 Installation and power supply...
MASTERING DIGITAL TO ANALOG USER MANUAL. VER.7/April Use ver.5 manual for earlier units (without toslink)
") MASTERING DIGITAL TO ANALOG CONVERTER USER MANUAL VER.7/April 2007 Use ver.5 manual for earlier units (without toslink) Quick Start.3 Introduction.....4 This manual may be updated Download the newest version
MASTERING DIGITAL TO ANALOG CONVERTER USER MANUAL VER.7/April 2007 Use ver.5 manual for earlier units (without toslink) Quick Start.3 Introduction.....4 This manual may be updated Download the newest version
SoundPals. ASDM-8 User Guide. HD/SD Auto Audio De-embedder
 SoundPals ASDM-8 User Guide HD/SD Auto Audio De-embedder Printing History SoundPals HD/SDI Audio de-embedder Rev. N/C SEPTEMBER 2016 Printed in U.S.A. Part Number 08-2057-00 The information contained in
Eastern Electric. MiniMax Tube DAC Supreme. Owner Manual UNCOMPROMISING AUDIO DESIGNS MADE AFFORDABLE
 Eastern Electric UNCOMPROMISING AUDIO DESIGNS MADE AFFORDABLE MiniMax Tube DAC Supreme Owner Manual Introduction - Thank you for purchasing the MiniMax DAC Supreme. You give us the ultimate complement
Model 5240 Digital to Analog Key Converter Data Pack
 Model 5240 Digital to Analog Key Converter Data Pack E NSEMBLE D E S I G N S Revision 2.1 SW v2.0 This data pack provides detailed installation, configuration and operation information for the 5240 Digital
BP2-MM/MC Phono Preamplifier Owner s Manual
 BP2-MM/MC Phono Preamplifier Owner s Manual Important Safety Instructions The lightning flash with arrowhead symbol within an equilateral triangle, is intended to alert the user to the presence of un-insulated
SATRI AMPLIFIER AMP-51R. Owner s Manual
 SATRI AMPLIFIER AMP-51R Owner s Manual contents SAFETY INSTRUCTIONS 4 INTRODUCTION 6 OVERVIEW (FRONT PANEL) 8 OVERVIEW (REAR PANEL) 9 OVERVIEW (REMOTE CONTROL) 1 1 OPERATION 12 TROUBLESHOOTING 13 SPECIFICATION
BP2-MM MM Phono Preamplifier Owner s Manual
 BP2-MM MM Phono Preamplifier Owner s Manual Important Safety Instructions The lightning flash with arrowhead symbol within an equilateral triangle, is intended to alert the user to the presence of un-insulated
USER MANUAL. 27 Full HD Widescreen LED Monitor L27ADS
 USER MANUAL 27 Full HD Widescreen LED Monitor L27ADS TABLE OF CONTENTS 1 Getting Started 2 Control Panel/ Back Panel 3 On Screen Display 4 Technical Specs 5 Care & Maintenance 6 Troubleshooting 7 Safety
OPERATION MANUAL. USF-402AADC Audio Analog Digital Converter. 1 st Edition
 OPERATION MANUAL USF-402AADC Audio Analog Digital Converter 1 st Edition Precautions Important Safety Warnings [Operation] Hazard [Transportation] Hazard [Circuitry Access] Do not operate the unit under
Model CMX3838A2 AV Matrix Switch with DSP audio (firmware 1.0)
") Model CMX3838A2 AV Matrix Switch with DSP audio (firmware 1.0) Overview: This product is a full featured video & audio matrix switch. It is most commonly used to independently distribute video & audio
Model CMX3838A2 AV Matrix Switch with DSP audio (firmware 1.0) Overview: This product is a full featured video & audio matrix switch. It is most commonly used to independently distribute video & audio
2.0 Wall Mount TV Soundbar Instruction Manual
 8010275 2.0 Wall Mount TV Soundbar Instruction Manual Read all of the instructions before using this soundbar and keep the manual in a safe place for future reference. Safety Information CA UT IO N RISK
Rebis Audio Ltd. RA226 Digital Sampler User Guide
 Rebis Audio Ltd. RA226 Digital Sampler User Guide CONTENTS Page Caution 2 Powering Up 2 Controls 3, 4 Detailed Description Input Level Set 5 Recording 5 Sampling 5 Multiple Samples 6 Editing 6 Playback
LavryBlack Series Model AD11 Stereo Analog to Digital Converter With Microphone Preamplifier
 LavryBlack Series Model AD11 Stereo Analog to Digital Converter With Microphone Preamplifier Lavry Engineering, Inc. P.O. Box 4602 Rolling Bay, WA 98061 http://lavryengineering.com email: techsupport@lavryengineering.com
Chameleon Labs Model 7720
 Chameleon Labs Model 7720 Stereo Compressor Owner s Manual 704 228 th Avenue NE, # 826 Sammamish, WA 98074 206-264-7602 www.chameleonlabs.com Revision C - December, 2007 UNPACKING AND INSPECTION Carefully
DLP600M 6+1 Relay Module for Heating and Cooling Plants
 Product Sheet TH6.25 Thermostat Type DLP600M DLP600M 6+1 Relay Module for Heating and Cooling Plants The DLP 600 M is a relay module for activation of loads (namely thermal actuators or circulators) in
RoHS. Atma-Sphere Music Preamplifier. model P-2 OWNER'S MANUAL. Please study this document carefully before using equipment
 1742 Selby Av. St. Paul, MN 55104 651 690 2246 atma sphere.com Atma-Sphere Music Preamplifier model P-2 OWNER'S MANUAL Please study this document carefully before using equipment RoHS CONGRATULATIONS!
Wired Troubleshooting Manual
 Wired Troubleshooting Manual Congratulations on your choice of this product. Its superior sound reproduction will provide enjoyment and entertainment. We appreciate your patronage and take pride in the
Specifications. End-Point Linearity - ±5% F.S., when used with HACO SCR-speed control
 Specifications Model 552 Catalog No. Model Power 55-0665 552 115 VAC, 50-60 Hz 55-0673 552A 230 VAC, 50-60 Hz Input - Single-ended, DC coupled 0 to +10V. Signal source can be Floating (not referenced to
Low Noise Solid State Phono Preamplifier User's Guide and Operating Information
 Bel Canto Design PHONO 1 Low Noise Solid State Phono Preamplifier User's Guide and Operating Information Bel Canto Design 212 Third Avenue North Suite 345 Minneapolis, MN 55401 Phone: (612) 317.4550 Fax:
USER MANUAL. 22" Class Slim HD Widescreen Monitor L215DS
 USER MANUAL 22" Class Slim HD Widescreen Monitor L215DS TABLE OF CONTENTS 1 Getting Started Package Includes Installation 2 Control Panel / Back Panel Control Panel Back Panel 3 On Screen Display 4 Technical
DA8-T DA8-T MANUAL
 J C F A U D I O MANUAL 1.0 contact@jcfaudio.com www.jcfaudio.com Safety Information Do not repair, modify, service this device except in the manner in which it is described in this manual. Doing so can
A y r e. K-1x Preamplifier. Owner s Manual
 A y r e K-1x Preamplifier Owner s Manual Table of Contents Welcome to Ayre........................... 2 Installation and Operation......................... 3 Optimizing the Phono Stage........................
INSTALLATION MANUAL FT-FOTR-8VD-ST-S. 8-Channel Digital Duplex Baseband Video Transmitter and Receiver With Reverse Data Transmission for PTZ Cameras
 INSTALLATION MANUAL FT-FOTR-8VD-ST-S 8-Channel Digital Duplex Baseband Transmitter and Receiver With Reverse Transmission for PTZ Cameras v1.0 4/5/11 1 PACKAGE CONTENTS This package contains: One each
DLP200M 2 Relay Module for Heating and Cooling Plants
 Product Sheet TH6.24 Thermostat Type DLP200M DLP200M 2 Relay Module for Heating and Cooling Plants The DLP 200 M is a relay module for activation of loads (namely thermal actuators or circulators) in wireless
3-DRX. AUTOMATIC THREE CHANNEL DIGITAL AES/EBU REPEATER and ANALOG AUDIO SWITCHER INSTALLATION AND OPERATING MANUAL
 3-DRX AUTOMATIC THREE CHANNEL DIGITAL AES/EBU REPEATER and ANALOG AUDIO SWITCHER INSTALLATION AND OPERATING MANUAL 3-DRX SECTION 1 INTRODUCTION The TITUS TECHNOLOGICAL LABORATORIES 3-DRX AUTOMATIC THREE
apple Service Source Apple Studio Display 17" LCD (ADC) Updated 6 Decenber Apple Computer, Inc. All rights reserved.
 Updated 6 Decenber Apple Computer, Inc. All rights reserved.") apple Service Source Apple Studio Display 17" LCD (ADC) Updated 6 Decenber 2004 2003 Apple Computer, Inc. All rights reserved. apple Service Source Take Apart Apple Studio Display 17" LCD (ADC) 2003 Apple
apple Service Source Apple Studio Display 17" LCD (ADC) Updated 6 Decenber 2004 2003 Apple Computer, Inc. All rights reserved. apple Service Source Take Apart Apple Studio Display 17" LCD (ADC) 2003 Apple
 Executive Solid Statesman FM Limiter Measured Performance Any trademarks used in this manual are the property of their respective owners. Executive Solid Statesman FM Limiter 1 Performance Measurements
INSTRUCTION BOOK FOR. Lectern
 INSTRUCTION BOOK FOR Lectern Disclaimer Milestone and its affiliated corporations and subsidiaries (collectively "Milestone"), intend to make this manual accurate and complete. However, Milestone makes
PREAMPLIFIER INTRODUCTION INSTRUCTIONS FOR USE. Thank you for purchasing the Musical Fidelity A3 CR remote control preamplifier.
 INTRODUCTION A3 CR PREAMPLIFIER INSTRUCTIONS FOR USE Thank you for purchasing the Musical Fidelity A3 CR remote control preamplifier. Used properly and carefully, it should give you many years of outstanding
VPS 100 YPSILON PHONO STAGE. OWNERS MANUAL V1 01/01/2010 All rights reserved
 VPS 100 YPSILON PHONO STAGE OWNERS MANUAL V1 01/01/2010 All rights reserved INTRODUCTION Thank you for trusting YPSILON ELECTRONICS. We assure you that you have made an excellent purchase. Your phono stage
The performance of a lifetime. Owner s Manual MOON 110LP v2 Phono Preamplifier
 The performance of a lifetime Owner s Manual MOON 110LP v2 Phono Preamplifier MOON by Simaudio simaudio.com Simaudio Ltd 1345 Newton Road, Boucherville, Québec J4B 5H2 CANADA Date Code: 20180831 01 INTRODUCTION
apple Service Source Apple Cinema HD Display 23" LCD (ADC) 11 April Apple Computer, Inc. All rights reserved.
 11 April Apple Computer, Inc. All rights reserved.") apple Service Source Apple Cinema HD Display 23" LCD (ADC) 11 April 2003 2003 Apple Computer, Inc. All rights reserved. apple Service Source Take Apart Apple Cinema HD Display 23" LCD (ADC) 2003 Apple
apple Service Source Apple Cinema HD Display 23" LCD (ADC) 11 April 2003 2003 Apple Computer, Inc. All rights reserved. apple Service Source Take Apart Apple Cinema HD Display 23" LCD (ADC) 2003 Apple
4 Input A/V Switcher with Automatic Input Mode and Volume Stabilizer. Model SVS-4D. User Manual
 4 Input A/V Switcher with Automatic Input Mode and Volume Stabilizer Model SVS-4D User Manual Table of Contents WHAT S INCLUDED... 2 INTRODUCTION... 3 IMPORTANT SAFETY PRECAUTIONS... 3 FRONT PANEL... 4
PAM-1840 Preamplifier Operation Manual
 PAM-1840 Preamplifier Operation Manual 1 TABLE OF CONTENTS INTRODUCTION 3 GENERAL INFORMATION 4 SPECIFICATIONS 4 OPERATING INSTRUCTIONS 5 MAINTENANCE 6 2 INTRODUCTION BEFORE APPLYING POWER Review this
MANLEY LABORATORIES, INC. OWNER'S MANUAL MANLEY REFERENCE DIGITAL TO ANALOGUE CONVERTER MANLEY LABORATORIES, INC MAGNOLIA AVE. CHINO, CA.
 MANLEY LABORATORIES, INC. OWNER'S MANUAL MANLEY REFERENCE DIGITAL TO ANALOGUE CONVERTER MANLEY LABORATORIES, INC 13880 MAGNOLIA AVE. CHINO, CA. 91710 TEL: (909) 627-4256 FAX: (909) 628-2482 CONTENTS SECTION
Routing Swichers 248
 Routing Swichers 248 BVG-1500...248 TIME CODE READER BVG-1600...250 TIME CODE GENERATOR BVX-10/10P...252 COMPONENT COLOR CORRECTOR BVX-D10...254 DIGITAL COLOR CORRECTOR BVR-D10/D11...256 REMOTE CONTROL
T2210HD/T2210HDA 21.5 Wide-Screen LCD Monitor User Manual
 T2210HD/T2210HDA 21.5 Wide-Screen LCD Monitor User Manual Table of Contents Package contents...3 Installation...4 To connect the monitor to your PC... 4 Adjusting your monitor...5 Functions of the buttons
Owner s Manual Digital Done Right
 C O R P O R A T I O N Casablanca Owner s Manual Digital Done Right PREFACE CONGRATULATIONS You have just acquired the most advanced component for the control and processing of audio and video ever to have
Specifications MAV Series Matrix Switchers
 Specifications MAV Series Matrix Switchers Video composite video and S-video models Routing MAV 44 Series... 4 x 4 matrix MAV 48 Series... 4 x 8 matrix MAV 62 Series... 6 x 2 matrix MAV 84 Series... 8