99cm (39 ) LCD TV/DVD Combo WITH DVB-T
|
|
|
- Emma Lane
- 5 years ago
- Views:
Transcription
1 99cm (39 ) LCD TV/DVD Combo WITH DVB-T INSTRUCTION MANUAL TFTV3900DT 5 Offering Australians quality since
2
3 Contents Power Supply... 1 Installation... 2 Use and Maintenance... 3 Important Safety Instructions Overview(Front View) / Accessories... 6 Overview(Back View)... 7 Remote control Basic Operation OSD Menu 1. PICTURE Menu SOUND Menu CHANNEL Menu FEATURE Menu SETUP Menu Multimedia Operation Multimedia Operation Recording Operation Recording Operation DVD operation DVD operation Simple Troubleshooting Specifications... 33
4 Power Supply 1
5 Installation 2
6 Use and Maintenance 3
7 Important Safety Instructions 4
8 Important Safety Instructions 5
9 Overview Front View Please insert a 12cm disc according to the silk INPUT MENU CH+ CH- VOL+ VOL - PLAY EJECT POWER LED Indicator Remote Control Sensor (keep clear) MENU: Display/exit the OSD menu. CH+/-: Scan through channels. VOL+/-: Adjust the volume. INPUT: Display the input source menu. PLAY: Play / Pause the disc playing EJECT: Eject the disc. POWER: Turn on/standby the TV set. User s Guide Remote Control Batteries (2xAAA) 6
10 Overview Back View Y Pb Pr HEADPHONE OUT HDMI1 HDMI2 HDMI3 USB PC audio in VIDEO L out R VIDEO L-IN R-IN AC POWER IN: Connect to the power. Headphone out: Connect it to your headphone or other audio equipment. HDMI 1/2/3: Connect it to the HDMI of DVD or other equipment. USB: USB jack for Recording and Media. VGA: For PC display. Connect it to the D-Sub 15 pins analog output connector of the PC. PC audio in: Connect it to the audio output terminal of PC. VIDEO out: Connect them to video terminals. L/R audio out: Connect them to audio terminals. YPbPr: Connect them to the YPbPr video output terminal of DVD. Video: Connect it to video output terminal of DVD. L/R in: Connect them to audio output terminals of DVD, shared with YPbPr. RF: Connect antenna or cable 75 Ohm coaxial to receive TV signal. Coax: Digital output to AV receiver. 7
11 Remote Control POWER REC LIST REC INPUT EPG REP CH/LIST SUBTITLE PVR/DVD MUTE DISPLAY POWER: Turn the TV on/standby. MUTE: Press to mute the sound, press again or press VOL+ to unmute. REC LIST: Record List. CH/LIST: Display the programs list. SUBTITLE: Turn on/off the subtitle display in DTV mode and DVD mode. EPG: To show the Electronic Program Guide during no-menu state only in DTV mode. REP: Repeat playing the title or chapter. : Load/eject DVD disc. OK MENU EXIT PVR/DVD REC : Press to start record the program in DTV mode. : Stop program. : Previous chapter. : Next chapter. : Pause program. : Play program. : Fast reverse. : Fast forward. 9 0 PICTURE NICAM/A2 VOL SOUND SLEEP FAV CH INPUT: Press to display the input source menu. DISPLAY: Press to display the current mode s information. * In DTV mode, play display one time, display the basic information. Play a second time, display the detail information. Play a third time to exit. SCREEN TV/TXT CANCEL REVEAL SETUP D-MENU TITLE PRO HOLD SIZE SUBPAGE INDEX LAN A-B GOTO SLOW MENU: System setup menu. EXIT: Exit the OSD menu. FAV: Display the favorite program list. NUMBER BUTTONS Press0-9 to select a TV channel directly when you are watching TV. Return to the previous channel viewed. CURSOR KEYS OK Allows you to navigate the on-screen menus and adjust the system settings to your preference. 8
12 Remote Control POWER MUTE REC LIST EPG CH/LIST REP SUBTITLE REC PVR/DVD INPUT DISPLAY MENU EXIT OK FAV CH / : Scan through channels. VOL / : Adjust the volume. PICTURE: Select the picture mode. NICAM/A2: TV Nicam/A2 select. SOUND: Select the sound mode. SLEEP: Standby timer. SCREEN: Turn on/off the screen. TV/TXT: Turn off/on the Teletext display. CANCEL: Cancel the Teletext display. REVEAL: Reveal any hidden text. HOLD: Hold or carry on the current subpage. SIZE: Press to see top half of page double size, Press again to see the bottom half of page double size. Press again for normal size. SUBPAGE: Press to enter subpages, pressagain to cancel. INDEX: Go to index. Colour buttons: Short cuts-follow the coloured links in the text PICTURE NICAM/A2 VOL SOUND SLEEP CH SCREEN TV/TXT CANCEL REVEAL SETUP D-MENU TITLE PRO HOLD SIZE SUBPAGE INDEX LAN A-B GOTO SLOW SETUP:DVD system setup. D-MENU:DVD play list/disc menu. TITLE: DVD title. PRO: Edit the program and play. LAN: Select DVD disc language. A-B: Select and play the preferable paragraph of DVD program by pressing this key twice at the beginning and end of it. GOTO: Play your favorite title/chapter/track. SLOW: Play DVD programs at slow speed. 9


13 Basic Operation Power on/off 1. Connect to the power supply with the power cord. 2. -To turn on the TV Press POWER button on the TV or remote control. -To turn off the TV Press POWER button on the TV or remote control. Input Source select Press INPUT button on the TV set or remote control to display the input source menu, and use CH+/- button on the TV set or button on remote control to select the input source, press OK button on the remote control to enter. Note: Before you select the input source, make sure the connections are prepared. DTV ATV AV YPBPR HDMI1 HDMI2 HDMI3 PC Media DVD Basic OSD Menu operation Press MENU button to display the OSD menu as below: Main menu: Picture Sound Channel Feature Setup Submenu (Picture menu for example) Hint---you should operate the OSD menu according to the hint. Use / button to select the main menu, and press / OK button to enter the submenu. In the submenu, use / button to select the function item, press / OK button to enter the setup menu, then press / button to adjust, or press / to select and press OK / / button to confirm. * (Press MENU / button to return to the upper menu.) * (Press EXIT button to exit the menu display.) Note1: Only when you input the suitable signal, the relevant items can be activated Note2: Please operating the OSD menu according to hint on the bottom of the banner. 10
. Colour: Adjust image colour from black and white. Tint: Control the tint ( NTSC mode only). Colour Temp.")
14 OSD Menu 1. Picture menu Description Picture Mode: Select your desired picture mode from Dynamic, Standard, Mild and User. Brightness: Adjust image black level. Contrast: Adjust image contrast. Sharpness: Adjust the sharpness(gray and invalid in VGA/PC mode). Colour: Adjust image colour from black and white. Tint: Control the tint ( NTSC mode only). Colour Temp.: Select an optimum color temperature mode to suit your eyes for viewing from Warm, Cool, Standard. Aspect Ratio: Change the aspect for the screen from 4:3,16:9, full, Zoom1, Zoom2 etc... Noise Reduction: If the broadcast signal received is weak, you can select the Noise Reduction option to reduce the video noise level between Off, Low, Middle and High. 11

15 OSD Menu OSD Menu 2. Sound menu Description Sound Mode: Select your desired sound mode from Standard, Movie, Music, Speech and User. Bass: Adjust the level of the lower-pitched sounds. Treble: Adjust the level of the higherpitched sounds. Balance: Adjust the audio output between left and right speakers. Surround: Turn on/off the surround sound function. Auto Volume Level (AVL): The volumes of all sources will be maintained when the function s on. SPDIF: Select the spdif mode for the TV from off, PCM and Auto. 12


16 OSD Menu 3. Channel menu(in ATV/DTV mode) Australia Description Channel Management: Enter the Channel management menu to edit the channels. Delete: Press RED button to sign the channels you want to delete, it will hint you when you exit. Lock: User must set the Lock enable (Feature-Lock- Lock enable) at ON to active this function. Press GREEN button to sign(lock) or cancel(unlock) the channel. And you have to enter the password to view the program. Skip: Press YELLOW button to skip the channel or cancel the setting, and the program will not be programed by CH+/- button. Swap: Press BLUE button to sign the channel, press / button to move, and press OK button to swap the position. Rename: Press OK button to enter the rename menu to rename the ATV channel. Favorite Management: Add or remove favourite channels by the colour buttons. Up to 4 favourite lists are available, RED-Fav1, GREEN-Fav2, YELLOW-Fav3, BLUE-Fav4. Note: You could display the Favourite list 1/2/3/4 by press the FAV button once/twice/three times/ four times. 13


17 OSD Menu Country: Select the country. When the Child Lock is on, please enter the Password (Lock Password in Feature menu) to start Auto and Manual Search. Auto Search: Press OK button to enter the Auto Search menu, select search mode, and press OK button to start auto search. Note: 1. ALL: Auto search channels for DTV, ATV and Radio. DTV: Auto search channels for DTV and radio. ATV: Auto search channels for ATV. 2. When the TV is auto tunning, you could press MENU button to stop auto tunning and return to preview menu. DTV Manual Search : Enter the DTV Manual Search menu. Press button to select the Channel item, and press button to select the channel, then press button to select the Start item, and press button to manual search ATV Manual Search : Enter the ATV Manual Search menu. Current Channel: Select the current channel for manual searching. Search: Press OK button to enter the search menu, and manual search the frequency by button. Fine Tune: Press OK button to enter the Fine tune menu, and fine tune the frequency by button. Color/Sound System: Select the Color/Sound system for the program. 14

18 OSD Menu OSD Menu 4. Feature menu Description Lock: This menu allows you to lock certain features of the television so that they can not be used or viewed. For example if you don t want certain channels viewed by children or if the television is to be used in a hotel and you want certain channels be locked. When you enter the system lock menu you will be asked for a password. As default it is Lock Enable - Turn on/off the Lock Channel function. Note: When it is be turned on, the functions of Parental Guidance and Change Pin code below will be locked, and the functions Lock(in Channel Management), Auto Search, DTV Manual Search, ATV manual Search in Channel menu will also be locked. Parental Guidance - Select the Parental Guidance mode, or turn off the function. Change Pin Code Press OK button to enter, first enter the current code, then enter your new code and confirm your new code. 15

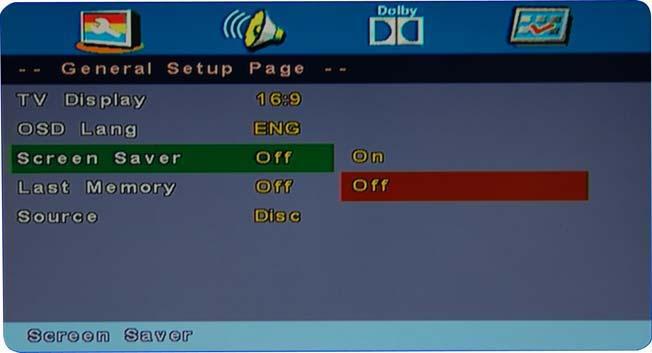
19 OSD Menu OSD Menu Hotel Mode - Enter the Hotel Setting menu. Hotel Lock: Turn on/off the Hotel Lock function. Channel Lock: Disable the Channel menu in OSD. Picture Lock: Disable the Picture menu in OSD. Sound Lock: Disable the Sound menu in OSD. Feature Lock: Disable the Feature menu in OSD. Setup Lock: Disable the Setup menu in OSD. Key Lock: Disable the buttons on the TV set. Source Lock: Disable the input source you desired. Set Source: Select the default source when you turn on the TV. Channel Number: Select the default channel number when you turn on the TV. Max Volume: Set the Max volume for the TV. Default Volume: Set the default volume when the program is on. Clear Lock: Clear all the locks above, it means set all the locks to OFF and max volume to 100. Database Export: Export all Hotel Settings to the USB device. Database Import: Import all Hotel Settings from the USB device. Language: Lets you adjust the different language options available. Clock: Allows you to set the time zone (as default the information is taken automatically from the digital signal). Sleep Timer: Lets you set the sleep timer so the television automatically switches off after a certain amount of time. Auto Power Off: The TV will switch off itself automatically if no change in status within the time you select. You can choose 1H, 2H, 4H or off. Hearing Impaired: You can switch on the hearing impaired feature, this provides additional information and subtitles PVR/Timeshift: Setup menu for recording, please see the Recording Operation section. 16

20 OSD Menu OSD Menu 5. SETUP menu Description OSD Timer: Lets you adjust the amount of time the On Screen Menu stays on the screen before disappearing. PC Setup: Change the PC Settings in PC mode. Auto Adjust: Setup the parameter of the screen automatically. H/V-Position: Adjust the transverse/vertical position of the screen. Phase: Adjust the phase of the ADC sampling clock relative to the sync signal, until a stable image is obtained. Clock: Adjust the pixel clock frequency, until the image size is maximized for the screen. Blue Screen: Changes the background when there is no input between clear and a blue background (Only available in some sources). Reset TV Setting - This clears all the TV settings for the television. Software Upgrade: From time to time we may release new firmware to improve the running of the television (available to download). This menu lets you upgrade that software onto the television. Further details of how to do this will be issued with the firmware. Contact the helpline or refer to the product support section of the website. 17

.")
; Press RED button to delete the file; Press GREEN button")
21 Multimedia Operation Multimedia Operation Basic Operation 1). Press the INPUT button on the remote control to display the input source menu, select Media source by the / buttons, and press OK button to enter the Multimedia menu as shown below. DTV ATV AV YPBPR HDMI1 HDMI2 HDMI3 PC Media DVD 2). Insert USB device, and select the Media mode form Photo, Music, Movie and ebook, then you will find the name of the device display on the screen as shown below. Hints for operation 3). Press / button to select the USB device and press OK button to enter the file list as shown below. Return to device list File list Preview Informations Hints Press / buttons to move (press OK button to select the file or unfold the folder); Press RED button to delete the file; Press GREEN button to sign or cancel all the files to playlist; Press OK button to sign or cancel the selected file to playlist. Press button to previous menu, Press EXIT button to select the file view type: list( ) or thumbnails( ). Press Exit again to veturn to the root MENU. Then press button to program the files (be signed) you select or the files in the fold you select. Press button to stop and exit the full screen program, please notes the hints on the bottom. 18


22 Multimedia Operation Multimedia Operation 1. Photo Play the photo Press / button to select the option on the table, and press OK button to change. Note: You could press OK button to display the option table when it disappears. Play/Pause the photo playing. Stop and exit the full screen program. Play the previous or next file directly. Ratate the picture(0, 90, 180, 270). Zoom in/out the picture, you could move the picture by Cursor left/right/up/down button in Zoom mode. Display the information of the current file. Display the photo setup menu, and select the Repeat mode, Background Music, Slide Time, Effect. Display the playing list. 2. Music Play the music Press / button to select the option on the table, and press OK button to change. ALL Play/Pause the music playing. Stop and exit the music playing. Play fast backword or forword. Play the previous or next file directly. Select the repeat mode for playing music. Switch the window between Information and Playlist. Switch off the screen displaying (BLUE button as quick button), and it will be turned on by exepet power button). 19


23 Multimedia Operation Multimedia Operation 3. Movie Play the movie Press / button to select the option on the table, and press OK button to change. Note: You could press OK button to display the option table when it disappears. AB Play/Pause the movie playing. Stop and exit the full screen program. Play fast backword or forword. Play the movie in slow mode. Play the movie in step mode. Set the A-B repeat playing mode. Play the previous or next file directly. Display the playing list. Display the information of the current file. Display the movie setup menu, and setup the Program, Subtitle, Audio, Repeat mode. Goto mode, Input the time and start playing directly. 4. ebook Play the text Turn to previous/next page of the text. RED button: Add or delete the bookmark. GREEN button: Goto the appoint page. YELLOW button: Display the bookmark list. BLUE button: Display the playlist. 20
. Record File Format Select Record File Format mode from TS and PS for storing in the USB device. 2).")

.")

24 Recording Operation PVR settings Press the MENU button select Feature-PVR/Timeshift menu, press OK button to enter the menu as below. 1). Record File Format Select Record File Format mode from TS and PS for storing in the USB device. 2). Partition Select USB device informations Format: Press RED button to format the selected USB device. Set Default Partition: Press GREEN button to set the focus partition as the default partition.the recorders are stored in the default partition. It need to be reset if the default partition is full in recording progress. 3). Timeshift Buffer Set Timeshift Buffer mode: auto, 30Mins, 1hr, 2hr. 4). Timer Enter the Timer menu to setup the timer recording settings. Press yellow button to add. Recorder: Turn on/off the recorder function. Type: Select the type of the program you want to recording. Channel: Select the channel you want to recording. Start Time: Setup the start time for recording the program. Duration: Setup the duration time for recording. Date: Select the date for recording. Mode: Select the mode for recording. 21

25 Recording Operation 5). Record List Display the Record list menu. Delete: Press RED button to delete the selected record plan. 6). Recorder Start Press OK button to start recording, as the function of the REC button on the remote control. EPG and Timer Record Press EPG button on the remote control to display the EPG menu. EPG mode: Press RED button to change the EPG display mode. Daily mode: shows the information of the programs to be broadcasted in daily mode. Weekly mode: shows the information of the programs to be broadcasted in weekly mode. Reminder: Press GREEN button once to remind the program for watching, and press GREEN button again to remind the program for recording. You could check it in Timer menu, and the TV will record the program according to your settings automatically. Previous/Next Day: Press YELLOW/BLUE button to display the programs on previous or next day. 22

26 Recording Operation Recording Press REC button on the remote control to start recording in DTV mode, and the TV will give you a hint. Select OK item, and press OK to start recording, there will be a sign on the screen. Note: a. Please make sure the USB device is on the TV. b. Please mke sure the speed and free space of the USB is enough. c. Press STOP button to exit the recording mode. d. Press Recording list button to display the Recorder list, and you could play the program you selected. The recording will be going on, and the Recording menu will display when you exit the Recorder list. e. You could also play the Recorded program in Multimedia mode. Timeshift Press PAUSE button on the remote control to start timeshift in DTV mode, and the TV will give you a hint. Select OK item, and press OK to start timeshift, there will be a sign on the screen, and the screen will be freezed. Note: a. Please make sure the USB device is on the TV. b. Please make sure the speed and free space of the USB is enough. c. Press STOP button to exit the timeshift mode. d. Press PLAY button to play the program you are recording from the beginning, and the timeshift will be going on. e. Timeshift time menu on the right top corner shows the fallen time between the current picture and the living broadcasting picture; f. During the recoding progress, if the signal is missing, the recording process will take a pause until the signal is stable again. 23

27 DVD Operation Press the Power button on the TV or the remote control, then press the INPUT button to select DVD mode. If there is no disc in the DVD player the screen will show "NO DISC". Insert Disc according to picture next to disc slot. Do not touch the playing surface. Hold the disc around the outside with your fingers and place the disc into the slot. The player will automatically draw the disc into the player. To "Eject" the disc, press the EJECT button on the TV or the " " button on the remote control. Audio 4:3 Pan Scan 4:3 Letter Box Wide 4:3 Pan Scan 4:3 Letter Box Wide 24

28 DVD Operation 25

29 DVD Operation 26
30 DVD Operation Spdif Setup Spdif out Spdif off Spdif /RAW is for amplifiers with a built in digital decoder. Spdif/PCM is selected for amplifiers with no built in digital decoder. - - Spdif Setup Page - - Spdif Output Spdif Off Spdif/RAW Spdif/Pcm Setup Spdif 27
31 DVD Operation Volume or NO disc 28
32 DVD Operation 29
33 DVD Operation 30
34 DVD Operation 31
35 Simple Troubleshooting If the display fails or performance dramatically deteriorates check the Display in accordance with the following instructions.remember to check the peripherals topinpiont the source of the failure. If the display still fails to perform as expected,connect your helpline for assistance. No power - Check all connections to the TV. - Press either the power button or the Standby button on the Remote control. No picture or sound - Ensure that the TV is plugged in and the power is on. - Ensure that the aerial is connected. - Try a different programme. Poor picture quality - Check the aerial connections. - Check that the channel is tuned in properly. - Adjust the picture settings:brightness,colour,sharpness,contrast,hue. - Make sure that the TV is not located close to electrical appliances that may emit radio frequency interference. No colour - Adjust the colour setting. - Check that the programme is broadcast in colour. - Check that the cannel is tuned properly. TV does not respond to remote control - Check that there are no obstructions between the remote control and the unit. - Check that the remote control is within range of the unit. - Check that the batteries in the remote control and not weak or exhausted. This TV is for household use and registered as harmless on electromagnetic waves. Therefor,you can use it in every location as well as residential areas. 32
36 Specifications LCD Panel Panel Size 39 Max. Resolution Input Connector VIDEO YPbPr VGA AUDIO (L/R) PC AUDIO HDMI RF USB 1920 x Output Connector HEADPHONE 1 COAX 1 VIDEO 1 AUDIO OUT (L/R) 1 Main Voltage Power V ~ 50/60HZ 160W IMPORTANT NOTICE: This product composes up to 6.0 million cells and a few cell defects may occur In the manufacture of the panel. Several dead pixels (allow up to 2 bright or 2 dark pixels) on the panel are deemed acceptable by the industry standards. In line with manufacturers and would not mean that the panel is faulty. Dead pixels panels with 6 pixels or more within 12 month period, Palsonic Corporation Pty Ltd. complies with industry standard and reserves the right to repairthe unitand non-refundable. We hope you will understand that the product that corresponds to this standard is regarded as acceptable. 33
37
38
39
40 Palsonic Customer Service Telephone (Australia) Palsonic C ABN Joynton Avenue, Waterloo NSW 2017 Australia Telephone (02) Facsimile (02)
60cm(23.6 ) LED TV WITH DVD & DVB-T
 LED TV WITH DVD & DVB-T") 60cm(23.6 ) LED TV WITH DVD & DVB-T INSTRUCTION MANUAL TFTV6045LEDR Contents Power Supply... 1 Installation... 2 Use and Maintenance... 3 Important Safety Instructions... 4-5 Overview(Front View) / Accessories...
60cm(23.6 ) LED TV WITH DVD & DVB-T INSTRUCTION MANUAL TFTV6045LEDR Contents Power Supply... 1 Installation... 2 Use and Maintenance... 3 Important Safety Instructions... 4-5 Overview(Front View) / Accessories...
100cm(40 ) LED TV WITH DVB-T
 LED TV WITH DVB-T") 100cm(40 ) LED TV WITH DVB-T PT4088F 6 400mm 400mm Contents Power Supply... 1 Installation... 2 Use and Maintenance... 3 Important Safety Instructions... 4-5 Overview(Front View) / Accessories... 6 Overview(Back
100cm(40 ) LED TV WITH DVB-T PT4088F 6 400mm 400mm Contents Power Supply... 1 Installation... 2 Use and Maintenance... 3 Important Safety Instructions... 4-5 Overview(Front View) / Accessories... 6 Overview(Back
HD TV USER MANUAL 21.5 LED LCD TV. > Please read carefully before use
 HD TV 21.5 LED LCD TV USER MANUAL > Please read carefully before use Contents Safety Precautions Power Supply... 1 Installation... 2 Use and Maintenance... 3 Important Safety Instructions... 4-5 User
KGN&, > Ϯϰs USER MANUAL
 USER MANUAL KGN Contents Contents Safety Precautions Power Supply... 1 Installation... 2 Use and Maintenance... 3 Important Safety Instructions... 4-5 User Guidance Information Names of each part(front
< > ϯϯyyϭ USER MANUAL
 USER MANUAL Contents Contents Safety Precautions Power Supply... 1 Installation... 2 Use and Maintenance... 3 Important Safety Instructions... 4-5 User Guidance Information Names of each part(front View)
<'E&, > WZKϮϰs USER MANUAL
 USER MANUAL Contents Contents Safety Precautions Power Supply... 1 Installation... 2 Use and Maintenance... 3 Important Safety Instructions... 4-5 User Guidance Information Names of each part(front View)
KALED24DVDWA USER MANUAL
 KALED24DVDWA USER MANUAL Contents Contents Safety Precautions Power Supply... 1 Installation... 2 Use and Maintenance... 3 Important Safety Instructions... 4-5 User Guidance Information Names of each part(front
SIZE/WEIGHT - AX Size (without base): 447 x 40 x 270 mm - Size (with base): 447 x 160 x 309 mm - Net weight: 3.4 kg (no stand/packaging)
: 447 x 40 x 270 mm - Size (with base): 447 x 160 x 309 mm - Net weight: 3.4 kg (no stand/packaging)") STANDBY MUTE PROGRAM FAV CH GOTO SUBTITLE A-B AUDIO ASPECT HOLD INDEX SIZE EPG RAVEAL TEXT REC ANGLE DISPLAY REPEAT D.SETUP D.MENU TITLE EJECT ZOOM MIX SUBPAGE TIMESHIFT TV/RADIO AX1519/AX1522/AX1524/AX1532
STANDBY MUTE PROGRAM FAV CH GOTO SUBTITLE A-B AUDIO ASPECT HOLD INDEX SIZE EPG RAVEAL TEXT REC ANGLE DISPLAY REPEAT D.SETUP D.MENU TITLE EJECT ZOOM MIX SUBPAGE TIMESHIFT TV/RADIO AX1519/AX1522/AX1524/AX1532
TFD-2622 USER S MANUAL
 26 Wide Screen LCD TV with DVD player TFD-2622 USER S MANUAL Contents Contents Caution Safety Information Unit and Accessories Product Feature Introduction 1. Front View 2. Rear View 3. Remote Control
26 Wide screen LCD TV With DVD Model No.: DVT-2621
 26 Wide screen LCD TV With DVD Model No.: DVT-2621 For information and support, www.lenco.eu Contents Contents Caution Safety Information Unit and Accessories Product Feature Introduction 1. Front View
USER MANUAL KGN1080P32VD
 USER MANUAL KGN1080P32VD USB... Power cord Remote control/batteries Power/Standby button Picture mode button Sound mode button Multi-digits channel buttton P.MODE S.MODE FREEZE SLEEP 1 2 3 4 5 6 7 8 9
32 LED TV Model NO.: LED-3264MC
 32 LED TV Model NO.: LED-3264MC Instruction Manual Contents Contents Safety Information 1-3 Product Introduction 4 Connections 5 Remote Control 6-7 AUTO INSTALLATION 8-9 Basic Operation 10 OSD Menu 1.
p LCD Television with LED Backlight and Built-in DVD Player MODEL: TL23K1-DTP
 23 1080p LCD Television with LED Backlight and Built-in DVD Player MODEL: TL23K1-DTP 17 Contents Contents Caution Safety Information Unit and Accessories 2 3 4 Introduction 5-9 1. Front View 5 2. Rear
USER MANUAL KGNPRO19VD
 USER MANUAL KGNPRO19VD X P.MODE S.MODE SLEEP AUDIO 1 2 3 4 5 6 7 8 9 A/DTV USB/SD FAV + 0 SOURCE MENU OK INFO EXIT MUTE VOL CH ASPECT TTX TITLE /AUTO DVD.SETU P EPG SU BTITL E D.MENU ZOOM/REC.LIST GOTO
19 LCD TV WITH DVB & DVD
 19 LCD TV WITH DVB & DVD Model NO.: TFD-1945DVBT BLACK(UT) Instruction Manual CONTENTS Safety Precautions Power Supply 1 Installation 2 Use and Maintenance 3 Important Safety Instructions 4~5 User Guidance
USER MANUAL KALED32DVDWC
 USER MANUAL KALED32DVDWC Contents Caution Safety Information Names of each part Front View Accessories Back View Remote Control Basic Operation OSD Menu 1. Picture menu 2. Sound menu 3. Channel menu 4.
KGNϭϬϴϬWWZKϮϮs USER MANUAL
 USER MANUAL KGN X P.MODE S.MODE SLEEP AUDIO 1 2 3 4 5 6 7 8 9 USB/SD A/DTV FAV + 0 SOURCE MENU OK INFO EXIT MUTE VOL CH ASPECT /C AN CE L TTX /SIZE D.MENU/HOLD U P G /AUTO DVD.SETU P /S B A E TITLE EPG
39" 1080p LCD Television PLCD3992A
 PROSCAN 39" 1080p LCD Television PLCD3992A Contents Contents Caution Safety Information Unit and Accessories Product Feature 2 3 4 4 Introduction 5-9 1. Front View 5 2. Rear View 6 3. Instruction for
Safety warning Important Safety Instructions. Wall Mount Specifications. Electronic Program Guide. Lock Menu 18. PVR File System
 LT-32N370Z 32 INPUT Safety warning Important Safety Instructions Wall Mount Specifications Electronic Program Guide Lock Menu 18 PVR File System 11 11 11 14 15 16 17 19 20 21 21 22 23 24 25 INPUT AAA
22 LED TV. Model NO.: LED-2253MC. Instruction Manual
 22 LED TV Model NO.: LED-2253MC Instruction Manual Contents Caution Caution Safety Information Product Introduction Front View Rear View Connections Remote Control Basic Operation 1. Video menu 2. Audio
24 LED TV Model NO.: LED-2449
 24 LED TV Model NO.: LED-2449 Instruction Manual Contents Contents Caution Safety Information Accessories Technical Specification Product Introduction Front View Rear View Connections Remote Control Basic
32" FULL HD LED TV with DVB-T/-C/-S2 & CI+ Slot & DVD-Player Model No.: LDD-327
 32" FULL HD LED TV with DVB-T/-C/-S2 & CI+ Slot & DVD-Player Model No.: LDD-327 Contents Contents Safety Information 1-3 Product Introduction 4 Connections 5 Remote Control 6-7 AUTO INSTALLATION Basic
AX1919/AX1922/AX1924/AX /24V LED DVD/TV
 AX1919/AX1922/AX1924/AX1932 12/24V LED DVD/TV PANEL - Display Size: 19 (48cm) - AX1919 22 (56cm) - AX1922 24 (60cm) - AX1924 32 (81cm) - AX1932 - High Definition LED TV - AX1919/32 - Full High Definition
TFTV7450M 72cm(29")HD LED TV/DVD Combo
HD LED TV/DVD Combo") TFTV7450M 72cm(29")HD LED TV/DVD Combo Table Of Contents Important Safety Instructions...2 View of Unit...4 Front Panel... 4 Right Side Panel... 4 Rear Panel... 5 Remote Control...6 Remote Control Drawing...
TFTV7450M 72cm(29")HD LED TV/DVD Combo Table Of Contents Important Safety Instructions...2 View of Unit...4 Front Panel... 4 Right Side Panel... 4 Rear Panel... 5 Remote Control...6 Remote Control Drawing...
26 TV/DVD COMBO Model NO.: TFD-2627MC
 26 TV/DVD COMBO Model NO.: TFD-2627MC Instruction Manual Contents Caution Caution Safety Information Product Introduction Front View Rear View Connections Remote Control Basic Operation OSD Menu 1. Video
CL1901HDVDR 19 LCD TV CONIA POWER MUTE REC LIST CH/LIST EPG REP SUBTITLE REC PVR/DVD TV/AV DISPLAY MENU EXIT PICTURE FAV NICAM/A2 SOUND SLEEP
 REC TV/AV VO L SETUP EPG PICTURE PVR/DVD OK REP SUBTITLE NICAM/A2 SOUND SLEEP TV/TXT CANCEL REVEAL D-MENU TITLE DISPLAY FAV C H SCREEN PRO HOLD SIZE SUBPAGE INDEX LAN A-B GOTO SLOW CONIA CL1901HDVDR POWER
Caratec Vision CAV224DS. User s Manual
 Caratec Vision CAV224DS User s Manual Contents Contents Safety Information 1-3 Product Introduction 4 Connections 5 Remote Control 6-7 AUTO INSTALLATION Basic Operation 8-9 10 OSD Menu 1. Picture menu
Channel Management Favorite Management Country Auto Search DTV Manual Search ATV Manual Search
 C20230F-LED 3 4 5 6 7-8 9 9 10 10 11 11 12 12 13 13 14-15 15 15 15 15 16-17 18 18 18 Management Favorite Management Country Auto Search DTV Manual Search ATV Manual Search 19 19 19 20 20 21 21 Setting
USER MANUAL KGN1080PPRO26VD
 USER MANUAL KGN1080PPRO26VD USB... TITLE D.MENU USB/SD /REC.LIST Remote control/batteries Power cord Power/Standby button Picture mode button Sound mode button Multi-digits channel buttton P.MODE S.MODE
23 LED Television TLAE-02319
 Instruction Manual 23 LED Television TLAE-02319 Contents Caution Safety Information Accessories Technical Specification Product Introduction Front View Rear View Connections Remote Control Basic Operation
32" LED Television PLDED3257A-B
 32" LED Television PLDED3257A-B IIIIIIIIIIII WWW.TUV.COM IIIIIIIIIII Contents Contents Caution Safety Information Unit and Accessories Product Feature 2 3 4 4 Introduction 1. Front View 2. Rear View 5-10
CONTENTS 8 ACCESSORIES 13 9 TROUBLE SHOOTING AND ADVICE SPECIFICATIONS BATTERY USAGE CAUTION 13
 CONTENTS 1 PREFACE 2 2 SAFETY PRECAUTIONS 2 3 FRONT & BACK VIEW, REAR CONNECTION OF LCD 3 4 TV INSTALLATION DRAWINGS 4 4.1 ANTENNA CONNECTION 4 4.2 AV1 INPUT CONNECTION 4 4.3 AV2 INPUT CONNECTION 4 4.4
Safety Information...2 Important Safety Precautions...3
 TFTV3955M Table Of Contents Preparations Guide Safety Information...2 Important Safety Precautions...3 Installed And Connected TV TV Bracket assemble...4 TV Buttons And Terminal Interface... 5 External
66CM (26 ) LCD TV with DVBT / C & DVD Model No.: DVT-2681 BLACK
 LCD TV with DVBT / C & DVD Model No.: DVT-2681 BLACK") 66CM (26 ) LCD TV with DVBT / C & DVD Model No.: DVT-2681 BLACK For information and support, www.lenco.eu Contents Contents Caution Safety Information Accessories Technical Specification Product Introduction
66CM (26 ) LCD TV with DVBT / C & DVD Model No.: DVT-2681 BLACK For information and support, www.lenco.eu Contents Contents Caution Safety Information Accessories Technical Specification Product Introduction
23 Wide Screen LCD TV
 23 Wide Screen LCD TV DFT-2370 FULL HD USER S MANUAL 8 8-9 10 11 11 12 13-14 15 1 2 User s Manual Mains cable This User Guide 3 Indicator on(red) Indicator on(null) Standby mode Power on mode TV/AV 9
USER S MANUAL MANUEL DE L UTILISATEUR MANUAL DEL USUARIO EW39T4LZ
 USER S MANUAL MANUEL DE L UTILISATEUR MANUAL DEL USUARIO EW39T4LZ Contents Contents Caution Safety Information Unit and Accessories Product Feature 2 3 4 4 Introduction 5-9 1. Front View 5 2. Rear View
Front and Rear Panel Remote Control Connecting to a Television...4. Connecting to an Audio System...5
 Table of Contents Front and Rear Panel... 1 Remote Control...... 2 Connecting to a Television...4 Connecting to an Audio System...5 Connecting to a DVD Recorder or VCR... 6 First Time Installation... 7
Contents Unpacking the TV / Accessory s Installing / Removing the Base Stand
 Contents Unpacking the TV / Accessory s Installing / Removing the Base Stand Front / Right Side View and Controls Rear View and Sockets 1 2 3 4 Remote Control 5-6 Installing Batteries in the Remote Control
NMS ETA TM Stereo Advanced Digital TV Set-top Box
 Digital TV HD Set-top Box STB2-T2 NMS ETA TM Stereo Advanced Digital TV Set-top Box User Guide CONTENTS Safety Information... 3 Introduction... 4 Set-top Box Front Panel... 4 Set-top Box Back Panel...
Full High Definition LCD TV. Kogan 1080p42 USER MANUAL
 Full High Definition LCD TV Kogan 1080p42 USER MANUAL Safety information To ensure reliable and safe operation of this equipment, please read carefully all of the instructions in this user guide, especially
16" WIDE SCREEN HD LED TV WITH DVD PLAYER MODEL NO: NTD-1552
 16" WIDE SCREEN HD LED TV WITH DVD PLAYER MODEL NO: NTD-1552 Instruction Manual PLEASE READ CAREFULLY BEFORE USE Table of Contents SAFETY INFORMATION WARNING IMPORTANT SAFETY PRECAUTIONS 1 FRONT/BACK PANEL
Attention. Please handle this product with care and inspect it regularly to ensure it is in good working order.
 Attention Please handle this product with care and inspect it regularly to ensure it is in good working order. If the product, power supply cord or plug shows any signs of damage: stop use, unplug and
32 LED TV C32227T2WAKEUP
 32 LED TV C32227T2WAKEUP Contents Unpacking the TV / Accessory s Installing / Removing the Base Stand Front / Right Side View and Controls Rear View and Sockets 1 2 3 4 Remote Control 5-6 Installing Batteries
Safety Instructions. General Safety Instructions
 Table of Contents Safety Instructions...2 General Safety Instructions...2 Installation...3 Cleaning...4 General Description...5 Specifications & Accessories...5 Specifications...5 Accessories...5 Input
26 HD Ready Digital LCD TV with DVD Player
 26 HD Ready Digital LCD TV with DVD Player Instruction Manual L26DVDB10 L26DVDB10_IB_final110210_running change3.indd 1 10/02/2011 3:36 PM Contents Preparation... 4 Unpacking the TV...4 Installing / Removing
(BM4 x12 6PCS) Power Cable. User Guide
 Power Cable. User Guide") 85 T2 SMART TV 58 (BM4 x12 6PCS) Power Cable User Guide The parts (BM4 x12 6PCS) Installation Place the TV face down on a soft and flat surface (blanket, foam, cloth, etc.) to prevent any damage to the
85 T2 SMART TV 58 (BM4 x12 6PCS) Power Cable User Guide The parts (BM4 x12 6PCS) Installation Place the TV face down on a soft and flat surface (blanket, foam, cloth, etc.) to prevent any damage to the
Neck (BM4x12 4PCS) (ST4x14 4PCS) Power Cable
 (ST4x14 4PCS) Power Cable") 32 32 Neck (BM4x12 4PCS) (ST4x14 4PCS) Power Cable Neck (BM4x12 4PCS) (ST4x14 4PCS) 1.Place the neck in position as shown, fix it with the supplied screws (BM4 x 12) 3 (ST4x14 4 PCS) 100 x 100 mm DTV,
32 32 Neck (BM4x12 4PCS) (ST4x14 4PCS) Power Cable Neck (BM4x12 4PCS) (ST4x14 4PCS) 1.Place the neck in position as shown, fix it with the supplied screws (BM4 x 12) 3 (ST4x14 4 PCS) 100 x 100 mm DTV,
User Manual TFTV4000FHD FHD LCD TV. PALSONIC CUSTOMER SERVICE Telephone AUSTRALIA :
 User Manual TFTV4000FHD FHD LCD TV PALSONIC CUSTOMER SERVICE Telephone AUSTRALIA : 1300 657 888 www.palsonic.com.au Important safety information nglish CAUTION RISK OF ELECTRIC SHOCK; DO NOT OPEN WARNING
IMPORTANT! USER MANUAL. LCDV3255HD 32 HD Wide Screen LCD TV WARRANTY INFORMATION INSIDE. PLEASE READ. Product Image to be inserted
 LCDV3255HD 32 HD Wide Screen LCD TV Product Image to be inserted USER MANUAL IMPORTANT! WARRANTY INFORMATION INSIDE. PLEASE READ Trademark of TEAC Corporation JAPAN www.teac.com.au WARRANTY REGISTRATION
English DMB-118HDMK3
 English DMB-118HDMK3 Table of Contents Safety Information...1 System Connection...1 Remote Control...2 First Time Installation...3 Basic Operation...3 Change Channel...3 Volume and Mute...3 Subtitle/Audio
32 (80cm) HD LED LCD TV
 HD LED LCD TV") 32 (80cm) HD LED LCD TV / GVADLED32 Instruction Manual 2 Contents Preface 4 Safety Precautions 4 Important Safety Instructions 7 In the Carton 10 Connections and Functions 11 Basic Installation 12 Remote
32 (80cm) HD LED LCD TV / GVADLED32 Instruction Manual 2 Contents Preface 4 Safety Precautions 4 Important Safety Instructions 7 In the Carton 10 Connections and Functions 11 Basic Installation 12 Remote
32" HD LED/LCD TELEVISION MODEL: SRO322016
 32" HD LED/LCD TELEVISION MODEL: SRO322016 1. Place the TV with the display side down on a flat surface, Use a cloth to protect the display. 2. Flat base, the base will be one of the pillars placed
Digital Terrestrial Television Receiver USER S MANUAL
 # 5024 Digital Terrestrial Television Receiver USER S MANUAL CAUTION RISK OF ELECTRIC SHOCK DO NOT OPEN This symbol is intended to alert the user to the presence of insulated dangerous voltage within the
User Manual TFTV8155DT. PALSONIC CUSTOMER SERVICE Telephone AUSTRALIA :
 User Manual TFTV8155DT PALSONIC CUSTOMER SERVICE Telephone AUSTRALIA : 1300 657 888 www.palsonic.com.au Important safety information CAUTION RISK OF ELECTRIC SHOCK; DO NOT OPEN WARNING This symbol is intended
Table of Contents Safety Precautions 1.1 Safety Precautions... Introduction to the Product 2.1 Features Important Information
 best, and Table of Contents Safety Precautions 1.1 Safety Precautions..... 1 Introduction to the Product 2.1 Features..... 3 2.2 Important Information... 4 2.3 The Device and Accessories... 5 Functional
55.5cm (22 ) LCD TV with DVD, DVB-T & CI Model No.: DVT-2234
 LCD TV with DVD, DVB-T & CI Model No.: DVT-2234") 55.5cm (22 ) LCD TV with DVD, DVB-T & CI Model No.: DVT-2234 For information and support, www.lenco.eu Contents 1-3 SAFETY INFORMATION 4 5-6 7 8-11 12 13 14 15-22 Unit Remote Control Aerial connection
55.5cm (22 ) LCD TV with DVD, DVB-T & CI Model No.: DVT-2234 For information and support, www.lenco.eu Contents 1-3 SAFETY INFORMATION 4 5-6 7 8-11 12 13 14 15-22 Unit Remote Control Aerial connection
LCD19DVDID HD DIGITAL LCD TV/DVD
 tesco 19_18 english manual main.page 1 26. 6. 2008 10:19:44 LCD19DVDID-308 19 HD DIGITAL LCD TV/DVD blank.pdf 30. 6. 2008 8:18:36 tesco english manual warnings 01Page 1 19. 9. 2007 14:22:25 WARNINGS Thank
LT-50N530Z 50" class INPUT
 LT-50N530Z 50" class INPUT Safety warning Important Safety Instructions Wall Mount Specifications Electronic Program Guide Lock Menu 18 PVR File System 11 11 11 14 15 16 17 19 20 21 21 22 23 24 25 Safety
User Manual. High Definition Digital Set Top Box HDSTB250
 User Manual High Definition Digital Set Top Box HDSTB250 CHANNEL HDSTB250 Please read this User Manual carefully to ensure proper use of this product and keep this manual for future reference. Important
19 HD Ready Digital LCD TV with DVD Player
 19 HD Ready Digital LCD TV with DVD Player Instruction Manual L19DVDP10 L19DVDB20 Logik L19DVDP10_B20_IB_100914_Zell.indd 1 14/09/2010 3:02 PM Logik L19DVDP10_B20_IB_100914_Zell.indd 2 14/09/2010 3:02
24 HD Ready 1080p Digital LCD TV. Instruction Manual L24DIGB10
 24 HD Ready 1080p Digital LCD TV Instruction Manual L24DIGB10 Contents Preparation... 4 Unpacking the TV...4 Installing / Removing the Base Stand...5 Front / Top / Side View and Controls...6 Rear View
FV400 DIGITAL TV RECEIVER WITH MODULATOR INSTRUCTION MANUAL
 FV400 DIGITAL TV RECEIVER WITH MODULATOR INSTRUCTION MANUAL Please read this instruction manual carefully before using your receiver Table of Contents Introduction-----------------------------------------------------------------------------
your new 48" FHD LED TV. Screws(supplied) M4X20 6PCS TV set Stand Adapter Batteries
 M4X20 6PCS TV set Stand Adapter Batteries") 48 LED TV your new 48" FHD LED TV. TV set Stand Screws(supplied) M4X20 6PCS Adapter Batteries 1 The parts TV set Stand Screws(supplied) M4x20 6PCS Installation Place the TV face down on a soft and flat
48 LED TV your new 48" FHD LED TV. TV set Stand Screws(supplied) M4X20 6PCS Adapter Batteries 1 The parts TV set Stand Screws(supplied) M4x20 6PCS Installation Place the TV face down on a soft and flat
DIGITAL SET TOP BOX STB 7017 INSTRUCTION MANUAL
 DIGITAL SET TOP BOX STB7017 INSTRUCTION MANUAL STB 7017 CHANNEL After Sales Support Now you have purchased a Tevion product you can rest assured in the knowledge that as well as your 3 year parts and labour
Quick Start Guide. Full HD 1080p Dual Tuner Digital HDTV Recorder, Receiver and Media Center Box MODEL : PHD-VRX. To view full version of
 Full HD 1080p Dual Tuner Digital HDTV Recorder, Receiver and Media Center Box Quick Start Guide MODEL : PHD-VRX To view full version of PHD VRX user manual, USB DTV Recording and Timeshifting Operation
PLUSTV 1680ex USER S MANUAL
 PLUSTV 1680ex USER S MANUAL Ver 1.0 Contents 1. Instruction... 1 1.1 Functions and features... 1 1.2 Packaged contents... 2 1.3 Technical specifications... 3 2. Remote control instructions... 4 2.1 Diagram
61CM CORDLESS REMOTE COLOUR TELEVISION MODEL: Type Tested Electrical Safety AS/NZS 3250 Lic 4165 Standards Australia APP No: N16712
 OWNER'S MANUAL 61CM CORDLESS REMOTE COLOUR TELEVISION MODEL: 6159 Type Tested Electrical Safety AS/NZS 3250 Lic 4165 Standards Australia APP No: N16712 PALSONIC CORPORATION PTY LTD 1 JOYNTON AVENUE WATERLOO
101.6cm (40 ) Full HD Direct LED LCD TV with 100Hz Technology MEDION P12173 (MD 30727) Instruction Manual N26968
 Full HD Direct LED LCD TV with 100Hz Technology MEDION P12173 (MD 30727) Instruction Manual N26968") 101.6cm (40 ) Full HD Direct LED LCD TV with 100Hz Technology MEDION P12173 (MD 30727) Instruction Manual N26968 EN 101.6cm (40 ) Full HD Direct LED LCD TV with 100Hz Technology Warranty Details The product
101.6cm (40 ) Full HD Direct LED LCD TV with 100Hz Technology MEDION P12173 (MD 30727) Instruction Manual N26968 EN 101.6cm (40 ) Full HD Direct LED LCD TV with 100Hz Technology Warranty Details The product
QUICK START GUIDE MODEL : PHD-VRX2
 Full HD 1080p Dual Tuner Digital HDTV Recorder, Receiver and Media Center Box QUICK START GUIDE MODEL : PHD-VRX2 Copyright 2013, PrimeDTV Technologies, Inc. Front View Menu: Display On-screen (OSD) Main
Programming Manual for Broadcastvision Entertainment
 Programming Manual for Broadcastvision Entertainment 18.5 Widescreen LCD Part Number: AXS19HD2G 18.5 Widescreen Controller Part Number: AXSPVSC-BVE AXS19HD2G AXSPVSC-BVE Other parts and accessories included
Full High Definition LCD TV USER MANUAL
 1080p3 LCD TV Full High Definition LCD TV 1080p3 USER MANUAL Important Safety Precautions Important Safety Precautions 1 CAUTION RISK OF ELECTRIC SHOCK DO NOT OPEN This symbol indicates important instructions
22 Full HD LED TV with DVD Player. Instruction Manual L22FEDN12 / L22FEDP12 / L22FEDR12 / L22FEDW12 / L22FEDV12 / L22FEDY12 / L22FEDO12
 22 Full HD LED TV with DVD Player Instruction Manual L22FEDN12 / L22FEDP12 / L22FEDR12 / L22FEDW12 / L22FEDV12 / L22FEDY12 / L22FEDO12 Contents Preparation...5 Unpacking the TV...5 Installing / Removing
User Manual High Definition Digital Set Top Box DVBT9070 Please read this User Manual carefully to ensure proper use of this product and keep this man
 User Manual High Definition Digital Set Top Box DVBT9070 Please read this User Manual carefully to ensure proper use of this product and keep this manual for future reference. Important Safety Instructions
Throughout the whole user manual, pay special attention to the following marks that
 Notice Warnings, Cautions and Notes Throughout the whole user manual, pay special attention to the following marks that indicate hazardous situations. Warning ** Indicates a hazardous situation which could
Switching on... 7 Switching off... 7 Menu Function... 8 Menu Operations... 8 Channel... 8 Sound... 8 Option... 8 Picture... 9 Time...
 Table of Contents Chapter 1: Introduction Precautions... 3 Product... 3 Power and Plug... 3 Power Cord and Signal Cable... 3 Use Environment... 3 Cleaning... 3 Hanging the TV Set on the Wall... 3 Buttons
E-LED TV 32 DVB-T2. Please read these instructions before operating your set and retain them for future reference. Model: J32E601B2 EUF4ZX-E011 ENG
 E-LED TV 32 DVB-T2 ENG Operating Instruction Please read these instructions before operating your set and retain them for future reference. Model: J32E601B2 EUF4ZX-E011 PRECAUTION ENG 1. Read these instructions.
216_17 english manual 02.pdf :57:03
 2 216_17 english manual 02.pdf 3. 11. 2008 13:57:03 216_17 english manual 03 new.pdfpage 1 3. 11. 2008 14:03:08 Important information regarding the digital TV switchover Television in the UK is going digital,
31.5 (80cm) HD LED LCD TV
 HD LED LCD TV") 31.5 (80cm) HD LED LCD TV GVA32HD1 INSTRUCTION MANUAL 2 CONTENTS Preface 4 Safety Precautions 4 Important Safety Instructions 7 In the Carton 10 Attaching Stand & Wall Mounting Instructions 11 Connections
31.5 (80cm) HD LED LCD TV GVA32HD1 INSTRUCTION MANUAL 2 CONTENTS Preface 4 Safety Precautions 4 Important Safety Instructions 7 In the Carton 10 Attaching Stand & Wall Mounting Instructions 11 Connections
VU226LD 22" LCD HD Ready with Stand Rotation / Steam Moulding (Black Gloss)
") VU226LD 22" LCD HD Ready with Stand Rotation / Steam Moulding (Black Gloss) VU226LD 22" LCD HD Ready with Stand Rotation / Steam Moulding Finish Features Widescreen Aspect Ratio 1366 (H) x 768(V) pixel
VU226LD 22" LCD HD Ready with Stand Rotation / Steam Moulding (Black Gloss) VU226LD 22" LCD HD Ready with Stand Rotation / Steam Moulding Finish Features Widescreen Aspect Ratio 1366 (H) x 768(V) pixel
SYMBOLS USED ON THE RECEIVER... 3 SAFETY INSTRUCTIONS... 4 I.GENERAL INFORMATION...
 Table of Contents SYMBOLS USED ON THE RECEIVER... 3 SAFETY INSTRUCTIONS... 4 I.GENERAL INFORMATION... 5 1. Preface... 5 2. Main Features... 5 3. General Operation of the Receiver... 6 4. Front Panel...
19.4 (49cm) HD LED LCD TV with built-in DVD Player. Instruction Manual L20PTC17a 24 Month Manufacturer s Warranty
 HD LED LCD TV with built-in DVD Player. Instruction Manual L20PTC17a 24 Month Manufacturer s Warranty") 19.4 (49cm) HD LED LCD TV with built-in DVD Player Instruction Manual L20PTC17a 24 Month Manufacturer s Warranty Table of Contents Television Overview 2 Remote Control 4 Important Safety Instructions 6
19.4 (49cm) HD LED LCD TV with built-in DVD Player Instruction Manual L20PTC17a 24 Month Manufacturer s Warranty Table of Contents Television Overview 2 Remote Control 4 Important Safety Instructions 6
22 / 24 Full HD LED TV
 22 / 24 Full HD LED TV Instruction Manual L22FE12N L24FE12N Contents Preparation...5 Unpacking the TV...5 Installing / Removing the Base Stand...6 Front / Right Side View and Controls...7 Rear View and
User s Manual. TFTV804LED 80cm (31.5 ) HD LED TV with DVB-T LED TV. Offering Australians quality since TELETEXT COMPONENT
 HD LED TV with DVB-T LED TV. Offering Australians quality since TELETEXT COMPONENT") MULTIMEDIA INTERFACE VIEW User s Manual TFTV804LED 80cm (31.5 ) HD LED TV with DVB-T RECORD DTV via USB SUPER Slim Design COMPONENT Input USB 2.0 Connection LED TV Liquid Crystal Display TELETEXT HIGH-DEFINITION
MULTIMEDIA INTERFACE VIEW User s Manual TFTV804LED 80cm (31.5 ) HD LED TV with DVB-T RECORD DTV via USB SUPER Slim Design COMPONENT Input USB 2.0 Connection LED TV Liquid Crystal Display TELETEXT HIGH-DEFINITION
SET TOP BOX MODEL: GDB01SFV1 USER MANUAL
 SET TOP BOX MODEL: USER MANUAL 1 2 3 4 5 6 7 8 Welcome Your Set Top Box 2.1 In The Box 2.2 Front View 2.3 Rear View Quick Setup 3.1 TV Connection 3.2 Recording from the set top box 3.3 Record one channel
High Definition Digital Set Top Box With USB Record DFTA45R. The Gold Technical Support Line: (Charges will apply at $2.
 High Definition Digital Set Top Box With USB Record INSTRUCTION MANUAL DFTA45R The Gold Technical Support Line: 1902 215 259 (Charges will apply at $2.95 per minute) Safety Instructions Always read the
GDB9 INSTRUCTION MANUAL DIGITAL TERRESTRIAL RECEIVER
 GDB9 INSTRUCTION MANUAL DIGITAL TERRESTRIAL RECEIVER Goodmans Support: www.goodmans.co.uk/support Please read these instructions before use and keep for future reference IMPORTANT SAFETY INSTRUCTIONS Thank
50 (127cm) FHD LED LCD TV. Instruction Manual L50HTV17a 24 Month Manufacturer s Warranty
 FHD LED LCD TV. Instruction Manual L50HTV17a 24 Month Manufacturer s Warranty") 50 (127cm) FHD LED LCD TV Instruction Manual L50HTV17a 24 Month Manufacturer s Warranty Contents Guide to the Television 3 Front / Bottom View and Controls 3 Rear View and Sockets 4 Remote Control 5 Installing
50 (127cm) FHD LED LCD TV Instruction Manual L50HTV17a 24 Month Manufacturer s Warranty Contents Guide to the Television 3 Front / Bottom View and Controls 3 Rear View and Sockets 4 Remote Control 5 Installing
ATSC HDTV DIGITAL TERRESTRIAL SET TOP TUNER
 ATSC HDTV DIGITAL TERRESTRIAL SET TOP TUNER CHO4006 Compact ATSC Set Top Box User s Manual Deleted: Index Introduction.. 1 Panel... 2 Connection.. 3 Remote Controller...... 4 Software Operation.... 5-26
4.1CONNECTING ANTENNAS DRAWING VIDEO INPUT DRAWING YPBPR1 INPUT DRAWING YPBPR2 INPUT DRAWING PC (VGA) INPUT DRAWING 5
 INPUT DRAWING 5") CONTENTS 1 PREFACE 2 2 SAFETY PRECAUTIONS 2 3 FRONT&BACK VIEW, REAR CONNECTION OF LCD 3 4 TV INSTALLATION GUIDE 4 4.1CONNECTING ANTENNAS DRAWING 4 4.2 VIDEO INPUT DRAWING 4 4.3 YPBPR1 INPUT DRAWING 4 4.4
CONTENTS 1 PREFACE 2 2 SAFETY PRECAUTIONS 2 3 FRONT&BACK VIEW, REAR CONNECTION OF LCD 3 4 TV INSTALLATION GUIDE 4 4.1CONNECTING ANTENNAS DRAWING 4 4.2 VIDEO INPUT DRAWING 4 4.3 YPBPR1 INPUT DRAWING 4 4.4
DIGITAL WATERPROOF TV / MIRROR TV USER MANUAL. copyright and intellectual property rights. 10"/15" /17"/19"/22"/26"/32" series
 DIGITAL USER MANUAL MENU VOL- VOL+ CH- CH+ TV/AV POWER IR copyright and intellectual property rights The original manufacturer exclusively own or are licensed to use all copyright and other intellectual
Prestigio P370MW User s Manual
 Prestigio P370MW User s Manual Trademarks HDMI, the HDMI logo and High-Definition Multimedia Interface are trademarks or registered trademarks of HDMI Licensing LLC. All other brand and product names are
DIGITAL TERRESTRIAL RECEIVER NVR-2090DU CHANNEL
 DIGITAL TERRESTRIAL RECEIVER NVR-2090DU CHANNEL 1 Espanol ~ Digital Video Broadcasting 2 3 STANDBY DTV/VCR TEXT MUTE VOL+ INFO PLAY/PAUSE EPG VOL- CH+ STOP SETUP EXIT 23 FAV- ENTER FAV+ 24 25 SOURCE CH-
OPERATING INSTRUCTIONS LCD COLOUR TELEVISION WITH REMOTE CONTROL
 OPERATING INSTRUCTIONS LCD40-920 COLOUR TELEVISION WITH REMOTE CONTROL For assistance, please call our Tesco Electrical Helpline on 0845 4566767 Contents Features... 2 Accessories... 2 Introduction...
42" / 47" 3D Ready LCD TV. Instruction Manual L423CD11 L473CD11
 42" / 47" 3D Ready LCD TV Instruction Manual L423CD11 L473CD11 L42_473CD11_IB_111013_Zell.indd 1 13/10/2011 12:05 PM Contents Preparation...5 Unpacking the TV...5 Installing / Removing the Base Stand...6
GET STARTED. For assistance, call us on or visit manhattan-tv.com/help
 GET STARTED For assistance, call us on 020 8450 0005 or visit manhattan-tv.com/support Check Freeview HD coverage in your area by visiting freeview.co.uk For assistance, call us on 020 8450 0005 or visit
VU326LD 32" LCD HD Ready with Stand Rotation / Steam Moulding (Black Gloss Finish)
") VU326LD 32" LCD HD Ready with Stand Rotation / Steam Moulding (Black Gloss Finish) VU326LD 32" LCD HD Ready with Stand Rotation / Steam Moulding (Black Gloss Finish) Features Widescreen Aspect Ratio 1366
VU326LD 32" LCD HD Ready with Stand Rotation / Steam Moulding (Black Gloss Finish) VU326LD 32" LCD HD Ready with Stand Rotation / Steam Moulding (Black Gloss Finish) Features Widescreen Aspect Ratio 1366
Be sure to run the vehicle engine while using this unit to avoid battery exhaustion.
 CAUTION: TO REDUCE THE RISK OF ELECTRIC SHOCK DO NOT REMOVE COVER (OR BACK) NO USER-SERVICEABLE PARTS INSIDE REFER SERVICING TO QUALIFIED SERVICE PERSONNE; Please Read all of these instructions regarding
Preparation. Connection. Switching On. Tuning In. Please refer to Antenna Connection (See the page 10).
.") Preparation Connection Please refer to Antenna Connection (See the page 10). NOTE: Please use good-quality RF cable. Make sure well connected with tuner to ensure effect. Switching On Turn on your TV Set.
Preparation Connection Please refer to Antenna Connection (See the page 10). NOTE: Please use good-quality RF cable. Make sure well connected with tuner to ensure effect. Switching On Turn on your TV Set.
GENERAL INFORMATION INSTALLATION MENU INFORMATION. Main Features For your Safety Unpacking General Operation RCU Rear Panel.
 GENERAL INFORMATION 3 Main Features For your Safety Unpacking General Operation RCU Rear Panel 3 4 7 7 8 9 INSTALLATION 10 MENU INFORMATION Main Menu 1. Installation 1.1 Satellite list 1.2 Dish Setting
MAX T200 HD QUICK INSTALLATION GUIDE
 MAX T200 HD QUICK INSTALLATION GUIDE MAX T200 HD QUICK INSTALLATION GUIDE CONTENT receiver BATTERIES x 2 REMOTE CONTROL Quick installation guide Quick Installation Guide The lightning flash with arrowhead