Scheps Omni Channel User Guide
|
|
|
- Moris Cobb
- 6 years ago
- Views:
Transcription


1 Scheps Omni Channel User Guide
2 Scheps Omni Channel Introduction... 3 Startup Condition... 4 Using Presets... 5 Components... 6 Mono Component... 6 Stereo Component... 7 Expanded View... 8 Stereo Mode and Stereo Controls Linking... 9 Common Controls Side Chain Channel Strip Modules Pre Module EQ Module DS 2 Module Compressor Module Gate Module Master Module Insert Plugin Slot Rearranging Processing Sequence Using Scheps Omni Channel Practical examples Working with M/S Focus Mode Controls Controls common to all modules Pre Module DS 2 Module EQ Module Compressor Module Gate Module Master Module
3 Introduction Thanks for choosing Waves! In order to get the most out of your Scheps Omni Channel plugin, please take a few minutes to read this user guide. We also suggest that you visit the Waves support site, where you ll find an extensive answer base, the latest tech specs, detailed installation guides, new software updates, and current information on licensing and registration. Sign up at the support site and you will receive personalized information about your registered products and authorization status, reminders when updates are available, and more. A note from Andrew Scheps Hello and welcome to the Scheps Omni Channel user guide! I m really excited about this plugin, and so is everyone at Waves. It took a lot of hard work to bring it to life, and I think the final product has not only met, but exceeded, all of our expectations. The genesis of Scheps Omni Channel came from our desire to fulfill the classic definition of a channel strip (EQ, Dynamics, and more in one plugin), while giving the user the sonic color options and flexibility that you get from mixing and matching equipment or plugins. The real breakthrough came when we redefined channel strip" to mean everything you need to make your tracks sound better, all in one easy-to-use unified interface. We think Scheps Omni Channel lives up to that definition, and then some! Scheps Omni Channel is a powerful channel strip plugin that was developed in collaboration with multi-grammy winning mixing engineer Andrew Scheps. It s made up of the kinds of tools that Andrew has used over the years to craft the sound of his legendary mixes; tools that help get the mix done, and get it done really well. Scheps Omni Channel is made up of five processing modules, an input/output section, and an insert point for an additional plugin. All of these hold up on their own, but together they shine. This is not just a collection of useful, great-sounding processors, nor is it just an artist signature plugin that delivers the taste and attitude of a specific engineer It s both. You can start with the presets to get an idea of how Andrew (and other world-class engineers) would use the plugin. There s also a Focus mode that highlights the go-to controls best suited for the loaded preset. This points your eyes and fingers in the right direction and helps you learn how the modules work together. You can, of course, explore the plugin on your own. You ll quickly see just how much freedom you have to create the sound you re looking for. 3

4 Startup Condition When you instantiate Scheps Omni Channel on a track, all processing modules and all sections within modules are switched off. A module that s off does not consume any CPU power, so opening the plugin like this may help you use only the modules that you need and save CPU. Sections within a module can be bypassed independently, but this does not affect CPU. 4


5 Using Presets Load factory presets and save and load custom presets in the WaveSystem Toolbar at the top of the plugin. Presets saved here can easily be shared between instances, whether in the same session in a different session or in a different host application. 1 Download the WaveSystem Toolbar user guide to learn more about saving and loading presets, comparing settings, undoing and redoing, and accessing product details. This tiny toolbar can really help you, so it s worth investigating. The arrows on the left side of the toolbar provide 32 levels of undo and redo. This includes all plugin functions, including resequencing modules. All presets factory and user-created are recalled from the Load menu (far left). To restore all controls to their factory default positions, select Full Reset. Use the Save menu (left) to create presets from existing plugin settings and to copy presets to other instances of Schpes Omin Channel. To delete a preset, hold Cmd while opening the Load menu (Mac). Set as Default Preset saves the current settings as the default preset. It will load each time Scheps Omni Channel is instantiated. Stereo and mono components have different default presets. If you do not want any default preset, use the host computer s operating system to delete the file. Preset files are located here: Mac: Users>Shared>Waves>Plug-In Settings Windows: C:\Users\Public\Waves Audio\Plug-In Settings 5 1 When working with Pro Tools, you must close and relaunch the application after creating a user preset in order to hear the results.

6 Components Scheps Omni Channel has two components: Mono and Stereo. Mono Component Collapsed View Processing Modules Insert Point Master Section 6

7 Stereo Component Collapsed View Stereo Mode Select Processing Modules Insert Point Master Section 7
8 Expanded View A module can also be controlled from its Expanded view. It provides more control options than the Collapsed view, as well as giving you access to the Left and Right (in Stereo or Duo mode) or Mid and Side controls (in M/S mode) separately. Knobs are bigger than in the Collapsed view, so it s easier to read and it s well suited for touch displays. To open the Expanded view, click on the window symbol at the top right-hand side of a module strip. At the top of the Expanded view panel is a bar that controls basic window functions. It varies slightly by module. Bypass module Stereo mode Link EXT SC Close window Click on module name Select between the three stereo modes: Stereo, Duo, and M/S. Click to link/unlink the left and right controls. Click to turn on or off the module s external side chain. Click on the folder symbol button to return to the Collapsed view. 8
9 Stereo Mode and Stereo Controls Linking There are two controls that affect stereo channels: Stereo Mode and Stereo Controls Linking. Stereo Mode Select In the Scheps Omni Chanel stereo component, there are three modes for processing a stereo signal within a module: Stereo, Duo, and M/S. In all modules, the Stereo Mode switch sets whether the stereo input signal will be processed as L/R stereo (Stereo and Duo modes) or will be converted to M/S for separate control of the mid and side channels (M/S mode). Additionally, In the dynamics modules (DS 2, Compressor, and Gate), the Stereo Mode selection determines how the side chain is processed. Stereo Duo M/S Left and right channels are summed in the side chain. The side chain values are the same for left and right, so dynamic processing will apply equally to both channels. Left and right channels of the side chain are processed separately, so dynamic processing may not be the same for the left and right channels. Mid and side channels of the side chain are processed separately, so dynamic processing may not be the same for the mid and side channels.. 2 Regardless of a module s Stereo Mode, its output is always stereo. If needed, it will be converted to M/S at the input of the next module in the chain. This allows re-ordering of the modules on the fly with no impact on the stereo processing. 2 Pro Tools provides only a mono side chain. 9


10 Linking Controls In the Collapsed view, there is one control per function (e.g., frequency, gain, SC listen, thump), whether the signal is mono or stereo. Both channels of a stereo signal are controlled together, and by default, with the same values. Use the Stereo Linking button in the Expanded view to decouple left and right controls so that you can adjust the sides separately. When you relink variable controls, such as knobs and faders, their offsets will be maintained. When discrete switches are linked (e.g., EQ type, filter on/off, SC on/off, and dynamics processing mode), clicking a left or right control will set both controls to the same value. In Stereo or Duo stereo modes, the left and right control sections are labeled L and R. In the M/S mode, the labels will change to M and S for mid and side Left and right, or mid and side, are always linked in the Collapsed view. 10

11 Common Controls To activate a module, click on its name button and the light will go on. When the light is off, the module is bypassed. In addition, certain sections can be bypassed individually: In the Pre module, the Saturation and Thump sections can be bypassed. In the EQ module, each band can be bypassed individually. In the DS 2 module, each band can be bypassed individually. Switches are illuminated when active or selected. The switch, fader, knob, that s currently being controlled is outlined in yellow Copy Channel Parameters You can copy plugin parameters between left and right sides of any module. While in the collapsed view, right-click in a blank space of the module. This opens the Stereo Copy dropdown menu. Copy the parameters of the left side to the right, or vice versa. Copying overwrites the parameters of the target channel. This feature is not available in the mono component. 11


12 Side Chain Each dynamics module can accept an external side chain, as well as its own internal side chain. The entire plugin receives one side chain signal, which is common to all modules. Side chain EQ controls are located in the SC section of the Expanded view. Click the SC button at the bottom of a module to access its SC controls. When you first open the window, all side chain controls are inactive: SC on/off; EXT SC; and all SC EQ controls. Touch any EQ control in the side chain section and that filter becomes active and lights up. The SC button at the top will also become active. Disable and enable the entire side chain with this button. When the side chain is disabled, any active controls, including the EXT SC indicator, will blink until SC is again enabled. To activate a module s external side chain, click the EXT SC button on the top bar. Click the Side Chain Listen switch to hear only the side chain and how it s being affected by the SC filters. To easily locate a side band frequency, hold Ctrl and slide vertically over the Frequency control knob. This engages the Side Chain Listen mode and lets you sweep across the entire frequency range. Let go and the side band frequency is set. This is particularly useful in the DS 2 module, since a precise side band frequency is particularly important. Use the output faders to control the monitor level of the side chain. You can use the same technique in the EQ module to quickly and precisely locate a frequency. 12


13 Channel Strip Modules Pre Module The Pre module is used primarily to add harmonic distortion, much like analog devices add odd or even harmonics, or clipping, to a signal. The name Pre suggests the type of harmonic distortion that one would normally associate with driving preamps. But don t be misled by this module s default position at the beginning of the chain. Think of it instead as a processor that adds warmth and color that can be located at any point in the signal path. At the heart of the module is the Saturation section, which controls the type and amount of added harmonic distortion. There are also HP/LP filters and an EQ that adds a gentle low-frequency thump or resonance. Collapsed View Expanded view button Stereo mode selector Saturation Control Panel HP/LP filter on/off HP/LP filter frequency HP/LP filter slope Expanded View Thump on/off and gain select 13


14 EQ Module The EQ module is a four-band equalizer. Each band provides a distinct musical sound that holds up on its own, while blending well with the other bands. Rather than being restricted to certain frequency ranges per band, each band can be centered at any audio frequency. Plus, any band can become fully parametric. At the top and bottom are the High and Low shelves. There are two shelf types, each with a fixed Q, as well as one adjustable parametric bell. There are two other EQ sections: Mid and Tone. They are identical except in the wide mode, where Mid is a wider, cleaner filter best, suited for enhancing the characteristic sound of the source. Tone is a bit narrower and can really help a source pop out of the track without too much EQ. Since it s somewhat smeary, it s good for coloring and gluing a track together. Collapsed View Expanded view button Stereo mode selector High section High filter type Mid bell EQ Mid bell filter type Tone bell EQ Tone bell EQ filter type Expanded View Low section Low filter type 14


15 DS 2 Module The DS 2 module has two identical dynamic processing sections. Like a de-esser, gain reduction is activated based on a frequency-defined side chain. Unlike a de-esser, each of the two DS 2 processors can selectively control dynamics at any frequency, with adjustable bandwidth and shape. The side chain for the module can be an internal or an external source. One external side band supplies both processing sections. Expanded view button Collapsed View Stereo mode selector DS 2 #1 sideband filters types DS 2 #1 on/off DS 2 #1 frequency DS 2 #1 gain reduction meter DS 2 #1 threshold DS 2 #1 side chain listen DS 2 #2 controls are the same as DS 2 #1 Expanded View DS 2 module level adjust Access Expanded view to adjust side chain EQ 15


16 Compressor Module The Compressor module is made up of three different compressor units, each with very different characteristics. VCA is a very fast, transparent, linear compressor. FET is a slightly slower compressor. There s more distortion and color than in the VCA, and it s smoother. OPT (opto) is slow and very smooth, so transients are maintained. Changing the compressor type does not alter the parameter settings, so you can efficiently compare the impact of each compressor type on the signal. Expanded view button Collapsed View Stereo mode selector Compressor type Threshold Gain reduction meter Ratio Attack Release Expanded View Module output level and mix Access Expanded view to adjust side chain EQ 16


17 Gate Module The Gate module is a standard gate/expander with controls for threshold, attack and release. It also has controls for Range and Close, which let you adjust the maximum noise reduction to maintain a consistent noise floor. The sidechain can be internal or external and also can be filtered. While this may seem like the most standard of the modules, its ability to gate in M/S can yield some amazing results. Expanded view button Collapsed View Stereo mode selector Gate/Expander mode select Threshold Attenuation Meter Gate range (attenuation) Gate close (max attenuation) Attack time Expanded View Release time Access Expanded view to adjust side chain EQ 17

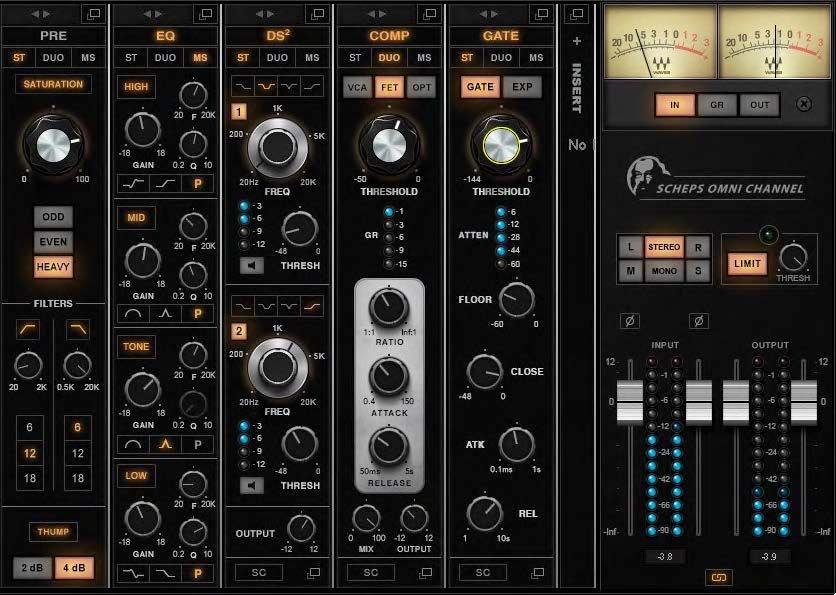
18 Master Module The Master module is divided into four sections: Twin VU meters that display input, gain reduction, and output level A Monitor section for selecting the output and monitoring format A brickwall limiter Input and output faders and meters Output VU meters: Input, Output, Gain Reduction Meter trim pot Output/monitor mode select Output brickwall limiter Input phase invert Input/output peak and clip indicators Stereo Link Input/output faders and meters 18
 sign at the top of the slot and select a plugin from the menu.")
19 Insert Plugin Slot You can add one plugin in the channel strip to provide additional, specific plugin processing. To insert a plugin, click the plus (+) sign at the top of the slot and select a plugin from the menu. This allows you to, for instance, add a second EQ module so you can have one before and one after dynamics processing, or double-compress a signal. 19

20 Rearranging Processing Sequence You can change the position of a module in the channel strip, and thus its place in the signal flow. Click+Drag on the left/right arrows above the module s name. In this example, we move the EQ module to the last place in the plugin s signal flow. The position of a module in the proceeding chain can dramatically alter its influence on the overall sound of the signal. Experiment! The Master module cannot be moved. 20
21 Using Scheps Omni Channel Practical examples Andrew Scheps gives us a few examples of using Scheps Omni Channel in the studio. Example #1: Kick Drum When mixing a kick drum, you ll usually want to start with the EQ. You can get to work right away on the main interface and start with the EQ while completely ignoring the rest of the modules in the strip. Maybe boost a little 60 Hz shelf, boost 12 khz shelf for air, and somewhere around 5 khz to 7.5 khz broad tone for the beater. While adjusting the low shelf, you may notice it s getting a little messy in the low end. Head over to the Pre module and dial in the HPF at 30 Hz with an 18 db-per-octave slope to clean up the sub while keeping the boom. While still in the Pre module, check out the Saturation and the Thump sections to see if either gives you more of what you re looking for. You might find that with the Thump engaged you can reduce gain of the low shelf a bit. Now that the EQ is sculpted (with some other goodies along the way), you can decide whether or not to compress with a slow attack time to bring out a little punch (quickly auditioning the three compressor types to see what suits this recording), or possibly use the gate to try to better isolate the drum mic. Now, with dynamics engaged, you re into processing where the order can really make a difference. Therefore, drag the Compressor module pre- and post-eq and see what works better for you. You can even expand the dynamics controls and see if putting a high-pass filter on the compressor side chain keeps it from pumping too much. You can also try smashing a little more than you otherwise would and then dialing back the wet/dry control to turn it into a parallel compressor. While trying to tweak the gate, you realize that it s working OK, but what you re really trying to get rid of is bleed ringing from the floor tom that happens every time the drummer plays the kick drum. A gate can t help 21
22 with that, but the DS 2 certainly can. Use the Ctrl modifier (Mac) to solo the sidechain while finding the trouble frequencies. Try a couple of different filter shapes to isolate the bleed as much as possible, and then use the threshold control to suck out the bleed as much as you can without taking too much tone away from the drum. Example #2: Vocal Here you might reach for the high pass filter first just to control the boom of the recording and some plosives, but the first major port of call would probably be the compressor. Set up a 4:1 compressor with relatively slow attack and fast release for presence and then try out the compressor types to see what works best on this voice. Now it s time for the rest of the preamp controls, using a little Saturation to add some grit and maybe even a little thump to add some body. From here, you move to the EQ, open up the top with the resonant high shelf, and try the two different midrange bands to see which the voice responds to best. Then, it s on to the DS 2. Band 1 can be set up for classic de-essing, and then dial in Band 2 in the 2.5 khz to 3.5 khz range and just crack the threshold to handle the increased nasal quality of the voice when the singer sings loudly. Try moving the DS 2 module pre- and post-compressor to see which placement handles the artifacts better. Lastly put the Expander first in the chain to help duck the headphone bleed for you automatically to cut down on the amount of fader rides you ll need to do later. 22
23 Example #3: Overheads Dealing with overheads can be tricky and every recording is different. But let s assume this is a relatively straight-ahead recording acting as cymbal mics, as opposed to trying to capture a complete, full-frequency picture of the drum kit. The first thing to do might be to put a 12-dB-per-octave HP filter on both sides to take care of any sub from the kick or toms. Next, let s EQ in M/S mode. This will let you add a little low mid in the middle of the image to give body to the kit. Then add some top shelf to the sides in order to open up the cymbals without stepping on the snare or vocal. Then, in Expanded view, put one midrange band in parametric mode, link the controls, and find the harsh area around 3 khz using the Ctrl solo shortcut, and then suck some of it out to make things clearer. From here, make sure your Compressor is post EQ and start with the VCA compressor for some clean punch, or maybe the FET compressor for some dirt. Really play with the attack and release times to get the excitement that the compression can add without destroying the transients and dynamics. Also, don t forget to try the compressor in Duo mode instead of Stereo mode. Unlinking the compressors might make the drums feel wider. 23
24 Working with M/S M/S mode can be tricky if you re new to it. Below are some general guidelines that can help get you started thinking in M/S for each module. Using the Pre module in the M/S mode You re working with the stereo overheads track and you want to add a bit of separation and attitude to the kick and snare that are on the O/H track. Choose M/S audio format. Open the Expanded view and add Clip to the Mid part of the signal only until you find the right amount of crunch that comes with a clipped signal. This will certainly draw attention to the kick and snare. Try adding some Even harmonics to the side. This may defocus the edges a bit. Using the EQ module in the M/S mode EQ processing a mid/side signal is a classic way to open up a track and make space for an instrument that s at the center of a stereo image. You can use M/S EQ processing to help focus and separate the bass drum and snare from the overheads. You will have pretty good control of the mono tracks, but add the stereo overhead and the mix can become mushy, since the bass and snare are less focused in the O/H. To reconcile these two types of tracks, set the EQ module audio format to M/S for the O/H, and then brighten up the sides and pull back the mid. You can also think of it as helping an instrument work with the rest of the tracks. On a piano, adding low mids and some focused upper mids can make it sound more powerful and have more tone. But this can fight with the bass and vocal. Try adding these frequencies just to the sides and actually dialing back the low end in the middle. This will leave more room for bass and vocals in the middle while still giving you a present, powerful piano. 24
25 Using the Compressor module in the M/S mode Compressing in M/S can be harder to conceptualize than some of the other processes. But you can use it in very creative ways, especially when you have a source like a loop that has multiple elements to it. With M/S compression you can really focus on one set of elements in the Mid and the rest on the Sides. For instance, use a slow attack VCA compressor in the middle to add attack to the kick and snare in a loop, while quickening up the attack and slowing down the release on the sides to even out and add sustain to percussion and cymbals. 25

26 Focus Mode Click the orange button on the WaveSystem Toolbar to enable the Focus mode. This mode simplifies working with Scheps Omni Channel presets. Load a preset in this mode and certain controls will be highlighted. These are the controls that you are most likely to use with this particular preset. All other controls will also remain active. The Focus mode leads you to the relevant controls as soon as a preset is loaded. Your eyes know where to go so no time is wasted. It helps you understand the interaction between controls and between modules, so you can quickly get to know the plugin and develop your own strategies. 26
27 Controls Controls common to all modules Module on/off Click on the module name to bypass the module. Range: Not illuminated=bypass; Illuminated=not bypassed Access the Expanded view Click the window icon at the upper right corner to open the module s Expanded view. Stereo Mode This selection serves two purposes: In all modules, the Stereo Mode switch sets whether the stereo input signal will be processed as L/R stereo (Stereo and Duo modes) or will be converted to M/S for separate control of the mid and side channels (M/S mode). In the dynamics modules (DS 2, Compressor, and Gate), the Stereo Mode selection also determines how the signal will be used in dynamics processing for calculating the signal as it relates to threshold. Stereo Duo M/S Left and right are summed. This value is used for establishing internal side band gain. This value is the same for left and right, so gain reduction detection will apply equally to both channels. This affects dynamics processing only, not processing adjustments. Left and right are considered separately in calculating internal side chain. Each side can have its own dynamic ranges, so dynamic processing may behave differently for left and right. It does not alter the stereo signal itself. The L/R stereo signal is converted to M/S so that the middle part of the signal can be dynamically processed differently than the side part of the signal. Regardless of a module s Stereo Mode, its output is always stereo. If needed, it will be converted to M/S at the input of the next module in the chain. Section on/off Many individual sections can be bypassed. Click on the section name to be turned on or off. Tuning off a section will reduce CPU load. Range: Not Illuminated=bypassed; Illuminated=not bypassed Most modules use one control for both left and right channels (when using the stereo component). To access channels independently or to create offsets between the two, open the Expanded view window. 27

28 Pre Module The Pre module uses harmonic distortion, HP/LP filters, and a low-frequency thump to add depth and warmth to a recording. Saturation section Analogue devices typically produce odd and/or even harmonics. Adding some harmonic distortion to mix elements can keep a mix element from sounding too clean. This sound is, in a way, reminiscent of analog circuits. Saturation section on/off Bypasses saturation processing Range: off or on Saturation level Adjusts the amount of harmonic distortion added to the original signal. Range: 0 to 100% Saturation type Selects between Odd and Even harmonics. The impact of odd vs. even harmonics on a signal is very content-dependent. In contrast to Even and Odd, Heavy is less about adding harmonics and is more of a traditional clipper. It has a custom response to give you a different sound than most clippers, allowing you to shape the sound in ways a simple clipper can t. Range: Radio switch selects between the three saturation types 28
29 HP/LP filters Filter on/off Individual on/off switches for HP and LP filters. Range: on or off Filter frequency Sets HP/LP frequency Range: HP: 20 Hz to 20 khz LP: 500 Hz to 20 khz Filer slope select Select between 6 db, 12dB, or 18 db per octave. Separate L/R select controls in Stereo component. Thump section Thump on/off; Thump gain Thump introduces a wide boost that feels more like resonance than EQ. This adds warmth and color. Range: off or on Boost: +2 db or +4 db The Pre module Collapsed and Expanded views are identical in functions and controls. 29

30 DS 2 Module The DS 2 module works much like a de-esser: when sound at a specified frequency surpasses a threshold, gain is reduced by a defined amount. DS 2 differs from a de-esser in that any frequency can serve as the side band that triggers the compressor. It can, of course, be used as a standard de-esser. There are two identical DS 2 sections, so that low-frequency and high-frequency sounds can be addressed simultaneously. Shown here are DS 2 #2 and the side chain control. Filter type select Selects shape of filter for side chain detection. Range: low shelf, bell, narrow cut, high shelf Frequency Sets the roll-off start point for a high-pass filter or the center frequency for the band-pass filter. Range: 20 Hz to 20 khz Threshold Sets the processor s engagement level. The processor s threshold uses adaptive sensing to provide more natural results. Range: -48 db to 0 db Side chain listen Click to audition the side chain filter. Range: off or on Hold Ctrl while moving the Frequency control vertically to audition the side band and sweep through frequencies. This helps locate accurate frequency settings. DS 2 module output level adjust Range -12 db to +12 db Gain reduction meter Indicates gain reduction imposed by the compressor. Range: -12 db to -3 db (four steps) Side chain control access Click on the SC button to access the DS 2 Expanded view for side chain control. 30
31 DS 2 Expanded View The DS 2 Expanded view consists of four identical sections (two sections in the mono component) that are used to control frequency and threshold independently for the left and right channels in both DS 2 sections, and to set the filter types used for side chain detection. The External Side Chain button at the top of the window enables and disables external side chain for the entire DS 2 module. All sections share the same side chain. Independent DS 2 module engage/bypass switches. Independent Side Chain Filter select for the left and right channels of both DS 2 sections. Filter type Range: low shelf, notch, bell, high shelf Independent Side Chain Listen buttons Select side chain listen for the left and right channels of both processors. The section s signal is band limited to enable you to focus on a specific side band. Main outs are muted and only side chain is heard. Frequency sweep To precisely locate a side chain frequency, hold Ctrl and drag vertically on a frequency control. This activates side chain listen and lets you sweep across frequencies. 31

32 EQ Module High section Gain Adjusts the gain of the high-shelf filter. Range: -18 db to +18 db Frequency Sets the frequency of the shelf filter. Range: 20 Hz to 20 khz High filter types: Resonant shelf This shelf adds a small emphasis just prior to the beginning and end of the shelf. Usually this results in a more aggressive shelf. Shelf This standard shelf tends to be smoother, and lacks the bump of the resonant shelf. These two shelf types use a fixed Q that s part of the filter design. As a result, the Q control is not available. It s very difficult to make generalizations about the effect that a type of shelf will have on a sound. Experiment. Parametric This is a bell-shaped EQ, and unlike the shelf filters, the Q control is available. Q (parametric mode only) Range: 0.2 to 10 32

33 Bell-shaped EQs There are two Bell EQ section in the middle of module: Mid and Tone. Both have three shape options: Wide, Narrow, and Parametric. The Mid and Tone sections are identical in the Narrow and Parametric modes. When the Wide bell shape is selected, the character of the two EQs diverges. Mid is a relatively wide, clean filter, best suited for enhancing the characteristic sound of the source. Tone is a bit narrower and can really help a source pop out of the track without too much EQ. Since it s somewhat smeary, it s good for coloring and gluing a track together. Mid and Tone Controls Gain Adjusts the gain of the bell. Range: -18 db to +18 db Frequency Sets the center frequency of the bell Range: 20 Hz to 20 khz EQ filter type Selects the shape of the bell filter. Range: Wide, Narrow, Parametric (In the Parametric mode, the Q control is available for adjusting the width of the bell.) Q (parametric mode only) Range: 0.2 to 10 33

34 Low section Gain Adjusts the gain of the low-shelf filter. Range: -18 db to +18 db Frequency Sets the frequency of the shelf filter. Hold Ctrl and drag vertically over the Frequency control to easily isolate a desired frequency. Range: 20 Hz to 20 khz Low filter types Resonate Shelf (fixed Q), Shelf (fixed Q), Parametric (bell with adjustable Q) Q (parametric mode only) Range: 0.2 to 10 The EQ module Collapsed and Expanded views are identical in functions and controls. 34

35 Compressor Module The Compressor model consists of three different compressor modes. VCA is a modern-sounding compressor. It s the most transparent of these three compressor types. Its feed-forward processing can yield very fast attacks and there s very little distortion. Because of this design, there is no compression in the side chain. FET sounds slower than a VCA compressor due to its feed backward processing. It actually operates more quickly than VCA, but it takes a bit longer to activate. There s more distortion and color than in the VCA compressor type, and it tends to be more peaky. There is compression in the side chain. The FET compressor can be used to create a deep, pumpy compression sound. Set Ratio between 20:1 and infinity:1. Start with a very slow attack and a fast release. Experiment with these time values, since they can have an impressive effect on the sound. OPT is based on photocell compressors. It s the slowest and smoothest of these three compressors. It has a long memory so it tends to be soft and quite rich. Because of its slower attack, transients are more easily maintained. There is compression in the side chain. Range: three-positon radio switch Threshold Sets the compressor s engagement level. Range: -50 db to 0 db Gain reduction meter Shows the amount of gain reduction introduced by the compressor. Range: -15 db to -1 db Ratio Determines how hard the signal is compressed. Range: 1:1 to infinity:1 Attack Determines how quickly the compressor reacts to a signal. Range: 0.4 ms to 150 ms Release Determines how fast the compressor reduces processing after the signal falls below the threshold. Range: 50 ms to 5000 ms 35

36 Output mix ratio Determines the wet/dry ratio of the compressor module output Range: 0% to 100% Compressor output level Trims the output level of the compressor module Range: -12 db to +12 db Compressor side chain adjust Click on the SC button in the Collapsed view to open the Expanded view for side chain adjustment. Side chain filters There are identical side chain filter sections for left and right channels (mid and side in the M/S stereo mode). Use the Link button to decouple left and right channels. Hold Ctrl and drag vertically over the Frequency control to easily isolate a desired frequency. Side chain listen Solos side chain signal only. Click to lock. Hold Ctrl+drag to sweep across side band frequencies. Range: off or on Low-shelf filter Filter active: (off or on) Gain (range -18 db to +18 db) Frequency (range: 20 Hz to 20 khz) Bell filter Filter active: (off or on) Gain (range -18 db to +18 db) Frequency (range: 20 Hz to 20 khz) High pass filter Filter active (off or on) Frequency (range: 20 Hz to 20 khz) 36
 to \"open\" (all of the signal passes through). It's all or nothing, on or off.")
37 Gate Module GATE/EXP Select Toggles between Gate and Expander modes. Range: Gate or Expander A gate, sometimes called a "noise gate, is a downward expander with an extremely high ratio. When the signal level reaches the threshold, the gate goes from "closed" (no signal passes through) to "open" (all of the signal passes through). It's all or nothing, on or off. An expander increases the dynamic range of the audio signal. Expanders are generally used to make quiet sounds even quieter by reducing the level of an audio signal that falls below a set threshold level. Threshold Sets the Gate open and close level. Range: -Infinity to 0 db Attenuation meter Shows the gain reduction introduced by the gate. Range: -60 db to -6 db Range Sets maximum gain reduction. Range limits the amount of gain reduction brought on by the gate. It can preserve some air in the track. Range: -60 db to 0 db Close This is a secondary close threshold. If Close is set to zero, the open and close threshold is unaffected. But if it is set to any value other than zero, the Close value will determine the closing threshold. This value must be lower than the Threshold for the Close function to take effect. Attack Determines how quickly the Gate opens Range: 0.1 ms to 10,000 ms Release Sets how fast the Gate closes (fades out) after the signal falls below Threshold. Range: 0.1 ms to 10,000 ms 37
38 Side chain filters Click on the SC button to open the Expanded view for side chain adjustment. Hold Ctrl and drag vertically over the Frequency control to easily isolate a desired frequency. External side chain On/Off Range: off or on HP/LP side chain filters HP Range 20 Hz to 15,000 Hz LP Range: 20 Hz to 15,000 Hz Link HP and LP filters Allows you to keep the bandwidth between the HP and LP filters, but use either knob to sweep the frequency spectrum. This essentially turns the HP and LP filters into a band pass filter. 38

39 Master Module The VU Meter section has three metering sources: plugin input, plugin output, and total gain reduction. This selection affects VU meters only. It does not affect full-scale meters or audio output. Use the meter trim pot on the right to align the meters to a reference tone. Range 4 db to 26 db. Use the Monitor section (stereo component only) to select how audio is monitored. Selections are: stereo or mono, left or right, mid or side. This selection is reflected in the VU meters and the Output full scale meters. The Limiter is an adjustable brickwall limiter that is positioned just before the plugin s output. Lower the Limit setting significantly and you will likely hear distortion. Limiter Range: -30 db to 0 db Full-scale Input and Output Meters are at the bottom of the module. Link the left and right input faders or output faders with the Link button at the bottom. When faders are unlinked, you can establish an offset between left and right faders, and then relink them. The offset between the two faders will be maintained as they move. Clipping is indicated at the top of the meter and peak level hold is at the bottom. Click on the meter to clear all indicators. 39
CLA MixHub. User Guide
 CLA MixHub User Guide Contents Introduction... 3 Components... 4 Views... 4 Channel View... 5 Bucket View... 6 Quick Start... 7 Interface... 9 Channel View Layout..... 9 Bucket View Layout... 10 Using
Abbey Road TG Mastering Chain User Guide
 Abbey Road TG Mastering Chain User Guide CONTENTS Introduction... 3 About the Abbey Road TG Mastering Chain Plugin... 3 Quick Start... 5 Components... 6 The WaveSystem Toolbar... 6 Interface... 7 Modules
spiff manual version 1.0 oeksound spiff adaptive transient processor User Manual
 oeksound spiff adaptive transient processor User Manual 1 of 9 Thank you for using spiff! spiff is an adaptive transient tool that cuts or boosts only the frequencies that make up the transient material,
WAVES H-EQ HYBRID EQUALIZER USER GUIDE
 WAVES H-EQ HYBRID EQUALIZER USER GUIDE TABLE OF CONTENTS CHAPTER 1 INTRODUCTION...3 1.1 WELCOME...3 1.2 PRODUCT OVERVIEW...3 1.3 CONCEPTS AND TERMINOLOGY...4 1.4 COMPONENTS...7 CHAPTER 2 QUICK START GUIDE...8
NOTICE. The information contained in this document is subject to change without notice.
 NOTICE The information contained in this document is subject to change without notice. Toontrack Music AB makes no warranty of any kind with regard to this material, including, but not limited to, the
Liquid Mix Plug-in. User Guide FA
 Liquid Mix Plug-in User Guide FA0000-01 1 1. COMPRESSOR SECTION... 3 INPUT LEVEL...3 COMPRESSOR EMULATION SELECT...3 COMPRESSOR ON...3 THRESHOLD...3 RATIO...4 COMPRESSOR GRAPH...4 GAIN REDUCTION METER...5
WAVES Cobalt Saphira. User Guide
 WAVES Cobalt Saphira TABLE OF CONTENTS Chapter 1 Introduction... 3 1.1 Welcome... 3 1.2 Product Overview... 3 1.3 Components... 5 Chapter 2 Quick Start Guide... 6 Chapter 3 Interface and Controls... 7
L+R: When engaged the side-chain signals are summed to mono before hitting the threshold detectors meaning that the compressor will be 6dB more sensit
 TK AUDIO BC2-ME Stereo Buss Compressor - Mastering Edition Congratulations on buying the mastering version of one of the most transparent stereo buss compressors ever made; manufactured and hand-assembled
1 Prepare to PUNISH! 1.1 System Requirements. Plug-in formats: Qualified DAW & Format Combinations: System requirements: Other requirements:
 Table of Contents 1 Prepare to PUNISH!... 2 1.1 System Requirements... 2 2 Getting Started... 3 2.1 Presets... 3 2.2 Knob Default Values... 5 3 The Punish Knob... 6 3.1 Assigning Parameters to the Punish
ACME Audio. Opticom XLA-3 Plugin Manual. Powered by
 ACME Audio Opticom XLA-3 Plugin Manual Powered by Quick Start Install and Authorize your New Plugin: If you do not have an account, register for free on the Plugin Alliance website Double-click the.mpkg
WAVES Scheps Parallel Particles. User Guide
 WAVES Scheps Parallel Particles TABLE OF CONTENTS Chapter 1 Introduction... 3 1.1 Welcome... 3 1.2 Product Overview... 3 1.3 A Word from Andrew Scheps... 4 1.4 Components... 4 Chapter 2 Quick Start Guide...
Sub Kick This particular miking trick is one that can be used to bring great low-end presence to the kick drum.
 Kick Drum As the heartbeat of the contemporary drum kit, the kick drum sound we ve grown accustomed to hearing is both boomy and round on the bottom and has a nice, bright click in the high mid range.
soothe audio processor Manual and FAQ
 soothe audio processor Manual and FAQ Thank you for using soothe! soothe is a spectral processor for suppressing resonances in the mid and high frequencies. It works by automatically detecting the resonances
DW Drum Enhancer. User Manual Version 1.
 DW Drum Enhancer User Manual Version 1.0 http://audified.com/dwde http://services.audified.com/download/dwde http://services.audified.com/support DW Drum Enhancer Table of contents Introduction 2 What
Syrah. Flux All 1rights reserved
 Flux 2009. All 1rights reserved - The Creative adaptive-dynamics processor Thank you for using. We hope that you will get good use of the information found in this manual, and to help you getting acquainted
Eventide Inc. One Alsan Way Little Ferry, NJ
 Copyright 2015, Eventide Inc. P/N: 141257, Rev 2 Eventide is a registered trademark of Eventide Inc. AAX and Pro Tools are trademarks of Avid Technology. Names and logos are used with permission. Audio
D-901 PC SOFTWARE Version 3
 INSTRUCTION MANUAL D-901 PC SOFTWARE Version 3 Please follow the instructions in this manual to obtain the optimum results from this unit. We also recommend that you keep this manual handy for future reference.
Neo DynaMaster Full-Featured, Multi-Purpose Stereo Dual Dynamics Processor. Neo DynaMaster. Full-Featured, Multi-Purpose Stereo Dual Dynamics
 Neo DynaMaster Full-Featured, Multi-Purpose Stereo Dual Dynamics Processor with Modelling Engine Developed by Operational Manual The information in this document is subject to change without notice and
Eventide Inc. One Alsan Way Little Ferry, NJ
 Copyright 2017, Eventide Inc. P/N: 141236, Rev 4 Eventide is a registered trademark of Eventide Inc. AAX and Pro Tools are trademarks of Avid Technology. Names and logos are used with permission. Audio
SPL Analog Code Plug-ins Manual Classic & Dual-Band De-Essers
 SPL Analog Code Plug-ins Manual Classic & Dual-Band De-Essers Sibilance Removal Manual Classic &Dual-Band De-Essers, Analog Code Plug-ins Model # 1230 Manual version 1.0 3/2012 This user s guide contains
MTurboComp. Overview. How to use the compressor. More advanced features. Edit screen. Easy screen vs. Edit screen
 MTurboComp Overview MTurboComp is an extremely powerful dynamics processor. It has been designed to be versatile, so that it can simulate any compressor out there, primarily the vintage ones of course.
Using Cubase SE with DSP Factory
 Manual by Ludvig Carlson, Anders Nordmark, Roger Wiklander Quality Control: C. Bachmann, H. Bischoff, S. Pfeifer, C. Schomburg The information in this document is subject to change without notice and does
Element 78 MPE-200. by Summit Audio. Guide To Operations. for software version 1.23
 Element 78 MPE-200 by Summit Audio Guide To Operations for software version 1.23 TABLE OF CONTENTS IMPORTANT SAFETY AND GROUNDING INSTRUCTIONS COVER 1. UNPACKING AND CONNECTING...3 AUDIO CONNECTIONS...4
USER S GUIDE DSR-1 DE-ESSER. Plug-in for Mackie Digital Mixers
 USER S GUIDE DSR-1 DE-ESSER Plug-in for Mackie Digital Mixers Iconography This icon identifies a description of how to perform an action with the mouse. This icon identifies a description of how to perform
OVERLOUD GEMS USER MANUAL
 USER MANUAL Rev. 1.1 TABLE OF CONTENTS INTRODUCTION... 1 WHY GEMS?... 1 MENU BAR... 3 COMP76... 4 EQ495... 6 TAPEDESK... 7 EQ84... 12 LEGAL NOTICE... 14 INTRODUCTION OVERLOUD GEMS is a collection of top
Lindell 354E User Manual. Lindell 354E. User Manual
 Lindell354EUserManual Lindell 354E User Manual Introduction Congratulation on choosing the Lindell 354E multi band compressor. This plugin faithfully reproduces the behavior and character of the most famous
TF5 / TF3 / TF1 DIGITAL MIXING CONSOLE. TF Editor User Guide
 TF5 / TF3 / TF1 DIGITAL MIXING CONSOLE EN Special notices Copyrights of the software and this document are the exclusive property of Yamaha Corporation. Copying or modifying the software or reproduction
MDistortionMB. Easy screen vs. Edit screen
 MDistortionMB Easy screen vs. Edit screen The plugin provides 2 user interfaces - an easy screen and an edit screen. Use the Edit button to switch between the two. By default most plugins open on the easy
USER S GUIDE ADX 100. Frequency Conscious Gating, Compression, Limiting, and Expansion. Plug-in for Mackie Digital Mixers
 USER S GUIDE ADX 100 Frequency Conscious Gating, Compression, Limiting, and Expansion TM Plug-in for Mackie Digital Mixers Iconography This icon identifies a description of how to perform an action with
VoiceStrip for PowerCore Manual. Manual VoiceStrip for PowerCore
 VoiceStrip for PowerCore Manual English Manual VoiceStrip for PowerCore SUPPORT AND CONTACT DETAILS TABLE OF CONTENTS TC SUPPORT INTERACTIVE The TC Support Interactive website www.tcsupport.tc is designed
CHANNEL STRIP. manual ÀÀÀÀÀ ÀÀÀÀÀ ÀÀÀÀÀ ÀÀÀÀÀ ÀÀÀÀÀ ÀÀÀÀÀ ÀÀÀÀÀ ÀÀÀÀÀ ÀÀÀÀÀ ÀÀÀÀÀ ÀÀÀÀÀ ÀÀÀÀÀ ÀÀÀÀÀ
 QQQQQ QQQQQ QQQQQ QQQQQ QQQQQ QQQQQ QQQQQ RRRR RRRR RRRR RRRR RRRR RRRR RRRR SSSSS SSSSS SSSSS SSSSS SSSSS SSSSS TTTT TTTT TTTT TTTT TTTT TTTT manual CHANNEL STRIP contents GREEN 5: CHANNEL STRIP Introduction..................................................................4
MDynamicsMB. Overview. Easy screen vs. Edit screen
 MDynamicsMB Overview MDynamicsMB is an advanced multiband dynamic processor with clear sound designed for mastering, however its high performance and zero latency, makes it ideal for any task. It features
The basic concept of the VSC-2 hardware
 This plug-in version of the original hardware VSC2 compressor has been faithfully modeled by Brainworx, working closely with Vertigo Sound. Based on Vertigo s Big Impact Design. The VSC-2 plug-in sets
NOVATRON. novatron DEEPER INTO THE CONTROLS -1-
 WELCOME TO NOVATRON Novatron is an analog-modeled compressor that borrows so many sonic properties from so many different classic hardware units that, ironically, it could only exist in the world of dsp.
Character Users Guide
 Cha r a c t e r Us e r sgui de Character Users Guide Metric Halo $Revision: 1619 $ Publication date $Date: 2012-02-10 20:41:00-0400 (Friday, 10 Feb 2012) $ Copyright 2011 Metric Halo Table of Contents
Operation Manual FXpansion Audio
 2 Table of Contents 1 Introduction 3 2 DCAM Dynamics processors 4 21 BusComp 6 22 ChanComp 9 23 CrossComp 12 24 EnvShaper 17 3 MIDI Learn 19 4 Credits 21 Introduction 1 3 Introduction Welcome to FXpansion
MAutoPitch. Presets button. Left arrow button. Right arrow button. Randomize button. Save button. Panic button. Settings button
 MAutoPitch Presets button Presets button shows a window with all available presets. A preset can be loaded from the preset window by double-clicking on it, using the arrow buttons or by using a combination
SPL Analog Code Plug-in Manual
 SPL Analog Code Plug-in Manual EQ Rangers Manual EQ Rangers Analog Code Plug-ins Model Number 2890 Manual Version 2.0 12 /2011 This user s guide contains a description of the product. It in no way represents
bx_xl manual The New Loud 2010 by Brainworx Music & Media GmbH
 bx_xl manual The New Loud 2010 by Brainworx Music & Media GmbH Index 1.0 bx_xl Quick Guide 4 2.0 What is the bx_xl limiter? 4 3.0 bx_xl Flow Chart 6 4.0 What is M/S technology? 7 4.1 What is M/S good for
TL AUDIO M4 TUBE CONSOLE
 TL AUDIO M4 TUBE CONSOLE USER MANUAL TL AUDIO M4 TUBE CONSOLE M4 INTRODUCTION... 3 M4 MIXER TECHNICAL SPECIFICATION... 4 Mic Input:... 4 Line Input:... 4 Phase Rev:... 4 High Pass Filter:... 4 Frequency
Precision DeEsser Users Guide
 Precision DeEsser Users Guide Metric Halo $Revision: 1670 $ Publication date $Date: 2012-05-01 13:50:00-0400 (Tue, 01 May 2012) $ Copyright 2012 Metric Halo. MH Production Bundle, ChannelStrip 3, Character,
MWobbler. The plugin provides 2 user interfaces - an easy screen and an edit screen. Use the Edit button to switch between the two.
 MWobbler Easy screen vs. Edit screen The plugin provides 2 user interfaces - an easy screen and an edit screen. Use the Edit button to switch between the two. By default most plugins open on the easy screen
DIGITAL MIXING CONSOLE. TF Editor V3.6 User's Guide
 DIGITAL MIXING CONSOLE TF Editor V3.6 User's Guide EN Special notices Copyrights of the software and this document are the exclusive property of Yamaha Corporation. Copying or modifying the software or
+10db Compressor User s Manual. +10db Compressor. User s Manual
 +10db Compressor 1 Intro Thank you for installing +10db Compressor! This plugin is modelled after a very popular analog compressor unit that was built in the 60s, famous for it s ability to give a huge
The Warm Tube Buss Compressor
 The Warm Tube Buss Compressor Warm Tube Buss Compressor PC VST Plug-In Library Creator: Michael Angel, www.cdsoundmaster.com Manual Index Installation The Programs About The Warm Tube Buss Compressor Download,
SPL Analog Code Plug-in Manual
 SPL Analog Code Plug-in Manual EQ Rangers Vol. 1 Manual SPL Analog Code EQ Rangers Plug-in Vol. 1 Native Version (RTAS, AU and VST): Order # 2890 RTAS and TDM Version : Order # 2891 Manual Version 1.0
TF5 / TF3 / TF1 DIGITAL MIXING CONSOLE. TF StageMix User's Guide
 TF5 / TF3 / TF1 DIGITAL MIXING CONSOLE EN Note The software and this document are the exclusive copyrights of Yamaha Corporation. Copying or modifying the software or reproduction of this document, by
Voxengo Soniformer User Guide
 Version 3.7 http://www.voxengo.com/product/soniformer/ Contents Introduction 3 Features 3 Compatibility 3 User Interface Elements 4 General Information 4 Envelopes 4 Out/In Gain Change 5 Input 6 Output
Credits MSMAX USER GUIDE - PAGE 2
 Credits MSMAX USER GUIDE - PAGE 2 Credits MSMAX CREDITS A GIANT THANK YOU GOES OUT TO THE BETA TESTING TEAM FOR THEIR VALUABLE INPUT AND SUPPORT. Instrument Credits: Product Design: Igor Shilov and Josh
Studio One Pro Mix Engine FX and Plugins Explained
 Studio One Pro Mix Engine FX and Plugins Explained Jeff Pettit V1.0, 2/6/17 V 1.1, 6/8/17 V 1.2, 6/15/17 Contents Mix FX and Plugins Explained... 2 Studio One Pro Mix FX... 2 Example One: Console Shaper
bx_console N Plugin Manual
 bx_console N bx_console N is part of the growing line of Brainworx TMT console emulation plugins. More details on our patent-pending TMT (Tolerance Modeling Technology) inside this manual. Developed by
BRTC-M2 COMPRESSOR. CDSoundMaster BIG ROUND TUBE COMPRESSOR BY MX2 MICHAEL HEILER AND MICHAEL ANGEL
 BRTC-M2 COMPRESSOR CDSoundMaster BIG ROUND TUBE COMPRESSOR BY MX2 MICHAEL HEILER AND MICHAEL ANGEL Manual Index About the BRTC-M2 Installation User Controls Recommended Settings About the BRTC-M2 The BRTC-M2
G-Stomper Mixer & Master V Mixer & Master... 2
 G-Stomper Studio G-Stomper Rhythm G-Stomper VA-Beast User Manual App Version: 5.7.2 Date: 04/06/2018 Author: planet-h.com Official Website: https://www.planet-h.com/ Contents 11 Mixer & Master... 2 11.1
OVERLOUD GEMS USER MANUAL
 USER MANUAL Rev. 1.3 TABLE OF CONTENTS INTRODUCTION... 1 WHY GEMS?... 1 MENU BAR... 3 COMP76... 4 EQ495... 6 TAPEDESK... 7 EQ84... 12 DOPAMINE... 14 SCRIBBLES... 16 PREFERENCES... 18 LEGAL NOTICE... 19
Dynamic Spectrum Mapper V2 (DSM V2) Plugin Manual
 Plugin Manual") Dynamic Spectrum Mapper V2 (DSM V2) Plugin Manual 1. Introduction. The Dynamic Spectrum Mapper V2 (DSM V2) plugin is intended to provide multi-dimensional control over both the spectral response and dynamic
Dynamic Spectrum Mapper V2 (DSM V2) Plugin Manual 1. Introduction. The Dynamic Spectrum Mapper V2 (DSM V2) plugin is intended to provide multi-dimensional control over both the spectral response and dynamic
MMorph. Randomize button. Presets button
 MMorph MMorph allows seamless morphing from one signal to another. Send one signal to the main input and another to the side chain, MMorph then allows you to transition frequency characteristics smoothly
MAutoDynamicEq. Now, how is the level measured? Overview. The Band Settings
 MAutoDynamicEq Overview Dynamics processors, such as compressors and expanders, dynamically manipulate the overall level of the audio material. Equalizers change the spectral character of the audio, statically.
User Manual. Neve Channel Strip Issue 2. !!!Please read includes important safety instructions!!!
 User Manual Neve 8801 Channel Strip 527 358 Issue 2!!!Please read includes important safety instructions!!! 2007 AMS Neve Ltd own the copyright of all information and drawings contained in this manual
Lindell 254E User Manual. Lindell 254E. User Manual
 Lindell 254E User Manual Introduction Congratulation on choosing the Lindell 254E compressor and limiter. This plugin faithfully reproduces the behavior and character of the most famous vintage diode bridge
BOUNCE. COMPRESSOR with Analog Sound & Digital Transparency USER MANUAL
 BOUNCE COMPRESSOR with Analog Sound & Digital Transparency USER MANUAL BEAT SKILLZ Features: BOUNCE is a transparent yet versatile compressor that can do subtle compression to full thrusting and punchy
installation To install the Magic Racks: Groove Essentials racks, copy the files to the Audio Effect Rack folder of your Ableton user library.
 installation To install the Magic Racks: Groove Essentials racks, copy the files to the Audio Effect Rack folder of your Ableton user library. The exact location of your library will depend on where you
TrackComp. 1 Introduction System Requirements Installation and Setup How to Install on Windows... 4
 TrackComp Contents 1 Introduction 4 1.1 System Requirements.................................... 4 1.1.1 Windows....................................... 4 1.1.2 Mac OS........................................
Recording to Tape (Analogue or Digital)...10
...10") c o n t e n t s DUAL MIC-PRE Green Dual Mic Pre (introduction).............................4 Section (i): Setting Up Power Connections...........................................4 Power Supply................................................5
c o n t e n t s DUAL MIC-PRE Green Dual Mic Pre (introduction).............................4 Section (i): Setting Up Power Connections...........................................4 Power Supply................................................5
Chapter 4 Signal Paths
 Chapter 4 Signal Paths The OXF-R3 system can be used to build a wide variety of signal paths with maximum flexibility from a basic default configuration. Creating configurations is simple. Signal paths
«Limiter 6» Modules and parameters description
 «Limiter 6» Modules and parameters description Developed by: Vladislav Goncharov vladgsound.wordpress.com With collaboration of: Dax Liniere www.puzzlefactory.com.au 2011-2012 2 1 Introduction... 3 1.1
Outline ip24 ipad app user guide. App release 2.1
 Outline ip24 ipad app user guide App release 2.1 Project Management Search project by name, place and description Delete project Order projects by date Order projects by date (reverse order) Order projects
S I N E V I B E S FRACTION AUDIO SLICING WORKSTATION
 S I N E V I B E S FRACTION AUDIO SLICING WORKSTATION INTRODUCTION Fraction is a plugin for deep on-the-fly remixing and mangling of sound. It features 8x independent slicers which record and repeat short
RT-DRIVE DLM808 DIGITAL PROCESSOR AUDIO MATRIX PROCESSOR
 RT-DRIVE DLM808 DIGITAL PROCESSOR AUDIO MATRIX PROCESSOR 2 1. Introduction 2. Features 3. Usefull Data 4. Function Buttons and LED Indicators 5. Rear Panel 6. DSP Control 1. Configuration of IP Address
DOD OWNER'S MANUAL 866 SERIES II GATED COMPRESSOR/LIMITER SIGNAL PROCESSORS
 DOD SIGNAL PROCESSORS 866 SERIES II GATED COMPRESSOR/LIMITER OWNER'S MANUAL 866 SERIES II GATED COMPRESSOR/LIMITER INTRODUCTION : The DOD 866 Series II is a stereo gated compressor/limiter that can be
SR-D8-M, SR-D8-S. (Ver ) SOFTWARE INSTRUCTIONS
 SOFTWARE INSTRUCTIONS") SOFTWARE INSTRUCTIONS active l ine array speak er SYStems SR-D8-M, SR-D8-S (Ver. 1.1.1) Thank you for purchasing TOA's Active Line Array Speaker Systems. Please carefully follow the instructions in this
SOFTWARE INSTRUCTIONS active l ine array speak er SYStems SR-D8-M, SR-D8-S (Ver. 1.1.1) Thank you for purchasing TOA's Active Line Array Speaker Systems. Please carefully follow the instructions in this
AirEQ. Beyond Analog. Designed by Fabrice Gabriel
 Beyond Analog Designed by Fabrice Gabriel www.eiosis.com AirEQ Version 1.1 Fabrice Gabriel: Plugin Design, Algorithm Design and Tuning Romain Moret: Project Management, Development and Optimization Vincent
bx_console Plugin Manual
 bx_console Plugin Manual Quick Start Install and Authorize your New Plugin: If you do not have an account, register for free on the Plugin Alliance website Double-click the.mpkg (Mac) or.exe (Win) file
Newfangled Audio Eventide Inc. One Alsan Way Little Ferry, NJ 07643
 Copyright 2016, Newfangled Audio P/N: 141301 Eventide is a registered trademark of Eventide Inc. Newfangled Audio and Elevate are trademarks of Orthogonal Art and Science, LLC. AAX and Pro Tools are trademarks
FAT MAN FAT 1. TLAudio. user manual. stereo valve compressor. TL Audio Limited, Sonic Touch, Iceni Court, Icknield Way, Letchworth, SG6 1TN England
 user manual FAT MAN by TLAudio TL Audio Limited, Sonic Touch, Iceni Court, Icknield Way, Letchworth, SG6 1TN England Tel: +44 (0)1462 680888 Fax: +44 (0)1462 680999 email: info@tlaudio.co.uk web: http://www.tlaudio.co.uk
SSL Console Bundle for MX4 Page 2
 User Guide V1.1 Table of Contents SSL Console Bundle for MX4 Page 2 Table of Contents 1.! Introduction...! Page 3! 2.! System Requirements!... Page 4! Compatible SSL Hardware Systems!... Page 4! DSP Resources!...
Award Winning Stereo-to-5.1 Surround Up-mix Plugin
 Award Winning Stereo-to-5.1 Surround Up-mix Plugin Sonic Artifact-Free Up-Mix Improved Digital Signal Processing 100% ITU Fold-back to Original Stereo 32/64-bit support for VST and AU formats More intuitive
COMPRESSOR LIMITER MANUAL VER See the next page for startup switch settings E5th street Superior WI USA davehilldesigns.
 COMPRESSOR LIMITER MANUAL VER 1.1 201200219 2117 E5th street Superior WI USA 54880 davehilldesigns.com See the next page for startup switch settings 2012 Dave Hill Designs Start Up Settings 2 Safety Information
All Discrete Surround Mixing and Recording Console. Operator s Manual REVISED
 All Discrete Surround Mixing and Recording Console Operator s Manual REVISED 7-22-10 Written for Automated Processes Incorporated by Daniel Pfeifer 2010 1.0 Overview 1.1 Introduction and Features 1.2 Vision
S6k Mastering Preset Specs sw 3.60
 S6k Mastering Preset Specs sw 3.60 This section contains detailed descriptions of Mastering and Monitoring presets of System 6000 and Mastering 6000. From version 3.60, the Mastering sections contains
y AW4416 Audio Workstation Signal Flow Tutorial
 y AW44 Audio Workstation Signal Flow Tutorial This tutorial will help you learn the various parts of a CHANNEL by following the signal through #1. Use the Signal Flow Diagram included with this document.
Eventide Inc. One Alsan Way Little Ferry, NJ
 Copyright 2017, Eventide Inc. P/N: 141237, Rev 4 Eventide is a registered trademark of Eventide Inc. AAX and Pro Tools are trademarks of Avid Technology. Names and logos are used with permission. Audio
Vintage Audio MSL-MK2. Quad VCA Buss Compressor
 Vintage Audio MSL-MK2 Quad VCA Buss Compressor Vintage Audio MSL-mk2 Quad VCA Compressor ++ Congratulations on your purchase of your new Vintage Audio MSL-mk2 Quad VCA Buss compressor. The MSL-mk2 is based
ULN-8 Quick Start Guide
 Metric Halo $Revision: 1671 $ Publication date $Date: 2012-7-21 12:42:12-0400 (Mon, 21 Jul 2012) $ Copyright 2012 Metric Halo Table of Contents 1.... 5 Prepare the unit for use... 5 Connect the ULN-8 to
1 Introduction. 2 Features. Welcome to CS-3301, a channel strip plugin with gate, EQs, compressor, saturation and oversampling.
 MANUAL 2017 1 Introduction Welcome to CS-3301, a channel strip plugin with gate, EQs, compressor, saturation and oversampling. 2 Features CS-3301 offers following features: Noise gate LC/HC and 5 band
SIGNAL PROCESSOR. Operation Manual
 SIGNAL PROCESSOR Operation Manual Using the PDF manual From the Contents on page 2, click on the desired topic to automatically jump to the corresponding page. Click on a link in this manual to jump to
MTurboReverb. Overview. Under the hood
 MTurboReverb Overview MTurboReverb is probably the most powerful algorithmic reverb ever made. Most reverbs are based around a single algorithm, for which you can change certain properties, such as reverb
SIGNAL PROCESSOR. Operation Manual
 SIGNAL PROCESSOR Operation Manual Using the PDF manual From the Contents on page 2, click on the desired topic to automatically jump to the corresponding page. Click on a link in this manual to jump to
Renaissance Compressor
 Renaissance Compressor Table of Contents Chapter 1... About the Renaissance Compressor... 2 Chapter 2... The Controls... 3 Mode, Behavior, Character buttons... 3 Threshold... 4 Ratio, Attack, Rekease,
Bionic Supa Delay Disciples Edition
 Bionic Supa Delay Disciples Edition VST multi effects plug-in for Windows Version 1.0 by The Interruptor + The Disciples http://www.interruptor.ch Table of Contents 1 Introduction...3 1.1 Features...3
Eventide Inc. One Alsan Way Little Ferry, NJ
 Copyright 2017, Eventide Inc. P/N: 141263, Rev 5 Eventide is a registered trademark of Eventide Inc. AAX and Pro Tools are trademarks of Avid Technology. Names and logos are used with permission. Audio
Introducing the New Daking Console
 Introducing the New Daking Console Daking The Console that can change from a Legacy Bussing scheme to DAW Direct Routing with the touch of a button. Features: Class A Circuitry Transformer Coupled Pre-Amps
Optional Plug-ins for Auria 2.0
 Optional Plug-ins for Auria 2.0 Copyright 2015 by WaveMachine Labs, Inc Optional Plug-ins User Guide for Auria 2.0 Original documentation provided by individual plug-in manufactures. Adapted by Corey Weiner
MRhythmizer. Randomize button. Presets button. Left arrow button. Right arrow button
 MRhythmizer Randomize button Randomize button (with the text 'Random') generates random settings. Generally, randomization in plug-ins works by selecting random values for all parameters, but rarely achieves
DTS Neural Mono2Stereo
 WAVES DTS Neural Mono2Stereo USER GUIDE Table of Contents Chapter 1 Introduction... 3 1.1 Welcome... 3 1.2 Product Overview... 3 1.3 Sample Rate Support... 4 Chapter 2 Interface and Controls... 5 2.1 Interface...
PLUGIN MANUAL. museq
 PLUGIN MANUAL museq Welcome! introduction SYSTEM REQUIREMENTS Please check all information on this topic here: https://plugin-alliance.com/en/systemrequirements.html ACTIVATION Details about the activation
Credits:! Product Idea: Tilman Hahn Product Design: Tilman Hahn & Dietrich Pank Product built by: Dietrich Pank Gui Design: Benjamin Diez
 whoosh 1.1 owners manual Document Version: 2.0 Product Version: 1.1 System Requirements: Mac or PC running the full version of Native Instruments Reaktor 5.9 and up. For Protools users: We no longer support
Reason Overview3. Reason Overview
 Reason Overview3 In this chapter we ll take a quick look around the Reason interface and get an overview of what working in Reason will be like. If Reason is your first music studio, chances are the interface
PLUGIN MANUAL. karacter
 PLUGIN MANUAL karacter Welcome! introduction SYSTEM REQUIREMENTS Please check all information on this topic here: https://plugin-alliance.com/en/systemrequirements.html ACTIVATION Details about the activation
MASELEC MTC-6 SURROUND master transfer and monitor system
 MASELEC MTC-6 SURROUND master transfer and monitor system http://www.maselec.com/ Mases Electronics Ltd. Bishopswood, Cannon Hill Close, Bray, Berks SL6 2DH, England. Tel/Fax: +44 (0) 1628-770 104. E-mail:
User Manual Tonelux Tilt and Tilt Live
 User Manual Tonelux Tilt and Tilt Live User Manual for Version 1.3.16 Rev. Feb 21, 2013 Softube User Manual 2007-2013. Amp Room is a registered trademark of Softube AB, Sweden. Softube is a registered