1. Product Name. 2. Product Code. 3. Colour. 4. Brief Description. Ceiling-Mounted Interactive Wall Projection. Not applicable
|
|
|
- Junior Greene
- 5 years ago
- Views:
Transcription


1 . Product Name Ceiling-Mounted Interactive Wall Projection 2. Product Code Colour Not applicable 4. Brief Description Imagine looking into a mirror and seeing yourself playing drums, splatting critters or tapping stars to change their colour and to make sounds.
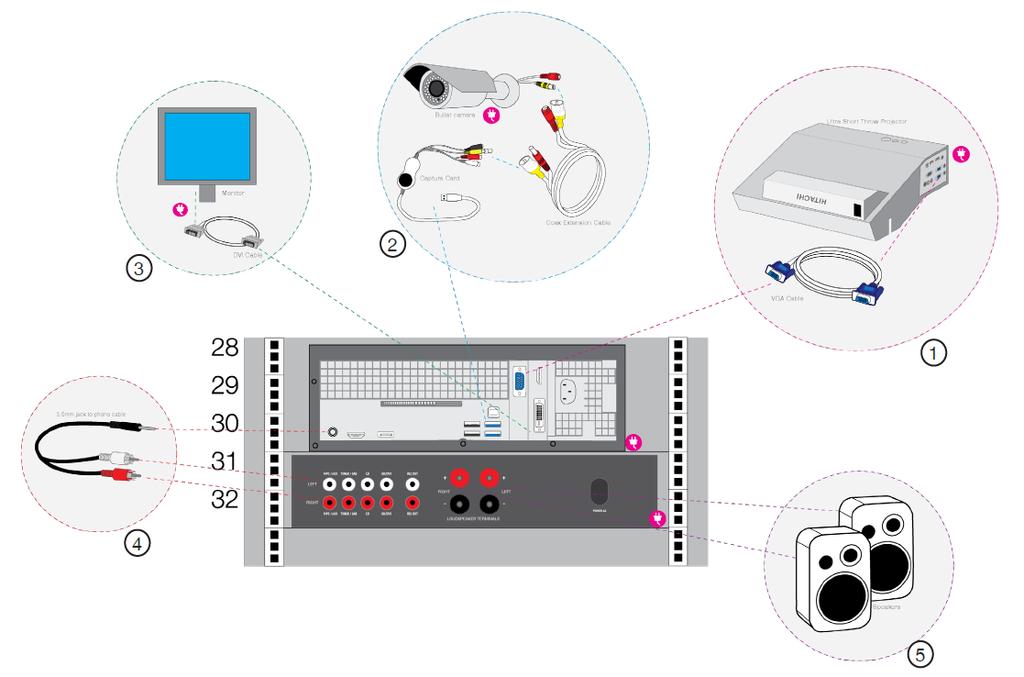
2 5. Contents Quantity Component Notes 2 3.5mm to 3.5mm Stereo Jack Plug Cable.2M Projector & Wall Mount Loudspeaker Cable Projector Fixing Kit 2V A, 2.mm Power Supply.5m IEC Cable DVI -D Single Link Cable (Male to Male) 2m 0m SVGA Male to Male Cable 0m IEC Cable 0m BNC Cable BNC Socket to RCA Plug USB Video Capture Card IR Day Night Camera PC Audio into Amp Ultra Short Throw Projector with wall bracket 0M Alternative fixing method for Projector if wall bracket is not suitable Camera Power Supply From Graphics Card to Monitor From Graphics Card to Projector Projector Power Camera Video and Power Connects Camera BNC Cable to Capture Card Video Signal into PC Camera used for motion tracking in this system 9" Monitor (VESA 00x00) DVI Cable from PC into Monitor Dell USB Mouse Dell USB Keyboard (qwerty) JBL Control Speaker (White) Software License Mini Amplifier VGA/DVI HDMI Low Profile Brackets Geforce Nvidia GT 740 2GB PCI-E with Low Profile Bracket Dell Optiplex 3040 PC Wired Mouse Wired Keyboard Speakers that could be ceilingmounted of necessary) Audio from PC Graphics Card - will be installed into PC
3 6. Snoezelen Stimulations Sight Sound 7. Best Use Use in a darkened environment. 8. Compatible ROMPA Products ROMPA offers a wide range of multi-sensory products please visit for more information. 9. Starting Up There are no short cuts when installing this product. Please read all these instructions carefully. 0. Detailed Description Imagine looking into a mirror and seeing yourself playing drums, splatting critters or tapping stars to change their colour and to make sounds. A movement of the hand or a flick of a finger can trigger any number of audio-visual events around you. Truly immersive, responsive and rewarding. For individuals and groups. Fully customisable. ROMPA can install this for you please contact us for information.. Safety Always supervise the use of this product Use in a suitably clear space that is free of obstacles to allow users the opportunity to move freely. 2. Technical Specification Size: The projection is an aspect ratio of 4:3 The optimum projection size is between.5m to 2m wide The optimum distance from the front of the projector to the wall is between 35cm and 45cm Weight: ceiling mounted components weight approximately 8kg
4
5 3. Installation. Check you have all components before you begin see your packing list. 2. Assess cable routes and location for PC and monitor. 3. Decide upon the location of the projector and the control area. 4. Identify any wall imperfections e.g. indentations, skew that may distort the projection image. Even the slightest of curvature will alter the rectangular shape of the image. Please be aware of this when choosing a suitable location for the Interactive Wall Projection. 5. Decide whether projector should be wall or ceiling mounted. Wall mounted - use UST mounting bracket supplied with projector. Follow installation instructions in mounting bracket manual for installation and adjustment. Ceiling mounted - use SG ceiling kit where you will have a steel wire for 600 x 600 suspender ceiling or Z braces for plasterboard and concrete ceilings. To install the baseplate:
6 The Front Surface Mirror must be handled with care. Finger marks will damage the mirror coating and reduce the clarity of the projected image. Keep this covered until it has been mounted.
7
8
9
10
11 6. Determine whether amplifier should be mounted onto a rack, wall or free standing. Projector Installation. To determine optimum projection size; turn projector on whilst it is on the floor to confirm distance from wall. 2. Depending on your projection mounting solution, install the projector: For Wall Mounted Installation: Please follow the instructions in the wall mount manufacturers manual. For Steel Wire Installation: Please refer the instructions above for guidance on suspended ceiling install. For Z Brace Installation: Please refer the instructions above for guidance on Plaster/Concrete ceiling install. 3. Once installed, turn projector on to see where the image is and adjust accordingly. At this point it does not need to be connected to the PC. 4. Taking into account the projected image area, judge where the camera should be above the image. Make sure that the camera doesn't overlap the edge of the
12 projection image. 5. Install the camera on the wall. Set up PC i. Insert USB capture card into USB port ii. Connect IEC cable to power socket iii. Connect the keyboard iv. Connect the monitor using the VGA cables Cables Please ensure all cabling is neat and tidy, using surface mounted conduit.
13 6. Cabling the amplifier i. 3.5mm jack to bare wire audio cable from PC (jack end) to amplifier. Bare wires connect to amplifier terminal block ii. Connect power supply to amplifier 7. Cabling the Camera i. Connect camera to BNC power cable - power to red, video to yellow. ii. Connect 2v PSU to other red BNC power cable iii. Connect USB capture card to other yellow video cable 8. Cabling the projector i. Run the VGA cable from the PC to the projector ii. Run IEC power to the projector Please note: the VGA cable must be used for the Projector. 9. Cable the monitor i. Run the DVI-D cable from the monitor to the PC graphics card.
14 Please note: In all MM installations the VGA output goes to the projector, the DVI-D output goes to the monitor. Never use HDMI. Powering up the system 0. Connect the following power cables to a 6-way extension cable i. Projector IEC ii. Camera 2V iii. Monitor IEC iv. Amp v. PC IEC. Connect extension cable to a power outlet in the room Test and configuration of the system 2. Turn on PC, Camera, Monitor, Amplifier and Projector 3. Run Magic Mirror software 4. Check orientation of camera, you will see the cameras image in the software. When in front of the mirror, your left hand should move on the left side of the screen so you are fully mirrored. 5. Check that the Magic Mirror is working when in the run time To start run time, press the play button on the software's control panel and gesture into the projection to/make contact with an interactive object. If correctly configured, you will see an interaction and hear a sound. Using the Ceiling-Mounted Interactive Wall Projection There are a few things you need to familiarize yourself with before you attempt to turn the system on for the first time:. PC and Monitor - this will usually be housed in a dedicated server rack or on a shelf close to the projector 2. Projector - mounted on or above the ceiling and controlled by an IR remote control unit 3. Amplifier - powers the speakers To begin with turn on the main power switch and make sure all equipment is in standby mode. You can tell that the equipment is in standby mode by checking the status of the standby LED's. Next switch the PC on using the button on the front of the PC. The Monitor will turn on automatically and you will see the Magic Mirror software begin to load. Note: if the Monitor doesn't come on, turn on using the Monitor's power button. Note: if the Magic Mirror software does not load automatically, locate the icon on the

15 Desktop and double click to run. Locate the Projector Remote and turn the projector on. When the projector warms up and shows the image it should display the Magic Mirror's output screen with the first app in the list visible. If you don't see this, but instead see the extended PC Desktop (as standard, this is a Sensory Guru logo), then this is most likely because the software is not running. Locate the icon on the Desktop and double click to run. If you see nothing at all, check the projector input is set to Computer. This is the button directly below the ON button of the Projector remote. The system is ready to use. Simply press Play on the Control Panel to activate. Once the system is powered on you can begin to use the apps Start by selecting the app you wish to use from the Scheduler (B). To do so simply click on an app name (such as Jack In The Box) with a single-click using the left mouse button. The app is now selected and should appear on your Projection wall. The next step is to activate the Magic Mirror. This is done by pressing the Play button on the Control Panel (D). The system is now active and ready for use. You may now switch between apps by simply clicking on the app name once (as above). The scene will change and be instantly ready for use. Elements may be freely moved around the screen by clicking anywhere on an their green boundary line (between the anchor points [the little white squares])

16 Tip! Be careful when moving elements, especially if there is a background image underneath. If you don't quite place the mouse on the boundary line, it may click through to the element below, moving that one instead! When you are finished using the system, close down the software by clicking the red box with the white cross at the top-right part of the screen (the same way most Windows applications are closed). If you have made any changes, a message will appear asking you if you would like to save them. Click "No" if you do not intend to keep changes or wish the system to be reset back to the default for the next use. To Create Your Own Apps Much like other computer programs, this system consists of a file (or a document) that can be worked on and saved. The Apps in the Sequencer are simply layers within this document. These layers are known as Levels in this system. For example, Jack In The Box is on Level whilst Stars is on Level 2. When you click on Stars whilst Jack In The Box is open, you are simply switching between these levels. Start a new file. Open the Magic Mirror. Click File from the very top tool bar and select New. You will now have a fresh file to work with. Save this new file. Click File>Save As. When the Save As browsing window appears, navigate to the Magic Mirror folder (C:\Program Files\Magic Mirror\) and look for the folder named "Settings". Give your file a unique memorable name and click Save


17 Note: the software, once opened, will load the default file (MagicMirrorMaster.Cfg). To load your own file, click File>Load - or Crtl+O and navigate to the Settings folder. Open the Settings folder, locate your file and click Open. From the Elements panel under the Create column, click "Field". You will notice a small Field Element appear on the Working Monitor and a green square followed by a number (the Level) and the work Dyn (which is short for Dynamic Field Element).


18 To make the new element easier to work with, click the bottom-right anchor point and drag to make it larger. Now move the element. It is a good idea to do this now, as any further elements created will appear in this area so will be overlapped and tricky to get to. Click on a boundary line anywhere between the anchor points and drag to move (like drag and dropping items on your desktop!).
.")


19 Move up to the Elements panel and click on the More tab (under the Properties column). Click the "Def Glyph" Brose button and locate the image you wish to use. In this case, the image "PinkFlower.png". Do the same for "Trig Glyph" but this time, select the image "RedFlower.png". The two options will now show the image files that have been loaded, like this:


20 If you don't see any images where you would expect to find them, click on the drop list for "Files of type:" at the bottom of the Browse window and select "all files": If you wish, you may test your progress by moving down to the Control Panel and pressing the Play button. Move over your element to see it triggered and the second image displayed: The next step would be to add some sound. Move back up to the Elements panel and click the Samples tab under the Properties column.


21 Click "New" and locate the file "HarpBloom.wav". Once loaded, the Samples tab will now show the file, like this: Again, if you do not see the sound file you are looking for, click on the drop list for "Files of type:" at the bottom of the Browse window and select "all files" (as above). Test your progress once again to hear the sound now accompanies the image change when triggered. Cast your mind back to the start of this tutorial, in the Elements List that contains information about the element. The number is significant because it is the Level at which the element resides. In order to make this work an app in its own right, let's give the app a name!

22 This is done with a small and simple piece of code typed into the Sequencer: Notice that "Run" is highlighted. Also note the large white box below. Click "Edit" and you will see that the large white box becomes editable: In the large white box, we are going to type some words that will signify our element's Level as an "app". Before we do so however, we will need to type a piece of code that will initiate the process. This is because we are working on a new file for the first time. Once this is entered, it need not be done for this app again, the following code is a two part command to tell the software to produce a secondary monitor ie; the Projected image (the "MO" part) and take a snap shot of the background for optimum use (the "BK" part) The one-off code to type here is: "MO+ BK"


23 While we still have the Sequencer in edit mode, we may as well type the next part of code. The following code is required for each app you wish to create: G = Name of app where "G" refers to the element. In this case G stands for "green" (the default colour given to an element when created. This need not be changed for these purposes)and the number stands for "Level ". And "Name of app" is your chosen name for the app you wish to create. We need to type this new code on a new line. So, make sure the Sequencer is in edit mode, click immediately after MO+ BK and press return to enter a new line. Type "G = Flower". Keep the Sequencer in edit mode for now Let's type the code for the next app. Even though we have not yet created any content for it, it is a good idea to get this part done now as when the new app is selected, the next Level will automatically be selected for us to work on!

24 Again, go to the end of the previous line (in this case to the end of "G = Flower") and press return. Type in the following: "G2 = Dog" This creates a new Level for our new app! Now click Run. Test your progress by now clicking on the next app. To do so, simply move the mouse cursor over the line that says "G2 = Dog" in the Sequencer and sing-click it. You should notice that the flower of the first app disappears. This is because we are switching to Level 2 (the next app). Let's put some content on it! With the Dog app selected, create a new Field Element (as above). As before, move to the More tab in the Elements panel. For Default Glyph load the file "Dog.png". For the Triggered Glyph, load "Dog2.png". Under the Samples tab, load the file "DogBark.wav". You now have two apps! Note: If you would like to add to either of your apps, simply select the app you wish to add to (by clicking on its name in the Sequencer) and create new elements as desired. Any new elements created will be created on the same Level hence they will all be a part of that app. If you want to create a new app, first enter the new app's code as we did for app 2, click Run and with the newly created app selected, go about creating new Elements. You will need to save any changes you make, if you wish to keep them, each time you close the software.

25 4. Care and Maintenance. Clear the projector filters every 3 to 6 months depending on use. 2. Change the projector lamp as required using a new lamp of the same specification. 5. Troubleshooting In the unlikely event of product failure, please check the following: Problem: Incorrect camera settings Amcap is a program used to configure a camera connected via composite connection. For example; the cameras used by the Magic Mirror system. Amcap can be opened by double clicking the Desktop shortcut icon if one has been created. If there is no shortcut icon, you can find Amcap here: C:\Program Files\Magic Mirror\tools\ Once open you will be presented with the main interface. Note, that if the camera is plugged in and set up correctly, you will see the camera image. If not, then there will be either a complete black or white image instead. Locate the "Options" menu at the top The Options menu contains some further options: "Video Capture Filter", Video Capture Pin" and depending on what version of the software you are running, you may have "Video Crossbar":


26 From the Options menu, select "Video Capture Filter". Look at the Video Decoder tab and make sure the Video Standard option is set to "PAL_B". Click "Apply" and then "Ok" to exit. Next, select "Video Capture Pin". Video Standard should automatically be set to "PAL_B" having just set that in the capture filter panel. Set the Frame Rate to "25.000" and Make sure the Output Size is set to "704 x 576". Click "Apply" and then "OK" to exit.


27 Finally, (if your version shows it) select "Video Crossbar". In the first section, Input, select ": Video Composite In". Click "Apply" and then "OK" to exit.
28 If your camera is correctly connected and powered, with these settings, you should now see an image in Amcap. Close Amcap. Note: Make sure Amcap is correctly configured and CLOSED before starting the Magic Mirror software. There will be a conflict and subsequent error message if trying to run the Magic Mirror and Amcap together. Problem: System not responding to interaction or intermittent interaction Make sure you have pressed Play on the Control Panel to ensure the Magic Mirror is active. If you are finding your Interactive Field Element to be unresponsive or too sensitive, try adjusting the settings to suit. This may occur in very low/very high ambient light situations or where the environment allows for direct sunlight or concentrated light in certain areas around the room. For example; one of your elements is sitting right over a bright window. Sensitivity, Threshold and Filter settings (Elements panel > Fields column) Sensitivty and threshold work together to set a Field Element's overall sensitivity; Sensitivity relates to movement. The higher the sensitivity value the more easily the element will detect movement. For example; the sensitivity is set high, the element detects even the slightest of movement from a wiggling finger. Threshold relates to a value at which the element will trigger. Even though the element is set to a high sensitivity level and is detecting the movement from the wiggling finger, the element has not yet triggered. It will not trigger until the finger movement becomes more prominent and breaks through the threshold value. In this case, it is necassary to either reduce the threshold level, or increase physical movement to trigger the element. The Filter option determines how quickly the Field Element resets after being triggered. For example; if increased in value, the triggered event will linger for longer. If the value is very low or set to zero, the element will reset itself almost instantly after being triggered. If the Filter is set in this way, you may experience a 'bouncing' trigger event. This is where the element is triggered, resets very fast and triggers instantly producing a bouncing effect. To reduce this effect you may set the Debounce value a little higher (the

29 Debounce setting is to the left under the Options column). A value of around 2 will redcuce this unwanted effect sufficiently for most situations. Unless of course, that's the effect you are looking for! The camera supplied with this system is powered by a 2V Power Supply. If you are experiencing problems with connectivity or the system appears to be unresponsive to user interaction, check that the LED array on the camera is glowing red as shown below. If not, then it is likely that the Camera is either unplugged or turned off. Rule this out first before following the next series of steps! When you are sure that the Power Supply is turned on and all connections are good we need to determine whether the issue is with the Power Supply or the Camera, locate an alternative 2V PSU A 2.mm DC Plug and connect to the system - please contact us. Problem: No sound Before proceeding with troubleshooting sound, make sure the PC has not been muted. Also make sure you have pressed Play on the Control Panel to ensure the Magic Mirror is active. Navigate to the bottom right of the Desktop screen and locate the speaker icon (within the toolbar). Click it to reveal the volume slider. Adjust as required. If you have a fixed installation, your system will be connected to either an amplifier or an existing sound system. Locate the amplifier. If it is a Nuvo amplifier (small white unit), make sure it is on by slowly turning the volume knob to the right (turned fully left will turn the amp off). If you have a black Cambridge Audio amplifier, make sure the volume knob is turn up sufficiently (but not too high!). Make sure the source selector is set to the correct source.


30 This is usually 'CD' or 'MP3' depending on your setup. If either of the do not work, try slowly selecting each source until the sound comes on. If your system is connected to your own sound setup, check that you have it set correctly Problem: I can't see a computer image displayed through the Projector? This is a very common issue people experience when operating projectors, which can usually be rectified very quickly. Most projectors have multiple input sources to make it possible to connect more than one PC or video device. If you have turned on both the PC & Projector, and the Projector displays an image like the one below (image varies depending on the make and model, but all have a version of this) it is likely that a different image source has been selected. Solving this issue is usually as simple as selecting the correct source from the remote control. All Magic Mirror systems will be set to display on Computer or Computer 2. Very occasionally the issue may have a different cause. If someone has accessed the rear of the PC or needed to access the ceiling near the Projector, it is possible that the VGA Cable has been disconnected from the PC or the Projector. Please see articles relating to Magic Carpet component list for more info.
31 Further copies of these instructions can be downloaded at We hope you find our instructions invaluable. If you have any suggestions for improving them further your comments will be greatly received please contact us at CEILING-MOUNTED INTERACTIVE WALL PROJECTION 22590, May 207 Copyright ROMPA Ltd
insors Grid Room System Installation Guide
 insors Grid Room System Installation Guide May 2006 insors Integrated Communications www.insors.com 312-786-9169 Introduction insors Grid is a state-of-the-art software-based system that supports a highly
Hip Hop Activity Box. Instruction Manual. Hip Hop Activity Box 22875, October 2018 Copyright ROMPA Ltd
 Hip Hop Activity Box Instruction Manual Hip Hop Activity Box 22875, October 2018 Copyright ROMPA Ltd Contents 3 Panel Overview 5 Colour 5 Description 5 Technical Specification 6 Dimensions 7 Contents 8
U S E R G U I D E HD1000
 U S E R G U I D E HD1000 1 W e l c o m e t o R o k u! In This Guide... Bring your HDTV to life with Roku. For the first time, you ll enjoy viewing your favorite digital photos in high-definition on your
Hardware Setup. If you have any further questions after checking this document, please contact
 Hardware Setup If you have any further questions after checking this document, please contact support@cognisens.com Hardware Setup Getting Started: NeuroTracker Pro WHAT TO BUY SETTING UP YOUR 3D TV SETTING
Pro L1500UH/L1500UHNL/L1505UH/ L1505UHNL/L1750UNL/L1755UNL/L1715SNL
 Pro L1500UH/L1500UHNL/L1505UH/ L1505UHNL/L1750UNL/L1755UNL/L1715SNL Quick Reference This Quick Reference card gives brief instructions on connecting your projector and using common features. For details,
Features of the Projector
 Features of the Projector User s Guide 1 Position adjustment function for a variety of projection screens Images can be projected regardless of the location. The keystone distortion that occurs as a result
WDP02 Wireless FHD Kit User Manual
 WDP02 Wireless FHD Kit User Manual Copyright Copyright 2015 by BenQ Corporation. All rights reserved. No part of this publication may be reproduced, transmitted, transcribed, stored in a retrieval system
Operating Instructions
 Marshall Electronics Broadcast A/V Division Model No. VSW-2200 4-Input Seamless SDI A/V Switcher Operating Instructions Table of Contents 1. Overview... 2. Features.... Package Contents... 4. Specifications...
COLOR TFT LCD MONITOR. Manual
 COLOR TFT LCD MONITOR Manual Safety defended: Properly maintains your system to be possible to guarantee its service life and to reduce the damage risk. It should avoid the damp and exceeding temperature
Sound to Sight Showtime
 Sound to Sight Showtime Instruction Manual Sound to Sight Showtime 22870, March 2018 Copyright ROMPA Ltd Contents 3 At a Glance Panel Overview Colour Description Contents Technical Specification What s
About your Kobo ereader...6
 User Guide Kobo Glo HD User Guide Table of Contents About your Kobo ereader...6 Anatomy of your Kobo ereader...6 Charging your Kobo ereader...8 Charging your Kobo ereader with a wall adapter...9 Turning
USER MANUAL. VP-435 Component / UXGA HDMI Scaler MODEL: P/N: Rev 13
 KRAMER ELECTRONICS LTD. USER MANUAL MODEL: VP-435 Component / UXGA HDMI Scaler P/N: 2900-000262 Rev 13 Contents 1 Introduction 1 2 Getting Started 2 2.1 Achieving the Best Performance 2 2.2 Safety Instructions
COLOR TFT LCD MONITOR WITH MULTI-TOUCH FUNCTION Manual
 COLOR TFT LCD MONITOR WITH MULTI-TOUCH FUNCTION Manual DEAR CUSTOMERS Thank you for choosing our TFT LCD (liquid crystal display) monitor. This product employs integrate circuits, low power consumption,
P-2 Installing the monitor (continued) Carry out as necessary
 Carry out as necessary") P-2 Installing the monitor (continued) Carry out as necessary Using the monitor without the bezel MDT552S satisfies the UL requirements as long as it is used with the bezel attached. When using the monitor
P-2 Installing the monitor (continued) Carry out as necessary Using the monitor without the bezel MDT552S satisfies the UL requirements as long as it is used with the bezel attached. When using the monitor
CP-255ID Multi-Format to DVI Scaler
 CP-255ID Multi-Format to DVI Scaler Operation Manual DISCLAIMERS The information in this manual has been carefully checked and is believed to be accurate. Cypress Technology assumes no responsibility
OPERATING GUIDE. HIGHlite 660 series. High Brightness Digital Video Projector 16:9 widescreen display. Rev A June A
 OPERATING GUIDE HIGHlite 660 series High Brightness Digital Video Projector 16:9 widescreen display 111-9714A Digital Projection HIGHlite 660 series CONTENTS Operating Guide CONTENTS About this Guide...
EPSON PowerLite 8100i/9100i Multimedia Projector
 EPSON PowerLite 8100i/9100i Multimedia Projector User s Guide Important Safety Information WARNING: Never look into the projector lens when the lamp is turned on; the bright light can damage your eyes.
CONTENTS 8 ACCESSORIES 13 9 TROUBLE SHOOTING AND ADVICE SPECIFICATIONS BATTERY USAGE CAUTION 13
 CONTENTS 1 PREFACE 2 2 SAFETY PRECAUTIONS 2 3 FRONT & BACK VIEW, REAR CONNECTION OF LCD 3 4 TV INSTALLATION DRAWINGS 4 4.1 ANTENNA CONNECTION 4 4.2 AV1 INPUT CONNECTION 4 4.3 AV2 INPUT CONNECTION 4 4.4
Quick Operation Guide of LTN7700/7600 Series NVR
 Quick Operation Guide of LTN7700/7600 Series NVR UD.6L0202B0042A02 Thank you for purchasing our product. If there is any question or request, please do not hesitate to contact dealer. This manual is applicable
About your Kobo ereader...6
 User Guide Kobo Touch 2.0 User Guide Table of Contents About your Kobo ereader...6 Anatomy of your Kobo ereader...6 Charging your Kobo ereader...8 Charging your Kobo ereader with a wall adapter...9 Turning
SATRI AMPLIFIER AMP-51R. Owner s Manual
 SATRI AMPLIFIER AMP-51R Owner s Manual contents SAFETY INSTRUCTIONS 4 INTRODUCTION 6 OVERVIEW (FRONT PANEL) 8 OVERVIEW (REAR PANEL) 9 OVERVIEW (REMOTE CONTROL) 1 1 OPERATION 12 TROUBLESHOOTING 13 SPECIFICATION
42 Freestanding Infrared Multi Touch Screen Kiosk User s Manual
 42 Freestanding Infrared Multi Touch Screen Kiosk User s Manual Manual Version L42HD-T2.2 Safety Instructions Please keep the display away from any heat sources such as radiators or direct sunlight. Place
Quick Reference. PowerLite 5510/5520W/5530U/5535U
 PowerLite 5510/5520W/5530U/5535U Quick Reference This Quick Reference card gives brief instructions on connecting your projector and using common features. For details, see the online User s Guide. VGA
Data Acquisition Using LabVIEW
 Experiment-0 Data Acquisition Using LabVIEW Introduction The objectives of this experiment are to become acquainted with using computer-conrolled instrumentation for data acquisition. LabVIEW, a program
Be sure to run the vehicle engine while using this unit to avoid battery exhaustion.
 CAUTION: TO REDUCE THE RISK OF ELECTRIC SHOCK DO NOT REMOVE COVER (OR BACK) NO USER-SERVICEABLE PARTS INSIDE REFER SERVICING TO QUALIFIED SERVICE PERSONNE; Please Read all of these instructions regarding
Notations Used in This User s Guide
 User s Guide Notations Used in This User s Guide 1 CAUTION Indicates procedures which may result in damage or injury if sufficient care is not taken. TIP PROCEDURE Indicates additional information and
Part names (continued) Remote control
 Remote control") Introduction Part names (continued) Remote control (1) STANDBY ( 25) (1) (2) ON ( 25) (3) (3) ID - 1 / 2 / 3 / 4 s ( 18) (4) (4) COMPUTER 1 ( 27) (7) (5) COMPUTER 2 * (8) (6) COMPUTER 3 * (10) (13) (7)
Introduction Part names (continued) Remote control (1) STANDBY ( 25) (1) (2) ON ( 25) (3) (3) ID - 1 / 2 / 3 / 4 s ( 18) (4) (4) COMPUTER 1 ( 27) (7) (5) COMPUTER 2 * (8) (6) COMPUTER 3 * (10) (13) (7)
CP-255ID CV, SV, VGA and DVI to DVI Scaler / Converter OPERATION MANUAL
 CP-255ID CV, SV, VGA and DVI to DVI Scaler / Converter OPERATION MANUAL DISCLAIMERS The information in this manual has been carefully checked and is believed to be accurate. CYP (UK) Ltd assumes no responsibility
PowerLite Pro G6070W/G6170/G6270W/ G6470WU/G6570WU/G6770WU/G6870/ G6970WU
 PowerLite Pro G6070W/G6170/G6270W/ G6470WU/G6570WU/G6770WU/G6870/ G6970WU Quick Reference This Quick Reference card gives brief instructions on connecting your PowerLite projector and using common features.
Quick Help Teaching Room Technology Support
 Quick Help Teaching Room Technology Support Technical assistance is available. If you require assistance, please call Ext 6066 Quick Help Technology Overview INDEX INDEX Touch Screen Is not active 3 Technology
E-MANUAL. Thank you for purchasing this Samsung product. To receive more complete service, please register your product at.
 E-MANUAL Thank you for purchasing this Samsung product. To receive more complete service, please register your product at www.samsung.com/register Model Serial No. Contents Quick Guides Using Smart Hub
E-MANUAL. Thank you for purchasing this Samsung product. To receive more complete service, please register your product at.
 E-MANUAL Thank you for purchasing this Samsung product. To receive more complete service, please register your product at www.samsung.com/register Model Serial No. Contents Connecting Antenna and External
E-MANUAL. Thank you for purchasing this Samsung product. To receive more complete service, please register your product at.
 E-MANUAL Thank you for purchasing this Samsung product. To receive more complete service, please register your product at www.samsung.com/register Model Serial No. Contents Quick Guide Using the Smart
About your Kobo ereader...6
 Kobo Clara HD - User Guide Table of Contents About your Kobo ereader...6 Anatomy of your Kobo ereader...6 Turning your Kobo ereader on and off...8 Charging your Kobo ereader...9 Charging your Kobo ereader
Harmony Ultimate. User Guide
 Harmony Ultimate User Guide Harmony Ultimate User Guide Table of Contents About this Manual... 6 Terms used in this manual... 6 At a Glance... 6 Features... 6 Know your Harmony Ultimate... 6 Features of
INSTRUCTION MANUAL. 19 HD Widescreen Water Resistant Television VSPA19LCD-AE1B VSPA19LCD-AE1M VSPA19LCD-AE1W. Model No. FINGER TOUCH TECHNOLOGY RATED
 INSTRUCTION MANUAL 19 HD Widescreen Water Resistant Television VSPA19LCD-AE1B Model No. VSPA19LCD-AE1M VSPA19LCD-AE1W FINGER TOUCH TECHNOLOGY IMPORTANT: Please read these instructions before installing
Integrator s Guide Concord
 Integrator s Guide Concord HD Component Video / Composite Video / Analog Audio Matrix Switch with Cat5 outputs 2 3 Table of Contents Table of Contents... 3 Introduction... 4 Features:... 4 Installation...
Camera 220C Document Camera User s Guide
 Camera 220C Document Camera User s Guide #401-220C-00 Table of Contents TABLE OF CONTENTS... 0 TABLE OF CONTENTS... 1 COPYRIGHT INFORMATION... 2 CHAPTER 1 PRECAUTIONS... 3 CHAPTER 2 PACKAGE CONTENT...
1CHDVRD1 USER MANUAL. These instructions apply to unit model 1CHDVRD1 only. Please read carefully before use.
 These instructions apply to unit model 1CHDVRD1 only. Please read carefully before use. 1CHDVRD1 USER MANUAL Description Description... 03 Features... 03 Notes... 03 Packing List... 04 Technical Specifications...
CSLUX-300I Multi-Format to HDMI Scaler
 CSLUX-300I Multi-Format to HDMI Scaler Operation Manual DISCLAIMERS The information in this manual has been carefully checked and is believed to be accurate. Cypress Technology assumes no responsibility
INSTALATION AND OPERATION MANUAL ABYSSAL OS Overlay Module Version 1.0.1
 INSTALATION AND OPERATION MANUAL ABYSSAL OS Overlay Module Version 1.0.1 Thank you for purchasing the Abyssal OS Overlay Module for your ROV. This instruction manual contains all the information you ll
Quick Reference. PowerLite. Pro G5550NL/G5650WNL/G5950NL
 PowerLite Pro G5550NL/G5650WNL/G5950NL Quick Reference This Quick Reference card gives brief instructions on connecting your PowerLite projector and using common features. For details, install and view
AC335A. VGA-Video Ultimate Plus BLACK BOX Back Panel View. Remote Control. Side View MOUSE DC IN OVERLAY
 AC335A BLACK BOX 724-746-5500 VGA-Video Ultimate Plus Position OVERLAY MIX POWER FREEZE ZOOM NTSC/PAL SIZE GENLOCK POWER DC IN MOUSE MIC IN AUDIO OUT VGA IN/OUT (MAC) Remote Control Back Panel View RGB
Warranty Information
 Accuform Signs does not handle the warranty for the Digital Signage Displays. Please read below for details on the warranty of your product. If you are having trouble and need assistance, please contact
INSTALLING YOUR MANHATTAN SX
 Your USER GUIDE SX INSTALLING YOUR MANHATTAN SX Unpack the following from your Giftbox: 2x AAA batteries Remote control Manhattan SX SCART Adapter HDMI cable Power adapter AV Lead You ll need: A TV with
Quick Reference. PowerLite G5910
 PowerLite G5910 Quick Reference This Quick Reference card gives brief instructions on connecting your PowerLite projector and using common features. For details, see the online User s Guide. VGA-to-component
TeamWork Kits Installation Guide
 TX 0 RX COM +5V APARATUS US TeamWork Kits Installation Guide TeamWork 400 and TeamWork 600 Kits The TeamWork 400 and TeamWork 600 kits consist of an HDMI switcher, system controller, Cable Cubby, and cables
USER MANUAL. 22" Class Slim HD Widescreen Monitor L215DS
 USER MANUAL 22" Class Slim HD Widescreen Monitor L215DS TABLE OF CONTENTS 1 Getting Started Package Includes Installation 2 Control Panel / Back Panel Control Panel Back Panel 3 On Screen Display 4 Technical
28 4K LED monitor. User Manual M284K
 28 4K LED monitor User Manual M284K CONTENTS Safety Information... 2 What s included..... 4 Getting Started....... 8 Troubleshooting.... 14 Specification.... 15 2 of 15 SAFETY INFORMATION Read these instructions
enjoy it. you want Here s how to You ve decided Contents
 SHAWDigital TV Contents Check list and Helpful Hints 4 Getting Started 5 Using the Shaw Universal Remote 6 On-screen Interactive Program Guide (IPG) 8 Quick Access Menu 10 On-screen Interactive Program
PowerLite Home Cinema 1440 User's Guide
 PowerLite Home Cinema 1440 User's Guide Contents PowerLite Home Cinema 1440 User's Guide... 9 Introduction to Your Projector... 10 Projector Features... 10 Product Box Contents... 11 Additional Components...
Contents. Contents. Important safety instructions Wall mounting the set. Important safety instructions Wall Mounting the Set
 Contents Contents Important safety instructions Wall mounting the set 2 4 Important safety instructions Wall Mounting the Set Introduciton 5 6 7 10 10 11 11 11 12 12 13 13 Controls Connection options Remote
TFT LCD USER MANUAL TFT-15 TFT-17 TFT-19
 TFT15, 17, 19 Manual_Layout 2 01/03/2013 15:35 Page 1 TFT LCD monitor USER MANUAL TFT-15 TFT-17 TFT-19 TFT15, 17, 19 Manual_Layout 2 01/03/2013 15:35 Page 2 2 TFT15, 17, 19 Manual_Layout 2 01/03/2013 15:36
MDS 100 LINE MULTIPLIER, SCAN CONVERTER AND SWITCHER
 5 INPUTS WITH ASSOCIATED AUDIO 2 SIMULTANEOUS CONVERSIONS: PC/TV AND TV/PC WIDE RANGE OF CORRECTIONS AND ADJUSTMENTS MUTE AUDIO FUNCTION ON BOTH OUTPUTS OSD ON BOTH OUTPUTS MAINTENANCE OF PRESETTINGS POSSIBILITY
Scan Converter Quick Installation Guide
 Scan Converter Quick Installation Guide Software Note: No software is required to use your scan converter. Please complete the hardware installation and system setup before you determine the need to the
Quick Reference Guide
 Multimedia Projector Quick Reference Guide MODEL 103-011100-01 Projection lens is optional. English Use this book as a reference guide when setting up the projector. For detailed information about installation,
USER MANUAL. 27 Full HD Widescreen LED Monitor L27ADS
 USER MANUAL 27 Full HD Widescreen LED Monitor L27ADS TABLE OF CONTENTS 1 Getting Started 2 Control Panel/ Back Panel 3 On Screen Display 4 Technical Specs 5 Care & Maintenance 6 Troubleshooting 7 Safety
Features of the Projector
 Features of the Projector 1 Direct Power On You can make the projector turn on and be ready to project images simply by connecting the power cable. You can also turn the power on for projectors in places
The only warranties for HP products and services are set forth in the express warranty statements accompanying such products and services.
 The only warranties for HP products and services are set forth in the express warranty statements accompanying such products and services. Nothing herein should be construed as constituting an additional
XHD inch Widescreen LCD Monitor USERGUIDE
 XHD3000 30-inch Widescreen LCD Monitor USERGUIDE Contents Chapter 1: Checking Out Your Monitor...... 1 Package contents....................................... 2 Monitor features.......................................
CSLUX-300 Multi-Format to HDMI Scaler
 CSLUX-300 Multi-Format to HDMI Scaler Operation Manual DISCLAIMERS The information in this manual has been carefully checked and is believed to be accurate. Cypress Technology assumes no responsibility
E-MANUAL. Thank you for purchasing this Samsung product. To receive more complete service, please register your product at.
 E-MANUAL Thank you for purchasing this Samsung product. To receive more complete service, please register your product at www.samsung.com/register Model Serial No. Contents Connecting Antenna and External
Converts any TV to Digital. MFR-300 User Guide
 Converts any TV to Digital MFR-300 User Guide Introduction Thank you for choosing this TVonics Freeview box. Record the serial number in the space provided below (the serial number can be found on the
INSTALATION AND OPERATION MANUAL ABYSSAL OS Overlay Module Version 1.3
 INSTALATION AND OPERATION MANUAL ABYSSAL OS Overlay Module Version 1.3 Thank you for purchasing the Abyssal OS Overlay Module for your ROV. This instruction manual contains all the information you ll need
Wall Ball Setup / Calibration
 Wall Ball Setup / Calibration Wall projection game 1 Table of contents Wall Projection Ceiling Mounted Calibration Select sensor and display Masking the projection area Adjusting the sliders What s happening?
P XGA TFT Monitor. User s Manual
 P6151 15 XGA TFT Monitor User s Manual Disclaimers This manual has been carefully checked and believed to contain accurate information. Axiomtek Co., Ltd. assumes no responsibility for any infringements
EW400. Plug and Play Projection. Native WXGA, 4000 ANSI Lumens. USB plug and play presenting. Up to 6000 hours lamp life and 70% energy saving
 EW400 Plug and Play Projection Native WXGA, 4000 ANSI Lumens USB plug and play presenting Up to 6000 hours lamp life and 70% energy saving Crestron RoomView RJ45 control and monitoring EW400 Stylish yet
E-MANUAL. Thank you for purchasing this Samsung product. To receive more complete service, please register your product at.
 E-MANUAL Thank you for purchasing this Samsung product. To receive more complete service, please register your product at www.samsung.com/register Model Serial No. Contents Quick Guides Using Smart Hub
ivw-ud322 / ivw-ud322f
 ivw-ud322 / ivw-ud322f Video Wall Controller Supports 2 x 2, 2 x 1, 3 x 1, 1 x 3, 4 x 1 & 1 x 4 Video Wall Array User Manual Rev. 1.01 i Notice Thank you for choosing inds products! This user manual provides
Dell Wyse 5030 PCoIP Zero Client
 Dell Wyse 5030 PCoIP Zero Client User Guide Regulatory Model: PxN Regulatory Type: PxN001 Notes, cautions, and warnings NOTE: A NOTE indicates important information that helps you make better use of your
CSLUX-300I Multi-Format to HDMI Scaler
 CSLUX-300I Multi-Format to HDMI Scaler Operation Manual SAFETY PRECAUTIONS Please read all instructions before attempting to unpack, install or operate this equipment and before connecting the power supply.
HD Video Capture Pro
 HD Video Capture Pro Quick Start Guide Thanks for purchasing ezcap291 HD Video Capture Pro. The following guides you how to set up. Hope this device will bring you nice digital experience. With this ezcap291
USER GUIDE FOR NETmc MARINE X-Ops
 USER GUIDE FOR NETmc MARINE X-Ops Rev.2.2 Firmware v.1.2.8 X-Ops, 1.2.9 Pipeline September 2013 NETmc Marine X-Ops Manual-Rev.2.2 September 2013 1 of 17 Contents 1. Introduction... 3 1.1 Multi-channel
Hi! Let s get started.
 Hi! Let s get started. What s in the box Roku 2 player Roku 2 enhanced remote Headphones 2 x AA batteries for remote A/V cable (RCA) Power adapter Get to know your Roku 2 A Front view B E Back view C
Quick Reference. PowerLite 4650/4750W/4855WU PL4650/4750W PL4855WU
 PowerLite 4650/4750W/4855WU Quick Reference This Quick Reference card gives brief instructions on connecting your PowerLite projector and using common features. For details, see the online User s Guide.
E-MANUAL. Thank you for purchasing this Samsung product. To receive more complete service, please register your product at.
 E-MANUAL Thank you for purchasing this Samsung product. To receive more complete service, please register your product at www.samsung.com/register Model Serial No. Contents Quick Guides Using Smart Hub
Notations Used in This Guide
 User s Guide Notations Used in This Guide Indicates procedures which may result in damage or injury if sufficient care is not taken. Indicates additional information and points which may be useful to know
Lite USER GUIDE. 3 Lite. For more information visit
 USER GUIDE Lite 3 Lite For more information visit www.caldigit.com Table of Contents Section 1 : General Information Introduction 3 General Use Warnings 3 Safety Warnings 3 System Requirements 4 In the
PowerLite Home Cinema 1450 User's Guide
 PowerLite Home Cinema 1450 User's Guide Contents PowerLite Home Cinema 1450 User's Guide... 9 Introduction to Your Projector... 10 Projector Features... 10 Product Box Contents... 11 Additional Components...
1. Product Name. 2. Product Code. 3. Colour. 4. Brief Description. 5. Contents. Wi Fi Mood Lighting. As supplied
 1. Product Name Wi Fi Mood Lighting 2. Product Code 20845 3. Colour As supplied 4. Brief Description Ceiling mounted, these dimmable and long life LED downlights can transform the mood of a room. 5. Contents
Quick Reference. PowerLite Pro Z9750UNL/Z9870UNL Z10000UNL/Z10005UNL
 PowerLite Pro Z9750UNL/Z9870UNL Z10000UNL/Z10005UNL Quick Reference This Quick Reference card gives brief instructions on connecting your PowerLite projector and using common features. For details, see
Projector Features. User s Guide
 Projector Features 1 Colour mode function The following six preset colour modes are provided so that you can easily obtain optimum images simply by selecting a Colour mode. In addition, if projecting onto
Colour Control48 Order Code: Control48
 Colour Control48 Order Code: Control48 www.cobrainternational.com User Manual Cobra Colour Control 48 Dear Customer, Thank you for purchasing the Cobra Colour Control 48. With decades of experience in
Remote Control. degraded, causing unreliable operation. The recommended effective distance for remote operation is about 16 feet (5 meters).
.") Media Streaming Sound Bar RTS736W User Manual Remote Control using the remote control Point the remote control at the REMOTE SENSOR located on the unit (see Front Panel illustration for precise location).
Media Streaming Sound Bar RTS736W User Manual Remote Control using the remote control Point the remote control at the REMOTE SENSOR located on the unit (see Front Panel illustration for precise location).
PN50A550S1F/PN58A550S1F
 PN50A550SF/PN58A550SF -800-SAMSUNG (767864) Samsung Electronics America, Inc. 05 Challenger Road Ridgefield Park, NJ 07660-05 Samsung Electronics Canada Inc., Customer Service 55 Standish Court Mississauga,
E-MANUAL. Thank you for purchasing this Samsung product. To receive more complete service, please register your product at.
 E-MANUAL Thank you for purchasing this Samsung product. To receive more complete service, please register your product at www.samsung.com/register Model Serial No. Contents Quick Guide Using Smart Hub
INSTALLATION AND OPERATION INSTRUCTIONS EVOLUTION VIDEO DISTRIBUTION SYSTEM
 INSTALLATION AND OPERATION INSTRUCTIONS EVOLUTION VIDEO DISTRIBUTION SYSTEM ATTENTION: READ THE ENTIRE INSTRUCTION SHEET BEFORE STARTING THE INSTALLATION PROCESS. WARNING! Do not begin to install your
E-MANUAL. Thank you for purchasing this Samsung product. To receive more complete service, please register your product at.
 E-MANUAL Thank you for purchasing this Samsung product. To receive more complete service, please register your product at www.samsung.com/register Model Serial No. Contents Quick Guide Using Smart Hub
GET STARTED. For assistance, call us on or visit manhattan-tv.com/support
 GET STARTED For assistance, call us on 020 8450 0005 or visit manhattan-tv.com/support Check Freeview HD coverage in your area by visiting freeview.co.uk INSTALLING YOUR T1 Unpack the following from your
Quick Installation Guide for USB2.0 & FireWire Frame Grabber & Optilia AMCap
 Quick Installation Guide for USB2.0 & FireWire Frame Grabber & Optilia AMCap This manual describes how to install the Frame Grabber 1 Installation You have to log on to your computer as Administrator or
E-MANUAL. Thank you for purchasing this Samsung product. To receive more complete service, please register your product at.
 E-MANUAL Thank you for purchasing this Samsung product. To receive more complete service, please register your product at www.samsung.com/register Model Serial No. Contents Quick Guides Connecting the
E-MANUAL. Thank you for purchasing this Samsung product. To receive more complete service, please register your product at.
 E-MANUAL Thank you for purchasing this Samsung product. To receive more complete service, please register your product at www.samsung.com/register Model Serial No. Contents Quick Guide Using Remote and
AHD. Quick Start Guide. DIY Do-It-Yourself. Network DVR with H.264 Compression
 AHD DIY Do-It-Yourself Quick Start Guide Network DVR with H.264 Compression A VIDEO DISPLAY Using a high quality monitor, connect it to DVR via VGA Cable or HDMI Cable. STEP 1 Turning on DVR STEP 2 Connect
Harmony Smart Control. User Guide
 Harmony Smart Control User Guide Harmony Smart Control User Guide Table of Contents About this Manual... 6 Terms used in this manual:... 6 At a Glance... 6 Features... 6 Supported devices... 6 Know your
E-MANUAL. Thank you for purchasing this Samsung product. To receive more complete service, please register your product at.
 E-MANUAL Thank you for purchasing this Samsung product. To receive more complete service, please register your product at www.samsung.com/register Model Serial No. Contents Quick Guide Using Smart Hub
USER GUIDE 3. For more information visit
 USER GUIDE 3 For more information visit www.caldigit.com Table of Contents Section 1 : General Information Introduction 3 General Use Warnings 3 Safety Warnings 3 System Requirements 4 In the Box 4 TS3
Contents. Quick Guides. Connections. Remote Control and Peripherals. Connecting a Mobile Device. Using Smart Hub
 SMART TV E-Manual Contents Quick Guides Using Smart Hub 1 Connecting to the Internet 1 Setting up Smart Hub 1 Using Smart Hub Using the Samsung Smart Remote 2 Operating the TV with the POINTER button 3
For safe and correct use, be sure to read "Safety Information" before using the machine. Operating Instructions
 For safe and correct use, be sure to read "Safety Information" before using the machine. Operating Instructions TABLE OF CONTENTS Introduction...5 Copyrights to Images...5 Important...5 Notes to Users
CHAPTER 1. SETUP AND SOFTWARE INSTALLATION
 CHAPTER 1. SETUP AND SOFTWARE INSTALLATION CONNECT A GEFORCE-BASED PC TO A 3D TV Use the following procedure to connect your system to a 3D TV: 1. Check the video connectors on your GPU and use the correct
Installation / Set-up of Autoread Camera System to DS1000/DS1200 Inserters
 Installation / Set-up of Autoread Camera System to DS1000/DS1200 Inserters Written By: Colin Langridge Issue: Draft Date: 03 rd July 2008 1 Date: 29 th July 2008 2 Date: 20 th August 2008 3 Date: 02 nd