WARNING. Owner s Record. Customer Support. Attention
|
|
|
- Augustine Fowler
- 6 years ago
- Views:
Transcription
1
2
3 WARNING To reduce the risk of fire or shock hazard, do not expose the unit to rain or moisture. calls when the phone is available. If the phone jack is used for another phone, use the provided splitter. You are cautioned that any changes or modifications not expressly approved in this manual could void your authority to operate this equipment. The Satellite Receiver is intended for use only within the United States. This symbol is intended to alert the user to the presence of uninsulated dangerous voltage within the product s enclosure that may be of significant magnitude to constitute a risk of electric shock to persons. This symbol is intended to alert the user to the presence of important operating and maintenance (servicing) instructions in the literature accompanying the appliance. Note to the Satellite Dish Antenna Installer This reminder is provided to call the Satellite Dish Antenna installer s attention to Article 810 and in particular Article of the NEC (National Electrical Code), which covers proper installation and grounding of television receiving equipment, as well as to Article of the NEC, which specifies that the Satellite Dish Antenna cable ground shall be connected to the grounding system of the building as close to the point of cable entry as practical. Attention Telephone Line Interruption A continuous, land-based phone line connection is required for DIRECTV Pay Per View functionality and sports subscriptions. Periodically, information on your TiVo Service is sent, free of charge, via your telephone line. If you use your telephone during the time the information is being forwarded, you will hear static noise for approximately 30 seconds. It is not necessary to install a separate phone line. Simply plug the receiver into any existing phone jack; it can detect when your phone line is in use and make Local Programming With this Digital Satellite Receiver and the proper Satellite Dish Antenna, you may be able to receive local channels from DIRECTV in certain markets. Additional equipment may be required in some areas. Check with your retailer or visit for information on availability of local channels from DIRECTV in your area Owner s Record The model and serial numbers are located on the back of the Satellite Receiver. Record these numbers in the space provided below. Refer to these numbers whenever you need to call your sales or service representative regarding this product. Model Number: Serial Number: Customer Support For Hardware and Installation To arrange for the installation of your Satellite Receiver, call the dealer from whom you purchased your system. For general information, or to resolve problems related to the operation of your Satellite Receiver, please contact your Sony dealer. If your dealer or installer is unable to answer your questions, call the Sony Direct Response Center at SONY (7669). 3
4 DIRECTV Programming For subscription information and activation, or to resolve problems related to programming, call: DIRECTV at DIRECTV ( ) TiVo Service To use the digital recording features of your Satellite Receiver, you will need to activate the TiVo Service (see the back cover of this Installation Guide or the Viewer s Guide for details). You can activate the TiVo Service through DIRECTV when you activate your programming. Macrovision Information This product incorporates copyright protection technology that is protected by U.S. patents and other intellectual property rights. Use of this copyright protection technology is granted by Macrovision for home and other limited pay per view uses only. Reverse engineering or disassembly is prohibited. Note on Recording Programming Programming may be recorded for home viewing only. All other recording is expressly prohibited. Some programming may not be recorded. An additional recording fee may be applied. Call your program providers for details. Software Downloads Your Satellite Receiver is able to receive upgrades or modifications to some of its features and functions. These modifications will occur automatically, usually at times when the receiver would likely be turned off. A continuous, land-based phone line connection is required in order for your receiver to receive downloads. If your receiver is on when an upgrade or modification is sent, you may experience a disruption in reception for a short period of time. Your reception should return to normal after the modification is complete. Your receiver must be plugged in to receive any upgrades. Do not unplug your receiver while an upgrade is in progress. Trademark, Copyright, and License Information Sony and Remote Commander are trademarks and the Sony Partnership and Express Support are service marks of Sony. DIRECTV, the Cyclone Design logo and DIRECT TICKET are trademarks of DIRECTV Inc., a unit of Hughes Electronics Corp., and are used with permission. TiVo, TiVo Central, and the TiVo logo are trademarks of TiVo Inc TiVo Inc. All rights reserved. TiVo Inc., 2160 Gold Street, Alviso, CA Manufactured under license from Dolby Laboratories. Dolby, the double-d symbol and Pro Logic are trademarks of Dolby Laboratories. Confidential Unpublished Works Dolby Laboratories Inc. All rights reserved. Macrovision is a trademark of Macrovision Corporation. About This Installation Guide This Installation Guide is part of the complete documentation for your Satellite Receiver. This Installation Guide describes how to connect the Satellite Receiver. The Start Here poster provides an easy to read summary of this Installation Guide and includes information on how to activate DIRECTV programming and the TiVo Service. The Viewer s Guide provides detailed information about how to activate and use your DIRECTV Service/TiVo Service, and how to use the different features of this product. A Note provides information that may be necessary to complete the task. A z Tip provides information that may make the task easier to perform. 4
5 Table of Contents Getting Started 6 Overview 7 Carton Contents 8 Parts, Controls, and Functions 8 Front Panel 10 Back Panel 12 Remote Control 15 Installing Batteries Connecting Your Equipment 17 Cables You Can Use 18 Connection Overview 19 Step 1: Connecting the Satellite Dish Antenna and Telephone Line 20 Step 2: Connecting Your TV 21 Step 3: Adding a VCR (Advanced Connection) 22 Step 4: Connecting the IR Controller (Advanced Connection) 23 Step 5: Adding an Audio System (Advanced Connection) 24 Step 6: Connecting the AC Power Cord 25 Step 7: Inserting the Access Card Additional Information 27 Programming Your Remote Control 29 Code Search Method 30 Troubleshooting 36 Specifications 37 FCC Regulations and Information 39 Sony Software License Agreement 41 Limited Warranty Getting Started 5
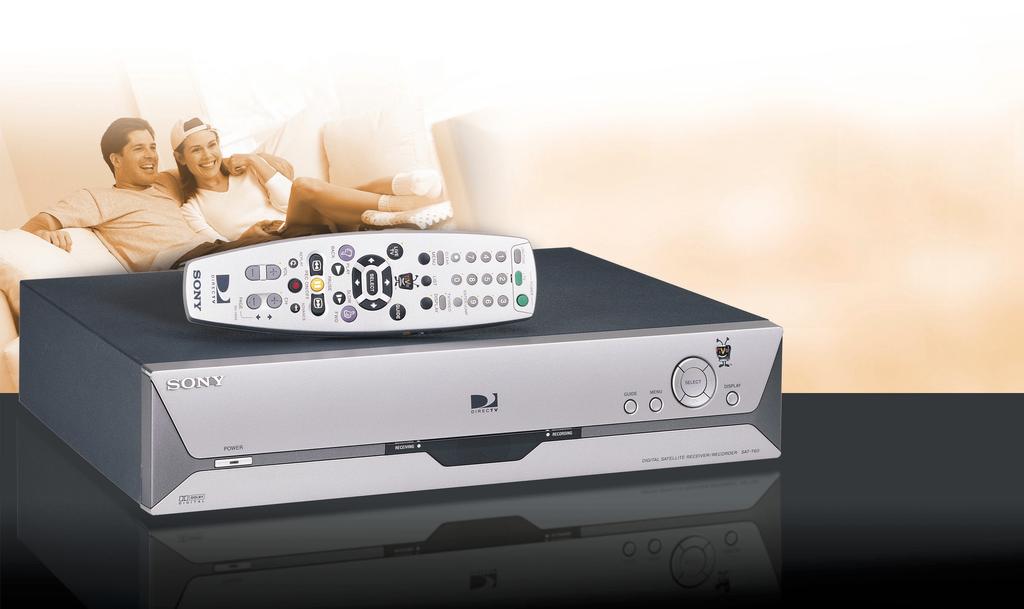
6 Overview Congratulations on your purchase of the Sony SAT-T60 Digital Satellite Receiver/Recorder. You will soon be enjoying total control over your television viewing. To enjoy DIRECTV programming and the TiVo Service, you must complete the following tasks Connect your Satellite Receiver. Use this Installation Guide to help you connect the Satellite Receiver to your other audio/video equipment. Install the Satellite Dish Antenna. Refer to your Satellite Dish Antenna s installation instructions, or have the Satellite Dish Antenna professionally installed. Set up the Satellite Dish Antenna. Refer to the Viewer s Guide to complete the setup of your Satellite Dish Antenna. Activate your services. Call DIRECTV at: DIRECTV ( ) to activate your DIRECTV programming and TiVo Service, then refer to the Viewer s Guide. 6 Overview
7 SELECT POWER Getting Started Carton Contents Check your carton to make sure all of the following items are included. If you are missing any items, contact your Sony dealer. Satellite Receiver/Recorder Remote Control Getting Started Size AA (R6) batteries (2) AC power cord RG-6 Coaxial cable Audio/Video cable S-Video cable IR Control cable Notes Your Satellite Receiver comes with 50 feet of phone cord for you to connect to your nearest phone jack. You don t need a dedicated phone line (your Satellite Receiver only needs to share the phone line for five to ten minutes a day), but you may wish to consider installing a jack nearby. Phone cord Access Card Phone splitter IR Emitters Your Satellite Receiver cannot be used with any digital phone system. Doing so will damage your Satellite Receiver and void your warranty. (Check the Access Card slot in the back panel.) Carton Contents 7
8 Parts, Controls, and Functions Front Panel POWER button Press to turn on/off your Satellite Receiver. The indicator lights when the Satellite Receiver is on. B RECEIVING indicator Yellow indicates that the Satellite Receiver is receiving a signal from the Remote Control. C Remote Control Signal Reception Window Receives control signals from your Remote Control. 8 Parts, Controls, and Functions
9 D RECORDING indicator Red indicates that the Satellite Receiver is recording a program. Yellow indicates that the Satellite Receiver is currently using the telephone line. The indicator may appear orange if the unit is both recording a program and using the telephone line. E Guide button Press to open the Program Guide. F MENU button Press to open the DIRECTV Menu. G / / / /SELECT button Press the / / / buttons to move the highlight within menus and guides. Press SELECT to select the highlighted item. H TiVo button Press to open the TiVo Central Menu. I DISPLAY button Press to open a display that shows information about the current program. When you press this button while viewing the Program Guide, Display Option appears. Getting Started Parts, Controls, and Functions 9
10 Back Panel AC In ACCESS CARD SATELLITE IN 2 1 OPTIONAL REQUIRED TEL LINE CNTRL OUTPUT OUT 2 1 SERIAL IR VIDEO AUDIO L AUDIO R DIGITAL AUDIO OUT (OPTICAL) S-VIDEO CH 3 4 VHF/UHF VHF/UHF IN POWER OFF PASS-THRU ONLY (SAT) OUT VHF/UHF POWER OFF PASS-THRU qa SATELLITE IN jacks Input satellite signals from your Satellite Dish Antenna using RG-6 coaxial cable (not supplied). You must connect a Satellite Dish Antenna to the REQUIRED jack to use your Satellite Receiver. If you have a dual LNB dish, connect an RG-6 coaxial cable from the second LNB to the OPTIONAL jack. B CNTRL (control) OUT SERIAL jack Reserved for future products and applications. C A/V OUTPUT jacks Output audio and video signals to your TV and other audio/video equipment using A/V cables and S-Video cable (supplied). D DIGITAL AUDIO OUT (OPTICAL) jack Outputs digital audio signals to the digital optical input of your audio system. E VHF/UHF IN jack Inputs analog non-satellite signals from your TV antenna or cable TV connection. Some antennas require an adapter (not supplied). 10 Parts, Controls, and Functions
11 F VHF/UHF (SAT) OUT jack Outputs audio and video signals to the VHF/UHF input on your TV or VCR using RF coaxial cable (supplied). The signal from the VHF/UHF IN jack passes through when the power is off. G CH 3 4 switch When you use an RF connection (VHF/UHF (SAT) OUT jack) to your TV, this setting determines the TV channel on which you can view programs from the Satellite Receiver. H CNTRL (control) OUT IR jack Outputs control signals to your Sony VCR so the Satellite Receiver can operate your Sony VCR using the IR controller (supplied). I TEL LINE jack Connects the Satellite Receiver to a telephone outlet using a telephone cord (supplied). J ACCESS CARD slot This is the slot where you insert your DIRECTV Access Card (supplied). After you have inserted the Access Card, do not remove the Access Card unless instructed to do so by your service provider. Caution: Please insert card slowly and insure that it protrudes out about a ¼" from the back panel. Avoid inserting card at an angle as this may cause card to drop inside the receiver. K AC~In jack Inputs AC power from a power outlet using the AC power cord. Getting Started Parts, Controls, and Functions 11
12 Remote Control qa qs qd POWER MUTING TV CLEAR 0 SAT ENTER/JUMP TV/VIDEO MENU LIST DISPLAY LIVE TV GUIDE SELECT PLAY SLOW BACK FWD PAUSE REC ON/OFF REPLAY ADVANCE VOL CH PAGE RM-Y809 qf qg qh qj qk ql w; wa ws wd wf wg wh wj wk 1 MUTING button Mutes the sound of your TV. See Programming Your Remote Control on page 27 to set up the Remote Control to operate your TV. B Number keys Enter numbers for changing channels and entering setup information. Use the delimiter (subchannel) button to select subchannels (for example, 2.1). C CLEAR button Closes the Channel Banner and Status Bar, and clears the text characters you enter in any text entry box. D LIST button Opens the Now Playing List of recorded programs. E MENU button Opens the DIRECTV Menu when the TV/SAT function switch is set to SAT. Opens the TV Menu when the TV/SAT function switch is set to TV. F LIVE TV button Changes to the live programming on the last selected channel. G / / / /SELECT buttons Press the / / / buttons to move the highlight within menus and guides. Press SELECT to select the highlighted item. H Thumbs Down button Use to indicate that you do not like a program. You can apply up to three thumbs down for any program. I PLAY button Plays a program at normal speed. J PAUSE button Pauses playback. Once in pause mode, you can use the BACK and FWD (forward) buttons to reverse or advance frame-by-frame. 12 Parts, Controls, and Functions
13 K BACK button Plays a program in reverse fast search mode. Shows a program in reverse frame-by-frame when in pause mode. Press up to three times to increase the speed of the search or frame-by-frame viewing. L (Instant) REPLAY button Replays the previous eight seconds of the current program. M VOL (volume) +/ buttons Controls the volume of your TV. See Programming Your Remote Control on page 27 to set up the Remote Control to operate your TV or audio system. N POWER/TV button Turns your TV or audio system on and off. See Programming Your Remote Control on page 27 to set up the Remote Control to operate your TV or audio system. O POWER/SAT button Turns the Satellite Receiver on and off. When the power to the Satellite Receiver is off, the antenna (or cable) signal passes through to your TV (see VHF/UHF (SAT) OUT on page 11). P Remote Active indicator Flashes while the Remote Control is transmitting signals or being programmed. Q ENTER/JUMP button Selects the currently entered number as the channel to watch, or jumps back to the previously set channel. R TV/VIDEO button Switches between the various inputs of your TV. See Programming Your Remote Control on page 27 to set up the Remote Control to operate your TV. S DISPLAY button Opens a Channel Banner that shows information about the current program. You can select either the grid-type guide or TiVo guide by pressing this button while the Program Guide is open. continued Getting Started Parts, Controls, and Functions 13
14 T TV/SAT function switch Move up to set the Remote Control to operate your TV functions. When you set this switch to TV, the buttons with a mark operate your Sony TV (see Programming Your Remote Control on page 27). Move down to set the Remote Control to operate the Satellite Receiver functions. U TiVo button Opens TiVo Central, which provides access to features and options. V GUIDE button Opens the Program Guide. W Thumbs Up button Use to indicate that you like a program. You can apply up to three thumbs up for any program. X SLOW button Plays a program in slow speed. Y FWD (forward) button Plays a program in fast search mode. Shows a program frame-by-frame when in pause mode. Press up to three times to increase the speed of the search or frame-by-frame viewing. wh ADVANCE button While watching a live program, pressing this button advances viewing to the current time. While watching a recorded program, pressing this button advances viewing to the end of the program. Press again to go to the beginning of the recorded program. wj REC (record) ON/OFF button Starts or stops recording of the current program. wk CH (channel) +/ or PAGE buttons Changes the Satellite Receiver s channel shown on your TV. Also pages up and down in menus and guides. 14 Parts, Controls, and Functions
15 Installing Batteries Before you can use the Remote Control, you must insert the supplied batteries. If you want to use this Remote Control to operate other audio/video equipment, such as a TV or stereo, you must program the Remote Control (see page 27). 1 Pull the latch and lift the cover to open the battery compartment. Getting Started 2 Insert two size AA batteries (supplied). Be sure to match the + and marks on the batteries with the + and marks inside the battery compartment. Notes When the batteries become weak, the Remote Active indicator flashes. If the Remote Control does not work properly, the batteries may be weak. When replacing batteries, replace both batteries with new ones. Do not mix different types of batteries together. 3 Close the cover. Insert the tabs on the cover into the gaps in the rear of the battery compartment. Then, lower the cover onto the Remote Control until you hear the latch click. Parts, Controls, and Functions 15
16
17 Connecting Your Connecting Your Equipment Cables You Can Use Below is a description of the cables you can use to make connections. Not all cables are supplied with your Satellite Receiver (see page 7). Coaxial (RF) Cable with F-type connectors (not supplied) for VHF/UHF jacks Use the VHF/UHF IN jack to receive signals from a TV antenna or from a cable TV connection. You can also use the VHF/UHF (SAT) OUT jack to send audio and video signals to your TV or VCR. RG-6 Coaxial Cable with F-type connectors for SATELLITE IN jacks Use the SATELLITE IN jacks to receive signals from DIRECTV Satellites through your Satellite Dish Antenna. Audio/Video Cables with RCA-type plugs for Audio/Video (A/V) jacks Use the audio/video jacks to send good quality analog video and stereo audio signals. Connecting Your Equipment S-Video Cables with S-Video plugs for S-VIDEO jacks Use the S-VIDEO jack to send excellent quality analog video signals. Optical Cable with Optical plug (not supplied) for DIGITAL AUDIO (OPTICAL) jack Use the DIGITAL AUDIO OUT (OPTICAL) jack to send excellent quality audio signals to a Dolby Digital receiver. RJ-11 Phone Cord for TEL LINE jack Use the TEL LINE jack to connect to a telephone outlet. Periodically, information on your DIRECT TICKET, Pay Per View selections, and TiVo Service is sent, free of charge, via your telephone line. 17
18 Connection Overview Notes Before you begin connecting your Satellite Receiver, unplug all of your audio/video equipment from the power outlet to reduce the possibility of shock hazard. This section explains the basic steps for connecting the Satellite Receiver. Your programming source signal(s) and equipment may allow for other connection possibilities. If you have any questions, refer to the operating instructions for that equipment or contact your programming provider(s). Follow the procedures or make the connections in each of the steps to connect your Satellite Receiver to your other audio/video equipment. Step 1: Connecting the Satellite Dish Antenna and Telephone Line Page 19 v Step 2: Connecting Your TV Page 20 v Step 3: Adding a VCR (Advanced Connection) Page 21 v Step 4: Connecting the IR Controller (Advanced Connection) Page 22 v Step 5: Adding an Audio System (Advanced Connection) Page 23 v Step 6: Connecting the AC Power Cord Page 24 v Step 7: Inserting the Access Card Page 25 18
19 Step 1: Connecting the Satellite Dish Antenna and Telephone Line You must connect a DIRECTV Satellite Dish Antenna to the SATELLITE IN REQUIRED jack to use your Satellite Receiver. 1 2 Connect the SATELLITE IN REQUIRED jack to your Satellite Dish Antenna using RG-6 coaxial cable (not supplied). Connect the TEL LINE jack to a telephone line wall jack using the supplied telephone cord. Note Your Satellite Dish Antenna installation manual provides detailed instructions on how to install RG-6 coaxial cable from your Satellite Dish Antenna. You must connect the TEL LINE jack to a telephone line wall jack to use the DIRECTV and TiVo Service. AC In If you have a dual LNB dish, connect the RG-6 coaxial cable from the second LNB to the OPTIONAL jack. Satellite Receiver ACCESS CARD SATELLITE IN 2 1 OPTIONAL REQUIRED 1 TEL LINE RG-6 Coaxial Cable from Satellite Dish Antenna CNTRL OUTPUT OUT 2 1 SERIAL IR AUDIO R AUDIO L VIDEO DIGITAL AUDIO OUT (OPTICAL) S-VIDEO VHF/UHF CH 3 4 VHF/UHF IN POWER OFF PASS-THRU ONLY (SAT) OUT VHF/UHF POWER OFF PASS-THRU Connecting Your Equipment 2 CAUTION Only connect your authorized Satellite Dish Antenna to the SATELLITE IN jack as described in the Installation Instructions. Connecting any other equipment to this jack could result in damage to the equipment and/or receiver. Telephone Cord 19
20 1 If you have a local TV antenna or cable company service Connect it to the VHF/UHF IN jack on your Satellite Receiver using a coaxial cable or RF adapter (not supplied). You can view local stations using your TV controls when the power to the receiver is off. Note You must use the VHF/UHF (SAT) OUT jack to connect to your TV or VCR when a local TV antenna or cable company service is connected to the VHF/UHF IN jack (see 2c below and 1c on page 21). When the power to the Satellite Receiver is off, the antenna signal passes through to your TV. Step 2: Connecting Your TV Connect your TV to the Satellite Receiver as shown below. Satellite Receiver AC In ACCESS CARD SATELLITE IN 2 1 OPTIONAL REQUIRED TEL LINE CNTRL OUTPUT OUT 2 1 SERIAL IR AUDIO R AUDIO L VIDEO Coaxial Cable DIGITAL AUDIO OUT (OPTICAL) S-VIDEO 1 VHF/UHF CH 3 4 VHF/UHF IN POWER OFF PASS-THRU ONLY (SAT) OUT VHF/UHF POWER OFF PASS-THRU 2a If your TV has A/V input jacks Connect the AUDIO/VIDEO OUTPUT jacks on your Satellite Receiver to the A/V input jacks on your TV using the supplied A/V cable. If your TV has only one audio input, connect it to the AUDIO L jack on the receiver. (Be sure to match the colors on the jacks with the colored plugs on the A/V cable.) A/V Cable 2a 2b 2c 2b If your TV has an S-Video input Use the S-Video cable instead of the yellow video connection shown in 2a. S Video Cable 20 2c If your TV does not have A/V jacks Connect the VHF/UHF (SAT) OUT jack to the VHF/UHF input jack on your TV using coaxial cable. Notes With this connection, your input source is channel 3 or channel 4 on your TV depending on how you set the CH 3 4 switch on the Satellite Receiver. If you connect using 2a or 2b, you can connect your local TV antenna or cable company service to the TV s VHF/UHF input directly. IN TV S VIDEO VIDEO L(MONO) R -AUDIO- VHF/UHF Coaxial Cable
21 Step 3: Adding a VCR (Advanced Connection) 1a 1b If your TV and VCR have A/V jacks Connect the AUDIO/VIDEO OUTPUT jacks of your Satellite Receiver to the A/V input jacks of your VCR using the supplied A/V cable. Then, connect the A/V output jacks of your VCR to the A/V input jacks of your TV using an A/V cable. (Be sure to match the colors on the jacks with the colored plugs on the A/V cable.) If your TV and VCR have S-Video jacks Use an S-Video cable (supplied) instead of the yellow video connection shown in 1a. z Tip To allow your Satellite Receiver to control the recording functions of your Sony VCR, see Step 4: Connecting the IR Controller (Advanced Connection) on page 22. You can save recorded programs by adding a VCR. Satellite Receiver AC In ACCESS CARD SATELLITE IN 2 1 OPTIONAL REQUIRED A/V Cable TEL LINE CNTRL OUTPUT OUT 2 1 SERIAL S Video Cable IR 1a AUDIO R AUDIO L VIDEO 1b DIGITAL AUDIO OUT (OPTICAL) S-VIDEO CH 3 4 VHF/UHF IN VHF/UHF POWER OFF PASS-THRU ONLY (SAT) OUT VHF/UHF POWER OFF PASS-THRU 1c Connecting Your Equipment 1c If your TV and VCR do not have A/V jacks Connect the VHF/UHF (SAT) OUT jack on the Satellite Receiver to the VHF/UHF input jack on your VCR using coaxial cable. Then, connect the VHF/UHF output jack on your VCR to the VHF/UHF input jack on your TV using coaxial cable. Set the CH 3 4 switch of your VCR to the channel that does not carry broadcasts in your area. Note With this connection, your input source is channel 3 or channel 4 depending on how you set the CH 3 4 switch on your VCR. 1a AUDIO VIDEO S VIDEO LINE IN LINE OUT 1b A/V Cable IN OUT 1c VCR S Video Cable Coaxial Cable TV IN S VIDEO VIDEO L(MONO) -AUDIO- R Coaxial Cable VHF/UHF 21
22 Step 4: Connecting the IR Controller (Advanced Connection) If you connected a Sony VCR in Step 3, you can let the Satellite Receiver control recording functions by connecting the IR (Infrared) Controller. Satellite Receiver AC In ACCESS CARD SATELLITE IN 2 1 OPTIONAL REQUIRED TEL LINE CNTRL OUTPUT OUT 2 1 SERIAL IR VIDEO AUDIO L AUDIO R DIGITAL AUDIO OUT (OPTICAL) S-VIDEO VHF/UHF CH 3 4 VHF/UHF IN POWER OFF PASS-THRU ONLY (SAT) OUT VHF/UHF POWER OFF PASS-THRU 1 Connect the IR Controller to the IR CNTRL OUT jack on the Satellite Receiver. 1 2 Place the IR Controller under and in front of the VCR. The IR Controller must extend just in front of the infrared sensor of the VCR. IR Controller z Tip If the infrared sensor is not marked on your Sony VCR, refer to your VCR s operating instructions. IR Sensor VCR (front view) 2 1 /2" to 1" IR Controller 22
23 Step 5: Adding an Audio System (Advanced Connection) You can connect your Satellite Receiver to an audio system for enhanced sound enjoyment. Audio System 1a 1b If you have a stereo or Dolby Pro Logic audio system Connect the AUDIO R and L jacks on the Satellite Receiver to the audio inputs of your audio system. If you have a digital or Dolby Digital audio system Connect the DIGITAL AUDIO OUT (OPTICAL) jack on the Satellite Receiver to the optical digital input of your audio system. z Tip If you connect your Satellite Receiver to a Dolby Digital receiver, refer to the Viewer s Guide for more information on how to set up Dolby Digital. Satellite Receiver AC In ACCESS CARD SATELLITE IN 2 1 OPTIONAL LINE OUT LINE IN 1a REQUIRED TEL LINE AUDIO CNTRL OUTPUT OUT 2 1 SERIAL IR Stereo Cable OPTICAL IN AUDIO R AUDIO L VIDEO 1b Optical Cable DIGITAL AUDIO OUT (OPTICAL) S-VIDEO VHF/UHF CH 3 4 VHF/UHF IN POWER OFF PASS-THRU ONLY (SAT) OUT VHF/UHF POWER OFF PASS-THRU Connecting Your Equipment 23
24 Step 6: Connecting the AC Power Cord After all other connections are complete, connect the AC power cord to the Satellite Receiver and a power outlet. Satellite Receiver AC In ACCESS CARD SATELLITE IN 2 1 OPTIONAL REQUIRED TEL LINE CNTRL OUTPUT OUT 2 1 SERIAL IR VIDEO AUDIO L AUDIO R DIGITAL AUDIO OUT (OPTICAL) S-VIDEO VHF/UHF CH 3 4 VHF/UHF IN POWER OFF PASS-THRU ONLY (SAT) OUT VHF/UHF POWER OFF PASS-THRU AC Power Cord to power outlet 24
25 Step 7: Inserting the Access Card You must verify that the Access Card is securely inserted into your Satellite Receiver to make your DIRECTV service available. Refer to the Access Card for instructions on which direction to insert the card. Satellite Receiver AC In ACCESS CARD SATELLITE IN 2 1 OPTIONAL REQUIRED TEL LINE CNTRL OUTPUT OUT 2 1 SERIAL IR VIDEO AUDIO L AUDIO R DIGITAL AUDIO OUT (OPTICAL) S-VIDEO VHF/UHF CH 3 4 VHF/UHF IN POWER OFF PASS-THRU ONLY (SAT) OUT VHF/UHF POWER OFF PASS-THRU Connecting Your Equipment Access Card Installation is complete After you insert the Access Card, the installation of your Satellite Receiver is complete. The remaining steps you must complete to begin enjoying your Satellite Receiver are: Install your Satellite Dish Antenna outside your home. Refer to the Satellite Dish Antenna installation manual. Aim the Satellite Dish Antenna to get the strongest possible signal. Refer to the Viewer s Guide. Activate DIRECTV programming and TiVo Service. Refer to the Viewer s Guide and call DIRECTV ( ). 25
26
27 Additional Information Additional Information Programming Your Remote Control You must complete Guided Setup in the Viewer s Guide before you can program your Remote Control. You can program your Remote Control to operate your TV s power, muting, volume, and change the TV s input source using the TV/VIDEO button. You can also program your Remote Control to operate the volume of your audio system if your audio system is connected to your TV. Remote Setup PTV Remote TV PTV Remote A/V Stereo System Follow these steps to program your Remote Control using the on-screen Code Entry method. If this method does not work, try the Code Search method (page 29). 1 2 Start at TiVo Central or the DIRECTV Menu. Press the TiVo button to go to TiVo Central, or press the MENU button to go to the DIRECTV Menu. Open Remote Control Setup using the / / / /SELECT buttons. Notes The actual screens that appear may be different from those shown in this manual. This Remote Control cannot operate your VCR. Use your VCR s remote to operate your VCR. a)highlight and select Messages & Setup. The Messages & Setup screen appears. b)highlight and select Receiver and Phone Setup. c)highlight and select Remote Control Setup. The Television Brand screen appears. Additional Information continued Programming Your Remote Control 27
28 SELECT POWER TV Television Brand Press SELECT to choose your TV brand and continue. SEARS SHARP SIEMENS SIGNATURE SONY SOUNDESIGN FPO Codes for SONY FPO Possible codes for this device are: 0043, 0067, 0075, 0117, 0130, 0136, 0170 Program your TV PWR, VOL, and MUTE buttons: Point the PTV Remote away from the Recorder and hold down the TV PWR and TIVO buttons on the Remote for 5 sec. Enter the first code using the numbers on the Remote. Test the TV PWR button. If it doesn't work, try the next code. MUTING TiVo Button POWER/TV SAT Highlight and select your TV brand using the / / / /SELECT buttons. The available codes for your TV brand appear. Enter the Remote Control code. a)cover the IR emitter on the front end of the Remote Control. This prevents the Remote Control from operating your Satellite Receiver while you program the Remote Control. b)press and hold the TiVo and POWER/TV buttons at the same time until the Remote Active indicator lights (about three seconds), then release the buttons. The indicator remains lit. c)use the number keys to enter one of the four-digit codes listed for your TV brand. The indicator flashes three times, indicating that you entered the code correctly. d)test the code by aiming your Remote Control at the TV and pressing the POWER/TV button. If the TV turns off, you have programmed the correct code. e)if the Remote Control did not turn off your TV, repeat steps 4a through 4d and try the next code listed for your TV. Note If you connected an audio system to your Satellite Receiver, you can program the Remote Control s POWER/TV, VOL (volume) and MUTING buttons to operate your audio system rather than your TV. In step 2c on the previous page, select Remote A/V Stereo System, and continue the procedure. 28 Programming Your Remote Control
29 Code Search Method The Remote Control has hundreds of available codes. The correct code for your TV might be available, even if it is not listed for your TV brand in the on-screen Code Entry method. 1 Set the Remote Control to Code Search mode. a)press and hold the TiVo and POWER/TV buttons at the same time until the Remote Active indicator lights (about three seconds), then release the buttons. The indicator remains lit. b)using the number keys on the Remote Control, enter Test the code. a)aim the Remote Control at the TV, press POWER/TV and see if the TV turns off or on. b)if the TV does turn off and on, press MUTING and VOL (volume) +/ to make sure they operate the TV. If these buttons operate the TV, go to step 4 below. Notes The Code Search method automatically programs the POWER/TV, VOL +/, and MUTING buttons on the Remote Control. If you have an audio system connected to the Satellite Receiver, you can program the POWER/TV button on the Remote Control to turn on and off both the audio system and your TV. To do so, use code 1999 instead of 0999 in step 1b. To reset the Remote Control back to the manufacturer s settings, enter code 0981 in step 1b. 3 4 Press the CH (channel) + button to cycle to the next code, then test the code by repeating step 2 above. The Remote Control has hundreds of available codes. If the Remote Active indicator goes out, you have tested all of the codes. Press ENTER to set the code and exit Code Search mode. Press CLEAR to exit Code Search mode without setting a new code. Additional Information Programming Your Remote Control 29
30 Troubleshooting DIRECTV, TiVo and Sony are dedicated to providing you with quality support and customer service. If you have any questions or difficulties, first refer to the troubleshooting section in each manual. If you still need help, see below for the appropriate customer service department to contact: Contact Sony at SONY (7669) if you need assistance with: Connecting your Satellite Receiver with your TV and other A/V equipment. Initial Guided Setup difficulties (e.g. phone calls failing). Programming the Remote Control to control your TV or A/V equipment. A system that does not function properly after restart. Questions about your Limited Warranty. Contact DIRECTV and TiVo customer support at DIRECTV ( ) if you need assistance with: Activating DIRECTV programming. Activating or using a feature of the TiVo Service. Getting correct Program Guide data. Understanding an on-screen message from TiVo regarding your TiVo Service account. You can also refer to the FAQ s listed in the web sites below. DIRECTV: TiVo: Sony: or at custserv@info.sel.sony.com When you call DIRECTV, you will need to reference your account number and/or Access Card number. When you call either DIRECTV or Sony, you will need to reference your model and serial number located on the inside of the back cover of the Viewer s Guide. 30 Troubleshooting
31 Symptom My Satellite Receiver isn t making the setup phone calls. Solution Do not use a wireless phone connection. Verify that your phone line is working by disconnecting the phone cord from your Satellite Receiver, connecting it to a phone, and checking for a dial tone. Make sure the phone cord is connected to the Satellite Receiver and the wall jack. If you are getting a busy signal when connecting, try another local dial-in number from the Dial-In Number screen or try the call during off peak hours, before 3 pm or after 11 pm. Try changing your phone dialing options by following the steps below. After making changes to phone dialing options, make a test call (press the TiVo button to go to TiVo Central, then choose Messages & Setup, then Receiver & Phone Setup, then Phone Connection and select Make Test Call ). If you have voice mail or other non-standard dial tone, press the TiVo button to go to TiVo Central, then choose Messages & Setup, then Receiver & Phone Setup, then Phone Connection, then Change Dialling Options and turn off dial tone detection. If you have call waiting, press the TiVo button to go to TiVo Central, then choose Messages & Setup, then Receiver & Phone Setup, then Phone Connection, then Change Dialling Options and disable call waiting by entering the correct prefix in Call Waiting Prefix (usually *70, ). If you use a dial prefix for outside lines, press the TiVo button to go to TiVo Central, then choose Messages & Setup, then Receiver & Phone Setup, then Phone Connection, then Change Dialing Options and set the Dial Prefix (for example, 9, ). Additional Information continued Troubleshooting 31
32 Symptom My Satellite Receiver isn t making the setup phone calls. (continued) When I turn on my TV, Searching for Satellite Signal... appears. Solution If you have a low-voltage phone line, press the TiVo button to go to TiVo Central, then choose Messages & Setup, then Receiver & Phone Setup, then Phone Connection, then Change Dialling Options and turn off phone availability detection. If you have a caller ID box, try removing it from the line since some models interfere with the Satellite Receiver modem s ability to make a call. If you use a fax machine or computer modem connected to the same phone line, make sure they are not using the line while your Satellite Receiver is trying to make a call. It could be that you have too much line noise to make a connection. The Satellite Receiver ships with a 50 foot cord. try a shorter cord, or you can buy a line noise filter at your local electronics store. Your Satellite Receiver is having trouble tuning to the channel you are on. Follow these steps to restore the video: Try changing channels. If you see the same message on every channel, your video cable may not be connected. Check to make sure all the satellite connections on the back of your Satellite Receiver are secure. Disconnect the AC power cord, wait 15 seconds, then connect the AC power cord again. Try using another set of video cables to determine if one of your cables is not working. Check the position of the dish antenna. 32 Troubleshooting
33 Symptom Audio/Video is out of sync. I do not see the Welcome Screen when I turn on my Satellite Receiver for the first time. Solution Try changing channels. Press the PAUSE button on the Remote Control, press the BACK button to move back a frame or two, then press PAUSE again to resume play. Press the MENU button to go to the DIRECTV Menu, then press the LIVE TV button to return to live television. Disconnect the AC power cord, wait 15 seconds, then connect the AC power cord again. If you are using your stereo to reproduce the audio portion of the program, it must be hooked up to the Satellite Receiver to avoid an audio/video delay. If you are using Composite Video and L/R Audio cables or S-Video cables, make sure your TV is displaying the appropriate video source. You may need to use the Input, Source, Select, or TV/Video button on your TV to change video sources. If you are having trouble changing the video source, refer to the instructions that came with your TV. If you used coaxial RF cable to connect your Satellite Receiver, make sure you are viewing the same channel (3 or 4) that you selected using the switch on the back of your Satellite Receiver. If your Satellite Receiver is connected to a VCR using coaxial RF cable, make sure the VCR s input is set to the same channel (3 or 4) that you selected using the switch on the back of your Satellite Receiver. If your Satellite Receiver is connected to an A/V receiver or switch box, try connecting it directly to the TV instead. Make sure cables are connected from the output jack of one device to the input jack of another device. Cables should never be connected from output jack to output jack or input jack to input jack. Additional Information continued Troubleshooting 33
34 Symptom I do not see the Welcome Screen when I turn on my Satellite Receiver for the first time. (continued) I m having trouble watching antenna or cable channels. I m having trouble using my Satellite Receiver to record antenna or cable channels. Solution The cables you are using to connect your Satellite Receiver to your TV or other equipment may be damaged or defective. Try exchanging the cables connected to the Satellite Receiver with other cables that you know are working properly. If you have connected the antenna or cable directly to your TV, make sure your TV is using the correct video source. Use the Input, Source, Select, or TV/Video button on your Remote Control (if programmed), or your TV, or your TV remote control to change to change the video source. Some TVs also have a Menu button that allows you to change the video source using an on-screen menu. If you are having trouble changing the video source, refer to the instructions that came with your TV. If you have the antenna or cable connected to your Satellite Receiver, make sure the Satellite Receiver is in standby mode by pressing the POWER button on the front of the Satellite Receiver or POWER/SAT on the Remote Control. The green power light on the front of the Satellite Receiver goes out when the Satellite Receiver is in standby mode. While you are watching antenna or cable channels you will be unable to use DIRECTV and TiVo functions (such as purchasing pay per view programs, using parental controls, viewing on-screen program guides, or pausing live TV). The Satellite Receiver only records DIRECTV Channels. You can watch antenna or cable channels while recording DIRECTV channels. However, you will not be able to use your Satellite Receiver to record cable or antenna channels. 34 Troubleshooting
35 Symptom My Remote Control is not working properly. I m having problems with my Access Card. Solution Make sure that the batteries are inserted correctly. Try removing the batteries and reinserting them without touching any buttons on the Remote Control. Replace the batteries with new ones. If you are watching antenna or cable channels, you must set the TV/SAT switch on the Remote Control to TV. If you are using the Remote Control to operate your TV, stereo, or A/V receiver, make sure you have programmed the Remote Control properly. Make sure the Access Card is inserted properly. If the card is not protruding at least one quarter inch from the back panel of the Satellite Receiver, the Access Card has been inserted incorrectly. If you are replacing an existing Satellite Receiver, make sure you are using the Access Card that came with this Satellite Receiver, not the Access Card that was used your old Satellite Receiver. Additional Information Troubleshooting 35
36 Specifications Inputs and outputs Video Out S-Video 4-pin mini DIN (1) Composite Video RCA (2) Audio Line Out Stereo L/R RCA (2 pairs) Satellite In F-connector Female (2) VHF/UHF In F-connector Female (1) VHF/UHF (SAT) Out F-connector Female (1) Digital Audio Out Optical (1) Telephone RJ-11 female, 2 wire (1) Control Out 3.5 mm mini jack sockets (2) General Power requirements 120 V AC, 60 Hz Power consumption 60 W Operating temperature 21 C to 45 C (70 F to 113 F) Operating Humidity 5% to 80% Dimensions Approx mm (w/h/d) (Approx /16 inches) including projecting parts and controls Mass Approx. 4.6 kg (10 lbs) Supplied accessories Remote Control (1) Size AA (R6) batteries (2) AC power cord (1) RF Coaxial cable (1) Audio/Video cable (1) IR Control cable (1) S-Video cable (1) Phone cord (1) Phone splitter (1) Access Card (1) Optional Sony-brand Digital Satellite Receiver Accessories Local TV Antenna ANJ-AA1 Installation Kit ANJ-DS2 Amplifier EAC-DA1 Diplexer EAC-DD1 Voltage Switch EAC-DV2 Satellite Dish Antenna SAN-18D3 SAN-24MD1 36 Specifications
37 This device complies with Part 68 of the FCC rules. The FCC Part 68 label is located on the back of this product. This label contains the FCC number for this equipment and the Ringer Equivalence Number (REN). If requested, this information must be provided to your telephone company. FCC Regulations and Information Your Satellite Receiver has been registered by the Federal Communication Commission (FCC) as not being harmful to the telephone network when connected directly to the telephone lines. In order to fully comply with the Rules of the FCC, the following instructions should be read carefully and followed completely where applicable: 1 The Federal Communication Commission (FCC) has established Rules which permit this device to be directly connected to the telephone network. Standardized jacks are used for these connections. This equipment should not be used on party lines or coin phones. 2 If this device is malfunctioning, it may also be causing harm to the telephone network; this device should be disconnected until the source of the problem can be determined and until repair has been made. If this is not done, the telephone company may temporarily disconnect service. 3 The telephone company may make changes in its technical operations and procedures; if such changes affect the compatibility or use of this device, the telephone company is required to give adequate notice of the changes. You will be advised of your right to file a complaint with the FCC. 4 If the telephone company requests information on what equipment is connected to their lines, inform them of: a. The telephone number to which this unit is connected. b. The ringer equivalence number. c. The USOC jack required. d.the FCC Registration Number. 5 Items (b) and (d) are indicated on the label. The Ringer Equivalence Number (REN) is used to determine how many devices can be connected to your telephone line. In most areas, the sum of the RENs of all devices on any one line should not exceed five (5). If too many devices are attached, they may not ring properly. Additional Information FCC Regulations and Information 37
38 Service Requirements In the event of equipment malfunction, all repairs should be performed by Sony or an authorized agent. It is the responsibility of users requiring service to report the need for service to our company or to one of our authorized agents. For service, call SONY (7669). Declaration of Conformity Trade Name: Sony Model No.: SAT-T60 Responsible Party: Sony Electronics Inc. Address: 1 Sony Drive, Park Ridge, NJ USA Telephone No.: This device complies with Part 15 of the FCC rules. Operation is subject to the following two conditions: (1) This device may not cause harmful interference, and (2) this device must accept any interference received, including interference that may cause undesired operation. Radio Interference Information This equipment has been tested and found to comply with the limits for a Class B digital device, pursuant to Part 15 of the FCC Rules. These limits are designed to provide reasonable protection against harmful interference in a residential installation. This equipment generates, uses and can radiate radio frequency energy and, if not installed and used in accordance with the instructions, may cause harmful interference to radio communications. However, there is no guarantee that interference will not occur in a particular installation. If this equipment does cause interference to radio or television reception (which you can determine by turning the equipment off and on), you are encouraged to try to correct the interference by one or more of the following measures: Reorient or relocate the receiving antenna (the antenna for radio or television that is receiving the interference) Change the position of the Satellite Receiver with respect to the radio or television equipment that is receiving the interference Move the Satellite Receiver away from the equipment that is receiving the interference Plug the Satellite Receiver into a different outlet so that the Satellite Receiver and the equipment receiving the interference are on different branch circuits Shielded I/O cable and cords must be used for this equipment to comply with the relevant FCC regulations. Changes or modifications not expressly approved in writing by Sony Electronics, Inc., void the user s authority to operate this equipment. If these measures do not eliminate the interference, you should consult your Satellite Receiver dealer or an experienced radio/television technician for additional suggestions. In addition, you may find the following booklet prepared by the Federal Communications Commission helpful: How to Identify and Resolve Radio-TV Interference Problems. This booklet is available from the U.S. Government Printing Office, Washington, D.C., Stock No FCC Regulations and Information
39 Sony Software License Agreement ATTENTION: USE OF THE SOFTWARE IS SUBJECT TO THE SONY SOFTWARE LICENSE TERMS SET FORTH BELOW. USING THE SOFTWARE OR THE PRODUCT IN WHICH IT IS INCORPORATED INDICATES USER S ACCEPTANCE OF THESE LICENSE TERMS. IF THE USER DOES NOT ACCEPT THESE LICENSE TERMS, THE USER SHOULD IMMEDIATELY RETURN THE ENTIRE PRODUCT IN ITS ORIGINAL PACKING IN ORDER TO RECEIVE A FULL REFUND OF THE PURCHASE PRICE. License and Restrictions Sony Electronics Inc. ( Sony ) grants User a license to Use one copy of the software which is provided to you as part of this Sony product ( Software ). Use means storing, loading, installing, executing or displaying the Software. User may not copy, modify the Software or disable any licensing or control features of the Software. No portion of the Software may be reproduced in any form, or by any means, without prior written permission from Sony. User is not permitted to modify, distribute, publish, transmit or create derivative works of any Software included for any public or commercial purposes. In consideration of this authorization, User agrees that any copy of this Software which User makes shall retain all copyright and other proprietary notices in the same form and manner as on the original. Except as specified above, nothing contained herein shall be construed as conferring by implication, estoppel or otherwise any license or right under any patent, trademark or copyright of Sony, its affiliates or any third party licensor. User may not in any way sell, lease, rent, license, sublicense or otherwise distribute the Software. The Software may only be accessed by the functionality of the Sony product in which the Software is incorporated by Sony (the Product(s) ), and a User shall not intentionally make the Software directly accessible to others or to hardware other than the Products, or otherwise expose an API. Nothing in this Agreement grants User any rights, license or interest with respect to source code of the Software. User shall not modify, translate, reverse engineer, decompile or disassemble the Software or any part thereof or otherwise attempt to derive source code or create derivative works therefrom, and shall not authorize any third party to do any of the foregoing unless Sony's prior written consent is obtained. Sony may elect to provide to User updates and other support services for the licensed Software. All updates provided to User shall constitute licensed Software under this License, and such updates shall be governed by the terms hereof. Intellectual Property The Software is owned and copyrighted by Sony, its affiliates or its third party licensors. User's license confers no title or ownership in the Software and is not a sale of any rights in the Software. Sony's affiliates and/or third party suppliers may protect their rights directly in the event of any User's violation of this Agreement. The trademarks, tradenames, Product designation, logos and service marks ( Marks ) displayed with this Software are the property of Sony, its affiliates or third party licensors, and User shall acquire no rights of any kind in or to any Mark under which the Software and/or Products are marketed. User is not permitted to use these Marks without the prior written consent of Sony, its affiliates or the applicable third party licensor which may own the Mark. Sony is a registered trademark of Sony Corporation. User agrees not to remove, alter or destroy any patent, trademark or copyright markings or notices placed upon or contained within the Software, User Manuals or documentation. User further agrees to insert and maintain with the Software and any documentation a copyright notice in User's name. Termination User's license will automatically terminate upon any transfer of the Product. Upon transfer, User must deliver the Software, including any copies and related documentation, to the transferee. The transferee must accept these License Terms as a condition to the transfer. Otherwise, Sony does not authorize the transfer and the User and transferee will be in violation of this Agreement should the transferee use the Product. This license will automatically terminate upon User's failure to comply with any of these License Terms. Upon termination, User must stop using the Product and immediately destroy the Software, together with all copies, adaptations and merged portions in any form and/or return it to Sony. Export Requirements and U.S. Government Restricted Rights User may not export or re-export the Software or any copy or adaptation in violation of any applicable laws or regulations. The Software and documentation have been developed entirely at private expense and are provided as Commercial Computer Software - Restricted Rights in accordance with FAR (1987) or limited rights in technical data in accordance with FAR (1987). User has only those rights provided for such Software and documentation by the applicable FAR or DFARS clause or this Sony Software License Agreement. Sony Software License Agreement 39
Activate and install your Sony SVR Complete Guided Setup. Use the TiVo service it's easy!
 Activate and install your Sony SVR-3000 Complete Guided Setup Use the TiVo service it's easy! STEP 1 Activate and install Let s get started! This guide describes the basics for setting up your new Sony
(1) Remote Commander. Operating Instructions RM-SC by Sony Corporation 1 RM-SC E
 Remote Commander. Operating Instructions RM-SC by Sony Corporation 1 RM-SC E") -858-0-11(1) Remote Commander Operating Instructions RM-SC200 199 by Sony Corporation 1 WARNING This equipment has been tested and found to comply with the limits for a Class B digital device, pursuant
-858-0-11(1) Remote Commander Operating Instructions RM-SC200 199 by Sony Corporation 1 WARNING This equipment has been tested and found to comply with the limits for a Class B digital device, pursuant
Owner s Manual D DIRECTV Receiver User s Guide. DIRECTV, Inc. 2230E Imperial Hwy El Segundo, CA Telephone: DIRECTV ( )
") DIRECTV, Inc. 0E Imperial Hwy El Segundo, CA 90 Telephone: 800 DIRECTV (7-88) MF8-00A-0 D0-00... DIRECTV Receiver User s Guide Owner s Manual Warning! Important Safety Instructions Important Safety Information
DIRECTV, Inc. 0E Imperial Hwy El Segundo, CA 90 Telephone: 800 DIRECTV (7-88) MF8-00A-0 D0-00... DIRECTV Receiver User s Guide Owner s Manual Warning! Important Safety Instructions Important Safety Information
Wireless Sound Bar *MFL * SIMPLE MANUAL
 ENGLISH SIMPLE MANUAL Wireless Sound Bar To view the instructions of advanced features, visit http://www.lg.com and then download Owner s Manual. Some of the content in this manual may differ from your
Evolution Digital HD Set-Top Box Important Safety Instructions
 Evolution Digital HD Set-Top Box Important Safety Instructions 1. Read these instructions. 2. Keep these instructions. 3. Heed all warnings. 4. Follow all instructions. 5. Do not use this apparatus near
Receiver Description and Installation
 Receiver Front Panel Smart Card Door Behind this door is a slot for a future smart card. No smart card is included with this receiver. Arrow Buttons Use the ARROW buttons to change channels on the nearby
Integrated Remote Commander
 3-244-192-12 (1) Integrated Remote Commander Operating Instructions RM-VL1000 2002 Sony Corporation WARNING To prevent fire or shock hazard, do not expose the unit to rain or moisture. To avoid electrical
User Guide. QIP2500 Series Set-Top Terminal
 User Guide QIP2500 Series Set-Top Terminal CAUTION RISK OF ELECTRIC SHOCK CAUTION: TO REDUCE THE RISK OF ELECTRIC SHOCK, DO NOT REMOVE COVER (OR BACK). NO USER-SERVICEABLE PARTS INSIDE. REFER SERVICING
User Guide. Centrex Recording Interface
 User Guide Centrex Recording Interface Table of Contents Introduction... 2 The Meridian Business Set... 3 Key Numbering Plan (18 button add-on)... 4 Key Numbering Plan (36 button add-on)... 5 Key Numbering
ZXV10 B760H ZXV10 B760E RichMedia Box User Guide
 ZTE CORPORATION NO.55,Hi-techRoadSouth,ShenZhen,P.R.China Postcode:518057 Tel: (86) 755 26771900 800-9830-9830 Fax: (86) 755 26772236 URL: http://support.zte.com.cn E-mail: doc@zte.com.cn ZXV10 B760H ZXV10
Model 1421 Distribution Amplifier
 Model 1421 Distribution Amplifier Installation and Operating Instructions The 1421 Distribution Amplifier provides four independent, wide bandwidth outputs from one video input. The unit is color compatible
HD Digital Set-Top Box Quick Start Guide
 HD Digital Set-Top Box Quick Start Guide Eagle Communications HD Digital Set-Top Box Important Safety Instructions WARNING TO REDUCE THE RISK OF FIRE OR ELECTRIC SHOCK, DO NOT EXPOSE THIS PRODUCT TO RAIN
900-Lumen Portable LED Projector Part #: User manual
 900-Lumen Portable LED Projector Part #: 21797 User manual 900-Lumen LED Projector Manual Page 2 of 14 900-Lumen LED Projector Manual Page 3 of 14! SAFETY WARNINGS AND CAUTIONS WARNING: To reduce the risk
InnoMedia ESBC B. Quick Install Guide. 1
 InnoMedia ESBC 9528-4B Quick Install Guide www.innomedia.com 1 Table of Contents Introduction 3 Package Contents 3 CAUTION 3 Installation 4 Wall-Mounting Instructions 6 Troubleshooting 7 Appendix A. LED
User Instructions. 16 SCB Sync Station.
 User Instructions 16 SCB Sync Station Contents Overview... 1 Specifications... 1 Compliance and approvals... 2 Safety instructions... 3 Set up... 4 How to charge multiple devices... 4 How to synchronize
IPSTB1200 /IPC3200 Media Client User guide
 IPSTB1200 /IPC3200 Media Client User guide Safety/Compliance Important Safety Instructions Please carefully read these safety and compliance instructions and this entire user guide. Follow all instructions
HD Digital MPEG2 Encoder / QAM Modulator Get Going Guide
 series HD Digital MPEG2 Encoder / QAM Modulator Get Going Guide HDb2640 HDb2620 HDb2540 HDb2520 The HDbridge 2000 Series is a combination HD MPEG 2 Encoder and frequency-agile QAM Modulator, all in a 1RU
Wireless 1080P HDMI Video Kit - Mid-Range
 Wireless 1080P HDMI Video Kit - Mid-Range Installation Guide Introduction The Wireless 1080P HDMI Video Kit - Mid-Range transmits HDMI A/V signals up to 165ft (line-of-sight) wirelessly and supports high-definition
CAUTION RISK OF ELECTRIC SHOCK NO NOT OPEN
 Evolution Digital HD Set-Top Box Important Safety Instructions 1. Read these instructions. 2. Keep these instructions. 3. Heed all warnings. 4. Follow all instructions. 5. Do not use this apparatus near
Welcome to NEED HELP? DIRECTV offers the best entertainment experience. Use this guide to make the most of it LKR FCC ID : ORS
 NEED HELP? Important Tips Do not unplug your receiver If you unplug it you may miss the most recent updates that improve our service. The DIRECTV receiver is designed to consume very little energy while
17 19 PROFESSIONAL LCD COLOUR MONITOR ART
 17 19 PROFESSIONAL LCD COLOUR MONITOR ART. 41657-41659 Via Don Arrigoni, 5 24020 Rovetta S. Lorenzo (Bergamo) http://www.comelit.eu e-mail:export.department@comelit.it WARNING: TO REDUCE THE RISK OF FIRE
AITech ProA/V Media Extender 5GHz Digital
 AITech ProA/V Media Extender 5GHz Digital 5 GHz Wireless Digital Media Transmitter and Receiver User Manual Table of Contents 1. Package Contents 2. Panels and Functions AV Sender AV Receiver 3. Setup
By CHANNEL VISION. Flush Mount Amplifier A0350
 Spkrs Local In IR In 24VDC A0350 10 The A0350 can be used with Channel Vision s CAT5 audio hubs to provide a powerful 50Watts per channel in the listening zone. Alternatively, the A0350 can be added to
WELCOME! WHAT S IN THE BOX: WHAT S IN THE BOX:
 QUICK START GUIDE WELCOME! Thank you for buying the Slingbox TM SOLO. Follow these instructions to connect your new Slingbox and start watching your TV anywhere on your laptop or mobile*. For more information
Wireless Sound Bar *MFL * SIMPLE MANUAL
 ENGLISH SIMPLE MANUAL Wireless Sound Bar Please read this manual carefully before operating your set and retain it for future reference. To view the instructions of advanced features, visit http://www.lg.com
2.4 GHz WIRELESS VIDEO SENDER SYSTEM MODEL: VS6234
 2.4 GHz WIRELESS VIDEO SENDER SYSTEM MODEL: VS6234 Please read this manual thoroughly before operating this system OPERATING INSTRUCTIONS 03/02 1 SAFETY INSTRUCTIONS CAUTION! RISK OF ELECTRIC SHOCK. DO
Digital Satellite Receiver
 3-800-356-21 FOR POSITION ONLY ITI TO PROVIDE Digital Satellite Receiver Operating Instructions SAT-A1 1995 by Sony Corporation WARNING To prevent fire or shock hazard, do not expose the unit to rain or
Electro Magnetic Compatibility (EMC) Warning. Important notes for users in the U.K. FCC declaration. Caution. Fuse
 Warning. Important notes for users in the U.K. FCC declaration. Caution. Fuse") Warning: to prevent fire or shock hazard, do not expose camera or monitor to rain or moisture. The lightning flash with arrowhead symbol, within a triangle, is intended to alert the user to the presence
Warning: to prevent fire or shock hazard, do not expose camera or monitor to rain or moisture. The lightning flash with arrowhead symbol, within a triangle, is intended to alert the user to the presence
SMART Hi-Fi AUDIO *MFL * SJ8 SIMPLE MANUAL. Wireless Multi-room Sound Bar
 ENGLISH SIMPLE MANUAL SJ8 SMART Hi-Fi AUDIO Wireless Multi-room Sound Bar Please read this manual carefully before operating your set and retain it for future reference. To view the instructions of advanced
Always there to help you. Register your product and get support at SRP5018. Question? Contact Philips.
 Always there to help you Register your product and get support at www.philips.com/support Question? Contact Philips SRP5018 User manual Contents 1 Your universal remote 2 Introduction 2 Overview of the
Golf ball tracker. Instruction manual
 Golf ball tracker Instruction manual General Intended use The Prazza golf ball finder is intended for use on the golf course only and should never be used inside the home or any other enclosed environment.the
USERS GUIDE MCX-HTS. HDMI to 3G SDI Converter. Manual Number:
 USERS GUIDE MCX-HTS HDMI to 3G SDI Converter i Manual Number: 151226 SAFETY INSTRUCTIONS Please review the following safety precautions. If this is the first time using this model, then read this manual
Wireless 5.8GHz AV Sender With Built in Remote Control Extender
 Wireless 5.8GHz AV Sender With Built in Remote Control Extender AR-1913 User Manual TABLE OF CONTENTS Box Contents..................2 User Guide.............3 Installation............4 Trouble Shooting............
DDW36C Advanced Wireless Gateway - Safety and Installation Product Insert. Federal Communications Commission (FCC) Interference Statement
 Interference Statement") DDW36C Advanced Wireless Gateway - Safety and Installation Product Insert Federal Communications Commission (FCC) Interference Statement This equipment has been tested and found to comply with the limits
DDW36C Advanced Wireless Gateway - Safety and Installation Product Insert Federal Communications Commission (FCC) Interference Statement This equipment has been tested and found to comply with the limits
User Manual TL-TP70-HDIR 70m Extender with ARC and IR All Rights Reserved Version: TL-TP70-HDIR_180723
 User Manual TL-TP70-HDIR 70m Extender with ARC and IR All Rights Reserved Version: TL-TP70-HDIR_180723 Preface Read this user manual carefully before using this product. Pictures shown in this manual is
MONOPRICE. BitPath AV 4K 1X4 HDMI Splitter Extender over Single Cat6 with IR, 120m. User's Manual P/N 16286
 MONOPRICE BitPath AV 4K 1X4 HDMI Splitter Extender over Single Cat6 with IR, 120m P/N 16286 User's Manual SAFETY WARNINGS AND GUIDELINES Please read this entire manual before using this device, paying
ATTACHING & REMOVING THE BASE
 TV53DB ATTACHING & REMOVING THE BASE 1. To install or remove the neck, screw in or remove the 4 screws indicated in the picture. 2. To install the base, place the display unit flat on a table. Afterwards
HD Digital MPEG2 Encoder / QAM Modulator
 HD Digital MPEG2 Encoder / QAM Modulator YPrPb VGA In QAM Out series Get Going Guide ZvPro 600 Series is a one or two-channel Component or VGA-to-QAM MPEG 2 Encoder/ Modulator, all in a compact package
ES-3305P / ES-3308P / ES-3316P. Quick Installation Guide / v1.0
 ES-3305P / ES-3308P / ES-3316P Quick Installation Guide 09-2012 / v1.0 1 COPYRIGHT Copyright Edimax Technology Co., Ltd. all rights reserved. No part of this publication may be reproduced, transmitted,
MONOPRICE. BitPath AV SDI Extender over Single Cat6 Cable, 120m. User's Manual P/N 16227
 MONOPRICE BitPath AV SDI Extender over Single Cat6 Cable, 120m P/N 16227 User's Manual SAFETY WARNINGS AND GUIDELINES Please read this entire manual before using this device, paying extra attention to
Dual Antenna Wireless Multi-Channel Expandable HDMI Extender Installation Guide
 Dual Antenna Wireless Multi-Channel Expandable HDMI Extender Installation Guide 04-1125A Introduction The Dual Antenna Wireless Multi-Channel Expandable HDMI Extender wirelessly transmits HDMI signals
2.0 Wall Mount TV Soundbar Instruction Manual
 8010275 2.0 Wall Mount TV Soundbar Instruction Manual Read all of the instructions before using this soundbar and keep the manual in a safe place for future reference. Safety Information CA UT IO N RISK
MONOPRICE. BitPath AV SDI Wireless Transmitter & Receiver Kit, 200m. User's Manual P/N 16225
 MONOPRICE BitPath AV SDI Wireless Transmitter & Receiver Kit, 200m P/N 16225 User's Manual SAFETY WARNINGS AND GUIDELINES Please read this entire manual before using this device, paying extra attention
User Manual PS-684. HDBaseT Extender Kit 70m. All Rights Reserved. Version: UHBT70P_2016V1.2
 User Manual PS-684 All Rights Reserved Version: UHBT70P_2016V1.2 Preface Read this user manual carefully before using this product. Pictures shown in this manual is for reference only, different model
VLHDMIEXTFIB_2017V1.0
 User Manual VLHDMIEXTFI ll Rights Reserved Version: VLHDMIEXTFI_2017V1.0 Preface Read this user manual carefully before using the product. Pictures are shown in this manual for reference only, different
1-In / 2-Out. HDMI Splitter User s Guide
 1-In / 2-Out HDMI Splitter 1500659 User s Guide We hope you enjoy your 1-In / 2-Out HDMI Splitter from RadioShack. This HDMI splitter allows the 4K2K digital signal from a HDMI device to be displayed on
MONOPRICE. BitPath AV HDMI Extender over Single Cat6 Cable, 120m. User's Manual P/N 16228
 MONOPRICE BitPath AV HDMI Extender over Single Cat6 Cable, 120m P/N 16228 User's Manual SAFETY WARNINGS AND GUIDELINES Please read this entire manual before using this device, paying extra attention to
Always there to help you. Register your product and get support at SRP3013. Question? Contact Philips.
 Always there to help you Register your product and get support at www.philips.com/support Question? Contact Philips SRP3013 User manual Contents 1 Your universal remote 2 Introduction 2 Overview of the
Reference WIRING THE SYSTEM TOGETHER. Page 4-1 TWO OR MORE RECEIVERS
 4 Reference WIRING THE SYSTEM TOGETHER TWO OR MORE RECEIVERS Each output on the LNBF can support a single receiver. You cannot connect two receivers to the same output (for example, by using a line splitter),
Receiver Description and Installation
 The Receiver Front Panel Smart Card Door Behind this door is a slot for a future smart card. No smart card is included with this receiver. Info Button Press the INFO button to see information about a program
ES-5500M V2 / ES-5800M V2
 ES-5500M V2 / ES-5800M V2 Quick Installation Guide 05-2012 / v1.0 COPYRIGHT Copyright Edimax Technology Co., Ltd. all rights reserved. No part of this publication may be reproduced, transmitted, transcribed,
MONOPRICE. BitPath AV 4K HDMI Wireless Transmitter & Receiver Kit, 200m. User's Manual P/N 16223
 MONOPRICE BitPath AV 4K HDMI Wireless Transmitter & Receiver Kit, 200m P/N 16223 User's Manual SAFETY WARNINGS AND GUIDELINES Please read this entire manual before using this device, paying extra attention
KODAK Video Monitor CFH-V10
 Quick Start Guide CAUTION RISK OF ELECTRIC SHOCK DO NOT OPEN CAUTION TO REDUCE THE RISK OF ELECTRIC SHOCK, DO NOT REMOVE COVER (OR BACK). NO USER SERVICEABLE PARTS INSIDE, REFER SERVICING TO QUALIFIED
User Manual TP70L. HDBaseT Extender. All Rights Reserved. Version: TP70L2016V1.1
 User Manual TP70L HDBaseT Extender All Rights Reserved Version: TP70L2016V1.1 Preface Read this user manual carefully before using this product. Pictures shown in this manual is for reference only, different
OPERATIONS MANUAL FOR EDISON PROFESSIONAL Professional ABS Molded Loudspeaker M4000
 M4000 Introduction: Congratulations on your purchase of an M-4000 powered loudspeaker, engineered and manufactured by BriteLite Enterprises. The M-4000 includes a high-output compression driver, and 15
User Manual TL-2X1-HDVC 2x1 HDMI & VGA Switcher with Control All Rights Reserved Version: TL-2X1-HDVC_160630
 User Manual TL-2X1-HDVC 2x1 HDMI & VGA Switcher with Control All Rights Reserved Version: TL-2X1-HDVC_160630 Preface Read this user manual carefully before using this product. Pictures shown in this manual
Full HD Multi-Channel Expandable Wireless HDMI Gateway Extender
 Full HD Multi-Channel Expandable Wireless HDMI Gateway Extender Installation Guide P/N: CE-H22T11-S1/CE-H22U11-S1 04-1097A 1 Introduction The Full HD Multi-Channel Expandable Wireless HDMI Gateway Extender
 Register your product and get support at www.philips.com/welcome SWS3435S/27 SWS3435H/37 EN User manual Contents 1 Important 4 Safety 4 English 2 Your SWS3435 6 Overview 6 3 Installation 7 Connect the
LF-IRX. 12 Month Limited Warranty LF-IRX. Remote Control Extender. Owner s manual. For customer service and technical information::
 12 Month Limited Warranty Audiovox Electronics Corporation (the company) warrants to the original purchaser of this product that should this product or any part thereof, under normal use and conditions,
User s Guide. 5.8GHz Wireless A/V Signal Sender
 1500332 User s Guide 5.8GHz Wireless A/V Signal Sender Thank you for purchasing your A/V Signal Sender from RadioShack. Please read this user s guide before installing, setting up, and using your new sender.
Satellite Radio. Expand Your Factory Radio ISSR bit & 29-bit LAN. Owner s Manual Gateway. add. Harness Connection USB. Port 1 Port.
 Expand Your Factory Radio Harness Connection add Satellite Radio Dip Switches Port 1 Port 2 (See Manual) USB GM 11-bit & 29-bit LAN Owner s Manual Gateway ISSR12 Table of Contents 1. Introduction 2. Precautions
DSS Receiver User s Manual
 DSS Receiver User s Manual Safety Information WARNING To reduce risk of fire or shock hazard, do not expose this receiver to rain or moisture. WARNING RISK OF ELECTRIC SHOCK DO NOT OPEN TO REDUCE THE RISK
Instruction Guide. The TV Jockey Computer Monitor TV Tuner with Remote COMP2VGATVGB. The Professionals Source For Hard-to-Find Computer Parts
 VIDEO ADAPTER The TV Jockey Computer Monitor TV Tuner with Remote COMP2VGATVGB Instruction Guide * Actual product may vary from photo The Professionals Source For Hard-to-Find Computer Parts FCC COMPLIANCE
Limited Warranty. TERK and the TERK logo are registered trademarks of AUDIOVOX Corp.
 Limited Warranty Audiovox Corporation (Audiovox) warrants this product against defects in materials or workmanship for one (1) year from the date of purchase. During this period, this product will be replaced
MONOPRICE. BitPath AV VGA Extender over Single Cat6 Cable, 120m. User's Manual P/N 16226
 MONOPRICE BitPath AV VGA Extender over Single Cat6 Cable, 120m P/N 16226 User's Manual SAFETY WARNINGS AND GUIDELINES Please read this entire manual before using this device, paying extra attention to
TV Connector user guide
 TV Connector user guide Thank you Thank you for choosing the TV Connector. The intended use of the TV Connector is to connect your hearing aids directly to your TV or audio source. Your TV Connector Hearing
Electric Wall/Ceiling Projection Screen Saker Plus Series User s Guide
 Electric Wall/Ceiling Projection Screen Saker Plus Series User s Guide Important Safety & Warning Precautions Make sure to read this user s guide and follow the procedures below. Caution: The screen s
HD Digital MPEG2 Encoder / QAM Modulator
 HD Digital MPEG2 Encoder / QAM Modulator HDMI In QAM Out series Get Going Guide ZvPro 800 Series is a one or two-channel unencrypted HDMI-to-QAM MPEG 2 Encoder / QAM Modulator, all in a compact package
blink USER GUIDE Bluetooth capable Reclocker Wyred 4 Sound. All rights reserved. v1.0
 blink Bluetooth capable Reclocker USER GUIDE Wyred 4 Sound. All rights reserved. v1.0 Table of Contents READ FIRST Important 1 Package contents 1 About the blink Bluetooth Streamer/Reclocker 1 Connectivity
Owner's Manual DIGITAL TO ANALOG BROADCAST CONVERTER WITH REMOTE CONTROL. Model: CVD508 PLEASE READ BEFORE OPERATING THIS EQUIPMENT.
 Size: 148.5(W) x 210(H)mm (A5) DIGITAL TO ANALOG BROADCAST CONVERTER WITH REMOTE CONTROL Owner's Manual PLEASE READ BEFORE OPERATING THIS EQUIPMENT. Model: CVD508 FCC NOTICE: To assure continued compliance,
UNDER TABLE 4X1 HDMI SWITCHER
 UNDER TABLE 4X1 HDMI SWITCHER Welcome! Everyone at Altinex greatly appreciates your purchase of the UT260-041. We are confident that you will find it to be reliable and easy to use. If you need support,
Introduction. Important Safety Instructions
 Introduction Congratulations on purchasing your Eviant Portable Digital TV. On June 12, 2009 the conversion to digital television broadcasting will be complete all throughout the United States and Puerto
Satellite Receiver User s Guide
 Satellite Receiver User s Guide GRD33G3A We bring good things to life. SAFETY INFORMATION WARNING To reduce risk of fire or shock hazard, do not expose this receiver to rain or moisture. WARNING RISK OF
MONOPRICE. BitPath AV VGA Wireless Transmitter & Receiver Kit, 200m. User's Manual P/N 16224
 MONOPRICE BitPath AV VGA Wireless Transmitter & Receiver Kit, 200m P/N 16224 User's Manual SAFETY WARNINGS AND GUIDELINES Please read this entire manual before using this device, paying extra attention
Stereo Cassette Deck
 3-858-050-11(1) Stereo Cassette Deck Operating Instructions 199 by Sony Corporation 3-858-050-11 (1) WARNING To prevent fire or shock hazard, do not expose the unit to rain or moisture. To avoid electrical
USER S MANUAL. Deuce HD User's Manual WORLD HEADQUARTERS
 USER S MANUAL WORLD HEADQUARTERS Artel Video Systems 5B Lyberty Way Westford, MA 01886 Tel: (978) 263-5775 Fax: (978) 263-9755 Email: info@artel.com Web: www.artel.com P/N 1219 Rev. F Copyright 2016 USER
TFT LCD MONITOR USER MANUAL. L80AP and L101AP
 TFT LCD MONITOR USER MANUAL L80AP - 8.0 and L101AP - 10.1 Table Of Contents Table of contents/ Warning.... 2 Precautions...3 About this user manual and products / Items included in the delivery..... 4
AUDIO WIRELESS. with IR Extender Feature OWNER S MANUAL SENDER T CAT. NO
 /V WIRELESS AUDIO UDIO/V /VIDEO SENDER with IR Extender Feature OWNER S MANUAL SENDER 15-2572T CAT. NO. 15-2572 SENDER 15-2572T FCC CAUTION THIS DEVICE COMPLIES WITH PART 15 OF THE FCC RULES. OPERATION
HDS-21RS Owner s Manual 2 x 1 HDMI Switch with Scaling
 HDS-21RS Owner s Manual 2 x 1 HDMI Switch with Scaling PureLink TM 535 East Crescent Avenue Ramsey, NJ 07446, USA Tel: 201.488.3232 Fax: 201.621.6118 E-mail: info@purelinkav.com www.purelinkav.com For
CGA0101 Wireless Cable Gateway Quick Installation Guide
 Package Contents CGA0101 cable modem * 1 Quick Installation Guide * 1 RJ-45 CAT 5e cable * 1 Rear Panel and Hardware Connection 12 V/1.5 A Power Adaptor * 1 Telephone cord * 1 This chapter describes the
In-Ceiling Electric Motorized Front Projection Screen Evanesce Series. User s Guide
 In-Ceiling Electric Motorized Front Projection Screen Evanesce Series User s Guide Important Safety & Warning Precautions Make sure to read this user s guide and follow the procedures below. Caution: The
Before you can install your LCD TV on the wall, you must fi rst remove the base using the steps below:
 Quick Start Guide English CONTENTS INSTALLING LCD TV ON THE WALL.. TV CHANNEL INSTALLATION........ PRESENTATION OF THE LCD TV...... ACCESSORIES.................... BATTERY INSTALLATION............ REMOTE
MaxView Cinema Kit Quick Install Guide
 SYSTEM SETUP The MaxView will work at any of the following display settings: INSTALLATION MaxView Cinema Kit Quick Install Guide Step 1 - Turn off your computer. Disconnect your monitor s VGA cable from
ZvBox 150. HD video distribution over COAX Get Going Guide
 ZvBox 150 HD video distribution over COAX Get Going Guide ZvBox 150 is an HD MPEG 2 Encoder and frequency agile QAM Modulator. It allows you to convert any HD video source, Component or RGB (VGA), in real
USER INSTRUCTIONS MODEL CSI-200 COAXIAL SYSTEM INTERFACE
 USER INSTRUCTIONS MODEL CSI-200 COAXIAL SYSTEM INTERFACE 9350-7676-000 Rev B, 5/2001 PROPRIETARY NOTICE The RTS product information and design disclosed herein were originated by and are the property of
Television Audio Remastering Device
 Television Audio Remastering Device Developed in Hollywood, California. Made in the USA What s Inside? 1x Aftermaster Pro 1x HDMI Cable 1x USB Power Cable and Wall Plug 2 Table of Contents 2) What s Inside
SmartBox. User Manual. Turn your TV into a SmartTV! Plug n play. Wireless Dual Band
 SmartBox User Manual Turn your TV into a SmartTV! Wireless Dual Band Plug n play TV Remote Guide 5 4 1. ON / Stand by 2. Select package 1 6 2 3 7 3. 4. Favourite channels Electronic Program Guide (EPG
DTA Easy Setup Guide. Installation Operation Troubleshooting
 DTA Easy Setup Guide Installation Operation Troubleshooting Table of Contents What s included in this Install... Kit 4 Items that you may also need....5 Start Here... 6 Connecting to a TV (No VCR )....8
Hardware Setup. HP Dual TV Tuner/Digital Video Recorder. Document Part Number:
 Hardware Setup HP Dual TV Tuner/Digital Video Recorder Document Part Number: 374787-001 November 2004 This guide provides steps to help you set up your HP Dual TV Tuner/Digital Video Recorder hardware
MultiView T4 / T5 Transmitter
 MultiView T4 / T5 Transmitter Quick Reference & Setup Guide Magenta Research 128 Litchfield Road, New Milford, CT 06776 USA (860) 210-0546 FAX (860) 210-1758 www.magenta-research.com PN 5310188-01, Rev
Mini Projector User s Guide
 Mini Projector User s Guide Please read this manual before Model P50 Table of Contents 1. Table of Contents---------------------------------1 2. Warnings-----------------------------------------2 3. Accessories---------------------------------------4
PREPROGRAMMED FOR YOUR SET-TOP BOX
 New Knoxville Telephone NKTELCO, Inc. Goldstar Communications 301 W. South Street PO Box 219 New Knoxville, OH 45871 PREPROGRAMMED FOR YOUR SET-TOP BOX ADB Remote Functions 1 New Knoxville Telephone 301
Set Up Your OTA Antenna & Dual-Tuner OTA Adapter
 Set Up Your OTA Antenna & Dual-Tuner OTA Adapter TM DISH knows that getting local channels like ABC, CBS, FOX, and NBC is important to our customers. This adapter makes watching your over-the-air local
VNS2200 Amplifier & Controller Installation Guide
 VNS2200 Amplifier & Controller Installation Guide VNS2200 Amplifier & Controller Installation 1. Determine the installation location for the VNS2200 device. Consider the following when determining the
ASH - EOC-01. Ethernet Over Coax Adapter User Guide
 ASH - EOC-01 Ethernet Over Coax Adapter User Guide ASH - EOC-01 User s Guide 1 Table of Contents Warning and Safety Information 3 Product Overview 8 Package Contents and Accessories 8 Introduction 9 Indicators
TV CHANNEL INSTALLATION
 LCD TV TV CHANNEL ATION Immediately after unpacking and plugging in your new television, run the auto program function to set up the TV for the broadcast or cable channels available in your area. If you
User Manual TL-2X1-HDV 2x1 HDMI & VGA Switcher All Rights Reserved Version: TL-2X1-HDV_160630
 User Manual TL-2X1-HDV 2x1 HDMI & VGA Switcher All Rights Reserved Version: TL-2X1-HDV_160630 Preface Read this user manual carefully before using this product. Pictures shown in this manual are for reference
QIP7232 P2. Hybrid QAM/IP High-definition Set-top. Quick Start Guide
 QIP7232 P2 Hybrid QAM/IP High-definition Set-top Quick Start Guide Before You Begin Introduction Congratulations on receiving a Motorola QIP7232 Hybrid QAM/IP High-definition Set-top. This document will
User Manual CVA3. HDMI Audio Decoder. All Rights Reserved. Version: CVA3_2016V1.0
 User Manual CVA3 All Rights Reserved Version: CVA3_2016V1.0 Preface Read this user manual carefully before using this product. Pictures shown in this manual is for reference only, different model and specifications
Model Extend HDMI audio and video connections up to 300 feet. Add up to 8 additional receivers with a dedicated network switch
 HDMI Extender over Single CAT 6 Cable with IR Control Model 103002 Extend HDMI audio and video connections up to 300 feet Utilize existing Cat 6 wiring for an easy installation Add up to 8 additional receivers