Edition Notes. Edition Notes. Trademarks. Copyright Notice. Manual Usage. Document Printing. Intended Audience. Disclaimer
|
|
|
- Neil Flowers
- 6 years ago
- Views:
Transcription


1 User Manual
2 Edition Notes Edition Notes Trademarks Copyright Notice Manual Usage Document Printing Intended Audience Disclaimer CHAUVET Publications Hot Line Document Revision The Legend 1200E Spot User Manual Rev. 03c covers the description, safety precautions, installation, programming, operation, and maintenance of the Legend 1200E Spot product. CHAUVET released this edition of the Legend 1200E Spot User Manual Rev. 03c in October CHAUVET is a registered trademark of CHAUVET & Sons Inc. (d/b/a CHAUVET or Chauvet). The CHAUVET logo in its entirety including the Chauvet name and the dotted triangle, and all other trademarks on this manual pertaining to services, products or marketing statements (example: It s Green Thinking ) are owned or licensed by CHAUVET. Any other product names, logos, brands, company names, and other trademarks featured or referred to within this document are the property of their respective trademark holders. CHAUVET owns the content of this user manual in its entirety, including but not limited to pictures, logos, trademarks, and resources. Copyright 2010 CHAUVET All rights reserved Electronically published by CHAUVET in the United States of America CHAUVET authorizes its customers to download and print this manual for professional information purposes only. CHAUVET expressly prohibits the usage, copy, storage, distribution, modification, or printing of this manual or its content for any other purpose without its written consent. For better results, print this document in color, on letter size paper (8.5 x 11 inches), double sided. If using A4 paper (210 x 297 mm), configure your printer to scale the content of this document to A4 paper. Any person in charge of installing, operating, and/or maintaining the Legend 1200E Spot should read the guide that shipped with it as well as this manual in their entirety before installing, operating, or maintaining this product. CHAUVET believes that the information contained in this manual is accurate in all respects. However, CHAUVET assumes no responsibility for any error or omissions in this document. CHAUVET reserves the right to revise this document and to make changes from time to time in the content hereof without obligation of CHAUVET to notify any person or company of such revision or changes. This does not constitute in any way a commitment by CHAUVET to make such changes. CHAUVET may issue a revision of this manual or a new edition of it to incorporate such changes. If you have any comments about the accuracy of this document or general suggestions regarding how we can improve it, please call us at (800) (US callers) or (international callers). You can download the latest versions of all CHAUVET products manuals from The Legend 1200E Spot User Manual Rev. 03c supersedes all previous versions of this manual. Please discard any older versions of this manual you may have, whether in printed or electronic format, and replace them with this version. Author Editor Manager PD Manager O. Desmonteix D. Couppe M. Graham F. Sellers Product at a Glance Use on Dimmer Auto Programs Outdoor Use Auto-ranging Power Supply Sound Activated Replaceable Fuse DMX User Serviceable Master/Slave CMY Color Mixing Legend 1200E Spot User Manual Rev. 03c
3 Table of Contents Table of Contents 1. Before You Begin...1 What is Included... 1 Unpacking Instructions... 1 Typographic Conventions... 1 Icon Meaning... 1 Safety Notes Introduction...3 Product Description... 3 Features... 3 Additional Features... 3 Options... 3 DMX Channel Summary Channel Mode Channel Mode... 4 Product Overview... 5 Product Dimensions Setup...7 AC Power... 7 AC Plug... 7 Fuse Replacement... 7 DMX Linking... 7 DMX Modes... 7 Mounting... 8 Orientation... 8 Rigging... 8 Bracket Installation... 9 Optics... 9 Color Wheel... 9 Gobo Wheels Replacing Gobos Lamp Replacement Increasing the Lamp s Life Operation...13 Control Panel Description Home Screen Control Options Menu Map Programming Navigation Control DMX Operation Fixture Settings Lamp Settings Display Settings Fixture Tests Fixture Information Fixture Reset Special Functions Offset Mode Entering Offset Mode DMX Values Mode 1 (Basic) Mode 2 (Advanced) Legend 1200E Spot User Manual Rev. 03c -a-
4 Table of Contents 5. Technical Information General Maintenance Dust Screen Cleaning Error Messages Troubleshooting Guide Returns Procedure Claims Contact Us Technical Specifications b- Legend 1200E Spot User Manual Rev. 03c
5 Before You Begin 1. Before You Begin What is Included One Legend 1200E Spot Two omega brackets Two hanging trigger clamps One flight case Warranty Card Quick Reference Guide Unpacking Instructions Typographic Conventions This product ships in a flight case. Immediately upon receiving this product, carefully unpack it and check the container in which you received it. Make sure that you have received all the parts indicated above and that they are all in good condition. If the material inside the container (this product and any other accessory included with it) appears damaged from shipping, or if the container shows signs of mishandling, notify the shipper immediately. In addition, retain the container and all the packing material for inspection. See the Claims section in the Technical Information chapter. Convention Meaning 1~512 A range of values in the text 50/60 A set of mutually exclusive values in the text [10] A DIP switch to be configured Claims A new term, or a section or chapter in this document COLORado UM The name of another publication or manual <SET> A button on the fixture s control panel Settings A fixture function or a menu option MENU > Settings A sequence of menu options 1~10 A range of menu values from which to choose in a menu Yes/No A set of two mutually exclusive menu options in a menu ON A unique value to entered or select in a menu Icon Meaning Icon Meaning This icon indicates critical installation, configuration, or operation information. Failure to comply with this information may render the fixture partially or completely inoperative, damage third-party equipment, or cause harm to the user. This icon indicates important installation or configuration information. Failure to comply with this information may prevent the fixture from functioning correctly. This icon indicates useful, although non-critical information. The term DMX used throughout this document refers to the USITT DMX512-A transmission protocol. Legend 1200E Spot User Manual Rev. 03c -1-
6 Before You Begin Safety Notes Please read the following notes carefully because they include important safety information about the installation, usage, and maintenance of this product. It is important to read all these notes before starting to work with this product. There are no user serviceable parts inside this product. Any reference to servicing it you may find from now on in this User Manual will only apply to properly CHAUVET certified technicians. Do not open the housing or attempt any repairs unless you are one of them. Please refer to all applicable local codes and regulations for the proper installation of this product. Keep this manual for future consultation. If you sell this product to another user, make sure that they also receive this manual. Personal Safety Avoid direct eye exposure to the light source while the fixture is on. Always disconnect this product from its power source before servicing. Lamp explosion hazard! Do not open the lamp cover within five minutes of having turned off the fixture. The bulb remains hot for a long time after turn off. Never touch the bulb barehanded and always handle it by its metallic contacts. Always connect this product to a grounded circuit to avoid the risk of electrocution. Do not touch this product s housing when operating because it may be very hot. Mounting and Rigging This product is for indoor use only! To prevent risk of fire or shock, do not expose this product to rain or moisture. Make sure there are no flammable materials close to this product while operating. When hanging this product, always secure it to a fastening device using a safety chain/cable (not provided). Do not carry this fixture from the head; use the handles instead. Power and Wiring Always make sure that you are connecting this product to the proper voltage, as per the specifications in this manual or on the product s sticker. Never connect this product to a dimmer pack or rheostat. Make sure the product s housing or power cable are not cracked, crimped, or damaged. Never disconnect this product by pulling or tugging on the power cable. Operation Do not operate this fixture if you see damage on the housing, lenses, ultraviolet filter, or cables; have the damaged parts replaced by an authorized technician at once. Do not cover the ventilation slots when the fixture is operating to avoid internal overheating. Do not aim this fixture toward the Sun. Otherwise, the lenses could concentrate the solar energy and cause internal overheating. The maximum ambient temperature (Ta) is 104 F (40 C). Do not operate this product at a higher temperature. In case of a serious operating problem, stop using this product immediately! In the unlikely event that your CHAUVET product may require service, please contact CHAUVET Technical Support. -2- Legend 1200E Spot User Manual Rev. 03c
7 Introduction 2. Introduction Product Description The Legend 1200E Spot is a moving yoke fixture with a 1200 W short arc discharge lamp. It contains an LCD control panel (display), through which all of the settings can be set or modified. This fixture can operate at 200~240 VAC, 50/60 Hz, which eliminates the need for a voltage selection switch. The ballast and igniter in the lamp circuit are both of the electronic type. 23 or 31-channel DMX moving yoke Features Pan 540⁰ in 2.8 sec Tilt 270⁰ in 1.6 sec Color wheel: Seven colors + white (red, blue, pink, green, magenta, orange, and UV) Split/linear colors Rainbow color spin at variable speeds Gobo wheel 1: Indexed, rotating gobo wheel with gobo shake: Six glass, slot-n-lock gobos + open (two multicolor, four B/W) Gobo wheel spin at variable speeds 16-bit gobo rotation Gobo wheel 2: Indexed, rotating gobo wheel with gobo shake: Six glass, slot-n-lock gobos + open (one multicolor, five B/W) Gobo wheel spin at variable speeds 16-bit gobo rotation Variable frost Variable CTC filter (3,200~6,000 K) CMY color mixing system with vector speed adjustments 3-facet, 5-facet, 3D, and infinite prism with macros Variable shutter Variable iris Variable focus Variable 16-bit dimming (0~100%) Linear zoom (15~30⁰) Individual reset of pan/tilt, color, gobo, shutter, prism, focus Move-in-black for pan/tilt, color, gobo Remote fixture reset, lamp on/off, vector speed adjustments Built-in movement macros with range adjustments Built-in color macros Additional Features 3-pin and 5-pin DMX connections Two additional free glass gobos User-configurable lamp ignition delay User-configurable maintenance reminder Electronic ballast with power factor correction Electronic power supply Automatic pan & tilt correction Pan & tilt locks Lamp and fixture usage timer Power saver mode Options W-DMX (wireless DMX) receiver W-DMX (wireless DMX) transmitter Legend 1200E Spot User Manual Rev. 03c -3-
8 Introduction DMX Channel Summary 31-Channel Mode 23-Channel Mode Channel Function Channel Function 1 Pan 1 Pan 2 Pan fine 2 Pan fine 3 Tilt 3 Tilt 4 Tilt fine 4 Tilt fine 5 Pan/tilt speed 5 Pan/tilt speed 6 Dimmer 6 Dimmer 7 Dimmer fine 7 Shutter 8 Shutter 8 Color 9 Color 9 Cyan 10 Cyan 10 Magenta 11 Magenta 11 Yellow 12 Yellow 12 3,200 K (CTO) Filter 13 3,200 K (CTO) 13 Gobo 1 14 CMY/CTO Filter Speed 14 Gobo 1 rotation 15 Gobo 1 15 Gobo 2 16 Gobo 1 rotation 16 Gobo 2 rotation 17 Gobo 1 rotation fine 17 Focus 18 Gobo 2 18 Zoom 19 Gobo 2 rotation 19 Effect/prism 20 Gobo 2 rotation fine 20 Effect/prism rotation 21 Focus 21 Iris 22 Zoom 22 Frost 23 Effect/prism 23 Function 24 Effect/prism rotation 25 Iris 26 Frost 27 Pan/tilt Movement macro 28 Pan/tilt Movement macro range 29 Preset Color 30 Color macro (CMY) 31 Function -4- Legend 1200E Spot User Manual Rev. 03c
 DMX")
 Fuse holder (Lamp) DMX out (5-pin) DMX")
 Legend 1200E Spot User Manual Rev.")
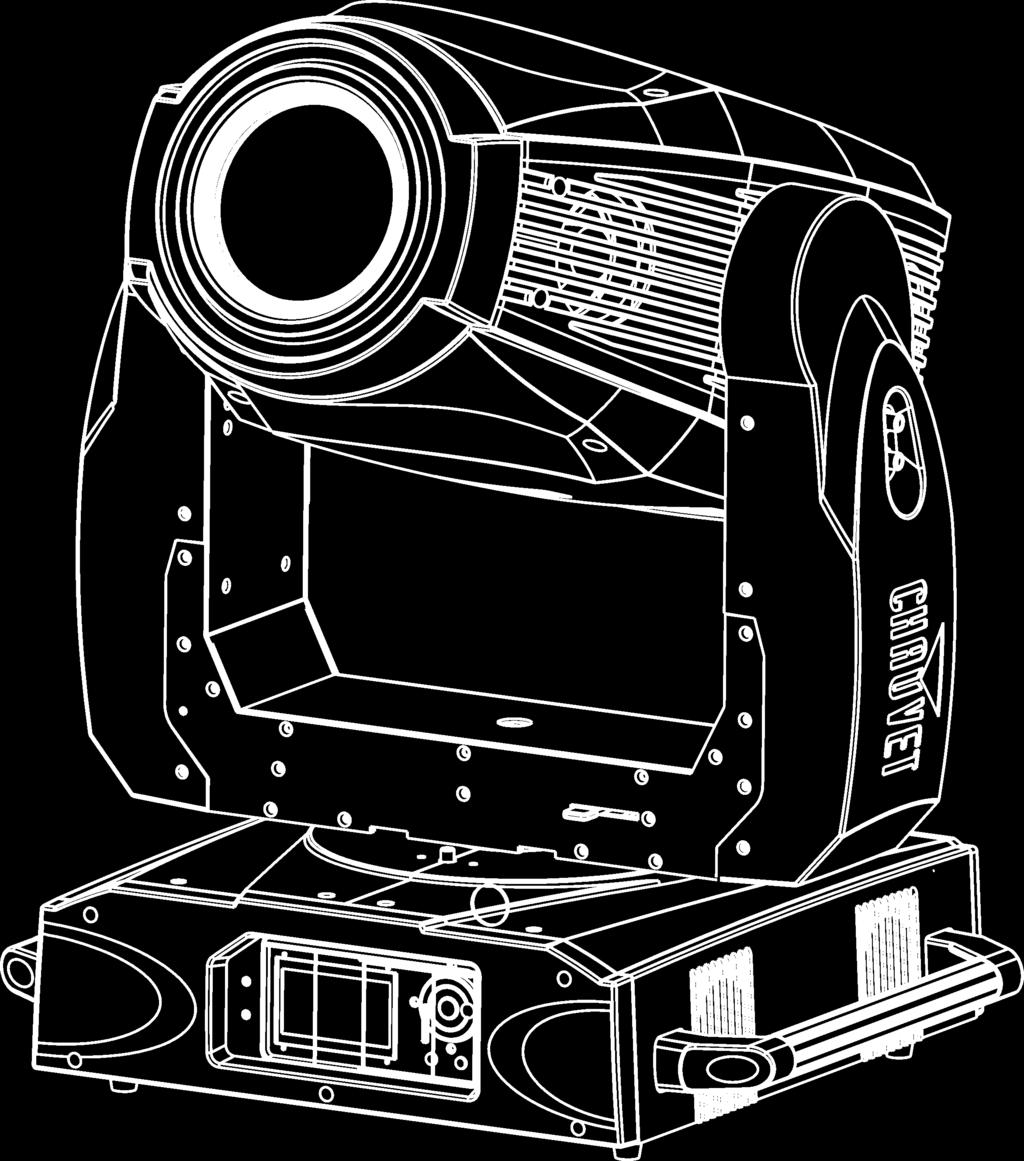
9 Introduction Product Overview Liquid Crystal Display Jog Wheel ENTER button Power LED indicator DMX in (3-pin) DMX out (3-pin) DMX LED indicator MENU button POWER button Fuse holder (Main) Fuse holder (Lamp) DMX out (5-pin) DMX in (5-pin) Power input Tilt lock Pan lock Control panel Carrying handle (1 of 2) Legend 1200E Spot User Manual Rev. 03c -5-

10 Introduction Product Dimensions -6- Legend 1200E Spot User Manual Rev. 03c
11 Setup 3. Setup AC Power The Legend 1200E Spot has an auto-ranging power supply that can work with an input voltage range of 200~240 VAC, 50/60 Hz. Make sure that you are connecting this product to the proper voltage, as per the specifications in this guide, the product s user manual, or on the product s sticker. Always connect the Legend 1200E Spot to a protected circuit with an appropriate electrical ground to avoid the risk of electrocution or fire. To determine the power requirements for the Legend 1200E Spot see the label affixed to the bottom of the fixture. Alternatively, you may refer to the corresponding specifications chart in the Technical Information chapter of this manual. The listed current rating indicates the maximum current draw during normal operation. For more information, you may download the Sizing the Circuit Breakers document from the CHAUVET Web site. Never connect the Legend 1200E Spot to a rheostat (variable resistor) or dimmer circuit, even if the rheostat or dimmer channel serves only as a 0 to 100% switch. AC Plug The Legend 1200E Spot has a bare-ended power input cord that is hard-wired to the base of the fixture. Use the table below to wire a plug for the power cord. Connection Wire (US) Wire (Europe) Screw Color AC Live Black Brown Yellow or Brass AC Neutral White Blue Silver AC Ground Green/Yellow Green/Yellow Green Make sure to disconnect the fixture s power cord before replacing a blown fuse, and always replace it with a fuse of the same type and rating. Fuse Replacement DMX Linking DMX Modes 1) With a Phillips #2 screwdriver, unscrew the fuse holder from its housing. 2) Remove the blown fuse from its holder and replace it with a good fuse of the exact same type and rating. 3) Screw the fuse holder back in its place and reconnect power. You may link any Legend 1200E Spot fixture to a DMX controller using a standard DMX serial connection. If using other DMX compatible fixtures with a Legend 1200E Spot, it is possible to control them individually with a single DMX controller. If you are not familiar with the DMX standard, or if you need information about the DMX cables needed to link the Legend 1200E Spot fixture to a DMX controller, you may download the DMX Primer document from the CHAUVET Web site. The Legend 1200E Spot can operate in 23 and 31-channel DMX modes. You will find information about these DMX modes in the Introduction chapter (brief description), the Operation Instructions chapter (configuration details), and the DMX Values section (individual channel values). Legend 1200E Spot User Manual Rev. 03c -7-


12 Setup Mounting Orientation Rigging Before mounting this fixture, read and follow the safety recommendations indicated in the Safety Notes section (page 2 of this manual). Always mount this fixture in any safe position while making sure that there is adequate room around it for ventilation, configuration, and maintenance. Make sure to mount this fixture away from any flammable material as indicated in the Safety Notes section. The Legend 1200E Spot comes with two omega brackets and two clamps. You will have to use two mounting points per fixture. You can also mount the Legend 1200E Spot on the floor or any other firm, horizontal surface. CHAUVET recommends following the general guidelines below when mounting the Legend 1200E Spot. When selecting an installation location, consider ease of access to the fixture for operation, programming adjustments, and routine maintenance. Never mount the fixture in places where rain, high humidity, extreme temperature changes, or restricted ventilation may affect it. If hanging this fixture, make sure that the location where you are mounting the fixture can support its weight. Please see the Technical Specifications section of this manual for the weight requirement of this fixture. Only mount this fixture where the base is in a horizontal position, either hanging or standing, as indicated in the diagram below. Doing otherwise may cause damage to the fixture and void its warranty. Standing position Product Mounting Diagram Hanging position Standing position Safety cable Safety Cable Installation Diagram Omega brackets with clamps -8- Legend 1200E Spot User Manual Rev. 03c


13 Setup Bracket Installation You can mount the included brackets on either side of the mounting plate. This allows for positioning the fixture s base in the best possible orientation to access the control panel and the fuses. Control Panel Bracket Mounting Diagram Location 1 Location 2 Optics Color Wheel The Legend 1200E Spot has one color wheel with seven colors and two gobo wheels that support six rotating, slot-n-lock gobos each. The colors in the color wheel are not replaceable, but the gobos are. The diagram below shows the color wheel and the names of each of the seven color filters on it. Legend 1200E Spot User Manual Rev. 03c -9-


14 Setup Gobo Wheels The diagram below shows both gobo wheels and the number assigned to each gobo on each wheel. Rotating Gobo Wheel Rotating Gobo Wheel Legend 1200E Spot User Manual Rev. 03c

 Turn the fixture off and disconnect it from the power outlet.")
15 Setup Replacing Gobos The gobos in the Legend 1200E Spot s gobo wheels are removable from their gobo plates. This operation is quite simple, although it requires the technician to be careful and to follow the recommended procedure. Make sure to disconnect the fixture s power cord before replacing a gobo. Always replace a gobo with a gobo of the same dimensions. When inserting a glass gobo, always make sure that the shinny side of the gobo (glass base) faces the lamp. This provides a layer of protection against the high temperature from the lamp. 1) Turn the fixture off and disconnect it from the power outlet. 2) Open the head cover by loosening the four fastening screws at the sides of the top cover. 3) Separate the gobo plate away from the gobo wheel by pushing it toward the front of the moving head. Be careful not to push the gobo out of the gobo plate. 4) Once released from its slot, extract the gobo plate by pulling it outward. 5) On a flat surface, remove the expansion ring that holds the gobo in place and remove the gobo from the gobo plate. 6) Insert a new gobo and hold it in place with the expansion ring. 7) Slide the tip of the gobo plate under the pressure plate near the center of the gobo wheel. 8) Push the gobo plate inwards. DO NOT force the gobo plate into the gobo wheel slot. If correctly installed, the gobo plate should accommodate itself in the gobo wheel slot. Screws Screws Cover Screws Location Removed Gobo Gobo Removal Sequence Legend 1200E Spot User Manual Rev. 03c -11-
 with your bare hands.")
 Turn the fixture off and disconnect it from the power outlet.")
 Lift and rotate the lamp cover as per the diagram to expose the base of the lamp. 5) Rotate the ceramic base of the lamp 90º counterclockwise. 6) Pull the lamp out by holding it from its base only.")
 Use the adjustment screws (marked B in the diagram) to position the lamp in the center of the reflector to obtain the best output.")
16 Setup Lamp Replacement The Legend 1200E Spot is equipped with a Phillips MSR1200SA/SE FastFit lamp. This lamp uses a socket that allows for fast and easy lamp changes. Follow the procedure below to safely change the Legend 1200E Spot s lamp. Never touch the lamp s envelope (glass bulb) with your bare hands. FastFit lamps do not require touching the lamp s envelope during removal or installation. If you touched the lamp s envelope, clean it with isopropyl alcohol and wipe it with a lint-free cloth before installing it. Procedure 1) Turn the fixture off and disconnect it from the power outlet. 2) Wait at least 15 minutes for the lamp to cool down. 3) Loosen the two screws on the lamp cover (marked A in the diagram). 4) Lift and rotate the lamp cover as per the diagram to expose the base of the lamp. 5) Rotate the ceramic base of the lamp 90º counterclockwise. 6) Pull the lamp out by holding it from its base only. 7) Insert the new lamp and turn it 90º clockwise. 8) Reverse steps 3 and 4. 9) Use the adjustment screws (marked B in the diagram) to position the lamp in the center of the reflector to obtain the best output. Lamp Replacement Diagram Lamp cover Lamp FastFit Socket Positions Locked Unlocked Increasing the Lamp s Life NEVER turn the fixture s power off while the lamp is striking, as this can damage the lamp permanently. ALWAYS turn the lamp off by using the DMX controller or the fixture s control panel. Then wait at least five minutes before switching off the fixture. This will keep the fans running to extract any remaining heat from the fixture s head. ALWAYS wait 15 minutes to turn the lamp back on. DO NOT touch the lamp without wearing gloves to avoid leaving grease on the bulb or on the contacts that could reduce the lamp s life. ALWAYS change the lamp when it has reached its recommended lifespan to avoid the risk of lamp explosion Legend 1200E Spot User Manual Rev. 03c


17 Operation 4. Operation Control Panel Description Button <MENU> <ENTER> <JOG WHEEL> Function Exits from the current menu or function Enables the currently displayed menu or sets the currently selected value in to the current function Navigates upwards through the menu list and increases the numeric value when in a function Jog wheel Control Panel Diagram ENTER button MENU button Home Screen Upon power up, the LCD will show the Legend logo and the fixture s identification. After completing the power up tests, the LCD will show the DMX address, the DMX mode, and the fixture s temperature, along with the warning sign if the tests have detected an error. DMX Address Error Indicator DMX Mode Fixture s temperature When the warning sign shows, press <ENTER> to read the corresponding error message (see Error Messages in the Technical Information chapter). Press <ENTER> while looking at an error messages to clear it. Control Options You can set the Legend 1200E Spot s start address in the 001~512 DMX range. This allows for the control of up to 22 fixtures in the 23-channel DMX Mode 1 and up to 16 fixtures in the 31-channel DMX Mode 2. Legend 1200E Spot User Manual Rev. 03c -13-
18 Operation Menu Map Main Menu Level 2 nd Level 3 rd Level 4 th Level DMX Functions Fixture Settings Lamp Settings Display Settings Fixture Test Fixture Information Reset Function Special Functions DMX Address 1~512 DMX Channel Mode Mode 1 (23) Mode 2 (31) View DMX Value N/A WDMX Setting Active (Requires optional Retransmit W-DMX card) Reset Memory Pan Inverse Tilt Inverse Bl.o. P/T Moving Bl.o. Color Change No/Yes Bl.o. Gobo Change Auto Focus On/Off State/Power On On/Off Off Via DMX On if DMX On No/Yes Off if DMX Off Cooling Mode High/Auto Ignition Delay Low Power Delay 0~255 Display Inverse Back Light Auto Off No/Yes Back Light Intensity 1~10 Temperature Unit C/ F Auto Test N/A Manual Test 000~255 Fixture use time N/A Lamp On Time Exit/ Reset Time Firmware Version N/A Pan & Tilt Color Gobo & Iris Shutter & Dimmer No/Yes Focus & Zoom Prism & Frost All Fixture Maintenance Interval/Remain Time Factory Settings Yes/No N/A No/Yes N/A N/A N/A N/A N/A N/A N/A -14- Legend 1200E Spot User Manual Rev. 03c
19 Operation Programming Navigation Control DMX Operation DMX Address DMX Modes View DMX Values Fixture Settings Carry out all the programming procedures indicated below from the control panel. Refer to the Menu Map page to learn how the menu options relate to each other. The Control Panel s liquid crystal display (LCD) shows the menu items you select. When you select a menu function, the display will show the available options for the selected function with the first one already highlighted. If not at the home screen, press <MENU> repeatedly until the home screen shows. To enter programming mode from the home screen, press <MENU>. This is the first menu level. To highlight functions or options from a screen, rotate the jog wheel and stop at the desired function or option. To accept the highlighted option, press <ENTER>. This may open another screen, as per the Menu Map. To activate or enable a selected option, press <ENTER>. To return to the previous screen without changing the current option s value, press <MENU>. The Legend 1200E Spot operates always in standard DMX mode (no Slave, Auto, or ID addressing modes). The options in the DMX Operation section set the starting DMX address and the DMX mode as well as show the fixture s DMX configuration. To access this section, do the following: 1) Press <MENU>. 2) Select DMX Functions. 3) Select the corresponding function as indicated below. 4 Press <MENU> to exit once you are done with this section. To select the starting DMX address, do the following: 1) Select DMX Address. 2) Select a DMX address (001~512). To select the DMX mode, whether Basic (23 channels) or Advanced (31 channels), do the following: 1) Select DMX Channel Mode. 2) Select Mode 1 (23) (Basic) or Mode 2 (31) (Advanced). This option shows the values for all the fixture s DMX functions, from the first channel (starting address) to the last channel (23 for Basic and 31 for Advanced). 1) Select View DMX Value. 2) Press <ENTER> (the values will show on the screen). 3) Scroll with the jog wheel to see all values. 4) Press <MENU> to exit. The options in the Fixture Settings section set the pan and tilt modes as well as the blackout options. To access this section, do the following: 1) Press <MENU>. 2) Select Fixture Settings. 3) Select the corresponding function as indicated below. 4) Press <MENU> to exit once you are done with this section. Pan Reversal This option reverses the pan angle assignments from 000 = 0º and 255 = 540º to 000 = 540º and 255 = 0º. 1) Select Pan Inverse. 2) Select Yes (reversed assignments) or No (normal assignments). Continues on the next page Legend 1200E Spot User Manual Rev. 03c -15-
20 Operation Continued from previous page Tilt Reversal This option reverses the tilt angle assignments from 000 = 0º and 255 = 270º to 000 = 270º and 255 = 0º. 1) Select Tilt Inverse. 2) Select Yes (reversed assignments) or No (normal assignments). Blackout During Head Motion Blackout During Color Change Auto Focus Lamp Settings Lamp On/Off Immediate or Delayed Lamp Strike This option enables the blackout feature while the fixture head is moving (panning or tilting). 1) Select Bl.o. P/T Moving. 2) Select Yes (blackout enabled) or No (blackout disabled). This option enables the blackout feature while the fixture is changing colors. 1) Select Bl.o. Color Change. 2) Select Yes (blackout enabled) or No (blackout disabled). This option enables the auto focus feature while the fixture is zooming from narrow to wide and vice versa. 1) Select Auto Focus. 2) Select Yes (auto focus enabled) or No (autofocus disabled). The Lamp Settings section comprises all the parameters that affect the fixture s lamp and its operation. To access this section, do the following: 1) Press <MENU>. 2) Select Lamp Settings. 3) Select the corresponding function as indicated below. 4) Press <MENU> to exit once you are done with this section. This option allows turning the lamp off and back on without having to power cycle the fixture. 1) Select On/Off. 2) Select Yes or No. The lamp will turn on or off after pressing <ENTER>. This option allows the lamp to strike immediately (Yes) or in delayed mode (No) after powering on the fixture. Delaying the lamp strike reduces the inrush current. 1) Select State/Power On. 2) Select Yes (immediate) or No (delayed). The Ignition Delay option on page 17 controls the delay between power on and the lamp striking. Lamp On/Off Remote Control Lamp On When DMX is Present This option allows the lamp to turn the lamp off and back on from the DMX controller. 1) Select Off Via DMX. 2) Select Yes or No When enabled (Yes), this option turns the lamp on when DMX signal is present. 1) Select On if DMX On. 2) Select Yes or No Continues on the next page -16- Legend 1200E Spot User Manual Rev. 03c
21 Operation Continued from previous page Lamp Off When DMX is Absent Cooling Mode Ignition Delay Lamp Dousing Display Settings Display Reversal When enabled (Yes), this option turns the lamp off when DMX signal is absent. 1) Select Off if DMX Off. 2) Select Yes or No This option determines the speed of the cooling fans, whether always high or automatic. 1) Select Cooling Mode. 2) Select High or Auto. When the State/Power On option is active, this setting configures the delay before the lamp strikes after power on. 1) Select Ignition Delay. 2) Select the ignition delay in seconds (000 to 255). This option decreases the lamp power after the shutters/dimmers have been closed for a configurable time to reduce the internal heat accumulation. 1) Select Low Power Delay. 3) Select the time delay in seconds (000~255). 4) Press <ENTER>. The options in the Display Settings section control the operation of the fixture s LCD. To access this section, do the following: 1) Press <MENU>. 2) Select Display Settings. 3) Select the corresponding function as indicated below. 4) Press <MENU> to exit once you are done with this section. This option reverses the LCD orientation (180º) to read it upright when the fixture is hanging from a truss. 1) Select On/Off. 2) Select Yes or No. Back Light Automatic Off This option determines whether the LCD backlight will turn off automatically after 30 seconds of control panel inactivity. 1) Select Back Light Automatic Off. 2) Select Yes or No. Back Light Intensity Temperature Unit This option selects the intensity of the LCD backlight. 1) Select Back Light Intensity. 2) Select 1~10. When enabled (Yes), this option turns the lamp on when DMX signal is present. 1) Select On if DMX On. 2) Select ºC (Celsius) or ºF (Fahrenheit). Continues on the next page Legend 1200E Spot User Manual Rev. 03c -17-
22 Operation Continued from previous page Fixture Tests Auto Test Manual Test Fixture Information Fixture Operation Timer The options in the Lamp Settings section control what tests the fixture will run. To access this section, do the following: 1) Press <MENU>. 2) Select Fixture Tests. 3) Select the corresponding function as indicated below. 4) Press <MENU> to exit once you are done with this section. This option sets the fixture to run the automatic test. 1) Select Auto Test. 2) Press <ENTER>. The fixture will run a single sequence of tests to verify all its functions. This option allows the operator to select which tests to run. 1) Select Manual Test. 2) Select a function from the list (1~21). 3) Set the value (000~255) for the selected function (the fixture will assume the new function value, as if you had used a DMX controller). 4) Press <ENTER>. 5) Repeat steps 2 through 4 for the other functions. 6) When done with the test, press <MENU> (the fixture will go back to DMX mode and all the manually entered values will become 000). The options in the Fixture Information section control the fixture usage timers and show the firmware version. To access this section, do the following: 1) Press <MENU>. 2) Select Fixture Information. 3) Select the corresponding function as indicated below. 4) Press <MENU> to exit once you are done with this section. This option shows the time the fixture has been in operation. 1) Select Fixture use time. 2) Press <ENTER>. The fixture will show the accumulated time of operation. The Fixture Use Time is not resettable. Lamp Operation Timer Firmware Version Fixture Reset This option allows the operator see the fixture and lamp usage timers as well to reset the lamp usage timer after changing the lamp. 1) Select Lamp On Time (the accumulated lamp usage time will show). 2) Select Exit or Reset Time (do this only after changing the lamp). This option shows the installed firmware version for each of its various microcontrollers. 1) Select Firmware Version. 2) Press <ENTER>. The options in the Fixture Reset section control the resetting of the various functions of this fixture. To access this section, do the following: 1) Press <MENU>. 2) Select Reset Function. 3) Select the corresponding function as indicated below. 4) Press <MENU> to exit once you are done with this section. Continues on the next page -18- Legend 1200E Spot User Manual Rev. 03c
23 Operation Continued from previous page Pan & Tilt Color Shutter & Dimmer Zoom All Special Functions Fixture Maintenance Timers This option resets the pan and tilt of the fixture s head to their corresponding home positions. 1) Select Pan & Tilt. 2) Select Yes (reset) or No (exit without resetting). 2) Press <ENTER>. The fixture s will move to the pan and tilt home positions. This option resets the color wheel to its corresponding home position. 1) Select Color. 2) Select Yes (reset) or No (exit without resetting). 2) Press <ENTER>. The color wheel will move to its home position. This option resets the shutter and dimmer to their corresponding home positions. 1) Select Shutter & Dimmer. 2) Select Yes (reset) or No (exit without resetting). 2) Press <ENTER>. The shutter and dimmer will move to their corresponding home positions. This option resets the zoom to its home position. 1) Select Zoom. 2) Select Yes (reset) or No (exit without resetting). 2) Press <ENTER>. The zoom will move to its home position. This option resets all the motors to their corresponding home positions. 1) Select All. 2) Select Yes (reset) or No (exit without resetting). 2) Press <ENTER>. All motors will move to their corresponding home positions. The Special Functions section comprises the maintenance timer options and the factory default option. To access this section, do the following: 1) Press <MENU>. 2) Select Special Functions. 3) Select the corresponding function as indicated below. 4) Press <MENU> to exit once you are done with this section. This fixture has a built-in timer to remind the operator that it is time for the fixture s routine maintenance. When the preset time elapses, the warning icon shows on the LCD. 1) Select Fixture Maintenance. 2) To change the maintenance interval timer, a) Select Interval. b) Select the new interval (in hours). c) Press <MENU>. 3) To reset the remaining time counter, a) Select Remain Time. b) Select Reset Time (reset the timer) or Exit (exit without resetting). c) Press <MENU>. Continues on the next page Legend 1200E Spot User Manual Rev. 03c -19-
24 Operation Continued from previous page Factory Default If you want to default the fixture to its factory configuration, follow the following steps: 1) Select Factory Settings. 3) Select Yes (default fixture) or No (exit without defaulting). 4) Press <ENTER>. The above operation will default all the fixture s parameters to their original factory configuration values. Defaulting the fixture does not affect the home position settings. Offset Mode Entering Offset Mode Pan Motor Tilt Motor Shutter Motor Color Motor Cyan Dichroic Flag Motor Magenta Dichroic Flag Motor Yellow Dichroic Flag Motor 3200 K Filter Dichroic Flag Motor Gobo 1 Motor The Offset Mode provides fine adjustments for the home position of all the moving parts in the optical path as well as the pan and tilt movements. The home position is where the moving parts go when you reset them. In their corresponding home position, the moving parts should not show any border or reduce the light output. If they do, use the Offset Mode to fine adjust them. 1) Press <MENU> to enter the regular Menu Mode. 2) Press <ENTER> for more than three seconds to enter the Offset Mode (the Offset Mode menu will show). 4) Press <MENU> to exit once you are done with offset adjustments. 1) Select Pan and press <ENTER> (a pop up window will open). a) Select the new value (-128~127). b) Accept the new value. 1) Select Tilt and press <ENTER> (a pop up window will open). a) Select the new value (-128~127). b) Accept the new value. 1) Select Shutter and press <ENTER> (a pop up window will open). a) Select the new value (0~255). b) Accept the new value. 1) Select Color 1 and press <ENTER> (a pop up window will open). a) Select the new value (-128~127). b) Accept the new value. 1) Select Cyan and press <ENTER> (a pop up window will open). a) Select the new value (0~255). b) Accept the new value. 1) Select Magenta and press <ENTER> (a pop up window will open). a) Select the new value (0~255). b) Accept the new value. 1) Select Yellow and press <ENTER> (a pop up window will open). a) Select the new value (0~255). b) Accept the new value. 1) Select 3200 K Filter and press <ENTER> (a pop up window will open). a) Select the new value (0~255). b) Accept the new value. 1) Select Gobo 1 and press <ENTER>. a) Select the new value (-128~127). b) Accept the new value. Continues on the next page -20- Legend 1200E Spot User Manual Rev. 03c
25 Operation Continued from previous page R-Gobo 1 Motor Gobo 2 Motor R-Gobo 2 Motor Iris Motor Prism Motor R-Prism Motor Frost Motor Focus Motor Zoom Motor 1) Select R-Gobo 1 and press <ENTER>. a) Select the new value (-128~127). b) Accept the new value. 1) Select Gobo 2 and press <ENTER>. a) Select the new value (-128~127). b) Accept the new value. 1) Select R-Gobo 2 and press <ENTER>. a) Select the new value (-128~127). b) Accept the new value. 1) Select Iris and press <ENTER>. a) Select the new value (0~255). b) Accept the new value. 1) Select Prism and press <ENTER>. a) Select the new value (0~255). b) Accept the new value. 1) Select R-Prism and press <ENTER>. a) Select the new value (-128~127). b) Accept the new value. 1) Select Frost and press <ENTER>. a) Select the new value (0~255). b) Accept the new value. 1) Select Focus and press <ENTER>. a) Select the new value (0~255). b) Accept the new value. 1) Select Zoom and press <ENTER>. a) Select the new value (0~255). b) Accept the new value. Legend 1200E Spot User Manual Rev. 03c -21-
26 Operation DMX Values Mode 1 (Basic) Channel Function Value Percent/Setting 1 Pan ~540º 2 Pan Fine ~100% 3 Tilt ~270º 4 Tilt Fine ~100% 5 Pan/Tilt Speed Fast~slow 6 Dimmer ~100% 7 Shutter 8 Color Cyan ~100% 10 Magenta ~100% 11 Yellow ~100% K Filter ~100% 13 Gobo 1 14 R-Gobo 1 15 Gobo Closed Open Macro 1 (open~closed) (slow~fast) Macro 2 (open~closed) (fast~slow) Macro 3 (open~closed) (slow~fast~slow) Random Strobe Open Open (white) Red Dark Blue Pink Green Yellow Orange UV Split Colors CCW rotation (fast~slow) Stop CW rotation (slow~fast) Open (white) Gobo 1 Gobo 2 Gobo 3 Gobo 4 Gobo 5 Gobo 6 Gobo 1 shake Gobo 2 shake Gobo 3 shake Gobo 4 shake Gobo 5 shake Gobo 6 shake CCW rotation (fast~slow) Stop CW rotation (slow~fast) Gobo indexing CCW rotation (fast~slow) Stop CW rotation (slow~fast)) Open (white) Gobo 7 Gobo 8 Gobo 9 Gobo 10 Gobo 11 Gobo 12 Gobo 7 shake Gobo 8 shake Gobo 9 shake Gobo 10 shake Continues on the next page -22- Legend 1200E Spot User Manual Rev. 03c
27 Operation Continued from previous page Mode 1 (Cont.) Channel Function Value Percent/Setting 15 Gobo 2 (Cont.) 16 R-Gobo Gobo 11 shake Gobo 12 shake CCW rotation (fast~slow) Stop CW rotation (slow~ fast) Gobo indexing CCW rotation (fast~slow) Stop CW rotation (slow~fast) 17 Focus Narrow~wide 18 Zoom ~ Open Effect 1 19 Effect/prism Effect Effect Effect 4 Effect Macro 1~24 20 R-Effect/Prism Gobo indexing CCW rotation (fast~slow) Stop CW rotation (slow~fast) 21 Iris ~0% 22 Frost ~100% Open closed (fast~slow) Closed open (fast~slow) Frost Frost effect 23 Function No function Auto focus (enable) Auto focus (disable) Fan speed (auto) Fan speed (high) No function Pan/tilt move-in-black (enable) Pan/tilt move-in-black (disable) Color move-in-black (enable) Color move-in-black (disable) Gobo move-in-black (enable) Gobo move-in-black (disable) Lamp On Pan/tilt reset Color reset Gobo1/Gobo2/Iris reset Shutter reset Focus/zoom reset Frost/effect reset Reset all Pan/tilt/color/gobo move-in-black (enable) Pan/tilt/color/gobo move-in-black (disable) Lamp off No function End of Mode 1 Legend 1200E Spot User Manual Rev. 03c -23-
28 Operation Mode 2 (Advanced) Channel Function Value Percent/Setting 1 Pan ~540 2 Pan fine ~100% 3 Tilt ~270 4 Tilt fine ~100% 5 Pan/tilt Speed Fast~slow 6 Dimmer ~100% 7 Dimmer fine ~100% 8 Shutter 9 Color Cyan ~100% 11 Magenta ~100% 12 Yellow ~100% K Filter ~100% 14 Filters Speed Fast~slow 15 Gobo 1 16 R-Gobo R-Gobo 1 Fine ~100% 18 Gobo Closed Open Macro 1 (open~closed) (slow~fast) Macro 2 (open~closed) (fast~slow) Macro 3 (open~closed) (slow~fast~slow) Random Strobe Open Open (white) Red Dark Blue Pink Green Yellow Orange UV Split Colors CCW rotation (fast~slow) Stop CW rotation (slow~fast) Open (white) Gobo 1 Gobo 2 Gobo 3 Gobo 4 Gobo 5 Gobo 6 Gobo 1 shake Gobo 2 shake Gobo 3 shake Gobo 4 shake Gobo 5 shake Gobo 6 shake CCW rotation (fast~slow) Stop CW rotation (slow~fast) Gobo indexing CCW rotation (fast~slow) Stop CW rotation (slow~fast)) Open (white) Gobo 7 Gobo 8 Gobo 9 Gobo 10 Gobo 11 Gobo 12 Gobo 7 shake Gobo 8 shake Gobo 9 shake Continues on the next page -24- Legend 1200E Spot User Manual Rev. 03c
29 Operation Continued from previous page Mode 2 (Cont.) Channel Function Value Percent/Setting 18 Gobo 2 (Cont.) 19 R-Gobo Gobo 10 shake Gobo 11 shake Gobo 12 shake CCW rotation (fast~slow) Stop CW rotation (slow~fast) Gobo indexing CCW rotation (fast~slow) Stop CW rotation (slow~fast)) 20 R-Gobo 2 Fine ~0% 21 Focus Narrow~wide 22 Zoom ~30 23 Effect/prism 24 R-Effect/prism Open Effect 1 Effect 2 Effect 3 Effect 4 Effect Macro 1~24 Gobo indexing CCW rotation (fast~slow) Stop CW rotation (slow~fast)) 25 Iris ~0% 26 Frost ~100% Open~closed (fast~slow) Closed~open (fast~slow) Frost Frost effect 27 Pan/tilt Macro (works with Channel 28) Off Macro 1 Macro 2 Macro 3 Macro 4 Macro 5 Macro 6 Macro 7 Macro 8 Macro 9 Macro 10 Macro 11 Macro 12 Macro 13 Macro 14 Macro 15 Macro 16 Macro 17 Macro 18 Macro 19 Macro 20 Macro 21 Macro 22 Macro 23 Macro 24 Macro 25 Macro 26 Macro Macro Range ~100% (works with Channel 27) Continues on the next page Legend 1200E Spot User Manual Rev. 03c -25-
30 Operation Continued from previous page Mode 2 (Cont.) Channel Function Value Percent/Setting 29 Preset Color 30 Color Macro 31 Function White Color 1 Color 2 Color 3 Color 4 Color 5 Color 6 Color 7 Color 8 Color 9 Color 10 Color 11 Open Macro 1 Macro 2 Macro 3 Macro 4 Macro 5 Macro 6 Macro 7 Macro 8 Macro 9 Macro 10 Macro 11 Macro 12 No function Auto focus (enable) Auto focus (disable) Fan speed (auto) Fan speed (high) No function Pan/tilt move-in-black (enable) Pan/tilt move-in-black (disable) Color move-in-black (enable) Color move-in-black (disable) Gobo move-in-black (enable) Gobo move-in-black (disable) Lamp On Pan/tilt reset Color reset Gobo1/Gobo2/Iris reset Shutter reset Focus/zoom reset Frost/effect reset Reset all Pan/tilt/color/gobo move-in-black (enable) Pan/tilt/color/gobo move-in-black (disable) Lamp off No function End of Mode Legend 1200E Spot User Manual Rev. 03c

31 Technical Information 5. Technical Information General Maintenance To maintain optimum performance and minimize wear, the user should clean the light fixtures frequently. Usage and environment are contributing factors in determining the cleaning frequency. As a rule, the user should clean the fixtures at least twice a month. Dust build up reduces light output performance and can cause overheating. This can lead to reduced light source life and increased mechanical wear. CHAUVET recommends cleaning the fixture s external optics with a soft cloth using normal glass cleaning fluid. To clean a fixture, follow the recommendations below: Unplug the fixture from power. Wait until the fixture is cold. Use a vacuum (or dry compressed air) and a soft brush to remove dust collected on the external vents and reachable internal components. Clean all external optics and glass surfaces with a mild solution of glass cleaner or isopropyl alcohol, and a soft, lint free cotton cloth or a lens cleaning tissue. Apply the solution directly to the cloth or tissue and drag any dirt and grime to the outside of the lens. Gently polish the external glass surfaces until they are free of haze and lint. When cleaning units with a movable mirror, you should keep the contact with the mirror surface to a minimum to avoid scratching or damaging it. Always dry the external optics and glass surfaces carefully after cleaning them. If the fixture has one or more fans, refrain from spinning them using compressed air. Dust Screen Cleaning The Legend 1200E Spot fixture uses multiple fans. To prevent dust buildup on the components of the optic path, each of the fans on the forward section of the moving head have a dust screen as shown in the diagram below. To access the dust screens, remove the bottom and top housings of the moving head, at which point you will have be able to remove the housing sides. Once you have cleaned the dust screens, reverse the process to replace them. Despite having dust screens, the fixture still needs regular cleaning of its lenses, color wheels, and the other components in the optical path. Legend 1200E Spot User Manual Rev. 03c -27-
32 Technical Information Error Messages Message Cause(s) Action(s) Lamp Startup Fail Temperature Sense Fail The lamp has not started after being struck. There is no communication with temperature sensor. Lamp Hot Protection Fixture temperature is higher than 105º C; lamp was switched to low power for safety. Lamp Hot Power Off Fixture temperature is 110º C or higher; lamp was switched to off for safety. Check lamp Check lamp socket and wiring Check ballast and igniter Check sensor wiring Check sensor integrity Check control board Check fans Check fan wiring Clean vents Check fans Check fan wiring Clean vents Maintenance Fixture Fixture Maintenance timer expired. Proceed with maintenance and reset timer Lamp On Over 700 Hour Lamp change is overdue. Change lamp Memory Initial Fail Memory chip error found. Change main board Fan 1 Error Fan 2 Error Fan 3 Error Fan 4 Error Fan 5 Error Fan 6 Error CPU-B Error CPU-C Error CPU-D Error CPU-E Error CPU F Error CPU G Error CPU H Error Pan Home Sensor Error Pan Encode Error Tilt Home Sensor Error Tilt Encode Error Color 1 Reset Fail Cyan Reset Fail Magenta Reset Fail Yellow Reset Fail 3200 K Filter Reset Fail Gobo 1 Reset Fail R-Gobo 1 Reset Fail Gobo 2 Reset Fail R-Gobo Reset Fail Iris Reset Fail Effect Reset Fail R-Effect Reset Fail Frost Reset Fail Focus Reset Fail Zoom Reset Fail The indicated fan is not working. Check fan Check fan wiring There is no communication with the indicated auxiliary CPU. The moving head failed going to home position after power up or fixture reset. The indicated moving part failed going to home position after power up or fixture reset. Check sensors wiring and position Check stepper motor, belt, and driver board Check control boards Check moving head s free movement Check sensors wiring and position Check stepper motor, belt,and driver board Check the corresponding control board Check main control board Check part s free movement and integrity Check sensors wiring and position Check stepper motor, belt, and driver board Check the corresponding control board Check main control board -28- Legend 1200E Spot User Manual Rev. 03c
33 Technical Information Troubleshooting Guide Symptom Cause(s) Action(s) Fixture does not power up Fixture powers up but lamp does not ignite Lamp ignited but has low intensity/color temperature Lamp flickers or turns off by itself Circuit breaker/fuse keeps tripping/blowing Fixture does not respond to DMX when nearby fixtures on the same universe do DMX signal problems No power on outlet Repair outlet problem or use another outlet Blown fuse Replace blown fuse with same type and rating fuse Bad power cord/plug Repair or replace power cord/plug Bad power switch Replace power switch Bad power supply Replace power supply Bad main controller Replace main controller State/Power On parameter set to NO Change parameter to YES Lamp temperature problems Check error messages and follow instructions Lamp problems Check error messages and follow instructions Dimmer not at full output Adjust dimmer value Lamp still cold Wait for lamp to come up with full output temperature CTC or CMY filter interfering Set color wheel or filter to home position Defective or old lamp Replace lamp Misaligned lamp Realign lamp Defective lamp wires or socket Repair/change wiring or socket Defective ballast Replace ballast Defective or old lamp Replace lamp Temperature problems Check error messages and follow instructions Defective lamp wires or socket Repair/change wiring or socket Defective ballast Replace ballast Excessive circuit load Check total load placed on the electrical circuit Short circuit along the power wires Check for a short in the electrical wiring Wrong DMX addressing Check DMX mode and starting DMX address Damaged DMX cables Check DMX cables Wrong polarity on the controller Check polarity switch settings on the controller Loose DMX cables Check cable connections Faulty DMX interface Replace the Main board Faulty Display/Main board Replace the Main board Non DMX cables Use only DMX compatible cables Bouncing signals Install terminator as suggested Long cable / low level signal Install an optically coupled DMX splitter right after the fixture with the strong signal Too many fixtures Install an optically coupled DMX splitter after unit #32 or before Interference from AC wires Keep DMX cables separated from power cables or fluorescent/black lights If you still experience technical problems after trying the above solutions, contact CHAUVET Technical Support. Legend 1200E Spot User Manual Rev. 03c -29-
Edition Notes. Edition Notes. Trademarks. Copyright Notice. Manual Usage. Document Printing. Intended Audience. Disclaimer
 User Manual Edition Notes Edition Notes Trademarks Copyright Notice Manual Usage Document Printing Intended Audience Disclaimer CHAUVET Publications Hot Line Document Revision The Q-Spot 160-LED User Manual
180w led gobo moving USER MANUAL
 180w led gobo moving USER MANUAL 1. BEFORE YOU BEGIN What is included 1 x Light 1 x Mounting bracket and screws 1 x Power cable 1 x User Manual Unpacking Instructions Congratulations on purchasing ART-TECH
Edition Notes. Edition Notes. Trademarks CHAUVET is a registered trademark of CHAUVET & Sons Inc. (d/b/a CHAUVET or
 User Manual Edition tes Edition tes The Legend 230SR Beam User Manual Rev. 3 covers the description, safety precautions, installation, programming, operation, and maintenance of the Legend 230SR Beam.
TABLE OF CONTENTS. Returns Contact Us Page 2 of 21 Intimidator Spot LED 450 User Manual Rev. 2
 User Manual TABLE OF CONTENTS 1. Before You Begin...3 What Is Included... 3 Unpacking Instructions... 3 Claims... 3 Text Conventions... 3 Symbols... 3 Disclaimer... 3 Product at a Glance... 4 Safety Notes...
Quick Reference Guide
 Quick Reference Guide About this Guide Disclaimer The Q-Wash 360Z-LED Quick Reference Guide (QRG) only contains the product s connection and mounting information as well as the menu options and the DMX
Edition Notes. Copyright Notice. Disclaimers. Trademarks. Intended Audience. CHAUVET Publications Hot Line. Document Revision. Fixture at a Glance
 User Manual Edition Notes Copyright Notice CHAUVET released this edition of the Legend 1200E Spot User Manual Rev. 02c in July 2009. The Legend 1200E Spot User Manual Rev. 02c covers the description, safety
Edition Notes. Edition Notes. Trademarks CHAUVET is a registered trademark of CHAUVET & Sons LLC. (d/b/a CHAUVET
 User Manual Edition Notes Edition Notes The Rogue R1 Beam User Manual Rev. 3 covers the description, safety precautions, installation, programming, operation, and maintenance of the Rogue R1 Beam. Chauvet
1. Before You Begin... 3
 User Manual TABLE OF CONTENTS 1. Before You Begin... 3 What Is Included... 3 Unpacking Instructions... 3 Claims... 3 Text Conventions... 3 Symbols... 3 Disclaimer... 3 Product at a Glance... 4 Safety Notes...
TABLE OF CONTENTS. Page 2 of 18 Intimidator Barrel LED 300 User Manual (Rev. 5)
") User Manual TABLE OF CONTENTS 1. Before You Begin...3 What Is Included... 3 Unpacking Instructions... 3 Claims... 3 Text Conventions... 3 Icons... 3 Product at a Glance... 4 Safety Notes... 4 2. Introduction...5
User Manual TABLE OF CONTENTS 1. Before You Begin...3 What Is Included... 3 Unpacking Instructions... 3 Claims... 3 Text Conventions... 3 Icons... 3 Product at a Glance... 4 Safety Notes... 4 2. Introduction...5
Edition Notes. Edition Notes. Trademarks CHAUVET is a registered trademark of CHAUVET & Sons, LLC. (d/b/a CHAUVET
 User Manual Edition Notes Edition Notes The Legend 330SR Spot User Manual Rev. 7 covers the description, safety precautions, installation, programming, operation, and maintenance of the Legend 330SR Spot.
TABLE OF CONTENTS. 1. Before you Begin... 3 What is Included... 3 Unpacking Instructions... 3 Text Conventions... 3 Icons... 3 Safety Notes...
 User Manual TABLE OF CONTENTS 1. Before you Begin... 3 What is Included... 3 Unpacking Instructions... 3 Text Conventions... 3 Icons... 3 Safety Notes... 4 2. Introduction... 5 Product Overview... 5 3.
1. BEFORE YOU BEGIN INTRODUCTION CONTROL FEATURES... 5 Additional Features... 5 PRODUCT OVERVIEW SETUP... 6
 User Manual TABLE OF CONTENTS 1. BEFORE YOU BEGIN... 3 WHAT IS INCLUDED... 3 UNPACKING INSTRUCTIONS... 3 MANUAL CONVENTIONS... 3 ICONS... 3 SAFETY INSTRUCTIONS... 4 2. INTRODUCTION... 5 CONTROL FEATURES...
Edition Notes. Edition Notes. Trademarks CHAUVET is a registered trademark of CHAUVET & Sons, LLC. (d/b/a CHAUVET
 User Manual Edition tes Edition tes The Legend 230SR Beam User Manual Rev. 5 covers the description, safety precautions, installation, programming, operation, and maintenance of the Legend 230SR Beam.
Edition Notes. Edition Notes. Trademarks. Copyright Notice. Manual Usage. Document Printing. Intended Audience. Disclaimer.
 User Manual Edition Notes Edition Notes Trademarks Copyright Notice Manual Usage Document Printing Intended Audience Disclaimer Document Revision The Q-Wash 560Z-LED User Manual Rev. 12 covers the description,
TABLE OF CONTENTS. Page 2 of 18 Intimidator Spot LED 250 User Manual (Rev. 6)
") User Manual TABLE OF CONTENTS 1. Before You Begin...3 What Is Included... 3 Unpacking Instructions... 3 Claims... 3 Text Conventions... 3 Symbols... 3 Document Information... 3 Product at a Glance... 4
User Manual TABLE OF CONTENTS 1. Before You Begin...3 What Is Included... 3 Unpacking Instructions... 3 Claims... 3 Text Conventions... 3 Symbols... 3 Document Information... 3 Product at a Glance... 4
TABLE OF CONTENTS. Page 2 of 16 COLORband PiX IP User Manual (Rev. 1)
") User Manual TABLE OF CONTENTS 1. Before You Begin...3 What Is Included... 3 Unpacking Instructions... 3 Claims... 3 Text Conventions... 3 Icons... 3 Disclaimer... 3 Product at a Glance... 4 Safety Notes...
User Manual TABLE OF CONTENTS 1. Before You Begin...3 What Is Included... 3 Unpacking Instructions... 3 Claims... 3 Text Conventions... 3 Icons... 3 Disclaimer... 3 Product at a Glance... 4 Safety Notes...
1. BEFORE YOU BEGIN INTRODUCTION SETUP... 7
 User Manual TABLE OF CONTENTS 1. BEFORE YOU BEGIN... 3 WHAT IS INCLUDED... 3 UNPACKING INSTRUCTIONS... 3 MANUAL CONVENTIONS... 3 ICONS... 3 SAFETY NOTES... 4 2. INTRODUCTION... 5 PRODUCT OVERVIEW... 6
Edition Notes. Edition Notes. Trademarks CHAUVET is a registered trademark of CHAUVET & Sons, LLC. (d/b/a CHAUVET or Chauvet).
.") User Manual Edition Notes Edition Notes The OVATION Min-E-10CW User Manual Rev. 3 covers the description, safety precautions, installation, programming, operation, and maintenance of the OVATION Min-E-10CW.
User Manual Edition Notes Edition Notes The OVATION Min-E-10CW User Manual Rev. 3 covers the description, safety precautions, installation, programming, operation, and maintenance of the OVATION Min-E-10CW.
TABLE OF CONTENTS. 1. Before you Begin Introduction Setup Operation Technical Information...
 User Manual TABLE OF CONTENTS 1. Before you Begin... 3 What is Included... 3 Unpacking Instructions... 3 Text Conventions... 3 Icons... 3 Document Information... 3 Product at a Glance... 4 Safety Notes...
EDITION NOTES. Document Revision
 User Manual EDITION NOTES The STRIKE 1 User Manual includes a description, safety precautions, installation, programming, operation and maintenance instructions for the STRIKE 1 as of the release date
Edition Notes. Edition Notes
 User Manual Edition Notes Edition Notes This User Manual Rev. 2 covers the description, safety precautions, installation, programming, operation, and maintenance of the COLORdash Par-Tri 18VW. CHAUVET
ALO 030 MKII. 30 Watt DMX LED scanner. User manual
 ALO 030 MKII 30 Watt DMX LED scanner User manual Safety instructions WARNING! Always keep this device away from moisture and rain! Hazardous electrical shocks may occur! WARNING! Only connect this device
TABLE OF CONTENTS. Page 2 of 25 COLORband PiX-M User Manual (Rev. 1)
") User Manual TABLE OF CONTENTS 1. Before You Begin...3 What Is Included... 3 Unpacking Instructions... 3 Claims... 3 Text Conventions... 3 Symbols... 3 Disclaimer... 3 Product at a Glance... 4 Safety Notes...
User Manual TABLE OF CONTENTS 1. Before You Begin...3 What Is Included... 3 Unpacking Instructions... 3 Claims... 3 Text Conventions... 3 Symbols... 3 Disclaimer... 3 Product at a Glance... 4 Safety Notes...
Edition Notes. Edition Notes. Trademarks. Copyright Notice. Manual Usage. Document Printing
 User Manual Edition Notes Edition Notes Trademarks Copyright Notice Manual Usage Document Printing The COLORado 1 Tour User Manual Rev. 02 covers the description, safety precautions, installation, programming,
TABLE OF CONTENTS. Product Maintenance Technical Specifications...18 Returns Contact Us... 19
 User Manual TABLE OF CONTENTS 1. Before You Begin...3 What Is Included... 3 Unpacking Instructions... 3 Claims... 3 Text Conventions... 3 Symbols... 3 Disclaimer... 3 Product at a Glance... 4 Safety Notes...
Fixture One XLR Signal Cable One Omega Clamp - Two Safety Chain One User Manual - One
 TABLE OF CONTENTS 1. INTRODUCTION AND UNPACKING 1 2. SAFTEY INSTRUCTIONS 1-2 3. OPERATION INSTRUCTIONS 2-3 4. MOUNTING AND INSTALLATION 3-4 5. DMX-512 CONTROL CONNECTIONS 4-5 6. MENU NAVIGATION 5 7. PHOTOMETRIC
User Manual. Snapshot. Use on Dimmer. Outdoor Use. Sound Activated DMX. Master/Slave. Auto-ranging Power Supply. Replaceable Fuse.
 Snapshot Use on Dimmer Outdoor Use Sound Activated DMX Master/Slave Auto-ranging Power Supply Replaceable Fuse User Serviceable Duty Cycle User Manual 3000 N 29 th Ct, Hollywood, FL 33020 U.S.A. (800)
LED Spot 300W. Please read this user manual before your operation
 LED Spot 300W Please read this user manual before your operation 1. Introduction 2. General Guideline 3. Safety Instructions 4. Cleaning and Maintenance 5. Technical Parameters 6. DMX Channels 7. Remark
TABLE OF CONTENTS. Page 2 of 16 COLORrail IRC IP User Manual (Rev. 1)
") User Manual TABLE OF CONTENTS 1. Before You Begin...3 What Is Included... 3 Unpacking Instructions... 3 Claims... 3 Text Conventions... 3 Icons... 3 Disclaimer... 3 Product at a Glance... 4 Safety Notes...
User Manual TABLE OF CONTENTS 1. Before You Begin...3 What Is Included... 3 Unpacking Instructions... 3 Claims... 3 Text Conventions... 3 Icons... 3 Disclaimer... 3 Product at a Glance... 4 Safety Notes...
Snapshot. Kinta X USER MANUAL
 Kinta X Snapshot OK on Dimmer Outdoor OK Sound Activated DMX5 Master/Slave 5V/30V Switch Replaceable Fuse User Serviceable Duty Cycle USER MANUAL 500 NW 08th Avenue, Sunrise, FL 3335 U.S.A. (800) 76-084
1. Before you Begin Introduction Setup Operation Technical Information Technical Specifications...
 User Manual TABLE OF CONTENTS 1. Before you Begin... 3 What is Included... 3 Unpacking Instructions... 3 Text Conventions... 3 Icons... 3 Safety Notes... 4 2. Introduction... 5 Product Overview... 5 3.
Edition Notes. Edition Notes. Trademarks. Copyright Notice. Manual Usage. Document Printing. Intended Audience. Disclaimer
 User Manual Edition Notes Edition Notes Trademarks Copyright Notice Manual Usage Document Printing Intended Audience Disclaimer CHAUVET Publications Hot Line Document Revision The COLORado 1-Tri IP User
The STRIKE 4 User Manual Rev. 1 is the first edition of this manual. Go to for the latest version.
 User Manual Edition Notes Edition Notes The STRIKE 4 User Manual Rev. 1 covers the description, safety precautions, installation, programming, operation, and maintenance of the STRIKE 4. Chauvet released
Edition Notes. Edition Notes. Trademarks. Copyright Notice. Manual Usage. Document Printing
 User Manual Edition Notes Edition Notes Trademarks Copyright Notice Manual Usage Document Printing The COLORado 2 Tour User Manual Rev. 02b covers the description, safety precautions, installation, programming,
Snapshot. LED Mushroom USER MANUAL. OK on Dimmer Outdoor OK Sound-Activated DMX512 Master/Slave 115V/230V Switch Replaceable Fuse User-Serviceable
 LED Mushroom Snapshot OK on Dimmer Outdoor OK Sound-Activated DMX5 Master/Slave 5V/30V Switch Replaceable Fuse User-Serviceable USER MANUAL 500 NW 08th Avenue, Sunrise, FL 3335 U.S.A. (800) 76-084 (954)
The Synapse 4 User Manual Rev. 1 is the first edition of this manual. Go to for the latest version.
 User Manual Edition Notes Edition Notes The Synapse 4 User Manual Rev. 1 covers the description, safety precautions, installation, programming, operation, and maintenance of the Synapse 4. Chauvet released
thinpar 38
 thinpar 38 OWNER S MANUAL www.venuelightingeffects.com INTRODUCTION The Venue Thinpar 38 is a DMX intelligent LED Par Can. It is lightweight and compact which makes it a great light for clubs, parties,
1. Before You Begin... 3
 User Manual TABLE OF CONTENTS 1. Before You Begin... 3 What Is Included... 3 Unpacking Instructions... 3 Claims... 3 Text Conventions... 3 Symbols... 3 Disclaimer... 3 Product at a Glance... 4 Safety Notes...
TABLE OF CONTENTS. 1. Before You Begin...3
 User Manual TABLE OF CONTENTS 1. Before You Begin...3 What Is Included... 3 Unpacking Instructions... 3 Claims... 3 Text Conventions... 3 Icons... 3 Document Information... 3 Product at a Glance... 4 Safety
1. Before You Begin... 3
 User Manual TABLE OF CONTENTS 1. Before You Begin... 3 What Is Included... 3 Unpacking Instructions... 3 Claims... 3 Text Conventions... 3 Symbols... 3 Disclaimer... 3 Product at a Glance... 4 Safety Notes...
TABLE OF CONTENTS. 2. Introduction... 3 Product Overview... 3 Product Dimensions... 3
 User Manual TABLE OF CONTENTS Table of Contents 1. Before You Begin... 1 What Is Included... 1 Unpacking Instructions... 1 Claims... 1 Text Conventions... 1 Symbols... 1 Disclaimer... 1 Safety Notes...
EDITION NOTES. Document Revision
 User Manual EDITION NOTES The Maverick MK1 Spot User Manual includes a description, safety precautions, installation, programming, operation and maintenance instructions for the Maverick MK1 Spot as of
1. Before You Begin Introduction Setup Operation Technical Information Technical Specifications...
 User Manual TABLE OF CONTENTS 1. Before You Begin... 3 What Is Included... 3 Unpacking Instructions... 3 Text Conventions... 3 Icons... 3 Document Information... 3 Product at a Glance... 4 Safety Notes...
Snapshot DMX MEGA STROBE III. User Manual
 DMX MEGA STROBE III Snapshot Use on Dimmer Outdoor Use Sound Activated DMX5 Master / Slave 5 V / 30 V Switch Resettable Breaker User Serviceable Duty Cycle User Manual 3000 N 9 th Ct, Hollywood, FL 3300
PRODUCT SPECIFICATIONS
 FOS Beam 150W 1 PRODUCT SPECIFICATIONS TECHNICAL SPECIFICATION Voltage: 100/240 Volt AC, 50/60 Hz. Power Consumption: 250 Watt. Light Source: 150 Watt LED, 6800K Beam angle: 2 Colors: 11 dichroic color
LED Thunder S-150 Code 1097
 LED Thunder S-150 Code 1097 User Manual 1 1 SAFETY INSTRUCTIONS This device has left the factory in perfect condition. In order to maintain this condition and to ensure a safe operation, it is absolutely
Edition Notes. Edition Notes. Trademarks CHAUVET is a registered trademark of CHAUVET & Sons Inc. (d/b/a CHAUVET or
 User Manual Edition Notes Edition Notes The Q-Wash 436Z-LED User Manual Rev. 2 covers the description, safety precautions, installation, programming, operation, and maintenance of the Q-Wash 436Z-LED.
1. Before You Begin... 3
 User Manual TABLE OF CONTENTS 1. Before You Begin... 3 What Is Included... 3 Unpacking Instructions... 3 Claims... 3 Text Conventions... 3 Symbols... 3 Disclaimer... 3 Product at a Glance... 4 Safety Notes...
1. Before You Begin... 3
 User Manual TABLE OF CONTENTS 1. Before You Begin... 3 What Is Included... 3 Unpacking Instructions... 3 Claims... 3 Text Conventions... 3 Symbols... 3 Disclaimer... 3 Product at a Glance... 4 Safety Notes...
Edition Notes. Edition Notes. Trademarks CHAUVET, the Chauvet logo and Maverick MK1 Hybrid are registered trademarks or
 User Manual Edition Notes Edition Notes The Maverick MK1 Hybrid User Manual Rev. 1 covers the description, safety precautions, installation, programming, operation, and maintenance of the Maverick MK1
Edition Notes. Document Revision
 User Manual Edition Notes The Ovation F-55WW User Manual includes a description, safety precautions, installation, programming, operation and maintenance instructions for the Ovation F-55WW as of the release
1. Before You Begin... 4
 User Manual TABLE OF CONTENTS 1. Before You Begin... 4 What is Included... 4 Unpacking Instructions... 4 Claims... 4 Text Conventions... 4 Symbols... 4 Disclaimer... 4 Product at a Glance... 5 Safety Notes...
Table of Contents TABLE OF CONTENTS. Line Dancer User Manual Rev. 1
 User Manual TABLE OF CONTENTS Table of Contents 1. Before You Begin... 1 What Is Included... 1 Unpacking Instructions... 1 Claims... 1 Text Conventions... 1 Symbols... 1 Disclaimer... 1 Product at a Glance...
TABLE OF CONTENTS. Page 2 of 24 CORE 3x3 User Manual Rev. 2
 User Manual TABLE OF CONTENTS 1. Before You Begin... 3 What Is Included... 3 Unpacking Instructions... 3 Claims... 3 Text Conventions... 3 Symbols... 3 Disclaimer... 3 Product at a Glance... 4 Safety Notes...
TABLE OF CONTENTS. Page 2 of 17 COLORstrip User Manual (Rev. 5)
") User Manual TABLE OF CONTENTS 1. Before You Begin...3 What Is Included... 3 Claims... 3 Text Conventions... 3 Symbols... 3 Document Information... 3 Product at a Glance... 4 Safety Notes... 4 2. Introduction...5
User Manual TABLE OF CONTENTS 1. Before You Begin...3 What Is Included... 3 Claims... 3 Text Conventions... 3 Symbols... 3 Document Information... 3 Product at a Glance... 4 Safety Notes... 4 2. Introduction...5
BEAM MOVING HEAD YODN Lamp. 132W 2R MOVING HEAD Brightness / Stability USER MANUAL. Version 1.0 beta
 BEAM MOVING HEAD YODN Lamp W R MOVING HEAD Brightness / Stability This product manual contains important information about the safe installation and use of this projector. Please read and follow these
1. Before You Begin... 4
 User Manual TABLE OF CONTENTS 1. Before You Begin... 4 What Is Included... 4 Unpacking Instructions... 4 Claims... 4 Text Conventions... 4 Symbols... 4 Disclaimer... 4 Product at a Glance... 5 Safety Notes...
ORLAND SCAN PR PR LIGHTING LTD. Yingbin Road, Dashi Panyu, Guangzhou, China
 ORLAND SCAN PR-1201 This product manual contains important information about the safe installation and use of this projector. Please read and follow these instructions carefully and keep this manual in
PRODUCT SPECIFICATIONS
 FOS Spot 150W 1 PRODUCT SPECIFICATIONS TECHNICAL SPECIFICATION Voltage: 100/240 Volt AC, 50/60 Hz. Power Consumption: 250 Watt. Light Source: 150 Watt LEDs, 7500K. Beam angle: 14. Colors: 8 colors + White
User Manual. Snapshot. Use on Dimmer. Outdoor Use. Sound Activated DMX. Master/Slave. Auto-ranging Power Supply. Replaceable Fuse.
 Snapshot Use on Dimmer Outdoor Use Sound Activated DMX Master/Slave Auto-ranging Power Supply Replaceable Fuse User Serviceable Duty Cycle User Manual 500 NW 08th Avenue, Sunrise, FL 3335 U.S.A. (800)
Edition Notes. Edition Notes. Trademarks. Copyright Notice. Manual Usage. Document Printing. Intended Audience. Disclaimers
 User Manual Edition Notes Edition Notes Trademarks Copyright Notice Manual Usage Document Printing Intended Audience Disclaimers CHAUVET Publications Hot Line Document Revision CHAUVET released this edition
User Manual. Snapshot. Use on Dimmer. Outdoor Use. Sound Activated DMX. Master/Slave. Auto-ranging Power Supply. Replaceable Fuse.
 Snapshot Use on Dimmer Outdoor Use Sound Activated DMX Master/Slave Auto-ranging Power Supply Replaceable Fuse User Manual User Serviceable Duty Cycle 5200 NW 108 th Ave Sunrise, FL 33351 (800) 762-1084
Edition Notes. Edition Notes. Trademarks CHAUVET is a registered trademark of CHAUVET & Sons Inc. (d/b/a CHAUVET or
 User Manual Edition Notes Edition Notes The COLORado Déco Quad-1 Tour User Manual Rev. 2 covers the description, safety precautions, installation, programming, operation, and maintenance of the COLORado
BEFORE YOU BEGIN INTRODUCTION CONTROL FEATURES... 5 Additional Features... 5 PRODUCT OVERVIEW SETUP...
 User Manual TABLE OF CONTENTS... 1 1. BEFORE YOU BEGIN... 3 WHAT IS INCLUDED... 3 UNPACKING INSTRUCTIONS... 3 MANUAL CONVENTIONS... 3 ICONS... 3 SAFETY INSTRUCTIONS... 4 2. INTRODUCTION... 5 CONTROL FEATURES...
aorun manual V2.0 MARCH 2018
 aorun manual V2.0 MARCH 2018 table of CONTENTS Dimensions 2 Safety instruction 5 Physical installation 6 Control panel 8 Menu navigation 9 DMX Protocols 12 DMX protocol CH14 12 DMX protocol CH16 15 DMX
1. Before You Begin... 4
 User Manual TABLE OF CONTENTS 1. Before You Begin... 4 What Is Included... 4 Unpacking Instructions... 4 Claims... 4 Text Conventions... 4 Symbols... 4 Disclaimer... 4 Product at a Glance... 5 Safety Notes...
BEAM MOVING HEAD WITH 100W OSRAM HRI LAMP AND 8-FACET PRISM USER GUIDE
 BEAM MOVING HEAD WITH 100W OSRAM HRI LAMP AND 8-FACET PRISM USER GUIDE 10410 - Version 1 / 11-2015 English Ray1R - Beam moving head with 100W OSRAM HRI LAMP and 8-facet prism 1 - Safety information Important
LED Techno Strobe RGB ST-4000RGB USER MANUAL
 LED Techno Strobe RGB ST-4000RGB USER MANUAL CHAUVET5200 NW 108th Avenue, Sunrise, FL 33351 U.S.A (800) 762-1084 (954) 577-4455 FAX (954) 929-5560 www.chauvetlighting.com Table of Contents 1. BEFORE YOU
Dragonfly Quad. User Manual V1.4. Order code: EQLED101
 Dragonfly Quad User Manual V1.4 Order code: EQLED101 Safety advice WARNING FOR YOUR OWN SAFETY, PLEASE READ THIS USER MANUAL CAREFULLY BEFORE YOUR INITIAL START-UP! Before your initial start-up, please
1. Before You Begin... 3
 User Manual TABLE OF CONTENTS 1. Before You Begin... 3 What Is Included... 3 Unpacking Instructions... 3 Claims... 3 Text Conventions... 3 Symbols... 3 Disclaimer... 3 Product at a Glance... 4 Safety Notes...
TABLE OF CONTENTS. 2. Introduction... 3 Product Overview... 3 Product Dimensions... 3
 User Manual TABLE OF CONTENTS Table of Contents 1. Before You Begin... 1 What Is Included... 1 Unpacking Instructions... 1 Claims... 1 Text Conventions... 1 Symbols... 1 Disclaimer... 1 Intellectual Property...
BSL HELIOS USERS GUIDE
 BSL HELIOS USERS GUIDE 1. Product Introduction: 1.1 Before unpack the fixture, pls make sure that the packing is in good condition, following items will be found in the box: - The fixture - This users
LED SPOT HEAD USERS GUIDE
 LED SPOT HEAD USERS GUIDE 1 1. Product Introduction: 1.1 Before unpack the fixture, pls make sure that the packing is in good condition, following items will be found in the box: - The fixture - This users
User Manual. Snapshot. Use on Dimmer. Outdoor Use. Sound Activated DMX. Master/Slave. 115 V / 230 V Switchable. Replaceable Fuse.
 Snapshot Use on Dimmer Outdoor Use Sound Activated DMX Master/Slave 115 V / 230 V Switchable Replaceable Fuse User Serviceable Duty Cycle User Manual 3000 N 29 th Ct, Hollywood, FL 33020 U.S.A. (800) 762-1084
MHL-1410WISPOT 14X 10W QUAD DMX 2.4GHZ
 Ref. No.: 150.523 MHL-1410WISPOT 14X 10W QUAD DMX 2.4GHZ MANUAL Thank you for purchasing one of our products. Before you use this product please read these instructions carefully to enjoy optimal performance
TABLE OF CONTENTS. Intimidator Spot 100 IRC User Manual
 User Manual TABLE OF CONTENTS 1. Before You Begin...3 What Is Included... 3 Unpacking Instructions... 3 Claims... 3 Text Conventions... 3 Symbols... 3 Disclaimer... 3 Product at a Glance... 4 Safety Notes...
LED Beam Moving Head. TWIST-150LED Order No INSTRUCTION MANUAL
 LED Beam Moving Head TWIST-150LED Order No. 38.7970 INSTRUCTION MANUAL MONACOR INTERNATIONAL GmbH & Co. KG Zum Falsch 36 28307 Bremen Germany www.monacor.com 01.30.11.2016 ELECTRONICS FOR SPECIALISTS ELECTRONICS
LED SPOT HEAD USERS GUIDE
 LED SPOT HEAD USERS GUIDE 1. Product Introduction: 1 1.1 Before unpack the fixture, pls make sure that the packing is in good condition, following items will be found in the box: -The fixture -This users
ArtFox Lighting. LED Beam Wash 19E. User manual. 6. Fixture Cleaning. Please read the instructions carefully before use
 6. Fixture Cleaning ArtFox Lighting LED Beam Wash 19E The cleaning of internal and external optical lenses and/or mirrors must be carried out periodically to optimize light output. Cleaning frequency depends
Edition Notes. Edition Notes. Trademarks CHAUVET, the Chauvet logo and Maverick MK1 Hybrid are registered trademarks or
 User Manual Edition Notes Edition Notes The Maverick MK1 Hybrid User Manual Rev. 7 covers the description, safety precautions, installation, programming, operation, and maintenance of the Maverick MK1
KingWash 7QX 7x40w,Zoom 5-60degree. User manual. Please read the instructions carefully before use TABLE OF CONTENTS
 KingWash 7QX 7x40w,Zoom 5-60degree User manual Please read the instructions carefully before use TABLE OF CONTENTS 1. Safety Instructions... 2 2. Technical Specifications... 4 3. How To Control The Unit...
*Lens tubes sold separately. User Manual
 *Lens tubes sold separately User Manual Edition Notes Edition Notes The OVATION E-190WW User Manual Rev. 5 covers the description, safety precautions, installation, programming, operation, and maintenance
Edition Notes. Document Revision
 User Manual Edition Notes The Ovation F-145WW User Manual includes a description, safety precautions, installation, programming, operation and maintenance instructions for the Ovation F-145WW as of the
FXpar 9 User Manual Rev. 1
 User Manual FXPAR 9 1. Before You Begin... 1 What Is Included... 1 Unpacking Instructions... 1 Claims... 1 Text Conventions... 1 Symbols... 1 Disclaimer... 1 Product at a Glance... 2 Safety Notes... 2
TABLE OF CONTENTS. Page 2 of 21 COLORband PiX User Manual Rev. 6
 User Manual TABLE OF CONTENTS 1. Before You Begin... 3 What Is Included... 3 Unpacking Instructions... 3 Claims... 3 Text Conventions... 3 Icons... 3 Document Information... 3 Product at a Glance... 4
1. Before You Begin... 4
 User Manual TABLE OF CONTENTS 1. Before You Begin... 4 What Is Included... 4 Unpacking Instructions... 4 Claims... 4 Text Conventions... 4 Symbols... 4 Disclaimer... 4 Product at a Glance... 5 Safety Notes...
Edition Notes. Edition Notes. Trademarks CHAUVET is a registered trademark of CHAUVET & Sons Inc. (d/b/a CHAUVET or
 User Manual Edition Notes Edition Notes The COLORado 1-TRI TOUR User Manual Rev. 2 covers the description, safety precautions, installation, programming, operation, and maintenance of the COLORado 1-TRI
www. eklights.com Guangzhou Liangyi Lighting Equipments Co.,Ltd. 37 Gongyedadao, Xinhua, Huadu, Guangzhou PC:510800
 Guangzhou Liangyi Lighting Equipments Co.,Ltd. 37 Gongyedadao, Xinhua, Huadu, Guangzhou PC:510800 Tel: (020)666 090 88-8002 Fax: (020) 868 670 11 www. eklights.com USER MANUAL CONTENTS SAFETY DIMENSION
Edition Notes. Edition Notes. Trademarks. Copyright Notice. Manual Usage. Document Printing. Intended Audience. Disclaimer.
 User Manual Edition Notes Edition Notes Trademarks Copyright Notice Manual Usage Document Printing Intended Audience Disclaimer Document Revision The COLORado 1 Quad Tour User Manual Rev. 2 covers the
EZwedge Tri User Manual Rev. 1
 User Manual EZwedge Tri User Manual Rev. 1 TABLE OF CONTENTS 1. Before You Begin... 3 What Is Included... 3 Unpacking Instructions... 3 Claims... 3 Text Conventions... 3 Symbols... 3 Disclaimer... 3 Product
Edition Notes. Edition Notes
 User Manual Edition Notes Edition Notes This user manual covers the description, safety precautions, installation, programming, operation, and maintenance of the Q-Wash 419Z-LED. Chauvet released this
LED Spot Light User Manual Model LS90 Big Dipper Laser Science And Technology Co., Ltd Please read this manual carefully before operating
 LED Spot Light User Manual Model:LS90 Big Dipper Laser Science And Technology Co., Ltd REV: 1.01 Please read this manual carefully before operating Warnings: Please check the package whether any damage
Table of Contents TABLE OF CONTENTS. EVE P-130 RGB User Manual Rev. 4
 User Manual TABLE OF CONTENTS Table of Contents 1. Before You Begin... 1 What Is Included... 1 Unpacking Instructions... 1 Claims... 1 Text Conventions... 1 Symbols... 1 Disclaimer... 1 Intellectual Property...
TFX-950CM Stage Wash 950
 TFX-950CM Stage Wash 950 USER MANUAL Chauvet, 3000 N 29 th Ct, Hollywood, FL 33020 U.S.A (800) 762-1084 (954) 929-1115 FAX (954) 929-5560 www.chauvetlighting.com TABLE OF CONTENT BEFORE YOU BEGIN... 3
JunoScan MK-II LED scanner. user manual
 JunoScan MK-II LED scanner user manual Musikhaus Thomann e.k. Treppendorf 30 96138 Burgebrach Germany Telephone: +49 (0) 9546 9223-0 E-mail: info@thomann.de Internet: www.thomann.de 26.10.2012 Table of
TABLE OF CONTENTS TABLE OF CONTENTS
 User Manual TABLE OF CONTENTS TABLE OF CONTENTS 1. Edition Notes... 1 Trademarks... 1 Copyright Notice... 1 Manual Use... 1 Document Printing... 1 Intended Audience... 1 Disclaimer... 1 Document Revision...
Edition Notes. Edition Notes. Trademarks CHAUVET is a registered trademark of CHAUVET & Sons Inc. (d/b/a CHAUVET or
 User Manual Edition Notes Edition Notes The COLORado 2 Zoom IP User Manual Rev. 3 covers the description, safety precautions, installation, programming, operation, and maintenance of the COLORado 2 Zoom
Edition Notes. Document Revision
 User Manual Edition Notes The Ovation F-915VW User Manual includes a description, safety precautions, installation, programming, operation and maintenance instructions for the Ovation F-915VW as of the
Edition Notes. Edition Notes. Trademarks CHAUVET, the Chauvet logo and OVATION F-95WW are registered trademarks or
 User Manual Edition Notes Edition Notes The OVATION F-95WW User Manual Rev. 6 covers the description, safety precautions, installation, programming, operation, and maintenance of the OVATION F-95WW. Chauvet
User Manual. 360W LED Moving Zoom KEEP THIS MANUAL FOR FUTURE NEEDS. 36pcs10W 4 in 1 RGBW LEDs
 User Manual 360W LED Moving Zoom 36pcs10W 4 in 1 RGBW LEDs KEEP THIS MANUAL FOR FUTURE NEEDS 1. Dispacking Thank you for choosing our moving head. For your own safety, please read this manual before installing