Operating Manual Englisch UFS 931sw/HD+
|
|
|
- Joan Daniels
- 5 years ago
- Views:
Transcription


1 Operating Manual Englisch UFS 931sw/HD+
2 Preface Dear customer, this operating manual is intended to help you make the fullest use of the extensive range of functions offered by your new HD+ satellite receiver. We have tried to make the operating instructions as easy as possible to understand, and to keep them as concise as possible. To help you understand particular specialist terms that cannot be translated, we have added a short glossary at the end of the manual. If you will not be using your receiver for a longer period, you should use disconnect it from the mains to save energy. For shorter breaks, you can use the remote control to switch the receiver to standby, which uses only a minimal amount of energy. We wish you good reception and hope you will enjoy using your new HD+ receiver. Your KATHREIN team 2


3 Difference Between PAL and HDTV The difference between PAL and HDTV High-resolution TV is characterised by a signifi cantly higher number of picture lines on the TV set. The usual European standard PAL achieves a resolution of 576 lines vertically and 720 lines horizontally. The high-resolution TV provides an impressive resolution, up to fi ve times higher than the usual PAL standard TV, and hence delivering more detail sharpness and responsiveness. A HDTV picture can contain up to fi ve times as many picture points, that is, approximately 2 million pixels compared to a conventional PAL picture with only approximately 400,000 pixels. Worldwide there are currently two HDTV standards, based on the two formats 1080i and 720p. The two standards differ in the number of picture lines and in the transmission procedure. To the human eye, the difference between the two HDTV standards is hardly perceptible; whereas in comparison to the PAL system, moving pictures look much more dynamic in HDTV. Transmission technology and reception equipment will be able to handle both standards in the future. 1080i 1920 x p 1280 x 720 PAL 720 x 576 3
4 List of Contents Preface... 2 Difference Between PAL and HDTV... 3 List of Contents... 4 Safety Instructions - Important Notes... 6 Connection and Set-Up Scope of supply Inserting batteries into the remote control Front/rear view of the receiver (front flap open) Connecting the receiver TV connection Audio connection Digital Analogue First installation Common Interface Important information Inserting the HD+ Card in the smart card reader Inserting the smart card and the CA module Basic Functions Remote control for live operation (TV/Radio) I want to watch TV I want to listen to the radio I want to see teletext Editing and selection options in the menus Channel selection from the channel list Channel Information Calling up the channel options Audio Selection Subtitles Selection Teletext Electronic Programme Guide (EPG) General information on the programme guide Calling up the EPG Navigation in the EPG (remote control buttons in the EPG) Views using the EPG Current View Preview View (Program guide) Timer List View Genres view (movies, series...) Recording settings (programming the timer) Recording Once Only Recording Daily Recording Weekly Recording Monday to Friday Overlapping recordings Timer List Main Menu Calling up the main menu and introduction Menu overview Main Menu - Edit Channel List Calling up the Edit Channel List menu Editing channel list Editing TV or radio channel lists Pre-sorting complete channel list (filtering) Moving a channel Adding channel to favourites list Deleting channel or removing from favourites list Main Menu - Search for Channels Standard Channel Search Automatic Search Advanced Channel Search
5 List of Contents Main Menu - Security Main Menu - Settings Video Settings Audio Settings Menu Settings Miscellaneous CA module CI (Common Interface) Common interface expert settings LNB Settings General Terms and Conditions of Business for HD For your notes Main Menu - Service Menu Sat Finder Channel Information Smartcard (HD+ Card) PIN Change (HD+ Card) System Information (Update Software) Update Software Restore Factory Settings Main Menu - Language Troubleshooting Technical Appendix Alphanumeric entries Advanced connection example Technical specifications Sat IF connection examples Single systems Community antenna network systems (4 x Sat IF) Community antenna network systems (8 x Sat IF), multi-feed Community antenna network systems (16 x Sat IF), multi-feed Single cable systems Short technical guide Service
6 Safety Instructions - Important Notes These two pages contain important information about operation, installation location and connection of the unit. Read these instructions carefully before setting up the device. Danger! Mains cable Make sure that the mains cable (power supply cable) is not damaged. Units with a damaged mains cable must be disconnected from the mains (unplugged at the mains power socket) and repaired by an electrical specialist before being used. Only use the power pack supplied (if available)! Risk of fatal injury due to electric shock! Moisture, direct sunlight, heat, naked flames Protect the unit against moisture, dripping and splashed water (do not place any fi lled objects such as vases on top of the unit). Do not place the unit close to a heater or expose it to direct sunlight and do not operate it in damp locations. Only use the unit in a moderate climate, not in tropical conditions! Place no naked fl ames such as candles on top of the unit! There is a risk of fi re! Cleaning Disconnect the mains plug before cleaning the unit. Only use a dry cloth for cleaning and only clean the outer surface. Never open the casing of the unit. Touching the parts inside the unit carries a risk of death due to electric shock! Warning! Playing children Make sure that children do not push any objects into the ventilation slots. Risk of fatal injury due to electric shock! Earthing The antenna system must be earthed as specifi ed or equipotentially bonded. EN 60728/11 and any national regulations must be complied with. Risk of voltage surges due to lightning strikes! Power supply voltage Only operate the unit at the specified mains voltage (indicated on the rear of the unit or on the external power pack). The unit may only be connected to the mains and switched on once it has been connected to the antenna and to the TV set or the cable network and PC. If the mains voltage is too high, there is a risk of fi re! Warning! Warning! Do not cover Batteries If your unit was supplied with batteries (e.g. for the remote control), take care that the batteries are not exposed to excessively high temperatures, direct sunshine or fi re. Exchange the batteries only with types that are identical or equivalent. Otherwise the batteries and also the remote control may be damaged. Comply also with the safety instructions stated on the batteries: There is a risk of explosions! Ventilation The heat generated in this unit is adequately dissipated. However, the unit should never be installed in a cupboard or on shelves with inadequate ventilation. Never cover the cooling slots on the unit (e.g. with other equipment, magazines, tablecloths, clothing or curtains)! 6
7 Safety Instructions - Important Notes Important! Do not place any objects on top of the unit. Unless stated to the contrary in the Connection and Set-Up and Installation sections in the manual supplied, maintain a clearance of at least 10 cm above the unit, 2 cm to either side and 5 cm behind the unit, to allow unobstructed dissipation of the heat generated. There is a risk of fi re! Repairs Ensure that any repairs to your unit are carried out by qualifi ed personnel. Opening the unit and attempting to repair it yourself voids all warranty claims! Improper work on the unit may jeopardise the electrical safety of the unit. The manufacturer accepts no liability for accidents caused by the user opening the casing of the unit! Connections Incorrect wiring of the connections can lead to malfunctions or defects on the unit! Periods of extended absence, thunderstorms, mains socket accessibility In order to disconnect the unit from the mains completely, the mains plug must be unplugged from the wall socket! Therefore install the unit close to a mains socket and make sure that socket is accessible at all times, so that you can disconnect the unit from the mains if necessary. If you are away for an extended period, and during thunderstorms, always switch the unit off at the mains and unplug it from the socket. This also applies to the other equipment connected to the unit. Isolation from the cable network is also recommended. Note any timer programming (receiver) and turn the unit on again promptly before the recording time. Installation location All electronic equipment generates heat, The temperature rise of this unit does however lie within the permissible range. Sensitive furniture surfaces and veneers may become discoloured by the effects of constant heat over time. The feet of the unit can also cause colour changes to treated furniture surfaces. If necessary, place the unit on a suitable stable and fl at base! Electronic equipment is not domestic waste - it must be disposed of properly in accordance with directive 2002/96/EC OF THE EUROPEAN PARLIAMENT AND THE COUNCIL dated 27 th January 2003 concerning used electrical and electronic appliances. At the end of its service life, take this device for disposal at a designated public collection point. Spent batteries are special waste! Do not throw spent batteries into your domestic waste; take them to a collection point for spent batteries! The Die HD+ Card Karte is ist only intended ausschließlich to be used für die in Nutzung in der Bundesrepublik the Federal Republic Deutschland bestimmt. of Germany. 7

8 Safety Instructions - Important Notes The channels available on the satellites and transponders are subject to continual change. If changes do occur, the new channels have to be set on the receiver because the factory preset programming corresponds to the status on the date of manufacture. The information for these settings can be found on the Internet or in relevant magazines. Your receiver was equipped in the factory with the latest software version at that time. We are, however, constantly working on adapting the software to the wishes of our customers and to developments in technology. Further information on this can be found in the chapters Main Menu - Service Menu, System information - (software update). Please keep the original packaging in case you need to return the product at any time! The receivers are fragile due to their construction and are only adequately protected by the original packaging. If the receiver is not shipped correctly the guarantee/warranty on it will be voided. Any modifi cations to the receiver software, or the use of applications not provided by Kathrein, will invalidate the warranty! You will have to bear the costs yourself for shipping and repairing any receiver that requires attention due to modifi cations to the software and use of applications other than those provided by Kathrein! Therefore exclusively use only software and applications provided by Kathrein for your receiver. These are available by downloading from the satellite or from our Internet pages ( Make sure that the ventilation slots on the unit are not covered in any way. Otherwise the unit may overheat. There is a risk of fire! The power supply unit and the receiver are for indoors use only! Use the power supply unit supplied with the receiver. The use of any power supply unit may damage the receiver. There is a risk of fire! The original power supply unit may differ from that illustrated 8
9 Safety Instructions - Important Notes Before you switch disconnect the receiver from the mains, you must switch it to the standby mode by pressing the stand-by button ( ) on the remote control. In standby mode, any changed or new data that is broadcast will be saved by the receiver. As soon as the receiver is in the standby mode, it can be disconnected from the mains at any time. You must not disconnect the receiver from the mains while it is in operation! This can lead to a loss of data and corruption of the software. This unit makes use of legally protected technologies, which are protected by patents in the USA and also by other intellectual property rights in other countries. KATHREIN-Werke KG has obtained licences from Audio MPEG Inc. and Societa Italiana per lo sviluppo dell elettronica, S.I.SV.EL, S.P.A to use these technologies. These licences carry certain restrictions, which apply also to you as the customer. Accordingly this unit may only be used by the end customer for private non-commercial purposes and for the licensed content. It may not be used for commercial purposes. The use of products or processes that are sold or used with this unit is not included in this statement. The use of reverse engineering is not permitted in respect of the licensed technologies, nor is disassembly. The information in this operating manual was correct at the time of going to print. We reserve the right however to make changes at any time and without prior notice. If new software is released for your receiver, and this affects the information in the operating manual (e.g. changes to the menus and/ or functions), if we believe it necessary we will make available a new operating manual for download under Make a note of the receiver's basic settings (these are set during the fi rst installation), so you can restore them if necessary! The term DiSEqC used in this operating manual is a registered trade mark of the European Telecommunication Satellite Organisation (EUTELSAT). Manufactured under licence from Dolby Laboratories. Dolby and the double-d symbol are registered trademarks of Dolby Laboratories. HDMI, the HDMI logo and High-Defi nition Multimedia Interface are trademarks or registered trademarks of HDMI Licensing LLC. 9
10 Connection and Set-Up UFS 931sw Remote control RC 671 HDMI cable 2 batteries AAA 1.5 V Power supply unit 230 V/12 V Operating Manual Safety instructions (multi-lingual) Remove the cover on the rear of the remote control. Insert the two batteries supplied into the remote control. Ensure correct polarity of the batteries; the + and markings as indicated inside the battery compartment. Slide the cover back onto the housing until it locks in place. 10
11 Connection and Set-Up 1. On/off switch (operation/standby) 1) 2. 4-character display 3. Common Interface for fi tting one CA module for Pay-TV cards 4. Card reader (Nagravision integrated - for HD+ Card) 5. Ejection button for CA module 6. RF(IF) input 7. USB 2.0 port (for service purposes only) 8. HDMI connection 9. Scart socket for TV connection 10. Audio outputs (L/R) - cinch sockets 11. Digital data stream output (SPDIF/Sony Philips Digital Interface Format) for Dolby Digital AC 3 audio 12. Power supply connection (12 V) 1) The unit is not fully disconnected from the mains (see the sections Safety Instructions - Important Instructions and Periods of extended absence, thunderstorms, mains socket accessibility ) LED in the front panel display: The LED lights up: Red Receiver is in standby mode The LED fl ashes: Red (once) Remote control has been operated Red (continuous) Recording in progress HDMI = High-Definition Multimedia Interface (digital interface for video and audio) RF(IF) = Intermediate frequency - satellite signal for the receiver converted by the LNB 11
12 Connection and Set-Up If you do not know the configuration of your satellite reception system, contact your specialist dealer. Connect the Sat IF inputs on the receiver to the satellite reception system. Use coaxial cable with an F standard connector (see illustration on right). Conventional DiSEqC system TV HDMI Scart Connect the satellite receiver (HDMI or alternatively TV Scart socket) and the TV set using an HDMI or Scart cable (see Connection example ). 12
13 Connection and Set-Up There are two ways you can access the digital audio. HDMI The stereo audio is transmitted to your TV set via the HDMI interface. If your TV set also supports Dolby Digital, you can also receive the Dolby Digital audio via the HDMI interface (provided broadcast by the channel provider). On this issue pay attention to the operating manual for your TV set. SPDIF Dolby Digital output The SPDIF output is intended for the connection of a Dolby Digital system (see Advanced connection example in the technical appendix). Connect the SPDIF output and the Dolby Digital system using an appropriate cable. If you want to play the sound on your hi-fi system, connect the audio cinch sockets to the input sockets on the hi-fi system, using an appropriate cable (see Advanced connection example in the technical appendix). SPDIF = Sony Philips Digital Interface Format (digital output for Dolby Digital AC 3 audio) 13

14 Connection and Set-Up Before you start to use the UFS 931, read the chapters Safety Instructions - Important Instructions, Important Information and Connection and Set-Up through to the item First installation. Do not connect the unit to the mains until all installation work has been properly carried out. The guidance provided in the First installation section assumes that the receiver has been properly connected as per the Safety Instructions - Important Information and Connection and Set-Up chapters through to the First installation section. Required buttons on remote control for fi rst installation:... Numeric input (Green) (Red) Go back one step in the fi rst installation Select/change individual menu parameters, navigation Proceed to next step in fi rst installation Confi rm the changed values/setting Cancel input, go back First switch your TV set on and select the AV-/HDMI input you have used to connect the receiver to your TV set. Switch on the receiver at the power switch on the front of the unit. Undertake the fi rst installation. If you have any questions or encounter problems, contact your specialist dealer. The following on-screen display appears: Tip! Always pay attention to the bar at the bottom of the onscreen display. This provides information on what to do next. Tip! Use the buttons to select the desired menu language for your receiver. The selected language will be given a coloured background. The following languages are available: German, English, French, Spanish, Italian, Turkish, Czech and Dutch. 14
15 Connection and Set-Up Press the (green) button to move to the next menu. The following on-screen display appears: Use the buttons here to select the basic settings for the video output of the receiver to the TV set. During this process refer to the operating manual for your TV set and take care to select only those settings that your TV set can process. Screen Format Here you can select the TV picture format. Either - 4:3 or - 16:9/Widescreen TV Picture Scaling Here you can select the type of screen display, depending on the setting of your TV format: - Screen format 4:3 : Pan & Scan or Letterbox - Screen format 16:9 : Always 16:9 or Automatic TV Output Format Select the type of video signal at the TV Scart socket here. Select the signal that your TV set can process. - FBAS Colour video baseband signal, - RGB Red/Green/Blue signal or - S-Video - Luminance/chrominance Press the (green) button to move to the next menu. 15
16 Connection and Set-Up The following on-screen display appears: Tip! If your receiver is connected as in the connection example (see illustration above), no changes are necessary in the rest of the first installation. If you are not familiar with the details of your reception system, note the following: In many cases the satellite reception system is a DiSEqC 1.0 system. This type of system is preadjusted. Confi rm the rest of the on-screen displays during the fi rst installation using the (green) button. You cannot damage your reception system during this process! If you do not receive a TV picture at the end of the first installation, contact your specialist dealer. Tip! You should perform the tuner configuration/make changes yourself only if you are fully familiar with the particulars of your reception system. You can set up the antenna (tuner) confi guration for the following types of reception systems: - DiSEqC Single Cable System - No LNB power (if your LNB has a dedicated power supply) - No DiSEqC - Toneburst Continue as described in the first installation for the type of reception you have selected. 16
17 Connection and Set-Up The individual items are selected using the buttons. If you need to access sub-menus, they can be called up using the button. The changes to the current settings can be performed using the buttons or the number pad. DiSEqC Sequence Using the buttons select here how often the DiSEqC command is to be sent. Position A-D (satellite selection) Position A Press the button to open the sub-menu. You can select a satellite and defi ne the related LNB confi guration (frequencies) for it. Then press the (green) button. If you change the default setting (in this example ASTRA 19.2 E ), a prompt Save LNB settings? will be displayed. Select Yes or No using the buttons and confirm your selection using the button. Repeat the process as necessary for the other positions (B, C, D). During the selection of the satellites, ensure you only select satellites that you can actually receive using your reception system. Press the (green) button to move to the next menu (software update). Continue the fi rst installation with the Software update chapter in the fi rst installation. LNB = Low Noise Block converter (feed system) 17
18 Connection and Set-Up The individual items are selected using the buttons. If you need to access sub-menus, they can be called up using the button. The changes to the current settings can be performed using the buttons or the number pad. The possible options for a single-cable system with Kathrein components are summarised at the end of this manual in the Technical Appendix section under Single-cable systems. Depending on the system to which they are connected, a maximum of four or eight receivers may be connected to a single-cable system (a twin receiver counts as two receivers). DiSEqC Sequence Cannot be changed. Position A and B (satellite selection - max. two) Position A Press the button to open the sub-menu. You can select a satellite and defi ne the related LNB confi guration (frequencies) for it. Then press the (green) button. If you change the default setting (in this example ASTRA 19.2 E ), a prompt Save LNB settings? will be displayed. Select Yes or No using the buttons and confirm your selection using the button. Repeat the process as necessary for the second position (B). 18 LNB = Low Noise Block converter (feed system)
19 Connection and Set-Up If you use a UAS 481 (single cable LNB) in your reception system, you are only allowed to select a satellite in position A. The remaining positions remain empty and must be set to Not used. In addition, for position A after pressing the button both frequencies (LOF) must be set to The settings can be made using the number pad or the keys. Then press the (green) button and on Save LNB settings select Yes. Confirm the selection with the button. Use the buttons to switch to the New SCD Registration line. Using the buttons select the Manual setting, and press the button. The following on-screen display appears: You can only use the Secure Channel with PIN function if this function is supported by the single-cable components used. In the case of Kathrein single-cable components, this is currently only the case for the EXU 908. Connected equipment Use the buttons to select the type of single cable system used in your reception system: If your system or your single cable component is not listed, select the setting Userdefi ned. Your available options are: - KATHREIN UAS 481 (single-cable LNB), - KATHREIN EXR 551, - KATHREIN EXR 552, - KATHREIN EXU 908 or - Userdefi ned (for all single-cable systems not covered by any of the above specifi cations) 19
20 Connection and Set-Up Refer to the documentation supplied with your system for the settings for the SCR, frequencies and any PIN assigned to the tuner. You will find there a printed list showing the assignment between the various SCRs and the respective transmission frequencies. It may happen that you cannot freely select the PIN for protection of individual frequencies; this also may be listed in the documentation for the single-cable components. Please note also that multiple receivers cannot share the same frequencies/ channels - the receivers would interfere with each other. Transmission channel Select a free available transmission channel. Transmission Frequency If not preset by the receiver, select here one of the free available transmission frequencies. See example on the right (EXR 551) assignment of a transmission channel to a transmission frequency. Secure Channel with PIN (not possible in every system) If your single cable system allows the transmission frequency to be protected by entering a PIN, this is the menu where that can be done. No other receiver can then use this transmission frequency unless the PIN is entered. Select the setting Yes. You then have the use of the number pad to enter a PIN code (0-255) in the line beneath Password PIN. Test Connection Switch to the Test Connection line and press the button. The receiver now tests the settings you have made. The following message appears: 20 SCR = Satellite Channel Router (transmission channel)
 and")
 button twice to move to the next menu (software update).")
21 Connection and Set-Up Press the button to confi rm the displayed message. If no connection can be established to the single-cable system, check your settings (transmission channel) and if necessary call for expert help. Press the button to confi rm the displayed message. Then press the (green) button twice to move to the next menu (software update). Continue the fi rst installation with the Software update chapter in the fi rst installation. 21
22 Connection and Set-Up The individual items are selected using the buttons. If you need to access sub-menus, they can be called up using the button. The changes to the current settings can be performed using the buttons or the number pad. Position A (satellite selection) Press the button to open the sub-menu. You can select a satellite and defi ne the related LNB confi guration (frequencies) for it. Then press the (green) button. If you change the default setting (in this example ASTRA 19.2 E ), a prompt Save LNB settings? will be displayed. Select Yes or No using the buttons and confirm your selection using the button. During the selection of the satellite, ensure you only select a satellite that you can actually receive using your reception system. Press the (green) button to move to the next menu (software update). Continue the fi rst installation with the Software update chapter in the fi rst installation. 22 LNB = Low Noise Block converter (feed system)
23 Connection and Set-Up The individual items are selected using the buttons. If you need to access sub-menus, they can be called up using the button. The changes to the current settings can be performed using the buttons or the number pad. Position A (satellite selection) Press the button to open the sub-menu. You can select a satellite and defi ne the related LNB confi guration (frequencies) for it. Then press the (green) button. If you change the default setting (in this example ASTRA 19.2 E ), a prompt Save LNB settings? will be displayed. Select Yes or No using the buttons and confirm your selection using the button. During the selection of the satellite, ensure you only select a satellite that you can actually receive using your reception system. Press the (green) button to move to the next menu (software update). Continue the fi rst installation with the Software update chapter in the fi rst installation. LNB = Low Noise Block converter (feed system) 23
24 Connection and Set-Up The individual items are selected using the buttons. If you need to access sub-menus, they can be called up using the button. The changes to the current settings can be performed using the buttons or the number pad. Position A-B (satellite selection) Position A Press the button to open the sub-menu. You can select a satellite and defi ne the related LNB confi guration (frequencies) for it. Then press the (green) button. If you change the default setting (in this example ASTRA 19.2 E ), a prompt Save LNB settings? will be displayed. Select Yes or No using the buttons and confirm your selection using the button. Repeat the process as necessary for the position (B). During the selection of the satellites, ensure you only select satellites that you can actually receive using your reception system. Press the (green) button to move to the next menu (software update). Continue the fi rst installation with the Software update chapter in the fi rst installation. 24 LNB = Low Noise Block converter (feed system)
25 Connection and Set-Up After the LNB settings the receiver starts a software update automatically. If new software is available for your receiver, it will be loaded automatically by the receiver. This software download can take up to an hour. However, you do not need to undertake the software update now, you can also update later manually using Main Menu, Service, System information. In this case cancel the software update using the button. You are prompted as to whether you are sure you want to cancel the software update. Use the buttons to select Yes and confi rm by pressing the button. The receiver automatically starts the channel search. 25
: Using the buttons you can select here the")
 are to be saved.")

26 Connection and Set-Up The following on-screen display appears: The following on-screen display then appears (a few seconds later): Using the buttons you can select here the country list (important for pre-sorting the programmes) in which the channels found (programmes) are to be saved. Currently only the selection Channel List Germany is available. Confi rm the selection with the button. The following on-screen display then appears: Press the button to terminate the first installation. The receiver automatically displays the TV picture. 26

27 Connection and Set-Up Always follow the operating instructions from your Pay-TV provider and the instructions supplied with the smart card and the CA module! The cards and modules are issued by the respective Pay TV providers, and contain the subscriber data and details of the channels for which the subscriber has paid. These channels are always scrambled. Contact the Pay TV provider if you are interested in subscribing to a particular Pay TV channel. You are responsible for the use of the smart card in the CA! The smart card sold by the Pay TV provider, specific to a particular encryption technology, is inserted into the CA module. Store your card and PIN code securely when not in use! The smart card reader (small slot) on the UFS 931 (Nagravision embedded) is intended to be used for the HD+ Card. The smart card reader is behind the fl ap on right on the front underneath the Common Interface (large slot). It must be possible to insert the smart card (chip contacts pointing down) in the smart card reader without the need for a large amount of force. Do not use excessive force and pay attention to the manual supplied with the smart card. 27
28 Connection and Set-Up The Common Interface (CI) on the UFS 931 is suitable for the use of one CA (Conditional Access) module. The CI slot is behind the fl ap on the right on the front. The CA module holds the smart card (chip contacts pointing downwards and towards socket strip) and is then inserted in the CI slot. The smart card should be inserted into the CA module without exerting excessive force. This also applies to inserting the CA module into the CI slot. Do not use a excessive force and follow the instructions supplied with the smart card and the CA module. To remove the module, press the relevant eject button. 28
 Call up channel information (info banner and detailed information) = Call up options menu = Switch between TV/radio mode Call up")
29 Basic Functions Currently unavailable Operation (on)/standby (off) Number pad Call up teletext Call up main menu Volume + (louder) Volume - (softer) Mute Channel selection = Call up favourites list = Display HD and audio settings Call up EPG (Electronic Programme Guide) Call up channel information (info banner and detailed information) = Call up options menu = Switch between TV/radio mode Call up the recording archive Select last channel called up, exit on-screen displays/ menus step by step = Navigation/channel or change channel option = Call up channel list, confi rmation/call up selection = Selection of sub-pages in teletext Not currently used = Teletext transparent = Teletext font size = Stop teletext search 29

30 Basic Functions - Using increase and decrease the volume - Using switch channels - Using display and hide again additional channel information - Using mute the audio - Using... enter the channel number directly - Using call up the channel list, - Using select a channel, - Using twice, call up channel and close channel list 30

31 Basic Functions - Using (blue) change to the radio mode - Using increase and decrease the volume - Using switch channels - Using display and hide again additional channel information - Using mute the audio - Using... enter the channel number directly - Using call up the channel list, - Using select a channel, - Using twice, call up channel and close channel list - Using (blue) change back to the TV mode 31

32 Basic Functions - Using call up teletext - Using... enter the required page directly or - Using page forward/backward - Using or return to TV 32

33 Basic Functions On some menus/on-screen displays the related views/selections have specifi c colour backgrounds. The colours assigned to the buttons are shown in the table below. Where the functions of these buttons are assigned for the current menu/view, they are also shown in the line at the bottom of the on-screen display. Colour Green Yellow Red Blue Button on the remote control Tip! Always pay attention to the bar at the bottom of the onscreen display. This provides information on what to do next. Tip! In many menus, all the editing and selection options for that menu are shown at the bottom of the on-screen display. Where a specifi c remote control button is required for executing them or calling them up, this also will be shown (see example screenshot above). 33


34 Basic Functions Press the button to open the channel list. The following on-screen display appears: Information on selecting favourites lists: You can also call up the favourites lists directly from TV screen, using the (red) button. Then use the buttons to select the desired favourites list. The desired channel is selected using the cursor ( ) buttons and confi rmed using the button. 34
 button: Call up the All Channels category Contains")

 buttons and called up using")
35 Basic Functions Now use the respective coloured button to select the category in which you wish to open a channel list: (red) button: Call up the Favourites category Contains the following channel lists: - Favourites lists 1-4 (green) button: Call up the All Channels category Contains the following channel lists: - Complete list - Channel lists sorted by satellite (yellow) button: Call up the alphabetically ordered lists Contains the following channel lists: - A-Z - Z-A Ordered by individual letters Channel list selection: Use the buttons to scroll through the currently available channel lists. Select the channel: After selecting the desired channel list, the desired channel is selected using the cursor ( ) buttons and called up using the button. To exit the channel list and return to the TV picture, press the button again, or press the button. 35

36 Basic Functions The channel info banner is shown for a few seconds each time the channel is changed (can be changed under Settings, Menu Settings ). However you can call up the banner again at any time using the button. The following icons (symbols) may appear in the channel info banner: Teletext is available Subtitles selected/number of subtitles available Soundtrack selected/number of soundtracks available Dolby Digital soundtrack selected Audio selection is: Stereo Programme broadcast in 4:3 format Portal channel selected/ number of channel options 36
. If, as in the example above, more than one page of text is available (1/2), you can display the second page with the aid of the button or the button.")

37 Basic Functions By pressing the button again or pressing it twice from the TV picture, you can display further additional information, if provided by the channel provider, on the current programme (see example screenshot on the right). If, as in the example above, more than one page of text is available (1/2), you can display the second page with the aid of the button or the button. Using the button, you can also see, if available, the additional information on the next programme. Using the button or the button you can leave the additional information and/or the program info banner and return to the TV picture. Portal channels bundle together several channel options. After selecting the portal channel press the (yellow) button. The following on-screen display appears (example): Use the buttons to select your desired channel option, and press the button to confirm your selection. 37
: Use the cursor ( ) buttons to select your desired soundtrack option, and press the button to")
 button twice.")
38 Basic Functions Press the (yellow) button (twice in case of a portal channel). The following on-screen display appears (example): Use the cursor ( ) buttons to select your desired soundtrack option, and press the button to confi rm your selection. If the channel banner includes the following symbol for subtitles, you can call up the Subtitle function as follows: Press the (yellow) button twice. The following on-screen display appears (example): Use the buttons to select the desired subtitles and confi rm by pressing the button. The receiver will automatically return to the TV picture. 38

39 Basic Functions This symbol channel. in the channel information shows you whether teletext is available for the selected When you press the button, the receiver processes the teletext service data for your TV set to display, even when the signal is encrypted. During the search, the page which is being searched for is displayed in the top left-hand corner with the time and date displayed at the top right. When the search is fi nished, the teletext broadcast by the relevant encrypted channel provider appears: You have several options for calling up the desired pages: - Entry using the number pad - Scroll backwards and forwards using the buttons - Scroll up and down in the sub-pages (e.g. 1/2 and 2/2) using the buttons - button teletext is displayed transparent - button teletext font size - button teletext search is stopped If you press the button again, the teletext is displayed transparent. Press the button to exit teletext. 39
40 Electronic Programme Guide (EPG) What is the electronic programme guide: The electronic programme guide (in the following section referred to as the EPG for short) provides all programme information free of charge (EPG data) and informs you up to a week in advance. However, this programme information must be broadcast by the related channel provider. If no EPG data are available the receiver, instead of showing information on the current program, shows the message No information available. EPG data update The EPG data for the currently selected channel are updated automatically in the background while you are watching a TV channel. The EPG data is not available immediately after first installation. The EPG data will only be updated when a channel is watched. 40
 - irrespective of which view you had set the last time you exited the EPG.")
41 Electronic Programme Guide (EPG) The EPG is called up by pressing the button. Each time the EPG is called up, you will automatically be shown the Current view (green) - irrespective of which view you had set the last time you exited the EPG. The following on-screen display appears (example): 1) Colour Button on the remote control View Green Currently showing Yellow Programme preview Red Timer list Blue Genres 41
42 Electronic Programme Guide (EPG) (red) button Call up the timer list (display of all pre-programmed recordings) buttons Navigation in the individual views (e.g. 15 minutes skip forward in the Current view) (yellow) button (blue) button button (red dot) button button,, buttons Call up a preview of the currently selected channel (Program guide) Call up the genres overview (P+) jump forwards 24 hours in the EPG, (P-) jump backwards 24 hours in the EPG (e.g. in Current and in Preview ) Add a programme to the recording settings Shows any further information on the selected programme Press one of these buttons in the Preview or Current view to close the EPG and display the selected programme on the TV screen Navigation within each view is always performed using the cursor ( ) buttons. The buttons allow you to select individual channels/ programs, and the buttons allow you to scroll from page to page in the currently selected list. Pressing the or button exits the EPG and returns to the TV picture. 42

43 Electronic Programme Guide (EPG) The Current view can be called up at any time in EPG by pressing the (green) button. In the Current view you can see all channels displayed in the order of the complete channel list. Provided that EPG data has been supplied by the channel provider, the receiver shows for each channel the current program being shown, with start time, fi nish time, and progression bar. You can use the cursor ( ) buttons to select the desired programme and if available you can use the button to call up further information on the desired programme. If you wish to view the programme currently being shown on a channel, you need not exit the EPG, just select the desired channel. At the top right of the screen you will see the current TV picture for the selected channel. The button allows you to look ahead in 15 minute steps to future programmes on the channels (press the button to return to the current time). 43


44 Electronic Programme Guide (EPG) The Preview view can be called up at any time in EPG by pressing the (yellow) button. In the Preview view you can see the programs for the currently selected channel. Provided that EPG data has been supplied/transmitted by the channel provider, the receiver displays the programme lists for one week in advance. You can use the cursor ( ) buttons to select the desired programme and, if available, you can use the button to open further information on the desired programme. You can use the buttons to scroll through the programmes in the order of the complete list of programmes; you remain however in the preview. The button allows you to scroll backwards and forwards a day at a time. Using the (red dot) button you can copy the selected programme to the recording settings (see the Recording settings item). The Timer List can be called up at any time in EPG by pressing the (red) button. You will fi nd a detailed explanation of the timer list in this chapter in the section Recording settings, Timer list. 44

45 Electronic Programme Guide (EPG) The Genres view can be called up at any time in EPG by pressing the (blue) button. In the Genres view you can display the programmes sorted by genre. Provided that EPG data has been supplied by the channel provider, the receiver sorts the programme into the existing categories. The following genres are available: Movies, Series, Sport, Children s programs, Entertainment, Current affairs, Reportage, Art & Culture, Education, Music, Leisure and Adult programs. You can select the required genre using the buttons. You can use the cursor ( ) buttons to select the desired programme in the genre and, if available, you can use the button to open further information on the desired programme. Using the (red dot) button you can copy the selected programme to the recording settings (see the Recording settings item). 45
 button appears at the bottom of the on-screen display.")
46 Electronic Programme Guide (EPG) The (red dot) button allows you to set a programme for recording at any time. The programme to be recorded can be selected in any of the EPG views, provided the (red dot) button appears at the bottom of the on-screen display. If the programme appears on the EPG: Select the desired programme and press the (red dot) button. The following on-screen display appears (see example screenshot on the right): Use the buttons to select the desired recording mode. The following recording mode options are available: - Once Only: The recording will be performed once - Daily: The recording will be performed daily at the time you specify - Weekly: The recording will be performed once a week on the same day and at the same time - Monday to Friday: The recording will be performed every week from Monday to Friday at the same time. Use the cursor ( ) buttons to select the further items and use the number pad to complete the settings. When all settings have been made, switch to the Apply line and press the button to apply/save the recording settings. The receiver then automatically displays the timer list in which you can see the recordings you have planned (see section Timer List ). A maximum of eight timers can be programmed. 46
47 Electronic Programme Guide (EPG) Programme not in EPG: Select any programme on the channel on which the desired programme is to be broadcast at a later date, and press the (red dot) button. The following on-screen display appears (example): As there is no EPG data, you must enter the data (date, start, end) manually. Enter the data using the cursor ( ) buttons or the number pad. In addition, you can also change the duration of the recording. The receiver automatically adjusts the end time for the recording to the duration you have selected. Press the button to save your settings. Use the buttons to select the Once Only recording mode (see screenshot on the right). You can then use the buttons to select the individual fi elds. Make the settings using the number pad or the buttons. When all settings have been made, switch to the Apply line and press the button to apply/save the recording settings. The receiver then automatically displays the timer list in which you can see the recordings you have planned (see section Timer List ). 47
48 Electronic Programme Guide (EPG) Use the buttons to select the Daily recording mode (see screenshot on the right). You can then use the buttons to select the individual fi elds. Make the settings using the number pad or the buttons. When all settings have been made, switch to the Apply line and press the button to apply/save the recording settings. The receiver then automatically displays the timer list in which you can see the recordings you have planned (see section Timer List ). Note that the day of the week for the selected programme is included in the recording planning. Therefore before applying the recording settings using the button, select the program on the day of the week that in future you will wish to make the weekly recording. You can then use the buttons to select the individual fi elds. Make the settings using the number pad or the buttons. When all settings have been made, switch to the Apply line and press the button to apply/save the recording settings. The receiver then automatically displays the timer list in which you can see the recordings you have planned (see section Timer List ). 48


49 Electronic Programme Guide (EPG) Use the buttons to select the Monday - Friday recording mode (see screenshot on the right). You can then use the buttons to select the individual fi elds. Make the settings using the number keys or the buttons. When all settings have been made, switch to the Apply line and press the button to apply/save the recording settings. The receiver then automatically displays the timer list in which you can see the recordings you have planned (see section Timer List ). If there is an overlap in the planning, the receiver will display the warning shown on the right as soon as you try to apply the recording settings. Using the buttons select whether you want to discard the recording settings (select No ) or whether you still want to plan the recording (select Yes ). If you save the recording despite an overlap, you must then delete one of the two overlapping recordings in the timer list (see Timer List). 49
50 Electronic Programme Guide (EPG) The Timer List view can be called up at any time in EPG by pressing the (red) button. The following on-screen display appears (example): The Timer List view shows you all the recordings that are scheduled. The cursor ( ) buttons allow you to select a recording. Using the button you can revise the recording settings again. Make the settings as described for the related type of recording. The (red dot) button allows you to delete a recording that had been scheduled. 50

51 Main Menu The main menu is called up by pressing the button. The following on-screen display appears: The programme showing on the currently selected channel always appears in the top right-hand corner of the main menu. The selected menus, sub-menus and items, and also the parameters to be set, are each marked in colour. Tip! Always pay attention to the bar at the bottom of the on-screen display. This provides information on what to do next. Tip! The sub-menus are selected using the buttons and called up using the button. Use the buttons also to select the sub-menu items. The settings of the various parameters in the individual items are performed using the buttons or the number pad. The main menu and sub-menus can be exited step-by-step using the button. Press the button to return directly from one of the menus to the TV picture. 51
52 Main Menu Main Menu (call up by pressing the button) Edit Channel List Search for Channels Security Box Settings Service Menu Favourites 1 Standard Channel Search Video Settings Sat Finder Favourites 2 Automatic Search Audio Settings Channel Information Favourites 3 Advanced Channel Search Menu Settings Smartcard Favourites 4 General Information PIN Change All Channels CA Module System Information LNB Settings Restore Factory Settings Language 52
53 Main Menu - Edit Channel List Select the Edit Channel List menu using the button, the buttons in the main menu and. All changes to the channel lists and favourites lists which you can make as described in the following chapter are not saved by the receiver unless, when you exit the menu by pressing the button, you answer Yes to the question Changes have been save changes?, using the button. If you give the answer No, all the settings/changes you made will not be saved and the menu left. If you select Cancel and confirm using the button, you will remain in the previously selected menu and can make further settings/changes if necessary. Using the (blue) button you can select whether you want to edit TV or radio channel lists (or favourites lists). The editing of channel lists/favourites lists is identical. 53
 button.")
54 Main Menu - Edit Channel List Before you start to edit the channel lists, you can have the receiver pre-sort the complete channel list by specifi c criteria. If you want pre-sorting, press the (yellow) button. The following on-screen display appears: You can now use the following sort options (select and set using the cursor ( ) buttons): - Satellite: All or select one of the satellites received - Channels: All, Only free-to-air channels or Only encrypted channels - Filter by: No additional fi lter or New channels - Sorting: Number, A-Z, Z-A or Service ID Once you have made all the settings, switch to the OK line and confi rm the sorting process using the button. The on-screen display is closed automatically by the receiver. If you want to move a channel to a favourites list, first select the right column (Favourites) using the buttons and then the required favourites list using the (red) button. Using the cursor ( ) buttons select the channel in the complete channel list (left column) or a previously selected favourites list (right column) that you want to move to another position. Then press the button. The channel name is marked in bold and indented a little from the left edge. Now select the new position using the cursor ( ) buttons and then confi rm the insertion at the 54
55 Main Menu - Edit Channel List position marked using the button. Press the button to exit the menu again. Using the cursor ( ) buttons select the channel in the Channels list that you want to add to one of the favourites lists (see example screenshot on the right). Using the (red) button you can select between the four existing favourites lists. Then press the button. The channel is copied to the selected favourites list. Press the button to exit the menu again. 55
 remain in the complete channel list and are only deleted from the selected favourites list.")
56 Main Menu - Edit Channel List Channels deleted from the complete channel list (left column) cannot be restored and cannot only be found again with a renewed channel search. Channels deleted from a favourites list (right column) remain in the complete channel list and are only deleted from the selected favourites list. If you want to delete a channel from a favourites list, first select the right column (Favourites) using the buttons and then the required favourites list using the (red) button. Using the cursor ( ) buttons select the channel in the complete channel list (left column) or a previously selected favourites list (right column) that you want to delete. Then press the button. The channel is deleted. Press the button to exit the menu again. 56

 the receiver shows all newly found channels in the channel list under the heading New Channels.")
57 Main Menu - Search for Channels After calling up the menu you will see the following on-screen display: You have three different search options: - Standard Channel Search - Automatic Channel Search - Advanced Channel Search Use the buttons to select the desired search type and confi rm your selection using the button. Standard Channel Search Automatic Search Advanced Channel Search The channel list currently set is updated All transponders for the satellite you selected will be searched Only the selected transponder for the satellite you selected will be searched Tip! After a search (of whatever type) the receiver shows all newly found channels in the channel list under the heading New Channels. You will fi nd this rubric in the channel list at the end of the green complete list (select using the buttons). The channel list is called up on to the TV screen by pressing the button (see also section Basic Functions, Channel selection from the channel list ). Tip! After calling up the menu you will see the following on-screen display: Press the button to start updating the list selected above. 57
58 The list you selected previously is updated by the receiver. After the update confi rm the receiver message displayed using the button. The receiver jumps back to the Search for Channels menu. Press the button to exit the menu again. After calling up the menu you will see the following on-screen display: The buttons allow you to select different sets of parameters for the search. Satellite Select the satellites to be searched using the buttons or select the setting All. If All is selected, all the satellites you have selected in LNB Settings will be searched. Make sure your reception system is aligned to the selected satellite(s). Channels to search for Use the buttons to select the type of channels that are to be searched for. You have three options: - All All channels are searched for - Only free-to-air channels Only free-to-air channels are searched for - Only encrypted channels Only encrypted channels are searched for To view encrypted channels you need an appropriate CA (Conditional Access) module and a valid smart card together with a valid subscription to the relevant Pay TV provider. Then use the buttons to switch to the field Press <OK> to start scanning for all channels. Pressing the button starts the search. 58
59 Main Menu - Search for Channels During the search you will see the following on-screen display (example): Note: You can cancel the search at any time by pressing the button. After completion of the search, you will see the following on-screen display (example): You can now select the following options (using the buttons): - Yes, add new channels The new channels are added to the existing channel list - Yes, replace old channel list The channel list currently used will be replaced with the channels found - No, discard new channels The new channels found are not saved Confi rm your selection with the button. The receiver then jumps back to the Search for Channels menu. Press the button to exit the menu again. 59

60 Main Menu - Search for Channels After calling up the menu you will see the following on-screen display: The buttons allow you to select different sets of parameters for the search. In this menu you can selectively search a transponder for the new channels. Satellite Use the buttons to select the satellite on which the transponder you want to search is located. Make sure your reception system is aligned to this/these selected satellite(s). If you want search several transponders on a satellite, you should use an automatic channel search on the transmitting satellites or set the option Standard Channel Search on this menu to Yes. Transponder Use the buttons (transponder frequency already saved) or the number pad (transponder frequency not yet saved) to select the transponder frequency on which the channel being sought is transmitted. The Polarisation and Symbol Rate options only need to be specified if the transponder has yet to be saved. Symbol Rate Use the number pad to enter the related symbol rate. Polarisation Press the buttons to select the correct polarisation (horizontal or vertical). Standard Channel Search Select using the buttons whether you also want to undertake a standard channel search. With the setting Yes first the transponder selected above is searched and then all transponders on the satellite selected above. With the setting No only the transponder selected above on the selected satellite is searched. 60

61 Main Menu - Search for Channels Channels to search for Use the buttons to select the type of channels that are to be searched for. You have three options: - All All channels are searched for - Only free-to-air channels Only free-to-air channels are searched for - Only encrypted channels Only encrypted channels are searched for To view encrypted channels you need an appropriate CA (Conditional Access) module and a valid smart card together with a valid subscription to the relevant Pay TV provider. Then use the buttons to switch to the field Press <OK> to start scanning for all channels. Pressing the button starts the search. The subsequent on-screen displays during the search are identical to those for the automatic search. After completion of the search, you will see the following on-screen display (example): You can now select the following options (using the buttons): - Yes, add new channels The new channels are added to the existing channel list - Yes, replace old channel list The channel list currently used will be replaced with the channels found - No, discard new channels The new channels found are not saved Confi rm your selection with the button. The receiver then jumps back to the Search for Channels menu. Press the button to exit the menu again. 61

, the receiver cannot be operated.")
62 Main Menu - Security After calling up the menu you will see the following on-screen display: In order to access this menu, you must enter the four-digit PIN code (factory setting: 0000 ). The following on-screen display then appears: In this menu you can set various restrictions/parental controls. The individual items are selected using the buttons. The changes to the current settings can be performed using the buttons or the number pad. Receiver Lock Select here whether the receiver should be locked. If the receiver is locked, the four-digit PIN code will be requested when it is switched on. Without the four-digit PIN code (factory setting: 0000 ), the receiver cannot be operated. Either - On or - Off Menu Lock Select here whether the main menu should be locked. If the main menu is locked, the four-digit PIN code will be requested when it is called up. Without the four-digit PIN code (factory setting: 0000 ), the main menu cannot be viewed and no changes can be made to the device settings. Either - On or - Off Change Device-PIN Confi rm the selection with the button. Using the number pad enter your current device PIN (factory setting: 0000) and confi rm using the button. Then using the number pad enter your new fourdigit device PIN and also confi rm using the button. Confi rm the new device PIN by entering 62
63 Main Menu - Security it again and confi rming again using the button. To save your new PIN code confi rm the message displayed by pressing the button. Your device PIN code has now been changed. Keep your four-digit device PIN in a safe place, so that you always have access to your channels should you ever forget it. If you have forgotten your device PIN, you must contact your dealer, who will be able to unlock your receiver for you. 63

64 Main Menu - Settings After calling up the menu you will see the following on-screen display: Use the buttons to select the desired menu and confi rm your selection using the button. After calling up the menu you will see the following on-screen display: The individual items are selected using the buttons. The changes to the current settings can be made using the buttons. Use the buttons here to select the settings for your TV set. When doing this, refer to the operating instructions for your TV set! Primary Output Select here the connection on the receiver to which you have connected your television. Either: HDMI or SCART AFD Automatic The video format may differ from the format to be displayed. AFD detects this situation and corrects the display if the setting On is selected. 64


65 Main Menu - Settings Video Settings To be able to make these settings, switch to the Video Settings line and then press the button. The following on-screen display appears: HDMI or SCART Picture Format Here you can select the TV picture format. Either: - 4:3 or - 16:9 Picture Format Here you can select the TV picture format. Either: - 4:3 or - 16:9 Picture Scaling Select the type of screen display, depending on your setting for the picture format: - TV aspect ratio 4:3 : Pan & Scan or Letterbox - TV aspect ratio 16:9 : Always 16:9 or Automatic Picture Scaling Select the type of screen display, depending on your setting for the picture format: - TV aspect ratio 4:3 : Pan & Scan or Letterbox - TV aspect ratio 16:9 : Always 16:9 or Automatic Native Resolution With the setting On the resolution broadcast is sent to the TV set connected. With the setting Off the resolution is adjusted to the setting HD Video Resolution (setting made on the next line). HD Video Resolution Here you can select the video resolution that will be sent to your TV set. Either: TV Output Format Select the type of video signal at the TV Scart socket here. Select the signal that your TV set can process: - Video FBAS Colour video baseband signal - RGB Red/Green/Blue signal or - S-video (Y/C) luminance/chrominance i (resolution 1920 x 1080, half-screen images) 65
66 Main Menu - Settings - 720p (resolution 1280 x 720, full-screen images) - 576p (resolution 720 x 576, full-screen images) or - 576i (resolution 720 x 576, half-screen images - PAL) AV Control Select here whether on switching off the receiver a signal is to be sent to switch off the TV set. HDCP Scrambling Select here whether HDCP (digital copy protection) is to be constantly set to Permanent or is never to be activated Never. In addition you can select the setting Automatic (recommended setting). To view some channels (HD+) it is necessary for the setting to be Permanent or Automatic. HDMI Audio Select here whether the digital audio is to be transmitted via the HDMI interface. HDMI-CEC Using CEC (Consumer Electronics Control) the receiver can be operated using the remote control for the TV set. However, this function cannot be guaranteed, as it is also dependent on the remote control for the TV set and we cannot test all sets. After calling up the menu you will see the following on-screen display: The individual items are selected using the buttons. The changes to the current settings can be made using the buttons. Audio Format Select here the required audio format. Either: - Stereo - Mono (from the left channel) 66
67 Main Menu - Settings - Mono (from the right channel) or - Mono (total) Multichannel-Audio Automatic Select here, if multichannel audio is available (e. g. Dolby Digital), whether this multichannel audio is to be output automatically (setting On ). The receiver may need to be connected to a Dolby Digital system or an AV amplifi er for this purpose. HDMI Audio Select here whether the digital audio is to be transmitted via the HDMI interface. Audio Delay Here you can set an audio delay if the video and audio transmission are not synchronised. You can choose between the settings None and from 10ms in steps of 10 up to 300ms. After calling up the menu you will see the following on-screen display: The individual items are selected using the buttons. The changes to the current settings can be made using the buttons. Info Banner Duration Select here whether the info banner is to be displayed on a channel change and if so, for how long. Possible settings: - None - 1, 2, 3, 4, seconds or - Permanent Info Banner Automatic Select here whether the info banner is to be displayed not only on a channel change, but also on a programme change on a channel. You can only make this setting if the setting Info Banner Duration is set to four seconds or longer, or Permanent. 67

68 Main Menu - Settings Menu Language Select here the required menu language. Available options: German, English, French, Italian, Spanish, Czech, Dutch and Turkish. After calling up the menu you will see the following on-screen display: The individual items are selected using the buttons. The changes to the current settings can be made using the buttons. Time Zone Adjustment Here you can select whether the local time offset to UTC (formerly GMT) (e.g. for Germany: + 1 hour) is to be automatically detected by the receiver (setting: Automatic ) or whether you want to set the adjustment manually (setting: Manual ). The setting for summer/winter time is then made automatically, or you must make the setting if Manual is selected. Time Zone (GMT) Select here the required time zone (e. g. for Germany: + 1 hour). You can make the setting in 1-hour steps or to some extent in 30-minute steps. The maximum offset is 12 hours (+ and -). Summertime / DST Here you can make the setting for summer time. Either - On or - Off (winter time) Channel List Update Select here whether the channel list is to be automatically maintained by the receiver in the standby mode. 68
69 Main Menu - Settings Sorting Select here whether the channel list is to always be sorted by the following criteria: - None (channel list remains as it is) - A-Z - Z-A - Service Provider - Service ID Display Brightness Select here from the three available brightness settings for the receiver display. Select the setting you fi nd easiest to read. - High - Medium - Low 69


70 Main Menu - Settings After calling up the menu you will see the following on-screen display (example): The individual items are selected using the buttons. The changes to the current settings can be performed using the buttons or the number pad. Press the button to access the menu generated by the CA module: From this menu, your card and your PIN code allow you to access various channels from your Pay-TV provider. CryptoWorks has been selected as an example here. The details can be different for each CA module. Always follow the instructions supplied by your Pay TV provider! Note: The module on-screen displays may be shown in English, even if you have selected German as the menu language, because the menu is generated directly by the module! 70
71 Main Menu - Settings Tip! Information for Conax, SECA, Viaccess and CryptoWorks users: Note that with monthly activation intervals, the channel providers have different procedures for activating Pay TV cards. Activation may therefore be a few days before or after the beginning of a new month. During this activation period, the CA module and card must be in the slot, and the receiver must be turned on and set to the booked Pay TV channel. Follow the instructions from the Pay TV provider. If your Pay TV card is then still not enabled, we recommend you briefl y withdraw the CA module with the card out of the slot, with the receiver switched on, and then re-insert it. This information has nothing to do with the properties of the receiver; it is merely intended to assist you. Tip! Only users familiar with the CI should make changes using this menu. After calling up the menu you will see the following on-screen display (example): The individual items are selected using the buttons. The changes to the current settings can be made using the buttons. See the section Connection and Set-Up, First installation. 71

72 Main Menu - Service Menu After calling up the menu you will see the following on-screen display: Use the buttons to select the desired menu and confi rm your selection using the button. After calling up the menu you will see the following on-screen display: If you do not have a meter for adjusting your refl ector, you can use the sat finder as an alignment aid. You can select the different lines using the buttons. Make changes in the lines using the buttons (e. g. Transponder). Once you have a good reception signal (see example above), press the button in the Quit line. 72


73 Main Menu - Service Menu After calling up the menu you will see the following on-screen display: You cannot change or delete any data here. This menu is merely for viewing the reception data for the currently selected channel. After calling up the menu you will see the following on-screen display (example): You cannot change or delete any data here. This menu contains data on smart card reader fi tted and data on the HD+ Card in the smart card reader. On this menu you can change your HD+ PIN. Please note that you are not allowed to use four digits that are the same (e. g. 1111). Keep your PIN in a safe place! If you have forgotten your PIN, please contact HD+ customer service. The entry is made using the number pad. Follow the on-screen displays/ instructions on the receiver to change your HD+ PIN. After calling up the menu you will see the following on-screen display (example): In the System Information menu, the receiver displays information regarding its hardware and software versions. 73


74 Main Menu - Service Menu To have the receiver search for new software, in the line Update Software press the button. First the following on-screen display appears: Use the buttons to select Yes and then press the button. The following on-screen display appears: The receiver will now searches for new software. If no new software is available, the following is displayed: No new software for found for this receiver Press the button to confi rm the displayed message. The receiver automatically jumps back to the System Information menu. 74

75 Main Menu - Service Menu If new software is available, the following is displayed (example): Press button to start the update process or the button to leave the menu without updating the software. After starting the update, you will see the following on-screen display: Once the software has been completely downloaded, you will see the following on-screen display: To save the new software, press the button. If you want to cancel the process, using the buttons fi rst select No and then press the button. After starting the update, you will see the following on-screen display: Follow all on-screen instructions! Once the update is complete, the receiver is re-initialised and starts operation again. Never turn off the receiver during the update process, as otherwise you could lose the entire software. You would then need to re-install it in a workshop or using a PC and network cable. You can use the System Information on the Service Menu to check whether the new software has been installed. Check the time setting following a software update! 75

76 Main Menu - Service Menu After calling up the menu you will see the following on-screen display: Use the buttons to select the setting Yes and then press the button. All receiver settings are reset to their original settings. After the reset, the receiver automatically restarts and you will see the fi rst on-screen display for the fi rst installation. After a factory reset you must undertake the fi rst installation (see chapter Connection and Set-Up, First installation ). 76
77 Main Menu - Language After calling up the menu you will see the following on-screen display: Select the line you want to change using the buttons. Make the changes using the buttons. Menu Language: Select the required language for the menus. Available options: German, English, French, Italian, Spanish, Czech, Dutch and Turkish. First and second audio language: Select here the required audio languages. Available options: German, English, French, Italian, Spanish, Czech, Dutch, Turkish, Portuguese, Polish, Swedish, Finnish, Danish, Norwegian, Slovakian, Catalan, Basque, Russian, Greek, Icelandic, Irish, Welsh, Gaelic, Sami, Croatian, Slovenian, Serbian, Bosnian, Macedonian, Hungarian, Rumanian, Bulgarian, Galician, Albanian, Ukrainian, Belarusian, Estonian, Latvian and Lithuanian. First and second subtitle language: Select here the required subtitle language. Available options: German, English, French, Italian, Spanish, Czech, Dutch, Turkish, Portuguese, Polish, Swedish, Finnish, Danish, Norwegian, Slovakian, Catalan, Basque, Russian, Greek, Icelandic, Irish, Welsh, Gaelic, Sami, Croatian, Slovenian, Serbian, Bosnian, Macedonian, Hungarian, Rumanian, Bulgarian, Galician, Albanian, Ukrainian, Belarusian, Estonian, Latvian and Lithuanian. Subtitles Automatic: Here you can set whether subtitles, if available, are displayed automatically or not. To quit the menu and save the changes, press the button. 77
78 Troubleshooting In the event of a malfunction, first check all the cable connections and operating states: 1. Receiver and TV set power plugs are connected to wall socket 2. Antenna cables are connected to the receiver input 3. Receiver and TV set correctly connected by a HDMI or Scart cable 4. Audio connections are made to the Hi-Fi or Dolby Digital system as appropriate 5. Receiver and TV set (Hi-Fi/Dolby Digital system) are switched on (check power indicators) 6. Receiver is responding to remote control A selection of troubleshooting tips is offered below. Problem Cause Remedy A No signal! warning appears on some or all channels Remote control no longer responding Wrong time being displayed The following channels cut out or No or bad signal! appears: DSF, Tele 5, HSE 24 and Sonnenklar TV Batteries may be discharged Remote control code has been changed inadvertently Summer Time setting wrong. An incorrect time was imported from the reception signal DECT telephones operate on the same frequency as these channels. Interference may occur due to inadequate level or poor shielding of cable Consult an antenna specialist to have it checked and repaired as necessary. Check the settings made in the Settings, Antenna & Satellite, Tuner Confi guration menu, and change them if necessary. Check the batteries By simultaneously pressing the Back button in conjunction with buttons on the number pad (1-8) the remote control code can be changed. Your receiver requires the remote control code 1. For this purpose simultaneously press the Back and 1 buttons. On Settings - Date and Time menu check Summer Time Enabled and change as necessary. Use the power switch to switch the receiver off from the current channel, e.g. Das Erste or ZDF, wait 10 seconds and then switch it back on Consult your antenna specialist 78


79 Technical Appendix For entries such as names of e.g. search expressions, use the keyboard displayed on the screen (see example screenshot). The letters assigned to the number pad also apply to your remote control. They are used very similarly to a mobile phone. The following buttons can be used for entry or to select an action: Button Assigned character/action Press 1 x 2 x 3 x 4 x 5 x. ß?! 1 a b c 2 ä d e f 3 ë g h i 4 ï j k l 5 m n o 6 ö p q r s 7 t u v 8 ü w x y z 9 1 x space 2 x 0 Last character is deleted Switch between upper case and lower case letters Confi rm the term entered 79
80 Technical Appendix Cancel entry without saving Cancel entry without saving After you have entered the desired expression, press the button in order to load the name/search expression or the button to abort the entry. TV HDMI Scart Hi-fi system Dolby Digital system 80
81 Technical Appendix Type UFS 931sw/HD+ Part no Colour Black RF section Sat IF band MHz Input level band dbμv TV system, video Modulation, FEC, demultiplexer DVB-S/DVB-S2 standard Video resolution CCIR 601 (720 x 576 lines), 576i, 576p, 720p, 1080i Video decryption MPEG-2, MPEG-4-compatible Input data rate MSymb/s 2-45, (30 for DVB-S2/8PSK) S/N db > 53 TV system, audio Decryption AC 3, MPEG 1, layers 1 and 2 Sampling rate khz 32/44,1/48 S/N db > 65 Power Supply Power supply voltage V/Hz 230 (+/- 10 %)/50-60 DC V 12 Power consumption (max./typ. operation/standby) W < 24/12/1 LNB supply (horiz./vert.) V/mA 14/18; max. 400 Control signal khz 22; DiSEqC 1.0, SCR single cable system Connections Sat IF input 1 x F socket TV/VCR connection 1 x Scart socket Video/audio output (digital) 1 x HDMI Audio output (analogue) 2 x Cinch sockets Audio output (digital) Standard fi bre-optic cable (SPDIF) Data interface Common Interface/Encryption system For 1 CA module/nagravision USB (for service purposes only) 1 x 2.0 Miscellaneous Ambient temperature C Max. +5 to +40 Unit dimensions (W x H x D) mm 270 x 34 x 167 Weight kg < 2 81

 KAZ")

82 Technical Appendix Sat IF Sat IF Sat IF 82 **) KAZ 11/KAZ 12 overvoltage protector

 KAZ")
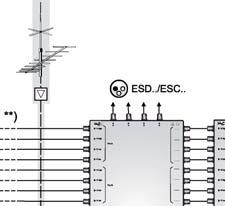

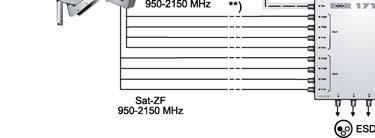


83 Technical Appendix Sat IF Sat IF Sat IF Sat IF **) KAZ 11/KAZ 12 overvoltage protector 83


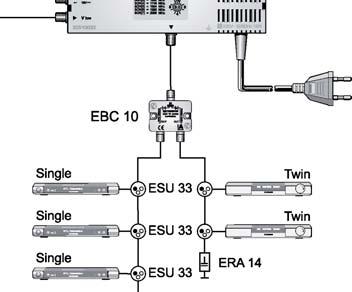
84 Technical Appendix Sat IF 4 connections per living unit 84 **) KAZ 11/KAZ 12 overvoltage protector

 KAZ")


85 Technical Appendix Sat IF Sat IF **) KAZ 11/KAZ 12 overvoltage protector 85
Operating Manual - Englisch - DVB combi receiver (SAT + DVB-T) UFS 790si/sw
 UFS 790si/sw") Operating Manual - Englisch - DVB combi receiver (SAT + DVB-T) UFS 790si/sw FOREWORD/IMPORTANT INFORMATION Dear customer, This operating manual is intended to help you make the fullest use of the extensive
Operating Manual - Englisch - DVB combi receiver (SAT + DVB-T) UFS 790si/sw FOREWORD/IMPORTANT INFORMATION Dear customer, This operating manual is intended to help you make the fullest use of the extensive
Operating Manual - Englisch - DVB combi receiver (SAT + DVB-T) UFS 790si/sw
 UFS 790si/sw") Operating Manual - Englisch - DVB combi receiver (SAT + DVB-T) UFS 790si/sw FOREWORD/SERVICE Dear customer, this operating manual is intended to help you make the fullest use of the extensive range of
Operating Manual - Englisch - DVB combi receiver (SAT + DVB-T) UFS 790si/sw FOREWORD/SERVICE Dear customer, this operating manual is intended to help you make the fullest use of the extensive range of
Operating manual. DVB Satellite Receiver UFS 640si
 Operating manual DVB Satellite Receiver UFS 640si PREFACE Dear customer, This operating manual is intended to help you make the fullest use of the extensive range of functions offered by your new satellite
UFS 910. Operating manual - englisch - HDTV receiver for satellite reception
 UFS 910 Operating manual - englisch - HDTV receiver for satellite reception PREFACE Dear customer, this Operating Manual is intended to help you make the fullest use of the extensive range of functions
Operating Instructions Part 1
 Operating Instructions Part 1 Connection and set-up UFS 946/CI+ English Safety instructions - important notes... 2 Product return/original packaging... 4 Fan/ventilation slots on the unit... 4 Switching
Quick Start Guide Connection and Set-up. UFT 930 English IMPORTANT. Read carefully before use!
 Quick Start Guide Connection and Set-up UFT 930 English IMPORTANT Read carefully before use! Contents 1 About This Guide... 3 2 Explanation of Symbols and Signal Words... 3 2.1 Symbols and Signal Words...
Quick Start Guide Connection and Set-up. UFS 800 English IMPORTANT. Read carefully before use!
 Quick Start Guide Connection and Set-up UFS 800 English IMPORTANT Read carefully before use! General Safety Instructions List of Contents 1 General safety instructions...2 2 About these instructions...6
DVB-T Receiver UFD 570/S
 User's Guide DVB-T Receiver UFD 570/S Order No.: 20210035 2 Foreword Foreword Dear customer, This User's Guide is designed to help you to use the extensive functions of your new DVB-T receiver most effectively.
SAFETY PRECAUTION ENGLISH PAG. 2. rev 1.2. dangerous voltage and to prevent only. operating and maintenance from a risk of electric shock.
 MAX S93+ SAFETY PRECAUTION The lightning fl ash with arrowhead WARNING: To reduce the risk of The exclamation point within an symbol, within an equilateral triangle, electric shock, don t open the cabinet.
DIGITAL SET TOP BOX STB 7017 INSTRUCTION MANUAL
 DIGITAL SET TOP BOX STB7017 INSTRUCTION MANUAL STB 7017 CHANNEL After Sales Support Now you have purchased a Tevion product you can rest assured in the knowledge that as well as your 3 year parts and labour
FV400 DIGITAL TV RECEIVER WITH MODULATOR INSTRUCTION MANUAL
 FV400 DIGITAL TV RECEIVER WITH MODULATOR INSTRUCTION MANUAL Please read this instruction manual carefully before using your receiver Table of Contents Introduction-----------------------------------------------------------------------------
User Manual High Definition Digital Set Top Box DVBT9070 Please read this User Manual carefully to ensure proper use of this product and keep this man
 User Manual High Definition Digital Set Top Box DVBT9070 Please read this User Manual carefully to ensure proper use of this product and keep this manual for future reference. Important Safety Instructions
User Guide. Plaza DS 100A freesat digital TV receiver
 User Guide Plaza DS 100A freesat digital TV receiver CONGRATULATIONS on buying a Manhattan Plaza DS 100A freesat receiver. This high performance unit is designed to provide you with the best of digital
DCR NL Digitale Kabelontvanger 2. EN Digital Cable Receiver 61
 DCR 5012 www.philips.com/support NL Digitale Kabelontvanger 2 EN Digital Cable Receiver 61 1 Table of contents 1 Important 62 2 Your Digital Cable Receiver 64 2.1 What s in the box? 65 2.2 What you also
CAUTION RISK OF ELECTRIC SHOCK NO NOT OPEN
 Evolution Digital HD Set-Top Box Important Safety Instructions 1. Read these instructions. 2. Keep these instructions. 3. Heed all warnings. 4. Follow all instructions. 5. Do not use this apparatus near
MAX T200 HD QUICK INSTALLATION GUIDE
 MAX T200 HD QUICK INSTALLATION GUIDE MAX T200 HD QUICK INSTALLATION GUIDE CONTENT receiver BATTERIES x 2 REMOTE CONTROL Quick installation guide Quick Installation Guide The lightning flash with arrowhead
English SAFETY PRECAUTION DO NOT INSTALL THE RECEIVER: PAG. 2
 U4109 SAFETY PRECAUTION The lightning fl ash with arrowhead symbol, within an equilateral triangle, is intended to alert the user to dangerous voltage and to prevent from a risk of electric shock. Warning:
SAFETY PRECAUTION ENGLISH DO NOT INSTALL THE RECEIVER: PAG. 2
 MAX S92+ HDMI SAFETY PRECAUTION The lightning fl ash with arrowhead symbol, within an equilateral triangle, is intended to alert the user to dangerous voltage and to prevent from a risk of electric shock.
HD Digital Set-Top Box Quick Start Guide
 HD Digital Set-Top Box Quick Start Guide Eagle Communications HD Digital Set-Top Box Important Safety Instructions WARNING TO REDUCE THE RISK OF FIRE OR ELECTRIC SHOCK, DO NOT EXPOSE THIS PRODUCT TO RAIN
IMPORTANT READ CAREFULLY BEFORE USE
 Quick Start Guide Connection and set-up UFSconnect 916 English You will fi nd an English version of this document at www.kathrein.com Vous trouverez la version française du document sur www.kathrein.com
English SAFETY PRECAUTION DO NOT INSTALL THE RECEIVER: PAG. 2
 U4127 SAFETY PRECAUTION The lightning fl ash with arrowhead symbol, within an equilateral triangle, is intended to alert the user to dangerous voltage and to prevent from a risk of electric shock. Warning:
INSTALLATION MANUAL VIP 1903 / VIP 1903 T VIP 1963 / VIP 1963 T
 INSTALLATION MANUAL VIP 1903 / VIP 1903 T VIP 1963 / VIP 1963 T We Declaration of Conformity Motorola Mobility, Inc. 101 Tournament Drive Horsham Pennsylvania 19044 USA declare under our sole responsibility
Installation Manual VIP 1003
 Installation Manual VIP 1003 We Caring for the Environment by Recycling When you see this symbol on a Motorola product, do not dispose of the product with residential or commercial waste. Recycling your
freesat HD Digital Satellite Receiver The default password is User s Manual FOXSAT-HD
 freesat HD Digital Satellite Receiver The default password is 0000. FOXSAT-HD Notice Thank you for purchasing a HUMAX product. Please read this user s manual carefully to be able to safely install, use
User Manual. High Definition Digital Set Top Box HDSTB250
 User Manual High Definition Digital Set Top Box HDSTB250 CHANNEL HDSTB250 Please read this User Manual carefully to ensure proper use of this product and keep this manual for future reference. Important
DSR 5580 Digital SAT-Receiver
 DSR 5580 Digital SAT-Receiver Operating Instructions Operating Instructions Contents Contents...2 General information...4 Safety and installation information...4 Connecting up the receiver...6 Controls,
NMS ETA TM Stereo Advanced Digital TV Set-top Box
 Digital TV HD Set-top Box STB2-T2 NMS ETA TM Stereo Advanced Digital TV Set-top Box User Guide CONTENTS Safety Information... 3 Introduction... 4 Set-top Box Front Panel... 4 Set-top Box Back Panel...
GET STARTED. For assistance, call us on or visit manhattan-tv.com/support
 GET STARTED For assistance, call us on 020 8450 0005 or visit manhattan-tv.com/support Check Freeview HD coverage in your area by visiting freeview.co.uk INSTALLING YOUR T1 Unpack the following from your
English SAFETY PRECAUTION DO NOT INSTALL THE RECEIVER: PAG. 2
 U4125 SAFETY PRECAUTION The lightning fl ash with arrowhead symbol, within an equilateral triangle, is intended to alert the user to dangerous voltage and to prevent from a risk of electric shock. Warning:
EDISION OS mega VIEWS
 + + H.265 HEVC VIEWS 1 2 3 4 5 Front view: 1. Power Button Switch between operation and standby modes 2. Display current menu information and channel name etc. 3. USB Connect to the External HDD or USB
Evolution Digital HD Set-Top Box Important Safety Instructions
 Evolution Digital HD Set-Top Box Important Safety Instructions 1. Read these instructions. 2. Keep these instructions. 3. Heed all warnings. 4. Follow all instructions. 5. Do not use this apparatus near
GET STARTED. For assistance, call us on or visit manhattan-tv.com/help
 GET STARTED For assistance, call us on 020 8450 0005 or visit manhattan-tv.com/support Check Freeview HD coverage in your area by visiting freeview.co.uk For assistance, call us on 020 8450 0005 or visit
User s Manual Bedienungsanleitung
 HD Digital Receiver HDTV Digital-Receiver The default password is 0000. Das voreingestellte Passwort lautet 0000. Bedienungsanleitung HD-FOX Notice Thank you for purchasing a HUMAX product. Please read
S7030PVR User Manual
 S7030PVR User Manual Important Safety Instructions 1) Do not use this apparatus near water. 2) Clean only with dry cloth. 3) Do not block any ventilation openings, install in accordance with the instructions.
GDB9 INSTRUCTION MANUAL DIGITAL TERRESTRIAL RECEIVER
 GDB9 INSTRUCTION MANUAL DIGITAL TERRESTRIAL RECEIVER Goodmans Support: www.goodmans.co.uk/support Please read these instructions before use and keep for future reference IMPORTANT SAFETY INSTRUCTIONS Thank
SNT7070 SATELLITE & TERRESTRIAL RECEIVER USER MANUAL WORKS WITH A UHF AERIAL. WORKS WITH A Satellite Dish
 SNT7070 SATELLITE & TERRESTRIAL RECEIVER USER MANUAL WORKS WITH A UHF AERIAL WORKS WITH A Satellite Dish Warning: 1. To reduce the risk of fire or electric shock, DO NOT expose this apparatus to rain or
Before you can install your LCD TV on the wall, you must fi rst remove the base using the steps below:
 Quick Start Guide English CONTENTS INSTALLING LCD TV ON THE WALL.. TV CHANNEL INSTALLATION........ PRESENTATION OF THE LCD TV...... ACCESSORIES.................... BATTERY INSTALLATION............ REMOTE
Operating Manual. DVB-T Meter MFK 16
 Operating Manual DVB-T Meter MFK 16 Preface Dear customer, KATHREIN-Werke KG has made every effort to ensure the accuracy and completeness of this manual. However, no liability can be accepted for potential
INSTALLING YOUR MANHATTAN SX
 Your USER GUIDE SX INSTALLING YOUR MANHATTAN SX Unpack the following from your Giftbox: 2x AAA batteries Remote control Manhattan SX SCART Adapter HDMI cable Power adapter AV Lead You ll need: A TV with
T1000n-VM USER MANUAL
 T1000n-VM USER MANUAL IMPORTANT! Safety Instructions 01. Read these Instructions. 02. Follow all Instructions. 03. Keep these Instructions. 04. Do not use this receiver near water. 05. Clean only with
Welcome to NEED HELP? DIRECTV offers the best entertainment experience. Use this guide to make the most of it LKR FCC ID : ORS
 NEED HELP? Important Tips Do not unplug your receiver If you unplug it you may miss the most recent updates that improve our service. The DIRECTV receiver is designed to consume very little energy while
Front and Rear Panel Remote Control Connecting to a Television...4. Connecting to an Audio System...5
 Table of Contents Front and Rear Panel... 1 Remote Control...... 2 Connecting to a Television...4 Connecting to an Audio System...5 Connecting to a DVD Recorder or VCR... 6 First Time Installation... 7
DSR 5500 Digital SAT-Receiver
 DSR 5500 Digital SAT-Receiver Operating Instructions Operating Instructions Contents Contents...2 General information...4 Safety and installation information...4 Connecting up the receiver...6 Controls,
Contents. English - 1 -
 Contents Features... 3 Introduction... 4 Preparation... 4 Safety Precautions... 4 Power Source... 4 Power Cord... 4 Moisture and Water... 4 Cleaning... 4 Ventilation... 4 Heat and Flames... 4 Lightning...
FD Trinitron Colour Television
 R 4-205-569-32(1) FD Trinitron Television Instruction Manual GB KV-14LM1U 2000 by Sony Corporation NOTICE FOR CUSTOMERS IN THE UNITED KINGDOM A moulded plug complying with BS1363 is fitted to this equipment
OWNER'S MANUAL MODEL: DTV-2000 STANDBY/ON
 OWNER'S MANUAL MODEL: DTV-2000 STANDBY/ON CH+ CH- TABLE OF CONTENTS SAFETY PRECAUTIONS IMPORTANT SAFETY INSTRUCTIONS and FEATURES ACCESSORIES and LOADING BATTERIES REMOTE CONTROL UNIT FRONT PANEL and REAR
GENERAL INFORMATION INSTALLATION MENU INFORMATION. Main Features For your Safety Unpacking General Operation RCU Rear Panel.
 GENERAL INFORMATION 3 Main Features For your Safety Unpacking General Operation RCU Rear Panel 3 4 7 7 8 9 INSTALLATION 10 MENU INFORMATION Main Menu 1. Installation 1.1 Satellite list 1.2 Dish Setting
DVB-T2. Digital Terrestrial Receiver WD-822T2 USER S MANUAL
 DVB-T2 Digital Terrestrial Receiver WD-822T2 USER S MANUAL Index Important Safety Instructions... 3 Main Features.... 5 Front and Rear Panel.... 6 Remote Control..... 7 Installing the Batteries..... 8
USER MANUAL FOR CABLE RECEIVER KAON KCF-200CO KAON KCF-H220SCO
 USER MANUAL FOR CABLE RECEIVER KAON KCF-200CO KAON KCF-H220SCO SECURITY INSTRUCTIONS FOR USING THE RECEIVER Always fallow these instructions to avoid risk of injury or damaging the equipment. Before cleaning
Manhattan Model: Plaza HDR S 500GB LET S GET STARTED YOUR USER GUIDE
 Manhattan Model: Plaza HDR S 500GB LET S GET STARTED YOUR USER GUIDE WELCOME TO FREESAT We are so pleased you bought this 500GB Manhattan Plaza HDR S Freesat+ HD recorder. Now you can enjoy: Quality state-of-the-art
LCD VALUE SERIES (32 inches)
") LCD VALUE SERIES (32 inches) http://www.orionimages.com All contents of this document may change without prior notice, and actual product appearance may differ from that depicted herein 1. SAFETY INSTRUCTION
LCD VALUE SERIES (32 inches) http://www.orionimages.com All contents of this document may change without prior notice, and actual product appearance may differ from that depicted herein 1. SAFETY INSTRUCTION
Xpresionn Digital Terrestrial Receiver. User Guide
 Xpresionn 2150 Digital Terrestrial Receiver User Guide GENERAL INFORMATION...3 A) SAFETY PRECAUTIONS...3 B) MAIN FEATURES...4 C) CONTENTS OF THE PACKAGING...4 D) REMOTE CONTROL...5 INSTALLATION...6 A)
Digi-Scart. Digital Terrestrial Receiver. Ref MET802
 Digi-Scart Ref. 441816 Digital Terrestrial Receiver MET802 WARNING - IMPORTANT Before installing your digital terrestrial receiver it is important that you read and understand the instructions completely.
User s Manual Bedienungsanleitung
 HD Digital Receiver User s Manual Bedienungsanleitung icord Cable The default password is 0000. Das voreingestellte Passwort lautet 0000. Notice Thank you for purchasing a HUMAX product. Please read this
SET TOP BOX MODEL: GDB01SFV1 USER MANUAL
 SET TOP BOX MODEL: USER MANUAL 1 2 3 4 5 6 7 8 Welcome Your Set Top Box 2.1 In The Box 2.2 Front View 2.3 Rear View Quick Setup 3.1 TV Connection 3.2 Recording from the set top box 3.3 Record one channel
SAFETY PRECAUTION ENGLISH DO NOT INSTALL THE RECEIVER: PAG. 2
 MAX S21 SAFETY PRECAUTION The lightning fl ash with arrowhead symbol, within an equilateral triangle, is intended to alert the user to dangerous voltage and to prevent from a risk of electric shock. Warning:
USER MANUAL (UK) IMPORTANT! Please read this manual before you connect the receiver! DIGIALITY T-2000 FTA / T-2001 CX
 IMPORTANT! Please read this manual before you connect the receiver! DIGIALITY T-2000 FTA / T-2001 CX") USER MANUAL (UK) IMPORTANT! Please read this manual before you connect the receiver! DIGIALITY T-2000 FTA / T-2001 CX 1 2 DIGIALITY T-2000 FTA / T-2001 CX BASIS USE AND BASIS FUNCTIONS TABLE OF CONTENTS
USER MANUAL (UK) IMPORTANT! Please read this manual before you connect the receiver! DIGIALITY T-2000 FTA / T-2001 CX 1 2 DIGIALITY T-2000 FTA / T-2001 CX BASIS USE AND BASIS FUNCTIONS TABLE OF CONTENTS
Safety Instructions. General Safety Instructions
 Table of Contents Safety Instructions...2 General Safety Instructions...2 Installation...3 Cleaning...4 General Description...5 Specifications & Accessories...5 Specifications...5 Accessories...5 Overview...6
 Register your product and get support at www.philips.com/welcome SWS3435S/27 SWS3435H/37 EN User manual Contents 1 Important 4 Safety 4 English 2 Your SWS3435 6 Overview 6 3 Installation 7 Connect the
User Manual of digital Set Top Box PAT1 02
 User Manual of digital Set Top Box PAT1 02 Please read this User Manual carefully to ensure proper use of this product and keep this manual for future reference. Important Safety Instructions 1) Read these
Instructions for use. UFS 810 English IMPORTANT READ CAREFULLY BEFORE USE
 Instructions for use UFS 810 English IMPORTANT READ CAREFULLY BEFORE USE List of Contents 1 About these instructions...4 1.1 Contents...4 1.2 Markings...4 1.2.1 Pre-requirements for certain functions...4
< > ϯϯyyϭ USER MANUAL
 USER MANUAL Contents Contents Safety Precautions Power Supply... 1 Installation... 2 Use and Maintenance... 3 Important Safety Instructions... 4-5 User Guidance Information Names of each part(front View)
Safety Instructions. General Safety Instructions
 Table of Contents Safety Instructions...2 General Safety Instructions...2 Installation...3 Cleaning...4 General Description...5 Specifications & Accessories...5 Specifications...5 Accessories...5 Overview...6
2850ST 2850ST USER GUIDE
 2850ST 2850ST USER GUIDE TABLE OF CONTENTS Table of contents... 2 About your high definition receiver... 3 What is HDTV?... 3 Getting started... 5 Safety first...5 Unpacking your digital receiver...5 Front
DVB Satellite Receiver
 User's Guide DVB Satellite Receiver for mobile applications UFD 545 Order No. 260 497 1 2 Foreword Vorwort Dear customer, This User's Guide is designed to help you to use the extensive functions of your
IMPORTANT SAFETY INSTRUCTIONS
 IMPORTANT SAFETY INSTRUCTIONS 1. Read, follow and keep these instructions safely. 2. Heed all warnings. 1. Do not use this apparatus near water. 2. Clean only with dry cloth. 3. Do not block any ventilation
Register your product and get support at SDV5122/27. EN User manual
 Register your product and get support at www.philips.com/welcome SDV5122/27 User manual Contents 1 Important 4 Safety 4 Notice for USA 5 Notice for Canada 5 Recycling 6 English 2 Your SDV5122 7 Overview
Contents. English - 1 -
 Contents Accessories... 2 Features... 2 Introduction... 2 Preparation... 2 Safety Precautions... 2 Power Source... 2 Power Cord... 2 Moisture and Water... 2 Cleaning... 3 Heat and Flames... 3 Lightning...
UNFOLD THE BASE. Quick Start Guide CONTENTS INSTALLING LCD TV ON THE WALL
 Quick Start Guide English CONTENTS INSTALLING LCD TV ON THE WALL.. UNFOLD THE BASE............... TV CHANNEL INSTALLATION........ PRESENTATION OF THE LCD TV..... ACCESSORIES.................... BATTERY
S8100-ZC DIGITAL SATELLITE RECEIVER USER MANUAL. Works only with a Satellite Dish. Version 1.3 AUGUST 2017
 S8100-ZC DIGITAL SATELLITE RECEIVER USER MANUAL Version 1.3 AUGUST 2017 Works only with a Satellite Dish Welcome Thank you for choosing the Dish TV S8100-ZC Satellite Receiver. The S8100-ZC is a Freeview
Quick Use and Hookup Guide
 Quick Use and Hookup Guide English CONTENTS ING LCD TV ON THE WALL.. TV CHANNEL ATION........ PRESENTATION OF THE LCD TV...... ACCESSORIES.................... BATTERY ATION............ REMOTE CONTROL OPERATION......
28 4K LED monitor. User Manual M284K
 28 4K LED monitor User Manual M284K CONTENTS Safety Information... 2 What s included..... 4 Getting Started....... 8 Troubleshooting.... 14 Specification.... 15 2 of 15 SAFETY INFORMATION Read these instructions
USER MANUAL. 27 Full HD Widescreen LED Monitor L27ADS
 USER MANUAL 27 Full HD Widescreen LED Monitor L27ADS TABLE OF CONTENTS 1 Getting Started 2 Control Panel/ Back Panel 3 On Screen Display 4 Technical Specs 5 Care & Maintenance 6 Troubleshooting 7 Safety
KGN&, > Ϯϰs USER MANUAL
 USER MANUAL KGN Contents Contents Safety Precautions Power Supply... 1 Installation... 2 Use and Maintenance... 3 Important Safety Instructions... 4-5 User Guidance Information Names of each part(front
USER MANUAL. 27 Full HD Widescreen LED Monitor L270E
 USER MANUAL 27 Full HD Widescreen LED Monitor L270E TABLE OF CONTENTS 1 Getting Started 2 Control Panel/ Back Panel 3 On Screen Display 4 Technical Specs 5 Care & Maintenance 6 Troubleshooting 7 Safety
Converts any TV to Digital. MFR-300 User Guide
 Converts any TV to Digital MFR-300 User Guide Introduction Thank you for choosing this TVonics Freeview box. Record the serial number in the space provided below (the serial number can be found on the
Quick start manual DIGIT ISIO STC DIGIT ISIO STC+ Digital Multituner-UHD Receiver with Internet access
 Quick start manual DIGIT ISIO STC DIGIT ISIO STC+ Digital Multituner-UHD Receiver with Internet access Dear Customer, Congratulations for choosing the DIGIT ISIO STC / DIGIT ISIO STC+ digital receiver.
Welcome to W light up your life
 USER GUIDE 1 Welcome to light up your life Dear Vision Communications Customer, Thank you for choosing LightWave TV from Vision. LightWave TV will open a whole new world of TV entertainment for you and
User manual. Goodmans Product Information:
 GDB7CA Digital Terrestrial Receiver User manual Goodmans Product Information: www.goodmans.co.uk/support Safety information Mains connection This receiver is suitable for use on A.C. mains supply, 220-240
User manual FT-8100 HD. English
 User manual FT-8100 HD English WARNING!!! On the USB Memory Function for FT-8100 HD model, user can make recording or playing function using by external USB devices such as USB Flash Memory Disk or external
The product must be installed in accordance with national regulations.
 Important safety instructions to be kept with the product Please read attentively To prevent fire and electric shock, do not expose this receiver to rain or moisture. In order to avoid any possible risk
HDS-600RS. User Guide
 HDS-600RS User Guide IMPORTANT SAFETY INFORMATION! Read these instructions carefully before using the product. Install Safely Place the unit on its feet on a firm, stable, horizontal surface. Unplug the
User s Manual Digital Satellite Receiver
 A_ENG_110944 User s Manual Digital Satellite Receiver Please read the entire manual thoroughly and retain it for future reference. ENG - 1 General Safety Warning CAUTION RISK OF ELECTRIC SHOCK DO NOT OPEN
CONTENTS 8 ACCESSORIES 13 9 TROUBLE SHOOTING AND ADVICE SPECIFICATIONS BATTERY USAGE CAUTION 13
 CONTENTS 1 PREFACE 2 2 SAFETY PRECAUTIONS 2 3 FRONT & BACK VIEW, REAR CONNECTION OF LCD 3 4 TV INSTALLATION DRAWINGS 4 4.1 ANTENNA CONNECTION 4 4.2 AV1 INPUT CONNECTION 4 4.3 AV2 INPUT CONNECTION 4 4.4
User s Guide. Digital Satellite Receiver
 User s Guide Digital Satellite Receiver Before Getting Started Information contained in this manual is subject to change without notice. No part of this publication may be copied, reproduced, or translated
Digital Set Top Box. User Guide
 Digital Set Top Box User Guide Contents Quick Guide.......................... 3 Connecting to a Television..................... 3 Connecting to a Television and VCR............. 3 Introduction..........................
Alpha Plus. User Guide
 Alpha Plus User Guide Contents Contents i 1 Introduction 1 1.1 Features.............................. 1 1.2 Accessories............................ 2 1.3 The Remote Control....................... 3 1.4
TRIAX T-HD505 VA Digital terrestrial DVB-T/T2 set-top box A
 TRIAX T-HD505 VA Digital terrestrial DVB-T/T2 set-top box 305060-A Contents Safety Precautions... 3 Disposal of batteries and set-top box... 4 Overview... 5 Front panel incl. CA-module and smart card...
OPERATING INSTRUCTIONS LCD COLOUR TELEVISION WITH REMOTE CONTROL
 OPERATING INSTRUCTIONS LCD40-920 COLOUR TELEVISION WITH REMOTE CONTROL For assistance, please call our Tesco Electrical Helpline on 0845 4566767 Contents Features... 2 Accessories... 2 Introduction...
INSTRUCTION MANUAL. 19 HD Widescreen Water Resistant Television VSPA19LCD-AE1B VSPA19LCD-AE1M VSPA19LCD-AE1W. Model No. FINGER TOUCH TECHNOLOGY RATED
 INSTRUCTION MANUAL 19 HD Widescreen Water Resistant Television VSPA19LCD-AE1B Model No. VSPA19LCD-AE1M VSPA19LCD-AE1W FINGER TOUCH TECHNOLOGY IMPORTANT: Please read these instructions before installing
DVB Satellite Receiver UFD 510
 Operating Manual DVB Satellite Receiver UFD 510 Order No.: 260 463 Controls, displays and connections Controls, displays and connections...4 View of front panel... 4 View of rear panel... 4 Front panel
Notice ** Copyright (Copyright 2001 HUMAX Corporation) GB 1
 GB 1") Notice Copyright (Copyright 2001 HUMAX Corporation) Not to be copied, used or translated in part or whole without HUMAX's prior consent in writing except approval of ownership of copyright and copyright
Notice Copyright (Copyright 2001 HUMAX Corporation) Not to be copied, used or translated in part or whole without HUMAX's prior consent in writing except approval of ownership of copyright and copyright
Digital Terrestrial Television Receiver USER S MANUAL
 # 5024 Digital Terrestrial Television Receiver USER S MANUAL CAUTION RISK OF ELECTRIC SHOCK DO NOT OPEN This symbol is intended to alert the user to the presence of insulated dangerous voltage within the
S8100-ZC USER MANUAL
 S8100-ZC USER MANUAL Welcome Thank you for choosing this Dish TV FreeviewPlus Satellite Set Top Box. You will be able to receive all Freeview Satellite TV and Radio Channels, as well as On Demand Catchup
Prestigio P370MW User s Manual
 Prestigio P370MW User s Manual Trademarks HDMI, the HDMI logo and High-Definition Multimedia Interface are trademarks or registered trademarks of HDMI Licensing LLC. All other brand and product names are
Be sure to run the vehicle engine while using this unit to avoid battery exhaustion.
 CAUTION: TO REDUCE THE RISK OF ELECTRIC SHOCK DO NOT REMOVE COVER (OR BACK) NO USER-SERVICEABLE PARTS INSIDE REFER SERVICING TO QUALIFIED SERVICE PERSONNE; Please Read all of these instructions regarding
Full High Definition LCD TV. Kogan 1080p42 USER MANUAL
 Full High Definition LCD TV Kogan 1080p42 USER MANUAL Safety information To ensure reliable and safe operation of this equipment, please read carefully all of the instructions in this user guide, especially
E32 Series User Guide
 PACKAGE CONTENTS E32 Series User Guide SCEPTRE Display x 1 TV Foot x 2 Screws x 4 Power Cord x 1 (attached) Warranty Card x 1 Display Remote Control (AAA Batteries included) x 1 User Guide x 1 (Complete
Operating Instructions DTR 200
 Operating Instructions DTR 200 Table of Contents Control elements and functional components.................... 3 Remote control...................... 3 Front side........................... 3 Back side............................
Digital TV receiver User guide
 Digital TV receiver User guide Welcome Thank you for buying this Free-toview Digital Box. This product allows you to enjoy free-to-view Digital TV on any television - with crisp sound, clear pictures and