Safety Information. Do Not
|
|
|
- Elwin Brooks
- 5 years ago
- Views:
Transcription

1 Safety Information Do Read, keep, and follow instructions. Heed all warnings. Turn off and unplug the power plug from the AC outlet before cleaning the unit. Use a soft dry cloth with mild detergent to clean the housing. Only use attachments/accessories certified by the manufacturer. Refer all servicing to certified service partner. Repair service is required once the device has been damaged in any way, such as power-supply cord or plug is damaged, liquid has been spilled or objects have fallen into the apparatus, the apparatus has been exposed to rain or moisture, does not operate normally, or has been dropped. Do Not Use this apparatus near water. Use abrasive cleaners, waxes or solvents to clean the unit. Install near any heat sources such as radiators, heaters, stoves, or other apparatus (including amplifier) that produce heat. To reduce the risk of fire or electric shock, do not expose this unit to rain or moisture. Open or disassemble the unit as this may cause electric shock. Near any appliance generating a strong magnetic field. Use in direct sunlight. To reduce the risk of fire or electric shock, do not expose this appliance to rain or moisture. Dangerous high voltages are present inside the enclosure. Do not open the cabinet. Refer servicing to qualified personnel only.
2 Features Native resolution output without compensation. Image Blending with smooth gray scale at overlap area (Crop feature only can be enable at default scenario: 1x4XGA, 1x3WXGA and 1x21080P. Cropping box/card is required for other blending scenarios. Warping/ 4 Corners / barrel /pincushion ( adjust via geometry grid: Max up to 17pionts x 17 points) Dynamic full range Black Level adjustment Standard 1U box for professional market with 2 blending sets User-friendly user interface for easy adjustment Environment conditions: Temperature: Operating: 0 C ~ 40 C (41 F ~ 104 F) Storage: -20 C ~ 60 C (-4 F ~ 140 F) Humidity: Operating: 5 C ~ 40 C, 80%RH (Max.), Non-condensing Storage: -20 C ~ 60 C, 80%RH (Max.), Non-condensing Package Overview The following parts are included in the carton. (*) GB-200 Blending Box AC Power Cord User s guide (CD) Warranty card Due to different applications in each country, some regions may have different accessories.


3 Product Overview Front Back 1. Front Side: LED indicators and Power Switch 2. Rear Side: Input / Output and control panel LED Light Message 1 Status LED LED Flashing Interval Blue Yellow (Second) Power On (Normal) Steady light OFF N/A Standby Flashing OFF 1 HDMI Rx. Failed OFF Flashing 1 HDMI Tx. Failed OFF Flashing 2 Warp Failed OFF Flashing 4 HDMI Rx. and Tx. Failed Flashing Alternately 1 HDMI Rx. and Warp Failed Flashing Alternately 2 HDMI Tx. and Warp Failed Flashing Alternately 4
4 I/O and Control Panel IP Definition Switch XXX ( xxx); xxx can be 10 ~ 250 Default IP for Channel A is Default IP for Channel B is
5 Connecting to the Devices For application GB-200 with cropping box at Multi-Function To connect the blending box with other devices, there should be cables listed as below
6 For application GB-200 is as stacking warp solution (stacking two projector to present one image) at Multi-Function project or is application at Blending project To connect the blending box with other devices, there should be cables listed as below The HDMI/DVI Splitter should support EDID reading feature that support to read GB-200 s EDID from PC side
7
 Properties Go to the start up menu and click")
, Windows7 (Home);")
8 Setting the IP Address Setting the Computer s IP Address Step 1: Open the Internet Protocol (TCP/IP) Properties Go to the start up menu and click Control Panel. Click on Network and Internet Connections. Warping Box supports Windows XP, Windows Vista (Home), Windows7 (Home); Warping Box does NOT support Mac OS.
 icon.")

9 Click on Network Connections. You should now see your LAN (local area network) icon. Right click the LAN (local area network) icon and click on Properties at the bottom of the drop down window. (*) Please disconnect the wireless network before setting computer s IP address.
 Properties window, check the radio button for Use the following IP address.")
 (NOTE #5) Click the OK button to save and apply the settings.")
10 Step 2: Set the computer s IP Address. Highlight the Internet Protocol (TCP/IP) and click the Properties button. In the Internet Protocol (TCP/IP) Properties window, check the radio button for Use the following IP address. Set computer s IP address to the same network group with blending box. e.g xxx (XXX= 10 ~ 250) (NOTE #5) Click the OK button to save and apply the settings. Please disconnect the wireless network before setting computer s IP address.


11 Setting the Computer s Proxy Server Step 1: Click on Internet Options You can find it in the following path: Start up menu -> Control Panel -> Network and Internet Connections -> Internet Options. Or open the web browser and select the Tools menu and then choose the Internet Options. Or Step 2: Select the Connections tab and then press the LAN Settings button.

12 Step 3: Do NOT check the Use a proxy server for your LAN option. Click the OK button to save and apply the settings.
 Step 1: Use flat screw to adjust the default IP address A ( 192.168.0.11) and B (192.168.0.12) in rear panel into other IP address when need other s IP Address for control.")
13 Setting the Blending Box s IP Address The default IP address of blending box is A ( ) and B ( ). If user needs to modify IP address, please follow instruction. (NOTE #6) Step 1: Use flat screw to adjust the default IP address A ( ) and B ( ) in rear panel into other IP address when need other s IP Address for control. Step 2: the architecture looks like the image shown as below.... Do NOT connect all boxes to the same IP address; it will cause IP address confilction.


14 Step 3: Installing the GB-200 AP Step 4: After installation is finishing, clicking the icon GB-200.exe on desktop
15 Multi-Function Project Create New Multi-Function Project The box can be operated following two scenarios: Multi-Function and Blending. Multi-function includes following feature (i) (ii) (iii) (iv) Warp: Adjust image to do geometry correction for curve, cylinders screen...etc Color :Adjust color uniformity by point or area Edge Blending: Adjust the smooth of gray scale at each edge Black Level : Adjust the luminance of black at non-overlap area can be as same as at overlap area
16 After installation AP, clicking GB-200 icon follows the steps to install Step 1: Create New Multi-Function Project. User can create channels for blending Press Multi-Function again; the second channel icon will show. If you need control more than two channel icons, please repeat the process again to create more icons of channel. The Icons of Channel Status (at position Red frame): Not Connected Icon :
17 Connected Icon: Sleep Icon: The channel is selected icon : The channel is connected and selected icon : How to delete the Channel: Press delete buttons after the channel was selected
18 Step 2: Generic Settings 1. Select Resolution :XGA/WXGA/1080P/WUXGA 2. Select Input source port :HDMI or DVI 3. Editing IP address at this channel that should be as same as one of IP address at rear panel of GB-200 BOX and click Connect to link 4. After the channel network is linked well with green hook on the icon of channel,clicking Synchronize to load default setting at AP into Box 5. Repeat Step 1 and Step 2 to create other channel s settings for control
19 Step 3: Warp Settings Press "Warp" on top bar to open Warp page 1. Adjustment Pattern Overview H Overlap : Modify the size of Horizontal overlap area V Overlap : Modify the size of Vertical overlap area Grid Color : Color of Pattern line (*1) Adjust Point : Present the point you are adjusting (*1) Marker Color : Present overlap area(*1) Marker Position : Marker color direction, L=left border, R=Right border, T=Upper border, B=Lower border (*1) Marker Cell : Marker Position(*1) (*1)Color can be customized by your preference. 2. Select Warp type Apply Linear or Curve correction at all edges 3. Adjust the Grid Number :Range are 2X2 (Min), 3X3,5X5,9X9,17X17(Max) Use mouse to adjust Grid Number or Key broad Ctrl with + to increase quantity of Grid and Cursor or Ctrl with - to decrease quantity of Grid and Cursor. For examples the Grid Number is 3 X 3and there are 9 Cursors 4. Adjust the Move Pitch :Range are , 0.1, 0.5, 1.0, 5.0, 10.0, 50.0, Use mouse or key broad + or - to adjust what is move pitch for each adjust at each point. 5. Select Cursor When the point is Blue that means the point is selected. Use mouse or key broad W A S D to select the point of Cursor you want to adjust 6. Move cursor Use Key broad to move Cursor with defined Move Pitch setting for each adjustment. For example :using to adjust, one step will be 10 pixels when Move Pitch is 10.
20 (*1) Coordinate:Provide detail information of X and Y axis of the select point for reference (*2)Press left click of mouse with green hook at Blank to send pure Black image when need Guide line for warp adjustment Adjust outer Cursors then inner of cursors For example: adjust outer 16 red points first then adjust 9 green points at following photo Each channel will present Green & Purple color by order from left to right.

21 1. The color settings of Cursor for Color adjustment Press left click of mouse with green hook for Show Cursor and right click of mouse on the Color to change the cursor color via Red/Green/Blue adjustment 2. Adjust Grid number: Range are 2x2, 3x3, 5x4, 9x7 Use mouse to adjust or Key broad Ctrl with + to increase number of Cursor or Ctrl with - to decrease number of Cursor. 3. Select Cursor When the point is Blue that means the point is selected. Use mouse or key broad W A S D to select the point of Cursor you want to adjust 4. Adjust contrast and brightness Typing the value of Red/Green/Blue then pressing key broad Enter Press Global to open following page to adjust fine tune of color for whole image Adjust contrast and brightness Typing the value of Red/Green/Blue then pressing key broad Enter Press Ok to close this page If the monitor or LCD projector don't have any color fine tune interface, please use Global to adjust the color for whole image Press Reset to reset all settings at Color page
22 Step 5: Edge Blending Settings Press" Edge Blending " on top bar to open Edge Blending page 1. Select which edge of image to modify : Top/Bottom/Right/Left At position Green frame Press left click with green hook for Enable then Input the start point and width of Blending area and press key broad Enter At position like Blue frame Press left click with green hook for Enable Marker and Use right click on the black squares of Start and End to change the Mark line color via Red/Green/Blue adjustment to display Mark Line on image 2. Modify the Gamma curve for blending area At position Purple frame Press left click with green hook for Enable and select Gamma number you need 3. The Test Pattern s settings at position Orange frame Input the value of overlapping horizontal pixels into Horizontal Space to define width of Blending area Input the of overlapping vertical pixels into Vertical Space to define height of Blending area Select the color of Test Pattern on this channel Press Enable to turn Test Pattern is on in image Press Enable again to turn Test Pattern is off in image
23 4. After all channels are enable of Test Pattern and are with interval color : Green or Purple 5. Call out Step 3 Warp page to match overlap with 4 blocks between each projector If the percentage in step 3 is too small to warp correctly 4 blocks is matching or the overlapping is too huge to warp too much, please go back to step 5 again and input the re-ranged overlap percentage(source) into the setting values of Horizontal Space and Vertical Space


24 Step 6: Black Level Settings Press" Black Level " on top bar to open Black Level page and Press left click with green hook for Enable 1. At position Green frame Press left click with green hook for Enable and select Gamma number for whole black level adjustment Notes: This Gamma number is designed for black level using not for overlap 2. At position Orange frame There are 10 kinds of color in palette for define Click one number of list to define the color you want in following page Select the color you want on Palette then press Ok Or Define new color on right half of page you need Add to Custom Colors then press Ok Define other number of list if you want to use more one colors of Black Level
 for control following settings And Use right click on the selected point( like a hollow point) to change the cursor color via Red/Green/Blue adjustment and use Enable cursor to show the")
25 3. At position Blue frame (i) Choosing one number(color) of Palette at Orange frame to define a quadrangle with this color (ii) Use mouse or key broad W A S D to select the point become a hollow point (like ) for control following settings And Use right click on the selected point( like a hollow point) to change the cursor color via Red/Green/Blue adjustment and use Enable cursor to show the cursor on image or not (iii) Use mouse or key broad to move four points to define the area of quadrangle you need and press overwrite to finalize the first layer of area of quadrangle Repeat steps (ii) & (iii) if you need more quadrangles to create and these are in same number(color)of Palette at Orange frame Repeating steps (I) to change another number (color) at Orange frame to create quadrangle with different color if need and steps (ii) to create other quadrangle At Black Level page, Press Reset to release all quadrangles at position Blue frame of page The color of all cursors only show when adjusting and won t show at final result
26 Save Config file Click File Save Information appears at display Red Screen Saving the setting of Warp Green Screen Saving the setting of color adjustment Red+Green+Blue+Cyan Saving the setting of Edge Blending Red+Green+Blue+Cyan Saving the setting of Black Level +Yellow+purple
27 Open the previous setting Clicking File Open Remember to click Synchronization All to synchronize all channels.

28 Blending Project (*) Create New Blending Project The box can be acted as two roles. One is Multi-Functions and the other is Blending box. The Blending Project can allow end-user to do image blending at multi-projectors with native resolution for each projector from PC Source. After installation AP, clicking GB-200 icon follows the steps to install Step 1: Create New Blending Project will go into Blending box process. Step 2: The following page defines the output resolution and which port will be input port
29 Select Resolution: Range XGA/WXGA/1080P Choice box output resolution (projector s native resolution) Select Input Port: Click Next button. Blending Box Project only support when source is PC and the OS must be Window 7 or Windows XP

30 Step 3: Set up layout of blending settings. Select Layout : Define the number of blending projectors, H means how many projectors will use in Horizontal And V means how many projectors will use in Vertical Define the value for percentage of Horizontal Overlap and Vertical overlap : (*). Click Next button The ideal condition: the overlap s percentage at optical should be same the overlap s percentage (the setting in GB-200 s AP). In real case, please input the overlap percentage at GB-200 AP should be equal or less ( < = )the percentage at optical if you want to use warping settings to match the overlap perfect at step 6 later.
 Select and Click the number(channel) inside the image (2) Change IP address to match each channel s IP address in Boxes (3) Click Apply button to access (4) Repeat above")
31 Step 4: Configure each channel s IP address in each Boxes into AP. The IP range is from to (1) Select and Click the number(channel) inside the image (2) Change IP address to match each channel s IP address in Boxes (3) Click Apply button to access (4) Repeat above process for other number (channel) to configure different IP address at each channel (5) Click OK button
 Waiting each channels network is linked well with green hook( like ) (2) Choose one channel and Clicking Synchronize All to load default setting at AP into Box 5-2 If OS is Windows XP(Not for")
32 Step 5: AP will synchronize the status for advanced fine tune items. (1) Waiting each channels network is linked well with green hook( like ) (2) Choose one channel and Clicking Synchronize All to load default setting at AP into Box 5-2 If OS is Windows XP(Not for Windows 7), the image will become orange after press OK,Please remembering to change manually the high resolution timing. Detail settings will be Case E of Trouble Shooting in final page
33 Step 6: Click Warp page to match overlap with 4 blocks between each projector(*) If the percentage of Horizontal Overlap and Vertical overlap at step 3 is too small to warp 4 four block matching correct or the overlapping is to huge to warp, please go back to step 1 again to Create New Blending Project and input the percentage you want to process again

34 Change the size of overlap area Click Overlap Change Overlap Area Must Click Warp page to enable this function 1. Adjust overlap area 2. Click Preview to preview the expected result

35 Saving the setting >Clicking File Save Information status at screen Red Screen BOX is saving Warp settings Green Screen BOX is saving Color settings Red+ Green+ Blue +Cyan BOX is saving Edge Blending settings screen Red+ Green+ Blue +Cyan + BOX is saving Black Level settings Yellow+ Purple screen In Blending Project: Orange screen There is no input source or the timing won t support
36 Open the Previous setting >Clicking File Open Config file After previous settings is open, please remember to press Connect then Synchronize All on each channel Information appears at display Red Screen Green Screen Red+ Green+ Blue +Cyan screen Red+ Green+ Blue +Cyan + Yellow+ Purple screen Orange screen BOX is saving Warp settings BOX is saving Color settings BOX is saving Edge Blending settings BOX is saving Black Level settings In Blending Project: There is no input source or the timing won't support 援
37 Delete GB-200 Channel Or Press (Del) Sound Effect 勾選表示關閉提示音效 Config file Auto Save
38 Compatibility Timing at Multi-Function Project XGA and WXGA only support 60Hz output. It might have frame tear when input timing is 50Hz
39 Compatibility Timing table at Blending Project (XGA) Layout 1H 2V 1H 3V 1H 4V 2H 1V 3H1V 2H2V Overlap Total HD Overlap (pixel) (%) Resolution MI DVI H: 0 H: ˇ ˇ H: 10 H: ˇ ˇ H: 20 H: ˇ ˇ H: 30 H: ˇ ˇ H: 40 H: ˇ ˇ H: 50 H: ˇ ˇ H: 0 H: ˇ ˇ H: 10 H: ˇ ˇ H: 20 H: ˇ ˇ H: 30 H: ˇ ˇ H: 40 H: ˇ ˇ H: 50 H: ˇ ˇ H: 26 H: ˇ ˇ H: 36 H: ˇ ˇ H: 46 H: ˇ ˇ H: 50 H: ˇ ˇ V: 0 V: ˇ ˇ V: 10 V: ˇ ˇ V: 20 V: ˇ ˇ V: 30 V: ˇ ˇ V: 40 V: ˇ ˇ V: 50 V: ˇ ˇ V: 21 V: ˇ ˇ V: 30 V: ˇ ˇ V: 40 V: ˇ ˇ V: 50 V: ˇ ˇ H: 25 H: 256 V: 23 V: ˇ ˇ H: 40 H: 408 V: 38 V: ˇ ˇ H: 50 V: 50 H: 512 V: ˇ ˇ For operating correctly on Blending Project, the recommend OS in PC will be windows 7 and Windows XP.
40 Compatibility Timing table at Blending Project (WXGA) Layout Overlap (%) Overlap (pixel) Total Resolution HDMI DVI H: 0 H: ˇ ˇ H: 10 H: ˇ ˇ 1H 2V H: 20 H: ˇ ˇ H: 30 H: ˇ ˇ H: 40 H: ˇ ˇ H: 50 H: ˇ ˇ H: 25 H: ˇ ˇ 1H 3V H: 35 H: ˇ ˇ H: 45 H: ˇ ˇ H: 50 H: ˇ ˇ V: 0 V: ˇ ˇ V: 10 V: ˇ ˇ 2H 1V V: 20 V: ˇ ˇ V: 30 V: ˇ ˇ V: 40 V: ˇ ˇ V: 50 V: ˇ ˇ V: 34 V: ˇ ˇ 3H1V V: 40 V: ˇ ˇ V: 45 V: ˇ ˇ V: 50 V: ˇ ˇ Compatibility Timing table at Blending Project (1080P@24) Layout Overlap (%) Overlap (pixel) Total Resolution HDMI DVI H: 10 H: ˇ ˇ H: 20 H: ˇ ˇ 1H 2V H: 30 H: ˇ ˇ 1080P@24Hz H: 40 H: ˇ ˇ H: 50 H: ˇ ˇ V: 25 V: ˇ ˇ 2H 1V V: 35 V: ˇ ˇ V: 45 V: ˇ ˇ V: 50 V: ˇ ˇ If there is request for image blending with more projectors (monitors) than above numbers, suggesting to work with other professional cropping video Boxes or powerful PC with multi-image-outputs graphic card that can send multi-native resolutions to multi-projector and GB102 can operate all features under Multi-Function Project at this case If customer need professional technical support,please call Optoma For operating correct on Blending feature, the recommend OS in PC will be windows 7 and Windows XP
41 Troubleshooting Case A: There are black and white stripes That means the input resolution is smaller than output resolution at Generic Settings Please make sure the input resolution is as same as the resolution in AP at Generic Settings / Resolution Case B: A part of image area is missing That means the input resolution is higher than output resolution at Generic Settings Please make sure the input resolution is as same as the resolution in AP at Generic Settings / Resolution and the frequency must be as same as the timing table can support Case C: The searching IP already is fail Please make sure the internet is connect well and all devices have correct and difference IP under same IP group ( xxx); xxx can be 10 ~ 250 Case D: The image already show Orange screen That means GB-200 can t recognize this timing and this timing isn t in Compatibility Timing table at Blending Project Case E: It will take100 second to source input signal if you press Synchronize before input signal connect to GB-200. Please make sure the HDMI/DVI Splitter that must supports to read Box s EDID from PC And Make sure OS is Window 7 that allow PC to creating customized timing If the OS is Window XP, please following steps before using Blending Project (i) Setup PC s resolution become 1024 x 768 at Display Properties before open New Blending Project Use right click to open following page and click Properties Changing Screen resolution become 1024 x 768
42

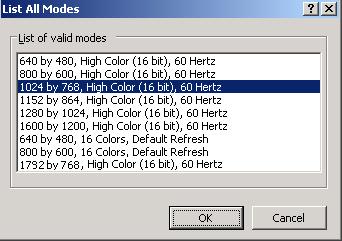
43 After open New Blending Project at Step 6 Please check the total resolution and select this timing under Display Properties settings Remember the total resolution at position Red frame Use right click to open following page and click Properties then Click Advanced at position Red frame Click Adapter Page and Click List All Modes to select this timing on table at position Red frame

44
PXL2760MW LED LCD Monitor
 PXL2760MW LED LCD Monitor USER'S GUIDE www.planar.com Content Operation Instructions...1 Safety Precautions...2 Package Overview...3 First Setup...4 Front View of the Product...5 Rear View of the Product...6
PX1710M LCD Monitor USER S GUIDE
 PX1710M LCD Monitor USER S GUIDE www.planar.com The information contained in this document is subject to change without notice. This document contains proprietary information that is protected by copyright.
PLL2710W LED LCD Monitor
 PLL2710W LED LCD Monitor USER'S GUIDE www.planar.com Content Operation Instructions...1 Safety Precautions...2 Package Overview...3 First Setup...4 Front View of the Product...5 Rear View of the Product...6
22" Touchscreen LED Monitor USER'S GUIDE
 22" Touchscreen LED Monitor USER'S GUIDE Content Operation Instructions...1 Unpacking Instructions...2 Safety Precautions...2 Front View of the Product...3 Rear View of the Product...4 Quick Installation...5
KRAMER ELECTRONICS LTD. USER MANUAL
 KRAMER ELECTRONICS LTD. USER MANUAL MODEL: Projection Curved Screen Blend Guide How to blend projection images on a curved screen using the Warp Generator version K-1.4 Introduction The guide describes
PLL2210MW LED Monitor
 PLL2210MW LED Monitor USER'S GUIDE www.planar.com Content Operation Instructions...1 Safety Precautions...2 First Setup...3 Front View of the Product...4 Rear View of the Product...5 Quick Installation...6
10.4" LCD Monitor with Aluminum Front Bezel YPM1040PHB
 SPECIFICATION FOR APPROVAL M0DEL: 10.4" LCD Monitor with Aluminum Front Bezel YPM1040PHB BASE MODEL Customer's Confirmation Approved by: Reviewed by: Prepared by: Supplier's Confirmation Approved by: Reviewed
Blackbird 1x4 HDMI Splitter for TV Walls
 Blackbird 1x4 HDMI Splitter for TV Walls P/N 30917 User's Manual SAFETY WARNINGS AND GUIDELINES Please read this entire manual before using this device, paying extra attention to these safety warnings
28 4K LED monitor. User Manual M284K
 28 4K LED monitor User Manual M284K CONTENTS Safety Information... 2 What s included..... 4 Getting Started....... 8 Troubleshooting.... 14 Specification.... 15 2 of 15 SAFETY INFORMATION Read these instructions
HDMI 5x1 Switch B-240-HDSWTCH-5X1 INSTALLATION MANUAL
 HDMI 5x1 Switch B-240-HDSWTCH-5X1 INSTALLATION MANUAL IMPORTANT SAFETY INSTRUCTIONS To reduce the risk of fire or electric shock, read and follow all instructions and warnings in this manual. Keep this
PXL2470MW LED LCD Monitor
 PXL2470MW LED LCD Monitor USER'S GUIDE www.planar.com Content Operation Instructions...1 Unpacking Instructions...2 Safety Precautions...2 Package Overview...3 First Setup...4 Front View of the Product...5
DCL9AW. User Manual. English
 DCL9AW User Manual English PRECAUTIONS Information for users applicable in European Union countries 1 Information for users applicable in United States of America 1 Installation 1 Power connection 1 Maintenance
Introduction...2. Features...2 Safety Precautions...2. Installation...4
 PE1900 Contents Introduction...2 Features...2 Safety Precautions...2 Installation...4 Unpacking the Display...4 Locations and Functions of Controls...4 Connections...5 Using Your Display...7 Turning the
Winmate Communication INC.
 20.1 Military Grade Display Model: R20L100-RKA2ML User s Manual Winmate Communication INC. May, 2011 1 IMPORTANT SAFETY INSTRUCTIONS Please read these instructions carefully before using the product and
PL2410W LCD Monitor USER'S GUIDE.
 PL2410W LCD Monitor USER'S GUIDE www.planar.com Content Operation Instructions...1 Safety Precautions...2 First Setup...3 Front View of the Product...4 Rear View of the Product...5 Quick Installation...6
35 INCH CURVED QHD LED MONITOR
 35 INCH CURVED QHD LED MONITOR eiq-35cmuwq60gafs Thank you for choosing electriq Please read this user manual before using this monitor and keep it safe for future reference. Visit our page www.electriq.co.uk
LA1500R USER S GUIDE.
 LA1500R USER S GUIDE www.planar.com The information contained in this document is subject to change without notice. This document contains proprietary information that is protected by copyright. All rights
USER MANUAL. 27 Full HD Widescreen LED Monitor L27ADS
 USER MANUAL 27 Full HD Widescreen LED Monitor L27ADS TABLE OF CONTENTS 1 Getting Started 2 Control Panel/ Back Panel 3 On Screen Display 4 Technical Specs 5 Care & Maintenance 6 Troubleshooting 7 Safety
USER MANUAL. 22" Class Slim HD Widescreen Monitor L215DS
 USER MANUAL 22" Class Slim HD Widescreen Monitor L215DS TABLE OF CONTENTS 1 Getting Started Package Includes Installation 2 Control Panel / Back Panel Control Panel Back Panel 3 On Screen Display 4 Technical
USER MANUAL. 28" 4K Ultra HD Monitor L28TN4K
 USER MANUAL 28" 4K Ultra HD Monitor L28TN4K TABLE OF CONTENTS 1 Getting Started 2 Control Panel/ Back Panel 3 On Screen Display 4 Technical Specs 5 Care & Maintenance 6 Troubleshooting 7 Safety Info &
HDBaseT RECEIVER B-520-RX-230-IR INSTALLATION MANUAL
 HDBaseT RECEIVER B-520-RX-230-IR INSTALLATION MANUAL IMPORTANT SAFETY INSTRUCTIONS To reduce the risk of fire or electric shock, read and follow all instructions and warnings in this manual. Keep this
HDBaseT RECEIVER B-520-RX-330-IR INSTALLATION MANUAL
 HDBaseT RECEIVER B-520-RX-330- INSTALLATION MANUAL IMPORTANT SAFETY INSTRUCTIONS To reduce the risk of fire or electric shock, read and follow all instructions and warnings in this manual. Keep this manual
HD Digital MPEG2 Encoder / QAM Modulator
 HD Digital MPEG2 Encoder / QAM Modulator YPrPb VGA In QAM Out series Get Going Guide ZvPro 600 Series is a one or two-channel Component or VGA-to-QAM MPEG 2 Encoder/ Modulator, all in a compact package
DISTRIBUTION AMPLIFIER
 MANUAL PART NUMBER: 400-0045-005 DA1907SX 1-IN, 2-OUT VGA/SVGA/XGA/UXGA DISTRIBUTION AMPLIFIER USER S GUIDE TABLE OF CONTENTS Page PRECAUTIONS / SAFETY WARNINGS... 2 GENERAL...2 GUIDELINES FOR RACK-MOUNTING...2
 Register your product and get support at www.philips.com/welcome SWW1890 User manual Contents 1 Important 4 Safety 4 English 2 Your Philips Wireless HD Net Connect 5 What is in the box 5 3 Overview 6
HD Digital MPEG2 Encoder / QAM Modulator Get Going Guide
 series HD Digital MPEG2 Encoder / QAM Modulator Get Going Guide HDb2640 HDb2620 HDb2540 HDb2520 The HDbridge 2000 Series is a combination HD MPEG 2 Encoder and frequency-agile QAM Modulator, all in a 1RU
MONOPRICE. 27" UHD IPS 4K Ultra Slim Aluminum Monitor. Quick User's Guide P/N 24658
 MONOPRICE 27" UHD IPS 4K Ultra Slim Aluminum Monitor P/N 24658 Quick User's Guide SAFETY WARNINGS AND GUIDELINES Please read this entire manual before using this device, paying extra attention to these
HD Digital MPEG2 Encoder / QAM Modulator
 HD Digital MPEG2 Encoder / QAM Modulator HDMI In QAM Out series Get Going Guide ZvPro 800 Series is a one or two-channel unencrypted HDMI-to-QAM MPEG 2 Encoder / QAM Modulator, all in a compact package
27'' Full HD LED Monitor KALED27MONSC Quick Start Guide
 Safety Warnings 27'' Full HD LED Monitor KALED27MONSC Quick Start Guide TO REDUCE THE RISK OF ELECTRIC SHOCK, DO NOT REMOVE ANY COVERS (OR BACKINGS). NO USER SERVICEABLE PARTS ARE INSIDE. REFER ALL SERVICING
USER MANUAL. 27 Full HD Widescreen LED Monitor L270E
 USER MANUAL 27 Full HD Widescreen LED Monitor L270E TABLE OF CONTENTS 1 Getting Started 2 Control Panel/ Back Panel 3 On Screen Display 4 Technical Specs 5 Care & Maintenance 6 Troubleshooting 7 Safety
HDBaseT RECEIVER B-540-RX-330-IR INSTALLATION MANUAL
 HDBaseT RECEIVER B-540-RX-330-IR INSTALLATION MANUAL IMPORTANT SAFETY INSTRUCTIONS To reduce the risk of fire or electric shock, read and follow all instructions and warnings in this manual. Keep this
PLL1920M LED LCD Monitor
 PLL1920M LED LCD Monitor USER'S GUIDE www.planar.com Content Operation Instructions...1 Safety Precautions...2 First Setup...3 Front View of the Product...4 Rear View of the Product...5 Installation...6
PT1500MX / PT1550MX PT1555MU / PT1505MU Touch Screen LCD Monitors
 PT1500MX / PT1550MX PT1555MU / PT1505MU Touch Screen LCD Monitors USER S GUIDE www.planar.com Important Recycle Instructions: Lamp(s) inside this product contains mercury. This product may contain other
LINK EXT40-4KECO. 4K 40m HDMI Extender. User Manual. Version: V1.0.1
 LINK EXT40-4KECO 4K 40m HDMI Extender User Manual Version: V1.0.1 Important Safety Instructions 1. Do not expose this apparatus to rain, moisture, dripping or splashing and that no objects filled with
ACUBRITE 23 SS. Manual. Stainless Steel Chassis 23" LCD Display. Content
 ACUBRITE 23 SS Stainless Steel Chassis 23" LCD Display Manual Introduction... 2 Hardware Installation... 2 The Display Timing... 5 The Display Outline Dimensions... 6 The Display Controls... 7 The Screen
MP 35" Zero-G 100Hz Curved Monitor with AMD FreeSync 2.0
 MP 35" Zero-G 100Hz Curved Monitor with AMD FreeSync 2.0 P/N 31005 User's Manual SAFETY WARNINGS AND GUIDELINES Please read this entire manual before using this device, paying extra attention to these
USER MANUAL. 27" 2K QHD LED Monitor L27HAS2K
 USER MANUAL 27" 2K QHD LED Monitor L27HAS2K TABLE OF CONTENTS 1 Getting Started 2 Control Panel/ Back Panel 3 On Screen Display 4 Technical Specs 5 Troubleshooting 6 Safety Info & FCC warning 1 GETTING
Operating Instructions
 Model No.: TESTER-H01 Operating Instructions Thanks for purchasing our product. Please be sure to read this instruction manual carefully before using our product. Contents HDMI Signal Generator...1 Product
Camera 220C Document Camera User s Guide
 Camera 220C Document Camera User s Guide #401-220C-00 Table of Contents TABLE OF CONTENTS... 0 TABLE OF CONTENTS... 1 COPYRIGHT INFORMATION... 2 CHAPTER 1 PRECAUTIONS... 3 CHAPTER 2 PACKAGE CONTENT...
INFORMATION TO THE USER
 U.S.FEDERAL COMMUNICATIONS COMMISSION RADIO FREQUENCY INTERFERENCE STATEMENT INFORMATION TO THE USER NOTE: This equipment has been tested and found to comply with the limits for a Class B digital device
USER MANUAL Full HD Widescreen LED Monitor L236VA
 USER MANUAL 23.6 Full HD Widescreen LED Monitor L236VA TABLE OF CONTENTS 1 Getting Started 2 Control Panel/ Back Panel 3 On Screen Display 4 Technical Specs 5 Care & Maintenance 6 Troubleshooting 7 Safety
MP Zero-G 27" WQHD 144Hz TN-LED Monitor with AMD FreeSync
 MP Zero-G 27" WQHD 144Hz TN-LED Monitor with AMD FreeSync P/N 31004 User's Manual SAFETY WARNINGS AND GUIDELINES Please read this entire manual before using this device, paying extra attention to these
19 / 20.1 / 22 WIDE SCREEN TFT-LCD MONITOR
 19 / 20.1 / 22 WIDE SCREEN TFT-LCD MONITOR V193/ V220 Series V202 Series USER MANUAL www.viewera.com Rev. 2.0 Table of Contents EMC Compliance......1 Important Precautions...2 1. Package contents....3
LINK EXT40-4KUHD 4:4:4 HDR HDBaseT Extender. User Manual. Version: V1.0.1
 LINK EXT40-4KUHD 4K@60 4:4:4 HDR HDBaseT Extender User Manual Version: V1.0.1 Important Safety Instructions 1. Do not expose this apparatus to rain, moisture, dripping or splashing and that no objects
-TECH DIGITAL. Explore The High DefinitionWorld. Website: Hot Line: [US] USER MANUAL
![-TECH DIGITAL. Explore The High DefinitionWorld. Website: Hot Line: [US] USER MANUAL](/thumbs/80/80689593.jpg "-TECH DIGITAL. Explore The High DefinitionWorld. Website: Hot Line: [US] USER MANUAL") -TECH DIGITAL Explore The High DefinitionWorld Website: www.jtechdigital.com Hot Line: 1-888-610-2818[US] USER MANUAL J-Tech Digital ProAV H.264 Encoder/Decoder Many to Many HDMI Extender RoHS 1 Operating
-TECH DIGITAL Explore The High DefinitionWorld Website: www.jtechdigital.com Hot Line: 1-888-610-2818[US] USER MANUAL J-Tech Digital ProAV H.264 Encoder/Decoder Many to Many HDMI Extender RoHS 1 Operating
USER MANUAL Full HD Widescreen LED Monitor L215ADS
 USER MANUAL 21.5 Full HD Widescreen LED Monitor L215ADS TABLE OF CONTENTS 1 Getting Started 2 Control Panel/ Back Panel 3 On Screen Display 4 Technical Specs 5 Care & Maintenance 6 Troubleshooting 7 Safety
User Manual 15" LCD Open frame SAW Touch Monitor KOT-0150US-SA4W. Table of Contents
 User Manual 15" LCD Open frame SAW Touch Monitor KOT-0150US-SA4W Table of Contents Chapter 1. Introduction...2 1.1 Product Description 1.2 About the Product Chapter 2. Installation and Setup...2 2.1 Unpacking
USER MANUAL Full HD Widescreen LED Monitor L215IPS
 USER MANUAL 21.5 Full HD Widescreen LED Monitor L215IPS TABLE OF CONTENTS 1 Getting Started 2 Control Panel/ Back Panel 3 On Screen Display 4 Technical Specs 5 Care & Maintenance 6 Troubleshooting 7 Safety
User Guide. 20 Widescreen LED Monitor NS-20EM50A13
 User Guide 20 Widescreen LED Monitor NS-20EM50A13 Contents Introduction.....................................................1 Safety Precautions...............................................1 WARNINGS:......................................................
Evolution Digital HD Set-Top Box Important Safety Instructions
 Evolution Digital HD Set-Top Box Important Safety Instructions 1. Read these instructions. 2. Keep these instructions. 3. Heed all warnings. 4. Follow all instructions. 5. Do not use this apparatus near
3G/HD/SD-SDI Quad-view Video Processor. User Manual
 MX-3004 3G/HD/SD-SDI Quad-view Video Processor User Manual The MX-3004 3G/HD/SD-SDI Quad-view Video Processor has been tested for conformity to safety regulations and requirements, and has been certified
TABLE OF CONTENTS Important Safety Instructions Package Content Setting Up the Display Trouble shooting Specifications Product Dimensions
 TABLE OF CONTENTS Important Safety Instructions...1 1.1 Safety precautions and maintenance....1 1.2 Use.......4 1.3 Installation Notes.......7 Package Content...9 2.1 Unpacking...9 2.2 Accessories......10
DH551C/DH550C/DL550C Double Sided Display User Manual
 DH551C/DH550C/DL550C Double Sided Display User Manual Disclaimer BenQ Corporation makes no representations or warranties, either expressed or implied, with respect to the contents of this document. BenQ
HDTV Supply Inc. reserves the right to make changes in the hardware, packaging and any accompanying documentation without prior written
 HDMI Matrix (Router Type) Model No. HDTVMX0404313 HDTV Supply, Inc Features Easy to use: install in seconds, no need for setting. Allows up to four HDMI audio/video devices to be independently switched
Precautions and Disclaimers What You Can Do with Geometry Manager Pro Check Your Computer System requirements...
 Operating Instructions Geometric & Setup Management Software Windows Geometry Manager Pro Ver. 4.0 Thank you for purchasing this Panasonic product. Before using this software, please read the instructions
User Manual CS-HDBTLPOER m HDBaseT Extender with Bi-directional PoE. Version: V1.0.0
 User Manual CS-HDBTLPOER-70 70m HDBaseT Extender with Bi-directional PoE Version: V1.0.0 Important Safety Instructions Warning: To reduce the risk of fire, electric shock or product damage: 1. Do not
USER GUIDE 3. For more information visit
 USER GUIDE 3 For more information visit www.caldigit.com Table of Contents Section 1 : General Information Introduction 3 General Use Warnings 3 Safety Warnings 3 System Requirements 4 In the Box 4 TS3
HMX Analyser HDMI 3D Mini Analyser. Operating Manual. Part No TRIAX - your ultimate connection
 HMX Analyser HDMI 3D Mini Analyser Part No. 310012 Operating Manual TRIAX - your ultimate connection Operating Manual The illustrations in this operation manual are for explanation and guidance purposes
Bring High-Definition to your life!
 HD Video Converter User Manual VGA+R/L Audio TO HDMI Converter Bring High-Definition to your life! Thank you for purchasing our product. To ensure safety and many years' trouble-free operation of the product,
UNDER TABLE 4X1 HDMI SWITCHER
 UNDER TABLE 4X1 HDMI SWITCHER Welcome! Everyone at Altinex greatly appreciates your purchase of the UT260-041. We are confident that you will find it to be reliable and easy to use. If you need support,
Installation Manual VIP 1003
 Installation Manual VIP 1003 We Caring for the Environment by Recycling When you see this symbol on a Motorola product, do not dispose of the product with residential or commercial waste. Recycling your
DC162 Digital Visualizer. User Manual. English - 1
 DC162 Digital Visualizer User Manual English - 1 Table of Contents CHAPTER 1 PRECAUTIONS... 5 CHAPTER 2 PACKAGE CONTENT... 7 CHAPTER 3 PRODUCT OVERVIEW... 8 3.1 PRODUCT INTRODUCTION... 8 3.2 I/O CONNECTION...
HD Digital Set-Top Box Quick Start Guide
 HD Digital Set-Top Box Quick Start Guide Eagle Communications HD Digital Set-Top Box Important Safety Instructions WARNING TO REDUCE THE RISK OF FIRE OR ELECTRIC SHOCK, DO NOT EXPOSE THIS PRODUCT TO RAIN
TP HDMI OVER ANYWIRE TRANSMITTER
 HDMI OVER ANYWIRE TRANSMITTER Welcome! Everyone at Altinex greatly appreciates your purchase of the TP315-101. We are confident that you will find it to be reliable and simple to use. If you need support,
AUTO - SCANNING WITH DIGITAL CONTROL LCD COLOR MONITOR FS-L1903C. User manual (Rev.01) SMITHS HEIMANN
 SMITHS HEIMANN") AUTO - SCANNING WITH DIGITAL CONTROL LCD COLOR MONITOR FS-L1903C User manual (Rev.01) SMITHS HEIMANN www.smithsdetection.com Table of Contents Safety Instructions... 5 Accessories... 8 Power Connections...
AUTO - SCANNING WITH DIGITAL CONTROL LCD COLOR MONITOR FS-L1903C User manual (Rev.01) SMITHS HEIMANN www.smithsdetection.com Table of Contents Safety Instructions... 5 Accessories... 8 Power Connections...
Table of Contents Precautions... 2
 Table of Contents Precautions... 2 Special notes on LCD monitors... 2 Package contents... 3 Installation instructions... 3 Assembling the monitor... 3 Adjusting the viewing angle... 4 Connecting the devices...
PS600 Digital Visualizer. User Manual. English - 0
 PS600 Digital Visualizer User Manual English - 0 Table of Content COPYRIGHT INFORMATION... 3 CHAPTER 1 PRECAUTIONS... 4 SAFETY PRECAUTIONS... 5 FCC WARNING... 5 EN55022 (CE RADIATION) WARNING... 5 CHAPTER
Operating Instructions
 Marshall Electronics Broadcast A/V Division Model No. VSW-2200 4-Input Seamless SDI A/V Switcher Operating Instructions Table of Contents 1. Overview... 2. Features.... Package Contents... 4. Specifications...
4K HDMI to 6G SDI Converter with SDI Loop Out P/N User's Manual
 4K HDMI to 6G SDI Converter with SDI Loop Out P/N 30445 User's Manual SAFETY WARNINGS AND GUIDELINES Please read this entire manual before using this device, paying extra attention to these safety warnings
PNP300 / PNP300UN / PNP350
 DOCUMENT NUMBER 400-0114-003 / UN / PNP350 Pop N Plug Slim INTERCONNECT BOX USER'S GUIDE TABLE OF CONTENTS Page PRECAUTIONS / SAFETY WARNINGS...2 GENERAL...2 INSTALLATION...2 CLEANING...2 ABOUT YOUR /300UN/350...3
Marshall Electronics. Pro A/V Communications VMV-402-SH. 3G/HD/SD-SDI Quad-viewer/Switcher with Audio Meter Display. User Manual.
 Marshall Electronics Pro A/V Communications VMV-402-SH 3G/HD/SD-SDI Quad-viewer/Switcher with Audio Meter Display User Manual Table of Contents 1. Introduction... 3 2. Features... 3 3. Package Contents...
PRO-3GSDIHDMI. 3G-SDI Extender with HDMI Scaler OPERATION MANUAL
 PRO-3GSDIHDMI 3G-SDI Extender with HDMI Scaler OPERATION MANUAL Safety Precautions Please read all instructions before attempting to unpack or install or operate this equipment, and before connecting the
Table of Contents. English. Table of Contents... 1 Usage Notice Introduction Installation User Controls Appendices...
 Table of Contents Table of Contents... 1 Usage Notice... 2 Precautions... 2 Introduction... 4 Product Features... 4 Package Overview... 5 Product Overview... 6 Main Unit... 6 Control Panel... 7 Connection
TP HDMI OVER ANYWIRE RECEIVER (DC)
") HDMI OVER ANYWIRE RECEIVER (DC) Welcome! Everyone at Altinex greatly appreciates your purchase of the TP315 106. We are confident that you will find it to be reliable and simple to use. If you need support,
HDMI OVER ANYWIRE RECEIVER (DC) Welcome! Everyone at Altinex greatly appreciates your purchase of the TP315 106. We are confident that you will find it to be reliable and simple to use. If you need support,
Wide LCD Monitor. User Manual
 Wide LCD Monitor User Manual PRECAUTIONS Information for users applicable in European Union countries 1 Information for users applicable in United States of America 1 1 Power connection 1 Maintenance 1
User Manual. Multi-Screen Splicing Processor J6
 User Manual Multi-Screen Splicing Processor J6 Rev1.0.0 NS160100147 Statement Dear users, Welcome to use the J6, a multi-screen splicing processor. This manual is intended to help you to understand and
LCD VALUE SERIES (32 inches)
") LCD VALUE SERIES (32 inches) http://www.orionimages.com All contents of this document may change without prior notice, and actual product appearance may differ from that depicted herein 1. SAFETY INSTRUCTION
LCD VALUE SERIES (32 inches) http://www.orionimages.com All contents of this document may change without prior notice, and actual product appearance may differ from that depicted herein 1. SAFETY INSTRUCTION
HDBaseT EXTENDER B-540-EXT-230-RS INSTALLATION MANUAL
 EXTENDER B-540-EXT-230-RS INSTALLATI MANUAL IMPORTANT SAFETY INSTRUCTIS To reduce the risk of fire or electric shock, read and follow all instructions and warnings in this manual. Keep this manual for
YCbCr (480i/576i) and RGBsync. 4 Press Component to change source to component connec tor. This connector supports YPbPr (480p/576p/720p/1080i)
 and RGBsync. 4 Press Component to change source to component connec tor. This connector supports YPbPr (480p/576p/720p/1080i)") Introduction Product Features This product is an XGA single chip 0.7 DLP TM projector. Outstanding features include: u True XGA, 1024 x 768 addressable pixels u Single chip DLP TM technology u NTSC3.58/NTSC4.43/PAL/SECAM
Introduction Product Features This product is an XGA single chip 0.7 DLP TM projector. Outstanding features include: u True XGA, 1024 x 768 addressable pixels u Single chip DLP TM technology u NTSC3.58/NTSC4.43/PAL/SECAM
INSTRUCTIONAL MANUAL FOR LCD ZOOM MICROSCOPE
 INSTRUCTIONAL MANUAL FOR LCD ZOOM MICROSCOPE ? 8 LCD Screen? 10.4 LCD Screen LCD Zoom Microscope Instruction Manual Please read the Instruction Manual carefully before installation and keep it for future
The absolute opposite of ordinary. G804 Quad Channel Edge Blending processor
 The absolute opposite of ordinary G804 Quad Channel Edge Blending processor Input: up to 4096*2160 @60hz 4:4:4 full color sampling Output: 2048*1080 @60Hz New generation Warp & Edge blending engine Technical
Lite USER GUIDE. 3 Lite. For more information visit
 USER GUIDE Lite 3 Lite For more information visit www.caldigit.com Table of Contents Section 1 : General Information Introduction 3 General Use Warnings 3 Safety Warnings 3 System Requirements 4 In the
Table of Contents Table of Contents... 1 Usage Notice... 2 Introduction... 4 Installation User Controls Appendices...
 Table of Contents Table of Contents... 1 Usage Notice... 2 Precautions... 2 Introduction... 4 Product Features... 4 Package Overview... 5 Product Overview... 6 Main Unit... 6 Control Panel... 7 Connection
HDMI Converter. Operating Instructions(P/N of this Instructions is INSYH0101)
") HDMI Converter Model No. YH0101 Operating Instructions(P/N of this Instructions is INSYH0101) Dear customer Thank you for purchasing this product. For optimum performance and safety, please read these
HDMI Converter Model No. YH0101 Operating Instructions(P/N of this Instructions is INSYH0101) Dear customer Thank you for purchasing this product. For optimum performance and safety, please read these
G-106Ex Single channel edge blending Processor. G-106Ex is multiple purpose video processor with warp, de-warp, video wall control, format
 G-106Ex Single channel edge blending Processor G-106Ex is multiple purpose video processor with warp, de-warp, video wall control, format conversion, scaler switcher, PIP/POP, 3D format conversion, image
2.0 Wall Mount TV Soundbar Instruction Manual
 8010275 2.0 Wall Mount TV Soundbar Instruction Manual Read all of the instructions before using this soundbar and keep the manual in a safe place for future reference. Safety Information CA UT IO N RISK
SuperSpeed USB 3.0 to HDMI Audio Video Adapter for Windows & Mac up to 2048x1152 / 1920x1200
 SuperSpeed USB 3.0 to HDMI Audio Video Adapter for Windows & Mac up to 2048x1152 / 1920x1200 Copyright and Trademarks Specifications are subject to change without notice. Cable Matters is a registered
DisplayPort Extender over 2 LC Fibers
 DisplayPort Extender over 2 LC Fibers Audio 3GSDI Embedder EXT-DP-CP-2FO User Manual Release A2 DisplayPort Extender over 2 LC Fibers Important Safety Instructions 1. Read these instructions. 2. Keep these
J6 User Manual. User Manual. Multi-Screen Splicing Processor J6. Xi an NovaStar Tech Co., Ltd. Rev1.0.1 NS
 J6 User Manual User Manual Multi-Screen Splicing Processor J6 Rev1.0.1 NS160110162 Statement Dear users, You are welcome to use the J6, a multi-screen splicing processor of Xi'an NovaStar Tech Co., Ltd.
17 19 PROFESSIONAL LCD COLOUR MONITOR ART
 17 19 PROFESSIONAL LCD COLOUR MONITOR ART. 41657-41659 Via Don Arrigoni, 5 24020 Rovetta S. Lorenzo (Bergamo) http://www.comelit.eu e-mail:export.department@comelit.it WARNING: TO REDUCE THE RISK OF FIRE
LM-WPS41 HD Caption Adder. User. Manual
 LM-WPS41 HD Caption Adder User Manual 1 Table of Contents 1. Installation Notes 3 2.Product Introduction 5 3. Machine installation 7 4. Software debugging 8 5. Remote Control Description 12 Chapter One
ZVOX AccuVoice TV Speaker Model AV203
 ZVOX AccuVoice TV Speaker Model AV203 SETUP & OPERATION www.zvoxaudio.com 2 ZVOX AccuVoice TV Speaker Setup & Operation READ THIS FIRST Important Safety Instructions For ZVOX Audio System WARNING TO PREVENT
MX-1004P. Professional Quad-View Video Processor. User Manual. Made in Taiwan
 MX-1004P Professional Quad-View Video Processor User Manual Made in Taiwan Safety and Notice The MX-1004P Professional Quad-View Video Processor has been tested for conformity to safety regulations and
Operating Instructions
 Model No.: SPL1T801 Operating Instructions Thanks for purchasing our product. Please be sure to read this instruction manual carefully before using our product. Introduction Wyrestorm s SPL1T801 is a
ZVOX AccuVoice TV Speaker Model AV203
 ZVOX AccuVoice TV Speaker Model AV203 SETUP & OPERATION www.zvoxaudio.com READ THIS FIRST Important Safety Instructions For ZVOX Audio System WARNING TO PREVENT FIRE OR SHOCK HAZARD, DO NOT EXPOSE THIS
TFT LCD MONITOR USER MANUAL. L80AP and L101AP
 TFT LCD MONITOR USER MANUAL L80AP - 8.0 and L101AP - 10.1 Table Of Contents Table of contents/ Warning.... 2 Precautions...3 About this user manual and products / Items included in the delivery..... 4
Operating Instructions. 120m HDMI Extender over IP with 4xRJ45 port
 120m HDMI Extender over IP with 4xRJ45 port Operating Instructions HDMI Splitter Operating Instructions Dear Customer Thank you for purchasing this product. For optimum performance and safety, please read
User Manual High Definition Digital Set Top Box DVBT9070 Please read this User Manual carefully to ensure proper use of this product and keep this man
 User Manual High Definition Digital Set Top Box DVBT9070 Please read this User Manual carefully to ensure proper use of this product and keep this manual for future reference. Important Safety Instructions
Zigen ZIG-ADM. 4K UHD+ Dolby Digital & DTS Stereo Decoder. 4K 60 Hz 4:4:4 HDCP 2.2 ZigNet, Full Web Interface and System Diagnostics
 Zigen ZIG-ADM 4K UHD+ Dolby Digital & DTS Stereo Decoder 4K 60 Hz 4:4:4 HDCP 2.2 ZigNet, Full Web Interface and System Diagnostics 1 Important Safety Instructions 1. Do not use this product near water.
HDBaseT Extender Over Single Cat5e/6 cable
 HDBaseT Extender Over Single Cat5e/6 cable Operating Instructions Dear Customer Thank you for purchasing this product. For optimum performance and safety, please read these instructions carefully before