SnapStream Media provides customer service to registered users. You can contact via , phone or mail.
|
|
|
- Jemima Chandler
- 6 years ago
- Views:
Transcription
1
2 Customer Service SnapStream Media provides customer service to registered users. You can contact via , phone or mail. Online For detailed instructions about how to use Beyond TV software go to the following links: Frequently Asked Questions Go to the frequently asked questions for detailed answers to the most asked about Beyond TV. The online FAQ is located at: Knowledge Base The SnapStream Knowledge Base serves as a support resource to supplement our standard documentation. If you're encountering a specific error message or wondering about compatibility issues with a particular TV tuner card, browse the Knowledge Base or use the search engine to search for articles about a particular issue. The knowledge base is located at: Us If you can t find the information you need, contact us at support@snapstream.com. Telephone Call with customer service questions. Our normal business hours are Monday through Friday 9:00 AM to 5:00 PM CST. Mail SnapStream Media ATTN: Customer Service 6730 Long Drive Houston, TX Buying More Gear To buy accessories like remote controls and IR blasters go to 1
3 Table of Contents Table of Contents...1 Installation...3 System Requirements...3 TV Tuner Card...3 Remote Control Setup...4 Your Broadcast TV Source...5 Broadcast Source Options... 5 Connecting Broadcast Source... 5 Connecting Audio Source... 7 Tuning External Receivers... 8 Install Beyond TV DirectX Installation Product Key Installing from CD Installing from Downloaded Files Uninstalling Beyond TV Configuring Beyond TV...12 Setup Wizard Select Country Select Remote Model Select Video Broadcast Source SnapStream.Net Setup Select Capture Device Configuring External Receivers...15 Select Video Input Select Channel Output Select Tuning Device Select Remote Model Record Remote's Buttons Advanced Tuning Settings External Tuning Testing Select Audio Device Select Audio Input Testing Your Configuration...18 Finish Using Beyond TV...19 ViewScape Overview Watch Live TV Timeshifting
4 Setup Recordings...21 SnapStream.Net Program Guide Recording Options Search by Title or Keyword Recording Settings and Priorities Upcoming Recordings Remote Recordings Adjusting Recording Quality Other Recording Formats Watch Recordings SmartSkip Second Skip and Instant Replay Managing Recordings...25 Keep Recordings Until ShowSqueeze Copying Shows to CD/DVD Settings...25 Reference Commands and Shortcuts...26 Keyboard Shortcuts Firefly StreamZap ATI Troubleshooting Tips...32 No video in setup wizard No audio in setup wizard No program guide data or can t retrieve remote recordings Poor video quality
5 Installation System Requirements Windows 2000, XP Home, or XP Professional Direct X 9.0 or greater Processor: o Using a TV tuner card with hardware encoding: Pentium, Celeron or AMD Athlon at 700 MHz and above o Using a TV tuner card without hardware encoding: Pentium 4, Celeron or AMD Athlon at 1.5 GHz and above 256 MB RAM Video Card: o nvidia GeForce 2 and above o ATI Graphics Radeon 7500 and above o Others with 16 MB RAM, 3D Acceleration, DirectX 9.0 compatibility 15 GB Hard Drive TV tuner card (PCI, USB, AGP) with WDM (Windows Driver Model) driver support Television Source: o Analog Cable o Digital Cable o Satellite o Antenna Internet access Optional hardware: o PC remote control o PC IR blaster TV Tuner Card An essential piece of the Beyond TV experience is the TV tuner card. Before installing and configuring Beyond TV, ensure that you can watch TV in the TV viewing application the manufacturer provides with your TV tuner card. Refer to the manufacturer's instructions for guidance on installing and configuring your TV tuner card. Beyond TV only supports use of WDM drivers with your TV tuner card. Beyond TV employs the Windows Driver Model (WDM) because this type of driver is compatible across all Microsoft Windows operating systems. If you are using VFW (Video for Windows) drivers, an alternate model for device driver development, or you have not updated your WDM drivers for some time, go to your card manufacturer's website to obtain the latest WDM drivers available for your card. The support section of the SnapStream website, has links for many TV tuner card manufacturer websites, as well as a complete and up-to-date list of supported TV tuner cards. 3
6 Remote Control Setup Each of the different remotes has a receiver that connects to your PC via a USB connection. Identify the remote control you've purchased from the options below and follow the instructions for configuration. You can purchase a remote control from store.snapstream.com. SnapStream Firefly If you've purchased a SnapStream Firefly remote with Beyond TV you don t need to do anything. After installing the Firefly software it will automatically work with Beyond TV. Streamzap If you've purchased a Streamzap remote with Beyond TV, configure it as specified during the installation of Beyond TV. If you've already installed Beyond TV and have subsequently purchased a Streamzap remote, use the following instructions to configure it: 1. Download the latest Streamzap Device Drivers from the Streamzap website. Go to and select the link for "Streamzap PC Remote Software." 2. Follow the directions provided by Streamzap. Once your remote is working correctly, you are ready to use it with Beyond TV. ATI If you've purchased an ATI Remote Wonder, configure it as specified during the installation of Beyond TV. If you've already installed Beyond TV, re-run the Setup Wizard or use the following instructions to manually configure it: 1. Download the latest ATI Remote Wonder Device Drivers from the ATI website. Go to and select the appropriate drivers for the operating system you're using with Beyond TV. 2. Follow the directions provided by ATI for driver installation. Once your remote is working correctly, you are ready to use it with Beyond TV. 4
7 Your Broadcast TV Source Broadcast Source Options The broadcast source is the way you receive your television signal. Beyond TV supports various broadcast sources. Antenna This is the traditional source for receiving a television signal. A coaxial cable runs from a nearby antenna into your home and connects directly to the coaxial input (video in) on your television. This broadcast source does not involve a provider. Cable (Analog) A cable television provider runs a coaxial cable into your home that carries a television signal. The coaxial cable connects directly to the coaxial input (video in) on your television. Your channel lineup depends on the tier of channels included in the package you've purchased. Cable (Digital) A cable television provider runs a coaxial cable into your home that connects to an external receiver box that decodes the provider's signal. This receiver box connects to your television and presents the channels available in the package you've purchased. Satellite A provider installs a local satellite dish that receives a television signal. This signal is carried via a coaxial cable connected to an external receiver box. This receiver box connects to your television and presents the channels available in the package you've purchased. Connecting Broadcast Source Most TV tuner cards have one coaxial TV input for video reception from your broadcast source. Certain TV tuner cards also offer a composite or S-Video input for use with a broader range of home theater components. Broadcast Source Antenna or Cable (Analog) Method of Connectivity Connect the coaxial cable carrying the television signal to the coaxial TV input on the back of your TV tuner card. NOTE: If you are using Antenna or Cable (Analog) as your broadcast source AND you have some external set-top box, follow the instructions for "Cable (Digital) or Satellite" Cable (Digital) or Satellite Connect your external receiver box to your TV tuner card using one of the following methods: Coaxial Composite S-Video After establishing this connection, you will need to establish an additional connection to your PC so that Beyond TV can tune to the channels available from your provider. Refer to the Tuning External Receivers section for information to complete your configuration. 5
8 S-Video Connect the S-Video cable from the Video Out on the back of your receiver box to the corresponding S-Video Input on the back of your TV tuner card. Coaxial Connect the coaxial cable from the "Out to TV" output on the back of your receiver box to the coaxial input on the back of your TV tuner card. Composite Connect the RCA cable from the Video Out on the back of your receiver box to the corresponding RCA Video Input on the back of your TV tuner card. 6
9 Connecting Audio Source Beyond TV uses your computer's sound card to record audio. Therefore you must establish a connection from your broadcast source to your computer's sound card to allow Beyond TV to record audio. NOTE: Some manufacturers now offer TV Tuner Cards that have integrated audio. If your tuner card uses this design, you will not need the 3.5mm cable to connect your tuner card and sound card. Most hardware encoders have integrated audio. Broadcast Source Antenna or Cable (Analog) Method of Connectivity Connect the line-out on the TV tuner card to the line-in on your computer's sound card via the 3.5mm audio cable provided by the tuner card manufacturer. The coaxial cable transmits audio to your TV tuner card and this connection transmits audio to your computer's sound card so it is available for Beyond TV to record. Cable (Digital) or Satellite Connect the RCA line out (a two-part red and white termination) on your external receiver box to the 3.5mm line-in on your computer's sound card. The coaxial cable running into your external receiver box transmits audio with the television signal and this connection transmits audio to your computer's sound card so it is available for Beyond TV to record. 7
10 Tuning External Receivers After connecting your external receiver and PC, you must establish a second "tuning" connection between these two pieces of hardware that allows Beyond TV to tune to the channels available from your external receiver. Use one of the following methods: NOTE: Be sure to select the appropriate cable to establish this connection. Cable and port types vary from manufacturer to manufacturer. Cables for the most common external receivers are available at store.snapstream.com. Establish a wireless line-of-sight, infrared (IR) connection between your PC and external receiver. In order to use this option, you must purchase an additional piece of hardware called an "IR Blaster" that connects to your PC and points toward your external receiver. Two popular IR Blasters are the USB-UIRT and the ACTiSYS IR200L. IMPORTANT NOTE: SnapStream will not provide support for the ACTiSYS IR200L. In-house testing has shown it works well with many receivers, but not at all with others. For more information, search the online Knowledge Base for "IR Blaster" at kb.snapstream.com. USB Infrared Connection Beyond TV Computer USB Port External Receiver Box External Receiver Port USB Plug External Receiver Serial Port Infrared Connection Beyond TV Computer PC Port External Receiver Box External Receiver Port PC Plug External Receiver 8

11 Establish a wired connection between your PC and external receiver using a serial cable that connects to the serial port on each piece of hardware. Serial Port to Serial Port Connection This type of connection is common for Sony receivers and can be used for some older RCA receivers. Beyond TV Computer PC Port External Receiver Box External Receiver Port PC Plug External Receiver Plug Serial Port to RJ-6 Port Connection This type of connection is common when using newer, "Fifth and Sixth" generation RCA receivers. Beyond TV Computer PC Port External Receiver Box External Receiver Port Cable Plug that connects to PC Cable Plug that connects to external receiver Once you have established a tuning connection using one of the above options, use the Setup Wizard to configure your setup. 9
12 Install Beyond TV 3 Before installing Beyond TV, completely uninstall any previous versions of Beyond TV. If you haven't installed Beyond TV previously, proceed according to the appropriate set of installation instructions below. Installing from CD Installing from Downloaded Files DirectX Installation In order to use Beyond TV, Microsoft's DirectX 9.0 must be installed with the Windows operating system on your computer. Microsoft describes DirectX as "the core Windows technology that drives high-speed multimedia and games on the PC." Earlier versions of Windows, such as Windows 98 and Windows 2000, may not have DirectX installed at all. If you are using Windows XP, you likely have an earlier version of DirectX installed. The Beyond TV installer automatically checks your system for the version of DirectX installed on your machine at the beginning of the install process. If DirectX 9.0 is not installed, you will be prompted to install or upgrade before you are permitted to proceed with the installation. To install DirectX 9.0, do the following: 1. Install DirectX 9.0 from the SnapStream CD provided. 2. Follow the DirectX 9.0 install instructions provided by Microsoft. 3. Run the Beyond TV installer again. For more information on DirectX, see the Microsoft DirectX Reference online at Product Key The Product Key is an alphanumeric key (numbers and lowercase letters) consisting of six sections that uniquely identifies an installation of Beyond TV. Here's an example of the Product Key format: 96832a94-19g1-57a8-nnbx-11v s86-27z2f0e6 If you purchased Beyond TV electronically, SnapStream will send you the Product Key for your purchase to the address you provided. If you purchased the CD version of Beyond TV, you can locate the Product Key for your purchase on a label adhered to the paper jacket containing your CD. NOTE: As the Product Key identifies your unique installation of Beyond TV, please keep it the event that you want to install Beyond TV on a new machine. If you have lost your Product Key you may retrieve it by placing your address you provided when purchasing Beyond TV at 10

13 Installing from CD After uninstalling any previous versions of Beyond TV, insert the Beyond TV disc into the CD-ROM drive on the computer where Beyond TV will be installed. The Beyond TV installer will launch automatically in a few moments. If it does not, navigate to the CD-ROM drive using Windows Explorer. Locate [autorun.exe] and double-click on it to start the installer. Before beginning the installation process, locate your Product Key as it will be required during the installation process. NOTE: If your Product Key doesn't register your install, verify that you have entered your Product Key correctly. If you didn't receive a Product Key, or the Product Key provided doesn't register your install, contact SnapStream Support. Once Beyond TV is installed, run the Setup Wizard to configure Beyond TV with your system's hardware and software. Installing from Downloaded Files After uninstalling any previous versions of Beyond TV, launch Windows Explorer, and locate the installer in the path to which it was downloaded. Double-click on it to begin the installation process. Before beginning the installation process, locate your Product Key as it will be required during the installation process. If you selected the option to download installation files for Beyond TV, the Product Key for your install arrived in an from SnapStream. NOTE: If your Product Key doesn't register your install, verify that you have entered your Product Key correctly. If you didn't receive a Product Key, or the Product Key provided doesn't register your install, contact SnapStream Support. Once Beyond TV is installed, run the Setup Wizard to configure Beyond TV with your system's hardware and software. Uninstalling Beyond TV Use the following instructions to uninstall Beyond TV. We suggest that you use the "Add or Remove Programs" feature within Windows to uninstall. 1. Open the "Add or Remove" Programs utility by going to Start > Control Panel > Add or Remove Programs. 2. Scroll through the list of programs on your computer; locate "SnapStream Beyond TV" 3. Select the "Change" button. The installer will check your current installation and launch the following window. Select the "Complete Removal" option according to uninstall. For Beyond TV 3.5 and later, click the "Change/Remove" Button. You will not see the Application Maintenance window. NOTE: Uninstalling from the Application Maintenance window will not delete recordings you've made with Beyond TV. 4. Close the "Add or Remove Programs" window after uninstalling Beyond TV. 11

14 Configuring Beyond TV Setup Wizard The Setup Wizard is a utility that will help navigate the process of configuring Beyond TV with your particular system. While it is generally used during the initial configuration of Beyond TV, you can use it anytime you want to change the configuration of Beyond TV. Launch the Setup Wizard from your Windows Start Menu. Before starting the Setup Wizard, make sure you've done the following: Connected your broadcast source and the TV tuner card in your PC. Connected your TV tuner card and sound card. Turned your PC speakers ON and unmute your system's audio. Established a "tuning" connection between your external receiver and PC. Access the Help File at any point in the Setup Wizard by pressing the F1 key. NOTE: You can run the Setup Wizard any time after installing Beyond TV by launching it from the Windows Start Menu. Start > All Programs > SnapStream Media > Beyond TV 3 > Beyond TV Setup Wizard If you need to exit the Setup Wizard, simply click the Cancel button at any point in the setup process. NOTE: The Beyond TV server must be closed to use the Setup Wizard. Exit Beyond TV by right-clicking on the Tray Icon and selecting Exit. 12
15 Select Country Select the country in which you are using Beyond TV. The Setup Wizard uses country selection to determine the frequency standard (PAL, NTSC, etc.) in that country. Beyond TV will use these frequencies to tune available TV channels. NOTE: SnapStream.Net currently only provides program guide data for users in the United States and Canada. If you are interested in using the integrated Electronic Program Guide for Beyond TV 3.5, be sure to select United States or Canada or you will not be able to use SnapStream.Net. Select Remote Model Choose the PC remote control that will be used with Beyond TV. If you do not plan to use a PC remote with Beyond TV, select "None (I will use the keyboard/mouse) ". SnapStream.Net Setup SnapStream.Net is a free electronic program guide offered with Beyond TV. If you have a SnapStream.Net account, your account will automatically be detected and your information will be displayed. If you do not have a SnapStream.Net account, you will be asked to create one. You may also choose to skip the SnapStream.Net Setup. NOTE: You do not have to register for a SnapStream.Net account to use Beyond TV. However, it is highly recommended that you create one. Video Source Beyond TV 3.5 can have multiple TV tuner cards in order to record on more than one channel at a time. Each tuner card must be configured as a Video Source in order for Beyond TV to use it. From this page, you can add a new source, edit an existing one, or complete the setup process. Select Video Broadcast Source The broadcast source is the means by which you receive television reception. Beyond TV uses the source you select to determine the proper setup process to tune to the channels available for watching and recording via your broadcast source. Choose the Antenna or Standard Cable option if you receive television reception through a coaxial cable that you connect directly to the video input on your television. This coaxial cable will now connect directly to the TV tuner card in the computer running Beyond TV. Choose the External Cable Box or Satellite option if you receive television reception on an external set-top box. Select Capture Device The capture device you're identifying in this aspect of the Setup Wizard is the TV tuner card to which you've connected your broadcast source. The Setup Wizard may identify other video capture devices, such as a web cam or an additional video capture card, which are installed in or connected to your PC. If you see multiple capture devices in the list, ensure you select the capture device that corresponds to the TV tuner card that Beyond TV will use. NOTE: If no capture devices appear in the list, check the installation of your TV tuner card (hardware) and the drivers (software) associated with this device. 13
16 Channel Lineup Each Video Source on your computer must have a lineup associated with it. From here, you can do the following: Create a new SnapStream.Net lineup This will let you automatically download the correct lineup given some information such as your zip code and your service provider. Select an existing lineup This will let you assign an existing lineup to your Video Source. Delete a lineup This will let you remove a lineup from the list of lineups currently configured on your PC. Create a new scanned lineup This will let Beyond TV determine what channels you have by scanning each channel one by one and seeing if there is a signal available. NOTE: Scanning for channels is only available if you have selected Standard Cable or Antenna as your input. 14
17 Configuring External Receivers Select Video Input Select the option in the list that corresponds with the method you've used to connect your external receiver box to the TV Tuner card in your computer. TIP: If you are unsure what type of connection you have, make sure that the cable type you are using matches the image presented with the option you've selected in the list. Video S-Video Select this option if you are using an S-Video cable to connect your external receiver box and TV tuner card. Video Tuner Select this option if you are using a coaxial cable to connect your external receiver box and TV tuner card. Video Composite Select this option if you are using a composite cable to connect your external receiver box and TV tuner card. Select Channel Output If you selected Video Tuner as your Video Input, you will need to tell Beyond TV which channel your receiver outputs video on. In most cases, external receivers output a signal on channel 3 or channel 4. Outside of the United States, external receivers may output reception on other channels. Refer to the manual provided by the manufacturer of your external receiver to determine the proper channel for your configuration. TIP: If you've been using your external cable or satellite set-top box with a television, select the same channel that the television uses for reception from your the set-top box. If you are unsure what channel to select, connecting a television to your set-top box is also good way to determine the channel to select. 15
18 Select Tuning Device Select the option in the list that corresponds with the method you've used to establish a tuning connection between your external receiver box and TV tuner card. TIP: If you are unsure what type of tuning connection you've established, make sure that the cable type you are using matches the image presented with the option you've selected in the list. ADS IR Blaster Select this option if you have the ADS IR Blaster installed on your computer. ACTiSYS IR200L Select this option if you are using the IR200L to tune your external receiver. Be sure to select the correct Port number corresponding to the COM Port on which your IR200L is installed. The ACTiSYS IR200L is available for purchase at store.snapstream.com. IMPORTANT NOTE: SnapStream will not provide support for the ACTiSYS IR200L In-house testing has shown it works well with many receivers, but not at all with others. For more information, search the online Knowledge Base for "IR Blaster" at kb.snapstream.com. Null Tuner Select this option if you are not using a tuning connection between your external receiver and TV Tuner card. NOTE: Selecting this option will render an only partially-configured Beyond TV. Without a tuning connection, Beyond TV will not be able to change channels on your external receiver. Therefore, you will not be able to record shows or watch Live TV. In a nutshell, selecting this option allows you to complete the Setup Wizard and review Beyond TV, but critical features won't be functional until you obtain the additional hardware to establish a tuning connection. Serial Port Tuner Select this option if you are using a wired connection between your PC and external receiver using a serial cable. Be sure to select the correct Port number corresponding to the COM Port to which you are connecting your cable. Cable packs for establishing this type of connection are also available from store.snapstream.com. USB-UIRT Select this option if you are using a USB-UIRT between your computer and external receiver. Select Remote Model Select the option in the list that matches the name of the external receiver you have connected to your PC. If you do not see your particular receiver, you can select Unlisted Remote to manually train your IR tuner using the remote that came with your receiver. NOTE: If you selected Serial Port Tuner as your Tuning Device, then you will not be able to select Unlisted Remote to train your tuner. 16
19 Advanced Tuning Settings These settings allow you to adjust your infrared (IR) tuning device to work properly with the range of external receivers supported by Beyond TV. We recommend only changing these settings after determining that you are unable to properly tune your device. Device Name Enter the name of your external receiver here. Use Enter after sending channel request Selecting this option makes Beyond TV transmit an 'Enter' command to your receiver after sending the digits for the channel. Pad Channels Selecting this option automatically increases the number of digits your IR device transmits to the receiver. Some receivers require channels to be entered as three digits or more digits. Pad to how many digits? The appropriate number of 0s will be added to each channel selection to make the total number of digits equal to the number you've specified in this field. For example, if you pad channels to 4 digits Beyond TV will send channel 13 as "0013." If you pad channels to 3 digits, it will send "013." Values in this field will only be recognized if you have enabled the Pad Channels option above. Pause between transmissions This value controls the length of time in milliseconds between transmissions from Beyond TV. Increase the delay if your receiver is missing channel digits. Decrease the delay if channel changing is sluggish. Number of Transmissions for each Button Press This setting ensures that transmissions from Beyond TV are properly detected. Use the table below to determine how to set this value for your situation. Symptom Slow channel-changing speed Receiver intermittently misses button presses Receiver duplicates button presses Solution Lower Value Increase Value Lower Value Record Remote's Buttons On this page, you will train Beyond TV on how to tune your receiver. You will need the remote control that came with your receiver in order to train Beyond TV. Simply point your remote control at the IR tuning device you have installed on your PC and click the Train button to begin. Follow the instructions in the box in the middle of the screen. Once each of the boxes next to the numbers and text that represent the buttons on your remote have a check mark, you have successfully trained Beyond TV. You can click the Reset button to start over. 17
20 External Tuning Testing Use this screen of the Setup Wizard to test whether your IR device is properly tuning your receiver. Your receiver is properly tuning from your IR device if the channel displayed in the Setup Wizard test appears on the receiver's LCD display or television. If your receiver does not have a display or you have no way of seeing to what channel your receivers is tuning, such as on a television, you will not be able to determine if the test is succeeding or failing. If your external receiver does have some type of display and you do not see channels changing as a result of the test, it is likely the test did not succeed. You will need to adjust your Advanced IR Settings. Try increasing the value for "Number of Transmissions for each Button Press." If this change doesn't correct the problem, increase the value for "Pause between transmissions." If neither of these adjustments corrects the problem, return to the Add Remote screen, retrain remote and test again. NOTE: We suggest you change one advanced setting at a time and test using this screen to see if it corrects the problem. Select Audio Device If you only have one sound card installed on your PC, Beyond TV will automatically skip this step. While Beyond TV uses the TV tuner card to capture video for recordings and live TV, it uses your computer's sound card to capture all audio. Select the sound card Beyond TV will use to record audio. If there are multiple options in the list, ensure that you select the sound card connected to your TV tuner card. NOTE: We suggest you change one advanced setting at a time and test using this screen to see if it corrects the problem. Select Audio Input If you have a tuner card with integrated audio, you will not see this screen in the Setup Wizard. Select an audio input based on the way you've configured your hardware. "Line In" is generally the default setting for the audio input. If you've connected your audio to a different input, such as the microphone jack, you will need to select the appropriate input from the list. You can confirm that you've selected the correct input if you hear the audio portion of live TV. NOTE: If you don't hear audio on any of the input options from the list, make sure your system's speakers are 'ON' and your system's audio is not muted. Testing Your Configuration This aspect of the Setup Wizard allows you to test the options you've selected and confirm that Beyond TV is working properly with your system. If your setup is working, the following will be true: You can view live TV You have a clean TV picture in the viewing window You can hear audio while viewing live TV You can change channels If any aspect of your configuration isn't working, use the Back button to return to specific sections of the Setup Wizard to change an aspect of your configuration to address the problem. If you are unable to resolve a technical issue when trying to configure Beyond TV with your system, refer to the online resources on our SnapStream Support Center website. Finish Beyond TV is now configured for use with your system. Select the Finish button to launch the Windows Interface. If you simply want to close the Setup Wizard without launching Beyond TV, uncheck the box next to Start Beyond TV. 18

21 Using Beyond TV ViewScape Overview The Beyond TV ViewScape allows you to transform your PC into a home theater. Recorded Shows Recorded Shows contains a library of your recordings and allows you to select how long to keep a show before deletion. Live TV Live television can be viewed and timeshifted (pause/rewind/fast forward) SnapStream.Net Program Guide The SnapStream.Net Program Guide displays schedules and descriptions of what is scheduled to air. From here, you can schedule recordings and view a list of all upcoming episodes of each show within the program guide. Setup Recordings Setup recordings by browsing the program guide, searching by show title or keyword, or scheduling a time and date manually. You can set priorities for certain shows and resolve conflicts when two shows are scheduled for recording at the same time. Settings Settings lets you change most commonly used Playing, Recording, SnapStream.Net, SmartSkip, and ShowSqueeze settings. 19
22 Watch Live TV The Live TV function transforms your monitor into a television set. You can use a remote control, keyboard, or mouse to navigate through the available channels. SnapStream.Net provides program information for each channel as you surf through them. Timeshifting While you watch live television, you can pause, rewind and fast forward what you watch. Keyboard commands: Spacebar Toggle between Pause and Play Rewind (press multiple times for higher speed rewind) Fast Forward (press multiple times for higher speed fast forward) Mouse commands: Pause Drag the timeshift marker to the desired part of broadcast Remote Control commands: Rewind (press multiple times for higher speed rewind) Fast Forward (press multiple times for higher speed fast forward) 20

23 Setup Recordings Beyond TV gives you maximum flexibility in creating and managing your favorite TV shows. The Setup Recordings page is divided into six different sections SnapStream.Net Program Guide, Search By Title, Search By Keyword, Recording Settings and Priorities, Upcoming Recordings, and Setup a Manual Recording. SnapStream.Net Program Guide Beyond TV s integrated electronic programming guide (EPG) is available to U.S. and Canadian users completely free. It stores two weeks of program data. Channel listings are available for all antenna, cable and satellite lineups. The program guide is automatically updated from the SnapStream.Net servers on a daily basis. Follow the steps below to record a show with the SnapStream.Net Program Guide 1. From the Home page, select SnapStream.Net Program Guide. 2. Scroll through the Program Guide to the show you want to record and select it. 3. Select a recording option. Recording Options View upcoming episodes Record this episode Record all episodes Record all new episodes Cancel Provides a listing of all future episodes. Select individual episodes in the list to schedule a recording. Schedule to record only the episode for the date and time you've selected. If the episode is currently showing, recording begins immediately. Schedule recording for all future episodes of the chosen show. Schedule recordings for all episodes that aren't repeats or re-runs. Do not record the selected show and return to the Program Guide. Recording icons with a slash on it indicates that this particular episode will not be recorded. These icons appear when you manually choose to not record specific episodes in a series or if another recording with higher priority is scheduled to record at the same time. 21

24 Search by Title or Keyword With Search By Title, you can search for your favorite show by entering the show title. With Search By Keyword, you can search for your favorite show by entering keywords. Beyond TV will search titles, episode titles, episode descriptions, actors, and directors for your keywords. Recording Settings and Priorities The Recording Settings and Priorities function displays the shows you have selected to record and allows you to adjust their priority in case of conflicts. Example: If you select to always record Friends and always record NBA Basketball, you can assign Friends a higher priority in the Recording Priorities. If there is ever a conflict, Friends will always take priority and be recorded instead of NBA Basketball. You can also view and edit details of shows to be recorded in Recording Settings and Priorities. Details include the quality of the recording, the target folder to store the recording, whether the show will be ShowSqueezed, and whether the show will have SmartSkip chapters generated. Upcoming Recordings Upcoming Recordings displays all shows scheduled to be recorded. You can cancel recordings in Upcoming Recordings. Example: If you select to record every episode of Everybody Loves Raymond, each individual episode will be listed in Upcoming Recordings, along with the episode title and description. 22
25 Remote Recordings A remote recording is a recording scheduled while you are away from your Beyond TV computer. Remote recordings can be triggered through SnapStream.Net from Internet browsers, web-enabled cell phones, and Pocket PCs To remotely schedule a recording: 1. Connect to SnapStream.Net (WAP and web-enabled Pocket PC users should use PC Internet browser users should use 2. Login using your SnapStream.Net username and password 3. Locate and choose the show you want to record in Television Listings, with the At a Glance feature, or by doing a search. 4. Choose one of the remote recording options 5. Check to see if the job has been added by going to the Remote Recordings tab in the SnapStream.Net interface. NOTE: Your SnapStream.Net account must first be configured for remote recordings. You can do this from your personal settings page in SnapStream.Net. Beyond TV polls SnapStream.Net at least every 15 minutes for remote recordings. Once Beyond TV has retrieved your remote recordings, they will be deleted from the Pending Recordings list on SnapStream.Net and appear in your list of scheduled recordings in Beyond TV. Adjusting Recording Quality Beyond TV sets the quality level, by default, to an automatic setting most suitable for your hardware. Higher quality recordings can be made by changing the quality setting. To change the quality setting 1. Go to the Settings section in the Beyond TV ViewScape. 2. Select Recording Settings. 3. Change Record Quality to a higher setting. Other Recording Formats By default, Beyond TV records all content in the MPEG-2 format, which then can be ShowSqueezed into the Windows Media format. Optionally, users who have TV tuner cards without hardware encoding can skip the process of ShowSqueezing MPEG-2 to Windows Media by recording directly to Windows Media. To change the file format from MPEG-2 to Windows Media: 1. Go to the Settings section in the Beyond TV ViewScape. 2. Select Recording Settings 3. Change the Recording Format to Windows Media NOTE: When recording to Windows Media as the default file format you cannot timeshift. 23

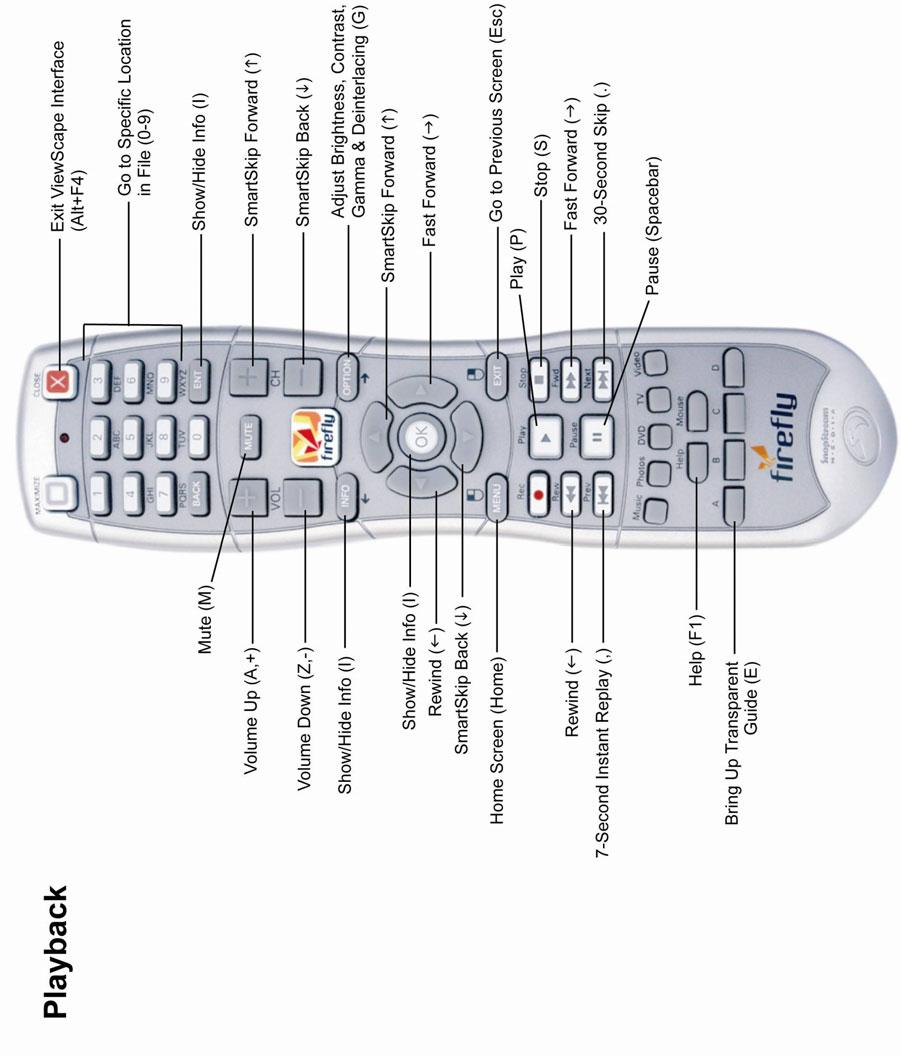
26 Watch Recordings Follow the steps below to watch recorded shows in the Beyond TV ViewScape. 1. Go to the Recorded Shows section in the Beyond TV ViewScape. 2. Scroll through the list of recorded shows and select the show you want to watch. 3. Select the "Play" option from the list on the bottom right of your screen. SmartSkip SmartSkip creates chapters that let you skip a series of commercials in one click. The trackbar displays alternating SmartSkip chapters. Beyond TV will automatically insert markers at major scene changes of recordings, creating chapters. You can then easily skip quickly from one chapter to another at the touch of a button. Chapters are indicated by dark and light blue bars alternating on the trackbar at the bottom of the screen. Use the up and down buttons on either the keyboard or remote control to navigate through the chapters. With a mouse, you can click on the point where indicating bars change colors. 30-Second Skip and Instant Replay While watching a recording in the Beyond TV ViewScape, you can skip forward 30 seconds with one click or get a 7- second instant replay. Skip forward and back lengths can be personalized on the Playback Settings page. Press. on the keyboard for 30-second skip and, for the 7-second instant replay. Press on the remote for 30-second skip and for 7-second instant replay. 24
27 Managing Recordings There are a variety of options for storing and deleting recordings. Keep Until You can designate a recorded show as either Keep until I delete it or Keep until space is needed. If Keep until I delete it is selected, the show will not be deleted automatically. If Keep until space is needed is selected, then the show will be automatically deleted when space is needed on the hard drive. ShowSqueeze ShowSqueezing a show makes the recording take up less space on your hard drive, enabling you to store more recorded shows. On the Home page of the Beyond TV ViewScape, go into Settings, then ShowSqueeze Settings to enable automatic ShowSqueeze, select the file format of the recompressed file and adjust the quality of the squeezed show. Copying Shows to CD/DVD Beyond TV supports the MPEG-2 format, which makes burning TV shows to DVDs a breeze. Just load Beyond TV recordings into third-party software such as Sonic s MyDVD or Roxio s Easy CD & DVD Creator. NOTE: You should record your TV shows to the right MPEG-2 quality profile to avoid the time-consuming recompressing step before burning to DVD. To avoid having to recompress, choose one of the pre-configured DVD quality settings in Beyond TV. Settings Recording Settings Playback Settings ShowSqueeze and SmartSkip Settings SnapStream.Net Settings Miscellaneous Settings From here, you can change what file format your shows are recorded in, the quality they are recorded in, and how many minutes of padding to add to the beginning and end of each recorded show. From here, you can change how Beyond TV displays your recorded shows. You can change settings such as the preferred MPEG-2 decoder, deinterlacing options, and the method of rendering to your screen. You can also change various time settings to adjust how you navigate through your shows. This section of the settings allows you to enable or disable Beyond TV's automatic generation of SmartSkip chapters and Automatic ShowSqueeze features. You can also configure your advanced ShowSqueeze options here. From this section, you can perform a manual SnapStream.Net Program Guide update or download any pending Remote Recordings. You can also configure whether or not to let Beyond TV automatically update your SnapStream.Net Program Guide periodically and whether or not to automatically check for pending Remote Recordings. This section contains various other settings such as the Screen Saver timer. 25
28 Keyboard Commands Global Keystroke Function Comments Move Selection Up Move Selection Down Page Up Page Down Enter Esc Home Move One Page Up Move One Page Down Choose Selection / View Details Exit current screen or Cancel Return to Home Screen Q Quiet Mode Mute navigation sounds Alt + Enter Toggle Full Screen and Windowed Del Delete Video Library, Recording Manager Only P Play Recording Video Library Only F1 F5 F6 View Remote Control help View Recorded Shows Launch Live TV F7 Open SnapStream.Net Program Guide F11 Toggle the border on and off For Windowed mode only 26
29 Theater (Watching Live TV and Recording) Keystroke Function Comments 1-9 Select Specific Channel or jump to a If watching Live TV, this will change channels. If watching a specific time. recorded show, this will jump to a specific time in the show. or PgUp Channel Up When watching Live TV or PgDn Channel Down When watching Live TV Jump to the next chapter When watching a recording with SmartSkip chapters Jump to the previous chapter When watching a recording with SmartSkip chapters L Return to the previous channel When watching Live TV Fast Forward (3 Speeds) Rewind (3 Speeds). [period] Skip Forward (30 Seconds), [comma] Skip Backward (7 Seconds) Backspace Go to front of buffer When watching Live TV Space(bar) Pause / Resume + [plus] Raise Volume - [minus] Lower Volume E M R S P View SnapStream.Net Guide Mute Audio / Unmute Audio Record Live TV Stop Recording Play G Adjust Video Settings Brightness, Contrast, Gamma X Reset Video Settings Each setting resets to the value 50 I Show / Hide Program Information 27
30 Program Guide Keystroke Function Comments Scroll Right Scroll Left Scroll Up Scroll Down Ctrl + Ctrl + Ctrl + Ctrl + Space(bar) Skip Back 6 Hours Skip Forward 6 Hours Move Page Up Move Page Down Go to Current Time 1-9 Select Specific Channel U Update Guide Information Requires an Internet connection R Open Record Options 28

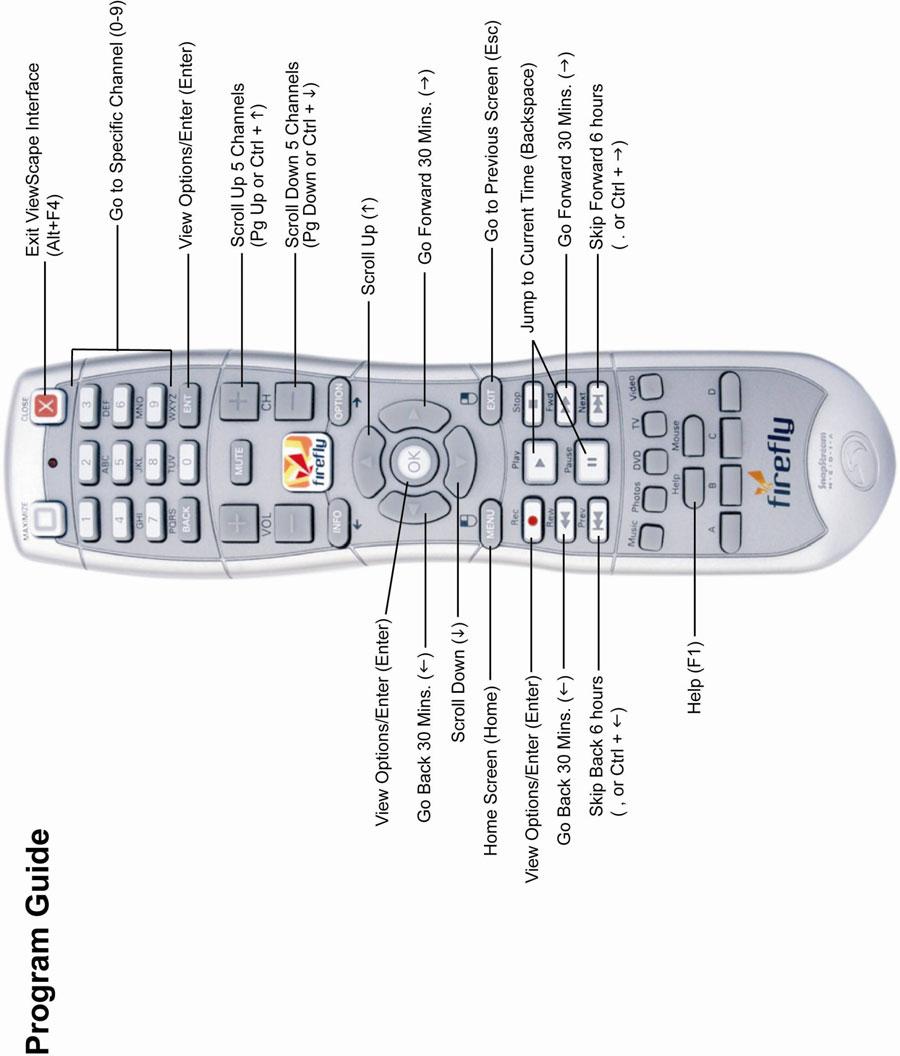
31 Firefly Firefly 29

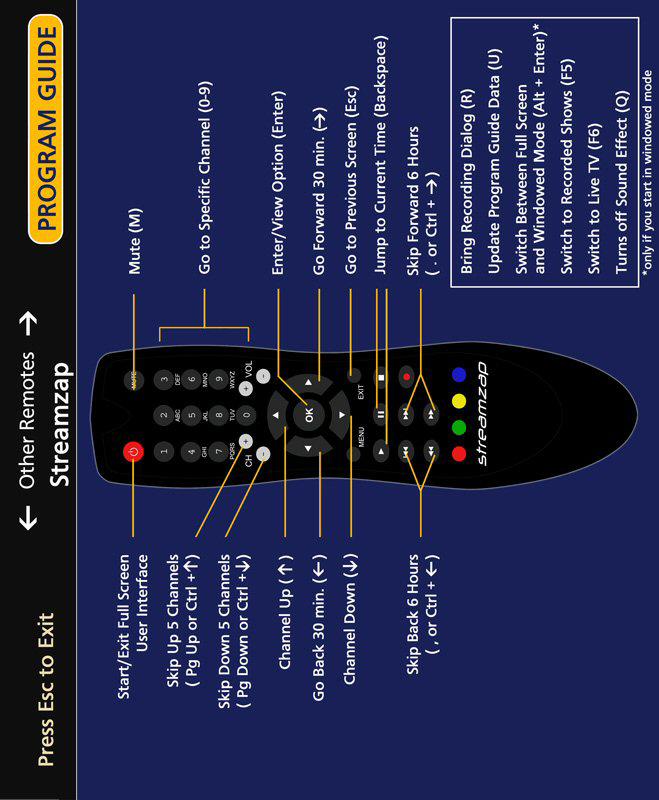
32 Stream Zap StreamZap 30

33 ATI ATI 31
. 2. Ensure that your video input to the capture card is securely connected and is transmitting a signal on the channel you have selected in the Test page. 3.")
, the Setup Wizard is running on the PRIMARY display, which will be indicated by the numeral 1 in the Display")
34 Troubleshooting Tips No video in setup wizard 1. Ensure that you are using a supported capture device as listed on the System Requirements page ( 2. Ensure that your video input to the capture card is securely connected and is transmitting a signal on the channel you have selected in the Test page. 3. Exit the Setup Wizard, and download and install the latest drivers for your capture device and video device. 4. Ensure that, in multiple display systems (two monitors, or one monitor and a TV-OUT), the Setup Wizard is running on the PRIMARY display, which will be indicated by the numeral 1 in the Display Properties window on the Settings tab (CONTROL PANEL DISPLAY SETTINGS (tab). Click the Identify button to display a large numeral 1 on the primary display and 2 on the secondary display. 5. Try adjusting your refresh rate by clicking the Advanced button and going to the Monitor tab. 6. Run the setup wizard again. You should get video in the setup wizard s test page. 32
35 No audio in setup wizard 1. Ensure that your tuner device is upgraded to the latest appropriate drivers. 2. Beyond TV works best with WHQL-approved sound drivers. To ensure that you are using approved drivers, visit and allow it to look for updates. If it finds appropriate drivers for your audio device, it will list them in the driver update section. Install those drivers and run the Setup Wizard again. 3. Ensure that the audio cable is connected from your tuner device's audio output to your computer's Line-In input. 4. If you are using a SoundBlaster (Audigy, Audigy 2, et.) device, you should enable the Record Without Monitoring or Record Without Playback option available in the Advanced section of your audio settings (START BUTTON RUN SNDVOL32). After a driver update, run the Setup Wizard again. If you still have no audio, finish the Setup Wizard as though you were receiving audio, and continue: 1. Make a short test recording with Beyond TV. 2. Start the volume control utility (This is usually a speaker or control board icon in your system tray, or is available through START BUTTON RUN SNDVOL32. Ensure that your "Master" (or "Main") and your "Wave" (or "WAV") outputs, in particular, are neither muted nor turned down. Then, view the recording you created in step 1, using Windows Media Player. If there is still no audio, please continue. 3. Start your volume control utility as in the previous step. Note the input (recording) and output (playback) settings. (You can change from recording to playback settings and back again through OPTIONS PROPERTIES.) NOTE: The following assumes that you are using your "Line In" input; change as applicable. 4. Ensure that: the Line-In Playback is muted or turned down all the way. the Line-In Recording is both "selected" (via the checkbox marked "Selected") and that the volume bar is close to the top. 5. Repeat steps 1 and 2. If you still get no audio, please contact SnapStream Support. No program guide data or can t retrieve remote recordings NOTE: Program Guide Data is provided by SnapStream.Net, and the setup is done in the Setup Wizard. SnapStream.Net accounts are currently only available to customers in the United States and Canada. 1. Ensure that you have successfully signed up for and properly configured a SnapStream.Net account via the Setup Wizard. If you have not done so, exit Beyond TV and run the Setup Wizard again to setup your account. Verify that it is functioning properly by logging in at with your login ID ( address) and password. 2. Ensure that your computer is able to contact SnapStream.Net for Program Guide data downloads by configuring any routers or firewalls to allow Beyond TV use of port
36 Poor video quality Note: Many users compare the Live TV or recording quality to that of proprietary TV-viewing software provided with the capture device. These programs do not compress the video stream at all, so there is no quality loss. Beyond TV compresses the stream, so in most cases there will be discernible quality loss. Beyond TV will by default attempt to detect the best quality level that your computer is capable of, and will set that quality profile by default. Many of the following suggestions will lower the CPU usage on your machine so that you may try a higher quality profile. 1. The following steps apply to all setups, and usually help to improve video quality, be it in recordings or in Live TV, greatly. a. Full system virus scan and removal b. Full system adware (spyware) scan and removal c. Full hard disk defragmentation 2. Try lowering the resolution or color depth of your desktop (CONTROL PANEL DISPLAY SETTINGS (tab)). 3. Ensure that, in multiple display systems (two monitors, or one monitor and a TV-OUT), Beyond TV is running on the PRIMARY display, which will be indicated by the numeral 1 in the Display Properties window on the Settings tab (CONTROL PANEL DISPLAY SETTINGS (tab)). Clicking the Identify button to display a large numeral 1 on the primary display and 2 on the secondary display. You can also try disabling the second monitor. 4. Playback of MPEG-2 videos can be greatly improved with the use of a third-party decoder, which Beyond TV 3.2 (and above) support. For detailed information on using a third-party decoder, please see our community article, "Improve the performance of Beyond TV 3 with third party MPEG-2 decoders," through the "Community" section from our website ( 34
37 Limited Warranty SnapStream Media Inc. ( SnapStream Media ) warrants the Beyond TV Software CD to the original purchaser against defects in materials and workmanship, under normal use, for a period of ninety (90) days from the original date of purchase. To make a claim under this limited warranty, you must either: 1) Return the product to the original purchase location with a dated sales receipt, your name, your current contact information (including address and phone number), and an explanation of the problems you are experiencing; OR 2) Obtain a Return Merchant Authorization ( RMA ) by ing SnapStream Media at orders@snapstream.com or calling Only packages with RMAs will be accepted for warranty processing. Once the RMA is obtained, mail the defective product (in its original packaging, freight prepaid, postmarked on or before the 90 th day from the original purchase date) with a copy of the original dated sales receipt, your current contact information (including address and phone number), and an explanation of the problems you are experiencing with the RMA clearly noted to: SnapStream Media Attn: Warranty Department 6730 Long Drive Houston, Texas The above states the original purchaser s sole and exclusive remedy for any breach of warranty with respect to the aforementioned products. Remedy for a breach of this warranty lies within the discretion of SnapStream Media and shall be: 1) repair or replacement of the product, or 2) refund of the purchase price. If you have any questions about the warranty claim procedure described above, you may contact SnapStream Media via at orders@snapstream.com or via phone at Disclaimers and Limitations This warranty does not apply to the Beyond TV software (i.e., the program itself). SnapStream Media cannot warranty how the software will work on your system. The software is warranted only to perform substantially in accordance with the specifications stated in the accompanying documentation. SnapStream Media services and the software are provided as is. This warranty does not extend our 30-day money back guarantee, which is applicable only to items purchased directly from SnapStream Media via our online store at store.snapstream.com. This warranty does not cover installation problems, settings adjustments or any other problems requiring consumer instruction nor does the warranty cover signal reception problems. This warranty does not cover cosmetic damage or damage due to acts of God, accident, abuse, misuse, improper use, negligence, or improper maintenance. SnapStream Media shall not be liable for any special, incidental or consequential damages for breach of any express or implied warranties on this product. Any implied warranties applicable to this product, including warranties of merchantability or fitness for a particular purpose, are limited to the ninety (90) day period of this warranty. Some states do not allow exclusion or limitation of incidental or consequential damages, or limitations as to how long an implied warranty lasts, so the above exclusions and limitations may not apply to you. This warranty gives you specific rights, and you may have other rights which vary from state to state. Disclaimer This manual is subject to change without notice and is provided for informational purposes only. SnapStream Media Inc. ( SnapStream Media ) assumes no liability or responsibility for inaccuracies or errors in this publication. Reproduction of this document in part or in full is strictly prohibited, unless SnapStream Media provides express written consent. Reproduction includes introducing any part of the document to a retrieval system, storing any part of the document in a retrieval system and/or transmitting the document via electronic means, mechanical means, photocopier, recording or otherwise. Compliance with applicable copyright laws is solely the responsibility of the consumer. Receipt of this manual does not give the consumer, or any other recipient of this publication, license to the patents, patents pending, trademarks, copyrights or other intellectual property relating to the subject matter in this manual or any associated hardware or software, except as expressly provided in express written license agreements with SnapStream Media SnapStream Media Inc. All rights reserved. 35
User s Guide W-E
 Presto! PVR ISDB User s Guide 518100-02-01-W-E-112307-02 Copyright 2007, NewSoft Technology Corp. All Rights Reserved. No portion of this document may be copied or reproduced in any manner without prior
VideoMate U3 Digital Terrestrial USB 2.0 TV Box Start Up Guide
 VideoMate U3 Digital Terrestrial USB 2.0 TV Box Start Up Guide Compro Technology, Inc. www.comprousa.com Copyright 2001-2005. Compro Technology, Inc. No part of this document may be copied or reproduced
FlyTV Express M5 MST-T 2 A 2
 FlyTV Express M5 MST-T 2 A 2 User Manual Animation Technologies Inc. www.lifeview.com Ver: 1.0 Copyright and Trademark Notice 2006 by Animation Technologies Inc. All rights reserved. Information in this
AVTuner PVR Quick Installation Guide
 AVTuner PVR Quick Installation Guide Introducing the AVTuner PVR The AVTuner PVR allows you to watch, record, pause live TV and capture high resolution video on your computer. Features and Benefits Up
DVB-T USB SET-TOP BOX
 DVB-T USB SET-TOP BOX User Manual Version: 1.0 (February 2005) TRANSYSTEM INC. No.1-2 Li-Hsin Rd.I Science-Based Industrial Park, Hsinchu, Taiwan Tel:+886-3-5780393 Fax:+886-3-5784111 e-mail: sales@transystem.com.tw
HDTV USB Digital TV software manual. AITech International Corporation V
 HDTV USB Digital TV software manual AITech International Corporation V2.63-0630 1 Chapter 1 DigitalTV Introduction 1.1 Introduction DigitalTV USB allows you to watch digital TV & Radio programs via USB
FlyDVB-S User Manual Animation Technologies Inc.
 FlyDVB-S User Manual Animation Technologies Inc. www.lifeview.com Ver: 1.9 Copyright and Trademark Notice 2006 by Animation Technologies Inc. All rights reserved. Information in this document is subject
Copyright and Disclaimer
 Copyright and Disclaimer All rights reserved. No part of this publication may be reproduced, stored in a retrieval system, or transmitted in any form or by any means electronic, mechanical, photocopying,
DVR-431 USB Wireless Receiver User Manual
 DVR-431 USB Wireless Receiver User Manual Thank you for using our wireless USB receiver, please read the following content carefully before using, it will help you make better use of this product. Introduction
Hardware Setup. HP Dual TV Tuner/Digital Video Recorder. Document Part Number:
 Hardware Setup HP Dual TV Tuner/Digital Video Recorder Document Part Number: 374787-001 November 2004 This guide provides steps to help you set up your HP Dual TV Tuner/Digital Video Recorder hardware
Satellite Receiver. Chapter REMOTE CONTROL USING THE MENUS USING TEXT FIELDS. About Your Satellite Receiver. What you ll find in this chapter:
 Satellite Receiver About Your Satellite Receiver Chapter What you ll find in this chapter: REMOTE CONTROL USING THE MENUS USING THE MENUS USING TEXT FIELDS 3 Chapter 2 Remote Control REMOTE CONTROL The
Instruction Guide. USB External PC TV Tuner with Remote Control USBTVTUNER. The Professionals Source For Hard-to-Find Computer Parts
 TV TUNER USB External PC TV Tuner with Remote Control USBTVTUNER Instruction Guide * Actual product may vary from photo Revised: July 27, 2004 (Rev. C) The Professionals Source For Hard-to-Find Computer
Cat s Eye edta-164 HDTV Tuner Card
 Cat s Eye edta-164 HDTV Tuner Card Installation Guide Version 1.0 VBox Communications Ltd. www.vboxcomm.com Copyright 2006, VBox Communications Ltd. All rights reserved. No part of this publication may
TELEVISION. Star Plans. Interactive Guide and DVR (Digital Video Recorder) Manual ARVIG arvig.net
 Manual ARVIG arvig.net") TELEVISION Star Plans Interactive Guide and DVR (Digital Video Recorder) Manual 888.99.ARVIG arvig.net TABLE OF CONTENTS DVR Remote Control Button Features...3 Arvig Digital TV i-guide Quick Reference
TELEVISION Star Plans Interactive Guide and DVR (Digital Video Recorder) Manual 888.99.ARVIG arvig.net TABLE OF CONTENTS DVR Remote Control Button Features...3 Arvig Digital TV i-guide Quick Reference
HiPix DTV-200 HDTV MultiMedia Control Card for your PC. Users Manual
 HiPix DTV-200 HDTV MultiMedia Control Card for your PC Users Manual Version 1.2 June, 2001 TELEMANN HIPIX DTV-200 SOFTWARE END-USER LICENSE This is a legally relevant License (the "License") between Global
HyperMedia User Manual
 HyperMedia User Manual Contents V3.5 Chapter 1 : HyperMedia Software Functions... 3 1.1 HyperMedia Introduction... 3 1.2 Main Panel... 3 1.2.2 Information Window... 4 1.2.3 Keypad... 4 1.2.4 Channel Index...
DVB-S 100 Installation Manual
 DVB-S 100 Installation Manual Contents V2.0 Chapter 1 : DVB-S 100 PCI Card Hardware Installation...2 1.1 Package Contents...2 1.2 System Requirements...2 1.3 Hardware Installation...2 Chapter 2 : DVB-S
BlazeVideo HDTV Player v6.0 User s Manual. Table of Contents
 BlazeVideo HDTV Player v6.0 User s Manual Table of Contents Ⅰ. Overview...2 1.1 Introduction...2 1.2 Features...2 1.3 System Requirements...3 Ⅱ. Appearance & Menus...4 Ⅲ. Operation Guide...5 3.1 Scan Channels...5
DVB-T Box, USB Monheim/Germany Tel. +49 (0)9091/ Fax +49 (0)9091/ Hama GmbH & Co KG.
9091/ Fax +49 (0)9091/ Hama GmbH & Co KG.") www.hama.de Hama GmbH & Co KG Postfach 80 86651 Monheim/Germany Tel. +49 (0)9091/502-0 Fax +49 (0)9091/502-274 hama@hama.de www.hama.de 00062776-01.05 DVB-T Box, USB 2.0 00062776 L TV USB receiver User
www.hama.de Hama GmbH & Co KG Postfach 80 86651 Monheim/Germany Tel. +49 (0)9091/502-0 Fax +49 (0)9091/502-274 hama@hama.de www.hama.de 00062776-01.05 DVB-T Box, USB 2.0 00062776 L TV USB receiver User
MaxView Cinema Kit Quick Install Guide
 SYSTEM SETUP The MaxView will work at any of the following display settings: INSTALLATION MaxView Cinema Kit Quick Install Guide Step 1 - Turn off your computer. Disconnect your monitor s VGA cable from
TV Tuner Card User Manual
 TV Tuner Card User Manual P/N: 400108013805 Ver: 3.00.000.0 Date: 2003-11-15 Copyright and Trademark Notice All rights reserved. Information in this document is subject to change without notice. No part
DVB-T Hybrid X8000T. PCI Card
 176149 DVB-T Hybrid X8000T PCI Card User Manual Ver: 1.0 Contents 1. Getting Started... 1 1.1 Introduction...1 1.2 Features...1 1.3 Package Contents...1 1.4 System Requirements...2 2. Input & Output Connections...
TVW750USBD ATSC Tuner Quick install manual
 Getting Started TVW750USBD ATSC Tuner Quick install manual The Diamond TVW750USBD ATSC Tuner is fully compatible for your Windows desktop PC or laptop. Important Notice: All channels are subject to coverage
CHAPTER 1. SETUP AND SOFTWARE INSTALLATION
 CHAPTER 1. SETUP AND SOFTWARE INSTALLATION CONNECT A GEFORCE-BASED PC TO A 3D TV Use the following procedure to connect your system to a 3D TV: 1. Check the video connectors on your GPU and use the correct
AVerTV 6. User Manual. English DISCLAIMER COPYRIGHT
 User Manual English DISCLAIMER All the screen shots in this documentation are only example images. The images may vary depending on the product and software version. Information presented in this documentation
HD PVR MCE Support Release Notes Version /28/2010
 HD PVR MCE Support Release Notes Version 1.1.28271 9/28/2010 The HD PVR support for Windows Media Center allows you to use the HD PVR to watch, pause and record high definition TV under Windows 7 Media
Wireless Studio. User s Guide Version 5.1x Before using this software, please read this manual thoroughly and retain it for future reference.
 4-743-161-12 (1) Wireless Studio User s Guide Version 5.1x Before using this software, please read this manual thoroughly and retain it for future reference. DWR-R01D/R02D/R02DN/R03D 2018 Sony Corporation
Table of Contents. Chapter 1 Introduction System Requirements Chapter 2 Introducing the AVerTV Application... 3
 Table of Contents Chapter 1 Introduction... 1 System Requirements... 2 Chapter 2 Introducing the AVerTV Application... 3 Launching the AVerTV DVB-T USB2.0 Application... 3 Running AVerTV DVB-T USB2.0 application
welcome to i-guide 09ROVI1204 User i-guide Manual R16.indd 3
 welcome to i-guide Introducing the interactive program guide from Rovi and your cable system. i-guide is intuitive, intelligent and inspiring. It unlocks a world of greater choice, convenience and control
DVB-S. User s manual
 DVB-S User s manual DVB-S Introduction 1.1 product Introduction DVB-S can implement IP data decoding and MPEG-2 A/V decoding. DVB-S can be widely used in software download, fast accessing internet, distance
Introduction 2. Installation 3. Suggested Configuration 4. Using the Remote 5. Adjustment Mode 6. Technical Specifications 7. Technical Support 8
 1 Table of Contents Introduction 2 Installation 3 Suggested Configuration 4 Using the Remote 5 Adjustment Mode 6 Technical Specifications 7 Technical Support 8 Warranty Information 8 2 Introduction Thank
HD Guide. User Manual
 HD Guide. User Manual You ve decided you want better TV. Here s how to enjoy it. Welcome to Shaw HD TV. To get the most out of your experience, it s best to know absolutely everything the service offers.
Instruction Manual DV5000 AV/ Component Bi-Directional DV- Video to Analog Converter
 Instruction Manual DV5000 AV/ Component Bi-Directional DV- Video to Analog Converter DV-5000 BI-DIRECTIONAL PROFESSIONAL DV-ANALOG MEDIA CONVERTER 2 Table Of Contents 1.0 Introduction 4 2.0 Specifications
BendBroadband User Guide. Alpha. Copyright 2015 ARRIS Group, Inc. All rights reserved.
 BendBroadband User Guide Alpha Copyright 2015 ARRIS Group, Inc. All rights reserved. Contents Welcome..................................8 Alpha Media Player Orientation The Main Menu Layout Horizontal Categories
E-MANUAL. Thank you for purchasing this Samsung product. To receive more complete service, please register your product at.
 E-MANUAL Thank you for purchasing this Samsung product. To receive more complete service, please register your product at www.samsung.com/register Model Serial No. Contents Quick Guides Connecting the
Instruction Guide. The TV Jockey Computer Monitor TV Tuner with Remote COMP2VGATVGB. The Professionals Source For Hard-to-Find Computer Parts
 VIDEO ADAPTER The TV Jockey Computer Monitor TV Tuner with Remote COMP2VGATVGB Instruction Guide * Actual product may vary from photo The Professionals Source For Hard-to-Find Computer Parts FCC COMPLIANCE
User's Guide. Version 2.3 July 10, VTelevision User's Guide. Page 1
 User's Guide Version 2.3 July 10, 2013 Page 1 Contents VTelevision User s Guide...5 Using the End User s Guide... 6 Watching TV with VTelevision... 7 Turning on Your TV and VTelevision... 7 Using the Set-Top
More Skills 14 Watch TV in Windows Media Center
 M05_TOWN5764_01_SE_SM5.QXD 11/24/10 1:08 PM Page 1 Chapter 5 Windows 7 More Skills 14 Watch TV in Windows Media Center You can watch and record broadcast TV in Windows Media Center. To watch and record
Harmony Ultimate. User Guide
 Harmony Ultimate User Guide Harmony Ultimate User Guide Table of Contents About this Manual... 6 Terms used in this manual... 6 At a Glance... 6 Features... 6 Know your Harmony Ultimate... 6 Features of
E-MANUAL. Thank you for purchasing this Samsung product. To receive more complete service, please register your product at.
 E-MANUAL Thank you for purchasing this Samsung product. To receive more complete service, please register your product at www.samsung.com/register Model Serial No. Contents Quick Guides Using Smart Hub
Copyright and Disclaimer
 Copyright and Disclaimer All rights reserved. No part of this publication may be reproduced, stored in a retrieval system, or transmitted in any form or by any means electronic, mechanical, photocopying,
ESI Video Viewer User s Guide
 ESI Video Viewer User s Guide 0450-1214 Rev. C For on-line help, visit www.esiusers.com. About ESI ESI (Estech Systems, Inc.) is a privately held corporation based in Plano, Texas. Founded in 1987, ESI
QUICK START GUIDE MODEL : PHD-VRX2
 Full HD 1080p Dual Tuner Digital HDTV Recorder, Receiver and Media Center Box QUICK START GUIDE MODEL : PHD-VRX2 Copyright 2013, PrimeDTV Technologies, Inc. Front View Menu: Display On-screen (OSD) Main
inside i-guidetm user reference manual 09ROVI1204 User i-guide Manual R16.indd 1
 inside i-guidetm user reference manual 09ROVI1204 User i-guide Manual R16.indd 1 4/6/10 12:26:18 PM Copyright 2010 Rovi Corporation. All rights reserved. Rovi and the Rovi logo are trademarks of Rovi Corporation
VDT-100 User Manual 1
 VDT-100 User Manual 1 Copyright Notice The use manual, including all its contents, is copyrighted by Videa Technology Inc.. All rights are reserved. Videa Technology Inc. reserves the right to improve
E-MANUAL. Thank you for purchasing this Samsung product. To receive more complete service, please register your product at.
 E-MANUAL Thank you for purchasing this Samsung product. To receive more complete service, please register your product at www.samsung.com/register Model Serial No. Contents Quick Guides Connecting the
E-MANUAL. Thank you for purchasing this Samsung product. To receive more complete service, please register your product at.
 E-MANUAL Thank you for purchasing this Samsung product. To receive more complete service, please register your product at www.samsung.com/register Model Serial No. Contents Connecting Antenna and External
ir32 installation files for IR receive and blaster functionality. mce the HD PVR MCE Support installer (setup.exe)
") HD PVR \ Colossus Media Center Support Release Notes Version 1.1.29178 6/27/2011 Support for Windows Media Center allows you to use one HD PVR or Colossus to watch, pause and record high definition TV
HD PVR \ Colossus Media Center Support Release Notes Version 1.1.29178 6/27/2011 Support for Windows Media Center allows you to use one HD PVR or Colossus to watch, pause and record high definition TV
Warranty and Registration. Warranty: One Year. Registration: Please register your product at Port, or. or Windows.
 7 7 Port, or or Windows Port Warranty and Registration Warranty: One Year Registration: Please register your product at www.aitech.com 2007 AITech International. All rights reserved. WEB CABLE PLUS PC-TO-TV
QUICK-START GUIDE LET S JUMP RIGHT IN
 QUICK-START FEATURES GUIDE LET S JUMP RIGHT IN TABLE OF OF CONTENTS INTRODUCING Introduction Page TV Basics Pages 4-6 Remote Control Map Turning Your TV and Receiver On and Off Changing Channels: Remote
Hardware Setup. If you have any further questions after checking this document, please contact
 Hardware Setup If you have any further questions after checking this document, please contact support@cognisens.com Hardware Setup Getting Started: NeuroTracker Pro WHAT TO BUY SETTING UP YOUR 3D TV SETTING
Celect Communications. Complete TV Users Guide
 Celect Communications Complete TV Users Guide 1 Contents Setting up your Remote... 4 Remote Guide... 5 Using the Guide Button... 8 Searching...10 Reminders...12 DVR Guide...13 Important Note...26 TV Main
USER GUIDE. Get the most out of your DTC TV service!
 TV USER GUIDE Get the most out of your DTC TV service! 1 800-367-4274 www.dtccom.net TV Customer Care Technical Support 615-529-2955 615-273-8288 Carthage Area Carthage Area 615-588-1277 615-588-1282 www.dtccom.net
HyperMedia Software User Manual
 HyperMedia Software User Manual Contents V1.2 Chapter 1 : HyperMedia software functions... 2 Chapter 2 : STVR... 3 2.1 System setting and channel setting... 3 2.2 Main panel... 6 2.2.1 Channel list...
Home Roam TV Basic User Manual
 Page1 Home Roam TV Basic User Manual Table of Contents 1. Safety Disclaimer... 2 2. Introduction... 2 3. What s in the Box... 2 4. Specifications... 2 5. Unit Functions... 3 5-1. Transmitter Module...
Complete TV Users Guide
 Celect Communications Complete TV Users Guide Connected Your pathway to the world 1 2 Contents Setting up your Remote... 4 Remote Guide... 5 Using the Guide Button... 8 Searching...10 Reminders...12 DVR
Receiver Description and Installation
 The Receiver Front Panel Smart Card Door Behind this door is a slot for a future smart card. No smart card is included with this receiver. Info Button Press the INFO button to see information about a program
First Time Setup Guide
 First Time Setup Guide www.exhibio.com 1.877.EXHIBIO (394.4246) Exhibio ST-200 Components & Accessories Standing Mount TV Tuner with Input Cable (USB 2.0 only) VESA Mount Over-the-Air Antenna Power Adapter
U S E R G U I D E HD1000
 U S E R G U I D E HD1000 1 W e l c o m e t o R o k u! In This Guide... Bring your HDTV to life with Roku. For the first time, you ll enjoy viewing your favorite digital photos in high-definition on your
Nero LiquidTV TiVo PC Manual
 Nero LiquidTV TiVo PC Manual Copyright and Trademark Information This document, like the software described therein, is provided as a license and may only be used or reproduced in accordance with the licensing
E-MANUAL. Thank you for purchasing this Samsung product. To receive more complete service, please register your product at. Model Serial No.
 E-MANUAL Thank you for purchasing this Samsung product. To receive more complete service, please register your product at www.samsung.com Model Serial No. To directly go to the page that provides instructions
AVer MediaCenter. User Manual
 AVer MediaCenter User Manual FCC NOTICE (Class B) This device complies with Part 15 of the FCC Rules. Operation is subject to the following two conditions: (1) this device may not cause harmful interference,
Precautions and Disclaimers What You Can Do with Geometry Manager Pro Check Your Computer System requirements...
 Operating Instructions Geometric & Setup Management Software Windows Geometry Manager Pro Ver. 4.0 Thank you for purchasing this Panasonic product. Before using this software, please read the instructions
Wilkes Repair: wilkes.net River Street, Wilkesboro, NC COMMUNICATIONS
 1 Wilkes COMMUNICATIONS 336.973.3103 877.973.3104 Repair: 336.973.4000 Email: wilkesinfo@wilkes.net wilkes.net 1400 River Street, Wilkesboro, NC 28697 2 Table of Contents REMOTE CONTROL DIAGRAM 4 PLAYBACK
Optiflex Interactive Video System
 Optiflex Interactive Video System Optiflex Interactive Video System 1 Before You Start...............2 On-site Video Surveillance.......6 Touchscreen Interface Viewing...10 Secure Remote Look-in........16
DVB-T2 T220 User Manual
 DVB-T2 T220 User Manual Chapter 1 Overview Important Notice: All channels are subject to coverage and may be changed from time to time. Reception may depend on the type and condition of your existing aerial.
HD-1603 Single Input MPEG-4 DVB-T HD Encoder/Modulator User Guide and Install Manual
 ZyCastR digi-mod HD Range digi-mod HD-1603 www.digi-modbyzycast.com HD-1603 Single Input MPEG-4 DVB-T HD Encoder/Modulator User Guide and Install Manual Table of Contents www.digi-modbyzycast.com Safety
UC1000 Universal Controller
 UC1000 Universal Controller Makes the KING Quest Satellite Antenna System compatible with DIRECTV DISH Bell TV Please read the! BEFORE YOU START! section on the inside of this cover before using the UC1000
Recording HDTV to ReadyNAS 600
 READYNAS SOLUTIONS SERIES Recording HDTV to ReadyNAS 600 Infrant Technologies, Inc. 3065 Skyway Court, Fremont, CA 94539 www.infrant.com HANTZ + PARTNER The Upgrade Company! www.hantz.com Deutschland:
E-MANUAL. Thank you for purchasing this Samsung product. To receive more complete service, please register your product at
 E-MANUAL Thank you for purchasing this Samsung product. To receive more complete service, please register your product at www.samsung.com M o d e l S e r i a ln o. To directly go to the page that provides
User s Manual PV-NT1004+ For DOC NO: /06/28
 User s Manual For PV-NT1004+ DOC NO: 54-1004+-01 Rev.A 00/06/28 FCC Requirement This device has been certified to comply with the limits for a Class B computing device pursuant to Subpart J of Part 15
Satellite Radio. Expand Your Factory Radio ISSR bit & 29-bit LAN. Owner s Manual Gateway. add. Harness Connection USB. Port 1 Port.
 Expand Your Factory Radio Harness Connection add Satellite Radio Dip Switches Port 1 Port 2 (See Manual) USB GM 11-bit & 29-bit LAN Owner s Manual Gateway ISSR12 Table of Contents 1. Introduction 2. Precautions
E-MANUAL. Thank you for purchasing this Samsung product. To receive more complete service, please register your product at. Model Serial No.
 E-MANUAL Thank you for purchasing this Samsung product. To receive more complete service, please register your product at www.samsung.com Model Serial No. To directly go to the page that provides instructions
Manual for TV software. TT-Viewer version Figure: TT-budget S2-3200
 Manual for TV software TT-Viewer version 2.7.0 Figure: TT-budget S2-3200 Index Manual TT-Viewer 3 1. Starting TT-Viewer software 3 2. General settings 5 3. Assignment of hardware 6 3.1 Unicable 7 4. Renderer
HDHomeRun Installation Instructions ( )
") HDHomeRun Installation Instructions (20101206) I. HDHomeRun Connections: HDHomeRun 3G Dual Tuner Back 1. Power connector 2. Network connector 3. Signal In Back 4. Power/Network LED 5. Tuner 0 6. Tuner
HDHomeRun Installation Instructions (20101206) I. HDHomeRun Connections: HDHomeRun 3G Dual Tuner Back 1. Power connector 2. Network connector 3. Signal In Back 4. Power/Network LED 5. Tuner 0 6. Tuner
Getting Started with myevnts
 Getting Started with myevnts Version 2.1.0 Document: Getting Started with myevnts Document Number: MYE-GSG-2.1.0 System Version: 2.1.0 Nielsen Media Research, Nielsen Homevideo Index, NSS, NTI and Pocketpiece
E-MANUAL. Thank you for purchasing this Samsung product. To receive more complete service, please register your product at.
 E-MANUAL Thank you for purchasing this Samsung product. To receive more complete service, please register your product at www.samsung.com/register Model Serial No. Contents Quick Guides Connecting the
for the Epson Stylus Pro 4000 User s Guide
 for the Epson Stylus Pro 4000 User s Guide All rights reserved. No part of this publication may be reproduced, stored in a retrieval system, or transmitted in any form or by any means, electronic, mechanical,
E-MANUAL. Thank you for purchasing this Samsung product. To receive more complete service, please register your product at.
 E-MANUAL Thank you for purchasing this Samsung product. To receive more complete service, please register your product at www.samsung.com/register Model Serial No. Contents Quick Guides Using Smart Hub
Digital Video User s Guide THE FUTURE NOW SHOWING
 Digital Video User s Guide THE FUTURE NOW SHOWING Welcome The NEW WAY to WATCH Digital TV is different than anything you have seen before. It isn t cable it s better! Digital TV offers great channels,
Table of Contents. Chapter 1 Introduction Video Conferencing on your PC... 1 Image and Video Capture... 1
 Table of Contents Chapter 1 Introduction... 1 Video Conferencing on your PC... 1 Image and Video Capture... 1 Chapter 2 Introducing the AVerTV Application... 2 Launching the AVerTV Application... 2 Introducing
Digital Video User s Guide THE FUTURE NOW SHOWING
 Digital Video User s Guide THE FUTURE NOW SHOWING Welcome The NEW WAY to WATCH Digital TV is different than anything you have seen before. It isn t cable it s better! Digital TV offers great channels,
Please follow the safety instructions in your notebook s directions for use.
 TV Remote Control Tuner Content Safety Instructions... 2 Battery disposal... 2 Summary... 3 TV card... 3 Remote control... 4 Inserting batteries... 4 Button Layout... 5 Changing the transmission/reception
 QUICK REFERENCE GUIDE Fusion is the first triple-play Gateway providing cable TV, high speed Internet and optional home phone capabilities in one single, simple and elegant solution. The Fusion quick reference
Roku TV. User Guide. Version 8.0. For U.S. and Canada. English
 Roku TV User Guide Version 8.0 For U.S. and Canada English Illustrations in this guide are provided for reference only and may differ from actual product appearance. Copyright 2018 Roku, Inc. All rights
E-MANUAL. Thank you for purchasing this Samsung product. To receive more complete service, please register your product at.
 E-MANUAL Thank you for purchasing this Samsung product. To receive more complete service, please register your product at www.samsung.com/register Model Serial No. Contents Quick Guides Connecting the
Digital Video Recorder From Waitsfield Cable
 www.waitsfieldcable.com 496-5800 Digital Video Recorder From Waitsfield Cable Pause live television! Rewind and replay programs so you don t miss a beat. Imagine coming home to your own personal library
E-MANUAL. Thank you for purchasing this Samsung product. To receive more complete service, please register your product at.
 E-MANUAL Thank you for purchasing this Samsung product. To receive more complete service, please register your product at www.samsung.com/register Model Serial No. Contents Connecting Antenna and External
EndNote. Version X3 for Macintosh and Windows
 EndNote Version X3 for Macintosh and Windows Copyright 2009 Thomson Reuters All rights reserved worldwide. No part of this publication may be reproduced, transmitted, transcribed, stored in a retrieval
S8100-ZC DIGITAL SATELLITE RECEIVER USER MANUAL. Works only with a Satellite Dish. Version 1.3 AUGUST 2017
 S8100-ZC DIGITAL SATELLITE RECEIVER USER MANUAL Version 1.3 AUGUST 2017 Works only with a Satellite Dish Welcome Thank you for choosing the Dish TV S8100-ZC Satellite Receiver. The S8100-ZC is a Freeview
BEVCOMM. Control Your Remote. Setup Use for programming sequences of devices controlled by the remote.
 B Contents Your Interactive Program Guide 4 Guide Symbols: Quick Menu Options 5 Search Categories and Listings 6 Program Information 7 Reminders 8 Mini Guide 9 Parental Controls 10 Favorites 11 Setup 12
S8100-ZC USER MANUAL
 S8100-ZC USER MANUAL Welcome Thank you for choosing this Dish TV FreeviewPlus Satellite Set Top Box. You will be able to receive all Freeview Satellite TV and Radio Channels, as well as On Demand Catchup
KB Hybrid USB Digital TV Tuner Install Guide V1.0
 KB Hybrid USB Digital TV Tuner Install Guide V1.0 USB VHF/UHF Connect the USB TV Tuner to a spare USB port and connect your aerial to the aerial socket on the USB TV Tuner. Also connect the A/V dongle
E-MANUAL. Thank you for purchasing this Samsung product. To receive more complete service, please register your product at.
 E-MANUAL Thank you for purchasing this Samsung product. To receive more complete service, please register your product at www.samsung.com/register Model Serial No. Contents Quick Guide Using Smart Hub
SuperSpeed USB 3.0 to HDMI Audio Video Adapter for Windows & Mac up to 2048x1152 / 1920x1200
 SuperSpeed USB 3.0 to HDMI Audio Video Adapter for Windows & Mac up to 2048x1152 / 1920x1200 Copyright and Trademarks Specifications are subject to change without notice. Cable Matters is a registered
QUICK START GUIDE QT ANALOG HD CAMERA & DVR BUNDLE ENGLISH
 QUICK START GUIDE QT ANALOG HD CAMERA & DVR BUNDLE ENGLISH Table of Contents Welcome What s Included...3 Understanding your DVR...4 Get Connected Registration...5 Connect Your Cameras...5 Connect DVR to
The Kaffeine Handbook. Jürgen Kofler Christophe Thommeret Mauro Carvalho Chehab
 Jürgen Kofler Christophe Thommeret Mauro Carvalho Chehab 2 Contents 1 Kaffeine Player 5 1.1 The Start Window...................................... 5 1.2 Play a File..........................................
D-Lab & D-Lab Control Plan. Measure. Analyse. User Manual
 D-Lab & D-Lab Control Plan. Measure. Analyse User Manual Valid for D-Lab Versions 2.0 and 2.1 September 2011 Contents Contents 1 Initial Steps... 6 1.1 Scope of Supply... 6 1.1.1 Optional Upgrades... 6
The new name-based recording feature has two key benefits:
 Introduction to Name-Based Recording INTRODUCTION TO NAME-BASED RECORDING The new name-based recording feature has two key benefits: Program recording based on the name, instead of the date and time the