Slate Digital - Virtual Buss Compressors. Virtual Mix Rack. User Guide
|
|
|
- Bernard Hill
- 6 years ago
- Views:
Transcription


1 Slate Digital - Virtual Buss Compressors Virtual Mix Rack User Guide
2 Virtual Mix Rack - User Guide 2 Virtual Mix Rack Version 2.0 Advanced Algorithms by Fabrice Gabriel Slate Digital Steven Slate - Fabrice Gabriel Mickaël Albisser - Alexis Andra - François Best - Raphaël Cathelain - Mathias Claveau - Romain Clement - Niccolo Comin - Joris Gignoux - Nicolas Lacombe - SebasDen Le Duc - Romain Moret - Tom Rasulo - François Reme - Julien Rolland - Anthony TaglianeH Audified (U73b) Jaromír Mačák - Vladimír Tichý Graphical Design Yannick Bonnefoy Ulf Ekelöf Vincent GauDer
3 Virtual Mix Rack - User Guide 3 Introduction 5 System Overview 7 Modular System 7 System Components 7 Requirements 8 Installation 9 VMR Overview 10 Slots & Modules 11 Library 13 VMR First Loading 15 Handling the Modules 16 Using the Modules 19 Preset System 22 Dream Strips 25 A/B Snapshots 26 Settings Menu 27 Miscellaneous 28 Virtual Mix Rack Modules 30 Revival 30 Trimmer 31 Mix Bundle One 32 Virtual Console Collection 38 Custom Series Bundle 43 FG-Bomber 49
4 Virtual Mix Rack - User Guide 4 Virtual Preamp Collection 52 Air and Earth Modules 54 FG-116 Blue Series 57 The Monster 61 Virtual Tube Collection 63 FG-Stress 66 Audified U73b 73 ilok Protection 75 Contacting Support 78 Making the Virtual Mix Rack 79
5 Virtual Mix Rack - User Guide 5 Introduction It s brings me such joy to introduce you to the Virtual Mix Rack. This is a processor that everyone at Slate is so proud of, and I hope that once you put it into use on your mixes, you ll understand why. The concept of the Virtual Mix Rack actually started years ago when I began to record my first drum samples. I had a rack of gear all wired into each other that would process my drum mics. What I found was that I always loved combining different gear because I preferred to blend the best parts of each one. For instance, I remember for a particular snare sample, I used the top end of a famous tube EQ, then used the midrange of a US EQ to add punch, then some low end shelf from a classic British EQ, and then finalized it with a touch of compression from a VCA compressor. I found it so convenient to have all the processors in one rack. Years later I saw something similar at NRG Recording Studios as I watched my good friend, Grammy award winning producer / mixer Jay Baumgardner, do a mix. I noticed on several tracks he had combined multiple pieces of gear to craft the final sound. On one vocal track, he had the top end of a famous tube EQ, the midrange and lows of a British console EQ, and then two different compressors combined all in a hybrid manner. I found it really clever how he used all the unique aspects of each processor. In the analog world, the need for multiple processors in one easy to use rack became extremely popular with the now industry standard 500 series. When I started using 500 series racks, I was delighted to be able to get my processing done so much more fast and efficiently. I knew that if we could recreate this in plugin form with precise analog modeling, we d have a hit. So in 2012, I drew a picture on a piece of paper and showed it to Fabrice. I love it. Let s do it, he said. Little did I know what a complex world we d be getting into. The Rack structure itself is a work of art, with the Slate Digital development team doing a fantastic job on creating a rack that has innovative concepts in its workflow. The graphical elements and ability to arrange the processors uniquely to the engineer s demands is fantastic. The rack works exactly as you d want it to, and it provides the exact same creativity as the analog version does, but with even more versatility. And then there is the analog modeling. All I can say is that these five processors have been the most challenging in our history, with special attention to the FG-116 which models the classic American FET compressor. In case, you re unaware of how we model analog processors, it starts with an examination of the schematic and then leads to an extensive testing of the actual gear, which then leads to initial algorithm modules created by Fabrice and the DSP team. These complex modules represent all the aspects of the gear. For instance, a transformer can have several modules that correspond to how this component affects the sound of the audio. It is then up to
6 Virtual Mix Rack - User Guide 6 me to tweak these modules, and send notes back to Fabrice and the DSP team if there are changes that need to be made. This back and forth process can happen many dozens of times. Because of the complexity of the FG-116, where every parameter affects all other parameters (such as how the gain reduction affects timing, output level affects transformer response), it becomes extremely difficult to match the analog gear. Often I d be able to match one piece of reference material exactly, but then the same setting would sound incorrect on another reference piece of material. It was really frustrating. But with perseverance (and a lot of coffee), the team came through and were able to recreate the sound with such precision that a room full of pro audio engineers was unable to hear the difference in a blind A/B test. That was a fun day for sure. The EQs are absolutely stunning. I can t find anything that the FG-N British EQ does not sound good on. It s so musical and fat, and is a staple in my mixing. For special effects, it s fun to crank the line input while on drive mode and to slam all the bands into a distortion. The FG-S is a musical craftsman. I love doing precise cuts with it, especially with its famous hi pass filter which has the magical ability to not make the frequencies above its cutoff point sound awkward like some other hi pass filters do. When you make the bandwidth wide, it can be really punchy on drums and transparently enhance a vocal after slamming it with some compression. The FG-401 is a compressor that is made to be a swiss army knife for mixing. Circuit 1 is your classic grabby VCA style compression, and is perfect for modern music of all kinds. Circuit 2 has a different circuit path and timing characteristic that is smoother and more transparent. You can slam stuff on circuit 2 without making it sound too squashed. It s amazing on bass, vocals, and is my go to for drum overheads. The transformer on the 401 is inspired by several designs, but I customized it by ear and it adds some beautiful depth and harmonic spark to liven up the source track. In conclusion, the Virtual Mix Rack has revolutionized the way I mix in the box. Combined with our other analog modeled processors, I m getting the best sounding mixes of my life and having more fun. I hope you find the same enjoyment. Happy mixing! Steven Slate CEO Slate Digital
7 Virtual Mix Rack - User Guide 7 System Overview Modular System Slate Digital VMR System is a modular architecture that allows the use of processing units, the Modules, within a Rack Platform, the Virtual Mix Rack Plugin. In the VMR System architecture, the Rack and the Modules are independent. They both reside on the system as two separate binary sets. This offers a more flexible way of adding new modules in the Virtual Mix Rack ecosystem, without having to systematically update the entire set of existing modules. This separation also allows an easier and more powerful way to deal with ilok licenses. Each Module could have it s own license, gathered into a licensed bundle, or even use the same license as the Virtual Mix Rack itself. System Components The VMR Platform is made of two components: the Virtual Mix Rack Plugin and the Virtual Mix Rack Modules. VMR Plugin The Virtual Mix Rack Plugin is the corner stone of the VMR System. It is the actual plugin you insert in the host. Within this plugin, you can load, use, move and remove VMR Modules. VMR Modules VMR Modules are like small plugins. In fact, they are plugins, except that they exist as a plugin format that only the VMR Rack can interpret and use. From the VMR System perspective, the Virtual Mix Rack Plugin is the host, and the VMR Modules are the modular processing units. Modules can be of any kind, dynamic processing, EQs, delay, reverbs, mixing utilities, mastering units, metering, etc.
8 Virtual Mix Rack - User Guide 8 Requirements Supported Systems Macintosh OS X 10.11, or Intel Processor, 4GB RAM AU, VST2, VST3 or AAX host (32 or 64-bit) ilok 2 or 3 Windows Windows 7, 8 or 10 (32 or 64-bit) Intel or AMD Processor, 4GB RAM VST2, VST3 or AAX host (32 or 64-bit) ilok 2 or 3 Rack and Module Licenses Due to the Modular architecture of the Virtual Mix Rack plugin, you will need multiple licenses to get the VMR System up and running: The VMR Rack license, which activates the VMR Rack and free Modules like Revival and Trimmer. Module / Modules Bundles licenses: for instance, the VMR Mix Bundle license contains licenses for the FG-116, FG-401, FG-N and FG-S modules. Bundled licenses cannot be separated *. Rack and Module Versions It s important to understand that the VMR Rack and Modules must always share the same version number. For instance a Module under version X will only work within a Rack that is also under version X, and vice-versa. Click the Slate Digital logo in the toolbar to open the About Panel, which will display the version number for the Rack and Modules. * See the ilok Protection section for more information. See the About Panel section for more information.
9 Virtual Mix Rack - User Guide 9 Installation Redeeming Your ilok License Before downloading the ilok License for Virtual Mix Rack or any Module or Bundle of Modules, you will need to install the latest ilok License Manager. You can download the latest installers here. In order to download your ilok license to your ilok 2 dongle, please visit the link that was given to you in your receipt and enter the required info including the issued passcode. This will unlock your ilok Activation Code. 1. Launch the ilok License Manager and sign in to your ilok account. 2. Click this button in the upper right corner of the window: 3. Enter your Activation Code and click Next. 4. Select your ilok 2 Dongle from the Activation Location dialog and click Activate. 5. You will receive a confirmation message when the license is moved to your ilok Dongle. Installing Virtual Mix Rack Macintosh Double-Click on the installer icon and follow the on-screen prompts. You may customize your installation by clicking the Customize button to select in particular: Module Presets you want to install VMR Modules you want to install VMR Plugin Formats you want to install Windows Double-Click on the installer icon and follow the on-screen prompts. You may choose to customize your installation in Select Components rubric. Choose the desired plug-in directory paths (those default are usually best), and proceed.
.")
10 Virtual Mix Rack - User Guide 10 VMR Overview VMR Plugin is divided into four areas: the Preset Bar (top), the Dream Strip Bar (VMR 2.0 button), Library (left), and Slots (center). Preset Bar provides functions to manage Rack Presets, Snapshots, and various utility features (Undo/Redo, Clear Rack, etc.). Dream Strip Bar provides a quick access to your most used Rack configuration. Library shows your installed Modules. Slot area is where you add and use Modules.

11 Virtual Mix Rack - User Guide 11 Slots & Modules There is an important distinction to be made between the VMR Slots and Modules. Slots The VMR Plugin can host up to eight Slots. Slots are empty spaces that load Modules. Host Automation is written to Slot parameters, not to Module parameters. Slots parameters belong to the Rack and they are the ones that are declared to your Host *. Each Slot has its own header with utility and preset functions*. Slots can be empty, in which case, a blank metal plate covers it, preventing it from virtual dust. * See Using the Modules section for more information.
12 Virtual Mix Rack - User Guide 12 Modules Modules are audio processing units that are loaded into an empty Slot. Module parameters are automatically mapped to Slot parameters. Module parameters are automatable only via Slot parameters.


13 Virtual Mix Rack - User Guide 13 Library The Library displays all the Modules that are installed on your system, and provides you with some information about them. This is a good place to get quick information about a Module, such as: Module Status: has a license been found for this Module? Module Category: Dynamics, EQ, Harmonics, etc. A brief description for each Module. Two views are available in VMR 2.0: the Thumbnail View, which displays Modules as icons, and the List View, which displays Modules with their names. To switch to the List View, click on the burger icon. To switch to the Thumbnail View, click on the rectangle icon. In both views, clicking on each Module or hovering the mouse over them will display a small popup that reveals more info and indicates the Module status:
/Ctrl(pc) key will add it to a currently filtered group, allowing you to create more complex filters. Using the Search Modules VMR 2.")
14 Virtual Mix Rack - User Guide 14 Using Category Filters You can use Category Filters to quickly search for a Module in the Library. Clicking on a filter will enable or disable it. Clicking on a filter while holding the Cmd(mac)/Ctrl(pc) key will add it to a currently filtered group, allowing you to create more complex filters. Using the Search Modules VMR 2.0 now offers a Search Modules feature if you would like to narrow your search even further. Simply click inside of the Search bar and type the characters pertaining to the module(s) you d like to find. The search results will yield any modules containing the sequence of characters typed. It can also find results for multiple Modules not relating to the entire string. For example, if you type Air 401 you would yield the results AirEQ Air, AirEQ Earth, and FG-401. This is useful if these are the only Modules you want to focus on.

15 Virtual Mix Rack - User Guide 15 VMR First Loading Unlike usual plugins, VMR is a plugin which loads several modules. Each module requires around 1 and 2 seconds to load, so when adding each modules loading time, it may require 10 or 20 seconds for the first VMR instance to fully load (depending on the number of modules you have and your system). Fortunately, this loading time occurs at the first instantiation only, when opening the VMR user interface. Once the plugin has been loaded in the session, other instances are quickly loaded. To help you monitor the loading progress during this first instantiation, we have added a panel which displays a progress bar:

16 Virtual Mix Rack - User Guide 16 Handling the Modules Adding Modules There are two ways of adding Modules: 1. By double clicking on the Module in the Library. 2. By Dragging the Module from the Library and dropping it into a Rack Slot. Moving Modules To Move a Module, grab it by its panel and start moving it around. The Rack processing sequence is updated during the drag operation, both visually and sonically (the audio path follows what s happening visually in real-time).

17 Virtual Mix Rack - User Guide 17 Duplicating Modules To duplicate a Module, Drag n Drop it while holding the Opt/Alt key. More generally, as long as the Opt/Alt key is pressed during a Drag n Drop operation, then the dragged Module will be a clone of the original one. Removing Modules There are two ways of removing Modules and Slots: 1. By clicking on the X icon in the Slot Header: this will remove the entire Slot, with the Module that is inside (note: the Rack will always have a minimum number of visible Slots, so when removing a Module, you can potentially end up with an empty Slot). 2. By dragging the Slot and dropping it outside of the Rack. Then the Slot is displaying a trash icon, as shown below:

18 Virtual Mix Rack - User Guide 18 Moving / Cloning Modules between Rack Instances This is one of the nice features of the VMR from a workflow perspective: you can add, move and duplicate Modules between two Rack Instances. To Move / Clone a Module from an instance to another, just drag the Module from the first Rack view to the second. Holding Opt/Alt during the Drag operation will duplicate the Module instead of moving it. This also works with the Library, you can grab a Module from any Rack instance s Library, and drop into any other Rack instance s Slot. Moving the VMR View The VMR can host up to eight Modules but has a maximum number of visible Slots. Depending on the screen resolution and the Library display, VMR can show four Modules or more. Thereby, some of them will be invisible and a Horizontal Scroll Bar will appear at the bottom of the Rack: This Scroll Bar allows you to move the view and make the hidden Modules visible. You can also move the view by clicking on a hidden Module (like B FG-401 ) in the Scroll Bar.

19 Virtual Mix Rack - User Guide 19 Using the Modules Power & Solo Modes Each Slot processing can be bypassed and soloed. To bypass a Slot, press the yellow Power Button in the left of the Slot Header. To Solo a Slot, press the S Button. Slot Solo has two modes of operations: 1. X-OR Solo: Left Click on a Solo Button to Solo the Slot and cancel any other Slot Solos. 2. Latch Solo: Cmd / Ctrl + Left Click on a Solo Button to add / remove the Slot in the current solo group. Module Preset System Each Slot embeds a light preset system which allows you to Save, Load and Delete presets for individual Modules *. Automation Panel For an easier handling of Automation, the Virtual Mix Rack has a special panel, dedicated to Automation Display. You can access this panel by clicking on the Slot Letter in each Slot Header. * See Preset System section for more information.

20 Virtual Mix Rack - User Guide 20 This panel displays a list of all the Automation Mappings, for all the currently loaded Modules: In the Automation Name column, you can read the names of the parameters as they will be seen by the Host. In the Parameter column, you can read the names of the Module Parameters. Depending on the plugin format your Rack is running, the Automation Names that are exposed to the Host by the Rack can be generic (like H-10 ), or they can be dynamically changed (like H-Drive ). Click anywhere outside the panel to dismiss it.
21 Virtual Mix Rack - User Guide 21 VMR Key Commands Reset Parameters to Default Mac: Double-Click or Opt + Click Win: Double-Click or Alt + Click Fine adjustments Mac: Right-Click + Drag or Cmd + Drag Win: Right-Click + Drag or Ctrl + Drag Enable Automation Dialog (Pro Tools and VST3 DAWs * only) Mac: Ctrl + Opt + Cmd + Click Win: Ctrl + Win + Alt + Click * Most of VST3 DAWs support this feature. This dialog often also allows the control assignment.

22 Virtual Mix Rack - User Guide 22 Preset System VMR Preset System The Preset System allows you to fasten your workflow by using predefined configuration. Presets are divided in two Layers: 1. Rack Presets: handled through the top Preset Bar 2. Module Presets: handled through the Preset Label within each Slot Rack and Module Preset Systems are independent. A Rack Preset contains all the Slots and Modules configuration, but it doesn t store which Module Preset has been used in which Slot, to avoid unnecessary synchronization mismatches. It just stores the Module Preset Names which have been used. Since VMR 2.0, we now divide Presets, both Rack and Modules, in two categories: 1. Factory Presets: Presets provided by the VMR installer 2. User Presets: Presets that you create To prevent loss of settings when installing a new VMR version, a Factory Preset cannot be overwritten. They are symbolized by a lock icon. Thus, to modify and save a Factory Preset, you must now pass through the Save As button. Rack Presets Clicking on the Preset Label area will open the Preset List: The Main Menu displays the Banks. The Sub-Menus display the Presets, divided in two categories: User and Factory Presets.


23 Virtual Mix Rack - User Guide 23 Clicking on the Menu Icon on the left will open the Preset Menu, from which you can: Rename/Delete the current Bank Export/Import Bank as.ebf" files Visualize and Edit Preset Information Rename/Delete the current Preset Clicking on the arrows on the right will navigate through the Presets and Banks. Clicking on the Save Button will update your current User Preset (not possible with a Factory Preset), or do the same as Save As if your Preset doesn t exist yet. Clicking on the Save As Button will open the Save Preset Panel, in which you can edit the Preset Information:
 Save As the")


, the star exponent will be")
24 Virtual Mix Rack - User Guide 24 Module Presets Clicking on the Preset Label area will open the Preset List, from which you can: Save the current User Preset (not possible with a Factory Preset) Save As the current Preset Delete the current Preset Reset the Module to its Default State Load a Module Preset Clicking on the Save As Button will open the Save preset as Panel: Modified Preset Status When you modify a Preset (both Rack and Module), a star exponent appears next to the Preset Name in order to inform you that the Preset is in a Modified Status. Saving the Preset will update it and then the star exponent will disappear. If this updated Preset is used in an other instance (or an other session), the star exponent will be displayed in this instance. Recalling the Preset will update it and then the star exponent will disappear.
25 Virtual Mix Rack - User Guide 25 Dream Strips The system is quite simple: any Rack Presets, User or Factory, can be set as Dream Strip, and will appear in the Dream Strip bar. This allows you to access in one-click to your most used rack configuration, depending on your track, for example: Vocal Channel, Drumbuss, Bass Channel, Mastering 1, etc. The Dream Strip bar can contains up to eight Dream Strips, but can also be empty if you do not use it. In this case the bar is hidden. The first Dream Strip is the Default VMR state (= home icon). To change it, simply re-order the Dream Strip buttons. If there are no Dream Strips, the Default VMR state is empty. To set a Preset as Dream Strip, two options are possible: Simply click on the Star in the Preset menu Save As the Preset and enable Dream Strip option To load a Dream Strip, simply click on the Dream Strip button. To re-order the Dream Strip buttons, simply drag and drop the buttons. To remove a Dream Strip, three options are possible: Right-click on the Dream Strip and select Remove From Dream Strips Disable the Star in the Preset Menu Save As the Preset and disable Dream Strip option To update a Dream Strip with the current rack configuration, right-click on the Dream Strip button and select Update With Current Strip. This will open the Save As panel with Factory Presets (as they are not overridable, see next section), and act as Save with User Presets. To help you start with VMR, seven Dream Strips are available, with different variations included in the corresponding Dream Strip Bank. You can then safely configure the Dream Strip bar as you want, VMR updates will not overwrite it.
26 Virtual Mix Rack - User Guide 26 A/B Snapshots The Virtual Mix Rack offers a simple A/B system to quickly compare two Rack configurations. A/B Snapshots can be controlled and switched from the dedicated A/B buttons. The Plugin is always operating on one of the two Snapshots, A or B, the current Snapshot being highlighted in yellow. Clicking on a Snapshot letter will switch your Rack to this Snapshot. Clicking on the arrow between the two buttons will copy the current Snapshot to the other.

27 Virtual Mix Rack - User Guide 27 Settings Menu Oversampling To reduce the aliasing effect produced by any digital clipping, VMR 2.0 now offers an Oversampling option accessible in the Settings menu. When Oversampling is On, the CPU usage will slightly increased and a short latency will be introduced: 63 samples at 44.1/48 khz and 127 samples at 88.2/96 khz. This latency can be automatically compensated by your DAW. Please note that the Oversampling setting is per instance, and it is saved in the VMR Presets and sessions in order to recover the same sound each time you recall a setting. Help User Guide Open this User Guide. Online Support Redirect you to the Slate Digital Support Website.
28 Virtual Mix Rack - User Guide 28 Miscellaneous Rotary Knob Mode Clicking on the Rotary Knob Mode icon in the Preset Bar toggles the Knob Mode between Linear and Rotary. In Linear Mode, the Knobs follow horizontal and vertical mouse moves. In Rotary Mode, the Knobs follow circular mouse moves (pretty useful on touch devices). The icon is highlighted in yellow when the Knobs are in Rotary Mode. Note: fine adjustments (Cmd/Ctrl+Drag) are also available in Rotary Knob Mode. Clear Rack The Clear Rack button allows you to rapidly remove all Modules and reorder Slots. Undo/Redo Undo/Redo allows you to revert or repeat any action, including rack configuration (Modules inserted, Slot order, etc.). A history of 20 actions is possible.

29 Virtual Mix Rack - User Guide 29 About Panel Clicking on the Slate Digital Logo in the Preset Bar opens the About Panel: In this Panel: Clicking on the Slate Digital logo will redirect you to the Slate Digital Website. Clicking on the Virtual Mix Rack label will open this User Guide. Left-Clicking on the Version Number label will toggle between build information. Right-Clicking on the Version Number label will open a quick support Menu. The Module Version Table displays useful information about all the installed Modules: their Names, Versions and Statuses.

30 Virtual Mix Rack - User Guide 30 Virtual Mix Rack Modules Revival The Revival is the product of years of research into what makes things sound better. The Slate Digital Team analyzed what it was about classic analog gear that could turn tracks into audio masterpieces, and broke the process down into two knobs. That may sound a bit crazy, but wait till you hear Revival. Revival borrows aspects of tubes, tape, transformers, and world class analog filters to create two processes. Shimmer adds depth, clarity, space, width, and air like you ve never heard. Thickness adds warmth, punch, body, and fatness. Revival can be used on individual tracks, such as to create air on a pop vocal or add fatness to drums, but is also amazing in mastering to bring out details in full mixes. VU Meter The VU Meter displays the RMS level of the signal at the output of the module, i.e., after the Mix. The meter is calibrated to display 0VU when being fed by a 1kHz sine wave with a peak level of -18dBFS by default. You can recalibrate this level by adjusting the screw below *. Shimmer & Thickness Shimmer adds to the high-end of the signal. It can be used to add air, brightness and clarity without harshness. Thickness affects the low-end, it will fatten up just about anything! * The meter calibration is a shared setting affecting all Output VU Meters of VMR Modules.

31 Virtual Mix Rack - User Guide 31 Trimmer The Trimmer is a very useful Module which brings you few basic operations within the Virtual Mix Rack: a RMS and Peak Level Monitoring, a simple Trim control and a Phase Reverse Switch. When using it in the first slot, the Trimmer allows you to define how the signal will hit the following VMR module, with a precise output level monitoring. VU Meter The VU Meter displays the RMS level of the signal at the output of the module, i.e., after the Mix. The meter is calibrated to display 0VU when being fed by a 1kHz sine wave with a peak level of -18dBFS by default. You can recalibrate this level by adjusting the screw below *. LED Meter The LED Meter displays the Peak level of the signal at the Output of the module. The level is in db Full Scale and going from -72dBFS to 0dBFS. Trim Knob The Trim Knob is a simple gain control, going from -24dB to +24dB. Phase Reverse Switch The Phase Reverse Switch is very classical: in Mono and Stereo, it flips the signal s polarity for all channels. * The meter calibration is a shared setting affecting all Output VU Meters of VMR Modules.
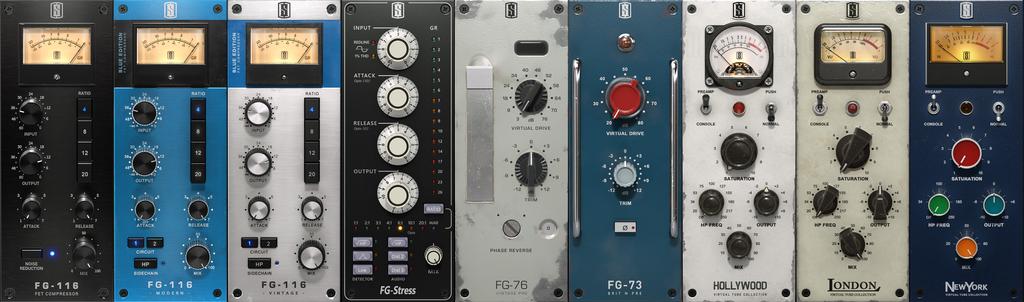
32 Virtual Mix Rack - User Guide 32 Mix Bundle One FG-116 The FG-116 is the most precise digital replication of the classic American FET limiter. No expense was spared to capture every nuance of this classic sounding compressor / limiter. From its trademark timing characteristics to the extremely musical sound of its transformer, the FG-116 will give engineers the musical and fat tone that has made the hardware so famous. The FG-116 sounds great on everything like lead vocals, drums, and bass guitars. GR Meter Displays the amount of compression in db. Input / Output * Increasing your Input Gain will result in more compression. To compensate the gain reduction introduced, use the Output Gain. Ratio Sets the amount of gain reduction. For example, if the ratio is set to 4:1: this means for input level 4dB over the threshold, 1dB will be output. Attack Controls the speed at which compression occurs after the signal has exceeded the threshold value. Turn clockwise for a fast attack, and counterclockwise for a slow attack. Shift+Click the Attack knob to turn compression on and off. When set to off, the unit will bypass the compression, while continuing to process with the Input and Output Gains. This allows you to impart some nice transformer saturation, without reducing the dynamic range of the track. * Moving the Input or Output Knob while holding the Shift key will inversely link the two controls. It is very useful in Attack OFF mode to use the module as a line driver.
33 Virtual Mix Rack - User Guide 33 Release Controls the speed at which compression stops, once the signal has fallen below the threshold value. Turn clockwise for a fast release, and counterclockwise for a slow release. Noise Reduction Disables the modeled noise. Mix Controls the blend between the compressed and uncompressed signals, which is very useful to achieve parallel compression without any additional routing.
34 Virtual Mix Rack - User Guide 34 FG-401 The FG-401 started as a recreation of the classic British console channel compressor, but morphed into quite a lot more. First, we gave it variable attack and release with increased range, adding more tonal options. We then added an optimal transformer inout, and not just any transformer, the famous transformer from the British Class A Console! This adds a beautiful warmth and sheen to the compressor. Last, we added an entirely unique second circuit path that provides and additional smooth and rich tone. The FG-401 is perhaps the most versatile mix compressor in the world that can sound good on any source you feed into it! GR Meter Displays the amount of compression in db. Threshold Sets the point at which compression will occur after an audio signals amplitude exceeds this set level. Ratio The Ratio Knob adjusts the slope of the compression curve. Attack Controls the speed at which compression occurs after the signal has exceeded the threshold value. Turn to the left for a fast attack, and to the right for a slow attack. Release Controls the speed at which compression stops, once the signal has fallen below the threshold value. Turn to the left for a fast release, and to the right for a slow release.
35 Virtual Mix Rack - User Guide 35 Make-Up The Make-Up Gain parameter allows for adjusting the output level; to compensate for level reduction as a result of compression. It s range is from -24dB to +24dB. Mix Controls the blend between the compressed and uncompressed signals, which is very useful to achieve parallel compression without any additional routing Transformer The Transformer Switch toggles the Transformer enablement. Circuit Toggles the FG-401 s processing between two circuits: Circuit 1 is punchier and more dynamic. Circuit 2 is more transparent and gives more space to the bass.

36 Virtual Mix Rack - User Guide 36 FG-N The FG-N is a digital recreation of one of the most classic discrete Class A British equalizers from the 70 s. All aspects of the circuit are modeled, including the rich harmonics and saturations that naturally occur when the equalizer is in use. The original model only contained one mid band, so we thought it would be nice to double it so that it has two mid bands. This equalizer is lush, fat, and bold. It sounds great on everything from drums to vocals, and can even add the perfect saturation to synth and electronic tracks. High-Shelf The High-Shelf has only one Gain Control. This band operates at a fixed frequency. EQ Bands 1 and 2 The EQ Bands have two controls: Frequency and Gain. Clicking on the frequency value labels will snap the Frequency Knob to the indicated value. Low-Shelf The Low-Shelf Band has two controls: Frequency and Gain. Clicking on the frequency value labels will snap the Frequency Knob to the indicated value. High-Pass Filter The High-pass Filter Frequency Knob controls the frequency of the high-pass filter. When set to "Off", the High-Pass is disabled. Line & Drive Line gain reduces the headroom of the equalizer, driving it into saturation and increasing the output level. You ll notice it s effect especially when using the filter gains. With Drive enabled, the Line gain output will be compensated by the same level that it is raised. Providing the same saturation effects without an increase in level. * * When disabling Drive, the Line knob will reset to 0dB. This is a simple UI link designed to protect your speakers and ears from a large jump in volume.
37 Virtual Mix Rack - User Guide 37 FG-S The FG-S is a digital recreation of one of the most famous British console equalizers from the 80 s. This equalizer also has rich harmonics and interactive mid bands with a fat musical tone. This is the ultimate workhorse mix eq that can be used on any track. It is great for surgical cutting strokes, or wide bell and shelf strokes for making drums and guitars punch out of the speakers. HF The High Filter section has three controls: Frequency, Gain, and Bell / Shelf switch. * The Bell Switch toggles the Filter between a Bell and a Shelf. HMF The High-Mid Filter section has three controls: Frequency, Q and Gain Knobs. * LMF The Low-Mid Filter section has three controls: Frequency, Q and Gain Knobs. * LF The Low Filter sections has three control : Frequency Knob, Gain Knob, and Bell/Shelf Switch. * The Bell Switch toggles the Filter between a Bell and a Shelf. Filter The Filter Frequency Knob controls the frequency of the High-Pass Filter. When set to "Out", the High-Pass is disabled. * Clicking on the frequency value labels will snap the Frequency Knob to the indicated value.

38 Virtual Mix Rack - User Guide 38 Virtual Console Collection The Virtual Console Collection consists of two modules: Virtual Channel and Virtual Mixbuss. Each module allows the user to choose from one of six meticulously modeled consoles. The Virtual Channel was designed for use on individual mixing channels, while the Virtual Mixbuss should be the first module insert of the master fader. When using the Virtual Console Collection across a mix, your DAW takes on the personality of a real analog mixing desk. The imaging and depth improves, instruments sit better in the frequency spectrum, and mixing becomes easier and more musical. You can even push the DAW faders up to find each mixer's "sweet spot. VU Meter The VU Meter displays the RMS level of the signal just after the Console and before the Output gain. The meter is calibrated to display 0VU when being fed by a 1kHz sine wave with a peak level of -18dBFS by default. You can recalibrate this level by adjusting the screw below *. Clip-LED The VCC Channel and Mixbuss are saturation modules. Above a certain input level proper to each consoles, the algorithm starts clipping, which means more saturation and non-linearities. As soon as the signal gets above the Clip Threshold, the Clip-LED lights. Thus, you can easily visualize how the signal behaves in the console. Input & Output Trim Input Trim adjusts the level pre-processing. Increasing the Input Trim will allow you to hit the Channel or Mixbuss harder. Boosting the Input Trim will have a different effect than boosting the Console Drive. Output Trim adjusts the level post-processing, which is useful for gain staging into following VMR modules. * The meter calibration is a shared setting affecting all Output VU Meters of VMR Modules.

39 Virtual Mix Rack - User Guide 39 Group I/O Group I/O allows to isolate the Input and Output section from the Group. Link I/O Link I/O allows for constant gain as the Input or Output Trims are adjusted *. Console Selects between the six console models. Console Drive Increases the nonlinear response of the selected console without increasing the output level. Drive can add more analog response without altering balances. Boosting the Console Drive will have a different effect than boosting the Input Trim. You can reduce the Console Drive level by turning it counterclockwise or add even more tone than before by pushing it all the way to 18! Group Assigns the VCC Channel or Mixbuss module to one of the eight groups. Noise Reduction Disables the modeled noise for each console model. Group Bypass Bypasses processing for the selected group. The Group Bypass state is identical to using the Power Button to bypass the module, but with the benefit of affecting every VCC module in the group. * Input & Output Link is a User Interface (UI) link only and therefore will not work when automation or hardware controllers are modifying the Input or Output Trims.
40 Virtual Mix Rack - User Guide 40 Grouping Groups make using the Virtual Console Collection very simple, quick, and intuitive. At its most basic use, you can just set all VCC Channels and the Mixbuss to the same group, emulating mixing through one console. You could also use several groups and make your own hybrid console! Grouped Parameters Input and Output Input / Output Link Console Console Drive Noise Reduction Grouping Operations Below are some rules that explain how grouping works with the VCC modules: When a VCC module is ungrouped, then the module uses the it s own settings. When a VCC module is grouped, then the module uses the Group s Settings. When a VCC module is joining an empty group, then the module keeps it s own settings, and applies it to the group. When a VCC module is joining an occupied group, then the module takes on the settings of the group. When a VCC module becomes ungrouped, then the module keeps it s last known settings. Tips Each Group label around the Group knob is clickable, allowing the user to directly select a Group, without having to scroll through the intermediate Groups. The Group s Tooltips allow you to select a Group simply by typing the Group number.
41 Virtual Mix Rack - User Guide 41 The Consoles Every console has been optimized so that it matches the original tone of its analog counterpart with absolute precision. In most of the consoles, you'll likely not hear a difference. However, the US-A and RC-Tube models were modified to match some new reference units that we obtained, and while the changes are very subtle, we think they are for the better and hope you'll agree! Brit 4k E This console models an early 80's British mixing desk that we were told about by many local LA engineers who were fans of the console's uniquely fat tone. This desk has a tight but punchy low end, warm low mid, and punchy and present mids. You can really hit the mix buss hard (do this either by pushing the faders into it OR by using the new input/out link), and it gives you an amazing saturation and makes transients sit in the mix much better. Brit N Discrete This classic desk has been a staple of the recording industry for over thirty years. Known for a rich, fat, and warm sound, it can add some classic vibe to your mixes. Brit 4k The most popular mixing console in the industry, this desk has a clean, punchy, wide, and slightly aggressive quality that has made it the go-to desk for rock, pop, metal, and hip hop. Push it hard to get some extra grit to the transients. US A Discrete One of the most sought after desks in the industry, this American made discrete console is known for a thick and fat tone with lots of vibe and midrange punch. Ψ Another classic British console, this desk is known for being the ultimate rock desk, with a wide soundstage, smooth highs, and fat low end. Push it hard for some extra fatness. RC-Tube The RC-Tube is based on a 50's, all tube broadcast desk. It has a super thick midrange, smooth high end, and fat and warm bottom end.
42 Virtual Mix Rack - User Guide 42 RC-Tube License & Feature Set RC-Tube is a feature-limited version of the Virtual Console Collection. If you have an RC-Tube license instead of a Virtual Console Collection license, the VCC Bundle modules will operate as follows: Console Models Brit 4k E, Brit 4k G, US A, Brit N, and Ψ will be dimmed. Console Models Brit 4k E, Brit 4k G, US A, Brit N, and Ψ may be selected, however, the VU Meter will not move and the selected Console will have no effect on the signal. The RC-Tube Console Model will not be dimmed and will process the signal when selected. If you purchase a Virtual Console Collection license, there s no need to install additional software; simply move the Virtual Console Collection license to your ilok 2 dongle and all Console Models will be unlocked!
43 Virtual Mix Rack - User Guide 43 Custom Series Bundle Custom Series EQ Introduction Shortly after the release of the Virtual Mix Rack last November, I found myself sitting in my Los Angeles studio staring at a rack of some of the industry s finest analog equalizers. Some I had bought, some I had borrowed, some I had rented, but it didn t matter, because on that day they were all mine. My objective was straightforward, but it was not easy. I was going to patch in all of the EQs and use them on a few dozen reference mixes so that I could understand which would be the most complimentary to the two classic EQ s that we already have in the Virtual Mix Rack, the FG-N and FG-S. But what ended up happening was way beyond what I had in mind... I started combining multiple EQ s on various tracks to form hybrid equalization sounds that I found to be superior to any single EQ. Within a month, I had developed the concept of an EQ where every single band s boost and cut was customized with combinations of the best analog filters so that it could be the most musical and intuitive tone shaping processor for modern audio production. The Custom Series Equalizer was born.
44 Virtual Mix Rack - User Guide 44 Boosts So many equalizers have the same behaviour throughout their entire spectrum. The curve style and nonlinear sound of all the filter bands are clones of one another. But I began to realize that for the perfect EQ, this did not make sense. To make the most intuitive and musical equalizer that would be best suited for a wide variety of sources, the boosts would have to all be unique to their specific job and role. Each boost filter would have to be customized. Boosting the Highs For high end boosts, the goal is clarity, depth, and musical sheen. I noticed that I could achieve a lot of these aspects with a famous tube EQ boost on the highs. It was so smooth and lush. But then I started adding a bit of an old mastering eq on the highs to combine it with the tube eq to make a hybrid boost. This was an even more magnificent sound on both individual tracks and full mixes. Boosting the Upper Mids I realized that for upper mids, I wanted something broad and present that wouldn t have the nasal and honky sound that I d experienced in some other EQ s. So by combining some of the upper bands of some discrete analog EQs, I made yet another unique tone that became my new standard for what an upper midrange boost should sound like. Boosting the Low Mids For the low mids, I found that combining another old tube EQ and a solid state American EQ gave me a boost that was warm and thick, but not too boxy. It could add body without adding mud. Boosting the Lows Finally, on the lows, I combined the boost of two different mastering EQs and after a week of tweaking the proportional gains and setting the ideal bandwidths, I created one of the most perfect sounding low filters I ve ever heard. It was massive, punchy, and deep, yet focused and clear.
45 Virtual Mix Rack - User Guide 45 Cuts After working on boosts, I began to use a transparent modern mastering EQ to experiment with cuts. My goal was to create attenuation shapes that accomplished exactly what most people are looking for when cutting frequencies, which is to remove the bad aspects of the sound that you dislike, without removing the aspects of the sound you DO like! Cutting the Highs For high end cuts, you want to attenuate the thinness and tinny aspects of the source, but not dull it. I was able to create a shape that could do this quite elegantly and musically. Cutting the Upper Mids The upper mid cut is very important, because you want to take out the honkiness and nasal sounds without losing impact and presence. Again, after a lot of work, I figured a way to accomplish this harmonious compromise. Cutting the Low Mids and Lows For the low mids and lows, you want to remove the boxiness but not the warmth. And for lows, you want to remove the boominess but not the body. Using customized curves, I was able to figure out the perfect method to meet these goals.
46 Virtual Mix Rack - User Guide 46 Creating the Custom Series EQ Once I had the entire topology complete in the analog domain, the Slate Digital team and I carefully recreated the exact tonality and function of this extremely hybrid equalizer in digital form, with precise attention being paid to every musical detail. This attention was especially crucial when dealing with the range and proportions of the the hybrid filters and their unique harmonics. When all was done, I had created what many of my trusted industry colleagues are calling the ALL STAR of equalizers. Every cut and boost is inspired by classic analog equalizers in unique proportional combinations, with a custom harmonic profile to give each band the perfect musical tone.you re going to hear smooth and clear highs, present and punchy mids, warm low mids, and massive lows that stay focused and clear. Each band contains three fixed frequency settings, and due to the wide tonal shape of the filters, this covers a lot of ground. This is by no means a surgical EQ! And then to top it all off, we added some extremely slick high and low pass filters. Conclusion Overall, the Custom Series EQ is the ultimate companion to the FG-N and FG-S. Whereas these two existing VMR EQs are strong, bold, and loaded with character, the Custom Series EQ can be more slick, cohesive, and broad. On light boosts it can sound so natural that it doesn t sound like the track has ever been EQ d. On stronger boosts, it can add a beautiful color and character without sounding artificial or overdone. It is truly, the All Star of equalizers!
47 Virtual Mix Rack - User Guide 47 Custom Series Lift Introduction The story of the Custom Series Lift also begins with that same rack of analog equalizers. As I began pulling up old mixes so that I could have some fresh tracks to hear the EQs on, I suddenly realized something that seems so obvious now. A lot of tracks, and even full mixes, required a pretty universal processing: They needed to be brighter and more present in the mix, fatter and deeper in the mix, or a bit of both. I began using some of our analog modeled filter algorithms to create a series of high end and low end parallel curves that had custom output stages using musical harmonic profiles. Eventually, I ended up with two curves, one which lifted the entire upper frequencies in a natural and musical way, and the other that lifted the entire low end frequencies, also in a very natural and musical way. I started using these two Lift processes on some tracks and was stunned at the results. With one knob, I could accomplish my processing goals instantly. I had a snare drum that was a bit dull and boxy. Adding some Hi Lift added sizzle and upper midrange punch, and some Low Lift added the perfect weight and body. Soon I tweaked each of the LIFTs so that there were two unique options for each one.
48 Virtual Mix Rack - User Guide 48 Hi Lift Present This effect focuses a bit more on lifting upper midrange frequencies and contains customized harmonics for amazing presence and impact. It sounds wonderful on drums, vocals, guitars, bass, and full mixes. Hi Lift Silky This effect focuses a bit more on the higher silky frequencies and adds the perfect clarity and depth. Acoustics, vocals, and full mixes can all benefit from this effect. Low Lift Big This effect adds a solid fat weight to the lows in an even and broad stroke. Anything that needs to be bigger and fatter will be the perfect match from this effect. Low Lift Punchy This effect has a bit more of a defined resonance and will add amazing punch to the lows. It s incredible on drums, full mixes, and electronic music. Conclusion Overall, the Custom Series Lift is going to be another amazing tool for your virtual analog arsenal that will get your ideas out faster and more intuitively, using only one knob to accomplish major audio tasks. I hope you use them to make the best sounding music of your career. Happy Mixing!

49 Virtual Mix Rack - User Guide 49 FG-Bomber Introduction One of the qualities of a great mix is its ability to transcend the music out of the 2 dimensional speakers, and to transcend it into the listening space, creating a 3D impact that allows the listener to feel like he or she has become part of the music. This 3D quality has always been one of the most difficult to achieve, but pro engineers have accomplished it with clever use of compression, eq, and fx. But at Slate Digital, we decided to decode the mystery once and for all. And so with the use of all of our analog know-how and expertise, we created a process that with only three knobs, can increase impact and dimension, enhance energy and liveliness, improve front to back depth, add tons of punch, and make sounds explode out of your speakers. And that s why we call it the FG-BOMBER. The FG-BOMBER has the most complex internal circuit path of any plugin we ve created. To get its unique effect, it combines all analog modeled transient processing, dynamic frequency manipulation, specialized compression, tube saturation, harmonic generation, filtering there is a ton behind the scenes. But we ve condensed all of these processes into a simple interface with just four knobs. Drive The Drive sets the level that is sent to the processing network. We ve set a marking on the Bomber meter (the little bomb icon) so that you can set the internal level in a way that is most optimized for the intended effect, but of course you can get great tone if you experiment beyond this level. Intensity The Intensity parameter adjusts how much of the effect is mixed in with the signal, and can be as little as a few percent to add some extra imaging to full masters, or cranked to create unique effects for drum mics and vocals. Tone The Tone parameter changes the character of the effect. Present focuses the effect on the mid frequencies, and will increase the transient impact sometimes dramatically, as well as extend the sustain and width. Fat will also increase the transient impact and depth in a lush and fat way where the low end will become bigger and wider. Tight is the most evenly balanced of the three tone settings, and will add clarity, punch, and tightness to the lows.
50 Virtual Mix Rack - User Guide 50 Output Trim Finally, an output trim controls the overall output of the entire module. Metering The Meter is monitoring the input signal after the Drive. Its goal is to show, through the bomb icon which corresponding to the sweet spot, how hot the signal should enter the effect for it to sound good. Getting Started with FG-Bomber Drum buss You may want to remove some compression if you have it on, just so you can really get to know the effect first. Note that it can work in conjunction with drum buss compression. Put it on Fat, adjust Drive so that it s peaking at Bomb, and slowly mix in the intensity. IMPORTANT, depending on the source material, it could be a very strong effect so sometimes it only needs a very little bit of intensity to make things sound amazing. But other times blending the effect in heavily can sound really huge. I have a really cool example where I recorded a drum-kit with ONE mic in front of the kit. Using Bomber on Present, I was able to make it sound like I had close mics on the kit too, it was pretty incredible. Mixes/Masters Here I would probably use Fat or Tight, and a little goes a long way. Hit the Bomb icon on the meter, and then slowly blend it in. You ll notice the mix starts to take on a more 3D effect, the percussion gets punchier, the vocal gets clearer. For Mastering when you are hitting a limiter that is crushing the impact of the mix, Bomber can pre-compensate in a way that makes everything sound just like the mix. Vocals Bomber can make the vocals sound much more articulate and clear. This is especially true when you compress a vocal first to make it sit in the mix. Sometimes the consonances of the words become a bit muffled, and Bomber can bring it back. Try it on Present and see if that makes the vocal pop, and again, sometimes all it takes is just a little turn of the intensity knob for it to work. Bass Bomber can make a bass sound incredible. Try it post compression on the present setting, and in this case play with the Drive and Intensity to see where it makes the bass pop out in an expressive way. Playing with Drive / Intensity Interaction The Drive and Intensity are very interactive. Get to know how they play off each other. You can decrease the percussiveness of the effect by overloading the drive
51 Virtual Mix Rack - User Guide 51 past the Bomb icon, and then compensating with less (but sometimes more!) Intensity. Conclusion The FG-BOMBER can be used to enhance the impact and dimension of any track or mix. Used with low intensity, it can be the perfect process to wake up a mix that needs some more excitement. On vocals, it can increase the clarity of the words, and make the vocals stand out more in busy mixes. For drums, it can be used on the buss to make them more punchy, lively, and deep. Overall, the FG-BOMBER will be the perfect companion to your other Slate Digital tools, and will ensure your mixes stand out above the rest!

52 Virtual Mix Rack - User Guide 52 Virtual Preamp Collection The Virtual Preamp Collection brings the authentic tone of two of the audio industry s most classic microphone preamplifiers to your digital audio workstation. Each preamp uses state of the art analog modeling technology to recreate every aspect of the preamp circuit from mild coloration to full on saturation and distortion. The Virtual Preamp Collection or VPC was originally designed to be used with the VMS-1 Hardware Mic Pre, but it can be used with any clean sounding preamp to add extra vibe. VPC can also add real analog preamp tone to any track or mix, and even create rich sounding distortion effects. FG-73 The FG-73 preamp module is modeled after one of the most famous British discrete solid state preamps in the audio industry that has been used on countless recordings. It has a bold, present, and warm sound that sounds great on any audio source and even full mixes. Bulb The Bulb indicates the amount of saturation applied to the input signal. It will begin to light up at the first point of saturation and glow even brighter as the input level or Virtual Drive is increased. Virtual Drive The Virtual Drive knob simulates the action of increasing the amplifier input gain while automatically decreasing an internal output trim, so it can set the gain staging of the preamp easily. For most color and tone effects, the left part of the knob should be used. For more saturation and full on distortion, the virtual drive can be pushed to the right side or even fully cranked. Trim & Phase Reverse The Trim Control is an output gain control. The Phase Reverse switch is very classical: in Mono and Stereo, it flips the signal s polarity for all channels, right after the input, before entering the preamp algorithm.

53 Virtual Mix Rack - User Guide 53 FG-76 This FG76 preamp module is modeled after a classic vintage tube preamp that has been used on many classic recordings. It has a thick, warm, and colorful tone that can make tracks and mixes sound more alive. The bottom end saturates in a very unique and musical way, making it a great module for bass guitar and kick drum tracks. Bulb The Bulb indicates the amount of saturation applied to the input signal. It will begin to light up at the first point of saturation and glow even brighter as the input level or Virtual Drive is increased. Virtual Drive The Virtual Drive knob simulates the action of increasing the amplifier input gain while automatically decreasing an internal output trim, so it can set the gain staging of the preamp easily. For most color and tone effects, the left part of the knob should be used. For more saturation and full on distortion, the virtual drive can be pushed to the right side or even fully cranked. Trim & Phase Reverse The Trim Control is an output gain control. The Phase Reverse switch is very classical: in Mono and Stereo, it flips the signal s polarity for all channels, right after the input, before entering the preamp algorithm.
54 Virtual Mix Rack - User Guide 54 Air and Earth Modules The Air and Earth modules bring two of the easiest to use and best sounding features from Eiosis AirEQ. Air is a smooth and silky high frequency adjustment. It can be used on any track in order to bring back some life and breathe, it will never sound harsh or unnatural. Air has been designed to work on all types of audio material, and can be combined with the included HiCut filter as well! For instance, you can boost the Air to add smooth clarity to the signal and use the HiCut filter if the sound is too crisp. Air is very different from a high frequency shelving filter that is usually used for that purpose, it s way smoother as the frequency response is adjusted so that the changes in the sound when using the knob are always very steady and predictable. Earth can be described as an adjustable transformer; its special phase design makes the sound tight and punchy. It s great to add sub lows, without adding any boominess. Because of its special phase behavior, the Earth is great to be used with the LoCut filter the same way as a Pultec equalizer: turn the Earth all the way up, and bring down the bass by using the 6dB to 24dB/oct LoCut filter. This way, you can take advantage of the very specific Earth sound, and adjust the bass amount with the LoCut filter. The Earth filter has been designed to be heard on any type of transducer, so it s great to add some extra low end that can be heard even on headphones, in a way that will always sound good in any situation or with any kind of track, without adding unpleasant peaks or very boomy resonances. Using negative values of Earth can also be useful if you want to remove sub lows that are too loud. It will retain the punch and presence of the bass while removing the unnecessary low frequencies that could make make the sound muddy.
55 Virtual Mix Rack - User Guide 55 AirEQ Air Air is a new type of filter that helps you to restore or to add brightness to the sound, while always remaining natural. It allows to gently add high frequencies, without adding harshness or unpleasant digital artifacts. The smoothness of the Air allows you to bring an instrument to the front of a mix, add a subtle brilliance to a sound or to make a vocal track breathe, simply by increasing Air. Always natural and smooth, this band has been designed specifically to allow very smooth high frequency boosts, in a region of the audio spectrum where harshness can be quickly obtained. HiCut The HiCut is useful for attenuating frequencies above the cutoff frequency. Unlike many digital equalizers, the Air module s HiCut filter is perfectly matched to an analog filter curve. This is very important in order to achieve a natural attenuation in the high frequencies. Freq Adjusts the filter s cutoff frequency. Q Adjusts the resonance at the cutoff frequency. Slope Determines how quickly frequencies above the cutoff are attenuated. Select between 6dB - 36dB per octave.
56 Virtual Mix Rack - User Guide 56 AirEQ Earth Earth brings deep and solid sub-lows. It can be described as an adjustable transformer. Inspired by real transformer behavior, it is now accessible with an easy, one-knob adjustment. The result is always a tight and precise bass sound, exempt of muddiness and nonlinearities. Being all linear in amplitude (i.e. without distortion or harmonics) is very useful to adjust bass in a levelindependent manner, without adding anything to the sound but what already exists in the signal. The Earth is very useful to quickly add some consistent sub-lows to tracks like kick drums and bass. However, it can be useful in many other situations, like sound effects, or any situation when you need to make a track deeper or more powerful. LowCut The LowCut is useful for attenuating frequencies below the cutoff frequency. Freq Adjusts the filter s cutoff frequency. Q Adjusts the resonance at the cutoff frequency. Slope Determines how quickly frequencies above the cutoff are attenuated. Select between 6dB - 36dB per octave.
57 Virtual Mix Rack - User Guide 57 FG-116 Blue Series The FG-116 Blue Series offer a wide variety of analog modeled dynamic processing flavors in the form of two Virtual Mix Rack Modules. FG-116 Vintage FG-116 Blue Vintage recreates the sound of two rev A FET compressors. Both compressors sound rich, colorful, and musical. Circuit 1 has the classic mid forward character that has made the blue striped FET compressors so famous. It adds a wonderful coloration to the upper mids especially, and adds a warm presence to vocals, bass, drums, and guitars. Compared to the Black 116, it will have a softer top and bottom end, and more articulate transients due to the harmonic distortion in the midrange. Circuit 2 is modeled after a rev A unit that had been updated and refurbished, and had a very unique and musical sound. Compared to Circuit 1, this model has much bigger lows and smoother mids and highs, making it sound quite stunning on drum room mics as well as vocals that need to have more bigness and don t require the midrange push of Circuit 1. Both Circuits have a Hi Pass Detective Filter that prevents low frequency content from triggering compression, which can sound really musical on a drum buss. Finally, the Mix/Knob allows you to parallel compress right inside the module, which is an ideal way to use this type of compression. NOTES: Remember, the magic sound of this compressor really lies in the release. Many top mixers keep the release all the way to the right (fastest) which makes everything that goes through the limiter much more forward, aggressive and exciting. The attack time on this compressor is very fast even on it s slowest setting which means it s always going to attenuate some of the source transient, but you ll be able to tailor the attack time depending on the desired effect. The attack fully to the right (fastest) will obliterate the transient completely. I would recommend starting out with the slowest attack and fastest release and then tweaking from there. Don t be afraid to over-compress and dial back the mix knob!
58 Virtual Mix Rack - User Guide 58 GR Meter Displays the amount of compression in db. Input / Output * Increasing your Input Gain will result in more compression. To compensate the gain reduction introduced, use the Output Gain. Ratio Sets the amount of gain reduction. For example, if the ratio is set to 4:1: this means for input level 4dB over the threshold, 1dB will be output. Attack Controls the speed at which compression occurs after the signal has exceeded the threshold value. Turn clockwise for a fast attack, and counterclockwise for a slow attack. Shift+Click the Attack knob to turn compression on and off. When set to off, the unit will bypass the compression, while continuing to process with the Input and Output Gains. This allows you to impart some nice transformer saturation, without reducing the dynamic range of the track. Release Controls the speed at which compression stops, once the signal has fallen below the threshold value. Turn clockwise for a fast release, and counterclockwise for a slow release. Circuit Toggles between the two circuits. High Pass Filter Adds a high pass filter to the compressors sidechain. Mix Controls the blend between the compressed and uncompressed signals, which is very useful to achieve parallel compression without any additional routing. * Moving the Input or Output Knob while holding the Shift key will inversely link the two controls. It is very useful in Attack OFF mode to use the module as a line driver.
59 Virtual Mix Rack - User Guide 59 FG-116 Modern FG-116 Blue Modern is a custom revision of the classic FET compressor that offers two unique circuits that blend the old school tone with new school topology. The output transformers have been cleaned up so that it will have no output saturation, and the attack has been decoupled from the release so that it can be set much slower than the hardware for more transient articulation. Both circuits of the Blue Modern sound hifi, punchy, musical, and yet, they still can achieve the classic aggressive tone that makes the FET compressors so famous. Circuit 1 is somewhat similar to the Vintage in that it will have a bit of a forward sounding character, but it is much cleaner and more pristine. The attack is slow enough that this compressor can sound amazing on close drum mics with the slowest attack and fastest release. Try it on a snare to bring out the punch while extending the decay. The mix knob works great in this situation where you can slightly over-compress and dial it back. On bass you can get a very edgy sound on this same setting. By backing down the release you ll start to tighten up the sound which can be great on kick drum. Circuit 2 will have a more breathable and punchy low end and overall smoother response on the top end. It sounds amazing on drum buss with the Hi Pass filter engaged, and even full mixes can really benefit from this musical compressor! Yes, with the Blue Modern, with the attack on the slowest and release on fastest, then with the HP filter on, you can use it on full mix and compress about 10db, then back off the mix knob to about 25% for a seriously incredible energy and excitement.. Even in combination with another mix buss compressor like FG-Grey or FG-Red. This setting will be really great on a lot of mix material in all genres.. Try it on electronic drum beats too to make them pound out of the speakers. Overall, there is a lot to explore with these two processors. I hope you enjoy the many musical flavors that they will give your mixes! Happy Mixing! Steven Slate

60 Virtual Mix Rack - User Guide 60 GR Meter Displays the amount of compression in db. Input / Output * Increasing your Input Gain will result in more compression. To compensate the gain reduction introduced, use the Output Gain. Ratio Sets the amount of gain reduction. For example, if the ratio is set to 4:1: this means for input level 4dB over the threshold, 1dB will be output. Attack Controls the speed at which compression occurs after the signal has exceeded the threshold value. Turn clockwise for a fast attack, and counterclockwise for a slow attack. Shift+Click the Attack knob to turn compression on and off. When set to off, the unit will bypass the compression, while continuing to process with the Input and Output Gains. This allows you to impart some nice transformer saturation, without reducing the dynamic range of the track. Release Controls the speed at which compression stops, once the signal has fallen below the threshold value. Turn clockwise for a fast release, and counterclockwise for a slow release. Circuit Toggles between the two circuits. High Pass Filter Adds a high pass filter to the compressors sidechain. Mix Controls the blend between the compressed and uncompressed signals, which is very useful to achieve parallel compression without any additional routing. * Moving the Input or Output Knob while holding the Shift key will inversely link the two controls. It is very useful in Attack OFF mode to use the module as a line driver.
61 Virtual Mix Rack - User Guide 61 The Monster Check this out, said Jeff, the engineer at a small recording studio built into a garage in my home town of Westfield, NJ. Jeff proceeded to press all the buttons in on his vintage FET compressor, and then raised the fader on his Mackie 8 Buss mixer. The drums, which were once neat, tight, and slappy, were now big explosive cannons! It was a really cool moment that has stayed in my memory ever since (in comparison, I have no clue what I ate for breakfast this morning). The ALL BUTTONS IN effect is famous no actually it s infamous. The sound is big, it s rude, it s extreme, it s over the top, and when it finds the right source, it creates a monstrous tone that slams out of a mix. And that s why we call this plugin that recreates that infamous tone, THE MONSTER. But the Slate Digital MONSTER isn t content just being a classic emulation of the ALL BUTTONS IN.. no it takes the sound into the 21st Century, with newly added features such as high and low frequency sidechain manipulation, attack processing to add more punch but keep the legendary sustain, and a mix knob to parallel compress right inside the processor. So go ahead, abuse your tracks with THE MONSTER, and create new and unique sounds that will have people ducking for cover. This MONSTER has some BITE!! Steven Slate

62 Virtual Mix Rack - User Guide 62 GR Meter Displays the amount of the compression in db. Attack Controls the speed at which compression occurs after the signal has exceeded the threshold value. Turn clockwise for a fast attack, and counterclockwise for a slow attack. Release Controls the speed at which compression stops, once the signal has fallen below the threshold value. Turn clockwise for a fast release, and counterclockwise for a slow release. Input / Output Increasing your Input Gain will result in more compression. To compensate the gain reduction introduced, use the Output Gain. Moving the Input or Output Knob while holding the Shift key will inversely link the two controls. Punch Enables an additional attack for adding more impact to transients. High Pass Filter Adds a high pass filter to the compressors sidechain. High Frequency Detection Pushes a high frequency bell filter into the sidechain to mellow highs. Mix Controls the blend between the compressed and uncompressed signals, which is very useful to achieve parallel compression without any additional routing.

63 Virtual Mix Rack - User Guide 63 Virtual Tube Collection The Slate Digital VIRTUAL TUBE COLLECTION is a set of three plugins for Virtual Mix Rack that recreate the sound of classic vintage tube circuits. Each module can act as a preamp, a saturator, and even a virtual tube summing console. Using VTC, you can add color, warmth, depth, and vibe to your mixes and masters. VMS users can also use VTC preamps with the microphone models for rich and vibey tone on their tracks. The Modules London is inspired by some vintage tube circuits originating from Europe. The sound is big, warm and bold in the lows and low mids, and slightly smooth in the top end. The transient response has a subtle thickness to it without being overly aggressive. London sounds amazing for fattening up tracks in preamp mode, or thickening things up with it s preamp saturation, and can add fat analog body in Console mode on the whole mix.
64 Virtual Mix Rack - User Guide 64 New York is inspired by some vintage tube circuits with a hint of inspiration from some New York solid state discrete circuits to give it tightness and impact. New York is aggressive in the mids, and tighter in the lows due its unique dynamic harmonic saturation. It can add incredible focus and punch to tracks in preamp mode, especially in push mode. It s also an all around winner for many genres in console mode when used on the master fader. You really dial in the saturation with New York and then find the perfect blend with the mix knob. Hollywood is perhaps the most colorful of the three modules, and it has got some beautiful air, depth, excitement, and some really big bottom! Use it on push mode and make your tracks come alive. It s fantastic when paired with some of the vintage VMS mics to add some extra top end flavor and warm lows. In console mode, it can simply transform a lifeless into something larger than life. Features VU Meter The VU Meter displays the RMS level of the signal at the Output of the module, i.e., after the Mix. The meter is calibrated to display 0VU when being fed by a 1kHz sine wave with a peak level of -18dBFS by default. You can recalibrate this level by adjusting the screw below *. Clipping Bulb The Bulb indicates the amount of clipping applied to the input signal. It will begin to light up at the first point of clipping and glow even brighter as the input level or Saturation is increased. Mode (Preamp/Console) This chooses which algorithm is selected in each VTC module. Preamp models a tube preamp circuit, and therefore the saturation will emulate cranking the input amplifier while attenuating an output trim. In Console mode, the module emulates a tube summing circuit including unique crosstalk and saturation properties. Color (Normal/Push) In Normal mode, the Module recreates realistic properties of the studied tube circuits. Push amplifies these nonlinearities to add even more expression, color, and vibe. * The meter calibration is a shared setting affecting all Output VU Meters of VMR Modules.
65 Virtual Mix Rack - User Guide 65 Saturation In Preamp Mode, this will emulate the tone of preamp saturation. For most audio sources, this will be more subtle up to 12 o clock, and then start to get more severe, likely ending up in rich tube distortion. In Console Mode, the saturation replicates mix buss overdrive (such as when you push faders hot into the master section of the console), so it is more forgiving and can add a thick, glued, colorful tone when pushed. High Pass Filter When used as a preamp to enhance the tone of clean preamps, the 6db/oct hi pass can clean up low rumble if needed. Output Gain Controls the output level of the processor. Mix This controls the balance between the dry unprocessed signal and the wet processed signal. This parameter is great when using preamp mode to add some thick distortion (like to a snare drum or vocal), and then blending the distortion back. Example Uses Use Preamp with Push across tracks to add vibe and color and remove digital cleanliness. Use Console as first insert on mixbuss with a bit of saturation to add weight, glue, and analog color to whole mix. Use Preamp or Console saturation on drums, vocals, guitar, keys. Use Preamp distortion with mix knob to add thickness and warmth to tracks like vocals, snare, toms, drum buss, or even whole mix. Use Console saturation in mastering chain to reduce peaks in a warm and punchy way.
66 Virtual Mix Rack - User Guide 66 FG-Stress I remember when the Distressor came out in the late nineties. Word of this compressor chameleon spread fast in the audio world, and as I sat in the studio lounge reading the now infamous review in Mix Magazine that claimed that this box could sound like so many classics, I thought to myself: I need to hear this thing. I got my wish rather quickly. The studio I interned at ended up getting a pair of them since they were more affordable than most vintage compressors. The first thing we did was put them on room mics on the nuke setting, fast attack, fast release a job previously accomplished by some 1176s. Well, the 1176s retired on drum mic duty that day. Then we put one of them on a vocal, 4:1, medium attack, fast release, hi pass on, and the peak filter in the detection. Bam vocal sounded rich, fat, and in your face without those pressing upper mids. We tossed it on 10:1 with the famous opto settings, and it made a bass guitar sing through the mix. We put it on 3:1 for some kick and snare, and it added punch, sustain, and tightness without even sounding compressed. Quickly we realized that every ratio brought on a new and unique sounding compressor. Add in all the options like the 2nd and 3rd Harmonic Distortion Generators, sidechain options, and signal path options, and there really wasn t anything the Distressor couldn t handle. So it brings us great joy to announce the Slate Digital FG-Stress, a precise digital replication of this incredible piece of technology that is licensed from Empirical Labs. And let me tell, the journey to get here has not been easy. The FG-Stress development was the most challenging development in company history. It was equal to developing eight different compressor plugins with their own characteristics. Then factor in all of the extra options such as the distortion modes, and the fact that the Distressor is a feedback design where so much of the circuitry dynamically interacts and you have one hell of a complex design! But after a strenuous two year development, we did it. And here is where I must explain the we. Slate Digital is widely known for its two founders, myself and Fabrice Gabriel, but the FG-Stress is a result of our incredible development team who work tirelessly behind the scenes. These geniuses should receive the accolades that they rightfully deserve, so it is my privilege and honor to give a special thanks to Raphael, Romain, and Francois for their tireless work.
67 Virtual Mix Rack - User Guide 67 You re going to love the FG-Stress just as engineers all around the globe love the Distressor. And so on behalf of the whole team here at Slate Digital, we hope you make some killer mixes! Steven Slate

68 Virtual Mix Rack - User Guide 68 FG-Stress Controls The FG-Stress module offers all the controls from the EL8 Distressor, plus an additional Mix knob to blend between dry and wet signals. Input Input Gain before the compressor, going from 0 to Increasing this parameter will result in more compression. Default value is 5. Attack Controls the speed at which compression occurs after the signal has exceeded the threshold value. Attack time goes from 0 to 10.5, with default value at 5. Release Controls the speed at which compression stops, once the signal has fallen below the threshold value. Release time goes from 0 to 10.5, with default value at 5. Output Output Gain after the compressor, going from 0 to Use this parameter to compensate the gain reduction introduced by the compression. Default value is 6.5. Ratio Ratio defines the amount of gain reduction. For example, if the Ratio is set to 4:1, this means for input level 4dB over the threshold, 1dB will be output. Default Ratio is 6. NUKE Ratio has a limiting curve, meaning that any input level over the threshold will be clipped. Shortcuts Moving the Input or Output Knob while holding the Shift key inversely links the two controls. It is very useful with 1:1 Ratio to use the module as a line driver. Switch to higher Ratios by left-clicking on the Ratio button Switch to lower Ratios by right-clicking on the Ratio button Switch to any Ratios by clicking on the Ratio LED Trigger the Opto Mode (Attack 10 and Release 0) by holding the Shift key when clicking on the Ratio 10:1 LED
69 Virtual Mix Rack - User Guide 69 Detector Activate one of these detector modes to modify the sidechain signal: HP: Add a 86 Hz high-pass (6dB/oct) to stop low frequency modulation. Bell: Push a 6 khz bell to increase the compression sensitivity in the mids. Link: Combine Left and Right inputs before feeding a single mono signal to the detector, therefore the same GR is applied on Left and Right. Please note that this mode is effective with stereo tracks only. Audio Activate one of these audio modes to modify the overall output signal: HP: Add a 80 Hz high-pass (18dB/oct) to smoothly attenuate lows. Dist 2: Add a 2nd harmonic in the compressed signal. Dist 3: Add a 3rd harmonic in the compressed signal. Please note that Dist 2 and Dist 3 cannot be on at a time, thus 5 states are available: HP HP + Dist 2 Dist 2 Dist 3 HP + Dist 3 Mix Usual Mix knob to blend between dry and wet signals.
70 Virtual Mix Rack - User Guide 70 Visual Indicators GR Meter The GR meter has 16 LEDs and is scaled in db. In Stereo, without Link engaged (true Stereo operation), the GR meter displays the maximum GR of both channels. In other cases (Mono or Stereo + Link), there is only one GR signal so no need to specify. Distortion Indicators REDLINE 1% THD From 0.25% of the Total Harmonic Distortion, the yellow LED 1% THD lights up, and from 3% of the THD, the REDLINE lights up and 1% THD goes off. This indicator is especially useful when the Audio Distortion options are enabled and/ or when the compressor is off (1:1 Ratio).
71 Virtual Mix Rack - User Guide 71 FG-Stress Calibration Procedure The FG-Stress is the perfect replication of its hardware counterpart. If you want to compare the real unit with the FG-Stress, it is crucial that both the analog unit and the FG-Stress algorithm are calibrated the same way. Indeed, the slightest calibration difference can change the sound, and the way that the compressor reacts to the audio. Because the FG-Stress has a feedback structure, the compression is highly dependent on input levels. Program dependence will affect the sound as well, as different audio content change the envelope behavior. Please review the calibration tutorial video here, and follow carefully these steps to properly make the comparison: 1. First, download this package which includes the required audio files for the procedure. 2. Choose a ratio on your hardware unit, we recommend starting with 6:1. 3. Set the parameters to the following: Input 5 / Output 5 Attack Min (0) Release Max (10.5) No filter, no link, no sat, no British mode 4. Play the corresponding ratio calibration file in a session at 96kHz. These files are available in the Calibration Files folder. Route one of the channels of the audio file to one D/A output and to your hardware unit. The 0dBFS of the file must play at 0dBFS out of your converter. Play the file corresponding to the ratio you selected. Loop the first four hits of the calibration file, which is a drum loop with calibrated levels. Adjust the Input knob of the hardware unit in order to read the following values on the gain reduction meter in succession: 10, 9, 8, 7. Make sure to play the loop for at least the 8 full bars of the file. The meter should read 10 on the first kick, 9 on the first snare then 8, then 7. NB: You may end up with different input calibrations for different ratios. This is normal. For example, your calibrated input may be 5.3 for a 6:1 ratio, and 5.5 for a 10:1 ratio. For extra clarification on this process, please reference to the calibration tutorial video.
72 Virtual Mix Rack - User Guide Once you have the input setting per ratio, you must keep the input at that setting and use the file level to determine how much gain reduction you want. 6. You can now process the three audio files we have provided through your hardware unit. You can find those files in the Test Files folder. IMPORTANT: You must only use one of three settings for attack and release: 0 (min.), 5 and 10.5 (max). Potentiometer tolerances vary from unit to unit, so in order to do initial matching, we need to keep it at these values. In addition, you must keep your output level at 5. This will give us a uniform output level to level match to. 7. Record the return of your hardware unit at 96k/24bit. 8. Bounce to a wav file. 9. Be sure to name the file using the following standard: Your Name_Ratio x_detector/audio x_ix_ax_rx_o5. For example: Steven Slate_Ratio 6_Det HP_Aud Dist 3_I5.4_A0_R10.5_O5 Please note that we suggest re-calibrating your input for each ratio. Although you may not have to calibrate for each ratio, some ratios might need to be recalibrated to match our calibration files. 10.Once you have exported your three hardware return files, please upload them using the following link.

73 Virtual Mix Rack - User Guide 73 Audified U73b The U73b is a faithful emulation of a vintage German broadcast compressor/limiter which was often used for mastering between 1960 and It is an all-tube varymu compressor/limiter with adjustable release time option. The circuit has been exactly kept as it was originally designed and only added an input and output gain before and immediately after the compressor circuit to assist with proper adjustment of the compression. GR Meter Displays the amount of compression in db. Please note that the Meter does not react with the Compression Amount parameter. Calibration The Calibration allows you to easily change the operational range of the compressor effect. By increasing its value, the module will require a hotter signal to compress and saturate, and inversely. We suggest to set this parameter to the headroom you use in your DAW recordings or headroom of your audio interface. The default setting is -18 db and it is loaded every time you load the module. High-Pass Filter Adds a High-Pass Filter connected in the compressor/ limiter circuit with around 100 Hz cut-off frequency and 6dB/octave slope. Although this filter helps to create the unique sound of the U73b compressor, the bass roll-off might not be suitable for all instruments when mixing, or for all genres when U73b is used for mastering. Compression Mode The Comp. Mode knob switches between the Compressor and Limiter mode. The Compressor mode has a lower threshold setting and very gentle increasing ratio, in opposite, the Limiter mode provides a higher threshold setting with higher ratio but still with a smooth knee.
74 Virtual Mix Rack - User Guide 74 Release The first three positions offer fixed release time, the other three positions marked with red labels provide adjustable release time dependent on program content. Input/Output Increasing the Input knob will result in more compression. To compensate the gain reduction introduced, use the Output knob. Moving the Input or Output Knob while holding the Shift key will inversely link the two controls. It is very useful to use the module as a line driver when Comp. Amount is null. Compression Amount The Comp. Amount allows you to adjust the compression effect while benefiting the module s saturation and color. Thereby, this is not a dry/wet parameter.

75 Virtual Mix Rack - User Guide 75 ilok Protection 3rd Party ilok License Transfer Fee When reselling any Slate software product, there will be a $10 License Transfer Fee in order for us to process the new customer into our user database. It is the responsibility of the seller to inform the buyer of this fee at the time of sale. Protection Messages and Statuses The Virtual Mix Rack Plugin have two different kinds of Licenses: Rack License Modules/Modules Bundles Licenses During the DAW plugin scan, if you don t have the Rack license on your ilok or if your ilok is unplugged, then you will get this panel: From this panel, by clicking on Activate, you will be able to move the Rack License to your ilok, without using the ilok License Manager.

76 Virtual Mix Rack - User Guide 76 In the DAW session, if you suddenly don t have the Rack License on your ilok or if your ilok is unplugged, then you will get this panel: By activating the Rack License through ilok License Manager or replugging your ilok, this panel will disappear.

77 Virtual Mix Rack - User Guide 77 If you have the Rack License, but then you don t have one specific Module s License on your ilok, then only this Module will be disabled in your Rack, and the Information Panel will display a specific message: If you own the specific Module s License, by clicking on Activate, you will be able to move the Module s License to your ilok, without using ilok License Manager.
CLA MixHub. User Guide
 CLA MixHub User Guide Contents Introduction... 3 Components... 4 Views... 4 Channel View... 5 Bucket View... 6 Quick Start... 7 Interface... 9 Channel View Layout..... 9 Bucket View Layout... 10 Using
1 Prepare to PUNISH! 1.1 System Requirements. Plug-in formats: Qualified DAW & Format Combinations: System requirements: Other requirements:
 Table of Contents 1 Prepare to PUNISH!... 2 1.1 System Requirements... 2 2 Getting Started... 3 2.1 Presets... 3 2.2 Knob Default Values... 5 3 The Punish Knob... 6 3.1 Assigning Parameters to the Punish
WAVES Cobalt Saphira. User Guide
 WAVES Cobalt Saphira TABLE OF CONTENTS Chapter 1 Introduction... 3 1.1 Welcome... 3 1.2 Product Overview... 3 1.3 Components... 5 Chapter 2 Quick Start Guide... 6 Chapter 3 Interface and Controls... 7
Syrah. Flux All 1rights reserved
 Flux 2009. All 1rights reserved - The Creative adaptive-dynamics processor Thank you for using. We hope that you will get good use of the information found in this manual, and to help you getting acquainted
Character Users Guide
 Cha r a c t e r Us e r sgui de Character Users Guide Metric Halo $Revision: 1619 $ Publication date $Date: 2012-02-10 20:41:00-0400 (Friday, 10 Feb 2012) $ Copyright 2011 Metric Halo Table of Contents
AirEQ. Beyond Analog. Designed by Fabrice Gabriel
 Beyond Analog Designed by Fabrice Gabriel www.eiosis.com AirEQ Version 1.1 Fabrice Gabriel: Plugin Design, Algorithm Design and Tuning Romain Moret: Project Management, Development and Optimization Vincent
WAVES H-EQ HYBRID EQUALIZER USER GUIDE
 WAVES H-EQ HYBRID EQUALIZER USER GUIDE TABLE OF CONTENTS CHAPTER 1 INTRODUCTION...3 1.1 WELCOME...3 1.2 PRODUCT OVERVIEW...3 1.3 CONCEPTS AND TERMINOLOGY...4 1.4 COMPONENTS...7 CHAPTER 2 QUICK START GUIDE...8
spiff manual version 1.0 oeksound spiff adaptive transient processor User Manual
 oeksound spiff adaptive transient processor User Manual 1 of 9 Thank you for using spiff! spiff is an adaptive transient tool that cuts or boosts only the frequencies that make up the transient material,
Liquid Mix Plug-in. User Guide FA
 Liquid Mix Plug-in User Guide FA0000-01 1 1. COMPRESSOR SECTION... 3 INPUT LEVEL...3 COMPRESSOR EMULATION SELECT...3 COMPRESSOR ON...3 THRESHOLD...3 RATIO...4 COMPRESSOR GRAPH...4 GAIN REDUCTION METER...5
Eventide Inc. One Alsan Way Little Ferry, NJ
 Copyright 2015, Eventide Inc. P/N: 141257, Rev 2 Eventide is a registered trademark of Eventide Inc. AAX and Pro Tools are trademarks of Avid Technology. Names and logos are used with permission. Audio
OVERLOUD GEMS USER MANUAL
 USER MANUAL Rev. 1.1 TABLE OF CONTENTS INTRODUCTION... 1 WHY GEMS?... 1 MENU BAR... 3 COMP76... 4 EQ495... 6 TAPEDESK... 7 EQ84... 12 LEGAL NOTICE... 14 INTRODUCTION OVERLOUD GEMS is a collection of top
User Manual Tonelux Tilt and Tilt Live
 User Manual Tonelux Tilt and Tilt Live User Manual for Version 1.3.16 Rev. Feb 21, 2013 Softube User Manual 2007-2013. Amp Room is a registered trademark of Softube AB, Sweden. Softube is a registered
Abbey Road TG Mastering Chain User Guide
 Abbey Road TG Mastering Chain User Guide CONTENTS Introduction... 3 About the Abbey Road TG Mastering Chain Plugin... 3 Quick Start... 5 Components... 6 The WaveSystem Toolbar... 6 Interface... 7 Modules
USER S GUIDE DSR-1 DE-ESSER. Plug-in for Mackie Digital Mixers
 USER S GUIDE DSR-1 DE-ESSER Plug-in for Mackie Digital Mixers Iconography This icon identifies a description of how to perform an action with the mouse. This icon identifies a description of how to perform
NOTICE. The information contained in this document is subject to change without notice.
 NOTICE The information contained in this document is subject to change without notice. Toontrack Music AB makes no warranty of any kind with regard to this material, including, but not limited to, the
soothe audio processor Manual and FAQ
 soothe audio processor Manual and FAQ Thank you for using soothe! soothe is a spectral processor for suppressing resonances in the mid and high frequencies. It works by automatically detecting the resonances
OVERLOUD GEMS USER MANUAL
 USER MANUAL Rev. 1.3 TABLE OF CONTENTS INTRODUCTION... 1 WHY GEMS?... 1 MENU BAR... 3 COMP76... 4 EQ495... 6 TAPEDESK... 7 EQ84... 12 DOPAMINE... 14 SCRIBBLES... 16 PREFERENCES... 18 LEGAL NOTICE... 19
DW Drum Enhancer. User Manual Version 1.
 DW Drum Enhancer User Manual Version 1.0 http://audified.com/dwde http://services.audified.com/download/dwde http://services.audified.com/support DW Drum Enhancer Table of contents Introduction 2 What
Eventide Inc. One Alsan Way Little Ferry, NJ
 Copyright 2017, Eventide Inc. P/N: 141236, Rev 4 Eventide is a registered trademark of Eventide Inc. AAX and Pro Tools are trademarks of Avid Technology. Names and logos are used with permission. Audio
Precision DeEsser Users Guide
 Precision DeEsser Users Guide Metric Halo $Revision: 1670 $ Publication date $Date: 2012-05-01 13:50:00-0400 (Tue, 01 May 2012) $ Copyright 2012 Metric Halo. MH Production Bundle, ChannelStrip 3, Character,
TABLE OF CONTENTS TABLE OF CONTENTS TABLE OF CONTENTS. 1 INTRODUCTION 1.1 Foreword 1.2 Credits 1.3 What Is Perfect Drums Player?
 TABLE OF CONTENTS TABLE OF CONTENTS 1 INTRODUCTION 1.1 Foreword 1.2 Credits 1.3 What Is Perfect Drums Player? 2 INSTALLATION 2.1 System Requirments 2.2 Installing Perfect Drums Player on Macintosh 2.3
SPL Analog Code Plug-in Manual
 SPL Analog Code Plug-in Manual EQ Rangers Vol. 1 Manual SPL Analog Code EQ Rangers Plug-in Vol. 1 Native Version (RTAS, AU and VST): Order # 2890 RTAS and TDM Version : Order # 2891 Manual Version 1.0
BRTC-M2 COMPRESSOR. CDSoundMaster BIG ROUND TUBE COMPRESSOR BY MX2 MICHAEL HEILER AND MICHAEL ANGEL
 BRTC-M2 COMPRESSOR CDSoundMaster BIG ROUND TUBE COMPRESSOR BY MX2 MICHAEL HEILER AND MICHAEL ANGEL Manual Index About the BRTC-M2 Installation User Controls Recommended Settings About the BRTC-M2 The BRTC-M2
VoiceStrip for PowerCore Manual. Manual VoiceStrip for PowerCore
 VoiceStrip for PowerCore Manual English Manual VoiceStrip for PowerCore SUPPORT AND CONTACT DETAILS TABLE OF CONTENTS TC SUPPORT INTERACTIVE The TC Support Interactive website www.tcsupport.tc is designed
ACME Audio. Opticom XLA-3 Plugin Manual. Powered by
 ACME Audio Opticom XLA-3 Plugin Manual Powered by Quick Start Install and Authorize your New Plugin: If you do not have an account, register for free on the Plugin Alliance website Double-click the.mpkg
Analog Code MicroPlug Manual. Attacker Plus
 Analog Code MicroPlug Manual Attacker Plus Manual Attacker Plus Analog Code MicroPlug Native Version (AAX, AU and VST) Manual Version 2.0 2/2017 This user s guide contains a description of the product.
+10db Compressor User s Manual. +10db Compressor. User s Manual
 +10db Compressor 1 Intro Thank you for installing +10db Compressor! This plugin is modelled after a very popular analog compressor unit that was built in the 60s, famous for it s ability to give a huge
SPL Analog Code Plug-in Manual
 SPL Analog Code Plug-in Manual EQ Rangers Manual EQ Rangers Analog Code Plug-ins Model Number 2890 Manual Version 2.0 12 /2011 This user s guide contains a description of the product. It in no way represents
BOUNCE. COMPRESSOR with Analog Sound & Digital Transparency USER MANUAL
 BOUNCE COMPRESSOR with Analog Sound & Digital Transparency USER MANUAL BEAT SKILLZ Features: BOUNCE is a transparent yet versatile compressor that can do subtle compression to full thrusting and punchy
Eventide Inc. One Alsan Way Little Ferry, NJ
 Copyright 2017, Eventide Inc. P/N: 141263, Rev 5 Eventide is a registered trademark of Eventide Inc. AAX and Pro Tools are trademarks of Avid Technology. Names and logos are used with permission. Audio
Newfangled Audio Eventide Inc. One Alsan Way Little Ferry, NJ 07643
 Copyright 2016, Newfangled Audio P/N: 141301 Eventide is a registered trademark of Eventide Inc. Newfangled Audio and Elevate are trademarks of Orthogonal Art and Science, LLC. AAX and Pro Tools are trademarks
USER S GUIDE ADX 100. Frequency Conscious Gating, Compression, Limiting, and Expansion. Plug-in for Mackie Digital Mixers
 USER S GUIDE ADX 100 Frequency Conscious Gating, Compression, Limiting, and Expansion TM Plug-in for Mackie Digital Mixers Iconography This icon identifies a description of how to perform an action with
TL AUDIO M4 TUBE CONSOLE
 TL AUDIO M4 TUBE CONSOLE USER MANUAL TL AUDIO M4 TUBE CONSOLE M4 INTRODUCTION... 3 M4 MIXER TECHNICAL SPECIFICATION... 4 Mic Input:... 4 Line Input:... 4 Phase Rev:... 4 High Pass Filter:... 4 Frequency
Lindell 354E User Manual. Lindell 354E. User Manual
 Lindell354EUserManual Lindell 354E User Manual Introduction Congratulation on choosing the Lindell 354E multi band compressor. This plugin faithfully reproduces the behavior and character of the most famous
Reason Overview3. Reason Overview
 Reason Overview3 In this chapter we ll take a quick look around the Reason interface and get an overview of what working in Reason will be like. If Reason is your first music studio, chances are the interface
PLUGIN MANUAL. karacter
 PLUGIN MANUAL karacter Welcome! introduction SYSTEM REQUIREMENTS Please check all information on this topic here: https://plugin-alliance.com/en/systemrequirements.html ACTIVATION Details about the activation
ULN-8 Quick Start Guide
 Metric Halo $Revision: 1671 $ Publication date $Date: 2012-7-21 12:42:12-0400 (Mon, 21 Jul 2012) $ Copyright 2012 Metric Halo Table of Contents 1.... 5 Prepare the unit for use... 5 Connect the ULN-8 to
Scheps Omni Channel User Guide
 Scheps Omni Channel User Guide Scheps Omni Channel Introduction... 3 Startup Condition... 4 Using Presets... 5 Components... 6 Mono Component... 6 Stereo Component... 7 Expanded View... 8 Stereo Mode and
M-16DX 16-Channel Digital Mixer
 M-6DX 6-Channel Digital Mixer Workshop Getting Started with the M-6DX 007 Roland Corporation U.S. All rights reserved. No part of this publication may be reproduced in any form without the written permission
Voxengo Soniformer User Guide
 Version 3.7 http://www.voxengo.com/product/soniformer/ Contents Introduction 3 Features 3 Compatibility 3 User Interface Elements 4 General Information 4 Envelopes 4 Out/In Gain Change 5 Input 6 Output
PLUGIN MANUAL. museq
 PLUGIN MANUAL museq Welcome! introduction SYSTEM REQUIREMENTS Please check all information on this topic here: https://plugin-alliance.com/en/systemrequirements.html ACTIVATION Details about the activation
WAVES Scheps Parallel Particles. User Guide
 WAVES Scheps Parallel Particles TABLE OF CONTENTS Chapter 1 Introduction... 3 1.1 Welcome... 3 1.2 Product Overview... 3 1.3 A Word from Andrew Scheps... 4 1.4 Components... 4 Chapter 2 Quick Start Guide...
User Guide 82S6MC040B
 Drumstrip User Guide 82S6MC040B Contents 1. Introduction 1 Features 1 2. System Requirements 3 Apple Macintosh 3 Windows/PC 3 Plug-in formats 3 3. Installation & Authorisation 4 4. Operational Overview
Dynamic Spectrum Mapper V2 (DSM V2) Plugin Manual
 Plugin Manual") Dynamic Spectrum Mapper V2 (DSM V2) Plugin Manual 1. Introduction. The Dynamic Spectrum Mapper V2 (DSM V2) plugin is intended to provide multi-dimensional control over both the spectral response and dynamic
Dynamic Spectrum Mapper V2 (DSM V2) Plugin Manual 1. Introduction. The Dynamic Spectrum Mapper V2 (DSM V2) plugin is intended to provide multi-dimensional control over both the spectral response and dynamic
USB AUDIO INTERFACE I T
 USB AUDIO INTERFACE EN DE FR ES IT JA Contents Introduction...3 Contents in this Operation Manual... 3 Features... 3 Panel Controls and Terminals (Details)...4 Rear Panel... 4 Front Panel... 6 Panel Controls
bx_townhouse Buss Compressor
 bx_townhouse Buss Compressor Developed by Brainworx and distributed by Plugin Alliance 1 Built in 1978 by the Townhouse maintenance staff from components supplied by Solid State Logic, this is the first
L+R: When engaged the side-chain signals are summed to mono before hitting the threshold detectors meaning that the compressor will be 6dB more sensit
 TK AUDIO BC2-ME Stereo Buss Compressor - Mastering Edition Congratulations on buying the mastering version of one of the most transparent stereo buss compressors ever made; manufactured and hand-assembled
User Manual Tube-Tech ME 1B
 User Manual Tube-Tech ME 1B Rev. Jun 28, 2013 Softube User Manual 2007-2013. Amp Room is a registered trademark of Softube AB, Sweden. Softube is a registered trademark of Softube AB, Sweden. All visual
Eventide Inc. One Alsan Way Little Ferry, NJ
 Copyright 2017, Eventide Inc. P/N: 141237, Rev 4 Eventide is a registered trademark of Eventide Inc. AAX and Pro Tools are trademarks of Avid Technology. Names and logos are used with permission. Audio
Lindell 254E User Manual. Lindell 254E. User Manual
 Lindell 254E User Manual Introduction Congratulation on choosing the Lindell 254E compressor and limiter. This plugin faithfully reproduces the behavior and character of the most famous vintage diode bridge
Eventide Inc. One Alsan Way Little Ferry, NJ
 Copyright 2017, Eventide Inc. P/N 141298, Rev 3 Eventide is a registered trademark of Eventide Inc. AAX and Pro Tools are trademarks of Avid Technology. Names and logos are used with permission. Audio
Award Winning Stereo-to-5.1 Surround Up-mix Plugin
 Award Winning Stereo-to-5.1 Surround Up-mix Plugin Sonic Artifact-Free Up-Mix Improved Digital Signal Processing 100% ITU Fold-back to Original Stereo 32/64-bit support for VST and AU formats More intuitive
LIO-8 Quick Start Guide
 Metric Halo $Revision: 1051 $ Publication date $Date: 2011-08-08 12:42:12-0400 (Mon, 08 Jun 2011) $ Copyright 2010 Metric Halo Table of Contents 1.... 5 Prepare the unit for use... 5 Connect the LIO-8
The basic concept of the VSC-2 hardware
 This plug-in version of the original hardware VSC2 compressor has been faithfully modeled by Brainworx, working closely with Vertigo Sound. Based on Vertigo s Big Impact Design. The VSC-2 plug-in sets
Eventide Inc. One Alsan Way Little Ferry, NJ
 Copyright 2017, Eventide Inc. P/N: 141218, Rev 7 Eventide is a registered trademark of Eventide Inc. AAX and Pro Tools are trademarks of Avid Technology. Names and logos are used with permission. Audio
SPL Analog Code Plugin Manual
 SPL Analog Code Plugin Manual EQ Ranger Plus Manual EQ Ranger Analog Code Plugins Manual Version 3.0 03/2016 This user s guide contains a description of the product. It in no way represents a guarantee
Background. About automation subtracks
 16 Background Cubase provides very comprehensive automation features. Virtually every mixer and effect parameter can be automated. There are two main methods you can use to automate parameter settings:
TF5 / TF3 / TF1 DIGITAL MIXING CONSOLE. TF Editor User Guide
 TF5 / TF3 / TF1 DIGITAL MIXING CONSOLE EN Special notices Copyrights of the software and this document are the exclusive property of Yamaha Corporation. Copying or modifying the software or reproduction
Studio One Pro Mix Engine FX and Plugins Explained
 Studio One Pro Mix Engine FX and Plugins Explained Jeff Pettit V1.0, 2/6/17 V 1.1, 6/8/17 V 1.2, 6/15/17 Contents Mix FX and Plugins Explained... 2 Studio One Pro Mix FX... 2 Example One: Console Shaper
NOVATRON. novatron DEEPER INTO THE CONTROLS -1-
 WELCOME TO NOVATRON Novatron is an analog-modeled compressor that borrows so many sonic properties from so many different classic hardware units that, ironically, it could only exist in the world of dsp.
Sub Kick This particular miking trick is one that can be used to bring great low-end presence to the kick drum.
 Kick Drum As the heartbeat of the contemporary drum kit, the kick drum sound we ve grown accustomed to hearing is both boomy and round on the bottom and has a nice, bright click in the high mid range.
Using Cubase SE with DSP Factory
 Manual by Ludvig Carlson, Anders Nordmark, Roger Wiklander Quality Control: C. Bachmann, H. Bischoff, S. Pfeifer, C. Schomburg The information in this document is subject to change without notice and does
Neo DynaMaster Full-Featured, Multi-Purpose Stereo Dual Dynamics Processor. Neo DynaMaster. Full-Featured, Multi-Purpose Stereo Dual Dynamics
 Neo DynaMaster Full-Featured, Multi-Purpose Stereo Dual Dynamics Processor with Modelling Engine Developed by Operational Manual The information in this document is subject to change without notice and
SPL Analog Code Plug-ins Manual Classic & Dual-Band De-Essers
 SPL Analog Code Plug-ins Manual Classic & Dual-Band De-Essers Sibilance Removal Manual Classic &Dual-Band De-Essers, Analog Code Plug-ins Model # 1230 Manual version 1.0 3/2012 This user s guide contains
AxumVideo 0 intro. Now that you have connected the different AXUM system parts, you are ready to configure the system according to your own needs.
 AxumVideo 0 intro Now that you have connected the different AXUM system parts, you are ready to configure the system according to your own needs. On the left we see the RACK unit and on the right we see
SIGNAL PROCESSOR. Operation Manual
 SIGNAL PROCESSOR Operation Manual Using the PDF manual From the Contents on page 2, click on the desired topic to automatically jump to the corresponding page. Click on a link in this manual to jump to
SIGNAL PROCESSOR. Operation Manual
 SIGNAL PROCESSOR Operation Manual Using the PDF manual From the Contents on page 2, click on the desired topic to automatically jump to the corresponding page. Click on a link in this manual to jump to
«Limiter 6» Modules and parameters description
 «Limiter 6» Modules and parameters description Developed by: Vladislav Goncharov vladgsound.wordpress.com With collaboration of: Dax Liniere www.puzzlefactory.com.au 2011-2012 2 1 Introduction... 3 1.1
Cristina Bachmann, Heiko Bischoff, Marion Bröer, Sabine Pfeifer, Heike Schilling, Benjamin Schütte This PDF provides improved access for
 Cristina Bachmann, Heiko Bischoff, Marion Bröer, Sabine Pfeifer, Heike Schilling, Benjamin Schütte This PDF provides improved access for vision-impaired users. Please note that due to the complexity and
456 SOLID STATE ANALOGUE TAPE + A80 RECORDER MODELS
 456 SOLID STATE ANALOGUE TAPE + A80 RECORDER MODELS 456 STEREO HALF RACK 456 MONO The 456 range in essence is an All Analogue Solid State Tape Recorder the Output of which can be recorded by conventional
TF5 / TF3 / TF1 DIGITAL MIXING CONSOLE. TF StageMix User's Guide
 TF5 / TF3 / TF1 DIGITAL MIXING CONSOLE EN Note The software and this document are the exclusive copyrights of Yamaha Corporation. Copying or modifying the software or reproduction of this document, by
Eventide Inc. One Alsan Way Little Ferry, NJ
 Copyright 2017, Eventide Inc. P/N: 141255, Rev 5 Eventide is a registered trademark of Eventide Inc. AAX and Pro Tools are trademarks of Avid Technology. Names and logos are used with permission. Audio
MDistortionMB. Easy screen vs. Edit screen
 MDistortionMB Easy screen vs. Edit screen The plugin provides 2 user interfaces - an easy screen and an edit screen. Use the Edit button to switch between the two. By default most plugins open on the easy
Chapter 4 Signal Paths
 Chapter 4 Signal Paths The OXF-R3 system can be used to build a wide variety of signal paths with maximum flexibility from a basic default configuration. Creating configurations is simple. Signal paths
Voxengo PHA-979 User Guide
 Version 2.6 http://www.voxengo.com/product/pha979/ Contents Introduction 3 Features 3 Compatibility 3 User Interface Elements 5 Delay 5 Phase 5 Output 6 Correlometer 7 Introduction 7 Parameters 7 Credits
Golden Age Project Comp-3A Optical Compressor Hardware > Processor Published August 2016 By Matt Houghton
 SOUND ON SOUND Golden Age Project Comp-3A Optical Compressor Hardware > Processor Published August 2016 By Matt Houghton The Swedish manufacturers resurrect a long-gone studio classic. The war of the clones
Polytek Reference Manual
 Polytek Reference Manual Table of Contents Installation 2 Navigation 3 Overview 3 How to Generate Sounds and Sequences 4 1) Create a Rhythm 4 2) Write a Melody 5 3) Craft your Sound 5 4) Apply FX 11 5)
Version 1.10 CRANE SONG LTD East 5th Street Superior, WI USA tel: fax:
 -192 HARMONICALLY ENHANCED DIGITAL DEVICE OPERATOR'S MANUAL Version 1.10 CRANE SONG LTD. 2117 East 5th Street Superior, WI 54880 USA tel: 715-398-3627 fax: 715-398-3279 www.cranesong.com 2000 Crane Song,LTD.
OUTER SPACE USER GUIDE
 OUTER SPACE USER GUIDE 2017/10/18 Table of Contents 1. Outer Space...3 1.1 Specifications...3 1.2 Installation...3 1.3 Registration...3 2. Parameters...4 2.1 Main Panel...4 2.2 Second Panel...5 2.3 Tape
G-Stomper Mixer & Master V Mixer & Master... 2
 G-Stomper Studio G-Stomper Rhythm G-Stomper VA-Beast User Manual App Version: 5.7.2 Date: 04/06/2018 Author: planet-h.com Official Website: https://www.planet-h.com/ Contents 11 Mixer & Master... 2 11.1
1 Introduction. 2 Features. Welcome to CS-3301, a channel strip plugin with gate, EQs, compressor, saturation and oversampling.
 MANUAL 2017 1 Introduction Welcome to CS-3301, a channel strip plugin with gate, EQs, compressor, saturation and oversampling. 2 Features CS-3301 offers following features: Noise gate LC/HC and 5 band
FAT MAN FAT 1. TLAudio. user manual. stereo valve compressor. TL Audio Limited, Sonic Touch, Iceni Court, Icknield Way, Letchworth, SG6 1TN England
 user manual FAT MAN by TLAudio TL Audio Limited, Sonic Touch, Iceni Court, Icknield Way, Letchworth, SG6 1TN England Tel: +44 (0)1462 680888 Fax: +44 (0)1462 680999 email: info@tlaudio.co.uk web: http://www.tlaudio.co.uk
V4.7 Software Quick Start Guide
 V4.7 Software Quick Start Guide INTRODUCTION TO V4.7 The 4.7 software update for the Vi Series includes a major update to the functionality of the Vi4 console in particular, bringing a new level of power
Mixers. The functions of a mixer are simple: 1) Process input signals with amplification and EQ, and 2) Combine those signals in a variety of ways.
 Process input signals with amplification and EQ, and 2) Combine those signals in a variety of ways.") Mixers The mixer is the central device in any sound studio. Although you can do a lot without it, sooner or later you are going to want to bring all of your materials together to make a piece of music,
Mixers The mixer is the central device in any sound studio. Although you can do a lot without it, sooner or later you are going to want to bring all of your materials together to make a piece of music,
Reference Guide Version 1.0
 Reference Guide Version 1.0 1 1) Introduction Thank you for purchasing Monster MIX. If this is the first time you install Monster MIX you should first refer to Sections 2, 3 and 4. Those chapters of the
bx_console Plugin Manual
 bx_console Plugin Manual Quick Start Install and Authorize your New Plugin: If you do not have an account, register for free on the Plugin Alliance website Double-click the.mpkg (Mac) or.exe (Win) file
MTurboComp. Overview. How to use the compressor. More advanced features. Edit screen. Easy screen vs. Edit screen
 MTurboComp Overview MTurboComp is an extremely powerful dynamics processor. It has been designed to be versatile, so that it can simulate any compressor out there, primarily the vintage ones of course.
^ÄtÇz{xÄÅ IVGI 2. Table of Contents. Introduction 2 Installation 3 Controls 4 Credits 5
 ^ÄtÇz{xÄÅ IVGI 2 Table of Contents Introduction 2 Installation 3 Controls 4 Credits 5 Introduction IVGI's base sound is comparable to the DESK mode in the big brother SDRR. Both started with the same base
D-901 PC SOFTWARE Version 3
 INSTRUCTION MANUAL D-901 PC SOFTWARE Version 3 Please follow the instructions in this manual to obtain the optimum results from this unit. We also recommend that you keep this manual handy for future reference.
MAutoPitch. Presets button. Left arrow button. Right arrow button. Randomize button. Save button. Panic button. Settings button
 MAutoPitch Presets button Presets button shows a window with all available presets. A preset can be loaded from the preset window by double-clicking on it, using the arrow buttons or by using a combination
VTAPE. The Analog Tape Suite. Operation manual. VirSyn Software Synthesizer Harry Gohs
 VTAPE The Analog Tape Suite Operation manual VirSyn Software Synthesizer Harry Gohs Copyright 2007 VirSyn Software Synthesizer. All rights reserved. The information in this document is subject to change
TYPE A USER GUIDE 2017/12/06
 TYPE A USER GUIDE 2017/12/06 Table of Contents 1. Type A...3 1.1 Specifications...3 1.2 Installation...3 1.3 Registration...3 2. Parameters...4 2.1 Main Panel...4 2.2 Second Panel...4 3. Usage...5 3.1
bx_console N Plugin Manual
 bx_console N bx_console N is part of the growing line of Brainworx TMT console emulation plugins. More details on our patent-pending TMT (Tolerance Modeling Technology) inside this manual. Developed by
AB-Loudness Match. Manual. by TBProAudio (C) TBProAudio 2018 Page 1 of 9
 TBProAudio 2018 Page 1 of 9") AB-Loudness Match Manual by TBProAudio 2018 (C) TBProAudio 2018 Page 1 of 9 1 Introduction Welcome to AB_LM, a gain control which enables level matched and sample accurate AB comparison of FX chains. We
AB-Loudness Match Manual by TBProAudio 2018 (C) TBProAudio 2018 Page 1 of 9 1 Introduction Welcome to AB_LM, a gain control which enables level matched and sample accurate AB comparison of FX chains. We
S I N E V I B E S FRACTION AUDIO SLICING WORKSTATION
 S I N E V I B E S FRACTION AUDIO SLICING WORKSTATION INTRODUCTION Fraction is a plugin for deep on-the-fly remixing and mangling of sound. It features 8x independent slicers which record and repeat short
installation To install the Magic Racks: Groove Essentials racks, copy the files to the Audio Effect Rack folder of your Ableton user library.
 installation To install the Magic Racks: Groove Essentials racks, copy the files to the Audio Effect Rack folder of your Ableton user library. The exact location of your library will depend on where you
Available Shortcut Keys (PC/MAC) 134 Options Menu 136 General Options 137 Spectrum Options 139 Input/Output Options 140 EQ/Harmony Options 141 Pitch
 134 Options Menu 136 General Options 137 Spectrum Options 139 Input/Output Options 140 EQ/Harmony Options 141 Pitch") Table of Contents Introduction 4 What s New in Nectar 2? 6 Authorization 7 Quickstart 12 Global Menu 16 Preset Manager 18 Overview Panel 19 Input and Output Gain 26 Input and Output Meters 28 Equalizer
Table of Contents Introduction 4 What s New in Nectar 2? 6 Authorization 7 Quickstart 12 Global Menu 16 Preset Manager 18 Overview Panel 19 Input and Output Gain 26 Input and Output Meters 28 Equalizer
M-16DX 16-Channel Digital Mixer
 M-16DX 16-Channel Digital Mixer Workshop The M-16DX Effects 008 Roland Corporation U.S. All rights reserved. No part of this publication may be reproduced in any form without the written permission of
Vintage Audio MSL-MK2. Quad VCA Buss Compressor
 Vintage Audio MSL-MK2 Quad VCA Buss Compressor Vintage Audio MSL-mk2 Quad VCA Compressor ++ Congratulations on your purchase of your new Vintage Audio MSL-mk2 Quad VCA Buss compressor. The MSL-mk2 is based
DIGITAL MIXING CONSOLE. TF Editor V3.6 User's Guide
 DIGITAL MIXING CONSOLE TF Editor V3.6 User's Guide EN Special notices Copyrights of the software and this document are the exclusive property of Yamaha Corporation. Copying or modifying the software or