2015 MESA SAFE COMPANY
|
|
|
- Tracy Brooks
- 5 years ago
- Views:
Transcription
1
2 2015 MESA SAFE COMPANY
3 CATEGORY PAGE CHECK LIST 2 OPENING YOUR SAFE 3 LOCK-OUT PENALTY 3 USING THE OVERRIDE FUNCTIONS 4 CHANGING THE OVERRIDE 4 CHANGING THE LOCK SETTTINGS 5 SETTING THE DATE & TIME 7 VIEW LOCK OPENING RECORDS 8 THE ANCHOR KIT 9 CHANGING THE BATTERIES 9 TROUBLESHOOTING 10 HOW TO ORDER KEYS 11 IMPORTANT INFORMATION ON SAFE USAGE 11 REGISTER YOUR SAFE 11 LIMITED 1 YEAR SAFE WARRANTY 12
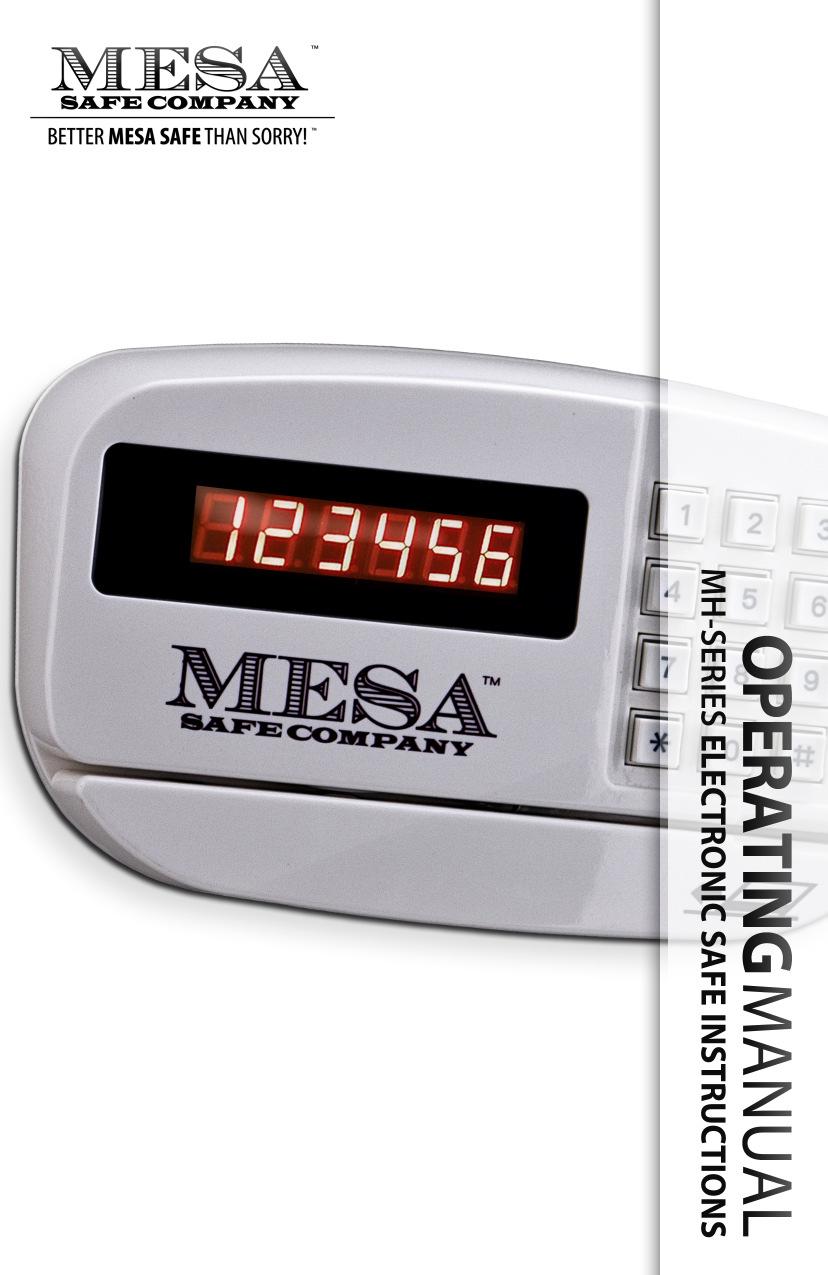
4 PG.2 MH-SERIES ELECTRONIC LOCK INSTRUCTIONS DEAR VALUED CUSTOMER: Congratulations on choosing your new MESA SAFE to secure and protect your valuables! You have made an excellent choice in your security measures. M E S A SAFE COMPA N Y has built a solid reputation on integrity and quality craftsmanship. We pride ourselves on delivering the best products in the industry and consistently exceed customer expectations. Before using your unit, thoroughly read and understand the Operating Instructions of the unit. This will ensure maximum efficiency and usability.! IMPORTANT : DO NOT RE TURN SAFE TO STORE If you are missing parts, have difficulty programming the lock or opening your safe, or any additional questions regarding the use and care of your safe, DO NOT RETURN your safe to the store. Please contact MESA SAFE COMPA N Y Technical Suppor t : [Monday thru Friday 7AM - 4PM/PST ] for assistance mesatm SAFE COMPANY AA r r AA AA r AA r I CHECK LIST n 4AA Batteries [not included] m 2 Override Keys [do NOT store keys in your safe] G 1 Allen Wrench o 2 Anchor Bolts NOTE : The lock is factory set to Hotel Function. [See Changing the Lock Setting to change to Standard Function]
5 MH-SERIES ELECTRONIC LOCK INSTRUCTIONS PG.3 OPENING YOUR SAFE [For the first time] NOTE : The safe comes from the factory unlocked. Using Personal Code 1 To unlock the safe: Enter your 3-6 digit code; [[ OPENED ]] will appear on the display & the safe will unlock 2 To lock the safe: Enter your 3-6 digit code then input #; [[ CLOSED ]] will appear on the display & the safe will be locked This is a hotel room configuration lock. User sets new code every time the safe is used [ The code you use to unlock the safe is the code you use to lock the safe. Once the safe is in the unlocked position, the safe will reset itself ready for any code] Use * to delete numbers that appear on the display. If is entered * before your code, a [[ - ]] will appear rather than the number, as a security feature Using a Credit Card [Any card with a magnetic strip] 1 To unlock the safe: Slide your credit card firmly from right to left with the magnetic strip down; [[ OPENED ]] will appear on the display & the safe will be locked 2 To lock the safe: Slide your credit card firmly from right to left with the magnetic strip down; [[ CLOSED ]] will appear on the display & the safe will be locked This is a hotel room configuration lock. User sets new card every time the safe is used. [ The card you use to unlock the safe is the card you use to lock the safe. Once the safe is in the unlocked position, the safe will reset itself ready for any card] IMPORTANT : Swipe your card firmly & evenly from right to left. If an incorrect direction or swiping speed too fast or too slow, [[ ERROR ]] or [[ AGAIN ]] will appear on the display. You will need to swipe your card again. The card to unlock the safe should be the same as the card to lock the safe. If not, [[ E-CARD ]] (error card) will appear on the display. LOCK-OUT PENALTY When the safe is in the locked position [[ E-Code ]] or [[ E-Card ]] will appear on the display after an invalid entry. If an incorrect code or card is used 4 consecutive times & [[ E-Code ]] or [[ E-Card ]] appeared on the display after every incorrect entry, the safe will go into a lock-out period of 15 minutes. During the period, when pressing a button on the keypad, [[ HOLD## ]] will appear on the display. The ## represents the time that is remaining in the lock-out period.
![PG.4 MH-SERIES ELECTRONIC LOCK INSTRUCTIONS USING THE OVERRIDE FUNCTIONS If [[ E-Code ]], [[ E-Card ]] or [[ ERROR ]] appear on the display after entering your code or swiping your card to unlock the](/docs-images/93/114517708/images/6-0.jpg "safe, you will need to use the O verride Code, O verride Card or O verride Keys If [[ E-BAR ]] appears on the display, you will need to use the O verride Keys Using the Override Code 1 Input : #- #;")
6 PG.4 MH-SERIES ELECTRONIC LOCK INSTRUCTIONS USING THE OVERRIDE FUNCTIONS If [[ E-Code ]], [[ E-Card ]] or [[ ERROR ]] appear on the display after entering your code or swiping your card to unlock the safe, you will need to use the O verride Code, O verride Card or O verride Keys If [[ E-BAR ]] appears on the display, you will need to use the O verride Keys Using the Override Code 1 Input : #- #; [[ SUPER ]] will appear on the display [do not pause between #- # entries] 2 Input : Override Code; the safe will unlock The default Override Code is: * * * * * * * IMPORTANT : Because the codes are factory set, we highly recommend changing the codes to your own unique codes immediately! Using the Override Card 1 Swipe the Override Card, the safe will unlock [See Changing the Override Card to set your card] Using the Override Keys 1 Locate the small round cap [on MH101E], or the oval emblem [on MHRC916E], just below the right side of the keypad 2 Using the allen wrench (included), remove the cover [for MH101 Model, simply remove the cap with your finger tips] 3 Insert the Override Key & turn clockwise, a ¼ turn & open door 4 To remove the key, turn the key counter- clockwise, a ¼ turn, back to the inserted position NOTE : The Override Key will only work when safe is in locked position. IMPORTANT : Do NOT store the Override Keys in the safe! CHANGING THE OVERRIDE Changing the Override Code NOTE : The safe must be in the unlocked position 1 Input: * - * ; [[ PROG ]] will appear on the display 2 Input: * * * * * * ; [[ OLD ]] will appear on the display 3 Input: Override Code - #; [[ NEW ]] will appear on the display The default Override Code is: * * * * * * * 4 Input a new 6-digit code - #; [[ AGAIN ]] will appear on the display 5 Re -Input the new Override Code - #; [[ GOOD ]] will appear on the display. The Override Code has been successfully changed.
7 Changing the Override Card NOTE : The safe must be in the unlocked position 1 Input: * - * ; [[ PROG ]] will appear on the display 2 Input: * * * * * * ; [[ C ARD ]] will appear on the display 3 Swipe the card you wish to set as the new Override Card; [[ GOOD ]] will appear on the display. The Override Card has been successfully changed CHANGING THE LOCK SETTINGS NOTE : The safe must be in the unlocked position 1 Input: * - * ; [[ PROG ]] will appear on the MH-SERIES ELECTRONIC LOCK INSTRUCTIONS PG display 2 Input: * * * * * * ; [[ CODE ]] will appear on the display followed by a 6-digit number 4 The 1 st 6-digit number is now displayed & Slot #1 will be Blinking [Slots: refer to graph] Default setting is: * * * * * * To advance to the next Slot without making changes to the current Slot, enter the number displayed in the current Slot Input # if you do not want to make any changes to the 1 st 6-digit number & would like to move on to the 2 nd 6-digit number Input: if you would like to start over & go back to Slot #1 * 5 Slot #1 : Entry Display Input: 0 to disable Entry Display. The numbers entered will not display Input: 1 to activate Entry Display. The numbers entered will display When Entr y Display is activated, Input : before entering code & the * numbers entered will not display for added security 6 Slot #2 : Code Display Input: 0 to disable Code Display. The code entered will not be displayed after the safe is locked Input: 1 to activate Code Display. The code entered will display for 2 seconds after the safe is locked 7 Slot #3 : Hide Button When Entr y Display is activated, Input : before entering code & the * numbers entered will not display Input: 0 to disable Hide Button function Input: 1 to activate Hide Button function
8 PG.6 MH-SERIES ELECTRONIC LOCK INSTRUCTIONS 8 Slot #4 : Audit Function Input: 0 to disable Audit Function Input: 1 to activate Audit Function 9 Slot #5 : Locking Function Input: 1 to place the lock into Standard Lock Mode If Standard Lock Mode is selected:! The 1 st code/card you use to lock the safe will be the set Once the code/card is set, you only need to input # to lock the safe # You will need to input your set code/card to unlock the safe $ To change your set code/card, you will need to go back into the Lock Settings [Refer back to Changing the Lock Settings] % Place the lock function into Hotel Lock Mode ^ Go back into the Lock Settings & Place the lock into Standard Lock Mode Input: 2 to place the lock into Hotel Lock Mode [ This is the default mode] 0 Slot #6 : Unused Slot Input: 1 if not already entered. This slot does not disable or activate any functions Input: # to confirm the 1 st set of Lock Settings & move forward to the 2 nd set of Lock Settings If you do not want to make any changes to the 2 nd set of Lock Settings, input # again The 2 nd set of Lock Settings The 2 nd 6-digit number [default setting: #1 is Blinking * * * * * * ] is now displayed & Slot Slot #1 : Invalid Entry Input a number from 1-9 digits to set the number of times allowed for entering an invalid code or card before placing the lock into the Lock- Out Penalty Slot #2 : Code Length Input 3 to set the code length to a 3-digit code Input 4 to set the code length to a 4-digit code Input 5 to set the code length to a 5-digit code Input 6 to set the code length to a 6-digit code Input 7 to set the code length to a 3-6 digit code
9 Slot #3 & #4 Lock-Out Period Input a number to set the length of the Lock- Out Penalty Example : For 5 mintues enter 0 in Slot #3 & 5 in Slot #4 Slot #5 Override Function [Code & Card] Input 0 to disable the O verride Function Input 1 to use the O verride Code entry only, disables the O verride Card Input 2 to use the O verride Card entry only, disables the O verride Code Input 3 to use the O verride Code & Card together. Input the O verride Code then swipe Override Card Input 4 to use either the O verride Code or the O verride Card Slot #6 Unused Slot Input 0 if not already entered. This slot does not disable or activate any functions Input: # to confirm the 2 nd set of Lock Settings & [[ GOOD ]] will appear on the display SETTING THE DATE & TIME NOTE : You will only need to set the date & time to use the Lock Opening Records function. The safe must be in the unlocked position. 1 Input: * - * ; [[ PROG ]] will appear on the display 2 Input: * * * * * * ; [[ DATE ]] will appear on the display followed by a 6-digit number The 6-digit number represents the year - month - day Example: December 1, 2013 = Slot #1 & #2 : Enter the Year 4 Slot #3 & #4 : Enter the Month 5 Slot #5 & #6 : Enter the Day 7 Input: # to confirm the date setting & move on to the clock The 6-digit number represents the hour - minute - second When adjusting the hour, you will need to use militar y time [24-hr rotation] Example: 7:25:59am = Slot #1 & #2 : Enter the Hour MH-SERIES ELECTRONIC LOCK INSTRUCTIONS PG ! " # $ % & ' (! ) * $ + " #, % + & -. / $ % 0 -
10 PG.8 MH-SERIES ELECTRONIC LOCK INSTRUCTIONS 9 Slot #3 & #4 : 1 Enter the Minutes 0 Slot #5 & #6 : 1 Enter the Seconds 7 Input: # to confirm the clock setting, [[ GOOD ]] will appear on the display VIEW LOCK OPENING RECORDS [Audit Trail] 2 NOTE : The safe must be in the unlocked position. 1 Input: * - * ; [[ PROG ]] will appear on the display 2 Input: * * * * * * ; [[ GOOD ]] will appear on the display followed by a 6-digit number One opening record uses two screens:! The 1 st screen displays the date that the safe was The 2 nd screen displays the time & method used to open the safe [Method: user code, card, override code, etc.] Method Reference [ What Opened the Safe?] 3 User Code: 1 is displayed Override Code: 2 is displayed User Card: 5 is displayed Override Card: 6 is displayed Example: Safe was open at 3:30:00pm by the O verride Code = * * * * * 3 Navigating through the Open Records 1 Press 2 to go back to the previous record Press 8 to go for ward to the next record Press 6 to show the next screen of a specific record Press 4 to show the previous screen of a specific record : 6 ; < = 8 < ; > Press 5 to go to the latest Lock- Opening record 4 Input: * ; [[ GOOD ]] will appear on the display & the Lock- Opening Records will close
11 MH-SERIES ELECTRONIC LOCK INSTRUCTIONS PG.9 THE ANCHOR KIT To maximize the security of your safe, MESA recommends using the anchor kit [provided] to bolt down your safe. The safe can be anchored to a wall, floor, etc., or a MESA Model MP-Pedestal [see MESASAFE.CO M for more info]. 1 Choose a suitable & convenient location for your safe. Set the safe in place & locate the anchor holes provided on the safe to mark the area to be drilled on the wall, floor, desk, etc. A If bolting your safe to a wall, please ensure that the safe is resting on a supporting surface; i.e., floor, table, shelf. 2 After marking the drill spots, move the safe aside and drill holes of the appropriate diameter & depth for the type of hardware being used & the mounting surface. [Anchor Kit: refer to Checklist for all items included] 3 Place safe back, aligning the anchor holes over the holes drilled, & install the fasteners as required. B IMPORTANT : If bolting down your safe from the bottom, be sure to remove the feet pads. CHANGING THE BATTERIES 1 With the door open, remove the battery compartment cover located on the inside of the door by pulling down the clip to release it 2 Install 4AA alkaline batteries [not included], note the polarity markings (-/+) in the battery compartment to ensure proper installation 3 Re -attach the battery compartment cover back into place B IMPORTANT : Do not use rechargeable batteries, mix alkaline with nonalkaline batteries, or mix old and new batteries.
12 PG.10 MH-SERIES ELECTRONIC LOCK INSTRUCTIONS TROUBLESHOOTING THE ISSUE WHAT S GOING ON THE SOLUTION [[ LO-BAT T ]] The batteries are low Change your batteries [[ E-BAR ]] [[ HOLD## ]] The door is not closed properly / The bolts are not locking 4 repeated incorrect user attempts. Lock-Out Penalty was initiated. Override Keys must be used to unlock & re-lock safe, then remove keys & try code. Wait 15 minutes then input correct user code/card [[ E-CODE ]] Incorrect user code entry Verify user code & re-enter [[ E-C ARD ]] [[ ERROR ]] or [[ AGAIN ]] Incorrect card used/not swiping the same card originally used to open safe Card was swiped incorrectly from left to right / Card was swiped too fast or too slow Swipe original card used to open safe Evenly re-swipe card from left to right To view Battery Levels, input [#] when safe is in the locked position [[ BAT T-H ]] Battery level is high [[ BAT T-L ]] Battery level is low
13 C C C C C C MH-SERIES ELECTRONIC LOCK INSTRUCTIONS PG.11 HOW TO ORDER KEYS 1 Contact Mesa Safe s Sales Department for availability & prices : You will need to provide your Proof of Purchase [receipt/invoice]. If you can t provide a Proof of Purchase, please send a notarized document stating that you are the owner of the safe [you must send the original notarized document by mail, copies will NOT be accepted] 3 Make sure these items are on your notarized document: Name, Safe Number, Key Number [stamped on the key lock], Mailing Address u IMPORTANT INFORMATION ON SAFE USAGE C Hold on to your Proof of Purchase [receipt/invoice]. You will need this to order keys or use the Warranty Service Do not open your safe if it is lying on its side, back or top. Only open your safe when it is in the upright position Do not slam the door. Extreme shock can damage the lock or jam the bolt work system Do not shut the door with the locking bolts in the locked position. This may damage the locking bolts & create problems unlocking & locking the safe Do not overstuff contents in the safe so that the door must be forced shut. Bolt work may jam as a result Keep liquids away from the keypad. Liquids can damage the keypad If you experience a difference in the feel of the operation, inconsistency or difficulty opening or operating the safe, DO NOT LOCK THE SAFE. Immediately contact our Professional Tech Assistants at ME S A SAFE C O M PA NY Customer Care : [Monday thru Friday 7AM - 4PM/PST ] REGISTER YOUR SAFE To aid with warranty coverage, please register your product online or complete the enclosed registration card. Register your safe online at MESASAFE.CO M/register --or-- Fill out the Registration Card included with your safe & mail to: Customer Service P.O Box Irvine, CA 92619
14 PG.12 MH-SERIES ELECTRONIC LOCK INSTRUCTIONS ~ MESA SAFE COMPANY LIMITED 1 YEAR WARRANTY Mesa Safe Company will guarantee your Mesa Safe free from defects for a period of one year from original purchase date on manufacturer defects only. This warranty is non-transferable and only applies to original owner with proof of purchase from an authorized dealer. Mesa Safe Company will not, under any circumstances, be liable to the initial consumer for any incidental, consequential, special, exemplary, or punitive damages arising out of the purchase or use of any Mesa Safe Company product(s). Mesa Safe Company s liability for any breach of this warranty shall be limited exclusively to repair or replacement of the defective product(s), as described above or a refund of the product(s). In no event shall Mesa Safe Company s obligation under this warranty exceed the price of the original product(s). Under no circumstances will Mesa Safe Company be held liable for contents stored inside the Safe(s). This warranty is limited to the terms stated herin. All expressed and implied warranties including the warranties of merchantability and fitness for a particular purpose are excluded, except as stated above. Mesa Safe Company disclaims all liabilities for incidental or consequential damages resulting from the use of this product, or arising out of any breach of this warranty. Some states do not allow the exclusion or limitation of incidental or consequential damages, so the above limitation may not apply to you. This warranty gives you specific legal rights, and you may have other rights as well, which will vary from state to state.
15 2015 MESA SAFE COMPANY
16
FINGERPRINT RECOGNITION SAFE MODEL NO: CS400FP
 CAUTION: Do not keep the override keys inside the safe. FINGERPRINT RECOGNITION SAFE MODEL NO: CS400FP PART NO: 7710200 OPERATION & MAINTENANCE INSTRUCTIONS LS0211 INTRODUCTION Thank you for purchasing
Installation & Programming Manual. Please read before using this timer.
 Installation & Programming Manual Please read before using this timer. Warning! This unit operates using two fresh, high-quality AA alkaline batteries.batteries must be installed for unit to operate. USE
Satellite Receiver. Chapter REMOTE CONTROL USING THE MENUS USING TEXT FIELDS. About Your Satellite Receiver. What you ll find in this chapter:
 Satellite Receiver About Your Satellite Receiver Chapter What you ll find in this chapter: REMOTE CONTROL USING THE MENUS USING THE MENUS USING TEXT FIELDS 3 Chapter 2 Remote Control REMOTE CONTROL The
Sport-TIMER 3000 TM Instruction Manual
 Sport-TIMER 3000 TM Instruction Manual Sport-TIMER 3000 TM Index of Uses Page Sport-TIMER 3000 TM RECORD OF PURCHASE The Sport-TIMER 3000 TM is fully warranted to the original purchaser against any defects
DD E SIG N E D & E N GIN EE R E. Holman Garden Lights App Instruction Manual. Android Android manual
 DD E SIG N E D & E N GIN EE R E Holman Garden Lights App Instruction Manual Android Android manual AUSTRALIAN Mounting the Controller Connecting your Lights Operating the App Troubleshooting Warranty Contact
4320 SS-25 Self-Strip Terminating Block
 4320 SS-25 Self-Strip Terminating Block Instructions May 2002 78-8130-7677-1 1.0 General The 3M 4320 SS-25 Self-Strip Terminating Block is a factory stubbed, self-stripping connecting block designed for
TDDFM14 OWNER S MANUAL
 TDDFM14 OWNER S MANUAL Table of Contents 3 Installation Features System Selector Switches 6 10 Connecting Wires and Mounting Thermostat 10 Operation (Programming) Programming/Setting Clock Personal Program
Automatic Satellite System. Model KD5500
 Automatic Satellite System for DISH Network Programming Model KD5500 Installation and Operating Instructions Digital TV Solutions for Mobile Markets 11200 Hampshire Avenue South, Bloomington, MN 55438-2453
Quick Release Roof-Mount Kit MB700
 Quick Release Roof-Mount Kit MB700 Owner s Manual Thank you for purchasing a KING product! The KING Quick Release Roof-Mount provides a convenient way to securely mount your KING antenna to your vehicle,
KD5500. Automatic Satellite TV Antenna for DISH Programming. Owner s Manual
 Automatic Satellite TV Antenna for DISH Programming KD5500 Owner s Manual 11200 Hampshire Avenue South, Bloomington, MN 55438 PH 952.922.6889 FAX 952.922.8424 kingcontrols.com IMPORTANT! The KING Relay
Quick Start Guide ABOUT THE CAMERA
 User Manual Quick Start Guide ABOUT THE CAMERA A Record Status B Record Switch C Rotating Lens D Battery Slot E Battery Latch F Card Format Button G USB H Format Switch I MicroSD card J Memory Status K
In-Wall Control Mount for ipod Touch
 In-Wall Control Mount for ipod Touch INTRODUCTION The Mirage KP-iOS is an in-wall system that allows ipod touch (4th generation) to become a semi-permanent fixture in your wall. The system allows you to
3M Coupling Tray FDTC-10S-COUPLINGTRAY
 3M Coupling Tray FDTC-10S-COUPLINGTRAY for use with 3M Fiber Dome Closures FDC 10S Instructions July 2010 3 1.0 Introduction The 3M Coupling Tray FDTC-10S-COUPLINGTRAY can accommodate up to 10 loose tubes.
blink USER GUIDE Bluetooth capable Reclocker Wyred 4 Sound. All rights reserved. v1.0
 blink Bluetooth capable Reclocker USER GUIDE Wyred 4 Sound. All rights reserved. v1.0 Table of Contents READ FIRST Important 1 Package contents 1 About the blink Bluetooth Streamer/Reclocker 1 Connectivity
READ ME FIRST. Touchstone TV Lift
 Whisper Lift II PRO 2 READ ME FIRST 1. After completing the unpacking and uncrating of the cabinet, you will find the Owner s Manual, TV, installation hardware, and the wireless remote all together and
Metal and Glass TV Stand for TVs up to 65 or 110 lbs. NS-HMG1856
 USER GUIDE Metal and Glass TV Stand for TVs up to 65 or 110 lbs. NS-HMG1856 SAFETY INFORMATION AND SPECIFICATIONS...2 PACKAGE CONTENTS: PARTS...3 PACKAGE CONTENTS: HARDWARE...4 ASSEMBLY INSTRUCTIONS...5
Owner s Manual RM-1 RF Remote
 Owner s Manual RM-1 RF Remote RM-1 Owner s Manual 2013 Universal Remote Control, Inc. The information in this Owner s Manual is copyright protected. No part of this manual may be copied or reproduced in
RT505TX Programmable. The RT505TX can be used with any of these receivers RXBC605 RXWBC605 RXVBC605 RXST MHz
 RT505TX T RT505 T505TX TX RT505TX RT505TX RT505TX 5TX Programmable Room o Thermostat RXBC605 RXRT505 RXWBC605 RXST625 RXVBC605 The RT505TX can be used with any of these receivers 868MHz RT505TX RT505TX
3M Distribution Box (DDB)
") 3M Distribution Box (DDB) Merged Copper and Fiber Pole/Post Mount Enclosure Installation Instructions November 2015 78-0015-2736-1-A 2 November 2015 78-0015-2736-1-A Contents 1.0 General 2.0 Enclosure
3M Distribution Box (DDB) Merged Copper and Fiber Pole/Post Mount Enclosure Installation Instructions November 2015 78-0015-2736-1-A 2 November 2015 78-0015-2736-1-A Contents 1.0 General 2.0 Enclosure
JACK Digital HDTV Over-the-Air Antenna
 JACK Digital HDTV Over-the-Air Antenna w/built-in SureLock Digital TV Signal Meter TM OA8200-White OA8201-Black SPECIFICATIONS Dimensions: 11.25 H x 16 W x 12.5 L Powered Amplifier +12 volt / 100 ma working
MXW-920 Waterproof Controller Owner's Manual
 MXW-920 Waterproof Controller Owner's Manual MXW-920 Owner s Manual 2012-2013 URC, Inc. The information in this owner s manual is copyright protected. No part of this manual may be copied or reproduced
OA White OA Black. Owner s Manual. Low Profile Digital HDTV Over-the-Air Antenna. w/built-in KING SureLock Digital TV Signal Meter
 Low Profile Digital HDTV Over-the-Air Antenna w/built-in KING SureLock Digital TV Signal Meter OA8200 - White OA8201 - Black Roof Thickness: 1 to 4-1/2 Roof Thickness: 4-1/2 to 8 (when installed with KING
3M Locator Plate N
 M Locator Plate 44-107N Instructions for the assembly of.100 x.100 preassembled socket connectors 1.0 General The M Locator Plate 44-107N is designed to aid in the assembly of the preassembled socket connector
JACK Digital HDTV Over-the-Air Antenna w/built-in SureLock Digital TV Signal Meter
 JACK Digital HDTV Over-the-Air Antenna w/built-in SureLock Digital TV Signal Meter OA8200 - White OA8201 - Black SPECIFICATIONS Dimensions: 11.25 H x 16 W x 12.5 L Powered Amplifier: +12 Volt / 100 ma
VHF + UHF Amplified HDTV Antenna Model OA8000 & OA8001 Installation Instructions Reception Frequencies
 VHF + UHF Amplified HDTV Antenna Model OA8000 & OA8001 Installation Instructions Reception Frequencies VHF: 54-216 MHz UHF: 470-698 MHz FM: 87.9-107.9 MHz Voltage Input: AC110-120V / AC220-240V Working:
Quick Start Guide. Handheld Transmitter HHa-941. Digital Hybrid Wireless US Patent 7,225,135
 Quick Start Guide Handheld Transmitter HHa-941 Digital Hybrid Wireless US Patent 7,225,135 For FCC Part 74 licensed operators Fill in for your records: Serial Number: Purchase Date: This guide is intended
LWX-1. Satellite Weather Radio Module Installation Instructions A
 LWX-1 Satellite Weather Radio Module Installation Instructions 988-0158-13A Copyright 2009 Navico All rights reserved. No part of this manual may be copied, reproduced, republished, transmitted or distributed
Tripod Portable Projection Screen Elite Tripod Series
 Tripod Portable Projection Screen Elite Tripod Series USER S GUIDE Rev. 060809-JA www.elitescreens.com info@elitescreens.com Tripod Screen Parts Identification Support beam Top Hook, Keystone Eliminator
OPERATING YOUR SYSTEM WITH MX-850
 OPERATING YOUR SYSTEM WITH MX-850 This remote control was Custom Programmed for you by: For questions about your Custom Programming call: Custom Programming of a complex home theater and/or a multi-room
G.S.I AC Controller. Installation & User Guide
 G.S.I AC Controller Installation & User Guide 2012 Galcon. All rights reserved. Information in this documentation is subject to change without notice and does not represent a commitment on part of Galcon.
MIRAGE. Skyline Mirage Set-Up Instructions Skyline Exhibits
 MIRAGE Skyline Mirage Set-Up Instructions www.skyline.com Table of Contents Mirage Pop-up is available in many sizes from 32 tall tabletops to 92 tall backwalls. The following set-up and repacking instructions
Low Profile Digital HDTV Over-the-Air Antenna CONTENTS
 Low Profile Digital HDTV Over-the-Air Antenna w/built-in KING SureLock Digital TV Signal Meter Owner s Manual Roof Thickness: 1 to 4-1/2 Roof Thickness: 4-1/2 to 8 (when installed with KING extension #21850)
Installation and Tuning Manual DAC 7000 DAC 2X
 Installation and Tuning Manual DAC 7000 DAC 2X DISCLAIMER While every effort has been made to ensure the accuracy of this document, Wayne s, Inc. nor its dealers assumes any responsibility for omissions
UC1000 Universal Controller
 UC1000 Universal Controller Makes the KING Quest Satellite Antenna System compatible with DIRECTV DISH Bell TV Please read the! BEFORE YOU START! section on the inside of this cover before using the UC1000
TO THE INSTALLER: BE SURE TO LEAVE THIS MANUAL WITH THE OWNER.
 Fixed Frame Screen Owner s Manual To the Owner Installation Instructions Screen Care CFS-010517 Maintenance TO THE INSTALLER: BE SURE TO LEAVE THIS MANUAL WITH THE OWNER. Printed in U.S.A. Stewart Filmscreen
INSTALLATION AND OPERATING MANUAL FOR ALL MATSUKO SWITCHBOX MODELS SWB 5 SWB 5P SWB 5P+PG WARNING:
 MSB12906121MAN UK English INSTALLATION AND OPERATING MANUAL FOR ALL MATSUKO SWITCHBOX MODELS SWB 5 SWB 5P SWB 5P+PG WARNING: Ensure that the Matsuko Switchbox is switched off at the mains before you attempt
2179-CD Series Fiber Optic Splice Closure. Installation Instructions
 2179-CD Series Fiber Optic Splice Closure Installation Instructions 1.0 Product Introduction The new 3M TM 2179-CD Series Fiber Optic Splice Closure can be used in buried, underground, aerial, and pedestal
900-Lumen Portable LED Projector Part #: User manual
 900-Lumen Portable LED Projector Part #: 21797 User manual 900-Lumen LED Projector Manual Page 2 of 14 900-Lumen LED Projector Manual Page 3 of 14! SAFETY WARNINGS AND CAUTIONS WARNING: To reduce the risk
Instruction Guide February 2017
 Instruction Guide February 2017 3M Instruction Guide: 3M TM Locator Plate 3443-81-XX, 3D-Printed Instructions for the assembly of 3M TM Ribbon Cable Wiremount Socket Assembly, 451 Series 1.0 General 1.1
MODEL HA07 - MASTER CONTROLLER INSTRUCTIONS
 Thank you for purchasing Intermatic s Home Settings devices. With these products you can reliably and remotely control lighting and appliances. The outstanding features of the Home Settings program include:
WID-DL74 WID-DL74 BLP WID. Designed for. Installation guide for workitdesk interactive table for. BrightLink Pro
 WID-DL74 WID-DL74 BLP WID Designed for BrightLink Pro Installation guide for workitdesk interactive table BrightLink Pro for Mounting the table unit 1 Unpack boxes 1 of 4 (Mobile base) and 2 of 4 (Motorized
Operating Your System. With the MX-880
 Operating Your System With the MX-880 This remote control was Custom Programmed for you by: For questions about your Custom Programming call: Custom Programming of a complex home theater and/or a multi-room
WS-6002U Atomic Clock. Instruction Manual
 WS-6002U Atomic Clock Instruction Manual TABLE OF CONTENTS Topic Page Inventory of Contents/ Additional Equipment 3 About WWVB 3 Quick Set-Up Guide 4 Detailed Set-Up Guide Battery Installation 5 Program
Access Control Keypad for MK-DV, JB-DV
 #91173 0406 Access Control Keypad for MK-DV, JB-DV - INSTRUCTIONS - The KVI is a surface mount electronic access control keypad for use with Aiphone s MK-DV or JB-DV video door station. Designed with the
USER S MANUAL. Save this manual for future reference. For a digital version of this manual, visit
 TM USER S MANUAL Save this manual for future reference. For a digital version of this manual, visit www.mylifter.com/installation. 4 5 TABLE OF CONTENTS 4 INSTALLING THE PULLEY SYSTEM FOR LIFTING 100
Electric Motorized Projection Screen Spectrum Series
 Electric Motorized Projection Screen Spectrum Series User s Guide 1 Important Safety & Warning Precautions Make sure to read this user s guide and follow the procedure below. Caution: The screen s Black
FOSC 450 C6 and D6 Closures
 FOSC 450 C6 and D6 Closures I N S T A L L A T I O N I N S T R U C T I O N Fiber Optic Splice Closure 1. General Product Information The FOSC 450 C6 and D6 fiber optic splice closures use compressed gel
Instruction Guide. USB External PC TV Tuner with Remote Control USBTVTUNER. The Professionals Source For Hard-to-Find Computer Parts
 TV TUNER USB External PC TV Tuner with Remote Control USBTVTUNER Instruction Guide * Actual product may vary from photo Revised: July 27, 2004 (Rev. C) The Professionals Source For Hard-to-Find Computer
Indoor/Outdoor Analog Wired Camera Model P-520 USER'S MANUAL
 Indoor/Outdoor Analog Wired Camera Model P-520 USER'S MANUAL WELCOME Welcome Thank you for choosing First Alert for your security needs! For more than half a century, First Alert has made the home-safety
75 Elliptical Antenna System
 Instruction and Assembly Manual 75 Elliptical Antenna System 7291 NW 74th Street Miami, FL 33166 GlobeCast Technical Service: (888) 988-5288 Manufactured By: 2002 Channel Master LLC Printed in U.S.A. 8000915-02
Digital Adapter Easy Setup Guide. Installation Operation Troubleshooting
 Digital Adapter Easy Setup Guide Installation Operation Troubleshooting Table of Contents What s included in this Install Kit? 4 Connecting to a TVwith HDMI Cable 8 Connecting to a TV with Coax Cable 9
High Density Block BRCP. HD BRCP- 128/192/256 pair. Installation Instructions
 High Density Block BRCP HD BRCP- 128/192/256 pair Installation Instructions Product Introduction The BRCP block is the latest generation of MDF terminal blocks developed by 3M, specifically designed for
RemotePoint. Navigator. User s Manual VP4150
 RemotePoint Navigator User s Manual VP4150 LASER Safety Statement CAUTION: Use of controls or adjustments or performance of procedures other than those specified herein may result in hazardous radiation
VQ4500 & VQ4510 Owner s Manual
 VQ4500 & VQ4510 Owner s Manual This manual contains detailed information on your KING Tailgater. To start watching TV right away, use the Quick Reference Guide. For PRODUCT REGISTRATION To provide ongoing
Single Station Waterproof Timer
 Single Station Waterproof Timer Installation and Programming Guide Features Up to four irrigation cycles per day Easy installation and programming Battery powered Waterproof and weather resistant 1234
QUICK START GUIDE SL-6. Powering and Wireless System for the 688 Field Production Mixer
 QUICK START GUIDE Powering and Wireless System for the 688 Field Production Mixer Welcome Thank you for purchasing the, the powering and wireless system that simplifies interconnection between the 688
Low Profile Digital HDTV Over-the-Air Antenna CONTENTS
 Low Profile Digital HDTV Over-the-Air Antenna Owner s Manual Roof Thickness: 1 to 4-1/2 Roof Thickness: 4-1/2 to 8 (when installed with KING extension #21850) OA8400 White OA8401 Black CONTENTS OPERATION
MWT-FM. Operation Manual. FM Single Channel Transmitter. man_mwtfm.
 MWT-FM FM Single Channel Transmitter Operation Manual man_mwtfm www.myeclubtv.com CONTENTS FCC COMPLIANCE STATEMENT. 3 INDUSTRY CANADA COMPLIANCE 3 MWT-FM ORIENTATION. 4 SAFETY PRECAUTIONS 5 FINDING FM
Parent s Guide. Zoo Jamz Stompin Fun Drums TM US
 Parent s Guide Zoo Jamz Stompin Fun Drums TM 91-003333-000 US INTRODUCTION Thank you for purchasing the Zoo Jamz Stompin Fun Drums! This drum kit features light-up drum pads so kids can follow along or
Winch Adjustable Feed Level Tubes for the Adult Turkey Feeder Installation & Operator s Instruction Manual MF /99
 Winch Adjustable Feed Level Tubes for the Adult Turkey Feeder Installation & Operator s Instruction Manual MF7-8 6/99 June 999 MF7B Chore-Time Warranty Winch Adjustable Feed Level Tubes for ATF Chore-Time
OUR MISSION. THE COMPANY.
 INFORCE OPERATING INSTRUCTIONS / WARRANTY THE COMPANY. Emissive Energy Corp., manufacturers of portable LED lighting, is an engineering company by background whose founders brought extensive knowledge
Lathem Time Corporation 200 Selig Drive, SW, Atlanta, GA 30336
 THIS EQUIPMENT COMPLIES WITH FCC REQUIREMENTS PURSUANT OF PART-15 This device complies with Part 15 of the FCC Rules. Operation is subject to the following two conditions: (1) this device may not cause
C 303W-RF Tri-element Array Microphone Instructions
 C 303W-RF Tri-element Array Microphone Instructions C 303W-RF Installation Instructions Packaging C 303W microphone Enclosure with 2.5 Metre (8ft) cae Link cable Cable gland It may be easier to remove
SLiC Fiber Aerial Closure System
 3 SLiC Fiber Aerial Closure System SLFC 533-SP SLFC 533-TS SLFC 733-SP Instructions May 2005 78-8135-4502-3-B N C H E S R A N G E M IL L IM E T E R S.4 10.6.8 A B C 15 20 I 1.0 Kit Contents Note: Examine
TV44. Owner s Manual. Amplified/Outdoor Satellite Dish Clip-on Antenna
 TV44 Owner s Manual Amplified/Outdoor Satellite Dish Clip-on Antenna Safety Precautions 1 Warning! Use extreme caution when installing or removing an outdoor antenna that is located close to overhead wires
Electric Wall/Ceiling Projection Screen Saker Tab-Tension Series User s Guide
 Electric Wall/Ceiling Projection Screen Saker Tab-Tension Series User s Guide Important Safety & Warning Precautions Make sure to read this user s guide and follow the procedures below. Caution: The screen
TV Lift System Model CL-65 Installation Instructions
 TV Lift System Model CL-65 Installation Instructions Contact: Support@Nexus21.com Toll Free: (866) 500-5438 Phone: (480) 951-6885 Fax: (480) 951-6879 Revised: 01/17/17 Below is a parts list describing
ROLL-A-STRIKE. Assembly Instructions Model CONTACT INFO. Hours. Technical Support Monday to Friday (9am to 5pm EST)
") PATENT - www.eastpointsports.com ROLL-A-STRIKE TM ELECTRONIC BOWLING Assembly Instructions Model --286 CONTACT INFO ASSEMBLY REQUIRED Hours Technical Support Monday to Friday (9am to 5pm EST) Email us
PATENT - www.eastpointsports.com ROLL-A-STRIKE TM ELECTRONIC BOWLING Assembly Instructions Model --286 CONTACT INFO ASSEMBLY REQUIRED Hours Technical Support Monday to Friday (9am to 5pm EST) Email us
Troubleshooting Guide 9630 Series
 Troubleshooting Guide 9630 Series Satellite Solutions for Mobile Markets 11200 Hampshire Avenue South, Bloomington, MN 55438-2453 Phone: (800) 982-9920 Fax: (952) 922-8424 www.kingcontrols.com 1305-SEMI
ezcinema Plus Series
 ezcinema Plus Series Portable Floor Pull-Up USER S GUIDE Rev062510-JA www.elitescreens.com info@elitescreens.com Precautions: Warning! damage can result from operational errors if the enclosed precautions
Electric Motorized Projection Screen PowerMax Tension Series
 Electric Motorized Projection Screen PowerMax Tension Series User s Guide Important Safety & Warning Precautions Make sure to read this user s guide and follow the procedures below. Caution: The screen
MP-7424 Football Scoreboard with MP5000 Console
 MP-7424 Football Scoreboard with MP5000 Console With additional instructions for Track and Soccer Operator s Manual Volume VII Rev. 10/17/07 Table of Contents Table of Contents...2 1.0 Keypad Console...3
OPERATION AND MAINTENANCE MANUAL
 OPERATION AND MAINTENANCE MANUAL SERIAL NUMBER CUSTOMER: SALES REP.: CONTENTS Mixer Installation / Assembly / Dimension Drawings Safety... 1 Customer Service Contact... 1 Initial Inspection... 2 Installation...2
INSTRUCTION MANUAL. Heart Rate Monitor. English. Model HR-100CAN ST/SP SET MODE TIME
 INSTRUCTION MANUAL Heart Rate Monitor Model HR-100CAN ST/SP SET MODE TIME English TABLE OF CONTENTS Before Using the Monitor Introduction...3 Components and Functions...4 Your Personal Data Maximum Heart
Quick Start. About the Camera. Power Button Battery Status Record Button Rotating Lens Record Status Memory Status Resolution Switch
 Product Guide 1 Quick Start About the Camera a b c d e f g h i j k l Power Button Battery Status Record Button Rotating Lens Record Status Memory Status Resolution Switch USB Charge Indicator Battery Latch
Doorphone Video Intercom
 HOME SERIES INSTRUCTION MANUAL Doorphone Video Intercom with Colour 4.3 LCD Monitor EN Getting to know your LCD Screen (Front) 1 2 3 4 5 6 1) LCD Screen - This is where you view your visitor that the intercom
VGA Extender LR EXT-VGA-141LR. User s Manual
 VGA Extender LR EXT-VGA-141LR User s Manual ASKING FOR ASSISTANCE Technical Support: Telephone (818) 772-9100 (800) 545-6900 Fax (818) 772-9120 Technical Support Hours: 8:00 AM to 5:00 PM Monday thru
Introduction. Package Contents. Installation Requirements
 Security Camera Security Camera Introduction Introduction Thank you for purchasing the aircam Dome. This Quick Start Guide is designed to guide you through the installation of the aircam Dome and show
Chapter 1 : FCC Radiation Norm...3. Chapter 2 : Package Contents...4. Chapter 3 : System Requirements...5. Chapter 4 : Hardware Description...
 Table of Contents Chapter 1 : FCC Radiation Norm...3 Chapter 2 : Package Contents...4 Chapter 3 : System Requirements...5 Chapter 4 : Hardware Description...6 Chapter 5 : Charging Your Video Watch...7
Wireless HDMI Extender. Model
 Model 103079 User Manual (Available in a PDF file) Email: support@cablematters.com Table of Contents 1. INTRODUCTION... 1 1.1 Introduction 1.2 Copyright and Trademarks 1.3 FCC Compliance Statement 2. PRODUCT
HTP1502W1 Remote Controlled Multicolor Lighting System
 Page 1 of 8 CHATSWORTH, CALIFORNIA 91311 USA www.cyron.com HTP1502W1 Remote Controlled Multicolor Lighting System Thank you for purchasing CYRON HTP1502W1 LED Lighting System. This system will bring the
VK-P10SE WARRANTY REGISTRATION FORM
 VK-P10SE WARRANTY REGISTRATION FORM Unit Serial Number: Customer Name: Address: Date of Purchase: Purchased From: Dealer Name: Address: IMPORTANT NOTE: In order to receive the full five-year product warranty,
Quick Installation Guide TV-H110 H/W: V1
 Quick Installation Guide TV-H110 H/W: V1 Table of Contents... 1 1. Before You Start... 2. Hardware Installation... 1 2 Troubleshooting... 13 Version 10.15.2008 1. Before you start Installation Requirements
ISIS intouch NET Wi Fi Touch Screen Controller Owner s Manual and Instruction Guide
 ISIS intouch NET Wi Fi Touch Screen Controller Owner s Manual and Instruction Guide Table of Contents Overview... 2 Warnings... 3 Kit Includes... 4 Installation Steps... 5 Locate the intouch NET module
MESA FIXED AUTOMATIC. Andrews/Raven Installer Manual // MESA. Rev 23 June MESA A/R Installation
 MESA FIXED AUTOMATIC // MESA Andrews/Raven Installer Manual 901-MESA A/R Installation Rev 23 June 10 A/R Installer Manual WHAT IS A MESA The MESA is a three (3) axis (Azimuth, Elevation and Skew) Automatic
Dynatel Advanced Cable Locator 2250
 3 Dynatel Advanced Cable Locator 2250 Quickly and Accurately Identify Underground Assets Pinpoint exact cable path and depth quickly and easily with this lightweight, easy-to-handle unit The 3M Dynatel
Designed in Colorado, USA. Bluetooth Cable. Quick Start Guide
 Designed in Colorado, USA Bluetooth Cable Quick Start Guide Registration + Maintenance Tips Congratulations on purchasing your new Bluetooth cable! Make sure to register your new cable and be the first
PREPROGRAMMED FOR YOUR SET-TOP BOX
 New Knoxville Telephone NKTELCO, Inc. Goldstar Communications 301 W. South Street PO Box 219 New Knoxville, OH 45871 PREPROGRAMMED FOR YOUR SET-TOP BOX ADB Remote Functions 1 New Knoxville Telephone 301
User Manual KODAK SCANZA DIGITAL FILM SCANNER. 4.7"W 4.7"H 5"D (120 x 120 x 127mm)
") KODAK SCANZA DIGITAL FILM SCANNER User Manual 4.7"W 4.7"H 5"D (120 x 120 x 127mm) Please read all directions before using the product and retain this guide for reference. 2 CONTENTS 1 INTRODUCTION 5 2
KODAK SCANZA DIGITAL FILM SCANNER User Manual 4.7"W 4.7"H 5"D (120 x 120 x 127mm) Please read all directions before using the product and retain this guide for reference. 2 CONTENTS 1 INTRODUCTION 5 2
Owner's Manual DIGITAL TO ANALOG BROADCAST CONVERTER WITH REMOTE CONTROL. Model: CVD508 PLEASE READ BEFORE OPERATING THIS EQUIPMENT.
 Size: 148.5(W) x 210(H)mm (A5) DIGITAL TO ANALOG BROADCAST CONVERTER WITH REMOTE CONTROL Owner's Manual PLEASE READ BEFORE OPERATING THIS EQUIPMENT. Model: CVD508 FCC NOTICE: To assure continued compliance,
SC-C1M SiriusConnect TM Vehicle Tuner
 SC-C1M SiriusConnect TM Vehicle Tuner For Special Market Applications Installation Guide Congratulations on the Purchase of your new SIRIUS SC-C1 SiriusConnect TM Vehicle Tuner. The SC-C1M is packaged
CT Series. Terminal User s Guide. Model CT74
 CT Series Terminal User s Guide Model CT74 THIS EQUIPMENT COMPLIES WITH FCC REQUIREMENTS PURSUANT OF PART-15 This device complies with Part 15 of the FCC Rules. Operation is subject to the following two
HD POWERLINK SYSTEM USER MANUAL HDP100
 HD POWERLINK SYSTEM USER MANUAL HDP100 CAUTION RISK OF ELECTRIC SHOCK. DO NOT OPEN. Caution: To reduce the risk of electric shock, do not remove cover (or back). No user serviceable parts inside. Refer
Safety Information. Camera System. If you back up while looking only at the monitor, you may cause damage or injury. Always back up slowly.
 Table of Contents Introduction...3 Safety Information...4-6 Before Beginning Installation...7 Installation Guide...8 Wiring Camera & Monitor...9-10 Replacement Installation Diagram...11 Clip-On Installation
Electric Motorized Projection Screen Spectrum Tab-Tension Series User s Guide
 Electric Motorized Projection Screen Spectrum Tab-Tension Series User s Guide Important Safety Precautions Make sure to read this user s guide and follow the procedures below prior to screen operation.
User s Guide. Model VQ4400
 User s Guide Model VQ4400 To subscribe to programming or for assistance with using the DISH Tailgater, visit mydish.com/tailgater or call 1-800-963-DISH (3474). Refer to mydish.com/tailgater for additional
For use with QED and hardwired control panels ONLY!
 K3129-5 10/98 6128WL Keypad/Receiver INSTALLATION INSTRUCTIONS For use with QED and hardwired control panels ONLY! General Information The 6128WL Keypad/Receiver is a combination unit. It replaces a 6128
4X1 Gefen TV Switcher. GTV-HDMI User Manual
 4X1 Gefen TV Switcher GTV-HDMI1.3-441 User Manual www.gefentv.com ASKING FOR ASSISTANCE Technical Support: Telephone (818) 772-9100 (800) 545-6900 Fax (818) 772-9120 Technical Support Hours: 8:00 AM to
Crimp & Cleave Termination Instructions for SEL ST Connectors
 Your Optical Fiber Solutions Partner Crimp & Cleave Termination Instructions for SEL ST Connectors For Use With: ST Termination Kit (SEL, Part Number BT05402-01) 200 µm HCS Fiber-Optic Cable ST Crimp &
MCS3-SP-RS422. Compact Jog/Shuttle Controller. Users Manual
 MCS3-SP-RS422 Compact Jog/Shuttle Controller Users Manual MCS3-SP-RS422, MCS-3800, MCS-3400 and MCS-3000 are trademarks of JLCooper Electronics. All other brand names are the property of their respective